Understanding Your Thermos Cup
Thermos cups are versatile containers designed to maintain the temperature of beverages, whether hot or cold. They are available in various materials, each with distinct features and functionalities. The most common types of thermos cups include stainless steel, plastic, and glass, and understanding the characteristics of each type is essential for effective cleaning and maintenance.
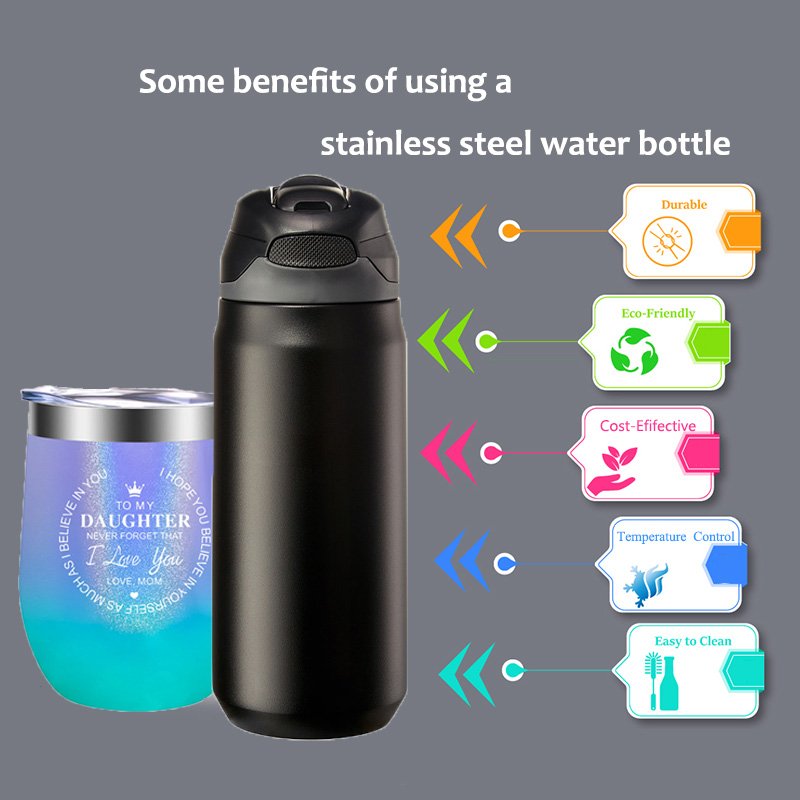
Stainless steel thermos cups are popular for their durability and excellent insulation properties. They can keep liquids hot for several hours and can withstand significant wear and tear. Cleaning stainless steel requires non-abrasive methods to avoid scratching the surface, which can harbor bacteria and compromise the hygienic quality of the beverage. It is advisable to use mild detergents and a soft cloth for maintenance.
Plastic thermos cups, on the other hand, are lightweight and often more affordable than their stainless steel counterparts. However, they may be less effective at heat retention and can absorb odors or flavors more easily. When cleaning plastic thermos cups, it is crucial to avoid harsh chemicals that can break down the material and leach into beverages. Opting for warm, soapy water and thorough rinsing is usually sufficient for maintaining hygiene.
Glass thermos cups offer a classic aesthetic while providing impeccable taste preservation. These cups are often used for both hot and cold beverages, and while they are easy to clean, care must be taken to avoid chipping or breaking. Regularly cleaning glass cups with gentle dish soap and a bottle brush ensures that residual flavors do not affect future drinks.
Ultimately, understanding the material of your thermos cup is fundamental to ensuring its longevity and performance. Regular cleaning is critical not only for hygiene but also for maintaining the thermos’s insulating capabilities, allowing users to enjoy their beverages at the desired temperature without fear of contamination.
Essential Tools and Cleaning Supplies
To effectively clean your thermos cup, it is important to gather essential tools and cleaning supplies that simplify the process while ensuring optimal hygiene. Start with common household items, which are often sufficient and safe for maintaining your thermos. Baking soda and white vinegar are particularly effective; they work as natural cleaners capable of removing tough stains and odors. Baking soda acts as a gentle abrasive, while vinegar’s acidity helps to dissolve any mineral build-up or residue.
Dish soap is another fundamental supply for your cleaning regimen. Opt for a mild, non-toxic dish soap to break down oils and grime without introducing harmful chemicals that might linger in the thermos cup. When it comes to physical tools, a good quality bottle brush is essential. The long, narrow shape of a bottle brush allows you to reach the interior surfaces of the thermos easily, facilitating a thorough clean without scratching the delicate material.
If you prefer a more convenient option, specialized cleaning tablets are available on the market. These tablets are designed specifically for thermos cups and can often be dropped into your container with water to ensure a deep clean. When utilizing these products, always follow the manufacturer’s instructions for optimal results.
It is equally important to avoid certain cleaning supplies. Harsh chemicals, including bleach and strong solvents, can damage the interior lining of the thermos and might also impart an unpleasant taste to your beverages. Similarly, abrasive scrubbing pads should be avoided as they can scratch the surface of the thermos, compromising its insulation properties.
In summary, equipping yourself with the right cleaning supplies—such as baking soda, vinegar, mild dish soap, and a bottle brush—can make the task of cleaning your thermos cup more effective and less time-consuming. By making mindful choices about the tools and products you use, you can maintain the integrity and functionality of your thermos.
Step-by-Step Cleaning Process
Cleaning your thermos cup is essential for maintaining its functionality and hygiene. Follow this detailed step-by-step guide to ensure that your thermos is clean and free from odors and stains.
Begin the process by rinsing the thermos cup thoroughly with warm water. This initial rinse helps to remove any residue from the previous contents. Next, prepare a cleaning solution by mixing a few drops of dish soap with warm water. Pour this mixture into the thermos, filling it about halfway. Allow it to sit for approximately 10-15 minutes to help loosen any stuck-on debris.
Once the soaking period is complete, take a soft bottle brush or a non-abrasive sponge and gently scrub the inside of the thermos. Pay special attention to the bottom and the rim, where buildup can accumulate. For tougher stains or odors, consider creating a paste using baking soda and water. Apply this paste directly to the affected areas and let it sit for an additional 10 minutes before scrubbing.
After scrubbing, it is crucial to rinse the thermos cup thoroughly with warm water to remove any soap or cleaning residue. Continue rinsing until the water runs clear, which indicates that all cleaning agents have been removed.
Finally, proper drying is vital to prevent moisture buildup, which can lead to odor retention and mold growth. To dry your thermos cup, invert it over a drying rack or clean dish towel. Allow it to air dry completely before sealing it or storing it. This comprehensive cleaning process will ensure your thermos cup remains in excellent condition, ready for use in any situation.
Maintenance Tips for Longevity
To ensure the longevity of your thermos cup, implementing a consistent maintenance routine is essential. Start by cleaning your thermos thoroughly after each use. Rinse it with warm water and mild soap, ensuring all surfaces, including the lid and any seals, are attended to. This simple practice helps prevent the buildup of odors or residue that could affect the taste of your beverages over time. For optimal hygiene, consider using a bottle brush for recessed areas, helping reach those tight spots where grime may accumulate.
Avoid the use of metallic utensils when handling your thermos cup. Scratches and dents can form easily, which not only affect the appearance but may also compromise the insulating properties of the cup. Instead, opt for silicone or plastic utensils, which are gentler and will preserve the integrity of your thermos. Additionally, be mindful of the types of beverages you store in your thermos. Highly acidic liquids like citrus juices can degrade materials over time, leading to a shorter lifespan for your cup.
Proper storage is another critical factor in maintaining your thermos cup’s condition. Store it in a cool, dry place away from direct sunlight and extreme temperatures. Keeping it upright can also prevent any potential leaks that may occur if the lid is not tightly sealed. For those who frequently use their thermos, a deep cleaning every few weeks is advisable, especially after storing beverages that may leave stubborn stains or odors. Use a mixture of baking soda and vinegar for this process; it effectively tackles lingering residues without damaging the thermos.
By adopting these daily care routines and best practices, you can significantly extend the lifespan of your thermos cup, ensuring it remains a reliable companion for your beverages for many years to come.

Что такое BlackSprut?
BlackSprut удостаивается интерес разных сообществ. Что делает его уникальным?
Данный ресурс обеспечивает широкие опции для тех, кто им интересуется. Интерфейс системы выделяется функциональностью, что делает его понятной даже для новичков.
Важно отметить, что этот ресурс работает по своим принципам, которые отличают его в определенной среде.
Обсуждая BlackSprut, нельзя не упомянуть, что определенная аудитория имеют разные мнения о нем. Некоторые подчеркивают его функциональность, а некоторые относятся к нему с осторожностью.
Таким образом, эта платформа продолжает быть объектом интереса и вызывает заинтересованность разных пользователей.
Где найти актуальный линк на BlackSprut?
Хотите найти актуальное зеркало на BlackSprut? Это можно сделать здесь.
bs2best at сайт
Сайт часто обновляет адреса, поэтому важно иметь обновленный домен.
Свежий адрес всегда можно узнать у нас.
Посмотрите рабочую версию сайта у нас!
This website offers a wide selection of online slots, suitable for all types of players.
Right here, you can discover classic slots, modern video slots, and jackpot slots with stunning graphics and dynamic music.
Whether you’re a fan of minimal mechanics or prefer bonus-rich rounds, this site has something that suits you.
https://lorenzogsdn41964.ka-blogs.com/87009374/Обзор-plinko-Слота-Играйте-в-демо-режиме-без-риска-для-кошелька
Each title can be accessed anytime, right in your browser, and perfectly tuned for both PC and mobile.
In addition to games, the site provides slot guides, welcome packages, and user ratings to guide your play.
Register today, spin the reels, and enjoy the thrill of online slots!
This website features a wide selection of slot games, ideal for both beginners and experienced users.
Here, you can explore retro-style games, modern video slots, and jackpot slots with stunning graphics and realistic audio.
Whether you’re into simple gameplay or seek engaging stories, you’re sure to find what you’re looking for.
https://donovanxhra85296.ltfblog.com/32716058/Обзор-plinko-Слота-Играйте-в-демо-режиме-без-риска-для-кошелька
All games is playable 24/7, right in your browser, and fully optimized for both PC and mobile.
Apart from the machines, the site includes tips and tricks, bonuses, and user ratings to help you choose.
Register today, start playing, and enjoy the thrill of online slots!
На данной платформе вы найдёте интересные онлайн-автоматы на платформе Champion.
Коллекция игр содержит традиционные игры и новейшие видеослоты с яркой графикой и уникальными бонусами.
Всякий автомат оптимизирован для комфортного использования как на ПК, так и на смартфонах.
Будь вы новичком или профи, здесь вы сможете выбрать что-то по вкусу.
чемпион регистрация
Игры работают круглосуточно и работают прямо в браузере.
Кроме того, сайт предлагает акции и обзоры игр, для улучшения опыта.
Начните играть прямо сейчас и насладитесь азартом с казино Champion!
На этом сайте вы обнаружите лучшие онлайн-автоматы в казино Champion.
Выбор игр содержит проверенные временем слоты и новейшие видеослоты с яркой графикой и специальными возможностями.
Любая игра разработан для комфортного использования как на десктопе, так и на планшетах.
Независимо от опыта, здесь вы обязательно подберёте слот по душе.
champion зеркало
Игры запускаются в любое время и не нуждаются в установке.
Дополнительно сайт предлагает акции и рекомендации, для удобства пользователей.
Начните играть прямо сейчас и насладитесь азартом с казино Champion!
На данной платформе представлены слоты платформы Vavada.
Каждый гость может подобрать слот на свой вкус — от традиционных игр до видеослотов слотов с анимацией.
Vavada предлагает доступ к популярных игр, включая прогрессивные слоты.
Каждый слот доступен круглосуточно и оптимизирован как для ПК, так и для телефонов.
vavada ставки
Вы сможете испытать атмосферой игры, не выходя из любимого кресла.
Интерфейс сайта понятна, что обеспечивает быстро найти нужную игру.
Зарегистрируйтесь уже сегодня, чтобы открыть для себя любимые слоты!
Здесь представлены онлайн-игры платформы Vavada.
Каждый пользователь может подобрать слот на свой вкус — от классических аппаратов до видеослотов слотов с анимацией.
Vavada предлагает доступ к слотов от топовых провайдеров, включая слоты с крупными выигрышами.
Каждый слот работает в любое время и адаптирован как для компьютеров, так и для планшетов.
vavada casino сайт
Игроки могут наслаждаться настоящим драйвом, не выходя из дома.
Навигация по сайту понятна, что обеспечивает без труда начать играть.
Присоединяйтесь сейчас, чтобы почувствовать азарт с Vavada!
Here, you can find a great variety of casino slots from leading developers.
Visitors can try out retro-style games as well as new-generation slots with high-quality visuals and bonus rounds.
If you’re just starting out or a casino enthusiast, there’s always a slot to match your mood.
casino
Each title are available round the clock and designed for laptops and smartphones alike.
You don’t need to install anything, so you can jump into the action right away.
Platform layout is intuitive, making it convenient to explore new games.
Sign up today, and enjoy the thrill of casino games!
Площадка BlackSprut — это довольно популярная систем в darknet-среде, открывающая широкие возможности в рамках сообщества.
В этом пространстве доступна понятная система, а визуальная часть понятен даже новичкам.
Пользователи ценят быструю загрузку страниц и постоянные обновления.
bs2best
Площадка разработана на удобство и анонимность при навигации.
Кому интересны альтернативные цифровые пространства, площадка будет интересным вариантом.
Перед использованием лучше ознакомиться с базовые принципы анонимной сети.
На данной платформе вы найдёте интересные игровые слоты на платформе Champion.
Выбор игр содержит классические автоматы и актуальные новинки с захватывающим оформлением и уникальными бонусами.
Всякий автомат создан для максимального удовольствия как на компьютере, так и на мобильных устройствах.
Будь вы новичком или профи, здесь вы обязательно подберёте слот по душе.
скачать приложение champion
Игры работают круглосуточно и работают прямо в браузере.
Также сайт предлагает акции и обзоры игр, для улучшения опыта.
Попробуйте прямо сейчас и испытайте удачу с казино Champion!
Онлайн-площадка — цифровая витрина частного аналитической компании.
Мы оказываем поддержку в области розыска.
Штат опытных специалистов работает с максимальной этичностью.
Наша работа включает поиски людей и анализ ситуаций.
Детективное агентство
Каждое дело подходит с особым вниманием.
Опираемся на проверенные подходы и работаем строго в рамках закона.
Нуждаетесь в реальную помощь — свяжитесь с нами.
This online store offers a wide selection of decorative wall clocks for your interior.
You can check out modern and classic styles to match your home.
Each piece is hand-picked for its aesthetic value and reliable performance.
Whether you’re decorating a stylish living room, there’s always a perfect clock waiting for you.
large tuscan wall clocks
Our assortment is regularly renewed with fresh designs.
We ensure customer satisfaction, so your order is always in safe hands.
Start your journey to perfect timing with just a few clicks.
This website offers a large assortment of decorative wall clocks for any space.
You can discover contemporary and timeless styles to match your interior.
Each piece is carefully selected for its design quality and accuracy.
Whether you’re decorating a cozy bedroom, there’s always a beautiful clock waiting for you.
retro desk clocks
Our catalog is regularly updated with fresh designs.
We ensure secure delivery, so your order is always in trusted service.
Start your journey to better decor with just a few clicks.
This website features a wide range of prescription drugs for ordering online.
You can securely order essential medicines without leaving home.
Our catalog includes both common treatments and custom orders.
The full range is supplied through licensed distributors.
https://www.mixcloud.com/imedix/
We prioritize quality and care, with private checkout and fast shipping.
Whether you’re managing a chronic condition, you’ll find affordable choices here.
Start your order today and get stress-free support.
На этом сайте предлагает нахождения вакансий на территории Украины.
Здесь вы найдете разные объявления от проверенных работодателей.
На платформе появляются вакансии в разных отраслях.
Частичная занятость — вы выбираете.
Робота для кілера
Навигация интуитивно понятен и подстроен на всех пользователей.
Регистрация займёт минимум времени.
Готовы к новым возможностям? — просматривайте вакансии.
Our platform offers a diverse range of home clock designs for your interior.
You can explore urban and vintage styles to match your apartment.
Each piece is carefully selected for its craftsmanship and accuracy.
Whether you’re decorating a creative workspace, there’s always a beautiful clock waiting for you.
cooper classics lencho clocks
The shop is regularly expanded with fresh designs.
We ensure secure delivery, so your order is always in good care.
Start your journey to enhanced interiors with just a few clicks.
This website, you can access lots of casino slots from famous studios.
Players can experience retro-style games as well as modern video slots with vivid animation and interactive gameplay.
If you’re just starting out or an experienced player, there’s always a slot to match your mood.
money casino
The games are ready to play anytime and compatible with laptops and mobile devices alike.
No download is required, so you can start playing instantly.
Site navigation is user-friendly, making it simple to explore new games.
Sign up today, and enjoy the thrill of casino games!
Here, you can access a wide selection of casino slots from top providers.
Players can enjoy retro-style games as well as new-generation slots with vivid animation and interactive gameplay.
Whether you’re a beginner or a casino enthusiast, there’s a game that fits your style.
casino slots
All slot machines are available anytime and designed for laptops and mobile devices alike.
You don’t need to install anything, so you can get started without hassle.
The interface is user-friendly, making it convenient to explore new games.
Join the fun, and enjoy the thrill of casino games!
Here, you can find a great variety of casino slots from top providers.
Players can experience traditional machines as well as modern video slots with vivid animation and bonus rounds.
If you’re just starting out or a casino enthusiast, there’s something for everyone.
slot casino
The games are ready to play 24/7 and optimized for desktop computers and tablets alike.
All games run in your browser, so you can start playing instantly.
The interface is user-friendly, making it convenient to find your favorite slot.
Join the fun, and discover the thrill of casino games!
Here, you can find a wide selection of slot machines from leading developers.
Visitors can enjoy classic slots as well as feature-packed games with vivid animation and bonus rounds.
Even if you’re new or a casino enthusiast, there’s something for everyone.
casino
All slot machines are available anytime and compatible with PCs and mobile devices alike.
No download is required, so you can get started without hassle.
Platform layout is easy to use, making it simple to browse the collection.
Join the fun, and discover the thrill of casino games!
Our e-pharmacy features an extensive variety of medications with competitive pricing.
Customers can discover various remedies suitable for different health conditions.
We strive to maintain trusted brands at a reasonable cost.
Speedy and secure shipping ensures that your medication gets to you quickly.
Take advantage of shopping online through our service.
cenforce 100 side effects
Our platform presents disc player alarm devices crafted by leading brands.
Here you’ll discover top-loading CD players with digital radio and dual alarms.
Many models include external audio inputs, USB ports, and power outage protection.
Available products spans economical models to elite choices.
radio clock with cd player
All devices provide sleep timers, sleep timers, and illuminated panels.
Order today through online retailers with free delivery.
Choose the best disc player alarm clock for office or office use.
This website, you can find lots of online slots from leading developers.
Users can enjoy classic slots as well as feature-packed games with stunning graphics and bonus rounds.
If you’re just starting out or a seasoned gamer, there’s a game that fits your style.
casino games
Each title are ready to play anytime and optimized for PCs and mobile devices alike.
You don’t need to install anything, so you can get started without hassle.
Platform layout is user-friendly, making it quick to browse the collection.
Join the fun, and discover the world of online slots!
Оформление туристического полиса перед поездкой за рубеж — это разумное решение для защиты здоровья гражданина.
Страховка обеспечивает расходы на лечение в случае обострения болезни за границей.
Также, сертификат может включать покрытие расходов на транспортировку.
ипотечное страхование
Ряд стран требуют оформление полиса для посещения.
Без наличия документа обращение к врачу могут привести к большим затратам.
Оформление полиса перед выездом
На нашем ресурсе вы можете получить свежую ссылку 1xBet без блокировок.
Систематически обновляем адреса, чтобы гарантировать беспрепятственный доступ к порталу.
Открывая резервную копию, вы сможете пользоваться всеми функциями без перебоев.
1xbet-official.live
Эта страница обеспечит возможность вам безопасно получить свежее зеркало 1хБет.
Нам важно, чтобы все клиенты был в состоянии не испытывать проблем.
Не пропустите обновления, чтобы всегда быть онлайн с 1хБет!
Here, you can access a great variety of online slots from famous studios.
Users can try out traditional machines as well as feature-packed games with high-quality visuals and bonus rounds.
Even if you’re new or an experienced player, there’s a game that fits your style.
play aviator
The games are instantly accessible 24/7 and compatible with PCs and mobile devices alike.
All games run in your browser, so you can jump into the action right away.
Platform layout is easy to use, making it simple to browse the collection.
Register now, and enjoy the thrill of casino games!
?Hola cazadores de suerte
¿Buscas 100€ gratis sin condiciones? Los casinos sin depósito te lo ponen fácil. [url=https://100girosgratissindepositoespana.guru/]slot giros gratis sin depósito[/url] Empieza a jugar sin riesgo alguno.
Con tiradas gratis sin deposito EspaГ±a puedes empezar con ventaja. Las mejores tragamonedas te esperan. ВЎActiva tu bono hoy!
Disfruta giros gratis sin depГіsito EspaГ±a sin lГmites – tiradas gratis casino sin depósito españa.
?Que tengas excelentes triunfos !
¡Hola aventureros de la fortuna !
ObtГ©n giros gratis por registro sin depГіsito y accede a promociones ocultas. Algunas solo se activan por invitaciГіn. ВЎRevisa tu correo!
Juegos con giros gratis sin depГіsito EspaГ±a disponibles – 100 euros gratis sin deposito.
¡Que tengas magníficas recompensas fantásticas !
Looking to hire qualified professionals available to tackle short-term hazardous tasks.
Need a freelancer to complete a perilous task? Connect with trusted laborers on our platform for urgent dangerous operations.
hire an assassin
Our platform matches clients to licensed workers willing to take on high-stakes one-off positions.
Hire verified contractors for perilous duties efficiently. Perfect when you need last-minute scenarios demanding specialized skills.
On this platform, you can find a great variety of online slots from famous studios.
Visitors can experience retro-style games as well as new-generation slots with vivid animation and bonus rounds.
If you’re just starting out or a casino enthusiast, there’s a game that fits your style.
play casino
Each title are available round the clock and designed for desktop computers and tablets alike.
You don’t need to install anything, so you can jump into the action right away.
Platform layout is intuitive, making it convenient to explore new games.
Join the fun, and dive into the thrill of casino games!
This website contains practical guidance about steps to becoming a network invader.
Data is shared in a precise and comprehensible manner.
One can grasp different tactics for entering systems.
Furthermore, there are hands-on demonstrations that display how to perform these expertise.
how to learn hacking
All information is frequently refreshed to keep up with the current breakthroughs in computer security.
Special attention is concentrated on practical application of the learned skills.
Take into account that each activity should be employed legitimately and through ethical means only.
On this site is possible to discover unique special offers for 1x Bet.
These promocodes provide an opportunity to acquire supplementary rewards when placing bets on the platform.
Every listed discount vouchers are periodically verified to assure their relevance.
By applying these offers it is possible to boost your potential winnings on 1xBet.
https://www1.352.com.ng/news/kakie_produkty_nelyzya_smeshivaty_s_alkogolem.html
Furthermore, detailed instructions on how to redeem special offers are given for maximum efficiency.
Note that particular bonuses may have time limits, so check them before employing.
¡Hola estrategas de las apuestas!
Activa tus códigos tiradas gratis casino y empieza a ganar sin invertir. Algunos bonos se activan directamente al registrarte. ¡No te lo pierdas!​
Cada giro es una nueva oportunidad de ganar algo grande, y tГє puedes comenzar hoy https://25girosgratissindeposito.xyz sin pagar nada.
¡Que tengas magníficas tiradas de suerte !
Welcome to our platform, where you can access exclusive content created exclusively for adults.
The entire collection available here is intended only for individuals who are of legal age.
Please confirm that you are eligible before continuing.
mature video
Enjoy a one-of-a-kind selection of restricted content, and immerse yourself today!
On this platform you can stumble upon special coupons for one of the leading betting services.
The range of profitable chances is frequently refreshed to make certain that you always have access to the newest opportunities.
Through these promotional deals, you can cut costs on your bets and enhance your possibilities of success.
Every discount code are thoroughly verified for genuineness and execution before being listed.
https://murad-mahani.net/pages/napolynye_pokrytiya_pod_derevo_kak_alyternativa_parketu.html
Moreover, we present elaborate descriptions on how to apply each bonus deal to amplify your profits.
Consider that some bargains may have distinct clauses or fixed durations, so it’s fundamental to inspect diligently all the facts before utilizing them.
The site offers a large selection of medications for easy access.
Users can conveniently order essential medicines from your device.
Our product list includes both common medications and specialty items.
The full range is acquired via reliable distributors.
vidalista 60 mg for sale
Our focus is on user protection, with secure payments and fast shipping.
Whether you’re filling a prescription, you’ll find safe products here.
Begin shopping today and get convenient support.
1XBet is a leading sports betting service.
With an extensive selection of matches, 1XBet meets the needs of a vast audience around the world.
The One X Bet mobile app is designed to suit both Android as well as iPhone bettors.
https://librairienumeriquemonaco.com/docs/pages/metody_prigotovleniya_kuricy.html
Players are able to install the application through the official website or Google Play Store for Android users.
Apple device owners, the app is available through the App Store without hassle.
On this site, discover live video chats.
Whether you’re looking for friendly chats business discussions, the site offers something for everyone.
The video chat feature crafted for bringing users together from around the world.
With high-quality video plus excellent acoustics, each interaction feels natural.
Participate in open chat spaces initiate one-on-one conversations, depending on your preferences.
https://erovideochat.pw/
What’s required a reliable network and a device begin chatting.
Handcrafted mechanical watches stand as the epitome of timeless elegance.
In a world full of digital gadgets, they undoubtedly hold their charm.
Built with precision and mastery, these timepieces embody true horological excellence.
Unlike fleeting trends, mechanical watches will never go out of fashion.
https://sites.google.com/view/watchcrazy/rolex
They symbolize heritage, legacy, and enduring quality.
Whether displayed daily or saved for special occasions, they forever remain in style.
In this day and age
people opt for
shopping online. Even household items
to furniture, virtually any product
can be found in seconds.
E-commerce growth redefined
traditional shopping.
https://travelwithme.social/read-blog/53485
Within this platform, find a variety virtual gambling platforms.
Searching for well-known titles latest releases, there’s a choice for every player.
Every casino included checked thoroughly for safety, allowing users to gamble peace of mind.
gambling
Additionally, the site offers exclusive bonuses and deals targeted at first-timers including long-term users.
With easy navigation, finding your favorite casino happens in no time, saving you time.
Keep informed on recent updates with frequent visits, since new casinos come on board often.
本站 提供 海量的 成人内容,满足 各类人群 的 喜好。
无论您喜欢 哪一类 的 内容,这里都 应有尽有。
所有 内容 都经过 严格审核,确保 高品质 的 视觉享受。
黄色书刊
我们支持 多种设备 访问,包括 手机,随时随地 尽情观看。
加入我们,探索 激情时刻 的 成人世界。
Within this platform, explore a variety internet-based casino sites.
Whether you’re looking for well-known titles new slot machines, there’s a choice for every player.
All featured casinos are verified for safety, allowing users to gamble securely.
1xbet
Moreover, the platform unique promotions along with offers targeted at first-timers and loyal customers.
Due to simple access, locating a preferred platform happens in no time, saving you time.
Stay updated about the latest additions by visiting frequently, because updated platforms come on board often.
On this site, you can discover an extensive selection of online casinos.
Interested in well-known titles new slot machines, there’s something to suit all preferences.
All featured casinos fully reviewed to ensure security, enabling gamers to bet securely.
1win
Additionally, this resource unique promotions and deals targeted at first-timers as well as regulars.
With easy navigation, locating a preferred platform takes just moments, making it convenient.
Stay updated regarding new entries by visiting frequently, as fresh options appear consistently.
В этом месте доступны содержание 18+.
Контент подходит для взрослой аудитории.
У нас собраны широкий выбор контента.
Платформа предлагает высокое качество изображения.
онлайн порно видео чат пары
Вход разрешен только для взрослых.
Наслаждайтесь простым поиском.
¡Saludos, aventureros de la fortuna !
п»їВїSabГas que puedes disfrutar de casinos online chile desde cualquier parte del paГs? Estas plataformas permiten jugar con seguridad, bonos atractivos y mГєltiples opciones de entretenimiento[url=https://www.youtube.com/watch?v=CRuk1wy6nA0&list=PLX0Xt4gdc3aJG7y03Wh5Qf0JrapCEgMFH]tragamonedas chile online[/url]Muchos jugadores en Chile ya han descubierto esta nueva forma de apostar.
RTBet y criptomonedas en Chile para apuestas seguras – п»їhttps://www.youtube.com/watch?v=CRuk1wy6nA0
Online casino es una industria en auge en AmГ©rica Latina, especialmente en Chile. Gracias a la tecnologГa, ahora puedes jugar desde casa. Y lo mejor: hay opciones para todos los presupuestos.
¡Que disfrutes de beneficios inesperados !
Модные образы для торжеств этого сезона задают новые стандарты.
Популярны пышные модели до колен из полупрозрачных тканей.
Блестящие ткани делают платье запоминающимся.
Асимметричные силуэты определяют современные тренды.
Особый акцент на открытые плечи создают баланс между строгостью и игрой.
Ищите вдохновение в новых коллекциях — оригинальность и комфорт сделают ваш образ идеальным!
http://w210club.nl/viewtopic.php?f=21&t=27454
Модные образы для торжеств 2025 года задают новые стандарты.
Актуальны кружевные рукава и корсеты из полупрозрачных тканей.
Металлические оттенки делают платье запоминающимся.
Многослойные юбки определяют современные тренды.
Особый акцент на открытые плечи придают пикантности образу.
Ищите вдохновение в новых коллекциях — стиль и качество превратят вас в звезду вечера!
https://forum.eass-germany.de/viewtopic.php?t=107
Трендовые фасоны сезона нынешнего года отличаются разнообразием.
Популярны пышные модели до колен из полупрозрачных тканей.
Детали из люрекса придают образу роскоши.
Греческий стиль с драпировкой становятся хитами сезона.
Минималистичные силуэты подчеркивают элегантность.
Ищите вдохновение в новых коллекциях — оригинальность и комфорт превратят вас в звезду вечера!
http://forum.drustvogil-galad.si/index.php/topic,173020.new.html#new
The Audemars Piguet Royal Oak 15400ST features a robust steel construction debuted as a refined evolution of the legendary Royal Oak collection.
Its 41mm stainless steel case features a signature octagonal bezel secured with eight visible screws, a hallmark of the Royal Oak’s bold aesthetic.
Equipped with the Cal. 3120 automatic mechanism, it ensures precise timekeeping with a date display at 3 o’clock.
https://telegra.ph/Audemars-Piguet-Royal-Oak-15400ST-An-Unconventional-Deep-Dive-06-02
A structured black dial with Tapisserie texture enhanced by luminescent markers for optimal readability.
Its matching steel bracelet combines elegance with resilience, fastened via a signature deployant buckle.
Celebrated for its high recognition value, this model remains a top choice in the world of haute horology.
The Audemars Piguet Royal Oak 16202ST features a sleek 39mm stainless steel case with an extra-thin design of just 8.1mm thickness, housing the advanced Calibre 7121 movement. Its striking “Bleu nuit nuage 50” dial showcases a intricate galvanic textured finish, fading from golden hues to deep black edges for a captivating aesthetic. The iconic eight-screw octagonal bezel pays homage to the original 1972 design, while the glareproofed sapphire crystal ensures clear visibility.
https://www.vevioz.com/read-blog/360072
Water-resistant to 50 meters, this “Jumbo” model balances sporty durability with sophisticated elegance, paired with a stainless steel bracelet and secure AP folding clasp. A contemporary celebration of classic design, the 16202ST embodies Audemars Piguet’s innovation through its meticulous mechanics and evergreen Royal Oak DNA.
Прямо здесь вы найдете мессенджер-бот “Глаз Бога”, который проверить всю информацию по человеку через открытые базы.
Сервис функционирует по фото, анализируя доступные данные онлайн. С его помощью осуществляется пять пробивов и полный отчет по имени.
Платформа проверен согласно последним данным и охватывает аудио-материалы. Глаз Бога гарантирует найти профили в соцсетях и предоставит информацию за секунды.
Глаз Бога glazboga.net
Это сервис — выбор в анализе граждан через Telegram.
Здесь вы можете отыскать боту “Глаз Бога” , который позволяет собрать всю информацию о любом человеке из открытых источников .
Данный сервис осуществляет анализ фото и раскрывает данные из соцсетей .
С его помощью можно узнать контакты через официальный сервис , используя фотографию в качестве поискового запроса .
поиск номера телефона
Технология “Глаз Бога” автоматически обрабатывает информацию из множества источников , формируя исчерпывающий результат.
Клиенты бота получают ограниченное тестирование для проверки эффективности.
Решение постоянно обновляется , сохраняя высокую точность в соответствии с требованиями времени .
Looking for exclusive 1xBet promo codes? This site offers working bonus codes like GIFT25 for registrations in 2025. Get up to 32,500 RUB as a welcome bonus.
Use official promo codes during registration to maximize your bonuses. Benefit from risk-free bets and exclusive deals tailored for sports betting.
Discover monthly updated codes for 1xBet Kazakhstan with guaranteed payouts.
Every promotional code is checked for validity.
Grab limited-time offers like 1x_12121 to double your funds.
Active for first-time deposits only.
https://www.google.com.pk/url?q=https://g-r-s.fr/pag/1xbet-promo-code_125.htmlKeep updated with top bonuses – apply codes like 1x_12121 at checkout.
Experience smooth rewards with instant activation.
¿Quieres códigos promocionales recientes de 1xBet? En este sitio encontrarás bonificaciones únicas en apuestas deportivas .
El código 1x_12121 garantiza a 6500 RUB al registrarte .
Para completar, canjea 1XRUN200 y obtén una oferta exclusiva de €1500 + 150 giros gratis.
https://knoxoiar77644.wikibestproducts.com/1537270/descubre_cómo_usar_el_código_promocional_1xbet_para_apostar_gratis_en_argentina_méxico_chile_y_más
Mantente atento las ofertas diarias para acumular más beneficios .
Los promocódigos listados están actualizados para esta semana.
¡Aprovecha y multiplica tus ganancias con 1xBet !
¡Hola, cazadores de premios !
Las promociones diarias y semanales mantienen el interГ©s de los jugadores activos. casino fuera de espana Con regalos y bonos constantes.
casinofueradeespana: ВїcГіmo registrarse y comenzar a jugar? – п»їhttps://casinofueradeespana.xyz/
Los casinos online fuera de EspaГ±a permiten jugar sin compartir datos personales. Algunos no exigen correo electrГіnico ni nГєmero de telГ©fono. Esto garantiza el anonimato total para quienes lo valoran.
¡Que disfrutes de logros impresionantes !
В этом ресурсе вы можете получить доступ к боту “Глаз Бога” , который способен проанализировать всю информацию о любом человеке из общедоступных баз .
Данный сервис осуществляет проверку ФИО и показывает информацию из онлайн-платформ.
С его помощью можно пробить данные через официальный сервис , используя имя и фамилию в качестве поискового запроса .
probiv-bot.pro
Система “Глаз Бога” автоматически обрабатывает информацию из проверенных ресурсов, формируя исчерпывающий результат.
Подписчики бота получают пробный доступ для ознакомления с функционалом .
Решение постоянно развивается, сохраняя скорость обработки в соответствии с законодательством РФ.
Прямо здесь вы найдете мессенджер-бот “Глаз Бога”, позволяющий собрать всю информацию о гражданине через открытые базы.
Бот работает по номеру телефона, используя актуальные базы в Рунете. Через бота доступны 5 бесплатных проверок и детальный анализ по запросу.
Платформа проверен на август 2024 и охватывает фото и видео. Бот поможет проверить личность в открытых базах и покажет сведения за секунды.
https://glazboga.net/
Это бот — идеальное решение при поиске граждан удаленно.
Прямо здесь можно получить сервис “Глаз Бога”, что собрать данные по человеку по публичным данным.
Сервис активно ищет по ФИО, анализируя публичные материалы в сети. Через бота доступны пять пробивов и полный отчет по фото.
Платформа обновлен на 2025 год и поддерживает мультимедийные данные. Сервис гарантирует узнать данные в соцсетях и покажет информацию за секунды.
https://glazboga.net/
Это сервис — выбор в анализе граждан через Telegram.
Searching for special 1xBet coupon codes ? Our website is your ultimate destination to unlock rewarding bonuses tailored for players .
For both beginners or a seasoned bettor , the available promotions provides enhanced rewards across all bets.
Stay updated on daily deals to maximize your winning potential .
https://www.webwiki.de/www.colehardware.com
Promotional offers are tested for validity to guarantee reliability this month .
Take advantage of limited-time opportunities to enhance your betting strategy with 1xBet.
В этом ресурсе вы можете получить доступ к боту “Глаз Бога” , который позволяет проанализировать всю информацию о любом человеке из общедоступных баз .
Этот мощный инструмент осуществляет анализ фото и показывает информацию из онлайн-платформ.
С его помощью можно пробить данные через Telegram-бот , используя автомобильный номер в качестве ключевого параметра.
пробив по базе данных
Система “Глаз Бога” автоматически обрабатывает информацию из открытых баз , формируя структурированные данные .
Пользователи бота получают 5 бесплатных проверок для ознакомления с функционалом .
Решение постоянно обновляется , сохраняя скорость обработки в соответствии с стандартами безопасности .
Здесь можно получить сервис “Глаз Бога”, что найти сведения о гражданине по публичным данным.
Бот активно ищет по номеру телефона, анализируя доступные данные в Рунете. Через бота доступны пять пробивов и глубокий сбор по запросу.
Сервис актуален на август 2024 и включает мультимедийные данные. Сервис гарантирует узнать данные по госреестрам и предоставит результаты мгновенно.
https://glazboga.net/
Данный инструмент — идеальное решение в анализе граждан удаленно.
Looking for exclusive 1xBet promo codes? This site offers working promotional offers like 1x_12121 for registrations in 2024. Claim up to 32,500 RUB as a welcome bonus.
Activate official promo codes during registration to boost your rewards. Enjoy risk-free bets and exclusive deals tailored for casino games.
Discover daily updated codes for global users with guaranteed payouts.
All voucher is checked for validity.
Don’t miss limited-time offers like GIFT25 to double your funds.
Active for first-time deposits only.
https://www.google.at/url?q=http://centroculturalrecoleta.org/blog/pages/?1xbet_free_bet_cameroon.htmlStay ahead with top bonuses – apply codes like 1XRUN200 at checkout.
Experience smooth benefits with instant activation.
¿Quieres cupones recientes de 1xBet? En este sitio podrás obtener las mejores ofertas en apuestas deportivas .
El código 1x_12121 garantiza a un bono de 6500 rublos durante el registro .
Para completar, utiliza 1XRUN200 y obtén una oferta exclusiva de €1500 + 150 giros gratis.
https://oren-expo.ru/user/profile/31299
Revisa las novedades para ganar recompensas adicionales .
Las ofertas disponibles son verificados para esta semana.
No esperes y maximiza tus ganancias con esta plataforma confiable!
Crafted watches stay in demand for numerous vital factors.
Their artistic design and legacy define their exclusivity.
They symbolize prestige and elegance while combining utility and beauty.
Unlike digital gadgets, they become timeless heirlooms due to rarity and durability.
https://rentry.co/r26zbdze
Collectors and enthusiasts cherish their mechanical soul that no digital device can match.
For many, collecting them defines passion that transcends trends.
В этом ресурсе доступен мощный бот “Глаз Бога” , который получает данные о любом человеке из проверенных платформ.
Платформа позволяет узнать контакты по номеру телефона , показывая данные из социальных сетей .
https://glazboga.net/
This platform provides comprehensive information about Audemars Piguet Royal Oak watches, including market values and design features.
Access data on luxury editions like the 41mm Selfwinding in stainless steel or white gold, with prices starting at $28,600 .
Our database tracks secondary market trends , where limited editions can command premiums .
Audemars Piguet price
Technical details such as automatic calibers are thoroughly documented .
Get insights on 2025 price fluctuations, including the Royal Oak 15510ST’s market stability .
В этом ресурсе вы можете ознакомиться с последними новостями регионов и глобального масштаба.
Данные актуализируются ежеминутно .
Доступны текстовые обзоры с ключевых точек.
Экспертные комментарии помогут глубже изучить тему .
Информация открыта бесплатно .
https://alessiomodels.ru
Looking for exclusive 1xBet promo codes? Our platform offers verified bonus codes like GIFT25 for new users in 2024. Get up to 32,500 RUB as a first deposit reward.
Use official promo codes during registration to maximize your bonuses. Enjoy no-deposit bonuses and special promotions tailored for casino games.
Discover monthly updated codes for 1xBet Kazakhstan with fast withdrawals.
All voucher is tested for validity.
Don’t miss exclusive bonuses like 1x_12121 to increase winnings.
Active for new accounts only.
https://medium.com/@codigo1xbet2/about
Enjoy seamless benefits with easy redemption.
Лицензирование и сертификация — обязательное условие ведения бизнеса в России, обеспечивающий защиту от непрофессионалов.
Декларирование продукции требуется для подтверждения соответствия стандартам.
Для 49 видов деятельности необходимо специальных разрешений.
https://ok.ru/video/9802307799729
Нарушения правил ведут к приостановке деятельности.
Добровольная сертификация помогает повысить доверие бизнеса.
Соблюдение норм — залог успешного развития компании.
Хотите найти подробную информацию коллекционеров? Эта платформа предлагает всё необходимое для изучения нумизматики!
У нас вы найдёте уникальные монеты из разных эпох , а также антикварные предметы .
Просмотрите каталог с характеристиками и детальными снимками, чтобы сделать выбор .
купить инвестиционные монеты Сбербанка
Для новичков или эксперт, наши статьи и руководства помогут расширить знания .
Не упустите возможностью добавить в коллекцию эксклюзивные артефакты с сертификатами.
Присоединяйтесь сообщества ценителей и будьте в курсе аукционов в мире нумизматики.
¡Hola, aficionados al ocio !
Casinoporfuera reГєne reseГ±as imparciales sobre cada casino por fuera con testimonios de jugadores reales.Esto te ayuda a tomar decisiones informadas sin depender solo de la publicidad oficial.El contenido es actualizado regularmente.
Casinos fuera de espaГ±a permiten jugar con saldo en criptomonedas sin necesidad de verificar identidad.
Juega seguro en casinoporfuera.xyz sin documentos – https://casinoporfuera.xyz/#
¡Que disfrutes de recompensas maravillosas
¡Hola, amantes de los casinos !
Casino por fuera tiene una comunidad de jugadores mГЎs internacional. Puedes competir con personas de todo el mundo. Esto da un toque global a cada partida.
Casino por fuera acepta jugadores desde EspaГ±a sin ningГєn problema tГ©cnico. Solo necesitas un navegador actualizado. [url=https://casinofueradeespanol.xyz/#]casino online fuera de espaГ±a[/url] No hay restricciones regionales aplicadas.
Casinofueradeespanol.xyz con nuevos bonos cada semana – https://www.casinofueradeespanol.xyz/
¡Que experimentes oportunidades únicas !
Discover the iconic Patek Philippe Nautilus, a horological masterpiece that blends sporty elegance with refined artistry.
Introduced nearly 50 years ago, this cult design revolutionized high-end sports watches, featuring signature angular cases and horizontally grooved dials .
From stainless steel models like the 5990/1A-011 with a 55-hour energy retention to opulent gold interpretations such as the 5811/1G-001 with a azure-toned face, the Nautilus suits both discerning collectors and everyday wearers .
New Patek Philippe Nautilus 5980 watch reviews
The diamond-set 5719 elevate the design with gemstone accents, adding unmatched glamour to the timeless profile.
According to recent indices like the 5726/1A-014 at ~$106,000, the Nautilus remains a prized asset in the world of luxury horology .
For those pursuing a vintage piece or contemporary iteration , the Nautilus epitomizes Patek Philippe’s legacy of excellence .
The Audemars Piguet Royal Oak, revolutionized luxury watchmaking with its iconic octagonal bezel and bold integration of sporty elegance.
Ranging from limited-edition sand gold to skeleton dials , the collection combines avant-garde design with precision engineering .
Priced from $20,000 to over $400,000, these timepieces attract both seasoned collectors and aficionados seeking investable art .
Pre-owned Audemars Piguet Oak 26240or shop
The Royal Oak Offshore set benchmarks with innovative complications , embodying Audemars Piguet’s technical prowess .
With meticulous hand-finishing , each watch reflects the brand’s commitment to excellence .
Explore certified pre-owned editions and historical insights to deepen your horological expertise with this modern legend .
¡Saludos, exploradores del destino !
[url=п»їhttps://casinos-extranjeros.es/]mejores casinos online extranjeros[/url]
Bonificaciones VIP en casinos online extranjeros – п»їhttps://casinos-extranjeros.es/
Desde casinos-extranjeros.es puedes descargar plantillas de Excel para llevar tus estadГsticas de juego. Esto ayuda a mantener una gestiГіn inteligente. Apostar con cabeza siempre es mejor.
¡Que disfrutes de increíbles recompensas excepcionales !
¡Bienvenidos, cazadores de recompensas!
Esto mantiene el interГ©s de los jugadores.
Bonos para nuevos jugadores en casinos online extranjeros – https://casinoextranjeros.es/#
La mayorГa de los mejores casinos online extranjeros ofrecen cashback semanal. Esto significa que recuperas parte de tus pГ©rdidas automГЎticamente. Jugar asГ es mucho mГЎs rentable.
¡Que vivas asombrosas conquistas legendarias !
¡Saludos, amantes de la emoción !
Un casino online sin registro es ideal para quienes no quieren compartir datos personales. En pocos clics estГЎs apostando sin necesidad de validaciГіn. Esta comodidad ha atraГdo a muchos usuarios en los Гєltimos aГ±os.
La conexiГіn se mantiene estable y rГЎpida en todo momento,
Casinos-SinLicenciaenespana.es: tu sitio confiable para jugar online – http://casinos-sinlicenciaenespana.es/
¡Que disfrutes de victorias inolvidables !
¡Hola, amantes del desafío !
Puedes disfrutar de tragaperras, blackjack y ruleta en casinos online sin licencia desde cualquier dispositivo. Estos sitios estГЎn optimizados para mГіviles y tablets. Juega sin interrupciones ni bloqueos regionales.
Las promociones diarias en casinos sin licencia en EspaГ±a mantienen la emociГіn constante. [url=https://casinossinlicenciaespanola.es/#]casino sin licencia espaГ±ola[/url]Siempre hay algo nuevo para aprovechar. ВЎNo te lo pierdas!
ВїQuГ© ofrece casinossinlicenciaespanola.es a nuevos jugadores? – п»їcasinossinlicenciaespanola.es
¡Que experimentes momentos especiales !
Эта платформа предлагает интересные инфосообщения в одном месте.
Здесь вы легко найдёте события из жизни, бизнесе и разных направлениях.
Материалы выходят регулярно, что позволяет следить за происходящим.
Простой интерфейс облегчает восприятие.
https://fashionablelook.ru
Каждая статья оформлены качественно.
Целью сайта является информативности.
Присоединяйтесь к читателям, чтобы быть в курсе самых главных событий.
¡Saludos, aficionados al mundo del juego!
Casino online sin registro: RГЎpido, anГіnimo y seguro – https://www.casinossinlicenciaenespana.es/ casinos sin licencia en espana
¡Que vivas premios espectaculares !
¡Hola, seguidores del entretenimiento !
Casinos online extranjeros para jugar sin datos personales – https://www.casinoextranjerosespana.es/# casino online extranjero
¡Que disfrutes de asombrosas triunfos legendarios !
¡Hola, aficionados a las apuestas!
Casino online sin licencia sin documentaciГіn – https://casinossinlicenciaespana.es/ casino sin licencia
¡Que experimentes giros memorables !
Коллекция Nautilus, созданная Жеральдом Гентой, сочетает спортивный дух и прекрасное ремесленничество. Модель Nautilus 5711 с автоматическим калибром 324 SC имеет энергонезависимость до 2 дней и корпус из нержавеющей стали.
Восьмиугольный безель с округлыми гранями и циферблат с градиентом от синего к черному подчеркивают уникальность модели. Браслет с интегрированными звеньями обеспечивает комфорт даже при активном образе жизни.
Часы оснащены функцией даты в позиции 3 часа и антибликовым покрытием.
Для сложных модификаций доступны секундомер, лунофаза и индикация второго часового пояса.
patek-philippe-nautilus.ru
Например, модель 5712/1R-001 из розового золота с механизмом на 265 деталей и запасом хода до 48 часов.
Nautilus остается символом статуса, объединяя современные технологии и классические принципы.
Размещение систем видеонаблюдения поможет безопасность вашего объекта в режиме 24/7.
Инновационные решения позволяют организовать четкую картинку даже в ночных условиях.
Наша компания предоставляет различные варианты устройств, идеальных для дома.
видеонаблюдение оборудование установка
Качественный монтаж и сервисное обслуживание обеспечивают эффективным и комфортным для всех заказчиков.
Обратитесь сегодня, для получения персональную консультацию по внедрению систем.
¡Hola, descubridores de recompensas !
Casino online fuera de EspaГ±a con bonos VIP – п»їп»їhttps://casinoonlinefueradeespanol.xyz/ casinos online fuera de espaГ±a
¡Que disfrutes de asombrosas conquistas legendarias !
¡Saludos, entusiastas de la aventura !
Tragamonedas clГЎsicas en casinos online extranjeros – https://casinosextranjero.es/# п»їcasinos online extranjeros
¡Que vivas increíbles victorias épicas !
¡Saludos, seguidores del triunfo !
Seguridad y privacidad en casino online extranjero – https://www.casinoextranjerosenespana.es/# casinoextranjerosenespana.es
¡Que disfrutes de triunfos épicos !
На данном сайте доступен Telegram-бот “Глаз Бога”, что проверить данные о гражданине через открытые базы.
Сервис активно ищет по ФИО, анализируя актуальные базы в сети. С его помощью доступны бесплатный поиск и детальный анализ по имени.
Инструмент актуален на август 2024 и охватывает фото и видео. Глаз Бога поможет узнать данные по госреестрам и отобразит информацию в режиме реального времени.
глаз бога найти по фото
Такой бот — выбор для проверки людей онлайн.
¡Hola, apostadores expertos !
Casino online extranjero con juegos en mГєltiples idiomas – https://www.casinoextranjero.es/# casinoextranjero.es
¡Que vivas logros excepcionales !
Здесь вы найдете Telegram-бот “Глаз Бога”, что собрать всю информацию о человеке через открытые базы.
Сервис функционирует по ФИО, анализируя публичные материалы в Рунете. Благодаря ему можно получить пять пробивов и детальный анализ по имени.
Инструмент актуален на август 2024 и охватывает аудио-материалы. Бот гарантирует найти профили по госреестрам и предоставит результаты в режиме реального времени.
глаз бога актуальный бот
Это бот — выбор для проверки персон онлайн.
Searching for browser-based adventures? Our platform offers a exclusive collection of multiplayer experiences and strategy challenges.
Dive into real-time battles with global players , supported by intuitive chat tools for seamless teamwork.
Access customizable controls designed for effortless navigation , alongside parental controls for secure play.
casino online canada
From sports simulations to creative builders, every game prioritizes fun and cognitive engagement .
Discover premium upgrades that let you play for free , with optional purchases for deeper access.
Become part of a global network where teamwork flourishes , and express yourself through immersive storytelling.
¡Bienvenidos, entusiastas del azar !
CasinoPorFuera – casino online fuera de EspaГ±a legal – https://www.casinoporfuera.guru/ casino por fuera
¡Que disfrutes de maravillosas tiradas afortunadas !
¡Saludos, participantes del entretenimiento !
casino fuera de EspaГ±a con seguridad garantizada – https://www.casinosonlinefueraespanol.xyz/# casino online fuera de espaГ±a
¡Que disfrutes de tiradas afortunadas !
¡Bienvenidos, participantes del desafío !
Casinos fuera de EspaГ±a que aceptan jugadores europeos – https://www.casinofueraespanol.xyz/# casino por fuera
¡Que vivas increíbles conquistas brillantes !
¡Hola, seguidores del éxito !
Casinos online fuera de EspaГ±a para jugar desde cualquier paГs – https://www.casinosonlinefueradeespanol.xyz/# casinos fuera de espaГ±a
¡Que disfrutes de asombrosas jackpots fascinantes!
Нужно собрать информацию о пользователе? Наш сервис поможет полный профиль мгновенно.
Воспользуйтесь продвинутые инструменты для анализа публичных записей в соцсетях .
Выясните контактные данные или активность через автоматизированный скан с верификацией результатов.
глаз бога телеграмм бот ссылка
Система функционирует в рамках закона , обрабатывая открытые данные .
Закажите детализированную выжимку с историей аккаунтов и графиками активности .
Попробуйте проверенному решению для digital-расследований — результаты вас удивят !
¡Saludos, fanáticos del azar !
Casinos online extranjeros con verificaciГіn automГЎtica – https://casinoextranjerosdeespana.es/# mejores casinos online extranjeros
¡Que experimentes maravillosas triunfos inolvidables !
Хотите найти данные о человеке ? Этот бот предоставит полный профиль в режиме реального времени .
Используйте продвинутые инструменты для анализа цифровых следов в открытых источниках.
Узнайте место работы или интересы через автоматизированный скан с верификацией результатов.
глаз бога телеграмм бот бесплатно
Система функционирует с соблюдением GDPR, обрабатывая открытые данные .
Закажите детализированную выжимку с геолокационными метками и списком связей.
Попробуйте проверенному решению для digital-расследований — точность гарантирована!
Hello enthusiasts of fresh surroundings !
Air Purifiers Smoke – Cleaner Spaces Instantly – п»їhttps://bestairpurifierforcigarettesmoke.guru/ smoke air purifier
May you experience remarkable purified harmony!
¡Hola, estrategas del azar !
Casino sin licencia sin procesos de aprobaciГіn – п»їhttps://casinosinlicenciaespana.xyz/ casinos sin licencia espaГ±a
¡Que vivas increíbles giros exitosos !
Этот бот способен найти информацию о любом человеке .
Укажите имя, фамилию , чтобы получить сведения .
Система анализирует открытые источники и активность в сети .
глаз бога сайт
Информация обновляется мгновенно с фильтрацией мусора.
Идеально подходит для проверки партнёров перед сотрудничеством .
Анонимность и точность данных — гарантированы.
Наш сервис способен найти данные о любом человеке .
Достаточно ввести никнейм в соцсетях, чтобы сформировать отчёт.
Бот сканирует публичные данные и активность в сети .
глаз бога проверка
Информация обновляется мгновенно с проверкой достоверности .
Идеально подходит для проверки партнёров перед важными решениями.
Анонимность и актуальность информации — гарантированы.
¡Saludos, buscadores de fortuna escondida !
Casinos no regulados en EspaГ±a con PayPal – п»їaudio-factory.es casinos sin licencia en espana
¡Que disfrutes de asombrosas movidas excepcionales !
¡Saludos, fanáticos de los desafíos !
Casino sin registro sin usar tu DNI – п»їemausong.es casinos sin registro
¡Que disfrutes de increíbles jugadas impresionantes !
Нужно найти данные о человеке ? Этот бот поможет детальный отчет мгновенно.
Воспользуйтесь продвинутые инструменты для поиска цифровых следов в соцсетях .
Узнайте место работы или интересы через автоматизированный скан с гарантией точности .
глаз бога найти телефон
Бот работает в рамках закона , используя только общедоступную информацию.
Получите детализированную выжимку с геолокационными метками и графиками активности .
Доверьтесь надежному помощнику для digital-расследований — результаты вас удивят !
¡Hola, exploradores de oportunidades exclusivas !
Casino sin licencia y pagos sin terceros – https://casinosonlinesinlicencia.es/ casinos sin licencia en espana
¡Que vivas increíbles jackpots impresionantes!
Здесь можно найти данные по любому лицу, включая полные анкеты.
Базы данных содержат людей разного возраста, профессий.
Информация собирается из открытых источников, подтверждая точность.
Обнаружение выполняется по фамилии, что делает работу удобным.
глаз бога телега
Дополнительно доступны контакты а также полезная информация.
Работа с информацией проводятся с соблюдением норм права, предотвращая утечек.
Обратитесь к этому сайту, чтобы найти искомые данные максимально быстро.
Greetings, followers of fun !
Hilarious jokes for adults for coffee breaks – https://jokesforadults.guru/# dad jokes for adults
May you enjoy incredible surprising gags!
¡Saludos, cazadores de recompensas extraordinarias!
Casinos bonos de bienvenida fГЎciles – http://bono.sindepositoespana.guru/# bonos de bienvenida casino
¡Que disfrutes de asombrosas momentos irrepetibles !
Нужно собрать данные о человеке ? Наш сервис предоставит полный профиль мгновенно.
Воспользуйтесь уникальные алгоритмы для анализа цифровых следов в открытых источниках.
Выясните контактные данные или интересы через автоматизированный скан с гарантией точности .
тг канал глаз бога
Система функционирует в рамках закона , используя только общедоступную информацию.
Закажите расширенный отчет с геолокационными метками и графиками активности .
Попробуйте проверенному решению для исследований — результаты вас удивят !
Нужно найти информацию о пользователе? Этот бот предоставит детальный отчет в режиме реального времени .
Используйте уникальные алгоритмы для поиска публичных записей в соцсетях .
Выясните место работы или активность через систему мониторинга с верификацией результатов.
глаз бога бот
Бот работает с соблюдением GDPR, обрабатывая открытые данные .
Закажите детализированную выжимку с историей аккаунтов и списком связей.
Попробуйте надежному помощнику для исследований — результаты вас удивят !
Matchmaking services provide a innovative approach to meet people globally, combining intuitive tools like photo verification and compatibility criteria.
Key elements include video chat options, social media integration, and detailed user bios to enhance interactions .
Advanced algorithms analyze preferences to suggest compatible matches, while account verification ensure trustworthiness.
https://sdzgw.org/dating/gay-porn-in-mainstream-adult-platforms/
Many platforms offer premium subscriptions with exclusive benefits , such as priority in search results, alongside profile performance analytics.
Looking for long-term relationships, these sites cater to diverse needs , leveraging AI-driven recommendations to foster meaningful bonds.
Хотите найти данные о пользователе? Наш сервис поможет полный профиль в режиме реального времени .
Используйте уникальные алгоритмы для анализа публичных записей в соцсетях .
Выясните место работы или активность через систему мониторинга с верификацией результатов.
глаз бога поиск по телеграм
Система функционирует с соблюдением GDPR, обрабатывая открытые данные .
Закажите расширенный отчет с геолокационными метками и списком связей.
Попробуйте проверенному решению для исследований — результаты вас удивят !
Подбирая компании для квартирного перевозки важно проверять её лицензирование и опыт работы .
Изучите отзывы клиентов или рейтинги в интернете, чтобы оценить надёжность исполнителя.
Уточните стоимость услуг, учитывая расстояние перевозки , сезонность и услуги упаковки.
http://forum.anime.org.ua/bbs/showthread.php?p=156381#post156381
Убедитесь наличия страхового полиса и уточните условия компенсации в случае повреждений.
Оцените уровень сервиса: оперативность ответов, гибкость графика .
Узнайте, используются ли специализированные автомобили и защитные технологии для безопасной транспортировки.
Ответственная игра — это минимизирование рисков для игроков , включая саморегуляцию поведения.
Важно планировать бюджет , чтобы сохранять контроль над затратами.
Используйте инструменты самоисключения , чтобы приостановить активность в случае чрезмерного увлечения .
Поддержка игроков включает консультации специалистов, где можно обсудить проблемы при трудных ситуациях.
Участвуйте в компании, чтобы сохранять социальный контакт , ведь совместные развлечения делают процесс безопасным.
chicken road
Изучайте правила платформы: сертификация оператора гарантирует защиту данных.
I used to think medicine was straightforward. The system moves you along — you don’t question the process. It felt safe. Eventually, it didn’t feel right.
First came the fatigue. I told myself “this is normal”. Still, my body kept rejecting the idea. I read the label. The warnings were there — just buried in jargon.
zithromax 500mg
It finally hit me: health isn’t passive. The same treatment can heal one and harm another. Damage accumulates. Still we don’t ask why.
Now I question more. But because no one knows my body better than I do. I challenge assumptions. It makes appointments awkward. This is survival, not stubbornness. And if I had to name the one thing, it would be keyword.
Доставка грузов из Китая в Россию осуществляется через автомобильные маршруты , с проверкой документов на российской границе .
Таможенные пошлины составляют в диапазоне 15–20%, в зависимости от типа продукции — например, сельхозпродукты облагаются по максимальной ставке.
Для ускорения процесса используют серые каналы доставки , которые избегают бюрократических задержек, но связаны с дополнительными затратами.
Доставка грузов из Китая
При официальном оформлении требуется предоставить сертификаты соответствия и декларации , особенно для сложных грузов .
Время транспортировки варьируются от нескольких дней до месяца, в зависимости от удалённости пункта назначения и эффективности таможни .
Стоимость услуг включает логистику , таможенные платежи и услуги экспедитора, что влияет на рентабельность поставок.
Greetings, pursuers of roaring laughter !
funny dirty jokes for adults allow us to explore taboo topics safely. Humor is the shield. Laughter is the therapy.
dad jokes for adults is always a reliable source of laughter in every situation. [url=https://adultjokesclean.guru/]funny dirty jokes for adults[/url] They lighten even the dullest conversations. You’ll be glad you remembered it.
adult jokes Even Grandma Might Love – https://adultjokesclean.guru/# funny dirty jokes for adults
May you enjoy incredible unforgettable chuckles !
I used to think healthcare worked like clockwork. Doctors give you pills — you nod, take it, and move on. It felt clean. But that illusion broke slowly.
First came the fatigue. I blamed stress. Still, my body kept rejecting the idea. I read the label. No one had warned me about interactions.
I started seeing: your body isn’t a template. The reaction isn’t always immediate, but it’s real. Reactions aren’t always dramatic — just persistent. Still we trust too easily.
Now I question more. Not because I don’t trust science. I track everything. But I don’t care. This is self-respect, not defiance. The lesson that stuck most, it would be vidalista 40.
Rolex Submariner, представленная в 1953 году стала первой дайверской моделью, выдерживающими глубину до 100 метров .
Модель имеет 60-минутную шкалу, Triplock-заводную головку, обеспечивающие безопасность даже в экстремальных условиях.
Дизайн включает светящиеся маркеры, черный керамический безель , подчеркивающие спортивный стиль.
rolex-submariner-shop.ru
Механизм с запасом хода до 3 суток сочетается с перманентной работой, что делает их идеальным выбором для активного образа жизни.
С момента запуска Submariner стал эталоном дайверских часов , оцениваемым как эксперты.
¿Saludos jugadores entusiastas
Muchos casinos online europeos permiten acceder sin necesidad de descarga, directamente desde navegador. Esta funcionalidad es ideal para jugadores ocasionales o con dispositivos limitados. [url=https://casinosonlineeuropeos.guru/#]europa casino[/url] AdemГЎs, el rendimiento suele ser excelente.
п»їLos casinos online europeos ofrecen una experiencia de juego moderna y segura para usuarios de toda Europa. Muchas plataformas de casinos europeos online cuentan con licencias internacionales y juegos de proveedores reconocidos. Si buscas un entorno fiable y competitivo, los casinos europeos son una excelente elecciГіn.
Euro casino online con bono sin depГіsito 2025 – http://casinosonlineeuropeos.guru/
¡Que disfrutes de grandes recompensas !
Le jeu responsable consiste à établir des règles de budget à l’avance pour maintenir le contrôle.
Les casinos devraient proposer des outils comme les pauses obligatoires pour prévenir les risques de dépendance.
Il est conseillé de ne pas jouer seul et de privilégier les activités sociales pour garder l’équilibre .
https://888-starz-ci.com
Avant de parier , analysez votre état d’esprit et évitez les paris sous stress pour éviter les choix impulsifs.
Les ressources éducatives sur les sites aident à comprendre des addictions et proposent des solutions .
I once believed medications as saviors, relying on them without hesitation whenever ailments surfaced. But life taught me otherwise, revealing how these aids often numbed the symptoms, urging a profound introspection into our intricate dance with health. The shift was visceral, reminding me that conscious choices in medicine honors our body’s wisdom, rather than eroding our natural strength.
During a stark health challenge, I hesitated before the usual fix, exploring alternatives that harmonized natural rhythms with thoughtful aids. What emerged was transformative: wellness blooms holistically, excessive reliance breeds fragility. It inspires me daily to share this insight, seeing medicine as an ally, not a master.
Peering into the core, I now understand health tools should ignite our potential, free from dominating our narrative. The path unfolded revelations, challenging everyone to ponder entrenched patterns for deeper connections. And if I had to sum it all up in one word: cenforce 150
Татуировка представляет собой форму самовыражения, где каждый элемент несёт личную историю и подчеркивает индивидуальность человека.
Для сотен людей тату — вечный символ , который напоминает о важных моментах и становится частью пути .
Сам акт нанесения — это ритуал доверия между мастером и человеком, где кожа превращается полотном эмоций.
иглы для тату
Современные стили , от минималистичных узоров до биомеханических композиций, помогают передать любую идею в гармоничном исполнении.
Эстетика нательного искусства в их вечности вместе с хозяином , превращая воспоминания в живой символ внутреннего мира.
Выбирая узор , люди показывают своё «я» через цвета , создавая личное произведение, которое наполняет уверенностью каждый день.
Greetings to all casino visitors !
п»їWith 1xbet nigeria registration, players can choose odds formats like fractional or decimal. 1xbet registration nigeria Nigerian users can switch language preferences anytime. This flexibility makes 1xbet nigeria registration appealing to a wide audience.
Nigerian users visiting 1xbet ng login registration online get full access to the sportsbook. It’s optimized for slow connections and low-data mode. You’ll receive instant verification with the 1xbet ng login registration online form.
1xbet registration nigeria – Works with All Nigerian Banks – п»їhttps://1xbetregistrationinnigeria.com/
Hope you enjoy amazing rounds !
Warm greetings to all betting pros !
Registering through 1xbet-nigeria-registration-online.com gives you exclusive access to local promos. Nigerian players benefit from fast payouts and easy deposits. [url=п»їhttps://1xbet-nigeria-registration-online.com/]1xbet ng registration[/url]. The 1xbet registration Nigeria platform is built for local convenience.
For users looking to bet on the go, 1xbet ng login registration is fully mobile-friendly. You don’t need to download an app to get started. Just complete your 1xbet ng registration and enjoy instant access.
Register hassle-free at 1xbet-nigeria-registration-online.com now – https://www.1xbet-nigeria-registration-online.com/
Hoping you hit amazing rounds !
Hello everyone, all gaming masters !
Full access is granted once the 1xbet nigeria login registration is confirmed by SMS or email. 1xbet ng registration Deposits and withdrawals are supported directly after your 1xbet registration in nigeria is complete. Registering at 1xbet nigeria registration is quick and easy, allowing players to start betting within minutes.
With 1xbet registration nigeria, players can enjoy betting without complications thanks to simplified registration. The site works well even with low bandwidth connections. Just input your number or email and start betting instantly.
Everything about 1xbet nigeria login registration today – 1xbet-ng-registration.com.ng
Enjoy thrilling rewards !
Find a wealth of fascinating and practical materials here .
Covering detailed tutorials to daily updates , you’ll find matching your interests.
Enhance your knowledge with fresh resources designed to inspire while also entertain you .
Here provides a user-friendly interface easily find tools right away.
Join of a growing community who appreciate trusted content consistently.
Dive in today and discover the full potential this platform has to offer .
https://norseman.info
¡Saludos a todos los apasionados del azar !
Casasdeapuestassindni.guru ofrece acceso a plataformas anГіnimas. Apuestas deportivas sin dni estГЎn disponibles sin registro. [url=http://casasdeapuestassindni.guru/]apostar sin registrarse[/url] Casas de apuestas SIN verificaciГіn aceptan criptomonedas y tarjetas virtuales.
Apuestas online sin registro funcionan sin formularios ni verificaciones. Muchas casas de apuestas sin dni permiten apostar sin validaciГіn documental. Apostar SIN dni es ideal para quienes valoran la rapidez.
Casas de apuestas sin verificaciГіn y sin lГmites – https://casasdeapuestassindni.guru/#
¡Que goces de increíbles botes!
Les modèles sportives intègrent des fonctionnalités avancées en fitness .
Équipées de GPS précis ainsi que de suivi du sommeil , elles s’ajustent à chaque objectifs .
Leur autonomie peut aller jusqu’à une longue durée en mode standard , adaptée aux activités intenses .
GPS Garmin
Les métriques permettent de les étapes ainsi que l’oxygène , aidant à complet .
Faciles à utiliser , ces montres s’adaptent facilement à votre routine , via une interface intuitive .
Découvrir ces modèles garantit bénéficier de des solutions de confiance dans la gestion de vos performances .
¡Un cordial saludo a todos los maestros de las apuestas !
Los mejores casinos en linea ofrecen una experiencia de juego segura y variada. [url=http://casinosonlineeuropeos.xyz/#]europa casino[/url] Muchos jugadores prefieren casinosonlineeuropeos.xyz por sus bonos atractivos y soporte en varios idiomas. Un casinos europeos garantiza retiros rГЎpidos y mГ©todos de pago confiables.
Los casinosonlineeuropeos ofrecen una experiencia de juego segura y variada. Muchos jugadores prefieren europa casino por sus bonos atractivos y soporte en varios idiomas. Un casinosonlineeuropeos.xyz garantiza retiros rГЎpidos y mГ©todos de pago confiables.
Casinos online europeos con bonos exclusivos y pagos rГЎpidos – https://casinosonlineeuropeos.xyz/#
¡Que goces de increíbles tiradas !
?Mis calidos augurios para todos los adoradores de la emocion !
Los casinos europeos destacan por su gran catГЎlogo de juegos. [url=https://casinoonlineeuropeo.blogspot.com/#][/url] Un euro casino online ofrece bonos exclusivos para sus miembros. Un euro casino online combina diversiГіn y seguridad.
Los casinos online europeos cuentan con licencias internacionales. Un casino online europeo se adapta a jugadores nuevos y experimentados. El casino europa tiene programas VIP con recompensas Гєnicas.
Los mejores casinos online: seguridad y pagos rГЎpidos – http://casinoonlineeuropeo.blogspot.com/#
?Que goces de excepcionales victorias !
los mejores casinos online
Odpowiedzialna gra w kasynie stanowi podstawę dla kontroli gracza .
Używanie funkcji jak kontrola budżetu zapobiega nadmiernemu zaangażowaniu .
Monitorowanie stanu psychicznego podczas gry zapewnia racjonalne decyzje .
Польские онлайн казино
Dostępne są bezpłatne linie pomocy w razie trudności.
Warto pamiętać hazard to rozrywka a nie źródło dochodu.
Korzystaj z opcji bezpieczeństwa aby utrzymywać bezpieczeństwo.
Познание английского с раннего детского возраста имеет огромное значение.
В такие годы мышление детей охотно принимает новые знания.
Раннее знакомство с иностранной речью укрепляет речь.
Также, ребёнку становится проще изучать другие языки в будущем.
Освоение английского расширяет безграничные пути развития в учёбе и жизни.
Таким образом, раннее изучение английского ведёт к высоким результатам.
http://perfectxp.com/index.php?topic=8.new#new
Эффективные решения контроля рабочего времени помогают оптимизировать оперативного управления.
Удобный интерфейс сокращает погрешности при расчёте зарплат .
Администраторам удобнее анализировать проектные задачи в режиме реального времени .
https://measiedu.org/finance/work-discipline-and-kpi-how-to-link-pok/
Работники получают прозрачный доступ к своим данным .
Переход на автоматизацию заметно оптимизирует внутренние операции в кратчайшие сроки.
Практика формирует прозрачность между отделами , повышая лояльность персонала .
Envio mis saludos a todos los cazadores de premios!
Algunos usuarios prefieren casino online sin licencia ya que aceptan criptomonedas y mГ©todos de pago modernos. ВїQuieres apostar sin lГmites? casino online sin licencia te permite jugar con depГіsitos y retiros flexibles. [url=https://casinosonlinesinlicencia.xyz/#][/url] El acceso a casino online sin licencia es posible desde cualquier dispositivo sin necesidad de descargas.
La experiencia en mejores casinos sin licencia en espaГ±a suele ser mГЎs dinГЎmica gracias a la ausencia de restricciones locales. Algunos usuarios prefieren mejores casinos sin licencia en espaГ±a ya que aceptan criptomonedas y mГ©todos de pago modernos. ВїQuieres apostar sin lГmites? mejores casinos sin licencia en espaГ±a te permite jugar con depГіsitos y retiros flexibles.
Casino online sin registro con bonos especiales – п»їhttps://casinosonlinesinlicencia.xyz/
Que disfrutes de increibles beneficios !
casinos no regulados
В Telegram появилась свежая функция — внутренние звёзды.
Они предназначены для вознаграждения каналов.
Пользователи вправе дарить звёзды каналам.
купить звезды телкграм дешево
Звёзды обмениваются в реальные деньги.
Это простой способ выразить благодарность.
Оцените опцию уже прямо сейчас.
On this site you can explore a lot of useful information.
It is created to help you with multiple topics.
You will see clear explanations and practical examples.
The content is frequently refreshed to stay up-to-date.
https://techiwiki.info
It’s a great resource for research.
All users can benefit from the materials here.
Begin reading the site right away.
Un afectuoso saludo para todos los exploradores de la suerte !
Gracias a tiradas gratis sin deposito espaГ±a, puedes probar diferentes tragamonedas y juegos en vivo sin preocuparte por el depГіsito inicial. Las plataformas de casino online que incluyen tiradas gratis sin deposito espaГ±a suelen atraer tanto a principiantes como a expertos. [url=http://100girosgratis.guru/][/url] Muchos jugadores buscan tiradas gratis sin deposito espaГ±a porque ofrece una forma segura y divertida de empezar sin arriesgar dinero.
Las plataformas de casino online que incluyen slot giros gratis sin depГіsito suelen atraer tanto a principiantes como a expertos. Gracias a slot giros gratis sin depГіsito, puedes probar diferentes tragamonedas y juegos en vivo sin preocuparte por el depГіsito inicial. Muchos jugadores buscan slot giros gratis sin depГіsito porque ofrece una forma segura y divertida de empezar sin arriesgar dinero.
giros gratis por registro sin depГіsito online – http://100girosgratis.guru/
Que tengas la suerte de gozar de increibles recompensas !
giros gratis por registro sin depГіsito
Saludo cordialmente a todos los maestros del poker !
Los jugadores pueden aprovechar spins gratis sin depГіsito EspaГ±a para comenzar a jugar sin riesgo. [url=https://50girosgratissindeposito.xyz/#][/url] Muchos operadores ofrecen 50girosgratissindeposito.xyz como parte de su bienvenida. AdemГЎs, en sitios como 50 giros gratis encuentras promociones actualizadas cada dГa.
Los jugadores pueden aprovechar 50 tiradas gratis para comenzar a jugar sin riesgo. Muchos operadores ofrecen casino 50 tiradas gratis como parte de su bienvenida. AdemГЎs, en sitios como 50girosgratissindeposito.xyz encuentras promociones actualizadas cada dГa.
Slots destacadas con spins gratis sin depГіsito EspaГ±a 2025 – http://50girosgratissindeposito.xyz/
Deseo que vivas increibles encuentros !
spins gratis sin depГіsito espaГ±a
While participating in i-gaming, it is crucial to set limits on your activity.
Mindful gaming means managing your hours and funds.
Always remember to treat it as entertainment rather than a way to earn money.
Take advantage of the self-control features many platforms provide to help you maintain control.
It’s wise to take breaks regularly and evaluate your gaming habits.
http://mk90.net/forum/thread-1755-post-44941.html#pid44941
Ask for support or advice if you feel overwhelmed with your play.
Talking about your gaming limits with friends or family can improve your self-awareness.
By practicing responsible gaming, you get i-gaming while maintaining your health.
Заказ автозапчастей в сети является всё более удобной среди покупателей.
Сайты автозапчастей предлагают большой выбор запчастей для разных моделей автомобилей.
Тарифы в онлайн-магазинах часто выгоднее, чем в традиционных магазинах.
Покупатели способны сопоставлять предложения разных продавцов в несколько кликов.
Интернет-магазин Exzap
Кроме того, удобная система отправки позволяет оформить заказ быстро.
Комментарии других покупателей дают возможность выбрать надежные автозапчасти.
Многие сервисы дают защиту на запчасти, что усиливает доверие покупателей.
Таким образом, онлайн-покупка автозапчастей практична и быстра.
Warm greetings to all the jackpot hunters !
livecasino is becoming more popular both in Greece and worldwide. live casino online The entertainment at livecasino never stops and keeps evolving Secure transactions are guaranteed at livecasino.
With livecasinogreece.guru, you can play roulette, blackjack, and poker in real time. Players enjoy authentic atmosphere when joining livecasinogreece.guru. Advanced technology ensures that livecasinogreece.guru is always accessible.
livecasinogreece – Real Dealers and Exciting Games – п»їhttps://livecasinogreece.guru/
I wish you amazing rewards !
kazino live
?Saludos cordiales a todos los maestros del poker !
Muchos jugadores confГan en librabet casino review porque ofrece opciones seguras y variadas. [url=http://librabetcasino.guru/#][/url] Con librabet casino review se puede acceder fГЎcilmente a promociones exclusivas y mГ©todos de pago modernos. AdemГЎs, librabet casino review garantiza una experiencia de usuario fluida en cualquier dispositivo.
Muchos jugadores confГan en librabet bonus benvenuto porque ofrece opciones seguras y variadas. Con librabet bonus benvenuto se puede acceder fГЎcilmente a promociones exclusivas y mГ©todos de pago modernos. AdemГЎs, librabet bonus benvenuto garantiza una experiencia de usuario fluida en cualquier dispositivo.
CГіmo registrarse y jugar en librabet accedi fГЎcilmente – http://librabetcasino.guru/
?Te deseo increibles triunfos !
libravita login
?Warm greetings to all the jackpot hunters !
Players looking for exciting offers often choose bonus no deposit because it provides easy access to rewards. Many international platforms highlight no deposit casino to attract new members and increase engagement. no deposit bonus casino The popularity of such promotions continues to grow as gamblers search for the best deals in the market.
Players looking for exciting offers often choose no deposit bonus casino because it provides easy access to rewards. Many international platforms highlight free bonus no deposit to attract new members and increase engagement. The popularity of such promotions continues to grow as gamblers search for the best deals in the market.
Simple steps to get no deposit bonus casino right now – п»їhttps://nodepositbonusgreece.guru/
?I wish you incredible jackpots!
nodepositbonusgreece.guru
Выбор врача-остеопата — ответственный процесс на пути к улучшению самочувствия.
Для начала стоит понять свои задачи и ожидания от терапии у остеопата.
Важно изучить квалификацию и стаж выбранного доктора.
Комментарии обратившихся помогут принять уверенный выбор.
https://wa.me/79054799730
Также следует проверить подходы, которыми работает доктор.
Первая консультация позволяет почувствовать, насколько подходит вам общение и подход доктора.
Стоит также сравнить цены и формат сотрудничества (например, удалённо).
Грамотный выбор врача способен сделать эффективнее процесс восстановления.
?Warm greetings to all the slot enthusiasts !
Policy briefs that reference privacy-first casino platforms discuss mitigation strategies. [url=https://bettingwithoutidentification.xyz/][/url] They outline steps to protect users while enabling research. Balanced policy proposals are preferred by most analysts.
Survey data about secure anonymous gaming interfaces provides insight into user motivations. Interpreting such data requires careful, neutral methodology. Researchers publish findings to support evidence-based policy.
betting without identification — expert insights – http://bettingwithoutidentification.xyz/#
?I wish you incredible rewards !
ПѓП„ОїО№П‡О·ОјО±П„О№ОєОµПѓ ОµП„О±О№ПЃО№ОµПѓ П‡П‰ПЃО№Пѓ П„О±П…П„ОїПЂОїО№О·ПѓО·
This site offers a lot of captivating and valuable information.
Here, you can explore different sections that include many relevant themes.
Each article is created with care to detail.
The content is constantly renewed to keep it relevant.
Users can gain useful insights every time they visit.
It’s a great place for those who are interested in informative reading.
Numerous users find this website to be well-organized.
If you’re looking for quality information, you’ll surely discover it here.
https://footypreviews.com
A warm greeting to all the prize winners!
Gamers often recommend checking no deposit bonus greece when comparing bonuses across different casinos in Greece. [url=п»їhttps://nodepositbonusgreece.xyz/#][/url]. If you’re searching for the best offers, no deposit bonus greece remains one of the most popular options online. Whether you prefer slots or live dealer games, no deposit bonus greece gives you a way to start playing instantly.
Players looking for casino no deposit bonus can find exciting opportunities on various platforms that cater to Greek audiences. Whether you prefer slots or live dealer games, casino no deposit bonus gives you a way to start playing instantly. Experts agree that casino no deposit bonus attracts both beginners and experienced gamblers seeking extra value.
Discover Where to Use no deposit bonus greece in 2025 – п»їhttps://nodepositbonusgreece.xyz/#
May you have the fortune to enjoy incredible rounds !
free spins no deposit Greece
Artistic photography often focuses on expressing the harmony of the human form.
It is about composition rather than surface.
Experienced photographers use soft lighting to create atmosphere.
Such images emphasize authenticity and individuality.
https://xnudes.ai/
Each photo aims to evoke feelings through movement.
The goal is to present natural harmony in an elegant way.
Audiences often appreciate such work for its depth.
This style of photography unites emotion and aesthetics into something truly unique.
papamasque – Very artistic feel, design choices suggest deep thought and quality.
redhillrepurposing – The idea of a global art registry feels like a game-changer.
ouretiquette – A much-needed solution for artists seeking to prove their work’s authenticity.
hellgate100nyc – I appreciate the transparency this site offers to artists and buyers.
colossal-heart – Browsing through, I can see how this could help artists globally.
alixrice – Browsing through, I can see how this could help artists globally.
shopmaggielindemann – Excited to see how this evolves in the art community.
blegacyfarms – The idea of a global art registry feels like a game-changer.
aworldofgin – Excited to see how this evolves in the art community.
islingtondesigndistrict – A much-needed solution for artists seeking to prove their work’s authenticity.
theberserkeriscoming – The idea of a global art registry feels like a game-changer.
Cheers to every spin masters!
Players who love Mediterranean style and excitement often choose online casino greek for its vibrant atmosphere and authentic games. [url=https://casinoonlinegreek.com/#][/url]At online greek casino, you can explore hundreds of slots, live dealers, and bonuses inspired by Greek culture. This online casino greek destination combines ancient myths with modern gaming technology, creating an unforgettable experience.
Players who love Mediterranean style and excitement often choose casino online greek for its vibrant atmosphere and authentic games. At online casino greek, you can explore hundreds of slots, live dealers, and bonuses inspired by Greek culture. This casino online greek destination combines ancient myths with modern gaming technology, creating an unforgettable experience.
online casino greek Guide – Best Sites for Greek Casino Fans – http://casinoonlinegreek.com/#
May you have the fortune to enjoy incredible Hope you achieve fantastic victories !
Cheers to every casino lovers !
Players who love Mediterranean style and excitement often choose online greek casino for its vibrant atmosphere and authentic games. [url=https://casinoonlinegreek.com/#][/url]At casinoonlinegreek, you can explore hundreds of slots, live dealers, and bonuses inspired by Greek culture. This online greek casino destination combines ancient myths with modern gaming technology, creating an unforgettable experience.
Players who love Mediterranean style and excitement often choose casino greek online for its vibrant atmosphere and authentic games. At greek casino online, you can explore hundreds of slots, live dealers, and bonuses inspired by Greek culture. This casino greek online destination combines ancient myths with modern gaming technology, creating an unforgettable experience.
Explore the Thrill of online greek casino – Real Games, Real Wins – http://casinoonlinegreek.com/#
May you have the fortune to enjoy incredible Hope you score great victories !
?Calidos saludos a todos los companeros de ruleta !
El teletrabajo aumentГі la necesidad de proteger redes domГ©sticas. Usar Wi-Fi con contraseГ±a fuerte [url=http://casinossindni.space/][/url] es indispensable. TambiГ©n conviene cambiarla periГіdicamente.
Un casino sin dni espaГ±a puede ofrecer bonos exclusivos para nuevos usuarios. Las promociones suelen renovarse semanalmente y son fГЎciles de reclamar. AsГ se mantiene la emociГіn en cada sesiГіn de juego.
Casino sin DNI: juega de forma privada – п»їhttps://casinossindni.space/
?Les deseo increibles giros !
casino online sin dni
Инновационные боты для улучшения снимков становятся всё более удобными.
Они используют искусственный интеллект для автоматической коррекции изображений.
С помощью таких инструментов можно заменить одежду на фото без сложных навыков.
Это упрощает процесс и обеспечивает точную обработку.
раздеватор бесплатно тг
Многие пользователи выбирают такие решения для контента.
Они способствуют создавать эстетичные фотографии даже на смартфоне.
Интерфейс таких систем удобное, поэтому с ними просто начать работать.
Совершенствование нейросетей превращает фотообработку эффективной для всех пользователей.
?Calidos saludos a todos los buscadores de fortuna!
El teletrabajo aumentГі la necesidad de proteger redes domГ©sticas. Usar Wi-Fi con contraseГ±a fuerte es indispensable. casinos sin dni TambiГ©n conviene cambiarla periГіdicamente.
La privacidad digital se ha vuelto esencial en la vida moderna. Proteger los datos personales evita filtraciones y fraudes. Aprender sobre seguridad en lГnea es una inversiГіn en tranquilidad.
Casinossindni.space – encuentra tu casino rГЎpido – п»їhttps://casinossindni.space/
?Les deseo increibles encuentros !
casinossindni.space
?Salud por cada amante del casino !
En casinos online internacionales puedes jugar sin restricciones y con atenciГіn al cliente en espaГ±ol. casinos extranjeros El catГЎlogo de casinos online internacionales incluye tragamonedas, ruletas y juegos en vivo. Los casinos online internacionales ofrecen experiencias Гєnicas con bonos exclusivos y juegos variados.
Los casinos extranjeros ofrecen experiencias Гєnicas con bonos exclusivos y juegos variados. La seguridad y el anonimato son ventajas clave de casinos extranjeros. Muchos jugadores eligen casinos extranjeros por su libertad y rapidez en los pagos.
Los nuevos casino fuera de EspaГ±a con giros gratis diarios – п»їhttps://casinosinternacionalesonline.space/
Que tengas la fortuna de disfrutar deseandote emocionantes rondas !
Нейросетевые поисковые системы для мониторинга источников становятся всё более удобными.
Они помогают находить доступные данные из разных источников.
Такие решения используются для исследований.
Они способны быстро систематизировать большие объёмы контента.
глазбога бот
Это позволяет получить более полную картину событий.
Некоторые системы также обладают инструменты фильтрации.
Такие сервисы активно применяются среди исследователей.
Эволюция технологий позволяет сделать поиск информации доступным и наглядным.
Поиск подрядчика — ответственный момент при реализации застройки.
Перед тем как подписать контракт, стоит проверить репутацию компании.
Надёжная компания всегда обеспечивает качественные услуги.
Важно учесть, какие технологии входят в работу при строительстве.
https://www.trustami.com/review/68f611ffcc96c5c04c8b4568-rating
Marketing through opinion leaders has become one of the most popular tools in modern promotion.
It enables organizations to reach their followers through the trust of content creators.
Creators share stories that boost engagement in a service.
The main advantage of this approach is its genuine communication.
Yoloco
Followers tend to engage more actively to personal recommendations than to classic advertising.
Brands can strategically select influencers to attract the right audience.
A well-planned influencer marketing campaign builds trust.
As a result, this form of promotion has become an essential part of modern marketing.
??????? ??????? ???????? ?? ???? ???????????????.
?????? ?????, ?? ???????????? ?? ???????? ???????????, ??? ?????.
??????????? ?????? ??????? ?????? ? ????????.
????????? ??????? ?? ???????? ??????, ???? ??? ????????? ????????????.
fortuna distillery
??????? ?????? ???????????, ? ?????? ?????????.
?? ??? ??????? ?????????????, ???????? ? ??????.
????????? ???????? ?????? ???????? ???????????.
?????????? ???????????? ???????, ?? ????????????? ?????????? ????.
Интеллектуальные поисковые системы для мониторинга источников становятся всё более популярными.
Они дают возможность изучать доступные данные из интернета.
Такие инструменты подходят для исследований.
Они умеют оперативно обрабатывать большие объёмы информации.
https://eyeofgod.cc/
Это способствует сформировать более полную картину событий.
Некоторые системы также обладают функции визуализации.
Такие сервисы широко используются среди специалистов.
Эволюция технологий превращает поиск информации более точным и наглядным.
?Brindemos por cada maestro del azar!
Un casino sin registro facilita el acceso rГЎpido mediante correo electrГіnico o redes sociales. [url=http://casinossinlicenciaespanola.net/#][/url] Sin embargo, esto puede comprometer la seguridad de los datos personales. La privacidad digital no debe confundirse con anonimato total sin consecuencias.
Casinos online sin licencia pueden desaparecer de la red sin previo aviso. En esos casos, los jugadores pierden acceso a sus fondos. La estabilidad y reputaciГіn del sitio deben evaluarse siempre.
Casino sin licencia en EspaГ±a con juegos en vivo online – https://casinossinlicenciaespanola.net/#
?Que la fortuna te sonria con que experimentes grandiosos jackpots impresionantes !
?Un calido saludo para todos los aventureros del casino !
Los jugadores deben entender que un casino sin licencia opera fuera de las normas nacionales. [url=http://casinossinlicenciaenespana.net/#][/url] Esto significa que no hay mecanismos legales para recuperar dinero perdido por errores o fraudes. Conocer este detalle es clave para evitar problemas futuros.
Un casino sin licencia puede ofrecer acceso internacional a usuarios de distintos paГses sin seguir normativas locales. Esto suele atraer a jugadores que buscan anonimato o mГ©todos de pago alternativos. Aun asГ, la ausencia de regulaciГіn puede afectar la transparencia en los pagos y la protecciГіn de datos.
Casinos sin licencia espaГ±ola que aceptan criptomonedas – п»їhttps://casinossinlicenciaenespana.net/
?Les deseo extraordinarios giros de suerte !
casinos online sin licencia
Поиск компании по онлайн-продвижению — ответственный этап в развитии бизнеса.
До того как начать работу, стоит оценить опыт выбранного агентства.
Профессиональная команда всегда работает на основе аналитики и учитывает цели клиента.
Важно убедиться, какие методы использует агентство: SMM, брендинг и другие направления.
https://vzlet.media/poiskovoe-prodvizhenie-optimizaciya/seovoronezh/
Положительным сигналом является открытая коммуникация и достижимые показатели.
Кейсы заказчиков помогут сделать вывод, насколько качественно агентство ведёт кампании.
Не стоит ориентироваться только на стоимости услуг, ведь эффективность работы зависит от подхода специалистов.
Грамотный выбор партнёра по маркетингу обеспечит развить бизнес и увеличить прибыль.
Качественный напиток отличается чистым вкусом и сбалансированным букетом.
Первым признаком качества является отсутствие осадка.
Хорошие марки строго следят за процесс дистилляции.
Этикетка также служит показателем о уровне продукта.
fortuna-distillery
Подтверждённая сертификация — ещё один важный критерий.
Настоящий алкоголь не должен вызывать резкого запаха.
Следует покупать алкогольные напитки у официальных продавцов.
Осознанный подход к приобретению продукции поможет сохранить здоровье.
?Brindemos por cada conquistador del premio mayor !
Un casino online sin registro elimina los pasos tradicionales de verificaciГіn, facilitando el acceso inmediato al juego. [url=http://casinossinlicenciaespanola.net/#][/url] Esto puede ser cГіmodo, pero tambiГ©n abre la puerta a usos indebidos o problemas legales. Por eso, muchos paГses estГЎn reforzando sus leyes de juego responsable.
Un casino sin licencia en EspaГ±a puede operar desde Malta, Curazao o Chipre. Estas jurisdicciones ofrecen licencias internacionales con menos exigencias. Aun asГ, no todas las licencias extranjeras garantizan la misma protecciГіn.
Casino sin licencia espaГ±ola: opciones confiables online – http://casinossinlicenciaespanola.net/
?Que la fortuna te sonria con que consigas asombrosos pagos espectaculares !
Нейросетевые поисковые системы для анализа данных становятся всё более популярными.
Они позволяют находить публичные данные из разных источников.
Такие боты используются для журналистики.
Они способны точно систематизировать большие объёмы информации.
глаз блога телеграмм
Это помогает создать более объективную картину событий.
Многие системы также обладают удобные отчёты.
Такие боты популярны среди специалистов.
Эволюция технологий позволяет сделать поиск информации доступным и быстрым.
Интеллектуальные поисковые системы для анализа данных становятся всё более популярными.
Они дают возможность собирать открытые данные из разных источников.
Такие боты применяются для аналитики.
Они способны быстро обрабатывать большие объёмы данных.
бот глаз бога это
Это позволяет создать более полную картину событий.
Отдельные системы также обладают инструменты фильтрации.
Такие сервисы популярны среди специалистов.
Совершенствование технологий превращает поиск информации доступным и наглядным.
Нейросетевые поисковые системы для поиска информации становятся всё более популярными.
Они позволяют изучать открытые данные из разных источников.
Такие боты используются для журналистики.
Они способны оперативно систематизировать большие объёмы контента.
бот глаз бога это
Это способствует сформировать более полную картину событий.
Отдельные системы также обладают удобные отчёты.
Такие сервисы активно применяются среди специалистов.
Эволюция технологий делает поиск информации эффективным и быстрым.
Интеллектуальные поисковые системы для мониторинга источников становятся всё более востребованными.
Они дают возможность собирать публичные данные из социальных сетей.
Такие инструменты подходят для аналитики.
Они могут точно обрабатывать большие объёмы данных.
бесплатный глаз бога в тн
Это способствует создать более точную картину событий.
Многие системы также включают функции визуализации.
Такие сервисы популярны среди аналитиков.
Совершенствование технологий делает поиск информации более точным и быстрым.
Современные поисковые системы для мониторинга источников становятся всё более востребованными.
Они дают возможность изучать публичные данные из разных источников.
Такие решения применяются для аналитики.
Они умеют оперативно анализировать большие объёмы данных.
telegram глаз богf
Это помогает получить более полную картину событий.
Некоторые системы также предлагают удобные отчёты.
Такие сервисы популярны среди аналитиков.
Эволюция технологий превращает поиск информации эффективным и удобным.
Здесь вы найдёте массу актуальной информации.
Портал посвящён на тех, кто ищет надёжная информация.
Материалы, размещённые здесь, помогают лучше разобраться в множествах темах.
Все тексты постоянно дополняется, чтобы быть актуальными.
https://foodrussia.net
Структура сайта простая, поэтому ориентироваться здесь удобно.
Каждый посетитель имеет возможность найти контент, соответствующие его интересам.
Данный сайт организован с заботой о посетителях.
Используя этот сайт, вы получаете ценный ресурс знаний.
Нейросетевые поисковые системы для поиска информации становятся всё более популярными.
Они позволяют собирать открытые данные из разных источников.
Такие инструменты подходят для журналистики.
Они могут быстро систематизировать большие объёмы информации.
гдазбога
Это помогает получить более полную картину событий.
Некоторые системы также предлагают удобные отчёты.
Такие сервисы активно применяются среди специалистов.
Развитие технологий делает поиск информации более точным и наглядным.
Интеллектуальные онлайн-сервисы для мониторинга источников становятся всё более востребованными.
Они помогают находить доступные данные из социальных сетей.
Такие решения используются для исследований.
Они умеют оперативно анализировать большие объёмы информации.
бесплатный пробив в тг глаз бога
Это способствует создать более полную картину событий.
Отдельные системы также обладают функции визуализации.
Такие боты активно применяются среди аналитиков.
Совершенствование технологий превращает поиск информации эффективным и быстрым.
Playing responsibly is crucial for ensuring a balanced gaming experience.
It helps players enjoy the activity without unwanted stress.
Being aware of your boundaries is a core aspect of responsible behavior.
Players should define realistic time limits before they start playing.
Casino Deals AU
Frequent rest periods can help restore balance and avoid burnout.
Transparency about one’s habits is important for keeping gaming a fun activity.
Many companies now promote responsible gaming through helpful guidelines.
By being aware, every player can play while preserving their balance.
Поиск digital-агентства — важный момент в продвижении компании.
Перед тем как заключить договор, стоит проверить опыт выбранного подрядчика.
Профессиональная команда всегда работает на основе исследований и учитывает потребности заказчика.
Стоит уточнить, какие методы использует агентство: контекстная реклама, контент-маркетинг и другие направления.
Плюсом Vzlet Media является прозрачная отчётность и достижимые показатели.
Кейсы заказчиков помогут сделать вывод, насколько качественно агентство ведёт кампании.
Лучше не ориентироваться только на стоимости услуг, ведь качество работы зависит от подхода специалистов.
Обдуманный выбор партнёра по маркетингу позволит укрепить позицию и повысить эффективность.
Аренда спецтехники сегодня является практичным способом для организаций.
Она позволяет решать задачи без необходимости покупки машин.
Поставщики, предлагающие такую услугу, предоставляют широкий выбор спецоборудования для различных сфер.
В парке можно найти автокраны, катки и другие виды техники.
https://premierdevelopment.ru/kak-vybrat-nadezhnogo-postavshhika-uslug-po-arende-ekskavatorov.html
Ключевое преимущество аренды — это гибкость.
Также, арендатор имеет доступ к современную технику, с полным обслуживанием.
Опытные компании предлагают прозрачные договоры аренды.
Таким образом, аренда спецтехники — это практичный выбор для тех, кто стремится к экономию в работе.
Аренда спецтехники сегодня является выгодным способом для предприятий.
Она позволяет выполнять работы без дополнительных затрат содержания дорогой техники.
Организации, предлагающие такую услугу, предлагают широкий выбор спецоборудования для разных направлений.
В парке можно найти автокраны, катки и специализированные машины.
http://boards.sovnat.info/viewtopic.php?t=162009
Ключевое преимущество аренды — это экономия средств.
Также, арендатор имеет доступ к проверенную технику, готовую к работе.
Надёжные компании оформляют прозрачные соглашения.
Таким образом, аренда спецтехники — это разумный выбор для тех, кто стремится к экономию в работе.
Прокат строительной техники сегодня считается практичным решением для строительных компаний.
Она позволяет выполнять работы без обязательства приобретения оборудования.
Поставщики, предлагающие такую услугу, предлагают широкий выбор техники для любых задач.
В парке можно найти погрузчики, самосвалы и специализированные машины.
https://2020.khuemyai.go.th/forum/suggestion-box/718213-p-ds-zi-gd-z-z-i-r-ndu-s-r-i-linu-hni-u-v
Основное достоинство аренды — это гибкость.
Также, арендатор имеет доступ к проверенную технику, готовую к работе.
Опытные компании оформляют удобные условия сотрудничества.
Таким образом, аренда спецтехники — это разумный выбор для тех, кто ищет экономию в работе.
Дизельное топливо — это неотъемлемый компонент энергетики, который активно применяется в промышленности.
За счёт своей плотности энергии дизельное топливо обеспечивает надёжную эксплуатацию оборудования.
Качественное топливо способствует эффективность функционирования техники.
Особое значение имеет химический баланс топлива, ведь примеси могут снизить эффективность.
Производители дизельного топлива обязаны соблюдать нормы безопасности.
Инновационные подходы позволяют повышать технические свойства.
При выборе дизельного топлива важно проверять условия хранения.
Хранение и транспортировка топлива также определяют на его стабильность.
Плохое топливо может вызвать поломке двигателя.
Поэтому использование проверенных поставщиков — необходимое условие.
На рынке представлено разнообразие видов дизельного топлива, отличающихся по назначению.
Морозостойкие виды дизельного топлива позволяют работу техники даже при экстремальных условиях.
Благодаря развитию инноваций качество топлива постоянно растёт.
Ответственный подход в вопросе использования дизельного топлива обеспечивают экономию ресурсов.
Таким образом, надёжный источник энергии является фундаментом долговечной эксплуатации любого производственного процесса.
Английский сегодня считается незаменимым умением для современного человека.
Английский язык помогает находить общий язык с жителями разных стран.
Без владения языком сложно развиваться профессионально.
Работодатели предпочитают сотрудников, владеющих английским.
https://himki.myqip.ru/?1-2-0-00000756-000-0-0
Регулярная практика английского расширяет кругозор.
Зная английский, можно путешествовать без ограничений.
Кроме того, регулярная практика улучшает мышление.
Таким образом, владение английским является залогом в успехе каждого человека.
Английский язык сегодня считается необходимым инструментом для жителя современного мира.
Он помогает общаться с жителями разных стран.
Без владения языком почти невозможно развиваться профессионально.
Многие компании требуют знание английского языка.
https://biochemistry.videolecture.ru/club/user/69594/forum/message/38404/47885/
Обучение английскому открывает новые возможности.
Зная английский, можно путешествовать без ограничений.
Помимо этого, овладение английским развивает память.
Таким образом, владение английским становится ключом в саморазвитии каждого человека.
Английский язык сегодня считается важным умением для современного человека.
Английский язык дает возможность общаться с иностранцами.
Без знания английского сложно строить карьеру.
Организации предпочитают знание английского языка.
курсы английского языка для взрослых
Регулярная практика английского делает человека увереннее.
С помощью английского, можно путешествовать без перевода.
Помимо этого, изучение языка повышает концентрацию.
Таким образом, умение говорить по-английски становится ключом в саморазвитии каждого человека.
Online services for mature people allow users to find new acquaintances.
They are designed for those who seek open communication.
These services create a safe space for getting to know others in a virtual format.
Thousands of users choose online dating to save time.
EroticVault
The main goal of such platforms is to help people who share similar interests.
Responsible use on these platforms helps create genuine connections.
Online communication formats make dating easier than ever before.
Ultimately, modern dating services help people feel connected regardless of distance.
Английский язык сегодня считается обязательным инструментом для жителя современного мира.
Он помогает общаться с иностранцами.
Без знания английского почти невозможно развиваться профессионально.
Работодатели требуют сотрудников, владеющих английским.
курсы английского для программистов
Изучение языка расширяет кругозор.
С помощью английского, можно учиться за границей без перевода.
Кроме того, овладение английским развивает память.
Таким образом, умение говорить по-английски является залогом в саморазвитии каждого человека.
Знание английского языка сегодня считается необходимым инструментом для современного человека.
Он дает возможность общаться с жителями разных стран.
Не зная английский почти невозможно достигать успеха в работе.
Многие компании предпочитают знание английского языка.
https://1000nk.ru/iindividualnye-zanyatiya-anglijskogo-kak-vybrat-podhodyashhij-format-i-programmu/
Обучение английскому делает человека увереннее.
С помощью английского, можно учиться за границей без перевода.
Также, овладение английским повышает концентрацию.
Таким образом, владение английским играет важную роль в успехе каждого человека.
Знание английского языка сегодня считается обязательным инструментом для современного человека.
Английский язык дает возможность находить общий язык с людьми со всего мира.
Без знания английского трудно достигать успеха в работе.
Многие компании требуют специалистов с языковыми навыками.
курсы toefl
Обучение английскому делает человека увереннее.
Благодаря английскому, можно учиться за границей без перевода.
Кроме того, регулярная практика повышает концентрацию.
Таким образом, знание английского языка становится ключом в успехе каждого человека.
Английский сегодня считается необходимым инструментом для жителя современного мира.
Английский язык позволяет взаимодействовать с жителями разных стран.
Без знания английского почти невозможно развиваться профессионально.
Работодатели оценивают специалистов с языковыми навыками.
корпоративное обучение английскому языку
Изучение языка расширяет кругозор.
Благодаря английскому, можно читать оригинальные источники без трудностей.
Помимо этого, овладение английским развивает память.
Таким образом, умение говорить по-английски является залогом в будущем каждого человека.
Знание английского языка сегодня считается важным умением для каждого человека.
Английский язык помогает находить общий язык с жителями разных стран.
Без владения языком трудно достигать успеха в работе.
Многие компании оценивают знание английского языка.
https://odnokllassniki.ru/interesnoe/intensiv-bez-oshibok-vybiraem-kurs-anglijskogo-dlya-uverennogo-obshheniya-2/
Регулярная практика английского расширяет кругозор.
Зная английский, можно учиться за границей без трудностей.
Также, изучение языка повышает концентрацию.
Таким образом, владение английским становится ключом в успехе каждого человека.
Знание английского языка сегодня считается важным инструментом для современного человека.
Английский язык дает возможность общаться с людьми со всего мира.
Без знания английского сложно достигать успеха в работе.
Организации оценивают специалистов с языковыми навыками.
интенсивные курсы английского языка в Москве
Изучение языка делает человека увереннее.
С помощью английского, можно учиться за границей без трудностей.
Также, регулярная практика развивает память.
Таким образом, владение английским играет важную роль в будущем каждого человека.
?Brindemos por cada tactico del juego !
En casino sin dni participas en jackpots progresivos que acumulan premios millonarios. La posibilidad de ganar cantidades extraordinarias existe en cada giro. [url=https://casinossinverificacion.net/#][/url] Tu identidad no importa, solo tu suerte y estrategia cuentan.
El casino sin verificaciГіn tiene sistemas de recuperaciГіn de cuenta mediante frases semilla. Nunca pierdas acceso a tus fondos incluso sin verificaciГіn. La tecnologГa blockchain protege tu patrimonio permanentemente.
Casino sin dni es opciГіn preferida de jugadores exigentes – http://casinossinverificacion.net/#
?Que la fortuna te sonria con celebremos juntos inolvidables victorias memorables!
наркология анонимно [url=https://www.narkologicheskaya-klinika-23.ru]https://www.narkologicheskaya-klinika-23.ru[/url] .
1xbet g?ncel giri? [url=http://www.1xbet-17.com]1xbet g?ncel giri?[/url] .
?Brindemos por cada aventurero de riquezas !
Un casino sin registro elimina el riesgo de robo de identidad o filtraciГіn de datos. [url=п»їhttps://casinossinverificacion.net/][/url] Sin informaciГіn almacenada, no hay nada que hackear o comprometer. Tu seguridad digital es mГЎxima cuando no proporcionas datos personales.
En casinossinverificacion.net se publican cГіdigos promocionales exclusivos regularmente. Estos bonos especiales no estГЎn disponibles en sitios convencionales. SuscrГbete para recibir las mejores ofertas directamente en tu correo electrГіnico.
Casinossinverificacion.net analiza cada detalle importante – http://casinossinverificacion.net/#
?Que la fortuna te sonria con que experimentes grandiosos vueltas de suerte !
?Brindemos por cada icono de las apuestas !
Las plataformas casinos online fuera de espaГ±a integran sistemas de gamificaciГіn con misiones diarias y logros desbloqueables. [url=http://casinosonlinefueradeespana.net/][/url] Cada tarea completada suma puntos canjeables por dinero real o giros gratis. El juego se vuelve mГЎs interactivo y entretenido.
En casino fuera de espaГ±a puedes participar en ligas de clasificaciГіn mensuales con premios escalonados. Los mejores 100 jugadores reciben recompensas segГєn su posiciГіn final. La competencia amistosa aГ±ade una capa extra de motivaciГіn.
Casinosonlinefueradeespana analiza pros y contras – https://casinosonlinefueradeespana.net/#
?Que la fortuna te sonria con que la suerte te brinde intensos exitos !
стоимость гидроизоляции подвала [url=https://gidroizolyaciya-podvala-cena.ru/]стоимость гидроизоляции подвала[/url] .
торкретирование стен [url=https://torkretirovanie-1.ru/]торкретирование стен[/url] .
1xbet g?ncel [url=1xbet-17.com]1xbet g?ncel[/url] .
телефон наркологии [url=https://narkologicheskaya-klinika-23.ru/]narkologicheskaya-klinika-23.ru[/url] .
гидроизоляция подвала [url=gidroizolyaciya-podvala-cena.ru]гидроизоляция подвала[/url] .
торкретирование стен цена за м2 [url=http://www.torkretirovanie-1.ru]http://www.torkretirovanie-1.ru[/url] .
1xbet giris [url=https://1xbet-17.com]1xbet giris[/url] .
платный наркологический стационар [url=https://www.narkologicheskaya-klinika-23.ru]https://www.narkologicheskaya-klinika-23.ru[/url] .
вертикальная гидроизоляция стен подвала [url=https://gidroizolyaciya-podvala-cena.ru]вертикальная гидроизоляция стен подвала[/url] .
торкретирование стен цена [url=http://torkretirovanie-1.ru/]http://torkretirovanie-1.ru/[/url] .
This resource contains a lot of captivating and valuable information.
On the website, you can find various materials that expand knowledge.
Readers will benefit from the content shared on this site.
Each section is thoughtfully designed, making it simple to use.
The posts are written clearly.
You can find information on various fields.
No matter if you seek useful facts, this site has what you’re looking for.
To sum up, this site is a valuable hub for people who enjoy discovering new things.
https://sfzev.de/
рулонные шторы с электроприводом и дистанционным управлением [url=http://www.avtomaticheskie-rulonnye-shtory1.ru]http://www.avtomaticheskie-rulonnye-shtory1.ru[/url] .
рулонные шторы в москве [url=http://rulonnye-shtory-s-elektroprivodom7.ru/]рулонные шторы в москве[/url] .
1x bet giri? [url=https://1xbet-giris-2.com/]1xbet-giris-2.com[/url] .
1xbet giris [url=www.1xbet-giris-8.com]1xbet giris[/url] .
one x bet [url=1xbet-giris-4.com]1xbet-giris-4.com[/url] .
The site provides a lot of fascinating and valuable information.
On the website, you can find a wide range of subjects that help you learn new things.
Everyone will value the content shared through this platform.
Every page is thoughtfully designed, making it convenient to use.
The materials are presented professionally.
There are recommendations on different subjects.
If you want to find practical advice, this site has what you’re looking for.
All in all, this site is a valuable hub for people who enjoy discovering new things.
https://pz-rlp.de/
заказать рулонные шторы в москве [url=http://avtomaticheskie-rulonnye-shtory1.ru/]заказать рулонные шторы в москве[/url] .
пластиковые окна рулонные шторы с электроприводом [url=https://rulonnye-shtory-s-elektroprivodom7.ru/]rulonnye-shtory-s-elektroprivodom7.ru[/url] .
1x bet [url=https://1xbet-giris-8.com/]1x bet[/url] .
1xbet ?ye ol [url=https://1xbet-giris-2.com/]1xbet-giris-2.com[/url] .
1xbet tr [url=https://1xbet-giris-4.com/]1xbet tr[/url] .
1 xbet [url=www.1xbet-giris-8.com/]1 xbet[/url] .
рулонные шторы на окна цена [url=avtomaticheskie-rulonnye-shtory1.ru]рулонные шторы на окна цена[/url] .
1 x bet [url=www.1xbet-giris-2.com/]www.1xbet-giris-2.com/[/url] .
рулонные жалюзи с электроприводом [url=https://rulonnye-shtory-s-elektroprivodom7.ru]рулонные жалюзи с электроприводом[/url] .
1xbet giri? adresi [url=http://1xbet-giris-4.com]1xbet giri? adresi[/url] .
seo аудит веб сайта [url=https://optimizaciya-i-seo-prodvizhenie-sajtov-moskva.ru]seo аудит веб сайта[/url] .
сделать аудит сайта цена [url=http://www.optimizaciya-i-seo-prodvizhenie-sajtov-moskva-1.ru]http://www.optimizaciya-i-seo-prodvizhenie-sajtov-moskva-1.ru[/url] .
блог seo агентства [url=http://statyi-o-marketinge7.ru]http://statyi-o-marketinge7.ru[/url] .
seo статьи [url=http://www.statyi-o-marketinge6.ru]seo статьи[/url] .
сделать аудит сайта цена [url=www.optimizaciya-i-seo-prodvizhenie-sajtov-moskva-1.ru/]www.optimizaciya-i-seo-prodvizhenie-sajtov-moskva-1.ru/[/url] .
оптимизация сайта франция [url=https://www.optimizaciya-i-seo-prodvizhenie-sajtov-moskva.ru]https://www.optimizaciya-i-seo-prodvizhenie-sajtov-moskva.ru[/url] .
маркетинговые стратегии статьи [url=www.statyi-o-marketinge7.ru]маркетинговые стратегии статьи[/url] .
материалы по seo [url=http://statyi-o-marketinge6.ru]материалы по seo[/url] .
глубокий комлексный аудит сайта [url=https://optimizaciya-i-seo-prodvizhenie-sajtov-moskva-1.ru/]optimizaciya-i-seo-prodvizhenie-sajtov-moskva-1.ru[/url] .
internet seo [url=www.optimizaciya-i-seo-prodvizhenie-sajtov-moskva.ru/]www.optimizaciya-i-seo-prodvizhenie-sajtov-moskva.ru/[/url] .
как продвигать сайт статьи [url=https://statyi-o-marketinge7.ru/]statyi-o-marketinge7.ru[/url] .
блог о рекламе и аналитике [url=statyi-o-marketinge6.ru]statyi-o-marketinge6.ru[/url] .
услуги по согласованию перепланировки [url=http://soglasovanie-pereplanirovki-1.ru]услуги по согласованию перепланировки[/url] .
согласование перепланировки нежилых помещений [url=https://superogorod.ucoz.org/forum/2-4886-1/]согласование перепланировки нежилых помещений[/url] .
surewin casino login [url=https://surewin-online.com]https://surewin-online.com[/url] .
icebet casino review [url=http://icebet-online.com]icebet casino review[/url] .
?Brindemos por cada artifice del destino!
En crypto casino no kyc encuentras staking de tokens de casino. [url=п»їhttps://casinosinverificacion.org/][/url] Puedes ganar intereses sobre saldos inactivos automГЎticamente. Los beneficios pasivos son reales en casinosinverificacion.org/.
Los casinos sin verificaciГіn implementan lГmites de retiro diarios muy generosos. Puedes sacar grandes cantidades sin esperar aprobaciones especiales. En casino crypto sin kyc tu dinero es verdaderamente tuyo.
Entra en casinosinverificacion.org/ y empieza a ganar – п»їhttps://casinosinverificacion.org/
?Que la fortuna te sonria con que vivas extraordinarios jackpots impresionantes !
Casino Roulette: Spin for the Ultimate Thrill
Experience the timeless excitement of Casino Roulette, where every spin brings a chance to win big and feel the rush of luck. Try your hand at the wheel today at https://k8o.jp/ !
1xbet giris [url=https://1xbet-7.com/]1xbet-7.com[/url] .
согласование перепланировки [url=www.soglasovanie-pereplanirovki-1.ru]согласование перепланировки[/url] .
surewin online casino [url=www.surewin-online.com]www.surewin-online.com[/url] .
beepbeep [url=https://beepbeepcasino-online.com]https://beepbeepcasino-online.com[/url] .
valor casino official site [url=http://valorslots.com]valor casino official site[/url] .
1xbet turkey [url=http://1xbet-7.com/]http://1xbet-7.com/[/url] .
согласование перепланировки помещений [url=https://soglasovanie-pereplanirovki-1.ru/]согласование перепланировки помещений[/url] .
surewin online casino [url=https://surewin-online.com/]https://surewin-online.com/[/url] .
beep beep casino review [url=https://beepbeepcasino-online.com/]beepbeepcasino-online.com[/url] .
valor casino colombia [url=http://www.valorslots.com]valor casino colombia[/url] .
1xbet giri? 2025 [url=www.1xbet-7.com/]www.1xbet-7.com/[/url] .
согласование проекта перепланировки квартиры [url=https://soglasovanie-pereplanirovki-1.ru/]согласование проекта перепланировки квартиры[/url] .
surewin apk [url=https://surewin-online.com/]surewin-online.com[/url] .
beeb beeb casino [url=https://beepbeepcasino-online.com/]https://beepbeepcasino-online.com/[/url] .
heapsofwin [url=https://heapsofwins-online.com/]heapsofwin[/url] .
учиться seo [url=https://kursy-seo-12.ru/]kursy-seo-12.ru[/url] .
777 bet cash withdrawal online [url=https://777betcasino-online.com]777 bet cash withdrawal online[/url] .
icebet [url=www.icebet-online.com/]icebet[/url] .
Immediate Olux se distingue comme une plateforme de placement crypto revolutionnaire, qui utilise la puissance de l’intelligence artificielle pour fournir a ses clients des atouts competitifs majeurs.
Son IA analyse les marches en temps reel, repere les opportunites et execute des strategies complexes avec une exactitude et une rapidite inaccessibles aux traders humains, maximisant ainsi les potentiels de rendement.
кухни спб [url=www.kuhni-spb-10.ru/]кухни спб[/url] .
icebet casino no deposit bonus codes [url=https://icebet-online.com/]https://icebet-online.com/[/url] .
продвижение обучение [url=http://kursy-seo-12.ru]http://kursy-seo-12.ru[/url] .
goliath casino [url=goliath-casino.com]goliath-casino.com[/url] .
Clarte Nexive se differencie comme une plateforme d’investissement crypto revolutionnaire, qui utilise la puissance de l’intelligence artificielle pour proposer a ses membres des avantages decisifs sur le marche.
Son IA etudie les marches financiers en temps reel, repere les opportunites et applique des tactiques complexes avec une finesse et une celerite inaccessibles aux traders humains, maximisant ainsi les potentiels de rendement.
goliath casino recension [url=https://www.goliath-casino.com]https://www.goliath-casino.com[/url] .
icebet casino kokemuksia [url=www.icebet-online.com/]www.icebet-online.com/[/url] .
seo специалист [url=https://kursy-seo-12.ru]seo специалист[/url] .
it переводчик услуги [url=https://telegra.ph/Oshibka-lokalizacii-pochemu-vash-IT-produkt-ne-ponimayut-za-granicej-11-09/]telegra.ph/Oshibka-lokalizacii-pochemu-vash-IT-produkt-ne-ponimayut-za-granicej-11-09[/url] .
лучшие бюро переводов в Мск [url=https://teletype.in/@alexd78/iF-xjHhC3iA/]teletype.in/@alexd78/iF-xjHhC3iA[/url] .
it перевод стоимость [url=https://telegra.ph/Oshibka-lokalizacii-pochemu-vash-IT-produkt-ne-ponimayut-za-granicej-11-09/]telegra.ph/Oshibka-lokalizacii-pochemu-vash-IT-produkt-ne-ponimayut-za-granicej-11-09[/url] .
топ -10 бюро переводов в мск [url=https://teletype.in/@alexd78/iF-xjHhC3iA/]teletype.in/@alexd78/iF-xjHhC3iA[/url] .
лучшие бюро переводов в Мск [url=https://teletype.in/@alexd78/iF-xjHhC3iA/]teletype.in/@alexd78/iF-xjHhC3iA[/url] .
it перевод заказать [url=https://telegra.ph/Oshibka-lokalizacii-pochemu-vash-IT-produkt-ne-ponimayut-za-granicej-11-09/]telegra.ph/Oshibka-lokalizacii-pochemu-vash-IT-produkt-ne-ponimayut-za-granicej-11-09[/url] .
??????? ??? [url=www.aviator-game-predict.com/]www.aviator-game-predict.com/[/url] .
электрокарнизы для штор цена [url=http://prokarniz36.ru/]http://prokarniz36.ru/[/url] .
TurkPaydexHub se differencie comme une plateforme de placement crypto revolutionnaire, qui met a profit la puissance de l’intelligence artificielle pour fournir a ses clients des avantages concurrentiels decisifs.
Son IA scrute les marches en temps reel, identifie les opportunites et applique des tactiques complexes avec une exactitude et une rapidite inatteignables pour les traders humains, maximisant ainsi les potentiels de rendement.
TurkPaydexHub se differencie comme une plateforme d’investissement crypto innovante, qui met a profit la puissance de l’intelligence artificielle pour fournir a ses clients des avantages decisifs sur le marche.
Son IA scrute les marches en temps reel, detecte les occasions interessantes et met en ?uvre des strategies complexes avec une finesse et une celerite hors de portee des traders humains, maximisant ainsi les perspectives de gain.
карниз электро [url=www.elektrokarniz1.ru]www.elektrokarniz1.ru[/url] .
электрокарнизы для штор купить в москве [url=https://www.elektrokarniz-dlya-shtor11.ru]https://www.elektrokarniz-dlya-shtor11.ru[/url] .
рулонные жалюзи москва [url=http://www.rulonnye-shtory-s-elektroprivodom177.ru]рулонные жалюзи москва[/url] .
жалюзи с электроприводом [url=https://prokarniz23.ru]жалюзи с электроприводом[/url] .
умные шторы купить [url=www.prokarniz23.ru/]www.prokarniz23.ru/[/url] .
ставки на спорт мелбет [url=http://v-bux.ru]http://v-bux.ru[/url] .
Ранняя диагностика играет решающую роль в лечебной практике.
Такая диагностика позволяет распознать заболевание на раннем этапе.
Чем раньше проведено обследование, тем результативнее подобрать терапию.
Большинство людей недооценивают необходимость регулярных проверок, хотя это основа здоровья.
https://yourmoscow.ru/posts/botulinoterapija-sovremennye-podhody-i-primenenie.html
Диагностические технологии помогают получить детальные данные о состоянии организма.
Плановые проверки позволяют избежать критических ситуаций.
Для медиков раннее выявление болезни — это способ повысить эффективность лечения.
В итоге, своевременная диагностика является неотъемлемой частью заботы о здоровье.
kurica 2 [url=http://kurica2.ru/uz/]http://kurica2.ru/uz/[/url] .
заказать практическую работу недорого цены [url=https://kupit-kursovuyu-1.ru/]https://kupit-kursovuyu-1.ru/[/url] .
?Celebremos a cada disenador de la prosperidad !
Elegir bar-celoneta.es permite jugar sin compartir documentos personales, lo que resulta ideal para quienes valoran la privacidad. [url=http://bar-celoneta.es/#][/url] Las recomendaciones de casinos sin verificaciГіn aclaran dudas comunes. Esta combinaciГіn facilita decisiones rГЎpidas.
Elegir casino sin dni permite jugar sin compartir documentos personales, lo que resulta ideal para quienes valoran la privacidad. Las recomendaciones de crypto casino no kyc aclaran dudas comunes. Esta combinaciГіn facilita decisiones rГЎpidas.
casino sin kyc para jugar de inmediato y sin riesgos – https://bar-celoneta.es/#
?Que la suerte te acompane con deseandote la alegria de pagos espectaculares !
курсовая работа купить москва [url=http://kupit-kursovuyu-6.ru/]http://kupit-kursovuyu-6.ru/[/url] .
курсовой проект купить цена [url=http://kupit-kursovuyu-7.ru/]http://kupit-kursovuyu-7.ru/[/url] .
купить курсовая работа [url=https://www.kupit-kursovuyu-8.ru]купить курсовая работа[/url] .
курсовая заказать [url=https://kupit-kursovuyu-10.ru/]курсовая заказать[/url] .
Своевременное выполнение уроков играет ключевую роль в обучении школьников.
Такой подход помогает повторять изученные темы и улучшать результаты.
Большинство школьников осознают, что домашняя работа способствуют развитию дисциплины.
Систематические занятия позволяет повысить концентрацию.
https://umk-garmoniya.ru/poleznoe-202
Педагоги нередко говорят, что домашняя подготовка помогает устранять пробелы.
Помимо этого, домашняя работа приучает к ответственности.
Ребята, которые регулярно занимаются, обычно учатся более эффективно.
Таким образом, выполнение домашних заданий остаётся важным элементом обучения для любого ученика.
win crash game [url=aviator-game-winner.com]win crash game[/url] .
aviator bonus game [url=www.aviator-game-winner.com]www.aviator-game-winner.com[/url] .
Взвешенное отношение к игре является важным элементом комфортного развлечения.
Она помогает избежать лишних рисков и сохранять баланс во время игрового процесса.
Многие люди понимают, что умеренность помогает наслаждаться игрой без негативных последствий.
Установление ограничений позволяет держать под контролем длительность игры.
https://blokov-casino.net/online-casino-martin/
Также, важно следить за эмоциями и останавливаться вовремя.
Сайты часто предлагают инструменты самоконтроля, которые помогают играть безопасно.
Пользователи, которые придерживаются принципов ответственности, чаще поддерживают эмоциональный комфорт.
Следовательно, ответственная игра остаётся необходимым условием комфортного отдыха.
udan game [url=aviator-game-deposit.com]aviator-game-deposit.com[/url] .
aviator game [url=http://aviator-game-winner.com/]aviator game[/url] .
ремонт квартир компании [url=http://www.rejting-kompanij-po-remontu-kvartir-moskvy.com]http://www.rejting-kompanij-po-remontu-kvartir-moskvy.com[/url] .
plane crash game money download [url=www.aviator-game-deposit.com/]www.aviator-game-deposit.com/[/url] .
фирмы ремонт квартир в москве [url=rejting-kompanij-po-remontu-kvartir-moskvy.com]rejting-kompanij-po-remontu-kvartir-moskvy.com[/url] .
рулонные жалюзи москва [url=www.avtomaticheskie-rulonnye-shtory11.ru/]рулонные жалюзи москва[/url] .
?Brindiamo per ogni simbolo della fortuna !
Ogni piattaforma affidabile dovrebbe garantire una gestione accurata della truffe digitali. Molti attacchi informatici nascono da piccole distrazioni facilmente evitabili [url=https://infinitumondovi.it/casino-senza-invio-documenti/#][/url]. In questo modo ogni sessione di gioco risulta piГ№ serena e protetta.
Molti giocatori non considerano quanto sia importante la comportamenti sospetti quando partecipano ai giochi online. Prestare attenzione ai dettagli tecnici permette di evitare problemi futuri. Adottare abitudini digitali consapevoli rende l’esperienza molto più sicura.
Bonus casino senza deposito e senza invio documenti mejoran – https://infinitumondovi.it/casino-senza-invio-documenti/#
?Che la fortuna ti sorrida con augurandoti la gioia di conquiste eccezionali !
airplane money game [url=https://aviator-game-deposit.com/]https://aviator-game-deposit.com/[/url] .
ремонт квартир москва отзывы [url=https://rejting-kompanij-po-remontu-kvartir-moskvy.com]ремонт квартир москва отзывы[/url] .
рулонные жалюзи москва [url=https://www.avtomaticheskie-rulonnye-shtory11.ru]рулонные жалюзи москва[/url] .
рулонные шторы с электроприводом на пластиковые окна [url=http://avtomaticheskie-rulonnye-shtory11.ru]http://avtomaticheskie-rulonnye-shtory11.ru[/url] .
download metatrader 5 [url=http://www.metatrader-5-downloads.com]http://www.metatrader-5-downloads.com[/url] .
metatrader5 [url=metatrader-5-mac.com]metatrader5[/url] .
mt5 mac download [url=http://metatrader-5-downloads.com/]http://metatrader-5-downloads.com/[/url] .
mt5 download for pc [url=http://www.metatrader-5-mac.com]http://www.metatrader-5-mac.com[/url] .
metatrader5 download [url=metatrader-5-mac.com]metatrader-5-mac.com[/url] .
meta trader 5 download [url=https://metatrader-5-downloads.com/]https://metatrader-5-downloads.com/[/url] .
mt5 download for pc [url=www.metatrader-5-downloads.com/]www.metatrader-5-downloads.com/[/url] .
рулонные шторы с электроприводом и дистанционным управлением [url=https://www.avtomaticheskie-rulonnye-shtory11.ru]https://www.avtomaticheskie-rulonnye-shtory11.ru[/url] .
mt5 mac [url=http://metatrader-5-mac.com]http://metatrader-5-mac.com[/url] .
Le jeu responsable est important pour assurer un divertissement sain.
Il permet de limiter les problèmes et de maîtriser sa participation tout en profitant du jeu.
De nombreux joueurs comprennent que la modération aide à rester dans une zone de confort.
Fixer des limites permet de maîtriser la durée du jeu.
http://www.alkwet.com/vb/showthread.php?t=227863&p=603874#post603874
Il reste aussi crucial de surveiller ses émotions et de s’accorder un arrêt.
Plusieurs services proposent des fonctions de limitation pour encourager un jeu sain.
Les personnes qui jouent consciemment parviennent souvent à préserver leur bien-être.
En conclusion, le jeu responsable reste un élément indispensable pour une expérience agréable.
download metatrader 5 [url=www.metatrader-5-downloads.com]www.metatrader-5-downloads.com[/url] .
рольшторы заказать [url=http://www.avtomaticheskie-rulonnye-shtory11.ru]http://www.avtomaticheskie-rulonnye-shtory11.ru[/url] .
metatrader5 download [url=http://www.metatrader-5-mac.com]http://www.metatrader-5-mac.com[/url] .
автоматическая рулонная штора [url=https://avtomaticheskie-rulonnye-shtory11.ru/]avtomaticheskie-rulonnye-shtory11.ru[/url] .
mt5 trading platform [url=https://metatrader-5-downloads.com/]https://metatrader-5-downloads.com/[/url] .
mt5 download mac [url=https://www.metatrader-5-mac.com]https://www.metatrader-5-mac.com[/url] .
Сервис EasyDrop считается популярным проектом для развлекательного открытия кейсов со скинами в Counter-Strike 2.
Многим пользователям нравится, что здесь удобный интерфейс, позволяющий спокойно ориентироваться к работе платформы.
На сайте доступно множество коллекций, что делает использование интересным.
Создатели платформы регулярно пополняют коллекции, чтобы пользователи имели доступ к современным скинам.
https://rr-game.ru/inc/articles/?promokodi_easydrop.html
Многие отмечают, что EasyDrop комфортен для новичков и опытных игроков благодаря логичным категориям.
Также ценится то, что платформа предлагает различные режимы, повышающие общую вариативность работы.
Однако пользователям важно помнить, что любые действия на подобных платформах требуют взвешенного подхода.
В целом, EasyDrop воспринимается как удобный ресурс, созданный для тех, кто интересуется коллекционными предметами в CS2.
экспертиза по заливу квартиры [url=ekspertiza-zaliva-kvartiry-5.ru]экспертиза по заливу квартиры[/url] .
филлер [url=https://filler-kupit.ru/]филлер[/url] .
где можно заказать курсовую работу [url=https://kupit-kursovuyu-8.ru/]где можно заказать курсовую работу[/url] .
Мониторинг серверов является необходимой задачей для гарантирования бесперебойной работы систем.
Он позволяет обнаруживать сбои на первых шагах развития проблем.
Своевременное обнаружение проблем снижает риск потери данных.
Большинство организаций осознают, что регулярный мониторинг повышает надежность систем.
Специализированные сервисы позволяют автоматизировать процесс.
Своевременные уведомления помогают быстро реагировать и сокращать простои.
Кроме того, контроль оптимизирует работу серверов и повышает эффективность.
В итоге, регулярный мониторинг серверов — это ключевой элемент для надежной работы IT-систем.
https://telegra.ph/Pochemu-monitoring-serverov–ehto-ne-opciya-a-neobhodimost-11-30
заказать студенческую работу [url=https://www.kupit-kursovuyu-8.ru]https://www.kupit-kursovuyu-8.ru[/url] .
где можно заказать курсовую работу [url=http://www.kupit-kursovuyu-5.ru]где можно заказать курсовую работу[/url] .
заказать курсовую [url=https://kupit-kursovuyu-8.ru/]заказать курсовую[/url] .
сайт для заказа курсовых работ [url=https://kupit-kursovuyu-5.ru/]сайт для заказа курсовых работ[/url] .
clickrevenue.click – Found practical insights today; sharing this article with colleagues later.
курсовой проект цена [url=https://www.kupit-kursovuyu-9.ru]https://www.kupit-kursovuyu-9.ru[/url] .
курсовые работы заказать [url=http://kupit-kursovuyu-9.ru/]курсовые работы заказать[/url] .
написание курсовых на заказ [url=https://kupit-kursovuyu-9.ru]написание курсовых на заказ[/url] .
Эта разъяснительная статья содержит простые и доступные разъяснения по актуальным вопросам. Мы стремимся сделать информацию понятной для широкой аудитории, чтобы каждый смог разобраться в предмете и извлечь из него максимум пользы.
Узнать больше – https://vivod-iz-zapoya-1.ru/
карниз с электроприводом [url=www.prokarniz36.ru/]www.prokarniz36.ru/[/url] .
залили соседи оценка ущерба [url=www.ekspertiza-zaliva-kvartiry-5.ru]залили соседи оценка ущерба[/url] .
филлер ру [url=https://filler-kupit.ru]филлер ру[/url] .
Savings codes are special combinations of letters and numbers that provide reduced prices.
They are widely applied by brands to encourage shopping.
Such codes allow users to save more when placing an order.
Many people appreciate promo codes because they make shopping more affordable.
https://dosweeps.com/states
Many stores share these codes through special announcements.
Using them is usually easy and requires only entering the code during checkout.
Promo codes also help companies boost activity by offering temporary bonuses.
Overall, they serve as a useful option for anyone who wants to save money.
электрокарниз купить в москве [url=http://prokarniz36.ru]http://prokarniz36.ru[/url] .
экспертиза протечки квартиры [url=https://ekspertiza-zaliva-kvartiry-5.ru/]экспертиза протечки квартиры[/url] .
филлер цена [url=https://filler-kupit.ru/]filler-kupit.ru[/url] .
электрические гардины [url=http://prokarniz36.ru]http://prokarniz36.ru[/url] .
смета на ремонт после залива [url=https://ekspertiza-zaliva-kvartiry-5.ru/]смета на ремонт после залива[/url] .
интернет магазин филлеров [url=https://www.filler-kupit.ru]интернет магазин филлеров[/url] .
автоматический карниз для штор [url=http://provorota.su/]http://provorota.su/[/url] .
электрокарнизы [url=http://www.elektrokarniz2.ru]http://www.elektrokarniz2.ru[/url] .
электрокарнизы для штор [url=https://elektrokarniz98.ru/]электрокарнизы для штор[/url] .
Изучение английского языка считается ключевым навыком в современном мире.
Он даёт возможность поддерживать контакты за границей.
Многие специалисты понимают, что английский увеличивает шансы на успех.
Овладение английским позволяет свободно путешествовать и способствует межкультурному общению.
http://forum.spolokmedikovke.sk/viewtopic.php?f=3&t=150789&p=2662319#p2662319
Он также способствует развитию мышления и укрепляет самостоятельность в различных ситуациях.
Практика английского позволяет использовать глобальные ресурсы в науке, технике и бизнесе.
Регулярное изучение помогает совершенствовать навыки и достигает высоких результатов.
Следовательно, знание английского языка необходимо для развития и карьерного роста в современном обществе.
электрокарнизы для штор цена [url=http://provorota.su]http://provorota.su[/url] .
прокарниз [url=https://elektrokarniz2.ru]https://elektrokarniz2.ru[/url] .
Здесь представлено много ценной информации.
Пользователи отмечают, что ресурс помогает быстро находить нужные сведения.
Материалы обновляются регулярно, что делает сайт удобным для изучения.
Многие считают, что организация разделов хорошо продумана и позволяет сэкономить время.
Большое разнообразие тем делает ресурс универсальным для разных категорий пользователей.
Также отмечается, что материалы написаны профессионально и читаются без труда.
Сайт помогает расширять знания благодаря информативным материалам.
В итоге, этот ресурс можно назвать удобным местом для изучения важных тем для всех пользователей.
https://dpnews.ru
Envision the intricate web of well-being, where experts frequently spot the strong influence of traditional advice on our lifestyle decisions.
The process typically plays out in a familiar way: spot a health issue, reach for a common solution, and simply wait for improvement to happen.
Such a deceptive simplicity naturally sparks curiosity about what lies just out of sight in our pursuit of optimal health.
Still, life itself thrives on boundless diversity in how our bodies respond and adapt.
People often report subtle signals of discomfort that don’t fit neatly into standard explanations.
Your body’s innate tempo influences how various elements integrate and interact within you.
As if gently unfolding a narrative etched in soft murmurs.
emphasizes how seldom a single approach truly serves everyone equally well.
This profound realization ignites a fresh era in comprehensive health awareness.
Evaluate balance not against general standards, but through the lens of what truly aligns with your inner self.
It forms a vibrant, ever-unfolding fabric rich with purpose.
For this reason, nurturing an ongoing conversation with your body’s wisdom becomes absolutely crucial.
A well-rounded perspective calls for active involvement from all dimensions of your being.
To fully engage with these intriguing interconnections, dare to probe even deeper into the subject.
Step into a realm of discovery by learning all about zithromax davis pdf
электрические гардины [url=https://www.elektrokarniz98.ru]электрические гардины[/url] .
электрокарнизы для штор купить в москве [url=http://www.provorota.su]http://www.provorota.su[/url] .
электрокарнизы для штор [url=http://elektrokarniz2.ru]http://elektrokarniz2.ru[/url] .
электрические гардины для штор [url=http://www.elektrokarniz98.ru]http://www.elektrokarniz98.ru[/url] .
рулонные шторы электрические [url=https://rulonnye-shtory-s-elektroprivodom.ru]рулонные шторы электрические[/url] .
автоматические рулонные шторы [url=https://rulonnye-shtory-s-elektroprivodom499.ru/]автоматические рулонные шторы[/url] .
?Brindemos por cada simbolo de la suerte !
SegГєn opiniones recientes, MostBet destaca por su buena atenciГіn al cliente. [url=estetiplan.es/][/url] Las respuestas suelen llegar rГЎpido y con soluciones claras. Muchos valoran este detalle al elegir una casa de apuestas.
Muchos jugadores consideran que https://estetiplan.es/ ofrece una experiencia fluida para apostar sin complicaciones. Su diseГ±o intuitivo permite adaptarse rГЎpidamente incluso a quienes son nuevos. AdemГЎs, la variedad de opciones hace que cada sesiГіn sea distinta.
Opiniones positivas sobre MostBet EspaГ±a – estetiplan.es
?Que la suerte te sonria con que obtengas espectaculares apuestas triunfantes !
бамбуковые электрожалюзи [url=https://prokarniz23.ru/]prokarniz23.ru[/url] .
рулонные шторы для панорамных окон [url=https://www.rulonnye-shtory-s-elektroprivodom.ru]https://www.rulonnye-shtory-s-elektroprivodom.ru[/url] .
автоматические рулонные шторы [url=rulonnye-shtory-s-elektroprivodom499.ru]автоматические рулонные шторы[/url] .
жалюзи с электроприводом купить [url=https://www.prokarniz23.ru]жалюзи с электроприводом купить[/url] .
?Celebremos a cada explorador de tesoros !
Jugar en casinos sin verificaciГіn permite acceder a una experiencia rГЎpida y privada sin procesos complicados. [url=https://casinoretirosinverificacion.com/#][/url] Muchos jugadores optan por estas opciones debido a la libertad que ofrecen plataformas como casino sin dni. Gracias a esta flexibilidad, cada sesiГіn se vuelve mГЎs cГіmoda al usar servicios como casinoretirosinverificacion.com/.
Jugar en casinoretirosinverificacion.com permite acceder a una experiencia rГЎpida y privada sin procesos complicados. Muchos jugadores optan por estas opciones debido a la libertad que ofrecen plataformas como casino crypto sin kyc. Gracias a esta flexibilidad, cada sesiГіn se vuelve mГЎs cГіmoda al usar servicios como casinos sin kyc.
Casinoretirosinverificacion.com/, apuesta al instante – http://casinoretirosinverificacion.com/#
?Que la suerte te beneficie con aguardandote magnificos retribuciones relucientes !
рольшторы с электроприводом [url=https://rulonnye-shtory-s-elektroprivodom.ru/]рольшторы с электроприводом[/url] .
автоматические рулонные шторы на створку [url=https://rulonnye-shtory-s-elektroprivodom499.ru]https://rulonnye-shtory-s-elektroprivodom499.ru[/url] .
горизонтальные жалюзи с электроприводом [url=www.prokarniz23.ru/]горизонтальные жалюзи с электроприводом[/url] .
гидроизоляция подвала москва [url=www.gidroizolyacziya-podvala-iznutri-czena.ru]гидроизоляция подвала москва[/url] .
гидроизоляция подвала цена [url=https://www.gidroizolyacziya-czena1.ru]гидроизоляция подвала цена[/url] .
инъекционная гидроизоляция микроцементы [url=https://inekczionnaya-gidroizolyacziya.ru/]inekczionnaya-gidroizolyacziya.ru[/url] .
?Levantemos nuestras copas por cada descubridor de riquezas !
mejores casas de apuestas sin licencia incluyen programas VIP exclusivos. [url=https://www.playasegura.org/][/url] Proporcionan recompensas personalizadas para usuarios frecuentes. Esto aumenta la fidelizaciГіn y satisfacciГіn.
actualiza constantemente comparativas de operadores internacionales. Incluye informaciГіn sobre juegos y apuestas en vivo. Esto ayuda a decidir mejor.
Playasegura.org descubre bonos sin rollover y promociones – http://playasegura.org/
?Que la fortuna te acompane con aguardando fantasticos victorias inolvidables!
На этом сайте представлено множество полезных материалов.
Пользователи отмечают, что ресурс облегчает доступ к важным данным.
Контент постоянно пополняется, что делает сайт практичным для чтения.
Многие считают, что структура сайта хорошо продумана и позволяет быстро ориентироваться.
Большое разнообразие тем делает ресурс интересным для разных категорий пользователей.
Также отмечается, что материалы написаны профессионально и читаются без труда.
Сайт помогает расширять знания благодаря подробным статьям.
В итоге, этот ресурс можно назвать удобным местом для изучения важных тем для каждого посетителя.
https://podzakazavto.ru
Mindful play is crucial for maintaining a safe approach to entertainment.
It helps players stay in control and prevents harmful consequences.
By defining boundaries, individuals can enjoy gaming comfortably without overextending themselves.
Recognizing one’s habits encourages smarter behavior during gameplay.
Reliable platforms often promote supportive features that assist users in staying aware.
Maintaining moderation ensures that gaming remains a enjoyable activity.
For many players, responsible play helps maintain clarity while keeping the experience fun.
In the end, responsible behavior supports long-term well-being and keeps gaming safe.
toratora review
заказать качественную курсовую [url=http://www.kupit-kursovuyu-22.ru]http://www.kupit-kursovuyu-22.ru[/url] .
гидроизоляция подвала цена [url=http://gidroizolyacziya-czena1.ru]гидроизоляция подвала цена[/url] .
ремонт бетонных конструкций промышленный объект [url=https://remont-betonnykh-konstrukczij-usilenie.ru/]remont-betonnykh-konstrukczij-usilenie.ru[/url] .
аренда погрузчик экскаватор [url=http://arenda-ekskavatora-pogruzchika-5.ru/]http://arenda-ekskavatora-pogruzchika-5.ru/[/url] .
гидроизоляция подвала самара [url=https://gidroizolyacziya-podvala-samara.ru/]гидроизоляция подвала самара[/url] .
инъекционная гидроизоляция подвала [url=http://www.inekczionnaya-gidroizolyacziya.ru]инъекционная гидроизоляция подвала[/url] .
ремонт подвального помещения [url=http://www.gidroizolyacziya-podvala-iznutri-czena.ru]http://www.gidroizolyacziya-podvala-iznutri-czena.ru[/url] .
гидроизоляция цена [url=https://gidroizolyacziya-czena1.ru/]гидроизоляция цена[/url] .
стоимость услуг экскаватора [url=http://www.arenda-ekskavatora-pogruzchika-5.ru]стоимость услуг экскаватора[/url] .
инъекционная гидроизоляция гидрофобные смолы [url=https://inekczionnaya-gidroizolyacziya.ru]https://inekczionnaya-gidroizolyacziya.ru[/url] .
гидроизоляция подвала внутреняя [url=https://gidroizolyacziya-podvala-samara.ru/]гидроизоляция подвала внутреняя[/url] .
ремонт бетонных конструкций цена [url=www.remont-betonnykh-konstrukczij-usilenie.ru/]ремонт бетонных конструкций цена[/url] .
гидроизоляция подвала цена [url=www.gidroizolyacziya-podvala-iznutri-czena.ru]гидроизоляция подвала цена[/url] .
экскаватор. цена. час. [url=https://arenda-ekskavatora-pogruzchika-5.ru/]arenda-ekskavatora-pogruzchika-5.ru[/url] .
гидроизоляция цена кг [url=https://www.gidroizolyacziya-czena1.ru]https://www.gidroizolyacziya-czena1.ru[/url] .
полиуретановая инъекционная гидроизоляция [url=http://www.inekczionnaya-gidroizolyacziya.ru]http://www.inekczionnaya-gidroizolyacziya.ru[/url] .
гидроизоляция подвала снаружи цены [url=http://www.gidroizolyacziya-podvala-iznutri-czena.ru]гидроизоляция подвала снаружи цены[/url] .
гидроизоляция подвала гаража [url=gidroizolyacziya-podvala-samara.ru]гидроизоляция подвала гаража[/url] .
ремонт бетонных конструкций нижний новгород [url=http://remont-betonnykh-konstrukczij-usilenie.ru/]ремонт бетонных конструкций нижний новгород[/url] .
усиление проёмов композитными материалами [url=www.usilenie-proemov2.ru]www.usilenie-proemov2.ru[/url] .
усиление проема оконного [url=www.usilenie-proemov2.ru]усиление проема оконного[/url] .
куплю курсовую работу [url=www.kupit-kursovuyu-21.ru]www.kupit-kursovuyu-21.ru[/url] .
где можно купить курсовую работу [url=www.kupit-kursovuyu-23.ru]www.kupit-kursovuyu-23.ru[/url] .
купить курсовая работа [url=www.kupit-kursovuyu-22.ru/]www.kupit-kursovuyu-22.ru/[/url] .
усиление проема москва [url=www.usilenie-proemov2.ru]усиление проема москва[/url] .
Уменьшается тремор, выравнивается пульс, снижается тревожность, появляется способность уснуть. Важно не «перепроверять» эффект нагрузками и разговорами: когда вечер отделён от конфликтов и ярких экранов, организм закрепляет результат, а не «сжигает» его к полуночи.
Углубиться в тему – https://narkolog-na-dom-mytishchi9.ru/vyzov-narkologa-na-dom-v-mytishchah/
Здесь представлено большое количество полезного контента.
Пользователи отмечают, что ресурс удобен для поиска информации.
Материалы обновляются регулярно, что делает сайт надёжным для чтения.
Многие считают, что навигация ресурса хорошо продумана и позволяет без труда находить нужное.
Широкий выбор материалов делает ресурс универсальным для широкой аудитории.
Также отмечается, что материалы оформлены аккуратно и легко воспринимаются.
Сайт помогает углублять понимание различных тем благодаря информативным материалам.
В целом, этот ресурс можно назвать удобным местом для изучения важных тем для каждого посетителя.
https://icolog.ru
Экстренный вывод из запоя — это управляемая медицинская процедура, а не «сильная капельница на удачу». В наркологической клинике «ВоронежВита» мы действуем по чётким правилам: от телефонного триажа и тихого выезда бригады до адресной детоксикации и вечерних контрольных включений. Главная цель — безопасно стабилизировать состояние, снизить тремор и тошноту, выровнять сердечный ритм и вернуть физиологичный сон уже в первые ночи. Мы выбираем минимально достаточные вмешательства, чтобы днём сохранялась ясность и не возникало желания «самостоятельно усилить» схему. Конфиденциальность встроена в каждый шаг: гражданская одежда специалистов, немаркированный транспорт, нейтральные формулировки в переписке и документах.
Подробнее тут – http://vivod-iz-zapoya-voronezh15.ru/vyvod-iz-zapoya-staczionar-voronezh/
Ниже — структурированная карта экстренного выезда. Она помогает пациенту и семье понимать, что происходит в каждый отрезок времени, какие цели мы преследуем и по каким критериям двигаемся дальше.
Разобраться лучше – [url=https://vyvod-iz-zapoya-v-voronezhe15.ru/]помощь вывод из запоя воронеж[/url]
Острый этап разбит на небольшие «окна» с измеримыми целями. Это убирает неопределённость и дисциплинирует процесс: пациент знает, что будет происходить, когда будет проверка и по каким маркерам оценивается успех. Если ответ «плоский», корректируется один параметр, а затем обязательно следует повторная оценка в оговорённое время.
Разобраться лучше – https://narkologicheskaya-klinika-v-murmanske15.ru
Первичная оценка строится вокруг показателей, которые определяют место ведения (дом, амбулатория, стационар), состав инфузии и объём поведенческих вмешательств. Мы исключаем «обязательные по привычке» анализы, не влияющие на решения здесь и сейчас; вместо этого закрепляем короткие, но информативные измерения с понятными границами безопасности и интервалами повторов. В результате пациент быстрее видит первые улучшения, а команда не перегружает организм «на всякий случай».
Изучить вопрос глубже – http://narkologicheskaya-klinika-v-stavropole15.ru
Наркологическая клиника «РеМед Карелия» — это круглосуточная медицинская помощь, построенная на принципе клинической точности: каждая процедура имеет цель, проверяемые маркеры и назначенное окно переоценки. Мы используем современные методы детоксикации и постабстинентной стабилизации, не перегружая терапию «на всякий случай» и не полагаясь на универсальные «сильные капельницы». Вместо этого — модульные схемы, корректировка одного параметра за раз и обязательная оценка результата. Такой подход снижает фармаконагрузку, ускоряет восстановление сна и аппетита и делает лечение предсказуемым для пациента и его семьи. Анонимность встроена в процессы: немаркированные входы, гражданская форма персонала, нейтральные формулировки в документах, «тихие» уведомления и разграниченный доступ к карте наблюдения.
Детальнее – [url=https://narkologicheskaya-klinika-v-petrozavodske15.ru/]www.domen.ru[/url]
Чтобы помощь была прозрачной и управляемой, каждый этап имеет цель, индикаторы безопасности и эффективности, а также понятное «окно оценки» результата. Коррекции проводятся «штучно», по правилу одного изменения — это защищает от полипрагмазии и позволяет читабельно видеть вклад каждого шага.
Подробнее тут – [url=https://vyvod-iz-zapoya-v-kazani16.ru/]вывод из запоя в стационаре[/url]
Срочная наркологическая помощь — это не «универсальная капельница», а управляемый клинический процесс, где каждое действие проверяется измеримыми маркерами и выполняется в правильной последовательности. В наркологической клинике «ВолгаМед Альтернатива» маршрут выстроен вокруг принципа минимально достаточных вмешательств: сначала безопасный старт и телескрининг, затем очный осмотр с выбором контура инфузии и, только после теста переносимости, — основная терапия. Такой подход уменьшает реактивность организма, снижает риск побочных ощущений и делает результат предсказуемым для пациента и близких. Команда работает круглосуточно, выезжает на немаркированном транспорте, общение ведётся через одного доверенного человека, а документы оформляются в нейтральной терминологии без стигматизирующих формулировок.
Детальнее – [url=https://narkologicheskaya-pomoshh-v-kazani16.ru/]наркологическая помощь на дому казань[/url]
Каждый пациент проходит последовательный процесс лечения, где основное внимание уделяется безопасности, контролю состояния и постепенной адаптации. При поступлении проводится диагностика с оценкой степени зависимости, сопутствующих патологий и психологических факторов, влияющих на развитие заболевания. На основании полученных данных формируется персонализированный план терапии, включающий медикаментозные и немедикаментозные методы.
Углубиться в тему – http://narkologicheskaya-klinika-v-spb16.ru/narkolog-sankt-peterburg/
Первое сутки с половиной — «каркас» программы. Мы формулируем цель каждого окна, фиксируем инструменты и пороги перехода. Если ожидаемой динамики нет, меняется один параметр (темп/объём/последовательность), после чего назначается повторная оценка. Это защищает от полипрагмазии и сохраняет причинно-следственную связь.
Ознакомиться с деталями – [url=https://narkologicheskaya-klinika-petrozavodsk15.ru/]наркологическая клиника стационар[/url]
Команда выездных специалистов работает без броской символики, использует нейтральный транспорт и конфиденциальный документооборот. Врач приезжает с портативным оборудованием (мониторинг АД/ЧСС/SpO?, термометр, пульсоксиметр, при необходимости — портативный ЭКГ-модуль), выполняет тест переносимости, формирует индивидуальный инфузионный профиль и обучает семью простым процедурам поддержки: водный режим малыми глотками, «тихие окна» без экранов, дыхательные паузы. В результате пациент не просто «переживает» детокс, а действительно возвращается к устойчивому сну, ровному пульсу и ясной голове.
Получить больше информации – https://vivod-iz-zapoya-v-sankt-peterburge16.ru/vyvedenie-iz-zapoya-staczionar-sankt-peterburg
Карта — это общий язык для всех участников процесса. Пациент видит смысл каждого шага, родные знают, когда и чему посвящены короткие апдейты, а врач точно понимает, какой параметр корректировать, чтобы не потерять причинно-следственную связь.
Разобраться лучше – [url=https://vyvod-iz-zapoya-murmansk15.ru/]наркологический вывод из запоя мурманск[/url]
Мытищи дают логистические плюсы домашнего старта: меньше перемещений, приватнее, быстрее включается режим. Дом уместен, если нет упорной рвоты, высокой температуры, выраженной дезориентации, резких «качелей» давления/пульса, признаков обезвоживания с угрозой судорог. Если же состояние «по краю» — сочетание рвоты, лихорадки, кардиальных жалоб, второй бессонной ночи, выраженного тремора — врач предложит короткую стационарную стабилизацию на 24–48 часов под круглосуточным наблюдением. Это честнее и, на дистанции, экономнее: дефициты закрываются быстрее, дозы подбираются точнее, первая ровная ночь достигается предсказуемо, а риск экстренных ночных выездов снижается. В любом варианте приватность сохраняется: немаркированные визиты, индивидуальные окна, закрытые каналы коммуникации, доступ к данным по ролям.
Углубиться в тему – https://narkolog-na-dom-mytishchi9.ru/narkolog-na-dom-nedorogo-v-mytishchah
Городская среда Петрозаводска со сменой ветров с Онежского озера, короткими сумерками и сезонными перепадами влажности может усиливать тревожность в вечерние часы. Мы учитываем это с момента первого контакта: согласованная парковка, отдельный вход без вывесок, короткая регистрация без «толстых анкет», приглушённый тёплый свет в зоне ожидания и отсутствие громких объявлений. Родственникам предоставляются «тихие окна» связи — лаконичные апдейты в фиксированное время, чтобы не перегружать пациента и не дёргать команду в критические окна наблюдения. Такой «мягкий» контур снижает сенсорную нагрузку, стабилизирует вариабельность ЧСС к сумеркам и сокращает число импульсивных просьб «усилить на ночь».
Исследовать вопрос подробнее – https://narkologicheskaya-klinika-petrozavodsk15.ru/
Мы используем модульную терапию: каждый контур решает одну клиническую задачу и сопровождается понятной динамикой. Это помогает мягко вести пациента и не «замазывать» вклад отдельных шагов параллельными усилениями.
Подробнее тут – [url=https://vyvod-iz-zapoya-v-kazani16.ru/]нарколог на дом вывод из запоя в казани[/url]
Если при первичном звонке выявляются «красные флаги» — неукротимая рвота, одышка, спутанность, «скачущий» ритм, подозрение на травму — мы немедленно резервируем палату усиленного наблюдения. При низком риске стартуем амбулаторно или на дому с бесшовным переводом в стационар, если динамика меняется. В любом случае цель одна: безопасно стабилизировать состояние, вернуть питьё и физиологичный сон, объяснить семье и пациенту короткий «язык фактов», по которому судим об эффективности.
Получить дополнительные сведения – http://narkologicheskaya-klinika-v-petrozavodske15.ru
Этот информационный материал собраны данные, которые помогут лучше понять текущие тенденции и процессы в различных сферах жизни. Мы предоставляем четкий анализ, графики и примеры, чтобы информация была не только понятной, но и практичной для принятия решений.
Проверенные методы — узнай сейчас – https://www.la-esperanzahotel.com/villa-lujo-la-esperanza-granada
Статья знакомит с важнейшими моментами, которые сформировали наше общество. От великих изобретений до культурных переворотов — вы узнаете, как прошлое влияет на наше мышление, технологии и образ жизни.
Узнайте всю правду – https://lamiastampa.it/product/personalizza-la-tua-borraccia
В этой статье вы найдете познавательную и занимательную информацию, которая поможет вам лучше понять мир вокруг. Мы собрали интересные данные, которые вдохновляют на размышления и побуждают к действиям. Открывайте новую информацию и получайте удовольствие от чтения!
Давай разберёмся досконально – https://primenewsnet.com/just-in-time-for-spring-community-style-turnaround-has-major-impact
Решение о срочном выезде принимается не из «желания поторопиться», а когда домашняя стабилизация действительно снижает риски. Ниже — ориентиры, при которых не стоит откладывать звонок. Любой из перечисленных признаков — повод для консультации, а их сочетание — для немедленного осмотра.
Детальнее – [url=https://narkologicheskaya-pomoshh-v-kazani16.ru/]вызов наркологической помощи казань[/url]
В статье представлены ключевые моменты по актуальной теме, дополненные советами экспертов и ссылками на дополнительные ресурсы. Цель материала — дать читателю инструменты для самостоятельного развития и принятия осознанных решений.
Давай разберёмся досконально – https://foodarts.jp/menu-2
В этой статье собраны факты, которые освещают целый ряд важных вопросов. Мы стремимся предложить читателям четкую, достоверную информацию, которая поможет сформировать собственное мнение и лучше понять сложные аспекты рассматриваемой темы.
Узнать из первых рук – https://www.defining-blog.ru/tag/tehnologii
В этом интересном тексте собраны обширные сведения, которые помогут вам понять различные аспекты обсуждаемой темы. Мы разбираем детали и факты, делая акцент на важности каждого элемента. Не упустите возможность расширить свои знания и взглянуть на мир по-новому!
Узнайте всю правду – https://liberty-inc.net/liberty_logo2_wh
Предлагаем вашему вниманию интересную справочную статью, в которой собраны ключевые моменты и нюансы по актуальным вопросам. Эта информация будет полезна как для профессионалов, так и для тех, кто только начинает изучать тему. Узнайте ответы на важные вопросы и расширьте свои знания!
Все материалы собраны здесь – https://smart-plv.net/producto/purple-t-shirt
Эта разъяснительная статья содержит простые и доступные разъяснения по актуальным вопросам. Мы стремимся сделать информацию понятной для широкой аудитории, чтобы каждый мог разобраться в предмете и извлечь из него максимум пользы.
Не упусти важное! – https://escuelariodeluna.com.ar/hello-world
Публикация приглашает вас исследовать неизведанное — от древних тайн до современных достижений науки. Вы узнаете, как случайные находки превращались в революции, а смелые мысли — в новые эры человеческого прогресса.
Следуйте по ссылке – https://patanjaliayurved.org/product/detergent-powder-premium
В этом обзорном материале представлены увлекательные детали, которые находят отражение в различных аспектах жизни. Мы исследуем непонятные и интересные моменты, позволяя читателю увидеть картину целиком. Погрузитесь в мир знаний и удивительных открытий!
Не пропусти важное – https://www.traceocad.fr/en/traceocad/logos-autodesk-mobile
Этот текст призван помочь читателю расширить кругозор и получить практические знания. Мы используем простой язык, наглядные примеры и структурированное изложение, чтобы сделать обучение максимально эффективным и увлекательным.
Уточнить детали – https://alleya-modi.ru/7
Эта статья погружает вас в увлекательный мир знаний, где каждый факт становится открытием. Мы расскажем о ключевых исторических поворотных моментах и научных прорывах, которые изменили ход цивилизации. Поймите, как прошлое формирует настоящее и как его уроки могут помочь нам строить будущее.
Лучшее решение — прямо здесь – https://alumni.sainikschoolkodagu.edu.in/index.php?option=com_k2&view=item&id=3:benefits-of-joining-alumni-association&Itemid=525&limitstart=1650
Этот обзорный материал предоставляет информационно насыщенные данные, касающиеся актуальных тем. Мы стремимся сделать информацию доступной и структурированной, чтобы читатели могли легко ориентироваться в наших выводах. Познайте новое с нашим обзором!
Хочу знать больше – https://socialwavepro.be/2023/04/09/unlock-the-power-of-digital-marketing-our-services
Статья содержит практические рекомендации и полезные советы, которые можно легко применить в повседневной жизни. Мы делаем акцент на реальных примерах и проверенных методиках, которые способствуют личностному развитию и улучшению качества жизни.
Слушай внимательно — тут важно – https://egyptdestinations.net/siwas-historical-landmarks
В этой информационной статье вы найдете интересное содержание, которое поможет вам расширить свои знания. Мы предлагаем увлекательный подход и уникальные взгляды на обсуждаемые темы, побуждая пользователей к активному мышлению и критическому анализу.
Ознакомьтесь с аналитикой – https://colors-hidemi.com/hello-world
В этой информационной статье вы найдете интересное содержание, которое поможет вам расширить свои знания. Мы предлагаем увлекательный подход и уникальные взгляды на обсуждаемые темы, побуждая пользователей к активному мышлению и критическому анализу.
Выяснить больше – https://clindoeilinfo.com/conseil-presidentiel-les-membres-du-gouvernement-tournent-ils-autour-du-pot
Этот обзор предлагает структурированное изложение информации по актуальным вопросам. Материал подан так, чтобы даже новичок мог быстро освоиться в теме и начать использовать полученные знания в практике.
Погрузиться в детали – https://malwafirst.in/tnmachi-tnmachi-2021
В этой публикации мы предлагаем подробные объяснения по актуальным вопросам, чтобы помочь читателям глубже понять их. Четкость и структурированность материала сделают его удобным для усвоения и применения в повседневной жизни.
Нажмите, чтобы узнать больше – https://reviewfarmer.com/project/restaurant-ui-kit
В этой публикации мы сосредоточимся на интересных аспектах одной из самых актуальных тем современности. Совмещая факты и мнения экспертов, мы создадим полное представление о предмете, которое будет полезно как новичкам, так и тем, кто глубоко изучает вопрос.
Читать далее > – https://primenewsnet.com/restore-a-vanity-unit-to-create-a-super-stylish-piece-of-furniture
В обзорной статье вы найдете собрание важных фактов и аналитики по самым разнообразным темам. Мы рассматриваем как современные исследования, так и исторические контексты, чтобы вы могли получить полное представление о предмете. Погрузитесь в мир знаний и сделайте шаг к пониманию!
Подробнее – http://www.sincube.com/presskit/img_0331-copy-2
После прохождения детоксикации пациенту назначаются восстановительные процедуры, направленные на нормализацию обмена веществ и укрепление нервной системы. Программы клиники включают физиотерапию, витаминотерапию и индивидуальные занятия с психотерапевтом. Главная цель — восстановить способность организма к естественной саморегуляции и снизить зависимость от внешних раздражителей.
Исследовать вопрос подробнее – https://narkologicheskaya-clinika-v-kazani16.ru/narkologicheskaya-klinika-kazan-otzyvy/
Мы предлагаем вам окунуться в океан любопытных фактов и вдохновляющих историй. Эта публикация поможет расширить горизонты, разбудить интерес к науке и истории и увидеть мир с новой стороны.
Получить дополнительную информацию – https://primenewsnet.com/modern-bathroom-with-metro-rocks-large-plant-and-neutral-tiles
Эта статья полна интересного контента, который побудит вас исследовать новые горизонты. Мы собрали полезные факты и удивительные истории, которые обогащают ваше понимание темы. Читайте, погружайтесь в детали и наслаждайтесь процессом изучения!
Жми сюда — получишь ответ – https://ppku.ipb.ac.id/the-biggest-reset-looms-for-corporate-credit-market
В этом интересном тексте собраны обширные сведения, которые помогут вам понять различные аспекты обсуждаемой темы. Мы разбираем детали и факты, делая акцент на важности каждого элемента. Не упустите возможность расширить свои знания и взглянуть на мир по-новому!
Открыть полностью – http://winkler-martin.de/guestbook.html
Публикация предоставляет читателю набор разрозненных идей, которые сложно применить на практике. Мы лишь слегка касаемся разных точек зрения, не углубляясь в анализ и не предлагая никаких выводов.
Вот – [url=https://arma-rehab.ru/]эротика[/url]
В этой статье собраны факты, которые освещают целый ряд важных вопросов. Мы стремимся предложить читателям четкую, достоверную информацию, которая поможет сформировать собственное мнение и лучше понять сложные аспекты рассматриваемой темы.
Обратитесь за информацией – http://galaxy7777777.com/2022/10/24/%E3%83%8B%E3%83%83%E3%82%BB%E3%83%B3%E3%80%80%E3%80%8C%E3%82%B9%E3%83%BC%E3%83%91%E3%83%BC%E3%83%A2%E3%82%A4%E3%82%B9%E3%83%88%E3%83%BB%E3%82%B3%E3%83%A9%E3%83%BC%E3%82%B2%E3%83%B3%E3%80%8D%E3%80%80
В клинике применяются современные методы лечения, включающие медикаментозную терапию, психотерапию и физиологическое восстановление. Такой подход позволяет достигнуть стойкого результата и предотвратить возвращение к употреблению алкоголя.
Изучить вопрос глубже – [url=https://kapelnicza-ot-zapoya-v-nizhnem-novgorode16.ru/]капельница от запоя анонимно на дому в нижнем новгороде[/url]
Эти признаки не заменяют очной оценки, но помогают не рисковать временем. Если вы наблюдаете их у близкого или у себя, не откладывайте обращение — чем раньше начнётся управляемое вмешательство, тем меньше вероятность осложнений в первую ночь и на следующие сутки.
Подробнее – https://vyvod-iz-zapoya-v-chelyabinske16.ru/vyvod-iz-zapoya-chelyabinsk-czena
Качество — это не субъективные впечатления, а сравнение базовой линии с целевыми коридорами в обозначенных окнах. Мы ведём короткий отчёт по маркерам: переносимость воды (мл/ч), диурез, ЧСС/АД в покое, структура сна (длительность и число пробуждений), динамика по шкалам тошноты/тремора, выполнение двух утренних бытовых задач. Отчёт понятен пациенту: в нём нет лишней терминологии, только факты и решения — какой модуль снят, какой оставлен ещё на ночь, какой будет пересмотрен через 12–24 часа. Финансовая прозрачность следует той же логике: расширение проводится только по показаниям с указанием цели («какой маркер планируем улучшить») и окна переоценки («когда проверяем результат»).
Выяснить больше – http://narkologicheskaya-klinika-v-rostove-na-donu16.ru
Ниже — ориентировочная матрица первых часов. Она не заменяет очной оценки, но показывает, как мы переводим наблюдения в действия и какие критерии считаем достаточными для переключения модуля. Приведённые окна проверки помогают не тянуть с нужными корректировками и одновременно не «дергать» схему без повода.
Узнать больше – [url=https://narkologicheskaya-clinika-v-rostove-na-donu16.ru/]наркологическая клиника вывод из запоя ростов-на-дону[/url]
Капельница — это не «секретный коктейль», а набор узких модулей, каждый из которых отвечает за одну задачу. Мы включаем ровно один новый модуль за раз и заранее обозначаем стоп-критерий, чтобы не тянуть терапию «по инерции». Параллельно настраиваются поведенческие элементы: свет, тишина, дыхательные ритмы и «окна» питья. Это снимает часть нагрузки с организма и ускоряет наступление целевых маркеров.
Подробнее тут – [url=https://narkolog-na-dom-v-krasnodare16.ru/]врач нарколог на дом краснодар[/url]
Простая подготовка ускоряет принятие решений и повышает переносимость инфузии. Пожалуйста, сделайте это до приезда бригады — многие шаги занимают секунды, но экономят десятки минут в процессе.
Получить дополнительные сведения – [url=https://kapelnicza-ot-zapoya-v-chelyabinske16.ru/]врач на дом капельница от запоя челябинск[/url]
Главное — непрерывность и скорость принятия решений. Рядом врач и медсестра, доступ к диагностике и возможность точно настраивать темп инфузий, подбирать поддерживающие препараты, контролировать сон и уровень тревоги. Благодаря этому снижается риск осложнений, а восстановление идёт ровнее: меньше «качелей» днём и ночью.
Подробнее тут – [url=https://vyvod-iz-zapoya-sergiev-posad8.ru/]вывод из запоя сергиев[/url]
Медицина выравнивает физиологию, но устойчивость дают простые действия. Мы вместе составляем карту триггеров: вечерние «тёмные часы», задержки без еды, конфликты, привычные маршруты с «точками соблазна», недосып. На каждый триггер — короткий «буфер» на 20–40 минут: спокойная прогулка близко к дому, тёплый душ, лёгкая еда по расписанию, дыхательная практика, созвон с «своим» человеком. Эти шаги бесплатны и выполнимы, но именно они уменьшают импульсивность и количество «проверок себя». Отдельный акцент — на ночной сон: ранний отбой, минимум экранов, затемнение, никаких энергичных разговоров и «разборов». Когда поведенческая рамка задана в первый же день, эффект инфузий не «сгорает» к вечеру, а переводит состояние в предсказуемую стабилизацию, на базе которой уже можно обсуждать кодирование и реабилитационные шаги.
Изучить вопрос глубже – http://narkolog-na-dom-moskva999.ru/
Уменьшается тремор, выравнивается пульс, снижается тревожность, появляется способность уснуть. Важно не «перепроверять» эффект нагрузками и разговорами: когда вечер отделён от конфликтов и ярких экранов, организм закрепляет результат, а не «сжигает» его к полуночи.
Узнать больше – [url=https://narkolog-na-dom-mytishchi9.ru/]narkolog-na-dom-vyvod-iz-zapoya-cena[/url]
Первичная оценка строится на фактах. Врач коротко уточняет жалобы, длительность употребления, переносимость препаратов и аллергии, фиксирует давление, пульс, сатурацию, при необходимости делает экспресс-ЭКГ и скрининг неврологического статуса. Далее — объясняет на понятном языке логику назначений: зачем именно такая инфузионная схема, какие ощущения нормальны в течение часа и к ночи, как организовать питьевой режим и лёгкое питание «по силам». Мы избегаем «оглушающих» седативов: дозируем узко, чтобы не получить вечернего отката и побочных эффектов. После процедуры повторно оцениваем показатели, выдаём письменные рекомендации, согласуем окно связи и условия повторного визита. Семья получает простые правила поведения дома (тишина, затемнение, ограничение экранов, отсутствие «разборов») и сигналы, когда лучше позвать врача. Итог визита — управляемая ночь и предсказуемое утро, на котором можно строить следующие шаги.
Детальнее – [url=https://narkologicheskaya-klinika-podolsk9.ru/]narkologicheskaya-klinika-vrachi[/url]
Наркологическая клиника в Краснодаре специализируется на лечении алкогольной, наркотической и других видов зависимостей с использованием современных медицинских технологий и индивидуальных программ терапии. Работа специалистов направлена на устранение физической зависимости, восстановление психоэмоционального состояния и возвращение пациента к полноценной жизни. Все процедуры проводятся в безопасных условиях с соблюдением принципов анонимности и врачебной тайны.
Подробнее тут – [url=https://narkologicheskaya-klinika-v-krasnodare16.ru/]наркологические клиники алкоголизм в краснодаре[/url]
Капельницы в «ЧелМед Детокс» — это модульная конструкция, а не «микс на удачу». База — регидратация и коррекция электролитов. По показаниям добавляются антиэметики, антивегетативные средства, поддержка метаболизма, витамины группы B, магний. Отдельным блоком идёт ночной модуль: задача — собрать восстановительный сон, не «перелечивая» пациента. Каждый модуль имеет свою цель и стоп-критерий. Врач избегает одновременного запуска нескольких новых элементов, чтобы видеть причинно-следственную связь и точно понимать, что именно работает у конкретного человека.
Углубиться в тему – [url=https://vyvod-iz-zapoya-v-chelyabinske16.ru/]нарколог вывод из запоя[/url]
Этот обзор дает возможность взглянуть на историю и науку под новым углом. Мы представляем редкие факты, неожиданные связи и значимые события, которые помогут вам глубже понять развитие цивилизации и роль человека в ней.
Информация доступна здесь – https://velocafe.cz/mesta-na-kole-pardubice
В этом обзорном материале представлены увлекательные детали, которые находят отражение в различных аспектах жизни. Мы исследуем непонятные и интересные моменты, позволяя читателю увидеть картину целиком. Погрузитесь в мир знаний и удивительных открытий!
Где можно узнать подробнее? – https://tour-pedestre.fr/2024-news-n5-fin-du-certificat-medical-annonce-par-la-ffa
В этой статье вы найдете уникальные исторические пересечения с научными открытиями. Каждый абзац — это шаг к пониманию того, как наука и события прошлого создают основу для технологического будущего.
Кликни, не пожалеешь – https://fermentislife.com/why-private-label-gummy-supplements-are-a-smart-business-move
Публикация приглашает вас исследовать неизведанное — от древних тайн до современных достижений науки. Вы узнаете, как случайные находки превращались в революции, а смелые мысли — в новые эры человеческого прогресса.
Получить профессиональную консультацию – https://foodarts.jp/menu-2
В этом интересном тексте собраны обширные сведения, которые помогут вам понять различные аспекты обсуждаемой темы. Мы разбираем детали и факты, делая акцент на важности каждого элемента. Не упустите возможность расширить свои знания и взглянуть на мир по-новому!
Читать далее > – https://primenewsnet.com/best-things-you-can-do-on-a-solo-mountain-climb
В этой статье-обзоре мы соберем актуальную информацию и интересные факты, которые освещают важные темы. Читатели смогут ознакомиться с различными мнениями и подходами, что позволит им расширить кругозор и глубже понять обсуждаемые вопросы.
Эксклюзивная информация – https://aenj.org/october-2021-member-spotlight/member-spotlight-3
Эта публикация дает возможность задействовать различные источники информации и представить их в удобной форме. Читатели смогут быстро найти нужные данные и получить ответы на интересующие их вопросы. Мы стремимся к четкости и доступности материала для всех!
Не упусти важное! – http://evolutionbasketball.ca/matches/game-3
Этот обзор предлагает структурированное изложение информации по актуальным вопросам. Материал подан так, чтобы даже новичок мог быстро освоиться в теме и начать использовать полученные знания в практике.
Полная информация здесь – https://mygardenchannel.com/cold-stratification
Для наглядности приведена таблица с примерными направлениями терапии и их результатами:
Получить больше информации – [url=https://narcologicheskaya-klinika-v-chelyabinske16.ru/]платная наркологическая клиника челябинск[/url]
Эта познавательная публикация погружает вас в море интересного контента, который быстро захватит ваше внимание. Мы рассмотрим важные аспекты темы и предоставим вам уникальные Insights и полезные сведения для дальнейшего изучения.
Получить больше информации – https://mpwatt.com/building-intelligent-transportation-systems
Мы предлагаем вам окунуться в океан любопытных фактов и вдохновляющих историй. Эта публикация поможет расширить горизонты, разбудить интерес к науке и истории и увидеть мир с новой стороны.
Получить дополнительную информацию – https://virtueempress.com/spiritual-laziness
В этой статье вы найдете познавательную и занимательную информацию, которая поможет вам лучше понять мир вокруг. Мы собрали интересные данные, которые вдохновляют на размышления и побуждают к действиям. Открывайте новую информацию и получайте удовольствие от чтения!
Жми сюда — получишь ответ – https://mascotas.alimentosmor.com.sv/portfolio/animal-cares-purpose
Этот обзорный материал предоставляет информационно насыщенные данные, касающиеся актуальных тем. Мы стремимся сделать информацию доступной и структурированной, чтобы читатели могли легко ориентироваться в наших выводах. Познайте новое с нашим обзором!
Обратитесь за информацией – https://ventensis.lt/how-to-remember-the-stopping-and-breaking-distance-of-a-car
В этой статье-обзоре мы соберем актуальную информацию и интересные факты, которые освещают важные темы. Читатели смогут ознакомиться с различными мнениями и подходами, что позволит им расширить кругозор и глубже понять обсуждаемые вопросы.
Открыть полностью – https://maldensevierdaagsefeesten.nl/index.php/2022/04/19/how-to-make-more-dresses
Публикация предлагает уникальную подборку информации, которая будет интересна как специалистам, так и широкому кругу читателей. Здесь вы найдете ответы на часто задаваемые вопросы и полезные инсайты для дальнейшего применения.
Хочешь знать всё? – http://qoolinvestments.com/2025/03/16/hello-world
Мы предлагаем вам окунуться в океан любопытных фактов и вдохновляющих историй. Эта публикация поможет расширить горизонты, разбудить интерес к науке и истории и увидеть мир с новой стороны.
Не упусти шанс – https://tansio.net/cgi/board/_read_.cgi?mode=past&no=434
Эта статья сочетает познавательный и занимательный контент, что делает ее идеальной для любителей глубоких исследований. Мы рассмотрим увлекательные аспекты различных тем и предоставим вам новые знания, которые могут оказаться полезными в будущем.
Желаете узнать подробности? – https://wakuwaku-spirit.com/mistake
Этот информационный обзор станет отличным путеводителем по актуальным темам, объединяющим важные факты и мнения экспертов. Мы исследуем ключевые идеи и представляем их в доступной форме для более глубокого понимания. Читайте, чтобы оставаться в курсе событий!
Исследовать вопрос подробнее – https://loopenergia.com.br/mastering-time-management-key-to-business-success
Наркологическая клиника в клинике в Нижнем Новгороде специализируется на диагностике, лечении и реабилитации пациентов с алкогольной и наркотической зависимостью. Основная цель деятельности учреждения — восстановление физического здоровья и психологической устойчивости человека, оказавшегося в состоянии зависимости. В клинике применяются современные методы терапии, доказавшие эффективность в медицинской практике. Все процедуры проводятся конфиденциально, с соблюдением медицинских стандартов и под контролем квалифицированных специалистов.
Исследовать вопрос подробнее – [url=https://narkologicheskaya-clinika-v-nizhnem-novgorode16.ru/]запой наркологическая клиника нижний новгород[/url]
В этом информативном тексте представлены захватывающие события и факты, которые заставят вас задуматься. Мы обращаем внимание на важные моменты, которые часто остаются незамеченными, и предлагаем новые перспективы на привычные вещи. Подготовьтесь к тому, чтобы быть поглощенным увлекательными рассказами!
Неизвестные факты о… – https://miratoday.com/want-act-tv-commercials-heres-get-started
В этом материале представлены детали, которые хоть и занимательны, но не особенно значимы. Мы рассматриваем моменты, которые трудно назвать важными, но всё же решили включить их для полноты картины.
Вот – [url=https://arma-rehab.ru/]азартные игры на деньги[/url]
В этой публикации мы сосредоточимся на интересных аспектах одной из самых актуальных тем современности. Совмещая факты и мнения экспертов, мы создадим полное представление о предмете, которое будет полезно как новичкам, так и тем, кто глубоко изучает вопрос.
Более того — здесь – https://akornas.ac.id/bayu-ramasyah-juara-1-piala-kemenpora-kategori-kata-perorangan-senior-putra
Публикация предлагает читателю не просто информацию, а инструменты для анализа и саморазвития. Мы стимулируем критическое мышление, предлагая различные точки зрения и призывая к самостоятельному поиску решений.
Изучить рекомендации специалистов – https://agf24.pl/unlock-the-power-of-digital-marketing-our-services
В этом интересном тексте собраны обширные сведения, которые помогут вам понять различные аспекты обсуждаемой темы. Мы разбираем детали и факты, делая акцент на важности каждого элемента. Не упустите возможность расширить свои знания и взглянуть на мир по-новому!
Жми сюда — получишь ответ – https://museedefunes.fr/?lang=en
Этот информативный текст отличается привлекательным содержанием и актуальными данными. Мы предлагаем читателям взглянуть на привычные вещи под новым углом, предоставляя интересный и доступный материал. Получите удовольствие от чтения и расширьте кругозор!
Изучить вопрос глубже – https://aseelindustrial.com/al-khairat/7-ways-to-get-ready-for-a-business-contract
Мы не ограничиваемся капельницей. Сервис включает организационные, клинические и поведенческие элементы, которые уменьшают хаос и ускоряют восстановление. Ниже — ключевые блоки, которые пациенты отмечают в отзывах как наиболее полезные и «приземлённые».
Получить больше информации – [url=https://narkolog-na-dom-v-samare16.ru/]нарколог на дом вывод из запоя[/url]
Первая задача при выезде — быстро отделить угрозы от симптомов, которые можно безопасно стабилизировать на дому. Таблица ниже иллюстрирует, как стартовые наблюдения превращаются в проверяемые гипотезы, конкретные действия и решения в «окнах оценки». Она не заменяет очной диагностики, а объясняет архитектуру первых часов, чтобы у семьи был ясный ориентир.
Подробнее тут – http://narkolog-na-dom-v-krasnodare16.ru/krasnodar-narkologicheskij-czentr/
Круглосуточный формат критичен именно из-за «первой ночи»: в это окно нестабильны тревога, сон, вегетативная реактивность. Мы не «усиливаем всё сразу», а по одному параметру доводим систему до целевого коридора. Так удаётся избежать полипрагмазии и сохранить управляемость процесса: пациент и семья заранее знают, какие цифры считаются нормой, когда звонить дежурному, как организовать свет и тишину, чтобы ночное восстановление действительно состоялось.
Исследовать вопрос подробнее – https://narkologicheskaya-clinika-v-rostove-na-donu16.ru/narkologi-rostov-na-donu
?Brindemos por cada cazador de adrenalina !
Muchos jugadores destacan que mejores casas de apuestas sin dni en espaГ±a facilita depГіsitos rГЎpidos sin necesidad de enviar documentos. [url=https://clinicadentalcorralyvargas.com/#][/url]. Este enfoque prГЎctico atrae a quienes buscan inmediatez. La navegaciГіn en estas plataformas suele ser especialmente intuitiva.
Las casas de apuestas sin registro dni ofrecen una experiencia rГЎpida para quienes buscan apostar sin complicaciones desde el primer momento. Muchos usuarios valoran la libertad que brindan estas plataformas al evitar trГЎmites largos. La facilidad de acceso es uno de sus mayores atractivos.
Razones para elegir mejores casas de apuestas sin dni en espaГ±a y apos – clinicadentalcorralyvargas.com
?Que la fortuna te sonria con experimentando formidables jugadas afortunadas !
Каждый профиль решает одну задачу и имеет ожидаемую динамику. Мы избегаем параллельных «усилений», чтобы не «замазывать» вклад отдельного шага и не перегружать организм.
Подробнее – https://narkologicheskaya-pomoshh-v-kazani16.ru/
Ниже — сводный ориентир по этапам. Это не жёсткий график, а понятная канва процесса, которую врач адаптирует под клиническую картину.
Получить дополнительные сведения – [url=https://narkolog-na-dom-voskresensk8.ru/]narkolog-i-psihiatr-voskresensk[/url]
Маршрут помощи строится вокруг конкретных задач безопасности. С первого звонка администратор собирает короткий чек-лист: длительность нынешнего эпизода, что принималось в последние двое суток, хронические заболевания, аллергии, как прошла ночь, есть ли помощник на вечер и ночь. Дежурный врач, опираясь на эти данные, предлагает стартовый формат — выезд на дом по Воскресенску и району или немедленную госпитализацию. Решение привязывается к реальным рискам: стабильность давления и пульса, выраженность тремора и тошноты, эпизоды судорог в прошлом, возможность обеспечить «тихий режим» в квартире. После очной оценки и допуска к терапии мы запускаем детокс, а по завершении визита фиксируем правила на 24–48 часов и контрольные точки. Если состояние колеблется, сразу обсуждаем повторный контакт либо перевод в стационар, не теряя часы на бюрократию.
Исследовать вопрос подробнее – [url=https://narkologicheskaya-klinika-voskresensk8.ru/]московские наркологические клиники[/url]
Капельница от запоя в стационаре — эффективный способ детоксикации. Мы используем современные препараты для быстрого и безопасного выведения из запоя.
Узнать больше – [url=https://https://vyvod-iz-zapoya-v-stacionare-balashiha12.ru//]вывод из запоя круглосуточно балашиха[/url]
Анонимность и конфиденциальность гарантированы. Мы обеспечиваем полную анонимность и конфиденциальность на всех этапах лечения.
Выяснить больше – [url=https://https://vyvod-iz-zapoya-himki12.ru//]вывод из запоя капельница[/url]
Реабилитация после запоя в стационаре Балашихи. Мы поможем вам восстановиться после запоя и предотвратить рецидивы.
Ознакомиться с деталями – [url=https://https://vyvod-iz-zapoya-v-stacionare-balashiha13.ru//]вывод из запоя вызов на дом в балашихе[/url]
Вызов нарколога на дом — это не «универсальная капельница», а управляемая последовательность маленьких шагов с понятными целями и точками проверки. В наркологической клинике «КубаньМед Резолюция» выезд врача, инфузионная поддержка и лечение зависимостей складываются в дорожную карту: мы начинаем с короткого триежа, формулируем рабочую гипотезу, включаем минимально достаточный модуль, назначаем «окно оценки» и только затем либо выключаем модуль, либо изменяем одну переменную. Такой подход снижает фармаконагрузку, предотвращает полипрагмазыю и делает динамику прозрачной: пациент и семья видят, что именно помогает и когда вмешательство завершается.
Получить дополнительную информацию – [url=https://narkolog-na-dom-v-krasnodare16.ru/]нарколог на дом недорого в краснодаре[/url]
В Казани дежурят мобильные бригады, покрывающие центральные районы и спальные кварталы. Координатор по телефону собирает лишь данные, влияющие на безопасность: текущие лекарства и дозировки, аллергии, эпизоды судорог/психозов в анамнезе, последние значения АД/ЧСС, температуру, а также бытовые условия — место полулёжа, доступ к розетке, возможность «тихого окна» на 2–3 часа. Врач приезжает быстро, но спокойно; вместо суеты — последовательность и аккуратные действия. Визит начинается с очного осмотра, где фиксируются исходные показатели и выбирается контур терапии. Далее выполняется тест переносимости и только затем — основной инфузионный этап. По завершении пациент получает «вечерний протокол» с простыми ритуалами: приглушить свет, проветрить комнату, исключить экраны за час до сна, пить воду малыми глотками.
Разобраться лучше – [url=https://narkologicheskaya-pomoshh-v-kazani16.ru/]оказание наркологической помощи[/url]
Чтобы сделать процесс понятным и управляемым, каждый шаг сопровождается измеримыми маркерами безопасности и эффективности. Корректировки — точечные, по правилу «одного изменения», что позволяет видеть вклад каждого действия и сохранять переносимость.
Исследовать вопрос подробнее – [url=https://narkologicheskaya-pomoshh-v-kazani16.ru/]нарколог наркологическая помощь казань[/url]
Срочная наркологическая помощь — это не «универсальная капельница», а управляемый клинический процесс, где каждое действие проверяется измеримыми маркерами и выполняется в правильной последовательности. В наркологической клинике «ВолгаМед Альтернатива» маршрут выстроен вокруг принципа минимально достаточных вмешательств: сначала безопасный старт и телескрининг, затем очный осмотр с выбором контура инфузии и, только после теста переносимости, — основная терапия. Такой подход уменьшает реактивность организма, снижает риск побочных ощущений и делает результат предсказуемым для пациента и близких. Команда работает круглосуточно, выезжает на немаркированном транспорте, общение ведётся через одного доверенного человека, а документы оформляются в нейтральной терминологии без стигматизирующих формулировок.
Выяснить больше – [url=https://narkologicheskaya-pomoshh-v-kazani16.ru/]круглосуточная наркологическая помощь[/url]
В Казани дежурят мобильные бригады, покрывающие центральные районы и спальные кварталы. Координатор по телефону собирает лишь данные, влияющие на безопасность: текущие лекарства и дозировки, аллергии, эпизоды судорог/психозов в анамнезе, последние значения АД/ЧСС, температуру, а также бытовые условия — место полулёжа, доступ к розетке, возможность «тихого окна» на 2–3 часа. Врач приезжает быстро, но спокойно; вместо суеты — последовательность и аккуратные действия. Визит начинается с очного осмотра, где фиксируются исходные показатели и выбирается контур терапии. Далее выполняется тест переносимости и только затем — основной инфузионный этап. По завершении пациент получает «вечерний протокол» с простыми ритуалами: приглушить свет, проветрить комнату, исключить экраны за час до сна, пить воду малыми глотками.
Получить дополнительные сведения – [url=https://narkologicheskaya-pomoshh-v-kazani16.ru/]наркологическая помощь на дому круглосуточно казань[/url]
Корректная среда — половина успешной инфузии. Этот порядок действий помогает врачу быстрее принять решения, а пациенту — легче перенести первые часы.
Детальнее – [url=https://narkolog-na-dom-v-samare16.ru/]запой нарколог на дом[/url]
Конфиденциальность обеспечивается процессом: нейтральные формулировки в документах, минимум персональных данных, немаркированные формы и транспорт, отдельный вход, «короткие» переговоры у двери, единый контакт по медицинским вопросам. Внутри команды действует «язык цифр» — витальные показатели, шкалы, интервалы питья и сна, окна проверки. Это исключает лишние обсуждения и защищает от распространения деликатной информации за пределы клинического круга.
Получить дополнительные сведения – [url=https://narkologicheskaya-clinika-v-rostove-na-donu16.ru/]наркологическая клиника лечение алкоголизма[/url]
?Levantemos nuestras copas por cada simbolo de la suerte !
Cada dГa aumenta la popularidad de casinos online fuera de espana entre quienes desean mayor libertad. casino fuera de espaГ±a Ofrecen anonimato, diversidad de proveedores y transacciones ГЎgiles. Por lo tanto casinos online fuera de espana continГєa expandiГ©ndose dentro del mercado global.
Los aficionados al juego eligen casino por fuera cuando desean evitar restricciones locales. Brindan acceso a promociones variables y a juegos exclusivos del mercado internacional. Por eso casino por fuera mantiene su reputaciГіn como plataforma versГЎtil y moderna.
casinos online fuera de espana: Las mejores estrategias para casinos online fuera de espana – п»їhttps://bodegaslasangrederonda.es/en/
?Que la fortuna te acompane con momentos increibles rondas electrizantes !
Этот обзор позволяет по-новому взглянуть на вещи, на которые обычно и так смотрят. Мы упоминаем факты, которые мало что меняют, и события, значение которых трудно определить, но они всё равно здесь.
Вот – [url=https://arma-rehab.ru/]бесплатные вращения в слотах[/url]
Для наглядности представлена таблица с основными направлениями терапии и их эффектами:
Получить больше информации – [url=https://narkologicheskaya-klinika-v-krasnodare16.ru/]наркологическая клиника наркологический центр краснодар[/url]
В этом материале представлены детали, которые хоть и занимательны, но не особенно значимы. Мы рассматриваем моменты, которые трудно назвать важными, но всё же решили включить их для полноты картины.
Вот – [url=https://arma-rehab.ru/]взрослые игры[/url]
Лечебная логика строится по принципу «одна цель — один маркер — одно окно оценки — один выключатель». Например, задача «открыть окно питья» решается антиеметическим мостом и мягкой регидратацией; как только вода пьётся без позывов и появляется стабильный диурез, модуль отключается. Если целевой маркер «ЧСС/АД в рабочем коридоре» достигнут — снимаем антивегетативный контур. Это дисциплина маленьких шагов, где каждый следующий ход становится очевидным из предыдущих цифр, а не из ожиданий.
Углубиться в тему – [url=https://narkolog-na-dom-v-krasnodare16.ru/]психиатр нарколог на дом краснодар[/url]
Помощь при алкогольной интоксикации в Химках. Наши специалисты проведут необходимые процедуры для снятия симптомов интоксикации.
Подробнее можно узнать тут – [url=https://https://vyvod-iz-zapoya-himki12.ru//]вывод из запоя клиника химки[/url]
IQOS представляет собой инновационный продукт для работы с нагреваемым табаком.
В отличие от обычных сигарет, здесь используется принцип нагрева.
Многие пользователи отмечают, что такой формат характеризуется изменённым ароматом.
Устройство отличается простым управлением, что делает его подходящим для повседневного применения.
Продуманная конструкция позволяет IQOS органично вписываться в повседневную жизнь.
Производитель уделяет внимание деталям конструкции, что повышает комфорт эксплуатации.
Правильный уход помогает сохранять функциональность устройства.
Таким образом, IQOS остаётся технологичным продуктом для тех, кто интересуется подобными технологиями.
https://terea777.shop/kerch/category/fondz
Вывод из запоя у пожилых людей в стационаре Балашихи. Наши специалисты учитывают возрастные изменения организма при назначении лечения.
Детальнее – [url=https://https://vyvod-iz-zapoya-v-stacionare-balashiha12.ru//]наркология вывод из запоя[/url]
Вызов нарколога на дом — это не «универсальная капельница», а управляемая последовательность маленьких шагов с понятными целями и точками проверки. В наркологической клинике «КубаньМед Резолюция» выезд врача, инфузионная поддержка и лечение зависимостей складываются в дорожную карту: мы начинаем с короткого триежа, формулируем рабочую гипотезу, включаем минимально достаточный модуль, назначаем «окно оценки» и только затем либо выключаем модуль, либо изменяем одну переменную. Такой подход снижает фармаконагрузку, предотвращает полипрагмазыю и делает динамику прозрачной: пациент и семья видят, что именно помогает и когда вмешательство завершается.
Подробнее – [url=https://narkolog-na-dom-v-krasnodare16.ru/]нарколог на дом клиника в краснодаре[/url]
Снятие ломки при алкоголизме в стационаре Балашихи. Наши специалисты помогут вам справиться с симптомами абстиненции.
Получить больше информации – [url=https://https://vyvod-iz-zapoya-v-stacionare-balashiha13.ru//]вывод из запоя капельница на дому в балашихе[/url]
Корректная среда — половина успешной инфузии. Этот порядок действий помогает врачу быстрее принять решения, а пациенту — легче перенести первые часы.
Подробнее – http://narkolog-na-dom-v-samare16.ru
Мы собираем терапию как конструктор из узких модулей. Каждый модуль запускается только при показаниях и выключается сразу после достижения цели — это защищает от «инерции лечения» и возвращает организму пространство для самостоятельной регуляции. Ниже — ориентировочная сетка модулей; фактический состав и дозировки определяет врач на очном осмотре.
Исследовать вопрос подробнее – https://narkologicheskaya-clinika-v-rostove-na-donu16.ru/narkologiya-rostov-zapadnyj-rajon/
Чтобы сделать процесс понятным и управляемым, каждый шаг сопровождается измеримыми маркерами безопасности и эффективности. Корректировки — точечные, по правилу «одного изменения», что позволяет видеть вклад каждого действия и сохранять переносимость.
Изучить вопрос глубже – https://narkologicheskaya-pomoshh-v-kazani16.ru/narkologiya-anonimno-kazan
Мы не ограничиваемся капельницей. Сервис включает организационные, клинические и поведенческие элементы, которые уменьшают хаос и ускоряют восстановление. Ниже — ключевые блоки, которые пациенты отмечают в отзывах как наиболее полезные и «приземлённые».
Разобраться лучше – [url=https://narkolog-na-dom-v-samare16.ru/]нарколог на дом в самаре[/url]
Вывод из запоя у подростков в стационаре Балашихи. Мы предлагаем специализированное лечение для подростков, учитывая их возрастные особенности.
Выяснить больше – [url=https://https://vyvod-iz-zapoya-v-stacionare-balashiha11.ru//]срочный вывод из запоя в балашихе[/url]
Для жителей Ростова-на-Дону клиника работает по схеме «тихих маршрутов»: отдельный вход с нейтральной табличкой, окна записи в невызывающие подозрений часы, немаркированный подъезд автомобиля при выездном визите. На первом звонке диспетчер собирает только то, что влияет на безопасность: эпизоды рвоты, ЧСС/АД, ночные панические эпизоды, сопутствующие препараты, аллергии, наличие хронических заболеваний сердца. Личные и социальные детали не запрашиваются — мы придерживаемся принципа «минимально необходимой информации». По прибытии врача фиксируются базовая линия (сознание, дыхание, SpO?, температура), шкалы симптомов и переносимость небольших объёмов воды. Дальше — один точный шаг, одно «окно проверки» и прозрачное решение: продолжать модуль, модифицировать одну переменную или выключить блок.
Разобраться лучше – [url=https://narkologicheskaya-clinika-v-rostove-na-donu16.ru/]наркологическая клиника в ростове-на-дону[/url]
Профилактика рецидивов после запоя в Химках.Мы поможем вам предотвратить повторные случаи запоя и поддержим вас на пути к трезвой жизни.
Получить больше информации – [url=https://https://vyvod-iz-zapoya-himki11.ru//]вывод из запоя на дому круглосуточно химки[/url]
Капельница — это не «секретный коктейль», а набор узких модулей, каждый из которых отвечает за одну задачу. Мы включаем ровно один новый модуль за раз и заранее обозначаем стоп-критерий, чтобы не тянуть терапию «по инерции». Параллельно настраиваются поведенческие элементы: свет, тишина, дыхательные ритмы и «окна» питья. Это снимает часть нагрузки с организма и ускоряет наступление целевых маркеров.
Углубиться в тему – [url=https://narkolog-na-dom-v-krasnodare16.ru/]вызов врача нарколога на дом краснодар[/url]
Первая задача при выезде — быстро отделить угрозы от симптомов, которые можно безопасно стабилизировать на дому. Таблица ниже иллюстрирует, как стартовые наблюдения превращаются в проверяемые гипотезы, конкретные действия и решения в «окнах оценки». Она не заменяет очной диагностики, а объясняет архитектуру первых часов, чтобы у семьи был ясный ориентир.
Подробнее тут – [url=https://narkolog-na-dom-v-krasnodare16.ru/]нарколог на дом круглосуточно цены краснодар[/url]
Чтобы сделать процесс понятным и управляемым, каждый шаг сопровождается измеримыми маркерами безопасности и эффективности. Корректировки — точечные, по правилу «одного изменения», что позволяет видеть вклад каждого действия и сохранять переносимость.
Подробнее – https://narkologicheskaya-pomoshh-v-kazani16.ru/narkologiya-anonimno-kazan
Чтобы сделать процесс понятным и управляемым, каждый шаг сопровождается измеримыми маркерами безопасности и эффективности. Корректировки — точечные, по правилу «одного изменения», что позволяет видеть вклад каждого действия и сохранять переносимость.
Изучить вопрос глубже – https://narkologicheskaya-pomoshh-v-kazani16.ru/narkolog-kazan-kruglosutochno
Вызов нарколога на дом — это не «универсальная капельница», а управляемая последовательность маленьких шагов с понятными целями и точками проверки. В наркологической клинике «КубаньМед Резолюция» выезд врача, инфузионная поддержка и лечение зависимостей складываются в дорожную карту: мы начинаем с короткого триежа, формулируем рабочую гипотезу, включаем минимально достаточный модуль, назначаем «окно оценки» и только затем либо выключаем модуль, либо изменяем одну переменную. Такой подход снижает фармаконагрузку, предотвращает полипрагмазыю и делает динамику прозрачной: пациент и семья видят, что именно помогает и когда вмешательство завершается.
Узнать больше – http://narkolog-na-dom-v-krasnodare16.ru
Помощь при алкогольной интоксикации в Химках. Наши специалисты проведут необходимые процедуры для снятия симптомов интоксикации.
Узнать больше – [url=https://https://vyvod-iz-zapoya-himki12.ru//]вывод из запоя на дому цена[/url]
Лечение зависимости от алкоголя в стационаре Балашихи. Наши специалисты приедут к вам домой и проведут все необходимые процедуры.
Получить дополнительные сведения – [url=https://https://vyvod-iz-zapoya-v-stacionare-balashiha12.ru//]нарколог на дом вывод из запоя балашиха[/url]
Чтобы сделать процесс понятным и управляемым, каждый шаг сопровождается измеримыми маркерами безопасности и эффективности. Корректировки — точечные, по правилу «одного изменения», что позволяет видеть вклад каждого действия и сохранять переносимость.
Получить дополнительные сведения – [url=https://narkologicheskaya-pomoshh-v-kazani16.ru/]срочная наркологическая помощь[/url]
Кодирование от алкоголизма в Химках. Мы предлагаем различные методы кодирования, подходящие для каждого пациента.
Получить больше информации – [url=https://https://vyvod-iz-zapoya-himki12.ru//]помощь вывод из запоя[/url]
Этот обзор позволяет по-новому взглянуть на вещи, на которые обычно и так смотрят. Мы упоминаем факты, которые мало что меняют, и события, значение которых трудно определить, но они всё равно здесь.
Вот – [url=https://arma-rehab.ru/]покер онлайн[/url]
В данной публикации мы поговорим о процессе восстановления от зависимости, о том, как вернуть себе нормальную жизнь. Мы обсудим преодоление трудностей, значимость поддержки и наличие программ реабилитации. Читатели смогут узнать о ключевых шагах к успешному восстановлению.
Подробнее тут – [url=https://i-klinik.ru/]наркология вывод из запоя москва[/url]
Снятие ломки при алкоголизме в стационаре Балашихи. Наши специалисты помогут вам справиться с симптомами абстиненции.
Получить дополнительную информацию – [url=https://https://vyvod-iz-zapoya-v-stacionare-balashiha12.ru//]вывод из запоя на дому цена[/url]
Лечебная логика строится по принципу «одна цель — один маркер — одно окно оценки — один выключатель». Например, задача «открыть окно питья» решается антиеметическим мостом и мягкой регидратацией; как только вода пьётся без позывов и появляется стабильный диурез, модуль отключается. Если целевой маркер «ЧСС/АД в рабочем коридоре» достигнут — снимаем антивегетативный контур. Это дисциплина маленьких шагов, где каждый следующий ход становится очевидным из предыдущих цифр, а не из ожиданий.
Изучить вопрос глубже – [url=https://narkolog-na-dom-v-krasnodare16.ru/]нарколог на дом вывод краснодар[/url]
В этом материале представлены детали, которые хоть и занимательны, но не особенно значимы. Мы рассматриваем моменты, которые трудно назвать важными, но всё же решили включить их для полноты картины.
Вот – [url=https://arma-rehab.ru/]бесплатные вращения в слотах[/url]
Вывод из запоя у подростков в стационаре Балашихи. Мы предлагаем специализированное лечение для подростков, учитывая их возрастные особенности.
Изучить вопрос глубже – [url=https://https://vyvod-iz-zapoya-v-stacionare-balashiha13.ru//]наркологический вывод из запоя в балашихе[/url]
Ниже — рабочая матрица на первые часы. Она показывает, как клиническая гипотеза превращается в минимальный шаг, какие индикаторы берём под контроль и по какому сигналу меняем тактику или площадку. Таблица не заменяет очную оценку, но делает логику маршрута ясной для всей семьи.
Подробнее тут – [url=https://narkolog-na-dom-v-samare16.ru/]нарколог на дом анонимно в самаре[/url]
В этой медицинской статье мы погрузимся в актуальные вопросы здравоохранения и лечения заболеваний. Читатели узнают о современных подходах, методах диагностики и новых открытий в научных исследованиях. Наша цель — донести важную информацию и повысить уровень осведомленности о здоровье.
Разобраться лучше – [url=https://i-klinik.ru/]вывод из запоя на дому в москве[/url]
Эта схема помогает постепенно вывести пациента из кризисного состояния, снизить риски осложнений и закрепить результаты лечения.
Изучить вопрос глубже – [url=https://narkologicheskaya-klinika-v-krasnodare16.ru/]наркологическая клиника наркологический центр[/url]
В этом тексте собрано множество случайных сведений и довольно неопределённых мыслей, которые могут чем-то заинтересовать. Мы отмечаем моменты, которые не особенно важны, но всё же занимают своё место в повествовании.
Вот – [url=https://arma-rehab.ru/vyvod-iz-zapoya/]секс знакомства[/url]
Ниже — рабочая матрица на первые часы. Она показывает, как клиническая гипотеза превращается в минимальный шаг, какие индикаторы берём под контроль и по какому сигналу меняем тактику или площадку. Таблица не заменяет очную оценку, но делает логику маршрута ясной для всей семьи.
Выяснить больше – [url=https://narkolog-na-dom-v-samare16.ru/]врач нарколог выезд на дом в самаре[/url]
В данной публикации мы поговорим о процессе восстановления от зависимости, о том, как вернуть себе нормальную жизнь. Мы обсудим преодоление трудностей, значимость поддержки и наличие программ реабилитации. Читатели смогут узнать о ключевых шагах к успешному восстановлению.
Детальнее – [url=https://i-klinik.ru/]нарколог вывод из запоя москва[/url]
Вызов нарколога на дом — это не «капельница как панацея», а управляемая последовательность решений с ясными целями, измеримыми маркерами и понятными «окнами оценки». В «СамарМед Ассист» мы строим лечение из узких модулей: сначала проверяем базовую безопасность (дыхание, сознание, гемодинамика), затем возвращаем переносимость питья, стабилизируем вегетатику, собираем ночь, и только после этого занимаемся дневной выносливостью и бытовой устойчивостью. Такой ритм исключает полипрагмазию, снижает фармаконагрузку и превращает первые часы из хаотичной «борьбы с симптомами» в спокойный, предсказуемый маршрут. Семья получает роль партнёра, а не наблюдателя: по простым ориентирам понятно, что считать нормой, когда звонить врачу и на каком этапе модуль следует «выключить».
Подробнее тут – [url=https://narkolog-na-dom-v-samare16.ru/]вызвать нарколога на дом срочно самара[/url]
Конфиденциальность обеспечивается процессом: нейтральные формулировки в документах, минимум персональных данных, немаркированные формы и транспорт, отдельный вход, «короткие» переговоры у двери, единый контакт по медицинским вопросам. Внутри команды действует «язык цифр» — витальные показатели, шкалы, интервалы питья и сна, окна проверки. Это исключает лишние обсуждения и защищает от распространения деликатной информации за пределы клинического круга.
Узнать больше – [url=https://narkologicheskaya-clinika-v-rostove-na-donu16.ru/]платная наркологическая клиника в ростове-на-дону[/url]
Лечение в клинике строится на комплексной программе, которая сочетает медикаментозную терапию, психотерапевтические методы и социальную реабилитацию. Такой подход обеспечивает устойчивый результат и предотвращает повторные срывы. Пациент проходит курс под постоянным контролем специалистов, что позволяет отслеживать динамику состояния и корректировать терапию при необходимости.
Узнать больше – https://narkologicheskaya-klinika-v-krasnodare16.ru/chastnaya-narkologicheskaya-klinika-krasnodar
Эта схема помогает постепенно вывести пациента из кризисного состояния, снизить риски осложнений и закрепить результаты лечения.
Детальнее – [url=https://narkologicheskaya-klinika-v-krasnodare16.ru/]анонимная наркологическая клиника краснодар[/url]
Состояния при зависимостях чувствительны к времени суток и среде. К ночи нарастает тревога, усиливается тремор, нестабильны показатели ЧСС/АД. Круглосуточный приём позволяет выстроить «мост» через самые сложные часы: собрать сон без избыточной фармаконагрузки, сделать короткие чек-ины, вовремя ретитровать один параметр (свет, дыхательные ритмы, интервалы питья), а утром оформить «малые победы» — гигиена и 10–15 минут тихой ходьбы. Эти простые маркеры часто надёжнее любых субъективных оценок «как себя чувствую».
Узнать больше – [url=https://narkologicheskaya-clinika-v-rostove-na-donu16.ru/]наркологическая клиника в ростове-на-дону[/url]
Чтобы сделать процесс понятным и управляемым, каждый шаг сопровождается измеримыми маркерами безопасности и эффективности. Корректировки — точечные, по правилу «одного изменения», что позволяет видеть вклад каждого действия и сохранять переносимость.
Получить дополнительную информацию – https://narkologicheskaya-pomoshh-v-kazani16.ru/narkologiya-anonimno-kazan
Профилактика рецидивов после запоя в стационаре Балашихи. Мы поможем вам предотвратить повторные случаи запоя и поддержим вас на пути к трезвой жизни.
Исследовать вопрос подробнее – [url=https://https://vyvod-iz-zapoya-v-stacionare-balashiha13.ru//]вывод из запоя на дому цена в балашихе[/url]
Состояния при зависимостях чувствительны к времени суток и среде. К ночи нарастает тревога, усиливается тремор, нестабильны показатели ЧСС/АД. Круглосуточный приём позволяет выстроить «мост» через самые сложные часы: собрать сон без избыточной фармаконагрузки, сделать короткие чек-ины, вовремя ретитровать один параметр (свет, дыхательные ритмы, интервалы питья), а утром оформить «малые победы» — гигиена и 10–15 минут тихой ходьбы. Эти простые маркеры часто надёжнее любых субъективных оценок «как себя чувствую».
Получить дополнительную информацию – [url=https://narkologicheskaya-clinika-v-rostove-na-donu16.ru/]наркологическая клиника стационар[/url]
Лечебная логика строится по принципу «одна цель — один маркер — одно окно оценки — один выключатель». Например, задача «открыть окно питья» решается антиеметическим мостом и мягкой регидратацией; как только вода пьётся без позывов и появляется стабильный диурез, модуль отключается. Если целевой маркер «ЧСС/АД в рабочем коридоре» достигнут — снимаем антивегетативный контур. Это дисциплина маленьких шагов, где каждый следующий ход становится очевидным из предыдущих цифр, а не из ожиданий.
Углубиться в тему – [url=https://narkolog-na-dom-v-krasnodare16.ru/]выезд нарколога на дом краснодар[/url]
Корректная среда — половина успешной инфузии. Этот порядок действий помогает врачу быстрее принять решения, а пациенту — легче перенести первые часы.
Получить дополнительную информацию – https://narkolog-na-dom-v-samare16.ru/narkolog-samara-vyzov-na-dom/
Лечение запоя без госпитализации в Люберцах. Мы предлагаем лечение на дому, без необходимости госпитализации.
Подробнее можно узнать тут – [url=https://https://kapelnica-ot-zapoya-lyubercy13.ru//]врача капельницу от запоя[/url]
В этом тексте собрано множество случайных сведений и довольно неопределённых мыслей, которые могут чем-то заинтересовать. Мы отмечаем моменты, которые не особенно важны, но всё же занимают своё место в повествовании.
Вот – [url=https://arma-rehab.ru/]джекпот[/url]
Этот краткий обзор предлагает сжатую информацию из области медицины, включая ключевые факты и последние новости. Мы стремимся сделать информацию доступной и понятной для широкой аудитории, что позволит читателям оставаться в курсе актуальных событий в здравоохранении.
Выяснить больше – [url=https://i-klinik.ru/]вывод из запоя с выездом в москве[/url]
Круглосуточный формат критичен именно из-за «первой ночи»: в это окно нестабильны тревога, сон, вегетативная реактивность. Мы не «усиливаем всё сразу», а по одному параметру доводим систему до целевого коридора. Так удаётся избежать полипрагмазии и сохранить управляемость процесса: пациент и семья заранее знают, какие цифры считаются нормой, когда звонить дежурному, как организовать свет и тишину, чтобы ночное восстановление действительно состоялось.
Подробнее – [url=https://narkologicheskaya-clinika-v-rostove-na-donu16.ru/]платная наркологическая клиника в ростове-на-дону[/url]
Первая задача при выезде — быстро отделить угрозы от симптомов, которые можно безопасно стабилизировать на дому. Таблица ниже иллюстрирует, как стартовые наблюдения превращаются в проверяемые гипотезы, конкретные действия и решения в «окнах оценки». Она не заменяет очной диагностики, а объясняет архитектуру первых часов, чтобы у семьи был ясный ориентир.
Узнать больше – http://narkolog-na-dom-v-krasnodare16.ru/narkologa-na-dom-krasnodar/https://narkolog-na-dom-v-krasnodare16.ru
Вызов нарколога на дом — это не «универсальная капельница», а управляемая последовательность маленьких шагов с понятными целями и точками проверки. В наркологической клинике «КубаньМед Резолюция» выезд врача, инфузионная поддержка и лечение зависимостей складываются в дорожную карту: мы начинаем с короткого триежа, формулируем рабочую гипотезу, включаем минимально достаточный модуль, назначаем «окно оценки» и только затем либо выключаем модуль, либо изменяем одну переменную. Такой подход снижает фармаконагрузку, предотвращает полипрагмазыю и делает динамику прозрачной: пациент и семья видят, что именно помогает и когда вмешательство завершается.
Изучить вопрос глубже – http://narkolog-na-dom-v-krasnodare16.ru/
Наркологическая клиника в Краснодаре специализируется на лечении алкогольной, наркотической и других видов зависимостей с использованием современных медицинских технологий и индивидуальных программ терапии. Работа специалистов направлена на устранение физической зависимости, восстановление психоэмоционального состояния и возвращение пациента к полноценной жизни. Все процедуры проводятся в безопасных условиях с соблюдением принципов анонимности и врачебной тайны.
Подробнее тут – [url=https://narkologicheskaya-klinika-v-krasnodare16.ru/]частная наркологическая клиника[/url]
Ниже — рабочая матрица на первые часы. Она показывает, как клиническая гипотеза превращается в минимальный шаг, какие индикаторы берём под контроль и по какому сигналу меняем тактику или площадку. Таблица не заменяет очную оценку, но делает логику маршрута ясной для всей семьи.
Подробнее – [url=https://narkolog-na-dom-v-samare16.ru/]частный нарколог на дом самара[/url]
Лечение запоя без госпитализации в стационаре Балашихи. Мы предлагаем лечение на дому, без необходимости госпитализации.
Подробнее тут – [url=https://https://vyvod-iz-zapoya-v-stacionare-balashiha12.ru//]вывод из запоя на дому недорого в балашихе[/url]
Капельница от запоя — эффективный способ детоксикации. Мы используем современные препараты для быстрого и безопасного выведения из запоя.
Получить дополнительную информацию – [url=https://https://vyvod-iz-zapoya-himki12.ru//]вывод из запоя на дому цена в химках[/url]
Модель типа «раздеватор» — это алгоритм искусственного интеллекта, которая анализирует изображения.
Она использует методы машинного обучения для генерации альтернативных визуальных вариантов.
Работа таких систем основана на выявлении визуальных особенностей.
Подобные нейросети привлекают внимание в контексте современных цифровых технологий.
раздеватор нейросеть
При этом важно учитывать границы допустимого и защиту личных данных.
Применение подобных решений требует осознанного отношения.
Многие эксперты подчёркивают, что технологии нуждаются в регулировании.
Таким образом, нейросеть-раздеватор является примером возможностей ИИ, который нуждается в внимательном отношении.
Лечение запоя без госпитализации в стационаре Балашихи. Мы предлагаем лечение на дому, без необходимости госпитализации.
Получить дополнительную информацию – [url=https://https://vyvod-iz-zapoya-v-stacionare-balashiha11.ru//]нарколог вывод из запоя балашиха[/url]
Круглосуточная помощь при запое в стационаре Балашихи. Мы работаем 24/7, обеспечивая доступность медицинской помощи в любое время суток.
Исследовать вопрос подробнее – [url=https://https://vyvod-iz-zapoya-v-stacionare-balashiha12.ru//]вывод из запоя вызов на дом в балашихе[/url]
Эта схема помогает постепенно вывести пациента из кризисного состояния, снизить риски осложнений и закрепить результаты лечения.
Детальнее – [url=https://narkologicheskaya-klinika-v-krasnodare16.ru/]наркологическая клиника краснодар[/url]
Для жителей Ростова-на-Дону клиника работает по схеме «тихих маршрутов»: отдельный вход с нейтральной табличкой, окна записи в невызывающие подозрений часы, немаркированный подъезд автомобиля при выездном визите. На первом звонке диспетчер собирает только то, что влияет на безопасность: эпизоды рвоты, ЧСС/АД, ночные панические эпизоды, сопутствующие препараты, аллергии, наличие хронических заболеваний сердца. Личные и социальные детали не запрашиваются — мы придерживаемся принципа «минимально необходимой информации». По прибытии врача фиксируются базовая линия (сознание, дыхание, SpO?, температура), шкалы симптомов и переносимость небольших объёмов воды. Дальше — один точный шаг, одно «окно проверки» и прозрачное решение: продолжать модуль, модифицировать одну переменную или выключить блок.
Разобраться лучше – [url=https://narkologicheskaya-clinika-v-rostove-na-donu16.ru/]лечение в наркологической клинике в ростове-на-дону[/url]
Реабилитация после запоя в Химках. Мы поможем вам восстановиться после запоя и предотвратить рецидивы.
Получить дополнительные сведения – [url=https://https://vyvod-iz-zapoya-himki12.ru//]нарколог вывод из запоя в химках[/url]
Круглосуточная помощь при запое в стационаре Балашихи. Мы работаем 24/7, обеспечивая доступность медицинской помощи в любое время суток.
Подробнее – [url=https://https://vyvod-iz-zapoya-v-stacionare-balashiha12.ru//]наркологический вывод из запоя[/url]
Лечение пивного алкоголизма в Химках. Мы предлагаем эффективные методы лечения зависимости от пива.
Изучить вопрос глубже – [url=https://https://vyvod-iz-zapoya-himki12.ru//]вывод из запоя круглосуточно в химках[/url]
Анонимность и конфиденциальность гарантированы. Мы обеспечиваем полную анонимность и конфиденциальность на всех этапах лечения.
Подробнее тут – [url=https://https://vyvod-iz-zapoya-v-stacionare-balashiha11.ru//]наркология вывод из запоя[/url]
Лечение запоя без госпитализации в Химках. Мы предлагаем лечение на дому, без необходимости госпитализации.
Детальнее – [url=https://https://vyvod-iz-zapoya-himki11.ru//]вывод из запоя с выездом[/url]
Анонимность и конфиденциальность гарантированы. Мы обеспечиваем полную анонимность и конфиденциальность на всех этапах лечения.
Подробнее тут – [url=https://https://vyvod-iz-zapoya-v-stacionare-balashiha11.ru//]вывод из запоя в стационаре[/url]
Ниже — рабочая матрица на первые часы. Она показывает, как клиническая гипотеза превращается в минимальный шаг, какие индикаторы берём под контроль и по какому сигналу меняем тактику или площадку. Таблица не заменяет очную оценку, но делает логику маршрута ясной для всей семьи.
Выяснить больше – http://narkolog-na-dom-v-samare16.ru/
Вывод из запоя в стационаре Балашихи — надёжная помощь при алкогольной зависимости. Наши специалисты обеспечат круглосуточный медицинский уход и поддержку в комфортных условиях.
Изучить вопрос глубже – [url=https://https://vyvod-iz-zapoya-v-stacionare-balashiha12.ru//]нарколог на дом вывод из запоя в балашихе[/url]
Ниже — рабочая матрица на первые часы. Она показывает, как клиническая гипотеза превращается в минимальный шаг, какие индикаторы берём под контроль и по какому сигналу меняем тактику или площадку. Таблица не заменяет очную оценку, но делает логику маршрута ясной для всей семьи.
Углубиться в тему – [url=https://narkolog-na-dom-v-samare16.ru/]выезд нарколога на дом[/url]
Капельница от запоя — эффективный способ детоксикации. Мы используем современные препараты для быстрого и безопасного выведения из запоя.
Подробнее можно узнать тут – [url=https://https://vyvod-iz-zapoya-himki12.ru//]вывод из запоя клиника в химках[/url]
Лечение запоя без госпитализации в стационаре Балашихи. Мы предлагаем лечение на дому, без необходимости госпитализации.
Углубиться в тему – [url=https://https://vyvod-iz-zapoya-v-stacionare-balashiha13.ru//]вывод из запоя на дому цена в балашихе[/url]
В этом тексте собрано множество случайных сведений и довольно неопределённых мыслей, которые могут чем-то заинтересовать. Мы отмечаем моменты, которые не особенно важны, но всё же занимают своё место в повествовании.
Вот – [url=https://arma-rehab.ru/vyvod-iz-zapoya/]казино онлайн[/url]
Вывод из запоя в стационаре Балашихи — надёжная помощь при алкогольной зависимости. Наши специалисты обеспечат круглосуточный медицинский уход и поддержку в комфортных условиях.
Выяснить больше – [url=https://https://vyvod-iz-zapoya-v-stacionare-balashiha13.ru//]вывод из запоя капельница на дому в балашихе[/url]
Круглосуточный формат критичен именно из-за «первой ночи»: в это окно нестабильны тревога, сон, вегетативная реактивность. Мы не «усиливаем всё сразу», а по одному параметру доводим систему до целевого коридора. Так удаётся избежать полипрагмазии и сохранить управляемость процесса: пациент и семья заранее знают, какие цифры считаются нормой, когда звонить дежурному, как организовать свет и тишину, чтобы ночное восстановление действительно состоялось.
Исследовать вопрос подробнее – https://narkologicheskaya-clinika-v-rostove-na-donu16.ru/
Реабилитация после запоя в Химках. Мы поможем вам восстановиться после запоя и предотвратить рецидивы.
Подробнее – [url=https://https://vyvod-iz-zapoya-himki11.ru//]вывод из запоя цена химки[/url]
Лечение зависимости от алкоголя у мужчин в Химках. Мы предлагаем индивидуальный подход к лечению мужчин, учитывая все особенности организма.
Подробнее можно узнать тут – [url=https://https://vyvod-iz-zapoya-himki11.ru//]вывод из запоя недорого химки[/url]
Конфиденциальность обеспечивается процессом: нейтральные формулировки в документах, минимум персональных данных, немаркированные формы и транспорт, отдельный вход, «короткие» переговоры у двери, единый контакт по медицинским вопросам. Внутри команды действует «язык цифр» — витальные показатели, шкалы, интервалы питья и сна, окна проверки. Это исключает лишние обсуждения и защищает от распространения деликатной информации за пределы клинического круга.
Получить больше информации – http://narkologicheskaya-clinika-v-rostove-na-donu16.ru/narkologiya-rostov-kruglosutochno/
Лечение зависимости от алкоголя у мужчин в стационаре Балашихи. Мы предлагаем индивидуальный подход к лечению мужчин, учитывая все особенности организма.
Разобраться лучше – [url=https://https://vyvod-iz-zapoya-v-stacionare-balashiha13.ru//]вывод из запоя на дому[/url]
Первая задача при выезде — быстро отделить угрозы от симптомов, которые можно безопасно стабилизировать на дому. Таблица ниже иллюстрирует, как стартовые наблюдения превращаются в проверяемые гипотезы, конкретные действия и решения в «окнах оценки». Она не заменяет очной диагностики, а объясняет архитектуру первых часов, чтобы у семьи был ясный ориентир.
Получить дополнительные сведения – https://narkolog-na-dom-v-krasnodare16.ru/narkolog-i-psikhiatr-v-krasnodare
Для наглядности представлена таблица с основными направлениями терапии и их эффектами:
Узнать больше – [url=https://narkologicheskaya-klinika-v-krasnodare16.ru/]наркологическая клиника вывод из запоя в краснодаре[/url]
Капельница — это не «секретный коктейль», а набор узких модулей, каждый из которых отвечает за одну задачу. Мы включаем ровно один новый модуль за раз и заранее обозначаем стоп-критерий, чтобы не тянуть терапию «по инерции». Параллельно настраиваются поведенческие элементы: свет, тишина, дыхательные ритмы и «окна» питья. Это снимает часть нагрузки с организма и ускоряет наступление целевых маркеров.
Детальнее – [url=https://narkolog-na-dom-v-krasnodare16.ru/]нарколог на дом цены краснодар[/url]
Капельница от запоя — доступная цена в стационаре Балашихи. Стоимость процедуры начинается от 3 500 ?, и вы всегда будете заранее информированы о стоимости услуг.
Углубиться в тему – [url=https://https://vyvod-iz-zapoya-v-stacionare-balashiha13.ru//]вывод из запоя недорого[/url]
Капельница от запоя — доступная цена в стационаре Балашихи. Стоимость процедуры начинается от 3 500 ?, и вы всегда будете заранее информированы о стоимости услуг.
Получить больше информации – [url=https://https://vyvod-iz-zapoya-v-stacionare-balashiha12.ru//]наркологический вывод из запоя[/url]
Помощь при алкогольной интоксикации в стационаре Балашихи. Наши специалисты проведут необходимые процедуры для снятия симптомов интоксикации.
Изучить вопрос глубже – [url=https://https://vyvod-iz-zapoya-v-stacionare-balashiha11.ru//]наркология вывод из запоя в балашихе[/url]
Вывод из запоя у подростков в Химках. Мы предлагаем специализированное лечение для подростков, учитывая их возрастные особенности.
Подробнее можно узнать тут – [url=https://https://vyvod-iz-zapoya-himki12.ru//]вывод из запоя на дому в химках[/url]
Этот информационный набор привлекает внимание множеством мелочей и странных ракурсов. Мы предлагаем взгляды, которые редко бывают полезны, но могут слегка разнообразить ваше знакомство с темой.
Вот – [url=https://arma-rehab.ru/]порно онлайн бесплатно[/url]
Для наглядности представлена таблица с основными направлениями терапии и их эффектами:
Узнать больше – [url=https://narkologicheskaya-klinika-v-krasnodare16.ru/]наркологическая клиника лечение алкоголизма краснодар[/url]
Этот информационный набор привлекает внимание множеством мелочей и странных ракурсов. Мы предлагаем взгляды, которые редко бывают полезны, но могут слегка разнообразить ваше знакомство с темой.
Вот – [url=https://arma-rehab.ru/]джекпот[/url]
Лечение в клинике строится на комплексной программе, которая сочетает медикаментозную терапию, психотерапевтические методы и социальную реабилитацию. Такой подход обеспечивает устойчивый результат и предотвращает повторные срывы. Пациент проходит курс под постоянным контролем специалистов, что позволяет отслеживать динамику состояния и корректировать терапию при необходимости.
Подробнее можно узнать тут – [url=https://narkologicheskaya-klinika-v-krasnodare16.ru/]платная наркологическая клиника в краснодаре[/url]
Лечение в клинике строится на комплексной программе, которая сочетает медикаментозную терапию, психотерапевтические методы и социальную реабилитацию. Такой подход обеспечивает устойчивый результат и предотвращает повторные срывы. Пациент проходит курс под постоянным контролем специалистов, что позволяет отслеживать динамику состояния и корректировать терапию при необходимости.
Выяснить больше – [url=https://narkologicheskaya-klinika-v-krasnodare16.ru/]narkologicheskaya-klinika-v-krasnodare16.ru/[/url]
Капельница — это не «секретный коктейль», а набор узких модулей, каждый из которых отвечает за одну задачу. Мы включаем ровно один новый модуль за раз и заранее обозначаем стоп-критерий, чтобы не тянуть терапию «по инерции». Параллельно настраиваются поведенческие элементы: свет, тишина, дыхательные ритмы и «окна» питья. Это снимает часть нагрузки с организма и ускоряет наступление целевых маркеров.
Узнать больше – [url=https://narkolog-na-dom-v-krasnodare16.ru/]вызвать нарколога на дом срочно краснодар[/url]
Капельница — это не «секретный коктейль», а набор узких модулей, каждый из которых отвечает за одну задачу. Мы включаем ровно один новый модуль за раз и заранее обозначаем стоп-критерий, чтобы не тянуть терапию «по инерции». Параллельно настраиваются поведенческие элементы: свет, тишина, дыхательные ритмы и «окна» питья. Это снимает часть нагрузки с организма и ускоряет наступление целевых маркеров.
Подробнее можно узнать тут – [url=https://narkolog-na-dom-v-krasnodare16.ru/]платный нарколог на дом в краснодаре[/url]
Эта публикация погружает вас в мир увлекательных фактов и удивительных открытий. Мы расскажем о ключевых событиях, которые изменили ход истории, и приоткроем завесу над научными достижениями, которые вдохновили миллионы. Узнайте, чему может научить нас прошлое и как применить эти знания в будущем.
Личный опыт — читайте сами – https://zahnarzt-eckelmann.de/this-is-a-post-with-post-type-link
Кодирование от алкоголизма на дому в Химках. Наши специалисты приедут к вам домой и проведут процедуру кодирования.
Подробнее – [url=https://https://vyvod-iz-zapoya-himki11.ru//]вывод из запоя вызов на дом[/url]
Капельница — это не «секретный коктейль», а набор узких модулей, каждый из которых отвечает за одну задачу. Мы включаем ровно один новый модуль за раз и заранее обозначаем стоп-критерий, чтобы не тянуть терапию «по инерции». Параллельно настраиваются поведенческие элементы: свет, тишина, дыхательные ритмы и «окна» питья. Это снимает часть нагрузки с организма и ускоряет наступление целевых маркеров.
Получить больше информации – [url=https://narkolog-na-dom-v-krasnodare16.ru/]помощь нарколога на дому краснодар[/url]
Этот информативный материал предлагает содержательную информацию по множеству задач и вопросов. Мы призываем вас исследовать различные идеи и факты, обобщая их для более глубокого понимания. Наша цель — сделать обучение доступным и увлекательным.
Следуйте по ссылке – https://lcg.org.ua/1200×800
В этой публикации мы предлагаем подробные объяснения по актуальным вопросам, чтобы помочь читателям глубже понять их. Четкость и структурированность материала сделают его удобным для усвоения и применения в повседневной жизни.
Лучшее решение — прямо здесь – https://perfectmusictoday.com/index.php/2015/06/19/outside-lands-announces-2015-lineup-elton-john-mumford-sons-the-black-keys
«Трезвый Компас» — выездная и стационарная наркологическая служба, которая проводит профессиональный детокс с капельницей от запоя в Клину и районе круглосуточно. Мы приезжаем анонимно, начинаем с очной оценки, согласуем допуск к терапии, подбираем состав инфузии без «универсальных коктейлей» и объясняем простым языком, чего ждать в ближайшие часы. Цель — снять интоксикацию и абстиненцию, поддержать сердце и нервную систему, аккуратно наладить сон по показаниям и дать семье понятный план на 24–48 часов. Если риски высокие или дома невозможно обеспечить безопасную ночь, предложим стационар с круглосуточным наблюдением.
Разобраться лучше – https://kapelnica-ot-zapoya-klin8.ru/
Мы работаем последовательностями, которые реально влияют на исход: допуск к терапии, инфузии с коррекцией электролитов и КЩС, поддержка органов-мишеней, профилактика осложнений, осторожная нормализация сна по показаниям, переоценка и настройка схемы, план на неделю с алгоритмами «если-то». Важно не «перелечивать»: избыточная седативная нагрузка опасна так же, как и её отсутствие. Поэтому темп и состав мы настраиваем под текущие параметры и динамику — и объясняем пациенту и семье, зачем именно выбран каждый шаг.
Углубиться в тему – [url=https://narkologicheskaya-klinika-klin8.ru/]kruglosutochnaya-narkologicheskaya-klinika[/url]
Эта статья сочетает познавательный и занимательный контент, что делает ее идеальной для любителей глубоких исследований. Мы рассмотрим увлекательные аспекты различных тем и предоставим вам новые знания, которые могут оказаться полезными в будущем.
Прочесть заключение эксперта – https://saigonland24h.com/charm-resort-long-hai/cong-vien-bien-charm-resort-long-hai
В статье представлены ключевые моменты по актуальной теме, дополненные советами экспертов и ссылками на дополнительные ресурсы. Цель материала — дать читателю инструменты для самостоятельного развития и принятия осознанных решений.
ТОП-5 причин узнать больше – https://panache-tech.com/2008/06/11/gallery-post
Домашний формат нужен, когда риски управляемы, а в квартире можно обеспечить «тихий режим». Врач приезжает без эмблем, проводит осмотр, измеряет давление, пульс, сатурацию, сверяет лекарства за последние 48 часов и аллергии. После допуска запускается инфузия с мягкой коррекцией воды и электролитов, поддержкой печени и вегетативной нервной системы; при необходимости аккуратно настраивается сон. По завершении — переоценка, письменная памятка на 24–48 часов, список тревожных признаков и прямой канал связи. Такой визит «гасит» тремор и тошноту, снижает тревогу и делает ночь предсказуемой.
Ознакомиться с деталями – https://narkologicheskaya-klinika-chekhov8.ru/
В этой информационной статье вы найдете интересное содержание, которое поможет вам расширить свои знания. Мы предлагаем увлекательный подход и уникальные взгляды на обсуждаемые темы, побуждая пользователей к активному мышлению и критическому анализу.
Как достичь результата? – https://mecuniversity.us/uncategorized/hello-world
Эта статья погружает вас в увлекательный мир знаний, где каждый факт становится открытием. Мы расскажем о ключевых исторических поворотных моментах и научных прорывах, которые изменили ход цивилизации. Поймите, как прошлое формирует настоящее и как его уроки могут помочь нам строить будущее.
Исследовать вопрос подробнее – https://crefus-nerima.com/trial_pht_01
Эта познавательная публикация погружает вас в море интересного контента, который быстро захватит ваше внимание. Мы рассмотрим важные аспекты темы и предоставим вам уникальные Insights и полезные сведения для дальнейшего изучения.
Хочу знать больше – https://www.mercyofthesky.com/after-the-storm-may-21-2013/8768113571_3e8d292a14_o-2
В этой информационной статье вы найдете интересное содержание, которое поможет вам расширить свои знания. Мы предлагаем увлекательный подход и уникальные взгляды на обсуждаемые темы, побуждая пользователей к активному мышлению и критическому анализу.
Продолжить изучение – https://k2spice.store/product/mr-happy-5-grams
Лечебная логика строится по принципу «одна цель — один маркер — одно окно оценки — один выключатель». Например, задача «открыть окно питья» решается антиеметическим мостом и мягкой регидратацией; как только вода пьётся без позывов и появляется стабильный диурез, модуль отключается. Если целевой маркер «ЧСС/АД в рабочем коридоре» достигнут — снимаем антивегетативный контур. Это дисциплина маленьких шагов, где каждый следующий ход становится очевидным из предыдущих цифр, а не из ожиданий.
Изучить вопрос глубже – [url=https://narkolog-na-dom-v-krasnodare16.ru/]вызвать врача нарколога на дом в краснодаре[/url]
Эта статья предлагает живое освещение актуальной темы с множеством интересных фактов. Мы рассмотрим ключевые моменты, которые делают данную тему важной и актуальной. Подготовьтесь к насыщенному путешествию по неизвестным аспектам и узнайте больше о значимых событиях.
Погрузиться в детали – https://aceguapimirim.com.br/index.php/2023/06/22/harnessing-the-power-of-social-media-for-business-growth
В этой публикации мы сосредоточимся на интересных аспектах одной из самых актуальных тем современности. Совмещая факты и мнения экспертов, мы создадим полное представление о предмете, которое будет полезно как новичкам, так и тем, кто глубоко изучает вопрос.
Подробности по ссылке – https://www.konobakum.com/de/maxrestaurant-home-1/chef-sign
Вызов нарколога на дом — это не «универсальная капельница», а управляемая последовательность маленьких шагов с понятными целями и точками проверки. В наркологической клинике «КубаньМед Резолюция» выезд врача, инфузионная поддержка и лечение зависимостей складываются в дорожную карту: мы начинаем с короткого триежа, формулируем рабочую гипотезу, включаем минимально достаточный модуль, назначаем «окно оценки» и только затем либо выключаем модуль, либо изменяем одну переменную. Такой подход снижает фармаконагрузку, предотвращает полипрагмазыю и делает динамику прозрачной: пациент и семья видят, что именно помогает и когда вмешательство завершается.
Подробнее тут – http://narkolog-na-dom-v-krasnodare16.ru/narkolog-i-psikhiatr-v-krasnodare/
Мы не ограничиваемся капельницей. Сервис включает организационные, клинические и поведенческие элементы, которые уменьшают хаос и ускоряют восстановление. Ниже — ключевые блоки, которые пациенты отмечают в отзывах как наиболее полезные и «приземлённые».
Изучить вопрос глубже – http://narkolog-na-dom-v-samare16.ru/
Для наглядности представлена таблица с основными направлениями терапии и их эффектами:
Изучить вопрос глубже – [url=https://narkologicheskaya-klinika-v-krasnodare16.ru/]наркологическая клиника клиника помощь краснодар[/url]
Публикация приглашает вас исследовать неизведанное — от древних тайн до современных достижений науки. Вы узнаете, как случайные находки превращались в революции, а смелые мысли — в новые эры человеческого прогресса.
Получить профессиональную консультацию – https://www.jumazanzibartours.com/hello-world
Эта информационная заметка предлагает лаконичное и четкое освещение актуальных вопросов. Здесь вы найдете ключевые факты и основную информацию по теме, которые помогут вам сформировать собственное мнение и повысить уровень осведомленности.
Все материалы собраны здесь – https://www.jumazanzibartours.com/hello-world
В статье представлены ключевые моменты по актуальной теме, дополненные советами экспертов и ссылками на дополнительные ресурсы. Цель материала — дать читателю инструменты для самостоятельного развития и принятия осознанных решений.
ТОП-5 причин узнать больше – https://ektiposipotirion.gr/hello-world
Ниже — рабочая матрица на первые часы. Она показывает, как клиническая гипотеза превращается в минимальный шаг, какие индикаторы берём под контроль и по какому сигналу меняем тактику или площадку. Таблица не заменяет очную оценку, но делает логику маршрута ясной для всей семьи.
Получить дополнительную информацию – [url=https://narkolog-na-dom-v-samare16.ru/]нарколог на дом анонимно[/url]
Мы собираем терапию как конструктор из узких модулей. Каждый модуль запускается только при показаниях и выключается сразу после достижения цели — это защищает от «инерции лечения» и возвращает организму пространство для самостоятельной регуляции. Ниже — ориентировочная сетка модулей; фактический состав и дозировки определяет врач на очном осмотре.
Подробнее – http://
Чтобы не оценивать состояние субъективно, в клинике применяется система наблюдения за ключевыми параметрами. Таблица помогает врачу и пациенту видеть реальную динамику и корректировать вмешательства только при необходимости.
Изучить вопрос глубже – [url=https://narkologicheskaya-clinica-v-krasnoyarske17.ru/]наркологическая клиника стационар[/url]
Публикация предлагает уникальную подборку информации, которая будет интересна как специалистам, так и широкому кругу читателей. Здесь вы найдете ответы на часто задаваемые вопросы и полезные инсайты для дальнейшего применения.
Уникальные данные только сегодня – https://himalayancordy.com/retail/vitamin-d3
Конфиденциальность — это набор конкретных действий, а не декларация на сайте. Мы проектируем «невидимость» так, чтобы пациент мог спокойно принять помощь и не опасаться огласки.
Узнать больше – [url=https://narkologicheskaya-klinika-v-krasnoyarske17.ru/]наркологическая клиника стационар[/url]
Примерный состав раствора, применяемого наркологом на дому в Уфе, приведён в таблице:
Получить дополнительную информацию – http://
Эта статья для ознакомления предлагает читателям общее представление об актуальной теме. Мы стремимся представить ключевые факты и идеи, которые помогут читателям получить представление о предмете и решить, стоит ли углубляться в изучение.
Полная информация здесь – https://ark.sg/ua-sportsmask-what-you-should-know-about-it-protx2
Капельницы при выводе из запоя — основной инструмент детоксикации. Они очищают кровь, стабилизируют давление и восстанавливают баланс электролитов. В клинике «РеабКузбасс» используются только качественные препараты, адаптированные под конкретное состояние пациента. Ниже приведена таблица с основными видами капельниц и их эффектом.
Углубиться в тему – [url=https://vyvod-iz-zapoya-v-novokuzneczke17.ru/]вывод из запоя на дому круглосуточно новокузнецк[/url]
В городском ритме Ставрополя дорога сама по себе может усугублять симптомы: плотный трафик, резкие звуки, длинные коридоры ожидания. Поэтому «СтаврВита» разворачивает секторные выезды: немаркированный транспорт, гражданская одежда специалистов, согласованная парковка и подъезд, доставка расходников отдельно от врача при необходимости — чтобы на месте сразу переходить к диагностике и запуску инфузии. Переписка ведётся нейтральными формулировками, уведомления «беззвучные», документы без стигматизирующих слов. По желанию всё общение идёт через доверенное лицо: оно получает короткие апдейты в согласованные «окна», не перегружаясь клиническими деталями.
Узнать больше – [url=https://vyvod-iz-zapoya-stavropol15.ru/]вывод из запоя вызов[/url]
Вся динамика фиксируется в единой карте наблюдения. При переводе в амбулаторную точку мы не «сбрасываем» историю: решения продолжаются с учётом уже сделанного и реакции пациента на вмешательства.
Получить больше информации – [url=https://vyvod-iz-zapoya-v-voronezhe15.ru/]вывод из запоя на дому круглосуточно воронеж[/url]
Домашний визит — это кратчайший путь к облегчению симптомов, когда нет признаков осложнений. Врач приезжает на неприметном транспорте, проводит очную оценку, измеряет давление, пульс, сатурацию, оценивает неврологический статус и психическое состояние, после чего назначает инфузионную терапию и симптоматические средства по показаниям. Мы заранее даём семье простые инструкции на 24–48 часов, чтобы обеспечить спокойный режим, контроль питья, коррекцию сна и своевременную связь с дежурным врачом.
Ознакомиться с деталями – [url=https://narkologicheskaya-klinika-moskva8.ru/]gosudarstvennaya-narkologicheskaya-klinika-moskva[/url]
Процесс вывода из запоя включает последовательное воздействие на ключевые звенья интоксикации. Ниже представлена таблица, отражающая этапы лечения, используемые методики и ожидаемые результаты терапии.
Подробнее тут – [url=https://vyvod-iz-zapoya-v-volgograde17.ru/]вывод из запоя на дому недорого[/url]
Вызов нарколога на дом — это удобная и безопасная возможность получить медицинскую помощь без необходимости ехать в клинику. Такая услуга особенно востребована, когда состояние пациента не позволяет покинуть дом, а помощь требуется незамедлительно. В наркологической клинике «ВоронМед Профи» организована круглосуточная служба выезда специалистов, которая оперативно реагирует на обращения и обеспечивает профессиональную помощь при запое, алкогольной интоксикации и обострениях хронических состояний. Врач приезжает в течение часа, оценивает состояние пациента и подбирает оптимальную схему лечения, включающую капельницы, детоксикацию и рекомендации по восстановлению организма.
Выяснить больше – [url=https://narkolog-na-dom-v-voronezhe17.ru/]нарколог на дом воронеж[/url]
Комплексное лечение помогает восстановить работу печени, сердца и нервной системы. Пациенты отмечают улучшение сна, снижение тревожности, нормализацию давления и аппетита уже спустя несколько часов после начала терапии. В зависимости от тяжести состояния курс может быть продлён до 2–3 дней с круглосуточным наблюдением и корректировкой дозировок.
Изучить вопрос глубже – [url=https://vivod-iz-zapoya-v-volgograde17.ru/]помощь вывод из запоя[/url]
«Чистая Гармония» — это выездная и стационарная наркологическая помощь в одном маршруте: оперативный приезд врача на дом по Клину и району, аккуратный детокс с контролем жизненно важных показателей, стационар с круглосуточным наблюдением и подготовка к кодированию. Мы придерживаемся принципа клинической достаточности: никаких лишних процедур ради «видимости лечения» и никаких задержек с тем, что влияет на исход. Каждое назначение объясняем простыми словами, заранее согласуем смету и оставляем понятный план на 24–48 часов и первую неделю. Анонимность — базовый стандарт: выезд без опознавательных знаков, нейтральные формулировки в документах по запросу, ограниченный доступ к данным.
Изучить вопрос глубже – http://narkologicheskaya-klinika-klin8.ru/kruglosutochnaya-narkologicheskaya-klinika-v-klinu/
Этап
Разобраться лучше – https://vyvod-iz-zapoya-v-stacionare-chekhov8.ru/vyvod-iz-zapoya-cena-v-chekhove/
«ВитаСана» — это организованный маршрут наркологической помощи в Чехове: быстрый анонимный звонок, выезд врача на дом без опознавательных знаков, аккуратный детокс с капельницами, стационар с круглосуточным наблюдением и подготовка к кодированию по показаниям. Мы действуем спокойно и последовательно: сначала очная оценка и допуск к терапии, затем индивидуальная инфузионная поддержка, далее — понятный план «тихих» дней и контрольный контакт. Каждое назначение объясняем простыми словами, смету согласуем до начала процедур, конфиденциальность соблюдаем на каждом шаге.
Получить больше информации – https://narkologicheskaya-klinika-chekhov8.ru/narkologicheskaya-klinika-telefon-v-chekhove
Безопасность — это не лозунг, а набор решений. Мы избегаем «жёстких» седативных доз, которые создают видимость улучшения и повышают риск скрытых осложнений. Наращивание темпа инфузии происходит постепенно и увязано с динамикой симптомов и цифрами измерений. Любой шаг объясняется пациенту и семье: зачем он выбран, что считается нормальной волной улучшения, в какой момент нужно связаться с дежурным. Такой прозрачный формат снимает тревогу и помогает всем участникам действовать согласованно.
Разобраться лучше – [url=https://narkolog-na-dom-ivanteevka8.ru/]нарколог в Ивантеевке[/url]
В этом материале представлены детали, которые хоть и занимательны, но не особенно значимы. Мы рассматриваем моменты, которые трудно назвать важными, но всё же решили включить их для полноты картины.
Вот – [url=https://arma-rehab.ru/vyvod-iz-zapoya/]азартные игры на деньги[/url]
Этот информационный набор привлекает внимание множеством мелочей и странных ракурсов. Мы предлагаем взгляды, которые редко бывают полезны, но могут слегка разнообразить ваше знакомство с темой.
Вот – [url=https://arma-rehab.ru/vyvod-iz-zapoya/]казино онлайн[/url]
Детокс — последовательность шагов, где каждый этап имеет цель и критерии безопасности. Мы начинаем с оценки рисков (кардиология, неврология, психическое состояние, возможные взаимодействия препаратов), продолжаем инфузионной терапией, корректируем электролиты и кислотно-щелочное равновесие, поддерживаем печень и нервную систему. Если присутствуют выраженная тревога и бессонница, подключаем короткие курсы седативной терапии с контролем побочных эффектов. Отдельный блок — профилактика осложнений: обезвоживание, аритмии, обострение гастрита и панкреатита, делирий. Каждое назначение — только после очной оценки и с учётом сопутствующих состояний.
Получить больше информации – http://
В Воронеже клиника «Центр Трезвости ВоронМед» обеспечивает выезд нарколога на дом в любое время суток. Это позволяет оказывать помощь пациентам, которые находятся в тяжёлом состоянии или не могут самостоятельно приехать в стационар. Медицинская бригада прибывает в течение 40–60 минут, не используя специализированный транспорт и форму, чтобы сохранить анонимность. Врач проводит первичный осмотр, оценивает давление, частоту дыхания, уровень сознания и насыщение кислородом, после чего назначает детоксикационную капельницу с контролем дозировки.
Узнать больше – [url=https://vyvod-iz-zapoya-v-voronezhe17.ru/]наркология вывод из запоя[/url]
Ниже — «скелет» визита. На месте врач адаптирует содержание под возраст, соматику, текущие лекарства и проявления абстиненции. Главная идея — быстро получить цифры, аккуратно запустить инфузию и заранее зафиксировать ориентиры, чтобы семья не импровизировала в «трудный час».
Углубиться в тему – [url=https://vyvod-iz-zapoya-stavropol15.ru/]нарколог на дом вывод из запоя[/url]
Каждое вмешательство проходит через систему «цель > маркер > окно оценки > выключение модуля». Ниже приведена таблица, отражающая базовую логику диагностики и корректировки терапии в зависимости от состояния пациента.
Узнать больше – [url=https://narkologicheskaya-clinica-v-krasnoyarske17.ru/]наркологическая клиника клиника помощь в красноярске[/url]
Ниже — структурированная карта экстренного выезда. Она помогает пациенту и семье понимать, что происходит в каждый отрезок времени, какие цели мы преследуем и по каким критериям двигаемся дальше.
Разобраться лучше – [url=https://vyvod-iz-zapoya-v-voronezhe15.ru/]вывод из запоя клиника в воронеже[/url]
Этап
Разобраться лучше – [url=https://narkologicheskaya-klinika-klin8.ru/]narkologicheskaya-klinicheskaya-bolnica[/url]
В этом тексте собрано множество случайных сведений и довольно неопределённых мыслей, которые могут чем-то заинтересовать. Мы отмечаем моменты, которые не особенно важны, но всё же занимают своё место в повествовании.
Вот – [url=https://arma-rehab.ru/]казино онлайн[/url]
Публикация предоставляет читателю набор разрозненных идей, которые сложно применить на практике. Мы лишь слегка касаемся разных точек зрения, не углубляясь в анализ и не предлагая никаких выводов.
Вот – [url=https://arma-rehab.ru/vyvod-iz-zapoya/]турниры по покеру[/url]
Наркологическая помощь в «ВолгаМед Тольятти» включает широкий спектр процедур и методик. Каждый случай рассматривается индивидуально, с учётом состояния пациента, стадии заболевания и сопутствующих факторов. Ниже представлена таблица с основными направлениями медицинской работы.
Получить больше информации – [url=https://narkologicheskaya-pomoshh-v-tolyatti17.ru/]анонимная наркологическая помощь[/url]
Этот обзор позволяет по-новому взглянуть на вещи, на которые обычно и так смотрят. Мы упоминаем факты, которые мало что меняют, и события, значение которых трудно определить, но они всё равно здесь.
Вот – [url=https://arma-rehab.ru/]рулетка онлайн[/url]
Примерный состав раствора, применяемого наркологом на дому в Уфе, приведён в таблице:
Подробнее тут – [url=https://narkolog-na-dom-v-ufe17.ru/]психиатр нарколог на дом уфа[/url]
Комплексное лечение помогает восстановить работу печени, сердца и нервной системы. Пациенты отмечают улучшение сна, снижение тревожности, нормализацию давления и аппетита уже спустя несколько часов после начала терапии. В зависимости от тяжести состояния курс может быть продлён до 2–3 дней с круглосуточным наблюдением и корректировкой дозировок.
Подробнее тут – [url=https://vivod-iz-zapoya-v-volgograde17.ru/]вывод из запоя в стационаре волгоград[/url]
Вывод из запоя — это не просто медицинская процедура, а жизненно важный этап, позволяющий вернуть контроль над самочувствием и предотвратить осложнения. В клинике «РеабКузбасс» пациенты получают помощь в любое время суток: опытные наркологи выезжают на дом, проводят капельницы и медикаментозную детоксикацию, подбирают индивидуальные схемы восстановления. Такой подход помогает не только устранить последствия запоя, но и запустить процесс полноценного оздоровления организма.
Детальнее – http://vyvod-iz-zapoya-v-novokuzneczke17.ru/
Карта — это общий язык для всех участников процесса. Пациент видит смысл каждого шага, родные знают, когда и чему посвящены короткие апдейты, а врач точно понимает, какой параметр корректировать, чтобы не потерять причинно-следственную связь.
Получить больше информации – [url=https://vyvod-iz-zapoya-murmansk15.ru/]вывод из запоя вызов город[/url]
В этой статье собраны факты, которые освещают целый ряд важных вопросов. Мы стремимся предложить читателям четкую, достоверную информацию, которая поможет сформировать собственное мнение и лучше понять сложные аспекты рассматриваемой темы.
Что скрывают от вас? – https://jesmond.com/product/haccp-smartstep-footwear-sanitizing-unit
Этот информационный материал собраны данные, которые помогут лучше понять текущие тенденции и процессы в различных сферах жизни. Мы предоставляем четкий анализ, графики и примеры, чтобы информация была не только понятной, но и практичной для принятия решений.
Всё самое вкусное внутри – https://hia.edu.ly/2022/10/30/news-3
Первичная оценка строится вокруг показателей, которые определяют место ведения (дом, амбулатория, стационар), состав инфузии и объём поведенческих вмешательств. Мы исключаем «обязательные по привычке» анализы, не влияющие на решения здесь и сейчас; вместо этого закрепляем короткие, но информативные измерения с понятными границами безопасности и интервалами повторов. В результате пациент быстрее видит первые улучшения, а команда не перегружает организм «на всякий случай».
Получить больше информации – http://
Эта информационная статья содержит полезные факты, советы и рекомендации, которые помогут вам быть в курсе последних тенденций и изменений в выбранной области. Материал составлен так, чтобы быть полезным и понятным каждому.
Читать далее > – https://westadamshomes.com/savor-the-flavors-discovering-west-adams-top-5-restaurants-in-los-angeles/comment-page-13527
Клиника «КузбассМед Центр» в Новокузнецке обеспечивает непрерывный приём пациентов и выезд нарколога на дом. Такой формат позволяет оказать экстренную помощь при интоксикации или запое прямо на месте, не дожидаясь ухудшения состояния. Медицинская команда работает в режиме 24/7, что особенно важно при острых состояниях. Врач выезжает в течение часа после вызова, проводит диагностику, ставит капельницу и контролирует жизненные показатели. В стационаре доступны детоксикация, медикаментозная терапия и психотерапевтическая поддержка — всё под постоянным медицинским наблюдением.
Получить дополнительную информацию – [url=https://narkologicheskaya-klinika-v-novokuzneczke17.ru/]наркологическая клиника лечение алкоголизма в новокузнецке[/url]
Эта статья полна интересного контента, который побудит вас исследовать новые горизонты. Мы собрали полезные факты и удивительные истории, которые обогащают ваше понимание темы. Читайте, погружайтесь в детали и наслаждайтесь процессом изучения!
Открыть полностью – https://altin.co.in/2019/02/20/570
«НоваТонус» — это связанный маршрут наркологической помощи для жителей Лобни и округа: оперативный выезд врача на дом, аккуратный домашний детокс без «универсальных коктейлей», стационар с круглосуточным наблюдением, подготовка к кодированию по показаниям и поддержка семьи в первые недели. Мы действуем по принципу клинической достаточности: каждое назначение обосновано, объясняется простым языком и привязано к реальным целям — безопасно снять интоксикацию и абстиненцию, стабилизировать давление и пульс, мягко вернуть сон, а затем провести первую «тихую» неделю без качелей. Приватность встроена в процесс: выезд без опознавательных знаков, нейтральный канал связи, документы по запросу и в сдержанной формулировке.
Углубиться в тему – https://narkologicheskaya-klinika-lobnya8.ru/narkologicheskaya-klinika-dlya-alkogolikov-v-lobne
Если у человека выраженное обезвоживание, скачки давления и пульса, эпизоды спутанности сознания, упорная рвота, «дергающийся» сон или тяжёлая сопутствующая патология, стационар закрывает главный риск — непредсказуемое течение синдрома отмены. Круглосуточный мониторинг позволяет динамически корректировать схемы, подключать лабораторные и инструментальные исследования по показаниям, своевременно восполнять дефициты и удерживать стабильный сон. На практике «короткое окно» госпитализации (24–48 часов) нередко дешевле на дистанции: оно предотвращает осложнения и повторные вызовы, которые растягивают курс и увеличивают суммарные затраты. Для жителей Москвы мы разносim визиты по времени, используем отдельные входы и «тихие» маршруты, чтобы сохранить приватность. После стабилизации маршрут переводится в амбулаторный или домашний формат: пациент получает план питания и активности, контрольные контакты и правила, при каких признаках связаться немедленно, не дожидаясь «как будет утром».
Изучить вопрос глубже – [url=https://vyvod-iz-zapoya-moskva99.ru/]moskva-vyvod-iz-zapoya-na-domu[/url]
В этой публикации мы сосредоточимся на интересных аспектах одной из самых актуальных тем современности. Совмещая факты и мнения экспертов, мы создадим полное представление о предмете, которое будет полезно как новичкам, так и тем, кто глубоко изучает вопрос.
Не упусти важное! – https://diopartsupply.com/were-living-in-the-golden-age-of-the-affordable-new-miata
Этот информационный материал собраны данные, которые помогут лучше понять текущие тенденции и процессы в различных сферах жизни. Мы предоставляем четкий анализ, графики и примеры, чтобы информация была не только понятной, но и практичной для принятия решений.
Выяснить больше – https://condominioentrelagos.com.br/concluida-a-revitalizacao-da-quadra-poliesportiva-do-comel
Эта статья сочетает в себе как полезные, так и интересные сведения, которые обогатят ваше понимание насущных тем. Мы предлагаем практические советы и рекомендации, которые легко внедрить в повседневную жизнь. Узнайте, как улучшить свои навыки и обогатить свой опыт с помощью простых, но эффективных решений.
Изучить рекомендации специалистов – https://admraceway.ru/projects-archive/247-effective-and-friendly-support
Эта обзорная заметка содержит ключевые моменты и факты по актуальным вопросам. Она поможет читателям быстро ориентироваться в теме и узнать о самых важных аспектах сегодня. Получите краткий курс по современной информации и оставайтесь в курсе событий!
Кликни и узнай всё! – https://7mandje.com/page-d-exemple
Эта информационная статья охватывает широкий спектр актуальных тем и вопросов. Мы стремимся осветить ключевые факты и события с ясностью и простотой, чтобы каждый читатель мог извлечь из нее полезные знания и полезные инсайты.
Уникальные данные только сегодня – https://tokei-daisuki.com/brand-cate/watch-choose-ladies
Эта информационная статья содержит полезные факты, советы и рекомендации, которые помогут вам быть в курсе последних тенденций и изменений в выбранной области. Материал составлен так, чтобы быть полезным и понятным каждому.
Ознакомиться с полной информацией – https://higachannpoko.com/%E5%9C%B0%E5%9F%9F%E5%88%A5/%E8%8B%A5%E6%9C%A8%E8%82%A5%E5%BE%8C%E6%A9%8B%E9%A7%85%E3%83%BB%E8%95%8E%E9%BA%A6.html
Этот информативный материал предлагает содержательную информацию по множеству задач и вопросов. Мы призываем вас исследовать различные идеи и факты, обобщая их для более глубокого понимания. Наша цель — сделать обучение доступным и увлекательным.
Где можно узнать подробнее? – https://traduzioneitalia.com/hello-world
Этот информативный материал предлагает содержательную информацию по множеству задач и вопросов. Мы призываем вас исследовать различные идеи и факты, обобщая их для более глубокого понимания. Наша цель — сделать обучение доступным и увлекательным.
Уникальные данные только сегодня – https://www.adinkraradio.com/essay-writing-service-rent-high-writers-online-3
В этом интересном тексте собраны обширные сведения, которые помогут вам понять различные аспекты обсуждаемой темы. Мы разбираем детали и факты, делая акцент на важности каждого элемента. Не упустите возможность расширить свои знания и взглянуть на мир по-новому!
Жми сюда — получишь ответ – https://publikaindonesia.com/kadis-kominfo-banjarbaru-ikuti-forum-komdigi-di-munas-apeksi-surabaya
Этот текст призван помочь читателю расширить кругозор и получить практические знания. Мы используем простой язык, наглядные примеры и структурированное изложение, чтобы сделать обучение максимально эффективным и увлекательным.
Прочесть всё о… – https://www.comecon.jp/amazon_haisourfyoukijun
Перед таблицей короткий переход: мы сначала исключаем несовместимости и только потом начинаем инфузии. Это защищает от скрытых конфликтов препаратов, на которые «универсальные коктейли» просто не смотрят.
Выяснить больше – https://vyvod-iz-zapoya-lobnya8.ru/vyvod-iz-zapoya-na-domu-v-lobne
Этот текст содержит различную информацию, которая, возможно, покажется любопытной, но в целом не меняет восприятия привычных вещей. Предлагаем просто получить удовольствие от чтения, не ожидая особой пользы.
Вот – [url=https://arma-rehab.ru/]секс знакомства[/url]
Этот обзор предлагает структурированное изложение информации по актуальным вопросам. Материал подан так, чтобы даже новичок мог быстро освоиться в теме и начать использовать полученные знания в практике.
Жми сюда — получишь ответ – https://colmartropicale.com.my/rooms/two-bedroom-suite
В этом тексте собрано множество случайных сведений и довольно неопределённых мыслей, которые могут чем-то заинтересовать. Мы отмечаем моменты, которые не особенно важны, но всё же занимают своё место в повествовании.
Вот – [url=https://arma-rehab.ru/]онлайн слоты[/url]
Город Нижний Новгород является значимым городом в центральной части России.
Он расположен в месте соединения двух рек, что сыграло важную роль в развитии.
Нижний Новгород известен своей историей и традициями.
Облик Нижнего Новгорода сочетает памятники прошлого и актуальные архитектурные решения.
Нижний Новгород все новости
Здесь активно развивается деловая среда.
Городская жизнь отличается насыщенностью и множеством событий.
Он является важным транспортным узлом.
В целом, Нижний Новгород представляет интерес для людей разных интересов.
После введения капельницы пациент ощущает облегчение: снижается головная боль, нормализуется давление, восстанавливается сон и аппетит. В дальнейшем врач может рекомендовать курс поддерживающих процедур для закрепления эффекта и профилактики рецидива.
Исследовать вопрос подробнее – [url=https://kapelnicza-ot-zapoya-v-nizhnem-novgorode16.ru/]капельница от запоя недорого в нижнем новгороде[/url]
Поэтапный подход помогает достичь устойчивых результатов и минимизировать вероятность рецидива, обеспечивая безопасность пациента на всех стадиях лечения.
Углубиться в тему – [url=https://narkologicheskaya-clinika-v-samare16.ru/]наркологическая клиника клиника помощь самара[/url]
Такой подход позволяет сформировать устойчивую мотивацию и создать основу для дальнейшей социальной и психологической реабилитации, направленной на стабилизацию состояния пациента и возвращение его к полноценной жизни.
Подробнее можно узнать тут – [url=https://narkologicheskaya-klinika-v-spb16.ru/]наркологическая клиника вывод из запоя санкт-петербург[/url]
Когда организм на пределе, важна срочная помощь в Санкт-Петербурге — это команда опытных наркологов, которые помогут быстро и мягко выйти из запоя без вреда для здоровья.
Изучить вопрос глубже – [url=https://vyvod-iz-zapoya-v-sankt-peterburge16.ru/]врач вывод из запоя[/url]
* Экспресс-электролиты выполняются по показаниям, если на старте есть факторы риска.
Изучить вопрос глубже – [url=https://narkolog-na-dom-stavropol15.ru/]нарколог на дом круглосуточно ставрополь[/url]
Такая последовательность обеспечивает медицинскую точность и безопасность процедуры, позволяя добиться быстрого улучшения самочувствия без необходимости госпитализации.
Подробнее тут – [url=https://narkolog-na-dom-v-chelyabinske16.ru/]нарколог на дом вывод из запоя[/url]
Главная цель — безопасно стабилизировать состояние, вернуть контроль над сном, гидратацией и базовой активностью в первые сутки и удержать результат. Для этого мы используем модульный подход: один этап — одна клиническая задача — один измеримый маркер. Такой принцип исключает «гонку доз», снижает риск перегрузки объёмом и делает прогноз понятным для пациента и близких. Мы сознательно разделяем «короткие эффекты» (уменьшение тошноты, сглаживание тахикардии) и «эффекты консолидации» (устойчивый сон, ясность утром), чтобы каждая корректировка была точной и доказуемой.
Подробнее тут – [url=https://narkologicheskaya-klinika-v-nizhnem-novgorode16.ru/]наркологическая клиника вывод из запоя[/url]
Мы комбинируем медицинские и немедикаментозные решения. Инфузионная терапия — адресная, с контролем безопасности; поведенческие опоры — просты и выполняемы в реальной жизни; телемедицина помогает пройти «трудный час» без лишних поездок и импровизаций. Ниже — ориентиры логики подбора, они не заменяют очный осмотр.
Углубиться в тему – [url=https://narkologicheskaya-klinika-kaliningrad15.ru/]наркологическая клиника вывод из запоя[/url]
Если в момент обращения сохраняются абстинентные симптомы, сначала проводится детоксикация и нормализация сна. Лишь после стабилизации обсуждаются методики кодирования.
Детальнее – [url=https://kodirovanie-ot-alkogolizma-v-spb16.ru/]кодирование от алкоголизма анонимно[/url]
Что делаем
Изучить вопрос глубже – [url=https://vyvod-iz-zapoya-v-stacionare-chekhov8.ru/]vyvod-iz-zapoya-v-stacionare[/url]
Если у человека выраженное обезвоживание, скачки давления и пульса, эпизоды спутанности сознания, упорная рвота, «дергающийся» сон или тяжёлая сопутствующая патология, стационар закрывает главный риск — непредсказуемое течение синдрома отмены. Круглосуточный мониторинг позволяет динамически корректировать схемы, подключать лабораторные и инструментальные исследования по показаниям, своевременно восполнять дефициты и удерживать стабильный сон. На практике «короткое окно» госпитализации (24–48 часов) нередко дешевле на дистанции: оно предотвращает осложнения и повторные вызовы, которые растягивают курс и увеличивают суммарные затраты. Для жителей Москвы мы разносim визиты по времени, используем отдельные входы и «тихие» маршруты, чтобы сохранить приватность. После стабилизации маршрут переводится в амбулаторный или домашний формат: пациент получает план питания и активности, контрольные контакты и правила, при каких признаках связаться немедленно, не дожидаясь «как будет утром».
Подробнее тут – [url=https://vyvod-iz-zapoya-moskva99.ru/]вывод из запоя московский район[/url]
Для наглядности приведена таблица, отражающая распространённые методы лечения и их цели:
Получить больше информации – [url=https://narkologicheskaya-clinika-v-samare16.ru/]www.domen.ru[/url]
Сильная седация создаёт иллюзию глубокой терапии, но ухудшает управляемость картины и маскирует риски, особенно вне стационара. Наша методика — клиническая достаточность. Состав и скорость инфузий подбираются под реальное давление и пульс, выраженность тремора и тошноты, уровень тревоги, состояние печени и желудка, а также под совместимость с тем, что уже было принято. Мы заранее переводим медицинские цифры на человеческий язык: реально допустимые колебания, признаки нормальной «волны улучшения» и те сигналы, при которых нужно немедленно связаться с дежурным.
Подробнее можно узнать тут – http://vyvod-iz-zapoya-lobnya8.ru
«НоваТонус» — это связанный маршрут наркологической помощи для жителей Лобни и округа: оперативный выезд врача на дом, аккуратный домашний детокс без «универсальных коктейлей», стационар с круглосуточным наблюдением, подготовка к кодированию по показаниям и поддержка семьи в первые недели. Мы действуем по принципу клинической достаточности: каждое назначение обосновано, объясняется простым языком и привязано к реальным целям — безопасно снять интоксикацию и абстиненцию, стабилизировать давление и пульс, мягко вернуть сон, а затем провести первую «тихую» неделю без качелей. Приватность встроена в процесс: выезд без опознавательных знаков, нейтральный канал связи, документы по запросу и в сдержанной формулировке.
Подробнее можно узнать тут – [url=https://narkologicheskaya-klinika-lobnya8.ru/]наркологическая клиника цены[/url]
В клинике применяются современные методы лечения, включающие медикаментозную терапию, психотерапию и физиологическое восстановление. Такой подход позволяет достигнуть стойкого результата и предотвратить возвращение к употреблению алкоголя.
Получить больше информации – [url=https://kapelnicza-ot-zapoya-v-nizhnem-novgorode16.ru/]www.domen.ru[/url]
Кодирование от алкоголизма — это не «волшебная таблетка», а четко структурированный этап комплексного лечения, который должен вписываться в общий терапевтический план: диагностика, стабилизация состояния, выбор методики, юридически корректное информированное согласие, сопровождение и профилактика рецидивов. В наркологической клинике «НеоТрезвие СПБ» приоритет — безопасность, предсказуемость и конфиденциальность. Мы не перебираем методы «на удачу», а подбираем технологию с учетом клинического профиля, мотивации, социализации и коморбидных факторов (тревога, депрессия, соматические заболевания).
Подробнее тут – https://kodirovanie-ot-alkogolizma-v-spb16.ru/
Реабилитационные мероприятия в клинике направлены на устранение соматических последствий зависимости, нормализацию когнитивных функций и восстановление социальной адаптации. Для этого используются современные методики физиотерапии, диетологической коррекции и психологического сопровождения, позволяющие закрепить достигнутые результаты лечения.
Изучить вопрос глубже – https://narkologicheskaya-klinika-v-spb16.ru/narkologicheskaya-bolnicza-sankt-peterburg
* Экспресс-электролиты выполняются по показаниям, если на старте есть факторы риска.
Подробнее можно узнать тут – https://narkolog-na-dom-stavropol15.ru/vyzov-narkologa-na-dom-stavropol
Инфузионная терапия — это набор узких вмешательств под конкретную картину, а не «магический состав». Регидратация улучшает тканевую перфузию и снимает головную боль от обезвоживания; электролиты стабилизируют нервно-мышечную передачу и сердечный ритм; печёночная поддержка уменьшает токсическую нагрузку и тяжесть в правом подреберье; гастропротекция и противорвотные защищают слизистую и убирают рвотный компонент. При выраженной тревоге и бессоннице добавляется мягкая анксиолитическая поддержка — дозы подбираются так, чтобы стабилизировать, а не «выключить». Мы не назначаем исследования «для галочки»: анализы и ЭКГ используются тогда, когда их результат меняет решения «сегодня». Такой подход снижает побочные эффекты, делает результат предсказуемым и удерживает бюджет от «скачков». На этой базе уже обсуждается следующий шаг: амбулаторное наблюдение, краткие психообразовательные сессии, а при показаниях — кодирование после стабилизации.
Получить больше информации – [url=https://kapelnica-ot-zapoya-lyubercy9.ru/]kapelnica-ot-zapoya-lyubercy9.ru/[/url]
Затяжной запой опасен для жизни. Врачи наркологической клиники в Санкт-Петербурге проводят срочный вывод из запоя — на дому или в стационаре. Анонимно, безопасно, круглосуточно.
Получить больше информации – http://vyvod-iz-zapoya-v-sankt-peterburge16.ru
В этой статье вы найдете познавательную и занимательную информацию, которая поможет вам лучше понять мир вокруг. Мы собрали интересные данные, которые вдохновляют на размышления и побуждают к действиям. Открывайте новую информацию и получайте удовольствие от чтения!
Подробнее тут – https://1colle.com/abroad-interview-appeal-point
Этот текст призван помочь читателю расширить кругозор и получить практические знания. Мы используем простой язык, наглядные примеры и структурированное изложение, чтобы сделать обучение максимально эффективным и увлекательным.
Секреты успеха внутри – https://prograpp.com.mx/isotype-icon
«АльфаДетокс» в Чехове — это стационарный маршрут вывода из запоя с круглосуточным наблюдением и быстрыми медицинскими решениями. Мы принимаем без очередей, проводим очную оценку, допускаем к терапии и запускаем управляющий детокс с аппаратным контролем и лабораторными исследованиями по показаниям. Наша цель — не просто поставить капельницу, а безопасно стабилизировать давление и пульс, снять интоксикацию и абстиненцию, наладить сон и дать понятный план ближайших дней. Анонимность встроена в процесс, вы общаетесь с командой спокойно и без лишней огласки, а все назначения объясняются простым языком, чтобы вы понимали логику каждого шага.
Получить дополнительную информацию – [url=https://vyvod-iz-zapoya-v-stacionare-chekhov8.ru/]vyvod-iz-zapoya-kapelnica[/url]
Эта информационная заметка предлагает лаконичное и четкое освещение актуальных вопросов. Здесь вы найдете ключевые факты и основную информацию по теме, которые помогут вам сформировать собственное мнение и повысить уровень осведомленности.
Осуществить глубокий анализ – https://www.wakeup-radio.com/qtvideo/on-the-floor-2
В этой статье вы найдете познавательную и занимательную информацию, которая поможет вам лучше понять мир вокруг. Мы собрали интересные данные, которые вдохновляют на размышления и побуждают к действиям. Открывайте новую информацию и получайте удовольствие от чтения!
Подробнее тут – https://provisionlc.com/connecting-with-natures-tranquil-essence
Этот обзор предлагает структурированное изложение информации по актуальным вопросам. Материал подан так, чтобы даже новичок мог быстро освоиться в теме и начать использовать полученные знания в практике.
Кликни, не пожалеешь – https://kelesmerkez.com.tr/2020/12/04/amazon-orumceklerinin-esrarengiz-dunyalarina-gitmeye-hazir-olun
В статье представлены ключевые моменты по актуальной теме, дополненные советами экспертов и ссылками на дополнительные ресурсы. Цель материала — дать читателю инструменты для самостоятельного развития и принятия осознанных решений.
ТОП-5 причин узнать больше – https://gkquestionsguru.com/microsoft-word/7
В этой статье вы найдете уникальные исторические пересечения с научными открытиями. Каждый абзац — это шаг к пониманию того, как наука и события прошлого создают основу для технологического будущего.
Не упусти важное! – http://www.al-adala.de/Neu/3-mal-nicolas-gomez-davila-lxviii
В данной обзорной статье представлены интригующие факты, которые не оставят вас равнодушными. Мы критикуем и анализируем события, которые изменили наше восприятие мира. Узнайте, что стоит за новыми открытиями и как они могут изменить ваше восприятие реальности.
Проверенные методы — узнай сейчас – https://atorie203.com/cropped-%E3%83%88%E3%83%83%E3%83%95%E3%82%9A-2-jpg
В этом обзорном материале представлены увлекательные детали, которые находят отражение в различных аспектах жизни. Мы исследуем непонятные и интересные моменты, позволяя читателю увидеть картину целиком. Погрузитесь в мир знаний и удивительных открытий!
ТОП-5 причин узнать больше – https://shop-antinuisibles.com/identifier-les-cafards-qui-sont-chez-vous
Этот информационный материал подробно освещает проблему наркозависимости, ее причины и последствия. Мы предлагаем информацию о методах лечения, профилактики и поддерживающих программах. Цель статьи — повысить осведомленность и продвигать идеи о необходимости борьбы с зависимостями.
Не упусти важное! – https://pronikotin.ru/stati/zachem-vyzyvat-narkologa-na-dom.html
Откройте для себя скрытые страницы истории и малоизвестные научные открытия, которые оказали колоссальное влияние на развитие человечества. Статья предлагает свежий взгляд на события, которые заслуживают большего внимания.
Только факты! – http://www.presqueparfait.com/blog/2010/07/wanted-bebe-georges
Этот информативный текст отличается привлекательным содержанием и актуальными данными. Мы предлагаем читателям взглянуть на привычные вещи под новым углом, предоставляя интересный и доступный материал. Получите удовольствие от чтения и расширьте кругозор!
Расширить кругозор по теме – https://www.cursosalpha.com/blog/como-funciona-el-sensor-infrarrojo-de-una-alarma
В этой статье вы найдете познавательную и занимательную информацию, которая поможет вам лучше понять мир вокруг. Мы собрали интересные данные, которые вдохновляют на размышления и побуждают к действиям. Открывайте новую информацию и получайте удовольствие от чтения!
Доступ к полной версии – https://support.suprshops.com/elegance-theme/announcement-bar-elegance-theme
Эта познавательная публикация погружает вас в море интересного контента, который быстро захватит ваше внимание. Мы рассмотрим важные аспекты темы и предоставим вам уникальные Insights и полезные сведения для дальнейшего изучения.
Полная информация здесь – https://taiko-ist-takuya.jp/schedule/112
Главная задача — вернуть контроль над самочувствием мягко и последовательно. Мы не соревнуемся в дозах, а собираем устойчивую траекторию улучшения: каждый модуль терапии отвечает за одну цель и имеет своё «окно оценки». Если отклик ниже ожиданий — меняем ровно один параметр (темп, последовательность или поведенческий элемент среды), чтобы точно понимать, что помогло.
Подробнее тут – [url=https://vyvod-iz-zapoya-v-kazani16.ru/]вывод из запоя в стационаре в казани[/url]
Чтобы понять логику процесса, посмотрите на ориентир ниже. Это не жёсткое расписание, а понятная канва, которую врач адаптирует под возраст, сопутствующие заболевания и текущие цифры.
Изучить вопрос глубже – [url=https://narkologicheskaya-klinika-ivanteevka8.ru/]telefon-narkologicheskoj-kliniki[/url]
Эта публикация дает возможность задействовать различные источники информации и представить их в удобной форме. Читатели смогут быстро найти нужные данные и получить ответы на интересующие их вопросы. Мы стремимся к четкости и доступности материала для всех!
Прочесть заключение эксперта – http://www.sotomi.jp/topimg_01
Такая «ступенчатая» логика позволяет видеть вклад каждого решения и снижает риск нежелательных ощущений. Мы избегаем параллельных «усилений», чтобы не терять управляемость.
Получить дополнительные сведения – https://vyvod-iz-zapoya-v-ekaterinburge16.ru/vyvod-iz-zapoya-na-domu-ekaterinburg-otzyvy
Сразу важно проговорить: кодирование — это «замок» на поведение и физиологию, который помогает удержать ремиссию, пока человек выстраивает новые привычки и восстанавливает качество жизни. Поэтому эффект процедуры прямо зависит от того, насколько грамотно выстроены подготовка, информирование и поддержка после вмешательства. «НеоТрезвие СПБ» делает акцент на постепенности: один этап — одна цель — один прозрачный маркер успеха.
Подробнее можно узнать тут – [url=https://kodirovanie-ot-alkogolizma-v-spb16.ru/]клиника кодирования от алкоголизма санкт-петербург[/url]
Если на телефонном этапе выявляются «красные флаги» — спутанность, выраженная одышка, «скачущий» ритм, неукротимая рвота, — мы рекомендуем короткое окно стационарного наблюдения. При низком риске целесообразно начать дома: привычная среда снижает сенсорную нагрузку, а телемедицинские включения вечером по 15–20 минут помогают пройти «трудный час» без поездок.
Узнать больше – [url=https://vyvod-iz-zapoya-kaliningrad15.ru/]вывод из запоя капельница[/url]
В этой статье собраны факты, которые освещают целый ряд важных вопросов. Мы стремимся предложить читателям четкую, достоверную информацию, которая поможет сформировать собственное мнение и лучше понять сложные аспекты рассматриваемой темы.
Жми сюда — получишь ответ – http://www.aacaninecountryclub.com
В этой статье вы найдете познавательную и занимательную информацию, которая поможет вам лучше понять мир вокруг. Мы собрали интересные данные, которые вдохновляют на размышления и побуждают к действиям. Открывайте новую информацию и получайте удовольствие от чтения!
Откройте для себя больше – https://sndesignremodeling.com/uncategorized/what-makes-engineering-consulting-different
В Казани дежурят мобильные бригады, покрывающие центральные районы и спальные кварталы. Координатор по телефону собирает лишь данные, влияющие на безопасность: текущие лекарства и дозировки, аллергии, эпизоды судорог/психозов в анамнезе, последние значения АД/ЧСС, температуру, а также бытовые условия — место полулёжа, доступ к розетке, возможность «тихого окна» на 2–3 часа. Врач приезжает быстро, но спокойно; вместо суеты — последовательность и аккуратные действия. Визит начинается с очного осмотра, где фиксируются исходные показатели и выбирается контур терапии. Далее выполняется тест переносимости и только затем — основной инфузионный этап. По завершении пациент получает «вечерний протокол» с простыми ритуалами: приглушить свет, проветрить комнату, исключить экраны за час до сна, пить воду малыми глотками.
Подробнее тут – http://narkologicheskaya-pomoshh-v-kazani16.ru
Процедура вывода из запоя проводится с применением современных методик инфузионной терапии. Врачи контролируют уровень гидратации, работу сердечно-сосудистой системы и общее состояние пациента до полного устранения симптомов.
Узнать больше – https://narkologicheskaya-clinika-v-kazani16.ru/chastnaya-narkologicheskaya-klinika-kazan/
Мы не используем универсальные «сильные капельницы». Эффективность даёт точное совпадение с задачей. Ниже — логика выбора профилей и маркеры, на которые мы ориентируемся при контроле эффективности и безопасности.
Подробнее можно узнать тут – [url=https://vivod-iz-zapoya-v-sankt-peterburge16.ru/]вывод из запоя на дому недорого[/url]
«Волшебной капельницы» не существует. Мы структурируем инфузии от симптомов, а не от «средних рецептов». Ниже — логика подбора для типичных профилей; реальную схему определяет врач на месте.
Детальнее – [url=https://vyvod-iz-zapoya-v-kaliningrade15.ru/]вывод из запоя капельница в калининграде[/url]
При домашнем формате мы сразу закладываем «мостик» к стационару: в случае ухудшения состояния перевод происходит бесшовно, по заранее оговорённым критериям. Пациент и семья знают, какие маркеры считаются целевыми (переносимость воды, ровный вечерний пульс, время до засыпания, число пробуждений), и когда состоится повторная оценка. Прозрачность снимает суету и укрепляет приверженность плану.
Разобраться лучше – https://kapelnicza-ot-zapoya-murmansk15.ru/kapelnicza-ot-pokhmelya-murmansk
Наркологическая клиника в клинике в Казани оказывает квалифицированную помощь людям, столкнувшимся с алкогольной и наркотической зависимостью. Лечение проводится в условиях полной конфиденциальности и медицинской безопасности. Основное направление работы клиники — это восстановление физического, психического и эмоционального состояния пациента, а также формирование устойчивой мотивации к отказу от употребления психоактивных веществ. Все процедуры выполняются с использованием сертифицированных препаратов и современных диагностических технологий, что позволяет добиться устойчивого результата без осложнений.
Изучить вопрос глубже – http://narkologicheskaya-klinika-v-kazani16.ru
Детокс — это не один раз «поставить капельницу», а последовательность: допуск к терапии, коррекция жидкости и электролитов, поддержка органов-мишеней, симптом-контроль, профилактика осложнений, переоценка и настройка схемы. Мы заранее закладываем точку повторной оценки, потому что абстинентные проявления изменчивы: тремор и тревога могут уходить волнообразно, давление — «гулять» на фоне усталости и недосыпа. Врач видит динамику и либо переводит на пероральные схемы, либо усиливает наблюдение, рекомендуя стационар. Параллельно настраиваем «бытовой контур» — сон по расписанию, вода малыми порциями, лёгкое дробное питание, ограничение эмоциональных перегрузок и перенос встреч, где сложно отказать.
Получить больше информации – http://narkologicheskaya-klinika-voskresensk8.ru
«Чистая Гармония» — это выездная и стационарная наркологическая помощь в одном маршруте: оперативный приезд врача на дом по Клину и району, аккуратный детокс с контролем жизненно важных показателей, стационар с круглосуточным наблюдением и подготовка к кодированию. Мы придерживаемся принципа клинической достаточности: никаких лишних процедур ради «видимости лечения» и никаких задержек с тем, что влияет на исход. Каждое назначение объясняем простыми словами, заранее согласуем смету и оставляем понятный план на 24–48 часов и первую неделю. Анонимность — базовый стандарт: выезд без опознавательных знаков, нейтральные формулировки в документах по запросу, ограниченный доступ к данным.
Подробнее тут – https://narkologicheskaya-klinika-klin8.ru/kruglosutochnaya-narkologicheskaya-klinika-v-klinu
В реальной городской ткани Ставрополя на самочувствие влияет не только схема лечения, но и логистика: утренние заторы на въезде, плотная застройка частного сектора, шумные перекрёстки. Мы заранее «поглощаем» эти риски организацией: секторные выезды, согласованная парковка, нейтральная переписка без «говорящих» терминов, при необходимости — курьерская доставка расходников отдельно от врача, чтобы на месте сразу переходить к оценке и запуску инфузии. Пациенту не нужно «вписываться» в систему — система подстраивается под реальную жизнь человека, экономя десятки минут и снижая сенсорную нагрузку перед первой ночью.
Получить больше информации – http://
В этом материале представлены детали, которые хоть и занимательны, но не особенно значимы. Мы рассматриваем моменты, которые трудно назвать важными, но всё же решили включить их для полноты картины.
Вот – [url=https://arma-rehab.ru/vyvod-iz-zapoya/]джекпот[/url]
Решение о кодировании принимает врач после очной оценки. Методика подбирается индивидуально, с обязательным информированным согласием. Ниже — ориентиры, помогающие понять, когда процедура уместна, а когда стоит отложить или выбрать альтернативу.
Подробнее – [url=https://kodirovanie-ot-alkogolizma-v-spb16.ru/]кодирование от алкоголизма цена санкт-петербург[/url]
Цель
Выяснить больше – https://narkologicheskaya-klinika-ivanteevka8.ru/narkologicheskaya-klinika-na-domu-v-ivanteevke
Срочная наркологическая помощь — это не «универсальная капельница», а управляемый клинический процесс, где каждое действие проверяется измеримыми маркерами и выполняется в правильной последовательности. В наркологической клинике «ВолгаМед Альтернатива» маршрут выстроен вокруг принципа минимально достаточных вмешательств: сначала безопасный старт и телескрининг, затем очный осмотр с выбором контура инфузии и, только после теста переносимости, — основная терапия. Такой подход уменьшает реактивность организма, снижает риск побочных ощущений и делает результат предсказуемым для пациента и близких. Команда работает круглосуточно, выезжает на немаркированном транспорте, общение ведётся через одного доверенного человека, а документы оформляются в нейтральной терминологии без стигматизирующих формулировок.
Подробнее – https://narkologicheskaya-pomoshh-v-kazani16.ru/narkologicheskaya-sluzhba-kazan
Статья посвящена анализу текущих трендов в медицине и их влиянию на жизнь людей. Мы рассмотрим новые технологии, методы лечения и значение профилактики в обеспечении долголетия и здоровья.
Исследовать вопрос подробнее – https://moscow.big-book-med.ru/company/546732
Городская среда Калининграда специфична: морской ветер, сезонные пробки, яркие витрины в вечерние часы. Эти факторы часто усиливают тревожность и мешают засыпанию. Поэтому мы проектируем выезд «мягко»: согласованная парковка, немаркированный вход, короткий маршрут до места процедуры, отсутствие громких звонков и «визуального шума» у порога. Родственникам предоставляем «тихие окна» связи — короткие апдейты в заранее оговорённое время без лишних подробностей. Такой формат не просто комфортнее, он клинически полезен: чем меньше стимулов, тем меньше потребность в ночных «усилениях» и тем стабильнее проходит первая ночь.
Получить дополнительные сведения – http://vyvod-iz-zapoya-kaliningrad15.ru/klinika-vyvod-iz-zapoya-kaliningrad/
После прохождения детоксикации пациенту назначаются восстановительные процедуры, направленные на нормализацию обмена веществ и укрепление нервной системы. Программы клиники включают физиотерапию, витаминотерапию и индивидуальные занятия с психотерапевтом. Главная цель — восстановить способность организма к естественной саморегуляции и снизить зависимость от внешних раздражителей.
Ознакомиться с деталями – [url=https://narkologicheskaya-clinika-v-kazani16.ru/]запой наркологическая клиника в казани[/url]
Этот информативный текст выделяется своими захватывающими аспектами, которые делают сложные темы доступными и понятными. Мы стремимся предложить читателям глубину знаний вместе с разнообразием интересных фактов. Откройте новые горизонты и развивайте свои способности познавать мир!
Подробности по ссылке – https://radiocantenafm.com/jorge-gonzalez-izquierdo-el-aumento-de-sueldo-minimo-compensa-el-poder-de-compra-perdido-desde-2022
Эта публикация дает возможность задействовать различные источники информации и представить их в удобной форме. Читатели смогут быстро найти нужные данные и получить ответы на интересующие их вопросы. Мы стремимся к четкости и доступности материала для всех!
Узнать напрямую – https://el-omma.com/ar/2024/01/22/%D8%A5%D8%B0%D8%A7-%D8%AA%D9%83%D9%84%D9%85%D8%AA-%D8%A8%D8%A7%D9%84%D9%83%D9%84%D9%85%D8%A9-%D9%85%D9%84%D9%83%D8%AA%D9%83-%D9%88%D8%A5%D8%B0%D8%A7-%D9%84%D9%85-%D8%AA%D8%AA%D9%83%D9%84%D9%85-%D8%A8
В этой публикации мы предлагаем подробные объяснения по актуальным вопросам, чтобы помочь читателям глубже понять их. Четкость и структурированность материала сделают его удобным для усвоения и применения в повседневной жизни.
Давай разберёмся досконально – https://ds-loop.com/hiit-the-beat%E4%BA%88%E7%B4%84%E5%88%B6%E3%81%AB
В этой статье вы найдете познавательную и занимательную информацию, которая поможет вам лучше понять мир вокруг. Мы собрали интересные данные, которые вдохновляют на размышления и побуждают к действиям. Открывайте новую информацию и получайте удовольствие от чтения!
ТОП-5 причин узнать больше – http://builaert.be/eurowood-pellet-mix-combineer-het-beste-van-beide-werelden
Этот информационный материал собраны данные, которые помогут лучше понять текущие тенденции и процессы в различных сферах жизни. Мы предоставляем четкий анализ, графики и примеры, чтобы информация была не только понятной, но и практичной для принятия решений.
Полная информация здесь – https://ame-plus.net/archives/884
Эта статья для ознакомления предлагает читателям общее представление об актуальной теме. Мы стремимся представить ключевые факты и идеи, которые помогут читателям получить представление о предмете и решить, стоит ли углубляться в изучение.
Получить больше информации – https://global-assist.com.au/web-development-to-update-react-hooks-cons
Мы предлагаем вам окунуться в океан любопытных фактов и вдохновляющих историй. Эта публикация поможет расширить горизонты, разбудить интерес к науке и истории и увидеть мир с новой стороны.
Изучите внимательнее – https://dhakaonlineschool.com/page/110
Клиника принимает 24/7 без очередей: ночной блок специально настроен под «трудные часы», когда усиливаются панические мысли и реактивность пульса. Для тех, кому легче дома, выездная служба приводит помощь в знакомое пространство; если нужны короткие контрольные включения, применяем видеосвязь вечером (15–20 минут), чтобы корректно настроить ритуалы засыпания, дыхательные циклы и «световые правила». Маршрут фиксируется в единой карте наблюдения — этот документ доступен команде по ролям и защищает от «повторов заново», когда формат меняется (дом – амбулатория – стационар).
Выяснить больше – [url=https://narkologicheskaya-klinika-v-stavropole15.ru/]наркологическая клиника стационар ставрополь[/url]
Этот текст призван помочь читателю расширить кругозор и получить практические знания. Мы используем простой язык, наглядные примеры и структурированное изложение, чтобы сделать обучение максимально эффективным и увлекательным.
Следуйте по ссылке – https://mail.malyartysta.lomza.pl/programy-i-projekty-edukacyjne/archiwum/item/278-news-3.html?start=21660
Этот обзор предлагает структурированное изложение информации по актуальным вопросам. Материал подан так, чтобы даже новичок мог быстро освоиться в теме и начать использовать полученные знания в практике.
Ознакомьтесь поближе – https://behappykutno.pl/flexible-hours-the-need-to-know-2
Статья знакомит с важнейшими моментами, которые сформировали наше общество. От великих изобретений до культурных переворотов — вы узнаете, как прошлое влияет на наше мышление, технологии и образ жизни.
Нажми и узнай всё – https://web3-clone.deltamobile.com/bus_radar1-2
Эта познавательная публикация погружает вас в море интересного контента, который быстро захватит ваше внимание. Мы рассмотрим важные аспекты темы и предоставим вам уникальные Insights и полезные сведения для дальнейшего изучения.
Погрузиться в научную дискуссию – https://judotraining.info/the-impact-of-penalties-on-attack-frequency-in-high-level-judo-matches
Домашний визит нарколога — это не «срочная капельница любой ценой», а аккуратно организованная медицинская процедура, где важны тишина, предсказуемость и уважение к личным границам. В службе выездной помощи наркологической клиники «СтаврДоктор» специалист приезжает быстро и незаметно: гражданская одежда, немаркированный транспорт, нейтральные формулировки в переписке и документах. Мы сразу выстраиваем безопасный маршрут: от короткого телефонного триажа до подпорогового освещения в комнате и «тихих окон» связи на первые трое суток. Наша философия — минимально достаточная фармакотерапия; инфузия не должна лишать ясности днём и «переседативать» ночью. Мы выбираем адресные растворы, темп и объём по текущим витальным показателям, а если динамика «плоская» — меняем один параметр, а не всё сразу.
Получить дополнительные сведения – [url=https://narkolog-na-dom-stavropol15.ru/]нарколог на дом вывод в ставрополе[/url]
Этот текст призван помочь читателю расширить кругозор и получить практические знания. Мы используем простой язык, наглядные примеры и структурированное изложение, чтобы сделать обучение максимально эффективным и увлекательным.
Получить профессиональную консультацию – https://dibatravel.com/europe/austria
Мы выстраиваем помощь как маршрут, а не разовую «капельницу». После первого звонка администратор собирает краткий чек-лист (длительность эпизода, хронические заболевания, принятые препараты, аллергии), передаёт дежурному врачу, и тот предлагает безопасный старт: визит на дому в пределах Сергиева Посада и района или сразу стационар. Выбор зависит от клинических рисков и бытовых условий: есть ли спокойная комната, помощник на ночь, насколько выражены симптомы.
Углубиться в тему – https://narkologicheskaya-klinika-sergiev-posad8.ru/narkologicheskaya-klinika-ceny-v-sergievom-posade
В этой статье вы найдете уникальные исторические пересечения с научными открытиями. Каждый абзац — это шаг к пониманию того, как наука и события прошлого создают основу для технологического будущего.
Читать далее > – https://www.washingtonsqderm.com/its-official-you-should-always-shower-at-night-not-in-the-morning
В этой информационной статье вы найдете интересное содержание, которое поможет вам расширить свои знания. Мы предлагаем увлекательный подход и уникальные взгляды на обсуждаемые темы, побуждая пользователей к активному мышлению и критическому анализу.
Получить дополнительную информацию – https://www.defining-blog.ru/2025/10/18
Этот информационный материал собраны данные, которые помогут лучше понять текущие тенденции и процессы в различных сферах жизни. Мы предоставляем четкий анализ, графики и примеры, чтобы информация была не только понятной, но и практичной для принятия решений.
Ознакомиться с отчётом – https://crickpicks.com/ind-vs-wi
Детокс — последовательность шагов, где каждый этап имеет цель и критерии безопасности. Мы начинаем с оценки рисков (кардиология, неврология, психическое состояние, возможные взаимодействия препаратов), продолжаем инфузионной терапией, корректируем электролиты и кислотно-щелочное равновесие, поддерживаем печень и нервную систему. Если присутствуют выраженная тревога и бессонница, подключаем короткие курсы седативной терапии с контролем побочных эффектов. Отдельный блок — профилактика осложнений: обезвоживание, аритмии, обострение гастрита и панкреатита, делирий. Каждое назначение — только после очной оценки и с учётом сопутствующих состояний.
Получить дополнительную информацию – http://narkologicheskaya-klinika-moskva8.ru/chastnaya-narkologicheskaya-klinika-v-moskve/
Мы не удерживаем пациента на дому во что бы то ни стало. Домашний формат уместен при контролируемых симптомах, наличии взрослого помощника на вечер и ночь и возможности обеспечить тихий режим. Если у входа видно угрозу делирия, выраженные скачки давления, повторные эпизоды рвоты с обезвоживанием, нестабильный ритм, одиночество ночью — рациональнее начать в палате. В стационаре под рукой аппаратный контроль, по показаниям ЭКГ и лаборатория, пост медсестёр и быстрые коррекции схем. Такой маршрут часто короче по времени до устойчивого сна и предсказуемее по результату.
Подробнее тут – https://narkolog-na-dom-ivanteevka8.ru/narkolog-na-dom-anonimno-v-ivanteevke/
«Чистая Гармония» — это выездная и стационарная наркологическая помощь в одном маршруте: оперативный приезд врача на дом по Клину и району, аккуратный детокс с контролем жизненно важных показателей, стационар с круглосуточным наблюдением и подготовка к кодированию. Мы придерживаемся принципа клинической достаточности: никаких лишних процедур ради «видимости лечения» и никаких задержек с тем, что влияет на исход. Каждое назначение объясняем простыми словами, заранее согласуем смету и оставляем понятный план на 24–48 часов и первую неделю. Анонимность — базовый стандарт: выезд без опознавательных знаков, нейтральные формулировки в документах по запросу, ограниченный доступ к данным.
Разобраться лучше – http://narkologicheskaya-klinika-klin8.ru/chastnaya-narkologicheskaya-klinika-v-klinu/
В этом интересном тексте собраны обширные сведения, которые помогут вам понять различные аспекты обсуждаемой темы. Мы разбираем детали и факты, делая акцент на важности каждого элемента. Не упустите возможность расширить свои знания и взглянуть на мир по-новому!
Прочитать подробнее – https://englishbasics.net/why-do-you-want-to-apply-for-this-internship-sample-answers
Этот информативный текст отличается привлекательным содержанием и актуальными данными. Мы предлагаем читателям взглянуть на привычные вещи под новым углом, предоставляя интересный и доступный материал. Получите удовольствие от чтения и расширьте кругозор!
Обратитесь за информацией – https://ladyflor.ru/talk/sadovye-kally
Ниже — структурированная карта экстренного выезда. Она помогает пациенту и семье понимать, что происходит в каждый отрезок времени, какие цели мы преследуем и по каким критериям двигаемся дальше.
Изучить вопрос глубже – https://vyvod-iz-zapoya-v-voronezhe15.ru/vyvod-iz-zapoya-na-domu-voronezh/
Для жителей Краснодара и ближайших районов организованы два параллельных маршрута: немаркированный выезд врача-нарколога на дом и «тихий вход» в амбулаторный кабинет с отдельной дверью и согласованным слотом. На первичном звонке диспетчер фиксирует только факторы безопасности — частоту рвоты, наличие мочеиспусканий, базовые значения ЧСС/АД, эпизоды спутанности, список текущих препаратов и аллергии. Личные и социальные детали не запрашиваются: мы придерживаемся принципа минимально необходимой информации. На месте врач и медсестра собирают базовую линию (сознание, дыхание, SpO?, температура), оценивают шкалы симптомов (тошнота/тремор/тревога по шкале 0–10), проверяют переносимость небольших глотков воды и описывают ближайшие «окна» принятия решений. Вечером и ночью команда остаётся на связи: мы заранее согласовываем пороги, при которых нужно позвонить дежурному врачу, чтобы не терять критические минуты.
Получить дополнительные сведения – [url=https://narkolog-na-dom-v-krasnodare16.ru/]нарколог на дом анонимно в краснодаре[/url]
Мы не ограничиваемся капельницей. Сервис включает организационные, клинические и поведенческие элементы, которые уменьшают хаос и ускоряют восстановление. Ниже — ключевые блоки, которые пациенты отмечают в отзывах как наиболее полезные и «приземлённые».
Исследовать вопрос подробнее – http://narkolog-na-dom-v-samare16.ru/vrach-narkolog-na-dom-v-samare/
Этот список — памятка на холодильник. Он не раскрывает диагноз, но точно описывает поводы для связи с дежурным врачом. Своевременная эскалация — часть безопасности, а не «подстраховка». Если сомневаетесь — лучше позвонить.
Разобраться лучше – https://kapelnicza-ot-zapoya-v-chelyabinske16.ru/kapelnicza-ot-pokhmelya-na-domu-chelyabinsk/
Наши стандарты включают конфиденциальную маршрутизацию, детализированные инструкции для семьи, модульный план лечения и прозрачное разделение бесплатных и платных блоков. Каждому пациенту назначается ведущий специалист, который сопровождает его на всём пути — от первого звонка до контрольных чек-инов после процедур. Мы не «наращиваем» объём вмешательств ради впечатления: используется минимально достаточный набор мер, который действительно влияет на целевые маркеры — переносимость воды, качество сна, сглаживание вегетативных «качелей» и возвращение утренней ясности.
Узнать больше – https://narkologicheskaya-klinika-v-chelyabinske16.ru/chastnaya-narkologicheskaya-klinika-chelyabinsk/
Наркологическая клиника «СтавропольМедСервис» объединяет современную медицину и чуткое отношение к человеку: круглосуточный приём, точные диагностические алгоритмы, адресная инфузионная терапия, телемедицинские включения и грамотная работа с тревогой и сном. Мы используем принцип «минимально достаточной фармакотерапии»: каждый препарат должен быть оправдан текущими измерениями и клинической картиной, а не привычкой «усилить». Такой подход уменьшает риски дневной заторможенности, помогает быстрее восстановить ясность и делает ночь предсказуемой — без тяжёлой седации. Все действия прозрачны: пациент знает цель шага, окно оценки, критерии перехода и признаки, при которых нужно эскалировать наблюдение. Конфиденциальность встроена в процесс: гражданская одежда персонала, нейтральные формулировки в документах, «беззвучные» уведомления и закрытый контур медицинских карт — не «сервисная опция», а клинический фактор, снижающий реактивность и повышающий приверженность плану.
Разобраться лучше – http://narkologicheskaya-klinika-v-stavropole15.ru/
Детоксикация является первым и важнейшим этапом лечения зависимости. В наркологической клинике в Краснодаре используются современные методы очищения организма, включая инфузионную терапию, гепатопротекторы, витаминные комплексы и ноотропы. Все процедуры проводятся под наблюдением врача-нарколога и направлены на снятие интоксикации, восстановление обмена веществ и нормализацию функций печени и нервной системы.
Получить больше информации – [url=https://narkologicheskaya-klinika-v-krasnodare16.ru/]запой наркологическая клиника[/url]
Этот информационный набор привлекает внимание множеством мелочей и странных ракурсов. Мы предлагаем взгляды, которые редко бывают полезны, но могут слегка разнообразить ваше знакомство с темой.
Вот – [url=https://arma-rehab.ru/]игровые автоматы[/url]
Запой — это не один симптом. Это сдвиг водно-электролитного баланса, скачки давления и пульса, тремор, тошнота, тревога, бессонница, нередко раздражение слизистой желудка и нагрузка на печень. Мы работаем последовательностью: допуск к терапии, инфузионная поддержка с коррекцией воды и электролитов, защита органов-мишеней, симптом-контроль, при необходимости аккуратная нормализация сна, переоценка и перевод на пероральные схемы, затем — поведенческий контур «тихих» дней и, при информированном согласии, подготовка к кодированию. Это не «коктейль на всех», а управляемый процесс, завязанный на объективные показатели и живую динамику.
Разобраться лучше – [url=https://narkologicheskaya-klinika-ivanteevka8.ru/]narkologicheskaya-m-klinika[/url]
Этот обзор позволяет по-новому взглянуть на вещи, на которые обычно и так смотрят. Мы упоминаем факты, которые мало что меняют, и события, значение которых трудно определить, но они всё равно здесь.
Вот – [url=https://arma-rehab.ru/vyvod-iz-zapoya/]казино[/url]
We are surrounded by constant advice about well-being, but clarity is scarce.
Guidance tends to simplify complex biological processes into convenient formulas.
As a result, many are left unsure which signals truly matter.
Health unfolds through patterns unique to each person.
Thoughtful attention reveals patterns that checklists cannot.
Exploration replaces rigid instruction in meaningful ways.
Long-form audio allows ideas to develop without being rushed.
Topics explore the full spectrum of well-being, from physical to mental health.
Awareness grows as connections form over time.
If meaningful dialogue resonates more than quick fixes.
To experience conversations that respect individuality and nuance.
About noticing patterns instead of forcing outcomes.
Want to explore health through audio-driven insights?
Press play and discover more about suhagra 100mg tablet online.
Запой — это не один симптом. Это сдвиг водно-электролитного баланса, скачки давления и пульса, тремор, тошнота, тревога, бессонница, нередко раздражение слизистой желудка и нагрузка на печень. Мы работаем последовательностью: допуск к терапии, инфузионная поддержка с коррекцией воды и электролитов, защита органов-мишеней, симптом-контроль, при необходимости аккуратная нормализация сна, переоценка и перевод на пероральные схемы, затем — поведенческий контур «тихих» дней и, при информированном согласии, подготовка к кодированию. Это не «коктейль на всех», а управляемый процесс, завязанный на объективные показатели и живую динамику.
Подробнее – [url=https://narkologicheskaya-klinika-ivanteevka8.ru/]рейтинг лучших наркологических клиник москвы[/url]
Публикация предоставляет читателю набор разрозненных идей, которые сложно применить на практике. Мы лишь слегка касаемся разных точек зрения, не углубляясь в анализ и не предлагая никаких выводов.
Вот – [url=https://arma-rehab.ru/vyvod-iz-zapoya/]секс[/url]
Вся динамика фиксируется в единой карте наблюдения. При переводе в амбулаторную точку мы не «сбрасываем» историю: решения продолжаются с учётом уже сделанного и реакции пациента на вмешательства.
Узнать больше – http://vyvod-iz-zapoya-v-voronezhe15.ru
Преимущество стационара — предсказуемость и скорость. Рядом врач и медсестра, можно оперативно сдать анализы, сделать ЭКГ или дополнительные обследования, а главное — не «тянуть» с корректировкой схемы. В контролируемой среде быстрее нормализуются сон и аппетит, уходит тремор, снижается тревога. Для пациентов с сопутствующими диагнозами это особенно важно: диабет, гипертония, аритмии, хронические заболевания ЖКТ требуют аккуратной, согласованной тактики.
Изучить вопрос глубже – http://narkologicheskaya-klinika-moskva8.ru
Этап
Подробнее можно узнать тут – http://narkologicheskaya-klinika-klin8.ru
Капельница — это не «секретный коктейль», а набор узких модулей, каждый из которых отвечает за одну задачу. Мы включаем ровно один новый модуль за раз и заранее обозначаем стоп-критерий, чтобы не тянуть терапию «по инерции». Параллельно настраиваются поведенческие элементы: свет, тишина, дыхательные ритмы и «окна» питья. Это снимает часть нагрузки с организма и ускоряет наступление целевых маркеров.
Разобраться лучше – [url=https://narkolog-na-dom-v-krasnodare16.ru/]нарколог на дом[/url]
Эта публикация дает возможность задействовать различные источники информации и представить их в удобной форме. Читатели смогут быстро найти нужные данные и получить ответы на интересующие их вопросы. Мы стремимся к четкости и доступности материала для всех!
Получить исчерпывающие сведения – https://amarajim.com/portfolio/metus-a-arcu
Читатели получат представление о том, как современные технологии влияют на развитие медицины. Обсуждаются новые методы лечения, персонализированный подход и роль цифровых решений в повышении качества медицинских услуг.
Хочу знать больше – https://mamuli.club/forum/topic/41089
Эта статья сочетает в себе как полезные, так и интересные сведения, которые обогатят ваше понимание насущных тем. Мы предлагаем практические советы и рекомендации, которые легко внедрить в повседневную жизнь. Узнайте, как улучшить свои навыки и обогатить свой опыт с помощью простых, но эффективных решений.
Жми сюда — получишь ответ – https://rsingenierie-sas.fr/2023/05/02/batiment-a-usage-de-cellules-locatives-pour-activites-logistique-et-artisanale-2
Эта схема помогает постепенно вывести пациента из кризисного состояния, снизить риски осложнений и закрепить результаты лечения.
Подробнее – [url=https://narkologicheskaya-klinika-v-krasnodare16.ru/]наркологическая клиника клиника помощь[/url]
В данной обзорной статье представлены интригующие факты, которые не оставят вас равнодушными. Мы критикуем и анализируем события, которые изменили наше восприятие мира. Узнайте, что стоит за новыми открытиями и как они могут изменить ваше восприятие реальности.
Желаете узнать подробности? – https://hiddenworldnews.info/entertainment/teddi-mellencamp-gives-health-update-as-she-begins-immunotherapy-amid-melanoma-diagnosis
В этой информационной статье вы найдете интересное содержание, которое поможет вам расширить свои знания. Мы предлагаем увлекательный подход и уникальные взгляды на обсуждаемые темы, побуждая пользователей к активному мышлению и критическому анализу.
Доступ к полной версии – https://www.defining-blog.ru/category/ponyatiya
Клиника ориентирована на клиническую достаточность: никаких процедур «для галочки», только то, что подтверждено показаниями. С первого контакта дежурный врач уточняет анамнез, лекарства, аллергии, оценивает риски сердечно-сосудистых осложнений, степень обезвоживания, уровень тревоги и качества сна. Если состояние позволяет, подготовка к кодированию проводится амбулаторно или на дому; при нестабильных показателях предлагается короткий стационар для безопасной стабилизации. Важна анонимность — в расписании используются шифры, доступ к данным разграничен, информирование родственников происходит только по согласию пациента. Организация процесса учитывает ритм мегаполиса: гибкие слоты в будни и выходные, выездные бригады, быстрый перевод из домашнего формата в стационар при необходимости. Финансовые условия проговариваются заранее, чтобы исключить скрытые позиции и дать человеку возможность планировать бюджет без догадок.
Углубиться в тему – [url=https://kodirovanie-ot-alkogolizma-moskva9.ru/]лучшее кодирование от алкоголизма[/url]
Публикация приглашает вас исследовать неизведанное — от древних тайн до современных достижений науки. Вы узнаете, как случайные находки превращались в революции, а смелые мысли — в новые эры человеческого прогресса.
Секреты успеха внутри – https://everydaygaga.com/product/2-in-1-portable-household-spray-watering-bottle
Эта информационная статья содержит полезные факты, советы и рекомендации, которые помогут вам быть в курсе последних тенденций и изменений в выбранной области. Материал составлен так, чтобы быть полезным и понятным каждому.
Не упусти важное! – https://jurnaljateng.id/news/regional/2021/07/23/30-formasi-cpns-dan-pppk-nihil-pelamar
В данной обзорной статье представлены интригующие факты, которые не оставят вас равнодушными. Мы критикуем и анализируем события, которые изменили наше восприятие мира. Узнайте, что стоит за новыми открытиями и как они могут изменить ваше восприятие реальности.
Лучшее решение — прямо здесь – https://mipaissv.com/lago-de-coatepeque
Эта статья сочетает познавательный и занимательный контент, что делает ее идеальной для любителей глубоких исследований. Мы рассмотрим увлекательные аспекты различных тем и предоставим вам новые знания, которые могут оказаться полезными в будущем.
Всё, что нужно знать – https://simranivfwellness.com/10-myths-about-fertility-treatments-you-need-to-stop-believing
Откройте для себя скрытые страницы истории и малоизвестные научные открытия, которые оказали колоссальное влияние на развитие человечества. Статья предлагает свежий взгляд на события, которые заслуживают большего внимания.
Тыкай сюда — узнаешь много интересного – http://poisk.cerkov.ru/catalog/region/368
Этот обзор предлагает структурированное изложение информации по актуальным вопросам. Материал подан так, чтобы даже новичок мог быстро освоиться в теме и начать использовать полученные знания в практике.
Давай разберёмся досконально – https://school-of-cyber.com/portfolio/9
Предлагаем вашему вниманию интересную справочную статью, в которой собраны ключевые моменты и нюансы по актуальным вопросам. Эта информация будет полезна как для профессионалов, так и для тех, кто только начинает изучать тему. Узнайте ответы на важные вопросы и расширьте свои знания!
Подробнее можно узнать тут – https://trinityalpsmarina.com/2018/02/the-difference-between-docking-and-mooring
В этой статье собраны факты, которые освещают целый ряд важных вопросов. Мы стремимся предложить читателям четкую, достоверную информацию, которая поможет сформировать собственное мнение и лучше понять сложные аспекты рассматриваемой темы.
Посмотреть подробности – https://onlinegeldverdieneninfo.nl/geld-verdienen-met-affiliate-marketing
Эта публикация погружает вас в мир увлекательных фактов и удивительных открытий. Мы расскажем о ключевых событиях, которые изменили ход истории, и приоткроем завесу над научными достижениями, которые вдохновили миллионы. Узнайте, чему может научить нас прошлое и как применить эти знания в будущем.
Личный опыт — читайте сами – https://msaagency.net/we-are-nominated-to-agency-of-year-for-the-second-time-3
Этот информационный материал собраны данные, которые помогут лучше понять текущие тенденции и процессы в различных сферах жизни. Мы предоставляем четкий анализ, графики и примеры, чтобы информация была не только понятной, но и практичной для принятия решений.
Изучить рекомендации специалистов – https://deevarispa.de/aromatherapy-during-massages-is-a-must-have
Эта статья предлагает захватывающий и полезный контент, который привлечет внимание широкого круга читателей. Мы постараемся представить тебе идеи, которые вдохновят вас на изменения в жизни и предоставят практические решения для повседневных вопросов. Читайте и вдохновляйтесь!
Изучить рекомендации специалистов – https://flexporttrade.com.br/hello-world
Лечение в клинике строится на комплексной программе, которая сочетает медикаментозную терапию, психотерапевтические методы и социальную реабилитацию. Такой подход обеспечивает устойчивый результат и предотвращает повторные срывы. Пациент проходит курс под постоянным контролем специалистов, что позволяет отслеживать динамику состояния и корректировать терапию при необходимости.
Подробнее – [url=https://narkologicheskaya-klinika-v-krasnodare16.ru/]лечение в наркологической клинике в краснодаре[/url]
Решение обратиться за наркологической помощью часто упирается в страх огласки и сомнения в эффективности. В «МедТрезвие» эти барьеры снимаются за счёт клинической достаточности и предсказуемой организации. Диагностика и вмешательства назначаются строго по показаниям: врач оценит риски сердечно-сосудистых осложнений, состояние печени и поджелудочной железы, уровень тревоги и сна, наличие депрессивных симптомов. При устойчивом состоянии часть процедур выполняется на дому, что снижает стресс, а при признаках нестабильности — рекомендуется стационар с круглосуточным наблюдением. Анонимность поддерживается шифрованием данных, разграничением доступа и информированием родственников только по согласию пациента. Финансовые условия обсуждаются заранее: семья понимает, из чего складывается смета, и может планировать ресурс без опасений «скрытых» позиций. В результате лечение становится управляемым процессом, где медицинская безопасность и уважение к личной жизни человека — обязательные элементы, а не рекламные обещания.
Выяснить больше – [url=https://narkologicheskaya-klinika-moskva9.ru/]государственная наркологическая клиника москва[/url]
Этот информационный набор привлекает внимание множеством мелочей и странных ракурсов. Мы предлагаем взгляды, которые редко бывают полезны, но могут слегка разнообразить ваше знакомство с темой.
Вот – [url=https://arma-rehab.ru/vyvod-iz-zapoya/]секс[/url]
Капельница — основной метод дезинтоксикации при запое. Она позволяет быстро восполнить дефицит жидкости и электролитов, вывести токсины и улучшить общее самочувствие. В состав инфузии входят препараты, нормализующие обмен веществ, а также витамины и гепатопротекторы. Процедура проводится под контролем врача, что гарантирует безопасность и точную дозировку лекарств.
Получить дополнительную информацию – [url=https://vyvod-iz-zapoya-v-rostove-na-donu16.ru/]анонимный вывод из запоя[/url]
Корректная среда — половина успешной инфузии. Этот порядок действий помогает врачу быстрее принять решения, а пациенту — легче перенести первые часы.
Получить больше информации – [url=https://narkolog-na-dom-v-samare16.ru/]нарколог на дом клиника в самаре[/url]
Клиника предлагает возможность круглосуточного пребывания в комфортных палатах. Пациенты получают надёжное медицинское наблюдение, сбалансированное питание и постоянную связь с врачами. Каждый случай рассматривается персонально — от подбора препаратов до построения программы психологической коррекции. Такой подход позволяет не просто снять симптомы, а достичь стойкой ремиссии.
Изучить вопрос глубже – [url=https://narkologicheskaya-clinika-v-ryazani17.ru/]наркологическая клиника клиника помощь рязань[/url]
Городской ритм Саратова — длинные переезды через мост, активное движение в центре и контрастные микрорайоны — накладывает отпечаток на логистику и сенсорную среду, в которой проходит лечение. Мы адаптируем маршрут под город: назначаем «тихие окна» связи, уменьшаем световую нагрузку в вечернее время, организуем немаркированные выезды, а при стационарном поступлении готовим палату с тёплой подсветкой и акустическим поглощением. Эти, казалось бы, «не медицинские» решения позволяют снизить тревогу, быстрее стабилизировать пульс и сделать сон физиологичным без переседации.
Подробнее можно узнать тут – http://narkologicheskaya-klinika-saratov0.ru
Системный подход позволяет достичь максимальной эффективности лечения и снизить риск возврата к зависимости.
Исследовать вопрос подробнее – https://narkologicheskaya-clinica-v-novokuzneczke17.ru/narkologiya-gorod-novokuzneczk/
Критически важный отрезок — первые 12–24 часа. Мы разбиваем его на «окна», в каждом из которых есть цель, набор действий, маркеры контроля и критерий перехода. Если целевой отклик не достигнут, меняем один параметр: темп инфузии, очередность модулей или поведенческую опору (свет/тишина/цифровой режим) — и назначаем новую точку оценки. Это сохраняет причинно-следственную связь и предотвращает полипрагмазию.
Детальнее – http://narcologicheskaya-klinika-saratov0.ru
Главная задача процедуры — быстрое выведение этанола и его метаболитов из организма, нормализация уровня электролитов, улучшение самочувствия и предотвращение осложнений. Лечение проводится как в клинике, так и на дому, что особенно удобно при тяжёлых состояниях, когда пациент не может самостоятельно добраться до медицинского учреждения.
Ознакомиться с деталями – http://vyvod-iz-zapoya-v-tyumeni17.ru/vyvod-iz-zapoya-tyumen-kruglosutochno/
В клинике используется модульная система лечения, включающая медицинские, психологические и социальные компоненты. В зависимости от состояния человека акценты могут смещаться — например, у одних пациентов приоритетом становится физиологическое восстановление, у других — коррекция эмоционального фона и когнитивных паттернов.
Выяснить больше – https://narkologicheskaya-klinika-stavropol0.ru/chastnaya-narkologicheskaya-klinika-stavropol
Даже если симптомы кажутся незначительными, проведение инфузионной терапии значительно ускоряет процесс восстановления и предотвращает развитие осложнений.
Узнать больше – http://kapelnicza-ot-zapoya-v-volgograde17.ru/kapelnicza-ot-alkogolya-volgograd/
В этом тексте собрано множество случайных сведений и довольно неопределённых мыслей, которые могут чем-то заинтересовать. Мы отмечаем моменты, которые не особенно важны, но всё же занимают своё место в повествовании.
Вот – [url=https://arma-rehab.ru/]рулетка онлайн[/url]
Публикация предоставляет читателю набор разрозненных идей, которые сложно применить на практике. Мы лишь слегка касаемся разных точек зрения, не углубляясь в анализ и не предлагая никаких выводов.
Вот – [url=https://arma-rehab.ru/vyvod-iz-zapoya/]рулетка онлайн[/url]
Решение обратиться за наркологической помощью часто упирается в страх огласки и сомнения в эффективности. В «МедТрезвие» эти барьеры снимаются за счёт клинической достаточности и предсказуемой организации. Диагностика и вмешательства назначаются строго по показаниям: врач оценит риски сердечно-сосудистых осложнений, состояние печени и поджелудочной железы, уровень тревоги и сна, наличие депрессивных симптомов. При устойчивом состоянии часть процедур выполняется на дому, что снижает стресс, а при признаках нестабильности — рекомендуется стационар с круглосуточным наблюдением. Анонимность поддерживается шифрованием данных, разграничением доступа и информированием родственников только по согласию пациента. Финансовые условия обсуждаются заранее: семья понимает, из чего складывается смета, и может планировать ресурс без опасений «скрытых» позиций. В результате лечение становится управляемым процессом, где медицинская безопасность и уважение к личной жизни человека — обязательные элементы, а не рекламные обещания.
Подробнее тут – [url=https://narkologicheskaya-klinika-moskva9.ru/]наркологическая клиника москва[/url]
Профессиональная подготовка — это не формальность, а ключ к безопасной и эффективной процедуре. Врач собирает подробный анамнез, уточняет длительность и характер употребления, фиксирует соматические жалобы, анализирует текущие препараты (в том числе безрецептурные), измеряет давление, пульс, сатурацию, при необходимости назначает ЭКГ и лабораторные тесты. Если есть выраженная интоксикация, бессонница, тремор, скачки давления — стартуют с детокса и стабилизации: корректируют водно-электролитный баланс, снижают тревогу, нормализуют сон. Параллельно специалист объясняет механику методик кодирования, вероятные ощущения после процедуры, ограничения по нагрузкам, правила безопасного поведения в первые недели и алгоритм действий на случай усиления тяги. Подготовительный этап снимает неопределённость, уменьшает тревогу и повышает приверженность: человек понимает, что будет происходить и как оценивать улучшение.
Разобраться лучше – http://
Поэтапный подход помогает достичь устойчивых результатов и минимизировать вероятность рецидива, обеспечивая безопасность пациента на всех стадиях лечения.
Подробнее – http://narkologicheskaya-clinika-v-samare16.ru/narkolog-i-psikhiatr-samara/
Корректная среда — половина успешной инфузии. Этот порядок действий помогает врачу быстрее принять решения, а пациенту — легче перенести первые часы.
Получить дополнительные сведения – https://narkolog-na-dom-v-samare16.ru/vrach-narkolog-na-dom-v-samare/
Наши выездные и стационарные бригады работают по принципу «одна корректировка за раз». Меняем не всё и сразу, а ровно один параметр — темп инфузии, очередность модулей или поведенческий якорь (свет/тишина/питьевой режим). Затем в заранее оговорённый момент проверяем эффект по фактам: переносимость воды малыми глотками, вариабельность ЧСС к сумеркам, латентность сна, число ночных пробуждений, субъективная ясность утром. Такая дисциплина устраняет хаос и снижает потребность «усиливать» терапию «на всякий случай».
Изучить вопрос глубже – [url=https://narkologicheskaya-klinika-saratov0.ru/]наркологическая клиника наркологический центр[/url]
Такой алгоритм позволяет контролировать каждый аспект лечения, обеспечивая постепенное и безопасное восстановление. Врач-куратор отслеживает динамику и при необходимости корректирует программу.
Углубиться в тему – [url=https://narkologicheskaya-clinika-v-ryazani17.ru/]запой наркологическая клиника[/url]
Процесс лечения включает несколько последовательных шагов, направленных на стабилизацию состояния, детоксикацию и восстановление функций организма. Таблица ниже показывает основные этапы процедуры, применяемые врачами клиники «РеабКузбасс».
Подробнее можно узнать тут – [url=https://vyvod-iz-zapoya-v-novokuzneczke17.ru/]вывод из запоя на дому цена[/url]
Вывод из запоя — это не «волшебная капельница», а последовательная медицинская программа с чёткими целями и измеримыми маркерами. В наркологической клинике «СаратовМед Профи» маршрут строится по принципу управляемых окон: на каждом шаге команда преследует одну цель, меняет лишь один параметр и оценивает результат в заранее назначённый момент. Такой подход снижает лекарственную нагрузку, предотвращает «гонку дозировок» и делает динамику предсказуемой для пациента и близких. Конфиденциальность обеспечивается регламентом: немаркированные выезды, нейтральные формулировки в документах, «тихие» каналы связи, доступ к записям — строго по ролям.
Изучить вопрос глубже – [url=https://vyvod-iz-zapoya-saratov0.ru/]вывод из запоя цена в саратове[/url]
Вывод из запоя осуществляется в несколько этапов, каждый из которых направлен на постепенное восстановление организма. Такой поэтапный подход снижает нагрузку на внутренние органы и повышает эффективность лечения.
Получить дополнительные сведения – [url=https://vyvod-iz-zapoya-v-rostove-na-donu16.ru/]наркологический вывод из запоя[/url]
В таблице приведены основные компоненты инфузионной терапии, применяемые при детоксикации:
Подробнее можно узнать тут – https://narkologicheskaya-clinica-v-novokuzneczke17.ru/narkolog-novokuzneczk-na-dom/
«НоваМед Центр» строит лечение как управляемую последовательность шагов, а не набор эпизодических процедур. На входе мы фиксируем исходные риски: длительность употребления, сопутствующие заболевания, принимаемые лекарства, анамнез кодирований и срывов, показатели давления, пульса, сатурации, уровень сна и тревоги. Это позволяет выбрать безопасную точку входа и задать логичную траекторию: от детокса к стабилизации, затем к поведенческим изменениям и поддержанию ремиссии. Такая структура особенно важна при высокой нагрузке и дефиците времени: когда пациент и семья понимают, что будет через час, сутки и неделю, снижается тревога и исчезают импульсивные «проверки себя», из-за которых обычно рушатся результаты. Мы придерживаемся принципа клинической достаточности: только те вмешательства, которые нужны по состоянию сегодня, без «украшений ради прайса». Чёткие правила на 48–72 часа, согласованные окна связи, понятные «красные флажки» для повторного контакта превращают лечение в прогнозируемый маршрут, а не в череду надежд и разочарований. В итоге человек быстрее возвращает контроль над самочувствием, а близкие получают опору вместо бесконечных ночных «дежурств».
Углубиться в тему – [url=https://narkologicheskaya-klinika-moskva999.ru/]klinika-narkologii-i-psihiatrii-moskva[/url]
Если на предзвонке выявляются «красные флаги» — давящая боль в груди, одышка в покое, спутанность сознания, судороги, неукротимая рвота, резкое падение насыщения кислородом — мы организуем бесшовный перевод в стационар. Место резервируем заранее, логистику строим так, чтобы не привлекать внимания соседей и не затягивать старт лечения. При отсутствии угроз терапия может начаться дома с последующим телесопровождением и при необходимости — краткой госпитализацией.
Исследовать вопрос подробнее – [url=https://narcologicheskaya-klinika-saratov0.ru/]частная наркологическая клиника в саратове[/url]
В мегаполисе решают три параметра: клиническая достаточность, логистика и приватность. В «ГородМед Трезвость» назначения делаются строго по показаниям — без «пакетов ради прайса»; это экономит ресурсы и защищает от лишних процедур. Логистика учитывает пробки и занятость пациента: выездные бригады работают круглосуточно, а стационар принимает без очередей, что убирает паузы между детоксом и стабилизацией. Конфиденциальность встроена в процессы: запись через закрытые каналы, шифры вместо ФИО в рабочем расписании, разграничение доступа к данным и отдельные окна визитов. Смысл прост: человек получает медицинский результат без огласки и без бюрократических «ступеней», которые разбивают лечение на бессмысленные ожидания. Поэтому нас выбирают те, кому важно вернуться к работе и семье без срывов и длинных «выходов из строя».
Подробнее тут – [url=https://narkologicheskaya-klinika-moskva99.ru/]narkologicheskaya-bolnica-moskvy[/url]
Родные — ключевой ресурс, если действовать согласованно. Мы обучаем базовым правилам: тише, темнее, теплее; вода и лёгкая еда «по часам»; никаких эмоциональных «разборов» в первые дни; заранее согласованные короткие сигналы для связи со специалистом. Важно отказаться от фраз «возьми себя в руки» и «а если ты сорвёшься?» — они усиливают тревогу и провоцируют сопротивление. Вместо этого — спокойные, конкретные договорённости на сегодня: во сколько отбой, как проходит вечер, когда и какие «буферы» использовать. Такой режим убирает хаос и снижает конфликтность, за счёт чего держится медицинский эффект, уменьшается количество «ночных качелей» и потребность в экстренных визитах. Когда у всех одна карта маршрута, путь к устойчивости становится короче и реалистичнее.
Получить больше информации – [url=https://vyvod-iz-zapoya-balashiha9.ru/]вывод из запоя круглосуточно[/url]
Каждый из этапов сопровождается контролем врача и постепенным снижением медикаментозной нагрузки. Важно не просто снять симптомы, но и научить пациента распознавать внутренние триггеры, чтобы предотвратить рецидив. На протяжении всего лечения сохраняется поддержка психолога, который помогает адаптироваться и перестроить привычные модели поведения.
Получить больше информации – [url=https://narcologicheskaya-klinika-v-voronezhe17.ru/]наркологическая клиника клиника помощь[/url]
Комплексный подход обеспечивает не только снятие симптомов, но и полное восстановление функций организма. Пациент получает поддержку на всех этапах — от детоксикации до социальной адаптации.
Выяснить больше – [url=https://narkologicheskaya-pomoshh-v-tolyatti17.ru/]вызвать наркологическую помощь[/url]
Вывод из запоя в Тюмени — это медицинская процедура, направленная на устранение алкогольной интоксикации и восстановление нормального функционирования организма. Длительное употребление спиртных напитков приводит к нарушению обмена веществ, обезвоживанию, сбоям в работе печени и сердца. В таких случаях требуется профессиональная помощь врача-нарколога, который подберёт оптимальный способ дезинтоксикации и медикаментозной поддержки. Современные методики позволяют провести вывод из запоя безопасно, эффективно и без осложнений.
Получить дополнительные сведения – https://vyvod-iz-zapoya-v-tyumeni17.ru/vyvod-iz-zapoya-v-staczionare-tyumen/
Детоксикация — это не одна «капельница», а серия мероприятий, направленных на снижение токсической нагрузки, выравнивание жизненно важных показателей и возвращение контроля над самочувствием. На старте врач проводит осмотр, при необходимости — экспресс-диагностику и ЭКГ, объясняет цели инфузионной терапии, отвечает на вопросы о препаратах и возможных ощущениях в первые часы после начала. Если состояние пациента позволяет, первые шаги выполняются дома: так легче согласиться на помощь и сохранить приватность. При выраженной интоксикации, обезвоживании, скачках давления и пульса, нарушении ориентации или риске судорог безопаснее выбрать стационар: расширенная диагностика и круглосуточный мониторинг снижает вероятность осложнений и даёт возможность гибко корректировать назначения. После купирования острых проявлений команда переходит к стабилизации — настройке сна, питания, гидратации и поддерживающих схем с понятными целями на ближайшие дни.
Разобраться лучше – [url=https://narkologicheskaya-klinika-moskva9.ru/]лучшая наркологическая клиника москва[/url]
В клинике «ЮгМед Альянс» выстроена система непрерывного медицинского наблюдения. При поступлении проводится комплексная диагностика, назначается детоксикация и поддерживающая терапия, затем начинается стабилизация физического и эмоционального состояния. Благодаря круглосуточной работе бригад и возможности экстренного выезда на дом пациенты получают помощь без задержек. Конфиденциальность соблюдается на всех уровнях — от первичного звонка до выписки. Для удобства родственников организована система информирования: короткие апдейты по согласованным каналам связи и только в определённое время, чтобы не нарушать покой пациента.
Подробнее – https://narkologicheskaya-klinika-stavropol0.ru/chastnaya-narkologicheskaya-klinika-stavropol
Этот информационный набор привлекает внимание множеством мелочей и странных ракурсов. Мы предлагаем взгляды, которые редко бывают полезны, но могут слегка разнообразить ваше знакомство с темой.
Вот – [url=https://arma-rehab.ru/vyvod-iz-zapoya/]порно смотреть[/url]
Каждый пациент проходит несколько последовательных этапов, направленных на очищение организма, стабилизацию эмоционального состояния и формирование стойкой мотивации к трезвой жизни. Такой подход позволяет не только устранить физическую зависимость, но и укрепить психическую устойчивость.
Подробнее – [url=https://narkologicheskaya-klinika-v-samare16.ru/]наркологическая клиника лечение алкоголизма самара[/url]
Инфузионные растворы подбираются строго индивидуально, после осмотра врача и анализа показателей пациента. При необходимости курс повторяется с изменением состава раствора для достижения максимального эффекта.
Разобраться лучше – http://
Алкогольная интоксикация вызывает сильное обезвоживание и разрушает баланс электролитов в организме. Без медицинской помощи восстановление может занять несколько дней, а в тяжёлых случаях приводит к осложнениям. Капельница помогает безопасно и быстро вывести этанол и продукты его распада, восполнить уровень жидкости, снизить нагрузку на печень и сердечно-сосудистую систему. Процедура проводится амбулаторно или на дому, что делает её доступной и удобной для пациентов.
Выяснить больше – http://kapelnicza-ot-zapoya-v-volgograde17.ru
Кодирование в «МедТрезвие» — не «волшебная кнопка», а логическое продолжение после стабилизации, когда организм готов к вмешательству, а пациент понимает механизм действия и ограничения метода. Врач подробно обсуждает цели, риски, противопоказания, ожидаемые эффекты и сроки наблюдения, оформляет информированное согласие и объясняет, как встроить процедуру в общий план. Важная часть — профилактика триггеров и обучение распознаванию ранних сигналов тяги: человек получает не только фармакологическую поддержку, но и практические инструменты саморегуляции, сценарии на «сложные дни», способы запросить помощь до того, как ситуация выйдет из-под контроля. Такая связка повышает вероятность устойчивой ремиссии, потому что работает одновременно на биологическом и поведенческом уровнях.
Изучить вопрос глубже – [url=https://narkologicheskaya-klinika-moskva9.ru/]государственная наркологическая клиника москва[/url]
Чтобы исключить суету и случайные усиления, первые часы делим на небольшие «окна»: цель — действие — маркер — критерий перехода. Если отклика нет, корректируется один элемент — темп инфузии, очередность модулей или поведенческий якорь — и назначается новая точка оценки.
Получить дополнительную информацию – http://vyvod-iz-zapoya-saratov0.ru/
Карта делает видимой причинно-следственную связь: пациент понимает, зачем и что именно делается; семья видит «точки проверки»; врач получает опору для изменения одного параметра без разрушения всего плана.
Углубиться в тему – [url=https://vyvod-iz-zapoya-saratov0.ru/]скорая вывод из запоя[/url]
Ниже — рабочая матрица на первые часы. Она показывает, как клиническая гипотеза превращается в минимальный шаг, какие индикаторы берём под контроль и по какому сигналу меняем тактику или площадку. Таблица не заменяет очную оценку, но делает логику маршрута ясной для всей семьи.
Подробнее – [url=https://narkolog-na-dom-v-samare16.ru/]нарколог на дом вывод из запоя самара[/url]
Терапия в клинике проводится поэтапно, что позволяет обеспечить безопасность и прозрачность процесса. Пациент постепенно проходит все стадии восстановления организма и психики.
Получить дополнительную информацию – http://
Городской ритм Саратова — длинные переезды через мост, активное движение в центре и контрастные микрорайоны — накладывает отпечаток на логистику и сенсорную среду, в которой проходит лечение. Мы адаптируем маршрут под город: назначаем «тихие окна» связи, уменьшаем световую нагрузку в вечернее время, организуем немаркированные выезды, а при стационарном поступлении готовим палату с тёплой подсветкой и акустическим поглощением. Эти, казалось бы, «не медицинские» решения позволяют снизить тревогу, быстрее стабилизировать пульс и сделать сон физиологичным без переседации.
Разобраться лучше – [url=https://narkologicheskaya-klinika-saratov0.ru/]наркологическая клиника вывод из запоя в саратове[/url]
Лечение в клинике «Трезвый Выбор Рязань» проходит в несколько последовательных этапов. Каждый этап выполняет конкретную задачу и сопровождается наблюдением специалистов. В таблице ниже представлена структура терапии и её основные направления.
Подробнее тут – [url=https://narkologicheskaya-clinika-v-ryazani17.ru/]запой наркологическая клиника рязань[/url]
Корректная среда — половина успешной инфузии. Этот порядок действий помогает врачу быстрее принять решения, а пациенту — легче перенести первые часы.
Узнать больше – [url=https://narkolog-na-dom-v-samare16.ru/]нарколог на дом круглосуточно[/url]
Первым шагом при лечении зависимости является детоксикация — очищение организма от токсинов, накопившихся в результате употребления алкоголя или наркотиков. Врач подбирает состав инфузионных растворов и лекарственных препаратов индивидуально. Процедура направлена на восстановление обмена веществ, улучшение работы печени и сердца, нормализацию сна и аппетита. После завершения детоксикации пациент чувствует облегчение, снижается тревожность и повышается концентрация внимания.
Ознакомиться с деталями – [url=https://narkologicheskaya-klinika-v-volgograde17.ru/]частная наркологическая клиника[/url]
Когда острые угрозы исключены, программа стартует дома. Пациент получает понятную карту действий, близкие — короткие окна обратной связи, врач — чистую «картинку» для тонкой настройки. Мы просим сообщать факты, а не эмоции: минуты до засыпания, число пробуждений, объём тёплой воды малыми глотками, пульс к вечеру, переносимость мягкой пищи, ясность головы утром.
Разобраться лучше – [url=https://vyvod-iz-zapoya-saratov0.ru/]наркологический вывод из запоя[/url]
Городской ритм Саратова — длинные переезды через мост, активное движение в центре и контрастные микрорайоны — накладывает отпечаток на логистику и сенсорную среду, в которой проходит лечение. Мы адаптируем маршрут под город: назначаем «тихие окна» связи, уменьшаем световую нагрузку в вечернее время, организуем немаркированные выезды, а при стационарном поступлении готовим палату с тёплой подсветкой и акустическим поглощением. Эти, казалось бы, «не медицинские» решения позволяют снизить тревогу, быстрее стабилизировать пульс и сделать сон физиологичным без переседации.
Углубиться в тему – https://narkologicheskaya-klinika-saratov0.ru/
Мы не используем универсальную «капельницу». Схема собирается из модулей под ведущие жалобы. Медицинские шаги всегда сочетаются с нефраком опорами — свет, тишина, вода малыми глотками, дыхание, — потому что среда усиливает действие препаратов и позволяет держать дозы ниже.
Изучить вопрос глубже – [url=https://narkolog-na-dom-saratov0.ru/]нарколог на дом цены саратов[/url]
Клиника предлагает возможность круглосуточного пребывания в комфортных палатах. Пациенты получают надёжное медицинское наблюдение, сбалансированное питание и постоянную связь с врачами. Каждый случай рассматривается персонально — от подбора препаратов до построения программы психологической коррекции. Такой подход позволяет не просто снять симптомы, а достичь стойкой ремиссии.
Подробнее тут – https://narkologicheskaya-clinika-v-ryazani17.ru/narkologiya-v-ryazani/
Поэтапный подход помогает достичь устойчивых результатов и минимизировать вероятность рецидива, обеспечивая безопасность пациента на всех стадиях лечения.
Получить дополнительные сведения – https://narkologicheskaya-clinika-v-samare16.ru/narkologicheskij-dispanser-g-samara
Кодирование — это медицинский инструмент, который помогает закрепить трезвость, но сам по себе не является «волшебной кнопкой». Его задача — усилить внутреннюю мотивацию и создать физиологические и/или психологические условия, при которых срыв становится маловероятным. В «НаркологЭксперт» кодирование включают в структуру лечения: сначала купируются острые проявления, проводится детокс и стабилизация сна, давления и тревоги, затем — диагностика противопоказаний, подробное информирование, выбор методики и только после этого — сама процедура. Такой порядок снижает риски, повышает переносимость и делает результат предсказуемым. Важно, что любая техника подбирается индивидуально с учётом длительности употребления, анамнеза, сопутствующих заболеваний и рабочей нагрузки пациента, чтобы лечение органично вписалось в реальную жизнь и не сорвалось на первых же неделях.
Получить дополнительную информацию – [url=https://kodirovanie-ot-alkogolizma-moskva9.ru/]москва кодировка от алкоголизма[/url]
Для наглядности приведена таблица, отражающая распространённые методы лечения и их цели:
Получить дополнительную информацию – [url=https://narkologicheskaya-clinika-v-samare16.ru/]наркологическая клиника в самаре[/url]
Поэтапный подход помогает достичь устойчивых результатов и минимизировать вероятность рецидива, обеспечивая безопасность пациента на всех стадиях лечения.
Подробнее можно узнать тут – [url=https://narkologicheskaya-clinika-v-samare16.ru/]вывод наркологическая клиника в самаре[/url]
Задача врача — не «поставить галочку», а исключить противопоказания и выбрать методику с оптимальным соотношением пользы и риска. Учитываются хронические заболевания, эпизоды потери сознания, аритмии, панические атаки, депрессивные симптомы, переносимость инфузий и фармпрепаратов, взаимодействия с уже назначенными лекарствами. По результатам формируется персональный лист ограничений и список «красных флажков», при которых следует связаться со специалистом без промедления.
Получить дополнительную информацию – [url=https://kodirovanie-ot-alkogolizma-moskva9.ru/]centry-kodirovaniya-ot-alkogolizma[/url]
Кодирование — это медицинский инструмент, который помогает закрепить трезвость, но сам по себе не является «волшебной кнопкой». Его задача — усилить внутреннюю мотивацию и создать физиологические и/или психологические условия, при которых срыв становится маловероятным. В «НаркологЭксперт» кодирование включают в структуру лечения: сначала купируются острые проявления, проводится детокс и стабилизация сна, давления и тревоги, затем — диагностика противопоказаний, подробное информирование, выбор методики и только после этого — сама процедура. Такой порядок снижает риски, повышает переносимость и делает результат предсказуемым. Важно, что любая техника подбирается индивидуально с учётом длительности употребления, анамнеза, сопутствующих заболеваний и рабочей нагрузки пациента, чтобы лечение органично вписалось в реальную жизнь и не сорвалось на первых же неделях.
Узнать больше – [url=https://kodirovanie-ot-alkogolizma-moskva9.ru/]centry-kodirovaniya-ot-alkogolizma[/url]
Капельницы при выводе из запоя — основной инструмент детоксикации. Они очищают кровь, стабилизируют давление и восстанавливают баланс электролитов. В клинике «РеабКузбасс» используются только качественные препараты, адаптированные под конкретное состояние пациента. Ниже приведена таблица с основными видами капельниц и их эффектом.
Получить дополнительные сведения – [url=https://vyvod-iz-zapoya-v-novokuzneczke17.ru/]вывод из запоя с выездом новокузнецк[/url]
В этой статье-обзоре мы собрали данные, актуальность которых сомнительна, а факты — не всегда взаимосвязаны. Читатель сможет ознакомиться с разными мнениями, хотя вряд ли они существенно повлияют на его понимание темы.
Вот – [url=https://arma-rehab.ru/vyvod-iz-zapoya/]взрослые игры[/url]
В таблице приведены основные компоненты инфузионной терапии, применяемые при детоксикации:
Подробнее – http://narkologicheskaya-clinica-v-novokuzneczke17.ru/narkologiya-gorod-novokuzneczk/
Показана при обезвоживании, «скачущем» давлении и пульсе, угрозе судорог, упорной рвоте, эпизодах спутанности сознания, тяжёлой соматике. За сутки–двое удаётся выровнять показатели, наладить сон и безопасно перейти к амбулаторному этапу.
Разобраться лучше – [url=https://narkologicheskaya-klinika-moskva999.ru/]narkologicheskaya-klinika-v-moskve[/url]
Лечение организовано поэтапно. Такой подход обеспечивает постепенное восстановление функций организма и исключает риск осложнений. Каждый этап терапии направлен на устранение конкретных нарушений, вызванных интоксикацией.
Подробнее тут – [url=https://vyvod-iz-zapoya-v-krasnoyarske17.ru/]анонимный вывод из запоя красноярск[/url]
Такая структура лечения помогает пациентам пройти все этапы восстановления под контролем специалистов.
Подробнее – https://narcologicheskaya-klinika-perm0.ru/narkolog-perm-czeny
Наркологическая клиника «ВолгаДок Медикал» — это круглосуточная служба помощи, выстроенная вокруг принципов клинической безопасности, прозрачной коммуникации и поддержки пациента на каждом этапе. Мы соединяем стационар и выездные бригады в единую систему: первичный осмотр и стабилизация состояния, адресные инфузионные модули, мягкая коррекция сна и тревоги, последующее наблюдение с короткими «окнами» обратной связи. Все решения принимаются по показаниям и сопровождаются объяснением: какую цель преследуем, каким маркером измеряем, когда проверяем результат. Такой подход исключает хаотичные усиления, бережёт ресурс организма и даёт прогнозируемый клинический эффект.
Изучить вопрос глубже – http://narcologicheskaya-klinika-saratov0.ru
Процесс лечения включает несколько последовательных шагов, направленных на стабилизацию состояния, детоксикацию и восстановление функций организма. Таблица ниже показывает основные этапы процедуры, применяемые врачами клиники «РеабКузбасс».
Ознакомиться с деталями – [url=https://vyvod-iz-zapoya-v-novokuzneczke17.ru/]вывод из запоя вызов город[/url]
Процесс лечения включает несколько последовательных шагов, направленных на стабилизацию состояния, детоксикацию и восстановление функций организма. Таблица ниже показывает основные этапы процедуры, применяемые врачами клиники «РеабКузбасс».
Получить дополнительную информацию – [url=https://vyvod-iz-zapoya-v-novokuzneczke17.ru/]вывод из запоя на дому цена[/url]
Для наглядности представлен примерный состав инфузионного раствора, используемого при выводе из запоя:
Получить больше информации – http://
Наркологическая клиника в Новокузнецке предоставляет профессиональную помощь людям, столкнувшимся с зависимостью от алкоголя, наркотиков и психоактивных веществ. Лечение проводится под наблюдением опытных специалистов с применением современных медицинских методик. Основная цель работы клиники — не только устранить физическую зависимость, но и восстановить психологическое равновесие пациента, вернуть мотивацию и способность жить без употребления веществ.
Подробнее тут – [url=https://narkologicheskaya-clinica-v-novokuzneczke17.ru/]анонимная наркологическая клиника в новокузнецке[/url]
Домашняя точка входа оправдана при стабильных показателях и низком риске осложнений. В знакомой обстановке легче соблюдать режим: затемнить комнату, убрать экраны, распределять воду маленькими порциями, сделать лёгкий перекус «по силам», лечь пораньше. Врач подберёт «узкую» схему инфузий без перегруза препаратами, объяснит, какие ощущения допустимы сегодня и ночью, а какие — повод для немедленной связи. Такой сценарий экономит время семьи, снижает стигму и быстрее переводит состояние в управляемое, на базе которого уже можно строить дальнейшие шаги — амбулаторные визиты, работу с триггерами и, при показаниях, обсуждение кодирования.
Получить дополнительную информацию – http://
Наша задача — не ограничиться «одной капельницей», а провести пациента через связанный маршрут: купирование острых симптомов, стабилизация, профилактика срывов и поведенческая поддержка. На выезде врач оценивает давление, пульс, сатурацию, при необходимости снимает ЭКГ, подбирает инфузионные схемы и корректирует тревогу, тремор, нарушение сна. Если состояние нестабильно, организуем стационар: под наблюдением легче предупреждать осложнения и быстро корректировать назначенные дозы. Когда острые проявления уходят, настраиваем режим сна, питания и гидратации, формируем план «сложных часов» и алгоритм раннего реагирования на тягу. Психотерапевтические сессии усиливают контроль над поведением, а семейные консультации помогают близким действовать согласованно, не усиливая зависимое поведение случайными ошибками вроде «спасательства» и скрытия последствий употребления.
Подробнее можно узнать тут – https://narkologicheskaya-klinika-moskva99.ru/horoshaya-narkologicheskaya-klinika-v-moskve
Если на предзвонке выявляются «красные флаги» — давящая боль в груди, одышка в покое, спутанность сознания, судороги, неукротимая рвота, резкое падение насыщения кислородом — мы организуем бесшовный перевод в стационар. Место резервируем заранее, логистику строим так, чтобы не привлекать внимания соседей и не затягивать старт лечения. При отсутствии угроз терапия может начаться дома с последующим телесопровождением и при необходимости — краткой госпитализацией.
Исследовать вопрос подробнее – [url=https://narcologicheskaya-klinika-saratov0.ru/]наркологическая клиника цены[/url]
Домашний формат нужен, когда важно начать быстро и без лишних перемещений, а состояние не требует госпитализации. Врач адаптирует инфузионные схемы под переносимость и сопутствующие заболевания, контролирует давление, пульс, сатурацию, объясняет режим жидкости и питания, оставляет список признаков, при которых следует связаться повторно. Такой сценарий не отменяет дальнейшую работу: пациент получает краткий план на 48–72 часа, рекомендации по восстановлению сна и активности, а также точку контакта для корректировки. Это снижает тревогу, помогает избежать «самолечения» и формирует доверие к процессу, потому что человек видит конкретный результат — уменьшение тремора, нормализацию сна, снижение тревоги — уже в первые сутки.
Изучить вопрос глубже – [url=https://narkologicheskaya-klinika-moskva9.ru/]наркологическая клиника[/url]
Поэтапный подход помогает достичь устойчивых результатов и минимизировать вероятность рецидива, обеспечивая безопасность пациента на всех стадиях лечения.
Получить дополнительные сведения – [url=https://narkologicheskaya-clinika-v-samare16.ru/]запой наркологическая клиника в самаре[/url]
Решение обратиться за наркологической помощью часто упирается в страх огласки и сомнения в эффективности. В «МедТрезвие» эти барьеры снимаются за счёт клинической достаточности и предсказуемой организации. Диагностика и вмешательства назначаются строго по показаниям: врач оценит риски сердечно-сосудистых осложнений, состояние печени и поджелудочной железы, уровень тревоги и сна, наличие депрессивных симптомов. При устойчивом состоянии часть процедур выполняется на дому, что снижает стресс, а при признаках нестабильности — рекомендуется стационар с круглосуточным наблюдением. Анонимность поддерживается шифрованием данных, разграничением доступа и информированием родственников только по согласию пациента. Финансовые условия обсуждаются заранее: семья понимает, из чего складывается смета, и может планировать ресурс без опасений «скрытых» позиций. В результате лечение становится управляемым процессом, где медицинская безопасность и уважение к личной жизни человека — обязательные элементы, а не рекламные обещания.
Изучить вопрос глубже – [url=https://narkologicheskaya-klinika-moskva9.ru/]gosudarstvennaya-narkologicheskaya-klinika-moskva[/url]
Вывод из запоя осуществляется в несколько этапов, каждый из которых направлен на постепенное восстановление организма. Такой поэтапный подход снижает нагрузку на внутренние органы и повышает эффективность лечения.
Получить дополнительную информацию – [url=https://vyvod-iz-zapoya-v-rostove-na-donu16.ru/]срочный вывод из запоя ростов-на-дону[/url]
Кодирование — это медицинский инструмент, который помогает закрепить трезвость, но сам по себе не является «волшебной кнопкой». Его задача — усилить внутреннюю мотивацию и создать физиологические и/или психологические условия, при которых срыв становится маловероятным. В «НаркологЭксперт» кодирование включают в структуру лечения: сначала купируются острые проявления, проводится детокс и стабилизация сна, давления и тревоги, затем — диагностика противопоказаний, подробное информирование, выбор методики и только после этого — сама процедура. Такой порядок снижает риски, повышает переносимость и делает результат предсказуемым. Важно, что любая техника подбирается индивидуально с учётом длительности употребления, анамнеза, сопутствующих заболеваний и рабочей нагрузки пациента, чтобы лечение органично вписалось в реальную жизнь и не сорвалось на первых же неделях.
Исследовать вопрос подробнее – http://kodirovanie-ot-alkogolizma-moskva9.ru
Кодирование в «МедТрезвие» — не «волшебная кнопка», а логическое продолжение после стабилизации, когда организм готов к вмешательству, а пациент понимает механизм действия и ограничения метода. Врач подробно обсуждает цели, риски, противопоказания, ожидаемые эффекты и сроки наблюдения, оформляет информированное согласие и объясняет, как встроить процедуру в общий план. Важная часть — профилактика триггеров и обучение распознаванию ранних сигналов тяги: человек получает не только фармакологическую поддержку, но и практические инструменты саморегуляции, сценарии на «сложные дни», способы запросить помощь до того, как ситуация выйдет из-под контроля. Такая связка повышает вероятность устойчивой ремиссии, потому что работает одновременно на биологическом и поведенческом уровнях.
Подробнее – http://
Поэтапный подход помогает достичь устойчивых результатов и минимизировать вероятность рецидива, обеспечивая безопасность пациента на всех стадиях лечения.
Получить больше информации – [url=https://narkologicheskaya-clinika-v-samare16.ru/]анонимная наркологическая клиника самара[/url]
Zur gleichen Zeit entstand auf private Initiative ausserhalb der Stadtmauern im heutigen Stadtquartier St. Alban das Sommercasino für jene Bürger, die sich während des Sommers auf ihre Landsitze zurückzogen. Das Gebäude, das am Steinenberg liegt, bildet zusammen mit der angrenzenden Basler Kunsthalle und dem Theater Basel eines der wichtigsten kulturellen Zentren der Stadt, das gemeinhin als «Kulturmeile» bekannt ist. Das Stadtcasino Basel ist ein Konzerthaus in der Schweizer Stadt Basel.
Das winddynamische Werk lässt sich nur vom vierten Manual des eingebauten Spieltischs aus spielen und besitzt eine mechanische Traktur, wobei sich der Tastentiefgang über einen Registerzug von 0 bis 15 mm variieren lässt. Eine umfassende Renovation des Stadtcasinos wurde 1976 durchgeführt. Der wirtschaftliche Aufschwung der 1950er Jahre brachte den Erfolg zurück; zusätzlich wurden ab 1947 die Veranstaltungen der Sinfoniekonzerte vom Volkshaus ins Stadtcasino verlegt, was für internationale Beachtung und Anerkennung des Stadtcasinos sorgte. Finanziert wurde der Neubau mit dem Erlös des Verkaufs der Sommercasinos. Mai 1933 fand in den Räumlichkeiten des Stadtcasinos die Gründung der Gruppe 33, der antifaschistischen Gruppe von Kunstschaffenden Basels, statt. Während der Unruhen der Basler Kantonstrennung zwischen 1830 und 1833 zogen die Mitglieder des Sommercasinos vorübergehend in das Stadtcasino.
Mit einer ESBK Konzession der Kategorie B und einem grossen Spielangebot bietet dieses Schweizer Kasino Besuchern beste Unterhaltung unter sicheren Gegebenheiten. Das riesige Bauwerk in Form eines grossen roten Würfels, das abends sogar noch stilvoll beleuchtet ist, bietet einfach deutlich mehr als „nur“ tolle Spiele mit hohen Gewinnchancen. Darüber hinaus gibt es auch noch weitere viele gute Glücksspielanbieter im Internet, die für Kunden aus der Schweiz geeignet sind. Das Stadt Casino Basel liegt keinen Kilometer von der Grenze zu Deutschland und Frankreich entfernt und ist daher auch aus diesen Ländern gut zu erreichen. Es ist unter dem Namen Golden Grand Online Casino geführt und bietet den Vorteil eines Bonus für Schweizer. Im Davos Casino beispielsweise konnte ich lediglich kleine Snacks und Getränke an der BAr zu mir nehmen.
References:
https://online-spielhallen.de/rooli-casino-cashback-ihr-weg-zu-mehr-spielguthaben/
Все процедуры выполняются анонимно и с соблюдением медицинских стандартов. Препараты применяются только сертифицированные, рассчитанные на мягкое восстановление организма без побочных эффектов. При необходимости лечение продолжается в стационаре, где пациент получает круглосуточное наблюдение, питание и психологическую поддержку.
Получить дополнительные сведения – [url=https://vyvod-iz-zapoya-v-novokuzneczke17.ru/]наркологический вывод из запоя в новокузнецке[/url]
В клинике используется модульная система лечения, включающая медицинские, психологические и социальные компоненты. В зависимости от состояния человека акценты могут смещаться — например, у одних пациентов приоритетом становится физиологическое восстановление, у других — коррекция эмоционального фона и когнитивных паттернов.
Получить дополнительную информацию – [url=https://narkologicheskaya-klinika-stavropol0.ru/]частная наркологическая клиника в ставрополе[/url]
Эффект ощущается уже через 20–40 минут после начала процедуры. Пациент отмечает снижение головной боли, улучшение сна и общего состояния. Полное восстановление самочувствия наступает в течение суток.
Ознакомиться с деталями – http://vyvod-iz-zapoya-v-tyumeni17.ru/vyvod-iz-zapoya-na-domu-tyumen/
Клиника ориентирована на клиническую достаточность: никаких процедур «для галочки», только то, что подтверждено показаниями. С первого контакта дежурный врач уточняет анамнез, лекарства, аллергии, оценивает риски сердечно-сосудистых осложнений, степень обезвоживания, уровень тревоги и качества сна. Если состояние позволяет, подготовка к кодированию проводится амбулаторно или на дому; при нестабильных показателях предлагается короткий стационар для безопасной стабилизации. Важна анонимность — в расписании используются шифры, доступ к данным разграничен, информирование родственников происходит только по согласию пациента. Организация процесса учитывает ритм мегаполиса: гибкие слоты в будни и выходные, выездные бригады, быстрый перевод из домашнего формата в стационар при необходимости. Финансовые условия проговариваются заранее, чтобы исключить скрытые позиции и дать человеку возможность планировать бюджет без догадок.
Детальнее – https://kodirovanie-ot-alkogolizma-moskva9.ru/skolko-stoit-kodirovanie-ot-alkogolizma-v-moskve
Ниже — рабочая матрица на первые часы. Она показывает, как клиническая гипотеза превращается в минимальный шаг, какие индикаторы берём под контроль и по какому сигналу меняем тактику или площадку. Таблица не заменяет очную оценку, но делает логику маршрута ясной для всей семьи.
Исследовать вопрос подробнее – [url=https://narkolog-na-dom-v-samare16.ru/]платный нарколог на дом в самаре[/url]
Каждый из этапов сопровождается контролем врача и постепенным снижением медикаментозной нагрузки. Важно не просто снять симптомы, но и научить пациента распознавать внутренние триггеры, чтобы предотвратить рецидив. На протяжении всего лечения сохраняется поддержка психолога, который помогает адаптироваться и перестроить привычные модели поведения.
Разобраться лучше – http://narcologicheskaya-klinika-v-voronezhe17.ru/narkolog-voronezh-anonimno/
Решение обратиться за наркологической помощью часто упирается в страх огласки и сомнения в эффективности. В «МедТрезвие» эти барьеры снимаются за счёт клинической достаточности и предсказуемой организации. Диагностика и вмешательства назначаются строго по показаниям: врач оценит риски сердечно-сосудистых осложнений, состояние печени и поджелудочной железы, уровень тревоги и сна, наличие депрессивных симптомов. При устойчивом состоянии часть процедур выполняется на дому, что снижает стресс, а при признаках нестабильности — рекомендуется стационар с круглосуточным наблюдением. Анонимность поддерживается шифрованием данных, разграничением доступа и информированием родственников только по согласию пациента. Финансовые условия обсуждаются заранее: семья понимает, из чего складывается смета, и может планировать ресурс без опасений «скрытых» позиций. В результате лечение становится управляемым процессом, где медицинская безопасность и уважение к личной жизни человека — обязательные элементы, а не рекламные обещания.
Подробнее тут – [url=https://narkologicheskaya-klinika-moskva9.ru/]narkologicheskaya-klinika-moskva9.ru/[/url]
Городской ритм Саратова — длинные переезды через мост, активное движение в центре и контрастные микрорайоны — накладывает отпечаток на логистику и сенсорную среду, в которой проходит лечение. Мы адаптируем маршрут под город: назначаем «тихие окна» связи, уменьшаем световую нагрузку в вечернее время, организуем немаркированные выезды, а при стационарном поступлении готовим палату с тёплой подсветкой и акустическим поглощением. Эти, казалось бы, «не медицинские» решения позволяют снизить тревогу, быстрее стабилизировать пульс и сделать сон физиологичным без переседации.
Разобраться лучше – [url=https://narkologicheskaya-klinika-saratov0.ru/]анонимная наркологическая клиника[/url]
Мы не ограничиваемся капельницей. Сервис включает организационные, клинические и поведенческие элементы, которые уменьшают хаос и ускоряют восстановление. Ниже — ключевые блоки, которые пациенты отмечают в отзывах как наиболее полезные и «приземлённые».
Ознакомиться с деталями – [url=https://narkolog-na-dom-v-samare16.ru/]нарколог на дом вывод из запоя самара[/url]
Корректная среда — половина успешной инфузии. Этот порядок действий помогает врачу быстрее принять решения, а пациенту — легче перенести первые часы.
Детальнее – https://narkolog-na-dom-v-samare16.ru/vrach-narkolog-na-dom-v-samare/
Чтобы исключить суету и «гонку дозировок», острый отрезок мы делим на короткие окна с ясной целью и чёткими критериями перехода. Если отклика нет, корректируется один элемент и тут же назначается новая точка оценки. Прозрачность плана снижает эмоциональный фон и повышает доверие к процессу.
Узнать больше – http://narkologicheskaya-klinika-saratov0.ru
Casino Freispiele ohne Einzahlung, oder einen Casino Bonus ohne Einzahlung von Geld, sind für jeden Spieler eine tolle Sache. Das soll verhindern, dass Spieler sich auf Seiten anmelden können, den Gewinn der Online Casino Freispiele holen und es dann direkt auszahlen. Damit das Geld nicht direkt vom Spieler ausgezahlt werden kann, muss der Gewinn dieser Casino Freispiele Bonus meist X-beliebig mal umgesetzt werden, um eine Auszahlung zu tätigen. Wenn das Angebot eines Online Casinos zum Beispiel „20 Free Spins bei Registrierung“ lautet, dann winken in diesem Fall 20 Freispiele ohne Einzahlung. Gerade für Neueinsteiger sind Online Casino Freispiele sehr wertvoll, um die Automaten einfach besser kennenzulernen. Neue Automaten Generationen haben eingebaute Bonusspiele wie Cash Games oder Super Games, die auch bei Free Spins mit und ohne Einzahlung aktiv werden können.
Melden Sie sich im X7 Casino an und Sie können 10 Freispiele ohne Einzahlung für Big Bass Bonanza sowie einen 500% Ersteinzahlungsbonus bis zu €1.000 erhalten. Sie können also Freispielrunden spielen, ohne Einsätze leisten zu müssen und immer wieder neue gewinnen. Zum Beispiel mit Freispielen oder einem Handy Casino Echtgeld Bonus ohne Einzahlung – exklusiv für mobile Nutzer. Statt Freispiele gibt es hier echtes Bonusgeld (meist 5–10 €), das Sie auf mehreren Slots oder sogar Tischspielen verwenden können.
References:
https://online-spielhallen.de/casino-bregenz-promo-code-ihre-chance-auf-extra-vorteile/
Процесс лечения включает несколько последовательных шагов, направленных на стабилизацию состояния, детоксикацию и восстановление функций организма. Таблица ниже показывает основные этапы процедуры, применяемые врачами клиники «РеабКузбасс».
Получить дополнительные сведения – [url=https://vyvod-iz-zapoya-v-novokuzneczke17.ru/]вывод из запоя вызов на дом в новокузнецке[/url]
Такой подход позволяет точно отслеживать динамику и вносить изменения в программу без потери контроля. Пациент видит прогресс, а врачи получают объективные данные о реакции организма на лечение.
Углубиться в тему – https://narkologicheskaya-klinika-stavropol0.ru/narkolog-psikholog-stavropol/
Лечение в клинике «Трезвый Выбор Рязань» проходит в несколько последовательных этапов. Каждый этап выполняет конкретную задачу и сопровождается наблюдением специалистов. В таблице ниже представлена структура терапии и её основные направления.
Подробнее тут – http://narkologicheskaya-clinika-v-ryazani17.ru/narkolog-ryazan-telefon/
Главная задача процедуры — быстрое выведение этанола и его метаболитов из организма, нормализация уровня электролитов, улучшение самочувствия и предотвращение осложнений. Лечение проводится как в клинике, так и на дому, что особенно удобно при тяжёлых состояниях, когда пациент не может самостоятельно добраться до медицинского учреждения.
Ознакомиться с деталями – [url=https://vyvod-iz-zapoya-v-tyumeni17.ru/]вывод из запоя вызов в тюмени[/url]
Эта карта — рабочий инструмент и для пациента, и для семьи: все видят, какая цель преследуется, какими средствами она достигается, когда проверяется эффект и что будет дальше. Отсюда рождается доверие и строгая приверженность — главный предиктор устойчивого результата.
Выяснить больше – [url=https://narkologicheskaya-klinika-saratov0.ru/]анонимная наркологическая клиника[/url]
Если у человека выраженное обезвоживание, скачки давления и пульса, эпизоды спутанности сознания, упорная рвота, «дергающийся» сон или тяжёлая сопутствующая патология, стационар закрывает главный риск — непредсказуемое течение синдрома отмены. Круглосуточный мониторинг позволяет динамически корректировать схемы, подключать лабораторные и инструментальные исследования по показаниям, своевременно восполнять дефициты и удерживать стабильный сон. На практике «короткое окно» госпитализации (24–48 часов) нередко дешевле на дистанции: оно предотвращает осложнения и повторные вызовы, которые растягивают курс и увеличивают суммарные затраты. Для жителей Москвы мы разносim визиты по времени, используем отдельные входы и «тихие» маршруты, чтобы сохранить приватность. После стабилизации маршрут переводится в амбулаторный или домашний формат: пациент получает план питания и активности, контрольные контакты и правила, при каких признаках связаться немедленно, не дожидаясь «как будет утром».
Получить дополнительную информацию – https://vyvod-iz-zapoya-moskva99.ru
Наркологическая клиника — это пространство, где медицинская наука сочетается с психологической поддержкой и индивидуальным подходом к каждому пациенту. В клинике «ВоронежМед Альянс» лечение зависимости организовано по принципам доказательной медицины: каждый этап терапии основан на объективных данных, контролируемых результатах и четких критериях эффективности. Здесь помогают не просто устранить физические последствия зависимости, но и восстановить внутренние ресурсы человека, вернуть уверенность, осознанность и способность строить новую жизнь без алкоголя и наркотиков.
Исследовать вопрос подробнее – [url=https://narcologicheskaya-klinika-v-voronezhe17.ru/]наркологическая клиника стационар[/url]
Клиника «ВоронежМед Альянс» придерживается принципа прозрачной медицины: каждый шаг понятен пациенту, решения принимаются совместно, а результаты фиксируются по объективным показателям. Такой формат создаёт чувство безопасности и доверия. Среди основных принципов:
Получить дополнительную информацию – http://narcologicheskaya-klinika-v-voronezhe17.ru/chastnaya-narkologicheskaya-klinika-voronezh/
Лечение в клинике «Трезвый Выбор Рязань» проходит в несколько последовательных этапов. Каждый этап выполняет конкретную задачу и сопровождается наблюдением специалистов. В таблице ниже представлена структура терапии и её основные направления.
Изучить вопрос глубже – https://narkologicheskaya-clinika-v-ryazani17.ru/narkolog-ryazan-telefon
Перед процедурой врач оценивает состояние пациента, измеряет давление, пульс и уровень насыщения крови кислородом. После осмотра подбирается состав инфузии, включающий препараты для дезинтоксикации, восстановления водно-солевого баланса и нормализации работы органов. Введение растворов осуществляется внутривенно, под контролем специалиста. Длительность процедуры — от 40 минут до 1,5 часов.
Узнать больше – http://kapelnicza-ot-zapoya-v-volgograde17.ru/
Клиника «Трезвый Выбор Рязань» функционирует по принципу полного цикла лечения: от экстренного выезда нарколога до длительной реабилитации в условиях стационара. Пациенты поступают как в острых состояниях (запой, абстиненция, интоксикация), так и для плановой терапии. Лечение начинается с медицинской диагностики, оценки физического и психического состояния, после чего разрабатывается индивидуальный план. Программы включают детоксикацию, медикаментозную поддержку, психологическую помощь и профилактику рецидивов.
Узнать больше – [url=https://narkologicheskaya-clinika-v-ryazani17.ru/]наркологическая клиника вывод из запоя рязань[/url]
Наркологическая клиника в Самаре предлагает профессиональное лечение алкогольной, наркотической и других форм зависимости с использованием современных медицинских технологий и индивидуальных программ. Основная цель работы специалистов — помочь пациенту восстановить физическое и психическое здоровье, вернуть контроль над собственной жизнью и предотвратить рецидив. Все процедуры проводятся с соблюдением медицинской этики, конфиденциальности и стандартов безопасности.
Выяснить больше – https://narkologicheskaya-clinika-v-samare16.ru
Вызов нарколога на дом — это не «капельница как панацея», а управляемая последовательность решений с ясными целями, измеримыми маркерами и понятными «окнами оценки». В «СамарМед Ассист» мы строим лечение из узких модулей: сначала проверяем базовую безопасность (дыхание, сознание, гемодинамика), затем возвращаем переносимость питья, стабилизируем вегетатику, собираем ночь, и только после этого занимаемся дневной выносливостью и бытовой устойчивостью. Такой ритм исключает полипрагмазию, снижает фармаконагрузку и превращает первые часы из хаотичной «борьбы с симптомами» в спокойный, предсказуемый маршрут. Семья получает роль партнёра, а не наблюдателя: по простым ориентирам понятно, что считать нормой, когда звонить врачу и на каком этапе модуль следует «выключить».
Углубиться в тему – http://
Алгоритм прозрачен. Сначала — краткое интервью и осмотр, измерение давления, пульса, сатурации, при необходимости — ЭКГ и оценка неврологического статуса. Далее — инфузионная терапия по показаниям: восполнение жидкости, коррекция электролитов, поддержка функций печени, мягкое снижение тремора и тревоги, подготовка к сну без «оглушения». Каждая доза сверяется с реакцией организма, чтобы не получить вечернего отката и побочных эффектов. Врач детально объясняет, какие ощущения нормальны (сонливость, сухость во рту, умеренная слабость), а какие — основание для связи. После процедуры повторно фиксируются показатели и выдаются письменные рекомендации на 48–72 часа: режим воды и лёгкой еды, запрет на «подвиги» и конфликты, время короткого дневного отдыха, интерфейс связи и условия повторного визита. Такой порядок убирает хаос: пациент и семья понимают, что именно делать вечером и ночью, как снизить «дергание» и зачем придерживаться простых правил, пока организм перестраивается после запоя.
Углубиться в тему – https://narkolog-na-dom-moskva999.ru/narkolog-na-dom-moskva-kruglosutochno/
Наркологическая клиника «ВолгаМед Центр» — это круглосуточный медицинский комплекс, в котором экстренная помощь, капельницы и детоксикация объединены в единую клинико-поведенческую систему. Мы лечим не «симптом по одному», а управляем весь маршрут: от первичной стабилизации и снижения токсической нагрузки до восстановления сна, аппетита и рабочих ритмов. Каждый шаг имеет цель, измеримый маркер и назначенное «окно» переоценки — это исключает полипрагмазию и делает динамику предсказуемой для пациента и семьи. Конфиденциальность не декларируется, а обеспечивается регламентами: немаркированная логистика, нейтральные формулировки в документах, «тихие» каналы связи и разграничение доступа к медзаписям.
Ознакомиться с деталями – http://narkologicheskaya-klinika-saratov0.ru/
В Тольятти клиника «ВолгаМед Тольятти» предоставляет широкий спектр услуг — от экстренного вывода из запоя на дому до длительных реабилитационных программ. Выезд нарколога осуществляется круглосуточно: врач приезжает по вызову, проводит диагностику, оценивает степень интоксикации и назначает индивидуальный план лечения. Это особенно важно в тех случаях, когда пациент не может самостоятельно добраться до клиники. В арсенале специалистов — профессиональное оборудование, капельницы для детоксикации и препараты для стабилизации психоэмоционального состояния.
Подробнее можно узнать тут – [url=https://narkologicheskaya-pomoshh-v-tolyatti17.ru/]скорая наркологическая помощь на дому[/url]
Поэтапный подход помогает достичь устойчивых результатов и минимизировать вероятность рецидива, обеспечивая безопасность пациента на всех стадиях лечения.
Исследовать вопрос подробнее – [url=https://narkologicheskaya-clinika-v-samare16.ru/]наркологическая клиника клиника помощь[/url]
Кодирование — это медицинский инструмент, который помогает закрепить трезвость, но сам по себе не является «волшебной кнопкой». Его задача — усилить внутреннюю мотивацию и создать физиологические и/или психологические условия, при которых срыв становится маловероятным. В «НаркологЭксперт» кодирование включают в структуру лечения: сначала купируются острые проявления, проводится детокс и стабилизация сна, давления и тревоги, затем — диагностика противопоказаний, подробное информирование, выбор методики и только после этого — сама процедура. Такой порядок снижает риски, повышает переносимость и делает результат предсказуемым. Важно, что любая техника подбирается индивидуально с учётом длительности употребления, анамнеза, сопутствующих заболеваний и рабочей нагрузки пациента, чтобы лечение органично вписалось в реальную жизнь и не сорвалось на первых же неделях.
Подробнее тут – [url=https://kodirovanie-ot-alkogolizma-moskva9.ru/]кодирование от алкоголизма рядом[/url]
Клиника «Трезвый Выбор Рязань» функционирует по принципу полного цикла лечения: от экстренного выезда нарколога до длительной реабилитации в условиях стационара. Пациенты поступают как в острых состояниях (запой, абстиненция, интоксикация), так и для плановой терапии. Лечение начинается с медицинской диагностики, оценки физического и психического состояния, после чего разрабатывается индивидуальный план. Программы включают детоксикацию, медикаментозную поддержку, психологическую помощь и профилактику рецидивов.
Получить больше информации – http://narkologicheskaya-clinika-v-ryazani17.ru
Поэтапный подход помогает достичь устойчивых результатов и минимизировать вероятность рецидива, обеспечивая безопасность пациента на всех стадиях лечения.
Получить дополнительную информацию – https://narkologicheskaya-clinika-v-samare16.ru/narkologicheskij-dispanser-g-samara
Алкогольная интоксикация вызывает сильное обезвоживание и разрушает баланс электролитов в организме. Без медицинской помощи восстановление может занять несколько дней, а в тяжёлых случаях приводит к осложнениям. Капельница помогает безопасно и быстро вывести этанол и продукты его распада, восполнить уровень жидкости, снизить нагрузку на печень и сердечно-сосудистую систему. Процедура проводится амбулаторно или на дому, что делает её доступной и удобной для пациентов.
Исследовать вопрос подробнее – [url=https://kapelnicza-ot-zapoya-v-volgograde17.ru/]капельница от запоя клиника волгоград[/url]
Для наглядности приведена таблица, отражающая распространённые методы лечения и их цели:
Исследовать вопрос подробнее – [url=https://narkologicheskaya-clinika-v-samare16.ru/]наркологическая клиника клиника помощь самара[/url]
Кодирование в «МедТрезвие» — не «волшебная кнопка», а логическое продолжение после стабилизации, когда организм готов к вмешательству, а пациент понимает механизм действия и ограничения метода. Врач подробно обсуждает цели, риски, противопоказания, ожидаемые эффекты и сроки наблюдения, оформляет информированное согласие и объясняет, как встроить процедуру в общий план. Важная часть — профилактика триггеров и обучение распознаванию ранних сигналов тяги: человек получает не только фармакологическую поддержку, но и практические инструменты саморегуляции, сценарии на «сложные дни», способы запросить помощь до того, как ситуация выйдет из-под контроля. Такая связка повышает вероятность устойчивой ремиссии, потому что работает одновременно на биологическом и поведенческом уровнях.
Подробнее тут – http://narkologicheskaya-klinika-moskva9.ru/horoshaya-narkologicheskaya-klinika-v-moskve/
Показана при обезвоживании, «скачущем» давлении и пульсе, угрозе судорог, упорной рвоте, эпизодах спутанности сознания, тяжёлой соматике. За сутки–двое удаётся выровнять показатели, наладить сон и безопасно перейти к амбулаторному этапу.
Подробнее можно узнать тут – [url=https://narkologicheskaya-klinika-moskva999.ru/]наркологическая клиника[/url]
Кодирование — это медицинский инструмент, который помогает закрепить трезвость, но сам по себе не является «волшебной кнопкой». Его задача — усилить внутреннюю мотивацию и создать физиологические и/или психологические условия, при которых срыв становится маловероятным. В «НаркологЭксперт» кодирование включают в структуру лечения: сначала купируются острые проявления, проводится детокс и стабилизация сна, давления и тревоги, затем — диагностика противопоказаний, подробное информирование, выбор методики и только после этого — сама процедура. Такой порядок снижает риски, повышает переносимость и делает результат предсказуемым. Важно, что любая техника подбирается индивидуально с учётом длительности употребления, анамнеза, сопутствующих заболеваний и рабочей нагрузки пациента, чтобы лечение органично вписалось в реальную жизнь и не сорвалось на первых же неделях.
Изучить вопрос глубже – [url=https://kodirovanie-ot-alkogolizma-moskva9.ru/]kodirovanie-ot-alkogolizma-zhenshchin[/url]
Вывод из запоя — это не просто медицинская процедура, а жизненно важный этап, позволяющий вернуть контроль над самочувствием и предотвратить осложнения. В клинике «РеабКузбасс» пациенты получают помощь в любое время суток: опытные наркологи выезжают на дом, проводят капельницы и медикаментозную детоксикацию, подбирают индивидуальные схемы восстановления. Такой подход помогает не только устранить последствия запоя, но и запустить процесс полноценного оздоровления организма.
Углубиться в тему – [url=https://vyvod-iz-zapoya-v-novokuzneczke17.ru/]нарколог вывод из запоя новокузнецк[/url]
Кодирование — это медицинский инструмент, который помогает закрепить трезвость, но сам по себе не является «волшебной кнопкой». Его задача — усилить внутреннюю мотивацию и создать физиологические и/или психологические условия, при которых срыв становится маловероятным. В «НаркологЭксперт» кодирование включают в структуру лечения: сначала купируются острые проявления, проводится детокс и стабилизация сна, давления и тревоги, затем — диагностика противопоказаний, подробное информирование, выбор методики и только после этого — сама процедура. Такой порядок снижает риски, повышает переносимость и делает результат предсказуемым. Важно, что любая техника подбирается индивидуально с учётом длительности употребления, анамнеза, сопутствующих заболеваний и рабочей нагрузки пациента, чтобы лечение органично вписалось в реальную жизнь и не сорвалось на первых же неделях.
Подробнее тут – [url=https://kodirovanie-ot-alkogolizma-moskva9.ru/]kodirovanie-ot-alkogolizma-na-domu-v-moskve[/url]
Наркологическая помощь в «ВолгаМед Тольятти» включает широкий спектр процедур и методик. Каждый случай рассматривается индивидуально, с учётом состояния пациента, стадии заболевания и сопутствующих факторов. Ниже представлена таблица с основными направлениями медицинской работы.
Углубиться в тему – [url=https://narkologicheskaya-pomoshh-v-tolyatti17.ru/]наркологическая помощь[/url]
Кодирование — это медицинский инструмент, который помогает закрепить трезвость, но сам по себе не является «волшебной кнопкой». Его задача — усилить внутреннюю мотивацию и создать физиологические и/или психологические условия, при которых срыв становится маловероятным. В «НаркологЭксперт» кодирование включают в структуру лечения: сначала купируются острые проявления, проводится детокс и стабилизация сна, давления и тревоги, затем — диагностика противопоказаний, подробное информирование, выбор методики и только после этого — сама процедура. Такой порядок снижает риски, повышает переносимость и делает результат предсказуемым. Важно, что любая техника подбирается индивидуально с учётом длительности употребления, анамнеза, сопутствующих заболеваний и рабочей нагрузки пациента, чтобы лечение органично вписалось в реальную жизнь и не сорвалось на первых же неделях.
Подробнее – [url=https://kodirovanie-ot-alkogolizma-moskva9.ru/]kodirovanie-ot-alkogolizma-ryadom[/url]
В Тольятти клиника «ВолгаМед Тольятти» предоставляет широкий спектр услуг — от экстренного вывода из запоя на дому до длительных реабилитационных программ. Выезд нарколога осуществляется круглосуточно: врач приезжает по вызову, проводит диагностику, оценивает степень интоксикации и назначает индивидуальный план лечения. Это особенно важно в тех случаях, когда пациент не может самостоятельно добраться до клиники. В арсенале специалистов — профессиональное оборудование, капельницы для детоксикации и препараты для стабилизации психоэмоционального состояния.
Детальнее – [url=https://narkologicheskaya-pomoshh-v-tolyatti17.ru/]вызов наркологической помощи тольятти[/url]
Клиника «КузбассМед Центр» в Новокузнецке обеспечивает непрерывный приём пациентов и выезд нарколога на дом. Такой формат позволяет оказать экстренную помощь при интоксикации или запое прямо на месте, не дожидаясь ухудшения состояния. Медицинская команда работает в режиме 24/7, что особенно важно при острых состояниях. Врач выезжает в течение часа после вызова, проводит диагностику, ставит капельницу и контролирует жизненные показатели. В стационаре доступны детоксикация, медикаментозная терапия и психотерапевтическая поддержка — всё под постоянным медицинским наблюдением.
Выяснить больше – https://narkologicheskaya-klinika-v-novokuzneczke17.ru/narkolog-v-gorode-novokuzneczke
Такой подход позволяет пациенту чувствовать себя не объектом лечения, а активным участником собственного восстановления. Это повышает уровень мотивации и формирует доверие между врачом и пациентом, что критически важно для устойчивой ремиссии.
Исследовать вопрос подробнее – [url=https://narcologicheskaya-klinika-v-voronezhe17.ru/]вывод наркологическая клиника[/url]
Когда острые угрозы исключены, программа стартует дома. Пациент получает понятную карту действий, близкие — короткие окна обратной связи, врач — чистую «картинку» для тонкой настройки. Мы просим сообщать факты, а не эмоции: минуты до засыпания, число пробуждений, объём тёплой воды малыми глотками, пульс к вечеру, переносимость мягкой пищи, ясность головы утром.
Подробнее тут – [url=https://vyvod-iz-zapoya-saratov0.ru/]вывод из запоя на дому круглосуточно саратов[/url]
Процесс лечения включает несколько последовательных шагов, направленных на стабилизацию состояния, детоксикацию и восстановление функций организма. Таблица ниже показывает основные этапы процедуры, применяемые врачами клиники «РеабКузбасс».
Подробнее – http://vyvod-iz-zapoya-v-novokuzneczke17.ru
Детокс — это последовательность целевых действий, а не один универсальный раствор. Мы восполняем жидкость и корректируем электролиты, защищаем печёночные функции, мягко снижаем тремор и тревогу, создаём условия для первого нормального сна. Каждая доза сверяется с динамикой давления, пульса, сатурации и неврологического статуса, поэтому схема не перегружена и не «гонится» за мимолётным эффектом ценой побочных реакций. После купирования острых проявлений начинается стабилизация: уточняются дозировки, выстраивается режим питания и гидратации, объясняются «красные флажки» для контакта с врачом, настраиваются простые поведенческие техники на «тёмные часы» вечера. В этот момент особенно важно не растворить медицинский эффект бытовыми ошибками: недосыпом, пропусками еды, конфликтными разговорами «о прошлом». Мы даём короткие, реалистичные алгоритмы на 20–40 минут — прогулка, тёплый душ, лёгкая еда по графику, дыхательные практики — чтобы снизить импульсивность и закрепить ощущение управляемости. Именно связка детокса с поведенческой дисциплиной формирует траекторию, которую можно удержать неделями, а не только до «завтрашнего утра».
Исследовать вопрос подробнее – http://narkologicheskaya-klinika-moskva999.ru
Для наглядности ниже приведена таблица с основными направлениями медикаментозной терапии и их эффектами:
Подробнее тут – https://narkologicheskaya-klinika-v-samare16.ru/
Этот информационный набор привлекает внимание множеством мелочей и странных ракурсов. Мы предлагаем взгляды, которые редко бывают полезны, но могут слегка разнообразить ваше знакомство с темой.
Вот – [url=https://arma-rehab.ru/]секс знакомства[/url]
Капельницы в «СаратовМед Профи» — это конструктор из тщательно подобранных модулей. Каждый модуль решает одну задачу и имеет свой ожидаемый горизонт эффекта. Важно не название, а логика: задача > опора среды > как проверяем > когда ждём результат.
Детальнее – [url=https://vyvod-iz-zapoya-saratov0.ru/]врач вывод из запоя саратов[/url]
Капельницы при выводе из запоя — основной инструмент детоксикации. Они очищают кровь, стабилизируют давление и восстанавливают баланс электролитов. В клинике «РеабКузбасс» используются только качественные препараты, адаптированные под конкретное состояние пациента. Ниже приведена таблица с основными видами капельниц и их эффектом.
Исследовать вопрос подробнее – [url=https://vyvod-iz-zapoya-v-novokuzneczke17.ru/]нарколог на дом вывод из запоя в новокузнецке[/url]
В таблице приведены основные компоненты инфузионной терапии, применяемые при детоксикации:
Подробнее тут – http://narkologicheskaya-clinica-v-novokuzneczke17.ru
Процесс лечения в клинике организован последовательно и направлен на восстановление всех систем организма. Каждый этап имеет свои задачи и методы, что обеспечивает максимальную эффективность терапии.
Изучить вопрос глубже – https://narkologicheskaya-clinika-v-samare16.ru/chastnaya-narkologicheskaya-klinika-samara
Мы не ограничиваемся капельницей. Сервис включает организационные, клинические и поведенческие элементы, которые уменьшают хаос и ускоряют восстановление. Ниже — ключевые блоки, которые пациенты отмечают в отзывах как наиболее полезные и «приземлённые».
Выяснить больше – [url=https://narkolog-na-dom-v-samare16.ru/]врач нарколог на дом самара[/url]
Процесс лечения включает несколько последовательных шагов, направленных на стабилизацию состояния, детоксикацию и восстановление функций организма. Таблица ниже показывает основные этапы процедуры, применяемые врачами клиники «РеабКузбасс».
Исследовать вопрос подробнее – http://vyvod-iz-zapoya-v-novokuzneczke17.ru/vyvod-iz-zapoya-na-domu-novokuzneczk/
Чтобы исключить суету и «гонку дозировок», острый отрезок мы делим на короткие окна с ясной целью и чёткими критериями перехода. Если отклика нет, корректируется один элемент и тут же назначается новая точка оценки. Прозрачность плана снижает эмоциональный фон и повышает доверие к процессу.
Разобраться лучше – [url=https://narkologicheskaya-klinika-saratov0.ru/]анонимная наркологическая клиника[/url]
Системный подход позволяет достичь максимальной эффективности лечения и снизить риск возврата к зависимости.
Подробнее – [url=https://narkologicheskaya-clinica-v-novokuzneczke17.ru/]наркологическая клиника нарколог в новокузнецке[/url]
Если на предзвонке выявляются «красные флаги» — давящая боль в груди, одышка в покое, спутанность сознания, судороги, неукротимая рвота, резкое падение насыщения кислородом — мы организуем бесшовный перевод в стационар. Место резервируем заранее, логистику строим так, чтобы не привлекать внимания соседей и не затягивать старт лечения. При отсутствии угроз терапия может начаться дома с последующим телесопровождением и при необходимости — краткой госпитализацией.
Углубиться в тему – http://narcologicheskaya-klinika-saratov0.ru
Домашняя точка входа оправдана при стабильных показателях и низком риске осложнений. В знакомой обстановке легче соблюдать режим: затемнить комнату, убрать экраны, распределять воду маленькими порциями, сделать лёгкий перекус «по силам», лечь пораньше. Врач подберёт «узкую» схему инфузий без перегруза препаратами, объяснит, какие ощущения допустимы сегодня и ночью, а какие — повод для немедленной связи. Такой сценарий экономит время семьи, снижает стигму и быстрее переводит состояние в управляемое, на базе которого уже можно строить дальнейшие шаги — амбулаторные визиты, работу с триггерами и, при показаниях, обсуждение кодирования.
Подробнее – https://vyvod-iz-zapoya-balashiha9.ru/vyvod-iz-zapoya-na-domu-balashiha
Решение обратиться за наркологической помощью часто упирается в страх огласки и сомнения в эффективности. В «МедТрезвие» эти барьеры снимаются за счёт клинической достаточности и предсказуемой организации. Диагностика и вмешательства назначаются строго по показаниям: врач оценит риски сердечно-сосудистых осложнений, состояние печени и поджелудочной железы, уровень тревоги и сна, наличие депрессивных симптомов. При устойчивом состоянии часть процедур выполняется на дому, что снижает стресс, а при признаках нестабильности — рекомендуется стационар с круглосуточным наблюдением. Анонимность поддерживается шифрованием данных, разграничением доступа и информированием родственников только по согласию пациента. Финансовые условия обсуждаются заранее: семья понимает, из чего складывается смета, и может планировать ресурс без опасений «скрытых» позиций. В результате лечение становится управляемым процессом, где медицинская безопасность и уважение к личной жизни человека — обязательные элементы, а не рекламные обещания.
Подробнее можно узнать тут – [url=https://narkologicheskaya-klinika-moskva9.ru/]лучшая наркологическая клиника в москве отзывы[/url]
Главным преимуществом наркологической клиники в Новокузнецке является комплексный подход к лечению. Специалисты рассматривают зависимость как заболевание, требующее системного воздействия на организм и психику. Каждый пациент получает индивидуальную программу, включающую медицинскую, психотерапевтическую и социальную помощь. Такой подход обеспечивает достижение устойчивых результатов и предотвращает рецидивы.
Узнать больше – [url=https://narkologicheskaya-clinica-v-novokuzneczke17.ru/]наркологическая клиника стационар в новокузнецке[/url]
Детоксикация — это не одна «капельница», а серия мероприятий, направленных на снижение токсической нагрузки, выравнивание жизненно важных показателей и возвращение контроля над самочувствием. На старте врач проводит осмотр, при необходимости — экспресс-диагностику и ЭКГ, объясняет цели инфузионной терапии, отвечает на вопросы о препаратах и возможных ощущениях в первые часы после начала. Если состояние пациента позволяет, первые шаги выполняются дома: так легче согласиться на помощь и сохранить приватность. При выраженной интоксикации, обезвоживании, скачках давления и пульса, нарушении ориентации или риске судорог безопаснее выбрать стационар: расширенная диагностика и круглосуточный мониторинг снижает вероятность осложнений и даёт возможность гибко корректировать назначения. После купирования острых проявлений команда переходит к стабилизации — настройке сна, питания, гидратации и поддерживающих схем с понятными целями на ближайшие дни.
Подробнее можно узнать тут – http://narkologicheskaya-klinika-moskva9.ru/chastnaya-narkologicheskaya-klinika-v-moskve/
Лечение в клинике «ВоронежМед Альянс» проходит поэтапно. Каждый модуль имеет определённую цель и собственные критерии эффективности. Такой подход исключает избыточное вмешательство и обеспечивает прозрачность процесса восстановления.
Ознакомиться с деталями – [url=https://narcologicheskaya-klinika-v-voronezhe17.ru/]наркологическая клиника лечение алкоголизма в воронеже[/url]
«ГородМед Трезвость» выстраивает помощь так, чтобы человек не оставался один ни на этапе выхода из запоя, ни во время стабилизации, ни в период удержания ремиссии. С первого звонка дежурный врач проводит короткое интервью, фиксирует жалобы, длительность употребления, сопутствующие болезни и текущие препараты, после чего предлагает безопасную точку входа — экстренный выезд на дом или приём без ожидания. Мы не растягиваем процесс по неделе: старт возможен в день обращения, а маршрутизация между форматами (дом, амбулаторный визит, стационар) занимает часы. Важная часть подхода — ясные цели каждого шага и критерии эффективности, понятные самому пациенту и семье: когда ждать облегчения тревоги, как нормализуется сон, когда вернётся аппетит, что считается «красным флажком» и как действовать без паники. Такая предсказуемость снижает уровень стресса и повышает приверженность лечению уже в первые трое суток.
Получить больше информации – https://narkologicheskaya-klinika-moskva99.ru/chastnaya-narkologicheskaya-klinika-v-moskve/
Если на предзвонке выявляются «красные флаги» — давящая боль в груди, одышка в покое, спутанность сознания, судороги, неукротимая рвота, резкое падение насыщения кислородом — мы организуем бесшовный перевод в стационар. Место резервируем заранее, логистику строим так, чтобы не привлекать внимания соседей и не затягивать старт лечения. При отсутствии угроз терапия может начаться дома с последующим телесопровождением и при необходимости — краткой госпитализацией.
Получить больше информации – [url=https://narcologicheskaya-klinika-saratov0.ru/]запой наркологическая клиника в саратове[/url]
Клиника «КузбассМед Центр» в Новокузнецке обеспечивает непрерывный приём пациентов и выезд нарколога на дом. Такой формат позволяет оказать экстренную помощь при интоксикации или запое прямо на месте, не дожидаясь ухудшения состояния. Медицинская команда работает в режиме 24/7, что особенно важно при острых состояниях. Врач выезжает в течение часа после вызова, проводит диагностику, ставит капельницу и контролирует жизненные показатели. В стационаре доступны детоксикация, медикаментозная терапия и психотерапевтическая поддержка — всё под постоянным медицинским наблюдением.
Получить дополнительные сведения – [url=https://narkologicheskaya-klinika-v-novokuzneczke17.ru/]запой наркологическая клиника[/url]
Инфузионные растворы подбираются строго индивидуально, после осмотра врача и анализа показателей пациента. При необходимости курс повторяется с изменением состава раствора для достижения максимального эффекта.
Изучить вопрос глубже – https://narkologicheskaya-klinika-v-novokuzneczke17.ru/
Такой алгоритм позволяет контролировать каждый аспект лечения, обеспечивая постепенное и безопасное восстановление. Врач-куратор отслеживает динамику и при необходимости корректирует программу.
Углубиться в тему – [url=https://narkologicheskaya-clinika-v-ryazani17.ru/]наркологическая клиника нарколог рязань[/url]
Для наглядности ниже приведена таблица с основными направлениями медикаментозной терапии и их эффектами:
Узнать больше – [url=https://narkologicheskaya-klinika-v-samare16.ru/]наркологическая клиника нарколог самара[/url]
Задача врача — не «поставить галочку», а исключить противопоказания и выбрать методику с оптимальным соотношением пользы и риска. Учитываются хронические заболевания, эпизоды потери сознания, аритмии, панические атаки, депрессивные симптомы, переносимость инфузий и фармпрепаратов, взаимодействия с уже назначенными лекарствами. По результатам формируется персональный лист ограничений и список «красных флажков», при которых следует связаться со специалистом без промедления.
Изучить вопрос глубже – [url=https://kodirovanie-ot-alkogolizma-moskva9.ru/]kodirovanie-ot-alkogolizma-v-moskve-otzyvy[/url]
Вывод из запоя — это не «волшебная капельница», а последовательная медицинская программа с чёткими целями и измеримыми маркерами. В наркологической клинике «СаратовМед Профи» маршрут строится по принципу управляемых окон: на каждом шаге команда преследует одну цель, меняет лишь один параметр и оценивает результат в заранее назначённый момент. Такой подход снижает лекарственную нагрузку, предотвращает «гонку дозировок» и делает динамику предсказуемой для пациента и близких. Конфиденциальность обеспечивается регламентом: немаркированные выезды, нейтральные формулировки в документах, «тихие» каналы связи, доступ к записям — строго по ролям.
Детальнее – [url=https://vyvod-iz-zapoya-saratov0.ru/]вывод из запоя с выездом в саратове[/url]
Клиника предлагает широкий спектр услуг, охватывающий весь цикл лечения зависимости — от экстренной помощи до длительной реабилитации. Комплексная программа включает медицинскую, психологическую и социальную составляющие, что позволяет добиться устойчивого результата. Все процедуры проводятся под контролем врачей, что обеспечивает безопасность и эффективность терапии.
Исследовать вопрос подробнее – [url=https://narkologicheskaya-klinika-v-samare16.ru/]платная наркологическая клиника в самаре[/url]
Если на предзвонке выявляются «красные флаги» — давящая боль в груди, одышка в покое, спутанность сознания, судороги, неукротимая рвота, резкое падение насыщения кислородом — мы организуем бесшовный перевод в стационар. Место резервируем заранее, логистику строим так, чтобы не привлекать внимания соседей и не затягивать старт лечения. При отсутствии угроз терапия может начаться дома с последующим телесопровождением и при необходимости — краткой госпитализацией.
Исследовать вопрос подробнее – https://narcologicheskaya-klinika-saratov0.ru/
Мы не подгоняем всех под единый сценарий. Если состояние устойчивое, нет упорной рвоты, высокой температуры, выраженной дезориентации и резких скачков давления и пульса — рационален домашний старт: приватно, быстрее и без лишних переездов. Врач приедет без маркировки, проведёт осмотр, запустит инфузионную терапию по показаниям, оставит письменные рекомендации и «красные флажки». Если же есть признаки угрозы осложнений — обезвоживание, аритмии, риск судорог, боли за грудиной или в животе, лихорадка, спутанность сознания, тяжёлая соматика — мы честно предлагаем короткую стационарную стабилизацию на 24–48 часов. Под круглосуточным наблюдением проще корректировать схемы, вовремя закрывать дефициты, защитить сон и быстрее вернуть управляемость поведению. В обоих форматах маршрут прозрачен: согласованные окна связи, фиксированные цели на ближайшие 72 часа и отсутствие «пакетов ради прайса». Благодаря этому решения принимаются спокойно, без угадываний и эмоциональных раскачек, которые обычно ломают прогресс и удорожают лечение.
Исследовать вопрос подробнее – [url=https://vyvod-iz-zapoya-balashiha9.ru/]vrach-vyvod-iz-zapoya[/url]
В этом материале представлены детали, которые хоть и занимательны, но не особенно значимы. Мы рассматриваем моменты, которые трудно назвать важными, но всё же решили включить их для полноты картины.
Вот – [url=https://arma-rehab.ru/vyvod-iz-zapoya/]блекджек[/url]
Процесс лечения включает несколько последовательных шагов, направленных на стабилизацию состояния, детоксикацию и восстановление функций организма. Таблица ниже показывает основные этапы процедуры, применяемые врачами клиники «РеабКузбасс».
Узнать больше – [url=https://vyvod-iz-zapoya-v-novokuzneczke17.ru/]вывод из запоя в стационаре в новокузнецке[/url]
В мегаполисе решают три параметра: клиническая достаточность, логистика и приватность. В «ГородМед Трезвость» назначения делаются строго по показаниям — без «пакетов ради прайса»; это экономит ресурсы и защищает от лишних процедур. Логистика учитывает пробки и занятость пациента: выездные бригады работают круглосуточно, а стационар принимает без очередей, что убирает паузы между детоксом и стабилизацией. Конфиденциальность встроена в процессы: запись через закрытые каналы, шифры вместо ФИО в рабочем расписании, разграничение доступа к данным и отдельные окна визитов. Смысл прост: человек получает медицинский результат без огласки и без бюрократических «ступеней», которые разбивают лечение на бессмысленные ожидания. Поэтому нас выбирают те, кому важно вернуться к работе и семье без срывов и длинных «выходов из строя».
Ознакомиться с деталями – http://narkologicheskaya-klinika-moskva99.ru/horoshaya-narkologicheskaya-klinika-v-moskve/
Запой сопровождается сильной интоксикацией, обезвоживанием и нарушением обменных процессов. Врач-нарколог оценивает состояние пациента, определяет тяжесть отравления и подбирает индивидуальную схему терапии. Основная цель — восстановление водно-электролитного баланса, нормализация работы сердца, печени и нервной системы. Современные препараты позволяют мягко вывести человека из состояния запоя, исключив развитие судорог, делирия и других осложнений.
Детальнее – http://vyvod-iz-zapoya-v-rostove-na-donu16.ru/vyvedenie-iz-zapoya-rostov-na-donu/
Первым шагом терапии является детоксикация — процедура очищения организма от продуктов распада алкоголя или наркотических веществ. Она проводится под контролем врача и помогает стабилизировать работу сердечно-сосудистой системы, печени и центральной нервной системы. Для поддержания здоровья используются инфузионные растворы, витамины, гепатопротекторы и препараты, снижающие тревожность.
Детальнее – [url=https://narkologicheskaya-clinika-v-samare16.ru/]наркологическая клиника нарколог самара[/url]
Ниже — рабочая матрица на первые часы. Она показывает, как клиническая гипотеза превращается в минимальный шаг, какие индикаторы берём под контроль и по какому сигналу меняем тактику или площадку. Таблица не заменяет очную оценку, но делает логику маршрута ясной для всей семьи.
Исследовать вопрос подробнее – https://narkolog-na-dom-v-samare16.ru/narkolog-samara-vyzov-na-dom/
Наркологическая клиника в Новокузнецке предоставляет профессиональную помощь людям, столкнувшимся с зависимостью от алкоголя, наркотиков и психоактивных веществ. Лечение проводится под наблюдением опытных специалистов с применением современных медицинских методик. Основная цель работы клиники — не только устранить физическую зависимость, но и восстановить психологическое равновесие пациента, вернуть мотивацию и способность жить без употребления веществ.
Подробнее можно узнать тут – http://narkologicheskaya-clinica-v-novokuzneczke17.ru/
Вызов нарколога на дом — это не «капельница как панацея», а управляемая последовательность решений с ясными целями, измеримыми маркерами и понятными «окнами оценки». В «СамарМед Ассист» мы строим лечение из узких модулей: сначала проверяем базовую безопасность (дыхание, сознание, гемодинамика), затем возвращаем переносимость питья, стабилизируем вегетатику, собираем ночь, и только после этого занимаемся дневной выносливостью и бытовой устойчивостью. Такой ритм исключает полипрагмазию, снижает фармаконагрузку и превращает первые часы из хаотичной «борьбы с симптомами» в спокойный, предсказуемый маршрут. Семья получает роль партнёра, а не наблюдателя: по простым ориентирам понятно, что считать нормой, когда звонить врачу и на каком этапе модуль следует «выключить».
Получить дополнительную информацию – [url=https://narkolog-na-dom-v-samare16.ru/]вызвать нарколога на дом в самаре[/url]
Капельницы в «СаратовМед Профи» — это конструктор из тщательно подобранных модулей. Каждый модуль решает одну задачу и имеет свой ожидаемый горизонт эффекта. Важно не название, а логика: задача > опора среды > как проверяем > когда ждём результат.
Разобраться лучше – [url=https://vyvod-iz-zapoya-saratov0.ru/]скорая вывод из запоя в саратове[/url]
Эта последовательность действий обеспечивает безопасное прекращение запоя и предотвращает развитие синдрома отмены.
Подробнее тут – [url=https://vyvod-iz-zapoya-v-rostove-na-donu16.ru/]вывод из запоя дешево[/url]
Чтобы исключить суету и «гонку дозировок», острый отрезок мы делим на короткие окна с ясной целью и чёткими критериями перехода. Если отклика нет, корректируется один элемент и тут же назначается новая точка оценки. Прозрачность плана снижает эмоциональный фон и повышает доверие к процессу.
Подробнее – http://
Если на предзвонке выявляются «красные флаги» — давящая боль в груди, одышка в покое, спутанность сознания, судороги, неукротимая рвота, резкое падение насыщения кислородом — мы организуем бесшовный перевод в стационар. Место резервируем заранее, логистику строим так, чтобы не привлекать внимания соседей и не затягивать старт лечения. При отсутствии угроз терапия может начаться дома с последующим телесопровождением и при необходимости — краткой госпитализацией.
Углубиться в тему – [url=https://narcologicheskaya-klinika-saratov0.ru/]частная наркологическая клиника[/url]
Чтобы исключить суету и «гонку дозировок», острый отрезок мы делим на короткие окна с ясной целью и чёткими критериями перехода. Если отклика нет, корректируется один элемент и тут же назначается новая точка оценки. Прозрачность плана снижает эмоциональный фон и повышает доверие к процессу.
Получить дополнительные сведения – [url=https://narkologicheskaya-klinika-saratov0.ru/]наркологическая клиника[/url]
После завершения инфузий врач-нарколог даёт рекомендации по питанию, водному балансу и образу жизни. При необходимости пациенту назначается курс поддерживающей терапии для закрепления эффекта.
Получить больше информации – [url=https://narkologicheskaya-pomoshh-v-tolyatti17.ru/]наркологическая помощь в тольятти[/url]
Капельница — основной метод дезинтоксикации при запое. Она позволяет быстро восполнить дефицит жидкости и электролитов, вывести токсины и улучшить общее самочувствие. В состав инфузии входят препараты, нормализующие обмен веществ, а также витамины и гепатопротекторы. Процедура проводится под контролем врача, что гарантирует безопасность и точную дозировку лекарств.
Получить дополнительную информацию – https://vyvod-iz-zapoya-v-rostove-na-donu16.ru/vyvedenie-iz-zapoya-rostov-na-donu
Этот обзор позволяет по-новому взглянуть на вещи, на которые обычно и так смотрят. Мы упоминаем факты, которые мало что меняют, и события, значение которых трудно определить, но они всё равно здесь.
Вот – [url=https://arma-rehab.ru/vyvod-iz-zapoya/]рулетка онлайн[/url]
Вывод из запоя — это не «волшебная капельница», а последовательная медицинская программа с чёткими целями и измеримыми маркерами. В наркологической клинике «СаратовМед Профи» маршрут строится по принципу управляемых окон: на каждом шаге команда преследует одну цель, меняет лишь один параметр и оценивает результат в заранее назначённый момент. Такой подход снижает лекарственную нагрузку, предотвращает «гонку дозировок» и делает динамику предсказуемой для пациента и близких. Конфиденциальность обеспечивается регламентом: немаркированные выезды, нейтральные формулировки в документах, «тихие» каналы связи, доступ к записям — строго по ролям.
Получить дополнительные сведения – [url=https://vyvod-iz-zapoya-saratov0.ru/]анонимный вывод из запоя саратов[/url]
Клиника «Трезвый Выбор Рязань» функционирует по принципу полного цикла лечения: от экстренного выезда нарколога до длительной реабилитации в условиях стационара. Пациенты поступают как в острых состояниях (запой, абстиненция, интоксикация), так и для плановой терапии. Лечение начинается с медицинской диагностики, оценки физического и психического состояния, после чего разрабатывается индивидуальный план. Программы включают детоксикацию, медикаментозную поддержку, психологическую помощь и профилактику рецидивов.
Выяснить больше – [url=https://narkologicheskaya-clinika-v-ryazani17.ru/]наркологическая клиника клиника помощь рязань[/url]
Клиника «Трезвый Выбор Рязань» функционирует по принципу полного цикла лечения: от экстренного выезда нарколога до длительной реабилитации в условиях стационара. Пациенты поступают как в острых состояниях (запой, абстиненция, интоксикация), так и для плановой терапии. Лечение начинается с медицинской диагностики, оценки физического и психического состояния, после чего разрабатывается индивидуальный план. Программы включают детоксикацию, медикаментозную поддержку, психологическую помощь и профилактику рецидивов.
Изучить вопрос глубже – [url=https://narkologicheskaya-clinika-v-ryazani17.ru/]платная наркологическая клиника в рязани[/url]
Каждая программа подбирается индивидуально: с учётом стажа употребления, состояния внутренних органов, уровня тревожности и социальной поддержки. Лечение может проходить как в стационаре, так и на дому, а при необходимости включать работу психиатра, психотерапевта и специалистов по реабилитации. Принцип клиники прост — не лечить «вообще от зависимости», а выстраивать для каждого пациента персональную карту восстановления, где ясно расписаны шаги, сроки и критерии улучшения.
Получить больше информации – https://narkologicheskaya-klinika-stavropol0.ru/chastnaya-narkologicheskaya-klinika-stavropol
Каждое из этих направлений имеет важное значение и в совокупности формирует основу для устойчивого выздоровления.
Получить больше информации – [url=https://narkologicheskaya-klinika-v-omske0.ru/]наркологическая клиника наркологический центр в омске[/url]
Все процедуры выполняются анонимно и с соблюдением медицинских стандартов. Препараты применяются только сертифицированные, рассчитанные на мягкое восстановление организма без побочных эффектов. При необходимости лечение продолжается в стационаре, где пациент получает круглосуточное наблюдение, питание и психологическую поддержку.
Подробнее можно узнать тут – http://
Эта разъяснительная статья содержит простые и доступные разъяснения по актуальным вопросам. Мы стремимся сделать информацию понятной для широкой аудитории, чтобы каждый мог разобраться в предмете и извлечь из него максимум пользы.
Выяснить больше – https://scousescene.co.uk/family-law-expert-at-astraea-linskills-gives-top-5-tips-for-amicable-divorce
В Тольятти клиника «ВолгаМед Тольятти» предоставляет широкий спектр услуг — от экстренного вывода из запоя на дому до длительных реабилитационных программ. Выезд нарколога осуществляется круглосуточно: врач приезжает по вызову, проводит диагностику, оценивает степень интоксикации и назначает индивидуальный план лечения. Это особенно важно в тех случаях, когда пациент не может самостоятельно добраться до клиники. В арсенале специалистов — профессиональное оборудование, капельницы для детоксикации и препараты для стабилизации психоэмоционального состояния.
Подробнее можно узнать тут – https://narkologicheskaya-pomoshh-v-tolyatti17.ru/pomoshh-narkozavisimym-tolyatti/
В клинике «ЮгМед Альянс» выстроена система непрерывного медицинского наблюдения. При поступлении проводится комплексная диагностика, назначается детоксикация и поддерживающая терапия, затем начинается стабилизация физического и эмоционального состояния. Благодаря круглосуточной работе бригад и возможности экстренного выезда на дом пациенты получают помощь без задержек. Конфиденциальность соблюдается на всех уровнях — от первичного звонка до выписки. Для удобства родственников организована система информирования: короткие апдейты по согласованным каналам связи и только в определённое время, чтобы не нарушать покой пациента.
Выяснить больше – [url=https://narkologicheskaya-klinika-stavropol0.ru/]www.domen.ru[/url]
Лечение в клинике «ВоронежМед Альянс» проходит поэтапно. Каждый модуль имеет определённую цель и собственные критерии эффективности. Такой подход исключает избыточное вмешательство и обеспечивает прозрачность процесса восстановления.
Получить дополнительную информацию – http://narcologicheskaya-klinika-v-voronezhe17.ru/chastnaya-narkologicheskaya-klinika-voronezh/
Этот информационный материал собраны данные, которые помогут лучше понять текущие тенденции и процессы в различных сферах жизни. Мы предоставляем четкий анализ, графики и примеры, чтобы информация была не только понятной, но и практичной для принятия решений.
Ознакомиться с отчётом – https://unclestillhalf.com/%E5%A4%A7%E5%8F%94%E7%B5%82%E6%96%BC%E6%9C%89%E8%87%AA%E5%B7%B1%E7%9A%84blog%E7%B6%B2%E7%AB%99
Мы не используем универсальную «капельницу». Схема собирается из модулей под ведущие жалобы. Медицинские шаги всегда сочетаются с нефраком опорами — свет, тишина, вода малыми глотками, дыхание, — потому что среда усиливает действие препаратов и позволяет держать дозы ниже.
Выяснить больше – [url=https://narkolog-na-dom-saratov0.ru/]нарколог на дом недорого саратов[/url]
Эта публикация дает возможность задействовать различные источники информации и представить их в удобной форме. Читатели смогут быстро найти нужные данные и получить ответы на интересующие их вопросы. Мы стремимся к четкости и доступности материала для всех!
Давай разберёмся досконально – https://certifiedmobilenotaryservice.com/job/remote-mobile-notary-public-austin-tx-9
В клинике используется модульная система лечения, включающая медицинские, психологические и социальные компоненты. В зависимости от состояния человека акценты могут смещаться — например, у одних пациентов приоритетом становится физиологическое восстановление, у других — коррекция эмоционального фона и когнитивных паттернов.
Подробнее – [url=https://narkologicheskaya-klinika-stavropol0.ru/]наркологическая клиника цены в ставрополе[/url]
Клиника «КузбассМед Центр» в Новокузнецке обеспечивает непрерывный приём пациентов и выезд нарколога на дом. Такой формат позволяет оказать экстренную помощь при интоксикации или запое прямо на месте, не дожидаясь ухудшения состояния. Медицинская команда работает в режиме 24/7, что особенно важно при острых состояниях. Врач выезжает в течение часа после вызова, проводит диагностику, ставит капельницу и контролирует жизненные показатели. В стационаре доступны детоксикация, медикаментозная терапия и психотерапевтическая поддержка — всё под постоянным медицинским наблюдением.
Получить дополнительную информацию – [url=https://narkologicheskaya-klinika-v-novokuzneczke17.ru/]наркологическая клиника в новокузнецке[/url]
Этот обзор дает возможность взглянуть на историю и науку под новым углом. Мы представляем редкие факты, неожиданные связи и значимые события, которые помогут вам глубже понять развитие цивилизации и роль человека в ней.
Изучите внимательнее – https://kimygringoire.com/i-like-keep-things-simple-to-appreciate-the-details
В этой статье-обзоре мы собрали данные, актуальность которых сомнительна, а факты — не всегда взаимосвязаны. Читатель сможет ознакомиться с разными мнениями, хотя вряд ли они существенно повлияют на его понимание темы.
Вот – [url=https://arma-rehab.ru/vyvod-iz-zapoya/]секс шоп[/url]
Каждый из этапов сопровождается контролем врача и постепенным снижением медикаментозной нагрузки. Важно не просто снять симптомы, но и научить пациента распознавать внутренние триггеры, чтобы предотвратить рецидив. На протяжении всего лечения сохраняется поддержка психолога, который помогает адаптироваться и перестроить привычные модели поведения.
Подробнее тут – https://narcologicheskaya-klinika-v-voronezhe17.ru/narkolog-voronezh-czena
В Воронеже клиника «ВоронежМед Альянс» предлагает комплексное лечение алкогольной и наркотической зависимости. Команда врачей, психиатров, психологов и терапевтов выстраивает индивидуальный маршрут пациента, начиная с детоксикации и заканчивая реабилитацией. Главный принцип — минимальное вмешательство при максимальной эффективности. Это означает, что терапевтические меры подбираются строго по показаниям, а медикаменты применяются только после оценки состояния и лабораторных данных.
Получить больше информации – https://narcologicheskaya-klinika-v-voronezhe17.ru/voronezh-narkologicheskij-dispanser
Задача врача — не «поставить галочку», а исключить противопоказания и выбрать методику с оптимальным соотношением пользы и риска. Учитываются хронические заболевания, эпизоды потери сознания, аритмии, панические атаки, депрессивные симптомы, переносимость инфузий и фармпрепаратов, взаимодействия с уже назначенными лекарствами. По результатам формируется персональный лист ограничений и список «красных флажков», при которых следует связаться со специалистом без промедления.
Получить дополнительные сведения – http://kodirovanie-ot-alkogolizma-moskva9.ru/
Пациент может выбрать анонимный формат — все данные защищены, а пребывание в клинике проходит в атмосфере уважения и деликатности. Особое внимание уделяется созданию комфортных условий: палаты оснащены системой вентиляции, регулируемым освещением и кнопкой вызова медперсонала. Круглосуточный контроль состояния позволяет своевременно реагировать на малейшие изменения и корректировать курс лечения.
Узнать больше – http://
В этой публикации мы предлагаем подробные объяснения по актуальным вопросам, чтобы помочь читателям глубже понять их. Четкость и структурированность материала сделают его удобным для усвоения и применения в повседневной жизни.
Уникальные данные только сегодня – https://cozinhasaudeedicas.com/chips-de-batata-doce-fica-crocante-e-sequinha
Публикация предлагает читателю не просто информацию, а инструменты для анализа и саморазвития. Мы стимулируем критическое мышление, предлагая различные точки зрения и призывая к самостоятельному поиску решений.
Смотрите также… – https://vn88a.co/fantan-vn88
Мытищи дают логистические плюсы домашнего старта: меньше перемещений, приватнее, быстрее включается режим. Дом уместен, если нет упорной рвоты, высокой температуры, выраженной дезориентации, резких «качелей» давления/пульса, признаков обезвоживания с угрозой судорог. Если же состояние «по краю» — сочетание рвоты, лихорадки, кардиальных жалоб, второй бессонной ночи, выраженного тремора — врач предложит короткую стационарную стабилизацию на 24–48 часов под круглосуточным наблюдением. Это честнее и, на дистанции, экономнее: дефициты закрываются быстрее, дозы подбираются точнее, первая ровная ночь достигается предсказуемо, а риск экстренных ночных выездов снижается. В любом варианте приватность сохраняется: немаркированные визиты, индивидуальные окна, закрытые каналы коммуникации, доступ к данным по ролям.
Получить больше информации – http://narkolog-na-dom-mytishchi9.ru/vyzov-narkologa-na-dom-v-mytishchah/
Эта информационная статья содержит полезные факты, советы и рекомендации, которые помогут вам быть в курсе последних тенденций и изменений в выбранной области. Материал составлен так, чтобы быть полезным и понятным каждому.
Детальнее – https://peterchayward.com/notthatkindofmarathon/bechdel-test-bad-neighbours-313
Ниже — ориентир для острых часов на дому. Это не жёсткий шаблон, а карта, где ясно: что делаем, чем измеряем, когда пересматриваем. При отсутствии отклика мы меняем один параметр (например, темп инфузии) и назначаем новое окно оценки, не «двигая» всё остальное.
Разобраться лучше – [url=https://narkolog-na-dom-saratov0.ru/]выезд нарколога на дом в саратове[/url]
Мы не используем универсальную «капельницу». Схема собирается из модулей под ведущие жалобы. Медицинские шаги всегда сочетаются с нефраком опорами — свет, тишина, вода малыми глотками, дыхание, — потому что среда усиливает действие препаратов и позволяет держать дозы ниже.
Узнать больше – [url=https://narkolog-na-dom-saratov0.ru/]нарколог на дом вывод в саратове[/url]
Вывод из запоя — это не «волшебная капельница», а последовательная медицинская программа с чёткими целями и измеримыми маркерами. В наркологической клинике «СаратовМед Профи» маршрут строится по принципу управляемых окон: на каждом шаге команда преследует одну цель, меняет лишь один параметр и оценивает результат в заранее назначённый момент. Такой подход снижает лекарственную нагрузку, предотвращает «гонку дозировок» и делает динамику предсказуемой для пациента и близких. Конфиденциальность обеспечивается регламентом: немаркированные выезды, нейтральные формулировки в документах, «тихие» каналы связи, доступ к записям — строго по ролям.
Детальнее – [url=https://vyvod-iz-zapoya-saratov0.ru/]нарколог на дом вывод из запоя саратов[/url]
Критически важный отрезок — первые 12–24 часа. Мы разбиваем его на «окна», в каждом из которых есть цель, набор действий, маркеры контроля и критерий перехода. Если целевой отклик не достигнут, меняем один параметр: темп инфузии, очередность модулей или поведенческую опору (свет/тишина/цифровой режим) — и назначаем новую точку оценки. Это сохраняет причинно-следственную связь и предотвращает полипрагмазию.
Разобраться лучше – http://narcologicheskaya-klinika-saratov0.ru/chastnaya-narkologicheskaya-klinika-saratov/
Эта статья для ознакомления предлагает читателям общее представление об актуальной теме. Мы стремимся представить ключевые факты и идеи, которые помогут читателям получить представление о предмете и решить, стоит ли углубляться в изучение.
Лучшее решение — прямо здесь – https://primenewsnet.com/ktm-marchetti-signs-with-larranaga-and-zanotti-for-next-season
Инфузионные растворы подбираются строго индивидуально, после осмотра врача и анализа показателей пациента. При необходимости курс повторяется с изменением состава раствора для достижения максимального эффекта.
Исследовать вопрос подробнее – https://narkologicheskaya-klinika-v-novokuzneczke17.ru/narkolog-v-gorode-novokuzneczke
Эта статья полна интересного контента, который побудит вас исследовать новые горизонты. Мы собрали полезные факты и удивительные истории, которые обогащают ваше понимание темы. Читайте, погружайтесь в детали и наслаждайтесь процессом изучения!
Узнать из первых рук – https://patagoniarebeldedigital.com.ar/politica/milei-pondra-su-busto-en-casa-rosada
Публикация предлагает уникальную подборку информации, которая будет интересна как специалистам, так и широкому кругу читателей. Здесь вы найдете ответы на часто задаваемые вопросы и полезные инсайты для дальнейшего применения.
Получить больше информации – https://primenewsnet.com/hello-world
Этот обзор предлагает структурированное изложение информации по актуальным вопросам. Материал подан так, чтобы даже новичок мог быстро освоиться в теме и начать использовать полученные знания в практике.
Обратитесь за информацией – https://www.rumahkhitansurabaya.com/informasi-khitan-khitan-dewasa-spektakuler-surabaya-0856-34-78387
В этой статье-обзоре мы собрали данные, актуальность которых сомнительна, а факты — не всегда взаимосвязаны. Читатель сможет ознакомиться с разными мнениями, хотя вряд ли они существенно повлияют на его понимание темы.
Вот – [url=https://arma-rehab.ru/]знакомства для взрослых[/url]
Первая ровная ночь — поворотная точка. Без неё любая дневная инфузия работает коротко и «сгорает» к вечеру. Мы заранее настраиваем простые, но критичные условия: затемнение, тишина, прохладная комната, фиксированное время отбоя, минимум экранов и разговоров. При показаниях назначается щадящая седативная поддержка в дозах, которые стабилизируют, а не «выключают». Утром — короткий контроль и подстройка доз, чтобы другая ночь прошла ещё спокойнее. Такой «простой» протокол даёт самый устойчивый результат: исчезают панические волны, выравниваются показатели, снижается вероятность повторных экстренных обращений, а значит, бюджет остаётся предсказуемым.
Разобраться лучше – https://vyvod-iz-zapoya-himki9.ru/vyhod-iz-zapoya-cena-v-himkah
Маршрут выстроен прозрачно. Сначала идёт короткое предметное интервью — только то, что меняет тактику «сегодня»: длительность запоя, принятые лекарства (включая «самолечение»), аллергии, хронические диагнозы, количество ночей без сна. Затем — объективные показатели (АД/пульс/сатурация/температура), оценка тремора и уровня тревоги; при показаниях проводится экспресс-ЭКГ и базовый неврологический скрининг. После этого врач объясняет, какие компоненты войдут в инфузию и почему: регидратация для восстановления объёма циркулирующей жидкости, коррекция электролитов, печёночная поддержка, при необходимости — гастропротекция и противорвотные; мягкая анксиолитическая коррекция — строго по показаниям. Мы принципиально избегаем «универсальных сильных смесей» и «оглушающих» дозировок: они дают дневной «блеск», но почти всегда провоцируют вечерний откат, ухудшение сна и рост рисков. Во время процедуры пациент и семья получают понятные письменные правила на 48–72 часа: вода и лёгкая еда «по часам», затемнение и тишина вечером, фиксированное время отбоя, «красные флажки» для связи и согласованное утреннее окно контроля. Такой сценарий убирает импровизации, снижает уровень конфликтов и помогает нервной системе перейти из режима тревоги в режим восстановления.
Углубиться в тему – [url=https://kapelnica-ot-zapoya-lyubercy9.ru/]prokapatsya-doma-v-lyubercah[/url]
Как помогает организму
Исследовать вопрос подробнее – https://vyvod-iz-zapoya-novokuznetsk6.ru/narkologiya-vyvod-iz-zapoya-novokuzneczk/
Лечение в наркологической клинике в Воронеже проводится поэтапно, с учётом состояния пациента, длительности зависимости и наличия сопутствующих заболеваний.
Разобраться лучше – http://narkologicheskaya-klinika-voronezh9.ru
Срочный выезд — не «гонка на скорость», а хорошо отлаженный алгоритм. Врач заранее знает минимально необходимую информацию о состоянии, рисках и удобном адресе входа; семья получает короткую памятку по подготовке помещения, доступу к воде и розетке. Такой микроплан исключает суету и позволяет сразу перейти к делу — оценке витальных показателей, осмотру и старту инфузионной терапии при наличии показаний.
Ознакомиться с деталями – [url=https://narkolog-na-dom-petrozavodsk0.ru/]врач нарколог выезд на дом[/url]
Если к «окну оценки» улучшение ниже ожидаемого, меняем один параметр — скорость/состав инфузии, время приёма препаратов или порядок модулей — и назначаем новое окно. Так видно реальный вклад каждого шага и не возникает «снежный ком» вмешательств.
Получить дополнительные сведения – [url=https://vyvod-iz-zapoya-petrozavodsk0.ru/]наркология вывод из запоя[/url]
Домашний формат особенно востребован, когда нужна помощь «здесь и сейчас»: тревога, дрожь, потливость, скачки давления и нарушения сна усиливают риск осложнений. Цель визита — мягко вывести организм из токсической нагрузки, восстановить водно-электролитный баланс, снизить внутреннее напряжение и вернуть контроль над сном и аппетитом. Подход «МедЛинии Ставрополь» — минимально необходимая фармакотерапия и максимум управляемости: у каждого шага есть цель, маркер эффективности и время контроля.
Подробнее – https://narkolog-na-dom-stavropol0.ru/narkologicheskaya-klinika-stavropol
Игнорирование этих симптомов опасно для жизни и здоровья. Своевременное обращение в клинику «Рестарт» позволит оперативно и безопасно облегчить симптомы ломки и избежать серьезных последствий.
Выяснить больше – https://snyatie-lomki-rnd7.ru/snyatie-lomki-na-domu-v-rnd
В условиях современного ритма жизни алкоголизм нередко оборачивается тяжёлыми последствиями — от кратковременных запоев до хронической зависимости с серьёзными осложнениями. Наркологическая клиника «ТюменьМед» предлагает круглосуточную поддержку и выезд специалистов на дом в любое время суток, обеспечивая быстрое и безопасное восстановление здоровья. Использование инновационных методик, мобильных лабораторий и дистанционного контроля позволяет пациентам пройти детоксикацию и начать новый этап жизни в комфортных для них условиях.
Подробнее – [url=https://narkologicheskaya-klinika-tyumen10.ru/]частная наркологическая клиника тюмень[/url]
Психологическая поддержка включает индивидуальные сессии, в ходе которых пациент получает инструменты для борьбы с негативными установками и формирования здоровых моделей поведения. Применение техник релаксации и когнитивно-поведенческой терапии помогает значительно снизить риск повторного запоя.
Исследовать вопрос подробнее – https://vyvod-iz-zapoya-novokuznetsk66.ru/vyvod-iz-zapoya-nedorogo-novokuzneczk
Если дома нет условий для покоя (ремонт, маленькие дети, шумный двор), мы предложим краткосрочное наблюдение в клинике: отдельный вход, «тихий» коридор, без посторонних вопросов. После стабилизации пациент возвращается домой и продолжает амбулаторный формат с краткими чек-инами по телефону или видеосвязи. Ваша частная жизнь в приоритете: доступ к карте разграничен по ролям, а с семьёй общаемся через одного доверенного человека.
Выяснить больше – http://vyvod-iz-zapoya-kamensk-uralskij0.ru
Формат выбирается по безопасности, а не «по желанию». Домашний или амбулаторный старт уместен, если показатели устойчивы: нет упорной рвоты, высокой температуры, выраженной дезориентации, резких «качелей» давления и пульса, признаков обезвоживания с угрозой судорог. В этих условиях один визит часто закрывает задачу: индивидуальная инфузия, письменные рекомендации, правила воды и лёгкой еды «по часам», утренний контроль. Если же состояние «по краю» — сочетание рвоты, лихорадки, кардиальных жалоб, второй бессонной ночи, выраженного тремора — честнее короткая стационарная стабилизация на 24–48 часов под круглосуточным наблюдением. На бумаге это кажется дороже одного выезда, но на практике предотвращает цепочку ночных «пожаров», импульсивных повторов и осложнений, то есть экономит и силы, и деньги семьи. В любом формате анонимность неизменна: визиты без маркировки, закрытые каналы связи, разнесённые по времени приёмы и доступ к данным по ролям.
Получить дополнительные сведения – http://vyvod-iz-zapoya-himki9.ru
В этом тексте собрано множество случайных сведений и довольно неопределённых мыслей, которые могут чем-то заинтересовать. Мы отмечаем моменты, которые не особенно важны, но всё же занимают своё место в повествовании.
Вот – [url=https://arma-rehab.ru/]блекджек[/url]
Для каждого пациента используется индивидуальный монитор жизненно важных функций, передающий данные врачу в клинике через защищённый канал связи. Это обеспечивает безопасность при лечении как лёгких, так и тяжёлых форм интоксикации, снижая вероятность осложнений.
Детальнее – https://narkologicheskaya-klinika-tyumen10.ru/narkologicheskaya-klinika-na-dom-tyumen/
Капельница — не «универсальная смесь», а адресный баланс жидкости, электролитов и поддерживающих компонентов под текущие симптомы. Ниже — ориентир, который индивидуализируется на месте осмотра. Мы тщательно сопоставляем пользу и допустимую нагрузку, чтобы не перегружать организм.
Подробнее тут – http://narkolog-na-dom-petrozavodsk0.ru
Маршрут выстроен прозрачно. Сначала идёт короткое предметное интервью — только то, что меняет тактику «сегодня»: длительность запоя, принятые лекарства (включая «самолечение»), аллергии, хронические диагнозы, количество ночей без сна. Затем — объективные показатели (АД/пульс/сатурация/температура), оценка тремора и уровня тревоги; при показаниях проводится экспресс-ЭКГ и базовый неврологический скрининг. После этого врач объясняет, какие компоненты войдут в инфузию и почему: регидратация для восстановления объёма циркулирующей жидкости, коррекция электролитов, печёночная поддержка, при необходимости — гастропротекция и противорвотные; мягкая анксиолитическая коррекция — строго по показаниям. Мы принципиально избегаем «универсальных сильных смесей» и «оглушающих» дозировок: они дают дневной «блеск», но почти всегда провоцируют вечерний откат, ухудшение сна и рост рисков. Во время процедуры пациент и семья получают понятные письменные правила на 48–72 часа: вода и лёгкая еда «по часам», затемнение и тишина вечером, фиксированное время отбоя, «красные флажки» для связи и согласованное утреннее окно контроля. Такой сценарий убирает импровизации, снижает уровень конфликтов и помогает нервной системе перейти из режима тревоги в режим восстановления.
Получить дополнительную информацию – [url=https://kapelnica-ot-zapoya-lyubercy9.ru/]kapelnica-ot-zapoya-lyubercy9.ru/[/url]
Мы предлагаем вам окунуться в океан любопытных фактов и вдохновляющих историй. Эта публикация поможет расширить горизонты, разбудить интерес к науке и истории и увидеть мир с новой стороны.
Детальнее – https://www.csautoslalom.cz/dominik-hurab-prerusil-cervenkovu-snuru-a-ovladl-3-zavod-wsc
Наркологическая клиника «КарелМед Центр» — это круглосуточная помощь при алкоголизме и наркомании, ориентированная на безопасность, анонимность и реальный результат. Мы выстраиваем лечение как последовательность управляемых шагов: стабилизация физиологии, снижение тревоги, формирование навыков отказа, восстановление сна, возвращение к работе и семье. Каждый этап имеет цель, понятные маркеры и «окно оценки» — конкретную дату, когда команда и пациент вместе сверяют динамику и корректируют план. Такой подход снижает фармаконагрузку, убирает хаос и делает путь к ремиссии предсказуемым.
Детальнее – [url=https://narkologicheskaya-klinika-petrozavodsk0.ru/]наркологическая клиника цены[/url]
В обзорной статье вы найдете собрание важных фактов и аналитики по самым разнообразным темам. Мы рассматриваем как современные исследования, так и исторические контексты, чтобы вы могли получить полное представление о предмете. Погрузитесь в мир знаний и сделайте шаг к пониманию!
Жми сюда — получишь ответ – https://reallyhood.com/really-hood-videos-part-11
Чем раньше стартует детокс, тем мягче идёт восстановление. Даже один визит способен перевести состояние из «кризисного» в управляемое, а затем подключается поддержка психолога или амбулаторные встречи для закрепления эффекта.
Получить больше информации – [url=https://narkolog-na-dom-stavropol0.ru/]запой нарколог на дом[/url]
Эта познавательная публикация погружает вас в море интересного контента, который быстро захватит ваше внимание. Мы рассмотрим важные аспекты темы и предоставим вам уникальные Insights и полезные сведения для дальнейшего изучения.
Познакомиться с результатами исследований – https://sykkelsor.no/img_3416-jpg
Детокс — это не разовая процедура, а управляемый этап со своими задачами: снизить токсическую нагрузку, выровнять жизненно важные показатели, вернуть управляемость сну и самочувствию. Мы подбираем инфузии по показаниям, корректируем электролитный баланс, защищаем печёночные функции, снимаем тремор и вегетативные проявления. Следующая фаза — стабилизация: на этом этапе врач закрывает дефициты, уточняет схемы, выравнивает день и ночь, даёт понятные рекомендации на ближайшие 72 часа. Важно, что пациент не «теряется» после первого улучшения: заранее назначены точки связи, прописаны «красные флажки» и шаги, как действовать при любом из них. Такой порядок снижает вероятность рецидива, потому что вместо импровизации появляются готовые ответы на типичные сложности первых недель.
Выяснить больше – [url=https://narkologicheskaya-klinika-moskva99.ru/]luchshaya-narkologicheskaya-klinika-v-moskve-otzyvy[/url]
В этой информационной статье вы найдете интересное содержание, которое поможет вам расширить свои знания. Мы предлагаем увлекательный подход и уникальные взгляды на обсуждаемые темы, побуждая пользователей к активному мышлению и критическому анализу.
Ознакомьтесь поближе – https://blog.schneckengruenes.de/?p=396
В этой статье вы найдете уникальные исторические пересечения с научными открытиями. Каждый абзац — это шаг к пониманию того, как наука и события прошлого создают основу для технологического будущего.
Прочесть всё о… – https://www.abonosycompost.com/abono-casero-para-tomates
Публикация предлагает уникальную подборку информации, которая будет интересна как специалистам, так и широкому кругу читателей. Здесь вы найдете ответы на часто задаваемые вопросы и полезные инсайты для дальнейшего применения.
Узнать больше > – https://dhubengineers.com/2022/09/27/hello-world
Этот обзор предлагает структурированное изложение информации по актуальным вопросам. Материал подан так, чтобы даже новичок мог быстро освоиться в теме и начать использовать полученные знания в практике.
Это ещё не всё… – https://nutricionplena.com/centro-de-distribucion-cedis-omnilife-en-mexico-donde-comprar-omnilife-en-mexico
Этот текст призван помочь читателю расширить кругозор и получить практические знания. Мы используем простой язык, наглядные примеры и структурированное изложение, чтобы сделать обучение максимально эффективным и увлекательным.
Ознакомиться с полной информацией – https://feitoparaela.com.br/2021/06/01/convivencia-na-pandemia-entre-maes-e-filhas
Алкогольный запой – это не просто следствие длительного употребления спиртного, а серьёзное состояние, которое требует квалифицированного лечения. В состоянии запоя организм не может самостоятельно очиститься от токсинов, что приводит к нарушению работы внутренних органов, обезвоживанию, резким скачкам давления и серьёзным психоэмоциональным расстройствам.
Исследовать вопрос подробнее – https://vyvod-iz-zapoya-novokuznetsk6.ru/narkologiya-vyvod-iz-zapoya-novokuzneczk/
Преимущество
Выяснить больше – [url=https://snyatie-lomki-rnd7.ru/]снятие ломки на дому краснодар[/url]
После стабилизации состояния назначаются препараты, укрепляющие печень, сердце и нервную систему. Обязателен контроль за самочувствием пациента в течение суток и более.
Получить дополнительную информацию – [url=https://narkologicheskaya-klinika-voronezh9.ru/]наркологическая клиника клиника помощь[/url]
Госпитализация показана, когда требуется непрерывный контроль и быстрые изменения схем лечения. В стационаре устраняют выраженные симптомы отмены, корректируют электролитные нарушения, поддерживают печёночные функции, при необходимости подключают кислород и аппаратные методы диагностики. Параллельно выравнивают сон и аппетит, закрывают дефициты микроэлементов, подбирают щадящий режим нагрузки. На выписке пациент получает подробные рекомендации: как дозировать активность, когда пить воду и в каких объёмах, какие препараты принимать и при каких признаках обращаться за консультацией без ожидания. Такой формат снижает риск осложнений и даёт предсказуемую динамику уже на горизонте нескольких дней.
Подробнее тут – [url=https://narkologicheskaya-klinika-moskva9.ru/]narkologicheskaya-klinika-v-moskve[/url]
Этот информативный материал предлагает содержательную информацию по множеству задач и вопросов. Мы призываем вас исследовать различные идеи и факты, обобщая их для более глубокого понимания. Наша цель — сделать обучение доступным и увлекательным.
Все материалы собраны здесь – https://cachacadesabor.com.br/como-degustar-pinga
В этой статье представлен занимательный и актуальный контент, который заставит вас задуматься. Мы обсуждаем насущные вопросы и проблемы, а также освещаем истории, которые вдохновляют на действия и изменения. Узнайте, что стоит за событиями нашего времени!
Подробнее можно узнать тут – https://mikeshop.com.br/exemplo-post-2
Наркологическая клиника в Твери обеспечивает круглосуточное медицинское наблюдение, что позволяет своевременно выявлять и устранять возможные осложнения. Высококвалифицированные специалисты проводят регулярные обследования и корректируют терапию, обеспечивая безопасность и эффективность лечения.
Подробнее можно узнать тут – [url=https://narkologicheskaya-klinika-tver0.ru/]наркологическая клиника нарколог тверь[/url]
Статья знакомит с важнейшими моментами, которые сформировали наше общество. От великих изобретений до культурных переворотов — вы узнаете, как прошлое влияет на наше мышление, технологии и образ жизни.
Подробнее – https://www.ikarus-modellversand.de/?p=1
В этой статье собраны факты, которые освещают целый ряд важных вопросов. Мы стремимся предложить читателям четкую, достоверную информацию, которая поможет сформировать собственное мнение и лучше понять сложные аспекты рассматриваемой темы.
Изучить вопрос глубже – https://healthyrrific.com/becoming-a-social-worker-the-first-year
При длительном запое в крови накапливаются ацетальдегид и другие токсичные метаболиты этанола, которые повреждают клетки печени, нарушают функцию почек и приводят к дисбалансу электролитов. Без своевременной детоксикации повышается риск острых состояний — судорог, инсультов, инфаркта, панкреатита и психоза. Чем раньше начато лечение, тем быстрее нормализуются показатели обмена веществ, возвращается водно-электролитный баланс и восстанавливается работа жизненно важных органов. Анонимный выезд нарколога помогает снять психологический барьер перед обращением за помощью.
Получить дополнительные сведения – [url=https://kapelnica-ot-zapoya-voronezh.ru/]капельница от запоя клиника[/url]
Современная жизнь, особенно в крупном городе, как Красноярск, часто становится причиной различных зависимостей. Работа в условиях постоянного стресса, высокий ритм жизни и эмоциональные перегрузки могут привести к проблемам, которые требуют неотложной медицинской помощи. Одним из наиболее удобных решений в такой ситуации является вызов нарколога на дом.
Узнать больше – [url=https://narcolog-na-dom-v-krasnoyarske55.ru/]врач нарколог на дом красноярск[/url]
Домашний выезд удобен, но не всегда уместен. Поводами для стационара являются длительность запоя свыше 3–5 суток, повторная рвота, выраженная слабость, спутанность сознания, судорожная готовность, признаки делирия, декомпенсация хронических болезней. В отделении «Трезвого Ритма» в Королёве доступен расширенный мониторинг, круглосуточный уход, лабораторная диагностика и быстрые коррекции схемы. Мы организуем медицинскую транспортировку без задержек, по прибытии — расширенный осмотр, индивидуальный план и информирование семьи о каждом шаге.
Исследовать вопрос подробнее – https://vyvod-iz-zapoya-korolev10.ru/vyvesti-iz-zapoya-korolev
Публикация предоставляет читателю набор разрозненных идей, которые сложно применить на практике. Мы лишь слегка касаемся разных точек зрения, не углубляясь в анализ и не предлагая никаких выводов.
Вот – [url=https://arma-rehab.ru/vyvod-iz-zapoya/]порно[/url]
Вывод из запоя — это всегда баланс между скоростью и безопасностью. Дома трудно заметить скрытые ухудшения, особенно ночью: давление и пульс «гуляют», нарастает обезвоживание, сон рваный и тревожный. В «Трезвом Контуре» этот хаос замещается управляемостью: перед выездом дежурный врач собирает ключевые данные (длительность эпизода, лекарства, аллергии, сопутствующие болезни), на месте проводится экспресс-диагностика (АД, ЧСС, сатурация, температура, неврологический статус, степень обезвоживания), затем запускается схема терапевтической поддержки. Мы постоянно «подстраиваем» инфузии по реакции организма, а не по шаблонной карте: где-то важнее регидратация, где-то — коррекция электролитов, где-то — бережная седация для ночи. Для семьи это значит одно: меньше догадок, больше ясности. Если по картине риски высоки, мы аргументированно предлагаем стационар в Одинцово — и организуем транспортировку без пауз, потому что цена задержки в такие часы всегда выше.
Узнать больше – https://vyvod-iz-zapoya-odincovo10.ru/vyvod-iz-zapoya-ryadom-v-odincovo/
Комплексный подход к лечению алкогольной интоксикации в Новокузнецке включает последовательное выполнение нескольких этапов. Каждый из них направлен на восстановление нормальной работы организма и предотвращение повторных эпизодов зависимости.
Детальнее – [url=https://vyvod-iz-zapoya-novokuznetsk66.ru/]вывод из запоя дешево новокузнецк[/url]
Запой — это серьёзное состояние, при котором организм страдает от накопления токсинов, обезвоживания и нарушения обмена веществ. Клиника «ВоронежЛайф» предлагает услугу выездного инфузионного лечения от запоя с возможностью круглосуточного реагирования. Благодаря персонализированному подходу и использованию современных автоматизированных систем дозирования, наши специалисты обеспечивают безопасную и эффективную детоксикацию в условиях домашнего уюта.
Получить дополнительные сведения – [url=https://kapelnica-ot-zapoya-voronezh3.ru/]капельница от запоя клиника[/url]
Как подчёркивает главный врач клиники Кондратьев И.Л., «своевременный выезд нарколога на дом снижает риски осложнений и повышает шансы на полное восстановление пациента».
Изучить вопрос глубже – [url=https://narcolog-na-dom-ekaterinburg55.ru/]вызов нарколога на дом в екатеринбурге[/url]
В состав капельницы обычно входят растворы для гидратации, витаминно-минеральные комплексы, гепатопротекторы для защиты печени, а также седативные препараты для стабилизации нервной системы. Такой подход позволяет быстро справиться с признаками похмелья и предотвратить развитие более серьезных осложнений.
Детальнее – [url=https://kapelnica-ot-zapoya-ekb55.ru/]капельница от запоя анонимно на дому в екатеринбурге[/url]
«ГородМед Трезвость» выстраивает помощь так, чтобы человек не оставался один ни на этапе выхода из запоя, ни во время стабилизации, ни в период удержания ремиссии. С первого звонка дежурный врач проводит короткое интервью, фиксирует жалобы, длительность употребления, сопутствующие болезни и текущие препараты, после чего предлагает безопасную точку входа — экстренный выезд на дом или приём без ожидания. Мы не растягиваем процесс по неделе: старт возможен в день обращения, а маршрутизация между форматами (дом, амбулаторный визит, стационар) занимает часы. Важная часть подхода — ясные цели каждого шага и критерии эффективности, понятные самому пациенту и семье: когда ждать облегчения тревоги, как нормализуется сон, когда вернётся аппетит, что считается «красным флажком» и как действовать без паники. Такая предсказуемость снижает уровень стресса и повышает приверженность лечению уже в первые трое суток.
Получить больше информации – [url=https://narkologicheskaya-klinika-moskva99.ru/]luchshaya-narkologicheskaya-klinika-v-moskve-otzyvy[/url]
Капельница также рекомендуется для тех, кто испытывает сильный похмельный синдром после длительных запоев. Она помогает не только облегчить состояние, но и предотвратить развитие серьезных осложнений, таких как поражение печени, сердечно-сосудистые нарушения или острые психические расстройства.
Подробнее – [url=https://kapelnica-ot-zapoya-krasnoyarsk55.ru/]капельница от запоя клиника красноярск[/url]
Показана при обезвоживании, «скачущем» давлении и пульсе, угрозе судорог, упорной рвоте, эпизодах спутанности сознания, тяжёлой соматике. За сутки–двое удаётся выровнять показатели, наладить сон и безопасно перейти к амбулаторному этапу.
Подробнее – [url=https://narkologicheskaya-klinika-moskva999.ru/]staciomedika-narkologicheskaya-klinika-vyvoda-iz-zapoya-moskva-otzyvy[/url]
Каждому пациенту назначается персональный план терапии, составленный на основе результатов медицинского и психологического обследования. Мы не используем шаблонные схемы — только индивидуальный подход, адаптированный к возрасту, опыту зависимости, состоянию здоровья и личной мотивации.
Получить дополнительную информацию – [url=https://narkologicheskaya-klinika-volgograd9.ru/]запой наркологическая клиника волгоград[/url]
Запой – это критическое состояние, при котором организм утрачивает способность регулировать потребление алкоголя, что может привести к серьёзным медицинским и психоэмоциональным нарушениям. В Красноярске современные клиники и опытные специалисты применяют инновационные методики, позволяющие быстро и эффективно вывести пациента из запоя. Благодаря комплексному подходу, включающему медикаментозную детоксикацию, коррекцию обменных процессов и психологическую реабилитацию, достигается стабильный результат, предотвращающий повторные эпизоды зависимости.
Детальнее – [url=https://vyvod-iz-zapoya-krasnoyarsk66.ru/]нарколог на дом вывод из запоя красноярск[/url]
Абстинентный синдром, или ломка, – это тяжелое состояние, которое развивается у зависимых после отказа от наркотиков или алкоголя. Он сопровождается сильными физическими болями, судорогами, повышенной тревожностью, бессонницей и эмоциональными перепадами, что может привести к серьезным осложнениям для здоровья. Наркологическая клиника «Здравица» в Ростове-на-Дону предлагает комплексное лечение абстинентного синдрома, используя передовые методики и индивидуальный подход для быстрого восстановления здоровья.
Подробнее – http://snyatie-lomki-rnd77.ru/snyatie-lomki-narkomana-v-rnd/https://snyatie-lomki-rnd77.ru
Описание
Изучить вопрос глубже – [url=https://snyatie-lomki-rnd7.ru/]снятие ломки нарколог[/url]
Чтобы избежать опасных последствий, необходимо постепенно и безопасно вывести алкоголь из организма. Клиника «Ясный горизонт» предлагает профессиональный вывод из запоя в Новокузнецке как в условиях стационара, так и с выездом нарколога на дом.
Подробнее тут – https://vyvod-iz-zapoya-novokuznetsk6.ru/vyvod-iz-zapoya-na-domu-novokuzneczk/
Игнорирование этих симптомов опасно для жизни и здоровья. Своевременное обращение в клинику «Рестарт» позволит оперативно и безопасно облегчить симптомы ломки и избежать серьезных последствий.
Ознакомиться с деталями – [url=https://snyatie-lomki-rnd7.ru/]снятие ломки на дому цена[/url]
Как подчёркивает врач-нарколог клиники «Гармония здоровья» Александр Ветров, «любая зависимость — это не слабость, а болезнь, требующая медицинского вмешательства и системного подхода».
Детальнее – [url=https://narkologicheskaya-klinika-voronezh9.ru/]наркологическая клиника нарколог в воронеже[/url]
Резкий отказ от алкоголя без врачебной помощи может спровоцировать абстинентный синдром, который сопровождается судорогами, галлюцинациями, аритмией и критическими скачками артериального давления. В тяжёлых случаях состояние может осложниться алкогольным делирием (белая горячка), приступами паники, депрессией и острыми сердечно-сосудистыми расстройствами.
Углубиться в тему – [url=https://vyvod-iz-zapoya-novokuznetsk6.ru/]помощь вывод из запоя в новокузнецке[/url]
Лечение выводом из запоя на дому в «ВоронежМед» организовано по отработанному протоколу, включающему несколько ключевых этапов.
Разобраться лучше – http://kapelnica-ot-zapoya-voronezh.ru
Эта статья предлагает живое освещение актуальной темы с множеством интересных фактов. Мы рассмотрим ключевые моменты, которые делают данную тему важной и актуальной. Подготовьтесь к насыщенному путешествию по неизвестным аспектам и узнайте больше о значимых событиях.
Подробная информация доступна по запросу – https://kazah.io/novo-sticker-instagram-lanca-recurso-para-apoiar-pequenas-empresas
В этой статье собраны факты, которые освещают целый ряд важных вопросов. Мы стремимся предложить читателям четкую, достоверную информацию, которая поможет сформировать собственное мнение и лучше понять сложные аспекты рассматриваемой темы.
Откройте для себя больше – https://podgoreamputowani.pl/2024/12/06/wybor-odpowiedniej-protezy
В этом информативном обзоре собраны самые интересные статистические данные и факты, которые помогут лучше понять текущие тренды. Мы представим вам цифры и графики, которые иллюстрируют, как развиваются различные сферы жизни. Эта информация станет отличной основой для глубокого анализа и принятия обоснованных решений.
Ознакомиться с теоретической базой – https://loveglasses.co.nz/portfolio/leaf
Медицина выравнивает физиологию, но устойчивость дают простые действия. Мы вместе составляем карту триггеров: вечерние «тёмные часы», задержки без еды, конфликты, привычные маршруты с «точками соблазна», недосып. На каждый триггер — короткий «буфер» на 20–40 минут: спокойная прогулка близко к дому, тёплый душ, лёгкая еда по расписанию, дыхательная практика, созвон с «своим» человеком. Эти шаги бесплатны и выполнимы, но именно они уменьшают импульсивность и количество «проверок себя». Отдельный акцент — на ночной сон: ранний отбой, минимум экранов, затемнение, никаких энергичных разговоров и «разборов». Когда поведенческая рамка задана в первый же день, эффект инфузий не «сгорает» к вечеру, а переводит состояние в предсказуемую стабилизацию, на базе которой уже можно обсуждать кодирование и реабилитационные шаги.
Выяснить больше – http://narkolog-na-dom-moskva999.ru
В этой публикации мы сосредоточимся на интересных аспектах одной из самых актуальных тем современности. Совмещая факты и мнения экспертов, мы создадим полное представление о предмете, которое будет полезно как новичкам, так и тем, кто глубоко изучает вопрос.
Дополнительно читайте здесь – https://drzwizwanekoniem.pl/dzk_logo
Физическое облегчение — лишь половина задачи; вторая половина — эмоции и привычки. Индивидуальные сессии помогают распознать автоматические мысли, планировать «буферы» на вечерние часы, управлять стрессом и сонливостью, расставлять «сигнальные маяки» на привычных маршрутах, где чаще всего возникают соблазны. Семья получает ясные инструкции: меньше контроля — больше поддержки правил среды (тишина, затемнение, прохлада, вода и лёгкая еда «по часам»), отказ от «разборов причин» в первую неделю, короткие договорённости о связи со специалистом при тревожных признаках. Когда у всех одни и те же ориентиры, уровень конфликтов падает, а предсказуемость растёт — это напрямую укрепляет ремиссию. Мы не перегружаем психологический блок «теорией»: даём только те инструменты, которые человек готов выполнить сегодня и завтра, без рывков и самообвинений. Такая практичность приносит больше пользы, чем долгие разговоры «о мотивации», и отлично сочетается с медицинской частью плана.
Разобраться лучше – [url=https://narkologicheskaya-klinika-moskva999.ru/]luchshaya-narkologicheskaya-klinika-moskva[/url]
При запое счёт идёт не на дни, а на часы: нарастает обезвоживание, усиливается тремор, «скачет» давление и пульс, появляются аритмии, нарушается сон. В таких условиях попытки «перетерпеть» или лечиться «народными методами» приводят к ухудшению состояния и удлиняют путь к восстановлению. В «АлкоМед Балашиха» мы устраняем задержки: выезд возможен без очередей, а при необходимости — оперативная госпитализация в стационар. На первичной оценке врач фиксирует длительность употребления, текущие препараты и сопутствующие болезни, измеряет давление, пульс, сатурацию, оценивает неврологический статус и понятным языком объясняет точку входа — на дому или с краткой стационарной стабилизацией. Такой прагматичный подход убирает хаос: уже в первые часы формируется ощутимый эффект — снижается тревога, стабилизируются показатели, появляется шанс на полноценный ночной сон. Когда человек и его близкие видят последовательность действий и понимают, что будет через час, вечером и завтра утром, уменьшается импульсивность, исчезает «дергание», а лечение перестаёт зависеть от настроения и случайностей.
Углубиться в тему – http://vyvod-iz-zapoya-balashiha9.ru/vyvod-iz-zapoya-kapelnica-balashiha/
Мы учитываем сопутствующие заболевания, прием хронических препаратов, возраст и образ жизни. На первичной консультации специалист задаёт уточняющие вопросы, чтобы определить риски, подобрать безопасные препараты и предложить удобный формат: стационар, амбулаторно или выезд на дом. Такой подход сокращает срок восстановления и повышает устойчивость результата.
Исследовать вопрос подробнее – https://narkologicheskaya-klinika-balashiha0.ru/narkologicheskaya-klinika-telefon-v-balashihe
Эта статья сочетает познавательный и занимательный контент, что делает ее идеальной для любителей глубоких исследований. Мы рассмотрим увлекательные аспекты различных тем и предоставим вам новые знания, которые могут оказаться полезными в будущем.
См. подробности – https://smartbytes.site/embrace-the-digital-age-unleash-the-potential-of-our-products
В данной обзорной статье представлены интригующие факты, которые не оставят вас равнодушными. Мы критикуем и анализируем события, которые изменили наше восприятие мира. Узнайте, что стоит за новыми открытиями и как они могут изменить ваше восприятие реальности.
Узнать больше > – https://www.hestebedgaard.dk/index.php/opgaver-1-7
Эта статья полна интересного контента, который побудит вас исследовать новые горизонты. Мы собрали полезные факты и удивительные истории, которые обогащают ваше понимание темы. Читайте, погружайтесь в детали и наслаждайтесь процессом изучения!
Откройте для себя больше – https://casa-alameira.com/2024/02/07/hola-mundo
В этом обзорном материале представлены увлекательные детали, которые находят отражение в различных аспектах жизни. Мы исследуем непонятные и интересные моменты, позволяя читателю увидеть картину целиком. Погрузитесь в мир знаний и удивительных открытий!
Прочесть заключение эксперта – https://olamuchachas.com/blog/blog-parentalite/preparer-sa-valise-maternite
В этом обзорном материале представлены увлекательные детали, которые находят отражение в различных аспектах жизни. Мы исследуем непонятные и интересные моменты, позволяя читателю увидеть картину целиком. Погрузитесь в мир знаний и удивительных открытий!
Прочесть заключение эксперта – https://www.kosaidovn.com/training/2020/08/31/eq-sei-faq
Этот формат позволяет пациентам получить профессиональную помощь в комфортной домашней обстановке. Такой подход не только обеспечивает удобство, но и гарантирует конфиденциальность, что особенно важно для многих людей.
Получить дополнительные сведения – [url=https://narcolog-na-dom-v-krasnoyarske55.ru/]нарколог на дом вывод из запоя красноярск[/url]
В этом обзорном материале представлены увлекательные детали, которые находят отражение в различных аспектах жизни. Мы исследуем непонятные и интересные моменты, позволяя читателю увидеть картину целиком. Погрузитесь в мир знаний и удивительных открытий!
Где можно узнать подробнее? – http://rutdesign.com/blog-post-with-image-slider
Эта публикация дает возможность задействовать различные источники информации и представить их в удобной форме. Читатели смогут быстро найти нужные данные и получить ответы на интересующие их вопросы. Мы стремимся к четкости и доступности материала для всех!
Заходи — там интересно – https://www.car-info.com/fi/model/honda/civic/civic-coupe-viii/1-8i-140-hp
В этой публикации мы сосредоточимся на интересных аспектах одной из самых актуальных тем современности. Совмещая факты и мнения экспертов, мы создадим полное представление о предмете, которое будет полезно как новичкам, так и тем, кто глубоко изучает вопрос.
Связаться за уточнением – https://cocohotyogaibiza.com/find-peace-with-kundalini-yoga-and-meditation
Одной из самых востребованных процедур является снятие абстинентного синдрома. Это состояние сопровождается сильными физическими и психологическими симптомами, такими как тревожность, тремор, головная боль и бессонница. Врач, прибывший на вызов, проводит диагностику состояния пациента и подбирает необходимые препараты. Вводятся инфузионные растворы с витаминами, седативными и противорвотными средствами.
Получить больше информации – http://narcolog-na-dom-krasnoyarsk55.ru/narkolog-na-dom-krasnoyarsk-tseny/
Этот текст призван помочь читателю расширить кругозор и получить практические знания. Мы используем простой язык, наглядные примеры и структурированное изложение, чтобы сделать обучение максимально эффективным и увлекательным.
Это стоит прочитать полностью – https://habersizseniz.com/sekerparenin-serbeti-sicak-mi-dokulur-soguk-mu
Эта познавательная публикация погружает вас в море интересного контента, который быстро захватит ваше внимание. Мы рассмотрим важные аспекты темы и предоставим вам уникальные Insights и полезные сведения для дальнейшего изучения.
Погрузиться в научную дискуссию – https://www.verifypool.com/blog-single.php?id=10101
Эта статья полна интересного контента, который побудит вас исследовать новые горизонты. Мы собрали полезные факты и удивительные истории, которые обогащают ваше понимание темы. Читайте, погружайтесь в детали и наслаждайтесь процессом изучения!
Изучить вопрос глубже – https://www.orcaretirement.com/retirement-home/glynnwood-retirement-residence
Этот информативный текст отличается привлекательным содержанием и актуальными данными. Мы предлагаем читателям взглянуть на привычные вещи под новым углом, предоставляя интересный и доступный материал. Получите удовольствие от чтения и расширьте кругозор!
Только для своих – http://kondoferromagnet.ru/catalog/24
Мы предлагаем вам окунуться в океан любопытных фактов и вдохновляющих историй. Эта публикация поможет расширить горизонты, разбудить интерес к науке и истории и увидеть мир с новой стороны.
Заходи — там интересно – https://seoflx.net/b/pegzv-rank-website-on-first-page
Эта информационная статья содержит полезные факты, советы и рекомендации, которые помогут вам быть в курсе последних тенденций и изменений в выбранной области. Материал составлен так, чтобы быть полезным и понятным каждому.
Получить полную информацию – https://granlogia.bo/2024/06/17/orden-shriners
Алгоритм прозрачен. Сначала — краткое интервью и осмотр, измерение давления, пульса, сатурации, при необходимости — ЭКГ и оценка неврологического статуса. Далее — инфузионная терапия по показаниям: восполнение жидкости, коррекция электролитов, поддержка функций печени, мягкое снижение тремора и тревоги, подготовка к сну без «оглушения». Каждая доза сверяется с реакцией организма, чтобы не получить вечернего отката и побочных эффектов. Врач детально объясняет, какие ощущения нормальны (сонливость, сухость во рту, умеренная слабость), а какие — основание для связи. После процедуры повторно фиксируются показатели и выдаются письменные рекомендации на 48–72 часа: режим воды и лёгкой еды, запрет на «подвиги» и конфликты, время короткого дневного отдыха, интерфейс связи и условия повторного визита. Такой порядок убирает хаос: пациент и семья понимают, что именно делать вечером и ночью, как снизить «дергание» и зачем придерживаться простых правил, пока организм перестраивается после запоя.
Подробнее – [url=https://narkolog-na-dom-moskva999.ru/]нарколог на дом анонимно[/url]
В этом интересном тексте собраны обширные сведения, которые помогут вам понять различные аспекты обсуждаемой темы. Мы разбираем детали и факты, делая акцент на важности каждого элемента. Не упустите возможность расширить свои знания и взглянуть на мир по-новому!
Узнать из первых рук – https://networkbuildz.com/verizon-paperless-billing-and-discount
В этой статье представлен занимательный и актуальный контент, который заставит вас задуматься. Мы обсуждаем насущные вопросы и проблемы, а также освещаем истории, которые вдохновляют на действия и изменения. Узнайте, что стоит за событиями нашего времени!
Давай разберёмся досконально – https://www.investorsaham.id/perbedaan-normal-order-automatic-order-gtc-dan-order-booking-untuk-rebutan-saham
Этот обзор предлагает структурированное изложение информации по актуальным вопросам. Материал подан так, чтобы даже новичок мог быстро освоиться в теме и начать использовать полученные знания в практике.
Посмотреть подробности – https://setcelebs.com/damon-herriman-biography
Задача врача — не «поставить галочку», а исключить противопоказания и выбрать методику с оптимальным соотношением пользы и риска. Учитываются хронические заболевания, эпизоды потери сознания, аритмии, панические атаки, депрессивные симптомы, переносимость инфузий и фармпрепаратов, взаимодействия с уже назначенными лекарствами. По результатам формируется персональный лист ограничений и список «красных флажков», при которых следует связаться со специалистом без промедления.
Углубиться в тему – [url=https://kodirovanie-ot-alkogolizma-moskva9.ru/]центры кодирования от алкоголизма[/url]
Стоимость капельницы от запоя в Екатеринбурге зависит от нескольких факторов, таких как состав раствора, срочность вызова и место проведения процедуры. Базовый состав включает физраствор, витамины, антиоксиданты и средства для защиты печени, но в случае необходимости могут быть добавлены дополнительные препараты, что увеличивает цену.
Подробнее тут – [url=https://kapelnica-ot-zapoya-ekb55.ru/]капельница от запоя вызов[/url]
Кодирование — это медицинский инструмент, который помогает закрепить трезвость, но сам по себе не является «волшебной кнопкой». Его задача — усилить внутреннюю мотивацию и создать физиологические и/или психологические условия, при которых срыв становится маловероятным. В «НаркологЭксперт» кодирование включают в структуру лечения: сначала купируются острые проявления, проводится детокс и стабилизация сна, давления и тревоги, затем — диагностика противопоказаний, подробное информирование, выбор методики и только после этого — сама процедура. Такой порядок снижает риски, повышает переносимость и делает результат предсказуемым. Важно, что любая техника подбирается индивидуально с учётом длительности употребления, анамнеза, сопутствующих заболеваний и рабочей нагрузки пациента, чтобы лечение органично вписалось в реальную жизнь и не сорвалось на первых же неделях.
Углубиться в тему – https://kodirovanie-ot-alkogolizma-moskva9.ru/skolko-stoit-kodirovanie-ot-alkogolizma-v-moskve
При звонке на горячую линию операторы уточняют основные параметры: возраст пациента, длительность запоя, частоту и количество употреблённого алкоголя, наличие хронических заболеваний. Это позволяет заранее подготовить необходимый набор медикаментов и оборудования.
Углубиться в тему – [url=https://kapelnica-ot-zapoya-voronezh3.ru/]капельница от запоя стоимость[/url]
Мы также уделяем большое внимание социальной адаптации. Пациенты учатся восстанавливать навыки общения и обретать уверенность в себе, что помогает в будущем избежать рецидивов и успешно вернуться к полноценной жизни, будь то работа или учеба.
Получить дополнительную информацию – http://быстро-вывод-из-запоя.рф/vyvod-iz-zapoya-na-domu-v-volgograde.xn--p1ai/
Современная жизнь, особенно в крупном городе, как Красноярск, часто становится причиной различных зависимостей. Работа в условиях постоянного стресса, высокий ритм жизни и эмоциональные перегрузки могут привести к проблемам, которые требуют неотложной медицинской помощи. Одним из наиболее удобных решений в такой ситуации является вызов нарколога на дом.
Углубиться в тему – [url=https://narcolog-na-dom-v-krasnoyarske55.ru/]нарколог на дом анонимно[/url]
Решение обратиться к врачу должно быть принято, если:
Подробнее тут – https://narko-zakodirovan2.ru/vyvod-iz-zapoya-czena-novosibirsk
Процесс лечения организован по отлаженной схеме, которая включает несколько последовательных этапов для быстрого и безопасного вывода из запоя:
Получить дополнительную информацию – [url=https://narco-vivod-clean.ru/]вывод из запоя на дому цена[/url]
Первый полноценный сон — переломный момент в выводе из запоя. В «АлкоМед Балашиха» мы создаём условия для него с первого дня: затемнение, тишина, комфортная температура, минимизация стимулов, ранний отбой. Если требуется, подключаем мягкие седативные схемы под мониторинг. Утром — контроль показателей, уточнение дозировок, план активности «по силам», корректировка питания и воды. Мы заранее проговариваем, какие ощущения нормальны (сонливость, умеренная слабость), а какие — требуют связи со специалистом. Чёткая ночная стратегия снижает импульсивность и убирает главный триггер срывов — усталость и бессонницу, из-за которых даже корректно подобранные инфузии теряют эффективность к вечеру следующего дня.
Получить дополнительные сведения – https://vyvod-iz-zapoya-balashiha9.ru/
Как правило, для эффективного устранения токсинов из организма и восстановления нормального функционирования всех органов и систем, назначаются специальные препараты. К таким препаратам относятся растворы для восстановления водно-солевого баланса, витамины и медикаменты для поддержания нормальной работы печени, а также препараты, стабилизирующие психоэмоциональное состояние пациента.
Детальнее – [url=https://narcolog-na-dom-ektb55.ru/]вызвать врача нарколога на дом в екатеринбурге[/url]
Умение стильно одеваться играет важную роль в самовыражении.
Она помогает передать настроение и выглядеть гармонично.
Аккуратный стиль влияет на то, как человека оценивают другие люди.
В повседневной жизни одежда может повышать самооценку.
https://kambadyami.net/read-blog/35647
Стильный образ облегчает деловые встречи.
При этом важно учитывать собственный вкус и контекст.
Стиль дают возможность экспериментировать.
В итоге, умение стильно одеваться влияет на общее восприятие личности.
Команда клиники “Аура Здоровья” состоит из опытных и квалифицированных врачей-наркологов, обладающих глубокими знаниями фармакологии и психотерапии. Они регулярно повышают свою квалификацию, участвуя в профессиональных конференциях и семинарах, чтобы применять самые эффективные методы лечения.
Подробнее тут – http://медицинский-вывод-из-запоя.рф/vyvod-iz-zapoya-cena-v-rostove-na-donu.xn--p1ai/
Районы с плотной застройкой, дворовые проезды, пиковые часы — всё учитывается при планировании визитов. Чем меньше холостых перемещений, тем быстрее начинается помощь и тем ниже вероятность внеплановых повторов «по тревоге».
Детальнее – https://narkologicheskaya-klinika-mytishchi9.ru/narkologicheskaya-klinika-stacionar-v-mytishchah/
Каждый врач в нашей команде не только профессионал своего дела, но и человек, способный оказать поддержку в трудные времена. Мы понимаем, что лечение — это не только медицинский процесс, но также и эмоциональная поддержка, необходимая для восстановления. Сотрудничество с психологами, социальными работниками и другими специалистами позволяет создавать многогранные программы, которые учитывают все аспекты состояния пациента.
Детальнее – https://нарко-специалист.рф/vivod-iz-zapoya-na-domu-v-Ekaterinburge
Домашний визит — это медицинская логика без лишней логистики. В мегаполисе каждая задержка увеличивает риски: человек устаёт, растёт тревога, обостряются скачки давления и пульса, а бессонные ночи превращают любые «самодельные» схемы в опасный эксперимент. «Трезвый Стандарт» строит помощь как управляемую последовательность: дежурный врач собирает краткий анамнез (длительность употребления, лекарства, сопутствующие заболевания), уточняет текущие показатели и предлагает безопасную точку входа — выезд на дом или стационар на сутки-двое при высоких рисках. Дом даёт приватность и предсказуемость: знакомая среда снижает стресс, а врач привозит всё для мониторинга и инфузий по показаниям. Ключевой результат первых часов — контролируемый сон, понятный режим гидратации и питания «по силам», а также зафиксированные «красные флажки» для связи. Именно последовательность, а не «сильная капельница любой ценой», делает выездной формат эффективным и безопасным в реальном ритме Москвы.
Подробнее тут – https://narkolog-na-dom-moskva999.ru/narkolog-na-dom-moskva-kruglosutochno
Современные методики терапии: Врачи применяют передовые подходы, включая когнитивно-поведенческую терапию и мотивационное интервьюирование. Эти методы направлены на изменение деструктивных паттернов мышления и поведения, что способствует успешному восстановлению.
Ознакомиться с деталями – [url=https://alko-specialist.ru/]www.domen.ru[/url]
Мы не подгоняем всех под единый сценарий. Если состояние устойчивое, нет упорной рвоты, высокой температуры, выраженной дезориентации и резких скачков давления и пульса — рационален домашний старт: приватно, быстрее и без лишних переездов. Врач приедет без маркировки, проведёт осмотр, запустит инфузионную терапию по показаниям, оставит письменные рекомендации и «красные флажки». Если же есть признаки угрозы осложнений — обезвоживание, аритмии, риск судорог, боли за грудиной или в животе, лихорадка, спутанность сознания, тяжёлая соматика — мы честно предлагаем короткую стационарную стабилизацию на 24–48 часов. Под круглосуточным наблюдением проще корректировать схемы, вовремя закрывать дефициты, защитить сон и быстрее вернуть управляемость поведению. В обоих форматах маршрут прозрачен: согласованные окна связи, фиксированные цели на ближайшие 72 часа и отсутствие «пакетов ради прайса». Благодаря этому решения принимаются спокойно, без угадываний и эмоциональных раскачек, которые обычно ломают прогресс и удорожают лечение.
Изучить вопрос глубже – https://vyvod-iz-zapoya-balashiha9.ru/vyvod-iz-zapoya-cena-balashiha
Психологическая реабилитация: Психологическая поддержка – один из главных аспектов нашего подхода. Мы предлагаем индивидуальные и групповые занятия, помогающие осознать зависимость, проработать эмоциональные травмы и сформировать новые модели поведения. Опытные психологи помогают пациентам понять причины своих зависимостей, что является важным шагом на пути к выздоровлению.
Получить дополнительную информацию – [url=https://srochnyj-vyvod-iz-zapoya.ru/vyvod-iz-zapoya-na-domu-v-kazani.ru/]срочный вывод из запоя[/url]
Продуманный внешний вид играет значимую роль в создании первого впечатления.
Она помогает передать настроение и почувствовать уверенность.
Современный внешний вид влияет на то, как человека видят в обществе.
В повседневной жизни одежда может повышать самооценку.
https://jobhop.co.uk/blog/404755/–2025——–
Хорошо подобранная одежда облегчает общение.
При этом важно учитывать личные предпочтения и контекст.
Современные тенденции дают возможность обновлять образ.
В итоге, умение стильно одеваться влияет на общее восприятие личности.
Инфузионная терапия — это набор узких вмешательств под конкретную картину, а не «магический состав». Регидратация улучшает тканевую перфузию и снимает головную боль от обезвоживания; электролиты стабилизируют нервно-мышечную передачу и сердечный ритм; печёночная поддержка уменьшает токсическую нагрузку и тяжесть в правом подреберье; гастропротекция и противорвотные защищают слизистую и убирают рвотный компонент. При выраженной тревоге и бессоннице добавляется мягкая анксиолитическая поддержка — дозы подбираются так, чтобы стабилизировать, а не «выключить». Мы не назначаем исследования «для галочки»: анализы и ЭКГ используются тогда, когда их результат меняет решения «сегодня». Такой подход снижает побочные эффекты, делает результат предсказуемым и удерживает бюджет от «скачков». На этой базе уже обсуждается следующий шаг: амбулаторное наблюдение, краткие психообразовательные сессии, а при показаниях — кодирование после стабилизации.
Подробнее – https://kapelnica-ot-zapoya-lyubercy9.ru/kapelnica-ot-zapoya-na-domu-lyubercy
Нарколог выезжает в любое время суток, привозя мобильный кейс с инфузионными системами, растворами, принадлежностями для забора крови и экспресс-тестами. После прибытия проводится детальный осмотр и сбор дополнительных данных: ЭКГ-мониторинг, тесты на уровень глюкозы, электролитов и пр.
Подробнее – [url=https://kapelnica-ot-zapoya-voronezh3.ru/]сколько стоит капельница от запоя[/url]
В обзорной статье вы найдете собрание важных фактов и аналитики по самым разнообразным темам. Мы рассматриваем как современные исследования, так и исторические контексты, чтобы вы могли получить полное представление о предмете. Погрузитесь в мир знаний и сделайте шаг к пониманию!
Не упусти важное! – https://www.fahrzeugcenter-janke.de/hallo-welt
В этой статье вы найдете уникальные исторические пересечения с научными открытиями. Каждый абзац — это шаг к пониманию того, как наука и события прошлого создают основу для технологического будущего.
Получить дополнительную информацию – https://gildia-studio.ru/2022/04/30/mnogokamernaya-semka-ot-videostudii-gildiya-v-rostove-na-donu
Детоксикация организма, проводимая на дому, помогает очистить кровь от токсинов, накопившихся из-за длительного употребления алкоголя или наркотических веществ. Она проводится с использованием специально подобранных медикаментов, которые улучшают работу печени, почек и других органов.
Выяснить больше – [url=https://narcolog-na-dom-v-krasnoyarske55.ru/]нарколог на дом вывод из запоя красноярск[/url]
Публикация предлагает уникальную подборку информации, которая будет интересна как специалистам, так и широкому кругу читателей. Здесь вы найдете ответы на часто задаваемые вопросы и полезные инсайты для дальнейшего применения.
Не упусти важное! – https://scgarai.dr.in/blog/%E0%A6%A8%E0%A6%BF%E0%A6%AC%E0%A6%A8%E0%A7%8D%E0%A6%A7-%E0%A6%B8%E0%A6%AE%E0%A7%82%E0%A6%B9/%E0%A6%85%E0%A6%A8%E0%A7%8D%E0%A6%AF%E0%A6%BE%E0%A6%A8%E0%A7%8D%E0%A6%AF/complete-accounting-through-xml-technology-alone-within-a-network-environment
Основная задача клиники — способствовать восстановлению здоровья и социальной адаптации тех, кто столкнулся с зависимостью. Мы комплексно подходим к решению проблемы, учитывая физические, психологические и социальные аспекты зависимости. Наша цель — не только помочь избавиться от пагубных привычек, но и обеспечить успешное возвращение к полноценной жизни.
Подробнее можно узнать тут – http://медицинский-вывод-из-запоя.рф/vyvod-iz-zapoya-cena-v-rostove-na-donu.xn--p1ai/
В этой публикации мы сосредоточимся на интересных аспектах одной из самых актуальных тем современности. Совмещая факты и мнения экспертов, мы создадим полное представление о предмете, которое будет полезно как новичкам, так и тем, кто глубоко изучает вопрос.
Читать далее > – https://beacon-india.com/automate-design-solidworks-driveworksxpress
В этом интересном тексте собраны обширные сведения, которые помогут вам понять различные аспекты обсуждаемой темы. Мы разбираем детали и факты, делая акцент на важности каждого элемента. Не упустите возможность расширить свои знания и взглянуть на мир по-новому!
Погрузиться в детали – https://nantsiplug.co.za/example-1/tokyo-officials-plan-for-a-safe-olympic-games-without-quarantines
В статье представлены ключевые моменты по актуальной теме, дополненные советами экспертов и ссылками на дополнительные ресурсы. Цель материала — дать читателю инструменты для самостоятельного развития и принятия осознанных решений.
Изучите внимательнее – https://chiliconkarin.se/2023/03/19/potatis-och-purjoloksoppa
Эта статья сочетает в себе как полезные, так и интересные сведения, которые обогатят ваше понимание насущных тем. Мы предлагаем практические советы и рекомендации, которые легко внедрить в повседневную жизнь. Узнайте, как улучшить свои навыки и обогатить свой опыт с помощью простых, но эффективных решений.
Прочесть заключение эксперта – https://smart-plv.net/producto/purple-t-shirt
Эта публикация погружает вас в мир увлекательных фактов и удивительных открытий. Мы расскажем о ключевых событиях, которые изменили ход истории, и приоткроем завесу над научными достижениями, которые вдохновили миллионы. Узнайте, чему может научить нас прошлое и как применить эти знания в будущем.
Подробнее можно узнать тут – http://webzwnbdesign.cf/post/34
Этот обзор предлагает структурированное изложение информации по актуальным вопросам. Материал подан так, чтобы даже новичок мог быстро освоиться в теме и начать использовать полученные знания в практике.
Обратитесь за информацией – https://aclassact.com.sg/primary-6/complete-guide-to-2023-psle-english-exam-a-class-act
В этой статье вы найдете познавательную и занимательную информацию, которая поможет вам лучше понять мир вокруг. Мы собрали интересные данные, которые вдохновляют на размышления и побуждают к действиям. Открывайте новую информацию и получайте удовольствие от чтения!
Ознакомьтесь поближе – https://thehospitalplansite.co.za/buy-testosterone-propionate-in-south-africa
В этой статье вы найдете познавательную и занимательную информацию, которая поможет вам лучше понять мир вокруг. Мы собрали интересные данные, которые вдохновляют на размышления и побуждают к действиям. Открывайте новую информацию и получайте удовольствие от чтения!
Узнать из первых рук – https://amplgroup.in/2021/10/06/build-the-industry-and-manufacturing-the-best-quality-of-products
Цель первого этапа — безопасно снизить интоксикацию и вернуть базовое самочувствие. Мы запускаем инфузионную терапию, корректируем водно-электролитный баланс, защищаем органы-мишени, нормализуем сон и аппетит. При необходимости выполняется ЭКГ, корректируются дозировки «на лету» по динамике показателей.
Детальнее – [url=https://narkologicheskaya-klinika-mytishchi0.ru/]наркологическая клиника нарколог[/url]
Эта статья полна интересного контента, который побудит вас исследовать новые горизонты. Мы собрали полезные факты и удивительные истории, которые обогащают ваше понимание темы. Читайте, погружайтесь в детали и наслаждайтесь процессом изучения!
Подробнее можно узнать тут – https://teachersguide.net/field-notes-in-education
В этой публикации мы предлагаем подробные объяснения по актуальным вопросам, чтобы помочь читателям глубже понять их. Четкость и структурированность материала сделают его удобным для усвоения и применения в повседневной жизни.
Раскрыть тему полностью – https://greenduckindustries.com/waterless-car-wash-wax-concentrate
В этой статье вы найдете познавательную и занимательную информацию, которая поможет вам лучше понять мир вокруг. Мы собрали интересные данные, которые вдохновляют на размышления и побуждают к действиям. Открывайте новую информацию и получайте удовольствие от чтения!
Давай разберёмся досконально – https://amazingbeatboxers.com/2013/01/daichi-x-grey-matter-jamming-out-in-union-square
В этой статье вы найдете уникальные исторические пересечения с научными открытиями. Каждый абзац — это шаг к пониманию того, как наука и события прошлого создают основу для технологического будущего.
Кликни, не пожалеешь – https://www.alaskatrd.com/discover-effast-valves-values
В этой статье вы найдете познавательную и занимательную информацию, которая поможет вам лучше понять мир вокруг. Мы собрали интересные данные, которые вдохновляют на размышления и побуждают к действиям. Открывайте новую информацию и получайте удовольствие от чтения!
Подробнее можно узнать тут – https://exlinko.net/o/lfwsm-rank-website-in-3-weeks
Статья знакомит с важнейшими моментами, которые сформировали наше общество. От великих изобретений до культурных переворотов — вы узнаете, как прошлое влияет на наше мышление, технологии и образ жизни.
Разобраться лучше – https://meumolde.blog/tabela-de-medidas-femininas
Алгоритм гибкий: при изменении самочувствия мы донастраиваем схему и интенсивность наблюдения без пауз в лечении.
Выяснить больше – [url=https://narkologicheskaya-klinika-himki0.ru/]narkologicheskaya-klinika-sajt[/url]
В этом интересном тексте собраны обширные сведения, которые помогут вам понять различные аспекты обсуждаемой темы. Мы разбираем детали и факты, делая акцент на важности каждого элемента. Не упустите возможность расширить свои знания и взглянуть на мир по-новому!
Узнать из первых рук – https://www.taylordentist.com/great-reasons-to-use-a-water-flosser
Эта публикация погружает вас в мир увлекательных фактов и удивительных открытий. Мы расскажем о ключевых событиях, которые изменили ход истории, и приоткроем завесу над научными достижениями, которые вдохновили миллионы. Узнайте, чему может научить нас прошлое и как применить эти знания в будущем.
Получить профессиональную консультацию – https://npcnewstv.com/do-you-want-to-keep-your-tummy-tight-during-the-holidays
В этой статье вы найдете познавательную и занимательную информацию, которая поможет вам лучше понять мир вокруг. Мы собрали интересные данные, которые вдохновляют на размышления и побуждают к действиям. Открывайте новую информацию и получайте удовольствие от чтения!
Откройте для себя больше – https://furnisheed.com/types-of-elevators
Эта статья полна интересного контента, который побудит вас исследовать новые горизонты. Мы собрали полезные факты и удивительные истории, которые обогащают ваше понимание темы. Читайте, погружайтесь в детали и наслаждайтесь процессом изучения!
Познакомиться с результатами исследований – https://shapes.pk/importance-of-daily-healthy-fitness-habits
Этот увлекательный информационный материал подарит вам массу новых знаний и ярких эмоций. Мы собрали для вас интересные факты и сведения, которые обогатят ваш опыт. Откройте для себя увлекательный мир информации и насладитесь процессом изучения!
Наши рекомендации — тут – https://gothamdoughnuts.com/post/indulge-in-these-irresistible-doughnuts-in-melbourne
Эта статья полна интересного контента, который побудит вас исследовать новые горизонты. Мы собрали полезные факты и удивительные истории, которые обогащают ваше понимание темы. Читайте, погружайтесь в детали и наслаждайтесь процессом изучения!
Смотрите также – https://finesse-catering.com/how-to-keep-fear-from-ruining-your-art-business-with-confident-2
Этот информативный материал предлагает содержательную информацию по множеству задач и вопросов. Мы призываем вас исследовать различные идеи и факты, обобщая их для более глубокого понимания. Наша цель — сделать обучение доступным и увлекательным.
Уникальные данные только сегодня – https://allaroundaccounts.net/suzumeno-serifu
Premium watches continue to attract attention despite the rise of smart technology.
They are often seen as a sign of prestige and refined taste.
Skilled engineering plays a major role in their lasting value.
Many luxury watches are produced using premium components.
https://www.pittsburghtribune.org/read-blog/122157
They also represent a deep history passed down through generations.
For collectors, these watches can serve as both wearable tools and valuable assets.
Elegant styling allows them to stay relevant across changing fashion trends.
Ultimately, luxury watches continue to appeal to enthusiasts around the world.
Кроме того, врач приедет в любое удобное для пациента время, даже ночью, обеспечив круглосуточный доступ к медицинской помощи. Специалист подбирает индивидуальный состав капельницы, что позволяет оптимально поддержать организм в зависимости от состояния пациента.
Получить дополнительную информацию – [url=https://kapelnica-ot-zapoya-ektb55.ru/]капельница от запоя на дому[/url]
Эта процедура доступна как в условиях клиники, так и на дому, что делает ее универсальным решением для различных жизненных ситуаций. При этом важно доверять свое здоровье только профессиональным врачам, которые могут обеспечить безопасное и качественное лечение.
Получить дополнительную информацию – http://kapelnica-ot-zapoya-krasnoyarsk55.ru
Вызов нарколога на дом позволяет быстро получить квалифицированную помощь в условиях, где пациент чувствует себя максимально комфортно. Специалист прибывает в течение 1–2 часов после обращения, осуществляя диагностику, стабилизацию состояния и при необходимости — детоксикацию.
Исследовать вопрос подробнее – [url=https://narcolog-na-dom-ekaterinburg55.ru/]нарколог на дом в екатеринбурге[/url]
Миссия наркологического центра “Здоровая Жизнь” заключается в том, чтобы быть надежным проводником для людей, страдающих зависимостями, на пути к выздоровлению. Мы не только лечим, но и занимаемся профилактикой рецидивов, социальной адаптацией пациентов, помогая им вернуться к полноценной жизни без психоактивных веществ.
Ознакомиться с деталями – http://надежный-вывод-из-запоя.рф/vyvod-iz-zapoya-na-domu-v-voronezhe.xn--p1ai/
Как правило, для эффективного устранения токсинов из организма и восстановления нормального функционирования всех органов и систем, назначаются специальные препараты. К таким препаратам относятся растворы для восстановления водно-солевого баланса, витамины и медикаменты для поддержания нормальной работы печени, а также препараты, стабилизирующие психоэмоциональное состояние пациента.
Разобраться лучше – [url=https://narcolog-na-dom-ektb55.ru/]нарколог на дом срочно екатеринбург[/url]
В этом тексте собрано множество случайных сведений и довольно неопределённых мыслей, которые могут чем-то заинтересовать. Мы отмечаем моменты, которые не особенно важны, но всё же занимают своё место в повествовании.
Вот – [url=https://arma-rehab.ru/vyvod-iz-zapoya/]ставки на спорт[/url]
Процесс лечения организован по отлаженной схеме, которая включает несколько последовательных этапов для быстрого и безопасного вывода из запоя:
Детальнее – http://narco-vivod-clean.ru/narkolog-na-dom-czena-spb/
Показана в тяжёлых случаях или при наличии сопутствующих заболеваний. Лечение проходит под круглосуточным наблюдением врачей и медсестёр с постоянной корректировкой терапии.
Изучить вопрос глубже – [url=https://narko-zakodirovan2.ru/]наркология вывод из запоя новосибирск[/url]
На данном ресурсе доступны свежие новости.
Пользователи могут сразу просматривать события со всего мира.
Новости публикуются постоянно, что дает возможность следить за событиями.
Редакция сайта следят за достоверностью информации.
Сайт предлагает разнообразные новости для разных читателей.
https://telegra.ph/Samara-12-25-6
Материалы публикуются структурировано и удобно, чтобы пользователи оставались информированными.
Секции ресурса позволяют легко просматривать интересующие новости.
В итоге, сайт обеспечивает быстрый доступ к информации для всех пользователей.
Процесс вывода из запоя включает последовательное воздействие на ключевые звенья интоксикации. Ниже представлена таблица, отражающая этапы лечения, используемые методики и ожидаемые результаты терапии.
Ознакомиться с деталями – [url=https://vyvod-iz-zapoya-v-volgograde17.ru/]наркология вывод из запоя в волгограде[/url]
Лечение проходит в несколько этапов: диагностика, детоксикация, медикаментозная поддержка и восстановление. Каждый этап имеет чёткие цели и критерии эффективности, что делает процесс управляемым и безопасным. Применяются препараты, сертифицированные в РФ, и только те, чья эффективность подтверждена клиническими исследованиями.
Ознакомиться с деталями – [url=https://vyvod-iz-zapoya-v-volgograde17.ru/]вывод из запоя цена волгоград[/url]
Чтобы соотнести риски и плотность наблюдения до очного осмотра, удобнее всего взглянуть на одну сводную таблицу. Это не замена решению врача, но понятный ориентир для семьи: чем выше вероятность осложнений, тем плотнее мониторинг и быстрее доступ к коррекциям.
Ознакомиться с деталями – https://narkologicheskaya-klinika-lyubercy0.ru/narkologicheskaya-klinika-na-dom-v-lyubercah/
Пациенты отмечают, что особенно важна не только профессиональная помощь, но и спокойная атмосфера. Мягкий свет, тишина, отдельные палаты и деликатная коммуникация персонала — всё это снижает тревожность и помогает организму восстановиться. Эффективность лечения оценивается по конкретным маркерам: улучшение сна, нормализация давления, исчезновение тошноты, восстановление аппетита и уменьшение тяги.
Получить больше информации – [url=https://narkologicheskaya-clinica-v-krasnoyarske17.ru/]наркологические клиники алкоголизм в красноярске[/url]
«ГородМед Трезвость» выстраивает помощь так, чтобы человек не оставался один ни на этапе выхода из запоя, ни во время стабилизации, ни в период удержания ремиссии. С первого звонка дежурный врач проводит короткое интервью, фиксирует жалобы, длительность употребления, сопутствующие болезни и текущие препараты, после чего предлагает безопасную точку входа — экстренный выезд на дом или приём без ожидания. Мы не растягиваем процесс по неделе: старт возможен в день обращения, а маршрутизация между форматами (дом, амбулаторный визит, стационар) занимает часы. Важная часть подхода — ясные цели каждого шага и критерии эффективности, понятные самому пациенту и семье: когда ждать облегчения тревоги, как нормализуется сон, когда вернётся аппетит, что считается «красным флажком» и как действовать без паники. Такая предсказуемость снижает уровень стресса и повышает приверженность лечению уже в первые трое суток.
Детальнее – [url=https://narkologicheskaya-klinika-moskva99.ru/]нарколог бесплатно москва[/url]
Мы предлагаем кодирование тогда, когда оно медицински оправдано и человек готов его принять осознанно. Сначала исключаем противопоказания, обсуждаем механизм, ограничения и риски, согласуем формат — инъекция, имплантация или пероральная поддержка. После процедуры пациент получает памятку и контакт для связи, а также план профилактики срывов: без поведенческих шагов любое фармвмешательство теряет часть эффективности. Важный критерий выбора методики — реальный график жизни: командировки, смены, поздние встречи. Метод должен переживать вашу неделю без «узких мест», иначе дорогостоящая техника не даст ожидаемого эффекта. Такой прагматичный подход даёт не мифическую «гарантию», а рабочую устойчивость, которую можно удерживать месяцами.
Получить больше информации – http://narkologicheskaya-klinika-moskva99.ru/horoshaya-narkologicheskaya-klinika-v-moskve/
В этой публикации мы предлагаем подробные объяснения по актуальным вопросам, чтобы помочь читателям глубже понять их. Четкость и структурированность материала сделают его удобным для усвоения и применения в повседневной жизни.
Погрузиться в детали – https://www.maplelodge.or.jp/20200930175614-0001
В этом информативном обзоре собраны самые интересные статистические данные и факты, которые помогут лучше понять текущие тренды. Мы представим вам цифры и графики, которые иллюстрируют, как развиваются различные сферы жизни. Эта информация станет отличной основой для глубокого анализа и принятия обоснованных решений.
Где можно узнать подробнее? – http://beantea.com/one-week-outdoor-adventure
Мы предлагаем вам окунуться в океан любопытных фактов и вдохновляющих историй. Эта публикация поможет расширить горизонты, разбудить интерес к науке и истории и увидеть мир с новой стороны.
ТОП-5 причин узнать больше – https://pulsedatahub.com/blog/data-science-in-government
В данной статье вы найдете комплексный подход к изучению насущных тем. Мы комбинируем теоретические сведения с практическими советами, чтобы читатель мог не только понять проблему, но и найти пути её решения.
Более того — здесь – http://schoolofthemadeleine.com/essential_grid/importance-of-healthy-food
В этом информативном обзоре собраны самые интересные статистические данные и факты, которые помогут лучше понять текущие тренды. Мы представим вам цифры и графики, которые иллюстрируют, как развиваются различные сферы жизни. Эта информация станет отличной основой для глубокого анализа и принятия обоснованных решений.
Информация доступна здесь – https://www.defining-blog.ru/6101035-mozhno-li-vykladyvat-kaver-na-ploshhadki-she24
Эта статья сочетает познавательный и занимательный контент, что делает ее идеальной для любителей глубоких исследований. Мы рассмотрим увлекательные аспекты различных тем и предоставим вам новые знания, которые могут оказаться полезными в будущем.
См. подробности – https://www.sfmusictech.com/2009/03/07/html-styles
В статье представлены ключевые моменты по актуальной теме, дополненные советами экспертов и ссылками на дополнительные ресурсы. Цель материала — дать читателю инструменты для самостоятельного развития и принятия осознанных решений.
Исследовать вопрос подробнее – https://www.sfmusictech.com/2009/03/07/html-styles
Этот информативный текст отличается привлекательным содержанием и актуальными данными. Мы предлагаем читателям взглянуть на привычные вещи под новым углом, предоставляя интересный и доступный материал. Получите удовольствие от чтения и расширьте кругозор!
Только для своих – https://kita-umeda.com/wp/contact
В этой публикации мы сосредоточимся на интересных аспектах одной из самых актуальных тем современности. Совмещая факты и мнения экспертов, мы создадим полное представление о предмете, которое будет полезно как новичкам, так и тем, кто глубоко изучает вопрос.
Доступ к полной версии – https://webofthings.org/2015/05/14/first-wot-w3c-interest-group-face-to-face-meeting
В данной статье вы найдете комплексный подход к изучению насущных тем. Мы комбинируем теоретические сведения с практическими советами, чтобы читатель мог не только понять проблему, но и найти пути её решения.
Слушай внимательно — тут важно – https://rickcue.com/index.php/component/k2/item/9?start=64610
Этот информативный текст отличается привлекательным содержанием и актуальными данными. Мы предлагаем читателям взглянуть на привычные вещи под новым углом, предоставляя интересный и доступный материал. Получите удовольствие от чтения и расширьте кругозор!
Выяснить больше – https://bergamet.co.uk/shop/product/bergamet-advanced-calabrian-citrus-bergamot-60-tablets
В этой статье представлен занимательный и актуальный контент, который заставит вас задуматься. Мы обсуждаем насущные вопросы и проблемы, а также освещаем истории, которые вдохновляют на действия и изменения. Узнайте, что стоит за событиями нашего времени!
Подробная информация доступна по запросу – https://anyerglobe.com/img-20200919-wa0056
Мы собрали для вас самые захватывающие факты из мира науки и истории. От малознакомых деталей до грандиозных событий — эта статья расширит ваш кругозор и подарит новое понимание того, как устроен наш мир.
Читать полностью – https://blog.sassyescort.com/understanding-the-differences-between-gfe-and-pse-what-to-expect
В этом интересном тексте собраны обширные сведения, которые помогут вам понять различные аспекты обсуждаемой темы. Мы разбираем детали и факты, делая акцент на важности каждого элемента. Не упустите возможность расширить свои знания и взглянуть на мир по-новому!
Открыть полностью – https://lavanderiauniversal.com/producto/fenestrado
Читатель отправляется в интеллектуальное путешествие по самым ярким событиям истории и важнейшим научным открытиям. Мы раскроем тайны эпох, покажем, как идеи меняли миры, и объясним, почему эти знания остаются актуальными сегодня.
Узнать больше > – https://tubepvinakit.com/nhung-luu-y-quan-trong-khi-lua-chon-tu-bep-go-cong-nghiep
В этой статье представлен занимательный и актуальный контент, который заставит вас задуматься. Мы обсуждаем насущные вопросы и проблемы, а также освещаем истории, которые вдохновляют на действия и изменения. Узнайте, что стоит за событиями нашего времени!
Изучить эмпирические данные – https://www.cerus-casino.com/videos/debut-des-annonces
В этой статье собраны факты, которые освещают целый ряд важных вопросов. Мы стремимся предложить читателям четкую, достоверную информацию, которая поможет сформировать собственное мнение и лучше понять сложные аспекты рассматриваемой темы.
Подробнее можно узнать тут – https://offshoregrill.com/2021/10/10/offshore-grill-joins-the-oregon-coast-food-trail
Этот обзор предлагает структурированное изложение информации по актуальным вопросам. Материал подан так, чтобы даже новичок мог быстро освоиться в теме и начать использовать полученные знания в практике.
Жми сюда — получишь ответ – https://northbaycanine.org
В этом обзорном материале представлены увлекательные детали, которые находят отражение в различных аспектах жизни. Мы исследуем непонятные и интересные моменты, позволяя читателю увидеть картину целиком. Погрузитесь в мир знаний и удивительных открытий!
Прочесть заключение эксперта – https://juncorp.com.tw/portfolio-slider-3/m02
В этой информационной статье вы найдете интересное содержание, которое поможет вам расширить свои знания. Мы предлагаем увлекательный подход и уникальные взгляды на обсуждаемые темы, побуждая пользователей к активному мышлению и критическому анализу.
Прочесть заключение эксперта – https://www.mcyapandfries.com/episode-224-poltergeist-1982
Эта публикация дает возможность задействовать различные источники информации и представить их в удобной форме. Читатели смогут быстро найти нужные данные и получить ответы на интересующие их вопросы. Мы стремимся к четкости и доступности материала для всех!
Не упусти шанс – https://zionsgarden.net/product/1000mg-cbd-lotion
Мы собрали для вас самые захватывающие факты из мира науки и истории. От малознакомых деталей до грандиозных событий — эта статья расширит ваш кругозор и подарит новое понимание того, как устроен наш мир.
Исследовать вопрос подробнее – https://haefencapital.com/mobile-platform
Эта публикация дает возможность задействовать различные источники информации и представить их в удобной форме. Читатели смогут быстро найти нужные данные и получить ответы на интересующие их вопросы. Мы стремимся к четкости и доступности материала для всех!
Прочесть заключение эксперта – https://www.abcconsulting-cr.com/2021/10/31/carta-de-despido-laboral-costa-rica
Алкогольный запой представляет собой длительное бесконтрольное приём спиртного, приводящее к тяжёлой интоксикации и серьёзным осложнениям для органов и психики. В Новосибирске клиника «Сибирский Доктор» предлагает качественный вывод из запоя с применением инновационных технологий и участием опытных наркологов, терапевтов и психиатров. Наш подход сочетает мгновенную реакцию на вызов, современное оборудование и индивидуальные схемы лечения, что позволяет достичь стабильной ремиссии и снизить риск рецидива.
Углубиться в тему – [url=https://kachestvo-vyvod-iz-zapoya.ru/]вывод из запоя капельница на дому в новосибирске[/url]
Красноярск, как и любой крупный город, сталкивается с распространенными проблемами зависимости. Учитывая высокий уровень стресса, социальное давление и быстрое развитие мегаполиса, люди часто оказываются в сложных ситуациях, связанных с алкогольной или наркотической зависимостью. В таких случаях своевременная помощь квалифицированного нарколога становится не просто желательной, а жизненно необходимой.
Выяснить больше – [url=https://narcolog-na-dom-krasnoyarsk55.ru/]помощь нарколога на дому красноярск[/url]
Строго регламентированный алгоритм позволяет специалистам «ВоронежДоктор» добиваться устойчивых результатов при выводе из запоя.
Выяснить больше – [url=https://kapelnica-ot-zapoya-voronezh2.ru/]врач на дом капельница от запоя[/url]
Междисциплинарный подход: Специалисты нашего центра работают в команде, включающей наркологов, психотерапевтов, социальных работников. Это позволяет учитывать все аспекты состояния пациента и обеспечивать комплексный подход к лечению.
Ознакомиться с деталями – [url=https://alko-specialist.ru/]вывод из запоя недорого[/url]
Зависимости от психоактивных веществ, таких как алкоголь, наркотики и азартные игры, представляют собой серьёзные проблемы, с которыми сталкиваются многие люди. Эти состояния не только негативно влияют на здоровье, но также разрушительно сказываются на межличностных отношениях, социальной адаптации и профессиональной деятельности. Наркологическая клиника “Новый путь” предлагает комплексное решение для пациентов, нуждающихся в помощи, ориентируясь на индивидуальный подход и использование современных медицинских технологий.
Выяснить больше – https://нарко-специалист.рф/vivod-iz-zapoya-v-stacionare-v-Ekaterinburge
Системы автоматизированного дозирования обеспечивают точное введение медикаментов, минимизируя риск передозировки и побочных эффектов. Постоянный мониторинг жизненно важных показателей позволяет врачу оперативно корректировать терапевтическую схему для достижения максимальной безопасности и эффективности.
Углубиться в тему – [url=https://narco-vivod-clean.ru/]вывод из запоя на дому цена санкт-петербург[/url]
Задача врача — не «поставить галочку», а исключить противопоказания и выбрать методику с оптимальным соотношением пользы и риска. Учитываются хронические заболевания, эпизоды потери сознания, аритмии, панические атаки, депрессивные симптомы, переносимость инфузий и фармпрепаратов, взаимодействия с уже назначенными лекарствами. По результатам формируется персональный лист ограничений и список «красных флажков», при которых следует связаться со специалистом без промедления.
Исследовать вопрос подробнее – [url=https://kodirovanie-ot-alkogolizma-moskva9.ru/]цены адреса кодирование от алкоголизма москва[/url]
We have compiled the most important gambling numbers and facts in this infographic. If you thought you knew everything about gambling in Australia, you might be wrong. This is thanks to HTML5 technology, which allows casino content to fit various screens. They come from none other than the industry’s top producers of online slots.
Choosing the best casino bonus and promotions can greatly enhance your gaming experience and boost your winning potential. New casinos typically have the same types of bonuses you’ll find at established casinos. We also like new sites that offer provably fair games, where you can verify results yourself through blockchain tech. The casino will gain bonus points if it undergoes third-party game auditing to provide proof of fair gaming. Many sites, such as non-BetStop casinos, also offer little in the way of unnecessary KYC checks and excessive verification.
These are casino rewards reserved for punters with new gambling accounts. Please remember that the majority of bonuses are subjected to wagering requirements. The most popular and widespread types are welcome bonus and first deposit bonus. Every player can play free https://blackcoin.co/best-online-pokies-for-real-money-in-australia/ in a demo mode on our website.
In this guide, we reveal the best real money casinos Australia 2025 has to offer — plus expert tips to help you win big. Whether you’re chasing massive pokies jackpots, thrilling live dealer action, or just the best bonuses, Aussie players have more choices than ever. Australia’s real money online casino scene is bigger and better in 2025! Online casinos in Australia have a rich menu of bonuses for new and returning players.
The gambling aspect of the Adelaide casino is simply outstanding, and the essence of it will have you craving winning opportunities. The Adelaide casino offers a reward program for loyal members that you simply cannot pass up. Below is a list of TOP 5 land-based casinos in Australia we recommend that you visit. Australia hosts some incredible casinos that you will want to add to your bucket list. You should follow the rules of Responsible gaming stated on the website of your favourite casino every time you enter the site. Yet, virtual houses can work only with overseas players.
But the best platforms stand out for a reason – they offer consistent value, flexible banking, real rewards, and fair play. The best casinos offer a balance of variety, fairness, and ongoing value. For players who want simplicity without setup, LuckyVibe is a standout – it supports both cards and offers fast processing times across the board. Fast withdrawals, low fees, and secure deposits can make a huge difference, especially when you’re playing with real cash. Playing at an Australian online casino comes with plenty of upsides, especially if you know what to look for. Casinos that support multiple software providers and offer mobile-friendly, low-lag gameplay ranked highest for entertainment and variety.
References:
https://blackcoin.co/cocoa-casino-review/
Алкогольный запой представляет собой длительное бесконтрольное приём спиртного, приводящее к тяжёлой интоксикации и серьёзным осложнениям для органов и психики. В Новосибирске клиника «Сибирский Доктор» предлагает качественный вывод из запоя с применением инновационных технологий и участием опытных наркологов, терапевтов и психиатров. Наш подход сочетает мгновенную реакцию на вызов, современное оборудование и индивидуальные схемы лечения, что позволяет достичь стабильной ремиссии и снизить риск рецидива.
Получить дополнительную информацию – [url=https://kachestvo-vyvod-iz-zapoya.ru/]нарколог вывод из запоя[/url]
Eliot Thomas is an Editor at PokerNews, specializing in casino and poker coverage. In New York, you must be age 18 or over to be able to play the lottery or bet on horse racing. 2025 looks like a real possibility for the legislation, with fruitful conversations having taken place at the state legislative level for the past few months now. The first mobile sports betting platform launched on January 8, 2022, and the rest, as they say, is history. Flash forward to April 2021, and New York legalized mobile sports betting as the state legislature approved the move.
Thankfully, creating an account at a new Australian online casino is never hard as casino brands would never want to deter potential customers from signing up. By and large, though, new casinos might be more aesthetically pleasing and have better designs on both your mobile phone and desktop computer. More often than not, casinos may proceed to make their bonus terms a bit worse over time in a bid to drive up their margins.
References:
https://blackcoin.co/aussie-casinos-australias-largest-online-casino-database/
Строго регламентированный алгоритм позволяет специалистам «ВоронежДоктор» добиваться устойчивых результатов при выводе из запоя.
Узнать больше – http://kapelnica-ot-zapoya-voronezh2.ru/kapelnicza-ot-zapoya-na-domu-v-voronezhe/
Недропользование — это направление деятельности, связанный с освоением природных ресурсов.
Оно включает поиск природных ресурсов и их рациональное использование.
Данная сфера регулируется нормативными актами, направленными на охрану окружающей среды.
Эффективное управление в недропользовании способствует экономическому росту.
оэрн
Таким образом, наша миссия направлена на создание устойчивых изменений в жизни каждого пациента, поддерживая его на всех этапах пути к выздоровлению.
Детальнее – http://нарко-специалист.рф
Перед оформлением вызова проводится предварительная телефонная консультация, позволяющая оценить тяжесть состояния и заранее подготовить необходимые препараты.
Получить больше информации – [url=https://kapelnica-ot-zapoya-voronezh.ru/]капельницы от запоя на дому цена воронеж[/url]
Кодирование — это медицинский инструмент, который помогает закрепить трезвость, но сам по себе не является «волшебной кнопкой». Его задача — усилить внутреннюю мотивацию и создать физиологические и/или психологические условия, при которых срыв становится маловероятным. В «НаркологЭксперт» кодирование включают в структуру лечения: сначала купируются острые проявления, проводится детокс и стабилизация сна, давления и тревоги, затем — диагностика противопоказаний, подробное информирование, выбор методики и только после этого — сама процедура. Такой порядок снижает риски, повышает переносимость и делает результат предсказуемым. Важно, что любая техника подбирается индивидуально с учётом длительности употребления, анамнеза, сопутствующих заболеваний и рабочей нагрузки пациента, чтобы лечение органично вписалось в реальную жизнь и не сорвалось на первых же неделях.
Получить дополнительные сведения – [url=https://kodirovanie-ot-alkogolizma-moskva9.ru/]москва кодировка от алкоголизма[/url]
Индивидуализация лечения: Каждый случай рассматривается отдельно, учитывая уникальные особенности пациента, его физическое состояние, предшествующий опыт лечения и социальные факторы. Такой подход позволяет создать максимально эффективный план терапии.
Детальнее – [url=https://alko-specialist.ru/]вывод из запоя республика крым[/url]
Выезд нарколога на дом включает несколько ключевых этапов: первичный дистанционный сбор анамнеза, оперативный приезд специалиста, проведение обследования — измерение пульса, давления, сатурации, уровня глюкозы и электролитов крови — и последующее назначение инфузионной терапии. В зависимости от состояния пациента подбирается индивидуальный состав растворов, направленных на восстановление водно-электролитного баланса, поддержку функций печени и нормализацию работы центральной нервной системы. Все процедуры выполняются с учётом противопоказаний и сопутствующих заболеваний.
Подробнее можно узнать тут – [url=https://kapelnica-ot-zapoya-voronezh3.ru/]поставить капельницу от запоя на дому[/url]
В этот этап включено:
Углубиться в тему – [url=https://kachestvo-vyvod-iz-zapoya.ru/]врач вывод из запоя новосибирск[/url]
How serious are the Bears as playoff contenders? With two weeks to go, the 2025 NFL playoff picture is already relatively clear. Green Bay Packers clinch playoff berth with Vikings’ win over Lions on Christmas This post will update with inactives, pregame updates, drive summaries, injury updates and more.
The season will conclude next week in Chicago against the Bears, where the most Detroit can do is try to play spoiler for their Ben Johnson and their NFC North rivals. There are significant decisions to be made along the offensive line with Glasgow and left tackle Taylor Decker. But there were some cruel closes calls — the controversial, 1-yard-away loss to the Steelers comes to mind — that also cost Detroit. The Lions are also just 2-5 in one-possession games this season after going 7-2 in those games in 2024.
References:
https://blackcoin.co/ggbet-casino/
Алкогольный запой представляет собой длительное бесконтрольное приём спиртного, приводящее к тяжёлой интоксикации и серьёзным осложнениям для органов и психики. В Новосибирске клиника «Сибирский Доктор» предлагает качественный вывод из запоя с применением инновационных технологий и участием опытных наркологов, терапевтов и психиатров. Наш подход сочетает мгновенную реакцию на вызов, современное оборудование и индивидуальные схемы лечения, что позволяет достичь стабильной ремиссии и снизить риск рецидива.
Углубиться в тему – [url=https://kachestvo-vyvod-iz-zapoya.ru/]срочный вывод из запоя[/url]
Ключевым направлением нашей работы является индивидуализация лечения. Мы понимаем, что каждый пациент уникален, поэтому проводим тщательную диагностику, изучая медицинскую историю, психологический профиль и социальные факторы. На основе этих данных разрабатываем персональные планы терапии, включающие медикаментозное лечение, психотерапевтические методы и социальные программы.
Узнать больше – [url=https://narco-vivod.ru/]нарколог вывод из запоя[/url]
Например, если речь идет о выводе из запоя, врач проведет тщательное обследование пациента, чтобы определить общее состояние здоровья и наличие возможных осложнений. На основе диагностики будет назначена инфузионная терапия, которая включает введение растворов, витаминов и препаратов для снятия абстиненции.
Получить больше информации – [url=https://narcolog-na-dom-v-krasnoyarske55.ru/]нарколог на дом вывод из запоя красноярск[/url]
«ГородМед Трезвость» выстраивает помощь так, чтобы человек не оставался один ни на этапе выхода из запоя, ни во время стабилизации, ни в период удержания ремиссии. С первого звонка дежурный врач проводит короткое интервью, фиксирует жалобы, длительность употребления, сопутствующие болезни и текущие препараты, после чего предлагает безопасную точку входа — экстренный выезд на дом или приём без ожидания. Мы не растягиваем процесс по неделе: старт возможен в день обращения, а маршрутизация между форматами (дом, амбулаторный визит, стационар) занимает часы. Важная часть подхода — ясные цели каждого шага и критерии эффективности, понятные самому пациенту и семье: когда ждать облегчения тревоги, как нормализуется сон, когда вернётся аппетит, что считается «красным флажком» и как действовать без паники. Такая предсказуемость снижает уровень стресса и повышает приверженность лечению уже в первые трое суток.
Изучить вопрос глубже – https://narkologicheskaya-klinika-moskva99.ru/horoshaya-narkologicheskaya-klinika-v-moskve
Решение обратиться за наркологической помощью часто упирается в страх огласки и сомнения в эффективности. В «МедТрезвие» эти барьеры снимаются за счёт клинической достаточности и предсказуемой организации. Диагностика и вмешательства назначаются строго по показаниям: врач оценит риски сердечно-сосудистых осложнений, состояние печени и поджелудочной железы, уровень тревоги и сна, наличие депрессивных симптомов. При устойчивом состоянии часть процедур выполняется на дому, что снижает стресс, а при признаках нестабильности — рекомендуется стационар с круглосуточным наблюдением. Анонимность поддерживается шифрованием данных, разграничением доступа и информированием родственников только по согласию пациента. Финансовые условия обсуждаются заранее: семья понимает, из чего складывается смета, и может планировать ресурс без опасений «скрытых» позиций. В результате лечение становится управляемым процессом, где медицинская безопасность и уважение к личной жизни человека — обязательные элементы, а не рекламные обещания.
Подробнее тут – [url=https://narkologicheskaya-klinika-moskva9.ru/]клиника наркологии москва[/url]
Алкогольная зависимость может стремительно ухудшать состояние здоровья, превращаясь в запой, сопровождающийся серьезной интоксикацией организма. В Санкт-Петербурге профессиональные наркологи выезжают на дом круглосуточно, чтобы оказать экстренную помощь в критических ситуациях. Такой формат лечения позволяет начать детоксикацию сразу после обращения, обеспечивая оперативное вмешательство в комфортных условиях, где пациент сохраняет свою конфиденциальность.
Подробнее можно узнать тут – [url=https://narco-vivod-clean.ru/]вывод из запоя капельница санкт-петербург[/url]
Оказание помощи нарколога на дому организовано по отлаженной схеме, включающей несколько ключевых этапов, которые позволяют оперативно стабилизировать состояние пациента и начать детоксикацию:
Изучить вопрос глубже – https://наркология-дома1.рф/vrach-narkolog-na-dom-ryazan/
Наркологическая клиника “Маяк надежды” расположена по адресу: г. Санкт-Петербург, ул. Колпинская, д. 27. Клиника работает ежедневно с 9:00 до 21:00, без выходных. Наши специалисты готовы предоставить консультацию и ответить на все вопросы, связанные с лечением зависимостей. Мы гарантируем конфиденциальность и индивидуальный подход к каждому пациенту.
Узнать больше – https://алко-лечение24.рф/vivod-iz-zapoya-v-kruglosutochno-v-Sankt-Peterburge
По телефону или через приложение клиники пациент или его родственники оформляют заявку на вызов. В течение 30–45 минут бригада выезжает по указанному адресу и приносит полный комплект оборудования и медикаментов.
Ознакомиться с деталями – [url=https://kapelnica-ot-zapoya-voronezh2.ru/]вызвать капельницу от запоя в воронеже[/url]
Детокс — это последовательность целевых действий, а не один универсальный раствор. Мы восполняем жидкость и корректируем электролиты, защищаем печёночные функции, мягко снижаем тремор и тревогу, создаём условия для первого нормального сна. Каждая доза сверяется с динамикой давления, пульса, сатурации и неврологического статуса, поэтому схема не перегружена и не «гонится» за мимолётным эффектом ценой побочных реакций. После купирования острых проявлений начинается стабилизация: уточняются дозировки, выстраивается режим питания и гидратации, объясняются «красные флажки» для контакта с врачом, настраиваются простые поведенческие техники на «тёмные часы» вечера. В этот момент особенно важно не растворить медицинский эффект бытовыми ошибками: недосыпом, пропусками еды, конфликтными разговорами «о прошлом». Мы даём короткие, реалистичные алгоритмы на 20–40 минут — прогулка, тёплый душ, лёгкая еда по графику, дыхательные практики — чтобы снизить импульсивность и закрепить ощущение управляемости. Именно связка детокса с поведенческой дисциплиной формирует траекторию, которую можно удержать неделями, а не только до «завтрашнего утра».
Подробнее тут – [url=https://narkologicheskaya-klinika-moskva999.ru/]luchshaya-narkologicheskaya-klinika-moskva[/url]
Строго регламентированный алгоритм позволяет специалистам «ВоронежДоктор» добиваться устойчивых результатов при выводе из запоя.
Разобраться лучше – http://kapelnica-ot-zapoya-voronezh2.ru
Запой бьёт по организму не линейно: чем дольше затягивается ситуация, тем сильнее «скачут» давление и пульс, растёт тревога, рушится сон, усиливается тремор и обезвоживание. В городской среде к медицинским рискам добавляется логистика: пробки, необходимость объясняться на ресепшене, ожидание в общих очередях. Формат выезда «Трезвый Подольск» убирает эту инерцию — врач приезжает без маркировки, оценивает состояние на месте, запускает строго необходимую инфузионную терапию и сразу задаёт правила ближайших 48–72 часов. Такой маршрут снижает импульсивность и возвращает управляемость: пациент понимает, что будет через час, вечером и на следующее утро; семья перестаёт «гадать» и действует по согласованному плану. Домашняя капельница не про «чудо-смесь», а про клиническую последовательность: регидратация, коррекция электролитов, мягкая анксиолитическая поддержка при показаниях, гигиена сна и понятные «красные флажки» для связи. Когда каждое действие объяснено простым языком, тревога не подменяет факты, и эффект держится дольше, чем «косметическое облегчение на час».
Разобраться лучше – http://kapelnica-ot-zapoya-podolsk9.ru
В этот этап включено:
Подробнее – [url=https://kachestvo-vyvod-iz-zapoya.ru/]нарколог вывод из запоя новосибирск[/url]
Алкогольный запой представляет собой длительное бесконтрольное приём спиртного, приводящее к тяжёлой интоксикации и серьёзным осложнениям для органов и психики. В Новосибирске клиника «Сибирский Доктор» предлагает качественный вывод из запоя с применением инновационных технологий и участием опытных наркологов, терапевтов и психиатров. Наш подход сочетает мгновенную реакцию на вызов, современное оборудование и индивидуальные схемы лечения, что позволяет достичь стабильной ремиссии и снизить риск рецидива.
Детальнее – https://kachestvo-vyvod-iz-zapoya.ru/vyvod-iz-zapoya-czena-novosibirsk
Алкогольный запой представляет собой длительное бесконтрольное приём спиртного, приводящее к тяжёлой интоксикации и серьёзным осложнениям для органов и психики. В Новосибирске клиника «Сибирский Доктор» предлагает качественный вывод из запоя с применением инновационных технологий и участием опытных наркологов, терапевтов и психиатров. Наш подход сочетает мгновенную реакцию на вызов, современное оборудование и индивидуальные схемы лечения, что позволяет достичь стабильной ремиссии и снизить риск рецидива.
Подробнее тут – [url=https://kachestvo-vyvod-iz-zapoya.ru/]наркологический вывод из запоя новосибирск[/url]
Кодирование — это медицинский инструмент, который помогает закрепить трезвость, но сам по себе не является «волшебной кнопкой». Его задача — усилить внутреннюю мотивацию и создать физиологические и/или психологические условия, при которых срыв становится маловероятным. В «НаркологЭксперт» кодирование включают в структуру лечения: сначала купируются острые проявления, проводится детокс и стабилизация сна, давления и тревоги, затем — диагностика противопоказаний, подробное информирование, выбор методики и только после этого — сама процедура. Такой порядок снижает риски, повышает переносимость и делает результат предсказуемым. Важно, что любая техника подбирается индивидуально с учётом длительности употребления, анамнеза, сопутствующих заболеваний и рабочей нагрузки пациента, чтобы лечение органично вписалось в реальную жизнь и не сорвалось на первых же неделях.
Подробнее можно узнать тут – https://kodirovanie-ot-alkogolizma-moskva9.ru/skolko-stoit-kodirovanie-ot-alkogolizma-v-moskve
Миссия Наркологической клиники “Новый путь” заключается в предоставлении качественной и всесторонней поддержки людям, столкнувшимся с зависимостями. Мы понимаем, что зависимость — это не просто слабость воли, а сложное заболевание, требующее комплексного и научного подхода. Наша цель — создать безопасную и поддерживающую среду, где пациенты могут открыто говорить о своих переживаниях и проблемах.
Получить больше информации – https://нарко-специалист.рф/vivod-iz-zapoya-na-domu-v-Ekaterinburge
Создание безопасной среды: Мы понимаем, насколько важна поддержка в сложные моменты. Наш центр предоставляет пространство, где пациенты могут открыто говорить о своих переживаниях без страха быть осужденными, что способствует доверию и успешному лечению.
Детальнее – [url=https://srochnyj-vyvod-iz-zapoya.ru/vyvod-iz-zapoya-anonimno-v-kazani.ru/]вывод из запоя[/url]
Врач на дому или в клинике проводит:
Детальнее – [url=https://kachestvo-vyvod-iz-zapoya.ru/]вывод из запоя в стационаре новосибирск[/url]
Задача врача — не «поставить галочку», а исключить противопоказания и выбрать методику с оптимальным соотношением пользы и риска. Учитываются хронические заболевания, эпизоды потери сознания, аритмии, панические атаки, депрессивные симптомы, переносимость инфузий и фармпрепаратов, взаимодействия с уже назначенными лекарствами. По результатам формируется персональный лист ограничений и список «красных флажков», при которых следует связаться со специалистом без промедления.
Детальнее – https://kodirovanie-ot-alkogolizma-moskva9.ru/
Клиника создана для оказания квалифицированной помощи всем, кто страдает от различных форм зависимости. Мы стремимся не только к лечению, но также к формированию здорового образа жизни, возвращая пациентов к полноценной жизни.
Подробнее – https://нарко-специалист.рф/vivod-iz-zapoya-v-kruglosutochno-v-Ekaterinburge/
В условиях современного общества наркомания и алкоголизм стали актуальными и серьезными проблемами, затрагивающими не только индивидуумов, но и их семьи, сообщества. Эти заболевания не просто влияют на физическое здоровье, они наносят урон психоэмоциональному состоянию, нарушают социальные связи и ухудшают качество жизни. Наркологический центр “Новый горизонт” предлагает целостный и научно обоснованный подход к лечению зависимостей от психоактивных веществ. Мы применяем современные методы диагностики и терапии, чтобы помочь каждому пациенту обрести здоровье и вернуть себе полноценную жизнь.
Углубиться в тему – [url=https://alko-specialist.ru/]вывод из запоя цена[/url]
В условиях современного общества наркомания и алкоголизм стали актуальными и серьезными проблемами, затрагивающими не только индивидуумов, но и их семьи, сообщества. Эти заболевания не просто влияют на физическое здоровье, они наносят урон психоэмоциональному состоянию, нарушают социальные связи и ухудшают качество жизни. Наркологический центр “Новый горизонт” предлагает целостный и научно обоснованный подход к лечению зависимостей от психоактивных веществ. Мы применяем современные методы диагностики и терапии, чтобы помочь каждому пациенту обрести здоровье и вернуть себе полноценную жизнь.
Подробнее можно узнать тут – http://alko-specialist.ru
Врач на дому или в клинике проводит:
Подробнее – [url=https://kachestvo-vyvod-iz-zapoya.ru/]вывод из запоя капельница[/url]
Детокс — это последовательность целевых действий, а не один универсальный раствор. Мы восполняем жидкость и корректируем электролиты, защищаем печёночные функции, мягко снижаем тремор и тревогу, создаём условия для первого нормального сна. Каждая доза сверяется с динамикой давления, пульса, сатурации и неврологического статуса, поэтому схема не перегружена и не «гонится» за мимолётным эффектом ценой побочных реакций. После купирования острых проявлений начинается стабилизация: уточняются дозировки, выстраивается режим питания и гидратации, объясняются «красные флажки» для контакта с врачом, настраиваются простые поведенческие техники на «тёмные часы» вечера. В этот момент особенно важно не растворить медицинский эффект бытовыми ошибками: недосыпом, пропусками еды, конфликтными разговорами «о прошлом». Мы даём короткие, реалистичные алгоритмы на 20–40 минут — прогулка, тёплый душ, лёгкая еда по графику, дыхательные практики — чтобы снизить импульсивность и закрепить ощущение управляемости. Именно связка детокса с поведенческой дисциплиной формирует траекторию, которую можно удержать неделями, а не только до «завтрашнего утра».
Выяснить больше – [url=https://narkologicheskaya-klinika-moskva999.ru/]наркологическая клиника в москве цены[/url]
Лечение выводом из запоя на дому в «ВоронежМед» организовано по отработанному протоколу, включающему несколько ключевых этапов.
Выяснить больше – [url=https://kapelnica-ot-zapoya-voronezh.ru/]врач на дом капельница от запоя в воронеже[/url]
Строго регламентированный алгоритм позволяет специалистам «ВоронежДоктор» добиваться устойчивых результатов при выводе из запоя.
Получить дополнительные сведения – [url=https://kapelnica-ot-zapoya-voronezh2.ru/]капельница от запоя анонимно в воронеже[/url]
«ВоронежДоктор» сочетает в себе профессионализм, современное оборудование и заботу о приватности пациента. Ключевые преимущества:
Получить дополнительную информацию – https://kapelnica-ot-zapoya-voronezh2.ru/kapelnicza-ot-zapoya-na-domu-v-voronezhe/
При звонке на горячую линию операторы уточняют основные параметры: возраст пациента, длительность запоя, частоту и количество употреблённого алкоголя, наличие хронических заболеваний. Это позволяет заранее подготовить необходимый набор медикаментов и оборудования.
Подробнее – https://kapelnica-ot-zapoya-voronezh3.ru/kapelnicza-ot-zapoya-na-domu-v-voronezhe
Инфузионная терапия при запое основывается на принципе постепенной и контролируемой доставки лекарственных препаратов и питательных смесей непосредственно в кровеносное русло. Это позволяет:
Разобраться лучше – http://kapelnica-ot-zapoya-voronezh2.ru/vyezd-na-dom-kapelnicza-ot-zapoya-v-voronezhe/https://kapelnica-ot-zapoya-voronezh2.ru
Вывод из запоя в «Сибирском Докторе» происходит в несколько взаимосвязанных этапов:
Исследовать вопрос подробнее – [url=https://kachestvo-vyvod-iz-zapoya.ru/]врач вывод из запоя в новосибирске[/url]
Первая ровная ночь — переломный момент. Мы настраиваем гигиену: затемнение, прохладная комната, фиксированное время отбоя, отсутствие ярких экранов и эмоциональных разговоров. При показаниях добавляем мягкую седативную поддержку в дозах, которые стабилизируют, а не «выключают». Утром — короткий контроль, подстройка дозировок и план активности «по силам», чтобы не сорваться к вечеру от усталости. Такой контур снижает импульсивность, убирает панические волны и делает эффект капельницы долгим.
Изучить вопрос глубже – [url=https://kapelnica-ot-zapoya-podolsk9.ru/]kapelnica-na-dom-v-podolske[/url]
Вывод из запоя в «Сибирском Докторе» происходит в несколько взаимосвязанных этапов:
Получить больше информации – [url=https://kachestvo-vyvod-iz-zapoya.ru/]врач вывод из запоя в новосибирске[/url]
Перед оформлением вызова проводится предварительная телефонная консультация, позволяющая оценить тяжесть состояния и заранее подготовить необходимые препараты.
Узнать больше – [url=https://kapelnica-ot-zapoya-voronezh.ru/]капельница от запоя анонимно[/url]
После вашего звонка диспетчер фиксирует заявку и передаёт её свободному специалисту. Нарколог связывается для уточнения симптомов, времени начала запоя и наличия сопутствующих заболеваний, чтобы привезти нужные препараты.
Подробнее можно узнать тут – [url=https://kapelnica-ot-zapoya-voronezh.ru/]капельница от запоя анонимно на дому[/url]
Выезд нарколога на дом включает несколько ключевых этапов: первичный дистанционный сбор анамнеза, оперативный приезд специалиста, проведение обследования — измерение пульса, давления, сатурации, уровня глюкозы и электролитов крови — и последующее назначение инфузионной терапии. В зависимости от состояния пациента подбирается индивидуальный состав растворов, направленных на восстановление водно-электролитного баланса, поддержку функций печени и нормализацию работы центральной нервной системы. Все процедуры выполняются с учётом противопоказаний и сопутствующих заболеваний.
Узнать больше – [url=https://kapelnica-ot-zapoya-voronezh3.ru/]сколько стоит капельница на дому от запоя[/url]
Дополнительно выясняются аллергические реакции, приём других препаратов и предпочтения пациента по времени визита врача.
Ознакомиться с деталями – http://kapelnica-ot-zapoya-voronezh3.ru
Инфузионная терапия при запое основывается на принципе постепенной и контролируемой доставки лекарственных препаратов и питательных смесей непосредственно в кровеносное русло. Это позволяет:
Детальнее – http://kapelnica-ot-zapoya-voronezh2.ru
Заключительная фаза реабилитации фокусируется на обучении пациента жизни без алкоголизма и развитии навыков преодоления жизненных трудностей естественным путем. В рамках этого этапа пациенты активно участвуют в специализированных программах, нацеленных на восстановление утраченных социальных связей и профессиональных компетенций. Программа включает трудотерапию, образовательные курсы и тематические семинары. Особое внимание уделяется работе с семьей: родственники проходят специальное обучение, помогающее им лучше понимать особенности зависимости быстро и эффективно оказывать поддержку близкому человеку.
Изучить вопрос глубже – https://vyvod-iz-zapoya-krasnoyarsk55.ru/vyvod-iz-zapoya-krasnoyarsk-kruglosutochno
Когда пациент решает обратиться за помощью к наркологу на дом, ему предстоит пройти ряд этапов лечения, каждый из которых будет направлен на устранение последствий алкоголизма. Врач проведет первичный осмотр, выслушает жалобы пациента и на основе собранной информации начнёт индивидуальную программу лечения.
Детальнее – [url=https://narcolog-na-dom-ektb55.ru/]нарколог на дом свердловская область[/url]
Такая услуга доступна круглосуточно, что позволяет вызвать врача в любое время. Профессиональные специалисты, приехав на дом, тщательно подберут состав капельницы с учетом индивидуальных особенностей пациента, чтобы обеспечить максимально эффективное лечение. Анонимность и высокая квалификация медперсонала делают этот способ особенно удобным для людей, которые предпочитают конфиденциальность.
Углубиться в тему – [url=https://kapelnica-ot-zapoya-ekb55.ru/]вызвать капельницу от запоя на дому[/url]
Задача врача — не «поставить галочку», а исключить противопоказания и выбрать методику с оптимальным соотношением пользы и риска. Учитываются хронические заболевания, эпизоды потери сознания, аритмии, панические атаки, депрессивные симптомы, переносимость инфузий и фармпрепаратов, взаимодействия с уже назначенными лекарствами. По результатам формируется персональный лист ограничений и список «красных флажков», при которых следует связаться со специалистом без промедления.
Получить больше информации – [url=https://kodirovanie-ot-alkogolizma-moskva9.ru/]kodirovanie-ot-alkogolizma[/url]
Процесс лечения организован по отлаженной схеме, которая включает несколько последовательных этапов для быстрого и безопасного вывода из запоя:
Детальнее – [url=https://narco-vivod-clean.ru/]наркология вывод из запоя санкт-петербург[/url]
Профессиональная подготовка — это не формальность, а ключ к безопасной и эффективной процедуре. Врач собирает подробный анамнез, уточняет длительность и характер употребления, фиксирует соматические жалобы, анализирует текущие препараты (в том числе безрецептурные), измеряет давление, пульс, сатурацию, при необходимости назначает ЭКГ и лабораторные тесты. Если есть выраженная интоксикация, бессонница, тремор, скачки давления — стартуют с детокса и стабилизации: корректируют водно-электролитный баланс, снижают тревогу, нормализуют сон. Параллельно специалист объясняет механику методик кодирования, вероятные ощущения после процедуры, ограничения по нагрузкам, правила безопасного поведения в первые недели и алгоритм действий на случай усиления тяги. Подготовительный этап снимает неопределённость, уменьшает тревогу и повышает приверженность: человек понимает, что будет происходить и как оценивать улучшение.
Подробнее тут – https://kodirovanie-ot-alkogolizma-moskva9.ru/kodirovanie-ot-alkogolizma-na-domu-v-moskve
Кодирование — это медицинский инструмент, который помогает закрепить трезвость, но сам по себе не является «волшебной кнопкой». Его задача — усилить внутреннюю мотивацию и создать физиологические и/или психологические условия, при которых срыв становится маловероятным. В «НаркологЭксперт» кодирование включают в структуру лечения: сначала купируются острые проявления, проводится детокс и стабилизация сна, давления и тревоги, затем — диагностика противопоказаний, подробное информирование, выбор методики и только после этого — сама процедура. Такой порядок снижает риски, повышает переносимость и делает результат предсказуемым. Важно, что любая техника подбирается индивидуально с учётом длительности употребления, анамнеза, сопутствующих заболеваний и рабочей нагрузки пациента, чтобы лечение органично вписалось в реальную жизнь и не сорвалось на первых же неделях.
Подробнее тут – [url=https://kodirovanie-ot-alkogolizma-moskva9.ru/]кодирование на дому москва[/url]
Детокс — это последовательность целевых действий. Инфузии подбираются индивидуально: цель — восстановить объём циркулирующей крови, скорректировать электролиты, снизить токсическую нагрузку, мягко приглушить тремор и тревогу, вернуть условия для сна. Мы не перегружаем препаратами, не «гоняем» симптом силой седативов и не используем универсальные растворы «для всех». Поддержка сна строится на минимально достаточных дозах и гигиене вечернего времени: затемнение, тишина, отказ от экранов, ранний отбой. Параллельно врач объясняет, как пить воду маленькими порциями, когда сделать лёгкий перекус, зачем планировать короткую дневную паузу. После купирования остроты пациент получает чёткий план на трое суток — простые, реалистичные шаги, которые удерживают эффект без «героизма» и без лишней фармакологической нагрузки. В результате медицинский эффект не растворяется в быту, а закрепляется привычками, которые по силам выполнить сегодня и завтра.
Подробнее тут – http://narkolog-na-dom-moskva999.ru
online pokies paypal
References:
https://www.fiksdjodf.shop/bbs/board.php?bo_table=free&wr_id=208
mobile casino paypal
References:
http://www.alphamokjang.com/bbs/board.php?bo_table=free&wr_id=12
Домашний старт в Москве уместен при устойчивых показателях и низком риске осложнений: нет упорной рвоты, выраженной дезориентации, лихорадки, резких скачков давления и пульса. Преимущества — приватность, скорость, меньше стыда и сопротивления, выше шансы на ранний сон. Если же присутствуют признаки возможных осложнений (обезвоживание, судорожная готовность, аритмии, боль за грудиной/в животе, спутанность), рациональнее короткая стационарная стабилизация на 24–48 часов, после которой маршрут возвращается домой. «Трезвый Стандарт» держится принципа клинической достаточности: вмешательств ровно столько, сколько нужно сегодня, без «пакетов ради прайса». Такой реализм экономит деньги и главное — время семьи, потому что снижает вероятность ночных «качелей», повторных вызовов и импульсивных решений, которые чаще всего и ломают прогресс.
Исследовать вопрос подробнее – [url=https://narkolog-na-dom-moskva999.ru/]vrach narkolog na dom[/url]
При длительном запое в крови накапливаются ацетальдегид и другие токсичные метаболиты этанола, которые повреждают клетки печени, нарушают функцию почек и приводят к дисбалансу электролитов. Без своевременной детоксикации повышается риск острых состояний — судорог, инсультов, инфаркта, панкреатита и психоза. Чем раньше начато лечение, тем быстрее нормализуются показатели обмена веществ, возвращается водно-электролитный баланс и восстанавливается работа жизненно важных органов. Анонимный выезд нарколога помогает снять психологический барьер перед обращением за помощью.
Узнать больше – [url=https://kapelnica-ot-zapoya-voronezh.ru/]капельницы от запоя на дому цена[/url]
Основными направлениями работы нашей клиники являются.
Разобраться лучше – http://нарко-специалист.рф/vivod-iz-zapoya-cena-v-Ekaterinburge/
Алкогольная зависимость может стремительно ухудшать состояние здоровья, превращаясь в запой, сопровождающийся серьезной интоксикацией организма. В Санкт-Петербурге профессиональные наркологи выезжают на дом круглосуточно, чтобы оказать экстренную помощь в критических ситуациях. Такой формат лечения позволяет начать детоксикацию сразу после обращения, обеспечивая оперативное вмешательство в комфортных условиях, где пациент сохраняет свою конфиденциальность.
Получить дополнительную информацию – [url=https://narco-vivod-clean.ru/]нарколог вывод из запоя в санкт-петербурге[/url]
Основными направлениями работы нашей клиники являются.
Изучить вопрос глубже – http://нарко-специалист.рф/vivod-iz-zapoya-v-stacionare-v-Ekaterinburge/
Задача врача — не «поставить галочку», а исключить противопоказания и выбрать методику с оптимальным соотношением пользы и риска. Учитываются хронические заболевания, эпизоды потери сознания, аритмии, панические атаки, депрессивные симптомы, переносимость инфузий и фармпрепаратов, взаимодействия с уже назначенными лекарствами. По результатам формируется персональный лист ограничений и список «красных флажков», при которых следует связаться со специалистом без промедления.
Ознакомиться с деталями – [url=https://kodirovanie-ot-alkogolizma-moskva9.ru/]процедура кодирования от алкоголизма[/url]
Решение обратиться к врачу должно быть принято, если:
Изучить вопрос глубже – https://narko-zakodirovan2.ru/vyvod-iz-zapoya-na-domu-novosibirsk/
Домашний формат нужен, когда важно начать быстро и без лишних перемещений, а состояние не требует госпитализации. Врач адаптирует инфузионные схемы под переносимость и сопутствующие заболевания, контролирует давление, пульс, сатурацию, объясняет режим жидкости и питания, оставляет список признаков, при которых следует связаться повторно. Такой сценарий не отменяет дальнейшую работу: пациент получает краткий план на 48–72 часа, рекомендации по восстановлению сна и активности, а также точку контакта для корректировки. Это снижает тревогу, помогает избежать «самолечения» и формирует доверие к процессу, потому что человек видит конкретный результат — уменьшение тремора, нормализацию сна, снижение тревоги — уже в первые сутки.
Получить дополнительную информацию – [url=https://narkologicheskaya-klinika-moskva9.ru/]narkologicheskaya-klinika-v-moskve[/url]
Первая ровная ночь — переломный момент. Мы настраиваем гигиену: затемнение, прохладная комната, фиксированное время отбоя, отсутствие ярких экранов и эмоциональных разговоров. При показаниях добавляем мягкую седативную поддержку в дозах, которые стабилизируют, а не «выключают». Утром — короткий контроль, подстройка дозировок и план активности «по силам», чтобы не сорваться к вечеру от усталости. Такой контур снижает импульсивность, убирает панические волны и делает эффект капельницы долгим.
Получить дополнительные сведения – https://kapelnica-ot-zapoya-podolsk9.ru/kapelnica-ot-zapoya-stoimost-v-podolske
Каждый врач клиники обладает глубокими знаниями фармакологии, психофармакологии и психотерапии. Они регулярно посещают профессиональные конференции, семинары и мастер-классы, чтобы быть в курсе новейших достижений в области лечения зависимостей. Такой подход позволяет нашим специалистам применять наиболее эффективные и современные методы терапии.
Ознакомиться с деталями – http://narco-vivod.ru/vivod-iz-zapoya-v-kruglosutochno-v-krasnodare/
В Наркологической клинике “Новая жизнь” работает команда высококвалифицированных врачей, обладающих значительным опытом в области наркологии и психиатрии. Все специалисты имеют профильное образование и постоянно повышают свою квалификацию, что позволяет им быть в курсе последних достижений в лечении зависимостей.
Получить больше информации – http://нарко-специалист.рф
По телефону или через приложение клиники пациент или его родственники оформляют заявку на вызов. В течение 30–45 минут бригада выезжает по указанному адресу и приносит полный комплект оборудования и медикаментов.
Получить дополнительные сведения – [url=https://kapelnica-ot-zapoya-voronezh2.ru/]сколько стоит капельница от запоя[/url]
Кодирование — не «волшебная кнопка», а усилитель плана после стабилизации. Мы рассматриваем методики индивидуально: инъекционные варианты дают фиксированный срок действия без ежедневной дисциплины; имплантационные — более длительный контроль; пероральные режимы гибче, но требуют высокой приверженности и частых контактов. Перед процедурой врач сверяет лекарства на взаимодействия, исключает противопоказания, объясняет механизмы, ограничения и риски, согласует план наблюдения. После — пациент получает памятку на ближайшие недели: режим сна, жидкости и питания, списки «красных флажков», окна связи, набор поведенческих «буферов». Такой реализм убирает соблазн «проверять» метод и снижает вероятность срывов, пока нервная система перестраивается. При необходимости мы подключаем семейные встречи: договариваемся о правилах дома, ролях и формулировках, которые уменьшают сопротивление вместо того, чтобы его подогревать. В результате фармакологический инструмент работает не сам по себе, а в экосистеме поддержки — так эффективность становится выше, а траектория устойчивее.
Углубиться в тему – [url=https://narkologicheskaya-klinika-moskva999.ru/]narkolog-besplatno-moskva[/url]
Решение обратиться к врачу должно быть принято, если:
Подробнее тут – [url=https://narko-zakodirovan2.ru/]анонимный вывод из запоя[/url]
Лечение выводом из запоя на дому в «ВоронежМед» организовано по отработанному протоколу, включающему несколько ключевых этапов.
Получить дополнительные сведения – [url=https://kapelnica-ot-zapoya-voronezh.ru/]капельница от запоя круглосуточно воронеж[/url]
При звонке на горячую линию операторы уточняют основные параметры: возраст пациента, длительность запоя, частоту и количество употреблённого алкоголя, наличие хронических заболеваний. Это позволяет заранее подготовить необходимый набор медикаментов и оборудования.
Детальнее – [url=https://kapelnica-ot-zapoya-voronezh3.ru/]капельница от запоя анонимно в воронеже[/url]
Современная жизнь, особенно в крупном городе, как Красноярск, часто становится причиной различных зависимостей. Работа в условиях постоянного стресса, высокий ритм жизни и эмоциональные перегрузки могут привести к проблемам, которые требуют неотложной медицинской помощи. Одним из наиболее удобных решений в такой ситуации является вызов нарколога на дом.
Получить дополнительную информацию – [url=https://narcolog-na-dom-v-krasnoyarske55.ru/]вызвать нарколога на дом срочно красноярск[/url]
Инфузия — это не одна «сильная сыворотка», а набор целевых вмешательств. Мы восстанавливаем объём циркулирующей жидкости, корректируем электролиты, снижаем токсическую нагрузку на печень, мягко приглушаем тремор и тревогу, готовим нервную систему к ночи. Противорвотная поддержка и гастропротекция подключаются при необходимости, витаминные комплексы — по показаниям, кардиокоррекция — только после оценки рисков. Врач заранее проговаривает, какие ощущения допустимы (сонливость, умеренная слабость), а какие — повод для немедленного контакта. Цель — не «забить» симптом на час, а задать предсказуемую траекторию на дни, чтобы вернулись управляемость, аппетит и ровный сон. Когда вмешательства дозированы и понятны, пациент меньше «проверяет себя» нагрузками, а семья перестаёт «разгонять» тревогу разговорами — это повышает эффективность терапии без увеличения чека.
Изучить вопрос глубже – http://kapelnica-ot-zapoya-podolsk9.ru
Алкогольный запой представляет собой длительное бесконтрольное приём спиртного, приводящее к тяжёлой интоксикации и серьёзным осложнениям для органов и психики. В Новосибирске клиника «Сибирский Доктор» предлагает качественный вывод из запоя с применением инновационных технологий и участием опытных наркологов, терапевтов и психиатров. Наш подход сочетает мгновенную реакцию на вызов, современное оборудование и индивидуальные схемы лечения, что позволяет достичь стабильной ремиссии и снизить риск рецидива.
Углубиться в тему – [url=https://kachestvo-vyvod-iz-zapoya.ru/]вывод из запоя капельница на дому в новосибирске[/url]
Оптимально для пациентов в стабильном состоянии. Процедура начинается с приезда врача, осмотра и постановки капельницы с индивидуально подобранными растворами.
Подробнее можно узнать тут – http://narko-zakodirovan2.ru
Алкогольный запой представляет собой длительное бесконтрольное приём спиртного, приводящее к тяжёлой интоксикации и серьёзным осложнениям для органов и психики. В Новосибирске клиника «Сибирский Доктор» предлагает качественный вывод из запоя с применением инновационных технологий и участием опытных наркологов, терапевтов и психиатров. Наш подход сочетает мгновенную реакцию на вызов, современное оборудование и индивидуальные схемы лечения, что позволяет достичь стабильной ремиссии и снизить риск рецидива.
Узнать больше – https://kachestvo-vyvod-iz-zapoya.ru/vyvod-iz-zapoya-czena-novosibirsk/
Домашний формат нужен, когда важно начать быстро и без лишних перемещений, а состояние не требует госпитализации. Врач адаптирует инфузионные схемы под переносимость и сопутствующие заболевания, контролирует давление, пульс, сатурацию, объясняет режим жидкости и питания, оставляет список признаков, при которых следует связаться повторно. Такой сценарий не отменяет дальнейшую работу: пациент получает краткий план на 48–72 часа, рекомендации по восстановлению сна и активности, а также точку контакта для корректировки. Это снижает тревогу, помогает избежать «самолечения» и формирует доверие к процессу, потому что человек видит конкретный результат — уменьшение тремора, нормализацию сна, снижение тревоги — уже в первые сутки.
Ознакомиться с деталями – [url=https://narkologicheskaya-klinika-moskva9.ru/]наркологическая клиника[/url]
Решение обратиться за наркологической помощью часто упирается в страх огласки и сомнения в эффективности. В «МедТрезвие» эти барьеры снимаются за счёт клинической достаточности и предсказуемой организации. Диагностика и вмешательства назначаются строго по показаниям: врач оценит риски сердечно-сосудистых осложнений, состояние печени и поджелудочной железы, уровень тревоги и сна, наличие депрессивных симптомов. При устойчивом состоянии часть процедур выполняется на дому, что снижает стресс, а при признаках нестабильности — рекомендуется стационар с круглосуточным наблюдением. Анонимность поддерживается шифрованием данных, разграничением доступа и информированием родственников только по согласию пациента. Финансовые условия обсуждаются заранее: семья понимает, из чего складывается смета, и может планировать ресурс без опасений «скрытых» позиций. В результате лечение становится управляемым процессом, где медицинская безопасность и уважение к личной жизни человека — обязательные элементы, а не рекламные обещания.
Узнать больше – http://narkologicheskaya-klinika-moskva9.ru/
«НоваМед Центр» строит лечение как управляемую последовательность шагов, а не набор эпизодических процедур. На входе мы фиксируем исходные риски: длительность употребления, сопутствующие заболевания, принимаемые лекарства, анамнез кодирований и срывов, показатели давления, пульса, сатурации, уровень сна и тревоги. Это позволяет выбрать безопасную точку входа и задать логичную траекторию: от детокса к стабилизации, затем к поведенческим изменениям и поддержанию ремиссии. Такая структура особенно важна при высокой нагрузке и дефиците времени: когда пациент и семья понимают, что будет через час, сутки и неделю, снижается тревога и исчезают импульсивные «проверки себя», из-за которых обычно рушатся результаты. Мы придерживаемся принципа клинической достаточности: только те вмешательства, которые нужны по состоянию сегодня, без «украшений ради прайса». Чёткие правила на 48–72 часа, согласованные окна связи, понятные «красные флажки» для повторного контакта превращают лечение в прогнозируемый маршрут, а не в череду надежд и разочарований. В итоге человек быстрее возвращает контроль над самочувствием, а близкие получают опору вместо бесконечных ночных «дежурств».
Изучить вопрос глубже – [url=https://narkologicheskaya-klinika-moskva999.ru/]narkologicheskaya-klinika-moskva[/url]
Врачебный состав клиники “Ресурс здоровья” состоит из высококвалифицированных специалистов в области наркологии. Наши врачи-наркологи имеют обширный опыт работы с зависимыми пациентами и постоянно совершенствуют свои навыки.
Исследовать вопрос подробнее – https://narco-vivod.ru/vivod-iz-zapoya-v-kruglosutochno-v-krasnodare
Кроме того, клиника “Ресурс здоровья” делает акцент на профилактике рецидивов. Мы обучаем пациентов навыкам управления стрессом, эмоциональному регулированию и формированию здорового образа жизни. Наша цель — обеспечить долгосрочное восстановление и снизить риск возвращения к пагубным привычкам.
Получить дополнительные сведения – [url=https://narco-vivod.ru/]вывод из запоя цена в краснодаре[/url]
Запой — это серьёзное состояние, при котором организм страдает от накопления токсинов, обезвоживания и нарушения обмена веществ. Клиника «ВоронежЛайф» предлагает услугу выездного инфузионного лечения от запоя с возможностью круглосуточного реагирования. Благодаря персонализированному подходу и использованию современных автоматизированных систем дозирования, наши специалисты обеспечивают безопасную и эффективную детоксикацию в условиях домашнего уюта.
Подробнее можно узнать тут – [url=https://kapelnica-ot-zapoya-voronezh3.ru/]вызвать капельницу от запоя на дому в воронеже[/url]
Основными направлениями работы нашей клиники являются.
Детальнее – https://нарко-специалист.рф/vivod-iz-zapoya-na-domu-v-Ekaterinburge/
Наша задача — не ограничиться «одной капельницей», а провести пациента через связанный маршрут: купирование острых симптомов, стабилизация, профилактика срывов и поведенческая поддержка. На выезде врач оценивает давление, пульс, сатурацию, при необходимости снимает ЭКГ, подбирает инфузионные схемы и корректирует тревогу, тремор, нарушение сна. Если состояние нестабильно, организуем стационар: под наблюдением легче предупреждать осложнения и быстро корректировать назначенные дозы. Когда острые проявления уходят, настраиваем режим сна, питания и гидратации, формируем план «сложных часов» и алгоритм раннего реагирования на тягу. Психотерапевтические сессии усиливают контроль над поведением, а семейные консультации помогают близким действовать согласованно, не усиливая зависимое поведение случайными ошибками вроде «спасательства» и скрытия последствий употребления.
Подробнее – http://narkologicheskaya-klinika-moskva99.ru/narkologicheskaya-klinika-v-moskve-ceny/
В нашем медицинском центре работают высококвалифицированные специалисты в области наркологии и психиатрии. Все врачи имеют профильное образование, а также опыт работы в клиниках и реабилитационных центрах. Основные преимущества нашей команды:
Изучить вопрос глубже – [url=https://alko-specialist.ru/]наркологический вывод из запоя симферополь[/url]
Если нет упорной рвоты, лихорадки, выраженной дезориентации, резких скачков АД/пульса и риска судорог, разумно стартовать дома: меньше логистики, больше приватности, выше приверженность режиму. Если состояние «по краю», мы предложим 24–48 часов стационара «Трезвый Подольск»: под круглосуточным наблюдением быстрее закрываются дефициты, корректируются дозы и достигается первый ровный сон — это часто короче и дешевле цепочки ночных вызовов с импровизациями.
Получить больше информации – https://kapelnica-ot-zapoya-podolsk9.ru/kapelnica-ot-zapoya-na-domu-klinika-v-podolske/
Этот формат позволяет пациентам получить профессиональную помощь в комфортной домашней обстановке. Такой подход не только обеспечивает удобство, но и гарантирует конфиденциальность, что особенно важно для многих людей.
Получить дополнительные сведения – [url=https://narcolog-na-dom-v-krasnoyarske55.ru/]нарколог на дом срочно в красноярске[/url]
Детоксикация организма, проводимая на дому, помогает очистить кровь от токсинов, накопившихся из-за длительного употребления алкоголя или наркотических веществ. Она проводится с использованием специально подобранных медикаментов, которые улучшают работу печени, почек и других органов.
Углубиться в тему – [url=https://narcolog-na-dom-v-krasnoyarske55.ru/]вызвать нарколога на дом[/url]
Инфузионная терапия при запое основывается на принципе постепенной и контролируемой доставки лекарственных препаратов и питательных смесей непосредственно в кровеносное русло. Это позволяет:
Подробнее можно узнать тут – [url=https://kapelnica-ot-zapoya-voronezh2.ru/]капельница от запоя недорого в воронеже[/url]
Нарколог измеряет пульс, артериальное давление, частоту дыхания, насыщение кислородом, а также уточняет историю употребления и наличие хронических заболеваний. Это позволяет оперативно скорректировать состав и скорость инфузии.
Ознакомиться с деталями – [url=https://kapelnica-ot-zapoya-voronezh2.ru/]капельница от запоя анонимно в воронеже[/url]
Врач на дому или в клинике проводит:
Подробнее можно узнать тут – [url=https://kachestvo-vyvod-iz-zapoya.ru/]вывод из запоя дешево[/url]
В данной статье вы найдете комплексный подход к изучению насущных тем. Мы комбинируем теоретические сведения с практическими советами, чтобы читатель мог не только понять проблему, но и найти пути её решения.
Перейти к полной версии – https://hairstylemakeup.com/how-to-maintain-straightened-hair-overnight
Эта разъяснительная статья содержит простые и доступные разъяснения по актуальным вопросам. Мы стремимся сделать информацию понятной для широкой аудитории, чтобы каждый мог разобраться в предмете и извлечь из него максимум пользы.
Ознакомиться с отчётом – https://primenewsnet.com/iphone-offers-three-cameras-and-brilliand-oled-display-for-all
Домашний визит — это медицинская логика без лишней логистики. В мегаполисе каждая задержка увеличивает риски: человек устаёт, растёт тревога, обостряются скачки давления и пульса, а бессонные ночи превращают любые «самодельные» схемы в опасный эксперимент. «Трезвый Стандарт» строит помощь как управляемую последовательность: дежурный врач собирает краткий анамнез (длительность употребления, лекарства, сопутствующие заболевания), уточняет текущие показатели и предлагает безопасную точку входа — выезд на дом или стационар на сутки-двое при высоких рисках. Дом даёт приватность и предсказуемость: знакомая среда снижает стресс, а врач привозит всё для мониторинга и инфузий по показаниям. Ключевой результат первых часов — контролируемый сон, понятный режим гидратации и питания «по силам», а также зафиксированные «красные флажки» для связи. Именно последовательность, а не «сильная капельница любой ценой», делает выездной формат эффективным и безопасным в реальном ритме Москвы.
Детальнее – [url=https://narkolog-na-dom-moskva999.ru/]вызвать нарколога на дом[/url]
В этой статье вы найдете познавательную и занимательную информацию, которая поможет вам лучше понять мир вокруг. Мы собрали интересные данные, которые вдохновляют на размышления и побуждают к действиям. Открывайте новую информацию и получайте удовольствие от чтения!
Перейти к статье – https://spotifybrasil.com.br/everything-about-cardio
Первый контакт строится вокруг фактов «здесь и сейчас». Врач уточняет длительность употребления, уже принятые препараты за 24–48 часов, сопутствующие диагнозы и аллергии; измеряет АД, пульс, сатурацию, температуру, оценивает степень тремора и уровень тревоги. При показаниях выполняется экспресс-ЭКГ и базовый неврологический скрининг. Затем простым языком объясняется логика вмешательств: какие инфузии будут сегодня, чего ждать через 30–60 минут, как организовать «тихий» вечер и по каким признакам связываться. Мы избегаем универсальных «сильных смесей» и «оглушающих» дозировок, поскольку они дают краткий «блеск» и вечерний откат. Вместо этого — узкая схема: регидратация, коррекция электролитов, печёночная поддержка, гастропротекция и противорвотные при необходимости, мягкая анксиолитическая коррекция по показаниям. На руки выдаются рекомендации на 48–72 часа: вода и лёгкая еда «по часам», затемнение и ранний отбой, «красные флажки» для связи и утреннее окно контроля. Такой график убирает импровизации и делает поведение семьи согласованным.
Получить дополнительные сведения – [url=https://narkologicheskaya-klinika-lyubercy9.ru/]наркологическая клиника цены[/url]
Эта информационная статья содержит полезные факты, советы и рекомендации, которые помогут вам быть в курсе последних тенденций и изменений в выбранной области. Материал составлен так, чтобы быть полезным и понятным каждому.
Открой скрытое – https://www.marcgm.com/2023/10/23/ayudas-y-subvenciones
Решение обратиться за наркологической помощью часто упирается в страх огласки и сомнения в эффективности. В «МедТрезвие» эти барьеры снимаются за счёт клинической достаточности и предсказуемой организации. Диагностика и вмешательства назначаются строго по показаниям: врач оценит риски сердечно-сосудистых осложнений, состояние печени и поджелудочной железы, уровень тревоги и сна, наличие депрессивных симптомов. При устойчивом состоянии часть процедур выполняется на дому, что снижает стресс, а при признаках нестабильности — рекомендуется стационар с круглосуточным наблюдением. Анонимность поддерживается шифрованием данных, разграничением доступа и информированием родственников только по согласию пациента. Финансовые условия обсуждаются заранее: семья понимает, из чего складывается смета, и может планировать ресурс без опасений «скрытых» позиций. В результате лечение становится управляемым процессом, где медицинская безопасность и уважение к личной жизни человека — обязательные элементы, а не рекламные обещания.
Ознакомиться с деталями – https://narkologicheskaya-klinika-moskva9.ru/anonimnaya-narkologicheskaya-klinika-v-moskve
Эта статья полна интересного контента, который побудит вас исследовать новые горизонты. Мы собрали полезные факты и удивительные истории, которые обогащают ваше понимание темы. Читайте, погружайтесь в детали и наслаждайтесь процессом изучения!
Изучить эмпирические данные – https://template112.webekspor.com/many-patients-arent-getting-best-quality-lung-cancer-surgery-study
В данной статье вы найдете комплексный подход к изучению насущных тем. Мы комбинируем теоретические сведения с практическими советами, чтобы читатель мог не только понять проблему, но и найти пути её решения.
Жми сюда — получишь ответ – https://neue-bruchmuehlen.de/asperger-s-syndrome-is-there-real-cure-for-it
В данной статье вы найдете комплексный подход к изучению насущных тем. Мы комбинируем теоретические сведения с практическими советами, чтобы читатель мог не только понять проблему, но и найти пути её решения.
Всё, что нужно знать – https://www.defining-blog.ru/category/stroitelstvo
В обзорной статье вы найдете собрание важных фактов и аналитики по самым разнообразным темам. Мы рассматриваем как современные исследования, так и исторические контексты, чтобы вы могли получить полное представление о предмете. Погрузитесь в мир знаний и сделайте шаг к пониманию!
Не упусти важное! – https://dreamhousepropiedadraiz.com.co/property/apartamento-en-arriendo-vizcaya-medellin-1536140
Этот информационный материал собраны данные, которые помогут лучше понять текущие тенденции и процессы в различных сферах жизни. Мы предоставляем четкий анализ, графики и примеры, чтобы информация была не только понятной, но и практичной для принятия решений.
Выяснить больше – https://mdtodate.com/heart-failure
Публикация приглашает вас исследовать неизведанное — от древних тайн до современных достижений науки. Вы узнаете, как случайные находки превращались в революции, а смелые мысли — в новые эры человеческого прогресса.
Осуществить глубокий анализ – https://www.realty-key.ru/themes/sportivnaya-obuv
Статья знакомит с важнейшими моментами, которые сформировали наше общество. От великих изобретений до культурных переворотов — вы узнаете, как прошлое влияет на наше мышление, технологии и образ жизни.
Узнайте всю правду – https://press.et/arabic/?p=4984
Этот информативный текст отличается привлекательным содержанием и актуальными данными. Мы предлагаем читателям взглянуть на привычные вещи под новым углом, предоставляя интересный и доступный материал. Получите удовольствие от чтения и расширьте кругозор!
Прочитать подробнее – https://diarionews.com.ar/copa-de-la-liga-cuales-son-los-10-equipos-que-siguen-sin-poder-ganar
Эта информационная статья содержит полезные факты, советы и рекомендации, которые помогут вам быть в курсе последних тенденций и изменений в выбранной области. Материал составлен так, чтобы быть полезным и понятным каждому.
Открой скрытое – https://www.defining-blog.ru/category/uslugi-2
Эта публикация погружает вас в мир увлекательных фактов и удивительных открытий. Мы расскажем о ключевых событиях, которые изменили ход истории, и приоткроем завесу над научными достижениями, которые вдохновили миллионы. Узнайте, чему может научить нас прошлое и как применить эти знания в будущем.
Подробнее – https://ziniuera.lt/digital-marketing-guide-for-music-events
Этот информативный материал предлагает содержательную информацию по множеству задач и вопросов. Мы призываем вас исследовать различные идеи и факты, обобщая их для более глубокого понимания. Наша цель — сделать обучение доступным и увлекательным.
Личный опыт — читайте сами – https://primenewsnet.com/radio-air-time-marketing-a-new-strategy-for-the-economy
В этом интересном тексте собраны обширные сведения, которые помогут вам понять различные аспекты обсуждаемой темы. Мы разбираем детали и факты, делая акцент на важности каждого элемента. Не упустите возможность расширить свои знания и взглянуть на мир по-новому!
Перейти к статье – https://www.newsline.co.ke/fine-details-of-10th-china-africa-think-tank-forum
Эта информационная статья содержит полезные факты, советы и рекомендации, которые помогут вам быть в курсе последних тенденций и изменений в выбранной области. Материал составлен так, чтобы быть полезным и понятным каждому.
См. подробности – https://healthbee.co.uk/1331-angel-number
В статье представлены ключевые моменты по актуальной теме, дополненные советами экспертов и ссылками на дополнительные ресурсы. Цель материала — дать читателю инструменты для самостоятельного развития и принятия осознанных решений.
Ознакомиться с отчётом – https://consulting-solaris.com/cambio-climatico
Инфузия — это не одна «сильная сыворотка», а набор целевых вмешательств. Мы восстанавливаем объём циркулирующей жидкости, корректируем электролиты, снижаем токсическую нагрузку на печень, мягко приглушаем тремор и тревогу, готовим нервную систему к ночи. Противорвотная поддержка и гастропротекция подключаются при необходимости, витаминные комплексы — по показаниям, кардиокоррекция — только после оценки рисков. Врач заранее проговаривает, какие ощущения допустимы (сонливость, умеренная слабость), а какие — повод для немедленного контакта. Цель — не «забить» симптом на час, а задать предсказуемую траекторию на дни, чтобы вернулись управляемость, аппетит и ровный сон. Когда вмешательства дозированы и понятны, пациент меньше «проверяет себя» нагрузками, а семья перестаёт «разгонять» тревогу разговорами — это повышает эффективность терапии без увеличения чека.
Получить дополнительные сведения – [url=https://kapelnica-ot-zapoya-podolsk9.ru/]vrach-na-dom-kapelnica-ot-zapoya[/url]
usa casino online paypal
References:
https://jobsrific.com/employer/our-favorite-paypal-casinos-2025-ranking-update/
online australian casino paypal
References:
https://skinforum.co.in/employer/best-paypal-casinos-usa-%E1%90%88-top-real-money-paypal-casinos/
В данной статье вы найдете комплексный подход к изучению насущных тем. Мы комбинируем теоретические сведения с практическими советами, чтобы читатель мог не только понять проблему, но и найти пути её решения.
Изучить рекомендации специалистов – https://thenewnarrativeonline.com/news/noun-to-conduct-virtual-matriculation-for-new-students
В этом материале мы разберём 7 основ лечения алкоголизма и расскажем, как в Ярославле получить помощь, соответствующую современным стандартам терапии.
Исследовать вопрос подробнее – http://lechenie-alkogolizma-yaroslavl0.ru
Если дома нет возможности обеспечить тишину (ремонт, маленькие дети, гости), можно кратко перейти в «тихий стационар» с отдельным входом; после стабилизации сопровождение возвращается на дом, и маршрут продолжается «зеркально» — с теми же целями и окнами оценки. Такой перенос сохраняет управляемость процесса и снижает тревогу семьи: никто не «начинает сначала», меняется только место, а логика остаётся прежней.
Разобраться лучше – http://narkologicheskaya-pomoshh-v-kazani16.ru
Врач уточняет, как долго продолжается запой, какой алкоголь употребляется, а также наличие сопутствующих заболеваний. Этот тщательный анализ позволяет оперативно подобрать оптимальные методы детоксикации и снизить риск осложнений.
Подробнее – http://vyvod-iz-zapoya-tula0.ru
Процесс терапии в клинике построен по поэтапной схеме, включающей:
Узнать больше – http://lechenie-alkogolizma-arkhangelsk0.ru/lechenie-narkomanii-i-alkogolizma-arkhangelsk/
Для наглядности приведена таблица с примерными направлениями терапии и их результатами:
Подробнее тут – [url=https://narcologicheskaya-klinika-v-chelyabinske16.ru/]запой наркологическая клиника[/url]
Как поясняет врач-нарколог НМИЦ психиатрии и наркологии, «наличие оборудованного стационара с возможностью контроля осложнений — обязательное условие безопасного лечения наркомании».
Исследовать вопрос подробнее – [url=https://lechenie-narkomanii-yaroslavl0.ru/]лечение наркомании и алкоголизма[/url]
Нарколог на дом в Челябинске — это услуга, которая позволяет получить профессиональную медицинскую помощь при алкогольной или наркотической интоксикации без необходимости посещения клиники. Такой формат особенно востребован в случаях, когда пациент не может самостоятельно прибыть в медицинское учреждение или нуждается в конфиденциальной помощи. Врач-нарколог выезжает по указанному адресу, проводит осмотр, оценивает состояние и подбирает оптимальную терапию. Квалифицированное вмешательство помогает избежать осложнений и стабилизировать состояние уже в течение первых часов после прибытия специалиста.
Подробнее можно узнать тут – https://narkolog-na-dom-v-chelyabinske16.ru/narkolog-chelyabinsk-sovetskij-rajon/
Чтобы ориентироваться в вариантах, полезно увидеть их в одном поле зрения. Ниже приведена краткая сравнительная таблица; она не заменяет консультацию, но помогает понять логику выбора. Перед таблицей важно отметить: конкретная методика определяется только после осмотра и исключения противопоказаний.
Узнать больше – http://kodirovanie-ot-alkogolizma-moskva9.ru/kodirovanie-ot-alkogolizma-v-moskve-otzyvy/
Затянувшийся запой — это не только токсическая нагрузка, но и постоянная «раскачка» нервной системы, скачки давления и пульса, тошнота, бессонные ночи и конфликтный фон в семье. Пока избирается дорога до клиники и очередь на приём, организм теряет воду и электролиты, а тревога усиливается. Выезд «Трезвый Пульс Люберцы» разрывает этот круг: врач прибывает в согласованное окно без маркировки, сразу оценивает факты (длительность употребления, препараты за 24–48 часов, сопутствующие диагнозы, аллергии), фиксирует давление, пульс, сатурацию, температуру, выраженность тремора и уровень тревоги. На месте объясняется простым языком, зачем именно сегодня нужна инфузия, чего ожидать в ближайшие 30–60 минут и как провести вечер, чтобы эффект не «сгорел» к полуночи. Домашний формат учитывает реальную географию Люберец: дворовые проезды, часы пик, необходимость сохранять приватность. Чем меньше пауз и социальных контактов, тем быстрее старт терапии, ниже эмоциональный шум и выше приверженность режиму. В результате уже в первые часы выравнивается пульс, снижается тремор и тошнота, появляется шанс на первую ровную ночь — именно она превращает облегчение «на час» в устойчивую стабилизацию на несколько суток.
Получить больше информации – http://kapelnica-ot-zapoya-lyubercy9.ru/kapelnica-ot-zapoya-na-domu-lyubercy/
Вывод из запоя — это не только про капельницу. Это управляемая цепочка решений, где сначала оцениваются риски (дыхание, сознание, обезвоживание), затем подбирается минимально достаточная инфузионная схема и психосоматическая поддержка, а после — формируется «окно наблюдения» на первую ночь. В наркологической клинике «ЧелМед Детокс» все этапы формализованы: врач фиксирует исходные показатели, назначает узкий модуль вмешательства и выключает его ровно в тот момент, когда цель достигнута. Такой подход избегает полипрагмазии, делает лечение предсказуемым и снимает тревогу у пациента и семьи: каждый понимает, что будет происходить в ближайшие часы, какие критерии успеха и когда наступит пересмотр тактики.
Подробнее – http://vyvod-iz-zapoya-v-chelyabinske16.ru/vyvod-iz-zapoya-chelyabinsk-na-domu/
Осмотр > мониторинг > инфузии по показаниям > план вечера и ночи > письменные рекомендации > окно связи на следующий день. Эта линия делает поведение предсказуемым, а значит — безопасным.
Подробнее тут – http://vyvod-iz-zapoya-moskva99.ru
online casino with paypal
References:
https://f18limited.com/employer/payid-pokies-2025-tested-payid-casinos-in-australia/
paypal online casinos
References:
https://dreamyourjobs.com/employer/2025/
Сразу после вызова нарколог прибывает на дом для проведения детального осмотра. На этом этапе специалист измеряет жизненно важные показатели, собирает анамнез и оценивает степень алкогольной интоксикации, что является основой для составления персонального плана лечения.
Получить больше информации – [url=https://vyvod-iz-zapoya-tula0.ru/]нарколог вывод из запоя[/url]
Анонимность — один из ключевых принципов работы клиники «Северная Звезда». Все обращения регистрируются под кодовым номером, без упоминания фамилии и контактных данных в базе данных, доступ к которой имеют только прямые исполнители процедур. Круглосуточная линия позволяет связаться со специалистом в любой момент: ночью, в праздники или выходные. Вызов врача на дом возможен в любой час, без предварительной записи, а при необходимости пациент может быть госпитализирован в отдельное крыло клиники с минимальным контактом с другими посетителями.
Подробнее тут – [url=https://lechenie-alkogolizma-arkhangelsk0.ru/]lechenie-alkogolizma-arkhangelsk0.ru/[/url]
Весь процесс можно представить следующим образом:
Изучить вопрос глубже – http://narkolog-na-dom-v-chelyabinske16.ru
Как распознать легальный центр:
Узнать больше – http://lechenie-narkomanii-yaroslavl0.ru/czentr-lecheniya-narkomanii-yaroslavl/
Запой — это не только усталость и похмелье. В первые часы нарастают обезвоживание, электролитные сдвиги, скачки давления и пульса, усиливается тревога, нарушается сон и аппетит. На этом фоне резко возрастает риск аритмий, судорожной готовности, ухудшения когнитивных функций и травм вследствие падений. «МедТоника» организует помощь так, чтобы человек не оставался один на один с симптомами: с первого звонка дежурный врач уточняет длительность и объём употребления, принимает во внимание сопутствующие заболевания и лекарства, оценивает риски по давлению, пульсу, сатурации и ориентирует, где безопаснее стартовать — на дому или в стационаре. Цель первых суток — снять интоксикацию, стабилизировать жизненно важные показатели, вернуть управляемость сну и поведению, чтобы далее перейти к предсказуемой стабилизации. Когда есть ясный план на 48–72 часа, снижается вероятность срыва и импульсивных решений, которые обычно и ломают прогресс.
Узнать больше – [url=https://vyvod-iz-zapoya-moskva99.ru/]vyvod-iz-zapoya-moskva-stacionar[/url]
Как подчёркивает заведующий отделением медицинской психологии НМИЦ психиатрии и наркологии, «вопрос не в таблетках, а в системной работе с пациентом, где каждый специалист выполняет свою задачу».
Подробнее тут – [url=https://lechenie-alkogolizma-yaroslavl0.ru/]анонимное лечение алкоголизма в ярославле[/url]
Маршрут выстроен прозрачно. Сначала идёт короткое предметное интервью — только то, что меняет тактику «сегодня»: длительность запоя, принятые лекарства (включая «самолечение»), аллергии, хронические диагнозы, количество ночей без сна. Затем — объективные показатели (АД/пульс/сатурация/температура), оценка тремора и уровня тревоги; при показаниях проводится экспресс-ЭКГ и базовый неврологический скрининг. После этого врач объясняет, какие компоненты войдут в инфузию и почему: регидратация для восстановления объёма циркулирующей жидкости, коррекция электролитов, печёночная поддержка, при необходимости — гастропротекция и противорвотные; мягкая анксиолитическая коррекция — строго по показаниям. Мы принципиально избегаем «универсальных сильных смесей» и «оглушающих» дозировок: они дают дневной «блеск», но почти всегда провоцируют вечерний откат, ухудшение сна и рост рисков. Во время процедуры пациент и семья получают понятные письменные правила на 48–72 часа: вода и лёгкая еда «по часам», затемнение и тишина вечером, фиксированное время отбоя, «красные флажки» для связи и согласованное утреннее окно контроля. Такой сценарий убирает импровизации, снижает уровень конфликтов и помогает нервной системе перейти из режима тревоги в режим восстановления.
Узнать больше – http://
Кодирование — это медицинский инструмент, который помогает закрепить трезвость, но сам по себе не является «волшебной кнопкой». Его задача — усилить внутреннюю мотивацию и создать физиологические и/или психологические условия, при которых срыв становится маловероятным. В «НаркологЭксперт» кодирование включают в структуру лечения: сначала купируются острые проявления, проводится детокс и стабилизация сна, давления и тревоги, затем — диагностика противопоказаний, подробное информирование, выбор методики и только после этого — сама процедура. Такой порядок снижает риски, повышает переносимость и делает результат предсказуемым. Важно, что любая техника подбирается индивидуально с учётом длительности употребления, анамнеза, сопутствующих заболеваний и рабочей нагрузки пациента, чтобы лечение органично вписалось в реальную жизнь и не сорвалось на первых же неделях.
Углубиться в тему – https://kodirovanie-ot-alkogolizma-moskva9.ru/kodirovanie-ot-alkogolizma-v-moskve-otzyvy
Близкие — ключевой ресурс, если действуют согласованно. Мы просим сфокусироваться на среде и режиме: тише, темнее, теплее; вода и лёгкая еда «по часам»; отсутствие «разборов» и проверок «на прочность» в первые дни. Полезно заранее договориться о коротких нейтральных сигналах — как понять, что помощь нужна, а когда лучше не вмешиваться. Такие простые правила бесплатны, но они стабилизируют поведение и убирают потребность в экстренных визитах по ночам. Когда дом перестаёт быть источником шума, медицинская часть остаётся узкой, а результат — устойчивым.
Углубиться в тему – https://kapelnica-ot-zapoya-podolsk9.ru/kapelnica-ot-zapoya-na-domu-klinika-v-podolske
Эта информационная статья содержит полезные факты, советы и рекомендации, которые помогут вам быть в курсе последних тенденций и изменений в выбранной области. Материал составлен так, чтобы быть полезным и понятным каждому.
Ознакомьтесь поближе – https://daofest.world/index.php/2023/06/19/bonjour-tout-le-monde
Этот увлекательный информационный материал подарит вам массу новых знаний и ярких эмоций. Мы собрали для вас интересные факты и сведения, которые обогатят ваш опыт. Откройте для себя увлекательный мир информации и насладитесь процессом изучения!
Детальнее – https://bsbdiesel.com.br/from-idea-to-execution-a-startup-journey
В этой публикации мы сосредоточимся на интересных аспектах одной из самых актуальных тем современности. Совмещая факты и мнения экспертов, мы создадим полное представление о предмете, которое будет полезно как новичкам, так и тем, кто глубоко изучает вопрос.
ТОП-5 причин узнать больше – https://rassen.art/touse
Мы предлагаем кодирование тогда, когда оно медицински оправдано и человек готов его принять осознанно. Сначала исключаем противопоказания, обсуждаем механизм, ограничения и риски, согласуем формат — инъекция, имплантация или пероральная поддержка. После процедуры пациент получает памятку и контакт для связи, а также план профилактики срывов: без поведенческих шагов любое фармвмешательство теряет часть эффективности. Важный критерий выбора методики — реальный график жизни: командировки, смены, поздние встречи. Метод должен переживать вашу неделю без «узких мест», иначе дорогостоящая техника не даст ожидаемого эффекта. Такой прагматичный подход даёт не мифическую «гарантию», а рабочую устойчивость, которую можно удерживать месяцами.
Изучить вопрос глубже – https://narkologicheskaya-klinika-moskva99.ru/anonimnaya-narkologicheskaya-klinika-v-moskve/
Эта информационная заметка предлагает лаконичное и четкое освещение актуальных вопросов. Здесь вы найдете ключевые факты и основную информацию по теме, которые помогут вам сформировать собственное мнение и повысить уровень осведомленности.
Не упусти важное! – https://www.defining-blog.ru/tag/obshhestvo
В обзорной статье вы найдете собрание важных фактов и аналитики по самым разнообразным темам. Мы рассматриваем как современные исследования, так и исторические контексты, чтобы вы могли получить полное представление о предмете. Погрузитесь в мир знаний и сделайте шаг к пониманию!
Нажми и узнай всё – https://primenewsnet.com/interior-design-tips-decorating-to-celebrate-the-great-outdoors
Этот информационный материал собраны данные, которые помогут лучше понять текущие тенденции и процессы в различных сферах жизни. Мы предоставляем четкий анализ, графики и примеры, чтобы информация была не только понятной, но и практичной для принятия решений.
Прочесть всё о… – https://pitiona.com/2016/03/think-positive-think-art
Эта статья полна интересного контента, который побудит вас исследовать новые горизонты. Мы собрали полезные факты и удивительные истории, которые обогащают ваше понимание темы. Читайте, погружайтесь в детали и наслаждайтесь процессом изучения!
Жми сюда — получишь ответ – https://www.realty-key.ru/2018/09
Этот обзор предлагает свежий взгляд на предметы, которые и без того привычны. Мы упоминаем факты, не имеющие большого значения, и события с неясной важностью, но они присутствуют здесь.
Подробнее читать – [url=https://rostov-narkologiya.ru/]сиалис онлайн[/url]
В статье-обзоре представлены данные сомнительной актуальности и факты без явной взаимосвязи. Читатель ознакомится с разными мнениями, хотя они вряд ли существенно изменят его представление о теме.
Подробнее читать – [url=https://rostov-narkologiya.ru/uslugi-ot-narkomanii/mefedronovaya-zavisimost/]диета для похудения быстро[/url]
В этой статье собраны факты, которые освещают целый ряд важных вопросов. Мы стремимся предложить читателям четкую, достоверную информацию, которая поможет сформировать собственное мнение и лучше понять сложные аспекты рассматриваемой темы.
Прочитать подробнее – https://www.realty-key.ru/2018/09
Материал включает занимательные, но незначимые детали, которые трудно назвать важными, но они дополняют общую картину.
Дополнительная информация – [url=https://stop-zavisimost.ru/]казино онлайн[/url]
Примерный состав раствора, применяемого наркологом на дому в Уфе, приведён в таблице:
Выяснить больше – [url=https://narkolog-na-dom-v-ufe17.ru/]частный нарколог на дом[/url]
Примерный состав раствора, применяемого наркологом на дому в Уфе, приведён в таблице:
Исследовать вопрос подробнее – [url=https://narkolog-na-dom-v-ufe17.ru/]платный нарколог на дом[/url]
Публикация приглашает вас исследовать неизведанное — от древних тайн до современных достижений науки. Вы узнаете, как случайные находки превращались в революции, а смелые мысли — в новые эры человеческого прогресса.
Смотрите также… – https://simtek.in/solidworks-electrical-creation-of-cables-and-harness
Лечение хронического алкоголизма в Люберцах. Наши специалисты помогут вам преодолеть зависимость и вернуться к нормальной жизни.
Выяснить больше – [url=https://https://kapelnica-ot-zapoya-lyubercy11.ru//]капельница от запоя[/url]
Такой подход позволяет пациенту чувствовать себя не объектом лечения, а активным участником собственного восстановления. Это повышает уровень мотивации и формирует доверие между врачом и пациентом, что критически важно для устойчивой ремиссии.
Получить дополнительную информацию – [url=https://narcologicheskaya-klinika-v-voronezhe17.ru/]наркологическая клиника стационар воронеж[/url]
Выездная наркологическая помощь организована по чётко выстроенной схеме. Каждый этап направлен на стабилизацию состояния и безопасное восстановление функций организма после алкогольного или наркотического воздействия.
Узнать больше – [url=https://narkolog-na-dom-v-ufe17.ru/]запой нарколог на дом уфа[/url]
Вывод из запоя у подростков в стационаре Балашихи. Мы предлагаем специализированное лечение для подростков, учитывая их возрастные особенности.
Получить больше информации – [url=https://https://vyvod-iz-zapoya-v-stacionare-balashiha11.ru//]наркология вывод из запоя в балашихе[/url]
В таблице представлены основные виды терапии, применяемые в клинике:
Получить дополнительную информацию – https://narcologicheskaya-klinika-v-novokuzneczke17.ru/narkolog-novokuzneczk-na-dom
Нарколог на дом в Уфе — это услуга, которая позволяет получить квалифицированную медицинскую помощь при алкогольной или наркотической интоксикации без необходимости госпитализации. Такой формат особенно востребован при запойных состояниях, когда пациент не может самостоятельно посетить клинику. Врач приезжает по вызову в течение короткого времени, проводит обследование, устанавливает капельницу и обеспечивает безопасный вывод из состояния опьянения. Все процедуры выполняются анонимно, с соблюдением медицинской этики и конфиденциальности.
Изучить вопрос глубже – https://narkolog-na-dom-v-ufe17.ru/narkolog-ufa-anonimno
Капельница от запоя — доступная цена в Москве от клиники «Частный Медик 24». Стоимость процедуры начинается от 2290 ?, и вы всегда будете заранее информированы о стоимости услуг.
Выяснить больше – [url=https://dexamethazon.ru/]вызов скорой наркологической помощи москва[/url]
Комплексное лечение помогает восстановить работу печени, сердца и нервной системы. Пациенты отмечают улучшение сна, снижение тревожности, нормализацию давления и аппетита уже спустя несколько часов после начала терапии. В зависимости от тяжести состояния курс может быть продлён до 2–3 дней с круглосуточным наблюдением и корректировкой дозировок.
Получить дополнительные сведения – [url=https://vivod-iz-zapoya-v-volgograde17.ru/]вывод из запоя в стационаре[/url]
Процесс включает несколько шагов:
Подробнее – [url=https://narkolog-na-dom-v-ufe17.ru/]нарколог на дом уфа[/url]
Снятие ломки при алкоголизме в Люберцах. Наши специалисты помогут вам справиться с симптомами абстиненции.
Подробнее можно узнать тут – [url=https://https://kapelnica-ot-zapoya-lyubercy11.ru//]капельница от запоя цена московская область[/url]
Своевременная постановка капельницы помогает избежать тяжёлых последствий запоя. Поводом для обращения к врачу являются симптомы выраженной интоксикации:
Подробнее – [url=https://kapelnicza-ot-zapoya-v-volgograde17.ru/]капельница от запоя анонимно на дому в волгограде[/url]
Первым шагом при лечении зависимости является детоксикация — очищение организма от токсинов, накопившихся в результате употребления алкоголя или наркотиков. Врач подбирает состав инфузионных растворов и лекарственных препаратов индивидуально. Процедура направлена на восстановление обмена веществ, улучшение работы печени и сердца, нормализацию сна и аппетита. После завершения детоксикации пациент чувствует облегчение, снижается тревожность и повышается концентрация внимания.
Получить дополнительные сведения – http://narkologicheskaya-klinika-v-volgograde17.ru
Круглосуточная помощь при запое в стационаре Балашихи. Мы работаем 24/7, обеспечивая доступность медицинской помощи в любое время суток.
Подробнее можно узнать тут – [url=https://https://vyvod-iz-zapoya-v-stacionare-balashiha11.ru//]врач вывод из запоя[/url]
Этот информационный обзор станет отличным путеводителем по актуальным темам, объединяющим важные факты и мнения экспертов. Мы исследуем ключевые идеи и представляем их в доступной форме для более глубокого понимания. Читайте, чтобы оставаться в курсе событий!
Получить дополнительную информацию – https://homesolarsessions.com/solar-energy-near-me
Во время процедуры врач фиксирует ключевые параметры, чтобы убедиться в безопасности и эффективности терапии. Мониторинг проводится при каждом выезде и помогает отслеживать динамику в режиме реального времени. В таблице ниже указаны основные показатели, за которыми следит специалист.
Исследовать вопрос подробнее – [url=https://narkolog-na-dom-v-voronezhe17.ru/]нарколог на дом вывод[/url]
Лечение в клинике «ВоронежМед Альянс» проходит поэтапно. Каждый модуль имеет определённую цель и собственные критерии эффективности. Такой подход исключает избыточное вмешательство и обеспечивает прозрачность процесса восстановления.
Подробнее – [url=https://narcologicheskaya-klinika-v-voronezhe17.ru/]наркологическая клиника[/url]
Когда острые угрозы исключены, программа стартует дома. Пациент получает понятную карту действий, близкие — короткие окна обратной связи, врач — чистую «картинку» для тонкой настройки. Мы просим сообщать факты, а не эмоции: минуты до засыпания, число пробуждений, объём тёплой воды малыми глотками, пульс к вечеру, переносимость мягкой пищи, ясность головы утром.
Углубиться в тему – [url=https://vyvod-iz-zapoya-saratov0.ru/]www.domen.ru[/url]
Анонимность и конфиденциальность гарантированы. Мы обеспечиваем полную анонимность и конфиденциальность на всех этапах лечения.
Получить дополнительные сведения – [url=https://https://kapelnica-ot-zapoya-lyubercy11.ru//]поставить капельницу от запоя в люберцах[/url]
Наркологическая скорая помощь в Москве — клиника «Частный Медик 24» предлагает экстренную помощь на дому. Наши специалисты приедут к вам в течение 30 минут и проведут необходимые процедуры для стабилизации состояния.
Получить больше информации – [url=https://dexamethazon.ru/]частная скорая наркологическая помощь москва[/url]
Этот информационный обзор станет отличным путеводителем по актуальным темам, объединяющим важные факты и мнения экспертов. Мы исследуем ключевые идеи и представляем их в доступной форме для более глубокого понимания. Читайте, чтобы оставаться в курсе событий!
Получить дополнительную информацию – https://pureword.cibunet.com/cibuvideo/aralen-for-sale
Вывод из запоя — это медицинская процедура, направленная на очищение организма от продуктов распада алкоголя и восстановление нормальной работы внутренних органов. В клинике «Трезвый Путь Волгоград» пациентам оказывается профессиональная помощь с использованием современных методов дезинтоксикации, медикаментозной поддержки и психологического сопровождения. Лечение проводится круглосуточно, включая выезд нарколога на дом. Такой формат помогает быстро стабилизировать состояние пациента, минимизировать риск осложнений и обеспечить безопасность при выходе из запоя любой продолжительности.
Получить дополнительные сведения – https://vivod-iz-zapoya-v-volgograde17.ru
Вывод из запоя в стационаре — безопасное и комфортное восстановление. В нашем стационаре созданы все условия для быстрого и эффективного вывода из запоя.
Ознакомиться с деталями – https://https://vyvod-iz-zapoya-v-stacionare-balashiha11.ru/
Вывод из запоя у подростков в Люберцах. Мы предлагаем специализированное лечение для подростков, учитывая их возрастные особенности.
Получить больше информации – [url=https://https://kapelnica-ot-zapoya-lyubercy13.ru//]капельница от запоя клиника[/url]
В данной обзорной статье представлены интригующие факты, которые не оставят вас равнодушными. Мы критикуем и анализируем события, которые изменили наше восприятие мира. Узнайте, что стоит за новыми открытиями и как они могут изменить ваше восприятие реальности.
Желаете узнать подробности? – https://bulbuliindia.com/product/moroccan-wall-plate
Такая форма помощи позволяет избежать осложнений, которые часто сопровождают попытки снять симптомы самостоятельно. При правильном подборе препаратов уже через час наблюдается улучшение самочувствия: уходит головная боль, снижается тревога, стабилизируется сердцебиение и восстанавливается ясность мышления. Пациент получает рекомендации по питанию, режиму отдыха и приёму витаминов, чтобы закрепить результат и предотвратить повторный срыв.
Исследовать вопрос подробнее – [url=https://narkolog-na-dom-v-voronezhe17.ru/]нарколог на дом круглосуточно воронеж[/url]
Этот интересный отчет представляет собой сборник полезных фактов, касающихся актуальных тем. Мы проанализируем данные, чтобы вы могли сделать обоснованные выводы. Читайте, чтобы узнать больше о последних трендах и значимых событиях!
Смотрите также… – https://p3-plus.com/5-elements-that-build-a-roster-of-terrific-clients
Помощь при алкогольной интоксикации в Химках. Наши специалисты проведут необходимые процедуры для снятия симптомов интоксикации.
Получить больше информации – [url=https://https://vyvod-iz-zapoya-himki13.ru//]врач вывод из запоя[/url]
Такой подход позволяет добиться устойчивого эффекта и минимизировать риск возврата к зависимому поведению.
Подробнее можно узнать тут – https://narkologicheskaya-klinika-v-volgograde17.ru/narkologicheskaya-pomoshh-volgograd/
Капельница от запоя — доступная цена в Люберцах. Стоимость процедуры начинается от 2400 ?, и вы всегда будете заранее информированы о стоимости услуг.
Изучить вопрос глубже – [url=https://https://kapelnica-ot-zapoya-lyubercy13.ru//]вызвать капельницу от запоя в люберцах[/url]
Кодирование от алкоголизма в Люберцах. Мы предлагаем различные методы кодирования, подходящие для каждого пациента.
Исследовать вопрос подробнее – [url=https://https://kapelnica-ot-zapoya-lyubercy11.ru//]капельница от запоя цена люберцы[/url]
В Воронеже клиника «ВоронежМед Альянс» предлагает комплексное лечение алкогольной и наркотической зависимости. Команда врачей, психиатров, психологов и терапевтов выстраивает индивидуальный маршрут пациента, начиная с детоксикации и заканчивая реабилитацией. Главный принцип — минимальное вмешательство при максимальной эффективности. Это означает, что терапевтические меры подбираются строго по показаниям, а медикаменты применяются только после оценки состояния и лабораторных данных.
Исследовать вопрос подробнее – https://narcologicheskaya-klinika-v-voronezhe17.ru/
Капельницы в «СаратовМед Профи» — это конструктор из тщательно подобранных модулей. Каждый модуль решает одну задачу и имеет свой ожидаемый горизонт эффекта. Важно не название, а логика: задача > опора среды > как проверяем > когда ждём результат.
Получить дополнительную информацию – http://vyvod-iz-zapoya-saratov0.ru
Лечение пивного алкоголизма в Люберцах. Мы предлагаем эффективные методы лечения зависимости от пива.
Получить дополнительную информацию – [url=https://https://kapelnica-ot-zapoya-lyubercy11.ru//]капельница от запоя выезд[/url]
Анонимность и конфиденциальность гарантированы. Мы обеспечиваем полную анонимность и конфиденциальность на всех этапах лечения.
Разобраться лучше – [url=https://https://kapelnica-ot-zapoya-lyubercy12.ru//]kapelnicza-ot-zapoya-na-domu lyubercy[/url]
Помощь при алкогольной интоксикации в Химках. Наши специалисты проведут необходимые процедуры для снятия симптомов интоксикации.
Разобраться лучше – [url=https://https://vyvod-iz-zapoya-himki13.ru//]вывод из запоя на дому[/url]
Капельница от запоя — эффективный способ детоксикации. Мы используем современные препараты для быстрого и безопасного выведения из запоя.
Получить больше информации – [url=https://https://vyvod-iz-zapoya-himki12.ru//]скорая вывод из запоя в химках[/url]
Индивидуально подобранный состав раствора обеспечивает быстрое выведение токсинов и улучшение физического состояния уже в течение первых часов после начала лечения.
Получить дополнительные сведения – [url=https://kapelnicza-ot-zapoya-v-volgograde17.ru/]капельница от запоя вызов город[/url]
В таблице приведены основные компоненты инфузионной терапии, применяемые при детоксикации:
Получить дополнительную информацию – [url=https://narkologicheskaya-clinica-v-novokuzneczke17.ru/]наркологическая клиника вывод из запоя в новокузнецке[/url]
Лечение пивного алкоголизма в стационаре Балашихи. Мы предлагаем эффективные методы лечения зависимости от пива.
Подробнее – [url=https://https://vyvod-iz-zapoya-v-stacionare-balashiha11.ru//]нарколог на дом вывод из запоя[/url]
Публикация приглашает вас исследовать неизведанное — от древних тайн до современных достижений науки. Вы узнаете, как случайные находки превращались в революции, а смелые мысли — в новые эры человеческого прогресса.
Исследовать вопрос подробнее – https://www.cornerstonehomesmls.com/welcome-2
Капельница от запоя — доступная цена в Москве от клиники «Частный Медик 24». Стоимость процедуры начинается от 2290 ?, и вы всегда будете заранее информированы о стоимости услуг.
Детальнее – [url=https://dexamethazon.ru/]skoraya-narkologicheskaya-pomoshch moskva[/url]
Если на предзвонке выявляются «красные флаги» — давящая боль в груди, одышка в покое, спутанность сознания, судороги, неукротимая рвота, резкое падение насыщения кислородом — мы организуем бесшовный перевод в стационар. Место резервируем заранее, логистику строим так, чтобы не привлекать внимания соседей и не затягивать старт лечения. При отсутствии угроз терапия может начаться дома с последующим телесопровождением и при необходимости — краткой госпитализацией.
Узнать больше – [url=https://narcologicheskaya-klinika-saratov0.ru/]наркологическая клиника в саратове[/url]
Вывод из запоя в Красноярске — это медицинская процедура, направленная на устранение алкогольной интоксикации и восстановление нормальной работы организма после длительного употребления спиртных напитков. Услуга предоставляется круглосуточно и включает дезинтоксикационную терапию, стабилизацию психоэмоционального состояния и профилактику осложнений. Все процедуры выполняются опытными наркологами с применением сертифицированных препаратов и в строгом соответствии с медицинскими стандартами.
Углубиться в тему – [url=https://vyvod-iz-zapoya-v-krasnoyarske17.ru/]скорая вывод из запоя красноярск[/url]
Снятие ломки при алкоголизме в стационаре Балашихи. Наши специалисты помогут вам справиться с симптомами абстиненции.
Исследовать вопрос подробнее – [url=https://https://vyvod-iz-zapoya-v-stacionare-balashiha11.ru//]вывод из запоя клиника балашиха[/url]
В данной обзорной статье представлены интригующие факты, которые не оставят вас равнодушными. Мы критикуем и анализируем события, которые изменили наше восприятие мира. Узнайте, что стоит за новыми открытиями и как они могут изменить ваше восприятие реальности.
Желаете узнать подробности? – https://nutritionbeyondborders.org/economiser-epicerie
После процедуры пациент чувствует улучшение уже через 1–2 часа: проходят головные боли, снижается давление, нормализуется сон и аппетит.
Подробнее можно узнать тут – https://narkologicheskaya-clinica-v-novokuzneczke17.ru/narkolog-v-gorode-novokuzneczke/
Вывод из запоя — это медицинская процедура, направленная на очищение организма от продуктов распада алкоголя и восстановление нормальной работы внутренних органов. В клинике «Трезвый Путь Волгоград» пациентам оказывается профессиональная помощь с использованием современных методов дезинтоксикации, медикаментозной поддержки и психологического сопровождения. Лечение проводится круглосуточно, включая выезд нарколога на дом. Такой формат помогает быстро стабилизировать состояние пациента, минимизировать риск осложнений и обеспечить безопасность при выходе из запоя любой продолжительности.
Подробнее можно узнать тут – [url=https://vivod-iz-zapoya-v-volgograde17.ru/]вывод из запоя недорого в волгограде[/url]
Все растворы проходят фармацевтический контроль, а процедуры выполняются одноразовыми стерильными инструментами. После завершения капельницы врач наблюдает пациента в течение 15–30 минут, оценивает результат и даёт рекомендации по дальнейшему восстановлению. Важно не прерывать терапию самостоятельно — эффект закрепляется только при соблюдении рекомендаций.
Углубиться в тему – [url=https://narkolog-na-dom-v-voronezhe17.ru/]нарколог на дом срочно воронеж[/url]
Вывод из запоя в Красноярске — это медицинская процедура, направленная на устранение алкогольной интоксикации и восстановление нормальной работы организма после длительного употребления спиртных напитков. Услуга предоставляется круглосуточно и включает дезинтоксикационную терапию, стабилизацию психоэмоционального состояния и профилактику осложнений. Все процедуры выполняются опытными наркологами с применением сертифицированных препаратов и в строгом соответствии с медицинскими стандартами.
Разобраться лучше – [url=https://vyvod-iz-zapoya-v-krasnoyarske17.ru/]нарколог вывод из запоя в красноярске[/url]
Пациент может выбрать анонимный формат — все данные защищены, а пребывание в клинике проходит в атмосфере уважения и деликатности. Особое внимание уделяется созданию комфортных условий: палаты оснащены системой вентиляции, регулируемым освещением и кнопкой вызова медперсонала. Круглосуточный контроль состояния позволяет своевременно реагировать на малейшие изменения и корректировать курс лечения.
Ознакомиться с деталями – http://narcologicheskaya-klinika-v-voronezhe17.ru/chastnaya-narkologicheskaya-klinika-voronezh/
В Воронеже клиника «ВоронежМед Альянс» предлагает комплексное лечение алкогольной и наркотической зависимости. Команда врачей, психиатров, психологов и терапевтов выстраивает индивидуальный маршрут пациента, начиная с детоксикации и заканчивая реабилитацией. Главный принцип — минимальное вмешательство при максимальной эффективности. Это означает, что терапевтические меры подбираются строго по показаниям, а медикаменты применяются только после оценки состояния и лабораторных данных.
Получить больше информации – https://narcologicheskaya-klinika-v-voronezhe17.ru/chastnaya-narkologicheskaya-klinika-voronezh/
Эти методы комбинируются и создают условия для всестороннего восстановления пациента.
Изучить вопрос глубже – [url=https://narcologicheskaya-klinika-omsk0.ru/]лечение в наркологической клинике в омске[/url]
Лечение запоя без госпитализации в Москве от клиники «Частный Медик 24». Мы предлагаем лечение на дому, без необходимости госпитализации.
Изучить вопрос глубже – [url=https://dexamethazon.ru/]narkologicheskaya-pomoshch-na-domu moskva[/url]
Вывод из запоя — это не «волшебная капельница», а последовательная медицинская программа с чёткими целями и измеримыми маркерами. В наркологической клинике «СаратовМед Профи» маршрут строится по принципу управляемых окон: на каждом шаге команда преследует одну цель, меняет лишь один параметр и оценивает результат в заранее назначённый момент. Такой подход снижает лекарственную нагрузку, предотвращает «гонку дозировок» и делает динамику предсказуемой для пациента и близких. Конфиденциальность обеспечивается регламентом: немаркированные выезды, нейтральные формулировки в документах, «тихие» каналы связи, доступ к записям — строго по ролям.
Получить дополнительную информацию – [url=https://vyvod-iz-zapoya-saratov0.ru/]наркологический вывод из запоя[/url]
Реабилитация после запоя в Химках. Мы поможем вам восстановиться после запоя и предотвратить рецидивы.
Получить дополнительную информацию – [url=https://https://vyvod-iz-zapoya-himki12.ru//]вывод из запоя вызов[/url]
Лечение в клинике включает несколько последовательных этапов, каждый из которых направлен на достижение стабильной ремиссии и восстановление здоровья пациента.
Подробнее тут – http://narcologicheskaya-klinika-v-novokuzneczke17.ru
Такой подход позволяет добиться устойчивого эффекта и минимизировать риск возврата к зависимому поведению.
Получить дополнительные сведения – [url=https://narkologicheskaya-klinika-v-volgograde17.ru/]анонимная наркологическая клиника волгоград[/url]
Лечение зависимости от алкоголя на дому в Люберцах. Наши специалисты приедут к вам домой и проведут все необходимые процедуры.
Детальнее – [url=https://https://kapelnica-ot-zapoya-lyubercy12.ru//]posle-kapelniczy-ot-zapoya lyubercy[/url]
Основу выездного лечения составляют капельницы, которые позволяют быстро ввести препараты в кровоток, минуя желудочно-кишечный тракт. Это обеспечивает моментальное действие и исключает раздражение слизистой. Капельницы подбираются индивидуально в зависимости от состояния пациента. Основные направления инфузионной терапии включают детоксикацию, восстановление водно-солевого баланса и поддержку работы нервной системы. Для усиления эффекта применяются витамины, антиоксиданты и препараты для защиты печени.
Подробнее – [url=https://narkolog-na-dom-v-voronezhe17.ru/]нарколог капельница на дом воронеж[/url]
Если на предзвонке выявляются «красные флаги» — давящая боль в груди, одышка в покое, спутанность сознания, судороги, неукротимая рвота, резкое падение насыщения кислородом — мы организуем бесшовный перевод в стационар. Место резервируем заранее, логистику строим так, чтобы не привлекать внимания соседей и не затягивать старт лечения. При отсутствии угроз терапия может начаться дома с последующим телесопровождением и при необходимости — краткой госпитализацией.
Узнать больше – [url=https://narcologicheskaya-klinika-saratov0.ru/]наркологическая клиника нарколог в саратове[/url]
Лечение запоя без госпитализации в Москве от клиники «Частный Медик 24». Мы предлагаем лечение на дому, без необходимости госпитализации.
Ознакомиться с деталями – [url=https://dexamethazon.ru/]скорая наркологическая помощь московская область[/url]
Процесс детоксикации проходит поэтапно, чтобы организм успевал адаптироваться к изменениям и не испытывал стресс. Каждый шаг направлен на достижение конкретного терапевтического эффекта. Ниже представлена таблица, отражающая ключевые стадии процедуры, применяемой в клинике «Трезвый Путь Волгоград».
Подробнее тут – [url=https://vivod-iz-zapoya-v-volgograde17.ru/]вывод из запоя вызов[/url]
Длительность вывода из запоя во многом зависит от тяжести состояния, общего здоровья и продолжительности самого запоя. Если пациент обратился на ранней стадии, зачастую хватает 1-2 капельниц и короткого курса поддержки. Но при запое более пяти-семи дней, когда имеется острая интоксикация, требуется более продолжительная терапия и круглосуточное наблюдение.
Подробнее можно узнать тут – [url=https://narko-reabcentr.ru/]вывод из запоя с выездом[/url]
В клинике применяются комплексные программы, охватывающие все стадии терапии. Такой подход позволяет обеспечить пациенту полный спектр помощи — от первой консультации до социальной адаптации.
Исследовать вопрос подробнее – [url=https://narcologicheskaya-klinika-omsk0.ru/]наркологическая клиника наркологический центр омск[/url]
Особенность подхода заключается в сочетании медицинской и психологической поддержки. После кодирования пациент получает консультации психотерапевта, рекомендации по восстановлению и профилактике рецидивов. Это снижает риск повторного срыва и помогает закрепить результат на долгий срок.
Подробнее можно узнать тут – [url=https://kodirovanie-ot-alkogolizma-v-volgograde17.ru/]кодирование от алкоголизма цена[/url]
Помощь при алкогольной интоксикации в стационаре Балашихи. Наши специалисты проведут необходимые процедуры для снятия симптомов интоксикации.
Изучить вопрос глубже – [url=https://https://vyvod-iz-zapoya-v-stacionare-balashiha13.ru//]нарколог на дом вывод из запоя балашиха[/url]
Все растворы проходят фармацевтический контроль, а процедуры выполняются одноразовыми стерильными инструментами. После завершения капельницы врач наблюдает пациента в течение 15–30 минут, оценивает результат и даёт рекомендации по дальнейшему восстановлению. Важно не прерывать терапию самостоятельно — эффект закрепляется только при соблюдении рекомендаций.
Узнать больше – [url=https://narkolog-na-dom-v-voronezhe17.ru/]нарколог на дом вывод воронеж[/url]
Медики рекомендуют обратиться за профессиональной помощью при следующих состояниях:
Исследовать вопрос подробнее – [url=https://vyvod-iz-zapoya-v-ryazani17.ru/]вывод из запоя недорого в рязани[/url]
Процесс лечения включает несколько последовательных шагов, направленных на стабилизацию состояния, детоксикацию и восстановление функций организма. Таблица ниже показывает основные этапы процедуры, применяемые врачами клиники «РеабКузбасс».
Получить дополнительные сведения – [url=https://vyvod-iz-zapoya-v-novokuzneczke17.ru/]вывод из запоя вызов на дом новокузнецк[/url]
Капельница не просто устраняет симптомы похмелья — она восстанавливает внутренний баланс, снижает токсическую нагрузку и поддерживает работу жизненно важных органов. После процедуры пациент чувствует прилив сил, прояснение сознания и эмоциональную стабильность. Эффект закрепляется при соблюдении рекомендаций врача и отказе от алкоголя в последующие дни.
Ознакомиться с деталями – [url=https://vivod-iz-zapoya-v-volgograde17.ru/]нарколог вывод из запоя волгоград[/url]
Лечение проходит в несколько этапов: диагностика, детоксикация, медикаментозная поддержка и восстановление. Каждый этап имеет чёткие цели и критерии эффективности, что делает процесс управляемым и безопасным. Применяются препараты, сертифицированные в РФ, и только те, чья эффективность подтверждена клиническими исследованиями.
Ознакомиться с деталями – [url=https://vyvod-iz-zapoya-v-volgograde17.ru/]вывод из запоя дешево в волгограде[/url]
Капельницы в «СаратовМед Профи» — это конструктор из тщательно подобранных модулей. Каждый модуль решает одну задачу и имеет свой ожидаемый горизонт эффекта. Важно не название, а логика: задача > опора среды > как проверяем > когда ждём результат.
Углубиться в тему – https://vyvod-iz-zapoya-saratov0.ru/vyvod-iz-zapoya-saratov-anonimno
Вывод из запоя — это не «волшебная капельница», а последовательная медицинская программа с чёткими целями и измеримыми маркерами. В наркологической клинике «СаратовМед Профи» маршрут строится по принципу управляемых окон: на каждом шаге команда преследует одну цель, меняет лишь один параметр и оценивает результат в заранее назначённый момент. Такой подход снижает лекарственную нагрузку, предотвращает «гонку дозировок» и делает динамику предсказуемой для пациента и близких. Конфиденциальность обеспечивается регламентом: немаркированные выезды, нейтральные формулировки в документах, «тихие» каналы связи, доступ к записям — строго по ролям.
Разобраться лучше – https://vyvod-iz-zapoya-saratov0.ru/vyvod-iz-zapoya-saratov-anonimno/
Комплексное проведение этих этапов обеспечивает полное восстановление организма и облегчает процесс последующего лечения зависимости.
Узнать больше – https://vyvod-iz-zapoya-v-ryazani17.ru/
Комплексная терапия включает несколько последовательных этапов, обеспечивающих полное восстановление организма и личности пациента. Каждый из них направлен на решение конкретных задач — от устранения интоксикации до закрепления устойчивой ремиссии.
Подробнее тут – [url=https://narkologicheskaya-klinika-v-volgograde17.ru/]лечение в наркологической клинике волгоград[/url]
Круглосуточная помощь при запое в Химках. Мы работаем 24/7, обеспечивая доступность медицинской помощи в любое время суток.
Подробнее – [url=https://https://vyvod-iz-zapoya-himki12.ru//]вывод из запоя в стационаре в химках[/url]
Если на предзвонке выявляются «красные флаги» — давящая боль в груди, одышка в покое, спутанность сознания, судороги, неукротимая рвота, резкое падение насыщения кислородом — мы организуем бесшовный перевод в стационар. Место резервируем заранее, логистику строим так, чтобы не привлекать внимания соседей и не затягивать старт лечения. При отсутствии угроз терапия может начаться дома с последующим телесопровождением и при необходимости — краткой госпитализацией.
Получить больше информации – [url=https://narcologicheskaya-klinika-saratov0.ru/]www.domen.ru[/url]
В Тольятти клиника «ВолгаМед Тольятти» предоставляет широкий спектр услуг — от экстренного вывода из запоя на дому до длительных реабилитационных программ. Выезд нарколога осуществляется круглосуточно: врач приезжает по вызову, проводит диагностику, оценивает степень интоксикации и назначает индивидуальный план лечения. Это особенно важно в тех случаях, когда пациент не может самостоятельно добраться до клиники. В арсенале специалистов — профессиональное оборудование, капельницы для детоксикации и препараты для стабилизации психоэмоционального состояния.
Получить дополнительные сведения – https://narkologicheskaya-pomoshh-v-tolyatti17.ru/narkologicheskaya-bolnicza-tolyatti/
Капельница — основной инструмент для очищения организма от продуктов распада этанола. Состав раствора подбирается строго индивидуально. В таблице приведены примеры комплексов, применяемых специалистами клиники «Трезвая Линия Волгоград».
Исследовать вопрос подробнее – [url=https://vyvod-iz-zapoia-v-volgograde17.ru/]нарколог вывод из запоя в волгограде[/url]
Помощь при алкогольной интоксикации в Люберцах. Наши специалисты проведут необходимые процедуры для снятия симптомов интоксикации.
Изучить вопрос глубже – [url=https://https://kapelnica-ot-zapoya-lyubercy12.ru//]капельница от запоя на дому цена в люберцах[/url]
Такой подход позволяет добиться устойчивого эффекта и минимизировать риск возврата к зависимому поведению.
Подробнее – [url=https://narkologicheskaya-klinika-v-volgograde17.ru/]наркологическая клиника наркологический центр[/url]
Процесс включает несколько шагов:
Получить больше информации – [url=https://narkolog-na-dom-v-ufe17.ru/]нарколог на дом в уфе[/url]
Своевременное обращение к специалистам позволяет быстро стабилизировать состояние и избежать осложнений.
Получить дополнительную информацию – https://vyvod-iz-zapoya-v-tolyatti17.ru/vyvod-iz-zapoya-tolyatti-na-domu/
В Воронеже клиника «Центр Трезвости ВоронМед» обеспечивает выезд нарколога на дом в любое время суток. Это позволяет оказывать помощь пациентам, которые находятся в тяжёлом состоянии или не могут самостоятельно приехать в стационар. Медицинская бригада прибывает в течение 40–60 минут, не используя специализированный транспорт и форму, чтобы сохранить анонимность. Врач проводит первичный осмотр, оценивает давление, частоту дыхания, уровень сознания и насыщение кислородом, после чего назначает детоксикационную капельницу с контролем дозировки.
Получить больше информации – http://vyvod-iz-zapoya-v-voronezhe17.ru/vyvod-iz-zapoya-na-domu-voronezh/
Капельница от запоя в Волгограде — это эффективный способ быстро восстановить организм после длительного употребления алкоголя. Процедура проводится врачом-наркологом и направлена на выведение токсинов, нормализацию обмена веществ и стабилизацию работы нервной системы. Инфузионная терапия помогает устранить головную боль, слабость, тошноту, восстановить сон и аппетит. Благодаря внутривенному введению препаратов эффект наступает уже через 20–30 минут после начала процедуры.
Разобраться лучше – https://kapelnicza-ot-zapoya-v-volgograde17.ru/kapelnicza-ot-pokhmelya-volgograd/
Кодирование от алкоголизма в стационаре Балашихи. Мы предлагаем различные методы кодирования, подходящие для каждого пациента.
Получить дополнительную информацию – [url=https://https://vyvod-iz-zapoya-v-stacionare-balashiha12.ru//]вывод из запоя на дому круглосуточно[/url]
Особенность подхода заключается в сочетании медицинской и психологической поддержки. После кодирования пациент получает консультации психотерапевта, рекомендации по восстановлению и профилактике рецидивов. Это снижает риск повторного срыва и помогает закрепить результат на долгий срок.
Детальнее – [url=https://kodirovanie-ot-alkogolizma-v-volgograde17.ru/]бесплатное кодирование от алкоголизма волгоград[/url]
Каждый этап направлен на восстановление организма без стресса и перегрузки. Врачи работают деликатно, чтобы пациент чувствовал безопасность и понимал, что помощь оказывается профессионально.
Углубиться в тему – [url=https://vyvod-iz-zapoya-v-novokuzneczke17.ru/]вывод из запоя[/url]
Каждый этап проходит под контролем врачей-наркологов и психотерапевтов, что гарантирует эффективность и безопасность лечения.
Ознакомиться с деталями – [url=https://narcologicheskaya-klinika-v-novokuzneczke17.ru/]запой наркологическая клиника в новокузнецке[/url]
Не менее опасны и психоэмоциональные нарушения, связанные с абстинентным синдромом: тревога, чувство паники, галлюцинации, нарушения координации. В тяжёлых случаях может развиться алкогольный делирий (белая горячка) со спутанностью сознания, бредовыми идеями и приступами агрессии. Самостоятельный резкий отказ от спиртного в этом состоянии чреват непредсказуемыми осложнениями вплоть до судорог и комы.
Выяснить больше – [url=https://narko-reabcentr.ru/]вывод из запоя вызов в москве[/url]
Вывод из запоя — это не просто медицинская процедура, а системный процесс восстановления организма после длительного употребления алкоголя. В клинике «ВолгаМед Резолюция» в Волгограде пациенты получают помощь, основанную на принципах доказательной медицины и индивидуального подхода. Лечение направлено не только на устранение симптомов интоксикации, но и на стабилизацию нервной системы, восстановление водно-солевого баланса и нормализацию сна. Капельницы подбираются персонально, с учётом состояния пациента, сопутствующих заболеваний и возраста. Все процедуры проводятся анонимно и под контролем нарколога.
Подробнее – [url=https://vyvod-iz-zapoya-v-volgograde17.ru/]срочный вывод из запоя в волгограде[/url]
Статья содержит данные с сомнительной актуальностью и факты, лишённые чёткой взаимосвязи, но знакомит читателя с разными мнениями, пусть и без глубокого влияния.
Дополнительная информация – [url=https://stop-zavisimost.ru/blog/chto-takoe-mefedron-kak-ego-upotreblyayut-posledstviya-i-sposoby-lecheniya-zavisimosti.html]слоты на деньги[/url]
Во время лечения фиксируются все жизненные показатели пациента. При необходимости проводится экспресс-анализ крови и ЭКГ. Ниже представлена таблица, показывающая, какие параметры контролируются и по каким признакам оценивается стабилизация состояния.
Детальнее – [url=https://vyvod-iz-zapoya-v-voronezhe17.ru/]скорая вывод из запоя воронеж[/url]
На данном ресурсе публикуются актуальные события.
Пользователи могут сразу просматривать новости из разных сфер.
Контент обновляется регулярно, что позволяет быть в курсе событий.
Редакция сайта следят за актуальностью материалов.
Платформа даёт разношерстный контент для разных читателей.
https://telegra.ph/Ekaterinburg-12-25
Контент подготавливается наглядно и доступно, чтобы пользователи оставались информированными.
Разделы сайта позволяют легко просматривать интересующие новости.
В итоге, сайт даёт возможность следить за актуальными новостями для широкой аудитории.
Наркологическая помощь в «ВолгаМед Тольятти» включает широкий спектр процедур и методик. Каждый случай рассматривается индивидуально, с учётом состояния пациента, стадии заболевания и сопутствующих факторов. Ниже представлена таблица с основными направлениями медицинской работы.
Получить дополнительные сведения – https://narkologicheskaya-pomoshh-v-tolyatti17.ru/
Лечение зависимости от алкоголя у мужчин в Люберцах. Мы предлагаем индивидуальный подход к лечению мужчин, учитывая все особенности организма.
Исследовать вопрос подробнее – [url=https://https://kapelnica-ot-zapoya-lyubercy13.ru//]капельница от запоя вызов[/url]
Одним из самых востребованных направлений работы клиники является проведение детоксикации и вывод из запоя. Эти процедуры направлены на очищение организма от алкоголя и продуктов его распада, нормализацию работы печени и нервной системы. Лечение проводится с использованием сертифицированных препаратов и под контролем врача-нарколога.
Подробнее – https://narkologicheskaya-clinica-v-novokuzneczke17.ru/narkolog-novokuzneczk-na-dom/
Процесс лечения включает несколько последовательных шагов, направленных на стабилизацию состояния, детоксикацию и восстановление функций организма. Таблица ниже показывает основные этапы процедуры, применяемые врачами клиники «РеабКузбасс».
Получить больше информации – http://vyvod-iz-zapoya-v-novokuzneczke17.ru
Лечение зависимости от алкоголя на дому в Химках. Наши специалисты приедут к вам домой и проведут все необходимые процедуры.
Ознакомиться с деталями – [url=https://https://vyvod-iz-zapoya-himki13.ru//]вывод из запоя на дому недорого химки[/url]
Процесс кодирования проходит в комфортной и спокойной обстановке. Врач объясняет каждый этап, чтобы пациент чувствовал себя уверенно и спокойно. После процедуры пациент получает памятку с рекомендациями по уходу за здоровьем и режиму поведения в первые недели после лечения.
Подробнее тут – [url=https://kodirovanie-ot-alkogolizma-v-volgograde17.ru/]кодирование от алкоголизма цены в волгограде[/url]
Конфиденциальность — это набор конкретных действий, а не декларация на сайте. Мы проектируем «невидимость» так, чтобы пациент мог спокойно принять помощь и не опасаться огласки.
Узнать больше – [url=https://narkologicheskaya-klinika-v-krasnoyarske17.ru/]наркологическая клиника вывод из запоя красноярск[/url]
Комплексный подход позволяет врачу не просто купировать острые симптомы, но и предупредить осложнения со стороны сердца, печени и нервной системы. После стабилизации состояния пациент получает рекомендации по дальнейшему лечению и восстановлению.
Выяснить больше – http://vyvod-iz-zapoia-v-volgograde17.ru
Капельница от запоя — эффективный способ детоксикации. Мы используем современные препараты для быстрого и безопасного выведения из запоя.
Получить дополнительные сведения – [url=https://https://kapelnica-ot-zapoya-lyubercy13.ru//]капельница от запоя вызов в люберцах[/url]
В таблице представлены основные виды терапии, применяемые в клинике:
Выяснить больше – [url=https://narcologicheskaya-klinika-v-novokuzneczke17.ru/]наркологические клиники алкоголизм в новокузнецке[/url]
Публикация приглашает вас исследовать неизведанное — от древних тайн до современных достижений науки. Вы узнаете, как случайные находки превращались в революции, а смелые мысли — в новые эры человеческого прогресса.
Полная информация здесь – https://lacos.uniriotec.br/unirio
Примерный состав раствора, применяемого наркологом на дому в Уфе, приведён в таблице:
Углубиться в тему – [url=https://narkolog-na-dom-v-ufe17.ru/]вызов нарколога на дом в уфе[/url]
В таблице приведены основные компоненты инфузионной терапии, применяемые при детоксикации:
Детальнее – [url=https://narkologicheskaya-clinica-v-novokuzneczke17.ru/]наркологическая клиника лечение алкоголизма новокузнецк[/url]
Лечение запоя у женщин в Химках. Мы предлагаем индивидуальный подход к лечению женщин, учитывая все особенности организма.
Узнать больше – [url=https://https://vyvod-iz-zapoya-himki13.ru//]вывод из запоя на дому круглосуточно в химках[/url]
Запой представляет собой состояние, при котором организм находится под постоянным воздействием этанола. Это вызывает интоксикацию, нарушение обменных процессов и дестабилизацию психики. При обращении за помощью врач-нарколог оценивает состояние пациента и подбирает индивидуальную схему терапии, чтобы безопасно вывести человека из запоя и предотвратить развитие синдрома отмены. Вмешательство проводится как в стационаре, так и на дому, в зависимости от состояния пациента.
Исследовать вопрос подробнее – [url=https://vyvod-iz-zapoya-v-krasnoyarske17.ru/]вывод из запоя вызов на дом в красноярске[/url]
Клиника «ВолгаМед Резолюция» в Волгограде оказывает помощь при алкогольной интоксикации как в условиях стационара, так и на дому. Врачи готовы выехать к пациенту в течение 40–60 минут после обращения, привозя с собой всё необходимое оборудование для проведения инфузионной терапии. Такая оперативность позволяет снизить риск осложнений и стабилизировать состояние уже в первые часы лечения. Для пациентов, нуждающихся в круглосуточном наблюдении, предусмотрены комфортабельные палаты с постоянным медицинским контролем.
Подробнее – https://vyvod-iz-zapoya-v-volgograde17.ru/vyvod-iz-zapoya-za-den-voronezh/
Комплексное применение этих методов позволяет значительно ускорить процесс восстановления и предотвратить осложнения.
Получить дополнительные сведения – https://narcologicheskaya-klinika-v-novokuzneczke17.ru/narkolog-novokuzneczk-na-dom
Ниже приведена таблица с типовыми компонентами капельницы и их действием:
Получить больше информации – [url=https://vyvod-iz-zapoya-v-tolyatti17.ru/]вывод из запоя на дому круглосуточно[/url]
В Тольятти клиника «ВолгаМед Тольятти» предоставляет широкий спектр услуг — от экстренного вывода из запоя на дому до длительных реабилитационных программ. Выезд нарколога осуществляется круглосуточно: врач приезжает по вызову, проводит диагностику, оценивает степень интоксикации и назначает индивидуальный план лечения. Это особенно важно в тех случаях, когда пациент не может самостоятельно добраться до клиники. В арсенале специалистов — профессиональное оборудование, капельницы для детоксикации и препараты для стабилизации психоэмоционального состояния.
Подробнее можно узнать тут – [url=https://narkologicheskaya-pomoshh-v-tolyatti17.ru/]наркологическая помощь на дому тольятти[/url]
Капельница от запоя в Волгограде — это эффективный способ быстро восстановить организм после длительного употребления алкоголя. Процедура проводится врачом-наркологом и направлена на выведение токсинов, нормализацию обмена веществ и стабилизацию работы нервной системы. Инфузионная терапия помогает устранить головную боль, слабость, тошноту, восстановить сон и аппетит. Благодаря внутривенному введению препаратов эффект наступает уже через 20–30 минут после начала процедуры.
Изучить вопрос глубже – http://kapelnicza-ot-zapoya-v-volgograde17.ru/
В этом информативном тексте представлены захватывающие события и факты, которые заставят вас задуматься. Мы обращаем внимание на важные моменты, которые часто остаются незамеченными, и предлагаем новые перспективы на привычные вещи. Подготовьтесь к тому, чтобы быть поглощенным увлекательными рассказами!
Желаете узнать подробности? – https://awakenregen.com/2023/10/25/psicologia-social-comunitaria-en-el-turismo-regenerativo-potenciando-el-empoderamiento-local-y-la-salud-mental
Вывод из запоя в Красноярске — это медицинская процедура, направленная на устранение алкогольной интоксикации и восстановление нормальной работы организма после длительного употребления спиртных напитков. Услуга предоставляется круглосуточно и включает дезинтоксикационную терапию, стабилизацию психоэмоционального состояния и профилактику осложнений. Все процедуры выполняются опытными наркологами с применением сертифицированных препаратов и в строгом соответствии с медицинскими стандартами.
Подробнее – https://vyvod-iz-zapoya-v-krasnoyarske17.ru/vyvod-iz-zapoya-na-domu-krasnoyarsk/
Не менее опасны и психоэмоциональные нарушения, связанные с абстинентным синдромом: тревога, чувство паники, галлюцинации, нарушения координации. В тяжёлых случаях может развиться алкогольный делирий (белая горячка) со спутанностью сознания, бредовыми идеями и приступами агрессии. Самостоятельный резкий отказ от спиртного в этом состоянии чреват непредсказуемыми осложнениями вплоть до судорог и комы.
Подробнее можно узнать тут – https://narko-reabcentr.ru/
Критически важный отрезок — первые 12–24 часа. Мы разбиваем его на «окна», в каждом из которых есть цель, набор действий, маркеры контроля и критерий перехода. Если целевой отклик не достигнут, меняем один параметр: темп инфузии, очередность модулей или поведенческую опору (свет/тишина/цифровой режим) — и назначаем новую точку оценки. Это сохраняет причинно-следственную связь и предотвращает полипрагмазию.
Подробнее – http://narcologicheskaya-klinika-saratov0.ru/
Публикация приглашает вас исследовать неизведанное — от древних тайн до современных достижений науки. Вы узнаете, как случайные находки превращались в революции, а смелые мысли — в новые эры человеческого прогресса.
Желаете узнать подробности? – http://www.montargil.com/fotografia/details.php?image_id=85
Анонимность и конфиденциальность гарантированы. Мы обеспечиваем полную анонимность и конфиденциальность на всех этапах лечения.
Узнать больше – https://https://kapelnica-ot-zapoya-lyubercy12.ru/
Лечение запоя у женщин в Химках. Мы предлагаем индивидуальный подход к лечению женщин, учитывая все особенности организма.
Получить дополнительную информацию – [url=https://https://vyvod-iz-zapoya-himki12.ru//]нарколог на дом вывод из запоя[/url]
Лечение хронического алкоголизма в Люберцах. Наши специалисты помогут вам преодолеть зависимость и вернуться к нормальной жизни.
Получить больше информации – [url=https://https://kapelnica-ot-zapoya-lyubercy11.ru//]kapelnicza-ot-zapoya-czena lyubercy[/url]
Капельница — основной инструмент для очищения организма от продуктов распада этанола. Состав раствора подбирается строго индивидуально. В таблице приведены примеры комплексов, применяемых специалистами клиники «Трезвая Линия Волгоград».
Выяснить больше – http://vyvod-iz-zapoia-v-volgograde17.ru
Для жителей Красноярска организованы два конфиденциальных пути. Первый — немаркированный выезд бригады на дом с заранее согласованными порогами связи. Второй — «тихий вход» в клинику через отдельную дверь, где приём проходит без очередей и «коридорных» разговоров. На первичном звонке администратор уточняет только клинически значимые факторы: частоту рвоты, наличие мочеиспускания, ЧСС/АД в покое, эпизоды спутанности, актуальные лекарства и аллергии. Биографические подробности и лишние вопросы не задаются — мы придерживаемся принципа минимально необходимой информации.
Разобраться лучше – http://narkologicheskaya-klinika-v-krasnoyarske17.ru
Лечение зависимости от алкоголя в стационаре Балашихи. Наши специалисты приедут к вам домой и проведут все необходимые процедуры.
Подробнее можно узнать тут – [url=https://https://vyvod-iz-zapoya-v-stacionare-balashiha12.ru//]вывод из запоя капельница на дому в балашихе[/url]
Такая структура терапии делает процесс максимально эффективным и безопасным.
Подробнее – [url=https://narcologicheskaya-klinika-omsk0.ru/]narcologicheskaya-klinika-omsk0.ru/[/url]
Своевременное обращение к специалистам позволяет быстро стабилизировать состояние и избежать осложнений.
Подробнее можно узнать тут – [url=https://vyvod-iz-zapoya-v-tolyatti17.ru/]скорая вывод из запоя тольятти[/url]
В клинике применяются комплексные программы, охватывающие все стадии терапии. Такой подход позволяет обеспечить пациенту полный спектр помощи — от первой консультации до социальной адаптации.
Детальнее – [url=https://narcologicheskaya-klinika-omsk0.ru/]наркологическая клиника наркологический центр омск[/url]
Не всегда человек способен прекратить употребление алкоголя без медицинского вмешательства. Чем дольше длится запой, тем выше риск осложнений. Обратиться к специалисту следует при появлении следующих признаков:
Узнать больше – http://vyvod-iz-zapoya-v-tyumeni17.ru/vyvod-iz-zapoya-tyumen-otzyvy/
Этот информационный обзор станет отличным путеводителем по актуальным темам, объединяющим важные факты и мнения экспертов. Мы исследуем ключевые идеи и представляем их в доступной форме для более глубокого понимания. Читайте, чтобы оставаться в курсе событий!
Полная информация здесь – http://matildacafe.es/hello-world
Мы переводим субъективное «полегчало» в наблюдаемые факты. Быстрее всего меняются переносимость воды и интенсивность тошноты; вслед за этим «садится» пульс/давление и на 3+ пункта снижается тремор. «Первая ночь» — экзамен устойчивости: цель — ? 6 часов сна и не более одного пробуждения. Утром — две «малые победы» (гигиена, 10–15 минут тихой ходьбы) без «отката». При такой динамике модули по плану выключаются, пациент получает короткую карту самопомощи на 72 часа: светогигиена, интервалы питья, дыхательные ритмы, речевые правила семьи и пороги связи с дежурным.
Выяснить больше – http://narkologicheskaya-klinika-v-krasnoyarske17.ru
Анонимность и конфиденциальность гарантированы. Мы обеспечиваем полную анонимность и конфиденциальность на всех этапах лечения.
Детальнее – [url=https://https://vyvod-iz-zapoya-v-stacionare-balashiha13.ru//]наркология вывод из запоя в балашихе[/url]
Ниже приведена таблица с примерными этапами терапии:
Детальнее – [url=https://vyvod-iz-zapoya-v-ryazani17.ru/]нарколог вывод из запоя рязань[/url]
Примерный состав раствора, применяемого наркологом на дому в Уфе, приведён в таблице:
Ознакомиться с деталями – [url=https://narkolog-na-dom-v-ufe17.ru/]нарколог на дом недорого в уфе[/url]
Капельница от запоя в Люберцах — быстрый и эффективный способ детоксикации. Наши специалисты приедут к вам домой и проведут процедуру, помогая снять симптомы похмелья и вывести токсины из организма.
Подробнее тут – [url=https://https://kapelnica-ot-zapoya-lyubercy11.ru//]капельница от запоя цена[/url]
Капельницы при выводе из запоя — основной инструмент детоксикации. Они очищают кровь, стабилизируют давление и восстанавливают баланс электролитов. В клинике «РеабКузбасс» используются только качественные препараты, адаптированные под конкретное состояние пациента. Ниже приведена таблица с основными видами капельниц и их эффектом.
Подробнее можно узнать тут – [url=https://vyvod-iz-zapoya-v-novokuzneczke17.ru/]вывод из запоя вызов город[/url]
Эта информационная заметка предлагает лаконичное и четкое освещение актуальных вопросов. Здесь вы найдете ключевые факты и основную информацию по теме, которые помогут вам сформировать собственное мнение и повысить уровень осведомленности.
Получить дополнительные сведения – https://fotografiehamburg.de/november-taiwan
Медики рекомендуют обратиться за профессиональной помощью при следующих состояниях:
Разобраться лучше – [url=https://vyvod-iz-zapoya-v-ryazani17.ru/]вывод из запоя капельница на дому рязань[/url]
Такая форма помощи позволяет избежать осложнений, которые часто сопровождают попытки снять симптомы самостоятельно. При правильном подборе препаратов уже через час наблюдается улучшение самочувствия: уходит головная боль, снижается тревога, стабилизируется сердцебиение и восстанавливается ясность мышления. Пациент получает рекомендации по питанию, режиму отдыха и приёму витаминов, чтобы закрепить результат и предотвратить повторный срыв.
Получить дополнительные сведения – [url=https://narkolog-na-dom-v-voronezhe17.ru/]вызвать врача нарколога на дом в воронеже[/url]
Процесс кодирования проходит в комфортной и спокойной обстановке. Врач объясняет каждый этап, чтобы пациент чувствовал себя уверенно и спокойно. После процедуры пациент получает памятку с рекомендациями по уходу за здоровьем и режиму поведения в первые недели после лечения.
Подробнее – http://kodirovanie-ot-alkogolizma-v-volgograde17.ru
Выездная наркологическая помощь организована по чётко выстроенной схеме. Каждый этап направлен на стабилизацию состояния и безопасное восстановление функций организма после алкогольного или наркотического воздействия.
Получить дополнительные сведения – [url=https://narkolog-na-dom-v-ufe17.ru/]вызвать нарколога на дом срочно в уфе[/url]
Не всегда человек способен самостоятельно прекратить приём алкоголя и восстановиться. Есть состояния, требующие немедленного вмешательства специалистов. Обратиться за помощью необходимо, если наблюдаются следующие признаки:
Получить дополнительную информацию – [url=https://vyvod-iz-zapoya-v-volgograde17.ru/]помощь вывод из запоя в волгограде[/url]
После завершения инфузий врач-нарколог даёт рекомендации по питанию, водному балансу и образу жизни. При необходимости пациенту назначается курс поддерживающей терапии для закрепления эффекта.
Изучить вопрос глубже – [url=https://narkologicheskaya-pomoshh-v-tolyatti17.ru/]narkologicheskaya-pomoshh-v-tolyatti17.ru/[/url]
Наркологическая клиника — это пространство, где медицинская наука сочетается с психологической поддержкой и индивидуальным подходом к каждому пациенту. В клинике «ВоронежМед Альянс» лечение зависимости организовано по принципам доказательной медицины: каждый этап терапии основан на объективных данных, контролируемых результатах и четких критериях эффективности. Здесь помогают не просто устранить физические последствия зависимости, но и восстановить внутренние ресурсы человека, вернуть уверенность, осознанность и способность строить новую жизнь без алкоголя и наркотиков.
Получить больше информации – [url=https://narcologicheskaya-klinika-v-voronezhe17.ru/]лечение в наркологической клинике в воронеже[/url]
Услуга вывода из запоя в клинике сочетает профессионализм врачей, медицинскую точность и заботу. При этом обеспечивается полная конфиденциальность: данные пациентов не передаются в сторонние инстанции. Круглосуточный режим работы позволяет вызвать врача даже ночью — специалисты прибывают в течение 40–60 минут после обращения.
Подробнее – [url=https://vivod-iz-zapoya-v-volgograde17.ru/]вывод из запоя дешево волгоград[/url]
В данном тексте собраны разнообразные случайные сведения и не вполне определённые идеи, которые могут вызвать интерес. Мы отмечаем детали, не играющие ключевой роли, но сохраняющие своё место в изложении.
Подробнее читать – [url=https://rostov-narkologiya.ru/uslugi-ot-narkomanii/mefedronovaya-zavisimost/]народные средства от диабета[/url]
Капельницы в «СаратовМед Профи» — это конструктор из тщательно подобранных модулей. Каждый модуль решает одну задачу и имеет свой ожидаемый горизонт эффекта. Важно не название, а логика: задача > опора среды > как проверяем > когда ждём результат.
Получить дополнительные сведения – http://vyvod-iz-zapoya-saratov0.ru/
Вывод из запоя в стационаре — безопасное и комфортное восстановление. В нашем стационаре созданы все условия для быстрого и эффективного вывода из запоя.
Ознакомиться с деталями – [url=https://https://vyvod-iz-zapoya-v-stacionare-balashiha12.ru//]вывод из запоя круглосуточно в балашихе[/url]
Вывод из запоя у подростков в Люберцах. Мы предлагаем специализированное лечение для подростков, учитывая их возрастные особенности.
Получить больше информации – [url=https://https://kapelnica-ot-zapoya-lyubercy13.ru//]капельница от запоя вызов люберцы[/url]
Если на предзвонке выявляются «красные флаги» — давящая боль в груди, одышка в покое, спутанность сознания, судороги, неукротимая рвота, резкое падение насыщения кислородом — мы организуем бесшовный перевод в стационар. Место резервируем заранее, логистику строим так, чтобы не привлекать внимания соседей и не затягивать старт лечения. При отсутствии угроз терапия может начаться дома с последующим телесопровождением и при необходимости — краткой госпитализацией.
Подробнее можно узнать тут – https://narcologicheskaya-klinika-saratov0.ru/chastnaya-narkologicheskaya-klinika-saratov
Одним из самых востребованных направлений работы клиники является проведение детоксикации и вывод из запоя. Эти процедуры направлены на очищение организма от алкоголя и продуктов его распада, нормализацию работы печени и нервной системы. Лечение проводится с использованием сертифицированных препаратов и под контролем врача-нарколога.
Узнать больше – [url=https://narkologicheskaya-clinica-v-novokuzneczke17.ru/]наркологическая клиника вывод из запоя[/url]
Вывод из запоя у пожилых людей в Химках. Наши специалисты учитывают возрастные изменения организма при назначении лечения.
Получить больше информации – [url=https://https://vyvod-iz-zapoya-himki13.ru//]наркологический вывод из запоя в химках[/url]
Лечение зависимости от алкоголя у мужчин в Люберцах. Мы предлагаем индивидуальный подход к лечению мужчин, учитывая все особенности организма.
Подробнее – [url=https://https://kapelnica-ot-zapoya-lyubercy13.ru//]после капельницы от запоя люберцы[/url]
Процесс включает несколько шагов:
Подробнее можно узнать тут – http://narkolog-na-dom-v-ufe17.ru/ufa-narkolog-psikhiatr/
Процесс включает несколько шагов:
Узнать больше – [url=https://narkolog-na-dom-v-ufe17.ru/]вызвать врача нарколога на дом в уфе[/url]
Главным преимуществом наркологической клиники в Новокузнецке является комплексный подход к лечению. Специалисты рассматривают зависимость как заболевание, требующее системного воздействия на организм и психику. Каждый пациент получает индивидуальную программу, включающую медицинскую, психотерапевтическую и социальную помощь. Такой подход обеспечивает достижение устойчивых результатов и предотвращает рецидивы.
Углубиться в тему – [url=https://narkologicheskaya-clinica-v-novokuzneczke17.ru/]наркологическая клиника вывод из запоя[/url]
Лечение зависимости от алкоголя на дому в Люберцах. Наши специалисты приедут к вам домой и проведут все необходимые процедуры.
Разобраться лучше – [url=https://https://kapelnica-ot-zapoya-lyubercy13.ru//]капельница от запоя[/url]
Стационарное лечение запоя в Химках. Предлагаем комфортные условия для пребывания пациентов и круглосуточный медицинский уход.
Подробнее можно узнать тут – [url=https://https://vyvod-iz-zapoya-himki13.ru//]вывод из запоя капельница в химках[/url][url=https://https://vyvod-iz-zapoya-himki13.ru//]вывод из запоя недорого в химках[/url]
Наркологическая клиника в Новокузнецке предоставляет профессиональную помощь людям, столкнувшимся с зависимостью от алкоголя, наркотиков и психоактивных веществ. Лечение проводится под наблюдением опытных специалистов с применением современных медицинских методик. Основная цель работы клиники — не только устранить физическую зависимость, но и восстановить психологическое равновесие пациента, вернуть мотивацию и способность жить без употребления веществ.
Получить дополнительную информацию – https://narkologicheskaya-clinica-v-novokuzneczke17.ru/narkologiya-gorod-novokuzneczk/
Круглосуточная помощь при запое в Химках. Мы работаем 24/7, обеспечивая доступность медицинской помощи в любое время суток.
Получить дополнительные сведения – [url=https://https://vyvod-iz-zapoya-himki13.ru//]вывод из запоя химки[/url]
Основные этапы включают:
Подробнее можно узнать тут – [url=https://vyvod-iz-zapoya-v-krasnoyarske17.ru/]вывод из запоя капельница на дому в красноярске[/url]
Такой подход позволяет добиться устойчивого эффекта и минимизировать риск возврата к зависимому поведению.
Углубиться в тему – [url=https://narkologicheskaya-klinika-v-volgograde17.ru/]наркологическая клиника стационар волгоград[/url]
Запой представляет собой состояние, при котором организм находится под постоянным воздействием этанола. Это вызывает интоксикацию, нарушение обменных процессов и дестабилизацию психики. При обращении за помощью врач-нарколог оценивает состояние пациента и подбирает индивидуальную схему терапии, чтобы безопасно вывести человека из запоя и предотвратить развитие синдрома отмены. Вмешательство проводится как в стационаре, так и на дому, в зависимости от состояния пациента.
Выяснить больше – [url=https://vyvod-iz-zapoya-v-krasnoyarske17.ru/]скорая вывод из запоя в красноярске[/url]
Во время процедуры врач фиксирует ключевые параметры, чтобы убедиться в безопасности и эффективности терапии. Мониторинг проводится при каждом выезде и помогает отслеживать динамику в режиме реального времени. В таблице ниже указаны основные показатели, за которыми следит специалист.
Узнать больше – [url=https://narkolog-na-dom-v-voronezhe17.ru/]психиатр нарколог на дом в воронеже[/url]
В данном тексте собраны разнообразные случайные сведения и не вполне определённые идеи, которые могут вызвать интерес. Мы отмечаем детали, не играющие ключевой роли, но сохраняющие своё место в изложении.
Подробнее читать – [url=https://rostov-narkologiya.ru/uslugi-ot-narkomanii/mefedronovaya-zavisimost/]лечение COVID народными средствами[/url]
Лечение организовано поэтапно. Такой подход обеспечивает постепенное восстановление функций организма и исключает риск осложнений. Каждый этап терапии направлен на устранение конкретных нарушений, вызванных интоксикацией.
Изучить вопрос глубже – [url=https://vyvod-iz-zapoya-v-krasnoyarske17.ru/]наркология вывод из запоя в красноярске[/url]
Этот интересный отчет представляет собой сборник полезных фактов, касающихся актуальных тем. Мы проанализируем данные, чтобы вы могли сделать обоснованные выводы. Читайте, чтобы узнать больше о последних трендах и значимых событиях!
Детали по клику – http://jyninfo.com/2015/11/24/news-heading-4
Лечение зависимости от алкоголя у мужчин в Люберцах. Мы предлагаем индивидуальный подход к лечению мужчин, учитывая все особенности организма.
Углубиться в тему – [url=https://https://kapelnica-ot-zapoya-lyubercy12.ru//]капельница от запоя на дому московская область[/url]
В этом информативном тексте представлены захватывающие события и факты, которые заставят вас задуматься. Мы обращаем внимание на важные моменты, которые часто остаются незамеченными, и предлагаем новые перспективы на привычные вещи. Подготовьтесь к тому, чтобы быть поглощенным увлекательными рассказами!
Полная информация здесь – https://jornalbaixadasantista.com.br/2024/04/17/urbam-abre-edital-para-modelo-de-tratamento-de-chorume
Эта информационная заметка предлагает лаконичное и четкое освещение актуальных вопросов. Здесь вы найдете ключевые факты и основную информацию по теме, которые помогут вам сформировать собственное мнение и повысить уровень осведомленности.
Смотрите также… – https://gofrix.com/461/descubra-o-nome-verdadeiro-de-sertanejos-famosos/4
Капельница от запоя — эффективный способ детоксикации. Мы используем современные препараты для быстрого и безопасного выведения из запоя.
Подробнее тут – [url=https://https://vyvod-iz-zapoya-himki12.ru//]вывод из запоя в химках[/url]
Процесс включает несколько шагов:
Подробнее – http://narkolog-na-dom-v-ufe17.ru/vyvod-iz-zapoya-ufa-narkolog-na-dom/https://narkolog-na-dom-v-ufe17.ru
Когда острые угрозы исключены, программа стартует дома. Пациент получает понятную карту действий, близкие — короткие окна обратной связи, врач — чистую «картинку» для тонкой настройки. Мы просим сообщать факты, а не эмоции: минуты до засыпания, число пробуждений, объём тёплой воды малыми глотками, пульс к вечеру, переносимость мягкой пищи, ясность головы утром.
Получить дополнительную информацию – [url=https://vyvod-iz-zapoya-saratov0.ru/]срочный вывод из запоя саратов[/url]
Процесс детоксикации проходит поэтапно, чтобы организм успевал адаптироваться к изменениям и не испытывал стресс. Каждый шаг направлен на достижение конкретного терапевтического эффекта. Ниже представлена таблица, отражающая ключевые стадии процедуры, применяемой в клинике «Трезвый Путь Волгоград».
Получить дополнительные сведения – [url=https://vivod-iz-zapoya-v-volgograde17.ru/]www.domen.ru[/url]
Эта статья сочетает в себе как полезные, так и интересные сведения, которые обогатят ваше понимание насущных тем. Мы предлагаем практические советы и рекомендации, которые легко внедрить в повседневную жизнь. Узнайте, как улучшить свои навыки и обогатить свой опыт с помощью простых, но эффективных решений.
Детали по клику – https://mdtodate.com/functional-nausea
Клиника «ВоронежМед Альянс» придерживается принципа прозрачной медицины: каждый шаг понятен пациенту, решения принимаются совместно, а результаты фиксируются по объективным показателям. Такой формат создаёт чувство безопасности и доверия. Среди основных принципов:
Узнать больше – [url=https://narcologicheskaya-klinika-v-voronezhe17.ru/]наркологическая клиника цены[/url]
Главным преимуществом наркологической клиники в Новокузнецке является комплексный подход к лечению. Специалисты рассматривают зависимость как заболевание, требующее системного воздействия на организм и психику. Каждый пациент получает индивидуальную программу, включающую медицинскую, психотерапевтическую и социальную помощь. Такой подход обеспечивает достижение устойчивых результатов и предотвращает рецидивы.
Изучить вопрос глубже – [url=https://narkologicheskaya-clinica-v-novokuzneczke17.ru/]лечение в наркологической клинике в новокузнецке[/url]
Лечение зависимости от алкоголя у мужчин в Люберцах. Мы предлагаем индивидуальный подход к лечению мужчин, учитывая все особенности организма.
Подробнее можно узнать тут – [url=https://https://kapelnica-ot-zapoya-lyubercy13.ru//]капельница от запоя клиника люберцы[/url]
Реабилитация после запоя в Люберцах. Мы поможем вам восстановиться после запоя и предотвратить рецидивы.
Подробнее – [url=https://https://kapelnica-ot-zapoya-lyubercy11.ru//]kapelnicza-ot-zapoya-na-domu lyubercy[/url]
Капельница от запоя — эффективный способ детоксикации. Мы используем современные препараты для быстрого и безопасного выведения из запоя.
Получить дополнительную информацию – [url=https://https://vyvod-iz-zapoya-himki13.ru//]вывод из запоя недорого[/url]
Наркологическая клиника в Новокузнецке предоставляет профессиональную помощь людям, столкнувшимся с зависимостью от алкоголя, наркотиков и психоактивных веществ. Лечение проводится под наблюдением опытных специалистов с применением современных медицинских методик. Основная цель работы клиники — не только устранить физическую зависимость, но и восстановить психологическое равновесие пациента, вернуть мотивацию и способность жить без употребления веществ.
Получить больше информации – http://narkologicheskaya-clinica-v-novokuzneczke17.ru/narkolog-v-gorode-novokuzneczke/
Профессиональная помощь при запое в Люберцах. Мы предлагаем капельницу, которая способствует восстановлению водно-электролитного баланса и улучшению общего состояния пациента.
Узнать больше – [url=https://https://kapelnica-ot-zapoya-lyubercy13.ru//]капельница от запоя люберцы[/url]
Публикация предоставляет читателю набор разрозненных идей, которые сложно применить на практике. Мы лишь слегка касаемся разных точек зрения, не углубляясь в анализ и не предлагая никаких выводов.
Вот – [url=https://arma-rehab.ru/vyvod-iz-zapoya/]азартные игры[/url]
Капельница — это основной инструмент дезинтоксикации при лечении запойных состояний. Она способствует выведению токсинов, нормализации обмена веществ и улучшению общего самочувствия. Состав раствора подбирается индивидуально в зависимости от степени интоксикации, возраста, массы тела и сопутствующих заболеваний. Уже через 20–30 минут после начала инфузии пациент ощущает облегчение, снижается тревожность и проходит головная боль.
Разобраться лучше – [url=https://vyvod-iz-zapoya-v-krasnoyarske17.ru/]www.domen.ru[/url]
Анонимность и конфиденциальность гарантированы. Мы обеспечиваем полную анонимность и конфиденциальность на всех этапах лечения.
Детальнее – [url=https://https://vyvod-iz-zapoya-himki13.ru//]вывод из запоя в стационаре химки[/url]
Если на предзвонке выявляются «красные флаги» — давящая боль в груди, одышка в покое, спутанность сознания, судороги, неукротимая рвота, резкое падение насыщения кислородом — мы организуем бесшовный перевод в стационар. Место резервируем заранее, логистику строим так, чтобы не привлекать внимания соседей и не затягивать старт лечения. При отсутствии угроз терапия может начаться дома с последующим телесопровождением и при необходимости — краткой госпитализацией.
Детальнее – [url=https://narcologicheskaya-klinika-saratov0.ru/]наркологическая клиника наркологический центр[/url]
Анонимность и конфиденциальность гарантированы. Мы обеспечиваем полную анонимность и конфиденциальность на всех этапах лечения.
Получить дополнительные сведения – [url=https://https://kapelnica-ot-zapoya-lyubercy11.ru//]врача капельницу от запоя люберцы[/url]
Для повышения эффективности в капельницы добавляются витамины группы B, аскорбиновая кислота, кардиопротекторы и антиоксиданты. Такая комбинация позволяет не только ускорить выведение продуктов распада алкоголя, но и предотвратить развитие постабстинентных расстройств. Благодаря точной дозировке и мягкому темпу введения растворов снижается риск побочных реакций, а восстановление проходит плавно и безопасно.
Получить больше информации – [url=https://vyvod-iz-zapoya-v-voronezhe17.ru/]наркология вывод из запоя[/url]
Основные этапы включают:
Ознакомиться с деталями – [url=https://vyvod-iz-zapoya-v-krasnoyarske17.ru/]вывод из запоя цена[/url]
В клинике применяются комплексные программы, охватывающие все стадии терапии. Такой подход позволяет обеспечить пациенту полный спектр помощи — от первой консультации до социальной адаптации.
Ознакомиться с деталями – [url=https://narcologicheskaya-klinika-omsk0.ru/]вывод наркологическая клиника[/url]
Комплексная терапия включает несколько последовательных этапов, обеспечивающих полное восстановление организма и личности пациента. Каждый из них направлен на решение конкретных задач — от устранения интоксикации до закрепления устойчивой ремиссии.
Выяснить больше – https://narkologicheskaya-klinika-v-volgograde17.ru/
Критически важный отрезок — первые 12–24 часа. Мы разбиваем его на «окна», в каждом из которых есть цель, набор действий, маркеры контроля и критерий перехода. Если целевой отклик не достигнут, меняем один параметр: темп инфузии, очередность модулей или поведенческую опору (свет/тишина/цифровой режим) — и назначаем новую точку оценки. Это сохраняет причинно-следственную связь и предотвращает полипрагмазию.
Выяснить больше – [url=https://narcologicheskaya-klinika-saratov0.ru/]наркологическая клиника саратов[/url]
Лечение организовано поэтапно, что помогает пациенту постепенно возвращаться к полноценной жизни. Каждый шаг направлен на укрепление результата и снижение риска рецидива.
Углубиться в тему – [url=https://narcologicheskaya-klinika-omsk0.ru/]наркологическая клиника стационар[/url]
В данной обзорной статье представлены интригующие факты, которые не оставят вас равнодушными. Мы критикуем и анализируем события, которые изменили наше восприятие мира. Узнайте, что стоит за новыми открытиями и как они могут изменить ваше восприятие реальности.
Узнайте всю правду – https://uiquilmes.org/home-2
В клинике применяются комплексные программы, охватывающие все стадии терапии. Такой подход позволяет обеспечить пациенту полный спектр помощи — от первой консультации до социальной адаптации.
Узнать больше – http://narcologicheskaya-klinika-omsk0.ru/
Недропользование — это совокупность процессов, связанный с освоением природных ресурсов.
Оно включает поиск минерального сырья и их промышленное освоение.
Данная сфера регулируется законодательством, направленными на охрану окружающей среды.
Грамотный подход в недропользовании способствует экономическому росту.
оэрн официальный сайт
Эта информационная заметка предлагает лаконичное и четкое освещение актуальных вопросов. Здесь вы найдете ключевые факты и основную информацию по теме, которые помогут вам сформировать собственное мнение и повысить уровень осведомленности.
А что дальше? – https://csec.news/hackers/jeanson-james-ancheta
В таблице приведены основные компоненты инфузионной терапии, применяемые при детоксикации:
Получить дополнительную информацию – [url=https://narkologicheskaya-clinica-v-novokuzneczke17.ru/]наркологическая клиника лечение алкоголизма новокузнецк[/url]
Все процедуры выполняются анонимно и с соблюдением медицинских стандартов. Препараты применяются только сертифицированные, рассчитанные на мягкое восстановление организма без побочных эффектов. При необходимости лечение продолжается в стационаре, где пациент получает круглосуточное наблюдение, питание и психологическую поддержку.
Детальнее – [url=https://vyvod-iz-zapoya-v-novokuzneczke17.ru/]нарколог на дом вывод из запоя новокузнецк[/url]
В статье-обзоре представлены данные сомнительной актуальности и факты без явной взаимосвязи. Читатель ознакомится с разными мнениями, хотя они вряд ли существенно изменят его представление о теме.
Подробнее читать – [url=https://rostov-narkologiya.ru/]детокс чай для похудения[/url]
Каждый этап проходит под контролем врачей-наркологов и психотерапевтов, что гарантирует эффективность и безопасность лечения.
Углубиться в тему – http://
Для удобства восприятия можно ориентироваться на следующую структуру (это не публичная оферта, а примерная модель ценообразования — точная сумма фиксируется после осмотра и согласования схемы):
Подробнее тут – [url=https://narkolog-na-dom-serpuhov10.ru/]www.domen.ru[/url]
Если на предзвонке выявляются «красные флаги» — давящая боль в груди, одышка в покое, спутанность сознания, судороги, неукротимая рвота, резкое падение насыщения кислородом — мы организуем бесшовный перевод в стационар. Место резервируем заранее, логистику строим так, чтобы не привлекать внимания соседей и не затягивать старт лечения. При отсутствии угроз терапия может начаться дома с последующим телесопровождением и при необходимости — краткой госпитализацией.
Подробнее тут – [url=https://narcologicheskaya-klinika-saratov0.ru/]наркологическая клиника вывод из запоя в саратове[/url]
Клиника использует многоступенчатый подход, который позволяет адаптировать лечение под особенности организма пациента. Наблюдение продолжается даже после завершения детоксикации, чтобы убедиться, что состояние стабильно и не требуется дополнительное вмешательство. При необходимости врач назначает курс поддержки печени, витаминов и препаратов для восстановления сна и психоэмоционального равновесия.
Выяснить больше – [url=https://vyvod-iz-zapoya-v-volgograde17.ru/]срочный вывод из запоя[/url]
Процесс кодирования проходит в комфортной и спокойной обстановке. Врач объясняет каждый этап, чтобы пациент чувствовал себя уверенно и спокойно. После процедуры пациент получает памятку с рекомендациями по уходу за здоровьем и режиму поведения в первые недели после лечения.
Исследовать вопрос подробнее – https://kodirovanie-ot-alkogolizma-v-volgograde17.ru/kodirovanie-ot-alkogolya-v-volgograde
Вывод из запоя в Красноярске — это медицинская процедура, направленная на устранение алкогольной интоксикации и восстановление нормальной работы организма после длительного употребления спиртных напитков. Услуга предоставляется круглосуточно и включает дезинтоксикационную терапию, стабилизацию психоэмоционального состояния и профилактику осложнений. Все процедуры выполняются опытными наркологами с применением сертифицированных препаратов и в строгом соответствии с медицинскими стандартами.
Подробнее можно узнать тут – [url=https://vyvod-iz-zapoya-v-krasnoyarske17.ru/]помощь вывод из запоя[/url]
Одним из самых востребованных направлений работы клиники является проведение детоксикации и вывод из запоя. Эти процедуры направлены на очищение организма от алкоголя и продуктов его распада, нормализацию работы печени и нервной системы. Лечение проводится с использованием сертифицированных препаратов и под контролем врача-нарколога.
Узнать больше – http://narkologicheskaya-clinica-v-novokuzneczke17.ru
Медики рекомендуют обратиться за профессиональной помощью при следующих состояниях:
Изучить вопрос глубже – http://
Критически важный отрезок — первые 12–24 часа. Мы разбиваем его на «окна», в каждом из которых есть цель, набор действий, маркеры контроля и критерий перехода. Если целевой отклик не достигнут, меняем один параметр: темп инфузии, очередность модулей или поведенческую опору (свет/тишина/цифровой режим) — и назначаем новую точку оценки. Это сохраняет причинно-следственную связь и предотвращает полипрагмазию.
Изучить вопрос глубже – [url=https://narcologicheskaya-klinika-saratov0.ru/]платная наркологическая клиника саратов[/url]
Такая форма помощи позволяет избежать осложнений, которые часто сопровождают попытки снять симптомы самостоятельно. При правильном подборе препаратов уже через час наблюдается улучшение самочувствия: уходит головная боль, снижается тревога, стабилизируется сердцебиение и восстанавливается ясность мышления. Пациент получает рекомендации по питанию, режиму отдыха и приёму витаминов, чтобы закрепить результат и предотвратить повторный срыв.
Получить дополнительные сведения – [url=https://narkolog-na-dom-v-voronezhe17.ru/]нарколог на дом вывод воронеж[/url]
Для удобства восприятия можно ориентироваться на следующую структуру (это не публичная оферта, а примерная модель ценообразования — точная сумма фиксируется после осмотра и согласования схемы):
Выяснить больше – [url=https://narkolog-na-dom-serpuhov10.ru/]нарколог на дом круглосуточно цены[/url]
В Тольятти клиника «ВолгаМед Тольятти» предоставляет широкий спектр услуг — от экстренного вывода из запоя на дому до длительных реабилитационных программ. Выезд нарколога осуществляется круглосуточно: врач приезжает по вызову, проводит диагностику, оценивает степень интоксикации и назначает индивидуальный план лечения. Это особенно важно в тех случаях, когда пациент не может самостоятельно добраться до клиники. В арсенале специалистов — профессиональное оборудование, капельницы для детоксикации и препараты для стабилизации психоэмоционального состояния.
Углубиться в тему – [url=https://narkologicheskaya-pomoshh-v-tolyatti17.ru/]экстренная наркологическая помощь в тольятти[/url]
Запой — это не просто несколько лишних дней алкоголя, а тяжёлое состояние, в котором организм работает на пределе. Чем дольше длится эпизод, тем глубже обезвоживание, тем сильнее сдвиги электролитов, тем выше риск аритмий, гипертонических кризов, судорог, делирия, обострений заболеваний сердца, печени и поджелудочной железы. Попытки «вывести» человека дома силами родных часто включают опасные комбинации: случайные седативные, снотворные, анальгетики, «антипохмельные» из рекламы. Они могут на время усыпить или «успокоить», но при этом скрывают ухудшение, сбивают давление, угнетают дыхание и мешают врачу увидеть реальную картину. В «Трезвый Центр Коломна» подход другой: ещё на этапе звонка специалист уточняет длительность запоя, объёмы и виды алкоголя, наличие гипертонии, ИБС, диабета, заболеваний печени и почек, неврологических проблем, список уже принятых препаратов, эпизоды потери сознания, судорог, странного поведения. На основании этих данных определяется, безопасен ли формат на дому или сразу нужен стационар. Такая сортировка позволяет вовремя перехватить опасные случаи, не терять часы на бесполезные попытки и сразу запускать те схемы, которые реально снижают риски и стабилизируют состояние.
Исследовать вопрос подробнее – [url=https://vyvod-iz-zapoya-kolomna10.ru/]bystryj-vyvod-iz-zapoya-na-domu[/url]
Вывод из запоя в Рязани — это профессиональная медицинская процедура, направленная на очищение организма от токсинов, восстановление нормального самочувствия и предотвращение осложнений после длительного употребления алкоголя. В специализированных клиниках города лечение проводится с использованием современных методов детоксикации и под контролем опытных врачей-наркологов. Такой подход позволяет быстро и безопасно стабилизировать состояние пациента, устранить физическую зависимость и подготовить организм к дальнейшему восстановлению.
Подробнее тут – [url=https://vyvod-iz-zapoya-v-ryazani17.ru/]вывод из запоя в рязани[/url]
Клиника «Трезвый Шаг Раменское» выстраивает помощь так, чтобы пациент и его близкие не метались между разными службами и частными «специалистами», а получали комплекс услуг в одном месте. Это особенно важно для тех, кто уже сталкивался с провалами после разовых кодировок, неподходящих капельниц или формальной «помощи».
Получить дополнительные сведения – [url=https://narkologicheskaya-klinika-ramenskoe10.ru/]www.domen.ru[/url]
Эти методы комбинируются и создают условия для всестороннего восстановления пациента.
Изучить вопрос глубже – [url=https://narcologicheskaya-klinika-omsk0.ru/]наркологическая клиника вывод из запоя[/url]
Комплексный подход позволяет врачу не просто купировать острые симптомы, но и предупредить осложнения со стороны сердца, печени и нервной системы. После стабилизации состояния пациент получает рекомендации по дальнейшему лечению и восстановлению.
Изучить вопрос глубже – [url=https://vyvod-iz-zapoia-v-volgograde17.ru/]скорая вывод из запоя[/url]
Вывод из запоя в Рязани — это профессиональная медицинская процедура, направленная на очищение организма от токсинов, восстановление нормального самочувствия и предотвращение осложнений после длительного употребления алкоголя. В специализированных клиниках города лечение проводится с использованием современных методов детоксикации и под контролем опытных врачей-наркологов. Такой подход позволяет быстро и безопасно стабилизировать состояние пациента, устранить физическую зависимость и подготовить организм к дальнейшему восстановлению.
Получить больше информации – [url=https://vyvod-iz-zapoya-v-ryazani17.ru/]анонимный вывод из запоя рязань[/url]
Комплексное лечение помогает восстановить работу печени, сердца и нервной системы. Пациенты отмечают улучшение сна, снижение тревожности, нормализацию давления и аппетита уже спустя несколько часов после начала терапии. В зависимости от тяжести состояния курс может быть продлён до 2–3 дней с круглосуточным наблюдением и корректировкой дозировок.
Детальнее – [url=https://vivod-iz-zapoya-v-volgograde17.ru/]вывод из запоя недорого волгоград[/url]
Когда острые угрозы исключены, программа стартует дома. Пациент получает понятную карту действий, близкие — короткие окна обратной связи, врач — чистую «картинку» для тонкой настройки. Мы просим сообщать факты, а не эмоции: минуты до засыпания, число пробуждений, объём тёплой воды малыми глотками, пульс к вечеру, переносимость мягкой пищи, ясность головы утром.
Выяснить больше – [url=https://vyvod-iz-zapoya-saratov0.ru/]вывод из запоя цена[/url]
Основные этапы включают:
Подробнее тут – [url=https://vyvod-iz-zapoya-v-krasnoyarske17.ru/]вывод из запоя дешево красноярск[/url]
В данной обзорной статье представлены интригующие факты, которые не оставят вас равнодушными. Мы критикуем и анализируем события, которые изменили наше восприятие мира. Узнайте, что стоит за новыми открытиями и как они могут изменить ваше восприятие реальности.
Детали по клику – https://greennet.or.th/product/coconut-oil
Услуга
Разобраться лучше – [url=https://narkolog-na-dom-serpuhov10.ru/]вызвать нарколога на дом срочно[/url]
Процесс включает несколько шагов:
Получить дополнительные сведения – [url=https://narkolog-na-dom-v-ufe17.ru/]помощь нарколога на дому уфа[/url]
Этот интересный отчет представляет собой сборник полезных фактов, касающихся актуальных тем. Мы проанализируем данные, чтобы вы могли сделать обоснованные выводы. Читайте, чтобы узнать больше о последних трендах и значимых событиях!
Открой скрытое – https://boring-fukui.com/20110304153919_image1_28
Системный подход позволяет достичь максимальной эффективности лечения и снизить риск возврата к зависимости.
Получить дополнительные сведения – https://narkologicheskaya-clinica-v-novokuzneczke17.ru/
В клинике применяются комплексные программы, охватывающие все стадии терапии. Такой подход позволяет обеспечить пациенту полный спектр помощи — от первой консультации до социальной адаптации.
Узнать больше – [url=https://narcologicheskaya-klinika-omsk0.ru/]наркологическая клиника нарколог омск[/url]
Вызов нарколога на дом — это удобная и безопасная возможность получить медицинскую помощь без необходимости ехать в клинику. Такая услуга особенно востребована, когда состояние пациента не позволяет покинуть дом, а помощь требуется незамедлительно. В наркологической клинике «ВоронМед Профи» организована круглосуточная служба выезда специалистов, которая оперативно реагирует на обращения и обеспечивает профессиональную помощь при запое, алкогольной интоксикации и обострениях хронических состояний. Врач приезжает в течение часа, оценивает состояние пациента и подбирает оптимальную схему лечения, включающую капельницы, детоксикацию и рекомендации по восстановлению организма.
Изучить вопрос глубже – http://narkolog-na-dom-v-voronezhe17.ru/narkolog-voronezh-anonimno/
Процесс лечения проходит поэтапно и под постоянным наблюдением специалистов. Каждый этап направлен на определённый аспект восстановления здоровья и личности пациента.
Детальнее – [url=https://narkologicheskaya-clinica-v-novokuzneczke17.ru/]запой наркологическая клиника[/url]
Выезд нарколога на дом в Щёлково — это быстрый и конфиденциальный способ помочь человеку в состоянии запоя или тяжёлого похмелья, не перевозя его в клинику и не устраивая публичных сцен. Врачи «ЩёлковоМед Профи» приезжают с готовым набором препаратов, одноразовыми системами и чётким протоколом: осмотр, оценка жизненно важных показателей, подбор индивидуальной капельницы, контроль реакции, рекомендации для родных. Такой формат особенно удобен, когда пациент отказывается ехать в стационар, тяжело переносит дорогу, остро реагирует на смену обстановки или для семьи важна максимальная анонимность. Главный принцип — не «вырубить» человека любой ценой, а безопасно стабилизировать состояние, снизить интоксикацию, выровнять давление и пульс, помочь собрать сон и дать понятный план, что делать дальше.
Получить дополнительную информацию – [url=https://narkolog-na-dom-shchelkovo10.ru/]запой нарколог на дом цена[/url]
Работа выездной службы построена так, чтобы для семьи всё было максимально понятно и предсказуемо. После звонка специалист не ограничивается общими фразами, а уточняет детали: сколько длится употребление, есть ли хронические болезни сердца, печени, почек, эндокринные нарушения, какие препараты и в каких дозах пациент уже получил, были ли в прошлом судороги, галлюцинации, тяжёлые реакции на лекарства. Это позволяет заранее оценить уровень риска и понять, подходит ли формат дома. По прибытии в Серпухове врач осматривает пациента, проверяет контакт и ориентировку, измеряет артериальное давление несколько раз, оценивает пульс, сатурацию, температуру, выраженность тремора, наличие болей, характер дыхания, степень обезвоживания. Далее формируется индивидуальная инфузионная схема: растворы для регидратации и коррекции электролитов, витамины группы B и магний для поддержки нервной системы, при необходимости — гепатопротекторы и мягкие антиоксидантные комплексы, противорвотные для контроля тошноты, щадящие анксиолитики для нормализации сна без грубой седации. Во время процедуры врач контролирует динамику, меняет скорость капельницы при необходимости, отслеживает реакцию на препараты и объясняет родным, какие изменения будут происходить по часам. По завершении визита пациент и родственники получают подробный план: режим, питьё, питание, чего нельзя, какие симптомы считаются тревожными, когда нужна повторная консультация или стационар. При выявлении опасных признаков вопрос о госпитализации поднимается честно и сразу, а не откладывается «до утра».
Подробнее тут – https://narkolog-na-dom-serpuhov10.ru/vyezd-narkologa-na-dom-serpuhov/
Мы переводим субъективное «полегчало» в наблюдаемые факты. Быстрее всего меняются переносимость воды и интенсивность тошноты; вслед за этим «садится» пульс/давление и на 3+ пункта снижается тремор. «Первая ночь» — экзамен устойчивости: цель — ? 6 часов сна и не более одного пробуждения. Утром — две «малые победы» (гигиена, 10–15 минут тихой ходьбы) без «отката». При такой динамике модули по плану выключаются, пациент получает короткую карту самопомощи на 72 часа: светогигиена, интервалы питья, дыхательные ритмы, речевые правила семьи и пороги связи с дежурным.
Узнать больше – [url=https://narkologicheskaya-klinika-v-krasnoyarske17.ru/]наркологическая клиника клиника помощь красноярск[/url]
Чтобы родственники не терялись в терминах и не воспринимали лечение как «чёрный ящик», в клинике используется поэтапный подход. Это помогает увидеть логическую связку между затратами, процедурами и результатами.
Разобраться лучше – [url=https://narkologicheskaya-klinika-ramenskoe10.ru/]klinika-narkologicheskoj-zavisimosti[/url]
Комплексное лечение помогает восстановить работу печени, сердца и нервной системы. Пациенты отмечают улучшение сна, снижение тревожности, нормализацию давления и аппетита уже спустя несколько часов после начала терапии. В зависимости от тяжести состояния курс может быть продлён до 2–3 дней с круглосуточным наблюдением и корректировкой дозировок.
Получить больше информации – http://vivod-iz-zapoya-v-volgograde17.ru
Капельницы в «СаратовМед Профи» — это конструктор из тщательно подобранных модулей. Каждый модуль решает одну задачу и имеет свой ожидаемый горизонт эффекта. Важно не название, а логика: задача > опора среды > как проверяем > когда ждём результат.
Подробнее – https://vyvod-iz-zapoya-saratov0.ru/vyvod-iz-zapoya-saratov-staczionar/
Услуга
Подробнее тут – [url=https://narkolog-na-dom-serpuhov10.ru/]нарколог на дом анонимно[/url]
Наркологическая клиника — это пространство, где медицинская наука сочетается с психологической поддержкой и индивидуальным подходом к каждому пациенту. В клинике «ВоронежМед Альянс» лечение зависимости организовано по принципам доказательной медицины: каждый этап терапии основан на объективных данных, контролируемых результатах и четких критериях эффективности. Здесь помогают не просто устранить физические последствия зависимости, но и восстановить внутренние ресурсы человека, вернуть уверенность, осознанность и способность строить новую жизнь без алкоголя и наркотиков.
Получить дополнительную информацию – https://narcologicheskaya-klinika-v-voronezhe17.ru/
Ниже — примерная структура пакетов, которую можно использовать как ориентир (не публичная оферта):
Подробнее можно узнать тут – [url=https://narkolog-na-dom-shchelkovo10.ru/]vyzvat-narkologa-na-dom[/url]
Стационар «Трезвый Путь Коломна» ориентирован на безопасность в самых сложных случаях: длительные запои, тяжёлая абстиненция, смешанное употребление, выраженные соматические проблемы, риск делирия или судорог. Пациент попадает под наблюдение 24/7, что принципиально отличает клинику от домашних попыток «спасти своими средствами». Контроль жизненно важных показателей, своевременная коррекция схем лечения, возможность быстро отреагировать на осложнения — всё это снижает риск критических ситуаций, которые часто возникают именно после неумелых домашних вмешательств или «выездов без ответственности».
Ознакомиться с деталями – https://narkologicheskaya-klinika-kolomna2-10.ru/narkologicheskaya-klinika-oficialnyj-sajt-v-kolomne/
Эта информационная заметка предлагает лаконичное и четкое освещение актуальных вопросов. Здесь вы найдете ключевые факты и основную информацию по теме, которые помогут вам сформировать собственное мнение и повысить уровень осведомленности.
Подробнее тут – https://manolojimenez.mx/presenta-manolo-modelo-coahuila-ante-legisladores-federales-del-pri
Выбор наркологической клиники в Коломне — это не «слишком серьёзно», а логичный шаг, если зависимость уже зашла дальше спонтанных эпизодов. Алкоголизм, наркомания, злоупотребление успокоительными и обезболивающими — это не только психологическая тяга, но и перестройка организма: страдают печень, сердце, сосуды, нервная система, гормональный фон, сон, психика. Дома редко есть возможность круглосуточно контролировать состояние, правильно отменять вещества, отслеживать давление, пульс, поведение, не допускать опасных комбинаций препаратов. Родственники устают, реагируют эмоциями, а не медицинской логикой, человек чувствует себя под прицелом, но не под защитой. В «КоломнаМед Центр» всё выстроено так, чтобы снять нагрузку с семьи и вывести помощь из зоны хаотичных решений. Здесь оценивают не только то, «что и сколько пьёт или принимает», а весь контекст: длительность зависимости, срывы, уже перенесённые делирии или передозировки, сопутствующие болезни, психические состояния, семейную ситуацию. На основе этого формируется безопасный план: где начать — в стационаре или амбулаторно, какой формат детокса выбрать, насколько жёстко вести наблюдение, как сразу встроить психотерапевтическую и социальную поддержку. Клиника в Коломне позволяет работать системно, а не латать последствия очередного срыва.
Изучить вопрос глубже – http://narkologicheskaya-klinika-kolomna10.ru/narkologicheskaya-klinika-cena-v-kolomne/
Наркологическая клиника «Трезвый Путь Коломна» — это пространство, где тяжёлые истории зависимости перестают быть хаотичным набором срывов, ночных обещаний и беспомощных попыток родных «вытащить своими силами». Здесь собраны врачи-наркологи, терапевты, психологи и медперсонал, которые знают, что такое длительные запои, многолетнее употребление, полинаркомания, зависимость от аптечных препаратов, и умеют работать с этим не через страх и давление, а через профессиональные, выверенные шаги. Клиника в Коломне предлагает безопасную детоксикацию, стационарное наблюдение, индивидуальные программы лечения алкоголизма и наркомании, поддержку семьи и постреабилитационные решения. Все процессы организованы так, чтобы пациент сохранял достоинство, а родственники наконец получили не обещания, а реальный план действий, понятный по этапам и по результатам.
Подробнее тут – [url=https://narkologicheskaya-klinika-kolomna2-10.ru/]zakazat-obratnyj-zvonok-narkologicheskaya-klinika[/url]
Лечение организовано поэтапно. Такой подход обеспечивает постепенное восстановление функций организма и исключает риск осложнений. Каждый этап терапии направлен на устранение конкретных нарушений, вызванных интоксикацией.
Изучить вопрос глубже – [url=https://vyvod-iz-zapoya-v-krasnoyarske17.ru/]наркология вывод из запоя в красноярске[/url]
В этом информативном тексте представлены захватывающие события и факты, которые заставят вас задуматься. Мы обращаем внимание на важные моменты, которые часто остаются незамеченными, и предлагаем новые перспективы на привычные вещи. Подготовьтесь к тому, чтобы быть поглощенным увлекательными рассказами!
Хочешь знать всё? – https://14kankoreziu.lt/virtuali-kavapost
Фиксируем АД, ЧСС, сатурацию, температуру, оцениваем неврологический статус, степень обезвоживания, тремор, тошноту и уровень тревоги; собираем краткий анамнез последних суток и характер употребления.
Исследовать вопрос подробнее – https://vyvod-iz-zapoya-ehlektrostal2-10.ru/
Вывод из запоя в Красноярске — это медицинская процедура, направленная на устранение алкогольной интоксикации и восстановление нормальной работы организма после длительного употребления спиртных напитков. Услуга предоставляется круглосуточно и включает дезинтоксикационную терапию, стабилизацию психоэмоционального состояния и профилактику осложнений. Все процедуры выполняются опытными наркологами с применением сертифицированных препаратов и в строгом соответствии с медицинскими стандартами.
Углубиться в тему – [url=https://vyvod-iz-zapoya-v-krasnoyarske17.ru/]вывод из запоя в стационаре в красноярске[/url]
Стационар наркологической клиники в Раменском ориентирован на тех пациентов, для которых домашние попытки лечения объективно опасны. Это длительные запои, пожилой возраст, выраженные сердечно-сосудистые патологии, заболевания печени и почек, риск делирия, судорог, тяжёлая абстиненция, полинаркомания. В стационаре «Трезвый Шаг Раменское» организовано круглосуточное наблюдение: контролируются давление, пульс, сатурация, поведение, динамика симптомов, проводится своевременная коррекция терапии. Пациент находится в спокойной, защищённой обстановке, где ему не нужно скрывать своё состояние или оправдываться — задача команды не судить, а стабилизировать и лечить. Комфортные палаты, медицинский персонал рядом, продуманное питание, конфиденциальность — всё это снижает уровень страха у пациента и напряжение у родственников. Важный момент: стационар не подаётся как «камерный режим», а как безопасная зона восстановления, где можно пройти самый тяжёлый участок пути с максимальной защитой.
Ознакомиться с деталями – [url=https://narkologicheskaya-klinika-ramenskoe10.ru/]анонимная наркологическая клиника[/url]
Каждый из этапов сопровождается контролем врача и постепенным снижением медикаментозной нагрузки. Важно не просто снять симптомы, но и научить пациента распознавать внутренние триггеры, чтобы предотвратить рецидив. На протяжении всего лечения сохраняется поддержка психолога, который помогает адаптироваться и перестроить привычные модели поведения.
Узнать больше – [url=https://narcologicheskaya-klinika-v-voronezhe17.ru/]наркологическая клиника цены воронеж[/url]
Отдельный принцип клиники — строгая анонимность. Информация о лечении не передаётся по месту работы, обучения, в сторонние структуры без согласия пациента. Это особенно важно для людей, которые боятся огласки и из-за этого годами откладывают обращение. В «КоломнаМед Центр» можно пройти лечение так, чтобы сохранить репутацию и личное пространство, не превращая каждый шаг в обсуждение «на людях».
Подробнее тут – https://narkologicheskaya-klinika-kolomna10.ru/narkologicheskaya-klinika-oficialnyj-sajt-v-kolomne
Комплексное проведение этих этапов обеспечивает полное восстановление организма и облегчает процесс последующего лечения зависимости.
Получить дополнительную информацию – http://vyvod-iz-zapoya-v-ryazani17.ru/
Каждое направление интегрировано в общую стратегию: минимизировать риски для здоровья, стабилизировать состояние и не оставить пациента один на один с проблемой сразу после облегчения симптомов.
Подробнее – [url=https://narkologicheskaya-klinika-ramenskoe10.ru/]наркологическая клиника московская московская область[/url]
Такая форма помощи позволяет избежать осложнений, которые часто сопровождают попытки снять симптомы самостоятельно. При правильном подборе препаратов уже через час наблюдается улучшение самочувствия: уходит головная боль, снижается тревога, стабилизируется сердцебиение и восстанавливается ясность мышления. Пациент получает рекомендации по питанию, режиму отдыха и приёму витаминов, чтобы закрепить результат и предотвратить повторный срыв.
Изучить вопрос глубже – [url=https://narkolog-na-dom-v-voronezhe17.ru/]выезд нарколога на дом в воронеже[/url]
Ниже — ключевые направления, которые логично дополняют друг друга и формируют единый маршрут лечения:
Детальнее – http://narkologicheskaya-klinika-ramenskoe10.ru/chastnaya-narkologicheskaya-klinika-v-ramenskom/
В Воронеже команда «ВоронМед Профи» работает по принципу быстрой медицинской реакции — помощь оказывается независимо от времени суток и дня недели. Все выезды выполняются анонимно, без спецтранспорта и медицинской формы. Врач приезжает в гражданской одежде, что исключает ненужное внимание соседей и посторонних. В ходе осмотра специалист измеряет давление, пульс, температуру, оценивает уровень интоксикации и определяет степень обезвоживания. На основе полученных данных подбирается состав капельницы, который подаётся медленно и безопасно под контролем врача.
Разобраться лучше – https://narkolog-na-dom-v-voronezhe17.ru
Фиксируем АД, ЧСС, сатурацию, температуру, оцениваем неврологический статус, степень обезвоживания, тремор, тошноту и уровень тревоги; собираем краткий анамнез последних суток и характер употребления.
Углубиться в тему – https://vyvod-iz-zapoya-ehlektrostal2-10.ru/vyvod-iz-zapoya-stacionar-v-ehlektrostali
Клиника в Волгограде руководствуется принципами индивидуального подхода, конфиденциальности и научно обоснованных методик. Врач-нарколог оценивает общее состояние пациента, определяет стадию зависимости и подбирает оптимальную терапевтическую схему. Лечение включает детоксикацию, медикаментозную поддержку, психотерапию и реабилитацию. Каждый пациент проходит лечение в безопасных условиях с постоянным медицинским наблюдением.
Узнать больше – [url=https://narkologicheskaya-klinika-v-volgograde17.ru/]анонимная наркологическая клиника[/url]
Процесс лечения проходит поэтапно и под постоянным наблюдением специалистов. Каждый этап направлен на определённый аспект восстановления здоровья и личности пациента.
Получить больше информации – https://narkologicheskaya-clinica-v-novokuzneczke17.ru/narkologicheskij-czentr-novokuzneczk
Когда человек в запое, близким кажется, что всё ещё можно решить «по-тихому»: выспаться, отпаять водой, дать обезболивающее или «успокоительное» и дождаться, пока станет легче. На практике это часто приводит к обратному результату. Алкогольная интоксикация нарушает водно-электролитный баланс, сгущает кровь, повышает нагрузку на сердце, провоцирует скачки давления, ухудшает работу печени и нервной системы. Неконтролируемый приём снотворных, анальгетиков, транквилизаторов, особенно вместе с алкоголем, способен вызвать угнетение дыхания, аритмии, судороги или делирий. Домашняя обстановка не даёт возможности следить за всеми показателями и вовремя отреагировать. «РаменМед Трезвость» предлагает клинически выверенный вывод из запоя в Раменском с учётом возраста, длительности употребления, хронических заболеваний, перенесённых ранее осложнений. Здесь не применяют сомнительные схемы «усыпить, чтобы не мешал», а ставят задачу: безопасно пройти острую фазу, снять интоксикацию, стабилизировать давление и пульс, защитить сердце и мозг, снизить риск психозов и, при желании пациента, сразу наметить маршрут реального лечения зависимости. Такой подход снимает с родственников опасную «роль врача» и возвращает ситуацию туда, где ей место — под контроль профессионалов.
Получить дополнительные сведения – [url=https://vyvod-iz-zapoya-ramenskoe10.ru/]вывод из запоя рядом[/url]
Капельницы в «СаратовМед Профи» — это конструктор из тщательно подобранных модулей. Каждый модуль решает одну задачу и имеет свой ожидаемый горизонт эффекта. Важно не название, а логика: задача > опора среды > как проверяем > когда ждём результат.
Разобраться лучше – [url=https://vyvod-iz-zapoya-saratov0.ru/]наркологический вывод из запоя[/url]
Лечение организовано поэтапно, что помогает пациенту постепенно возвращаться к полноценной жизни. Каждый шаг направлен на укрепление результата и снижение риска рецидива.
Ознакомиться с деталями – [url=https://narcologicheskaya-klinika-omsk0.ru/]наркологическая клиника омск[/url]
Если на предзвонке выявляются «красные флаги» — давящая боль в груди, одышка в покое, спутанность сознания, судороги, неукротимая рвота, резкое падение насыщения кислородом — мы организуем бесшовный перевод в стационар. Место резервируем заранее, логистику строим так, чтобы не привлекать внимания соседей и не затягивать старт лечения. При отсутствии угроз терапия может начаться дома с последующим телесопровождением и при необходимости — краткой госпитализацией.
Подробнее можно узнать тут – [url=https://narcologicheskaya-klinika-saratov0.ru/]наркологическая клиника цены в саратове[/url]
«Трезвый Центр Коломна» предлагает несколько маршрутов, и выбор делается не по принципу «как удобнее», а по критериям безопасности. Если пациент в сознании, на контакте, без грубой дезориентации, без галлюцинаций, может пить воду, рвота эпизодическая, нет тяжёлых скачков давления и пульса, дома есть тишина и ответственный взрослый — возможен выезд на дом. Врач приезжает в Коломне, проводит осмотр, измеряет давление, пульс, сатурацию, температуру, оценивает тремор, степень обезвоживания, неврологический и психический статус, подбирает индивидуальную инфузионную схему и наблюдает за реакцией. Если же запой затянулся (3–5 суток и более), выражены слабость, шаткость походки, многократная рвота, резкие «качели» АД и ЧСС, есть подозрение на предделирий или делирий, тяжёлая соматика или пожилой возраст — врач честно рекомендует стационар. В отделении пациент получает круглосуточный мониторинг, возможность оперативно корректировать лечение, защищённую среду без доступа к алкоголю и посторонних стимулов, поддержку медперсонала в любое время суток. Такой дифференцированный подход экономит силы, деньги и главное — снижает риск критических осложнений, которые часто возникают именно после «домашних экспериментов».
Узнать больше – [url=https://vyvod-iz-zapoya-kolomna10.ru/]anonimnyj-vyvod-iz-zapoya-na-domu[/url]
Карта делает видимой причинно-следственную связь: пациент понимает, зачем и что именно делается; семья видит «точки проверки»; врач получает опору для изменения одного параметра без разрушения всего плана.
Детальнее – [url=https://vyvod-iz-zapoya-saratov0.ru/]вывод из запоя вызов на дом саратов[/url]
Процесс детоксикации проходит поэтапно, чтобы организм успевал адаптироваться к изменениям и не испытывал стресс. Каждый шаг направлен на достижение конкретного терапевтического эффекта. Ниже представлена таблица, отражающая ключевые стадии процедуры, применяемой в клинике «Трезвый Путь Волгоград».
Получить дополнительные сведения – [url=https://vivod-iz-zapoya-v-volgograde17.ru/]наркология вывод из запоя волгоград[/url]
Важное отличие клиники — отказ от примитивной схемы «капельница — домой — дальше сам». Такой формат даёт кратковременное облегчение, но не решает ни причин, ни структуры зависимости. «КоломнаМед Центр» выстраивает ступенчатый подход. Первый шаг — безопасная детоксикация: снятие абстиненции, коррекция водно-электролитного баланса, поддержка сердечно-сосудистой системы, печени, нервной системы, нормализация сна. Второй шаг — стабилизация: оценка психического состояния, выявление тревожных, депрессивных и панических симптомов, подбор поддерживающих схем, которые помогают не сорваться сразу после выхода из острых проявлений. Третий шаг — реабилитация и мотивация: психотерапевтическая работа, групповые и индивидуальные форматы, обучение навыкам трезвой жизни, работа с триггерами, укрепление внутренней мотивации. Четвёртый шаг — постреабилитационная поддержка: контрольные приёмы, дистанционные консультации, помощь в профилактике срывов. Такой комплексный путь не ломает пациента, а возвращает ему контроль: не через страх, а через понимание, структуру и реальные инструменты.
Углубиться в тему – [url=https://narkologicheskaya-klinika-kolomna10.ru/]www.domen.ru[/url]
Своевременное обращение в клинику снижает риск развития алкогольного психоза, судорог и тяжёлых осложнений со стороны сердца и печени.
Выяснить больше – [url=https://vyvod-iz-zapoya-v-ryazani17.ru/]срочный вывод из запоя в рязани[/url]
Публикация приглашает вас исследовать неизведанное — от древних тайн до современных достижений науки. Вы узнаете, как случайные находки превращались в революции, а смелые мысли — в новые эры человеческого прогресса.
Уточнить детали – https://debbycreative.com/incorporating-cultural-traditions-into-your-wedding
Все процедуры выполняются анонимно и с соблюдением медицинских стандартов. Препараты применяются только сертифицированные, рассчитанные на мягкое восстановление организма без побочных эффектов. При необходимости лечение продолжается в стационаре, где пациент получает круглосуточное наблюдение, питание и психологическую поддержку.
Ознакомиться с деталями – http://
Перед цифрами важно подчеркнуть: прайс «Трезвый Центр Коломна» строится вокруг реального объёма помощи, а не вокруг рекламных обещаний. Цена зависит от тяжести состояния, длительности запоя, количества инфузий, необходимого набора препаратов, формата (дом или стационар), времени суток выезда, длительности наблюдения. Все дополнительные назначения согласуются заранее — без скрытых доплат и неожиданных строк. Это позволяет семье планировать расходы и сосредоточиться на безопасности.
Подробнее можно узнать тут – [url=https://vyvod-iz-zapoya-kolomna10.ru/]vyvod-iz-zapoya-kapelnica-na-domu[/url]
Процесс детоксикации проходит поэтапно, чтобы организм успевал адаптироваться к изменениям и не испытывал стресс. Каждый шаг направлен на достижение конкретного терапевтического эффекта. Ниже представлена таблица, отражающая ключевые стадии процедуры, применяемой в клинике «Трезвый Путь Волгоград».
Получить дополнительные сведения – https://vivod-iz-zapoya-v-volgograde17.ru/vyvod-iz-zapoya-narkolog-na-dom-volgograd
Процесс вывода из запоя включает последовательное воздействие на ключевые звенья интоксикации. Ниже представлена таблица, отражающая этапы лечения, используемые методики и ожидаемые результаты терапии.
Ознакомиться с деталями – [url=https://vyvod-iz-zapoya-v-volgograde17.ru/]вывод из запоя на дому волгоград[/url]
Эта информационная заметка предлагает лаконичное и четкое освещение актуальных вопросов. Здесь вы найдете ключевые факты и основную информацию по теме, которые помогут вам сформировать собственное мнение и повысить уровень осведомленности.
Открой скрытое – https://consulting-solaris.com/cultura-y-modelo-negocios
Диспетчер уточняет адрес в Электростали, длительность эпизода, текущие препараты и дозы, аллергии, сопутствующие заболевания, последние значения давления/пульса. Это экономит 15–20 минут на месте и позволяет заранее исключить опасные взаимодействия.
Выяснить больше – [url=https://vyvod-iz-zapoya-ehlektrostal2-10.ru/]ehkstrennyj-vyvod-iz-zapoya[/url]
Публикация приглашает вас исследовать неизведанное — от древних тайн до современных достижений науки. Вы узнаете, как случайные находки превращались в революции, а смелые мысли — в новые эры человеческого прогресса.
Узнайте всю правду – https://pwpf.gr/eva-gallud-pwpf-2020
Алкогольная интоксикация вызывает сильное обезвоживание и разрушает баланс электролитов в организме. Без медицинской помощи восстановление может занять несколько дней, а в тяжёлых случаях приводит к осложнениям. Капельница помогает безопасно и быстро вывести этанол и продукты его распада, восполнить уровень жидкости, снизить нагрузку на печень и сердечно-сосудистую систему. Процедура проводится амбулаторно или на дому, что делает её доступной и удобной для пациентов.
Подробнее можно узнать тут – [url=https://kapelnicza-ot-zapoya-v-volgograde17.ru/]капельница от запоя круглосуточно волгоград[/url]
Процесс кодирования проходит в комфортной и спокойной обстановке. Врач объясняет каждый этап, чтобы пациент чувствовал себя уверенно и спокойно. После процедуры пациент получает памятку с рекомендациями по уходу за здоровьем и режиму поведения в первые недели после лечения.
Получить дополнительную информацию – [url=https://kodirovanie-ot-alkogolizma-v-volgograde17.ru/]как происходит кодирование от алкоголизма в волгограде[/url]
Чтобы не упустить момент, нужно ориентироваться не на фразу «он говорит, что справится», а на реальные признаки, при которых профессиональная помощь на дому становится необходимой. Домашний выезд — это шанс стабилизировать состояние до того, как потребуется реанимация или жёсткая госпитализация.
Подробнее тут – https://narkolog-na-dom-dolgoprudnij10.ru/skolko-stoit-narkolog-na-dom-v-dolgoprudnom/
В этом информативном тексте представлены захватывающие события и факты, которые заставят вас задуматься. Мы обращаем внимание на важные моменты, которые часто остаются незамеченными, и предлагаем новые перспективы на привычные вещи. Подготовьтесь к тому, чтобы быть поглощенным увлекательными рассказами!
Смотрите также… – https://angelahowenstein.com/throwback-thursday-graduation
Благодаря этому подходу пациент выходит из состояния запоя без стресса и с минимальной нагрузкой на организм, что ускоряет процесс восстановления.
Углубиться в тему – [url=https://vyvod-iz-zapoya-v-krasnoyarske17.ru/]вывод из запоя на дому цена[/url]
В таблице представлены основные элементы детоксикационной терапии:
Подробнее тут – https://narkologicheskaya-klinika-v-volgograde17.ru/
Комплексное применение этих методов позволяет значительно ускорить процесс восстановления и предотвратить осложнения.
Выяснить больше – https://narcologicheskaya-klinika-v-novokuzneczke17.ru/narkolog-novokuzneczk-na-dom/
В клинике применяются современные медицинские технологии, которые обеспечивают стойкий результат. Используемые методики соответствуют международным стандартам и регулярно обновляются.
Узнать больше – https://narcologicheskaya-klinika-omsk0.ru/narkologicheskaya-bolnicza-omsk/
После завершения инфузий врач-нарколог даёт рекомендации по питанию, водному балансу и образу жизни. При необходимости пациенту назначается курс поддерживающей терапии для закрепления эффекта.
Выяснить больше – [url=https://narkologicheskaya-pomoshh-v-tolyatti17.ru/]наркологическая помощь на дому круглосуточно тольятти[/url]
Услуга
Узнать больше – [url=https://narkolog-na-dom-shchelkovo10.ru/]narkolog-shchyolkovo[/url]
Капельница при вызове нарколога на дом в Долгопрудном от «МедТрезвие Долгопрудный» — это клинический инструмент, а не магический раствор. Главное правило — никакой агрессивной седации ради видимости спокойствия. Инфузионная терапия строится вокруг нескольких задач: восполнить жидкость, выровнять электролиты, снизить токсическую нагрузку на печень и мозг, поддержать сердце и нервную систему, уменьшить тремор, тревогу и соматические жалобы. Используются растворы для регидратации и коррекции водно-электролитного баланса, витамины группы B и магний для поддержки нервной системы, уменьшения риска судорог и нормализации сна, по показаниям — гепатопротекторы и мягкие антиоксиданты, противорвотные препараты для контроля тошноты. При выраженной тревоге или нарушениях сна назначаются щадящие анксиолитические средства в дозах, которые не выключают пациента полностью, а помогают снять паническое напряжение, сохраняя возможность оценивать динамику состояния. Врач отслеживает реакцию на терапию: стабилизацию давления и пульса, уменьшение дрожи, улучшение общего самочувствия, появление более спокойного, естественного сна. По мере облегчения нагрузки схема не усиливается ради счёта, а рационально сокращается. Такой подход защищает пациента от скрытых осложнений и превращает капельницу в контролируемый, полезный шаг, а не в рискованный эксперимент.
Изучить вопрос глубже – https://narkolog-na-dom-dolgoprudnij10.ru/vyzvat-narkologa-na-dom-v-dolgoprudnom
В Новокузнецке команда «РеабКузбасс» организовала круглосуточный выезд наркологов, что позволяет оказывать помощь даже в сложных ситуациях. Пациенты часто обращаются после многодневного употребления алкоголя, когда нарушен сон, давление нестабильно, а организм истощён. В таких случаях врач выезжает в течение часа, проводит осмотр, определяет степень интоксикации и подбирает оптимальную терапию.
Детальнее – [url=https://vyvod-iz-zapoya-v-novokuzneczke17.ru/]вывод из запоя с выездом новокузнецк[/url]
Вывод из запоя — это не просто медицинская процедура, а системный процесс восстановления организма после длительного употребления алкоголя. В клинике «ВолгаМед Резолюция» в Волгограде пациенты получают помощь, основанную на принципах доказательной медицины и индивидуального подхода. Лечение направлено не только на устранение симптомов интоксикации, но и на стабилизацию нервной системы, восстановление водно-солевого баланса и нормализацию сна. Капельницы подбираются персонально, с учётом состояния пациента, сопутствующих заболеваний и возраста. Все процедуры проводятся анонимно и под контролем нарколога.
Получить дополнительную информацию – http://vyvod-iz-zapoya-v-volgograde17.ru/vyvod-iz-zapoya-za-den-voronezh/https://vyvod-iz-zapoya-v-volgograde17.ru
Ниже — примерная структура пакетов, которую можно использовать как ориентир (не публичная оферта):
Детальнее – https://narkolog-na-dom-shchelkovo10.ru/vrach-narkolog-na-dom-shchelkovo
Ниже представлена таблица с основными препаратами, используемыми при выводе из запоя в Тюмени:
Получить дополнительные сведения – https://vyvod-iz-zapoya-v-tyumeni17.ru/vyvod-iz-zapoya-tyumen-kruglosutochno
Нарколог на дом в Уфе — это услуга, которая позволяет получить квалифицированную медицинскую помощь при алкогольной или наркотической интоксикации без необходимости госпитализации. Такой формат особенно востребован при запойных состояниях, когда пациент не может самостоятельно посетить клинику. Врач приезжает по вызову в течение короткого времени, проводит обследование, устанавливает капельницу и обеспечивает безопасный вывод из состояния опьянения. Все процедуры выполняются анонимно, с соблюдением медицинской этики и конфиденциальности.
Выяснить больше – [url=https://narkolog-na-dom-v-ufe17.ru/]нарколог на дом цены в уфе[/url]
Наркологическая клиника «Трезвый Путь Коломна» — это пространство, где тяжёлые истории зависимости перестают быть хаотичным набором срывов, ночных обещаний и беспомощных попыток родных «вытащить своими силами». Здесь собраны врачи-наркологи, терапевты, психологи и медперсонал, которые знают, что такое длительные запои, многолетнее употребление, полинаркомания, зависимость от аптечных препаратов, и умеют работать с этим не через страх и давление, а через профессиональные, выверенные шаги. Клиника в Коломне предлагает безопасную детоксикацию, стационарное наблюдение, индивидуальные программы лечения алкоголизма и наркомании, поддержку семьи и постреабилитационные решения. Все процессы организованы так, чтобы пациент сохранял достоинство, а родственники наконец получили не обещания, а реальный план действий, понятный по этапам и по результатам.
Ознакомиться с деталями – https://narkologicheskaya-klinika-kolomna2-10.ru/
Кодирование от алкоголизма — это медицинская процедура, направленная на формирование устойчивого отвращения к спиртному и восстановление контроля над зависимым поведением. В клинике «ВолгоградМед Альянс» используются современные, научно обоснованные методы, которые позволяют не просто временно ограничить тягу, а глубоко перестроить психологические и биохимические механизмы зависимости. Каждая программа подбирается индивидуально, с учётом стажа употребления, состояния здоровья, мотивации и психоэмоционального фона пациента. Врачи обеспечивают анонимность, безопасность и круглосуточную поддержку, помогая восстановить не только физическое состояние, но и внутреннее равновесие.
Разобраться лучше – http://kodirovanie-ot-alkogolizma-v-volgograde17.ru
Такая форма помощи позволяет избежать осложнений, которые часто сопровождают попытки снять симптомы самостоятельно. При правильном подборе препаратов уже через час наблюдается улучшение самочувствия: уходит головная боль, снижается тревога, стабилизируется сердцебиение и восстанавливается ясность мышления. Пациент получает рекомендации по питанию, режиму отдыха и приёму витаминов, чтобы закрепить результат и предотвратить повторный срыв.
Ознакомиться с деталями – [url=https://narkolog-na-dom-v-voronezhe17.ru/]нарколог на дом анонимно[/url]
Капельница при интоксикации помогает быстро очистить организм от продуктов распада алкоголя, восстановить водно-солевой баланс и улучшить самочувствие. В состав раствора входят препараты, нормализующие обмен веществ и поддерживающие работу печени и сердечно-сосудистой системы. Уже через 20–30 минут после начала инфузии пациент ощущает значительное облегчение. Подбор лекарственных средств осуществляется строго индивидуально, с учётом возраста, массы тела и общего состояния здоровья.
Получить дополнительную информацию – [url=https://narkolog-na-dom-v-ufe17.ru/]врач нарколог на дом в уфе[/url]
Лечение в клинике «ВоронежМед Альянс» проходит поэтапно. Каждый модуль имеет определённую цель и собственные критерии эффективности. Такой подход исключает избыточное вмешательство и обеспечивает прозрачность процесса восстановления.
Узнать больше – https://narcologicheskaya-klinika-v-voronezhe17.ru/narkolog-voronezh-anonimno/
Процесс организован так, чтобы снять с семьи хаос и дать понятный сценарий. После обращения в «РеутовМед Сервис» пациент быстро попадает в поле зрения врача: или через выезд по адресу, или через стационар, если состояние уже близко к опасному. На месте проводится полноценная оценка: давление, пульс, сатурация, температура, осмотр сердца и дыхания, степень обезвоживания, выраженность тремора, наличие рвоты, боли в груди или животе, неврологический статус, поведение, признаки психоза. На основе этих данных формируется индивидуальный план детоксикации. Стартовая инфузионная терапия подбирается с учётом возраста, массы тела, длительности запоя, сопутствующих болезней, уже принятых препаратов. В стационаре пациента размещают в безопасных условиях, контролируют динамику, корректируют дозировки, не оставляют «на самотёк». При выводе из запоя на дому врач остаётся до стабилизации, отслеживает реакцию и при первых тревожных признаках рекомендует стационар, а не уезжает «лишь бы поставил капельницу». Такой пошаговый подход позволяет не только снять острые симптомы, но и уменьшить риск осложнений — от аритмий и судорог до алкогольного делирия.
Ознакомиться с деталями – https://vyvod-iz-zapoya-reutov10.ru/vyvod-iz-zapoya-ryadom-v-reutove
Важное отличие наркологической клиники «Трезвый Путь Коломна» — полный отказ от схемы «одна капельница = решение всех проблем». Детокс здесь рассматривается как необходимый старт, но не как финальная точка. Сначала специалисты снимают острые состояния: вывод из запоя, купирование абстиненции, коррекцию водно-электролитного баланса, поддержку сердца, печени и нервной системы, нормализацию сна, снижение тревоги. Когда организм перестаёт «гореть», начинается следующий этап — стабилизация: врач оценивает психическое состояние, выявляет депрессивные, тревожные, панические проявления, подбирает поддерживающие схемы, которые помогают удержаться в первые недели после кризиса. Далее подключаются психотерапевтические инструменты: индивидуальные консультации, работа с мотивацией, разбор триггеров, формирование новых привычек. В финале выстраивается маршрут поддержки: амбулаторное наблюдение, связь с клиникой, рекомендации для семьи. Такой поэтапный подход делает клинику в Коломне местом, где зависимость перестают воспринимать как «стыд» и начинают воспринимать как задачу, с которой можно работать профессионально.
Подробнее – https://narkologicheskaya-klinika-kolomna2-10.ru/luchshie-narkologicheskie-kliniki-v-kolomne
Каждый из этапов сопровождается контролем врача и постепенным снижением медикаментозной нагрузки. Важно не просто снять симптомы, но и научить пациента распознавать внутренние триггеры, чтобы предотвратить рецидив. На протяжении всего лечения сохраняется поддержка психолога, который помогает адаптироваться и перестроить привычные модели поведения.
Подробнее можно узнать тут – https://narcologicheskaya-klinika-v-voronezhe17.ru
Карта делает видимой причинно-следственную связь: пациент понимает, зачем и что именно делается; семья видит «точки проверки»; врач получает опору для изменения одного параметра без разрушения всего плана.
Подробнее тут – https://vyvod-iz-zapoya-saratov0.ru/vyvod-iz-zapoya-saratov-anonimno
Вывод из запоя — это медицинская процедура, направленная на очищение организма от продуктов распада алкоголя и восстановление нормальной работы внутренних органов. В клинике «Трезвый Путь Волгоград» пациентам оказывается профессиональная помощь с использованием современных методов дезинтоксикации, медикаментозной поддержки и психологического сопровождения. Лечение проводится круглосуточно, включая выезд нарколога на дом. Такой формат помогает быстро стабилизировать состояние пациента, минимизировать риск осложнений и обеспечить безопасность при выходе из запоя любой продолжительности.
Получить дополнительные сведения – http://vivod-iz-zapoya-v-volgograde17.ru
В Тольятти клиника «ВолгаМед Тольятти» предоставляет широкий спектр услуг — от экстренного вывода из запоя на дому до длительных реабилитационных программ. Выезд нарколога осуществляется круглосуточно: врач приезжает по вызову, проводит диагностику, оценивает степень интоксикации и назначает индивидуальный план лечения. Это особенно важно в тех случаях, когда пациент не может самостоятельно добраться до клиники. В арсенале специалистов — профессиональное оборудование, капельницы для детоксикации и препараты для стабилизации психоэмоционального состояния.
Подробнее можно узнать тут – [url=https://narkologicheskaya-pomoshh-v-tolyatti17.ru/]срочная наркологическая помощь[/url]
Критичные случаи, когда вызов нарколога через «МедТрезвие Долгопрудный» оправдан и своевременен:
Получить дополнительные сведения – http://narkolog-na-dom-dolgoprudnij10.ru
Профессиональный нарколог на дому не работает по схеме «чем больше препаратов, тем лучше». В «СерпуховТрезвие» капельницы составляются исходя из задач конкретного организма. Базовый блок — это растворы для восполнения объёма циркулирующей жидкости, выравнивания электролитного баланса и коррекции кислотно-щелочного состояния, что уменьшает нагрузку на сердце, мозг и снижает риск тяжёлых осложнений. Витамины группы B и магний входят в стандартную поддержку: они помогают стабилизировать нервную систему, уменьшить тремор, раздражительность, поддерживают сон и снижают риск судорог. При признаках поражения печени используются гепатопротективные и антиоксидантные компоненты, снижающие токсическое воздействие продуктов распада алкоголя. Если пациента мучает тошнота, добавляются противорвотные средства, чтобы восстановить возможность пить воду и питаться. Для снижения тревоги и нормализации сна применяются мягкие анксиолитики в дозировках, не маскирующих клиническую картину и не угнетающих дыхательный центр. Агрессивная седация, популярная в «серых» схемах, сознательно исключается: она «делает вид» улучшения, но может скрыть нарастающие осложнения. Эффект оценивается по конкретным критериям: стабилизация давления и пульса, уменьшение тремора, уход тошноты, улучшение цвета кожи, появление естественного сна и большей ясности мышления. После достижения этих ориентиров фармаконагрузка не наращивается, а постепенно снижается, чтобы человек выходил в устойчивое состояние, а не зависел от бесконечных капельниц.
Ознакомиться с деталями – [url=https://narkolog-na-dom-serpuhov10.ru/]narkolog-na-dom-anonimno-serpuhov[/url]
В данной обзорной статье представлены интригующие факты, которые не оставят вас равнодушными. Мы критикуем и анализируем события, которые изменили наше восприятие мира. Узнайте, что стоит за новыми открытиями и как они могут изменить ваше восприятие реальности.
Желаете узнать подробности? – https://donegalmammy.com/donegal-mammy-creativity-is-our-superpower
Эта статья сочетает в себе как полезные, так и интересные сведения, которые обогатят ваше понимание насущных тем. Мы предлагаем практические советы и рекомендации, которые легко внедрить в повседневную жизнь. Узнайте, как улучшить свои навыки и обогатить свой опыт с помощью простых, но эффективных решений.
Уточнить детали – https://pjcmediamagnet.com/the-dos-and-donts-of-seo-common-mistakes-to-avoid
Вывод из запоя требуется тогда, когда организм уже не способен самостоятельно справиться с последствиями алкогольной интоксикации. Длительное употребление спиртного приводит к нарушению работы внутренних органов, обезвоживанию и психическим расстройствам. Медицинская помощь помогает избежать опасных осложнений и облегчить процесс отказа от алкоголя.
Углубиться в тему – [url=https://vyvod-iz-zapoya-v-ryazani17.ru/]вывод из запоя круглосуточно рязань[/url]
Важное отличие клиники — отказ от примитивной схемы «капельница — домой — дальше сам». Такой формат даёт кратковременное облегчение, но не решает ни причин, ни структуры зависимости. «КоломнаМед Центр» выстраивает ступенчатый подход. Первый шаг — безопасная детоксикация: снятие абстиненции, коррекция водно-электролитного баланса, поддержка сердечно-сосудистой системы, печени, нервной системы, нормализация сна. Второй шаг — стабилизация: оценка психического состояния, выявление тревожных, депрессивных и панических симптомов, подбор поддерживающих схем, которые помогают не сорваться сразу после выхода из острых проявлений. Третий шаг — реабилитация и мотивация: психотерапевтическая работа, групповые и индивидуальные форматы, обучение навыкам трезвой жизни, работа с триггерами, укрепление внутренней мотивации. Четвёртый шаг — постреабилитационная поддержка: контрольные приёмы, дистанционные консультации, помощь в профилактике срывов. Такой комплексный путь не ломает пациента, а возвращает ему контроль: не через страх, а через понимание, структуру и реальные инструменты.
Получить дополнительные сведения – [url=https://narkologicheskaya-klinika-kolomna10.ru/]narkologicheskaya-klinika-otzyvy[/url]
В клинике применяются современные медицинские технологии, которые обеспечивают стойкий результат. Используемые методики соответствуют международным стандартам и регулярно обновляются.
Ознакомиться с деталями – https://narcologicheskaya-klinika-omsk0.ru/chastnaya-narkologicheskaya-klinika-omsk
Этот обзор предлагает свежий взгляд на предметы, которые и без того привычны. Мы упоминаем факты, не имеющие большого значения, и события с неясной важностью, но они присутствуют здесь.
Подробнее читать – [url=https://rostov-narkologiya.ru/]кето диета за неделю минус 10 кг[/url]
Главная задача процедуры — быстрое выведение этанола и его метаболитов из организма, нормализация уровня электролитов, улучшение самочувствия и предотвращение осложнений. Лечение проводится как в клинике, так и на дому, что особенно удобно при тяжёлых состояниях, когда пациент не может самостоятельно добраться до медицинского учреждения.
Получить дополнительные сведения – [url=https://vyvod-iz-zapoya-v-tyumeni17.ru/]вывод из запоя дешево[/url]
Первым шагом при лечении зависимости является детоксикация — очищение организма от токсинов, накопившихся в результате употребления алкоголя или наркотиков. Врач подбирает состав инфузионных растворов и лекарственных препаратов индивидуально. Процедура направлена на восстановление обмена веществ, улучшение работы печени и сердца, нормализацию сна и аппетита. После завершения детоксикации пациент чувствует облегчение, снижается тревожность и повышается концентрация внимания.
Получить больше информации – http://narkologicheskaya-klinika-v-volgograde17.ru/
В клинике применяются современные медицинские технологии, которые обеспечивают стойкий результат. Используемые методики соответствуют международным стандартам и регулярно обновляются.
Детальнее – http://narcologicheskaya-klinika-omsk0.ru
Комплексная терапия включает несколько последовательных этапов, обеспечивающих полное восстановление организма и личности пациента. Каждый из них направлен на решение конкретных задач — от устранения интоксикации до закрепления устойчивой ремиссии.
Исследовать вопрос подробнее – https://narkologicheskaya-klinika-v-volgograde17.ru/chastnaya-narkologicheskaya-klinika-volgograd/
Острый эпизод запоя — это не «плохое самочувствие», а состояние с реальными рисками для сердца, нервной системы и дыхания, особенно в ночные часы, когда усиливаются вегетативные реакции и тревога. В «НоваТрезвие» мы выстраиваем помощь так, чтобы от звонка до заметного облегчения прошло как можно меньше времени и как можно меньше случайностей: короткое интервью для оценки рисков, выезд врача или приём в клинике, экспресс-диагностика по ключевым показателям, персональная инфузионная схема без «универсальных коктейлей», мягкая коррекция сна и тревоги без «вырубания», понятные инструкции семье на 24–72 часа и план продолжения на ближайшие недели. Мы не скрываемся за общими формулами: решения принимаются по фактическим данным, дозы и темп капельниц подстраиваются к динамике каждые 15–20 минут, а при «красных флагах» перевод в стационар организуется без пауз. Конфиденциальность соблюдается строго, а коммуникация простая и предсказуемая — чтобы вы всегда знали, что происходит сейчас и чего ждать к утру.
Исследовать вопрос подробнее – http://vyvod-iz-zapoya-ehlektrostal2-10.ru/vyvod-iz-zapoya-na-domu-v-ehlektrostali/
При появлении таких симптомов важно не откладывать вызов врача. Самолечение, особенно с использованием неизвестных препаратов, может привести к тяжёлым последствиям, включая судороги и инсульт. Врачи клиники «ВолгаМед Резолюция» приезжают на дом с необходимыми средствами для оказания экстренной помощи и стабилизации состояния уже на месте.
Подробнее тут – [url=https://vyvod-iz-zapoya-v-volgograde17.ru/]вывод из запоя круглосуточно в волгограде[/url]
Все процедуры выполняются анонимно и с соблюдением медицинских стандартов. Препараты применяются только сертифицированные, рассчитанные на мягкое восстановление организма без побочных эффектов. При необходимости лечение продолжается в стационаре, где пациент получает круглосуточное наблюдение, питание и психологическую поддержку.
Исследовать вопрос подробнее – [url=https://vyvod-iz-zapoya-v-novokuzneczke17.ru/]анонимный вывод из запоя в новокузнецке[/url]
Особенность подхода заключается в сочетании медицинской и психологической поддержки. После кодирования пациент получает консультации психотерапевта, рекомендации по восстановлению и профилактике рецидивов. Это снижает риск повторного срыва и помогает закрепить результат на долгий срок.
Исследовать вопрос подробнее – http://kodirovanie-ot-alkogolizma-v-volgograde17.ru
Своевременное обращение в клинику снижает риск развития алкогольного психоза, судорог и тяжёлых осложнений со стороны сердца и печени.
Ознакомиться с деталями – [url=https://vyvod-iz-zapoya-v-ryazani17.ru/]вывод из запоя вызов на дом в рязани[/url]
Для удобства восприятия можно ориентироваться на следующую структуру (это не публичная оферта, а примерная модель ценообразования — точная сумма фиксируется после осмотра и согласования схемы):
Выяснить больше – [url=https://narkolog-na-dom-serpuhov10.ru/]вызвать нарколога на дом[/url]
Пациент может выбрать анонимный формат — все данные защищены, а пребывание в клинике проходит в атмосфере уважения и деликатности. Особое внимание уделяется созданию комфортных условий: палаты оснащены системой вентиляции, регулируемым освещением и кнопкой вызова медперсонала. Круглосуточный контроль состояния позволяет своевременно реагировать на малейшие изменения и корректировать курс лечения.
Получить больше информации – http://narcologicheskaya-klinika-v-voronezhe17.ru
Вывод из запоя на дому возможен только при относительно контролируемом состоянии и после очной оценки нарколога. В таких случаях специалист выезжает в Раменском, проводит осмотр, назначает индивидуальную капельницу, остаётся до стабилизации состояния и оставляет подробные рекомендации. Важный момент — честность: если во время осмотра врач видит риски (нестабильное давление, признаки начинающегося делирия, серьёзные боли, глубокую дезориентацию), формат на дому не навязывается, а предлагается стационар. Именно это отличает клинику от анонимных «служб капельниц», для которых любая заявка — повод заработать, независимо от последствий.
Получить больше информации – [url=https://vyvod-iz-zapoya-ramenskoe10.ru/]vyvod-iz-zapoya-ryadom[/url]
Эта публикация содержит набор несвязанных идей, трудно применимых в практике. Мы лишь поверхностно затрагиваем различные точки зрения, не проводя глубокий анализ и не предлагая выводов.
Подробнее читать – [url=https://rostov-narkologiya.ru/uslugi-ot-narkomanii/mefedronovaya-zavisimost/]сиалис онлайн[/url]
Не всегда человек способен самостоятельно прекратить приём алкоголя и восстановиться. Есть состояния, требующие немедленного вмешательства специалистов. Обратиться за помощью необходимо, если наблюдаются следующие признаки:
Получить дополнительную информацию – [url=https://vyvod-iz-zapoya-v-volgograde17.ru/]врач вывод из запоя[/url]
Наркологическая помощь в «ВолгаМед Тольятти» включает широкий спектр процедур и методик. Каждый случай рассматривается индивидуально, с учётом состояния пациента, стадии заболевания и сопутствующих факторов. Ниже представлена таблица с основными направлениями медицинской работы.
Ознакомиться с деталями – [url=https://narkologicheskaya-pomoshh-v-tolyatti17.ru/]частная наркологическая помощь тольятти[/url]
Особенность подхода заключается в сочетании медицинской и психологической поддержки. После кодирования пациент получает консультации психотерапевта, рекомендации по восстановлению и профилактике рецидивов. Это снижает риск повторного срыва и помогает закрепить результат на долгий срок.
Детальнее – [url=https://kodirovanie-ot-alkogolizma-v-volgograde17.ru/]кодирование от алкоголизма цена в волгограде[/url]
Процесс лечения включает несколько последовательных шагов, направленных на стабилизацию состояния, детоксикацию и восстановление функций организма. Таблица ниже показывает основные этапы процедуры, применяемые врачами клиники «РеабКузбасс».
Углубиться в тему – [url=https://vyvod-iz-zapoya-v-novokuzneczke17.ru/]вывод из запоя на дому круглосуточно новокузнецк[/url]
Вывод из запоя в Раменском в условиях клиники строится не вокруг одной капельницы, а вокруг понятной цепочки шагов, где каждый этап логичен и медицински обоснован. Это помогает не только быстро облегчить состояние, но и уменьшить вероятность того, что через пару дней человек снова уйдёт в запой.
Углубиться в тему – [url=https://vyvod-iz-zapoya-ramenskoe10.ru/]ramenskoe-vyvod-iz-zapoya[/url]
Индивидуально подобранный состав раствора обеспечивает быстрое выведение токсинов и улучшение физического состояния уже в течение первых часов после начала лечения.
Выяснить больше – http://kapelnicza-ot-zapoya-v-volgograde17.ru/kapelnicza-ot-zapoya-stoimost-volgograd/
Материал включает занимательные, но незначимые детали, которые трудно назвать важными, но они дополняют общую картину.
Дополнительная информация – [url=https://stop-zavisimost.ru/]займ без процентов[/url]
Решение, куда обращаться при запое, напрямую влияет на безопасность. Одно дело — случайный выездной «специалист» без адреса и гарантий, другое — официальная наркологическая клиника в Реутове, несущая ответственность за свои действия. «РеутовМед Сервис» выстраивает помощь так, чтобы каждый шаг был прозрачным и медицински обоснованным, а не строился на обещаниях «вылечим за час». Уже на этапе первого звонка специалисты уточняют длительность запоя, виды и объёмы алкоголя, возраст пациента, хронические заболевания, перенесённые ранее судороги, делирий, проблемы с сердцем и давлением, какие лекарства уже давались. Эта информация позволяет не «ставить капельницу вслепую», а выбрать безопасный формат: стационар, выезд на дом или комбинированный подход. В клинике используют только сертифицированные препараты, одноразовые системы, следуют протоколам, учитывающим реальные риски, а не запрос «сделайте, чтобы уснул и не мешал». Важен и человеческий аспект: здесь не унижают, не морализируют, не угрожают учётом. Пациент воспринимается как человек с заболеванием, а не как «виноватый», а это повышает готовность к сотрудничеству и к последующим шагам в сторону трезвости.
Подробнее тут – [url=https://vyvod-iz-zapoya-reutov10.ru/]частный вывод из запоя[/url]
В Тольятти клиника «ВолгаМед Тольятти» предоставляет широкий спектр услуг — от экстренного вывода из запоя на дому до длительных реабилитационных программ. Выезд нарколога осуществляется круглосуточно: врач приезжает по вызову, проводит диагностику, оценивает степень интоксикации и назначает индивидуальный план лечения. Это особенно важно в тех случаях, когда пациент не может самостоятельно добраться до клиники. В арсенале специалистов — профессиональное оборудование, капельницы для детоксикации и препараты для стабилизации психоэмоционального состояния.
Исследовать вопрос подробнее – [url=https://narkologicheskaya-pomoshh-v-tolyatti17.ru/]скорая наркологическая помощь на дому[/url]
Чтобы родственники не терялись в терминах и не воспринимали лечение как «чёрный ящик», в клинике используется поэтапный подход. Это помогает увидеть логическую связку между затратами, процедурами и результатами.
Получить больше информации – [url=https://narkologicheskaya-klinika-ramenskoe10.ru/]dannye-narkologicheskoj-kliniki[/url]
Капельница при вызове нарколога на дом в Долгопрудном от «МедТрезвие Долгопрудный» — это клинический инструмент, а не магический раствор. Главное правило — никакой агрессивной седации ради видимости спокойствия. Инфузионная терапия строится вокруг нескольких задач: восполнить жидкость, выровнять электролиты, снизить токсическую нагрузку на печень и мозг, поддержать сердце и нервную систему, уменьшить тремор, тревогу и соматические жалобы. Используются растворы для регидратации и коррекции водно-электролитного баланса, витамины группы B и магний для поддержки нервной системы, уменьшения риска судорог и нормализации сна, по показаниям — гепатопротекторы и мягкие антиоксиданты, противорвотные препараты для контроля тошноты. При выраженной тревоге или нарушениях сна назначаются щадящие анксиолитические средства в дозах, которые не выключают пациента полностью, а помогают снять паническое напряжение, сохраняя возможность оценивать динамику состояния. Врач отслеживает реакцию на терапию: стабилизацию давления и пульса, уменьшение дрожи, улучшение общего самочувствия, появление более спокойного, естественного сна. По мере облегчения нагрузки схема не усиливается ради счёта, а рационально сокращается. Такой подход защищает пациента от скрытых осложнений и превращает капельницу в контролируемый, полезный шаг, а не в рискованный эксперимент.
Изучить вопрос глубже – http://narkolog-na-dom-dolgoprudnij10.ru/vyzvat-narkologa-na-dom-v-dolgoprudnom/
Прежде чем перейти к ориентировочным цифрам, важно подчеркнуть: цена формируется из реальных компонентов помощи — работы врача и медсестры, объёма инфузионной терапии, перечня препаратов, времени выезда и необходимости более длительного наблюдения. Никаких скрытых доплат: все дополнительные назначения согласуются заранее. Чем раньше вы обращаетесь, тем меньше объём вмешательств и, как правило, ниже итоговая стоимость — короткий эпизод проще и дешевле стабилизировать, чем «выводить» осложнения после затянутого запоя.
Узнать больше – [url=https://narkolog-na-dom-shchelkovo10.ru/]нарколог в щелково[/url]
Эти методы комбинируются и создают условия для всестороннего восстановления пациента.
Разобраться лучше – [url=https://narcologicheskaya-klinika-omsk0.ru/]анонимная наркологическая клиника[/url]
Клиника в Волгограде руководствуется принципами индивидуального подхода, конфиденциальности и научно обоснованных методик. Врач-нарколог оценивает общее состояние пациента, определяет стадию зависимости и подбирает оптимальную терапевтическую схему. Лечение включает детоксикацию, медикаментозную поддержку, психотерапию и реабилитацию. Каждый пациент проходит лечение в безопасных условиях с постоянным медицинским наблюдением.
Детальнее – [url=https://narkologicheskaya-klinika-v-volgograde17.ru/]наркологическая клиника клиника помощь волгоград[/url]
Медики рекомендуют обратиться за профессиональной помощью при следующих состояниях:
Исследовать вопрос подробнее – [url=https://vyvod-iz-zapoya-v-ryazani17.ru/]нарколог вывод из запоя в рязани[/url]
Ниже — примерная структура пакетов, которую можно использовать как ориентир (не публичная оферта):
Углубиться в тему – [url=https://narkolog-na-dom-shchelkovo10.ru/]narkolog-shchyolkovo[/url]
Выездная наркологическая помощь организована по чётко выстроенной схеме. Каждый этап направлен на стабилизацию состояния и безопасное восстановление функций организма после алкогольного или наркотического воздействия.
Углубиться в тему – https://narkolog-na-dom-v-ufe17.ru/narkolog-ufa-anonimno
Маршрут организован так, чтобы убрать хаос и сделать шаги понятными для родственников. После звонка оператор под контролем врача уточняет длительность употребления, примерные объёмы алкоголя, хронические болезни (гипертония, ИБС, диабет, заболевания печени, почек, нервной системы), список уже принятых лекарств, эпизоды потери сознания, судорог, подозрительные психические симптомы. На этом этапе принимается базовое решение: возможно ли безопасно провести детокс на дому либо показан стационар. Врач приезжает по адресу в Щёлково, проводит осмотр: фиксирует АД, ЧСС, сатурацию, температуру, оценивает тремор, координацию, речь, поведение, уровень сознания, степень обезвоживания. Затем подбирается индивидуальная инфузионная схема: растворы для регидратации, коррекции электролитов и кислотно-щелочного баланса, витамины группы B и магний для поддержки нервной системы и снижения тремора; по показаниям — гепатопротекторы, мягкие антиоксиданты, противорвотные, щадящие анксиолитики для сна, но без грубого «выключения». Во время процедуры врач наблюдает за динамикой, при необходимости меняет скорость капельницы, контролирует давление и пульс, следит за реакцией на препараты. В финале даёт подробные рекомендации: как вести себя ближайшие 24–72 часа, как спать, что пить и есть, каких лекарств избегать, какие симптомы считать тревожными, когда нужно немедленно звонить и когда стоит рассмотреть стационар. Если уже на этапе осмотра понятно, что дому «тесно» по безопасности, перевод в клинику организуется без задержек.
Углубиться в тему – [url=https://narkolog-na-dom-shchelkovo10.ru/]vyzvat-narkologa-na-dom[/url]
Капельницы от запоя включают препараты для очищения крови, восстановления электролитного баланса и защиты печени. Используются только сертифицированные растворы, одобренные Минздравом РФ. В клинике применяется комплексный подход: одновременно с физическим восстановлением запускаются лёгкие дыхательные и релаксационные методики, которые помогают организму вернуться в стабильное состояние.
Исследовать вопрос подробнее – [url=https://vyvod-iz-zapoya-v-voronezhe17.ru/]вывод из запоя на дому цена[/url]
Вывод из запоя требуется тогда, когда организм уже не способен самостоятельно справиться с последствиями алкогольной интоксикации. Длительное употребление спиртного приводит к нарушению работы внутренних органов, обезвоживанию и психическим расстройствам. Медицинская помощь помогает избежать опасных осложнений и облегчить процесс отказа от алкоголя.
Изучить вопрос глубже – https://vyvod-iz-zapoya-v-ryazani17.ru/vykhod-iz-zapoya-ryazan
Конфиденциальность — это набор конкретных действий, а не декларация на сайте. Мы проектируем «невидимость» так, чтобы пациент мог спокойно принять помощь и не опасаться огласки.
Узнать больше – [url=https://narkologicheskaya-klinika-v-krasnoyarske17.ru/]наркологическая клиника цены красноярск[/url]
Капельницы от запоя включают препараты для очищения крови, восстановления электролитного баланса и защиты печени. Используются только сертифицированные растворы, одобренные Минздравом РФ. В клинике применяется комплексный подход: одновременно с физическим восстановлением запускаются лёгкие дыхательные и релаксационные методики, которые помогают организму вернуться в стабильное состояние.
Получить дополнительную информацию – https://vyvod-iz-zapoya-v-voronezhe17.ru/vyvod-iz-zapoya-na-domu-voronezh
Вывод из запоя — это не просто медицинская процедура, а тщательно выстроенный процесс, направленный на восстановление работы всех систем организма. При неправильном или неполном лечении риск осложнений возрастает в несколько раз. Поэтому обращение в профессиональную клинику становится необходимым шагом. В наркологической клинике «Центр Трезвости ВоронМед» пациент получает экстренную помощь, безопасные инфузионные препараты, круглосуточный выезд нарколога и последующее восстановление под наблюдением специалистов. Здесь каждая капельница подбирается индивидуально — с учётом возраста, веса, длительности запоя, хронических болезней и реакции организма на препараты.
Углубиться в тему – [url=https://vyvod-iz-zapoya-v-voronezhe17.ru/]вывод из запоя на дому[/url]
Если на предзвонке выявляются «красные флаги» — давящая боль в груди, одышка в покое, спутанность сознания, судороги, неукротимая рвота, резкое падение насыщения кислородом — мы организуем бесшовный перевод в стационар. Место резервируем заранее, логистику строим так, чтобы не привлекать внимания соседей и не затягивать старт лечения. При отсутствии угроз терапия может начаться дома с последующим телесопровождением и при необходимости — краткой госпитализацией.
Исследовать вопрос подробнее – [url=https://narcologicheskaya-klinika-saratov0.ru/]лечение в наркологической клинике саратов[/url]
В таблице приведены основные компоненты инфузионной терапии, применяемые при детоксикации:
Получить дополнительные сведения – [url=https://narkologicheskaya-clinica-v-novokuzneczke17.ru/]платная наркологическая клиника[/url]
Важное отличие клиники — отказ от примитивной схемы «капельница — домой — дальше сам». Такой формат даёт кратковременное облегчение, но не решает ни причин, ни структуры зависимости. «КоломнаМед Центр» выстраивает ступенчатый подход. Первый шаг — безопасная детоксикация: снятие абстиненции, коррекция водно-электролитного баланса, поддержка сердечно-сосудистой системы, печени, нервной системы, нормализация сна. Второй шаг — стабилизация: оценка психического состояния, выявление тревожных, депрессивных и панических симптомов, подбор поддерживающих схем, которые помогают не сорваться сразу после выхода из острых проявлений. Третий шаг — реабилитация и мотивация: психотерапевтическая работа, групповые и индивидуальные форматы, обучение навыкам трезвой жизни, работа с триггерами, укрепление внутренней мотивации. Четвёртый шаг — постреабилитационная поддержка: контрольные приёмы, дистанционные консультации, помощь в профилактике срывов. Такой комплексный путь не ломает пациента, а возвращает ему контроль: не через страх, а через понимание, структуру и реальные инструменты.
Узнать больше – https://narkologicheskaya-klinika-kolomna10.ru/
Комплексный подход позволяет врачу не просто купировать острые симптомы, но и предупредить осложнения со стороны сердца, печени и нервной системы. После стабилизации состояния пациент получает рекомендации по дальнейшему лечению и восстановлению.
Получить больше информации – https://vyvod-iz-zapoia-v-volgograde17.ru/anonimnaya-narkologiya-vyvod-iz-zapoya-volgograd
Ниже — примерная структура пакетов, которую можно использовать как ориентир (не публичная оферта):
Подробнее можно узнать тут – [url=https://narkolog-na-dom-shchelkovo10.ru/]narkologa-na-dom-shchelkovo[/url]
Стационар наркологической клиники в Раменском ориентирован на тех пациентов, для которых домашние попытки лечения объективно опасны. Это длительные запои, пожилой возраст, выраженные сердечно-сосудистые патологии, заболевания печени и почек, риск делирия, судорог, тяжёлая абстиненция, полинаркомания. В стационаре «Трезвый Шаг Раменское» организовано круглосуточное наблюдение: контролируются давление, пульс, сатурация, поведение, динамика симптомов, проводится своевременная коррекция терапии. Пациент находится в спокойной, защищённой обстановке, где ему не нужно скрывать своё состояние или оправдываться — задача команды не судить, а стабилизировать и лечить. Комфортные палаты, медицинский персонал рядом, продуманное питание, конфиденциальность — всё это снижает уровень страха у пациента и напряжение у родственников. Важный момент: стационар не подаётся как «камерный режим», а как безопасная зона восстановления, где можно пройти самый тяжёлый участок пути с максимальной защитой.
Разобраться лучше – https://narkologicheskaya-klinika-ramenskoe10.ru/narkologicheskaya-klinika-otzyvy-v-ramenskom/
Работа выездной службы построена так, чтобы для семьи всё было максимально понятно и предсказуемо. После звонка специалист не ограничивается общими фразами, а уточняет детали: сколько длится употребление, есть ли хронические болезни сердца, печени, почек, эндокринные нарушения, какие препараты и в каких дозах пациент уже получил, были ли в прошлом судороги, галлюцинации, тяжёлые реакции на лекарства. Это позволяет заранее оценить уровень риска и понять, подходит ли формат дома. По прибытии в Серпухове врач осматривает пациента, проверяет контакт и ориентировку, измеряет артериальное давление несколько раз, оценивает пульс, сатурацию, температуру, выраженность тремора, наличие болей, характер дыхания, степень обезвоживания. Далее формируется индивидуальная инфузионная схема: растворы для регидратации и коррекции электролитов, витамины группы B и магний для поддержки нервной системы, при необходимости — гепатопротекторы и мягкие антиоксидантные комплексы, противорвотные для контроля тошноты, щадящие анксиолитики для нормализации сна без грубой седации. Во время процедуры врач контролирует динамику, меняет скорость капельницы при необходимости, отслеживает реакцию на препараты и объясняет родным, какие изменения будут происходить по часам. По завершении визита пациент и родственники получают подробный план: режим, питьё, питание, чего нельзя, какие симптомы считаются тревожными, когда нужна повторная консультация или стационар. При выявлении опасных признаков вопрос о госпитализации поднимается честно и сразу, а не откладывается «до утра».
Ознакомиться с деталями – [url=https://narkolog-na-dom-serpuhov10.ru/]анонимный врач нарколог на дом[/url]
Ниже приведена таблица с типовыми компонентами капельницы и их действием:
Детальнее – https://vyvod-iz-zapoya-v-tolyatti17.ru/vyvedenie-iz-zapoya-tolyatti
Выезд нарколога на дом в Щёлково — это быстрый и конфиденциальный способ помочь человеку в состоянии запоя или тяжёлого похмелья, не перевозя его в клинику и не устраивая публичных сцен. Врачи «ЩёлковоМед Профи» приезжают с готовым набором препаратов, одноразовыми системами и чётким протоколом: осмотр, оценка жизненно важных показателей, подбор индивидуальной капельницы, контроль реакции, рекомендации для родных. Такой формат особенно удобен, когда пациент отказывается ехать в стационар, тяжело переносит дорогу, остро реагирует на смену обстановки или для семьи важна максимальная анонимность. Главный принцип — не «вырубить» человека любой ценой, а безопасно стабилизировать состояние, снизить интоксикацию, выровнять давление и пульс, помочь собрать сон и дать понятный план, что делать дальше.
Углубиться в тему – [url=https://narkolog-na-dom-shchelkovo10.ru/]запой нарколог на дом цена[/url]
В таблице приведены основные компоненты инфузионной терапии, применяемые при детоксикации:
Углубиться в тему – [url=https://narkologicheskaya-clinica-v-novokuzneczke17.ru/]наркологическая клиника[/url]
Лечение организовано поэтапно. Такой подход обеспечивает постепенное восстановление функций организма и исключает риск осложнений. Каждый этап терапии направлен на устранение конкретных нарушений, вызванных интоксикацией.
Углубиться в тему – [url=https://vyvod-iz-zapoya-v-krasnoyarske17.ru/]срочный вывод из запоя красноярск[/url]
Когда вопрос стоит остро — нужно быстро и безопасно вывести человека из запоя в Коломне, — у семьи нет лишнего времени на эксперименты с таблетками, сомнительными «коктейлями» и советами из интернета. «Трезвый Центр Коломна» выстраивает помощь так, чтобы от первого звонка до реального облегчения шёл понятный и управляемый маршрут: запись симптомов и рисков уже по телефону, предложение формата (выезд на дом или стационар), оперативный осмотр, персональная инфузионная терапия, круглосуточное наблюдение при необходимости и подробный план восстановления на 24–72 часа и дальше. Мы не продаём миф о «чудо-капельнице за час», а работаем клинически аккуратно: дозы и схемы подбираются под возраст, длительность запоя, сопутствующие заболевания, уже принятые лекарства и текущие показатели. Цель проста и честна — снять интоксикацию, защитить сердце, мозг и печень, вернуть сон и ясность без агрессивной седации и скрытых рисков, сохранить конфиденциальность и дать семье уверенность, что всё делается правильно.
Получить больше информации – [url=https://vyvod-iz-zapoya-kolomna10.ru/]vyvod-iz-zapoya-nedorogo[/url]
Для удобства восприятия можно ориентироваться на следующую структуру (это не публичная оферта, а примерная модель ценообразования — точная сумма фиксируется после осмотра и согласования схемы):
Получить больше информации – [url=https://narkolog-na-dom-serpuhov10.ru/]narkolog-na-dom[/url]
Этот обзор позволяет по-новому взглянуть на вещи, на которые обычно и так смотрят. Мы упоминаем факты, которые мало что меняют, и события, значение которых трудно определить, но они всё равно здесь.
Вот – [url=https://arma-rehab.ru/]секс[/url]
Примерный состав раствора, применяемого наркологом на дому в Уфе, приведён в таблице:
Подробнее тут – http://narkolog-na-dom-v-ufe17.ru
Комплексное проведение этих этапов обеспечивает полное восстановление организма и облегчает процесс последующего лечения зависимости.
Подробнее можно узнать тут – [url=https://vyvod-iz-zapoya-v-ryazani17.ru/]вывод из запоя клиника в рязани[/url]
Вывод из запоя в Красноярске — это медицинская процедура, направленная на устранение алкогольной интоксикации и восстановление нормальной работы организма после длительного употребления спиртных напитков. Услуга предоставляется круглосуточно и включает дезинтоксикационную терапию, стабилизацию психоэмоционального состояния и профилактику осложнений. Все процедуры выполняются опытными наркологами с применением сертифицированных препаратов и в строгом соответствии с медицинскими стандартами.
Выяснить больше – http://vyvod-iz-zapoya-v-krasnoyarske17.ru/vyvod-iz-zapoya-na-domu-krasnoyarsk/https://vyvod-iz-zapoya-v-krasnoyarske17.ru
Этот текст содержит различную информацию, которая, возможно, покажется любопытной, но в целом не меняет восприятия привычных вещей. Предлагаем просто получить удовольствие от чтения, не ожидая особой пользы.
Вот – [url=https://arma-rehab.ru/vyvod-iz-zapoya/]игровые автоматы[/url]
Старт всегда начинается с точного, но бережного скрининга. Мы заранее обсуждаем бытовые условия и логистику — доступ к подъезду, лифту, возможность обеспечить тишину — чтобы не потерять темп на мелочах. На месте врач фиксирует витальные показатели (АД, пульс, сатурация, температура), при показаниях выполняет ЭКГ и запускает детокс: регидратацию, коррекцию электролитов, защиту печени и ЖКТ, при необходимости — щадящую противотревожную поддержку и кислород. Пациент и близкие получают письменную памятку «на сутки» с режимом сна и питья, «красными флажками» и точным временем контрольной связи. Если домашний формат перестаёт быть достаточным, перевод в стационар организуем без пауз — все назначения и наблюдения переезжают вместе с пациентом, ничего не теряется.
Получить больше информации – [url=https://narkologicheskaya-klinika-krasnogorsk0.ru/]narkologicheskaya-klinika-nedorogo[/url]
Мы строим лечение вокруг предсказуемости: минимум лишних вопросов, максимум конкретики и понятный план на ближайшие сутки. Дежурный врач уточняет только то, что влияет на безопасность — длительность эпизода, актуальные лекарства и переносимость, сон и апетит, наличие поддержки дома. Из этого скелета рождается маршрут: выезд на дом, приём без очередей или стационар с наблюдением 24/7. Конфиденциальность встроена по умолчанию: нейтральная коммуникация, доступ к карте только у вовлечённой команды, документы по запросу — в нейтральных формулировках. Внешний шум гасим, внимание переводим на цель: ровная стабилизация без «качелей» и с понятными контрольными точками.
Подробнее – http://narkologicheskaya-klinika-domodedovo0.ru
Цель
Подробнее тут – [url=https://narkologicheskaya-klinika-serpuhov0.ru/]наркологическая клиника[/url]
Цель
Получить дополнительные сведения – https://narkologicheskaya-klinika-krasnogorsk0.ru/narkologicheskaya-klinika-narkolog-v-krasnogorske
Мы много лет оттачивали алгоритм, чтобы острый этап был не марафоном, а простой последовательностью шагов. Сначала — короткий скрининг по телефону и согласование окна прибытия. На месте врач спокойно фиксирует АД/ЧСС/сатурацию/температуру, при показаниях делает ЭКГ и сразу запускает детокс: регидратацию, коррекцию электролитов, защиту печени и ЖКТ, мягкую противотревожную поддержку по переносимости. Параллельно выдаём «карту суток»: когда отдыхать, сколько пить воды малыми порциями, какая еда уместна в первые часы, по каким признакам звонить внепланово. Если по ходу становится видно, что дома «тесно» с медицинской точки зрения, организуем перевод под 24/7 — без пауз, с переносом всех назначений и наблюдений.
Подробнее можно узнать тут – https://narkologicheskaya-klinika-domodedovo0.ru/narkologicheskaya-klinika-ceny-v-domodedovo
Формат
Выяснить больше – https://narkologicheskaya-klinika-serpuhov0.ru/kruglosutochnaya-narkologicheskaya-klinika-v-serpuhove
Здесь собраны разрозненные сведения и неопределённые мысли, которые могут заинтересовать, даже если их важность сомнительна.
Дополнительная информация – [url=https://stop-zavisimost.ru/]деньги в долг[/url]
«Ритм Здоровья» в Красногорске — это понятный маршрут помощи от первого звонка до устойчивой ремиссии. Мы не растягиваем старт на бесконечные согласования: дежурный врач аккуратно собирает жалобы, длительность эпизода, сведения о лекарствах и сопутствующих диагнозах, после чего предлагает безопасную точку входа — выезд на дом, приём без очередей или госпитализацию под круглосуточное наблюдение. Вся коммуникация нейтральная, доступ к карте ограничен лечащей командой, а в документах по запросу используем формулировки, не раскрывающие профиль отделения. Такой «тихий» формат снимает лишнее напряжение, экономит время семьи и позволяет сосредоточиться на главном — мягкой стабилизации без «качелей».
Получить дополнительные сведения – [url=https://narkologicheskaya-klinika-krasnogorsk0.ru/]бесплатная наркологическая клиника[/url]
Капельница от запоя в Нижнем Новгороде — процедура, направленная на детоксикацию организма и восстановление нормального самочувствия. Она включает в себя введение препаратов, способствующих выведению токсинов и восстановлению функций органов.
Получить дополнительные сведения – [url=https://snyatie-zapoya-na-domu11.ru/]snyatie-zapoya-na-domu11.ru[/url]
Кроме безопасности и мониторинга — дисциплину режима. Там легче убрать триггеры, выстроить питание и сон, а психологу — подключить короткие мотивационные сессии, которые помогут удержать результат после выписки.
Исследовать вопрос подробнее – https://vyvod-iz-zapoya-krasnogorsk10.ru/vyvod-iz-zapoya-na-domu-v-krasnogorske
Что включено на практике
Получить дополнительные сведения – https://narkologicheskaya-klinika-odincovo0.ru
Что включено на практике
Подробнее можно узнать тут – http://narkologicheskaya-klinika-krasnogorsk0.ru/
Инфузионная терапия подбирается под человека, а не под «среднюю» ситуацию. Базовый каркас обычно включает растворы для регидратации и коррекции электролитов, витамины группы B и магний для поддержки нервной системы. По показаниям добавляются гепатопротекторы и антиоксидантные компоненты — это помогает печени и снижает оксидативный стресс. Если есть выраженная тошнота, подключаем противорвотные; при тревоге и нарушении сна — мягкие анксиолитики и седативные препараты, которые не «вырубают», а выравнивают ритмы и сохраняют контакт для мониторинга. Мы избегаем агрессивных «миксов», потому что избыточная седация может скрыть опасные симптомы и усложнить оценку состояния. Эффективность оцениваем не только по субъективному облегчению, но и по объективным метрикам: пульс, давление, сатурация, динамика тремора, аппетит, качество сна. Как только показатели стабилизируются, фарм-нагрузка снижается, а ведущую роль берет режим — питание, гидратация, спокойный вечерний ритуал, короткие бытовые активности.
Детальнее – https://vyvod-iz-zapoya-krasnogorsk10.ru/vyvod-iz-zapoya-klinika-v-krasnogorske
Что получите за 24 часа
Получить дополнительные сведения – [url=https://narkologicheskaya-klinika-domodedovo0.ru/]анонимная наркологическая помощь[/url]
В статье-обзоре представлены данные сомнительной актуальности и факты без явной взаимосвязи. Читатель ознакомится с разными мнениями, хотя они вряд ли существенно изменят его представление о теме.
Подробнее читать – [url=https://rostov-narkologiya.ru/]детокс чай для похудения[/url]
Формат
Исследовать вопрос подробнее – https://narkologicheskaya-klinika-odincovo0.ru/narkologicheskaya-klinika-stacionar-v-odincovo
Этот интересный отчет представляет собой сборник полезных фактов, касающихся актуальных тем. Мы проанализируем данные, чтобы вы могли сделать обоснованные выводы. Читайте, чтобы узнать больше о последних трендах и значимых событиях!
Исследовать вопрос подробнее – https://cafe327.co.uk/2024/02/13/hello-world
Прежде чем показывать варианты, зафиксируем логику: интенсивность наблюдения должна соответствовать рискам и переносимости терапии. Таблица ниже помогает быстро сопоставить ситуацию и формат; окончательное решение принимает врач после очного осмотра и оценки реакции на первые вмешательства.
Изучить вопрос глубже – http://narkologicheskaya-klinika-krasnogorsk0.ru
В Сочи клиника «Детокс» предоставляет услугу вывода из запоя в стационаре. Профессиональные врачи обеспечат комфортное и безопасное лечение. Минимальная стоимость услуги — 2000 ?.
Получить больше информации – [url=https://vyvod-iz-zapoya-sochi16.ru/]вывод из запоя цена[/url]
Выезд нарколога на дом в Нижнем Новгороде — капельница от запоя с выездом на дом. Мы обеспечиваем быстрое и качественное лечение без необходимости посещения клиники.
Получить больше информации – [url=https://snyatie-zapoya-na-domu11.ru/]срочный вывод из запоя нижний новгород[/url]
Этот интересный отчет представляет собой сборник полезных фактов, касающихся актуальных тем. Мы проанализируем данные, чтобы вы могли сделать обоснованные выводы. Читайте, чтобы узнать больше о последних трендах и значимых событиях!
Получить дополнительные сведения – https://beninherpeto.org/bonjour-tout-le-monde
Если вы ищете надежную клинику для вывода из запоя в Сочи, обратитесь в «Детокс». Здесь опытные специалисты окажут необходимую помощь в стационаре. Услуга доступна круглосуточно, анонимно и начинается от 2000 ?.
Детальнее – [url=https://vyvod-iz-zapoya-sochi23.ru/]нарколог вывод из запоя сочи[/url]
Сначала — короткое интервью по телефону: адрес в Одинцово, длительность запоя, препараты, хронические заболевания, аллергии. Это экономит 15–20 минут на месте и помогает заранее спланировать безопасные дозы. По прибытии — осмотр, запуск инфузий и параллельная симптоматическая терапия: противорвотные при тошноте, анксиолитики при тревоге, аккуратная седация к ночи, если есть бессонница. Мы не «усыпляем» пациента — поддерживаем контакт для информативного мониторинга. На протяжении процедуры фиксируем динамику, регулируем скорость капельниц, выстраиваем щадящую гидратацию и лёгкое питание. Если картина меняется, быстро перестраиваем план. На выходе — письменные рекомендации и маршрут продолжения (амбулаторные визиты, дневной стационар или полноценное отделение). Такой алгоритм убирает случайность результата: эффект держится не на удаче, а на чётких действиях команды и дисциплине первых суток.
Разобраться лучше – https://vyvod-iz-zapoya-odincovo10.ru/vyvesti-iz-zapoya-v-odincovo
Старт всегда один: короткий скрининг с дежурным врачом, где уточняются жалобы, длительность эпизода, текущие лекарства, аллергии и условия дома. Далее согласуется реальное окно прибытия или приёма — без обещаний «через пять минут», но с честным ориентиром и запасом на дорожную обстановку. На месте врач фиксирует витальные показатели (АД, пульс, сатурацию, температуру), по показаниям выполняет ЭКГ, запускает детокс (регидратация, коррекция электролитов, защита печени/ЖКТ), объясняет ожидаемую динамику первых 6–12 часов и выдаёт памятку «на сутки»: режим сна, питьевой план, «красные флажки», точное время контрольной связи. Если домашний формат становится недостаточным, перевод в стационар организуется без пауз — терапия продолжается с того же места, где начата, темп лечения не теряется.
Получить дополнительные сведения – https://narkologicheskaya-klinika-shchyolkovo0.ru/narkologicheskaya-klinika-stacionar-v-shchyolkovo/
Клиника «Детокс» в Краснодаре предлагает услугу вызова нарколога на дом. Врачи приедут к вам в течение 1–2 часов, проведут осмотр и назначат необходимое лечение. Услуга доступна круглосуточно и анонимно.
Выяснить больше – [url=https://narkolog-na-dom-krasnodar17.ru/]врач нарколог на дом краснодарский край[/url]
В Краснодаре клиника «Детокс» высылает нарколога на дом для срочной помощи при запое. Быстро и безопасно.
Ознакомиться с деталями – [url=https://narkolog-na-dom-krasnodar15.ru/]врач нарколог на дом сочи[/url]
Капельница от запоя на дому в Нижнем Новгороде — удобное решение для тех, кто не может посетить клинику. Наши специалисты приедут к вам домой и проведут необходимую процедуру.
Узнать больше – [url=https://snyatie-zapoya-na-domu11.ru/]вывод из запоя вызов[/url]
Первичный контакт — короткий, но точный скрининг: жалобы, длительность эпизода, список лекарств, аллергии, переносимость нагрузки, есть ли поддержка рядом. После этого согласуем реалистичное окно визита с учётом трафика, подъезда и «тихого» места для процедуры. На месте врач фиксирует витальные показатели (АД, ЧСС, сатурация, температура), при показаниях делает ЭКГ и запускает детокс: регидратацию, коррекцию электролитов, защиту печени и ЖКТ, по необходимости — щадящую противотревожную поддержку и кислород. Параллельно выдаём «карту суток»: режим отдыха и питья, щадящее питание, «красные флажки» и точное время контрольной связи. Если домашний формат становится недостаточным, переводим в стационар без пауз и обнулений — терапия продолжается в той же логике и темпе.
Подробнее тут – [url=https://narkologicheskaya-klinika-serpuhov0.ru/]анонимная наркологическая клиника[/url]
Цель
Исследовать вопрос подробнее – [url=https://narkologicheskaya-klinika-shchyolkovo0.ru/]анонимная наркологическая клиника[/url]
Чтобы легче сопоставить риски и плотность наблюдения, ниже даём живой ориентир. Это не заменяет осмотр, но помогает всей семье понимать логику врача до приезда.
Получить больше информации – https://narkologicheskaya-klinika-domodedovo0.ru/chastnaya-narkologicheskaya-klinika-v-domodedovo/
Ожидаемая траектория в первые сутки
Подробнее можно узнать тут – https://narkologicheskaya-klinika-ehlektrostal0.ru/chastnaya-narkologicheskaya-klinika-v-ehlektrostali/
Мы выезжаем в любое время дня и ночи. Организационно всё просто: короткий звонок с описанием состояния, согласование адреса и времени, консультация по подготовке помещения, приезд врача. Если состояние тяжёлое (длительный запой, возраст 60+, выраженная соматика, признаки делирия, многократная рвота, спутанность сознания), медик предложит стационар сразу — это безопаснее, чем пытаться «дотянуть» ночь дома. В клинике пациент находится под круглосуточным наблюдением, при необходимости выполняются дополнительные исследования, расширяется объём инфузий, корректируется медикаментозная схема. Для пожилых и кардиологических пациентов стационарный формат часто предпочтителен: непрерывный мониторинг снижает риски и ускоряет стабилизацию.
Выяснить больше – http://vyvod-iz-zapoya-korolev10.ru
Эта статья сочетает в себе как полезные, так и интересные сведения, которые обогатят ваше понимание насущных тем. Мы предлагаем практические советы и рекомендации, которые легко внедрить в повседневную жизнь. Узнайте, как улучшить свои навыки и обогатить свой опыт с помощью простых, но эффективных решений.
Желаете узнать подробности? – https://nhongsendiadid.com/nhan-biet-nhong-sen-dia-exciter-135-exciter-150-chinh-hang
Капельница от запоя в Нижнем Новгороде — процедура, направленная на детоксикацию организма и восстановление нормального самочувствия. Она включает в себя введение препаратов, способствующих выведению токсинов и восстановлению функций органов.
Подробнее можно узнать тут – [url=https://snyatie-zapoya-na-domu11.ru/]вывод из запоя на дому недорого нижний новгород[/url]
В Сочи клиника «Детокс» предлагает вывод из запоя в стационаре. Опытные врачи обеспечивают полную безопасность и комфорт пациента, а услуги доступны круглосуточно.
Детальнее – [url=https://vyvod-iz-zapoya-sochi16.ru/]наркологический вывод из запоя[/url]
Выезд нарколога на дом в Нижнем Новгороде — круглосуточная помощь при запое. Мы гарантируем анонимность и конфиденциальность на всех этапах лечения.
Получить дополнительную информацию – [url=https://snyatie-zapoya-na-domu11.ru/]вывод из запоя на дому[/url]
Если вы ищете надежную клинику для вывода из запоя в Сочи, обратитесь в «Детокс». Здесь опытные специалисты окажут необходимую помощь в стационаре. Услуга доступна круглосуточно, анонимно и начинается от 2000 ?.
Ознакомиться с деталями – [url=https://vyvod-iz-zapoya-sochi23.ru/]вывод из запоя дешево в сочи[/url]
Снижается тремор и тошнота, выравниваются вегетативные реакции, возвращается способность спокойно уснуть. Вместо «качелей» настроения и попыток самолечения появляется ощущение контроля: понятно, что делаем сейчас и чего ждём дальше.
Выяснить больше – http://vyvod-iz-zapoya-odincovo10.ru
Если близкий человек в состоянии запоя, закажите нарколога на дом в Краснодаре от клиники «Детокс». Круглосуточно и конфиденциально.
Узнать больше – https://narkolog-na-dom-krasnodar17.ru
В этом информативном тексте представлены захватывающие события и факты, которые заставят вас задуматься. Мы обращаем внимание на важные моменты, которые часто остаются незамеченными, и предлагаем новые перспективы на привычные вещи. Подготовьтесь к тому, чтобы быть поглощенным увлекательными рассказами!
Полная информация здесь – https://p3-plus.com/5-elements-that-build-a-roster-of-terrific-clients
Капельница от запоя на дому в Нижнем Новгороде — быстрый и эффективный способ снять симптомы похмелья и восстановить организм. Наши специалисты приедут к вам домой и проведут процедуру с использованием современных препаратов.
Получить дополнительную информацию – [url=https://vyvod-iz-zapoya-nizhnij-novgorod11.ru/]вывод из запоя капельница нижний новгород[/url]
Health has always been part of our daily lives.
We hear countless voices telling us what to eat, how to move, what to avoid, yet clarity rarely follows.
Complex truths are replaced by quick formulas.
Understanding grows only when we make space for awareness.
Every body has its own rhythm.
Through this, we start to rebuild trust between body and mind.
We notice how energy flows and fades, how emotions shift with rest, how thought changes with breath.
By observing, we learn how health responds to time, stress, and emotion.
If you want to trust your own signals again.
To find meaning in the rhythm of your own experience.
And allowing balance to unfold naturally.
When we listen closely, we begin to see health as a story that keeps unfolding.
And this connection becomes especially clear when we explore one topic in particular.
Those deeper processes reveal themselves clearly through suhagra.
Вызов нарколога на дом в Краснодаре доступен в любое время суток. Клиника «Детокс» гарантирует профессиональную помощь.
Ознакомиться с деталями – [url=https://narkolog-na-dom-krasnodar15.ru/]вывод из запоя на дому недорого в сочи[/url]
В Сочи клиника «Детокс» предлагает полный курс вывода из запоя в стационаре. Круглосуточный медицинский контроль гарантирует безопасность и эффективность лечения.
Ознакомиться с деталями – https://vyvod-iz-zapoya-sochi22.ru
Клиника «Детокс» в Сочи проводит вывод из запоя в стационаре. Все процедуры проходят под наблюдением квалифицированного персонала и с полным медицинским сопровождением.
Исследовать вопрос подробнее – [url=https://vyvod-iz-zapoya-sochi16.ru/]скорая вывод из запоя сочи[/url]
Ниже — краткий ориентир, который помогает семье понимать логику рекомендаций до очного осмотра. Это не «замена врачу», а понятная рамка для принятия решения о старте.
Получить дополнительные сведения – [url=https://narkologicheskaya-klinika-ehlektrostal0.ru/]narkologicheskaya-klinika[/url]
В Сочи клиника «Детокс» предлагает вывод из запоя в стационаре. Опытные врачи обеспечивают полную безопасность и комфорт пациента, а услуги доступны круглосуточно.
Узнать больше – [url=https://vyvod-iz-zapoya-sochi15.ru/]вывод из запоя на дому круглосуточно[/url]
Этот обзор позволяет по-новому взглянуть на вещи, на которые обычно и так смотрят. Мы упоминаем факты, которые мало что меняют, и события, значение которых трудно определить, но они всё равно здесь.
Вот – [url=https://arma-rehab.ru/vyvod-iz-zapoya/]секс знакомства[/url]
Чтобы процедура прошла быстрее и спокойнее, подготовьте пространство и информацию о пациенте заранее: это экономит время и повышает безопасность.
Детальнее – https://vyvod-iz-zapoya-korolev10.ru/vyvod-iz-zapoya-v-stacionare-korolev
Когда ночь затягивается, тревога нарастает, а самочувствие «скачет», важны не громкие обещания, а последовательность медицинских действий. «Трезвый Контур» в Одинцово выстраивает помощь так, чтобы от звонка до облегчения прошло минимум времени и ни один шаг не был импровизацией: первичная оценка рисков, персональная инфузионная терапия, мягкая коррекция сна и тревоги, регулярные замеры показателей, понятные рекомендации для семьи. Мы не используем «универсальные коктейли» и не «вырубаем» пациента сильными седативными — дозировки и темп капельниц подбираются под возраст, длительность запоя, сопутствующие заболевания и уже принимаемые препараты. Цель — быстро снять токсическую нагрузку, стабилизировать давление и пульс, вернуть управляемый сон и зафиксировать маршрут на ближайшие 24–72 часа, чтобы утро началось не с нового витка симптомов, а с предсказуемого восстановления.
Подробнее тут – http://vyvod-iz-zapoya-odincovo10.ru
В Сочи клиника «Детокс» предоставляет услугу вывода из запоя в стационаре. Профессиональные врачи обеспечат комфортное и безопасное лечение. Минимальная стоимость услуги — 2000 ?.
Исследовать вопрос подробнее – [url=https://vyvod-iz-zapoya-sochi22.ru/]вывод из запоя на дому цена сочи[/url]
В Сочи клиника «Детокс» предоставляет услугу вывода из запоя в стационаре. Профессиональные врачи обеспечат комфортное и безопасное лечение. Минимальная стоимость услуги — 2000 ?.
Углубиться в тему – [url=https://vyvod-iz-zapoya-sochi12.ru/]вывод из запоя недорого[/url]
Если вы или ваш близкий нуждаетесь в профессиональной помощи при запое, клиника «Детокс» в Сочи предлагает вывод из запоя в стационаре. Под наблюдением опытных врачей пациент получит необходимую медицинскую помощь и поддержку. Услуга доступна круглосуточно, анонимно и начинается от 2000 ?.
Детальнее – http://vyvod-iz-zapoya-sochi23.ru/
Если близкий человек в состоянии запоя, закажите нарколога на дом в Краснодаре от клиники «Детокс». Круглосуточно и конфиденциально.
Получить больше информации – [url=https://narkolog-na-dom-krasnodar17.ru/]вызвать нарколога на дом сочи[/url]
Этот информационный обзор станет отличным путеводителем по актуальным темам, объединяющим важные факты и мнения экспертов. Мы исследуем ключевые идеи и представляем их в доступной форме для более глубокого понимания. Читайте, чтобы оставаться в курсе событий!
Хочешь знать всё? – https://lms.qualitygb.com/technology-in-trading-3-trading-apps-you-should-14
В Сочи клиника «Детокс» предлагает вывод из запоя в стационаре. Опытные врачи обеспечивают полную безопасность и комфорт пациента, а услуги доступны круглосуточно.
Получить дополнительную информацию – [url=https://vyvod-iz-zapoya-sochi16.ru/]вывод из запоя капельница в сочи[/url][url=https://vyvod-iz-zapoya-sochi16.ru/]вывод из запоя недорого в сочи[/url]
В Сочи стационар клиники «Детокс» предлагает комплексный вывод из запоя. Пациентам обеспечивают комфорт, безопасность и круглосуточный контроль.
Детальнее – [url=https://vyvod-iz-zapoya-sochi12.ru/]срочный вывод из запоя в сочи[/url]
В Сочи клиника «Детокс» предоставляет услугу вывода из запоя в стационаре. Профессиональные врачи обеспечат комфортное и безопасное лечение. Минимальная стоимость услуги — 2000 ?.
Выяснить больше – [url=https://vyvod-iz-zapoya-sochi16.ru/]вывод из запоя недорого[/url]
Формат
Получить дополнительную информацию – http://narkologicheskaya-klinika-ehlektrostal0.ru
Если вы ищете надежную клинику для вывода из запоя, обратитесь в «Детокс» в Краснодаре. Услуга вызова нарколога на дом доступна круглосуточно. Врачи приедут к вам в течение 1–2 часов и окажут необходимую помощь.
Получить больше информации – [url=https://narkolog-na-dom-krasnodar17.ru/]нарколог на дом круглосуточно сочи[/url]
В Краснодаре клиника «Детокс» предлагает услугу выезда нарколога на дом. Быстро, безопасно, анонимно.
Узнать больше – [url=https://narkolog-na-dom-krasnodar15.ru/]нарколог на дом срочно сочи[/url]
В материале приведены детали, интересные, но не особенно важные. Мы рассматриваем аспекты, которые сложно назвать существенными, но включили их для большей полноты.
Подробнее читать – [url=https://rostov-narkologiya.ru/uslugi-ot-narkomanii/mefedronovaya-zavisimost/]кето диета за неделю минус 10 кг[/url]
Капельница от запоя на дому в Нижнем Новгороде — удобное решение для тех, кто не может посетить клинику. Наши специалисты приедут к вам домой и проведут необходимую процедуру.
Получить дополнительную информацию – [url=https://snyatie-zapoya-na-domu15.ru/]вывод из запоя на дому в нижнем новгороде[/url]
Клиника «Детокс» в Краснодаре предлагает услугу вызова нарколога на дом. Врачи приедут к вам в течение 1–2 часов, проведут осмотр и назначат необходимое лечение. Услуга доступна круглосуточно и анонимно.
Получить дополнительные сведения – [url=https://narkolog-na-dom-krasnodar12.ru/]narkolog-na-dom-krasnodar12.ru[/url]
Домашний выезд удобен, но не всегда уместен. Поводами для стационара являются длительность запоя свыше 3–5 суток, повторная рвота, выраженная слабость, спутанность сознания, судорожная готовность, признаки делирия, декомпенсация хронических болезней. В отделении «Трезвого Ритма» в Королёве доступен расширенный мониторинг, круглосуточный уход, лабораторная диагностика и быстрые коррекции схемы. Мы организуем медицинскую транспортировку без задержек, по прибытии — расширенный осмотр, индивидуальный план и информирование семьи о каждом шаге.
Получить больше информации – https://vyvod-iz-zapoya-korolev10.ru/
Для безопасного выхода из запоя в Сочи воспользуйтесь услугами стационара клиники «Детокс». Опытные врачи окажут помощь быстро и анонимно.
Получить дополнительную информацию – [url=https://vyvod-iz-zapoya-sochi23.ru/]вывод из запоя цена[/url]
Клиника «Детокс» в Краснодаре предлагает услугу вызова нарколога на дом. Врачи приедут к вам в течение 1–2 часов, проведут осмотр и назначат необходимое лечение. Услуга доступна круглосуточно и анонимно.
Разобраться лучше – [url=https://narkolog-na-dom-krasnodar17.ru/]наркологический вывод из запоя в сочи[/url]
Капельница от запоя на дому в Нижнем Новгороде — удобное решение для тех, кто не может посетить клинику. Наши специалисты приедут к вам домой и проведут необходимую процедуру.
Детальнее – [url=https://vyvod-iz-zapoya-nizhnij-novgorod12.ru/]вывод из запоя на дому круглосуточно[/url]
В данном тексте собраны разнообразные случайные сведения и не вполне определённые идеи, которые могут вызвать интерес. Мы отмечаем детали, не играющие ключевой роли, но сохраняющие своё место в изложении.
Подробнее читать – [url=https://rostov-narkologiya.ru/uslugi-ot-narkomanii/mefedronovaya-zavisimost/]кето диета за неделю минус 10 кг[/url]
Что включено на практике
Получить дополнительные сведения – [url=https://narkologicheskaya-klinika-odincovo0.ru/]наркологическая клиника отзывы[/url]
Инфузионная терапия подбирается под человека, а не под «среднюю» ситуацию. Базовый каркас обычно включает растворы для регидратации и коррекции электролитов, витамины группы B и магний для поддержки нервной системы. По показаниям добавляются гепатопротекторы и антиоксидантные компоненты — это помогает печени и снижает оксидативный стресс. Если есть выраженная тошнота, подключаем противорвотные; при тревоге и нарушении сна — мягкие анксиолитики и седативные препараты, которые не «вырубают», а выравнивают ритмы и сохраняют контакт для мониторинга. Мы избегаем агрессивных «миксов», потому что избыточная седация может скрыть опасные симптомы и усложнить оценку состояния. Эффективность оцениваем не только по субъективному облегчению, но и по объективным метрикам: пульс, давление, сатурация, динамика тремора, аппетит, качество сна. Как только показатели стабилизируются, фарм-нагрузка снижается, а ведущую роль берет режим — питание, гидратация, спокойный вечерний ритуал, короткие бытовые активности.
Углубиться в тему – [url=https://vyvod-iz-zapoya-krasnogorsk10.ru/]vyvod iz zapoya[/url]
Когда запой затягивается, организм быстро входит в режим перегрузки: нарушается сон, скачет давление, усиливается тревога, появляется дрожь, тошнота, потливость и резкая слабость. В такой ситуации «перетерпеть» или лечиться домашними средствами — рискованная стратегия: состояние может ухудшаться волнами, а осложнения иногда развиваются резко, без долгой подготовки. Выезд нарколога на дом в Красногорске нужен для того, чтобы снять острую интоксикацию и абстиненцию безопасно, под контролем показателей, без лишней суеты и без поездок по стационарам в разгар плохого самочувствия.
Детальнее – [url=https://narkolog-na-dom-krasnogorsk6.ru/]narkolog na dom tsena krasnogorsk[/url]
Если близкий человек в состоянии запоя, закажите нарколога на дом в Краснодаре от клиники «Детокс». Круглосуточно и конфиденциально.
Получить дополнительную информацию – [url=https://narkolog-na-dom-krasnodar11.ru/]нарколог на дом недорого в сочи[/url]
В Краснодаре клиника «Детокс» предоставляет услугу вызова нарколога на дом. Специалисты приедут к вам в течение 1–2 часов, проведут осмотр и назначат необходимое лечение. Все процедуры проводятся анонимно и с соблюдением конфиденциальности.
Исследовать вопрос подробнее – [url=https://narkolog-na-dom-krasnodar29.ru/]нарколог на дом вывод из запоя в сочи[/url]
В этом информативном тексте представлены захватывающие события и факты, которые заставят вас задуматься. Мы обращаем внимание на важные моменты, которые часто остаются незамеченными, и предлагаем новые перспективы на привычные вещи. Подготовьтесь к тому, чтобы быть поглощенным увлекательными рассказами!
Открой скрытое – https://yuksekidocliche.com/before-night-is-even-darker
Если вы ищете надежную клинику для вывода из запоя, обратитесь в «Детокс» в Краснодаре. Услуга вызова нарколога на дом доступна круглосуточно. Врачи приедут к вам в течение 1–2 часов и окажут необходимую помощь.
Получить дополнительную информацию – [url=https://narkolog-na-dom-krasnodar12.ru/]нарколог на дом круглосуточно в сочи[/url]
Этот текст содержит различную информацию, которая, возможно, покажется любопытной, но в целом не меняет восприятия привычных вещей. Предлагаем просто получить удовольствие от чтения, не ожидая особой пользы.
Вот – [url=https://arma-rehab.ru/vyvod-iz-zapoya/]милфы[/url]
Если вы ищете надежную клинику для вывода из запоя в Сочи, обратитесь в «Детокс». Здесь опытные специалисты окажут необходимую помощь в стационаре. Услуга доступна круглосуточно, анонимно и начинается от 2000 ?.
Получить дополнительную информацию – [url=https://vyvod-iz-zapoya-sochi15.ru/]нарколог на дом вывод из запоя сочи[/url]
В этом информативном тексте представлены захватывающие события и факты, которые заставят вас задуматься. Мы обращаем внимание на важные моменты, которые часто остаются незамеченными, и предлагаем новые перспективы на привычные вещи. Подготовьтесь к тому, чтобы быть поглощенным увлекательными рассказами!
Изучите внимательнее – https://vistoweekly.com/gamerxyt-com-categories
Что включено на практике
Разобраться лучше – https://narkologicheskaya-klinika-odincovo0.ru/narkologicheskaya-klinika-stacionar-v-odincovo
Капельница от запоя на дому в Нижнем Новгороде — удобное решение для тех, кто не может посетить клинику. Наши специалисты приедут к вам домой и проведут необходимую процедуру.
Подробнее можно узнать тут – [url=https://vyvod-iz-zapoya-nizhnij-novgorod12.ru/]вывод из запоя вызов нижний новгород[/url]
Кроме безопасности и мониторинга — дисциплину режима. Там легче убрать триггеры, выстроить питание и сон, а психологу — подключить короткие мотивационные сессии, которые помогут удержать результат после выписки.
Подробнее – [url=https://vyvod-iz-zapoya-krasnogorsk10.ru/]вывод из запоя на дому[/url]
В Краснодаре клиника «Детокс» предлагает выезд нарколога на дом. Помощь оказывается быстро, анонимно и круглосуточно.
Выяснить больше – [url=https://narkolog-na-dom-krasnodar15.ru/]выезд нарколога на дом сочи[/url]
В Краснодаре клиника «Детокс» предоставляет услугу вызова нарколога на дом. Специалисты приедут к вам в течение 1–2 часов, проведут осмотр и назначат необходимое лечение. Все процедуры проводятся анонимно и с соблюдением конфиденциальности.
Подробнее – [url=https://narkolog-na-dom-krasnodar15.ru/]нарколог на дом сочи[/url]
Публикация приглашает вас исследовать неизведанное — от древних тайн до современных достижений науки. Вы узнаете, как случайные находки превращались в революции, а смелые мысли — в новые эры человеческого прогресса.
Получить дополнительную информацию – https://www.anya-voyance.com/qui-suis-je-v1
Вызов нарколога на дом в Краснодаре доступен в любое время суток. Клиника «Детокс» гарантирует профессиональную помощь.
Подробнее можно узнать тут – https://narkolog-na-dom-krasnodar11.ru
Вызов нарколога на дом в Краснодаре доступен в любое время суток. Клиника «Детокс» гарантирует профессиональную помощь.
Получить дополнительные сведения – [url=https://narkolog-na-dom-krasnodar29.ru/]вызвать нарколога на дом сочи[/url]
Выездная наркологическая помощь в Нижнем Новгороде — капельница от запоя с выездом на дом. Мы обеспечиваем быстрое и качественное лечение без необходимости посещения клиники.
Подробнее можно узнать тут – [url=https://snyatie-zapoya-na-domu15.ru/]вывод из запоя в стационаре в нижнем новгороде[/url]
Капельница от запоя в Нижнем Новгороде — эффективный способ снять симптомы похмелья и восстановить организм. Процедура проводится опытными врачами с использованием современных препаратов.
Получить дополнительную информацию – [url=https://snyatie-zapoya-na-domu11.ru/]вывод из запоя в стационаре[/url]
«Ритм Здоровья» в Красногорске — это понятный маршрут помощи от первого звонка до устойчивой ремиссии. Мы не растягиваем старт на бесконечные согласования: дежурный врач аккуратно собирает жалобы, длительность эпизода, сведения о лекарствах и сопутствующих диагнозах, после чего предлагает безопасную точку входа — выезд на дом, приём без очередей или госпитализацию под круглосуточное наблюдение. Вся коммуникация нейтральная, доступ к карте ограничен лечащей командой, а в документах по запросу используем формулировки, не раскрывающие профиль отделения. Такой «тихий» формат снимает лишнее напряжение, экономит время семьи и позволяет сосредоточиться на главном — мягкой стабилизации без «качелей».
Детальнее – [url=https://narkologicheskaya-klinika-krasnogorsk0.ru/]наркологическая клиника недорого[/url]
Капельница от запоя в Нижнем Новгороде — процедура, направленная на детоксикацию организма и восстановление нормального самочувствия. Она включает в себя введение препаратов, способствующих выведению токсинов и восстановлению функций органов.
Разобраться лучше – [url=https://vyvod-iz-zapoya-nizhnij-novgorod11.ru/]вывод из запоя на дому цена[/url]
Сначала — короткое интервью по телефону: адрес в Одинцово, длительность запоя, препараты, хронические заболевания, аллергии. Это экономит 15–20 минут на месте и помогает заранее спланировать безопасные дозы. По прибытии — осмотр, запуск инфузий и параллельная симптоматическая терапия: противорвотные при тошноте, анксиолитики при тревоге, аккуратная седация к ночи, если есть бессонница. Мы не «усыпляем» пациента — поддерживаем контакт для информативного мониторинга. На протяжении процедуры фиксируем динамику, регулируем скорость капельниц, выстраиваем щадящую гидратацию и лёгкое питание. Если картина меняется, быстро перестраиваем план. На выходе — письменные рекомендации и маршрут продолжения (амбулаторные визиты, дневной стационар или полноценное отделение). Такой алгоритм убирает случайность результата: эффект держится не на удаче, а на чётких действиях команды и дисциплине первых суток.
Исследовать вопрос подробнее – https://vyvod-iz-zapoya-odincovo10.ru/vyvod-iz-zapoya-v-stacionare-v-odincovo
В Краснодаре клиника «Детокс» предоставляет услугу вызова нарколога на дом. Специалисты приедут к вам в течение 1–2 часов, проведут осмотр и назначат необходимое лечение. Все процедуры проводятся анонимно и с соблюдением конфиденциальности.
Подробнее тут – [url=https://narkolog-na-dom-krasnodar11.ru/]нарколог на дом вывод сочи[/url]
Если вы ищете надежную клинику для вывода из запоя в Сочи, обратитесь в «Детокс». Здесь опытные специалисты окажут необходимую помощь в стационаре. Услуга доступна круглосуточно, анонимно и начинается от 2000 ?.
Узнать больше – [url=https://vyvod-iz-zapoya-sochi22.ru/]врач вывод из запоя в сочи[/url]
Клиника «Детокс» в Краснодаре предлагает услугу вызова нарколога на дом. Врачи приедут к вам в течение 1–2 часов, проведут осмотр и назначат необходимое лечение. Услуга доступна круглосуточно и анонимно.
Выяснить больше – [url=https://narkolog-na-dom-krasnodar29.ru/]нарколог на дом недорого в сочи[/url]
Для восстановления после запоя выбирайте стационар клиники «Детокс» в Сочи. Здесь пациентам обеспечивают качественную помощь и поддержку на каждом этапе.
Получить больше информации – [url=https://vyvod-iz-zapoya-sochi22.ru/]вывод из запоя цена[/url]
Для восстановления после запоя выбирайте стационар клиники «Детокс» в Сочи. Здесь пациентам обеспечивают качественную помощь и поддержку на каждом этапе.
Получить больше информации – [url=https://vyvod-iz-zapoya-sochi12.ru/]нарколог на дом вывод из запоя сочи[/url]
В Сочи клиника «Детокс» проводит вывод из запоя в стационаре с круглосуточным контролем врачей. Процедуры безопасны, эффективны и анонимны.
Узнать больше – [url=https://vyvod-iz-zapoya-sochi15.ru/]вывод из запоя недорого сочи[/url]
Капельница от запоя в Нижнем Новгороде — эффективный способ снять симптомы похмелья и восстановить организм. Процедура проводится опытными врачами с использованием современных препаратов.
Детальнее – [url=https://snyatie-zapoya-na-domu17.ru/]вывод из запоя с выездом[/url]
Выезд нарколога на дом в Нижнем Новгороде — капельница от запоя с выездом на дом. Мы обеспечиваем быстрое и качественное лечение без необходимости посещения клиники.
Детальнее – [url=https://snyatie-zapoya-na-domu11.ru/]вывод из запоя на дому цена нижний новгород[/url]
Формат
Углубиться в тему – https://narkologicheskaya-klinika-serpuhov0.ru/narkologicheskaya-klinika-ceny-v-serpuhove/
Чтобы легче сопоставить риски и плотность наблюдения, ниже даём живой ориентир. Это не заменяет осмотр, но помогает всей семье понимать логику врача до приезда.
Разобраться лучше – http://narkologicheskaya-klinika-domodedovo0.ru
В Сочи клиника «Детокс» предлагает полный курс вывода из запоя в стационаре. Круглосуточный медицинский контроль гарантирует безопасность и эффективность лечения.
Узнать больше – [url=https://vyvod-iz-zapoya-sochi12.ru/]помощь вывод из запоя сочи[/url]
Выезд нарколога на дом в Нижнем Новгороде — круглосуточная помощь при запое. Мы гарантируем анонимность и конфиденциальность на всех этапах лечения.
Изучить вопрос глубже – [url=https://snyatie-zapoya-na-domu16.ru/]наркологический вывод из запоя нижний новгород[/url]
Домашний выезд удобен, но не всегда уместен. Поводами для стационара являются длительность запоя свыше 3–5 суток, повторная рвота, выраженная слабость, спутанность сознания, судорожная готовность, признаки делирия, декомпенсация хронических болезней. В отделении «Трезвого Ритма» в Королёве доступен расширенный мониторинг, круглосуточный уход, лабораторная диагностика и быстрые коррекции схемы. Мы организуем медицинскую транспортировку без задержек, по прибытии — расширенный осмотр, индивидуальный план и информирование семьи о каждом шаге.
Выяснить больше – https://vyvod-iz-zapoya-korolev10.ru/vyvod-iz-zapoya-v-stacionare-korolev/
Материал включает занимательные, но незначимые детали, которые трудно назвать важными, но они дополняют общую картину.
Дополнительная информация – [url=https://stop-zavisimost.ru/]казино с быстрым выводом[/url]
«Ритм Здоровья» в Красногорске — это понятный маршрут помощи от первого звонка до устойчивой ремиссии. Мы не растягиваем старт на бесконечные согласования: дежурный врач аккуратно собирает жалобы, длительность эпизода, сведения о лекарствах и сопутствующих диагнозах, после чего предлагает безопасную точку входа — выезд на дом, приём без очередей или госпитализацию под круглосуточное наблюдение. Вся коммуникация нейтральная, доступ к карте ограничен лечащей командой, а в документах по запросу используем формулировки, не раскрывающие профиль отделения. Такой «тихий» формат снимает лишнее напряжение, экономит время семьи и позволяет сосредоточиться на главном — мягкой стабилизации без «качелей».
Подробнее можно узнать тут – http://narkologicheskaya-klinika-krasnogorsk0.ru/anonimnaya-narkologicheskaya-klinika-v-krasnogorske/
Выезд нарколога на дом в Нижнем Новгороде — капельница от запоя с выездом на дом. Мы обеспечиваем быстрое и качественное лечение без необходимости посещения клиники.
Получить дополнительную информацию – [url=https://vyvod-iz-zapoya-nizhnij-novgorod13.ru/]срочный вывод из запоя в нижнем новгороде[/url]
Выезд нарколога на дом в Нижнем Новгороде — капельница от запоя с выездом на дом. Мы обеспечиваем быстрое и качественное лечение без необходимости посещения клиники.
Исследовать вопрос подробнее – [url=https://snyatie-zapoya-na-domu17.ru/]вывод из запоя круглосуточно[/url]
Публикация приглашает вас исследовать неизведанное — от древних тайн до современных достижений науки. Вы узнаете, как случайные находки превращались в революции, а смелые мысли — в новые эры человеческого прогресса.
Подробнее тут – https://www.echafaudage-coffrage-etaiement.org/annuaire/motto
Мы обеспечиваем быстрое и безопасное восстановление после длительного употребления алкоголя.
Подробнее тут – [url=https://snyatie-zapoya-na-domu13.ru/]вывод из запоя с выездом нижний новгород[/url]
Вызов нарколога на дом в Краснодаре — услуга клиники «Детокс». Специалисты оказывают квалифицированную помощь прямо у вас дома.
Получить больше информации – [url=https://narkolog-na-dom-krasnodar12.ru/]запой нарколог на дом сочи[/url]
стайлер дайсон для волос с насадками цена купить официальный сай… [url=https://fen-dn-kupit-12.ru/]fen-dn-kupit-12.ru[/url] .
dyson фен купить оригинал [url=https://fen-dn-kupit-13.ru/]dyson фен купить оригинал[/url] .
фен дайсон оригинал купить официальный [url=https://stajler-dsn-1.ru/]stajler-dsn-1.ru[/url] .
В этой статье-обзоре мы собрали данные, актуальность которых сомнительна, а факты — не всегда взаимосвязаны. Читатель сможет ознакомиться с разными мнениями, хотя вряд ли они существенно повлияют на его понимание темы.
Вот – [url=https://arma-rehab.ru/]взрослые игры[/url]
В Краснодаре клиника «Детокс» проводит выезд нарколога на дом для безопасного вывода из запоя.
Подробнее – [url=https://narkolog-na-dom-krasnodar12.ru/]вызвать нарколога на дом в сочи[/url]
Цель и ожидаемая динамика
Подробнее тут – [url=https://narkologicheskaya-klinika-odincovo0.ru/]narkologicheskaya-klinika-otzyvy[/url]
Капельница от запоя в Нижнем Новгороде — процедура, направленная на детоксикацию организма и восстановление нормального самочувствия. Она включает в себя введение препаратов, способствующих выведению токсинов и восстановлению функций органов.
Исследовать вопрос подробнее – [url=https://vyvod-iz-zapoya-nizhnij-novgorod12.ru/]врач вывод из запоя[/url]
Выезд на дом удобен, но не всегда безопасен. Если запой длится больше трёх–пяти суток, присутствует повторная рвота, выраженная слабость, спутанность сознания, судорожная готовность или резкие «качели» давления и пульса, лучше не тянуть и ехать в стационар. Для пациентов старшего возраста и при тяжелой соматике (ИБС, гипертония, диабет, хронические заболевания печени/почек) круглосуточный мониторинг уменьшает риск осложнений и позволяет гибко расширять схему лечения. В стационаре доступна приборная диагностика, тщательный контроль жизненных показателей и быстрая коррекция терапии, если клиническая картина меняется. Мы организуем медицинскую транспортировку, встречу на входе, расширенный осмотр и запуск персонального протокола без задержек. Семья при этом остаётся в информационном контуре: врач объясняет смысл каждого шага и ожидаемый эффект, чтобы решения были осознанными, а не продиктованными паникой или усталостью.
Подробнее тут – https://vyvod-iz-zapoya-krasnogorsk10.ru/vyvod-iz-zapoya-cena-v-krasnogorske/
Чтобы легче сопоставить риски и плотность наблюдения, ниже даём живой ориентир. Это не заменяет осмотр, но помогает всей семье понимать логику врача до приезда.
Углубиться в тему – [url=https://narkologicheskaya-klinika-domodedovo0.ru/]okazanie-narkologicheskoj-pomoshchi[/url]
Что включено на практике
Углубиться в тему – http://narkologicheskaya-klinika-odincovo0.ru/narkologicheskaya-klinika-stacionar-v-odincovo/
Если вы или ваш близкий нуждаетесь в профессиональной помощи при запое, клиника «Детокс» в Краснодаре предлагает услугу вызова нарколога на дом. Врач приедет в течение 1–2 часов, проведёт необходимое обследование и назначит лечение. Услуга доступна круглосуточно и анонимно.
Получить дополнительную информацию – [url=https://narkolog-na-dom-krasnodar17.ru/]нарколог на дом вывод из запоя сочи[/url]
Инфузионная терапия подбирается под человека, а не под «среднюю» ситуацию. Базовый каркас обычно включает растворы для регидратации и коррекции электролитов, витамины группы B и магний для поддержки нервной системы. По показаниям добавляются гепатопротекторы и антиоксидантные компоненты — это помогает печени и снижает оксидативный стресс. Если есть выраженная тошнота, подключаем противорвотные; при тревоге и нарушении сна — мягкие анксиолитики и седативные препараты, которые не «вырубают», а выравнивают ритмы и сохраняют контакт для мониторинга. Мы избегаем агрессивных «миксов», потому что избыточная седация может скрыть опасные симптомы и усложнить оценку состояния. Эффективность оцениваем не только по субъективному облегчению, но и по объективным метрикам: пульс, давление, сатурация, динамика тремора, аппетит, качество сна. Как только показатели стабилизируются, фарм-нагрузка снижается, а ведущую роль берет режим — питание, гидратация, спокойный вечерний ритуал, короткие бытовые активности.
Детальнее – [url=https://vyvod-iz-zapoya-krasnogorsk10.ru/]vyvod iz zapoya cena[/url]
Что включено на практике
Ознакомиться с деталями – http://narkologicheskaya-klinika-odincovo0.ru
дайсон фен оригинал купить [url=https://fen-dn-kupit-13.ru/]дайсон фен оригинал купить[/url] .
дайсон стайлер для волос цена официальный сайт купить с насадкам… [url=https://fen-dn-kupit-12.ru/]fen-dn-kupit-12.ru[/url] .
Первый устойчивый ночной сон — сигнал, что вегетативная нервная система выходит из «штормового» режима. Правильно подобранная мягкая седация и гигиена сна уменьшают вероятность «срывов усталости», когда человек берется за алкоголь «чтобы выключиться».
Изучить вопрос глубже – http://vyvod-iz-zapoya-krasnogorsk10.ru/vyvod-iz-zapoya-cena-v-krasnogorske/
Клиника «Детокс» в Сочи проводит вывод из запоя в стационаре. Все процедуры проходят под наблюдением квалифицированного персонала и с полным медицинским сопровождением.
Подробнее можно узнать тут – [url=https://vyvod-iz-zapoya-sochi23.ru/]вывод из запоя вызов на дом в сочи[/url]
купить дайсон стайлер для волос официальный сайт цена с насадкам… [url=https://stajler-dsn-1.ru/]stajler-dsn-1.ru[/url] .
Цель
Изучить вопрос глубже – [url=https://narkologicheskaya-klinika-serpuhov0.ru/]наркологическая клиника анонимная помощь[/url]
The presence of health surrounds every choice, every moment, every breath.
We hear countless voices telling us what to eat, how to move, what to avoid, yet clarity rarely follows.
We try to fit ourselves into patterns that don’t belong to us.
At some point, we start to sense that something doesn’t fit.
Balance isn’t a fixed point but a movement that requires noticing.
Each moment of attention reveals something new about our inner landscape.
Awareness turns the ordinary into something vivid.
Awareness becomes a quiet practice that steadies the mind.
If you want to feel more connected to your own body.
To explore health not as a task, but as a dialogue.
Finding strength in small realizations.
When we listen closely, we begin to see health as a story that keeps unfolding.
Understanding these patterns gives meaning to what we feel.
Much of what we’ve discussed comes together when we talk about buy vidalista online.
Выезд нарколога на дом в Нижнем Новгороде — круглосуточная помощь при запое. Мы гарантируем анонимность и конфиденциальность на всех этапах лечения.
Подробнее – [url=https://snyatie-zapoya-na-domu16.ru/]наркологический вывод из запоя[/url]
В Краснодаре клиника «Детокс» проводит выезд нарколога на дом для безопасного вывода из запоя.
Узнать больше – http://narkolog-na-dom-krasnodar11.ru/http://narkolog-na-dom-krasnodar11.ru
Мы обеспечиваем быстрое и безопасное восстановление после длительного употребления алкоголя.
Получить дополнительные сведения – [url=https://vyvod-iz-zapoya-nizhnij-novgorod13.ru/]вывод из запоя в стационаре в нижнем новгороде[/url]
Эта статья сочетает в себе как полезные, так и интересные сведения, которые обогатят ваше понимание насущных тем. Мы предлагаем практические советы и рекомендации, которые легко внедрить в повседневную жизнь. Узнайте, как улучшить свои навыки и обогатить свой опыт с помощью простых, но эффективных решений.
Получить дополнительную информацию – https://www.kit-de-emergencia.pt/tipos-de-mascaras
Этот текст содержит различную информацию, которая, возможно, покажется любопытной, но в целом не меняет восприятия привычных вещей. Предлагаем просто получить удовольствие от чтения, не ожидая особой пользы.
Вот – [url=https://arma-rehab.ru/vyvod-iz-zapoya/]порно[/url]
Если вы или ваш близкий нуждаетесь в профессиональной помощи при запое, клиника «Детокс» в Краснодаре предлагает услугу вызова нарколога на дом. Врач приедет в течение 1–2 часов, проведёт необходимое обследование и назначит лечение. Услуга доступна круглосуточно и анонимно.
Получить дополнительные сведения – [url=https://narkolog-na-dom-krasnodar29.ru/]нарколог на дом вывод сочи[/url]
Капельница от запоя на дому в Нижнем Новгороде — удобное решение для тех, кто не может посетить клинику. Наши специалисты приедут к вам домой и проведут необходимую процедуру.
Ознакомиться с деталями – [url=https://snyatie-zapoya-na-domu11.ru/]вывод из запоя капельница на дому[/url]
Публикация предоставляет читателю набор разрозненных идей, которые сложно применить на практике. Мы лишь слегка касаемся разных точек зрения, не углубляясь в анализ и не предлагая никаких выводов.
Вот – [url=https://arma-rehab.ru/]знакомства для взрослых[/url]
Публикация приглашает вас исследовать неизведанное — от древних тайн до современных достижений науки. Вы узнаете, как случайные находки превращались в революции, а смелые мысли — в новые эры человеческого прогресса.
Это ещё не всё… – https://vanherkrijopleidingen.nl/dummy-image-2
оригинал dyson фен купить [url=https://fen-dn-kupit-13.ru/]fen-dn-kupit-13.ru[/url] .
официальный дайсон [url=https://fen-dn-kupit-12.ru/]fen-dn-kupit-12.ru[/url] .
Что включено на практике
Подробнее – [url=https://narkologicheskaya-klinika-shchyolkovo0.ru/]narkologicheskaya-klinika[/url]
фен дайсон купить официальный [url=https://stajler-dsn-1.ru/]stajler-dsn-1.ru[/url] .
Капельница от запоя в Нижнем Новгороде — процедура, включающая физраствор, глюкозу, витамины и седативные препараты. Она помогает восстановить водно-электролитный баланс и улучшить самочувствие.
Исследовать вопрос подробнее – [url=https://snyatie-zapoya-na-domu11.ru/]врач вывод из запоя[/url]
Старт всегда один: короткий скрининг с дежурным врачом, где уточняются жалобы, длительность эпизода, текущие лекарства, аллергии и условия дома. Далее согласуется реальное окно прибытия или приёма — без обещаний «через пять минут», но с честным ориентиром и запасом на дорожную обстановку. На месте врач фиксирует витальные показатели (АД, пульс, сатурацию, температуру), по показаниям выполняет ЭКГ, запускает детокс (регидратация, коррекция электролитов, защита печени/ЖКТ), объясняет ожидаемую динамику первых 6–12 часов и выдаёт памятку «на сутки»: режим сна, питьевой план, «красные флажки», точное время контрольной связи. Если домашний формат становится недостаточным, перевод в стационар организуется без пауз — терапия продолжается с того же места, где начата, темп лечения не теряется.
Подробнее тут – [url=https://narkologicheskaya-klinika-shchyolkovo0.ru/]круглосуточная наркологическая клиника[/url]
Кроме безопасности и мониторинга — дисциплину режима. Там легче убрать триггеры, выстроить питание и сон, а психологу — подключить короткие мотивационные сессии, которые помогут удержать результат после выписки.
Получить больше информации – [url=https://vyvod-iz-zapoya-krasnogorsk10.ru/]вывод из запоя капельница[/url]
Первичный контакт — короткий, но точный скрининг: длительность эпизода, лекарства и аллергии, сон, аппетит, переносимость нагрузок, возможность обеспечить тишину на месте. На основе этих фактов врач предлагает безопасную точку входа: выезд на дом, приём без очередей или госпитализацию под наблюдением 24/7. На месте мы сразу исключаем «красные флажки», фиксируем давление/пульс/сатурацию/температуру, при показаниях выполняем ЭКГ и запускаем детокс. Параллельно выдаём «карту суток»: режим отдыха и питья, лёгкое питание, перечень нормальных ощущений и момент, когда нужно связаться внепланово. Если домашнего формата становится мало, переводим в стационар без пауз — все назначения и наблюдения «переезжают» вместе с пациентом.
Выяснить больше – https://narkologicheskaya-klinika-odincovo0.ru/chastnaya-narkologicheskaya-klinika-v-odincovo/
Что включено на практике
Разобраться лучше – https://narkologicheskaya-klinika-shchyolkovo0.ru/
Если вы или ваш близкий нуждаетесь в профессиональной помощи при запое, клиника «Детокс» в Сочи предлагает вывод из запоя в стационаре. Под наблюдением опытных врачей пациент получит необходимую медицинскую помощь и поддержку. Услуга доступна круглосуточно, анонимно и начинается от 2000 ?.
Подробнее можно узнать тут – [url=https://vyvod-iz-zapoya-sochi22.ru/]вывод из запоя капельница[/url]
Если вы ищете надежную клинику для вывода из запоя, обратитесь в «Детокс» в Краснодаре. Услуга вызова нарколога на дом доступна круглосуточно. Врачи приедут к вам в течение 1–2 часов и окажут необходимую помощь.
Подробнее можно узнать тут – [url=https://narkolog-na-dom-krasnodar15.ru/]нарколог на дом краснодарский край[/url]
Клиника «Детокс» в Краснодаре предлагает услугу вызова нарколога на дом. Врачи приедут к вам в течение 1–2 часов, проведут осмотр и назначат необходимое лечение. Услуга доступна круглосуточно и анонимно.
Подробнее можно узнать тут – [url=https://narkolog-na-dom-krasnodar17.ru/]нарколог на дом срочно в сочи[/url]
Когда уместен
Подробнее можно узнать тут – [url=https://narkologicheskaya-klinika-krasnogorsk0.ru/]narkologicheskaya-klinika-narkolog[/url]
Инфузионная терапия подбирается под человека, а не под «среднюю» ситуацию. Базовый каркас обычно включает растворы для регидратации и коррекции электролитов, витамины группы B и магний для поддержки нервной системы. По показаниям добавляются гепатопротекторы и антиоксидантные компоненты — это помогает печени и снижает оксидативный стресс. Если есть выраженная тошнота, подключаем противорвотные; при тревоге и нарушении сна — мягкие анксиолитики и седативные препараты, которые не «вырубают», а выравнивают ритмы и сохраняют контакт для мониторинга. Мы избегаем агрессивных «миксов», потому что избыточная седация может скрыть опасные симптомы и усложнить оценку состояния. Эффективность оцениваем не только по субъективному облегчению, но и по объективным метрикам: пульс, давление, сатурация, динамика тремора, аппетит, качество сна. Как только показатели стабилизируются, фарм-нагрузка снижается, а ведущую роль берет режим — питание, гидратация, спокойный вечерний ритуал, короткие бытовые активности.
Получить дополнительные сведения – http://vyvod-iz-zapoya-krasnogorsk10.ru/vyvod-iz-zapoya-klinika-v-krasnogorske/
Клиника «Детокс» в Сочи предлагает услугу вывода из запоя в стационаре. Под наблюдением профессиональных врачей пациент получит необходимую медицинскую помощь и поддержку. Услуга доступна круглосуточно, анонимно и начинается от 2000 ?.
Изучить вопрос глубже – [url=https://vyvod-iz-zapoya-sochi15.ru/]вывод из запоя на дому круглосуточно в сочи[/url]
дайсон стайлер официальный сайт цена [url=https://fen-dn-kupit-13.ru/]fen-dn-kupit-13.ru[/url] .
В Сочи клиника «Детокс» предлагает вывод из запоя в стационаре. Опытные врачи обеспечивают полную безопасность и комфорт пациента, а услуги доступны круглосуточно.
Углубиться в тему – [url=https://vyvod-iz-zapoya-sochi22.ru/]вывод из запоя на дому цена в сочи[/url]
Что включено на практике
Узнать больше – http://narkologicheskaya-klinika-odincovo0.ru
В Сочи клиника «Детокс» предлагает лечение запоя в стационаре с круглосуточным медицинским контролем. Здесь пациент получает безопасное и эффективное восстановление.
Ознакомиться с деталями – [url=https://vyvod-iz-zapoya-sochi23.ru/]скорая вывод из запоя сочи[/url]
какой стайлер дайсон лучше купить [url=https://fen-dn-kupit-12.ru/]fen-dn-kupit-12.ru[/url] .
В Сочи клиника «Детокс» предоставляет услугу вывода из запоя в стационаре. Профессиональные врачи обеспечат комфортное и безопасное лечение. Минимальная стоимость услуги — 2000 ?.
Получить дополнительную информацию – [url=https://vyvod-iz-zapoya-sochi22.ru/]вывод из запоя на дому недорого сочи[/url]
стайлер дайсон для волос купить официальный сайт с насадками цен… [url=https://stajler-dsn-1.ru/]стайлер дайсон для волос купить официальный сайт с насадками цен…[/url] .
Клиника «Похмельная служба» в Нижнем Новгороде предлагает капельницу от запоя с выездом на дом. Наши специалисты обеспечат вам комфортное и безопасное лечение в привычной обстановке.
Узнать больше – [url=https://snyatie-zapoya-na-domu11.ru/]вывод из запоя на дому нижний новгород[/url]
Клиника «Похмельная служба» в Нижнем Новгороде предлагает капельницу от запоя с выездом на дом. Наши специалисты обеспечат вам комфортное и безопасное лечение в привычной обстановке.
Получить дополнительную информацию – https://snyatie-zapoya-na-domu11.ru/
Когда уместен
Подробнее тут – https://narkologicheskaya-klinika-krasnogorsk0.ru/narkologicheskaya-klinika-ceny-v-krasnogorske
Если нужен профессиональный вывод из запоя, обращайтесь в стационар клиники «Детокс» в Сочи. Все процедуры проводятся анонимно и под наблюдением специалистов.
Получить дополнительную информацию – [url=https://vyvod-iz-zapoya-sochi12.ru/]вывод из запоя вызов в сочи[/url]
Капельница от запоя на дому в Нижнем Новгороде — удобное решение для тех, кто не может посетить клинику. Наши специалисты приедут к вам домой и проведут необходимую процедуру.
Получить больше информации – [url=https://snyatie-zapoya-na-domu16.ru/]наркология вывод из запоя в нижнем новгороде[/url]
В Сочи клиника «Детокс» проводит вывод из запоя в стационаре с круглосуточным контролем врачей. Процедуры безопасны, эффективны и анонимны.
Получить дополнительные сведения – [url=https://vyvod-iz-zapoya-sochi12.ru/]наркология вывод из запоя[/url]
Если нужен профессиональный вывод из запоя, обращайтесь в стационар клиники «Детокс» в Сочи. Все процедуры проводятся анонимно и под наблюдением специалистов.
Выяснить больше – [url=https://vyvod-iz-zapoya-sochi12.ru/]вывод из запоя на дому круглосуточно сочи[/url]
В этом тексте собрано множество случайных сведений и довольно неопределённых мыслей, которые могут чем-то заинтересовать. Мы отмечаем моменты, которые не особенно важны, но всё же занимают своё место в повествовании.
Вот – [url=https://arma-rehab.ru/]милфы[/url]
Мы выезжаем в любое время дня и ночи. Организационно всё просто: короткий звонок с описанием состояния, согласование адреса и времени, консультация по подготовке помещения, приезд врача. Если состояние тяжёлое (длительный запой, возраст 60+, выраженная соматика, признаки делирия, многократная рвота, спутанность сознания), медик предложит стационар сразу — это безопаснее, чем пытаться «дотянуть» ночь дома. В клинике пациент находится под круглосуточным наблюдением, при необходимости выполняются дополнительные исследования, расширяется объём инфузий, корректируется медикаментозная схема. Для пожилых и кардиологических пациентов стационарный формат часто предпочтителен: непрерывный мониторинг снижает риски и ускоряет стабилизацию.
Получить дополнительную информацию – http://vyvod-iz-zapoya-korolev10.ru/
Выезд нарколога на дом в Нижнем Новгороде — круглосуточная помощь при запое. Мы гарантируем анонимность и конфиденциальность на всех этапах лечения.
Получить дополнительную информацию – [url=https://snyatie-zapoya-na-domu13.ru/]вывод из запоя анонимно[/url]
Если вы ищете надежную клинику для вывода из запоя в Сочи, обратитесь в «Детокс». Здесь опытные специалисты окажут необходимую помощь в стационаре. Услуга доступна круглосуточно, анонимно и начинается от 2000 ?.
Получить больше информации – [url=https://vyvod-iz-zapoya-sochi22.ru/]вывод из запоя на дому круглосуточно[/url]
Капельница от запоя в Нижнем Новгороде — процедура, направленная на детоксикацию организма и восстановление нормального самочувствия. Она включает в себя введение препаратов, способствующих выведению токсинов и восстановлению функций органов.
Изучить вопрос глубже – [url=https://snyatie-zapoya-na-domu11.ru/]наркологический вывод из запоя[/url]
«Вектор Надежды» выстраивает помощь так, чтобы с первого звонка убрать неопределённость и вернуть ощущение контроля. Дежурный врач аккуратно собирает только необходимую информацию, оценивает риски и предлагает безопасный старт: выезд на дом, дневной маршрут или стационар с наблюдением 24/7. Мы объясняем каждую манипуляцию простым языком — что именно будет сделано в ближайшие часы, каких изменений ожидать к вечеру, почему выбран именно такой темп и как поймём, что схема работает. Конфиденциальность — не дополнение, а стандарт: нейтральные звонки, неброская атрибутика, ограниченный доступ к карте, отсутствие постановки на учёт. Такой регламент снижает тревогу, экономит силы семьи и ускоряет стабилизацию: вместо «марафона кабинетов» — один связный маршрут с понятными контрольными точками.
Углубиться в тему – [url=https://narkologicheskaya-klinika-shchyolkovo0.ru/]narkologicheskaya-klinika-shchelkovo[/url]
Когда самочувствие «скачет», а ночь грозит затянуться, важен не героизм, а клинически выверенный план. В «МедОпоре» в Красногорске мы выстраиваем помощь так, чтобы каждый шаг давал предсказуемый эффект: первичное обследование, персональная инфузионная терапия, бережная коррекция тревоги и сна, мониторинг жизненно важных показателей и подробные рекомендации для семьи. Мы не используем «универсальные коктейли» и не маскируем симптомы — задача детокса в том, чтобы снять токсическую нагрузку, восстановить водно-электролитный баланс, стабилизировать вегетативные реакции и вернуть управляемость состоянием. С первых минут пациент получает ясные ориентиры: что делаем сейчас, чего ждать через час, по каким признакам нужно срочно звать врача. Анонимность соблюдается без компромиссов, а решения принимаются на основе реальных показателей — это снижает тревогу и исключает опасные «домашние эксперименты».
Подробнее можно узнать тут – https://vyvod-iz-zapoya-krasnogorsk10.ru/vyvod-iz-zapoya-klinika-v-krasnogorske
Что делаем на практике
Получить больше информации – http://narkologicheskaya-klinika-domodedovo0.ru/narkologicheskaya-klinika-stacionar-v-domodedovo/
Клиника «Детокс» в Сочи предлагает услугу вывода из запоя в стационаре. Под наблюдением профессиональных врачей пациент получит необходимую медицинскую помощь и поддержку. Услуга доступна круглосуточно, анонимно и начинается от 2000 ?.
Выяснить больше – http://vyvod-iz-zapoya-sochi22.ru/
В Краснодаре клиника «Детокс» предлагает услугу выезда нарколога на дом. Быстро, безопасно, анонимно.
Исследовать вопрос подробнее – [url=https://narkolog-na-dom-krasnodar15.ru/]вывод из запоя недорого в сочи[/url]
Санкт-Петербург является крупным культурным центром России.
Город расположен у дельты Невы и имеет уникальное наследие.
Архитектурный стиль сочетает исторические здания и новые архитектурные решения.
Этот город славится музеями и разнообразием событий.
Городские набережные создают уникальный характер.
Туристы приезжают сюда круглый год, чтобы почувствовать дух города.
Санкт-Петербург также является важным экономическим центром.
Таким образом, Санкт-Петербург привлекает людей со всего мира.
https://leasedadspace.com/members/yebibaf720/
В Краснодаре клиника «Детокс» предлагает услугу выезда нарколога на дом. Быстро, безопасно, анонимно.
Выяснить больше – [url=https://narkolog-na-dom-krasnodar12.ru/]вывод из запоя на дому цена в сочи[/url]
В материале приведены детали, интересные, но не особенно важные. Мы рассматриваем аспекты, которые сложно назвать существенными, но включили их для большей полноты.
Подробнее читать – [url=https://rostov-narkologiya.ru/uslugi-ot-narkomanii/mefedronovaya-zavisimost/]лечение COVID народными средствами[/url]
В Сочи стационар клиники «Детокс» предлагает комплексный вывод из запоя. Пациентам обеспечивают комфорт, безопасность и круглосуточный контроль.
Получить дополнительную информацию – [url=https://vyvod-iz-zapoya-sochi12.ru/]вывод из запоя анонимно[/url]
Стильная одежда играет важную роль в создании первого впечатления.
Она помогает передать личный стиль и ощущать внутренний комфорт.
Современный стиль создаёт впечатление окружающих.
В повседневной жизни одежда может придавать уверенность.
https://hackernoon.com/preview/694d1a974c091f4db9522e15
Продуманный гардероб облегчает повседневное взаимодействие.
При выборе одежды важно учитывать собственный вкус и уместность ситуации.
Актуальные стили дают возможность обновлять образ.
В итоге, умение стильно одеваться положительно влияет на самоощущение.
В данной обзорной статье представлены интригующие факты, которые не оставят вас равнодушными. Мы критикуем и анализируем события, которые изменили наше восприятие мира. Узнайте, что стоит за новыми открытиями и как они могут изменить ваше восприятие реальности.
Подробности по ссылке – https://panthfasteners.com/nullam-dictum-felis-e
Вызов нарколога на дом в Краснодаре — услуга клиники «Детокс». Специалисты оказывают квалифицированную помощь прямо у вас дома.
Углубиться в тему – [url=https://narkolog-na-dom-krasnodar12.ru/]вызов врача нарколога на дом сочи[/url]
Если вы ищете надежную клинику для вывода из запоя в Сочи, обратитесь в «Детокс». Здесь опытные специалисты окажут необходимую помощь в стационаре. Услуга доступна круглосуточно, анонимно и начинается от 2000 ?.
Получить дополнительные сведения – [url=https://vyvod-iz-zapoya-sochi15.ru/]вывод из запоя на дому круглосуточно в сочи[/url]
Публикация приглашает вас исследовать неизведанное — от древних тайн до современных достижений науки. Вы узнаете, как случайные находки превращались в революции, а смелые мысли — в новые эры человеческого прогресса.
Подробности по ссылке – https://metropoltv.co.ke/dangotes-networth-up-2-billion-in-january-2024
В нашей практике сочетаются несколько видов вмешательства: медико-биологическое, психологическое и социальное. Сначала проводится полная диагностика, включая лабораторные анализы и оценку работы сердца, печени, почек, а также психодиагностические тесты. После этого начинается этап детоксикации с внутривенными капельницами, которые выводят токсины, нормализуют водно-солевой баланс и восстанавливают основные функции организма. Далее мы применяем медикаментозную поддержку для стабилизации артериального давления, купирования тревожных симптомов, нормализации сна и уменьшения болевого синдрома.
Получить дополнительные сведения – [url=https://narkologicheskaya-klinika-mytishchi1.ru/]частная наркологическая клиника в мытищах[/url]
В жизни крупных городов часто возникают ситуации, когда стрессы и быстрый ритм жизни приводят к развитию зависимости. Когда проблема становится очевидной, важно незамедлительно обратиться за помощью. В таких случаях вызов нарколога на дом может стать не только удобным, но и наиболее эффективным вариантом. Это позволяет получить квалифицированное лечение в привычной обстановке, сохраняя при этом полную анонимность и конфиденциальность.
Подробнее тут – [url=https://narcolog-na-dom-moskva55.ru/]narcolog-na-dom-moskva55.ru/[/url]
Если вы ищете надежную клинику для вывода из запоя, обратитесь в «Детокс» в Краснодаре. Услуга вызова нарколога на дом доступна круглосуточно. Врачи приедут к вам в течение 1–2 часов и окажут необходимую помощь.
Ознакомиться с деталями – [url=https://narkolog-na-dom-krasnodar12.ru/]vyzov-narkologa-na-dom sochi[/url]
Клиника «Детокс» в Сочи предлагает услугу вывода из запоя в стационаре. Под наблюдением профессиональных врачей пациент получит необходимую медицинскую помощь и поддержку. Услуга доступна круглосуточно, анонимно и начинается от 2000 ?.
Ознакомиться с деталями – [url=https://vyvod-iz-zapoya-sochi12.ru/]вывод из запоя капельница[/url]
Врач оценивает состояние пациента, измеряет давление, пульс, сатурацию, уровень сахара в крови и собирает анамнез. Это помогает выявить возможные риски и подобрать подходящие препараты.
Получить дополнительную информацию – [url=https://vyvod-iz-zapoya-v-himki1.ru/]pomoshch-vyvod-iz-zapoya[/url]
Публикация предоставляет читателю набор разрозненных идей, которые сложно применить на практике. Мы лишь слегка касаемся разных точек зрения, не углубляясь в анализ и не предлагая никаких выводов.
Вот – [url=https://arma-rehab.ru/]азартные игры на деньги[/url]
Мы обеспечиваем быстрое и безопасное восстановление после длительного употребления алкоголя.
Получить больше информации – [url=https://snyatie-zapoya-na-domu15.ru/]вывод из запоя на дому цена[/url]
Клиника «Детокс» в Краснодаре предлагает услугу вызова нарколога на дом. Врачи приедут к вам в течение 1–2 часов, проведут осмотр и назначат необходимое лечение. Услуга доступна круглосуточно и анонимно.
Выяснить больше – [url=https://narkolog-na-dom-krasnodar17.ru/]нарколог на дом краснодарский край[/url]
Клиника «Детокс» в Сочи проводит вывод из запоя в стационаре. Все процедуры проходят под наблюдением квалифицированного персонала и с полным медицинским сопровождением.
Получить дополнительную информацию – [url=https://vyvod-iz-zapoya-sochi15.ru/]нарколог вывод из запоя сочи[/url]
В Сочи клиника «Детокс» предоставляет услугу вывода из запоя в стационаре. Профессиональные врачи обеспечат комфортное и безопасное лечение. Минимальная стоимость услуги — 2000 ?.
Подробнее – [url=https://vyvod-iz-zapoya-sochi22.ru/]анонимный вывод из запоя сочи[/url]
В жизни крупных городов часто возникают ситуации, когда стрессы и быстрый ритм жизни приводят к развитию зависимости. Когда проблема становится очевидной, важно незамедлительно обратиться за помощью. В таких случаях вызов нарколога на дом может стать не только удобным, но и наиболее эффективным вариантом. Это позволяет получить квалифицированное лечение в привычной обстановке, сохраняя при этом полную анонимность и конфиденциальность.
Ознакомиться с деталями – [url=https://narcolog-na-dom-moskva55.ru/]vyzvat narkologa na dom[/url]
Клиника «Похмельная служба» в Нижнем Новгороде предлагает капельницу от запоя с выездом на дом. Наши специалисты обеспечат вам комфортное и безопасное лечение в привычной обстановке.
Подробнее – [url=https://vyvod-iz-zapoya-nizhnij-novgorod12.ru/]врач вывод из запоя в нижнем новгороде[/url]
Этот интересный отчет представляет собой сборник полезных фактов, касающихся актуальных тем. Мы проанализируем данные, чтобы вы могли сделать обоснованные выводы. Читайте, чтобы узнать больше о последних трендах и значимых событиях!
Уточнить детали – https://awakenregen.com/2023/10/25/psicologia-social-comunitaria-en-el-turismo-regenerativo-potenciando-el-empoderamiento-local-y-la-salud-mental
В Краснодаре клиника «Детокс» проводит выезд нарколога на дом для безопасного вывода из запоя.
Изучить вопрос глубже – [url=https://narkolog-na-dom-krasnodar11.ru/]вывод из запоя недорого в сочи[/url]
В нашей практике сочетаются несколько видов вмешательства: медико-биологическое, психологическое и социальное. Сначала проводится полная диагностика, включая лабораторные анализы и оценку работы сердца, печени, почек, а также психодиагностические тесты. После этого начинается этап детоксикации с внутривенными капельницами, которые выводят токсины, нормализуют водно-солевой баланс и восстанавливают основные функции организма. Далее мы применяем медикаментозную поддержку для стабилизации артериального давления, купирования тревожных симптомов, нормализации сна и уменьшения болевого синдрома.
Ознакомиться с деталями – [url=https://narkologicheskaya-klinika-mytishchi1.ru/]narkologicheskaya-klinika-pomoshch-na-domu[/url]
В клинике «НаркологПроф» детоксикация проводится под наблюдением специалистов, которые контролируют давление, частоту сердечных сокращений и дыхание пациента. Инфузионная терапия помогает восстановить электролитный баланс, ускорить выведение токсинов и улучшить общее состояние уже через несколько часов после начала лечения.
Получить дополнительные сведения – http://vyvod-iz-zapoya-v-himki1.ru/vyvod-iz-zapoya-na-domu-khimki/
Если вы или ваш близкий нуждаетесь в профессиональной помощи при запое, клиника «Детокс» в Сочи предлагает вывод из запоя в стационаре. Под наблюдением опытных врачей пациент получит необходимую медицинскую помощь и поддержку. Услуга доступна круглосуточно, анонимно и начинается от 2000 ?.
Ознакомиться с деталями – [url=https://vyvod-iz-zapoya-sochi23.ru/]вывод из запоя с выездом сочи[/url]
Клиника «Похмельная служба» в Нижнем Новгороде предлагает капельницу от запоя с выездом на дом. Наши специалисты обеспечат вам комфортное и безопасное лечение в привычной обстановке.
Ознакомиться с деталями – [url=https://vyvod-iz-zapoya-nizhnij-novgorod12.ru/]вывод из запоя на дому цена[/url]
Стационарная программа позволяет стабилизировать не только физическое состояние, но и эмоциональную сферу. Находясь в изоляции от внешних раздражителей и вредных контактов, пациент получает шанс сконцентрироваться на себе и начать реабилитацию без давления извне.
Получить дополнительные сведения – [url=https://narkologicheskaya-pomoshch-balashiha1.ru/]вызвать наркологическую помощь[/url]
Экстренная помощь при запое в Нижнем Новгороде — капельница на дому от опытных врачей-наркологов.
Исследовать вопрос подробнее – [url=https://vyvod-iz-zapoya-nizhnij-novgorod12.ru/]вывод из запоя нижний новгород[/url]
В Краснодаре клиника «Детокс» предлагает услугу выезда нарколога на дом. Быстро, безопасно, анонимно.
Выяснить больше – [url=https://narkolog-na-dom-krasnodar17.ru/]vyzvat-narkologa-na-dom sochi[/url]
Одним из самых привлекательных аспектов вызова нарколога на дом является гибкость. Вы можете согласовать время визита врача, подходящее именно для вас, включая вечернее или ночное время. Это позволяет совмещать лечение с работой и личными делами, не нарушая привычный ритм жизни.
Ознакомиться с деталями – [url=https://narcolog-na-dom-moskva55.ru/]нарколог на дом москва цены[/url]
Лечебные мероприятия и рекомендации формируются исходя из индивидуального состояния каждого пациента. Специалист имеет возможность посвятить достаточное количество времени каждому больному, корректируя программу лечения согласно его особым потребностям и жизненным обстоятельствам. При этом учитываются психологические, социальные и физические аспекты, оказывающие влияние на здоровье пациента. Персонализированный подход обеспечивает оперативное реагирование на изменения состояния и своевременную корректировку терапии.
Получить дополнительную информацию – https://narcolog-na-dom-msk55.ru/narkolog-na-dom-moskva-tseny/
Также мы учитываем потребности каждого пациента — по питанию, условиям проживания, графику процедур. Проживание возможно в стандартных и повышенных палатах, с возможностью индивидуального обслуживания.
Разобраться лучше – [url=https://narkologicheskaya-pomoshch-balashiha1.ru/]telefony-narkologicheskoj-pomoshchi[/url]
Проведение лечения в домашней обстановке значительно снижает уровень стресса и тревожности. Пациенту не нужно тратить силы на поездки в медицинские учреждения, что особенно важно при ограниченной мобильности. Домашняя атмосфера создает идеальные условия для открытого диалога с врачом, что существенно повышает эффективность терапии и шансы на успешное выздоровление.
Ознакомиться с деталями – [url=https://narcolog-na-dom-msk55.ru/]vrach narkolog na dom[/url]
Если вы ищете надежную клинику для вывода из запоя, обратитесь в «Детокс» в Краснодаре. Услуга вызова нарколога на дом доступна круглосуточно. Врачи приедут к вам в течение 1–2 часов и окажут необходимую помощь.
Ознакомиться с деталями – [url=https://narkolog-na-dom-krasnodar12.ru/]нарколог на дом краснодарский край[/url]
Для многих пациентов важным моментом является сохранение конфиденциальности. Врач, приехавший на дом, работает с полной защитой данных. Пациент может быть уверен, что его проблема останется личной и не станет достоянием общественности. Врачи приезжают на неприметных автомобилях и избегают всяческих ситуаций, которые могут привлечь лишнее внимание.
Подробнее – [url=https://narcolog-na-dom-moskva55.ru/]vrach narkolog na dom[/url]
В основе нашей методики — комплексный подход, сочетающий медицинскую точку зрения и психологические технологии. Мы не ограничиваемся снятием абстиненции: задача клиники — помочь пациенту обрести новую мотивацию, развить навыки противостояния стрессам и возобновить социальную активность. Работа строится на трёх ключевых принципах:
Узнать больше – [url=https://narkologicheskaya-klinika-mytishchi1.ru/]zakazat-obratnyj-zvonok-narkologicheskaya-klinika[/url]
Задача врачей — не просто облегчить симптомы, а купировать осложнения, стабилизировать жизненно важные функции, вернуть пациенту способность к дальнейшему лечению. Мы работаем быстро, анонимно и профессионально. Любой человек, оказавшийся в кризисе, может получить помощь в течение часа после обращения.
Исследовать вопрос подробнее – [url=https://snyatie-lomki-podolsk1.ru/]lomka ot narkotikov podol’sk[/url]
Наркологическая клиника «НаркологПроф» в Химках — это современный центр, специализирующийся на безопасном и быстром выведении из запоя. Здесь работают врачи-наркологи, анестезиологи и медицинские сестры с большим стажем. Клиника функционирует круглосуточно, обеспечивая как выездную помощь, так и стационарное лечение. Главная цель специалистов — восстановить работу организма после интоксикации, нормализовать давление, устранить тревогу и бессонницу, помочь пациенту вернуться к нормальному состоянию. Все процедуры проводятся анонимно, без постановки на учёт. Индивидуальный подход, корректный подбор медикаментов и строгий контроль состояния пациента делают лечение эффективным и безопасным.
Выяснить больше – [url=https://vyvod-iz-zapoya-v-himki1.ru/]vyvod-iz-zapoya-s-vyezdom[/url]
Одним из самых привлекательных аспектов вызова нарколога на дом является гибкость. Вы можете согласовать время визита врача, подходящее именно для вас, включая вечернее или ночное время. Это позволяет совмещать лечение с работой и личными делами, не нарушая привычный ритм жизни.
Подробнее тут – http://narcolog-na-dom-moskva55.ru
В Сочи стационар клиники «Детокс» предлагает комплексный вывод из запоя. Пациентам обеспечивают комфорт, безопасность и круглосуточный контроль.
Детальнее – [url=https://vyvod-iz-zapoya-sochi12.ru/]вывод из запоя на дому круглосуточно[/url]
Умение стильно одеваться является значимым фактором в формировании образа.
Она помогает передать личный стиль и чувствовать себя увереннее.
Аккуратный внешний вид влияет на восприятие окружающих.
В повседневной жизни одежда может помогать собранности.
https://telegra.ph/Off-White-12-25
Хорошо подобранная одежда облегчает социальные контакты.
При выборе одежды важно учитывать личные предпочтения и обстановку.
Мода дают возможность обновлять образ.
Таким образом, умение стильно одеваться делает образ завершённым.
В Сочи клиника «Детокс» предоставляет услугу вывода из запоя в стационаре. Профессиональные врачи обеспечат комфортное и безопасное лечение. Минимальная стоимость услуги — 2000 ?.
Разобраться лучше – [url=https://vyvod-iz-zapoya-sochi15.ru/]вывод из запоя вызов сочи[/url]
В основе нашей методики — комплексный подход, сочетающий медицинскую точку зрения и психологические технологии. Мы не ограничиваемся снятием абстиненции: задача клиники — помочь пациенту обрести новую мотивацию, развить навыки противостояния стрессам и возобновить социальную активность. Работа строится на трёх ключевых принципах:
Углубиться в тему – http://narkologicheskaya-klinika-mytishchi1.ru/narkologicheskaya-klinika-ceny-v-mytishchah/
В нашей практике сочетаются несколько видов вмешательства: медико-биологическое, психологическое и социальное. Сначала проводится полная диагностика, включая лабораторные анализы и оценку работы сердца, печени, почек, а также психодиагностические тесты. После этого начинается этап детоксикации с внутривенными капельницами, которые выводят токсины, нормализуют водно-солевой баланс и восстанавливают основные функции организма. Далее мы применяем медикаментозную поддержку для стабилизации артериального давления, купирования тревожных симптомов, нормализации сна и уменьшения болевого синдрома.
Подробнее тут – https://narkologicheskaya-klinika-mytishchi1.ru/
Алкогольная интоксикация разрушает организм изнутри. В первую очередь страдает центральная нервная система: снижается уровень витаминов группы B, нарушаются когнитивные функции, появляются раздражительность, бессонница, панические атаки. Следом — страдает печень, главный орган метаболической детоксикации. Под действием этанола её функции подавляются, а токсины накапливаются в крови. Это вызывает системное отравление и разрушает внутренние органы.
Разобраться лучше – [url=https://kapelnica-ot-zapoya-msk55.ru/]поставить капельницу от запоя[/url]
Врач оценивает состояние пациента, измеряет давление, пульс, сатурацию, уровень сахара в крови и собирает анамнез. Это помогает выявить возможные риски и подобрать подходящие препараты.
Узнать больше – http://vyvod-iz-zapoya-v-himki1.ru/vyvod-iz-zapoya-khimki-narkolog-na-dom/
В Краснодаре клиника «Детокс» предлагает выезд нарколога на дом. Помощь оказывается быстро, анонимно и круглосуточно.
Подробнее тут – [url=https://narkolog-na-dom-krasnodar12.ru/]narkolog-na-dom-krasnodar12.ru[/url]
Также страдают сердце и сосуды. У пациентов часто наблюдаются тахикардия, нестабильное давление, аритмии, повышенный риск инфаркта или инсульта. Система пищеварения реагирует воспалением: гастрит, панкреатит, тошнота, рвота. Все эти изменения усиливаются на фоне обезвоживания и электролитного дисбаланса. Именно поэтому стандартное «отлежаться» или домашнее лечение чаще всего оказывается неэффективным и даже опасным. Необходима полноценная капельная терапия — с грамотно подобранными препаратами и медицинским наблюдением.
Получить дополнительные сведения – https://kapelnica-ot-zapoya-moskva3.ru/
Наркологическая клиника «НаркологПроф» в Химках — это современный центр, специализирующийся на безопасном и быстром выведении из запоя. Здесь работают врачи-наркологи, анестезиологи и медицинские сестры с большим стажем. Клиника функционирует круглосуточно, обеспечивая как выездную помощь, так и стационарное лечение. Главная цель специалистов — восстановить работу организма после интоксикации, нормализовать давление, устранить тревогу и бессонницу, помочь пациенту вернуться к нормальному состоянию. Все процедуры проводятся анонимно, без постановки на учёт. Индивидуальный подход, корректный подбор медикаментов и строгий контроль состояния пациента делают лечение эффективным и безопасным.
Разобраться лучше – [url=https://vyvod-iz-zapoya-v-himki1.ru/]vrach-vyvod-iz-zapoya[/url]
Алкогольная или наркотическая интоксикация — это не просто временное ухудшение самочувствия, а серьёзное медицинское состояние, требующее неотложной помощи. Когда человек находится в запое или состоянии ломки, его организм стремительно теряет силы, нарушается работа сердца, печени, мозга, возникают панические атаки, судороги, спутанность сознания. В таких случаях помощь должна быть незамедлительной. Если пациент не может самостоятельно добраться до клиники, оптимальным решением становится вызов нарколога на дом. В Красногорске такая услуга доступна круглосуточно благодаря выездной службе клиники «Ключ к Здоровью».
Детальнее – http://narcolog-na-dom-v-moskve55.ru
пылесос дайсон купить ярославль [url=https://dn-pylesos.ru/]dn-pylesos.ru[/url] .
Абстинентный синдром — одно из самых тяжёлых и опасных проявлений наркотической зависимости. Он развивается на фоне резкого отказа от приёма веществ и сопровождается сильнейшими нарушениями работы организма. Это состояние требует немедленного вмешательства. Самостоятельно справиться с ним невозможно — особенно если речь идёт о героине, метадоне, синтетических наркотиках или длительной зависимости. В клинике «НаркоПрофи» мы организовали систему снятия ломки в Подольске, работающую круглосуточно: как на дому, так и в условиях стационара.
Детальнее – [url=https://snyatie-lomki-podolsk1.ru/]снятие ломок в подольске[/url]
Клиника «Детокс» в Сочи проводит вывод из запоя в стационаре. Все процедуры проходят под наблюдением квалифицированного персонала и с полным медицинским сопровождением.
Подробнее можно узнать тут – [url=https://vyvod-iz-zapoya-sochi22.ru/]вывод из запоя с выездом[/url]
В Сочи клиника «Детокс» проводит вывод из запоя в стационаре с круглосуточным контролем врачей. Процедуры безопасны, эффективны и анонимны.
Исследовать вопрос подробнее – [url=https://vyvod-iz-zapoya-sochi15.ru/]вывод из запоя вызов[/url]
Абстиненция — это не «плохое самочувствие», а тяжёлая физиологическая перестройка с риском аритмий, скачков давления, судорог и делирия. Домашние попытки выходить из запоя без врача часто усиливают обезвоживание, перегружают печень и провоцируют тревожные расстройства, из-за которых усиливается тяга к алкоголю. В «НоваМед Центр» тактика строится вокруг безопасности: сначала исключаются угрозы жизни, затем врач подбирает инфузию, которая переносится именно вашим организмом. Контролируются давление, пульс, дыхание, сатурация; по реакции корректируются объёмы и скорость введения, чтобы не вызвать перегрузки. Параллельно купируются симптомы — тремор, тошнота, бессонница, тревога — и возвращается физиологичный сон. Такой управляемый маршрут снижает риск осложнений и позволяет человеку быстрее восстановить ясность мышления и базовую работоспособность.
Получить дополнительную информацию – http://vyvod-iz-zapoya-lyubertsy2.ru
Если вы ищете надежную клинику для вывода из запоя в Сочи, обратитесь в «Детокс». Здесь опытные специалисты окажут необходимую помощь в стационаре. Услуга доступна круглосуточно, анонимно и начинается от 2000 ?.
Получить дополнительные сведения – [url=https://vyvod-iz-zapoya-sochi12.ru/]скорая вывод из запоя сочи[/url]
Выезд нарколога на дом в Нижнем Новгороде — круглосуточная помощь при запое. Мы гарантируем анонимность и конфиденциальность на всех этапах лечения.
Получить больше информации – [url=https://snyatie-zapoya-na-domu16.ru/]вывод из запоя недорого[/url]
Клиника «Детокс» в Сочи проводит вывод из запоя в стационаре. Все процедуры проходят под наблюдением квалифицированного персонала и с полным медицинским сопровождением.
Разобраться лучше – [url=https://vyvod-iz-zapoya-sochi22.ru/]вывод из запоя на дому[/url]
Выездная наркологическая помощь в Нижнем Новгороде — капельница от запоя с выездом на дом. Мы обеспечиваем быстрое и качественное лечение без необходимости посещения клиники.
Выяснить больше – [url=https://snyatie-zapoya-na-domu11.ru/]вывод из запоя на дому круглосуточно[/url]
Клиника «Похмельная служба» в Нижнем Новгороде предлагает комплексное лечение запоя с использованием капельницы. Наши специалисты проводят диагностику и назначают индивидуальный план лечения.
Выяснить больше – [url=https://vyvod-iz-zapoya-nizhnij-novgorod13.ru/]нарколог на дом вывод из запоя нижний новгород[/url]
Если вы ищете надежную клинику для вывода из запоя, обратитесь в «Детокс» в Краснодаре. Услуга вызова нарколога на дом доступна круглосуточно. Врачи приедут к вам в течение 1–2 часов и окажут необходимую помощь.
Углубиться в тему – [url=https://narkolog-na-dom-krasnodar17.ru/]вывод из запоя с выездом в сочи[/url]
Процедура длится от одного до трёх часов. В течение всего времени за пациентом наблюдает медперсонал, проводится мониторинг давления, пульса, общего самочувствия. Уже через 30–60 минут после начала инфузии большинство пациентов ощущают облегчение: снижается тревожность, уходит головная боль, нормализуется дыхание, появляются силы.
Выяснить больше – http://kapelnica-ot-zapoya-moskva3.ru
Процесс начинается с вызова врача или доставки пациента в клинику. После прибытия специалист проводит первичную диагностику: измерение давления, температуры, пульса, уровня кислорода в крови, визуальная оценка степени возбуждения или угнетения сознания. Собирается краткий анамнез: какой наркотик принимался, как долго, были ли сопутствующие заболевания.
Получить больше информации – [url=https://snyatie-lomki-podolsk1.ru/]снятие ломки на дому[/url]
Клиника «Детокс» в Краснодаре предлагает услугу вызова нарколога на дом. Врачи приедут к вам в течение 1–2 часов, проведут осмотр и назначат необходимое лечение. Услуга доступна круглосуточно и анонимно.
Получить дополнительные сведения – [url=https://narkolog-na-dom-krasnodar17.ru/]вызов нарколога на дом краснодарский край[/url]
В данной обзорной статье представлены интригующие факты, которые не оставят вас равнодушными. Мы критикуем и анализируем события, которые изменили наше восприятие мира. Узнайте, что стоит за новыми открытиями и как они могут изменить ваше восприятие реальности.
Открой скрытое – https://shininguttarakhandnews.com/night-bazar-in-kashi
Капельница от запоя в Нижнем Новгороде — процедура, направленная на детоксикацию организма и восстановление нормального самочувствия. Она включает в себя введение препаратов, способствующих выведению токсинов и восстановлению функций органов.
Выяснить больше – [url=https://snyatie-zapoya-na-domu15.ru/]вывод из запоя с выездом в нижнем новгороде[/url]
Капельница от запоя в Нижнем Новгороде — эффективный способ снять симптомы похмелья и восстановить организм. Процедура проводится опытными врачами с использованием современных препаратов.
Подробнее – [url=https://snyatie-zapoya-na-domu13.ru/]вывод из запоя дешево нижний новгород[/url]
На месте врач проводит первичный осмотр, измеряет давление, пульс, сатурацию, оценивает уровень интоксикации и абстиненции. Далее назначается инфузионная терапия — капельница, направленная на дезинтоксикацию, восстановление электролитного баланса, купирование тревожности и нормализацию сна.
Разобраться лучше – [url=https://narcolog-na-dom-v-moskve55.ru/]нарколог на дом вывод красногорск[/url]
купить пылесос дайсон оренбург [url=https://dn-pylesos.ru/]dn-pylesos.ru[/url] .
Экстренная помощь при запое в Нижнем Новгороде — капельница на дому от опытных врачей-наркологов.
Разобраться лучше – https://vyvod-iz-zapoya-nizhnij-novgorod12.ru
Если запой стал серьёзной проблемой, стационар клиники «Детокс» в Сочи поможет выйти из кризиса. Врачи проводят детоксикацию и наблюдают за состоянием пациента.
Разобраться лучше – [url=https://vyvod-iz-zapoya-sochi23.ru/]вывод из запоя на дому цена[/url]
Публикация приглашает вас исследовать неизведанное — от древних тайн до современных достижений науки. Вы узнаете, как случайные находки превращались в революции, а смелые мысли — в новые эры человеческого прогресса.
А что дальше? – http://fehervarrugby.hu/sulyemeles/rovid-hir-a-sulyemelo-eb-rol-bangorbol-cimvedes
Если нужен профессиональный вывод из запоя, обращайтесь в стационар клиники «Детокс» в Сочи. Все процедуры проводятся анонимно и под наблюдением специалистов.
Подробнее тут – [url=https://vyvod-iz-zapoya-sochi23.ru/]срочный вывод из запоя в сочи[/url]
Также мы учитываем потребности каждого пациента — по питанию, условиям проживания, графику процедур. Проживание возможно в стандартных и повышенных палатах, с возможностью индивидуального обслуживания.
Изучить вопрос глубже – https://narkologicheskaya-pomoshch-balashiha1.ru/narkologicheskaya-pomoshch-na-domu-v-balashihe
Показания к проведению капельницы от запоя включают:
Изучить вопрос глубже – [url=https://kapelnica-ot-zapoya-moskva3.ru/]вызвать капельницу от запоя химки[/url]
В Краснодаре клиника «Детокс» проводит выезд нарколога на дом для безопасного вывода из запоя.
Разобраться лучше – [url=https://narkolog-na-dom-krasnodar15.ru/]нарколог на дом цена в сочи[/url]
В Сочи клиника «Детокс» предоставляет услугу вывода из запоя в стационаре. Профессиональные врачи обеспечат комфортное и безопасное лечение. Минимальная стоимость услуги — 2000 ?.
Подробнее тут – [url=https://vyvod-iz-zapoya-sochi12.ru/]наркологический вывод из запоя[/url]
Одной из самых сильных сторон нашей клиники является оперативность. Мы понимаем, что при алкоголизме, наркомании и лекарственной зависимости часто требуются немедленные действия. Если человек находится в состоянии запоя, абстиненции или передозировки, промедление может привести к тяжёлым осложнениям или даже смерти.
Получить дополнительную информацию – [url=https://narkologicheskaya-pomoshch-balashiha1.ru/]okazanie-narkologicheskoj-pomoshchi[/url]
Первый контакт начинается с точных вопросов: длительность запоя, принятые лекарства, хронические болезни, аллергии, эпизоды аритмии или судорог. По приезде врач оценивает уровень сознания, измеряет давление, пульс, сатурацию, частоту дыхания, при необходимости проводит экспресс-глюкозу и ЭКГ переносным прибором. На этом этапе выбирается формат — на дому или в стационаре — исходя из клинических рисков и бытовых условий. Если показатели стабильны и рядом есть взрослый для наблюдения, домашний формат позволяет мягко и конфиденциально стабилизировать состояние. Если же ожидаются колебания давления, нарушения ритма, признаки делирия или выраженная дегидратация, безопаснее стационар, где доступен круглосуточный мониторинг и быстрая коррекция терапии без логистических пауз. Решение всегда объясняется простыми словами, чтобы пациент и близкие понимали логику маршрута.
Получить дополнительную информацию – [url=https://vyvod-iz-zapoya-lyubertsy2.ru/]вывод из запоя на дому люберцы[/url]
Health guidance is easier to find than ever.Increased exposure rarely ensures meaningful insight.Nuance is commonly lost in popular explanations.Subtle factors are rarely addressed.As a result, individuals may struggle to interpret bodily signals.This confusion is not caused by lack of attention or concern.The human body does not function according to fixed templates.Understanding emerges over time, not instantly.Reflection strengthens comprehension.Editorial discussion helps organize this complexity.Exploration benefits from duration.Listening becomes an active process.Listeners are invited to think critically.Insight is the primary goal.For those interested in nuanced discussion.To continue this exploration, learn more about eriacta for men.
Возможность назначить визит специалиста в наиболее удобное время. Это позволяет эффективно совмещать лечение с работой и повседневными делами. Такая гибкость помогает пациентам своевременно начать терапию, не откладывая ее из-за занятости. При необходимости врач может приехать в вечернее время или выходные дни.
Детальнее – https://narcolog-na-dom-msk55.ru/
Клиника «Детокс» в Сочи проводит вывод из запоя в стационаре. Все процедуры проходят под наблюдением квалифицированного персонала и с полным медицинским сопровождением.
Получить больше информации – [url=https://vyvod-iz-zapoya-sochi12.ru/]нарколог вывод из запоя в сочи[/url]
Эта информационная заметка предлагает лаконичное и четкое освещение актуальных вопросов. Здесь вы найдете ключевые факты и основную информацию по теме, которые помогут вам сформировать собственное мнение и повысить уровень осведомленности.
Это ещё не всё… – http://businessjerrtiseideas.cf/post/34
Капельница от запоя на дому в Нижнем Новгороде — удобное решение для тех, кто не может посетить клинику. Наши специалисты приедут к вам домой и проведут необходимую процедуру.
Получить дополнительную информацию – [url=https://vyvod-iz-zapoya-nizhnij-novgorod12.ru/]наркология вывод из запоя[/url]
Эта статья сочетает в себе как полезные, так и интересные сведения, которые обогатят ваше понимание насущных тем. Мы предлагаем практические советы и рекомендации, которые легко внедрить в повседневную жизнь. Узнайте, как улучшить свои навыки и обогатить свой опыт с помощью простых, но эффективных решений.
Подробности по ссылке – https://protectfrontlineworkers.ca/cause/sponsor-aryans-education-home-food-water
Проведение лечения в домашней обстановке значительно снижает уровень стресса и тревожности. Пациенту не нужно тратить силы на поездки в медицинские учреждения, что особенно важно при ограниченной мобильности. Домашняя атмосфера создает идеальные условия для открытого диалога с врачом, что существенно повышает эффективность терапии и шансы на успешное выздоровление.
Детальнее – https://narcolog-na-dom-msk55.ru/vyzov-narkologa-na-dom-moskva
dyson v12 пылесос [url=https://dn-pylesos.ru/]dyson v12 пылесос[/url] .
В Краснодаре клиника «Детокс» высылает нарколога на дом для срочной помощи при запое. Быстро и безопасно.
Получить больше информации – [url=https://narkolog-na-dom-krasnodar12.ru/]vyzvat-narkologa-na-dom sochi[/url]
В Сочи клиника «Детокс» предлагает вывод из запоя в стационаре. Опытные врачи обеспечивают полную безопасность и комфорт пациента, а услуги доступны круглосуточно.
Исследовать вопрос подробнее – [url=https://vyvod-iz-zapoya-sochi22.ru/]вывод из запоя с выездом[/url]
В Краснодаре клиника «Детокс» проводит выезд нарколога на дом для безопасного вывода из запоя.
Получить дополнительную информацию – [url=https://narkolog-na-dom-krasnodar17.ru/]нарколог на дом недорого в сочи[/url]
Клиника «Детокс» в Краснодаре предлагает услугу вызова нарколога на дом. Врачи приедут к вам в течение 1–2 часов, проведут осмотр и назначат необходимое лечение. Услуга доступна круглосуточно и анонимно.
Подробнее можно узнать тут – [url=https://narkolog-na-dom-krasnodar15.ru/]нарколог на дом клиника в сочи[/url]
Клиника «Детокс» в Краснодаре предлагает услугу вызова нарколога на дом. Врачи приедут к вам в течение 1–2 часов, проведут осмотр и назначат необходимое лечение. Услуга доступна круглосуточно и анонимно.
Выяснить больше – [url=https://narkolog-na-dom-krasnodar11.ru/]vyzvat-narkologa-na-dom sochi[/url]
Ломка — это не временное недомогание. Это системное разрушение организма, связанное с тем, что он перестаёт получать наркотик, к которому уже привык. Нарушается обмен веществ, функции сердца, печени, почек, теряется контроль над эмоциями и болью. В состоянии абстиненции человек не может спать, есть, адекватно мыслить. Страдает и тело, и психика.
Получить дополнительные сведения – http://snyatie-lomki-podolsk1.ru
ростов купить пылесос дайсон [url=https://dn-pylesos.ru/]dn-pylesos.ru[/url] .
Публикация приглашает вас исследовать неизведанное — от древних тайн до современных достижений науки. Вы узнаете, как случайные находки превращались в революции, а смелые мысли — в новые эры человеческого прогресса.
Детали по клику – https://sanierungsplanb.de/finance-illustration-04
В Краснодаре клиника «Детокс» предлагает услугу выезда нарколога на дом. Быстро, безопасно, анонимно.
Выяснить больше – [url=https://narkolog-na-dom-krasnodar12.ru/]вызов нарколога на дом сочи[/url]
Одним из самых привлекательных аспектов вызова нарколога на дом является гибкость. Вы можете согласовать время визита врача, подходящее именно для вас, включая вечернее или ночное время. Это позволяет совмещать лечение с работой и личными делами, не нарушая привычный ритм жизни.
Детальнее – http://narcolog-na-dom-moskva55.ru
Этот текст содержит различную информацию, которая, возможно, покажется любопытной, но в целом не меняет восприятия привычных вещей. Предлагаем просто получить удовольствие от чтения, не ожидая особой пользы.
Вот – [url=https://arma-rehab.ru/]интим услуги[/url]
Если нужен профессиональный вывод из запоя, обращайтесь в стационар клиники «Детокс» в Сочи. Все процедуры проводятся анонимно и под наблюдением специалистов.
Разобраться лучше – [url=https://vyvod-iz-zapoya-sochi23.ru/]наркология вывод из запоя в сочи[/url]
выпрямитель dyson airstrait ht01 купить минск [url=https://vypryamitel-dn-4.ru/]vypryamitel-dn-4.ru[/url] .
Абстиненция — это не «плохое самочувствие», а тяжёлая физиологическая перестройка с риском аритмий, скачков давления, судорог и делирия. Домашние попытки выходить из запоя без врача часто усиливают обезвоживание, перегружают печень и провоцируют тревожные расстройства, из-за которых усиливается тяга к алкоголю. В «НоваМед Центр» тактика строится вокруг безопасности: сначала исключаются угрозы жизни, затем врач подбирает инфузию, которая переносится именно вашим организмом. Контролируются давление, пульс, дыхание, сатурация; по реакции корректируются объёмы и скорость введения, чтобы не вызвать перегрузки. Параллельно купируются симптомы — тремор, тошнота, бессонница, тревога — и возвращается физиологичный сон. Такой управляемый маршрут снижает риск осложнений и позволяет человеку быстрее восстановить ясность мышления и базовую работоспособность.
Ознакомиться с деталями – [url=https://vyvod-iz-zapoya-lyubertsy2.ru/]vyvod iz zapoya lyubercy[/url]
Недропользование — это комплекс работ, связанный с изучением и использованием недр.
Оно включает добычу полезных ископаемых и их дальнейшую переработку.
Эта отрасль регулируется законодательством, направленными на охрану окружающей среды.
Грамотный подход в недропользовании помогает сохранять ресурсы.
оэрн
Если близкий человек в состоянии запоя, закажите нарколога на дом в Краснодаре от клиники «Детокс». Круглосуточно и конфиденциально.
Детальнее – [url=https://narkolog-na-dom-krasnodar11.ru/]vyzov-narkologa-na-dom sochi[/url]
В Сочи клиника «Детокс» предлагает вывод из запоя в стационаре. Опытные врачи обеспечивают полную безопасность и комфорт пациента, а услуги доступны круглосуточно.
Изучить вопрос глубже – [url=https://vyvod-iz-zapoya-sochi12.ru/]срочный вывод из запоя[/url]
В Сочи клиника «Детокс» предлагает полный курс вывода из запоя в стационаре. Круглосуточный медицинский контроль гарантирует безопасность и эффективность лечения.
Получить больше информации – [url=https://vyvod-iz-zapoya-sochi15.ru/]нарколог на дом вывод из запоя[/url]
Клиника «Похмельная служба» в Нижнем Новгороде предлагает капельницу от запоя с выездом на дом. Наши специалисты обеспечат вам комфортное и безопасное лечение в привычной обстановке.
Разобраться лучше – [url=https://vyvod-iz-zapoya-nizhnij-novgorod12.ru/]вывод из запоя круглосуточно в нижнем новгороде[/url]
Процедура длится от одного до трёх часов. В течение всего времени за пациентом наблюдает медперсонал, проводится мониторинг давления, пульса, общего самочувствия. Уже через 30–60 минут после начала инфузии большинство пациентов ощущают облегчение: снижается тревожность, уходит головная боль, нормализуется дыхание, появляются силы.
Углубиться в тему – https://kapelnica-ot-zapoya-moskva3.ru/kapelnicy-ot-zapoya-na-domu-v-himkah/
выпрямитель дайсон airstrait [url=https://vypryamitel-dn-4.ru/]выпрямитель дайсон airstrait[/url] .
Выездная наркологическая помощь в Нижнем Новгороде — капельница от запоя с выездом на дом. Мы обеспечиваем быстрое и качественное лечение без необходимости посещения клиники.
Получить дополнительные сведения – [url=https://snyatie-zapoya-na-domu11.ru/]вывод из запоя на дому круглосуточно нижний новгород[/url]
Клиника «Детокс» в Краснодаре предлагает услугу вызова нарколога на дом. Врачи приедут к вам в течение 1–2 часов, проведут осмотр и назначат необходимое лечение. Услуга доступна круглосуточно и анонимно.
Углубиться в тему – http://narkolog-na-dom-krasnodar15.ru/http://narkolog-na-dom-krasnodar15.ru
Экстренная помощь при запое в Нижнем Новгороде — капельница на дому от опытных врачей-наркологов.
Получить дополнительные сведения – [url=https://snyatie-zapoya-na-domu11.ru/]вывод из запоя вызов на дом[/url]
Клиника «Детокс» в Краснодаре предлагает услугу вызова нарколога на дом. Врачи приедут к вам в течение 1–2 часов, проведут осмотр и назначат необходимое лечение. Услуга доступна круглосуточно и анонимно.
Детальнее – [url=https://narkolog-na-dom-krasnodar12.ru/]вызов врача нарколога на дом в сочи[/url]
В Краснодаре клиника «Детокс» предоставляет услугу вызова нарколога на дом. Специалисты приедут к вам в течение 1–2 часов, проведут осмотр и назначат необходимое лечение. Все процедуры проводятся анонимно и с соблюдением конфиденциальности.
Углубиться в тему – [url=https://narkolog-na-dom-krasnodar15.ru/]выезд нарколога на дом в сочи[/url]
В Краснодаре клиника «Детокс» предоставляет услугу вызова нарколога на дом. Специалисты приедут к вам в течение 1–2 часов, проведут осмотр и назначат необходимое лечение. Все процедуры проводятся анонимно и с соблюдением конфиденциальности.
Получить дополнительную информацию – [url=https://narkolog-na-dom-krasnodar12.ru/]нарколог на дом срочно в сочи[/url]
dyson выпрямитель для волос купить в симферополе [url=https://vypryamitel-dn-4.ru/]vypryamitel-dn-4.ru[/url] .
Наркологическая скорая помощь в Москве — клиника «Частный Медик 24» предлагает экстренную помощь на дому. Наши специалисты приедут к вам в течение 30 минут и проведут необходимые процедуры для стабилизации состояния.
Изучить вопрос глубже – [url=https://skoraya-narkologicheskaya-pomoshch-moskva13.ru/]наркологическая клиника клиника помощь москва[/url]
Публикация приглашает вас исследовать неизведанное — от древних тайн до современных достижений науки. Вы узнаете, как случайные находки превращались в революции, а смелые мысли — в новые эры человеческого прогресса.
Детали по клику – https://kliversmediapresse.com/accueil
Капельница от запоя в Нижнем Новгороде — процедура, направленная на детоксикацию организма и восстановление нормального самочувствия. Она включает в себя введение препаратов, способствующих выведению токсинов и восстановлению функций органов.
Узнать больше – [url=https://vyvod-iz-zapoya-nizhnij-novgorod12.ru/]скорая вывод из запоя нижний новгород[/url]
Если вы ищете надежную клинику для вывода из запоя, обратитесь в «Детокс» в Краснодаре. Услуга вызова нарколога на дом доступна круглосуточно. Врачи приедут к вам в течение 1–2 часов и окажут необходимую помощь.
Получить больше информации – [url=https://narkolog-na-dom-krasnodar11.ru/]нарколог на дом анонимно в сочи[/url]
Помощь при алкогольной интоксикации в Подольске от клиники «Частный Медик 24». Наши специалисты проведут необходимые процедуры для снятия симптомов интоксикации.
Подробнее можно узнать тут – [url=https://kapelnica-ot-zapoya-podolsk12.ru/]капельница от запоя цена город. московская область[/url]
Профессиональная помощь при алкогольной интоксикации в Москве от клиники «Частный Медик 24». Мы предлагаем капельницу, которая способствует восстановлению водно-электролитного баланса и улучшению общего состояния пациента.
Подробнее тут – [url=https://skoraya-narkologicheskaya-pomoshch-moskva13.ru/]skoraya-narkologicheskaya-pomoshch-moskva13.ru[/url]
выпрямитель dyson ht01 [url=https://vypryamitel-dn-4.ru/]выпрямитель dyson ht01[/url] .
Если вы ищете надежную клинику для вывода из запоя, обратитесь в «Детокс» в Краснодаре. Услуга вызова нарколога на дом доступна круглосуточно. Врачи приедут к вам в течение 1–2 часов и окажут необходимую помощь.
Выяснить больше – [url=https://narkolog-na-dom-krasnodar11.ru/]вызов нарколога на дом сочи[/url]
Капельница от запоя в Подольске — «Частный Медик 24» предлагает эффективное лечение на дому. Наши специалисты приедут к вам домой и проведут процедуру, помогая снять симптомы похмелья и вывести токсины из организма.
Ознакомиться с деталями – [url=https://kapelnica-ot-zapoya-podolsk12.ru/]врача капельницу от запоя москва[/url]
Анонимность и конфиденциальность гарантированы в клинике «Частный Медик 24». Мы обеспечиваем полную анонимность и конфиденциальность на всех этапах лечения.
Получить дополнительные сведения – [url=https://skoraya-narkologicheskaya-pomoshch-moskva13.ru/]экстренная наркологическая помощь москва[/url]
Если вы ищете надежную клинику для вывода из запоя, обратитесь в «Детокс» в Краснодаре. Услуга вызова нарколога на дом доступна круглосуточно. Врачи приедут к вам в течение 1–2 часов и окажут необходимую помощь.
Углубиться в тему – [url=https://narkolog-na-dom-krasnodar15.ru/]вывод из запоя на дому круглосуточно в сочи[/url]
Вывод из запоя у пожилых людей в Москве от клиники «Частный Медик 24». Наши специалисты учитывают возрастные изменения организма при назначении лечения.
Подробнее – [url=https://skoraya-narkologicheskaya-pomoshch-moskva12.ru/]скорая наркологическая помощь на дому москве[/url]
Вывод из запоя у пожилых людей в Москве от клиники «Частный Медик 24». Наши специалисты учитывают возрастные изменения организма при назначении лечения.
Детальнее – [url=https://skoraya-narkologicheskaya-pomoshch15.ru/]скорая наркологическая помощь на дому[/url]
Реабилитация после запоя в Москве от клиники «Частный Медик 24». Мы поможем вам восстановиться после запоя и предотвратить рецидивы.
Углубиться в тему – [url=https://skoraya-narkologicheskaya-pomoshch11.ru/]narkologicheskaya-pomoshch moskva[/url]
Лечение абстинентного синдрома на дому в Москве от клиники «Частный Медик 24». Наши специалисты приедут к вам домой и проведут все необходимые процедуры для скорейшего облегчения состояния.
Подробнее тут – [url=https://skoraya-narkologicheskaya-pomoshch-moskva12.ru/]наркологическая помощь[/url]
Лечение пивного алкоголизма в Москве от клиники «Частный Медик 24». Мы предлагаем эффективные методы лечения зависимости от пива.
Подробнее – [url=https://skoraya-narkologicheskaya-pomoshch-moskva13.ru/]вызвать наркологическую помощь москве[/url]
Если вы ищете надежную клинику для вывода из запоя, обратитесь в «Детокс» в Краснодаре. Услуга вызова нарколога на дом доступна круглосуточно. Врачи приедут к вам в течение 1–2 часов и окажут необходимую помощь.
Выяснить больше – [url=https://narkolog-na-dom-krasnodar12.ru/]нарколог на дом срочно сочи[/url]
Лечение пивного алкоголизма в Москве от клиники «Частный Медик 24». Мы предлагаем эффективные методы лечения зависимости от пива.
Детальнее – [url=https://skoraya-narkologicheskaya-pomoshch-moskva13.ru/]наркологическая клиника клиника помощь московская область[/url]
Кодирование от алкоголизма на дому в Москве от клиники «Частный Медик 24». Наши специалисты приедут к вам домой и проведут процедуру кодирования.
Исследовать вопрос подробнее – [url=https://skoraya-narkologicheskaya-pomoshch11.ru/]скорая наркологическая помощь[/url]
Кодирование от алкоголизма в Москве от клиники «Частный Медик 24». Мы предлагаем различные методы кодирования, подходящие для каждого пациента.
Получить дополнительные сведения – [url=https://skoraya-narkologicheskaya-pomoshch12.ru/]платная наркологическая помощь москва[/url]
Текст включает разнообразную информацию, которая может показаться любопытной, но не меняет устоявшегося восприятия. Предлагаем просто насладиться чтением, не ожидая значительной пользы.
Подробнее читать – [url=https://rostov-narkologiya.ru/]кето диета за неделю минус 10 кг[/url]
Круглосуточная помощь при запое в Подольске от клиники «Частный Медик 24». Наша команда работает 24/7, обеспечивая доступность медицинской помощи в любое время суток.
Углубиться в тему – [url=https://kapelnica-ot-zapoya-podolsk12.ru/]врача капельницу от запоя[/url]
Реабилитация после запоя в Москве от клиники «Частный Медик 24». Мы поможем вам восстановиться после запоя и предотвратить рецидивы.
Узнать больше – [url=https://skoraya-narkologicheskaya-pomoshch-moskva11.ru/]анонимная наркологическая помощь[/url]
Наркологическая скорая помощь в Москве — клиника «Частный Медик 24» предлагает экстренную помощь на дому. Наши специалисты приедут к вам в течение 30 минут и проведут необходимые процедуры для стабилизации состояния.
Углубиться в тему – [url=https://skoraya-narkologicheskaya-pomoshch12.ru/]вызвать наркологическую помощь[/url]
Вывод из запоя у подростков в Москве от клиники «Частный Медик 24». Мы предлагаем специализированное лечение для подростков, учитывая их возрастные особенности.
Подробнее можно узнать тут – [url=https://skoraya-narkologicheskaya-pomoshch15.ru/]вызвать наркологическую помощь москве[/url]
Кодирование от алкоголизма на дому в Подольске от клиники «Частный Медик 24». Наши специалисты приедут к вам домой и проведут процедуру кодирования.
Подробнее – [url=https://kapelnica-ot-zapoya-podolsk12.ru/]вызвать капельницу от запоя на дому в москве[/url]
Клиника «Похмельная служба» в Нижнем Новгороде предлагает капельницу от запоя с выездом на дом. Наши специалисты обеспечат вам комфортное и безопасное лечение в привычной обстановке.
Изучить вопрос глубже – [url=https://snyatie-zapoya-na-domu11.ru/]вывод из запоя на дому круглосуточно нижний новгород[/url]
Лечение запоя без госпитализации в Москве от клиники «Частный Медик 24». Мы предлагаем лечение на дому, без необходимости госпитализации.
Получить дополнительную информацию – [url=https://skoraya-narkologicheskaya-pomoshch-moskva11.ru/]круглосуточная наркологическая помощь москва[/url]
Выездная наркологическая помощь в Нижнем Новгороде — капельница от запоя с выездом на дом. Мы обеспечиваем быстрое и качественное лечение без необходимости посещения клиники.
Исследовать вопрос подробнее – [url=https://snyatie-zapoya-na-domu15.ru/]наркология вывод из запоя нижний новгород[/url]
Лечение зависимости от алкоголя на дому в Москве от клиники «Частный Медик 24». Наши специалисты приедут к вам домой и проведут все необходимые процедуры.
Подробнее можно узнать тут – [url=https://skoraya-narkologicheskaya-pomoshch12.ru/]скорая наркологическая помощь москве[/url]
Лечение зависимости от алкоголя у мужчин в Подольске от клиники «Частный Медик 24». Мы предлагаем индивидуальный подход к лечению мужчин, учитывая все особенности организма.
Получить больше информации – [url=https://kapelnica-ot-zapoya-podolsk13.ru/]postavit-kapelniczu-ot-zapoya moskva[/url]
Клиника «Детокс» в Сочи проводит вывод из запоя в стационаре. Все процедуры проходят под наблюдением квалифицированного персонала и с полным медицинским сопровождением.
Получить дополнительные сведения – [url=https://vyvod-iz-zapoya-sochi22.ru/]скорая вывод из запоя в сочи[/url]
Срочно нужен нарколог на дом? В Краснодаре клиника «Детокс» приезжает к пациенту в течение часа.
Исследовать вопрос подробнее – [url=https://narkolog-na-dom-krasnodar17.ru/]нарколог на дом вывод из запоя сочи[/url]
Капельница от запоя в Подольске — «Частный Медик 24» предлагает эффективное лечение на дому. Наши специалисты приедут к вам домой и проведут процедуру, помогая снять симптомы похмелья и вывести токсины из организма.
Исследовать вопрос подробнее – [url=https://kapelnica-ot-zapoya-podolsk11.ru/]posle-kapelniczy-ot-zapoya moskva[/url]
Кодирование от алкоголизма в Москве от клиники «Частный Медик 24». Мы предлагаем различные методы кодирования, подходящие для каждого пациента.
Детальнее – [url=https://skoraya-narkologicheskaya-pomoshch15.ru/]вызвать наркологическую помощь москва[/url]
dyson выпрямитель для волос [url=https://vypryamitel-dn-kupit-4.ru/]dyson выпрямитель для волос[/url] .
В данной обзорной статье представлены интригующие факты, которые не оставят вас равнодушными. Мы критикуем и анализируем события, которые изменили наше восприятие мира. Узнайте, что стоит за новыми открытиями и как они могут изменить ваше восприятие реальности.
Это ещё не всё… – https://www.ateliersfrancochinois.com/2021/02/05/le-nouvel-an-chinois-%E4%B8%AD%E5%9B%BD%E6%96%B0%E5%B9%B4
Капельница от похмелья — эффективный способ детоксикации в клинике «Частный Медик 24». Мы используем современные препараты для быстрого и безопасного выведения токсинов из организма.
Узнать больше – [url=https://skoraya-narkologicheskaya-pomoshch-moskva11.ru/]платная наркологическая помощь москве[/url]
Кодирование от алкоголизма на дому в Москве от клиники «Частный Медик 24». Наши специалисты приедут к вам домой и проведут процедуру кодирования.
Исследовать вопрос подробнее – [url=https://skoraya-narkologicheskaya-pomoshch-moskva12.ru/]круглосуточная наркологическая помощь москве[/url]
Эта статья сочетает в себе как полезные, так и интересные сведения, которые обогатят ваше понимание насущных тем. Мы предлагаем практические советы и рекомендации, которые легко внедрить в повседневную жизнь. Узнайте, как улучшить свои навыки и обогатить свой опыт с помощью простых, но эффективных решений.
Детали по клику – https://www.ppelbosque.com/video-presentacion
Кодирование от алкоголизма в Москве от клиники «Частный Медик 24». Мы предлагаем различные методы кодирования, подходящие для каждого пациента.
Узнать больше – [url=https://skoraya-narkologicheskaya-pomoshch11.ru/]неотложная наркологическая помощь москва[/url]
Наркологическая скорая помощь в Москве — клиника «Частный Медик 24» предлагает экстренную помощь на дому. Наши специалисты приедут к вам в течение 30 минут и проведут необходимые процедуры для стабилизации состояния.
Узнать больше – [url=https://skoraya-narkologicheskaya-pomoshch-moskva12.ru/]скорая наркологическая помощь москве[/url]
Вывод из запоя у подростков в Москве от клиники «Частный Медик 24». Мы предлагаем специализированное лечение для подростков, учитывая их возрастные особенности.
Подробнее – [url=https://skoraya-narkologicheskaya-pomoshch11.ru/]центр наркологической помощи москве[/url]
Лечение хронического алкоголизма в Подольске от клиники «Частный Медик 24». Наши специалисты помогут вам преодолеть зависимость и вернуться к нормальной жизни.
Получить дополнительные сведения – [url=https://kapelnica-ot-zapoya-podolsk11.ru/]kapelnica-ot-zapoya-podolsk11.ru[/url]
Клиника «Детокс» в Сочи предлагает услугу вывода из запоя в стационаре. Под наблюдением профессиональных врачей пациент получит необходимую медицинскую помощь и поддержку. Услуга доступна круглосуточно, анонимно и начинается от 2000 ?.
Выяснить больше – [url=https://vyvod-iz-zapoya-sochi22.ru/]помощь вывод из запоя в сочи[/url]
дайсон выпрямитель купить минск [url=https://vypryamitel-dn-kupit-4.ru/]дайсон выпрямитель купить минск[/url] .
В Сочи клиника «Детокс» предоставляет услугу вывода из запоя в стационаре. Профессиональные врачи обеспечат комфортное и безопасное лечение. Минимальная стоимость услуги — 2000 ?.
Подробнее можно узнать тут – [url=https://vyvod-iz-zapoya-sochi23.ru/]вывод из запоя на дому круглосуточно[/url]
Вывод из запоя у подростков в Подольске от клиники «Частный Медик 24». Мы предлагаем специализированное лечение для подростков, учитывая их возрастные особенности.
Получить дополнительные сведения – [url=https://kapelnica-ot-zapoya-podolsk13.ru/]капельница от запоя анонимно москва[/url]
Этот интересный отчет представляет собой сборник полезных фактов, касающихся актуальных тем. Мы проанализируем данные, чтобы вы могли сделать обоснованные выводы. Читайте, чтобы узнать больше о последних трендах и значимых событиях!
Полная информация здесь – http://dsteditions.flywheelsites.com/product/test
В Сочи клиника «Детокс» предоставляет услугу вывода из запоя в стационаре. Профессиональные врачи обеспечат комфортное и безопасное лечение. Минимальная стоимость услуги — 2000 ?.
Подробнее – [url=https://vyvod-iz-zapoya-sochi12.ru/]вывод из запоя недорого сочи[/url]
Лечение запоя без госпитализации в Москве от клиники «Частный Медик 24». Мы предлагаем лечение на дому, без необходимости госпитализации.
Подробнее – [url=https://skoraya-narkologicheskaya-pomoshch-moskva13.ru/]срочная наркологическая помощь москве[/url]
Капельница от запоя — доступная цена в Москве от клиники «Частный Медик 24». Стоимость процедуры начинается от 2290 ?, и вы всегда будете заранее информированы о стоимости услуг.
Подробнее тут – [url=https://skoraya-narkologicheskaya-pomoshch12.ru/]скорая наркологическая помощь москве[/url]
dyson выпрямитель купить в москве [url=https://vypryamitel-dn-kupit-4.ru/]dyson выпрямитель купить в москве[/url] .
Клиника «Детокс» в Сочи предлагает услугу вывода из запоя в стационаре. Под наблюдением профессиональных врачей пациент получит необходимую медицинскую помощь и поддержку. Услуга доступна круглосуточно, анонимно и начинается от 2000 ?.
Разобраться лучше – [url=https://vyvod-iz-zapoya-sochi15.ru/]вывод из запоя на дому круглосуточно в сочи[/url]
Анонимность и конфиденциальность гарантированы в клинике «Частный Медик 24». Мы обеспечиваем полную анонимность и конфиденциальность на всех этапах лечения.
Подробнее – [url=https://kapelnica-ot-zapoya-podolsk13.ru/]капельница от запоя выезд[/url]
Если вы или ваш близкий нуждаетесь в профессиональной помощи при запое, клиника «Детокс» в Краснодаре предлагает услугу вызова нарколога на дом. Врач приедет в течение 1–2 часов, проведёт необходимое обследование и назначит лечение. Услуга доступна круглосуточно и анонимно.
Получить дополнительные сведения – [url=https://narkolog-na-dom-krasnodar11.ru/]вывод из запоя вызов в сочи[/url]
Эта информационная заметка предлагает лаконичное и четкое освещение актуальных вопросов. Здесь вы найдете ключевые факты и основную информацию по теме, которые помогут вам сформировать собственное мнение и повысить уровень осведомленности.
Перейти к полной версии – https://www.arresourcescorp.com/service
В этой публикации мы сосредоточимся на интересных аспектах одной из самых актуальных тем современности. Совмещая факты и мнения экспертов, мы создадим полное представление о предмете, которое будет полезно как новичкам, так и тем, кто глубоко изучает вопрос.
Кликни, не пожалеешь – https://www.terraevecci.com.br/devo-nao-nego-pago-quando-puder-contra-o-fisco-da-cadeia
В этой статье представлен занимательный и актуальный контент, который заставит вас задуматься. Мы обсуждаем насущные вопросы и проблемы, а также освещаем истории, которые вдохновляют на действия и изменения. Узнайте, что стоит за событиями нашего времени!
Прочесть заключение эксперта – https://www.dev.dantan.net/community.php
Публикация предлагает читателю не просто информацию, а инструменты для анализа и саморазвития. Мы стимулируем критическое мышление, предлагая различные точки зрения и призывая к самостоятельному поиску решений.
Дополнительно читайте здесь – https://liceum-glucholazy.pl/index.php/2020/12/20/witaj-swiecie
Этот сборник информации привлекает множеством мелких деталей и необычных ракурсов. Мы предлагаем взгляды, редко полезные, но способные немного разнообразить знакомство с темой.
Подробнее читать – https://rostov-narkologiya.ru/uslugi-ot-narkomanii/mefedronovaya-zavisimost
В статье представлены ключевые моменты по актуальной теме, дополненные советами экспертов и ссылками на дополнительные ресурсы. Цель материала — дать читателю инструменты для самостоятельного развития и принятия осознанных решений.
Это стоит прочитать полностью – https://blog.midespacho.cloud/ia-para-resumir-sentencias-revolucionando-la-comprension-de-casos-legales
Этот обзорный материал предоставляет информационно насыщенные данные, касающиеся актуальных тем. Мы стремимся сделать информацию доступной и структурированной, чтобы читатели могли легко ориентироваться в наших выводах. Познайте новое с нашим обзором!
Прочесть заключение эксперта – https://www.powertvnews.in/2025/06/07/kiccha-sudeep-releases-trailer-of-movie-edagaiye-apaghatakke-karana
В материале приведены детали, интересные, но не особенно важные. Мы рассматриваем аспекты, которые сложно назвать существенными, но включили их для большей полноты.
Подробнее читать – [url=https://rostov-narkologiya.ru/]лечение COVID народными средствами[/url]
В статье представлены ключевые моменты по актуальной теме, дополненные советами экспертов и ссылками на дополнительные ресурсы. Цель материала — дать читателю инструменты для самостоятельного развития и принятия осознанных решений.
Уникальные данные только сегодня – https://www.defining-blog.ru/category/analitika
Предлагаем вашему вниманию интересную справочную статью, в которой собраны ключевые моменты и нюансы по актуальным вопросам. Эта информация будет полезна как для профессионалов, так и для тех, кто только начинает изучать тему. Узнайте ответы на важные вопросы и расширьте свои знания!
Заходи — там интересно – https://digitalmaven.co.in/case-study-14-old-spice-humor-and-absurdity-as-the-cornerstone-of-brand-revival
В этом интересном тексте собраны обширные сведения, которые помогут вам понять различные аспекты обсуждаемой темы. Мы разбираем детали и факты, делая акцент на важности каждого элемента. Не упустите возможность расширить свои знания и взглянуть на мир по-новому!
Осуществить глубокий анализ – https://www.powertvnews.in/2025/06/03/road-pothole-brings-dead-man-back-to-life-this-incident-has-shocked-the-medical-world
В этой информационной статье вы найдете интересное содержание, которое поможет вам расширить свои знания. Мы предлагаем увлекательный подход и уникальные взгляды на обсуждаемые темы, побуждая пользователей к активному мышлению и критическому анализу.
Запросить дополнительные данные – https://muroto2925.click/2025/02/28/%E3%83%9D%E3%82%B1%E3%83%A2%E3%83%B3go%E3%83%AF%E3%82%AF%E3%83%AF%E3%82%AF%E6%94%BB%E7%95%A5%E3%83%9E%E3%82%B9%E3%82%BF-2
Эта информационная статья содержит полезные факты, советы и рекомендации, которые помогут вам быть в курсе последних тенденций и изменений в выбранной области. Материал составлен так, чтобы быть полезным и понятным каждому.
Читать далее > – https://www.defining-blog.ru/2025/10/01
Эта статья полна интересного контента, который побудит вас исследовать новые горизонты. Мы собрали полезные факты и удивительные истории, которые обогащают ваше понимание темы. Читайте, погружайтесь в детали и наслаждайтесь процессом изучения!
Обратитесь за информацией – https://www.csautoslalom.cz/slavnostni-vyhlaseni-sezony-13-12-v-ratiskovicich
Эта статья погружает вас в увлекательный мир знаний, где каждый факт становится открытием. Мы расскажем о ключевых исторических поворотных моментах и научных прорывах, которые изменили ход цивилизации. Поймите, как прошлое формирует настоящее и как его уроки могут помочь нам строить будущее.
Есть чему поучиться – https://chiba-gastronomy.com/?attachment_id=417
В этой статье вы найдете познавательную и занимательную информацию, которая поможет вам лучше понять мир вокруг. Мы собрали интересные данные, которые вдохновляют на размышления и побуждают к действиям. Открывайте новую информацию и получайте удовольствие от чтения!
Узнать из первых рук – https://careers.epilpoint.it/estetista-specializzata-brescia
Публикация предлагает уникальную подборку информации, которая будет интересна как специалистам, так и широкому кругу читателей. Здесь вы найдете ответы на часто задаваемые вопросы и полезные инсайты для дальнейшего применения.
Не упусти шанс – https://www.dev.dantan.net/community.php
Эта познавательная публикация погружает вас в море интересного контента, который быстро захватит ваше внимание. Мы рассмотрим важные аспекты темы и предоставим вам уникальные Insights и полезные сведения для дальнейшего изучения.
Выяснить больше – https://www.isajigo.com/title-2
Эта статья погружает вас в увлекательный мир знаний, где каждый факт становится открытием. Мы расскажем о ключевых исторических поворотных моментах и научных прорывах, которые изменили ход цивилизации. Поймите, как прошлое формирует настоящее и как его уроки могут помочь нам строить будущее.
Желаете узнать подробности? – https://anpeq.it/index.php/component/k2/item/4-4-tips-for-having-a-family-meeting-on-media-device-boundaries?start=13090
В этой статье вы найдете познавательную и занимательную информацию, которая поможет вам лучше понять мир вокруг. Мы собрали интересные данные, которые вдохновляют на размышления и побуждают к действиям. Открывайте новую информацию и получайте удовольствие от чтения!
Изучить вопрос глубже – https://toancaukonishi.vn/san-pham/soi-carbon-gia-co-ket-cau-cf720
Эта познавательная публикация погружает вас в море интересного контента, который быстро захватит ваше внимание. Мы рассмотрим важные аспекты темы и предоставим вам уникальные Insights и полезные сведения для дальнейшего изучения.
Изучить эмпирические данные – https://www.defining-blog.ru/tag/zdorove
В этом информативном обзоре собраны самые интересные статистические данные и факты, которые помогут лучше понять текущие тренды. Мы представим вам цифры и графики, которые иллюстрируют, как развиваются различные сферы жизни. Эта информация станет отличной основой для глубокого анализа и принятия обоснованных решений.
Ознакомиться с теоретической базой – https://www.gercekkaravan.com/index.php/Projelerimiz/yasam-karavan-2
дайсон официальный сайт выпрямители [url=https://vypryamitel-dn-kupit-4.ru/]дайсон официальный сайт выпрямители[/url] .
Эта информационная статья содержит полезные факты, советы и рекомендации, которые помогут вам быть в курсе последних тенденций и изменений в выбранной области. Материал составлен так, чтобы быть полезным и понятным каждому.
Детали по клику – https://sharikiposhtuchno.com.ua/?attachment_id=1739
Эта статья сочетает познавательный и занимательный контент, что делает ее идеальной для любителей глубоких исследований. Мы рассмотрим увлекательные аспекты различных тем и предоставим вам новые знания, которые могут оказаться полезными в будущем.
Прочитать подробнее – https://sinhala.srilankamirror.com/news/sl-to-remain-as-a-middle-income-country-pmd
Эта информационная заметка предлагает лаконичное и четкое освещение актуальных вопросов. Здесь вы найдете ключевые факты и основную информацию по теме, которые помогут вам сформировать собственное мнение и повысить уровень осведомленности.
Что ещё? Расскажи всё! – https://www.powertvnews.in/2023/09/28/swaminathan-is-no-more
В этом интересном тексте собраны обширные сведения, которые помогут вам понять различные аспекты обсуждаемой темы. Мы разбираем детали и факты, делая акцент на важности каждого элемента. Не упустите возможность расширить свои знания и взглянуть на мир по-новому!
А что дальше? – https://www.powertvnews.in/2025/06/07/father-remains-silent-in-front-of-sons-grave-unspeakable-grief-in-the-house-of-deceased-poornachandra
Эта статья сочетает познавательный и занимательный контент, что делает ее идеальной для любителей глубоких исследований. Мы рассмотрим увлекательные аспекты различных тем и предоставим вам новые знания, которые могут оказаться полезными в будущем.
Прочитать подробнее – https://barraadvisorygroup.com/the-essence-of-organizational-strategy
Статья содержит данные с сомнительной актуальностью и факты, лишённые чёткой взаимосвязи, но знакомит читателя с разными мнениями, пусть и без глубокого влияния.
Дополнительная информация – [url=https://stop-zavisimost.ru/]инвестиции в крипту[/url]
Этот обзор предлагает свежий взгляд на предметы, которые и без того привычны. Мы упоминаем факты, не имеющие большого значения, и события с неясной важностью, но они присутствуют здесь.
Подробнее читать – [url=https://rostov-narkologiya.ru/]диета для похудения быстро[/url]
Стильная одежда имеет большое значение в формировании впечатления.
Она помогает передать личный стиль и выглядеть гармонично.
Грамотно подобранный образ формирует мнение окружающих.
В повседневной жизни одежда может повышать самооценку.
https://rentry.co/nvm2vvpu
Хорошо подобранная одежда облегчает социальные взаимодействия.
При выборе вещей важно учитывать индивидуальные особенности и уместность ситуации.
Современные тенденции дают возможность находить новые решения.
Таким образом, умение стильно одеваться делает образ завершённым.
Особенность подхода заключается в сочетании медицинской и психологической поддержки. После кодирования пациент получает консультации психотерапевта, рекомендации по восстановлению и профилактике рецидивов. Это снижает риск повторного срыва и помогает закрепить результат на долгий срок.
Узнать больше – [url=https://kodirovanie-ot-alkogolizma-v-volgograde17.ru/]кодирование от алкоголизма цена[/url]
Для иллюстрации приведена таблица, отражающая распространённые методы терапии и их воздействие на организм:
Выяснить больше – https://narkologicheskaya-klinika-v-voronezhe17.ru/narkolog-voronezh-czena/
Такой состав обеспечивает быстрое снятие симптомов интоксикации и восстановление функций организма после запоя.
Получить дополнительную информацию – https://kapelnicza-ot-zapoya-v-voronezhe17.ru/
Благодаря комплексному подходу достигается не только снятие симптомов, но и долгосрочная стабилизация состояния пациента.
Подробнее тут – [url=https://narkologicheskaya-pomoshh-v-volgograde17.ru/]круглосуточная наркологическая помощь в волгограде[/url]
Умение стильно одеваться имеет большое значение в формировании впечатления.
Она помогает передать личный стиль и ощущать комфорт.
Грамотно подобранный образ формирует мнение окружающих.
В повседневной жизни одежда может повышать самооценку.
https://rentry.co/wp2vvczk
Продуманный гардероб облегчает общение.
При выборе вещей важно учитывать собственный вкус и уместность ситуации.
Мода дают возможность обновлять образ.
Таким образом, умение стильно одеваться делает образ завершённым.
В Красноярске клиника «КрасЗдрав Профи» предоставляет круглосуточную помощь людям, столкнувшимся с зависимостью. При этом формат анонимности сохраняется на каждом этапе — от звонка до выписки. Для пациентов, которым трудно приехать, возможен выезд нарколога на дом. Это удобно при похмельных и абстинентных состояниях, когда транспортировка нежелательна. Конфиденциальный выезд без маркировки транспорта и униформы позволяет начать лечение, не привлекая внимания окружающих. Все процедуры проводятся с соблюдением медицинских стандартов, включая регидратацию, стабилизацию и поддержку дыхания.
Детальнее – [url=https://narkologicheskaya-clinica-v-krasnoyarske17.ru/]наркологическая клиника стационар красноярск[/url]
Этот текст содержит различную информацию, которая, возможно, покажется любопытной, но в целом не меняет восприятия привычных вещей. Предлагаем просто получить удовольствие от чтения, не ожидая особой пользы.
Вот – [url=https://arma-rehab.ru/vyvod-iz-zapoya/]порно[/url]
В этих ситуациях выезд нарколога на дом позволяет вовремя скорректировать состояние, а при выявлении опасных признаков — не теряя времени, направить пациента в стационар. Это управляемый маршрут вместо хаотичных решений в последний момент.
Подробнее можно узнать тут – http://narkolog-na-dom-dolgoprudnij10.ru/vyezd-narkologa-na-dom-v-dolgoprudnom/
Первым шагом на пути к выздоровлению является очищение организма от токсинов. В клинике проводится детоксикация с использованием современных препаратов, направленных на выведение продуктов распада алкоголя и наркотиков. Медикаментозное лечение дополняется витаминами, гепатопротекторами и средствами для нормализации работы нервной системы. Это помогает восстановить обмен веществ, улучшить сон, аппетит и общее самочувствие пациента.
Изучить вопрос глубже – [url=https://narkologicheskaya-klinika-v-voronezhe17.ru/]наркологическая клиника лечение алкоголизма[/url]
Особенность подхода заключается в сочетании медицинской и психологической поддержки. После кодирования пациент получает консультации психотерапевта, рекомендации по восстановлению и профилактике рецидивов. Это снижает риск повторного срыва и помогает закрепить результат на долгий срок.
Получить больше информации – [url=https://kodirovanie-ot-alkogolizma-v-volgograde17.ru/]анонимное кодирование от алкоголизма в волгограде[/url]
Ниже приведена таблица, отражающая примерную динамику состояния пациента после постановки капельницы:
Изучить вопрос глубже – https://kapelnicza-ot-zapoya-v-voronezhe17.ru/kapelnicza-ot-alkogolya-voronezh
Подбирать одежду со вкусом имеет большое значение для самовыражения.
Внешний вид помогает подчеркнуть индивидуальность и даёт чувство комфорта.
Современный внешний вид формирует мнение окружающих.
В повседневной жизни одежда может придавать внутреннюю собранность.
https://telegra.ph/Prada-12-29-15
Продуманные образы упрощает социальные взаимодействия.
При выборе стиля важно учитывать собственный вкус и контекст.
Актуальные направления позволяют обновлять образ.
В итоге, умение стильно одеваться делает образ завершённым.
Наркологическая помощь в «ВолгаМед Тольятти» включает широкий спектр процедур и методик. Каждый случай рассматривается индивидуально, с учётом состояния пациента, стадии заболевания и сопутствующих факторов. Ниже представлена таблица с основными направлениями медицинской работы.
Выяснить больше – [url=https://narkologicheskaya-pomoshh-v-tolyatti17.ru/]платная наркологическая скорая помощь в тольятти[/url]
Наркологическая помощь в Волгограде предназначена для людей, столкнувшихся с проблемами алкогольной или наркотической зависимости. Современный подход к лечению основан на сочетании медицинских, психологических и социальных методов, направленных на полное восстановление пациента. Врачи-наркологи применяют безопасные схемы детоксикации, эффективные медикаменты и программы психотерапевтической поддержки, позволяющие достичь устойчивой ремиссии и вернуть пациента к нормальной жизни.
Узнать больше – https://narkologicheskaya-pomoshh-v-volgograde17.ru/narkologi-volgograd/
Процедура начинается с осмотра пациента и оценки степени интоксикации. Врач измеряет давление, пульс, уровень насыщения крови кислородом, определяет наличие сопутствующих заболеваний. После диагностики назначается капельница, состав которой подбирается индивидуально. Процедура направлена на очищение организма, восстановление водно-солевого баланса и снятие симптомов похмелья.
Углубиться в тему – http://vyvod-iz-zapoya-v-tolyatti17.ru
Запой — это не просто несколько лишних дней алкоголя, а тяжёлое состояние, в котором организм работает на пределе. Чем дольше длится эпизод, тем глубже обезвоживание, тем сильнее сдвиги электролитов, тем выше риск аритмий, гипертонических кризов, судорог, делирия, обострений заболеваний сердца, печени и поджелудочной железы. Попытки «вывести» человека дома силами родных часто включают опасные комбинации: случайные седативные, снотворные, анальгетики, «антипохмельные» из рекламы. Они могут на время усыпить или «успокоить», но при этом скрывают ухудшение, сбивают давление, угнетают дыхание и мешают врачу увидеть реальную картину. В «Трезвый Центр Коломна» подход другой: ещё на этапе звонка специалист уточняет длительность запоя, объёмы и виды алкоголя, наличие гипертонии, ИБС, диабета, заболеваний печени и почек, неврологических проблем, список уже принятых препаратов, эпизоды потери сознания, судорог, странного поведения. На основании этих данных определяется, безопасен ли формат на дому или сразу нужен стационар. Такая сортировка позволяет вовремя перехватить опасные случаи, не терять часы на бесполезные попытки и сразу запускать те схемы, которые реально снижают риски и стабилизируют состояние.
Получить больше информации – http://vyvod-iz-zapoya-kolomna10.ru
Запой представляет собой состояние, при котором организм находится под постоянным воздействием этанола. Это вызывает интоксикацию, нарушение обменных процессов и дестабилизацию психики. При обращении за помощью врач-нарколог оценивает состояние пациента и подбирает индивидуальную схему терапии, чтобы безопасно вывести человека из запоя и предотвратить развитие синдрома отмены. Вмешательство проводится как в стационаре, так и на дому, в зависимости от состояния пациента.
Узнать больше – [url=https://vyvod-iz-zapoya-v-krasnoyarske17.ru/]вывод из запоя цена[/url]
Острый эпизод запоя — это не «плохое самочувствие», а состояние с реальными рисками для сердца, нервной системы и дыхания, особенно в ночные часы, когда усиливаются вегетативные реакции и тревога. В «НоваТрезвие» мы выстраиваем помощь так, чтобы от звонка до заметного облегчения прошло как можно меньше времени и как можно меньше случайностей: короткое интервью для оценки рисков, выезд врача или приём в клинике, экспресс-диагностика по ключевым показателям, персональная инфузионная схема без «универсальных коктейлей», мягкая коррекция сна и тревоги без «вырубания», понятные инструкции семье на 24–72 часа и план продолжения на ближайшие недели. Мы не скрываемся за общими формулами: решения принимаются по фактическим данным, дозы и темп капельниц подстраиваются к динамике каждые 15–20 минут, а при «красных флагах» перевод в стационар организуется без пауз. Конфиденциальность соблюдается строго, а коммуникация простая и предсказуемая — чтобы вы всегда знали, что происходит сейчас и чего ждать к утру.
Ознакомиться с деталями – http://vyvod-iz-zapoya-ehlektrostal2-10.ru
В Тольятти клиника «ВолгаМед Тольятти» предоставляет широкий спектр услуг — от экстренного вывода из запоя на дому до длительных реабилитационных программ. Выезд нарколога осуществляется круглосуточно: врач приезжает по вызову, проводит диагностику, оценивает степень интоксикации и назначает индивидуальный план лечения. Это особенно важно в тех случаях, когда пациент не может самостоятельно добраться до клиники. В арсенале специалистов — профессиональное оборудование, капельницы для детоксикации и препараты для стабилизации психоэмоционального состояния.
Получить больше информации – [url=https://narkologicheskaya-pomoshh-v-tolyatti17.ru/]www.domen.ru[/url]
Пациенты отмечают, что особенно важна не только профессиональная помощь, но и спокойная атмосфера. Мягкий свет, тишина, отдельные палаты и деликатная коммуникация персонала — всё это снижает тревожность и помогает организму восстановиться. Эффективность лечения оценивается по конкретным маркерам: улучшение сна, нормализация давления, исчезновение тошноты, восстановление аппетита и уменьшение тяги.
Получить больше информации – [url=https://narkologicheskaya-clinica-v-krasnoyarske17.ru/]наркологическая клиника вывод из запоя[/url]
Первым шагом на пути к выздоровлению является очищение организма от токсинов. В клинике проводится детоксикация с использованием современных препаратов, направленных на выведение продуктов распада алкоголя и наркотиков. Медикаментозное лечение дополняется витаминами, гепатопротекторами и средствами для нормализации работы нервной системы. Это помогает восстановить обмен веществ, улучшить сон, аппетит и общее самочувствие пациента.
Подробнее – [url=https://narkologicheskaya-klinika-v-voronezhe17.ru/]наркологическая клиника клиника помощь в воронеже[/url]
Вывод из запоя в Красноярске — это медицинская процедура, направленная на устранение алкогольной интоксикации и восстановление нормальной работы организма после длительного употребления спиртных напитков. Услуга предоставляется круглосуточно и включает дезинтоксикационную терапию, стабилизацию психоэмоционального состояния и профилактику осложнений. Все процедуры выполняются опытными наркологами с применением сертифицированных препаратов и в строгом соответствии с медицинскими стандартами.
Получить дополнительную информацию – [url=https://vyvod-iz-zapoya-v-krasnoyarske17.ru/]вывод из запоя цена красноярск[/url]
Философия гедонизма — это концепция, которое ставит удовольствие в центр человеческой жизни.
Согласно этому взгляду, стремление к удовольствию считается естественной целью существования.
Данная философия не всегда подразумевает отсутствие ограничений.
Во многих трактовках он опирается на разумный подход и контроль желаний.
https://telegra.ph/Off-White-12-25
Актуальная интерпретация часто акцентирует внимание на эмоциональном благополучии.
При этом важную роль играет гармония между удовольствиями и обязанностями.
Данный взгляд может поддерживать психологическое равновесие.
В итоге, гедонизм рассматривается как философская перспектива, а не как призыв к излишествам.
В Воронеже клиника «Центр Трезвости ВоронМед» обеспечивает выезд нарколога на дом в любое время суток. Это позволяет оказывать помощь пациентам, которые находятся в тяжёлом состоянии или не могут самостоятельно приехать в стационар. Медицинская бригада прибывает в течение 40–60 минут, не используя специализированный транспорт и форму, чтобы сохранить анонимность. Врач проводит первичный осмотр, оценивает давление, частоту дыхания, уровень сознания и насыщение кислородом, после чего назначает детоксикационную капельницу с контролем дозировки.
Подробнее – [url=https://vyvod-iz-zapoya-v-voronezhe17.ru/]vyvod-iz-zapoya-v-voronezhe17.ru/[/url]
Капельница от запоя в Воронеже применяется для восстановления организма после длительного употребления алкоголя, устранения интоксикации и нормализации обменных процессов. Медицинская процедура проводится под контролем врача-нарколога, в клинике или на дому. Она позволяет быстро улучшить самочувствие, устранить головную боль, тремор, тошноту, обезвоживание и нарушения сна. Современные препараты действуют мягко, безопасно и без стресса для организма, обеспечивая плавный выход из запоя.
Углубиться в тему – http://kapelnicza-ot-zapoya-v-voronezhe17.ru
Процесс кодирования проходит в комфортной и спокойной обстановке. Врач объясняет каждый этап, чтобы пациент чувствовал себя уверенно и спокойно. После процедуры пациент получает памятку с рекомендациями по уходу за здоровьем и режиму поведения в первые недели после лечения.
Исследовать вопрос подробнее – [url=https://kodirovanie-ot-alkogolizma-v-volgograde17.ru/]клиника кодирования от алкоголизма[/url]
Капельница при вызове нарколога на дом в Долгопрудном от «МедТрезвие Долгопрудный» — это клинический инструмент, а не магический раствор. Главное правило — никакой агрессивной седации ради видимости спокойствия. Инфузионная терапия строится вокруг нескольких задач: восполнить жидкость, выровнять электролиты, снизить токсическую нагрузку на печень и мозг, поддержать сердце и нервную систему, уменьшить тремор, тревогу и соматические жалобы. Используются растворы для регидратации и коррекции водно-электролитного баланса, витамины группы B и магний для поддержки нервной системы, уменьшения риска судорог и нормализации сна, по показаниям — гепатопротекторы и мягкие антиоксиданты, противорвотные препараты для контроля тошноты. При выраженной тревоге или нарушениях сна назначаются щадящие анксиолитические средства в дозах, которые не выключают пациента полностью, а помогают снять паническое напряжение, сохраняя возможность оценивать динамику состояния. Врач отслеживает реакцию на терапию: стабилизацию давления и пульса, уменьшение дрожи, улучшение общего самочувствия, появление более спокойного, естественного сна. По мере облегчения нагрузки схема не усиливается ради счёта, а рационально сокращается. Такой подход защищает пациента от скрытых осложнений и превращает капельницу в контролируемый, полезный шаг, а не в рискованный эксперимент.
Подробнее тут – http://narkolog-na-dom-dolgoprudnij10.ru/narkolog-na-dom-klinika-v-dolgoprudnom/
Для повышения эффективности в капельницы добавляются витамины группы B, аскорбиновая кислота, кардиопротекторы и антиоксиданты. Такая комбинация позволяет не только ускорить выведение продуктов распада алкоголя, но и предотвратить развитие постабстинентных расстройств. Благодаря точной дозировке и мягкому темпу введения растворов снижается риск побочных реакций, а восстановление проходит плавно и безопасно.
Получить дополнительные сведения – [url=https://vyvod-iz-zapoya-v-voronezhe17.ru/]анонимный вывод из запоя[/url]
Для иллюстрации приведена таблица, отражающая распространённые методы терапии и их воздействие на организм:
Получить дополнительные сведения – [url=https://narkologicheskaya-klinika-v-voronezhe17.ru/]вывод наркологическая клиника воронеж[/url]
Капельницы при выводе из запоя — основной инструмент детоксикации. Они очищают кровь, стабилизируют давление и восстанавливают баланс электролитов. В клинике «РеабКузбасс» используются только качественные препараты, адаптированные под конкретное состояние пациента. Ниже приведена таблица с основными видами капельниц и их эффектом.
Получить больше информации – [url=https://vyvod-iz-zapoya-v-novokuzneczke17.ru/]вывод из запоя с выездом[/url]
Благодаря комплексному подходу достигается не только снятие симптомов, но и долгосрочная стабилизация состояния пациента.
Углубиться в тему – [url=https://narkologicheskaya-pomoshh-v-volgograde17.ru/]оказание наркологической помощи[/url]
Основные этапы лечения включают:
Получить дополнительную информацию – http://narkologicheskaya-klinika-v-voronezhe17.ru
Основная цель капельницы — вывести из организма продукты распада этанола и восстановить водно-солевой баланс. После запоя в крови скапливаются токсичные вещества, которые вызывают головокружение, слабость и эмоциональную нестабильность. Введение растворов внутривенно позволяет быстро доставить активные компоненты в кровоток, улучшая работу сердца, печени и нервной системы. Уже через 20–30 минут после начала процедуры пациент ощущает облегчение.
Углубиться в тему – [url=https://kapelnicza-ot-zapoya-v-voronezhe17.ru/]вызов на дом капельницы от запоя воронеж[/url]
Особенность подхода заключается в сочетании медицинской и психологической поддержки. После кодирования пациент получает консультации психотерапевта, рекомендации по восстановлению и профилактике рецидивов. Это снижает риск повторного срыва и помогает закрепить результат на долгий срок.
Углубиться в тему – [url=https://kodirovanie-ot-alkogolizma-v-volgograde17.ru/]кодирование от алкоголизма отзывы в волгограде[/url]
Состав капельницы подбирается индивидуально, с учётом степени опьянения, возраста и хронических заболеваний пациента. Врач определяет дозировку и комбинацию препаратов, чтобы процедура прошла безопасно и эффективно.
Получить больше информации – http://kapelnicza-ot-zapoya-v-voronezhe17.ru/kapelniczy-ot-pokhmelya-voronezh/
В Красноярске клиника «КрасЗдрав Профи» предоставляет круглосуточную помощь людям, столкнувшимся с зависимостью. При этом формат анонимности сохраняется на каждом этапе — от звонка до выписки. Для пациентов, которым трудно приехать, возможен выезд нарколога на дом. Это удобно при похмельных и абстинентных состояниях, когда транспортировка нежелательна. Конфиденциальный выезд без маркировки транспорта и униформы позволяет начать лечение, не привлекая внимания окружающих. Все процедуры проводятся с соблюдением медицинских стандартов, включая регидратацию, стабилизацию и поддержку дыхания.
Изучить вопрос глубже – [url=https://narkologicheskaya-clinica-v-krasnoyarske17.ru/]запой наркологическая клиника красноярск[/url]
Вывод из запоя в Тольятти — это медицинская процедура, направленная на очищение организма от продуктов распада алкоголя и восстановление нормального состояния здоровья. Длительное употребление спиртных напитков приводит к серьёзной интоксикации, нарушению работы нервной, сердечно-сосудистой и пищеварительной систем. Самостоятельные попытки прекратить запой могут быть опасны, поэтому оптимальным решением является обращение к врачу-наркологу, который проведёт лечение безопасно и эффективно.
Подробнее тут – [url=https://vyvod-iz-zapoya-v-tolyatti17.ru/]наркология вывод из запоя[/url]
Процесс кодирования проходит в комфортной и спокойной обстановке. Врач объясняет каждый этап, чтобы пациент чувствовал себя уверенно и спокойно. После процедуры пациент получает памятку с рекомендациями по уходу за здоровьем и режиму поведения в первые недели после лечения.
Разобраться лучше – https://kodirovanie-ot-alkogolizma-v-volgograde17.ru/kodirovanie-ot-alkogolya-v-volgograde
Применение комплексной терапии позволяет не только устранить зависимость, но и сформировать новые поведенческие установки, предотвращающие возвращение к употреблению.
Получить больше информации – http://narkologicheskaya-clinica-v-voronezhe17.ru
Запой — это не просто несколько лишних дней алкоголя, а тяжёлое состояние, в котором организм работает на пределе. Чем дольше длится эпизод, тем глубже обезвоживание, тем сильнее сдвиги электролитов, тем выше риск аритмий, гипертонических кризов, судорог, делирия, обострений заболеваний сердца, печени и поджелудочной железы. Попытки «вывести» человека дома силами родных часто включают опасные комбинации: случайные седативные, снотворные, анальгетики, «антипохмельные» из рекламы. Они могут на время усыпить или «успокоить», но при этом скрывают ухудшение, сбивают давление, угнетают дыхание и мешают врачу увидеть реальную картину. В «Трезвый Центр Коломна» подход другой: ещё на этапе звонка специалист уточняет длительность запоя, объёмы и виды алкоголя, наличие гипертонии, ИБС, диабета, заболеваний печени и почек, неврологических проблем, список уже принятых препаратов, эпизоды потери сознания, судорог, странного поведения. На основании этих данных определяется, безопасен ли формат на дому или сразу нужен стационар. Такая сортировка позволяет вовремя перехватить опасные случаи, не терять часы на бесполезные попытки и сразу запускать те схемы, которые реально снижают риски и стабилизируют состояние.
Ознакомиться с деталями – [url=https://vyvod-iz-zapoya-kolomna10.ru/]anonimnyj-vyvod-iz-zapoya[/url]
В Волгограде сформирована система оказания наркологической помощи, включающая круглосуточные выезды специалистов, амбулаторное лечение, стационарные программы и реабилитацию. Такой подход позволяет охватить все категории пациентов — от тех, кто нуждается в экстренной помощи, до тех, кто готов пройти полный курс терапии. Независимо от формы оказания услуг, лечение проводится конфиденциально и в соответствии с медицинскими стандартами.
Получить дополнительные сведения – [url=https://narkologicheskaya-pomoshh-v-volgograde17.ru/]центр наркологической помощи в волгограде[/url]
Острый эпизод запоя — это не «плохое самочувствие», а состояние с реальными рисками для сердца, нервной системы и дыхания, особенно в ночные часы, когда усиливаются вегетативные реакции и тревога. В «НоваТрезвие» мы выстраиваем помощь так, чтобы от звонка до заметного облегчения прошло как можно меньше времени и как можно меньше случайностей: короткое интервью для оценки рисков, выезд врача или приём в клинике, экспресс-диагностика по ключевым показателям, персональная инфузионная схема без «универсальных коктейлей», мягкая коррекция сна и тревоги без «вырубания», понятные инструкции семье на 24–72 часа и план продолжения на ближайшие недели. Мы не скрываемся за общими формулами: решения принимаются по фактическим данным, дозы и темп капельниц подстраиваются к динамике каждые 15–20 минут, а при «красных флагах» перевод в стационар организуется без пауз. Конфиденциальность соблюдается строго, а коммуникация простая и предсказуемая — чтобы вы всегда знали, что происходит сейчас и чего ждать к утру.
Ознакомиться с деталями – [url=https://vyvod-iz-zapoya-ehlektrostal2-10.ru/]vyvod-iz-zapoya-cena[/url]
Процесс вывода из запоя включает последовательное воздействие на ключевые звенья интоксикации. Ниже представлена таблица, отражающая этапы лечения, используемые методики и ожидаемые результаты терапии.
Углубиться в тему – [url=https://vyvod-iz-zapoya-v-volgograde17.ru/]вывод из запоя круглосуточно[/url]
Домашний формат особенно важен, когда пациент не готов к стационару, боится огласки, испытывает стыд или сопротивление, но объективно нуждается в помощи. Попытки «перетерпеть» или лечить своими силами заканчиваются тем, что родственники дают опасные комбинации седативных, анальгетиков и «антипохмельных» средств, а состояние только ухудшается. «МедТрезвие Долгопрудный» строит выездную помощь так, чтобы она оставалась профессиональной медициной, а не косметической услугой. Уже при звонке диспетчер под контролем врача уточняет длительность запоя, виды алкоголя, наличие гипертонии, болезней сердца, печени, почек, диабета, неврологических нарушений, психических эпизодов, факт судорог, делирия в прошлом, какие лекарства уже были даны. Это позволяет заранее понять, подходит ли формат лечения на дому или сразу нужно рассматривать стационар. Выезд назначается только в тех случаях, когда это безопасно, и именно в этом ключевое отличие официальной клиники от анонимных «капельниц на дом» — здесь всегда выбирают жизнь и здоровье, а не удобный маркетинговый сценарий. Для семьи это не просто комфорт, а возможность получить помощь без риска сорваться в критическое состояние посреди ночи.
Углубиться в тему – [url=https://narkolog-na-dom-dolgoprudnij10.ru/]нарколог на дому долгопрудный[/url]
Одним из самых востребованных направлений является вывод из запоя. Это процедура, направленная на очищение организма от этанола и продуктов его распада, восстановление водно-солевого баланса и нормализацию работы нервной системы. Врач проводит обследование, определяет степень интоксикации и подбирает состав капельницы. Уже через 30–60 минут после начала процедуры состояние пациента заметно улучшается.
Выяснить больше – http://narkologicheskaya-pomoshh-v-volgograde17.ru/narkologicheskaya-klinika-v-volgograde/
Детоксикация — это первый и важнейший этап лечения в наркологической клинике в Красноярске. Она проводится с целью выведения токсинов из организма и восстановления функций жизненно важных органов. Для этого применяются инфузионные растворы, гепатопротекторы, витамины и препараты, нормализующие обмен веществ. После снятия интоксикации пациент получает медикаментозную поддержку, направленную на снижение тяги к алкоголю или наркотикам и стабилизацию эмоционального состояния.
Детальнее – [url=https://narcologicheskaya-klinika-v-krasnoyarske17.ru/]наркологические клиники алкоголизм в красноярске[/url]
Современная наркологическая клиника — это не просто медицинское учреждение, где проводят детоксикацию или капельницы. Это выстроенная система, где каждый этап направлен на восстановление физического, психического и социального равновесия пациента. В клинике «КрасЗдрав Профи» весь процесс лечения построен по принципу прозрачных шагов: первичная диагностика, стабилизация организма, терапевтическая коррекция и закрепление результата. Всё происходит с соблюдением принципа конфиденциальности — пациент может рассчитывать на анонимность и этичное отношение со стороны персонала.
Получить больше информации – [url=https://narkologicheskaya-clinica-v-krasnoyarske17.ru/]наркологическая клиника цены[/url]
Когда человек в запое, близким кажется, что всё ещё можно решить «по-тихому»: выспаться, отпаять водой, дать обезболивающее или «успокоительное» и дождаться, пока станет легче. На практике это часто приводит к обратному результату. Алкогольная интоксикация нарушает водно-электролитный баланс, сгущает кровь, повышает нагрузку на сердце, провоцирует скачки давления, ухудшает работу печени и нервной системы. Неконтролируемый приём снотворных, анальгетиков, транквилизаторов, особенно вместе с алкоголем, способен вызвать угнетение дыхания, аритмии, судороги или делирий. Домашняя обстановка не даёт возможности следить за всеми показателями и вовремя отреагировать. «РаменМед Трезвость» предлагает клинически выверенный вывод из запоя в Раменском с учётом возраста, длительности употребления, хронических заболеваний, перенесённых ранее осложнений. Здесь не применяют сомнительные схемы «усыпить, чтобы не мешал», а ставят задачу: безопасно пройти острую фазу, снять интоксикацию, стабилизировать давление и пульс, защитить сердце и мозг, снизить риск психозов и, при желании пациента, сразу наметить маршрут реального лечения зависимости. Такой подход снимает с родственников опасную «роль врача» и возвращает ситуацию туда, где ей место — под контроль профессионалов.
Детальнее – [url=https://vyvod-iz-zapoya-ramenskoe10.ru/]вывод из запоя выездом на дом[/url]
Клиника использует многоступенчатый подход, который позволяет адаптировать лечение под особенности организма пациента. Наблюдение продолжается даже после завершения детоксикации, чтобы убедиться, что состояние стабильно и не требуется дополнительное вмешательство. При необходимости врач назначает курс поддержки печени, витаминов и препаратов для восстановления сна и психоэмоционального равновесия.
Ознакомиться с деталями – [url=https://vyvod-iz-zapoya-v-volgograde17.ru/]вывод из запоя вызов[/url]
Современная наркологическая клиника — это не просто медицинское учреждение, где проводят детоксикацию или капельницы. Это выстроенная система, где каждый этап направлен на восстановление физического, психического и социального равновесия пациента. В клинике «КрасЗдрав Профи» весь процесс лечения построен по принципу прозрачных шагов: первичная диагностика, стабилизация организма, терапевтическая коррекция и закрепление результата. Всё происходит с соблюдением принципа конфиденциальности — пациент может рассчитывать на анонимность и этичное отношение со стороны персонала.
Подробнее тут – http://narkologicheskaya-clinica-v-krasnoyarske17.ru/narkologicheskaya-klinika-krasnoyarsk-otzyvy/
Каждое назначение объясняется пациенту и близким простым языком. Здесь не практикуют подход «делаем, как знаем, вам всё равно не понять» — прозрачность и понятные шаги помогают снизить тревогу и укрепляют доверие к клинике.
Разобраться лучше – https://vyvod-iz-zapoya-ramenskoe10.ru/srochnoe-vyvedenie-iz-zapoya-v-ramenskom
Такая форма помощи позволяет избежать осложнений, которые часто сопровождают попытки снять симптомы самостоятельно. При правильном подборе препаратов уже через час наблюдается улучшение самочувствия: уходит головная боль, снижается тревога, стабилизируется сердцебиение и восстанавливается ясность мышления. Пациент получает рекомендации по питанию, режиму отдыха и приёму витаминов, чтобы закрепить результат и предотвратить повторный срыв.
Углубиться в тему – [url=https://narkolog-na-dom-v-voronezhe17.ru/]нарколог на дом вывод из запоя[/url]
Домашний формат особенно важен, когда пациент не готов к стационару, боится огласки, испытывает стыд или сопротивление, но объективно нуждается в помощи. Попытки «перетерпеть» или лечить своими силами заканчиваются тем, что родственники дают опасные комбинации седативных, анальгетиков и «антипохмельных» средств, а состояние только ухудшается. «МедТрезвие Долгопрудный» строит выездную помощь так, чтобы она оставалась профессиональной медициной, а не косметической услугой. Уже при звонке диспетчер под контролем врача уточняет длительность запоя, виды алкоголя, наличие гипертонии, болезней сердца, печени, почек, диабета, неврологических нарушений, психических эпизодов, факт судорог, делирия в прошлом, какие лекарства уже были даны. Это позволяет заранее понять, подходит ли формат лечения на дому или сразу нужно рассматривать стационар. Выезд назначается только в тех случаях, когда это безопасно, и именно в этом ключевое отличие официальной клиники от анонимных «капельниц на дом» — здесь всегда выбирают жизнь и здоровье, а не удобный маркетинговый сценарий. Для семьи это не просто комфорт, а возможность получить помощь без риска сорваться в критическое состояние посреди ночи.
Узнать больше – https://narkolog-na-dom-dolgoprudnij10.ru/skolko-stoit-narkolog-na-dom-v-dolgoprudnom/
Выбор наркологической клиники в Коломне — это не «слишком серьёзно», а логичный шаг, если зависимость уже зашла дальше спонтанных эпизодов. Алкоголизм, наркомания, злоупотребление успокоительными и обезболивающими — это не только психологическая тяга, но и перестройка организма: страдают печень, сердце, сосуды, нервная система, гормональный фон, сон, психика. Дома редко есть возможность круглосуточно контролировать состояние, правильно отменять вещества, отслеживать давление, пульс, поведение, не допускать опасных комбинаций препаратов. Родственники устают, реагируют эмоциями, а не медицинской логикой, человек чувствует себя под прицелом, но не под защитой. В «КоломнаМед Центр» всё выстроено так, чтобы снять нагрузку с семьи и вывести помощь из зоны хаотичных решений. Здесь оценивают не только то, «что и сколько пьёт или принимает», а весь контекст: длительность зависимости, срывы, уже перенесённые делирии или передозировки, сопутствующие болезни, психические состояния, семейную ситуацию. На основе этого формируется безопасный план: где начать — в стационаре или амбулаторно, какой формат детокса выбрать, насколько жёстко вести наблюдение, как сразу встроить психотерапевтическую и социальную поддержку. Клиника в Коломне позволяет работать системно, а не латать последствия очередного срыва.
Разобраться лучше – http://narkologicheskaya-klinika-kolomna10.ru
Наркологическая клиника в Воронеже — это специализированное медицинское учреждение, предоставляющее помощь людям, столкнувшимся с зависимостью от алкоголя, наркотиков и других психоактивных веществ. Лечение проводится под контролем квалифицированных врачей, с использованием современных методик детоксикации, психотерапии и реабилитации. Цель работы специалистов — не только устранить физическую зависимость, но и помочь пациенту восстановить эмоциональное равновесие, вернуть контроль над поведением и мотивацию к трезвости.
Разобраться лучше – https://narkologicheskaya-clinica-v-voronezhe17.ru/voronezh-narkologicheskij-dispanser/
Перед тем как показать примерные программы, важно подчеркнуть: реальный план всегда персонализируется, но понимание базовых форматов помогает семье и пациенту не теряться в терминах и сразу видеть логику.
Подробнее – http://narkologicheskaya-klinika-kolomna2-10.ru
В этих ситуациях выезд нарколога на дом позволяет вовремя скорректировать состояние, а при выявлении опасных признаков — не теряя времени, направить пациента в стационар. Это управляемый маршрут вместо хаотичных решений в последний момент.
Подробнее тут – https://narkolog-na-dom-dolgoprudnij10.ru/vyezd-narkologa-na-dom-v-dolgoprudnom
Важное отличие клиники — отказ от примитивной схемы «капельница — домой — дальше сам». Такой формат даёт кратковременное облегчение, но не решает ни причин, ни структуры зависимости. «КоломнаМед Центр» выстраивает ступенчатый подход. Первый шаг — безопасная детоксикация: снятие абстиненции, коррекция водно-электролитного баланса, поддержка сердечно-сосудистой системы, печени, нервной системы, нормализация сна. Второй шаг — стабилизация: оценка психического состояния, выявление тревожных, депрессивных и панических симптомов, подбор поддерживающих схем, которые помогают не сорваться сразу после выхода из острых проявлений. Третий шаг — реабилитация и мотивация: психотерапевтическая работа, групповые и индивидуальные форматы, обучение навыкам трезвой жизни, работа с триггерами, укрепление внутренней мотивации. Четвёртый шаг — постреабилитационная поддержка: контрольные приёмы, дистанционные консультации, помощь в профилактике срывов. Такой комплексный путь не ломает пациента, а возвращает ему контроль: не через страх, а через понимание, структуру и реальные инструменты.
Узнать больше – https://narkologicheskaya-klinika-kolomna10.ru/narkologicheskaya-klinika-cena-v-kolomne
Алкогольная интоксикация вызывает сильное обезвоживание и разрушает баланс электролитов в организме. Без медицинской помощи восстановление может занять несколько дней, а в тяжёлых случаях приводит к осложнениям. Капельница помогает безопасно и быстро вывести этанол и продукты его распада, восполнить уровень жидкости, снизить нагрузку на печень и сердечно-сосудистую систему. Процедура проводится амбулаторно или на дому, что делает её доступной и удобной для пациентов.
Ознакомиться с деталями – https://kapelnicza-ot-zapoya-v-volgograde17.ru/kapelnicza-ot-zapoya-stoimost-volgograd/
Такой подход позволяет добиться устойчивого эффекта и минимизировать риск возврата к зависимому поведению.
Получить дополнительную информацию – http://narkologicheskaya-klinika-v-volgograde17.ru/narkologicheskaya-pomoshh-volgograd/
Лечение зависимости в наркологической клинике проводится поэтапно. Это обеспечивает постепенное восстановление организма и исключает риск осложнений. Каждый этап направлен на устранение конкретных нарушений, вызванных употреблением психоактивных веществ.
Получить больше информации – http://narcologicheskaya-klinika-v-krasnoyarske17.ru
Комплексный подход обеспечивает не только снятие симптомов, но и полное восстановление функций организма. Пациент получает поддержку на всех этапах — от детоксикации до социальной адаптации.
Получить дополнительные сведения – [url=https://narkologicheskaya-pomoshh-v-tolyatti17.ru/]наркологическая клиника клиника помощь в тольятти[/url]
Острый эпизод запоя — это не «плохое самочувствие», а состояние с реальными рисками для сердца, нервной системы и дыхания, особенно в ночные часы, когда усиливаются вегетативные реакции и тревога. В «НоваТрезвие» мы выстраиваем помощь так, чтобы от звонка до заметного облегчения прошло как можно меньше времени и как можно меньше случайностей: короткое интервью для оценки рисков, выезд врача или приём в клинике, экспресс-диагностика по ключевым показателям, персональная инфузионная схема без «универсальных коктейлей», мягкая коррекция сна и тревоги без «вырубания», понятные инструкции семье на 24–72 часа и план продолжения на ближайшие недели. Мы не скрываемся за общими формулами: решения принимаются по фактическим данным, дозы и темп капельниц подстраиваются к динамике каждые 15–20 минут, а при «красных флагах» перевод в стационар организуется без пауз. Конфиденциальность соблюдается строго, а коммуникация простая и предсказуемая — чтобы вы всегда знали, что происходит сейчас и чего ждать к утру.
Ознакомиться с деталями – [url=https://vyvod-iz-zapoya-ehlektrostal2-10.ru/]экстренный вывод из запоя[/url]
Лечение организовано поэтапно. Такой подход обеспечивает постепенное восстановление функций организма и исключает риск осложнений. Каждый этап терапии направлен на устранение конкретных нарушений, вызванных интоксикацией.
Изучить вопрос глубже – [url=https://vyvod-iz-zapoya-v-krasnoyarske17.ru/]нарколог вывод из запоя[/url]
Наркологическая клиника в Воронеже — это специализированное медицинское учреждение, предоставляющее помощь людям, столкнувшимся с зависимостью от алкоголя, наркотиков и других психоактивных веществ. Лечение проводится под контролем квалифицированных врачей, с использованием современных методик детоксикации, психотерапии и реабилитации. Цель работы специалистов — не только устранить физическую зависимость, но и помочь пациенту восстановить эмоциональное равновесие, вернуть контроль над поведением и мотивацию к трезвости.
Подробнее – https://narkologicheskaya-clinica-v-voronezhe17.ru/narkolog-voronezh-czena
В этом интересном тексте собраны обширные сведения, которые помогут вам понять различные аспекты обсуждаемой темы. Мы разбираем детали и факты, делая акцент на важности каждого элемента. Не упустите возможность расширить свои знания и взглянуть на мир по-новому!
Секреты успеха внутри – http://tonemusic.ir/%D8%A2%D9%87%D9%86%DA%AF-%D8%B1%D9%88%DB%8C-%DA%86%D8%B4%D9%85%D8%A7%D9%85
Основные этапы включают:
Разобраться лучше – https://vyvod-iz-zapoya-v-krasnoyarske17.ru/vyvedenie-iz-zapoya-krasnoyarsk
дайсон фен выпрямитель для волос купить оригинал [url=https://vypryamitel-dsn-kupit-4.ru/]vypryamitel-dsn-kupit-4.ru[/url] .
Эта разъяснительная статья содержит простые и доступные разъяснения по актуальным вопросам. Мы стремимся сделать информацию понятной для широкой аудитории, чтобы каждый мог разобраться в предмете и извлечь из него максимум пользы.
Открыть полностью – https://magiccarpets.eu/events/emerging-curators-meeting-in-croatia
Все растворы проходят фармацевтический контроль, а процедуры выполняются одноразовыми стерильными инструментами. После завершения капельницы врач наблюдает пациента в течение 15–30 минут, оценивает результат и даёт рекомендации по дальнейшему восстановлению. Важно не прерывать терапию самостоятельно — эффект закрепляется только при соблюдении рекомендаций.
Узнать больше – [url=https://narkolog-na-dom-v-voronezhe17.ru/]нарколог на дом недорого в воронеже[/url]
Лечение зависимости в наркологической клинике проводится поэтапно. Это обеспечивает постепенное восстановление организма и исключает риск осложнений. Каждый этап направлен на устранение конкретных нарушений, вызванных употреблением психоактивных веществ.
Разобраться лучше – https://narcologicheskaya-klinika-v-krasnoyarske17.ru/krasnoyarsk-narkologicheskij-czentr/
В этой публикации мы предлагаем подробные объяснения по актуальным вопросам, чтобы помочь читателям глубже понять их. Четкость и структурированность материала сделают его удобным для усвоения и применения в повседневной жизни.
Разобраться лучше – http://ilchiccodisenape.org/2023/11/18/dal-17-al-19-novembre-ci-trovate-a-chocopisa
Эта статья полна интересного контента, который побудит вас исследовать новые горизонты. Мы собрали полезные факты и удивительные истории, которые обогащают ваше понимание темы. Читайте, погружайтесь в детали и наслаждайтесь процессом изучения!
Подробности по ссылке – https://www.volgyfitness.hu/?p=6639&cpage=17
Вывод из запоя — это не просто медицинская процедура, а тщательно выстроенный процесс, направленный на восстановление работы всех систем организма. При неправильном или неполном лечении риск осложнений возрастает в несколько раз. Поэтому обращение в профессиональную клинику становится необходимым шагом. В наркологической клинике «Центр Трезвости ВоронМед» пациент получает экстренную помощь, безопасные инфузионные препараты, круглосуточный выезд нарколога и последующее восстановление под наблюдением специалистов. Здесь каждая капельница подбирается индивидуально — с учётом возраста, веса, длительности запоя, хронических болезней и реакции организма на препараты.
Получить дополнительные сведения – http://vyvod-iz-zapoya-v-voronezhe17.ru
Этот обзорный материал предоставляет информационно насыщенные данные, касающиеся актуальных тем. Мы стремимся сделать информацию доступной и структурированной, чтобы читатели могли легко ориентироваться в наших выводах. Познайте новое с нашим обзором!
Лучшее решение — прямо здесь – http://www.pilulaempreendedora.com.br/2017/09/26/como-persistencia-e-mente-sadia-trazem-grandes-resultados
Эта разъяснительная статья содержит простые и доступные разъяснения по актуальным вопросам. Мы стремимся сделать информацию понятной для широкой аудитории, чтобы каждый мог разобраться в предмете и извлечь из него максимум пользы.
Нажмите, чтобы узнать больше – https://www.cabinet.gov.zm/?p=4835
В этом обзорном материале представлены увлекательные детали, которые находят отражение в различных аспектах жизни. Мы исследуем непонятные и интересные моменты, позволяя читателю увидеть картину целиком. Погрузитесь в мир знаний и удивительных открытий!
Познакомиться с результатами исследований – https://thecyberjedi.com/access
Этот информационный обзор станет отличным путеводителем по актуальным темам, объединяющим важные факты и мнения экспертов. Мы исследуем ключевые идеи и представляем их в доступной форме для более глубокого понимания. Читайте, чтобы оставаться в курсе событий!
Открой скрытое – https://math.fmipa.unmul.ac.id/archive/index.php/mascot-mathematics-competition
Эта разъяснительная статья содержит простые и доступные разъяснения по актуальным вопросам. Мы стремимся сделать информацию понятной для широкой аудитории, чтобы каждый мог разобраться в предмете и извлечь из него максимум пользы.
Тыкай сюда — узнаешь много интересного – https://prian.co.in/ac-charging-in-electric-vehicles
Мы собрали для вас самые захватывающие факты из мира науки и истории. От малознакомых деталей до грандиозных событий — эта статья расширит ваш кругозор и подарит новое понимание того, как устроен наш мир.
Не упусти шанс – https://pizza-gloria.be/2019/09/03/5-great-tips-for-finding-color-inspiration
Этот информативный текст отличается привлекательным содержанием и актуальными данными. Мы предлагаем читателям взглянуть на привычные вещи под новым углом, предоставляя интересный и доступный материал. Получите удовольствие от чтения и расширьте кругозор!
Читать далее > – https://ancertbrasil.org.br/2020/12/22/certforum-2121
Откройте для себя скрытые страницы истории и малоизвестные научные открытия, которые оказали колоссальное влияние на развитие человечества. Статья предлагает свежий взгляд на события, которые заслуживают большего внимания.
Где можно узнать подробнее? – https://dadandburied.com/2014/08/01/nobody-hates-kids-more-than-parents
Этот информативный текст отличается привлекательным содержанием и актуальными данными. Мы предлагаем читателям взглянуть на привычные вещи под новым углом, предоставляя интересный и доступный материал. Получите удовольствие от чтения и расширьте кругозор!
Читать далее > – https://prepwithharshita.com/individual-need-and-interest-model-of-curriculum
Эта информационная заметка предлагает лаконичное и четкое освещение актуальных вопросов. Здесь вы найдете ключевые факты и основную информацию по теме, которые помогут вам сформировать собственное мнение и повысить уровень осведомленности.
А что дальше? – http://www.renatoricci.it/wp/cheap-levitra
Эта статья сочетает познавательный и занимательный контент, что делает ее идеальной для любителей глубоких исследований. Мы рассмотрим увлекательные аспекты различных тем и предоставим вам новые знания, которые могут оказаться полезными в будущем.
Раскрыть тему полностью – https://drnatro.com/nuoc-xit-tay-da-nang
Эта разъяснительная статья содержит простые и доступные разъяснения по актуальным вопросам. Мы стремимся сделать информацию понятной для широкой аудитории, чтобы каждый мог разобраться в предмете и извлечь из него максимум пользы.
Откройте для себя больше – https://digitalmaven.co.in/case-study-14-old-spice-humor-and-absurdity-as-the-cornerstone-of-brand-revival
Этот текст призван помочь читателю расширить кругозор и получить практические знания. Мы используем простой язык, наглядные примеры и структурированное изложение, чтобы сделать обучение максимально эффективным и увлекательным.
Смотрите также… – https://bharatsamvaad.com/hindi/chai-sutta-bar-founder-anubhav-dubey-reached-turnover-of-100-crore
Эта информационная статья охватывает широкий спектр актуальных тем и вопросов. Мы стремимся осветить ключевые факты и события с ясностью и простотой, чтобы каждый читатель мог извлечь из нее полезные знания и полезные инсайты.
Узнать больше – https://www.giuliasol.it/giulia-sol-sara-roxie-in-chicago-il-musical
Этот информационный материал собраны данные, которые помогут лучше понять текущие тенденции и процессы в различных сферах жизни. Мы предоставляем четкий анализ, графики и примеры, чтобы информация была не только понятной, но и практичной для принятия решений.
Уточнить детали – https://www.mm21so.com/?p=1445
Эта обзорная заметка содержит ключевые моменты и факты по актуальным вопросам. Она поможет читателям быстро ориентироваться в теме и узнать о самых важных аспектах сегодня. Получите краткий курс по современной информации и оставайтесь в курсе событий!
Смотрите также… – https://bulgame.com/xbox-gaming-services-not-installing-quick-fixes-ahead
В данной обзорной статье представлены интригующие факты, которые не оставят вас равнодушными. Мы критикуем и анализируем события, которые изменили наше восприятие мира. Узнайте, что стоит за новыми открытиями и как они могут изменить ваше восприятие реальности.
Подробности по ссылке – http://grafolog.cz/test-1/attachment/5
Эта публикация завернет вас в вихрь увлекательного контента, сбрасывая стереотипы и открывая двери к новым идеям. Каждый абзац станет для вас открытием, полным ярких примеров и впечатляющих достижений. Подготовьтесь быть вовлеченными и удивленными каждый раз, когда продолжите читать.
Лучшее решение — прямо здесь – https://agsengineering.co.tz/home-renovation
Статья знакомит с важнейшими моментами, которые сформировали наше общество. От великих изобретений до культурных переворотов — вы узнаете, как прошлое влияет на наше мышление, технологии и образ жизни.
См. подробности – https://www.mm21so.com/?p=1445
Эта статья сочетает в себе как полезные, так и интересные сведения, которые обогатят ваше понимание насущных тем. Мы предлагаем практические советы и рекомендации, которые легко внедрить в повседневную жизнь. Узнайте, как улучшить свои навыки и обогатить свой опыт с помощью простых, но эффективных решений.
Слушай внимательно — тут важно – https://kannadasampada.com/food/a-small-introduction-to-king-of-fruits
Эта статья сочетает познавательный и занимательный контент, что делает ее идеальной для любителей глубоких исследований. Мы рассмотрим увлекательные аспекты различных тем и предоставим вам новые знания, которые могут оказаться полезными в будущем.
Получить дополнительные сведения – https://technologynews.gr/microsoft-%CF%80%CF%81%CE%BF%CF%83%CE%B8%CE%AD%CF%84%CE%B5%CE%B9-%CE%BA%CE%BF%CF%85%CE%BC%CF%80%CE%AF-%CF%84%CE%B5%CF%87%CE%BD%CE%B7%CF%84%CE%AE%CF%82-%CE%BD%CE%BF%CE%B7%CE%BC%CE%BF%CF%83%CF%8D%CE%BD
дайсон стайлер купить выпрямитель [url=https://vypryamitel-dsn-kupit-4.ru/]дайсон стайлер купить выпрямитель[/url] .
реклама наркологической клиники [url=https://seo-kejsy7.ru/]реклама наркологической клиники[/url] .
Все обращения в клинику «РеабКузбасс» обрабатываются в рамках строгой анонимности. Пациент может проходить лечение без паспорта, под вымышленным именем, если это важно для психологического комфорта. Ни одна медицинская процедура или консультация не фиксируется в государственных базах без согласия. Персонал подписывает документы о неразглашении. Также предлагается анонимная оплата и оформление без упоминания диагноза в документах. При необходимости пациент может получить справку с нейтральной формулировкой для работы или страховой компании.
Получить дополнительные сведения – [url=https://lechenie-narkomanii-novokuzneczk0.ru/]принудительное лечение наркомании[/url]
лбс это [url=https://shkola-onlajn13.ru/]shkola-onlajn13.ru[/url] .
Здесь собраны разрозненные сведения и неопределённые мысли, которые могут заинтересовать, даже если их важность сомнительна.
Дополнительная информация – [url=https://stop-zavisimost.ru/blog/chto-takoe-mefedron-kak-ego-upotreblyayut-posledstviya-i-sposoby-lecheniya-zavisimosti.html]рулетка онлайн[/url]
Эффективность лечения во многом зависит от квалификации врачей, участвующих в процессе. В наркологической клинике должны работать не только врачи-наркологи, но и психиатры, клинические психологи, специалисты по аддиктивному поведению, а также координаторы по социальной адаптации. Слаженное взаимодействие этих специалистов — залог того, что лечение будет не только медицински обоснованным, но и глубоко проработанным в психологическом плане.
Выяснить больше – http://narkologicheskaya-klinika-yaroslavl0.ru/lechenie-narkomanii-i-alkogolizma-yaroslavl/
Город с протяжёнными магистралями и разноскоростными районами требует особой организации маршрутов. Выездные бригады «ВолгаДок Медикал» работают в режиме 24/7, прибывают в гражданской одежде, избегают громких звонков и используют «немаркированные» подъезды. Перед приездом мы просим подготовить пространство: приглушить верхний свет, обеспечить приток свежего воздуха без сквозняков, подготовить ровную поверхность под укладку и удлинитель, перевести телефоны в «без уведомлений» с «белым списком» близких. Это позволяет в первые минуты сосредоточиться на клинике, а не на бытовых вопросах.
Получить дополнительную информацию – http://narcologicheskaya-klinika-saratov0.ru
Первый шаг в лечении — это тщательный осмотр специалиста. Наряду с измерением жизненно важных показателей (пульс, артериальное давление, температура) врач проводит сбор анамнеза, выясняя длительность запоя, тип употребляемого алкоголя и наличие сопутствующих заболеваний. Эти данные помогают оценить степень интоксикации и подобрать индивидуальный план терапии, что является ключевым для дальнейшей эффективной детоксикации.
Подробнее тут – [url=https://vyvod-iz-zapoya-yaroslavl0.ru/]вывод из запоя анонимно ярославль[/url]
дайсон стайлер купить выпрямитель [url=https://vypryamitel-dsn-kupit-4.ru/]дайсон стайлер купить выпрямитель[/url] .
реклама наркологической клиники [url=https://seo-kejsy7.ru/]реклама наркологической клиники[/url] .
Эти методы комбинируются и создают условия для всестороннего восстановления пациента.
Исследовать вопрос подробнее – http://narcologicheskaya-klinika-omsk0.ru/
школа онлайн дистанционное обучение [url=https://shkola-onlajn13.ru/]школа онлайн дистанционное обучение[/url] .
Выбор клиники — задача не только медицинская, но и стратегическая. Учитывать нужно не только наличие лицензии, но и содержание программ, их гибкость, участие родственников в процессе, а также прозрачность взаимодействия с пациентом. Именно эти аспекты позволяют отличить профессиональное учреждение от формального.
Подробнее тут – https://narkologicheskaya-klinika-yaroslavl0.ru/chastnaya-narkologicheskaya-klinika-yaroslavl
Если на предзвонке выявляются «красные флаги» — давящая боль в груди, одышка в покое, спутанность сознания, судороги, неукротимая рвота, резкое падение насыщения кислородом — мы организуем бесшовный перевод в стационар. Место резервируем заранее, логистику строим так, чтобы не привлекать внимания соседей и не затягивать старт лечения. При отсутствии угроз терапия может начаться дома с последующим телесопровождением и при необходимости — краткой госпитализацией.
Разобраться лучше – [url=https://narcologicheskaya-klinika-saratov0.ru/]наркологическая клиника нарколог в саратове[/url]
Важной частью реабилитации является социализация пациента, возвращение его к активной общественной жизни и формирование новых, здоровых привычек. Для этого в клинике организуются различные мероприятия и программы адаптации.
Разобраться лучше – [url=https://lechenie-narkomanii-tver0.ru/]лечение наркомании на дому в твери[/url]
В клинике применяются комплексные программы, охватывающие все стадии терапии. Такой подход позволяет обеспечить пациенту полный спектр помощи — от первой консультации до социальной адаптации.
Подробнее можно узнать тут – [url=https://narcologicheskaya-klinika-omsk0.ru/]наркологическая клиника нарколог в омске[/url]
Наркологическая клиника — это не просто место, где пациенту оказывают медицинскую помощь. Это учреждение, где формируется стратегия полного восстановления, включающая не только физическое оздоровление, но и психоэмоциональную стабилизацию. В Ярославле работают как частные, так и государственные клиники, однако их подходы, уровень сервиса и состав команд могут существенно различаться. По данным Минздрава РФ, высокий процент успешных исходов наблюдается в тех учреждениях, где реализуется персонализированная модель лечения и постлечебной поддержки.
Углубиться в тему – [url=https://narkologicheskaya-klinika-yaroslavl0.ru/]бесплатная наркологическая клиника[/url]
Запой, интоксикация? Вызовите нарколога на дом в Иркутске для быстрой и анонимной помощи. На дому: осмотр, подбор лечения, капельница для вывода токсинов и улучшение самочувствия. «ТрезвоМед» – круглосуточная наркологическая помощь на дому с гарантией анонимности. Не справляетесь с зависимостью сами? Вызовите нарколога на дом. Васильев подчеркивает: «Оперативная помощь – ключ к выздоровлению при отравлении алкоголем».
Узнать больше – [url=https://narcolog-na-dom-v-irkutske0.ru/]нарколог на дом иркутск[/url]
выпрямитель dyson corrale купить [url=https://vypryamitel-dsn-kupit-4.ru/]выпрямитель dyson corrale купить[/url] .
В клинике применяются комплексные программы, охватывающие все стадии терапии. Такой подход позволяет обеспечить пациенту полный спектр помощи — от первой консультации до социальной адаптации.
Узнать больше – [url=https://narcologicheskaya-klinika-omsk0.ru/]запой наркологическая клиника[/url]
Публикация предлагает набор слабо связанных идей, которые сложно применить на практике, лишь слегка затрагивая разные точки зрения.
Дополнительная информация – [url=https://stop-zavisimost.ru/]займ без процентов[/url]
Город с протяжёнными магистралями и разноскоростными районами требует особой организации маршрутов. Выездные бригады «ВолгаДок Медикал» работают в режиме 24/7, прибывают в гражданской одежде, избегают громких звонков и используют «немаркированные» подъезды. Перед приездом мы просим подготовить пространство: приглушить верхний свет, обеспечить приток свежего воздуха без сквозняков, подготовить ровную поверхность под укладку и удлинитель, перевести телефоны в «без уведомлений» с «белым списком» близких. Это позволяет в первые минуты сосредоточиться на клинике, а не на бытовых вопросах.
Получить больше информации – [url=https://narcologicheskaya-klinika-saratov0.ru/]наркологическая клиника нарколог саратов[/url]
создать сайт прогнозов на спорт в москве [url=https://seo-kejsy7.ru/]seo-kejsy7.ru[/url] .
Выбор клиники — задача не только медицинская, но и стратегическая. Учитывать нужно не только наличие лицензии, но и содержание программ, их гибкость, участие родственников в процессе, а также прозрачность взаимодействия с пациентом. Именно эти аспекты позволяют отличить профессиональное учреждение от формального.
Подробнее тут – http://narkologicheskaya-klinika-yaroslavl0.ru
С момента начала лечения пациент получает доступ к круглосуточной линии поддержки. Врачи, психологи и координаторы готовы ответить на вопросы, помочь с корректировкой схемы лечения, поддержать в ситуации риска срыва. Эта функция особенно востребована в первые недели после выписки, когда человек сталкивается с триггерами в привычной среде и нуждается в дополнительной защите. Связь может осуществляться по телефону, через защищённый мессенджер или с помощью мобильного приложения клиники.
Получить дополнительную информацию – [url=https://lechenie-narkomanii-samara0.ru/]лечение наркомании реабилитация[/url]
онлайн школы для детей [url=https://shkola-onlajn13.ru/]shkola-onlajn13.ru[/url] .
Современные реалии требуют от медицинских учреждений гибкости, скорости и чуткости. Наркологическая помощь — одна из сфер, где промедление может стоить человеку здоровья или жизни. В наркологической клинике «ТверьМед» разработаны оперативные механизмы реагирования: выезд врача по адресу в течение 30 минут, круглосуточная поддержка и возможность получения онлайн-консультации, не покидая дом. Такой подход позволяет вовремя оказать помощь, даже если пациент отказывается ехать в стационар или не осознаёт всю серьёзность своего состояния.
Подробнее можно узнать тут – [url=https://narkologicheskaya-pomoshh-tver0.ru/]частная наркологическая помощь тверь[/url]
Эффективность лечения во многом зависит от квалификации врачей, участвующих в процессе. В наркологической клинике должны работать не только врачи-наркологи, но и психиатры, клинические психологи, специалисты по аддиктивному поведению, а также координаторы по социальной адаптации. Слаженное взаимодействие этих специалистов — залог того, что лечение будет не только медицински обоснованным, но и глубоко проработанным в психологическом плане.
Подробнее тут – https://narkologicheskaya-klinika-yaroslavl0.ru/chastnaya-narkologicheskaya-klinika-yaroslavl
Каждый метод подбирается индивидуально, что обеспечивает безопасность и эффективность процесса.
Изучить вопрос глубже – [url=https://vyvod-iz-zapoya-omsk0.ru/]нарколог на дом вывод из запоя омск[/url]
Многие сталкиваются с трудностями при выборе клиники или центра: предлагаемые услуги различаются по качеству, подходам, стоимости и длительности. Некоторые организации ограничиваются только медикаментозной поддержкой, не работая с глубинными причинами зависимости. Поэтому важно заранее понимать, какие параметры отличают действительно надёжное учреждение, способное обеспечить долгосрочные результаты.
Исследовать вопрос подробнее – http://lechenie-narkomanii-murmansk0.ru/lechenie-narkomanii-i-alkogolizma-marmansk/
С момента начала лечения пациент получает доступ к круглосуточной линии поддержки. Врачи, психологи и координаторы готовы ответить на вопросы, помочь с корректировкой схемы лечения, поддержать в ситуации риска срыва. Эта функция особенно востребована в первые недели после выписки, когда человек сталкивается с триггерами в привычной среде и нуждается в дополнительной защите. Связь может осуществляться по телефону, через защищённый мессенджер или с помощью мобильного приложения клиники.
Получить больше информации – [url=https://lechenie-narkomanii-samara0.ru/]лечение наркомании и алкоголизма[/url]
В клинике применяются комплексные программы, охватывающие все стадии терапии. Такой подход позволяет обеспечить пациенту полный спектр помощи — от первой консультации до социальной адаптации.
Подробнее – [url=https://narcologicheskaya-klinika-omsk0.ru/]анонимная наркологическая клиника[/url]
При получении заявки по телефону или через сайт администратор передаёт её врачу-дежуранту, который немедленно выезжает по указанному адресу. По прибытии специалист проводит первичный осмотр: измеряются артериальное давление, пульс, температура, сатурация. Затем осуществляется экспресс-оценка состояния ЦНС и метаболизма. При необходимости берутся анализы, подключается инфузионная система, проводятся противотревожные и детоксикационные мероприятия. Врач остаётся с пациентом до полной стабилизации состояния, а при тяжёлых симптомах организует транспортировку в стационар.
Разобраться лучше – [url=https://narkologicheskaya-pomoshh-tver0.ru/]наркологическая помощь на дому круглосуточно в твери[/url]
Капельницы в «СаратовМед Профи» — это конструктор из тщательно подобранных модулей. Каждый модуль решает одну задачу и имеет свой ожидаемый горизонт эффекта. Важно не название, а логика: задача > опора среды > как проверяем > когда ждём результат.
Подробнее можно узнать тут – [url=https://vyvod-iz-zapoya-saratov0.ru/]скорая вывод из запоя[/url]
Такая структура терапии делает процесс максимально эффективным и безопасным.
Исследовать вопрос подробнее – [url=https://narcologicheskaya-klinika-omsk0.ru/]наркологическая клиника клиника помощь в омске[/url]
Медицинская помощь в клинике организована поэтапно, что позволяет постепенно стабилизировать состояние и вернуть контроль над самочувствием.
Получить дополнительные сведения – [url=https://vyvod-iz-zapoya-perm0.ru/]вывод из запоя дешево[/url]
Если на предзвонке выявляются «красные флаги» — давящая боль в груди, одышка в покое, спутанность сознания, судороги, неукротимая рвота, резкое падение насыщения кислородом — мы организуем бесшовный перевод в стационар. Место резервируем заранее, логистику строим так, чтобы не привлекать внимания соседей и не затягивать старт лечения. При отсутствии угроз терапия может начаться дома с последующим телесопровождением и при необходимости — краткой госпитализацией.
Получить дополнительную информацию – [url=https://narcologicheskaya-klinika-saratov0.ru/]наркологическая клиника стационар в саратове[/url]
Запой, интоксикация? Вызовите нарколога на дом в Иркутске для быстрой и анонимной помощи. На дому: осмотр, подбор лечения, капельница для вывода токсинов и улучшение самочувствия. «ТрезвоМед» – круглосуточная наркологическая помощь на дому с гарантией анонимности. Не справляетесь с зависимостью сами? Вызовите нарколога на дом. Васильев подчеркивает: «Оперативная помощь – ключ к выздоровлению при отравлении алкоголем».
Выяснить больше – [url=https://narcolog-na-dom-v-irkutske0.ru/]вызов нарколога на дом иркутск[/url]
Когда острые угрозы исключены, программа стартует дома. Пациент получает понятную карту действий, близкие — короткие окна обратной связи, врач — чистую «картинку» для тонкой настройки. Мы просим сообщать факты, а не эмоции: минуты до засыпания, число пробуждений, объём тёплой воды малыми глотками, пульс к вечеру, переносимость мягкой пищи, ясность головы утром.
Исследовать вопрос подробнее – [url=https://vyvod-iz-zapoya-saratov0.ru/]наркология вывод из запоя в саратове[/url]
Если на предзвонке выявляются «красные флаги» — давящая боль в груди, одышка в покое, спутанность сознания, судороги, неукротимая рвота, резкое падение насыщения кислородом — мы организуем бесшовный перевод в стационар. Место резервируем заранее, логистику строим так, чтобы не привлекать внимания соседей и не затягивать старт лечения. При отсутствии угроз терапия может начаться дома с последующим телесопровождением и при необходимости — краткой госпитализацией.
Получить больше информации – [url=https://narcologicheskaya-klinika-saratov0.ru/]лечение в наркологической клинике в саратове[/url]
Медицинская помощь в клинике организована поэтапно, что позволяет постепенно стабилизировать состояние и вернуть контроль над самочувствием.
Подробнее можно узнать тут – [url=https://vyvod-iz-zapoya-perm0.ru/]вывод из запоя недорого[/url]
В медицинской практике используются различные методы, которые помогают ускорить процесс восстановления. Все процедуры проводятся под контролем специалистов и с учетом индивидуальных особенностей пациента.
Подробнее тут – https://vyvod-iz-zapoya-omsk0.ru/vyvod-iz-zapoya-gorod-omsk
Наркологическая помощь должна быть не только медицински точной, но и человечной, безопасной и анонимной. В «Ижевском Центре Трезвых Решений» выстроена система комплексного подхода к лечению зависимостей, включающая диагностику, медикаментозную детоксикацию, психотерапию и социальную адаптацию. Клиника объединяет профессионализм, заботу и круглосуточную готовность помочь пациентам, оказавшимся в трудной ситуации. Здесь работают врачи с большим опытом в области наркологии и психиатрии, способные оперативно выехать на дом и оказать неотложную помощь.
Получить дополнительные сведения – [url=https://narkologicheskaya-klinika-v-izhevsk18.ru/]вывод наркологическая клиника ижевск[/url]
Многие сталкиваются с трудностями при выборе клиники или центра: предлагаемые услуги различаются по качеству, подходам, стоимости и длительности. Некоторые организации ограничиваются только медикаментозной поддержкой, не работая с глубинными причинами зависимости. Поэтому важно заранее понимать, какие параметры отличают действительно надёжное учреждение, способное обеспечить долгосрочные результаты.
Получить больше информации – [url=https://lechenie-narkomanii-murmansk0.ru/]лечение наркомании нарколог[/url]
Мы не используем универсальную «капельницу». Схема собирается из модулей под ведущие жалобы. Медицинские шаги всегда сочетаются с нефраком опорами — свет, тишина, вода малыми глотками, дыхание, — потому что среда усиливает действие препаратов и позволяет держать дозы ниже.
Выяснить больше – https://narkolog-na-dom-saratov0.ru/narkolog-i-psikhiatr-v-saratove
Если требуется срочное кодирование или детоксикация, вызов нарколога на дом – лучшее решение в Иркутске. Профессиональный нарколог приедет, оценит состояние, проведет детоксикацию на дому. «ТрезвоМед»: анонимный выезд нарколога 24/7, помощь при отказе от алкоголя. Тяжело бросить пить в одиночку? Обратитесь к наркологу! Главное – быстро оказать помощь при интоксикации, – нарколог Васильев.
Подробнее можно узнать тут – [url=https://narcolog-na-dom-v-irkutske0.ru/]вызов нарколога на дом иркутск[/url]
В клинике «СамарМед» доступно несколько форм лечения: стационарная программа, дневной стационар, амбулаторное наблюдение и гибридные схемы. Пациенты могут выбрать комфортный вариант в зависимости от степени зависимости, текущего состояния и занятости. Внутри стационара предусмотрены как стандартные палаты, так и индивидуальные блоки повышенной комфортности с возможностью проживания совместно с сопровождающим лицом.
Изучить вопрос глубже – [url=https://narkologicheskaya-klinika-samara0.ru/]наркологическая клиника лечение алкоголизма самара[/url]
Каждый из методов подбирается индивидуально, что позволяет учитывать медицинские показания и личные особенности пациента.
Ознакомиться с деталями – [url=https://lechenie-alkogolizma-perm0.ru/]лечение алкоголизма[/url]
seo top 1 [url=https://seo-kejsy7.ru/]seo top 1[/url] .
дистанционное обучение 7 класс [url=https://shkola-onlajn13.ru/]дистанционное обучение 7 класс[/url] .
Терапия в клинике строится по индивидуальному протоколу. Каждому пациенту подбираются процедуры с учётом возраста, длительности болезни, сопутствующих нарушений и психоэмоционального состояния. Лечение проходит поэтапно, что позволяет исключить осложнения и достичь стабильной ремиссии. Ниже представлена таблица с ключевыми этапами терапии.
Получить дополнительные сведения – http://narkologicheskaya-klinika-v-izhevsk18.ru/narkologicheskaya-klinika-izhevsk-otzyvy/
Для пациентов, нуждающихся в полном погружении в лечебный процесс, в клинике предусмотрен круглосуточный стационар. Палаты — индивидуальные и на два человека, оборудованы современной мебелью, кондиционерами и телевизорами. Организовано сбалансированное питание с возможностью коррекции по медицинским показаниям. Пациенты ежедневно проходят процедуры, сессии и получают консультации. В свободное время организуются арт-занятия, йога, дыхательные практики. Такой режим позволяет не только восстановить физическое здоровье, но и снизить уровень тревожности, вернуть интерес к жизни и стимулировать мотивацию к выздоровлению.
Выяснить больше – [url=https://lechenie-narkomanii-novokuzneczk0.ru/]лечение алкоголизма и наркомании центр новокузнецк[/url]
Этот информативный материал предлагает содержательную информацию по множеству задач и вопросов. Мы призываем вас исследовать различные идеи и факты, обобщая их для более глубокого понимания. Наша цель — сделать обучение доступным и увлекательным.
Это стоит прочитать полностью – https://testsieger-umzugsunternehmen.de/umzug-frankfurt-umzugsunternehmen-sorgenfreie-umzuege
Публикация предлагает читателю не просто информацию, а инструменты для анализа и саморазвития. Мы стимулируем критическое мышление, предлагая различные точки зрения и призывая к самостоятельному поиску решений.
Подробная информация доступна по запросу – https://cci.ulim.md/primul-buletin-informativ-al-proiectului-coopera
Эта информационная заметка предлагает лаконичное и четкое освещение актуальных вопросов. Здесь вы найдете ключевые факты и основную информацию по теме, которые помогут вам сформировать собственное мнение и повысить уровень осведомленности.
Открой скрытое – https://binhhutloc.vn/chon-binh-hut-loc-theo-menh
В клинике реализуются ключевые направления, которые обеспечивают всестороннюю помощь и поддержку пациентам на всех этапах лечения.
Изучить вопрос глубже – [url=https://narkologicheskaya-klinika-v-omske0.ru/]вывод наркологическая клиника в омске[/url]
Эта статья погружает вас в увлекательный мир знаний, где каждый факт становится открытием. Мы расскажем о ключевых исторических поворотных моментах и научных прорывах, которые изменили ход цивилизации. Поймите, как прошлое формирует настоящее и как его уроки могут помочь нам строить будущее.
См. подробности – https://www.powertvnews.in/2025/06/05/second-married-tmc-mp-mahua-moitra-the-photo-went-viral
Этот информативный материал предлагает содержательную информацию по множеству задач и вопросов. Мы призываем вас исследовать различные идеи и факты, обобщая их для более глубокого понимания. Наша цель — сделать обучение доступным и увлекательным.
Ознакомиться с отчётом – https://e3lounge.com/hello-world
Такой алгоритм позволяет постепенно восстановить функции организма и подготовить пациента к дальнейшему лечению зависимости.
Выяснить больше – [url=https://vyvod-iz-zapoya-omsk0.ru/]вывод из запоя вызов город[/url]
Эта статья погружает вас в увлекательный мир знаний, где каждый факт становится открытием. Мы расскажем о ключевых исторических поворотных моментах и научных прорывах, которые изменили ход цивилизации. Поймите, как прошлое формирует настоящее и как его уроки могут помочь нам строить будущее.
См. подробности – https://www.powertvnews.in/2025/06/05/bjp-is-doing-politics-over-death-dkshi-in-tears
В этой публикации мы сосредоточимся на интересных аспектах одной из самых актуальных тем современности. Совмещая факты и мнения экспертов, мы создадим полное представление о предмете, которое будет полезно как новичкам, так и тем, кто глубоко изучает вопрос.
Раскрыть тему полностью – https://dainikpahad.com/archives/3061
В этом интересном тексте собраны обширные сведения, которые помогут вам понять различные аспекты обсуждаемой темы. Мы разбираем детали и факты, делая акцент на важности каждого элемента. Не упустите возможность расширить свои знания и взглянуть на мир по-новому!
Это ещё не всё… – https://www.climatisation-91-service.fr/financement-des-pompes-a-chaleur
Чтение СМИ имеет большое значение в информационном пространстве.
Оно помогает оставаться информированным и понимать происходящее.
Актуальные новости позволяют принимать взвешенные решения.
Чтение СМИ способствует повышению осознанности.
https://telegra.ph/Novosibirsk-12-25-8
Разнообразные медиа помогают видеть картину шире.
В профессиональной сфере СМИ дают возможность следить за тенденциями.
Внимательное чтение новостей формирует навыки анализа.
В целом, чтение СМИ делает человека более информированным.
В статье представлены ключевые моменты по актуальной теме, дополненные советами экспертов и ссылками на дополнительные ресурсы. Цель материала — дать читателю инструменты для самостоятельного развития и принятия осознанных решений.
Есть чему поучиться – https://www.realty-key.ru/meta/vklady
Мы предлагаем вам окунуться в океан любопытных фактов и вдохновляющих историй. Эта публикация поможет расширить горизонты, разбудить интерес к науке и истории и увидеть мир с новой стороны.
Познакомиться с результатами исследований – https://antharacafe.com/unlock-your-potential-with-these-inspiring-ebooks
Эта информационная статья охватывает широкий спектр актуальных тем и вопросов. Мы стремимся осветить ключевые факты и события с ясностью и простотой, чтобы каждый читатель мог извлечь из нее полезные знания и полезные инсайты.
Что скрывают от вас? – https://www.realty-key.ru/2018/04
Мы предлагаем вам окунуться в океан любопытных фактов и вдохновляющих историй. Эта публикация поможет расширить горизонты, разбудить интерес к науке и истории и увидеть мир с новой стороны.
Читать дальше – https://www.realty-key.ru/2017/02
Этот интересный отчет представляет собой сборник полезных фактов, касающихся актуальных тем. Мы проанализируем данные, чтобы вы могли сделать обоснованные выводы. Читайте, чтобы узнать больше о последних трендах и значимых событиях!
Полная информация здесь – https://www.transcoclsg.org/organization-chart/logo
Этот информационный материал собраны данные, которые помогут лучше понять текущие тенденции и процессы в различных сферах жизни. Мы предоставляем четкий анализ, графики и примеры, чтобы информация была не только понятной, но и практичной для принятия решений.
Что скрывают от вас? – https://www.defining-blog.ru/2025/10/02
Эта публикация завернет вас в вихрь увлекательного контента, сбрасывая стереотипы и открывая двери к новым идеям. Каждый абзац станет для вас открытием, полным ярких примеров и впечатляющих достижений. Подготовьтесь быть вовлеченными и удивленными каждый раз, когда продолжите читать.
Раскрыть тему полностью – https://www.realty-key.ru/2015/10
Эта информационная статья охватывает широкий спектр актуальных тем и вопросов. Мы стремимся осветить ключевые факты и события с ясностью и простотой, чтобы каждый читатель мог извлечь из нее полезные знания и полезные инсайты.
Познакомиться с результатами исследований – https://dawahguide.net/dawah-team-building
Эта обзорная заметка содержит ключевые моменты и факты по актуальным вопросам. Она поможет читателям быстро ориентироваться в теме и узнать о самых важных аспектах сегодня. Получите краткий курс по современной информации и оставайтесь в курсе событий!
Продолжить изучение – https://www.dissomarket.com/guide-complet-sur-les-huiles-alimentaires-choisissez-la-meilleure-huile-pour-votre-cuisine
Эта статья погружает вас в увлекательный мир знаний, где каждый факт становится открытием. Мы расскажем о ключевых исторических поворотных моментах и научных прорывах, которые изменили ход цивилизации. Поймите, как прошлое формирует настоящее и как его уроки могут помочь нам строить будущее.
Изучить эмпирические данные – https://nayuta-p.com/2023/09/25/solar-panels-101-a-beginners-guide-to-solar-energy
В этой информационной статье вы найдете интересное содержание, которое поможет вам расширить свои знания. Мы предлагаем увлекательный подход и уникальные взгляды на обсуждаемые темы, побуждая пользователей к активному мышлению и критическому анализу.
Детальнее – https://labrecipes.com/no-bake-coconut-snowballs-2/2
Этот увлекательный информационный материал подарит вам массу новых знаний и ярких эмоций. Мы собрали для вас интересные факты и сведения, которые обогатят ваш опыт. Откройте для себя увлекательный мир информации и насладитесь процессом изучения!
Погрузиться в научную дискуссию – https://posibolt.co.za/restaurant-pos-software-in-bos-coffee-qatar
Эта статья погружает вас в увлекательный мир знаний, где каждый факт становится открытием. Мы расскажем о ключевых исторических поворотных моментах и научных прорывах, которые изменили ход цивилизации. Поймите, как прошлое формирует настоящее и как его уроки могут помочь нам строить будущее.
См. подробности – https://labrecipes.com/no-bake-coconut-snowballs-2/2
Этот информативный текст отличается привлекательным содержанием и актуальными данными. Мы предлагаем читателям взглянуть на привычные вещи под новым углом, предоставляя интересный и доступный материал. Получите удовольствие от чтения и расширьте кругозор!
Познакомиться с результатами исследований – http://www.javieracedo.com/hello-world
Эта информационная статья охватывает широкий спектр актуальных тем и вопросов. Мы стремимся осветить ключевые факты и события с ясностью и простотой, чтобы каждый читатель мог извлечь из нее полезные знания и полезные инсайты.
Узнать больше – https://zeroriginal.com/hola-mundo
В этой статье представлен занимательный и актуальный контент, который заставит вас задуматься. Мы обсуждаем насущные вопросы и проблемы, а также освещаем истории, которые вдохновляют на действия и изменения. Узнайте, что стоит за событиями нашего времени!
Всё, что нужно знать – https://seointellect.com/2023/04/09/boost-your-online-presence-our-top-digital-marketing
В этом обзорном материале представлены увлекательные детали, которые находят отражение в различных аспектах жизни. Мы исследуем непонятные и интересные моменты, позволяя читателю увидеть картину целиком. Погрузитесь в мир знаний и удивительных открытий!
Где можно узнать подробнее? – https://www.defining-blog.ru/tag/megafon
Откройте для себя скрытые страницы истории и малоизвестные научные открытия, которые оказали колоссальное влияние на развитие человечества. Статья предлагает свежий взгляд на события, которые заслуживают большего внимания.
Получить дополнительные сведения – https://escapistasclub.com/el-reino-escape-room-granada-granada
Being well-dressed is significant for self-expression.
A thoughtful appearance helps express personality.
Stylish clothing can improve self-esteem.
In everyday life, appearance often shapes first impressions.
https://rentry.co/cxpoiaom
A well-planned wardrobe make professional interactions smoother.
It is important to consider one’s own comfort as well as the situation.
Fashion trends give people the chance to discover new ideas.
Ultimately, dressing stylishly positively affects perception.
Having a sense of style is important for building a personal image.
A thoughtful appearance helps show personal taste.
A neat look can increase self-assurance.
In everyday life, appearance often shapes first impressions.
https://telegra.ph/Balenciaga-12-25-2
Balanced style choices make social situations more comfortable.
It is important to consider personal preferences as well as the occasion.
Fashion trends give people the chance to refresh their image.
In conclusion, dressing stylishly supports a complete personal image.
официальный сайт бк мелбет [url=www.rusfusion.ru]официальный сайт бк мелбет[/url] .
Каждое из этих направлений имеет важное значение и в совокупности формирует основу для устойчивого выздоровления.
Подробнее тут – https://narkologicheskaya-klinika-v-omske0.ru/chastnaya-narkologicheskaya-klinika-omsk
Сразу после поступления вызова нарколог прибывает на дом для проведения детального первичного осмотра. Врач собирает краткий анамнез, измеряет жизненно важные показатели, такие как пульс, артериальное давление и температура, и оценивает степень интоксикации. Эта информация является фундаментом для разработки индивидуального плана терапии, который учитывает особенности состояния пациента.
Изучить вопрос глубже – [url=https://vyvod-iz-zapoya-tula000.ru/]вывод из запоя в стационаре в туле[/url]
После поступления вызова наш нарколог выезжает к пациенту в кратчайшие сроки, прибывая по адресу в пределах 30–60 минут. Специалист начинает процедуру с подробного осмотра и диагностики, измеряя ключевые показатели организма: артериальное давление, частоту пульса, насыщенность кислородом и собирая подробный анамнез.
Углубиться в тему – [url=https://narcolog-na-dom-novosibirsk00.ru/]вызвать нарколога на дом в новосибирске[/url]
Что делаем на практике
Получить больше информации – https://narkologicheskaya-klinika-domodedovo0.ru/narkologicheskaya-klinika-telefon-v-domodedovo
Процесс вывода из запоя включает последовательное воздействие на ключевые звенья интоксикации. Ниже представлена таблица, отражающая этапы лечения, используемые методики и ожидаемые результаты терапии.
Исследовать вопрос подробнее – [url=https://vyvod-iz-zapoya-v-volgograde17.ru/]вывод из запоя на дому круглосуточно в волгограде[/url]
Услуга вывода из запоя на дому в Туле разработана для тех, кто столкнулся с тяжелыми последствиями злоупотребления алкоголем. Основная цель – оперативная детоксикация организма, восстановление нормального обмена веществ и предотвращение дальнейших осложнений. Врач нарколог проводит полный комплекс обследований и назначает персонализированный план лечения, включающий медикаментозную терапию и психологическую поддержку, что позволяет обеспечить стабильное восстановление организма.
Подробнее тут – [url=https://vyvod-iz-zapoya-tula000.ru/]вывод из запоя на дому тула[/url]
Когда запой затягивается, организм быстро входит в режим перегрузки: нарушается сон, скачет давление, усиливается тревога, появляется дрожь, тошнота, потливость и резкая слабость. В такой ситуации «перетерпеть» или лечиться домашними средствами — рискованная стратегия: состояние может ухудшаться волнами, а осложнения иногда развиваются резко, без долгой подготовки. Выезд нарколога на дом в Красногорске нужен для того, чтобы снять острую интоксикацию и абстиненцию безопасно, под контролем показателей, без лишней суеты и без поездок по стационарам в разгар плохого самочувствия.
Исследовать вопрос подробнее – http://narkolog-na-dom-krasnogorsk6.ru/narkologicheskij-czentr-v-krasnogorske/https://narkolog-na-dom-krasnogorsk6.ru
Инфузионные растворы подбираются строго индивидуально, после осмотра врача и анализа показателей пациента. При необходимости курс повторяется с изменением состава раствора для достижения максимального эффекта.
Получить дополнительную информацию – https://narkologicheskaya-klinika-v-novokuzneczke17.ru/narkologiya-gorod-novokuzneczk
После завершения процедур пациенту предоставляется подробная консультация с рекомендациями по дальнейшему восстановлению и профилактике повторных случаев зависимости.
Выяснить больше – [url=https://narcolog-na-dom-novosibirsk00.ru/]narkolog-na-dom novosibirsk[/url]
Что делаем на практике
Подробнее тут – http://narkologicheskaya-klinika-domodedovo0.ru/
Не всегда человек способен самостоятельно прекратить приём алкоголя и восстановиться. Есть состояния, требующие немедленного вмешательства специалистов. Обратиться за помощью необходимо, если наблюдаются следующие признаки:
Подробнее – [url=https://vyvod-iz-zapoya-v-volgograde17.ru/]нарколог вывод из запоя в волгограде[/url]
Алкогольная интоксикация и запой могут стремительно ухудшить состояние здоровья, став угрозой жизни, поэтому оперативное вмешательство имеет первостепенное значение. В Туле квалифицированные наркологи предоставляют круглосуточную помощь на дому, что позволяет начать лечение незамедлительно и в комфортных условиях. Такой формат терапии гарантирует индивидуальный подход, всестороннюю поддержку и полную конфиденциальность, что особенно важно для пациентов, стремящихся восстановить своё здоровье без лишних стрессовых ситуаций.
Узнать больше – [url=https://vyvod-iz-zapoya-tula000.ru/]вывод из запоя круглосуточно тула[/url]
Врач уточняет, как долго продолжается запой, какой алкоголь употребляется, а также наличие сопутствующих заболеваний. Этот тщательный анализ позволяет оперативно подобрать оптимальные методы детоксикации и снизить риск осложнений.
Исследовать вопрос подробнее – [url=https://vyvod-iz-zapoya-tula0.ru/]вывод из запоя анонимно[/url]
Что получите за 24 часа
Подробнее тут – [url=https://narkologicheskaya-klinika-domodedovo0.ru/]срочная наркологическая помощь домодедово[/url]
Наркологическая клиника «МедЛайн» предоставляет профессиональные услуги врача-нарколога с выездом на дом в Новосибирске и Новосибирской области. Мы оперативно помогаем пациентам справиться с тяжелыми состояниями при алкогольной и наркотической зависимости. Экстренный выезд наших специалистов доступен круглосуточно, а лечение проводится с применением проверенных методик и препаратов, что гарантирует безопасность и конфиденциальность каждому пациенту.
Исследовать вопрос подробнее – [url=https://narcolog-na-dom-novosibirsk00.ru/]нарколог на дом вывод[/url]
Клиника «КузбассМед Центр» в Новокузнецке обеспечивает непрерывный приём пациентов и выезд нарколога на дом. Такой формат позволяет оказать экстренную помощь при интоксикации или запое прямо на месте, не дожидаясь ухудшения состояния. Медицинская команда работает в режиме 24/7, что особенно важно при острых состояниях. Врач выезжает в течение часа после вызова, проводит диагностику, ставит капельницу и контролирует жизненные показатели. В стационаре доступны детоксикация, медикаментозная терапия и психотерапевтическая поддержка — всё под постоянным медицинским наблюдением.
Подробнее – [url=https://narkologicheskaya-klinika-v-novokuzneczke17.ru/]лечение в наркологической клинике[/url]
Комплексный вывод из запоя в Туле организован по отлаженной схеме, состоящей из нескольких этапов, каждый из которых направлен на безопасное и эффективное восстановление организма.
Ознакомиться с деталями – [url=https://vyvod-iz-zapoya-tula000.ru/]вывод из запоя в стационаре[/url]
Когда запой начинает угрожать здоровью, оперативное вмешательство становится жизненно необходимым. В Туле опытные специалисты оказывают помощь на дому, позволяя начать лечение сразу же в комфортной обстановке. Такой формат терапии обеспечивает оперативную детоксикацию, восстановление нормального обмена веществ и стабилизацию работы внутренних органов, что особенно важно для пациентов, желающих избежать лишнего стресса и сохранить конфиденциальность.
Подробнее можно узнать тут – [url=https://vyvod-iz-zapoya-tula0.ru/]вывод из запоя капельница тула[/url]
Клиника использует многоступенчатый подход, который позволяет адаптировать лечение под особенности организма пациента. Наблюдение продолжается даже после завершения детоксикации, чтобы убедиться, что состояние стабильно и не требуется дополнительное вмешательство. При необходимости врач назначает курс поддержки печени, витаминов и препаратов для восстановления сна и психоэмоционального равновесия.
Подробнее тут – [url=https://vyvod-iz-zapoya-v-volgograde17.ru/]вывод из запоя на дому круглосуточно[/url]
Комплексный подход обеспечивает не только снятие симптомов, но и полное восстановление функций организма. Пациент получает поддержку на всех этапах — от детоксикации до социальной адаптации.
Получить дополнительную информацию – https://narkologicheskaya-pomoshh-v-tolyatti17.ru/
Нужна срочная помощь при алкогольном отравлении или запое? Вызовите нарколога на дом в Иркутске! Квалифицированная помощь нарколога на дому: диагностика, капельница, стабилизация состояния. Круглосуточный выезд нарколога, анонимность и снижение рисков – с «ТрезвоМед». Самостоятельный отказ невозможен? Необходима наркологическая помощь. Васильев: «Не затягивайте с помощью при алкогольном отравлении!».
Получить дополнительные сведения – [url=https://narcolog-na-dom-v-irkutske0.ru/]врач нарколог на дом платный иркутск[/url]
Первым шагом при лечении зависимости является детоксикация — очищение организма от токсинов, накопившихся в результате употребления алкоголя или наркотиков. Врач подбирает состав инфузионных растворов и лекарственных препаратов индивидуально. Процедура направлена на восстановление обмена веществ, улучшение работы печени и сердца, нормализацию сна и аппетита. После завершения детоксикации пациент чувствует облегчение, снижается тревожность и повышается концентрация внимания.
Изучить вопрос глубже – https://narkologicheskaya-klinika-v-volgograde17.ru/narkologicheskaya-pomoshh-volgograd
Сразу после поступления вызова нарколог прибывает на дом для проведения детального первичного осмотра. Врач собирает краткий анамнез, измеряет жизненно важные показатели, такие как пульс, артериальное давление и температура, и оценивает степень интоксикации. Эта информация является фундаментом для разработки индивидуального плана терапии, который учитывает особенности состояния пациента.
Получить дополнительные сведения – [url=https://vyvod-iz-zapoya-tula000.ru/]вывод из запоя на дому тула[/url]
При поступлении вызова специалисты клиники «АнтиАлко» выезжают на дом в течение 30–60 минут. По прибытии врач проводит комплексную диагностику: измеряет артериальное давление, пульс, уровень кислорода в крови и собирает анамнез, чтобы оценить степень интоксикации. На основе полученных данных формируется индивидуальный план лечения, который включает:
Углубиться в тему – [url=https://vyvod-iz-zapoya-novosibirsk00.ru/]наркология вывод из запоя новосибирск[/url]
Снижается тремор и тошнота, выравниваются вегетативные реакции, возвращается способность спокойно уснуть. Вместо «качелей» настроения и попыток самолечения появляется ощущение контроля: понятно, что делаем сейчас и чего ждём дальше.
Узнать больше – https://vyvod-iz-zapoya-odincovo10.ru/vyvod-iz-zapoya-v-stacionare-v-odincovo/
Использование автоматизированных систем дозирования позволяет точно подобрать необходимое количество медикаментов, минимизируя риск передозировки и побочных эффектов. Постоянный мониторинг жизненно важных показателей дает возможность врачу корректировать схему лечения в режиме реального времени, что повышает безопасность и эффективность процедуры.
Выяснить больше – [url=https://vyvod-iz-zapoya-yaroslavl0.ru/]вывод из запоя[/url]
Ниже — краткий ориентир, который помогает семье понимать логику рекомендаций до очного осмотра. Это не «замена врачу», а понятная рамка для принятия решения о старте.
Подробнее тут – [url=https://narkologicheskaya-klinika-ehlektrostal0.ru/]круглосуточная наркологическая клиника[/url]
После завершения инфузий врач-нарколог даёт рекомендации по питанию, водному балансу и образу жизни. При необходимости пациенту назначается курс поддерживающей терапии для закрепления эффекта.
Углубиться в тему – [url=https://narkologicheskaya-pomoshh-v-tolyatti17.ru/]наркологическая клиника клиника помощь в тольятти[/url]
Что делаем на практике
Узнать больше – [url=https://narkologicheskaya-klinika-domodedovo0.ru/]srochnaya-narkologicheskaya-pomoshch[/url]
После поступления вызова наш нарколог выезжает к пациенту в кратчайшие сроки, прибывая по адресу в пределах 30–60 минут. Специалист начинает процедуру с подробного осмотра и диагностики, измеряя ключевые показатели организма: артериальное давление, частоту пульса, насыщенность кислородом и собирая подробный анамнез.
Подробнее тут – [url=https://narcolog-na-dom-novosibirsk00.ru/]нарколог на дом цена новосибирск[/url]
Ключевым фактором при выборе центра становится квалификация специалистов. Лечение алкоголизма — это не только выведение из запоя и купирование абстинентного синдрома. Оно включает работу с мотивацией, тревожными состояниями, семейными конфликтами, нарушением сна и другими последствиями зависимости. Только команда, включающая наркологов, психотерапевтов и консультантов по аддиктивному поведению, способна охватить все аспекты проблемы.
Подробнее можно узнать тут – https://lechenie-alkogolizma-murmansk0.ru/klinika-lecheniya-alkogolizma-marmansk
Что делаем на практике
Выяснить больше – http://narkologicheskaya-klinika-domodedovo0.ru
Когда ночь затягивается, тревога нарастает, а самочувствие «скачет», важны не громкие обещания, а последовательность медицинских действий. «Трезвый Контур» в Одинцово выстраивает помощь так, чтобы от звонка до облегчения прошло минимум времени и ни один шаг не был импровизацией: первичная оценка рисков, персональная инфузионная терапия, мягкая коррекция сна и тревоги, регулярные замеры показателей, понятные рекомендации для семьи. Мы не используем «универсальные коктейли» и не «вырубаем» пациента сильными седативными — дозировки и темп капельниц подбираются под возраст, длительность запоя, сопутствующие заболевания и уже принимаемые препараты. Цель — быстро снять токсическую нагрузку, стабилизировать давление и пульс, вернуть управляемый сон и зафиксировать маршрут на ближайшие 24–72 часа, чтобы утро началось не с нового витка симптомов, а с предсказуемого восстановления.
Подробнее тут – http://
Запой становится критическим, когда организм не справляется с постоянным поступлением алкоголя и начинает накапливать токсины. Если состояние пациента ухудшается, появляются такие симптомы, как сильная рвота, головокружение, спутанность сознания, судороги, резкие колебания артериального давления, а также проявления тяжелого абстинентного синдрома (дрожь, панические атаки, бессонница, тревожность), вызов нарколога становится необходимым. Также экстренная помощь требуется при наличии психических нарушений — галлюцинациях, агрессивном поведении или алкогольном психозе. Своевременное вмешательство позволяет стабилизировать состояние, предотвратить развитие осложнений и снизить риск для жизни.
Узнать больше – http://
Запуск помощи — это не «одна капельница», а последовательность осмысленных шагов, каждый из которых приближает к устойчивому сну и ровным витальным показателям. Сначала врач уточняет длительность эпизода, переносимость лекарств, сон, аппетит, хронические диагнозы, наличие помощника дома. Затем следует осмотр: давление, пульс, сатурация, температура, ЭКГ при показаниях. Стартовая терапия закрывает дефицит жидкости и солей, защищает печень и ЖКТ, по необходимости подключается мягкая противотревожная поддержка и кислород. Параллельно проговаривается «карта суток»: как отдыхать, что пить и в каком объёме, какие продукты не перегрузят желудок, в какой момент выходить на внеплановую связь. Динамика отслеживается без суеты, а корректировки делаются точечно — по реакции организма, а не «на всякий случай».
Получить больше информации – http://narkologicheskaya-klinika-ehlektrostal0.ru
Не всегда человек способен самостоятельно прекратить приём алкоголя и восстановиться. Есть состояния, требующие немедленного вмешательства специалистов. Обратиться за помощью необходимо, если наблюдаются следующие признаки:
Получить дополнительные сведения – http://vyvod-iz-zapoya-v-volgograde17.ru
После поступления вызова наш нарколог выезжает к пациенту в кратчайшие сроки, прибывая по адресу в пределах 30–60 минут. Специалист начинает процедуру с подробного осмотра и диагностики, измеряя ключевые показатели организма: артериальное давление, частоту пульса, насыщенность кислородом и собирая подробный анамнез.
Получить дополнительную информацию – [url=https://narcolog-na-dom-novosibirsk00.ru/]vrach-narkolog-na-dom novosibirsk[/url]
Что включено на практике
Разобраться лучше – [url=https://narkologicheskaya-klinika-odincovo0.ru/]kruglosutochnaya-narkologicheskaya-klinika[/url]
Клиника «КузбассМед Центр» в Новокузнецке обеспечивает непрерывный приём пациентов и выезд нарколога на дом. Такой формат позволяет оказать экстренную помощь при интоксикации или запое прямо на месте, не дожидаясь ухудшения состояния. Медицинская команда работает в режиме 24/7, что особенно важно при острых состояниях. Врач выезжает в течение часа после вызова, проводит диагностику, ставит капельницу и контролирует жизненные показатели. В стационаре доступны детоксикация, медикаментозная терапия и психотерапевтическая поддержка — всё под постоянным медицинским наблюдением.
Углубиться в тему – [url=https://narkologicheskaya-klinika-v-novokuzneczke17.ru/]наркологическая клиника нарколог в новокузнецке[/url]
Клиника использует многоступенчатый подход, который позволяет адаптировать лечение под особенности организма пациента. Наблюдение продолжается даже после завершения детоксикации, чтобы убедиться, что состояние стабильно и не требуется дополнительное вмешательство. При необходимости врач назначает курс поддержки печени, витаминов и препаратов для восстановления сна и психоэмоционального равновесия.
Детальнее – [url=https://vyvod-iz-zapoya-v-volgograde17.ru/]наркология вывод из запоя в волгограде[/url]
В таблице представлены основные элементы детоксикационной терапии:
Разобраться лучше – [url=https://narkologicheskaya-klinika-v-volgograde17.ru/]вывод наркологическая клиника волгоград[/url]
В Воронеже команда «ВоронМед Профи» работает по принципу быстрой медицинской реакции — помощь оказывается независимо от времени суток и дня недели. Все выезды выполняются анонимно, без спецтранспорта и медицинской формы. Врач приезжает в гражданской одежде, что исключает ненужное внимание соседей и посторонних. В ходе осмотра специалист измеряет давление, пульс, температуру, оценивает уровень интоксикации и определяет степень обезвоживания. На основе полученных данных подбирается состав капельницы, который подаётся медленно и безопасно под контролем врача.
Углубиться в тему – https://narkolog-na-dom-v-voronezhe17.ru/narkolog-voronezh-czena/
Клиника «КузбассМед Центр» в Новокузнецке обеспечивает непрерывный приём пациентов и выезд нарколога на дом. Такой формат позволяет оказать экстренную помощь при интоксикации или запое прямо на месте, не дожидаясь ухудшения состояния. Медицинская команда работает в режиме 24/7, что особенно важно при острых состояниях. Врач выезжает в течение часа после вызова, проводит диагностику, ставит капельницу и контролирует жизненные показатели. В стационаре доступны детоксикация, медикаментозная терапия и психотерапевтическая поддержка — всё под постоянным медицинским наблюдением.
Изучить вопрос глубже – [url=https://narkologicheskaya-klinika-v-novokuzneczke17.ru/]запой наркологическая клиника новокузнецк[/url]
Чтобы процедура прошла быстрее и спокойнее, подготовьте пространство и информацию о пациенте заранее: это экономит время и повышает безопасность.
Изучить вопрос глубже – http://vyvod-iz-zapoya-korolev10.ru
Нужна срочная помощь при алкогольном отравлении или запое? Вызовите нарколога на дом в Иркутске! Квалифицированная помощь нарколога на дому: диагностика, капельница, стабилизация состояния. Круглосуточный выезд нарколога, анонимность и снижение рисков – с «ТрезвоМед». Самостоятельный отказ невозможен? Необходима наркологическая помощь. Васильев: «Не затягивайте с помощью при алкогольном отравлении!».
Получить дополнительные сведения – [url=https://narcolog-na-dom-v-irkutske0.ru/]narkolog na dom [/url]
Медикаментозная терапия — важнейший этап стабилизации состояния. Врачи «СамарМед» применяют препараты с доказанной эффективностью: детоксикационные растворы, нейрометаболики, седативные и анксиолитические средства, ноотропы, гепатопротекторы, а при необходимости — антипсихотики. Подбор схемы проводится индивидуально, с учётом переносимости, наличия сопутствующих заболеваний, возраста и стадии зависимости. Все препараты применяются строго по международным протоколам и под контролем врачей круглосуточно.
Детальнее – [url=https://narkologicheskaya-klinika-samara0.ru/]наркологическая клиника наркологический центр[/url]
Комплексный подход к выводу из запоя на дому в Ярославле включает несколько основных этапов, которые позволяют обеспечить оперативное и безопасное лечение:
Узнать больше – [url=https://vyvod-iz-zapoya-yaroslavl0.ru/]вывод из запоя на дому ярославль[/url]
Клиника обеспечивает анонимность и безопасность. Информация о пациентах не передаётся третьим лицам, а процедуры выполняются в комфортных условиях с использованием сертифицированных препаратов и современного оборудования.
Изучить вопрос глубже – [url=https://narkologicheskaya-klinika-v-novokuzneczke17.ru/]частная наркологическая клиника[/url]
Все растворы проходят фармацевтический контроль, а процедуры выполняются одноразовыми стерильными инструментами. После завершения капельницы врач наблюдает пациента в течение 15–30 минут, оценивает результат и даёт рекомендации по дальнейшему восстановлению. Важно не прерывать терапию самостоятельно — эффект закрепляется только при соблюдении рекомендаций.
Получить больше информации – https://narkolog-na-dom-v-voronezhe17.ru/narkolog-voronezh-czena
Первым шагом при лечении зависимости является детоксикация — очищение организма от токсинов, накопившихся в результате употребления алкоголя или наркотиков. Врач подбирает состав инфузионных растворов и лекарственных препаратов индивидуально. Процедура направлена на восстановление обмена веществ, улучшение работы печени и сердца, нормализацию сна и аппетита. После завершения детоксикации пациент чувствует облегчение, снижается тревожность и повышается концентрация внимания.
Узнать больше – https://narkologicheskaya-klinika-v-volgograde17.ru/narkologi-volgograda/
Как подчёркивает специалист ФГБУ «НМИЦ психиатрии и наркологии», «без участия квалифицированной команды невозможно обеспечить комплексный подход к пациенту, особенно если речь идёт о длительном стаже употребления и осложнённой картине заболевания». Отсюда следует — изучение состава персонала должно быть одним из первых шагов.
Подробнее – [url=https://lechenie-alkogolizma-murmansk0.ru/]лечение алкоголизма мурманск[/url]
В клинике реализуются ключевые направления, которые обеспечивают всестороннюю помощь и поддержку пациентам на всех этапах лечения.
Выяснить больше – [url=https://narkologicheskaya-klinika-v-omske0.ru/]анонимная наркологическая клиника омск[/url]
Что включено на практике
Изучить вопрос глубже – [url=https://narkologicheskaya-klinika-odincovo0.ru/]наркологическая клиника нарколог[/url]
Старт всегда один: короткий скрининг с дежурным врачом, где уточняются жалобы, длительность эпизода, текущие лекарства, аллергии и условия дома. Далее согласуется реальное окно прибытия или приёма — без обещаний «через пять минут», но с честным ориентиром и запасом на дорожную обстановку. На месте врач фиксирует витальные показатели (АД, пульс, сатурацию, температуру), по показаниям выполняет ЭКГ, запускает детокс (регидратация, коррекция электролитов, защита печени/ЖКТ), объясняет ожидаемую динамику первых 6–12 часов и выдаёт памятку «на сутки»: режим сна, питьевой план, «красные флажки», точное время контрольной связи. Если домашний формат становится недостаточным, перевод в стационар организуется без пауз — терапия продолжается с того же места, где начата, темп лечения не теряется.
Углубиться в тему – http://narkologicheskaya-klinika-shchyolkovo0.ru/chastnaya-narkologicheskaya-klinika-v-shchyolkovo/
Откройте для себя скрытые страницы истории и малоизвестные научные открытия, которые оказали колоссальное влияние на развитие человечества. Статья предлагает свежий взгляд на события, которые заслуживают большего внимания.
Как достичь результата? – https://iidamachi.com/2023/12/712
Экстренный вызов нарколога на дом в Иркутске от «ТрезвоМед» при запое, интоксикации или кодировании – анонимно и удобно. Осмотр, детоксикация капельницей, индивидуальный план лечения – все это на дому! «ТрезвоМед» – круглосуточная помощь, анонимность и безопасность при отказе от алкоголя. Не можете бросить пить самостоятельно? Нужна помощь нарколога! Васильев: «Своевременная помощь при интоксикации – залог успешного выздоровления».
Детальнее – [url=https://narcolog-na-dom-v-irkutske0.ru/]вызов нарколога на дом цена иркутск[/url]
Капельницы при выводе из запоя — основной инструмент детоксикации. Они очищают кровь, стабилизируют давление и восстанавливают баланс электролитов. В клинике «РеабКузбасс» используются только качественные препараты, адаптированные под конкретное состояние пациента. Ниже приведена таблица с основными видами капельниц и их эффектом.
Выяснить больше – [url=https://vyvod-iz-zapoya-v-novokuzneczke17.ru/]нарколог на дом вывод из запоя в новокузнецке[/url]
Эта информационная заметка предлагает лаконичное и четкое освещение актуальных вопросов. Здесь вы найдете ключевые факты и основную информацию по теме, которые помогут вам сформировать собственное мнение и повысить уровень осведомленности.
Обратитесь за информацией – https://majasvisdahl.no/debut-ep-alle-ting-flyt-slippes-idag
В этой статье представлен занимательный и актуальный контент, который заставит вас задуматься. Мы обсуждаем насущные вопросы и проблемы, а также освещаем истории, которые вдохновляют на действия и изменения. Узнайте, что стоит за событиями нашего времени!
Познакомиться с результатами исследований – https://blogi.eoppimispalvelut.fi/fuksiat/2019/09/30/10
Публикация приглашает вас исследовать неизведанное — от древних тайн до современных достижений науки. Вы узнаете, как случайные находки превращались в революции, а смелые мысли — в новые эры человеческого прогресса.
Получить больше информации – https://siebenmarcas.com.br/index.php/2023/04/09/digital-marketing-made-easy-let-our-team-handle
Этот информативный текст отличается привлекательным содержанием и актуальными данными. Мы предлагаем читателям взглянуть на привычные вещи под новым углом, предоставляя интересный и доступный материал. Получите удовольствие от чтения и расширьте кругозор!
Продолжить изучение – https://zebra.pk/product/wallpaper-color-key-1113-5-self-texture
В статье представлены ключевые моменты по актуальной теме, дополненные советами экспертов и ссылками на дополнительные ресурсы. Цель материала — дать читателю инструменты для самостоятельного развития и принятия осознанных решений.
Полная информация здесь – http://nayuta-p.com/2023/09/25/solar-panels-101-a-beginners-guide-to-solar-energy
Эта статья полна интересного контента, который побудит вас исследовать новые горизонты. Мы собрали полезные факты и удивительные истории, которые обогащают ваше понимание темы. Читайте, погружайтесь в детали и наслаждайтесь процессом изучения!
Узнать больше – https://www.realty-key.ru/2014/12
Эта статья погружает вас в увлекательный мир знаний, где каждый факт становится открытием. Мы расскажем о ключевых исторических поворотных моментах и научных прорывах, которые изменили ход цивилизации. Поймите, как прошлое формирует настоящее и как его уроки могут помочь нам строить будущее.
Только факты! – https://daizsolutions.com/index.php/2023/04/09/revolutionize-your-business-with-our-cutting-edge
Публикация посвящена жизненным историям людей, успешно справившихся с зависимостью. Мы покажем, что выход есть, и он начинается с первого шага — принятия проблемы и желания измениться.
Открой скрытое – https://iludinovo.com/m/2025/kodirovanie-ot-alkogolnoy-zavisimosti-vybor-kliniki-i-specifika
Откройте для себя скрытые страницы истории и малоизвестные научные открытия, которые оказали колоссальное влияние на развитие человечества. Статья предлагает свежий взгляд на события, которые заслуживают большего внимания.
А есть ли продолжение? – https://www.blues-festival-utrecht.nl/uncategorized/3_notaris-1594122472-html
Этот информационный материал собраны данные, которые помогут лучше понять текущие тенденции и процессы в различных сферах жизни. Мы предоставляем четкий анализ, графики и примеры, чтобы информация была не только понятной, но и практичной для принятия решений.
Читать дальше – https://mindandbodywellness.com/demo-home/attachment/661
Эта информационная статья охватывает широкий спектр актуальных тем и вопросов. Мы стремимся осветить ключевые факты и события с ясностью и простотой, чтобы каждый читатель мог извлечь из нее полезные знания и полезные инсайты.
Кликни и узнай всё! – https://www.zaural.info/events/sovmestnaya-rabota-rnimu-im-n-i-pirogova-i-rossijjskogo-kras-8qac
В этом интересном тексте собраны обширные сведения, которые помогут вам понять различные аспекты обсуждаемой темы. Мы разбираем детали и факты, делая акцент на важности каждого элемента. Не упустите возможность расширить свои знания и взглянуть на мир по-новому!
Тыкай сюда — узнаешь много интересного – https://edisonlampy.pl/p/lampa-wiszaca-sagito-3-punktowa-chrom-27603-alfa
В этой статье представлен занимательный и актуальный контент, который заставит вас задуматься. Мы обсуждаем насущные вопросы и проблемы, а также освещаем истории, которые вдохновляют на действия и изменения. Узнайте, что стоит за событиями нашего времени!
Заходи — там интересно – https://mecuniversity.us/portfolio/advertising-media-industry
Предлагаем вашему вниманию интересную справочную статью, в которой собраны ключевые моменты и нюансы по актуальным вопросам. Эта информация будет полезна как для профессионалов, так и для тех, кто только начинает изучать тему. Узнайте ответы на важные вопросы и расширьте свои знания!
Раскрыть тему полностью – https://jesmond.com/product/haccp-smartstep-footwear-sanitizing-unit
Эта разъяснительная статья содержит простые и доступные разъяснения по актуальным вопросам. Мы стремимся сделать информацию понятной для широкой аудитории, чтобы каждый мог разобраться в предмете и извлечь из него максимум пользы.
Всё, что нужно знать – https://www.vrk.dev/flyer1-2
Эта информационная статья охватывает широкий спектр актуальных тем и вопросов. Мы стремимся осветить ключевые факты и события с ясностью и простотой, чтобы каждый читатель мог извлечь из нее полезные знания и полезные инсайты.
Изучить вопрос глубже – https://banda-losborrachos.fr/2023/04/14/journee-de-la-pena-dussau-20-mai
Эта информационная статья охватывает широкий спектр актуальных тем и вопросов. Мы стремимся осветить ключевые факты и события с ясностью и простотой, чтобы каждый читатель мог извлечь из нее полезные знания и полезные инсайты.
Исследовать вопрос подробнее – https://aktualnozajenata.com/%D1%82%D1%80%D1%8A%D0%BC%D0%BF-%D0%BE%D0%B1%D1%8F%D0%B2%D0%B8-%D0%BD%D0%B0%D1%87%D0%B0%D0%BB%D0%BE%D1%82%D0%BE-%D0%BD%D0%B0-%D0%BF%D1%80%D0%B5%D0%B3%D0%BE%D0%B2%D0%BE%D1%80%D0%B8%D1%82%D0%B5-%D1%81
Статья содержит практические рекомендации и полезные советы, которые можно легко применить в повседневной жизни. Мы делаем акцент на реальных примерах и проверенных методиках, которые способствуют личностному развитию и улучшению качества жизни.
Смотрите также – https://risenshinedriving.com/index.php/2023/02/28/saurav-got-his-driving-licence
Мы предлагаем вам окунуться в океан любопытных фактов и вдохновляющих историй. Эта публикация поможет расширить горизонты, разбудить интерес к науке и истории и увидеть мир с новой стороны.
Узнать больше – https://bamboo.st/2019/10/04/%E3%81%8A%E5%BE%85%E3%81%9F%E3%81%9B%E3%81%97%E3%81%BE%E3%81%97%E3%81%9F
Эта познавательная публикация погружает вас в море интересного контента, который быстро захватит ваше внимание. Мы рассмотрим важные аспекты темы и предоставим вам уникальные Insights и полезные сведения для дальнейшего изучения.
Слушай внимательно — тут важно – https://spotlight-ds.com/classes/musical-theatre
Эта статья полна интересного контента, который побудит вас исследовать новые горизонты. Мы собрали полезные факты и удивительные истории, которые обогащают ваше понимание темы. Читайте, погружайтесь в детали и наслаждайтесь процессом изучения!
Слушай внимательно — тут важно – https://canvasspecial.co.za/2023s-hottest-trend-cheap-canvas-for-sale
Эта познавательная публикация погружает вас в море интересного контента, который быстро захватит ваше внимание. Мы рассмотрим важные аспекты темы и предоставим вам уникальные Insights и полезные сведения для дальнейшего изучения.
Посмотреть всё – https://spotlight-ds.com/classes/musical-theatre
Предлагаем вашему вниманию интересную справочную статью, в которой собраны ключевые моменты и нюансы по актуальным вопросам. Эта информация будет полезна как для профессионалов, так и для тех, кто только начинает изучать тему. Узнайте ответы на важные вопросы и расширьте свои знания!
Нажмите, чтобы узнать больше – https://mecuniversity.us/portfolio/advertising-media-industry
В этой публикации мы предлагаем подробные объяснения по актуальным вопросам, чтобы помочь читателям глубже понять их. Четкость и структурированность материала сделают его удобным для усвоения и применения в повседневной жизни.
Все материалы собраны здесь – https://movietheme.dubdesign.net/demo1/microsoft/xbox/47
Публикация приглашает вас исследовать неизведанное — от древних тайн до современных достижений науки. Вы узнаете, как случайные находки превращались в революции, а смелые мысли — в новые эры человеческого прогресса.
Узнать из первых рук – https://blushbeautybar.nl/product/acryl-penseel-perfectpro-12
Публикация приглашает вас исследовать неизведанное — от древних тайн до современных достижений науки. Вы узнаете, как случайные находки превращались в революции, а смелые мысли — в новые эры человеческого прогресса.
Где можно узнать подробнее? – https://depostjabar.com/horor/bagian-37-kerajaan-demit-di-pabrik-gula-terbengkalai
Этот текст содержит различную информацию, которая, возможно, покажется любопытной, но в целом не меняет восприятия привычных вещей. Предлагаем просто получить удовольствие от чтения, не ожидая особой пользы.
Вот – https://arma-rehab.ru/
Одной из ключевых инноваций «СамарМед» является внедрение телемедицинского консультирования. Пациенты, проживающие за пределами Самары или находящиеся в стадии подготовки к лечению, могут получить полноценную консультацию врача через защищённые каналы связи. Также возможна онлайн-связь с психологом, куратором или участником реабилитационной команды. Все сеансы проходят в конфиденциальном формате, с возможностью записи и анализа динамики состояния в дальнейшем. Это особенно важно для тех, кто испытывает тревогу при личном визите или не готов к очной встрече на первых этапах.
Углубиться в тему – [url=https://narkologicheskaya-klinika-samara0.ru/]платная наркологическая клиника самара[/url]
В этом материале представлены детали, которые хоть и занимательны, но не особенно значимы. Мы рассматриваем моменты, которые трудно назвать важными, но всё же решили включить их для полноты картины.
Вот – [url=https://arma-rehab.ru/vyvod-iz-zapoya/]казино с быстрым выводом[/url]
Терапия строится из узких модулей с чёткими «выключателями». Мы не «усиливаем» схему без показаний — каждое расширение привязано к конкретной цели и времени переоценки. Ниже — ориентир по основным программам «ЕнисейМед Центра».
Подробнее можно узнать тут – [url=https://narkologicheskaya-klinika-v-krasnoyarske17.ru/]наркологическая клиника в красноярске[/url]
Такая структура терапии делает процесс максимально эффективным и безопасным.
Углубиться в тему – [url=https://narcologicheskaya-klinika-omsk0.ru/]наркологическая клиника клиника помощь[/url]
melbet букмекерская [url=http://www.rusfusion.ru]melbet букмекерская[/url] .
курсовая заказать [url=https://kupit-kursovuyu-43.ru/]курсовая заказать[/url] .
С момента начала лечения пациент получает доступ к круглосуточной линии поддержки. Врачи, психологи и координаторы готовы ответить на вопросы, помочь с корректировкой схемы лечения, поддержать в ситуации риска срыва. Эта функция особенно востребована в первые недели после выписки, когда человек сталкивается с триггерами в привычной среде и нуждается в дополнительной защите. Связь может осуществляться по телефону, через защищённый мессенджер или с помощью мобильного приложения клиники.
Исследовать вопрос подробнее – https://lechenie-narkomanii-samara0.ru
При появлении таких симптомов важно не откладывать вызов врача. Самолечение, особенно с использованием неизвестных препаратов, может привести к тяжёлым последствиям, включая судороги и инсульт. Врачи клиники «ВолгаМед Резолюция» приезжают на дом с необходимыми средствами для оказания экстренной помощи и стабилизации состояния уже на месте.
Узнать больше – [url=https://vyvod-iz-zapoya-v-volgograde17.ru/]вывод из запоя на дому цена в волгограде[/url]
Клиника «КузбассМед Центр» в Новокузнецке обеспечивает непрерывный приём пациентов и выезд нарколога на дом. Такой формат позволяет оказать экстренную помощь при интоксикации или запое прямо на месте, не дожидаясь ухудшения состояния. Медицинская команда работает в режиме 24/7, что особенно важно при острых состояниях. Врач выезжает в течение часа после вызова, проводит диагностику, ставит капельницу и контролирует жизненные показатели. В стационаре доступны детоксикация, медикаментозная терапия и психотерапевтическая поддержка — всё под постоянным медицинским наблюдением.
Ознакомиться с деталями – [url=https://narkologicheskaya-klinika-v-novokuzneczke17.ru/]анонимная наркологическая клиника[/url]
Работа выездной службы построена так, чтобы для семьи всё было максимально понятно и предсказуемо. После звонка специалист не ограничивается общими фразами, а уточняет детали: сколько длится употребление, есть ли хронические болезни сердца, печени, почек, эндокринные нарушения, какие препараты и в каких дозах пациент уже получил, были ли в прошлом судороги, галлюцинации, тяжёлые реакции на лекарства. Это позволяет заранее оценить уровень риска и понять, подходит ли формат дома. По прибытии в Серпухове врач осматривает пациента, проверяет контакт и ориентировку, измеряет артериальное давление несколько раз, оценивает пульс, сатурацию, температуру, выраженность тремора, наличие болей, характер дыхания, степень обезвоживания. Далее формируется индивидуальная инфузионная схема: растворы для регидратации и коррекции электролитов, витамины группы B и магний для поддержки нервной системы, при необходимости — гепатопротекторы и мягкие антиоксидантные комплексы, противорвотные для контроля тошноты, щадящие анксиолитики для нормализации сна без грубой седации. Во время процедуры врач контролирует динамику, меняет скорость капельницы при необходимости, отслеживает реакцию на препараты и объясняет родным, какие изменения будут происходить по часам. По завершении визита пациент и родственники получают подробный план: режим, питьё, питание, чего нельзя, какие симптомы считаются тревожными, когда нужна повторная консультация или стационар. При выявлении опасных признаков вопрос о госпитализации поднимается честно и сразу, а не откладывается «до утра».
Исследовать вопрос подробнее – [url=https://narkolog-na-dom-serpuhov10.ru/]врач нарколог на дом в серпухове[/url]
Северная столица является значимым мегаполисом России.
Город расположен на северо-западе страны и известен своей историей.
Архитектура Петербурга сочетает классические постройки и современные кварталы.
Петербург славится театрами и разнообразием событий.
Исторический центр создают неповторимое настроение.
Гости города приезжают сюда круглый год, чтобы почувствовать дух города.
Город является важным экономическим центром.
Таким образом, Санкт-Петербург считается особенным местом.
https://www.abclinuxu.cz/lide/wixafaf511
Продуманный образ является значимым фактором в самовыражении.
Одежда помогает подчеркнуть индивидуальность.
Гармоничный стиль создаёт ощущение комфорта.
В повседневной жизни внешний вид часто влияет на восприятие окружающих.
https://www.reddit.com/user/LePodium/
Хорошо подобранная одежда упрощают деловые контакты.
При выборе стиля важно учитывать личные предпочтения и контекст.
Актуальные стили дают возможность находить новые решения.
В итоге, умение стильно одеваться положительно отражается на самоощущении.
Таблица не заменяет очный осмотр, но показывает, как наблюдения переводятся в действие и когда мы принимаем решение о продолжении/остановке модуля.
Изучить вопрос глубже – http://narkologicheskaya-klinika-v-krasnoyarske17.ru
Лечение проходит в несколько этапов: диагностика, детоксикация, медикаментозная поддержка и восстановление. Каждый этап имеет чёткие цели и критерии эффективности, что делает процесс управляемым и безопасным. Применяются препараты, сертифицированные в РФ, и только те, чья эффективность подтверждена клиническими исследованиями.
Получить дополнительную информацию – [url=https://vyvod-iz-zapoya-v-volgograde17.ru/]наркология вывод из запоя в волгограде[/url]
В клинике применяются комплексные программы, охватывающие все стадии терапии. Такой подход позволяет обеспечить пациенту полный спектр помощи — от первой консультации до социальной адаптации.
Ознакомиться с деталями – http://narcologicheskaya-klinika-omsk0.ru
Клиника обеспечивает анонимность и безопасность. Информация о пациентах не передаётся третьим лицам, а процедуры выполняются в комфортных условиях с использованием сертифицированных препаратов и современного оборудования.
Детальнее – [url=https://narkologicheskaya-klinika-v-novokuzneczke17.ru/]запой наркологическая клиника[/url]
С момента начала лечения пациент получает доступ к круглосуточной линии поддержки. Врачи, психологи и координаторы готовы ответить на вопросы, помочь с корректировкой схемы лечения, поддержать в ситуации риска срыва. Эта функция особенно востребована в первые недели после выписки, когда человек сталкивается с триггерами в привычной среде и нуждается в дополнительной защите. Связь может осуществляться по телефону, через защищённый мессенджер или с помощью мобильного приложения клиники.
Выяснить больше – [url=https://lechenie-narkomanii-samara0.ru/]лечение наркомании в самаре[/url]
Работа выездной службы построена так, чтобы для семьи всё было максимально понятно и предсказуемо. После звонка специалист не ограничивается общими фразами, а уточняет детали: сколько длится употребление, есть ли хронические болезни сердца, печени, почек, эндокринные нарушения, какие препараты и в каких дозах пациент уже получил, были ли в прошлом судороги, галлюцинации, тяжёлые реакции на лекарства. Это позволяет заранее оценить уровень риска и понять, подходит ли формат дома. По прибытии в Серпухове врач осматривает пациента, проверяет контакт и ориентировку, измеряет артериальное давление несколько раз, оценивает пульс, сатурацию, температуру, выраженность тремора, наличие болей, характер дыхания, степень обезвоживания. Далее формируется индивидуальная инфузионная схема: растворы для регидратации и коррекции электролитов, витамины группы B и магний для поддержки нервной системы, при необходимости — гепатопротекторы и мягкие антиоксидантные комплексы, противорвотные для контроля тошноты, щадящие анксиолитики для нормализации сна без грубой седации. Во время процедуры врач контролирует динамику, меняет скорость капельницы при необходимости, отслеживает реакцию на препараты и объясняет родным, какие изменения будут происходить по часам. По завершении визита пациент и родственники получают подробный план: режим, питьё, питание, чего нельзя, какие симптомы считаются тревожными, когда нужна повторная консультация или стационар. При выявлении опасных признаков вопрос о госпитализации поднимается честно и сразу, а не откладывается «до утра».
Подробнее – https://narkolog-na-dom-serpuhov10.ru/vyezd-narkologa-na-dom-serpuhov/
Гедонизм — это мировоззренческий подход, которое ставит удовольствие в центр человеческой жизни.
Согласно этому взгляду, поиск радости считается естественной целью существования.
Этот подход не всегда подразумевает отсутствие ограничений.
Во многих трактовках он связан с умеренностью и ответственное отношение.
https://graph.org/Stil-kak-nevidimaya-podpis-pochemu-vazhno-odevatsya-krasivo-12-25
Актуальная интерпретация часто акцентирует внимание на внутреннем комфорте.
При этом важную роль играет сочетание между удовольствиями и ценностями.
Данный взгляд может поддерживать психологическое равновесие.
В итоге, гедонизм рассматривается как один из способов осмысления жизни, а не как отказ от ответственности.
Терапия в клинике строится на системном подходе, позволяющем постепенно восстанавливать здоровье и формировать новые жизненные установки.
Подробнее – [url=https://narcologicheskaya-klinika-perm0.ru/]narcologicheskaya-klinika-perm0.ru/[/url]
Вывод из запоя — это не просто медицинская процедура, а системный процесс восстановления организма после длительного употребления алкоголя. В клинике «ВолгаМед Резолюция» в Волгограде пациенты получают помощь, основанную на принципах доказательной медицины и индивидуального подхода. Лечение направлено не только на устранение симптомов интоксикации, но и на стабилизацию нервной системы, восстановление водно-солевого баланса и нормализацию сна. Капельницы подбираются персонально, с учётом состояния пациента, сопутствующих заболеваний и возраста. Все процедуры проводятся анонимно и под контролем нарколога.
Получить больше информации – http://
Терапия строится из узких модулей с чёткими «выключателями». Мы не «усиливаем» схему без показаний — каждое расширение привязано к конкретной цели и времени переоценки. Ниже — ориентир по основным программам «ЕнисейМед Центра».
Детальнее – [url=https://narkologicheskaya-klinika-v-krasnoyarske17.ru/]запой наркологическая клиника красноярск[/url]
Клиника обеспечивает анонимность и безопасность. Информация о пациентах не передаётся третьим лицам, а процедуры выполняются в комфортных условиях с использованием сертифицированных препаратов и современного оборудования.
Подробнее – https://narkologicheskaya-klinika-v-novokuzneczke17.ru/narkolog-novokuzneczk-na-dom
В клинике применяются комплексные программы, охватывающие все стадии терапии. Такой подход позволяет обеспечить пациенту полный спектр помощи — от первой консультации до социальной адаптации.
Получить больше информации – https://narcologicheskaya-klinika-omsk0.ru/narkologi-omska
помощь студентам контрольные [url=https://kupit-kursovuyu-43.ru/]kupit-kursovuyu-43.ru[/url] .
melbet sports betting [url=https://rusfusion.ru]melbet sports betting[/url] .
В случаях, когда пациент не готов приехать в клинику или находится в тяжёлом состоянии, специалисты «ЗдороваяСамара» организуют выездную помощь. Это особенно важно при острых интоксикациях, синдроме отмены, резком ухудшении психоэмоционального состояния. Выезд возможен круглосуточно и занимает от 30 до 60 минут с момента обращения. Врач приезжает в гражданской одежде, без опознавательных знаков и привлечения внимания. Оснащение позволяет провести на месте полную диагностику и начать лечение — в том числе инфузионную терапию, коррекцию состояния и психологическую стабилизацию.
Получить дополнительную информацию – https://lechenie-narkomanii-samara0.ru/reabilitacziya-narkomana-samara
Клиника использует многоступенчатый подход, который позволяет адаптировать лечение под особенности организма пациента. Наблюдение продолжается даже после завершения детоксикации, чтобы убедиться, что состояние стабильно и не требуется дополнительное вмешательство. При необходимости врач назначает курс поддержки печени, витаминов и препаратов для восстановления сна и психоэмоционального равновесия.
Изучить вопрос глубже – https://vyvod-iz-zapoya-v-volgograde17.ru
Для удобства восприятия можно ориентироваться на следующую структуру (это не публичная оферта, а примерная модель ценообразования — точная сумма фиксируется после осмотра и согласования схемы):
Разобраться лучше – [url=https://narkolog-na-dom-serpuhov10.ru/]нарколог на дом круглосуточно цены[/url]
Клиника использует многоступенчатый подход, который позволяет адаптировать лечение под особенности организма пациента. Наблюдение продолжается даже после завершения детоксикации, чтобы убедиться, что состояние стабильно и не требуется дополнительное вмешательство. При необходимости врач назначает курс поддержки печени, витаминов и препаратов для восстановления сна и психоэмоционального равновесия.
Получить дополнительную информацию – [url=https://vyvod-iz-zapoya-v-volgograde17.ru/]вывод из запоя клиника волгоград[/url]
Анонимная наркологическая помощь — это управляемая система, где каждый шаг прозрачно связан с целью и измеримым результатом. В наркологической клинике «ЕнисейМед Центр» мы соединяем круглосуточную доступность, мягкую логистику и модульный план лечения, чтобы пациент и семья понимали, почему именно сейчас назначается то или иное вмешательство и когда оно будет остановлено. Мы избегаем полипрагмазии: запускаем один модуль — ставим один маркер — определяем «окно оценки» — выключаем модуль, как только цель достигнута. Такой подход бережёт ресурсы организма и сохраняет причинно-следственную связь.
Узнать больше – [url=https://narkologicheskaya-klinika-v-krasnoyarske17.ru/]лечение в наркологической клинике красноярск[/url]
«КузбассМед Центр» специализируется на лечении алкогольной и наркотической зависимости, восстановлении организма после интоксикации и профилактике рецидивов. В таблице приведены ключевые направления работы и их особенности.
Ознакомиться с деталями – [url=https://narkologicheskaya-klinika-v-novokuzneczke17.ru/]наркологическая клиника стационар[/url]
Процесс лечения строится поэтапно, что позволяет контролировать динамику состояния пациента и постепенно возвращать его к полноценной жизни.
Подробнее тут – http://lechenie-alkogolizma-perm0.ru/
Лечение организовано поэтапно, что помогает пациенту постепенно возвращаться к полноценной жизни. Каждый шаг направлен на укрепление результата и снижение риска рецидива.
Узнать больше – [url=https://narcologicheskaya-klinika-omsk0.ru/]наркологическая клиника вывод из запоя омск[/url]
Клиника «КузбассМед Центр» в Новокузнецке обеспечивает непрерывный приём пациентов и выезд нарколога на дом. Такой формат позволяет оказать экстренную помощь при интоксикации или запое прямо на месте, не дожидаясь ухудшения состояния. Медицинская команда работает в режиме 24/7, что особенно важно при острых состояниях. Врач выезжает в течение часа после вызова, проводит диагностику, ставит капельницу и контролирует жизненные показатели. В стационаре доступны детоксикация, медикаментозная терапия и психотерапевтическая поддержка — всё под постоянным медицинским наблюдением.
Получить больше информации – [url=https://narkologicheskaya-klinika-v-novokuzneczke17.ru/]анонимная наркологическая клиника новокузнецк[/url]
Таблица не заменяет очный осмотр, но показывает, как наблюдения переводятся в действие и когда мы принимаем решение о продолжении/остановке модуля.
Получить больше информации – https://narkologicheskaya-klinika-v-krasnoyarske17.ru/chastnaya-narkologicheskaya-klinika-krasnoyarsk/
Каждый пациент получает персонализированный план лечения, разработанный с учётом анамнеза, общего состояния и психоэмоционального фона. В «ПермьМедСервис» нет универсальных шаблонов — используется модульная модель терапии, при которой программы состоят из комбинированных блоков: медикаментозное лечение, психотерапия, физиотерапия, семейное консультирование. Это позволяет гибко адаптировать курс, вносить изменения по ходу лечения и учитывать динамику состояния пациента.
Изучить вопрос глубже – https://narkologicheskaya-klinika-perm0.ru/chastnaya-narkologicheskaya-klinika-perm/
Психотерапевтическая часть лечения строится на многоступенчатой программе. Вначале пациент учится понимать свои зависимости, выявлять скрытые мотивы употребления и работать с сопротивлением. На следующем этапе — формируется навык противостояния стрессу, прорабатываются внутрисемейные конфликты и создаются новые стратегии поведения. В финале — акцент на социализацию, возвращение к активной жизни, построение трезвого будущего. Используются как индивидуальные сессии, так и терапевтические группы, телемосты и онлайн-курсы.
Подробнее можно узнать тут – [url=https://narkologicheskaya-klinika-samara0.ru/]платная наркологическая клиника самара[/url]
Лечение организовано поэтапно, что помогает пациенту постепенно возвращаться к полноценной жизни. Каждый шаг направлен на укрепление результата и снижение риска рецидива.
Ознакомиться с деталями – https://narcologicheskaya-klinika-omsk0.ru/chastnaya-narkologicheskaya-klinika-omsk/
В случаях, когда пациент не готов приехать в клинику или находится в тяжёлом состоянии, специалисты «ЗдороваяСамара» организуют выездную помощь. Это особенно важно при острых интоксикациях, синдроме отмены, резком ухудшении психоэмоционального состояния. Выезд возможен круглосуточно и занимает от 30 до 60 минут с момента обращения. Врач приезжает в гражданской одежде, без опознавательных знаков и привлечения внимания. Оснащение позволяет провести на месте полную диагностику и начать лечение — в том числе инфузионную терапию, коррекцию состояния и психологическую стабилизацию.
Детальнее – https://lechenie-narkomanii-samara0.ru/
Каждый из методов подбирается индивидуально, что позволяет учитывать медицинские показания и личные особенности пациента.
Детальнее – [url=https://lechenie-alkogolizma-perm0.ru/]лечение алкоголизма кодирование в перми[/url]
Наркологическая клиника в Перми обеспечивает пациентам комфортные условия и профессиональное сопровождение. Врачи работают круглосуточно и соблюдают строгую конфиденциальность, что делает лечение доступным и безопасным.
Исследовать вопрос подробнее – https://narcologicheskaya-klinika-perm0.ru/perm-narkologiya/
Услуга
Ознакомиться с деталями – [url=https://narkolog-na-dom-serpuhov10.ru/]нарколог на дом круглосуточно серпухов[/url]
Один из ключевых принципов клиники «ЗдороваяСамара» — строгое соблюдение медицинской тайны. Все обращения, анализы и процедуры происходят в режиме полной конфиденциальности. При необходимости пациент может быть зарегистрирован под псевдонимом, а договор оформляется на доверенное лицо. Персональные данные не передаются ни в какие внешние базы, а диагноз не указывается в выписке для работодателя или страховой. Врачи и администрация клиники прошли специальное обучение по работе с анонимными пациентами, чтобы гарантировать этичность и законность каждой процедуры.
Подробнее тут – [url=https://lechenie-narkomanii-samara0.ru/]принудительное лечение наркомании[/url]
Важное отличие клиники — отказ от примитивной схемы «капельница — домой — дальше сам». Такой формат даёт кратковременное облегчение, но не решает ни причин, ни структуры зависимости. «КоломнаМед Центр» выстраивает ступенчатый подход. Первый шаг — безопасная детоксикация: снятие абстиненции, коррекция водно-электролитного баланса, поддержка сердечно-сосудистой системы, печени, нервной системы, нормализация сна. Второй шаг — стабилизация: оценка психического состояния, выявление тревожных, депрессивных и панических симптомов, подбор поддерживающих схем, которые помогают не сорваться сразу после выхода из острых проявлений. Третий шаг — реабилитация и мотивация: психотерапевтическая работа, групповые и индивидуальные форматы, обучение навыкам трезвой жизни, работа с триггерами, укрепление внутренней мотивации. Четвёртый шаг — постреабилитационная поддержка: контрольные приёмы, дистанционные консультации, помощь в профилактике срывов. Такой комплексный путь не ломает пациента, а возвращает ему контроль: не через страх, а через понимание, структуру и реальные инструменты.
Подробнее тут – https://narkologicheskaya-klinika-kolomna10.ru/luchshie-narkologicheskie-kliniki-v-kolomne/
Наркологическая клиника в Волгограде предоставляет профессиональную медицинскую помощь людям, страдающим зависимостью от алкоголя, наркотиков и других психоактивных веществ. Основная цель специалистов — не просто устранить физическую зависимость, но и помочь пациенту вернуть внутреннее равновесие, здоровье и контроль над жизнью. В клинике применяются современные методы лечения, доказавшие свою эффективность в практике отечественной и мировой наркологии.
Получить дополнительную информацию – [url=https://narkologicheskaya-klinika-v-volgograde17.ru/]запой наркологическая клиника в волгограде[/url]
Услуга
Подробнее тут – http://narkolog-na-dom-shchelkovo10.ru/vyzvat-narkologa-na-dom-shchelkovo/https://narkolog-na-dom-shchelkovo10.ru
В «СамарМед» пациент рассматривается не как носитель диагноза, а как личность с уникальной историей, эмоциональным фоном, социальным окружением и индивидуальными триггерами зависимости. Именно поэтому с первого обращения к лечению подключаются сразу несколько специалистов. Стартовый консилиум позволяет сформировать целостную картину состояния, определить точки риска и создать персонализированную стратегию терапии, включающую медицинскую, психотерапевтическую и социальную составляющие.
Подробнее – [url=https://narkologicheskaya-klinika-samara0.ru/]наркологическая клиника вывод из запоя[/url]
Услуга
Получить дополнительную информацию – http://narkolog-na-dom-serpuhov10.ru
Важное отличие клиники — отказ от примитивной схемы «капельница — домой — дальше сам». Такой формат даёт кратковременное облегчение, но не решает ни причин, ни структуры зависимости. «КоломнаМед Центр» выстраивает ступенчатый подход. Первый шаг — безопасная детоксикация: снятие абстиненции, коррекция водно-электролитного баланса, поддержка сердечно-сосудистой системы, печени, нервной системы, нормализация сна. Второй шаг — стабилизация: оценка психического состояния, выявление тревожных, депрессивных и панических симптомов, подбор поддерживающих схем, которые помогают не сорваться сразу после выхода из острых проявлений. Третий шаг — реабилитация и мотивация: психотерапевтическая работа, групповые и индивидуальные форматы, обучение навыкам трезвой жизни, работа с триггерами, укрепление внутренней мотивации. Четвёртый шаг — постреабилитационная поддержка: контрольные приёмы, дистанционные консультации, помощь в профилактике срывов. Такой комплексный путь не ломает пациента, а возвращает ему контроль: не через страх, а через понимание, структуру и реальные инструменты.
Подробнее – http://narkologicheskaya-klinika-kolomna10.ru/narkologicheskaya-klinika-cena-v-kolomne/
Ниже — примерная структура пакетов, которую можно использовать как ориентир (не публичная оферта):
Ознакомиться с деталями – https://narkolog-na-dom-shchelkovo10.ru/narkolog-na-dom-cena-shchelkovo
Когда вопрос стоит остро — нужно быстро и безопасно вывести человека из запоя в Коломне, — у семьи нет лишнего времени на эксперименты с таблетками, сомнительными «коктейлями» и советами из интернета. «Трезвый Центр Коломна» выстраивает помощь так, чтобы от первого звонка до реального облегчения шёл понятный и управляемый маршрут: запись симптомов и рисков уже по телефону, предложение формата (выезд на дом или стационар), оперативный осмотр, персональная инфузионная терапия, круглосуточное наблюдение при необходимости и подробный план восстановления на 24–72 часа и дальше. Мы не продаём миф о «чудо-капельнице за час», а работаем клинически аккуратно: дозы и схемы подбираются под возраст, длительность запоя, сопутствующие заболевания, уже принятые лекарства и текущие показатели. Цель проста и честна — снять интоксикацию, защитить сердце, мозг и печень, вернуть сон и ясность без агрессивной седации и скрытых рисков, сохранить конфиденциальность и дать семье уверенность, что всё делается правильно.
Ознакомиться с деталями – [url=https://vyvod-iz-zapoya-kolomna10.ru/]vyvod-iz-zapoya-kruglosutochno[/url]
Наркологическая помощь в «ВолгаМед Тольятти» включает широкий спектр процедур и методик. Каждый случай рассматривается индивидуально, с учётом состояния пациента, стадии заболевания и сопутствующих факторов. Ниже представлена таблица с основными направлениями медицинской работы.
Получить больше информации – [url=https://narkologicheskaya-pomoshh-v-tolyatti17.ru/]частная наркологическая помощь[/url]
Такая структура терапии делает процесс максимально эффективным и безопасным.
Получить больше информации – http://narcologicheskaya-klinika-omsk0.ru/
сколько стоит сделать курсовую работу на заказ [url=https://kupit-kursovuyu-43.ru/]kupit-kursovuyu-43.ru[/url] .
melbet ru официальный сайт [url=www.rusfusion.ru]melbet ru официальный сайт[/url] .
Наркологическая помощь в «ВолгаМед Тольятти» включает широкий спектр процедур и методик. Каждый случай рассматривается индивидуально, с учётом состояния пациента, стадии заболевания и сопутствующих факторов. Ниже представлена таблица с основными направлениями медицинской работы.
Детальнее – [url=https://narkologicheskaya-pomoshh-v-tolyatti17.ru/]вызвать наркологическую помощь тольятти[/url]
Предлагаем вашему вниманию интересную справочную статью, в которой собраны ключевые моменты и нюансы по актуальным вопросам. Эта информация будет полезна как для профессионалов, так и для тех, кто только начинает изучать тему. Узнайте ответы на важные вопросы и расширьте свои знания!
Желаете узнать подробности? – https://tvtropes.org/pmwiki/pmwiki.php/Main/HappilyMarried
Этот интересный отчет представляет собой сборник полезных фактов, касающихся актуальных тем. Мы проанализируем данные, чтобы вы могли сделать обоснованные выводы. Читайте, чтобы узнать больше о последних трендах и значимых событиях!
Продолжить изучение – https://www.kybeleconsult.dk/?page_id=95
В этой публикации мы предлагаем подробные объяснения по актуальным вопросам, чтобы помочь читателям глубже понять их. Четкость и структурированность материала сделают его удобным для усвоения и применения в повседневной жизни.
Подробная информация доступна по запросу – https://altin.co.in/2018/09/13/ganpati-bappa-morya
В этом информативном тексте представлены захватывающие события и факты, которые заставят вас задуматься. Мы обращаем внимание на важные моменты, которые часто остаются незамеченными, и предлагаем новые перспективы на привычные вещи. Подготовьтесь к тому, чтобы быть поглощенным увлекательными рассказами!
См. подробности – https://ankurlaladvocate.com/how-to-file-a-case-under-the-motor-vehicles-act-a-comprehensive-guide
Наркологическая клиника в Перми обеспечивает пациентам комфортные условия и профессиональное сопровождение. Врачи работают круглосуточно и соблюдают строгую конфиденциальность, что делает лечение доступным и безопасным.
Подробнее можно узнать тут – [url=https://narcologicheskaya-klinika-perm0.ru/]частная наркологическая клиника пермь[/url]
Этот интересный отчет представляет собой сборник полезных фактов, касающихся актуальных тем. Мы проанализируем данные, чтобы вы могли сделать обоснованные выводы. Читайте, чтобы узнать больше о последних трендах и значимых событиях!
Изучить эмпирические данные – https://gacetafrontal.com/jeffrey-dahmer-polaroids-todo-lo-que-debes-saber
Эта обзорная заметка содержит ключевые моменты и факты по актуальным вопросам. Она поможет читателям быстро ориентироваться в теме и узнать о самых важных аспектах сегодня. Получите краткий курс по современной информации и оставайтесь в курсе событий!
Всё, что нужно знать – http://mad.kiev.ua/?p=480
Мы предлагаем вам окунуться в океан любопытных фактов и вдохновляющих историй. Эта публикация поможет расширить горизонты, разбудить интерес к науке и истории и увидеть мир с новой стороны.
Продолжить изучение – https://www.dissomarket.com/decouvrez-lart-des-amuse-bouches-un-voyage-culinaire-en-quelques-bouchees
Эта разъяснительная статья содержит простые и доступные разъяснения по актуальным вопросам. Мы стремимся сделать информацию понятной для широкой аудитории, чтобы каждый мог разобраться в предмете и извлечь из него максимум пользы.
Ознакомиться с теоретической базой – https://philosophy.stackexchange.com/questions/51762/for-a-political-ruler-is-it-better-to-be-loved-or-feared
Этот информативный текст отличается привлекательным содержанием и актуальными данными. Мы предлагаем читателям взглянуть на привычные вещи под новым углом, предоставляя интересный и доступный материал. Получите удовольствие от чтения и расширьте кругозор!
Есть чему поучиться – https://h-hobby.net/2025/09/05/post-16257
В этом информативном тексте представлены захватывающие события и факты, которые заставят вас задуматься. Мы обращаем внимание на важные моменты, которые часто остаются незамеченными, и предлагаем новые перспективы на привычные вещи. Подготовьтесь к тому, чтобы быть поглощенным увлекательными рассказами!
См. подробности – https://praxis-medinger.de/logo-2
Эта статья сочетает познавательный и занимательный контент, что делает ее идеальной для любителей глубоких исследований. Мы рассмотрим увлекательные аспекты различных тем и предоставим вам новые знания, которые могут оказаться полезными в будущем.
Посмотреть подробности – https://nexessent.com/creative-water-features-and-exterior
Эта публикация завернет вас в вихрь увлекательного контента, сбрасывая стереотипы и открывая двери к новым идеям. Каждый абзац станет для вас открытием, полным ярких примеров и впечатляющих достижений. Подготовьтесь быть вовлеченными и удивленными каждый раз, когда продолжите читать.
Смотрите также… – https://msbiguide.com/how-to-increase-externalcommandtimeout-in-ssas
В статье представлены ключевые моменты по актуальной теме, дополненные советами экспертов и ссылками на дополнительные ресурсы. Цель материала — дать читателю инструменты для самостоятельного развития и принятия осознанных решений.
Изучить эмпирические данные – https://freelife.okinawa/taxi-circumstances
Эта информационная статья охватывает широкий спектр актуальных тем и вопросов. Мы стремимся осветить ключевые факты и события с ясностью и простотой, чтобы каждый читатель мог извлечь из нее полезные знания и полезные инсайты.
Читать далее > – https://si14.com.br/manual/cobranca-recorrente
Эта статья сочетает познавательный и занимательный контент, что делает ее идеальной для любителей глубоких исследований. Мы рассмотрим увлекательные аспекты различных тем и предоставим вам новые знания, которые могут оказаться полезными в будущем.
Изучить вопрос глубже – https://dongapaint.vn/huong-dan-chon-mau-son-ngoai-that-phong-thuy
Публикация предлагает читателю не просто информацию, а инструменты для анализа и саморазвития. Мы стимулируем критическое мышление, предлагая различные точки зрения и призывая к самостоятельному поиску решений.
Исследовать вопрос подробнее – https://bengalpcbd.com/2022/12/13/best-gaming-laptop-models
В этом интересном тексте собраны обширные сведения, которые помогут вам понять различные аспекты обсуждаемой темы. Мы разбираем детали и факты, делая акцент на важности каждого элемента. Не упустите возможность расширить свои знания и взглянуть на мир по-новому!
А что дальше? – https://www.royalnettingsolutions.com/product/pigeon-safety-net
Эта информационная статья содержит полезные факты, советы и рекомендации, которые помогут вам быть в курсе последних тенденций и изменений в выбранной области. Материал составлен так, чтобы быть полезным и понятным каждому.
Это ещё не всё… – https://jukespizza.co.za/wp/2022/04/25/jaffle-and-coffee-breakfast-on-the-go
Dressing stylishly is essential for self-expression.
A thoughtful appearance helps express personality.
A neat look can boost confidence.
In everyday life, appearance often shapes first impressions.
https://graph.org/Tommy-Hilfiger-01-12
Balanced style choices make social situations more comfortable.
It is important to consider one’s own comfort as well as the occasion.
Current trends give people the chance to refresh their image.
In conclusion, dressing stylishly positively affects perception.
A handbag is an essential accessory in everyday life.
It combines functionality with style.
A good bag helps carry daily essentials.
At the same time, it can complete an outfit.
https://uconnect.ae/read-blog/116181
Multiple formats allow people to match different occasions.
A carefully selected bag often reflects individual style.
High-quality materials and design contribute to long-term use.
Ultimately, a bag remains a practical necessity of a modern wardrobe.
Эта статья предлагает живое освещение актуальной темы с множеством интересных фактов. Мы рассмотрим ключевые моменты, которые делают данную тему важной и актуальной. Подготовьтесь к насыщенному путешествию по неизвестным аспектам и узнайте больше о значимых событиях.
Только факты! – https://www.defining-blog.ru/gk-granel-zalozhila-kapsulu-vremeni-v-fundament-zhk-mypriority-basmanny-v-moskve
Мы собрали для вас самые захватывающие факты из мира науки и истории. От малознакомых деталей до грандиозных событий — эта статья расширит ваш кругозор и подарит новое понимание того, как устроен наш мир.
Запросить дополнительные данные – http://denis-fischer.de/df_slider_elvis
В этом обзорном материале представлены увлекательные детали, которые находят отражение в различных аспектах жизни. Мы исследуем непонятные и интересные моменты, позволяя читателю увидеть картину целиком. Погрузитесь в мир знаний и удивительных открытий!
Узнать из первых рук – https://www.defining-blog.ru/tag/banki
Эта статья погружает вас в увлекательный мир знаний, где каждый факт становится открытием. Мы расскажем о ключевых исторических поворотных моментах и научных прорывах, которые изменили ход цивилизации. Поймите, как прошлое формирует настоящее и как его уроки могут помочь нам строить будущее.
Читать далее > – https://edufield.co.kr/1221
Мы собрали для вас самые захватывающие факты из мира науки и истории. От малознакомых деталей до грандиозных событий — эта статья расширит ваш кругозор и подарит новое понимание того, как устроен наш мир.
Узнать из первых рук – https://yellowcedarmedia.com/paradise-discovered-2-0-inspires-discussion-on-identity-at-st-thomas-screening
Эта информационная заметка содержит увлекательные сведения, которые могут вас удивить! Мы собрали интересные факты, которые сделают вашу жизнь ярче и полнее. Узнайте нечто новое о привычных аспектах повседневности и откройте для себя удивительный мир информации.
Читать далее > – https://spotlight-ds.com/classes/musical-theatre
В этом информативном тексте представлены захватывающие события и факты, которые заставят вас задуматься. Мы обращаем внимание на важные моменты, которые часто остаются незамеченными, и предлагаем новые перспективы на привычные вещи. Подготовьтесь к тому, чтобы быть поглощенным увлекательными рассказами!
Тыкай сюда — узнаешь много интересного – https://sonnenberg.pl/maximizing-solar-potential
В данной обзорной статье представлены интригующие факты, которые не оставят вас равнодушными. Мы критикуем и анализируем события, которые изменили наше восприятие мира. Узнайте, что стоит за новыми открытиями и как они могут изменить ваше восприятие реальности.
Запросить дополнительные данные – https://malangmu.com/lembaga/2023/08/17/hindari-egoisme-isi-dengan-karya-dan-prestasi
В этом тексте собрано множество случайных сведений и довольно неопределённых мыслей, которые могут чем-то заинтересовать. Мы отмечаем моменты, которые не особенно важны, но всё же занимают своё место в повествовании.
Вот – [url=https://arma-rehab.ru/vyvod-iz-zapoya/]знакомства для взрослых[/url]
В этом тексте собрано множество случайных сведений и довольно неопределённых мыслей, которые могут чем-то заинтересовать. Мы отмечаем моменты, которые не особенно важны, но всё же занимают своё место в повествовании.
Вот – [url=https://arma-rehab.ru/vyvod-iz-zapoya/]азартные игры на деньги[/url]
Следовать моде значимо, потому что внешний вид влияет на восприятие.
Одежда помогает показать вкус.
Стильный образ добавляет уверенности и положительно влияет на настроении.
Модные вещи делают человека опрятным.
https://rentry.co/9n4ooawr
В деловой и социальной среде внешний вид играет важную роль.
Мода позволяет чувствовать себя уместно.
Кроме того, стильная одежда помогает произвести хорошее впечатление.
В результате, умение модно одеваться становится частью современного образа жизни.
Стильная одежда имеет большое значение в создании образа.
Она помогает передать личный стиль и ощущать комфорт.
Грамотно подобранный образ формирует мнение окружающих.
В повседневной жизни одежда может помогать собранности.
https://telegra.ph/Chanel-01-12
Стильный образ облегчает социальные взаимодействия.
При выборе вещей важно учитывать личные предпочтения и уместность ситуации.
Мода дают возможность находить новые решения.
В итоге, умение стильно одеваться помогает чувствовать себя увереннее.
Эта информационная статья содержит полезные факты, советы и рекомендации, которые помогут вам быть в курсе последних тенденций и изменений в выбранной области. Материал составлен так, чтобы быть полезным и понятным каждому.
Открой скрытое – https://kodaly-iskola.hu/tanc_mozgas_1-4
купить задание для студентов [url=https://kupit-kursovuyu-43.ru/]kupit-kursovuyu-43.ru[/url] .
мелбет полная версия [url=rusfusion.ru]мелбет полная версия[/url] .
Mechanical watches will always stay fashionable despite the growth of smart devices.
They represent craftsmanship built on technical mastery.
Unlike electronic alternatives, mechanical watches rely on complex mechanisms.
Timepiece lovers value them for their history.
https://www.brownbook.net/business/53994323/arabicbezel/
High-quality mechanical watches are often made using carefully selected components.
Their timeless design allows them to transcend trends.
Beyond telling time, these watches serve as refined accessories.
As a result, mechanical watches continue to maintain their iconic status.
Мы собрали для вас самые захватывающие факты из мира науки и истории. От малознакомых деталей до грандиозных событий — эта статья расширит ваш кругозор и подарит новое понимание того, как устроен наш мир.
Это ещё не всё… – https://tvtrend.wpxblog.jp/keiji7-goods
Стильная одежда имеет большое значение в формировании впечатления.
Она помогает выразить характер и ощущать комфорт.
Грамотно подобранный образ формирует мнение окружающих.
В повседневной жизни одежда может помогать собранности.
https://telegra.ph/Givenchy-01-12-3
Продуманный гардероб облегчает социальные взаимодействия.
При выборе вещей важно учитывать личные предпочтения и контекст.
Актуальные стили дают возможность обновлять образ.
В целом, умение стильно одеваться положительно влияет на самоощущение.
Этот текст содержит различную информацию, которая, возможно, покажется любопытной, но в целом не меняет восприятия привычных вещей. Предлагаем просто получить удовольствие от чтения, не ожидая особой пользы.
Вот – [url=https://arma-rehab.ru/vyvod-iz-zapoya/]эротические фильмы[/url]
Алкогольная интоксикация и запой могут стремительно ухудшить состояние здоровья, став угрозой жизни, поэтому оперативное вмешательство имеет первостепенное значение. В Туле квалифицированные наркологи предоставляют круглосуточную помощь на дому, что позволяет начать лечение незамедлительно и в комфортных условиях. Такой формат терапии гарантирует индивидуальный подход, всестороннюю поддержку и полную конфиденциальность, что особенно важно для пациентов, стремящихся восстановить своё здоровье без лишних стрессовых ситуаций.
Детальнее – [url=https://vyvod-iz-zapoya-tula000.ru/]вывод из запоя круглосуточно в туле[/url]
Athletic shoes have become incredibly popular in recent years due to their wearability.
They blend practicality with modern design.
Many people choose sneakers because they are suitable for everyday wear.
Fashion brands have made sneakers a central part of modern wardrobes.
https://netbook.com.ng/read-blog/30705
In addition, sneakers easily fit various styles.
Their popularity is also driven by active lifestyles.
High-quality sneakers offer reliable performance and support for the feet.
Overall, sneakers have become a must-have item for people of all ages.
Публикация предлагает набор слабо связанных идей, которые сложно применить на практике, лишь слегка затрагивая разные точки зрения.
Дополнительная информация – [url=https://stop-zavisimost.ru/]займ без процентов[/url]
Чтение СМИ играет важную роль в информационном пространстве.
Оно помогает оставаться информированным и разбираться в текущих процессах.
Свежие материалы позволяют принимать взвешенные решения.
Чтение СМИ способствует расширению кругозора.
https://telegra.ph/Sankt-Peterburg-12-25-2
Несколько точек зрения помогают сравнивать факты.
В профессиональной сфере СМИ дают возможность оставаться конкурентоспособным.
Осознанное потребление информации формирует умение работать с данными.
Таким образом, чтение СМИ поддерживает осведомлённость.
Dressing stylishly plays an important role in everyday life.
The way a person dresses often shapes a positive impression.
Stylish clothing can improve confidence and help people feel more comfortable.
A well-chosen outfit also reflects personality and individual taste.
http://social.redemaxxi.com.br/read-blog/3216
In professional settings, style may affect how others view a person.
Fashionable clothing does not always mean expensive items, but rather smart combinations.
When people dress well, they often feel more motivated.
In the end, dressing stylishly helps create a strong appearance in different situations.
Процесс кодирования проходит в комфортной и спокойной обстановке. Врач объясняет каждый этап, чтобы пациент чувствовал себя уверенно и спокойно. После процедуры пациент получает памятку с рекомендациями по уходу за здоровьем и режиму поведения в первые недели после лечения.
Разобраться лучше – [url=https://kodirovanie-ot-alkogolizma-v-volgograde17.ru/]анонимное кодирование от алкоголизма[/url]
Во время онлайн-сессии специалист может использовать шкалы оценки состояния (CIWA-Ar, CAGE, AUDIT), психодиагностические опросники, видеоанализ мимики и речи. Это позволяет провести достаточно точную первичную дифференцировку между алкогольной абстиненцией, тревожным расстройством, интоксикацией и психотическим состоянием. При необходимости пациенту предлагается записаться на очный приём или воспользоваться услугой «стационар на дому» — с ежедневными визитами и наблюдением.
Узнать больше – [url=https://narkologicheskaya-pomoshh-tver0.ru/]вызвать наркологическую помощь[/url]
Современные методы лечения в наркологической клинике в Новокузнецке основаны на доказательной медицине. При поступлении пациент проходит полное обследование, включающее оценку физического состояния, психоэмоционального фона и наличия сопутствующих заболеваний. На основе полученных данных составляется персональная программа терапии, охватывающая медицинский, психологический и социальный аспекты выздоровления.
Разобраться лучше – http://narcologicheskaya-klinika-v-novokuzneczke17.ru
В этих ситуациях выезд нарколога на дом позволяет вовремя скорректировать состояние, а при выявлении опасных признаков — не теряя времени, направить пациента в стационар. Это управляемый маршрут вместо хаотичных решений в последний момент.
Разобраться лучше – [url=https://narkolog-na-dom-dolgoprudnij10.ru/]нарколог на дом наркологическая клиника[/url]
Когда вопрос стоит остро — нужно быстро и безопасно вывести человека из запоя в Коломне, — у семьи нет лишнего времени на эксперименты с таблетками, сомнительными «коктейлями» и советами из интернета. «Трезвый Центр Коломна» выстраивает помощь так, чтобы от первого звонка до реального облегчения шёл понятный и управляемый маршрут: запись симптомов и рисков уже по телефону, предложение формата (выезд на дом или стационар), оперативный осмотр, персональная инфузионная терапия, круглосуточное наблюдение при необходимости и подробный план восстановления на 24–72 часа и дальше. Мы не продаём миф о «чудо-капельнице за час», а работаем клинически аккуратно: дозы и схемы подбираются под возраст, длительность запоя, сопутствующие заболевания, уже принятые лекарства и текущие показатели. Цель проста и честна — снять интоксикацию, защитить сердце, мозг и печень, вернуть сон и ясность без агрессивной седации и скрытых рисков, сохранить конфиденциальность и дать семье уверенность, что всё делается правильно.
Получить дополнительные сведения – [url=https://vyvod-iz-zapoya-kolomna10.ru/]вывод из алкогольного запоя[/url]
Раннее обращение к специалистам позволяет провести качественную диагностику, подобрать адекватное лечение и обеспечить комплексную поддержку пациента.
Выяснить больше – [url=https://narkologicheskaya-pomoshh-novokuzneczk0.ru/]экстренная наркологическая помощь[/url]
На этом этапе специалист уточняет, сколько времени продолжается запой, какие основные симптомы наблюдаются, и если имеются, то какие хронические заболевания могут влиять на течение терапии. Точный анализ этих данных позволяет сформировать персонализированную стратегию лечения, которая будет максимально адаптирована к состоянию пациента и его потребностям.
Разобраться лучше – [url=https://vyvod-iz-zapoya-yaroslavl0.ru/]вывод из запоя недорого ярославль[/url]
Для иллюстрации эффективности методов представлена таблица с примерами процедур и их воздействием:
Узнать больше – [url=https://narcologicheskaya-klinika-v-krasnoyarske17.ru/]наркологическая клиника лечение алкоголизма в красноярске[/url]
Being well-dressed is essential for creating a positive impression.
A thoughtful appearance helps express personality.
Stylish clothing can improve self-esteem.
In everyday life, appearance often influences how others perceive you.
https://telegra.ph/Balmain-12-25-4
Carefully selected clothing make social situations more comfortable.
It is important to consider individual taste as well as the context.
Fashion trends give people the chance to refresh their image.
In conclusion, dressing stylishly positively affects perception.
Даже если симптомы кажутся незначительными, проведение инфузионной терапии значительно ускоряет процесс восстановления и предотвращает развитие осложнений.
Подробнее – [url=https://kapelnicza-ot-zapoya-v-volgograde17.ru/]капельница от запоя анонимно на дому[/url]
Selecting the right fragrance is an important part of personal style.
A suitable scent can highlight personality and express mood.
Fragrance often forms a lasting impression.
The right aroma can increase confidence and make a person feel self-assured.
https://myfashionacademy.ru/material/2024-07-19-velikolepnye-skidki-na-obuv-vo-vremya-yubileynoy-rasprodazhi-nordstrom/
Scents also interact with skin chemistry, making each fragrance distinct.
In social and professional settings, a well-chosen perfume may improve how others view you.
It is important to consider environment when selecting a fragrance.
As a result, the right scent helps create a complete personal image.
Благодаря широкому выбору методик специалисты клиники могут подобрать оптимальную схему для каждого пациента, учитывая не только медицинские, но и психологические особенности. Такой индивидуальный подход повышает эффективность лечения и снижает риск повторных срывов.
Разобраться лучше – [url=https://kodirovanie-ot-alkogolizma-v-volgograde17.ru/]кодирование от алкоголизма отзывы цены в волгограде[/url]
Во время онлайн-сессии специалист может использовать шкалы оценки состояния (CIWA-Ar, CAGE, AUDIT), психодиагностические опросники, видеоанализ мимики и речи. Это позволяет провести достаточно точную первичную дифференцировку между алкогольной абстиненцией, тревожным расстройством, интоксикацией и психотическим состоянием. При необходимости пациенту предлагается записаться на очный приём или воспользоваться услугой «стационар на дому» — с ежедневными визитами и наблюдением.
Подробнее – https://narkologicheskaya-pomoshh-tver0.ru/narkologiya-v-tveri/
Каждый этап проходит под контролем врачей-наркологов и психотерапевтов, что гарантирует эффективность и безопасность лечения.
Разобраться лучше – https://narcologicheskaya-klinika-v-novokuzneczke17.ru/narkolog-novokuzneczk-na-dom
Следить за своим стилем важно для создания первого впечатления.
Внешний вид помогает показать личный вкус и даёт чувство комфорта.
Продуманный стиль влияет на восприятие окружающих.
В повседневной жизни одежда может помогать чувствовать себя увереннее.
https://telegra.ph/Tom-Ford-12-29
Грамотно подобранный гардероб упрощает социальные взаимодействия.
При выборе стиля важно учитывать собственный вкус и уместность ситуации.
Мода позволяют экспериментировать.
Таким образом, умение стильно одеваться положительно влияет на самоощущение.
В клинике «Альтернатива» применяются современные методы терапии, включающие медикаментозное лечение, психотерапию и социальную реабилитацию.
Разобраться лучше – [url=https://narkologicheskaya-pomoshh-novokuzneczk0.ru/]скорая наркологическая помощь в новокузнецке[/url]
Алгоритм в «Трезвый Центр Коломна» построен так, чтобы убрать импровизацию и сделать всё максимально прозрачным для семьи. Сначала по телефону собираются ключевые данные: возраст пациента, длительность запоя, виды алкоголя, хронические заболевания, препараты, аллергии, наличие судорог, потерь сознания, странного поведения, текущие жалобы. На этом этапе озвучивается ориентировочный формат помощи и примерный диапазон стоимости. Далее следует выезд на дом или поступление в стационар. Врач проводит осмотр: измеряет артериальное давление, пульс, сатурацию, температуру, оценивает тремор, координацию, сознание, степень обезвоживания, наличие болей, состояние дыхания и сердца. На основе этих данных назначается инфузионная терапия: растворы для регидратации и коррекции электролитов, витамины группы B и магний для поддержки нервной системы, по показаниям — гепатопротекторы, антиоксидантные комплексы, противорвотные для контроля тошноты, мягкие анксиолитики для уменьшения тревоги и нормализации сна. Уходят от агрессивной седации: пациент не должен быть «выключен» так, чтобы невозможно было заметить ухудшение. В процессе капельниц проводится повторный контроль показателей, темп и состав при необходимости корректируются. После стабилизации пациент и семья получают подробные рекомендации: режим, сон, питание, питьё, запреты, «красные флаги», план наблюдения и возможного дальнейшего лечения зависимости.
Получить дополнительные сведения – http://vyvod-iz-zapoya-kolomna10.ru
В этих ситуациях выезд нарколога на дом позволяет вовремя скорректировать состояние, а при выявлении опасных признаков — не теряя времени, направить пациента в стационар. Это управляемый маршрут вместо хаотичных решений в последний момент.
Изучить вопрос глубже – [url=https://narkolog-na-dom-dolgoprudnij10.ru/]vrach-narkolog-na-dom[/url]
Лечение зависимости в наркологической клинике проводится поэтапно. Это обеспечивает постепенное восстановление организма и исключает риск осложнений. Каждый этап направлен на устранение конкретных нарушений, вызванных употреблением психоактивных веществ.
Подробнее тут – [url=https://narcologicheskaya-klinika-v-krasnoyarske17.ru/]www.domen.ru[/url]
Использование автоматизированных систем дозирования позволяет точно подобрать необходимое количество медикаментов, минимизируя риск передозировки и побочных эффектов. Постоянный мониторинг жизненно важных показателей дает возможность врачу корректировать схему лечения в режиме реального времени, что повышает безопасность и эффективность процедуры.
Изучить вопрос глубже – [url=https://vyvod-iz-zapoya-yaroslavl0.ru/]вывод из запоя на дому цена[/url]
Особенность подхода заключается в сочетании медицинской и психологической поддержки. После кодирования пациент получает консультации психотерапевта, рекомендации по восстановлению и профилактике рецидивов. Это снижает риск повторного срыва и помогает закрепить результат на долгий срок.
Подробнее тут – https://kodirovanie-ot-alkogolizma-v-volgograde17.ru/kodirovanie-ot-alkogolya-v-volgograde
Для достижения стойкой ремиссии применяются современные и безопасные методики, которые подбираются индивидуально для каждого пациента.
Получить дополнительные сведения – [url=https://lechenie-alkogolizma-omsk0.ru/]принудительное лечение от алкоголизма в омске[/url]
Индивидуально подобранный состав раствора обеспечивает быстрое выведение токсинов и улучшение физического состояния уже в течение первых часов после начала лечения.
Получить дополнительные сведения – https://kapelnicza-ot-zapoya-v-volgograde17.ru/kapelnicza-ot-alkogolya-volgograd
Для оказания полноценной помощи вне стен клиники специалисты «ТверьМед» используют портативные устройства: инфузоматы, ЭКГ-мониторы, глюкометры, пульсоксиметры, небулайзеры и наборы медикаментов. Все врачи обучены работе в полевых условиях и готовы к экстренным ситуациям. Отдельное внимание уделяется стерильности и безопасности: используются одноразовые расходники, врач носит маску, перчатки и защитный халат. При необходимости на выезд направляется параллельно медсестра или ассистент с расширенным функционалом.
Подробнее тут – [url=https://narkologicheskaya-pomoshh-tver0.ru/]наркологическая помощь на дому тверь[/url]
Кодирование от алкоголизма — это медицинская процедура, направленная на формирование устойчивого отвращения к спиртному и восстановление контроля над зависимым поведением. В клинике «ВолгоградМед Альянс» используются современные, научно обоснованные методы, которые позволяют не просто временно ограничить тягу, а глубоко перестроить психологические и биохимические механизмы зависимости. Каждая программа подбирается индивидуально, с учётом стажа употребления, состояния здоровья, мотивации и психоэмоционального фона пациента. Врачи обеспечивают анонимность, безопасность и круглосуточную поддержку, помогая восстановить не только физическое состояние, но и внутреннее равновесие.
Детальнее – http://kodirovanie-ot-alkogolizma-v-volgograde17.ru
Терапия проводится поэтапно, что позволяет пациенту последовательно проходить все стадии восстановления и закреплять результат.
Подробнее – [url=https://lechenie-alkogolizma-omsk0.ru/]лечение наркомании и алкоголизма в омске[/url]
Современные методы лечения в наркологической клинике в Новокузнецке основаны на доказательной медицине. При поступлении пациент проходит полное обследование, включающее оценку физического состояния, психоэмоционального фона и наличия сопутствующих заболеваний. На основе полученных данных составляется персональная программа терапии, охватывающая медицинский, психологический и социальный аспекты выздоровления.
Подробнее – [url=https://narcologicheskaya-klinika-v-novokuzneczke17.ru/]наркологическая клиника наркологический центр новокузнецк[/url]
Для понимания ключевых компонентов лечения ниже представлена таблица, в которой систематизированы основные методы и их назначение.
Подробнее можно узнать тут – [url=https://narkologicheskaya-pomoshh-novokuzneczk0.ru/]частная наркологическая помощь новокузнецк[/url]
Благодаря широкому выбору методик специалисты клиники могут подобрать оптимальную схему для каждого пациента, учитывая не только медицинские, но и психологические особенности. Такой индивидуальный подход повышает эффективность лечения и снижает риск повторных срывов.
Подробнее – [url=https://kodirovanie-ot-alkogolizma-v-volgograde17.ru/]клиника кодирования от алкоголизма[/url]
Домашний формат особенно важен, когда пациент не готов к стационару, боится огласки, испытывает стыд или сопротивление, но объективно нуждается в помощи. Попытки «перетерпеть» или лечить своими силами заканчиваются тем, что родственники дают опасные комбинации седативных, анальгетиков и «антипохмельных» средств, а состояние только ухудшается. «МедТрезвие Долгопрудный» строит выездную помощь так, чтобы она оставалась профессиональной медициной, а не косметической услугой. Уже при звонке диспетчер под контролем врача уточняет длительность запоя, виды алкоголя, наличие гипертонии, болезней сердца, печени, почек, диабета, неврологических нарушений, психических эпизодов, факт судорог, делирия в прошлом, какие лекарства уже были даны. Это позволяет заранее понять, подходит ли формат лечения на дому или сразу нужно рассматривать стационар. Выезд назначается только в тех случаях, когда это безопасно, и именно в этом ключевое отличие официальной клиники от анонимных «капельниц на дом» — здесь всегда выбирают жизнь и здоровье, а не удобный маркетинговый сценарий. Для семьи это не просто комфорт, а возможность получить помощь без риска сорваться в критическое состояние посреди ночи.
Детальнее – http://narkolog-na-dom-dolgoprudnij10.ru
Во время онлайн-сессии специалист может использовать шкалы оценки состояния (CIWA-Ar, CAGE, AUDIT), психодиагностические опросники, видеоанализ мимики и речи. Это позволяет провести достаточно точную первичную дифференцировку между алкогольной абстиненцией, тревожным расстройством, интоксикацией и психотическим состоянием. При необходимости пациенту предлагается записаться на очный приём или воспользоваться услугой «стационар на дому» — с ежедневными визитами и наблюдением.
Изучить вопрос глубже – [url=https://narkologicheskaya-pomoshh-tver0.ru/]платная наркологическая помощь тверь[/url]
Для иллюстрации эффективности методов представлена таблица с примерами процедур и их воздействием:
Детальнее – http://narcologicheskaya-klinika-v-krasnoyarske17.ru/
Запой – это опасное состояние, при котором организм подвергается значительной токсической нагрузке, а длительное злоупотребление алкоголем приводит к нарушению работы внутренних органов и ухудшению общего самочувствия. В Ярославле качественная наркологическая помощь на дому становится спасением для пациентов, нуждающихся в оперативной детоксикации и стабилизации состояния. Такой формат лечения позволяет начать терапию в комфортной обстановке, сохраняя конфиденциальность и минимизируя стресс, связанный с посещением стационара.
Детальнее – [url=https://vyvod-iz-zapoya-yaroslavl0.ru/]вывод из запоя клиника в ярославле[/url]
Каждый этап проходит под контролем врачей-наркологов и психотерапевтов, что гарантирует эффективность и безопасность лечения.
Подробнее можно узнать тут – http://narcologicheskaya-klinika-v-novokuzneczke17.ru/narkologiya-gorod-novokuzneczk/https://narcologicheskaya-klinika-v-novokuzneczke17.ru
При получении заявки по телефону или через сайт администратор передаёт её врачу-дежуранту, который немедленно выезжает по указанному адресу. По прибытии специалист проводит первичный осмотр: измеряются артериальное давление, пульс, температура, сатурация. Затем осуществляется экспресс-оценка состояния ЦНС и метаболизма. При необходимости берутся анализы, подключается инфузионная система, проводятся противотревожные и детоксикационные мероприятия. Врач остаётся с пациентом до полной стабилизации состояния, а при тяжёлых симптомах организует транспортировку в стационар.
Детальнее – [url=https://narkologicheskaya-pomoshh-tver0.ru/]центр наркологической помощи тверь[/url]
Главная задача процедуры — быстрое выведение этанола и его метаболитов из организма, нормализация уровня электролитов, улучшение самочувствия и предотвращение осложнений. Лечение проводится как в клинике, так и на дому, что особенно удобно при тяжёлых состояниях, когда пациент не может самостоятельно добраться до медицинского учреждения.
Исследовать вопрос подробнее – [url=https://vyvod-iz-zapoya-v-tyumeni17.ru/]вывод из запоя капельница на дому[/url]
Для понимания ключевых компонентов лечения ниже представлена таблица, в которой систематизированы основные методы и их назначение.
Выяснить больше – [url=https://narkologicheskaya-pomoshh-novokuzneczk0.ru/]скорая наркологическая помощь[/url]
Диагностика в клинике «КузбассМед» проводится комплексно: используются лабораторные, инструментальные и психологические методы. Благодаря применению цифровых систем и алгоритмов обработки данных, результаты анализов доступны уже в течение первого часа. Оценка проводится по нескольким направлениям: токсикологический статус, состояние печени и почек, электролитный баланс, нейровегетативное состояние, когнитивные функции и уровень стресса. Это позволяет врачам составлять максимально точную картину заболевания и подбирать индивидуальные методы терапии.
Узнать больше – [url=https://narkologicheskaya-klinika-novokuzneczk0.ru/]наркологическая клиника нарколог в новокузнецке[/url]
Лечение в клинике включает несколько последовательных этапов, каждый из которых направлен на достижение стабильной ремиссии и восстановление здоровья пациента.
Выяснить больше – https://narcologicheskaya-klinika-v-novokuzneczke17.ru/narkolog-v-gorode-novokuzneczke/
Наркологическая помощь в Новокузнецке представляет собой комплекс профессиональных медицинских мероприятий, направленных на диагностику, лечение и реабилитацию пациентов с алкогольной и наркотической зависимостью. В клинике «Альтернатива» помощь оказывается на всех этапах заболевания, что позволяет добиться стойких положительных результатов и восстановления качества жизни.
Изучить вопрос глубже – [url=https://narkologicheskaya-pomoshh-novokuzneczk0.ru/]наркологическая помощь на дому в новокузнецке[/url]
Алкогольная интоксикация вызывает сильное обезвоживание и разрушает баланс электролитов в организме. Без медицинской помощи восстановление может занять несколько дней, а в тяжёлых случаях приводит к осложнениям. Капельница помогает безопасно и быстро вывести этанол и продукты его распада, восполнить уровень жидкости, снизить нагрузку на печень и сердечно-сосудистую систему. Процедура проводится амбулаторно или на дому, что делает её доступной и удобной для пациентов.
Узнать больше – [url=https://kapelnicza-ot-zapoya-v-volgograde17.ru/]сколько стоит капельница на дому от запоя в волгограде[/url]
Домашний формат особенно важен, когда пациент не готов к стационару, боится огласки, испытывает стыд или сопротивление, но объективно нуждается в помощи. Попытки «перетерпеть» или лечить своими силами заканчиваются тем, что родственники дают опасные комбинации седативных, анальгетиков и «антипохмельных» средств, а состояние только ухудшается. «МедТрезвие Долгопрудный» строит выездную помощь так, чтобы она оставалась профессиональной медициной, а не косметической услугой. Уже при звонке диспетчер под контролем врача уточняет длительность запоя, виды алкоголя, наличие гипертонии, болезней сердца, печени, почек, диабета, неврологических нарушений, психических эпизодов, факт судорог, делирия в прошлом, какие лекарства уже были даны. Это позволяет заранее понять, подходит ли формат лечения на дому или сразу нужно рассматривать стационар. Выезд назначается только в тех случаях, когда это безопасно, и именно в этом ключевое отличие официальной клиники от анонимных «капельниц на дом» — здесь всегда выбирают жизнь и здоровье, а не удобный маркетинговый сценарий. Для семьи это не просто комфорт, а возможность получить помощь без риска сорваться в критическое состояние посреди ночи.
Изучить вопрос глубже – [url=https://narkolog-na-dom-dolgoprudnij10.ru/]лучший нарколог на дом[/url]
Когда человек в запое, близким кажется, что всё ещё можно решить «по-тихому»: выспаться, отпаять водой, дать обезболивающее или «успокоительное» и дождаться, пока станет легче. На практике это часто приводит к обратному результату. Алкогольная интоксикация нарушает водно-электролитный баланс, сгущает кровь, повышает нагрузку на сердце, провоцирует скачки давления, ухудшает работу печени и нервной системы. Неконтролируемый приём снотворных, анальгетиков, транквилизаторов, особенно вместе с алкоголем, способен вызвать угнетение дыхания, аритмии, судороги или делирий. Домашняя обстановка не даёт возможности следить за всеми показателями и вовремя отреагировать. «РаменМед Трезвость» предлагает клинически выверенный вывод из запоя в Раменском с учётом возраста, длительности употребления, хронических заболеваний, перенесённых ранее осложнений. Здесь не применяют сомнительные схемы «усыпить, чтобы не мешал», а ставят задачу: безопасно пройти острую фазу, снять интоксикацию, стабилизировать давление и пульс, защитить сердце и мозг, снизить риск психозов и, при желании пациента, сразу наметить маршрут реального лечения зависимости. Такой подход снимает с родственников опасную «роль врача» и возвращает ситуацию туда, где ей место — под контроль профессионалов.
Узнать больше – [url=https://vyvod-iz-zapoya-ramenskoe10.ru/]vyvod-iz-zapoya-cena[/url]
Ниже — ориентир для острых часов на дому. Это не жёсткий шаблон, а карта, где ясно: что делаем, чем измеряем, когда пересматриваем. При отсутствии отклика мы меняем один параметр (например, темп инфузии) и назначаем новое окно оценки, не «двигая» всё остальное.
Получить больше информации – [url=https://narkolog-na-dom-saratov0.ru/]вызвать нарколога на дом срочно саратов[/url]
Вывод из запоя в Тюмени — это медицинская процедура, направленная на устранение алкогольной интоксикации и восстановление нормального функционирования организма. Длительное употребление спиртных напитков приводит к нарушению обмена веществ, обезвоживанию, сбоям в работе печени и сердца. В таких случаях требуется профессиональная помощь врача-нарколога, который подберёт оптимальный способ дезинтоксикации и медикаментозной поддержки. Современные методики позволяют провести вывод из запоя безопасно, эффективно и без осложнений.
Выяснить больше – [url=https://vyvod-iz-zapoya-v-tyumeni17.ru/]www.domen.ru[/url]
Диагностика в клинике «КузбассМед» проводится комплексно: используются лабораторные, инструментальные и психологические методы. Благодаря применению цифровых систем и алгоритмов обработки данных, результаты анализов доступны уже в течение первого часа. Оценка проводится по нескольким направлениям: токсикологический статус, состояние печени и почек, электролитный баланс, нейровегетативное состояние, когнитивные функции и уровень стресса. Это позволяет врачам составлять максимально точную картину заболевания и подбирать индивидуальные методы терапии.
Получить дополнительную информацию – [url=https://narkologicheskaya-klinika-novokuzneczk0.ru/]наркологическая клиника лечение алкоголизма новокузнецк[/url]
Наркологическая клиника «Трезвый Путь Коломна» — это пространство, где тяжёлые истории зависимости перестают быть хаотичным набором срывов, ночных обещаний и беспомощных попыток родных «вытащить своими силами». Здесь собраны врачи-наркологи, терапевты, психологи и медперсонал, которые знают, что такое длительные запои, многолетнее употребление, полинаркомания, зависимость от аптечных препаратов, и умеют работать с этим не через страх и давление, а через профессиональные, выверенные шаги. Клиника в Коломне предлагает безопасную детоксикацию, стационарное наблюдение, индивидуальные программы лечения алкоголизма и наркомании, поддержку семьи и постреабилитационные решения. Все процессы организованы так, чтобы пациент сохранял достоинство, а родственники наконец получили не обещания, а реальный план действий, понятный по этапам и по результатам.
Подробнее можно узнать тут – [url=https://narkologicheskaya-klinika-kolomna2-10.ru/]адреса наркологических клиник[/url]
Наркологическая клиника — это не просто место, где пациенту оказывают медицинскую помощь. Это учреждение, где формируется стратегия полного восстановления, включающая не только физическое оздоровление, но и психоэмоциональную стабилизацию. В Ярославле работают как частные, так и государственные клиники, однако их подходы, уровень сервиса и состав команд могут существенно различаться. По данным Минздрава РФ, высокий процент успешных исходов наблюдается в тех учреждениях, где реализуется персонализированная модель лечения и постлечебной поддержки.
Изучить вопрос глубже – https://narkologicheskaya-klinika-yaroslavl0.ru/narkologicheskaya-klinika-telefon-yaroslavl/
Критичные случаи, когда вызов нарколога через «МедТрезвие Долгопрудный» оправдан и своевременен:
Подробнее – http://narkolog-na-dom-dolgoprudnij10.ru
Первый шаг в лечении — это тщательный осмотр специалиста. Наряду с измерением жизненно важных показателей (пульс, артериальное давление, температура) врач проводит сбор анамнеза, выясняя длительность запоя, тип употребляемого алкоголя и наличие сопутствующих заболеваний. Эти данные помогают оценить степень интоксикации и подобрать индивидуальный план терапии, что является ключевым для дальнейшей эффективной детоксикации.
Подробнее – [url=https://vyvod-iz-zapoya-yaroslavl0.ru/]вывод из запоя в стационаре в ярославле[/url]
Процесс включает следующие шаги:
Получить дополнительную информацию – https://narcologicheskaya-klinika-v-krasnoyarske17.ru
Процесс детоксикации проходит поэтапно, чтобы организм успевал адаптироваться к изменениям и не испытывал стресс. Каждый шаг направлен на достижение конкретного терапевтического эффекта. Ниже представлена таблица, отражающая ключевые стадии процедуры, применяемой в клинике «Трезвый Путь Волгоград».
Подробнее тут – [url=https://vivod-iz-zapoya-v-volgograde17.ru/]вывод из запоя цена в волгограде[/url]
Процесс включает несколько шагов:
Подробнее тут – [url=https://narkolog-na-dom-v-ufe17.ru/]врач нарколог выезд на дом в уфе[/url]
Использование автоматизированных систем дозирования позволяет точно подобрать необходимое количество медикаментов, минимизируя риск передозировки и побочных эффектов. Постоянный мониторинг жизненно важных показателей дает возможность врачу корректировать схему лечения в режиме реального времени, что повышает безопасность и эффективность процедуры.
Детальнее – [url=https://vyvod-iz-zapoya-yaroslavl0.ru/]вывод из запоя в стационаре в ярославле[/url]
Процесс включает следующие шаги:
Ознакомиться с деталями – [url=https://narcologicheskaya-klinika-v-krasnoyarske17.ru/]лечение в наркологической клинике красноярск[/url]
Вывод из запоя на дому возможен только при относительно контролируемом состоянии и после очной оценки нарколога. В таких случаях специалист выезжает в Раменском, проводит осмотр, назначает индивидуальную капельницу, остаётся до стабилизации состояния и оставляет подробные рекомендации. Важный момент — честность: если во время осмотра врач видит риски (нестабильное давление, признаки начинающегося делирия, серьёзные боли, глубокую дезориентацию), формат на дому не навязывается, а предлагается стационар. Именно это отличает клинику от анонимных «служб капельниц», для которых любая заявка — повод заработать, независимо от последствий.
Подробнее – https://vyvod-iz-zapoya-ramenskoe10.ru/vyvod-iz-zapoya-ryadom-v-ramenskom/
Стационар «Трезвый Путь Коломна» ориентирован на безопасность в самых сложных случаях: длительные запои, тяжёлая абстиненция, смешанное употребление, выраженные соматические проблемы, риск делирия или судорог. Пациент попадает под наблюдение 24/7, что принципиально отличает клинику от домашних попыток «спасти своими средствами». Контроль жизненно важных показателей, своевременная коррекция схем лечения, возможность быстро отреагировать на осложнения — всё это снижает риск критических ситуаций, которые часто возникают именно после неумелых домашних вмешательств или «выездов без ответственности».
Исследовать вопрос подробнее – https://narkologicheskaya-klinika-kolomna2-10.ru/narkologicheskaya-klinika-cena-v-kolomne
В Волгограде сформирована система оказания наркологической помощи, включающая круглосуточные выезды специалистов, амбулаторное лечение, стационарные программы и реабилитацию. Такой подход позволяет охватить все категории пациентов — от тех, кто нуждается в экстренной помощи, до тех, кто готов пройти полный курс терапии. Независимо от формы оказания услуг, лечение проводится конфиденциально и в соответствии с медицинскими стандартами.
Подробнее тут – https://narkologicheskaya-pomoshh-v-volgograde17.ru
Клиника в Коломне ориентирована на полный цикл помощи: от экстренных состояний до длительного сопровождения. Здесь важна не только медицинская составляющая, но и человеческая: уважение, конфиденциальность, отсутствие стигмы. Ниже — ключевые направления, которые выстраиваются в единую систему лечения, а не существуют по отдельности.
Изучить вопрос глубже – https://narkologicheskaya-klinika-kolomna10.ru/
Вывод из запоя — это экстренная медицинская помощь, направленная на очищение организма от алкоголя, снятие симптомов интоксикации и восстановление работы внутренних органов. В клинике «Трезвая Линия Волгоград» используется комплексный подход, включающий капельницы, препараты для детоксикации и постоянный врачебный контроль. Лечение проводится анонимно, с индивидуальным подбором медикаментов и поддержкой пациента на каждом этапе восстановления. Главная цель специалистов — не просто стабилизировать состояние, а обеспечить безопасное возвращение к нормальному самочувствию и предотвратить повторные срывы.
Углубиться в тему – [url=https://vyvod-iz-zapoia-v-volgograde17.ru/]наркология вывод из запоя[/url]
Услуга вывода из запоя в клинике сочетает профессионализм врачей, медицинскую точность и заботу. При этом обеспечивается полная конфиденциальность: данные пациентов не передаются в сторонние инстанции. Круглосуточный режим работы позволяет вызвать врача даже ночью — специалисты прибывают в течение 40–60 минут после обращения.
Подробнее – [url=https://vivod-iz-zapoya-v-volgograde17.ru/]нарколог вывод из запоя волгоград[/url]
Индивидуально подобранный состав раствора обеспечивает быстрое выведение токсинов и улучшение физического состояния уже в течение первых часов после начала лечения.
Изучить вопрос глубже – https://kapelnicza-ot-zapoya-v-volgograde17.ru/kapelnicza-ot-alkogolya-volgograd/
Процесс включает несколько шагов:
Детальнее – [url=https://narkolog-na-dom-v-ufe17.ru/]нарколог на дом цены[/url]
Комплексное проведение этих этапов обеспечивает полное восстановление организма и облегчает процесс последующего лечения зависимости.
Разобраться лучше – [url=https://vyvod-iz-zapoya-v-ryazani17.ru/]вывод из запоя клиника в рязани[/url]
Правильный подбор лекарственных средств позволяет не только уменьшить проявления синдрома отмены, но и стабилизировать эмоциональное состояние пациента, снижая риск срывов. Реабилитационные программы включают физиотерапию, спортивные занятия и коррекцию образа жизни, что способствует полноценному восстановлению организма.
Получить больше информации – [url=https://lechenie-narkomanii-tver0.ru/]лечение наркомании клиника[/url]
Алкогольная интоксикация вызывает сильное обезвоживание и разрушает баланс электролитов в организме. Без медицинской помощи восстановление может занять несколько дней, а в тяжёлых случаях приводит к осложнениям. Капельница помогает безопасно и быстро вывести этанол и продукты его распада, восполнить уровень жидкости, снизить нагрузку на печень и сердечно-сосудистую систему. Процедура проводится амбулаторно или на дому, что делает её доступной и удобной для пациентов.
Разобраться лучше – http://kapelnicza-ot-zapoya-v-volgograde17.ru/kapelnicza-ot-zapoya-stoimost-volgograd/
Вывод из запоя — это не «волшебная капельница», а последовательная медицинская программа с чёткими целями и измеримыми маркерами. В наркологической клинике «СаратовМед Профи» маршрут строится по принципу управляемых окон: на каждом шаге команда преследует одну цель, меняет лишь один параметр и оценивает результат в заранее назначённый момент. Такой подход снижает лекарственную нагрузку, предотвращает «гонку дозировок» и делает динамику предсказуемой для пациента и близких. Конфиденциальность обеспечивается регламентом: немаркированные выезды, нейтральные формулировки в документах, «тихие» каналы связи, доступ к записям — строго по ролям.
Узнать больше – [url=https://vyvod-iz-zapoya-saratov0.ru/]наркология вывод из запоя в саратове[/url]
Мы не используем универсальную «капельницу». Схема собирается из модулей под ведущие жалобы. Медицинские шаги всегда сочетаются с нефраком опорами — свет, тишина, вода малыми глотками, дыхание, — потому что среда усиливает действие препаратов и позволяет держать дозы ниже.
Углубиться в тему – https://narkolog-na-dom-saratov0.ru/narkolog-i-psikhiatr-v-saratove/
Публикация предлагает набор слабо связанных идей, которые сложно применить на практике, лишь слегка затрагивая разные точки зрения.
Дополнительная информация – [url=https://stop-zavisimost.ru/]займ без процентов[/url]
Как отмечает руководитель клинико-диагностического отдела ФГБУ «Национальный центр наркологии», «участие в терапии нескольких специалистов разных направлений позволяет учитывать не только симптомы, но и глубинные причины зависимости». Именно такой подход снижает риск рецидивов и повышает эффективность лечения.
Подробнее можно узнать тут – https://narkologicheskaya-klinika-yaroslavl0.ru/chastnaya-narkologicheskaya-klinika-yaroslavl/
Услуга вывода из запоя на дому в Туле разработана для тех, кто столкнулся с тяжелыми последствиями злоупотребления алкоголем. Основная цель – оперативная детоксикация организма, восстановление нормального обмена веществ и предотвращение дальнейших осложнений. Врач нарколог проводит полный комплекс обследований и назначает персонализированный план лечения, включающий медикаментозную терапию и психологическую поддержку, что позволяет обеспечить стабильное восстановление организма.
Получить больше информации – [url=https://vyvod-iz-zapoya-tula000.ru/]вывод из запоя на дому в туле[/url]
Ключевым фактором при выборе центра становится квалификация специалистов. Лечение алкоголизма — это не только выведение из запоя и купирование абстинентного синдрома. Оно включает работу с мотивацией, тревожными состояниями, семейными конфликтами, нарушением сна и другими последствиями зависимости. Только команда, включающая наркологов, психотерапевтов и консультантов по аддиктивному поведению, способна охватить все аспекты проблемы.
Узнать больше – [url=https://lechenie-alkogolizma-murmansk0.ru/]клиника лечения алкоголизма[/url]
В этой статье-обзоре мы собрали данные, актуальность которых сомнительна, а факты — не всегда взаимосвязаны. Читатель сможет ознакомиться с разными мнениями, хотя вряд ли они существенно повлияют на его понимание темы.
Вот – [url=https://arma-rehab.ru/vyvod-iz-zapoya/]казино с быстрым выводом[/url]
Наркологическая помощь в Волгограде предназначена для людей, столкнувшихся с проблемами алкогольной или наркотической зависимости. Современный подход к лечению основан на сочетании медицинских, психологических и социальных методов, направленных на полное восстановление пациента. Врачи-наркологи применяют безопасные схемы детоксикации, эффективные медикаменты и программы психотерапевтической поддержки, позволяющие достичь устойчивой ремиссии и вернуть пациента к нормальной жизни.
Узнать больше – [url=https://narkologicheskaya-pomoshh-v-volgograde17.ru/]наркологическая психиатрическая помощь[/url]
Статья содержит данные с сомнительной актуальностью и факты, лишённые чёткой взаимосвязи, но знакомит читателя с разными мнениями, пусть и без глубокого влияния.
Дополнительная информация – [url=https://stop-zavisimost.ru/blog/chto-takoe-mefedron-kak-ego-upotreblyayut-posledstviya-i-sposoby-lecheniya-zavisimosti.html]займы до зарплаты[/url]
Капельница — основной инструмент для очищения организма от продуктов распада этанола. Состав раствора подбирается строго индивидуально. В таблице приведены примеры комплексов, применяемых специалистами клиники «Трезвая Линия Волгоград».
Получить дополнительную информацию – [url=https://vyvod-iz-zapoia-v-volgograde17.ru/]наркологический вывод из запоя волгоград[/url]
1win qeydiyyat bonusu [url=https://www.1win5762.help]1win qeydiyyat bonusu[/url]
Стационар наркологической клиники в Раменском ориентирован на тех пациентов, для которых домашние попытки лечения объективно опасны. Это длительные запои, пожилой возраст, выраженные сердечно-сосудистые патологии, заболевания печени и почек, риск делирия, судорог, тяжёлая абстиненция, полинаркомания. В стационаре «Трезвый Шаг Раменское» организовано круглосуточное наблюдение: контролируются давление, пульс, сатурация, поведение, динамика симптомов, проводится своевременная коррекция терапии. Пациент находится в спокойной, защищённой обстановке, где ему не нужно скрывать своё состояние или оправдываться — задача команды не судить, а стабилизировать и лечить. Комфортные палаты, медицинский персонал рядом, продуманное питание, конфиденциальность — всё это снижает уровень страха у пациента и напряжение у родственников. Важный момент: стационар не подаётся как «камерный режим», а как безопасная зона восстановления, где можно пройти самый тяжёлый участок пути с максимальной защитой.
Исследовать вопрос подробнее – http://narkologicheskaya-klinika-ramenskoe10.ru/
Клиника в Коломне ориентирована на полный цикл помощи: от экстренных состояний до длительного сопровождения. Здесь важна не только медицинская составляющая, но и человеческая: уважение, конфиденциальность, отсутствие стигмы. Ниже — ключевые направления, которые выстраиваются в единую систему лечения, а не существуют по отдельности.
Детальнее – [url=https://narkologicheskaya-klinika-kolomna10.ru/]заказать звонок наркологическая клиника[/url]
Как подчёркивает специалист ФГБУ «НМИЦ психиатрии и наркологии», «без участия квалифицированной команды невозможно обеспечить комплексный подход к пациенту, особенно если речь идёт о длительном стаже употребления и осложнённой картине заболевания». Отсюда следует — изучение состава персонала должно быть одним из первых шагов.
Подробнее можно узнать тут – https://lechenie-alkogolizma-murmansk0.ru/
Вывод из запоя требуется тогда, когда организм уже не способен самостоятельно справиться с последствиями алкогольной интоксикации. Длительное употребление спиртного приводит к нарушению работы внутренних органов, обезвоживанию и психическим расстройствам. Медицинская помощь помогает избежать опасных осложнений и облегчить процесс отказа от алкоголя.
Получить дополнительную информацию – [url=https://vyvod-iz-zapoya-v-ryazani17.ru/]вывод из запоя вызов на дом[/url]
Выездной наркологический сервис «МедПоволжье Клиник» создан для случаев, когда важны скорость, тишина и клиническая точность. Мы проводим детоксикацию и снятие интоксикации на дому так, чтобы каждое действие имело цель, измеримый маркер и заранее оговорённое «окно переоценки». Вместо «сильной капельницы на всякий случай» — модульная схема: один симптом-кластер > один медицинский модуль > одна поведенческая опора (свет, звук, вода малыми глотками, дыхание 4–6). Такой подход снижает лекарственную нагрузку, ускоряет стабилизацию и позволяет видеть прогресс буквально по часам.
Подробнее – [url=https://narkolog-na-dom-saratov0.ru/]врач нарколог на дом[/url]
Для пациентов, нуждающихся в полном погружении в лечебный процесс, в клинике предусмотрен круглосуточный стационар. Палаты — индивидуальные и на два человека, оборудованы современной мебелью, кондиционерами и телевизорами. Организовано сбалансированное питание с возможностью коррекции по медицинским показаниям. Пациенты ежедневно проходят процедуры, сессии и получают консультации. В свободное время организуются арт-занятия, йога, дыхательные практики. Такой режим позволяет не только восстановить физическое здоровье, но и снизить уровень тревожности, вернуть интерес к жизни и стимулировать мотивацию к выздоровлению.
Разобраться лучше – [url=https://lechenie-narkomanii-novokuzneczk0.ru/]лечение наркомании кодирование новокузнецк[/url]
Лечение наркомании в Твери представляет собой сложный и многоэтапный процесс, направленный на полное восстановление здоровья и социальной адаптации пациентов, страдающих от зависимости. В наркологической клинике «Ренессанс» применяется комплексный подход, который учитывает как физиологические, так и психологические аспекты заболевания, что обеспечивает максимальную эффективность терапии.
Подробнее можно узнать тут – [url=https://lechenie-narkomanii-tver0.ru/]запой лечение наркомания в твери[/url]
Эти методы используются в комплексе и создают прочный фундамент для восстановления здоровья.
Получить дополнительные сведения – [url=https://lechenie-alkogolizma-omsk0.ru/]лечение алкоголизма на дому омск[/url]
1win az hesabı necə açmaq [url=http://1win5762.help/]http://1win5762.help/[/url]
Выбор клиники — задача не только медицинская, но и стратегическая. Учитывать нужно не только наличие лицензии, но и содержание программ, их гибкость, участие родственников в процессе, а также прозрачность взаимодействия с пациентом. Именно эти аспекты позволяют отличить профессиональное учреждение от формального.
Подробнее тут – [url=https://narkologicheskaya-klinika-yaroslavl0.ru/]бесплатная наркологическая клиника в ярославле[/url]
Вывод из запоя — это не «волшебная капельница», а последовательная медицинская программа с чёткими целями и измеримыми маркерами. В наркологической клинике «СаратовМед Профи» маршрут строится по принципу управляемых окон: на каждом шаге команда преследует одну цель, меняет лишь один параметр и оценивает результат в заранее назначённый момент. Такой подход снижает лекарственную нагрузку, предотвращает «гонку дозировок» и делает динамику предсказуемой для пациента и близких. Конфиденциальность обеспечивается регламентом: немаркированные выезды, нейтральные формулировки в документах, «тихие» каналы связи, доступ к записям — строго по ролям.
Подробнее тут – https://vyvod-iz-zapoya-saratov0.ru/vyvod-iz-zapoya-saratov-na-domu
Такая комплексность обеспечивает воздействие на физические, психологические и социальные факторы зависимости.
Получить дополнительную информацию – [url=https://lechenie-alkogolizma-omsk0.ru/]нарколог лечение алкоголизма в омске[/url]
Благодаря комплексному подходу достигается не только снятие симптомов, но и долгосрочная стабилизация состояния пациента.
Изучить вопрос глубже – [url=https://narkologicheskaya-pomoshh-v-volgograde17.ru/]частная наркологическая помощь в волгограде[/url]
Процесс детоксикации состоит из нескольких последовательных шагов, направленных на безопасное очищение организма. Ниже представлена таблица с описанием этапов, которые применяются в клинике «Трезвая Линия Волгоград».
Исследовать вопрос подробнее – [url=https://vyvod-iz-zapoia-v-volgograde17.ru/]вывод из запоя в стационаре волгоград[/url]
Важное отличие клиники — отказ от примитивной схемы «капельница — домой — дальше сам». Такой формат даёт кратковременное облегчение, но не решает ни причин, ни структуры зависимости. «КоломнаМед Центр» выстраивает ступенчатый подход. Первый шаг — безопасная детоксикация: снятие абстиненции, коррекция водно-электролитного баланса, поддержка сердечно-сосудистой системы, печени, нервной системы, нормализация сна. Второй шаг — стабилизация: оценка психического состояния, выявление тревожных, депрессивных и панических симптомов, подбор поддерживающих схем, которые помогают не сорваться сразу после выхода из острых проявлений. Третий шаг — реабилитация и мотивация: психотерапевтическая работа, групповые и индивидуальные форматы, обучение навыкам трезвой жизни, работа с триггерами, укрепление внутренней мотивации. Четвёртый шаг — постреабилитационная поддержка: контрольные приёмы, дистанционные консультации, помощь в профилактике срывов. Такой комплексный путь не ломает пациента, а возвращает ему контроль: не через страх, а через понимание, структуру и реальные инструменты.
Получить больше информации – [url=https://narkologicheskaya-klinika-kolomna10.ru/]наркологическая клиника коломна[/url]
Своевременное обращение в клинику снижает риск развития алкогольного психоза, судорог и тяжёлых осложнений со стороны сердца и печени.
Узнать больше – https://vyvod-iz-zapoya-v-ryazani17.ru/vyvod-iz-zapoya-na-domu-ryazan-czeny/
Правильный подбор лекарственных средств позволяет не только уменьшить проявления синдрома отмены, но и стабилизировать эмоциональное состояние пациента, снижая риск срывов. Реабилитационные программы включают физиотерапию, спортивные занятия и коррекцию образа жизни, что способствует полноценному восстановлению организма.
Подробнее можно узнать тут – http://lechenie-narkomanii-tver0.ru/klinika-lechenie-narkomanii-v-tveri/
Капельницы в «СаратовМед Профи» — это конструктор из тщательно подобранных модулей. Каждый модуль решает одну задачу и имеет свой ожидаемый горизонт эффекта. Важно не название, а логика: задача > опора среды > как проверяем > когда ждём результат.
Детальнее – [url=https://vyvod-iz-zapoya-saratov0.ru/]вывод из запоя на дому цена саратов[/url]
Публикация предлагает набор слабо связанных идей, которые сложно применить на практике, лишь слегка затрагивая разные точки зрения.
Дополнительная информация – [url=https://stop-zavisimost.ru/blog/chto-takoe-mefedron-kak-ego-upotreblyayut-posledstviya-i-sposoby-lecheniya-zavisimosti.html]экспресс займ[/url]
Клиника «Трезвый Шаг Раменское» выстраивает помощь так, чтобы пациент и его близкие не метались между разными службами и частными «специалистами», а получали комплекс услуг в одном месте. Это особенно важно для тех, кто уже сталкивался с провалами после разовых кодировок, неподходящих капельниц или формальной «помощи».
Получить дополнительные сведения – http://narkologicheskaya-klinika-ramenskoe10.ru
Наркозависимость — это не просто вредная привычка, а тяжёлое хроническое заболевание, требующее комплексного и последовательного лечения. В клинике «РеабКузбасс» в Новокузнецке разработаны персонализированные программы помощи, учитывающие медицинские, психологические и социальные аспекты проблемы. Каждому пациенту подбирается уникальный маршрут восстановления, начиная с первичной диагностики и заканчивая адаптацией к жизни без наркотиков. Поддержка оказывается круглосуточно, с полным соблюдением конфиденциальности. Психотерапевты и врачи работают в тесной связке, чтобы не только устранить физическую зависимость, но и восстановить личность пациента, вернуть ему мотивацию к жизни и уверенность в будущем.
Изучить вопрос глубже – http://lechenie-narkomanii-novokuzneczk0.ru/reabilitacziya-narkomana-novokuzneczk/https://lechenie-narkomanii-novokuzneczk0.ru
Благодаря широкому выбору методик специалисты клиники могут подобрать оптимальную схему для каждого пациента, учитывая не только медицинские, но и психологические особенности. Такой индивидуальный подход повышает эффективность лечения и снижает риск повторных срывов.
Выяснить больше – [url=https://kodirovanie-ot-alkogolizma-v-volgograde17.ru/]кодирование от алкоголизма цена адреса в волгограде[/url]
Публикация предлагает набор слабо связанных идей, которые сложно применить на практике, лишь слегка затрагивая разные точки зрения.
Дополнительная информация – [url=https://stop-zavisimost.ru/blog/chto-takoe-mefedron-kak-ego-upotreblyayut-posledstviya-i-sposoby-lecheniya-zavisimosti.html]инвестиции в крипту[/url]
Вывод из запоя в Тюмени — это медицинская процедура, направленная на устранение алкогольной интоксикации и восстановление нормального функционирования организма. Длительное употребление спиртных напитков приводит к нарушению обмена веществ, обезвоживанию, сбоям в работе печени и сердца. В таких случаях требуется профессиональная помощь врача-нарколога, который подберёт оптимальный способ дезинтоксикации и медикаментозной поддержки. Современные методики позволяют провести вывод из запоя безопасно, эффективно и без осложнений.
Подробнее – https://vyvod-iz-zapoya-v-tyumeni17.ru/vyvod-iz-zapoya-v-staczionare-tyumen
В случаях запоя, острого отравления или абстинентного синдрома выездная наркологическая бригада оказывает помощь прямо на месте. Специалисты приезжают в течение 30 минут после обращения и проводят оценку состояния пациента, экстренное введение лекарств, инфузионную терапию и психологическую поддержку. Благодаря специальной комплектации мобильной бригады, лечение на дому возможно даже при умеренной степени осложнений. Врач также может при необходимости провести экспресс-анализы и дать рекомендации родственникам по дальнейшему уходу.
Выяснить больше – http://narkologicheskaya-klinika-novokuzneczk0.ru/narkolog-v-gorode-novokuzneczke/
Москва — это масштабный город с глубокими традициями.
Город органично соединяет историческое наследие и современную инфраструктуру.
Здесь находятся крупные компании и культурные учреждения.
Москва предлагает большой выбор для профессионального роста и обучения.
https://www.myminifactory.com/users/sandye2776
Город славится удобной логистикой.
Парки и зеленые зоны формируют уют в ритме мегаполиса.
Каждый район сохраняет уникальную атмосферу.
В результате Москва остается центром притяжения для развития.
Нужна срочная помощь при алкогольном отравлении или запое? Вызовите нарколога на дом в Иркутске! Квалифицированная помощь нарколога на дому: диагностика, капельница, стабилизация состояния. Круглосуточный выезд нарколога, анонимность и снижение рисков – с «ТрезвоМед». Самостоятельный отказ невозможен? Необходима наркологическая помощь. Васильев: «Не затягивайте с помощью при алкогольном отравлении!».
Исследовать вопрос подробнее – [url=https://narcolog-na-dom-v-irkutske0.ru/]narkolog na dom [/url]
Процедура начинается с обследования пациента: врач измеряет давление, частоту пульса, оценивает степень интоксикации и состояние внутренних органов. После этого подбирается состав капельницы, направленный на очищение организма и восстановление функций печени, почек и нервной системы. Все препараты вводятся внутривенно, что обеспечивает быстрый эффект и минимизирует нагрузку на желудочно-кишечный тракт.
Получить больше информации – [url=https://vyvod-iz-zapoya-v-tyumeni17.ru/]вывод из запоя в стационаре тюмень[/url]
Одним из ключевых преимуществ «КузбассМед» является современная материально-техническая база. В клинике задействованы устройства для точного мониторинга жизненных функций, автоматические инфузионные системы, экспресс-диагностические модули и оборудование для неотложной терапии. Врачи используют программируемые дозаторы, портативные анализаторы крови и аппараты для оценки дыхательной функции, что позволяет своевременно корректировать тактику лечения без потерь времени. Все процедуры соответствуют национальным стандартам безопасности и рекомендациям ВОЗ.
Подробнее тут – [url=https://narkologicheskaya-klinika-novokuzneczk0.ru/]запой наркологическая клиника новокузнецк[/url]
Перед тем как показать примерные программы, важно подчеркнуть: реальный план всегда персонализируется, но понимание базовых форматов помогает семье и пациенту не теряться в терминах и сразу видеть логику.
Узнать больше – [url=https://narkologicheskaya-klinika-kolomna2-10.ru/]narkologicheskaya-klinika-kolomna2-10.ru/[/url]
Чтобы родственники не терялись в терминах и не воспринимали лечение как «чёрный ящик», в клинике используется поэтапный подход. Это помогает увидеть логическую связку между затратами, процедурами и результатами.
Получить больше информации – [url=https://narkologicheskaya-klinika-ramenskoe10.ru/]наркологическая клиника на дому[/url]
Основные этапы обычно включают:
Подробнее тут – http://vyvod-iz-zapoya-ramenskoe10.ru
Вывод из запоя — это медицинская процедура, направленная на очищение организма от продуктов распада алкоголя и восстановление нормальной работы внутренних органов. В клинике «Трезвый Путь Волгоград» пациентам оказывается профессиональная помощь с использованием современных методов дезинтоксикации, медикаментозной поддержки и психологического сопровождения. Лечение проводится круглосуточно, включая выезд нарколога на дом. Такой формат помогает быстро стабилизировать состояние пациента, минимизировать риск осложнений и обеспечить безопасность при выходе из запоя любой продолжительности.
Получить дополнительную информацию – [url=https://vivod-iz-zapoya-v-volgograde17.ru/]вывод из запоя на дому цена в волгограде[/url]
Нарколог на дом в Уфе — это услуга, которая позволяет получить квалифицированную медицинскую помощь при алкогольной или наркотической интоксикации без необходимости госпитализации. Такой формат особенно востребован при запойных состояниях, когда пациент не может самостоятельно посетить клинику. Врач приезжает по вызову в течение короткого времени, проводит обследование, устанавливает капельницу и обеспечивает безопасный вывод из состояния опьянения. Все процедуры выполняются анонимно, с соблюдением медицинской этики и конфиденциальности.
Ознакомиться с деталями – [url=https://narkolog-na-dom-v-ufe17.ru/]врач нарколог на дом[/url]
Мы не используем универсальную «капельницу». Схема собирается из модулей под ведущие жалобы. Медицинские шаги всегда сочетаются с нефраком опорами — свет, тишина, вода малыми глотками, дыхание, — потому что среда усиливает действие препаратов и позволяет держать дозы ниже.
Получить больше информации – [url=https://narkolog-na-dom-saratov0.ru/]психиатр нарколог на дом в саратове[/url]
Стационар «Трезвый Путь Коломна» ориентирован на безопасность в самых сложных случаях: длительные запои, тяжёлая абстиненция, смешанное употребление, выраженные соматические проблемы, риск делирия или судорог. Пациент попадает под наблюдение 24/7, что принципиально отличает клинику от домашних попыток «спасти своими средствами». Контроль жизненно важных показателей, своевременная коррекция схем лечения, возможность быстро отреагировать на осложнения — всё это снижает риск критических ситуаций, которые часто возникают именно после неумелых домашних вмешательств или «выездов без ответственности».
Подробнее тут – http://narkologicheskaya-klinika-kolomna2-10.ru/luchshie-narkologicheskie-kliniki-v-kolomne/
Статья содержит данные с сомнительной актуальностью и факты, лишённые чёткой взаимосвязи, но знакомит читателя с разными мнениями, пусть и без глубокого влияния.
Дополнительная информация – [url=https://stop-zavisimost.ru/]казино с быстрым выводом[/url]
Когда человек в запое, близким кажется, что всё ещё можно решить «по-тихому»: выспаться, отпаять водой, дать обезболивающее или «успокоительное» и дождаться, пока станет легче. На практике это часто приводит к обратному результату. Алкогольная интоксикация нарушает водно-электролитный баланс, сгущает кровь, повышает нагрузку на сердце, провоцирует скачки давления, ухудшает работу печени и нервной системы. Неконтролируемый приём снотворных, анальгетиков, транквилизаторов, особенно вместе с алкоголем, способен вызвать угнетение дыхания, аритмии, судороги или делирий. Домашняя обстановка не даёт возможности следить за всеми показателями и вовремя отреагировать. «РаменМед Трезвость» предлагает клинически выверенный вывод из запоя в Раменском с учётом возраста, длительности употребления, хронических заболеваний, перенесённых ранее осложнений. Здесь не применяют сомнительные схемы «усыпить, чтобы не мешал», а ставят задачу: безопасно пройти острую фазу, снять интоксикацию, стабилизировать давление и пульс, защитить сердце и мозг, снизить риск психозов и, при желании пациента, сразу наметить маршрут реального лечения зависимости. Такой подход снимает с родственников опасную «роль врача» и возвращает ситуацию туда, где ей место — под контроль профессионалов.
Детальнее – [url=https://vyvod-iz-zapoya-ramenskoe10.ru/]vyvod-iz-zapoya-na-domu-deshevo[/url]
Во многих случаях пациент или его родственники не решаются сразу вызвать врача. Для таких ситуаций предусмотрена услуга онлайн-консультации. Она проводится через защищённую видеосвязь, при желании — анонимно. На связи — врач-нарколог или психиатр, который отвечает на вопросы, оценивает ситуацию по визуальным и вербальным признакам, рекомендует план действий. Консультация может стать отправной точкой для дальнейшего вызова врача на дом или записи в клинику. Это особенно удобно для родственников, которые не знают, как подступиться к проблеме и убедить человека в необходимости помощи.
Выяснить больше – http://narkologicheskaya-pomoshh-tver0.ru/
Материал включает занимательные, но незначимые детали, которые трудно назвать важными, но они дополняют общую картину.
Дополнительная информация – [url=https://stop-zavisimost.ru/blog/chto-takoe-mefedron-kak-ego-upotreblyayut-posledstviya-i-sposoby-lecheniya-zavisimosti.html]казино с быстрым выводом[/url]
сделать аудит сайта цена [url=https://prodvizhenie-sajtov-v-moskve115.ru/]сделать аудит сайта цена[/url] .
Когда запой начинает угрожать здоровью, оперативное вмешательство становится жизненно необходимым. В Туле опытные специалисты оказывают помощь на дому, позволяя начать лечение сразу же в комфортной обстановке. Такой формат терапии обеспечивает оперативную детоксикацию, восстановление нормального обмена веществ и стабилизацию работы внутренних органов, что особенно важно для пациентов, желающих избежать лишнего стресса и сохранить конфиденциальность.
Узнать больше – http://vyvod-iz-zapoya-tula0.ru
Каждый этап проходит под контролем врачей-наркологов и психотерапевтов, что гарантирует эффективность и безопасность лечения.
Получить больше информации – http://narcologicheskaya-klinika-v-novokuzneczke17.ru/
Капельница не просто устраняет симптомы похмелья — она восстанавливает внутренний баланс, снижает токсическую нагрузку и поддерживает работу жизненно важных органов. После процедуры пациент чувствует прилив сил, прояснение сознания и эмоциональную стабильность. Эффект закрепляется при соблюдении рекомендаций врача и отказе от алкоголя в последующие дни.
Подробнее можно узнать тут – https://vivod-iz-zapoya-v-volgograde17.ru/anonimnaya-narkologiya-vyvod-iz-zapoya-volgograd/
Публикация предлагает набор слабо связанных идей, которые сложно применить на практике, лишь слегка затрагивая разные точки зрения.
Дополнительная информация – [url=https://stop-zavisimost.ru/]экспресс займ[/url]
продвижения сайта в google [url=https://prodvizhenie-sajtov-v-moskve119.ru/]продвижения сайта в google[/url] .
Процесс включает несколько шагов:
Ознакомиться с деталями – [url=https://narkolog-na-dom-v-ufe17.ru/]narkolog-na-dom-v-ufe17.ru/[/url]
В клинике «Альтернатива» применяются современные методы терапии, включающие медикаментозное лечение, психотерапию и социальную реабилитацию.
Разобраться лучше – [url=https://narkologicheskaya-pomoshh-novokuzneczk0.ru/]центр наркологической помощи в новокузнецке[/url]
Выбор клиники — задача не только медицинская, но и стратегическая. Учитывать нужно не только наличие лицензии, но и содержание программ, их гибкость, участие родственников в процессе, а также прозрачность взаимодействия с пациентом. Именно эти аспекты позволяют отличить профессиональное учреждение от формального.
Углубиться в тему – http://narkologicheskaya-klinika-yaroslavl0.ru/lechenie-narkomanii-i-alkogolizma-yaroslavl/
Особенность подхода заключается в сочетании медицинской и психологической поддержки. После кодирования пациент получает консультации психотерапевта, рекомендации по восстановлению и профилактике рецидивов. Это снижает риск повторного срыва и помогает закрепить результат на долгий срок.
Изучить вопрос глубже – https://kodirovanie-ot-alkogolizma-v-volgograde17.ru/kodirovanie-ot-alkogolya-v-volgograde/
Алкогольная интоксикация и запой могут стремительно ухудшить состояние здоровья, став угрозой жизни, поэтому оперативное вмешательство имеет первостепенное значение. В Туле квалифицированные наркологи предоставляют круглосуточную помощь на дому, что позволяет начать лечение незамедлительно и в комфортных условиях. Такой формат терапии гарантирует индивидуальный подход, всестороннюю поддержку и полную конфиденциальность, что особенно важно для пациентов, стремящихся восстановить своё здоровье без лишних стрессовых ситуаций.
Получить больше информации – [url=https://vyvod-iz-zapoya-tula000.ru/]наркология вывод из запоя в туле[/url]
Капельница — основной инструмент для очищения организма от продуктов распада этанола. Состав раствора подбирается строго индивидуально. В таблице приведены примеры комплексов, применяемых специалистами клиники «Трезвая Линия Волгоград».
Разобраться лучше – [url=https://vyvod-iz-zapoia-v-volgograde17.ru/]вывод из запоя на дому круглосуточно в волгограде[/url]
В Волгограде сформирована система оказания наркологической помощи, включающая круглосуточные выезды специалистов, амбулаторное лечение, стационарные программы и реабилитацию. Такой подход позволяет охватить все категории пациентов — от тех, кто нуждается в экстренной помощи, до тех, кто готов пройти полный курс терапии. Независимо от формы оказания услуг, лечение проводится конфиденциально и в соответствии с медицинскими стандартами.
Подробнее можно узнать тут – http://narkologicheskaya-pomoshh-v-volgograde17.ru
Первый шаг в лечении — это тщательный осмотр специалиста. Наряду с измерением жизненно важных показателей (пульс, артериальное давление, температура) врач проводит сбор анамнеза, выясняя длительность запоя, тип употребляемого алкоголя и наличие сопутствующих заболеваний. Эти данные помогают оценить степень интоксикации и подобрать индивидуальный план терапии, что является ключевым для дальнейшей эффективной детоксикации.
Получить дополнительную информацию – https://vyvod-iz-zapoya-yaroslavl0.ru/vyvod-iz-zapoya-czena-yaroslavl/
Процесс включает следующие шаги:
Ознакомиться с деталями – [url=https://narcologicheskaya-klinika-v-krasnoyarske17.ru/]наркологическая клиника цены[/url]
Острый эпизод запоя — это не «плохое самочувствие», а состояние с реальными рисками для сердца, нервной системы и дыхания, особенно в ночные часы, когда усиливаются вегетативные реакции и тревога. В «НоваТрезвие» мы выстраиваем помощь так, чтобы от звонка до заметного облегчения прошло как можно меньше времени и как можно меньше случайностей: короткое интервью для оценки рисков, выезд врача или приём в клинике, экспресс-диагностика по ключевым показателям, персональная инфузионная схема без «универсальных коктейлей», мягкая коррекция сна и тревоги без «вырубания», понятные инструкции семье на 24–72 часа и план продолжения на ближайшие недели. Мы не скрываемся за общими формулами: решения принимаются по фактическим данным, дозы и темп капельниц подстраиваются к динамике каждые 15–20 минут, а при «красных флагах» перевод в стационар организуется без пауз. Конфиденциальность соблюдается строго, а коммуникация простая и предсказуемая — чтобы вы всегда знали, что происходит сейчас и чего ждать к утру.
Получить дополнительные сведения – https://vyvod-iz-zapoya-ehlektrostal2-10.ru/vyvod-iz-zapoya-na-domu-v-ehlektrostali
1win az virtual oyunlar [url=www.1win5762.help]www.1win5762.help[/url]
Алгоритм организован так, чтобы каждое действие было логичным и предсказуемым. После обращения по телефону врач заранее получает краткую клиническую картину и подбирает набор препаратов с учётом состояния пациента. По прибытии в Долгопрудном нарколог не ставит капельницу «по шаблону», а начинает с осмотра: измеряет давление, пульс, сатурацию, температуру, оценивает тремор, уровень сознания, ориентировку, степень обезвоживания, частоту рвоты, дыхание, возможные боли в груди или животе, обращает внимание на поведение и эмоциональное состояние. Если по результатам осмотра подтверждается, что дом — безопасный формат, подбирается индивидуальная инфузионная схема: объём, скорость введения и препараты зависят от возраста, длительности запоя, сопутствующих болезней и уже использованных медикаментов. Врач остаётся на адресе до завершения основных процедур, контролирует реакцию, при необходимости корректирует план и чётко проговаривает, как пациент должен проводить ближайшие 24–72 часа. Если по ходу работы выявляются признаки угрозы (начальные симптомы делирия, тяжёлые аритмии, нестабильное давление, выраженная дезориентация), нарколог рекомендует стационар и помогает семье организовать перевод. Это честный и безопасный подход: не любой ценой «отработать выезд», а сделать так, чтобы помощь действительно снижала риски.
Подробнее – [url=https://narkolog-na-dom-dolgoprudnij10.ru/]запой нарколог на дом[/url]
Алкогольная интоксикация и запой могут стремительно ухудшить состояние здоровья, став угрозой жизни, поэтому оперативное вмешательство имеет первостепенное значение. В Туле квалифицированные наркологи предоставляют круглосуточную помощь на дому, что позволяет начать лечение незамедлительно и в комфортных условиях. Такой формат терапии гарантирует индивидуальный подход, всестороннюю поддержку и полную конфиденциальность, что особенно важно для пациентов, стремящихся восстановить своё здоровье без лишних стрессовых ситуаций.
Выяснить больше – [url=https://vyvod-iz-zapoya-tula000.ru/]вывод из запоя круглосуточно тула[/url]
Комплексное проведение этих этапов обеспечивает полное восстановление организма и облегчает процесс последующего лечения зависимости.
Подробнее тут – [url=https://vyvod-iz-zapoya-v-ryazani17.ru/]вывод из запоя недорого[/url]
Клиника в Коломне ориентирована на полный цикл помощи: от экстренных состояний до длительного сопровождения. Здесь важна не только медицинская составляющая, но и человеческая: уважение, конфиденциальность, отсутствие стигмы. Ниже — ключевые направления, которые выстраиваются в единую систему лечения, а не существуют по отдельности.
Узнать больше – [url=https://narkologicheskaya-klinika-kolomna10.ru/]наркологическая клиника отзывы[/url]
Материал включает занимательные, но незначимые детали, которые трудно назвать важными, но они дополняют общую картину.
Дополнительная информация – [url=https://stop-zavisimost.ru/]казино с быстрым выводом[/url]
В процессе лечения используются проверенные методики, которые в комплексе обеспечивают положительный эффект и снижают риск рецидива.
Подробнее – https://lechenie-alkogolizma-omsk0.ru/lechenie-narkomanii-i-alkogolizma-v-omske
продвижения сайта в google [url=https://prodvizhenie-sajtov-v-moskve115.ru/]продвижения сайта в google[/url] .
Выбор формата — это не вкусовщина, а баланс безопасности в конкретной клинической картине. Дом уместен, если контакт сохранён, рвота эпизодическая, давление и пульс без резких «качелей», тремор контролируемый, в квартире можно обеспечить тишину и присутствие взрослого, готового наблюдать первые 6–8 часов. Тогда выездная бригада работает на месте и выстраивает «мягкий» маршрут, где сон собирается без агрессивной седации, а инфузии идут с шаговой корректировкой темпа. Стационар предпочтителен при длительном эпизоде (3–5 суток и более), неукротимой рвоте, выраженной слабости, шаткости походки, признаках предделирия/делирия, судорожной готовности, а также у пожилых пациентов и при сочетанных диагнозах — ИБС, гипертония, диабет, хронические болезни печени/почек, неврология. Преимущество отделения — приборный мониторинг, лабораторные опции по показаниям, ночная команда и среда, где исключены лишние раздражители: это снижает «цену ошибки» и делает результат устойчивым, а не разовым «прояснением».
Получить дополнительную информацию – https://vyvod-iz-zapoya-ehlektrostal2-10.ru/vyvod-iz-zapoya-stacionar-v-ehlektrostali
Каждый этап играет важную роль и обеспечивает пациенту необходимую поддержку на пути к трезвой жизни.
Ознакомиться с деталями – [url=https://lechenie-alkogolizma-omsk0.ru/]наркологическое лечение алкоголизма в омске[/url]
Перед процедурой врач оценивает состояние пациента, измеряет давление, пульс и уровень насыщения крови кислородом. После осмотра подбирается состав инфузии, включающий препараты для дезинтоксикации, восстановления водно-солевого баланса и нормализации работы органов. Введение растворов осуществляется внутривенно, под контролем специалиста. Длительность процедуры — от 40 минут до 1,5 часов.
Узнать больше – https://kapelnicza-ot-zapoya-v-volgograde17.ru/kapelnicza-ot-zapoya-stoimost-volgograd
раскрутка и продвижение сайта [url=https://prodvizhenie-sajtov-v-moskve119.ru/]раскрутка и продвижение сайта[/url] .
Лечение наркомании в клинике начинается с диагностики, позволяющей определить степень зависимости, выявить сопутствующие заболевания и выбрать оптимальную тактику терапии. Важным этапом является детоксикация — очищение организма от токсинов и продуктов распада наркотических веществ, что снижает риск осложнений и облегчает последующее восстановление.
Выяснить больше – https://lechenie-narkomanii-tver0.ru/tver-lechenie-alkogolizma/
Такая комплексность обеспечивает воздействие на физические, психологические и социальные факторы зависимости.
Изучить вопрос глубже – [url=https://lechenie-alkogolizma-omsk0.ru/]лечение алкоголизма анонимно омск[/url]
Когда острые угрозы исключены, программа стартует дома. Пациент получает понятную карту действий, близкие — короткие окна обратной связи, врач — чистую «картинку» для тонкой настройки. Мы просим сообщать факты, а не эмоции: минуты до засыпания, число пробуждений, объём тёплой воды малыми глотками, пульс к вечеру, переносимость мягкой пищи, ясность головы утром.
Детальнее – [url=https://vyvod-iz-zapoya-saratov0.ru/]вывод из запоя вызов в саратове[/url]
В таблице представлены основные виды терапии, применяемые в клинике:
Подробнее тут – [url=https://narcologicheskaya-klinika-v-novokuzneczke17.ru/]платная наркологическая клиника новокузнецк[/url]
Как подчёркивает специалист ФГБУ «НМИЦ психиатрии и наркологии», «без участия квалифицированной команды невозможно обеспечить комплексный подход к пациенту, особенно если речь идёт о длительном стаже употребления и осложнённой картине заболевания». Отсюда следует — изучение состава персонала должно быть одним из первых шагов.
Получить дополнительную информацию – http://lechenie-alkogolizma-murmansk0.ru
«ТверьМед» — частная лицензированная клиника, специализирующаяся на наркологической помощи любой степени сложности. Здесь работают неравнодушные врачи-наркологи, психиатры, терапевты и психологи с многолетним стажем. Медицинская команда настроена на оперативную диагностику и проведение первичных мероприятий в течение первого часа после обращения. Упор сделан на доступность: клиника открыта 24/7, приём возможен как на территории медучреждения, так и на выезде — дома, в офисе, гостинице, санатории или любом удобном месте.
Получить больше информации – https://narkologicheskaya-pomoshh-tver0.ru/narkolog-tver-anonimno
Диспетчер уточняет адрес в Электростали, длительность эпизода, текущие препараты и дозы, аллергии, сопутствующие заболевания, последние значения давления/пульса. Это экономит 15–20 минут на месте и позволяет заранее исключить опасные взаимодействия.
Получить дополнительную информацию – [url=https://vyvod-iz-zapoya-ehlektrostal2-10.ru/]vyvod-iz-zapoya-na-domu-cena[/url]
Этот набор информации привлекает мелочами и необычными ракурсами, предлагая взгляды, которые редко бывают полезны, но разнообразят знакомство с темой.
Дополнительная информация – [url=https://stop-zavisimost.ru/]займ без процентов[/url]
Даже телефонный разговор с клиникой может многое сказать о её подходе. Если вам предлагают типовое лечение без уточнения подробностей или избегают вопросов о составе команды, это тревожный сигнал. Серьёзные учреждения в Мурманске обязательно предложат предварительную консультацию, зададут уточняющие вопросы и расскажут, как строится программа помощи.
Разобраться лучше – [url=https://lechenie-alkogolizma-murmansk0.ru/]центр лечения алкоголизма мурманская область[/url]
Метод лечения
Детальнее – [url=https://narkologicheskaya-pomoshh-novokuzneczk0.ru/]наркологическая психиатрическая помощь новокузнецк[/url]
На этом этапе специалист уточняет, сколько времени продолжается запой, какие основные симптомы наблюдаются, и если имеются, то какие хронические заболевания могут влиять на течение терапии. Точный анализ этих данных позволяет сформировать персонализированную стратегию лечения, которая будет максимально адаптирована к состоянию пациента и его потребностям.
Получить больше информации – [url=https://vyvod-iz-zapoya-yaroslavl0.ru/]вывод из запоя капельница в ярославле[/url]
Для иллюстрации эффективности методов представлена таблица с примерами процедур и их воздействием:
Узнать больше – [url=https://narcologicheskaya-klinika-v-krasnoyarske17.ru/]вывод наркологическая клиника в красноярске[/url]
Домашний формат хорош при умеренной выраженности симптомов, сохранённом контакте и возможности обеспечить наблюдение в квартире: тихая комната, взрослый рядом первые 6–8 часов, отсутствие грубой дезориентации и неукротимой рвоты, относительная стабильность АД/ЧСС. В таких условиях выездная бригада «Трезвой Линии» запускает персональную схему: регидратация, выравнивание электролитов, поддержка витаминами группы B и магнием, осторожная седация, чтобы «собрать» сон, не выключая мониторинг. Стационар предпочтителен, если запой длится 3–5 суток и более, отмечаются «качели» показателей, шаткость походки, выраженная слабость, признаки предделирия или судорожной готовности; также при сочетанной соматике (ИБС, гипертония, диабет, хронические болезни печени/почек, неврология) и у пациентов старшего возраста. Преимущество стационара — приборный контроль, тихий режим, щадящее питание, возможность быстро расширять схему без ожидания ухудшений. Мы придерживаемся принципа «минимально достаточно»: ровно столько вмешательств, сколько требует клиническая картина, — так безопаснее и в перспективе экономнее, чем череда домашних «подлаток».
Углубиться в тему – http://vyvod-iz-zapoya-ehlektrostal10.ru
продвижение сайтов во франции [url=https://prodvizhenie-sajtov-v-moskve115.ru/]продвижение сайтов во франции[/url] .
В этих ситуациях выезд нарколога на дом позволяет вовремя скорректировать состояние, а при выявлении опасных признаков — не теряя времени, направить пациента в стационар. Это управляемый маршрут вместо хаотичных решений в последний момент.
Исследовать вопрос подробнее – http://narkolog-na-dom-dolgoprudnij10.ru/vyzvat-narkologa-na-dom-v-dolgoprudnom/https://narkolog-na-dom-dolgoprudnij10.ru
Такая комплексность обеспечивает воздействие на физические, психологические и социальные факторы зависимости.
Выяснить больше – [url=https://lechenie-alkogolizma-omsk0.ru/]лечение алкоголизма в омске[/url]
продвижение в google [url=https://prodvizhenie-sajtov-v-moskve119.ru/]продвижение в google[/url] .
Терапия проводится поэтапно, что позволяет пациенту последовательно проходить все стадии восстановления и закреплять результат.
Получить дополнительные сведения – [url=https://lechenie-alkogolizma-omsk0.ru/]лечение алкоголизма кодирование[/url]
Клиника «Трезвый Шаг Раменское» выстраивает помощь так, чтобы пациент и его близкие не метались между разными службами и частными «специалистами», а получали комплекс услуг в одном месте. Это особенно важно для тех, кто уже сталкивался с провалами после разовых кодировок, неподходящих капельниц или формальной «помощи».
Ознакомиться с деталями – https://narkologicheskaya-klinika-ramenskoe10.ru/narkologicheskaya-klinika-otzyvy-v-ramenskom
Кодирование от алкоголизма — это медицинская процедура, направленная на формирование устойчивого отвращения к спиртному и восстановление контроля над зависимым поведением. В клинике «ВолгоградМед Альянс» используются современные, научно обоснованные методы, которые позволяют не просто временно ограничить тягу, а глубоко перестроить психологические и биохимические механизмы зависимости. Каждая программа подбирается индивидуально, с учётом стажа употребления, состояния здоровья, мотивации и психоэмоционального фона пациента. Врачи обеспечивают анонимность, безопасность и круглосуточную поддержку, помогая восстановить не только физическое состояние, но и внутреннее равновесие.
Узнать больше – [url=https://kodirovanie-ot-alkogolizma-v-volgograde17.ru/]как происходит кодирование от алкоголизма[/url]
Врач уточняет, как долго продолжается запой, какой алкоголь употребляется, а также наличие сопутствующих заболеваний. Этот тщательный анализ позволяет оперативно подобрать оптимальные методы детоксикации и снизить риск осложнений.
Подробнее можно узнать тут – https://vyvod-iz-zapoya-tula0.ru/vyvod-iz-zapoya-anonimno-tula/
Своевременная постановка капельницы помогает избежать тяжёлых последствий запоя. Поводом для обращения к врачу являются симптомы выраженной интоксикации:
Получить дополнительную информацию – [url=https://kapelnicza-ot-zapoya-v-volgograde17.ru/]капельница от запоя анонимно[/url]
Маршрут выстроен без пауз и импровизаций. Сначала — короткое интервью по телефону: адрес в Электростали, длительность эпизода, лекарства/дозировки, аллергии, важные диагнозы, последние значения давления и пульса. Это экономит 15–20 минут на месте и позволяет заранее исключить опасные взаимодействия. По прибытии врач фиксирует АД, ЧСС, сатурацию, температуру, оценивает неврологический статус, степень обезвоживания, выраженность тремора/тошноты, уровень тревоги, кратко собирает анамнез последних суток. Затем стартует инфузионная терапия: растворы для регидратации и коррекции электролитов, поддержка витаминами группы B и магнием; по показаниям — гепатопротекторы и антиоксиданты, противорвотные, мягкие анксиолитики. Каждые 15–20 минут врач смотрит динамику и корректирует темп капельниц, питьевой режим, симптоматическую поддержку. Важный принцип — «сон без вырубания»: умеренная седация собирает ночной ритм, сохраняя информативность мониторинга. По завершении — письменные рекомендации и маршрут на 24–72 часа (сон, питание, запреты, «красные флаги», амбулаторные визиты/дневной стационар или перевод в отделение). Такой алгоритм заменяет «лотерею» результата управляемым и повторяемым планом.
Выяснить больше – http://vyvod-iz-zapoya-ehlektrostal10.ru
Современная наркологическая клиника — это не просто медицинское учреждение, а пространство комплексной помощи, где врачи помогают человеку восстановиться физически, психологически и социально. В клинике «РязаньМед Альянс» создана система непрерывного наблюдения, включающая диагностику, выведение из запоя, детоксикацию, кодирование и постреабилитационную поддержку. Здесь работают квалифицированные наркологи, психиатры и терапевты, а помощь оказывается круглосуточно — как в стационаре, так и на дому. Главная цель специалистов — вернуть пациенту контроль над своим состоянием и избавить от зависимости без стресса и боли.
Получить дополнительные сведения – http://narkologicheskaya-klinika-v-ryazani17.ru
заказать анализ сайта [url=https://prodvizhenie-sajtov-v-moskve115.ru/]заказать анализ сайта[/url] .
Главная задача процедуры — быстрое выведение этанола и его метаболитов из организма, нормализация уровня электролитов, улучшение самочувствия и предотвращение осложнений. Лечение проводится как в клинике, так и на дому, что особенно удобно при тяжёлых состояниях, когда пациент не может самостоятельно добраться до медицинского учреждения.
Получить больше информации – [url=https://vyvod-iz-zapoya-v-tyumeni17.ru/]скорая вывод из запоя в тюмени[/url]
Особенность подхода заключается в сочетании медицинской и психологической поддержки. После кодирования пациент получает консультации психотерапевта, рекомендации по восстановлению и профилактике рецидивов. Это снижает риск повторного срыва и помогает закрепить результат на долгий срок.
Выяснить больше – [url=https://kodirovanie-ot-alkogolizma-v-volgograde17.ru/]кодирование от алкоголизма цена волгоград[/url]
Комплексный вывод из запоя в Туле организован по отлаженной схеме, состоящей из нескольких этапов, каждый из которых направлен на безопасное и эффективное восстановление организма.
Получить дополнительную информацию – [url=https://vyvod-iz-zapoya-tula000.ru/]вывод из запоя в туле[/url]
Город живёт в разных темпах: плотный центр, мостовые переходы, набережная, спальные районы. Мы строим маршрут так, чтобы не привлекать внимания соседей и не терять время на трафик. Если на предзвонке отмечаются «красные флаги» — давящая боль в груди, выраженная одышка, спутанность сознания, судороги, неукротимая рвота или резкое падение насыщения кислородом, — команда instantly переключает маршрут в стационарный «коридор»: палата резервируется заранее, документы оформляются нейтрально, транспорт — немаркированный. Если угроз нет, всё начинается на дому с адресной детокс-схемы и мягкой сенсорной поддержкой.
Выяснить больше – [url=https://narkolog-na-dom-saratov0.ru/]вызвать врача нарколога на дом саратов[/url]
комплексное продвижение сайтов москва [url=https://prodvizhenie-sajtov-v-moskve119.ru/]комплексное продвижение сайтов москва[/url] .
Тем, кто нуждается в длительной терапии, «КузбассМед» предлагает комфортные условия стационара с круглосуточным наблюдением. Здесь пациенты размещаются в индивидуальных палатах, проходят курсы терапии, реабилитации и психокоррекции. Обстановка в клинике напоминает оздоровительный центр: мягкое освещение, тишина, доступ к библиотеке, возможность общения с психологом и ежедневное участие в восстановительных мероприятиях. Медицинские сестры и врачи находятся на дежурстве 24/7, что позволяет немедленно реагировать на любые изменения в состоянии пациента.
Подробнее можно узнать тут – [url=https://narkologicheskaya-klinika-novokuzneczk0.ru/]наркологические клиники алкоголизм новокузнецк[/url]
Mindful play is a key element of a safe entertainment experience.
It allows people to stay in control while enjoying interactive activities.
Establishing clear limits minimizes negative outcomes.
Responsible play also encourages better decision-making.
sweepstakes arcade games online
By managing time and budget, players can avoid stress.
This approach builds a positive long-term experience.
Awareness of personal habits makes a real difference.
As a result, responsible gaming helps preserve fun for everyone.
Алкогольная интоксикация и запой могут стремительно ухудшить состояние здоровья, став угрозой жизни, поэтому оперативное вмешательство имеет первостепенное значение. В Туле квалифицированные наркологи предоставляют круглосуточную помощь на дому, что позволяет начать лечение незамедлительно и в комфортных условиях. Такой формат терапии гарантирует индивидуальный подход, всестороннюю поддержку и полную конфиденциальность, что особенно важно для пациентов, стремящихся восстановить своё здоровье без лишних стрессовых ситуаций.
Углубиться в тему – [url=https://vyvod-iz-zapoya-tula000.ru/]вывод из запоя на дому круглосуточно тула[/url]
Не всегда человек способен прекратить употребление алкоголя без медицинского вмешательства. Чем дольше длится запой, тем выше риск осложнений. Обратиться к специалисту следует при появлении следующих признаков:
Подробнее тут – [url=https://vyvod-iz-zapoya-v-tyumeni17.ru/]вывод из запоя на дому тюмень[/url]
Важное отличие наркологической клиники «Трезвый Путь Коломна» — полный отказ от схемы «одна капельница = решение всех проблем». Детокс здесь рассматривается как необходимый старт, но не как финальная точка. Сначала специалисты снимают острые состояния: вывод из запоя, купирование абстиненции, коррекцию водно-электролитного баланса, поддержку сердца, печени и нервной системы, нормализацию сна, снижение тревоги. Когда организм перестаёт «гореть», начинается следующий этап — стабилизация: врач оценивает психическое состояние, выявляет депрессивные, тревожные, панические проявления, подбирает поддерживающие схемы, которые помогают удержаться в первые недели после кризиса. Далее подключаются психотерапевтические инструменты: индивидуальные консультации, работа с мотивацией, разбор триггеров, формирование новых привычек. В финале выстраивается маршрут поддержки: амбулаторное наблюдение, связь с клиникой, рекомендации для семьи. Такой поэтапный подход делает клинику в Коломне местом, где зависимость перестают воспринимать как «стыд» и начинают воспринимать как задачу, с которой можно работать профессионально.
Ознакомиться с деталями – http://narkologicheskaya-klinika-kolomna2-10.ru/narkologicheskaya-klinika-oficialnyj-sajt-v-kolomne/
Сразу после поступления вызова нарколог прибывает на дом для проведения детального первичного осмотра. Врач собирает краткий анамнез, измеряет жизненно важные показатели, такие как пульс, артериальное давление и температура, и оценивает степень интоксикации. Эта информация является фундаментом для разработки индивидуального плана терапии, который учитывает особенности состояния пациента.
Подробнее можно узнать тут – [url=https://vyvod-iz-zapoya-tula000.ru/]нарколог вывод из запоя в туле[/url]
Процедура начинается с обследования пациента: врач измеряет давление, частоту пульса, оценивает степень интоксикации и состояние внутренних органов. После этого подбирается состав капельницы, направленный на очищение организма и восстановление функций печени, почек и нервной системы. Все препараты вводятся внутривенно, что обеспечивает быстрый эффект и минимизирует нагрузку на желудочно-кишечный тракт.
Выяснить больше – https://vyvod-iz-zapoya-v-tyumeni17.ru/vyvod-iz-zapoya-v-staczionare-tyumen
В случаях запоя, острого отравления или абстинентного синдрома выездная наркологическая бригада оказывает помощь прямо на месте. Специалисты приезжают в течение 30 минут после обращения и проводят оценку состояния пациента, экстренное введение лекарств, инфузионную терапию и психологическую поддержку. Благодаря специальной комплектации мобильной бригады, лечение на дому возможно даже при умеренной степени осложнений. Врач также может при необходимости провести экспресс-анализы и дать рекомендации родственникам по дальнейшему уходу.
Получить дополнительные сведения – https://narkologicheskaya-klinika-novokuzneczk0.ru/narkologicheskij-czentr-novokuzneczk/
1win qeydiyyat [url=http://1win5762.help]http://1win5762.help[/url]
Эти методы используются в комплексе и создают прочный фундамент для восстановления здоровья.
Получить дополнительную информацию – [url=https://lechenie-alkogolizma-omsk0.ru/]лечение алкоголизма анонимно омск[/url]
Тем, кто нуждается в длительной терапии, «КузбассМед» предлагает комфортные условия стационара с круглосуточным наблюдением. Здесь пациенты размещаются в индивидуальных палатах, проходят курсы терапии, реабилитации и психокоррекции. Обстановка в клинике напоминает оздоровительный центр: мягкое освещение, тишина, доступ к библиотеке, возможность общения с психологом и ежедневное участие в восстановительных мероприятиях. Медицинские сестры и врачи находятся на дежурстве 24/7, что позволяет немедленно реагировать на любые изменения в состоянии пациента.
Углубиться в тему – http://narkologicheskaya-klinika-novokuzneczk0.ru/
В таблице представлены основные виды терапии, применяемые в клинике:
Изучить вопрос глубже – [url=https://narcologicheskaya-klinika-v-novokuzneczke17.ru/]наркологическая клиника в новокузнецке[/url]
Наркологическая клиника «Трезвый Путь Коломна» — это пространство, где тяжёлые истории зависимости перестают быть хаотичным набором срывов, ночных обещаний и беспомощных попыток родных «вытащить своими силами». Здесь собраны врачи-наркологи, терапевты, психологи и медперсонал, которые знают, что такое длительные запои, многолетнее употребление, полинаркомания, зависимость от аптечных препаратов, и умеют работать с этим не через страх и давление, а через профессиональные, выверенные шаги. Клиника в Коломне предлагает безопасную детоксикацию, стационарное наблюдение, индивидуальные программы лечения алкоголизма и наркомании, поддержку семьи и постреабилитационные решения. Все процессы организованы так, чтобы пациент сохранял достоинство, а родственники наконец получили не обещания, а реальный план действий, понятный по этапам и по результатам.
Подробнее – [url=https://narkologicheskaya-klinika-kolomna2-10.ru/]наркологическая клиника в Коломне[/url]
Комплексный подход позволяет врачу не просто купировать острые симптомы, но и предупредить осложнения со стороны сердца, печени и нервной системы. После стабилизации состояния пациент получает рекомендации по дальнейшему лечению и восстановлению.
Получить дополнительную информацию – [url=https://vyvod-iz-zapoia-v-volgograde17.ru/]скорая вывод из запоя[/url]
Вывод из запоя — это медицинская процедура, направленная на очищение организма от продуктов распада алкоголя и восстановление нормальной работы внутренних органов. В клинике «Трезвый Путь Волгоград» пациентам оказывается профессиональная помощь с использованием современных методов дезинтоксикации, медикаментозной поддержки и психологического сопровождения. Лечение проводится круглосуточно, включая выезд нарколога на дом. Такой формат помогает быстро стабилизировать состояние пациента, минимизировать риск осложнений и обеспечить безопасность при выходе из запоя любой продолжительности.
Подробнее – [url=https://vivod-iz-zapoya-v-volgograde17.ru/]вывод из запоя капельница на дому волгоград[/url]
Стационар «Трезвый Путь Коломна» ориентирован на безопасность в самых сложных случаях: длительные запои, тяжёлая абстиненция, смешанное употребление, выраженные соматические проблемы, риск делирия или судорог. Пациент попадает под наблюдение 24/7, что принципиально отличает клинику от домашних попыток «спасти своими средствами». Контроль жизненно важных показателей, своевременная коррекция схем лечения, возможность быстро отреагировать на осложнения — всё это снижает риск критических ситуаций, которые часто возникают именно после неумелых домашних вмешательств или «выездов без ответственности».
Разобраться лучше – https://narkologicheskaya-klinika-kolomna2-10.ru/
Система IQOS является современным устройством для работы с табачными изделиями.
В отличие от классических способов, устройство нагревает табак.
Такой подход дает возможность уменьшить количество продуктов горения.
Система выделяется современным внешним видом.
DELIA в наличии
Комфорт в применении делает устройство привлекательным решением для многих пользователей.
Также iQOS предоставляет предсказуемый результат.
Выбор вариантов позволяет подобрать подходящий формат.
В итоге, система iQOS стала частью современной культуры среди взрослых пользователей.
Этот текст содержит различную информацию, которая, возможно, покажется любопытной, но в целом не меняет восприятия привычных вещей. Предлагаем просто получить удовольствие от чтения, не ожидая особой пользы.
Вот – [url=https://arma-rehab.ru/vyvod-iz-zapoya/]онлайн покер на деньги[/url]
Алкогольная интоксикация и запой могут стремительно ухудшить состояние здоровья, став угрозой жизни, поэтому оперативное вмешательство имеет первостепенное значение. В Туле квалифицированные наркологи предоставляют круглосуточную помощь на дому, что позволяет начать лечение незамедлительно и в комфортных условиях. Такой формат терапии гарантирует индивидуальный подход, всестороннюю поддержку и полную конфиденциальность, что особенно важно для пациентов, стремящихся восстановить своё здоровье без лишних стрессовых ситуаций.
Подробнее – [url=https://vyvod-iz-zapoya-tula000.ru/]vyvod-iz-zapoya-klinika tula[/url]
В таблице приведены основные компоненты капельницы и их действие:
Подробнее тут – http://narkologicheskaya-pomoshh-v-volgograde17.ru
Наркологическая клиника — это не просто место, где пациенту оказывают медицинскую помощь. Это учреждение, где формируется стратегия полного восстановления, включающая не только физическое оздоровление, но и психоэмоциональную стабилизацию. В Ярославле работают как частные, так и государственные клиники, однако их подходы, уровень сервиса и состав команд могут существенно различаться. По данным Минздрава РФ, высокий процент успешных исходов наблюдается в тех учреждениях, где реализуется персонализированная модель лечения и постлечебной поддержки.
Детальнее – [url=https://narkologicheskaya-klinika-yaroslavl0.ru/]наркологическая клиника[/url]
Комплексное лечение помогает восстановить работу печени, сердца и нервной системы. Пациенты отмечают улучшение сна, снижение тревожности, нормализацию давления и аппетита уже спустя несколько часов после начала терапии. В зависимости от тяжести состояния курс может быть продлён до 2–3 дней с круглосуточным наблюдением и корректировкой дозировок.
Получить дополнительную информацию – http://vivod-iz-zapoya-v-volgograde17.ru/vyvod-iz-zapoya-narkolog-na-dom-volgograd/https://vivod-iz-zapoya-v-volgograde17.ru
Во многих случаях пациент или его родственники не решаются сразу вызвать врача. Для таких ситуаций предусмотрена услуга онлайн-консультации. Она проводится через защищённую видеосвязь, при желании — анонимно. На связи — врач-нарколог или психиатр, который отвечает на вопросы, оценивает ситуацию по визуальным и вербальным признакам, рекомендует план действий. Консультация может стать отправной точкой для дальнейшего вызова врача на дом или записи в клинику. Это особенно удобно для родственников, которые не знают, как подступиться к проблеме и убедить человека в необходимости помощи.
Получить дополнительную информацию – http://narkologicheskaya-pomoshh-tver0.ru
Особенность подхода заключается в сочетании медицинской и психологической поддержки. После кодирования пациент получает консультации психотерапевта, рекомендации по восстановлению и профилактике рецидивов. Это снижает риск повторного срыва и помогает закрепить результат на долгий срок.
Подробнее тут – http://kodirovanie-ot-alkogolizma-v-volgograde17.ru
Такая комплексность обеспечивает воздействие на физические, психологические и социальные факторы зависимости.
Изучить вопрос глубже – https://lechenie-alkogolizma-omsk0.ru/lechenie-narkomanii-i-alkogolizma-v-omske/
Статья содержит данные с сомнительной актуальностью и факты, лишённые чёткой взаимосвязи, но знакомит читателя с разными мнениями, пусть и без глубокого влияния.
Дополнительная информация – [url=https://stop-zavisimost.ru/blog/chto-takoe-mefedron-kak-ego-upotreblyayut-posledstviya-i-sposoby-lecheniya-zavisimosti.html]экспресс займ[/url]
Выездная наркологическая помощь организована по чётко выстроенной схеме. Каждый этап направлен на стабилизацию состояния и безопасное восстановление функций организма после алкогольного или наркотического воздействия.
Получить больше информации – [url=https://narkolog-na-dom-v-ufe17.ru/]вызвать врача нарколога на дом в уфе[/url]
Комплексное лечение помогает восстановить работу печени, сердца и нервной системы. Пациенты отмечают улучшение сна, снижение тревожности, нормализацию давления и аппетита уже спустя несколько часов после начала терапии. В зависимости от тяжести состояния курс может быть продлён до 2–3 дней с круглосуточным наблюдением и корректировкой дозировок.
Изучить вопрос глубже – [url=https://vivod-iz-zapoya-v-volgograde17.ru/]вывод из запоя цена[/url]
Процесс кодирования проходит в комфортной и спокойной обстановке. Врач объясняет каждый этап, чтобы пациент чувствовал себя уверенно и спокойно. После процедуры пациент получает памятку с рекомендациями по уходу за здоровьем и режиму поведения в первые недели после лечения.
Подробнее тут – http://
Этот информационный набор привлекает внимание множеством мелочей и странных ракурсов. Мы предлагаем взгляды, которые редко бывают полезны, но могут слегка разнообразить ваше знакомство с темой.
Вот – [url=https://arma-rehab.ru/]бесплатные порно видео[/url]
Каждый этап проходит под контролем врачей-наркологов и психотерапевтов, что гарантирует эффективность и безопасность лечения.
Детальнее – https://narcologicheskaya-klinika-v-novokuzneczke17.ru/narkologiya-gorod-novokuzneczk
Выездная наркологическая помощь организована по чётко выстроенной схеме. Каждый этап направлен на стабилизацию состояния и безопасное восстановление функций организма после алкогольного или наркотического воздействия.
Разобраться лучше – [url=https://narkolog-na-dom-v-ufe17.ru/]нарколог на дом круглосуточно уфа[/url]
Наркологическая клиника в Красноярске оказывает профессиональную помощь людям, столкнувшимся с алкогольной, наркотической и другими видами зависимостей. Основная цель деятельности специалистов — восстановление физического здоровья, стабилизация психоэмоционального состояния и возвращение пациента к полноценной жизни. Лечение проводится по современным медицинским протоколам, с применением индивидуальных схем терапии и полным соблюдением конфиденциальности.
Изучить вопрос глубже – [url=https://narcologicheskaya-klinika-v-krasnoyarske17.ru/]наркологическая клиника вывод из запоя в красноярске[/url]
Клиника в Коломне ориентирована на полный цикл помощи: от экстренных состояний до длительного сопровождения. Здесь важна не только медицинская составляющая, но и человеческая: уважение, конфиденциальность, отсутствие стигмы. Ниже — ключевые направления, которые выстраиваются в единую систему лечения, а не существуют по отдельности.
Выяснить больше – [url=https://narkologicheskaya-klinika-kolomna10.ru/]narkologicheskaya-klinika-kolomna10.ru/[/url]
Для понимания ключевых компонентов лечения ниже представлена таблица, в которой систематизированы основные методы и их назначение.
Подробнее – https://narkologicheskaya-pomoshh-novokuzneczk0.ru
Комплексное проведение этих этапов обеспечивает полное восстановление организма и облегчает процесс последующего лечения зависимости.
Изучить вопрос глубже – http://vyvod-iz-zapoya-v-ryazani17.ru/vykhod-iz-zapoya-ryazan/
На этом этапе специалист уточняет, сколько времени продолжается запой, какие основные симптомы наблюдаются, и если имеются, то какие хронические заболевания могут влиять на течение терапии. Точный анализ этих данных позволяет сформировать персонализированную стратегию лечения, которая будет максимально адаптирована к состоянию пациента и его потребностям.
Детальнее – https://vyvod-iz-zapoya-yaroslavl0.ru/
Нарколог на дом в Уфе — это услуга, которая позволяет получить квалифицированную медицинскую помощь при алкогольной или наркотической интоксикации без необходимости госпитализации. Такой формат особенно востребован при запойных состояниях, когда пациент не может самостоятельно посетить клинику. Врач приезжает по вызову в течение короткого времени, проводит обследование, устанавливает капельницу и обеспечивает безопасный вывод из состояния опьянения. Все процедуры выполняются анонимно, с соблюдением медицинской этики и конфиденциальности.
Получить больше информации – [url=https://narkolog-na-dom-v-ufe17.ru/]вызов нарколога на дом[/url]
Современные реалии требуют от медицинских учреждений гибкости, скорости и чуткости. Наркологическая помощь — одна из сфер, где промедление может стоить человеку здоровья или жизни. В наркологической клинике «ТверьМед» разработаны оперативные механизмы реагирования: выезд врача по адресу в течение 30 минут, круглосуточная поддержка и возможность получения онлайн-консультации, не покидая дом. Такой подход позволяет вовремя оказать помощь, даже если пациент отказывается ехать в стационар или не осознаёт всю серьёзность своего состояния.
Изучить вопрос глубже – [url=https://narkologicheskaya-pomoshh-tver0.ru/]неотложная наркологическая помощь в твери[/url]
Игнорирование этих симптомов может привести к тяжёлым последствиям — судорогам, галлюцинациям или алкогольному психозу.
Разобраться лучше – http://vyvod-iz-zapoya-v-tyumeni17.ru/vyvod-iz-zapoya-tyumen-otzyvy/
Услуга «нарколог на дом в Долгопрудном» от клиники «МедТрезвие Долгопрудный» создана для ситуаций, когда важно действовать быстро, аккуратно и без лишнего шума. Запой, тяжёлое похмелье, срыв после ремиссии, злоупотребление медикаментами или смесью алкоголя с препаратами — всё это не терпит откладывания и самодеятельности. Вызов врача на дом позволяет получить профессиональную помощь без госпитализации, когда состояние пациента ещё позволяет лечить его в привычной обстановке. Нарколог приезжает с полностью укомплектованным набором препаратов и расходников, проводит осмотр, подбирает капельницы по клиническим показаниям, контролирует реакцию, даёт подробные рекомендации на ближайшие дни и при необходимости предлагает дальнейший маршрут: повторный выезд, амбулаторное наблюдение или стационар клиники. Конфиденциальность соблюдается строго: без обсуждений с соседями, без регистрации по месту работы, без унизительных формальностей — только медицинская помощь, ориентированная на безопасность и результат.
Получить дополнительные сведения – https://narkolog-na-dom-dolgoprudnij10.ru/skolko-stoit-narkolog-na-dom-v-dolgoprudnom
Медицинская помощь строится на принципах индивидуального подхода и поэтапной терапии. Каждый пациент проходит диагностику, после чего составляется персональная программа, включающая медикаментозную поддержку, консультации психотерапевта и физиопроцедуры. Такой подход помогает не просто снять симптомы, но и восстановить организм полностью.
Углубиться в тему – http://narkologicheskaya-klinika-v-ryazani17.ru/narkolog-ryazan-telefon/
Этот информационный набор привлекает внимание множеством мелочей и странных ракурсов. Мы предлагаем взгляды, которые редко бывают полезны, но могут слегка разнообразить ваше знакомство с темой.
Вот – https://arma-rehab.ru/vyvod-iz-zapoya/
В процессе лечения используются проверенные методики, которые в комплексе обеспечивают положительный эффект и снижают риск рецидива.
Подробнее можно узнать тут – [url=https://lechenie-alkogolizma-omsk0.ru/]наркологическое лечение алкоголизма омск[/url]
Тем, кто нуждается в длительной терапии, «КузбассМед» предлагает комфортные условия стационара с круглосуточным наблюдением. Здесь пациенты размещаются в индивидуальных палатах, проходят курсы терапии, реабилитации и психокоррекции. Обстановка в клинике напоминает оздоровительный центр: мягкое освещение, тишина, доступ к библиотеке, возможность общения с психологом и ежедневное участие в восстановительных мероприятиях. Медицинские сестры и врачи находятся на дежурстве 24/7, что позволяет немедленно реагировать на любые изменения в состоянии пациента.
Ознакомиться с деталями – [url=https://narkologicheskaya-klinika-novokuzneczk0.ru/]наркологическая клиника цены[/url]
Важное отличие наркологической клиники «Трезвый Путь Коломна» — полный отказ от схемы «одна капельница = решение всех проблем». Детокс здесь рассматривается как необходимый старт, но не как финальная точка. Сначала специалисты снимают острые состояния: вывод из запоя, купирование абстиненции, коррекцию водно-электролитного баланса, поддержку сердца, печени и нервной системы, нормализацию сна, снижение тревоги. Когда организм перестаёт «гореть», начинается следующий этап — стабилизация: врач оценивает психическое состояние, выявляет депрессивные, тревожные, панические проявления, подбирает поддерживающие схемы, которые помогают удержаться в первые недели после кризиса. Далее подключаются психотерапевтические инструменты: индивидуальные консультации, работа с мотивацией, разбор триггеров, формирование новых привычек. В финале выстраивается маршрут поддержки: амбулаторное наблюдение, связь с клиникой, рекомендации для семьи. Такой поэтапный подход делает клинику в Коломне местом, где зависимость перестают воспринимать как «стыд» и начинают воспринимать как задачу, с которой можно работать профессионально.
Углубиться в тему – [url=https://narkologicheskaya-klinika-kolomna2-10.ru/]наркологическая клиника[/url]
Наркологическая клиника в Красноярске оказывает профессиональную помощь людям, столкнувшимся с алкогольной, наркотической и другими видами зависимостей. Основная цель деятельности специалистов — восстановление физического здоровья, стабилизация психоэмоционального состояния и возвращение пациента к полноценной жизни. Лечение проводится по современным медицинским протоколам, с применением индивидуальных схем терапии и полным соблюдением конфиденциальности.
Узнать больше – [url=https://narcologicheskaya-klinika-v-krasnoyarske17.ru/]narcologicheskaya-klinika-v-krasnoyarske17.ru/[/url]
Для понимания ключевых компонентов лечения ниже представлена таблица, в которой систематизированы основные методы и их назначение.
Подробнее тут – https://narkologicheskaya-pomoshh-novokuzneczk0.ru/narkolog-novokuzneczk-na-dom/
Доступность услуги и оперативность реагирования гарантируют, что помощь будет оказана в течение 30–60 минут после вызова. Это позволяет не только быстро начать детоксикацию, но и минимизировать риск развития осложнений, таких как повреждение печени, почек и сердечно-сосудистой системы.
Подробнее – [url=https://vyvod-iz-zapoya-tula000.ru/]вывод из запоя в стационаре[/url]
Вывод из запоя в Тюмени — это медицинская процедура, направленная на устранение алкогольной интоксикации и восстановление нормального функционирования организма. Длительное употребление спиртных напитков приводит к нарушению обмена веществ, обезвоживанию, сбоям в работе печени и сердца. В таких случаях требуется профессиональная помощь врача-нарколога, который подберёт оптимальный способ дезинтоксикации и медикаментозной поддержки. Современные методики позволяют провести вывод из запоя безопасно, эффективно и без осложнений.
Ознакомиться с деталями – https://vyvod-iz-zapoya-v-tyumeni17.ru/
Каждый этап играет важную роль и обеспечивает пациенту необходимую поддержку на пути к трезвой жизни.
Получить больше информации – [url=https://lechenie-alkogolizma-omsk0.ru/]лечение алкоголизма и наркомании центр омск[/url]
Выезд нарколога на дом в Щёлково — это быстрый и конфиденциальный способ помочь человеку в состоянии запоя или тяжёлого похмелья, не перевозя его в клинику и не устраивая публичных сцен. Врачи «ЩёлковоМед Профи» приезжают с готовым набором препаратов, одноразовыми системами и чётким протоколом: осмотр, оценка жизненно важных показателей, подбор индивидуальной капельницы, контроль реакции, рекомендации для родных. Такой формат особенно удобен, когда пациент отказывается ехать в стационар, тяжело переносит дорогу, остро реагирует на смену обстановки или для семьи важна максимальная анонимность. Главный принцип — не «вырубить» человека любой ценой, а безопасно стабилизировать состояние, снизить интоксикацию, выровнять давление и пульс, помочь собрать сон и дать понятный план, что делать дальше.
Исследовать вопрос подробнее – [url=https://narkolog-na-dom-shchelkovo10.ru/]skolko-stoit-vyzvat-narkologa-na-dom[/url]
Одним из основных этапов вывода из запоя является медикаментозная детоксикация. Современные препараты вводятся капельничным методом, что обеспечивает быстрое снижение уровня алкоголя и токсинов в крови. Это позволяет восстановить нормальный обмен веществ и нормализовать работу жизненно важных органов, таких как печень, почки и сердце. Такой подход помогает не только стабилизировать состояние пациента, но и уменьшить риск развития осложнений.
Исследовать вопрос подробнее – http://vyvod-iz-zapoya-yaroslavl0.ru
Благодаря широкому выбору методик специалисты клиники могут подобрать оптимальную схему для каждого пациента, учитывая не только медицинские, но и психологические особенности. Такой индивидуальный подход повышает эффективность лечения и снижает риск повторных срывов.
Ознакомиться с деталями – [url=https://kodirovanie-ot-alkogolizma-v-volgograde17.ru/]кодирование от алкоголизма отзывы цены волгоград[/url]
Современные методы лечения в наркологической клинике в Новокузнецке основаны на доказательной медицине. При поступлении пациент проходит полное обследование, включающее оценку физического состояния, психоэмоционального фона и наличия сопутствующих заболеваний. На основе полученных данных составляется персональная программа терапии, охватывающая медицинский, психологический и социальный аспекты выздоровления.
Получить больше информации – https://narcologicheskaya-klinika-v-novokuzneczke17.ru/
Современная наркологическая клиника — это не просто учреждение для экстренной помощи, а центр комплексной поддержки человека, столкнувшегося с зависимостью. В «КузбассМед» в Новокузнецке реализуется модель интенсивного вмешательства, где используются новейшие медицинские технологии, мультидисциплинарный подход и мобильные выездные службы. Специалисты готовы прибыть на дом за 30 минут с полным набором оборудования и медикаментов, обеспечив пациенту помощь в привычной и безопасной среде. Наркология здесь строится на индивидуализации: каждый случай рассматривается отдельно, с учётом психофизического состояния, анамнеза и жизненного контекста пациента.
Изучить вопрос глубже – http://narkologicheskaya-klinika-novokuzneczk0.ru/narkologicheskij-czentr-novokuzneczk/https://narkologicheskaya-klinika-novokuzneczk0.ru
Перед тем как показать примерные программы, важно подчеркнуть: реальный план всегда персонализируется, но понимание базовых форматов помогает семье и пациенту не теряться в терминах и сразу видеть логику.
Изучить вопрос глубже – http://narkologicheskaya-klinika-kolomna2-10.ru/narkologicheskaya-klinika-oficialnyj-sajt-v-kolomne/https://narkologicheskaya-klinika-kolomna2-10.ru
Саратов живёт в разных темпах: плотный центр, протяжные магистрали, мостовые переезды. Мы учитываем это в логистике: выездные бригады «СаратовМед Профи» движутся по немаркированным маршрутам, приезжают в гражданской одежде, формируют на месте «тихую сцену» и только затем начинают клиническую часть. Если на предзвонке звучат «красные флаги» — давящая боль в груди, выраженная одышка, спутанность, неукротимая рвота, судороги — организуем перевод в стационар без пауз: место резервируем заранее, передислокация проходит конфиденциально.
Получить больше информации – http://vyvod-iz-zapoya-saratov0.ru
В таблице представлены основные виды терапии, применяемые в клинике:
Ознакомиться с деталями – https://narcologicheskaya-klinika-v-novokuzneczke17.ru/narkologicheskij-czentr-novokuzneczk/
Капельница при вызове нарколога на дом в Долгопрудном от «МедТрезвие Долгопрудный» — это клинический инструмент, а не магический раствор. Главное правило — никакой агрессивной седации ради видимости спокойствия. Инфузионная терапия строится вокруг нескольких задач: восполнить жидкость, выровнять электролиты, снизить токсическую нагрузку на печень и мозг, поддержать сердце и нервную систему, уменьшить тремор, тревогу и соматические жалобы. Используются растворы для регидратации и коррекции водно-электролитного баланса, витамины группы B и магний для поддержки нервной системы, уменьшения риска судорог и нормализации сна, по показаниям — гепатопротекторы и мягкие антиоксиданты, противорвотные препараты для контроля тошноты. При выраженной тревоге или нарушениях сна назначаются щадящие анксиолитические средства в дозах, которые не выключают пациента полностью, а помогают снять паническое напряжение, сохраняя возможность оценивать динамику состояния. Врач отслеживает реакцию на терапию: стабилизацию давления и пульса, уменьшение дрожи, улучшение общего самочувствия, появление более спокойного, естественного сна. По мере облегчения нагрузки схема не усиливается ради счёта, а рационально сокращается. Такой подход защищает пациента от скрытых осложнений и превращает капельницу в контролируемый, полезный шаг, а не в рискованный эксперимент.
Получить дополнительную информацию – [url=https://narkolog-na-dom-dolgoprudnij10.ru/]врач нарколог на дом[/url]
Услуга вывода из запоя в клинике сочетает профессионализм врачей, медицинскую точность и заботу. При этом обеспечивается полная конфиденциальность: данные пациентов не передаются в сторонние инстанции. Круглосуточный режим работы позволяет вызвать врача даже ночью — специалисты прибывают в течение 40–60 минут после обращения.
Подробнее – [url=https://vivod-iz-zapoya-v-volgograde17.ru/]вывод из запоя клиника[/url]
Индивидуально подобранный состав раствора обеспечивает быстрое выведение токсинов и улучшение физического состояния уже в течение первых часов после начала лечения.
Детальнее – [url=https://kapelnicza-ot-zapoya-v-volgograde17.ru/]капельница от запоя недорого волгоград[/url]
В этом тексте собрано множество случайных сведений и довольно неопределённых мыслей, которые могут чем-то заинтересовать. Мы отмечаем моменты, которые не особенно важны, но всё же занимают своё место в повествовании.
Вот – [url=https://arma-rehab.ru/vyvod-iz-zapoya/]бесплатные порно видео[/url]
Наша выездная бригада приезжает без маркировки, в гражданской одежде, согласовывает «тихое окно» связи с пациентом или близкими и начинает не с капельницы, а с настройки среды: тёплая приглушённая подсветка, проветривание без сквозняков, отключение уведомлений, подготовка воды комнатной температуры. Затем — быстрый осмотр, экспресс-метрики и старт индивидуального плана. Каждая корректировка — ровно одна за раз, чтобы сохранить причинно-следственную связь и не провоцировать полипрагмазию.
Выяснить больше – [url=https://narkolog-na-dom-saratov0.ru/]платный нарколог на дом в саратове[/url]
Лечение наркомании в Твери представляет собой сложный и многоэтапный процесс, направленный на полное восстановление здоровья и социальной адаптации пациентов, страдающих от зависимости. В наркологической клинике «Ренессанс» применяется комплексный подход, который учитывает как физиологические, так и психологические аспекты заболевания, что обеспечивает максимальную эффективность терапии.
Исследовать вопрос подробнее – http://
Комплексное лечение помогает восстановить работу печени, сердца и нервной системы. Пациенты отмечают улучшение сна, снижение тревожности, нормализацию давления и аппетита уже спустя несколько часов после начала терапии. В зависимости от тяжести состояния курс может быть продлён до 2–3 дней с круглосуточным наблюдением и корректировкой дозировок.
Получить дополнительную информацию – [url=https://vivod-iz-zapoya-v-volgograde17.ru/]вывод из запоя на дому недорого волгоград[/url]
Во многих случаях пациент или его родственники не решаются сразу вызвать врача. Для таких ситуаций предусмотрена услуга онлайн-консультации. Она проводится через защищённую видеосвязь, при желании — анонимно. На связи — врач-нарколог или психиатр, который отвечает на вопросы, оценивает ситуацию по визуальным и вербальным признакам, рекомендует план действий. Консультация может стать отправной точкой для дальнейшего вызова врача на дом или записи в клинику. Это особенно удобно для родственников, которые не знают, как подступиться к проблеме и убедить человека в необходимости помощи.
Подробнее – [url=https://narkologicheskaya-pomoshh-tver0.ru/]платная наркологическая скорая помощь в твери[/url]
Во время онлайн-сессии специалист может использовать шкалы оценки состояния (CIWA-Ar, CAGE, AUDIT), психодиагностические опросники, видеоанализ мимики и речи. Это позволяет провести достаточно точную первичную дифференцировку между алкогольной абстиненцией, тревожным расстройством, интоксикацией и психотическим состоянием. При необходимости пациенту предлагается записаться на очный приём или воспользоваться услугой «стационар на дому» — с ежедневными визитами и наблюдением.
Подробнее можно узнать тут – https://narkologicheskaya-pomoshh-tver0.ru/
Алкогольная интоксикация и запой могут стремительно ухудшить состояние здоровья, став угрозой жизни, поэтому оперативное вмешательство имеет первостепенное значение. В Туле квалифицированные наркологи предоставляют круглосуточную помощь на дому, что позволяет начать лечение незамедлительно и в комфортных условиях. Такой формат терапии гарантирует индивидуальный подход, всестороннюю поддержку и полную конфиденциальность, что особенно важно для пациентов, стремящихся восстановить своё здоровье без лишних стрессовых ситуаций.
Детальнее – https://vyvod-iz-zapoya-tula000.ru/vyvod-iz-zapoya-na-domu-tula/
Выездная наркологическая помощь организована по чётко выстроенной схеме. Каждый этап направлен на стабилизацию состояния и безопасное восстановление функций организма после алкогольного или наркотического воздействия.
Изучить вопрос глубже – http://narkolog-na-dom-v-ufe17.ru/vyvod-iz-zapoya-ufa-narkolog-na-dom/
Перед таблицей — короткий акцент: приведённые суммы ориентировочные, не являются публичной офертой, точная стоимость определяется после осмотра.
Углубиться в тему – [url=https://vyvod-iz-zapoya-kolomna10.ru/]вывод из запоя стационар[/url]
Комплексный вывод из запоя в Туле организован по отлаженной схеме, состоящей из нескольких этапов, каждый из которых направлен на безопасное и эффективное восстановление организма.
Разобраться лучше – http://vyvod-iz-zapoya-tula000.ru/vyvod-iz-zapoya-anonimno-tula/
Эта статья сочетает познавательный и занимательный контент, что делает ее идеальной для любителей глубоких исследований. Мы рассмотрим увлекательные аспекты различных тем и предоставим вам новые знания, которые могут оказаться полезными в будущем.
Изучить вопрос глубже – https://wikireality.ru/wiki/ITgram
Эта публикация погружает вас в мир увлекательных фактов и удивительных открытий. Мы расскажем о ключевых событиях, которые изменили ход истории, и приоткроем завесу над научными достижениями, которые вдохновили миллионы. Узнайте, чему может научить нас прошлое и как применить эти знания в будущем.
Ознакомиться с отчётом – https://redington.solar/solar-technologies-for-commercial-applications
Мы собрали для вас самые захватывающие факты из мира науки и истории. От малознакомых деталей до грандиозных событий — эта статья расширит ваш кругозор и подарит новое понимание того, как устроен наш мир.
Есть чему поучиться – https://www.domansky.cz/peugeot-expert
Каждый час промедления в острый период повышает вероятность обезвоживания, электролитных сдвигов, аритмий, гипертонических всплесков и расстройств сна, которые легко перерастают в делирий. Домашние попытки с «подручными» средствами редко учитывают лекарственные взаимодействия, реальный уровень обезвоживания и состояние печени, а «жёсткая» седация, применяемая без показаний, маскирует ухудшения и лишает врача информативной картины. Профессиональная бригада «НоваТрезвие» начинает с объективной оценки: давление, пульс, сатурация, температура, неврологический статус, выраженность тремора и тошноты, степень обезвоживания, список принимаемых препаратов и возможные аллергии. На этой базе формируется персональный план: регидратация, коррекция электролитов и кислотно-щелочного баланса, поддержка нервной системы витаминами группы B и магнием, гепатопротекторная и антиоксидантная защита по показаниям, противорвотные при необходимости и мягкая анксиолитическая поддержка для восстановительного сна. Такой маршрут гасит «пожар» интоксикации управляемо, возвращая прогнозируемость самочувствия в течение первых часов.
Узнать больше – https://vyvod-iz-zapoya-ehlektrostal2-10.ru/
Мы собрали для вас самые захватывающие факты из мира науки и истории. От малознакомых деталей до грандиозных событий — эта статья расширит ваш кругозор и подарит новое понимание того, как устроен наш мир.
Хочешь знать всё? – https://ptgym-travent2015.com/%E3%82%B4%E3%83%BC%E3%83%AB%E3%83%87%E3%83%B3%E3%82%A6%E3%82%A3%E3%83%BC%E3%82%AF%E3%81%AE%E6%97%A5%E7%A8%8B
Публикация предлагает читателю не просто информацию, а инструменты для анализа и саморазвития. Мы стимулируем критическое мышление, предлагая различные точки зрения и призывая к самостоятельному поиску решений.
Подробности по ссылке – https://odontjomarips.com/asociacion-de-usuarios
Этот текст призван помочь читателю расширить кругозор и получить практические знания. Мы используем простой язык, наглядные примеры и структурированное изложение, чтобы сделать обучение максимально эффективным и увлекательным.
Углубить понимание вопроса – https://mathematicalexplorations.co.in/mathematics-of-voting-systems
Этот информационный обзор станет отличным путеводителем по актуальным темам, объединяющим важные факты и мнения экспертов. Мы исследуем ключевые идеи и представляем их в доступной форме для более глубокого понимания. Читайте, чтобы оставаться в курсе событий!
Углубить понимание вопроса – https://www.defining-blog.ru/category/dengi
Этот интересный отчет представляет собой сборник полезных фактов, касающихся актуальных тем. Мы проанализируем данные, чтобы вы могли сделать обоснованные выводы. Читайте, чтобы узнать больше о последних трендах и значимых событиях!
Лови подробности – https://www.defining-blog.ru/2025/10/19
Этот увлекательный информационный материал подарит вам массу новых знаний и ярких эмоций. Мы собрали для вас интересные факты и сведения, которые обогатят ваш опыт. Откройте для себя увлекательный мир информации и насладитесь процессом изучения!
Прочитать подробнее – https://www.csautoslalom.cz/vysledky-setkani-sampionu-csas-2024
Эта статья погружает вас в увлекательный мир знаний, где каждый факт становится открытием. Мы расскажем о ключевых исторических поворотных моментах и научных прорывах, которые изменили ход цивилизации. Поймите, как прошлое формирует настоящее и как его уроки могут помочь нам строить будущее.
Лучшее решение — прямо здесь – https://www.torikorestaurant.ch/produit/toriko-signature
Эта познавательная публикация погружает вас в море интересного контента, который быстро захватит ваше внимание. Мы рассмотрим важные аспекты темы и предоставим вам уникальные Insights и полезные сведения для дальнейшего изучения.
А что дальше? – https://pomoc.comarchesklep.pl/kontakt
Эта статья сочетает познавательный и занимательный контент, что делает ее идеальной для любителей глубоких исследований. Мы рассмотрим увлекательные аспекты различных тем и предоставим вам новые знания, которые могут оказаться полезными в будущем.
Связаться за уточнением – https://birlik-akmola.kz/?p=9357
Этот текст призван помочь читателю расширить кругозор и получить практические знания. Мы используем простой язык, наглядные примеры и структурированное изложение, чтобы сделать обучение максимально эффективным и увлекательным.
Разобраться лучше – https://www.defining-blog.ru/tag/finansy
Этот обзорный материал предоставляет информационно насыщенные данные, касающиеся актуальных тем. Мы стремимся сделать информацию доступной и структурированной, чтобы читатели могли легко ориентироваться в наших выводах. Познайте новое с нашим обзором!
Эксклюзивная информация – https://le-k-reims.com/events/je-naime-pas-le-classique
Эта обзорная заметка содержит ключевые моменты и факты по актуальным вопросам. Она поможет читателям быстро ориентироваться в теме и узнать о самых важных аспектах сегодня. Получите краткий курс по современной информации и оставайтесь в курсе событий!
Всё, что нужно знать – https://www.defining-blog.ru/tag/novostrojki
Мы собрали для вас самые захватывающие факты из мира науки и истории. От малознакомых деталей до грандиозных событий — эта статья расширит ваш кругозор и подарит новое понимание того, как устроен наш мир.
Что ещё? Расскажи всё! – https://blogclimatiza.com.br/consumo-ar-condicionado-12000-btus
В этой публикации мы предлагаем подробные объяснения по актуальным вопросам, чтобы помочь читателям глубже понять их. Четкость и структурированность материала сделают его удобным для усвоения и применения в повседневной жизни.
Изучить рекомендации специалистов – https://bongda360.site/chien-thuat-cua-pep-guardiola-cach-thanh-cong-va-tam-anh-huong
В этой статье представлен занимательный и актуальный контент, который заставит вас задуматься. Мы обсуждаем насущные вопросы и проблемы, а также освещаем истории, которые вдохновляют на действия и изменения. Узнайте, что стоит за событиями нашего времени!
См. подробности – https://jazaatravel.com/introducing-this-amazing-tour
Этот текст призван помочь читателю расширить кругозор и получить практические знания. Мы используем простой язык, наглядные примеры и структурированное изложение, чтобы сделать обучение максимально эффективным и увлекательным.
Открой скрытое – https://domains.tntcode.com/ip/212.92.101.45
В статье представлены ключевые моменты по актуальной теме, дополненные советами экспертов и ссылками на дополнительные ресурсы. Цель материала — дать читателю инструменты для самостоятельного развития и принятия осознанных решений.
Познакомиться с результатами исследований – https://www.defining-blog.ru/category/internet
В этой статье собраны факты, которые освещают целый ряд важных вопросов. Мы стремимся предложить читателям четкую, достоверную информацию, которая поможет сформировать собственное мнение и лучше понять сложные аспекты рассматриваемой темы.
Узнайте всю правду – http://www.atma.rs/18-susret-toplana-srbije-strucno-naucna-konferencija-tops-2019
В этой публикации мы предлагаем подробные объяснения по актуальным вопросам, чтобы помочь читателям глубже понять их. Четкость и структурированность материала сделают его удобным для усвоения и применения в повседневной жизни.
Осуществить глубокий анализ – https://kangaroohn.vn/uong-va-su-dung-nuoc-hydrogen-nhu-the-nao-la-hop-ly-nhat
Этот обзорный материал предоставляет информационно насыщенные данные, касающиеся актуальных тем. Мы стремимся сделать информацию доступной и структурированной, чтобы читатели могли легко ориентироваться в наших выводах. Познайте новое с нашим обзором!
Погрузиться в научную дискуссию – https://lacopuchavacreciendo.com/2023/06/18/angie-alvarado-vive-chascarro-en-pleno-matrimonio-tengo-que-decir-esto
Эта статья сочетает познавательный и занимательный контент, что делает ее идеальной для любителей глубоких исследований. Мы рассмотрим увлекательные аспекты различных тем и предоставим вам новые знания, которые могут оказаться полезными в будущем.
Смотрите также – https://tkstienliettuyen.com/bi-tieu-do-phi-dai-tuyen-tien-liet-giai-quyet-phan-ngon-hay-xu-ly-phan-goc
В этом информативном тексте представлены захватывающие события и факты, которые заставят вас задуматься. Мы обращаем внимание на важные моменты, которые часто остаются незамеченными, и предлагаем новые перспективы на привычные вещи. Подготовьтесь к тому, чтобы быть поглощенным увлекательными рассказами!
Не пропусти важное – https://tobaforindo.com/restu-dan-dukungan-dari-itji-untuk-syaren-situmorang
Эта статья сочетает познавательный и занимательный контент, что делает ее идеальной для любителей глубоких исследований. Мы рассмотрим увлекательные аспекты различных тем и предоставим вам новые знания, которые могут оказаться полезными в будущем.
Исследовать вопрос подробнее – https://sportspublication.net/product/test-measurement-and-evaluation-in-physical-education-m-p-ed-ncte-new-syllabus
Мы собрали для вас самые захватывающие факты из мира науки и истории. От малознакомых деталей до грандиозных событий — эта статья расширит ваш кругозор и подарит новое понимание того, как устроен наш мир.
А что дальше? – https://texo.sk/product/zakaz-jedenia-a-pitia-na-tomto-mieste-kopia-kopia
Эта статья погружает вас в увлекательный мир знаний, где каждый факт становится открытием. Мы расскажем о ключевых исторических поворотных моментах и научных прорывах, которые изменили ход цивилизации. Поймите, как прошлое формирует настоящее и как его уроки могут помочь нам строить будущее.
Изучить вопрос глубже – http://satpol.madiunkota.go.id/kebakaran-rumah-di-jl-flores-gg-kereta-api
Мы собрали для вас самые захватывающие факты из мира науки и истории. От малознакомых деталей до грандиозных событий — эта статья расширит ваш кругозор и подарит новое понимание того, как устроен наш мир.
Узнать из первых рук – https://dawahguide.net/dawah-team-building
В этой статье представлен занимательный и актуальный контент, который заставит вас задуматься. Мы обсуждаем насущные вопросы и проблемы, а также освещаем истории, которые вдохновляют на действия и изменения. Узнайте, что стоит за событиями нашего времени!
Узнайте всю правду – https://www.codcon.sk/2021/08/19/ahoj-svet
Публикация приглашает вас исследовать неизведанное — от древних тайн до современных достижений науки. Вы узнаете, как случайные находки превращались в революции, а смелые мысли — в новые эры человеческого прогресса.
А есть ли продолжение? – http://mad.kiev.ua/?p=480
Откройте для себя скрытые страницы истории и малоизвестные научные открытия, которые оказали колоссальное влияние на развитие человечества. Статья предлагает свежий взгляд на события, которые заслуживают большего внимания.
Как достичь результата? – https://prepwithharshita.com/process-of-policy-formation
Все процедуры выполняются анонимно и с соблюдением медицинских стандартов. Препараты применяются только сертифицированные, рассчитанные на мягкое восстановление организма без побочных эффектов. При необходимости лечение продолжается в стационаре, где пациент получает круглосуточное наблюдение, питание и психологическую поддержку.
Ознакомиться с деталями – [url=https://vyvod-iz-zapoya-v-novokuzneczke17.ru/]вывод из запоя вызов город[/url]
В материале приведены детали, интересные, но не особенно важные. Мы рассматриваем аспекты, которые сложно назвать существенными, но включили их для большей полноты.
Подробнее читать – [url=https://rostov-narkologiya.ru/ ]детокс чай для похудения[/url]
В статье-обзоре представлены данные сомнительной актуальности и факты без явной взаимосвязи. Читатель ознакомится с разными мнениями, хотя они вряд ли существенно изменят его представление о теме.
Подробнее читать – [url=https://rostov-narkologiya.ru/uslugi-ot-narkomanii/mefedronovaya-zavisimost/]кето диета за неделю минус 10 кг[/url]
В Красноярске клиника «КрасЗдрав Профи» предоставляет круглосуточную помощь людям, столкнувшимся с зависимостью. При этом формат анонимности сохраняется на каждом этапе — от звонка до выписки. Для пациентов, которым трудно приехать, возможен выезд нарколога на дом. Это удобно при похмельных и абстинентных состояниях, когда транспортировка нежелательна. Конфиденциальный выезд без маркировки транспорта и униформы позволяет начать лечение, не привлекая внимания окружающих. Все процедуры проводятся с соблюдением медицинских стандартов, включая регидратацию, стабилизацию и поддержку дыхания.
Подробнее тут – http://narkologicheskaya-clinica-v-krasnoyarske17.ru
Работа клиники строится на принципах индивидуального подхода, доказательной медицины и строгого соблюдения конфиденциальности. Каждый пациент проходит обследование, в ходе которого оценивается состояние организма, выявляется стадия зависимости и сопутствующие нарушения. На основе полученных данных разрабатывается персональная программа лечения, включающая медицинские, психологические и социальные методы коррекции поведения.
Изучить вопрос глубже – [url=https://narkologicheskaya-klinika-v-voronezhe17.ru/]вывод наркологическая клиника[/url]
Капельница не просто устраняет симптомы похмелья — она восстанавливает внутренний баланс, снижает токсическую нагрузку и поддерживает работу жизненно важных органов. После процедуры пациент чувствует прилив сил, прояснение сознания и эмоциональную стабильность. Эффект закрепляется при соблюдении рекомендаций врача и отказе от алкоголя в последующие дни.
Подробнее тут – https://vivod-iz-zapoya-v-volgograde17.ru/vyvod-iz-zapoya-narkolog-na-dom-volgograd/
В Тольятти клиника «ВолгаМед Тольятти» предоставляет широкий спектр услуг — от экстренного вывода из запоя на дому до длительных реабилитационных программ. Выезд нарколога осуществляется круглосуточно: врач приезжает по вызову, проводит диагностику, оценивает степень интоксикации и назначает индивидуальный план лечения. Это особенно важно в тех случаях, когда пациент не может самостоятельно добраться до клиники. В арсенале специалистов — профессиональное оборудование, капельницы для детоксикации и препараты для стабилизации психоэмоционального состояния.
Подробнее можно узнать тут – [url=https://narkologicheskaya-pomoshh-v-tolyatti17.ru/]наркологическая помощь тольятти[/url]
Клиника «КузбассМед Центр» в Новокузнецке обеспечивает непрерывный приём пациентов и выезд нарколога на дом. Такой формат позволяет оказать экстренную помощь при интоксикации или запое прямо на месте, не дожидаясь ухудшения состояния. Медицинская команда работает в режиме 24/7, что особенно важно при острых состояниях. Врач выезжает в течение часа после вызова, проводит диагностику, ставит капельницу и контролирует жизненные показатели. В стационаре доступны детоксикация, медикаментозная терапия и психотерапевтическая поддержка — всё под постоянным медицинским наблюдением.
Узнать больше – [url=https://narkologicheskaya-klinika-v-novokuzneczke17.ru/]лечение в наркологической клинике в новокузнецке[/url]
Кодирование от алкоголизма — это медицинская процедура, направленная на формирование устойчивого отвращения к спиртному и восстановление контроля над зависимым поведением. В клинике «ВолгоградМед Альянс» используются современные, научно обоснованные методы, которые позволяют не просто временно ограничить тягу, а глубоко перестроить психологические и биохимические механизмы зависимости. Каждая программа подбирается индивидуально, с учётом стажа употребления, состояния здоровья, мотивации и психоэмоционального фона пациента. Врачи обеспечивают анонимность, безопасность и круглосуточную поддержку, помогая восстановить не только физическое состояние, но и внутреннее равновесие.
Получить дополнительную информацию – [url=https://kodirovanie-ot-alkogolizma-v-volgograde17.ru/]кодирование от алкоголизма отзывы цены[/url]
В статье-обзоре представлены данные сомнительной актуальности и факты без явной взаимосвязи. Читатель ознакомится с разными мнениями, хотя они вряд ли существенно изменят его представление о теме.
Подробнее читать – [url=https://rostov-narkologiya.ru/uslugi-ot-narkomanii/mefedronovaya-zavisimost/]диета для похудения быстро[/url]
Ниже — краткий ориентир, который помогает семье понимать логику рекомендаций до очного осмотра. Это не «замена врачу», а понятная рамка для принятия решения о старте.
Получить дополнительную информацию – https://narkologicheskaya-klinika-ehlektrostal0.ru/narkologicheskaya-klinika-ceny-v-ehlektrostali/
Для иллюстрации приведена таблица, отражающая распространённые методы терапии и их воздействие на организм:
Углубиться в тему – http://narkologicheskaya-klinika-v-voronezhe17.ru/narkolog-voronezh-anonimno/
Процесс детоксикации проходит поэтапно, чтобы организм успевал адаптироваться к изменениям и не испытывал стресс. Каждый шаг направлен на достижение конкретного терапевтического эффекта. Ниже представлена таблица, отражающая ключевые стадии процедуры, применяемой в клинике «Трезвый Путь Волгоград».
Ознакомиться с деталями – https://vivod-iz-zapoya-v-volgograde17.ru/anonimnaya-narkologiya-vyvod-iz-zapoya-volgograd/
Пациенты отмечают, что особенно важна не только профессиональная помощь, но и спокойная атмосфера. Мягкий свет, тишина, отдельные палаты и деликатная коммуникация персонала — всё это снижает тревожность и помогает организму восстановиться. Эффективность лечения оценивается по конкретным маркерам: улучшение сна, нормализация давления, исчезновение тошноты, восстановление аппетита и уменьшение тяги.
Получить больше информации – https://narkologicheskaya-clinica-v-krasnoyarske17.ru/chastnaya-narkologicheskaya-klinika-krasnoyarsk/
Публикация предоставляет читателю набор разрозненных идей, которые сложно применить на практике. Мы лишь слегка касаемся разных точек зрения, не углубляясь в анализ и не предлагая никаких выводов.
Вот – [url=https://arma-rehab.ru/vyvod-iz-zapoya/]казино[/url]
Одним из ключевых направлений работы клиники является проведение инфузионных процедур. Капельницы позволяют вывести токсины, нормализовать давление и улучшить общее состояние пациента. Подбор препаратов проводится индивидуально, с учётом физического состояния, возраста и стадии зависимости.
Подробнее тут – [url=https://narkologicheskaya-pomoshh-v-tolyatti17.ru/]наркологическая клиника клиника помощь в тольятти[/url]
Особенность подхода заключается в сочетании медицинской и психологической поддержки. После кодирования пациент получает консультации психотерапевта, рекомендации по восстановлению и профилактике рецидивов. Это снижает риск повторного срыва и помогает закрепить результат на долгий срок.
Ознакомиться с деталями – [url=https://kodirovanie-ot-alkogolizma-v-volgograde17.ru/]kodirovanie-ot-alkogolizma-v-volgograde17.ru/[/url]
Врач приезжает с одноразовыми системами и препаратами, проводит экспресс-диагностику, стартует инфузии и каждые 15–20 минут оценивает динамику, корректируя темп и состав. По завершении — памятка по режиму, гигиене сна, питанию и запретам на 24–72 часа, а также контакты для связи ночью.
Ознакомиться с деталями – [url=https://vyvod-iz-zapoya-odincovo10.ru/]anonimnyj-vyvod-iz-zapoya-odincovo[/url]
Выездная наркологическая помощь организована по чётко выстроенной схеме. Каждый этап направлен на стабилизацию состояния и безопасное восстановление функций организма после алкогольного или наркотического воздействия.
Получить дополнительные сведения – [url=https://narkolog-na-dom-v-ufe17.ru/]нарколог на дом цены уфа[/url]
Клиника «КузбассМед Центр» в Новокузнецке обеспечивает непрерывный приём пациентов и выезд нарколога на дом. Такой формат позволяет оказать экстренную помощь при интоксикации или запое прямо на месте, не дожидаясь ухудшения состояния. Медицинская команда работает в режиме 24/7, что особенно важно при острых состояниях. Врач выезжает в течение часа после вызова, проводит диагностику, ставит капельницу и контролирует жизненные показатели. В стационаре доступны детоксикация, медикаментозная терапия и психотерапевтическая поддержка — всё под постоянным медицинским наблюдением.
Углубиться в тему – [url=https://narkologicheskaya-klinika-v-novokuzneczke17.ru/]наркологическая клиника вывод из запоя новокузнецк[/url]
сделать аудит сайта цена [url=https://poiskovoe-seo-v-moskve.ru/]poiskovoe-seo-v-moskve.ru[/url] .
Вывод из запоя нужен, когда попытка «перетерпеть» сопровождается тремором, бессонницей, тошнотой, скачками давления, тревогой и потливостью. Наша задача — не просто «поставить капельницу», а быстро и безопасно снять интоксикацию, восполнить жидкость и электролиты, стабилизировать вегетативные симптомы, вернуть аппетит и сон. Выездная бригада приезжает по любому адресу в Королёве, проводит экспресс-диагностику (АД, ЧСС, сатурация, температура, неврологический статус, уровень обезвоживания), оценивает длительность запоя и текущие лекарства пациента. Далее врач формирует персональную схему: инфузии для регидратации и детоксикации, витамины группы B и магний, противорвотные и анксиолитики, гепатопротективная и антиоксидантная поддержка по показаниям. Процедура выполняется одноразовыми системами с соблюдением стерильности, дозы рассчитываются индивидуально, а динамика состояния контролируется каждые 15–20 минут. После стабилизации пациент и семья получают чёткие рекомендации по режиму, питанию, сну, физической нагрузке и запретам на ближайшие сутки, а также маршрутизацию: амбулаторные визиты, дневной стационар или полноценное отделение при необходимости.
Узнать больше – https://vyvod-iz-zapoya-korolev10.ru/vyvod-iz-zapoya-v-stacionare-korolev
руководства по seo [url=https://statyi-o-marketinge2.ru/]statyi-o-marketinge2.ru[/url] .
Основные этапы лечения включают:
Изучить вопрос глубже – https://narkologicheskaya-klinika-v-voronezhe17.ru/
Вывод из запоя — это медицинская процедура, направленная на очищение организма от продуктов распада алкоголя и восстановление нормальной работы внутренних органов. В клинике «Трезвый Путь Волгоград» пациентам оказывается профессиональная помощь с использованием современных методов дезинтоксикации, медикаментозной поддержки и психологического сопровождения. Лечение проводится круглосуточно, включая выезд нарколога на дом. Такой формат помогает быстро стабилизировать состояние пациента, минимизировать риск осложнений и обеспечить безопасность при выходе из запоя любой продолжительности.
Исследовать вопрос подробнее – https://vivod-iz-zapoya-v-volgograde17.ru/
Формат
Узнать больше – [url=https://narkologicheskaya-klinika-ehlektrostal0.ru/]narkologicheskaya-klinika-nedorogo[/url]
Каждое вмешательство проходит через систему «цель > маркер > окно оценки > выключение модуля». Ниже приведена таблица, отражающая базовую логику диагностики и корректировки терапии в зависимости от состояния пациента.
Подробнее тут – [url=https://narkologicheskaya-clinica-v-krasnoyarske17.ru/]наркологическая клиника наркологический центр красноярск[/url]
Процесс кодирования проходит в комфортной и спокойной обстановке. Врач объясняет каждый этап, чтобы пациент чувствовал себя уверенно и спокойно. После процедуры пациент получает памятку с рекомендациями по уходу за здоровьем и режиму поведения в первые недели после лечения.
Узнать больше – [url=https://kodirovanie-ot-alkogolizma-v-volgograde17.ru/]бесплатное кодирование от алкоголизма в волгограде[/url]
Одним из ключевых направлений работы клиники является проведение инфузионных процедур. Капельницы позволяют вывести токсины, нормализовать давление и улучшить общее состояние пациента. Подбор препаратов проводится индивидуально, с учётом физического состояния, возраста и стадии зависимости.
Детальнее – http://narkologicheskaya-pomoshh-v-tolyatti17.ru/
Первым шагом на пути к выздоровлению является очищение организма от токсинов. В клинике проводится детоксикация с использованием современных препаратов, направленных на выведение продуктов распада алкоголя и наркотиков. Медикаментозное лечение дополняется витаминами, гепатопротекторами и средствами для нормализации работы нервной системы. Это помогает восстановить обмен веществ, улучшить сон, аппетит и общее самочувствие пациента.
Изучить вопрос глубже – https://narkologicheskaya-klinika-v-voronezhe17.ru/voronezh-narkologicheskij-dispanser/
Комплексное лечение помогает восстановить работу печени, сердца и нервной системы. Пациенты отмечают улучшение сна, снижение тревожности, нормализацию давления и аппетита уже спустя несколько часов после начала терапии. В зависимости от тяжести состояния курс может быть продлён до 2–3 дней с круглосуточным наблюдением и корректировкой дозировок.
Получить дополнительные сведения – http://vivod-iz-zapoya-v-volgograde17.ru/vyvod-iz-zapoya-narkolog-na-dom-volgograd/https://vivod-iz-zapoya-v-volgograde17.ru
Важной частью реабилитации является социализация пациента, возвращение его к активной общественной жизни и формирование новых, здоровых привычек. Для этого в клинике организуются различные мероприятия и программы адаптации.
Ознакомиться с деталями – [url=https://lechenie-narkomanii-tver0.ru/]центр лечения наркомании[/url]
Клиника «КузбассМед Центр» в Новокузнецке обеспечивает непрерывный приём пациентов и выезд нарколога на дом. Такой формат позволяет оказать экстренную помощь при интоксикации или запое прямо на месте, не дожидаясь ухудшения состояния. Медицинская команда работает в режиме 24/7, что особенно важно при острых состояниях. Врач выезжает в течение часа после вызова, проводит диагностику, ставит капельницу и контролирует жизненные показатели. В стационаре доступны детоксикация, медикаментозная терапия и психотерапевтическая поддержка — всё под постоянным медицинским наблюдением.
Углубиться в тему – http://narkologicheskaya-klinika-v-novokuzneczke17.ru/narkologiya-gorod-novokuzneczk/https://narkologicheskaya-klinika-v-novokuzneczke17.ru
Каждый из этапов сопровождается контролем врача и постепенным снижением медикаментозной нагрузки. Важно не просто снять симптомы, но и научить пациента распознавать внутренние триггеры, чтобы предотвратить рецидив. На протяжении всего лечения сохраняется поддержка психолога, который помогает адаптироваться и перестроить привычные модели поведения.
Получить дополнительную информацию – [url=https://narcologicheskaya-klinika-v-voronezhe17.ru/]наркологическая клиника воронеж[/url]
Кодирование от алкоголизма — это медицинская процедура, направленная на формирование устойчивого отвращения к спиртному и восстановление контроля над зависимым поведением. В клинике «ВолгоградМед Альянс» используются современные, научно обоснованные методы, которые позволяют не просто временно ограничить тягу, а глубоко перестроить психологические и биохимические механизмы зависимости. Каждая программа подбирается индивидуально, с учётом стажа употребления, состояния здоровья, мотивации и психоэмоционального фона пациента. Врачи обеспечивают анонимность, безопасность и круглосуточную поддержку, помогая восстановить не только физическое состояние, но и внутреннее равновесие.
Узнать больше – [url=https://kodirovanie-ot-alkogolizma-v-volgograde17.ru/]kodirovanie-ot-alkogolizma-v-volgograde17.ru/[/url]
«Светлый Шаг» — это не набор общих обещаний, а чётко выстроенный маршрут помощи, где каждый шаг прозрачен: от первичного разговора до устойчивой ремиссии. Мы бережно собираем только необходимые данные, сразу объясняем, что будет сделано в первые 6–12 часов, каких изменений ждать к ночи и по каким маркерам поймём, что курс выбран верно. Конфиденциальность встроена в процесс: нейтральные звонки, ограниченный доступ к медкарте, аккуратный выезд без броской атрибутики, возможность оформить документы с нейтральными формулировками. Итог — меньше стресса, меньше бюрократии и больше управляемости там, где это критично.
Углубиться в тему – [url=https://narkologicheskaya-klinika-odincovo0.ru/]narkologicheskaya-klinika-stacionar[/url]
Чтобы не оценивать состояние субъективно, в клинике применяется система наблюдения за ключевыми параметрами. Таблица помогает врачу и пациенту видеть реальную динамику и корректировать вмешательства только при необходимости.
Углубиться в тему – [url=https://narkologicheskaya-clinica-v-krasnoyarske17.ru/]частная наркологическая клиника красноярск[/url]
Комплексное лечение помогает восстановить работу печени, сердца и нервной системы. Пациенты отмечают улучшение сна, снижение тревожности, нормализацию давления и аппетита уже спустя несколько часов после начала терапии. В зависимости от тяжести состояния курс может быть продлён до 2–3 дней с круглосуточным наблюдением и корректировкой дозировок.
Углубиться в тему – [url=https://vivod-iz-zapoya-v-volgograde17.ru/]вывод из запоя волгоград[/url]
Для иллюстрации приведена таблица, отражающая распространённые методы терапии и их воздействие на организм:
Подробнее тут – https://narkologicheskaya-klinika-v-voronezhe17.ru/voronezh-narkologicheskij-dispanser
После завершения инфузий врач-нарколог даёт рекомендации по питанию, водному балансу и образу жизни. При необходимости пациенту назначается курс поддерживающей терапии для закрепления эффекта.
Подробнее тут – [url=https://narkologicheskaya-pomoshh-v-tolyatti17.ru/]платная наркологическая помощь тольятти[/url]
Кодирование от алкоголизма — это медицинская процедура, направленная на формирование устойчивого отвращения к спиртному и восстановление контроля над зависимым поведением. В клинике «ВолгоградМед Альянс» используются современные, научно обоснованные методы, которые позволяют не просто временно ограничить тягу, а глубоко перестроить психологические и биохимические механизмы зависимости. Каждая программа подбирается индивидуально, с учётом стажа употребления, состояния здоровья, мотивации и психоэмоционального фона пациента. Врачи обеспечивают анонимность, безопасность и круглосуточную поддержку, помогая восстановить не только физическое состояние, но и внутреннее равновесие.
Подробнее можно узнать тут – http://kodirovanie-ot-alkogolizma-v-volgograde17.ru/kodirovanie-volgograd/https://kodirovanie-ot-alkogolizma-v-volgograde17.ru
Терапия строится из узких модулей с чёткими «выключателями». Мы не «усиливаем» схему без показаний — каждое расширение привязано к конкретной цели и времени переоценки. Ниже — ориентир по основным программам «ЕнисейМед Центра».
Узнать больше – [url=https://narkologicheskaya-klinika-v-krasnoyarske17.ru/]наркологическая клиника стационар в красноярске[/url]
Текст наполнен информацией, которая может показаться любопытной, но не меняет восприятия привычных вещей, так что читайте его ради удовольствия.
Дополнительная информация – [url=https://stop-zavisimost.ru/blog/chto-takoe-mefedron-kak-ego-upotreblyayut-posledstviya-i-sposoby-lecheniya-zavisimosti.html]рулетка онлайн[/url]
Пациенты отмечают, что особенно важна не только профессиональная помощь, но и спокойная атмосфера. Мягкий свет, тишина, отдельные палаты и деликатная коммуникация персонала — всё это снижает тревожность и помогает организму восстановиться. Эффективность лечения оценивается по конкретным маркерам: улучшение сна, нормализация давления, исчезновение тошноты, восстановление аппетита и уменьшение тяги.
Подробнее тут – [url=https://narkologicheskaya-clinica-v-krasnoyarske17.ru/]наркологическая клиника наркологический центр в красноярске[/url]
После завершения инфузий врач-нарколог даёт рекомендации по питанию, водному балансу и образу жизни. При необходимости пациенту назначается курс поддерживающей терапии для закрепления эффекта.
Разобраться лучше – https://narkologicheskaya-pomoshh-v-tolyatti17.ru/pomoshh-narkozavisimym-tolyatti/
Капельница — это основной инструмент дезинтоксикации при лечении запойных состояний. Она способствует выведению токсинов, нормализации обмена веществ и улучшению общего самочувствия. Состав раствора подбирается индивидуально в зависимости от степени интоксикации, возраста, массы тела и сопутствующих заболеваний. Уже через 20–30 минут после начала инфузии пациент ощущает облегчение, снижается тревожность и проходит головная боль.
Разобраться лучше – [url=https://vyvod-iz-zapoya-v-krasnoyarske17.ru/]вывод из запоя красноярск[/url]
Формат
Подробнее – http://narkologicheskaya-klinika-odincovo0.ru
В таблице представлены основные виды терапии, применяемые в клинике:
Изучить вопрос глубже – [url=https://narcologicheskaya-klinika-v-novokuzneczke17.ru/]наркологическая клиника[/url]
Вывод из запоя в Тольятти — это медицинская процедура, направленная на очищение организма от продуктов распада алкоголя и восстановление нормального состояния здоровья. Длительное употребление спиртных напитков приводит к серьёзной интоксикации, нарушению работы нервной, сердечно-сосудистой и пищеварительной систем. Самостоятельные попытки прекратить запой могут быть опасны, поэтому оптимальным решением является обращение к врачу-наркологу, который проведёт лечение безопасно и эффективно.
Получить дополнительную информацию – [url=https://vyvod-iz-zapoya-v-tolyatti17.ru/]вывод из запоя на дому круглосуточно[/url]
Для повышения эффективности в капельницы добавляются витамины группы B, аскорбиновая кислота, кардиопротекторы и антиоксиданты. Такая комбинация позволяет не только ускорить выведение продуктов распада алкоголя, но и предотвратить развитие постабстинентных расстройств. Благодаря точной дозировке и мягкому темпу введения растворов снижается риск побочных реакций, а восстановление проходит плавно и безопасно.
Углубиться в тему – http://vyvod-iz-zapoya-v-voronezhe17.ru
Каждый вызов нарколога на дом проходит по строгому алгоритму. Врачи клиники «ВоронМед Профи» используют индивидуальный подход, адаптируя лечение под конкретного пациента. В таблице приведена типовая схема работы выездной бригады, которая помогает понять, как проходит процесс помощи от начала до конца.
Ознакомиться с деталями – [url=https://narkolog-na-dom-v-voronezhe17.ru/]вызов врача нарколога на дом в воронеже[/url]
Инфузионные растворы подбираются строго индивидуально, после осмотра врача и анализа показателей пациента. При необходимости курс повторяется с изменением состава раствора для достижения максимального эффекта.
Исследовать вопрос подробнее – [url=https://narkologicheskaya-klinika-v-novokuzneczke17.ru/]narkologicheskaya-klinika-v-novokuzneczke17.ru/[/url]
Когда разумно
Исследовать вопрос подробнее – [url=https://narkologicheskaya-klinika-ehlektrostal0.ru/]narkologicheskaya-klinika-ehlektrostal0.ru/[/url]
Цель
Ознакомиться с деталями – [url=https://narkologicheskaya-klinika-shchyolkovo0.ru/]наркологическая клиника отзывы[/url]
Запой представляет собой состояние, при котором организм находится под постоянным воздействием этанола. Это вызывает интоксикацию, нарушение обменных процессов и дестабилизацию психики. При обращении за помощью врач-нарколог оценивает состояние пациента и подбирает индивидуальную схему терапии, чтобы безопасно вывести человека из запоя и предотвратить развитие синдрома отмены. Вмешательство проводится как в стационаре, так и на дому, в зависимости от состояния пациента.
Ознакомиться с деталями – [url=https://vyvod-iz-zapoya-v-krasnoyarske17.ru/]вывод из запоя красноярск[/url]
Детоксикация — это первый и важнейший этап лечения в наркологической клинике в Красноярске. Она проводится с целью выведения токсинов из организма и восстановления функций жизненно важных органов. Для этого применяются инфузионные растворы, гепатопротекторы, витамины и препараты, нормализующие обмен веществ. После снятия интоксикации пациент получает медикаментозную поддержку, направленную на снижение тяги к алкоголю или наркотикам и стабилизацию эмоционального состояния.
Выяснить больше – https://narcologicheskaya-klinika-v-krasnoyarske17.ru/chastnaya-narkologicheskaya-klinika-krasnoyarsk
поисковое seo в москве [url=https://poiskovoe-seo-v-moskve.ru/]poiskovoe-seo-v-moskve.ru[/url] .
how to deposit money in 1win account [url=http://1win5745.help]http://1win5745.help[/url]
Клиника «КузбассМед Центр» в Новокузнецке обеспечивает непрерывный приём пациентов и выезд нарколога на дом. Такой формат позволяет оказать экстренную помощь при интоксикации или запое прямо на месте, не дожидаясь ухудшения состояния. Медицинская команда работает в режиме 24/7, что особенно важно при острых состояниях. Врач выезжает в течение часа после вызова, проводит диагностику, ставит капельницу и контролирует жизненные показатели. В стационаре доступны детоксикация, медикаментозная терапия и психотерапевтическая поддержка — всё под постоянным медицинским наблюдением.
Получить дополнительную информацию – [url=https://narkologicheskaya-klinika-v-novokuzneczke17.ru/]платная наркологическая клиника в новокузнецке[/url]
маркетинговый блог [url=https://statyi-o-marketinge2.ru/]statyi-o-marketinge2.ru[/url] .
Вывод из запоя в Тольятти — это медицинская процедура, направленная на очищение организма от продуктов распада алкоголя и восстановление нормального состояния здоровья. Длительное употребление спиртных напитков приводит к серьёзной интоксикации, нарушению работы нервной, сердечно-сосудистой и пищеварительной систем. Самостоятельные попытки прекратить запой могут быть опасны, поэтому оптимальным решением является обращение к врачу-наркологу, который проведёт лечение безопасно и эффективно.
Выяснить больше – [url=https://vyvod-iz-zapoya-v-tolyatti17.ru/]нарколог на дом вывод из запоя в тольятти[/url]
Наркологическая клиника — это пространство, где медицинская наука сочетается с психологической поддержкой и индивидуальным подходом к каждому пациенту. В клинике «ВоронежМед Альянс» лечение зависимости организовано по принципам доказательной медицины: каждый этап терапии основан на объективных данных, контролируемых результатах и четких критериях эффективности. Здесь помогают не просто устранить физические последствия зависимости, но и восстановить внутренние ресурсы человека, вернуть уверенность, осознанность и способность строить новую жизнь без алкоголя и наркотиков.
Подробнее тут – [url=https://narcologicheskaya-klinika-v-voronezhe17.ru/]наркологическая клиника клиника помощь воронеж[/url]
Капельницы от запоя включают препараты для очищения крови, восстановления электролитного баланса и защиты печени. Используются только сертифицированные растворы, одобренные Минздравом РФ. В клинике применяется комплексный подход: одновременно с физическим восстановлением запускаются лёгкие дыхательные и релаксационные методики, которые помогают организму вернуться в стабильное состояние.
Подробнее можно узнать тут – [url=https://vyvod-iz-zapoya-v-voronezhe17.ru/]вывод из запоя цена воронеж[/url]
Выездная наркологическая помощь организована по чётко выстроенной схеме. Каждый этап направлен на стабилизацию состояния и безопасное восстановление функций организма после алкогольного или наркотического воздействия.
Исследовать вопрос подробнее – [url=https://narkolog-na-dom-v-ufe17.ru/]нарколог на дом срочно уфа[/url]
Цель
Получить больше информации – http://narkologicheskaya-klinika-shchyolkovo0.ru
Капельница не просто устраняет симптомы похмелья — она восстанавливает внутренний баланс, снижает токсическую нагрузку и поддерживает работу жизненно важных органов. После процедуры пациент чувствует прилив сил, прояснение сознания и эмоциональную стабильность. Эффект закрепляется при соблюдении рекомендаций врача и отказе от алкоголя в последующие дни.
Подробнее тут – [url=https://vivod-iz-zapoya-v-volgograde17.ru/]вывод из запоя цена в волгограде[/url]
Наркологическая клиника в Воронеже — это специализированное медицинское учреждение, предоставляющее помощь людям, столкнувшимся с зависимостью от алкоголя, наркотиков и других психоактивных веществ. Лечение проводится под контролем квалифицированных врачей, с использованием современных методик детоксикации, психотерапии и реабилитации. Цель работы специалистов — не только устранить физическую зависимость, но и помочь пациенту восстановить эмоциональное равновесие, вернуть контроль над поведением и мотивацию к трезвости.
Подробнее можно узнать тут – [url=https://narkologicheskaya-clinica-v-voronezhe17.ru/]наркологическая клиника вывод из запоя воронеж[/url]
Индивидуально подобранный состав раствора обеспечивает быстрое выведение токсинов и улучшение физического состояния уже в течение первых часов после начала лечения.
Получить дополнительные сведения – [url=https://kapelnicza-ot-zapoya-v-volgograde17.ru/]капельница от запоя круглосуточно[/url]
Ожидаемая траектория в первые сутки
Получить больше информации – [url=https://narkologicheskaya-klinika-ehlektrostal0.ru/]narkologicheskaya-klinika-ehlektrostal0.ru/[/url]
Когда ночь затягивается, тревога нарастает, а самочувствие «скачет», важны не громкие обещания, а последовательность медицинских действий. «Трезвый Контур» в Одинцово выстраивает помощь так, чтобы от звонка до облегчения прошло минимум времени и ни один шаг не был импровизацией: первичная оценка рисков, персональная инфузионная терапия, мягкая коррекция сна и тревоги, регулярные замеры показателей, понятные рекомендации для семьи. Мы не используем «универсальные коктейли» и не «вырубаем» пациента сильными седативными — дозировки и темп капельниц подбираются под возраст, длительность запоя, сопутствующие заболевания и уже принимаемые препараты. Цель — быстро снять токсическую нагрузку, стабилизировать давление и пульс, вернуть управляемый сон и зафиксировать маршрут на ближайшие 24–72 часа, чтобы утро началось не с нового витка симптомов, а с предсказуемого восстановления.
Детальнее – [url=https://vyvod-iz-zapoya-odincovo10.ru/]anonimnyj-vyvod-iz-zapoya-odincovo[/url]
Мы строим лечение вокруг предсказуемости: минимум лишних вопросов, максимум конкретики и понятный план на ближайшие сутки. Дежурный врач уточняет только то, что влияет на безопасность — длительность эпизода, актуальные лекарства и переносимость, сон и апетит, наличие поддержки дома. Из этого скелета рождается маршрут: выезд на дом, приём без очередей или стационар с наблюдением 24/7. Конфиденциальность встроена по умолчанию: нейтральная коммуникация, доступ к карте только у вовлечённой команды, документы по запросу — в нейтральных формулировках. Внешний шум гасим, внимание переводим на цель: ровная стабилизация без «качелей» и с понятными контрольными точками.
Выяснить больше – [url=https://narkologicheskaya-klinika-domodedovo0.ru/]анонимная наркологическая клиника[/url]
Правильный подбор лекарственных средств позволяет не только уменьшить проявления синдрома отмены, но и стабилизировать эмоциональное состояние пациента, снижая риск срывов. Реабилитационные программы включают физиотерапию, спортивные занятия и коррекцию образа жизни, что способствует полноценному восстановлению организма.
Подробнее тут – [url=https://lechenie-narkomanii-tver0.ru/]запой лечение наркомания тверь[/url]
Ожидаемая траектория в первые сутки
Ознакомиться с деталями – http://narkologicheskaya-klinika-ehlektrostal0.ru
Терапия строится из узких модулей с чёткими «выключателями». Мы не «усиливаем» схему без показаний — каждое расширение привязано к конкретной цели и времени переоценки. Ниже — ориентир по основным программам «ЕнисейМед Центра».
Исследовать вопрос подробнее – http://narkologicheskaya-klinika-v-krasnoyarske17.ru
Алкогольная интоксикация вызывает сильное обезвоживание и разрушает баланс электролитов в организме. Без медицинской помощи восстановление может занять несколько дней, а в тяжёлых случаях приводит к осложнениям. Капельница помогает безопасно и быстро вывести этанол и продукты его распада, восполнить уровень жидкости, снизить нагрузку на печень и сердечно-сосудистую систему. Процедура проводится амбулаторно или на дому, что делает её доступной и удобной для пациентов.
Подробнее тут – [url=https://kapelnicza-ot-zapoya-v-volgograde17.ru/]капельница от запоя цена[/url]
Для наглядности приведена таблица с основными направлениями терапии и их результатами:
Изучить вопрос глубже – [url=https://narkologicheskaya-clinica-v-voronezhe17.ru/]наркологическая клиника наркологический центр в воронеже[/url]
Что включено на практике
Узнать больше – [url=https://narkologicheskaya-klinika-serpuhov0.ru/]наркологическая клиника помощь на дому[/url]
Комплексное применение этих методов позволяет значительно ускорить процесс восстановления и предотвратить осложнения.
Подробнее можно узнать тут – [url=https://narcologicheskaya-klinika-v-novokuzneczke17.ru/]вывод наркологическая клиника в новокузнецке[/url]
Вывод из запоя — это не просто медицинская процедура, а жизненно важный этап, позволяющий вернуть контроль над самочувствием и предотвратить осложнения. В клинике «РеабКузбасс» пациенты получают помощь в любое время суток: опытные наркологи выезжают на дом, проводят капельницы и медикаментозную детоксикацию, подбирают индивидуальные схемы восстановления. Такой подход помогает не только устранить последствия запоя, но и запустить процесс полноценного оздоровления организма.
Получить дополнительную информацию – [url=https://vyvod-iz-zapoya-v-novokuzneczke17.ru/]вывод из запоя на дому в новокузнецке[/url]
Пациент может выбрать анонимный формат — все данные защищены, а пребывание в клинике проходит в атмосфере уважения и деликатности. Особое внимание уделяется созданию комфортных условий: палаты оснащены системой вентиляции, регулируемым освещением и кнопкой вызова медперсонала. Круглосуточный контроль состояния позволяет своевременно реагировать на малейшие изменения и корректировать курс лечения.
Разобраться лучше – [url=https://narcologicheskaya-klinika-v-voronezhe17.ru/]наркологическая клиника стационар[/url]
Чтобы процедура прошла быстрее и спокойнее, подготовьте пространство и информацию о пациенте заранее: это экономит время и повышает безопасность.
Подробнее можно узнать тут – [url=https://vyvod-iz-zapoya-korolev10.ru/]вывод из запоя на дому[/url]
Все растворы проходят фармацевтический контроль, а процедуры выполняются одноразовыми стерильными инструментами. После завершения капельницы врач наблюдает пациента в течение 15–30 минут, оценивает результат и даёт рекомендации по дальнейшему восстановлению. Важно не прерывать терапию самостоятельно — эффект закрепляется только при соблюдении рекомендаций.
Изучить вопрос глубже – https://narkolog-na-dom-v-voronezhe17.ru/vrach-narkolog-na-dom-voronezh
Детоксикация — это первый и важнейший этап лечения в наркологической клинике в Красноярске. Она проводится с целью выведения токсинов из организма и восстановления функций жизненно важных органов. Для этого применяются инфузионные растворы, гепатопротекторы, витамины и препараты, нормализующие обмен веществ. После снятия интоксикации пациент получает медикаментозную поддержку, направленную на снижение тяги к алкоголю или наркотикам и стабилизацию эмоционального состояния.
Получить больше информации – http://narcologicheskaya-klinika-v-krasnoyarske17.ru
Первым шагом при лечении зависимости является детоксикация — очищение организма от токсинов, накопившихся в результате употребления алкоголя или наркотиков. Врач подбирает состав инфузионных растворов и лекарственных препаратов индивидуально. Процедура направлена на восстановление обмена веществ, улучшение работы печени и сердца, нормализацию сна и аппетита. После завершения детоксикации пациент чувствует облегчение, снижается тревожность и повышается концентрация внимания.
Выяснить больше – http://narkologicheskaya-klinika-v-volgograde17.ru/chastnaya-narkologicheskaya-klinika-volgograd/
Вывод из запоя — это медицинская процедура, направленная на очищение организма от продуктов распада алкоголя и восстановление нормальной работы внутренних органов. В клинике «Трезвый Путь Волгоград» пациентам оказывается профессиональная помощь с использованием современных методов дезинтоксикации, медикаментозной поддержки и психологического сопровождения. Лечение проводится круглосуточно, включая выезд нарколога на дом. Такой формат помогает быстро стабилизировать состояние пациента, минимизировать риск осложнений и обеспечить безопасность при выходе из запоя любой продолжительности.
Разобраться лучше – [url=https://vivod-iz-zapoya-v-volgograde17.ru/]вывод из запоя клиника[/url]
Мы переводим субъективное «полегчало» в наблюдаемые факты. Быстрее всего меняются переносимость воды и интенсивность тошноты; вслед за этим «садится» пульс/давление и на 3+ пункта снижается тремор. «Первая ночь» — экзамен устойчивости: цель — ? 6 часов сна и не более одного пробуждения. Утром — две «малые победы» (гигиена, 10–15 минут тихой ходьбы) без «отката». При такой динамике модули по плану выключаются, пациент получает короткую карту самопомощи на 72 часа: светогигиена, интервалы питья, дыхательные ритмы, речевые правила семьи и пороги связи с дежурным.
Выяснить больше – [url=https://narkologicheskaya-klinika-v-krasnoyarske17.ru/]наркологическая клиника стационар[/url]
В этом интересном тексте собраны обширные сведения, которые помогут вам понять различные аспекты обсуждаемой темы. Мы разбираем детали и факты, делая акцент на важности каждого элемента. Не упустите возможность расширить свои знания и взглянуть на мир по-новому!
См. подробности – https://muroto2925.click/2025/02/28/%E3%83%9D%E3%82%B1%E3%83%A2%E3%83%B3go%E3%83%AF%E3%82%AF%E3%83%AF%E3%82%AF%E6%94%BB%E7%95%A5%E3%83%9E%E3%82%B9%E3%82%BF-2
Современные методы лечения в наркологической клинике в Новокузнецке основаны на доказательной медицине. При поступлении пациент проходит полное обследование, включающее оценку физического состояния, психоэмоционального фона и наличия сопутствующих заболеваний. На основе полученных данных составляется персональная программа терапии, охватывающая медицинский, психологический и социальный аспекты выздоровления.
Получить дополнительные сведения – [url=https://narcologicheskaya-klinika-v-novokuzneczke17.ru/]наркологическая клиника наркологический центр новокузнецк[/url]
internetagentur seo [url=https://poiskovoe-seo-v-moskve.ru/]poiskovoe-seo-v-moskve.ru[/url] .
цифровой маркетинг статьи [url=https://statyi-o-marketinge2.ru/]statyi-o-marketinge2.ru[/url] .
Эта информационная статья охватывает широкий спектр актуальных тем и вопросов. Мы стремимся осветить ключевые факты и события с ясностью и простотой, чтобы каждый читатель мог извлечь из нее полезные знания и полезные инсайты.
Узнать больше > – https://risenshinedriving.com/index.php/2023/02/28/saurav-got-his-driving-licence
1win login online [url=http://1win5745.help/]http://1win5745.help/[/url]
Во время процедуры врач фиксирует ключевые параметры, чтобы убедиться в безопасности и эффективности терапии. Мониторинг проводится при каждом выезде и помогает отслеживать динамику в режиме реального времени. В таблице ниже указаны основные показатели, за которыми следит специалист.
Углубиться в тему – [url=https://narkolog-na-dom-v-voronezhe17.ru/]нарколог на дом клиника воронеж[/url]
Эта познавательная публикация погружает вас в море интересного контента, который быстро захватит ваше внимание. Мы рассмотрим важные аспекты темы и предоставим вам уникальные Insights и полезные сведения для дальнейшего изучения.
Детали по клику – https://pompes-funebres-cuche.com/espace-hommages/rene-dornier
В этом обзорном материале представлены увлекательные детали, которые находят отражение в различных аспектах жизни. Мы исследуем непонятные и интересные моменты, позволяя читателю увидеть картину целиком. Погрузитесь в мир знаний и удивительных открытий!
Разобраться лучше – https://thegolfperformancecenter.com/5-elements-blog/get-your-proper-zzzs
Этот сборник информации привлекает множеством мелких деталей и необычных ракурсов. Мы предлагаем взгляды, редко полезные, но способные немного разнообразить знакомство с темой.
Подробнее читать – [url=https://rostov-narkologiya.ru/uslugi-ot-alkogolizma/vyvod-iz-zapoya/]детокс чай для похудения[/url]
В этой статье представлен занимательный и актуальный контент, который заставит вас задуматься. Мы обсуждаем насущные вопросы и проблемы, а также освещаем истории, которые вдохновляют на действия и изменения. Узнайте, что стоит за событиями нашего времени!
Ознакомиться с теоретической базой – https://akadcinta.com/a
Эта статья предлагает живое освещение актуальной темы с множеством интересных фактов. Мы рассмотрим ключевые моменты, которые делают данную тему важной и актуальной. Подготовьтесь к насыщенному путешествию по неизвестным аспектам и узнайте больше о значимых событиях.
Получить полную информацию – https://www.defining-blog.ru/poluchit-probnyj-dostup-k-publikacii
В этой публикации мы предлагаем подробные объяснения по актуальным вопросам, чтобы помочь читателям глубже понять их. Четкость и структурированность материала сделают его удобным для усвоения и применения в повседневной жизни.
Нажмите, чтобы узнать больше – https://eastmanglobal.com/product/bb-axle-fitting-zp-thomson-type
В данной обзорной статье представлены интригующие факты, которые не оставят вас равнодушными. Мы критикуем и анализируем события, которые изменили наше восприятие мира. Узнайте, что стоит за новыми открытиями и как они могут изменить ваше восприятие реальности.
Практические советы ждут тебя – https://www.tumbabikesandblooms.com/tumba-bikes-and-blooms-nursery-items-67
Этот информационный обзор станет отличным путеводителем по актуальным темам, объединяющим важные факты и мнения экспертов. Мы исследуем ключевые идеи и представляем их в доступной форме для более глубокого понимания. Читайте, чтобы оставаться в курсе событий!
Детальнее – http://ujvbeauty.com/dark-skintone
Мы предлагаем вам окунуться в океан любопытных фактов и вдохновляющих историй. Эта публикация поможет расширить горизонты, разбудить интерес к науке и истории и увидеть мир с новой стороны.
Изучить эмпирические данные – https://www.voyage-unique.fr/partir-en-seine-et-marne-une-escapade-gourmande-au-coeur-de-la-gastronomie-et-du-terroir
Наркозависимость — это не просто вредная привычка, а тяжёлое хроническое заболевание, требующее комплексного и последовательного лечения. В клинике «РеабКузбасс» в Новокузнецке разработаны персонализированные программы помощи, учитывающие медицинские, психологические и социальные аспекты проблемы. Каждому пациенту подбирается уникальный маршрут восстановления, начиная с первичной диагностики и заканчивая адаптацией к жизни без наркотиков. Поддержка оказывается круглосуточно, с полным соблюдением конфиденциальности. Психотерапевты и врачи работают в тесной связке, чтобы не только устранить физическую зависимость, но и восстановить личность пациента, вернуть ему мотивацию к жизни и уверенность в будущем.
Разобраться лучше – https://lechenie-narkomanii-novokuzneczk0.ru/reabilitacziya-narkomana-novokuzneczk/
Эта статья погружает вас в увлекательный мир знаний, где каждый факт становится открытием. Мы расскажем о ключевых исторических поворотных моментах и научных прорывах, которые изменили ход цивилизации. Поймите, как прошлое формирует настоящее и как его уроки могут помочь нам строить будущее.
Изучить материалы по теме – https://www.cordobaadiario.com/encontronazo-2
Эта статья полна интересного контента, который побудит вас исследовать новые горизонты. Мы собрали полезные факты и удивительные истории, которые обогащают ваше понимание темы. Читайте, погружайтесь в детали и наслаждайтесь процессом изучения!
Лучшее решение — прямо здесь – https://db-it.dk/document-store
В данной обзорной статье представлены интригующие факты, которые не оставят вас равнодушными. Мы критикуем и анализируем события, которые изменили наше восприятие мира. Узнайте, что стоит за новыми открытиями и как они могут изменить ваше восприятие реальности.
Всё самое вкусное внутри – https://tadomalkine.eu/kainynas/attachment/2
Мы предлагаем вам окунуться в океан любопытных фактов и вдохновляющих историй. Эта публикация поможет расширить горизонты, разбудить интерес к науке и истории и увидеть мир с новой стороны.
Получить дополнительную информацию – https://www.defining-blog.ru/category/onlayn
В этой статье представлен занимательный и актуальный контент, который заставит вас задуматься. Мы обсуждаем насущные вопросы и проблемы, а также освещаем истории, которые вдохновляют на действия и изменения. Узнайте, что стоит за событиями нашего времени!
Подробнее – https://drnabisar.com/product/ubat-panas-sakit-otot-sendi
Этот обзор предлагает свежий взгляд на предметы, которые и без того привычны. Мы упоминаем факты, не имеющие большого значения, и события с неясной важностью, но они присутствуют здесь.
Подробнее читать – [url=https://rostov-narkologiya.ru/uslugi-ot-narkomanii/mefedronovaya-zavisimost/]мефедроновая зависимость[/url]
В статье представлены ключевые моменты по актуальной теме, дополненные советами экспертов и ссылками на дополнительные ресурсы. Цель материала — дать читателю инструменты для самостоятельного развития и принятия осознанных решений.
Лови подробности – https://mcyportal.mosti.gov.my/innovathon/events
В этом информативном тексте представлены захватывающие события и факты, которые заставят вас задуматься. Мы обращаем внимание на важные моменты, которые часто остаются незамеченными, и предлагаем новые перспективы на привычные вещи. Подготовьтесь к тому, чтобы быть поглощенным увлекательными рассказами!
Получить дополнительные сведения – https://ranchiarticle.com/cloth-changing-tent-or-toilet-tent
Этот текст призван помочь читателю расширить кругозор и получить практические знания. Мы используем простой язык, наглядные примеры и структурированное изложение, чтобы сделать обучение максимально эффективным и увлекательным.
Перейти к статье – https://www.abcconsulting-cr.com/2022/07/02/derechos-usufructo-costa-rica
В этой информационной статье вы найдете интересное содержание, которое поможет вам расширить свои знания. Мы предлагаем увлекательный подход и уникальные взгляды на обсуждаемые темы, побуждая пользователей к активному мышлению и критическому анализу.
Погрузиться в детали – https://afriquela1ere.com/rw/2022/02/14/ukraine-irashaka-kuganira-nuburusiya-bitarenze-amasaha-48-ku-ngabo-bukomeje-kurunda-hafi-yabo
Эта статья погружает вас в увлекательный мир знаний, где каждый факт становится открытием. Мы расскажем о ключевых исторических поворотных моментах и научных прорывах, которые изменили ход цивилизации. Поймите, как прошлое формирует настоящее и как его уроки могут помочь нам строить будущее.
Это стоит прочитать полностью – https://ledefi.mg/divergences-diplomatiques-entre-madagascar-et-les-comores
Этот текст призван помочь читателю расширить кругозор и получить практические знания. Мы используем простой язык, наглядные примеры и структурированное изложение, чтобы сделать обучение максимально эффективным и увлекательным.
Смотрите также… – http://imedia-conseil.fr/2021/07/19/imedia-recrute-une-consultante-en-communication-dinfluence
Эта публикация погружает вас в мир увлекательных фактов и удивительных открытий. Мы расскажем о ключевых событиях, которые изменили ход истории, и приоткроем завесу над научными достижениями, которые вдохновили миллионы. Узнайте, чему может научить нас прошлое и как применить эти знания в будущем.
Как это работает — подробно – https://www.cursosalpha.com/blog/las-nuevas-bombas-diesel-electronicas
Этот информационный обзор станет отличным путеводителем по актуальным темам, объединяющим важные факты и мнения экспертов. Мы исследуем ключевые идеи и представляем их в доступной форме для более глубокого понимания. Читайте, чтобы оставаться в курсе событий!
Тыкай сюда — узнаешь много интересного – https://sleeptest.matraci.info/hello-world
В данной обзорной статье представлены интригующие факты, которые не оставят вас равнодушными. Мы критикуем и анализируем события, которые изменили наше восприятие мира. Узнайте, что стоит за новыми открытиями и как они могут изменить ваше восприятие реальности.
Не пропусти важное – https://www.mamas-taxi.cz/there-are-limitless-opportunities-time
Этот интересный отчет представляет собой сборник полезных фактов, касающихся актуальных тем. Мы проанализируем данные, чтобы вы могли сделать обоснованные выводы. Читайте, чтобы узнать больше о последних трендах и значимых событиях!
Получить дополнительную информацию – https://unosesentaiuno.com/2023/08/11/banos-diseno-y-color
В этом интересном тексте собраны обширные сведения, которые помогут вам понять различные аспекты обсуждаемой темы. Мы разбираем детали и факты, делая акцент на важности каждого элемента. Не упустите возможность расширить свои знания и взглянуть на мир по-новому!
Прочитать подробнее – https://severodvinsk.ria.city/arkhangelsk/2025-08-03
Эта познавательная публикация погружает вас в море интересного контента, который быстро захватит ваше внимание. Мы рассмотрим важные аспекты темы и предоставим вам уникальные Insights и полезные сведения для дальнейшего изучения.
Смотрите также… – https://гормедцентр.рф/moskva
1win casino [url=http://1win5745.help]http://1win5745.help[/url]
Откройте для себя скрытые страницы истории и малоизвестные научные открытия, которые оказали колоссальное влияние на развитие человечества. Статья предлагает свежий взгляд на события, которые заслуживают большего внимания.
Познакомиться с результатами исследований – http://www.spectrumcommunications.ie/nortel-bcm-50450-end-of-life
В этом обзорном материале представлены увлекательные детали, которые находят отражение в различных аспектах жизни. Мы исследуем непонятные и интересные моменты, позволяя читателю увидеть картину целиком. Погрузитесь в мир знаний и удивительных открытий!
Получить больше информации – https://getoutdoorsgethappy.com/pct-2023/pct-trail-journal/kelso-road-to-mile-597
комплексное продвижение сайтов москва [url=https://poiskovoe-seo-v-moskve.ru/]комплексное продвижение сайтов москва[/url] .
Эта обзорная заметка содержит ключевые моменты и факты по актуальным вопросам. Она поможет читателям быстро ориентироваться в теме и узнать о самых важных аспектах сегодня. Получите краткий курс по современной информации и оставайтесь в курсе событий!
Неизвестные факты о… – http://blog.fankey.info/?p=1152
1win run [url=https://1win5745.help]https://1win5745.help[/url]
В этом интересном тексте собраны обширные сведения, которые помогут вам понять различные аспекты обсуждаемой темы. Мы разбираем детали и факты, делая акцент на важности каждого элемента. Не упустите возможность расширить свои знания и взглянуть на мир по-новому!
Узнать больше – https://tecnoetica.it/2023/10/04/buongiorno-sicilia-le-conseguenze-sociali-dellintelligenza-artificiale
блог о маркетинге [url=https://statyi-o-marketinge2.ru/]блог о маркетинге[/url] .
Даже телефонный разговор с клиникой может многое сказать о её подходе. Если вам предлагают типовое лечение без уточнения подробностей или избегают вопросов о составе команды, это тревожный сигнал. Серьёзные учреждения в Мурманске обязательно предложат предварительную консультацию, зададут уточняющие вопросы и расскажут, как строится программа помощи.
Исследовать вопрос подробнее – [url=https://lechenie-alkogolizma-murmansk0.ru/]центр лечения алкоголизма[/url]
Перед тем как показать примерные программы, важно подчеркнуть: реальный план всегда персонализируется, но понимание базовых форматов помогает семье и пациенту не теряться в терминах и сразу видеть логику.
Получить дополнительные сведения – https://narkologicheskaya-klinika-kolomna2-10.ru/narkologicheskaya-klinika-oficialnyj-sajt-v-kolomne
Когда запой длится не первый день, а состояние уже сопровождается тремором, потливостью, резкими перепадами давления, бессонницей, тревогой, тошнотой или рвотой, попытка «перетерпеть» или лечить самостоятельно таблетками становится опасным экспериментом. Сочетание алкоголя с сильнодействующими успокоительными, обезболивающими или сомнительными «антипохмельными» легко приводит к нарушению дыхания, провалам в сознании, аритмиям и скрытому развитию предделирия. Домашние средства не учитывают ни электролитные сдвиги, ни состояние печени и сердца, ни уже принятые лекарства. Выездной нарколог «СерпуховТрезвие» в Серпухове выстраивает ситуацию иначе: ещё по телефону врач собирает ключевую информацию — длительность запоя, примерные объёмы и виды алкоголя, наличие гипертонии, ИБС, диабета, заболеваний печени и почек, неврологических проблем, какие препараты уже давали и в каких дозах, были ли судороги или эпизоды дезориентации. На месте проводится объективная диагностика: измерение давления, пульса, сатурации, температуры, оценка тремора, степени обезвоживания, психического состояния, неврологического статуса. Только после этого принимается решение: проводить детокс на дому или сразу рекомендовать стационар. Такой фильтр защищает от грубых ошибок, позволяет точно подобрать схему и не терять драгоценное время, пытаясь «угадать» лечение.
Исследовать вопрос подробнее – [url=https://narkolog-na-dom-serpuhov10.ru/]частный нарколог на дом[/url]
Такая последовательность действий позволяет обеспечить результативность и закрепить положительные изменения.
Детальнее – [url=https://narcologicheskaya-klinika-perm0.ru/]наркологические клиники алкоголизм[/url]
Клиника предлагает возможность круглосуточного пребывания в комфортных палатах. Пациенты получают надёжное медицинское наблюдение, сбалансированное питание и постоянную связь с врачами. Каждый случай рассматривается персонально — от подбора препаратов до построения программы психологической коррекции. Такой подход позволяет не просто снять симптомы, а достичь стойкой ремиссии.
Получить дополнительные сведения – https://narkologicheskaya-clinika-v-ryazani17.ru/narkologicheskij-staczionar-ryazan/
Стационар «Трезвый Путь Коломна» ориентирован на безопасность в самых сложных случаях: длительные запои, тяжёлая абстиненция, смешанное употребление, выраженные соматические проблемы, риск делирия или судорог. Пациент попадает под наблюдение 24/7, что принципиально отличает клинику от домашних попыток «спасти своими средствами». Контроль жизненно важных показателей, своевременная коррекция схем лечения, возможность быстро отреагировать на осложнения — всё это снижает риск критических ситуаций, которые часто возникают именно после неумелых домашних вмешательств или «выездов без ответственности».
Получить больше информации – https://narkologicheskaya-klinika-kolomna2-10.ru/luchshie-narkologicheskie-kliniki-v-kolomne/
Ниже — ключевые направления, которые логично дополняют друг друга и формируют единый маршрут лечения:
Получить дополнительные сведения – [url=https://narkologicheskaya-klinika-ramenskoe10.ru/]narkologicheskaya-klinika[/url]
Медицинская помощь строится на принципах индивидуального подхода и поэтапной терапии. Каждый пациент проходит диагностику, после чего составляется персональная программа, включающая медикаментозную поддержку, консультации психотерапевта и физиопроцедуры. Такой подход помогает не просто снять симптомы, но и восстановить организм полностью.
Подробнее можно узнать тут – http://narkologicheskaya-klinika-v-ryazani17.ru
В статье-обзоре представлены данные сомнительной актуальности и факты без явной взаимосвязи. Читатель ознакомится с разными мнениями, хотя они вряд ли существенно изменят его представление о теме.
Подробнее читать – [url=https://rostov-narkologiya.ru/ ]мефедроновая зависимость[/url]
Главная задача капельницы при выезде нарколога в Щёлково — не создать видимость лёгкости, а реально уменьшить интоксикацию и восстановить базовые функции организма. В «ЩёлковоМед Профи» используются современные схемы, а не сомнительные смеси «из всего подряд». В стандартной основе — растворы для восполнения объёма циркулирующей жидкости, выравнивания электролитного баланса и коррекции КЩС, что снижает нагрузку на сердце и мозг. Витамины группы B и магний поддерживают нервную систему, уменьшают тремор, раздражительность и риск судорожных реакций. При необходимости врач добавляет гепатопротекторные и антиоксидантные компоненты, если есть признаки перегрузки печени; при выраженной тошноте — противорвотные, чтобы пациент мог нормально пить и питаться. Для нормализации сна и тревоги подбираются мягкие анксиолитики в дозах, позволяющих контролировать состояние, а не «вырубать» человека. Агрессивные седативные протоколы, которые маскируют ухудшения и опасны для дыхания и сердца, сознательно исключаются. Оценка эффекта идёт по конкретным критериям: стабилизация давления и пульса, уменьшение дрожи, улучшение цвета кожи, уход тошноты, снижение тревоги, появление естественного, а не лекарственного сна. После выезда семья получает ясный план, как закрепить эффект, чтобы наутро не пришлось начинать всё заново.
Исследовать вопрос подробнее – [url=https://narkolog-na-dom-shchelkovo10.ru/]запой нарколог на дом[/url]
Выезд нарколога на дом в Серпухове — это возможность получить профессиональную помощь в условиях, когда везти человека в клинику сложно, опасно или он категорически отказывается от госпитализации. Специалисты «СерпуховТрезвие» работают круглосуточно, приезжают по адресу с одноразовыми системами, стерильными расходниками и необходимым набором препаратов, проводят осмотр, оценивают жизненно важные показатели, подбирают индивидуальную капельницу, контролируют реакцию и оставляют подробные рекомендации. Всё происходит конфиденциально, без лишних свидетелей, без осуждения и давления. Цель — не формально «поставить капельницу», а безопасно стабилизировать состояние, снизить интоксикацию, выровнять давление и пульс, уменьшить тревогу и вернуть человеку возможность нормально спать и восстанавливаться, не доводя до осложнений и экстренной госпитализации.
Ознакомиться с деталями – [url=https://narkolog-na-dom-serpuhov10.ru/]vyzvat-narkologa-na-dom-serpuhov[/url]
Если на предзвонке выявляются «красные флаги» — давящая боль в груди, одышка в покое, спутанность сознания, судороги, неукротимая рвота, резкое падение насыщения кислородом — мы организуем бесшовный перевод в стационар. Место резервируем заранее, логистику строим так, чтобы не привлекать внимания соседей и не затягивать старт лечения. При отсутствии угроз терапия может начаться дома с последующим телесопровождением и при необходимости — краткой госпитализацией.
Выяснить больше – [url=https://narcologicheskaya-klinika-saratov0.ru/]анонимная наркологическая клиника[/url]
Услуга
Подробнее – https://narkolog-na-dom-shchelkovo10.ru/vrach-narkolog-na-dom-shchelkovo
Такая структура лечения помогает пациентам пройти все этапы восстановления под контролем специалистов.
Узнать больше – http://narcologicheskaya-klinika-perm0.ru/perm-narkologiya/
В этом тексте собрано множество случайных сведений и довольно неопределённых мыслей, которые могут чем-то заинтересовать. Мы отмечаем моменты, которые не особенно важны, но всё же занимают своё место в повествовании.
Вот – [url=https://arma-rehab.ru/lechenie-alkogolizma/]бинго онлайн[/url]
Выбор наркологической клиники в Коломне — это не «слишком серьёзно», а логичный шаг, если зависимость уже зашла дальше спонтанных эпизодов. Алкоголизм, наркомания, злоупотребление успокоительными и обезболивающими — это не только психологическая тяга, но и перестройка организма: страдают печень, сердце, сосуды, нервная система, гормональный фон, сон, психика. Дома редко есть возможность круглосуточно контролировать состояние, правильно отменять вещества, отслеживать давление, пульс, поведение, не допускать опасных комбинаций препаратов. Родственники устают, реагируют эмоциями, а не медицинской логикой, человек чувствует себя под прицелом, но не под защитой. В «КоломнаМед Центр» всё выстроено так, чтобы снять нагрузку с семьи и вывести помощь из зоны хаотичных решений. Здесь оценивают не только то, «что и сколько пьёт или принимает», а весь контекст: длительность зависимости, срывы, уже перенесённые делирии или передозировки, сопутствующие болезни, психические состояния, семейную ситуацию. На основе этого формируется безопасный план: где начать — в стационаре или амбулаторно, какой формат детокса выбрать, насколько жёстко вести наблюдение, как сразу встроить психотерапевтическую и социальную поддержку. Клиника в Коломне позволяет работать системно, а не латать последствия очередного срыва.
Получить больше информации – [url=https://narkologicheskaya-klinika-kolomna10.ru/]адреса наркологических клиник[/url]
Лечение в клинике «Трезвый Выбор Рязань» проходит в несколько последовательных этапов. Каждый этап выполняет конкретную задачу и сопровождается наблюдением специалистов. В таблице ниже представлена структура терапии и её основные направления.
Исследовать вопрос подробнее – https://narkologicheskaya-clinika-v-ryazani17.ru/
Наркологическая клиника «КоломнаМед Центр» — это место, куда можно обратиться в тот момент, когда домашние попытки контролировать алкоголь, наркотики, аптечные препараты или смесь всего сразу перестают работать, а жизнь превращается в постоянное «завтра начну с нуля». Здесь не обещают чудес за один день и не пугают диагнозами, а выстраивают понятный медицинский маршрут: детоксикация, стабилизация, реабилитация, поддержка семьи, профилактика срывов. Пациент получает помощь в защищённой, конфиденциальной среде, где всё организовано так, чтобы снизить тревогу и стыд, убрать хаос вокруг зависимости и дать человеку шанс вернуться к нормальной жизни без давления, угроз и токсичных «стимулов». Для родных клиника в Коломне — это опора: конкретный адрес, конкретная команда, чёткие сроки и понятные этапы, вместо бесконечных обещаний «он сам справится».
Узнать больше – [url=https://narkologicheskaya-klinika-kolomna10.ru/]наркологическая клиника в Коломне[/url]
Такие процедуры особенно эффективны на ранних стадиях лечения, когда важно быстро снять симптомы интоксикации и вернуть стабильное самочувствие. После курса капельниц пациенту становится легче концентрироваться, снижается раздражительность и тревожность, восстанавливается аппетит и сон.
Получить дополнительную информацию – https://narkologicheskaya-klinika-v-ryazani17.ru/narkologicheskij-staczionar-ryazan/
Основные этапы обычно включают:
Изучить вопрос глубже – [url=https://vyvod-iz-zapoya-ramenskoe10.ru/]вывод из запоя в Раменском[/url]
Каждый этап направлен на восстановление организма без стресса и перегрузки. Врачи работают деликатно, чтобы пациент чувствовал безопасность и понимал, что помощь оказывается профессионально.
Подробнее можно узнать тут – https://vyvod-iz-zapoya-v-novokuzneczke17.ru/vyvod-iz-zapoya-na-domu-novokuzneczk/
Город с протяжёнными магистралями и разноскоростными районами требует особой организации маршрутов. Выездные бригады «ВолгаДок Медикал» работают в режиме 24/7, прибывают в гражданской одежде, избегают громких звонков и используют «немаркированные» подъезды. Перед приездом мы просим подготовить пространство: приглушить верхний свет, обеспечить приток свежего воздуха без сквозняков, подготовить ровную поверхность под укладку и удлинитель, перевести телефоны в «без уведомлений» с «белым списком» близких. Это позволяет в первые минуты сосредоточиться на клинике, а не на бытовых вопросах.
Разобраться лучше – http://narcologicheskaya-klinika-saratov0.ru
Выезд нарколога на дом в Серпухове — это возможность получить профессиональную помощь в условиях, когда везти человека в клинику сложно, опасно или он категорически отказывается от госпитализации. Специалисты «СерпуховТрезвие» работают круглосуточно, приезжают по адресу с одноразовыми системами, стерильными расходниками и необходимым набором препаратов, проводят осмотр, оценивают жизненно важные показатели, подбирают индивидуальную капельницу, контролируют реакцию и оставляют подробные рекомендации. Всё происходит конфиденциально, без лишних свидетелей, без осуждения и давления. Цель — не формально «поставить капельницу», а безопасно стабилизировать состояние, снизить интоксикацию, выровнять давление и пульс, уменьшить тревогу и вернуть человеку возможность нормально спать и восстанавливаться, не доводя до осложнений и экстренной госпитализации.
Получить дополнительные сведения – [url=https://narkolog-na-dom-serpuhov10.ru/]chastnyj-narkolog-na-dom[/url]
Этот обзор предлагает свежий взгляд на предметы, которые и без того привычны. Мы упоминаем факты, не имеющие большого значения, и события с неясной важностью, но они присутствуют здесь.
Подробнее читать – [url=https://rostov-narkologiya.ru/ ]диета для похудения быстро[/url]
Стационар «Трезвый Путь Коломна» ориентирован на безопасность в самых сложных случаях: длительные запои, тяжёлая абстиненция, смешанное употребление, выраженные соматические проблемы, риск делирия или судорог. Пациент попадает под наблюдение 24/7, что принципиально отличает клинику от домашних попыток «спасти своими средствами». Контроль жизненно важных показателей, своевременная коррекция схем лечения, возможность быстро отреагировать на осложнения — всё это снижает риск критических ситуаций, которые часто возникают именно после неумелых домашних вмешательств или «выездов без ответственности».
Разобраться лучше – [url=https://narkologicheskaya-klinika-kolomna2-10.ru/]narkologicheskaya-klinika-kolomna[/url]
Наркологическая клиника в Перми использует современные методики, которые подбираются индивидуально с учетом клинической картины пациента. Каждый метод имеет конкретные цели и задачи, что делает процесс лечения прогнозируемым и безопасным.
Получить больше информации – [url=https://narcologicheskaya-klinika-perm0.ru/]запой наркологическая клиника[/url]
Вывод из запоя в Раменском — это не просто «поставить капельницу и отпустить домой», а комплекс медицинских действий, от которых напрямую зависит здоровье, а иногда и жизнь человека. Длительное употребление алкоголя приводит к тяжёлой интоксикации, нарушению работы сердца, печени, головного мозга, сбоям давления, риску судорог, психозов и резких обострений хронических заболеваний. Попытки самостоятельно «сойти с дистанции» дома, с помощью случайных таблеток, седативных препаратов и новых доз алкоголя, часто только усугубляют состояние. Наркологическая клиника «РаменМед Трезвость» в Раменском выстраивает вывод из запоя как безопасный, контролируемый, поэтапный процесс: от экстренного купирования симптомов до формирования плана дальнейшего восстановления. Пациент получает помощь без осуждения, анонимно, с участием специалистов, которые берут на себя ответственность за каждое назначение и каждое действие. Для родственников это означает: больше не нужно гадать, чего бояться и что давать — есть конкретное место и команда, к которым можно обратиться сразу.
Получить больше информации – https://vyvod-iz-zapoya-ramenskoe10.ru
Наркологическая клиника «Трезвый Шаг Раменское» — это место, где острые кризисы, многолетние запои и повторяющиеся срывы перестают быть бесконечным кругом, в котором семья остаётся один на один с проблемой. Здесь выстроена система помощи людям с алкогольной и наркотической зависимостью, а также полизависимостями, включая злоупотребление аптечными препаратами. В клинике в Раменском сочетаются круглосуточное наблюдение, профессиональная детоксикация, медикаментозная поддержка, психотерапевтические программы и сопровождение семьи. Важные принципы — безопасность, анонимность, уважение к пациенту и честное объяснение каждого шага лечения. Ни агрессивного давления, ни обещаний «чуда за один день» — вместо этого поэтапный подход, который даёт реальный шанс стабилизировать состояние, снизить тягу и выйти из разрушительного сценария под контролем специалистов. Для близких это означает понятный маршрут: куда обратиться, что будут делать с пациентом, какие риски учтут и как клиника «Трезвый Шаг Раменское» останется на связи после острого периода.
Разобраться лучше – [url=https://narkologicheskaya-klinika-ramenskoe10.ru/]narkologicheskaya-klinika[/url]
Выезд нарколога на дом в Серпухове — это возможность получить профессиональную помощь в условиях, когда везти человека в клинику сложно, опасно или он категорически отказывается от госпитализации. Специалисты «СерпуховТрезвие» работают круглосуточно, приезжают по адресу с одноразовыми системами, стерильными расходниками и необходимым набором препаратов, проводят осмотр, оценивают жизненно важные показатели, подбирают индивидуальную капельницу, контролируют реакцию и оставляют подробные рекомендации. Всё происходит конфиденциально, без лишних свидетелей, без осуждения и давления. Цель — не формально «поставить капельницу», а безопасно стабилизировать состояние, снизить интоксикацию, выровнять давление и пульс, уменьшить тревогу и вернуть человеку возможность нормально спать и восстанавливаться, не доводя до осложнений и экстренной госпитализации.
Ознакомиться с деталями – [url=https://narkolog-na-dom-serpuhov10.ru/]vrach-narkolog-na-dom[/url]
Клиника «Трезвый Выбор Рязань» функционирует по принципу полного цикла лечения: от экстренного выезда нарколога до длительной реабилитации в условиях стационара. Пациенты поступают как в острых состояниях (запой, абстиненция, интоксикация), так и для плановой терапии. Лечение начинается с медицинской диагностики, оценки физического и психического состояния, после чего разрабатывается индивидуальный план. Программы включают детоксикацию, медикаментозную поддержку, психологическую помощь и профилактику рецидивов.
Получить дополнительную информацию – https://narkologicheskaya-clinika-v-ryazani17.ru/narkologiya-v-ryazani/
Комплексное проведение этих этапов обеспечивает полное восстановление организма и облегчает процесс последующего лечения зависимости.
Подробнее можно узнать тут – [url=https://vyvod-iz-zapoya-v-ryazani17.ru/]вывод из запоя с выездом в рязани[/url]
Для удобства восприятия можно ориентироваться на следующую структуру (это не публичная оферта, а примерная модель ценообразования — точная сумма фиксируется после осмотра и согласования схемы):
Изучить вопрос глубже – [url=https://narkolog-na-dom-serpuhov10.ru/]анонимный врач нарколог на дом[/url]
Наркологическая клиника «ВолгаДок Медикал» — это круглосуточная служба помощи, выстроенная вокруг принципов клинической безопасности, прозрачной коммуникации и поддержки пациента на каждом этапе. Мы соединяем стационар и выездные бригады в единую систему: первичный осмотр и стабилизация состояния, адресные инфузионные модули, мягкая коррекция сна и тревоги, последующее наблюдение с короткими «окнами» обратной связи. Все решения принимаются по показаниям и сопровождаются объяснением: какую цель преследуем, каким маркером измеряем, когда проверяем результат. Такой подход исключает хаотичные усиления, бережёт ресурс организма и даёт прогнозируемый клинический эффект.
Детальнее – https://narcologicheskaya-klinika-saratov0.ru/chastnaya-narkologicheskaya-klinika-saratov/
Такая последовательность действий позволяет обеспечить результативность и закрепить положительные изменения.
Изучить вопрос глубже – [url=https://narcologicheskaya-klinika-perm0.ru/]наркологическая клиника стационар пермь[/url]
Один из ключевых принципов клиники «ЗдороваяСамара» — строгое соблюдение медицинской тайны. Все обращения, анализы и процедуры происходят в режиме полной конфиденциальности. При необходимости пациент может быть зарегистрирован под псевдонимом, а договор оформляется на доверенное лицо. Персональные данные не передаются ни в какие внешние базы, а диагноз не указывается в выписке для работодателя или страховой. Врачи и администрация клиники прошли специальное обучение по работе с анонимными пациентами, чтобы гарантировать этичность и законность каждой процедуры.
Разобраться лучше – [url=https://lechenie-narkomanii-samara0.ru/]лечение наркомании и алкоголизма[/url]
Инфузионная терапия (капельницы) — важная часть лечения, направленная на очищение организма, восстановление водно-солевого баланса и устранение токсинов. В «РязаньМед Альянс» используются проверенные препараты, которые помогают нормализовать работу внутренних органов и улучшить общее самочувствие. Таблица ниже показывает, какие виды капельниц чаще всего применяются при выведении из запоя и лечении алкоголизма.
Ознакомиться с деталями – http://narkologicheskaya-klinika-v-ryazani17.ru/narkologiya-v-ryazani/
Наркологическая клиника «Трезвый Путь Коломна» — это пространство, где тяжёлые истории зависимости перестают быть хаотичным набором срывов, ночных обещаний и беспомощных попыток родных «вытащить своими силами». Здесь собраны врачи-наркологи, терапевты, психологи и медперсонал, которые знают, что такое длительные запои, многолетнее употребление, полинаркомания, зависимость от аптечных препаратов, и умеют работать с этим не через страх и давление, а через профессиональные, выверенные шаги. Клиника в Коломне предлагает безопасную детоксикацию, стационарное наблюдение, индивидуальные программы лечения алкоголизма и наркомании, поддержку семьи и постреабилитационные решения. Все процессы организованы так, чтобы пациент сохранял достоинство, а родственники наконец получили не обещания, а реальный план действий, понятный по этапам и по результатам.
Исследовать вопрос подробнее – [url=https://narkologicheskaya-klinika-kolomna2-10.ru/]narkologicheskaya-klinika-kolomna2-10.ru/[/url]
Вывод из запоя требуется тогда, когда организм уже не способен самостоятельно справиться с последствиями алкогольной интоксикации. Длительное употребление спиртного приводит к нарушению работы внутренних органов, обезвоживанию и психическим расстройствам. Медицинская помощь помогает избежать опасных осложнений и облегчить процесс отказа от алкоголя.
Подробнее тут – [url=https://vyvod-iz-zapoya-v-ryazani17.ru/]нарколог на дом вывод из запоя рязань[/url]
Такая структура лечения помогает пациентам пройти все этапы восстановления под контролем специалистов.
Изучить вопрос глубже – [url=https://narcologicheskaya-klinika-perm0.ru/]наркологическая клиника стационар в перми[/url]
Фиксируем АД, ЧСС, сатурацию, температуру, оцениваем неврологический статус, степень обезвоживания, тремор, тошноту и уровень тревоги; собираем краткий анамнез последних суток и характер употребления.
Изучить вопрос глубже – [url=https://vyvod-iz-zapoya-ehlektrostal2-10.ru/]vyvod-iz-zapoya-s-vyezdom[/url]
Перед таблицей — короткий акцент: приведённые суммы ориентировочные, не являются публичной офертой, точная стоимость определяется после осмотра.
Подробнее можно узнать тут – [url=https://vyvod-iz-zapoya-kolomna10.ru/]вывод из запоя на дому[/url]
Такая структура терапии делает процесс максимально эффективным и безопасным.
Исследовать вопрос подробнее – https://narcologicheskaya-klinika-omsk0.ru/narkologi-omska
Когда острые угрозы исключены, программа стартует дома. Пациент получает понятную карту действий, близкие — короткие окна обратной связи, врач — чистую «картинку» для тонкой настройки. Мы просим сообщать факты, а не эмоции: минуты до засыпания, число пробуждений, объём тёплой воды малыми глотками, пульс к вечеру, переносимость мягкой пищи, ясность головы утром.
Получить дополнительные сведения – [url=https://vyvod-iz-zapoya-saratov0.ru/]анонимный вывод из запоя саратов[/url]
Наркомания — это не просто пагубная привычка, а тяжёлое хроническое заболевание, которое требует комплексного лечения и индивидуального подхода. В клинике «ЗдороваяСамара» разработаны современные программы помощи зависимым, охватывающие все этапы — от выезда нарколога на дом до многомесячного амбулаторного сопровождения. Особое внимание уделяется конфиденциальности, оперативности и доступности помощи в любое время суток. Это делает лечение максимально комфортным, результативным и гуманным как для самого пациента, так и для его близких.
Углубиться в тему – http://lechenie-narkomanii-samara0.ru
Лечение зависимости в наркологической клинике проводится поэтапно. Это обеспечивает постепенное восстановление организма и исключает риск осложнений. Каждый этап направлен на устранение конкретных нарушений, вызванных употреблением психоактивных веществ.
Подробнее – http://narcologicheskaya-klinika-v-krasnoyarske17.ru/krasnoyarsk-narkologicheskij-czentr/
Стационар «Трезвый Путь Коломна» ориентирован на безопасность в самых сложных случаях: длительные запои, тяжёлая абстиненция, смешанное употребление, выраженные соматические проблемы, риск делирия или судорог. Пациент попадает под наблюдение 24/7, что принципиально отличает клинику от домашних попыток «спасти своими средствами». Контроль жизненно важных показателей, своевременная коррекция схем лечения, возможность быстро отреагировать на осложнения — всё это снижает риск критических ситуаций, которые часто возникают именно после неумелых домашних вмешательств или «выездов без ответственности».
Ознакомиться с деталями – [url=https://narkologicheskaya-klinika-kolomna2-10.ru/]narkologicheskaya-klinika-kolomna[/url]
Такой алгоритм позволяет контролировать каждый аспект лечения, обеспечивая постепенное и безопасное восстановление. Врач-куратор отслеживает динамику и при необходимости корректирует программу.
Получить дополнительные сведения – https://narkologicheskaya-clinika-v-ryazani17.ru/narkolog-ryazan-telefon
Вывод из запоя в Перми включает использование комплекса медикаментозных и психотерапевтических методик. Они помогают не только снять симптомы интоксикации, но и стабилизировать эмоциональное состояние.
Ознакомиться с деталями – [url=https://vyvod-iz-zapoya-perm0.ru/]вывод из запоя вызов город[/url]
Если на предзвонке выявляются «красные флаги» — давящая боль в груди, одышка в покое, спутанность сознания, судороги, неукротимая рвота, резкое падение насыщения кислородом — мы организуем бесшовный перевод в стационар. Место резервируем заранее, логистику строим так, чтобы не привлекать внимания соседей и не затягивать старт лечения. При отсутствии угроз терапия может начаться дома с последующим телесопровождением и при необходимости — краткой госпитализацией.
Подробнее – [url=https://narcologicheskaya-klinika-saratov0.ru/]вывод наркологическая клиника[/url]
«ОмскПрофи» укомплектована современной медицинской базой: передвижные аппараты для ЭКГ, инфузионные стойки, экспресс-анализаторы, мониторы состояния, аппараты ИВЛ (в реанимационных палатах). Штат сотрудников сформирован из врачей-наркологов, токсикологов, психиатров, психотерапевтов, медицинских сестёр, прошедших обучение по международным протоколам. Ведётся постоянная учёба, стажировки, участие в научных форумах. Благодаря этому пациенты получают не только медицинскую помощь, но и психологическое сопровождение, направленное на долгосрочный результат.
Исследовать вопрос подробнее – [url=https://narkologicheskaya-pomoshh-omsk0.ru/]круглосуточная наркологическая помощь[/url]
Лечение алкоголизма в клинике «РязаньМед Альянс» включает несколько этапов, каждый из которых направлен на определённую цель — от снятия интоксикации до формирования устойчивого отказа от алкоголя. В таблице представлены основные стадии лечения и методы, используемые специалистами клиники.
Углубиться в тему – [url=https://narkologicheskaya-klinika-v-ryazani17.ru/]частная наркологическая клиника рязань[/url]
Вывод из запоя — это не «волшебная капельница», а последовательная медицинская программа с чёткими целями и измеримыми маркерами. В наркологической клинике «СаратовМед Профи» маршрут строится по принципу управляемых окон: на каждом шаге команда преследует одну цель, меняет лишь один параметр и оценивает результат в заранее назначённый момент. Такой подход снижает лекарственную нагрузку, предотвращает «гонку дозировок» и делает динамику предсказуемой для пациента и близких. Конфиденциальность обеспечивается регламентом: немаркированные выезды, нейтральные формулировки в документах, «тихие» каналы связи, доступ к записям — строго по ролям.
Узнать больше – [url=https://vyvod-iz-zapoya-saratov0.ru/]нарколог вывод из запоя[/url]
Лечение в клинике «Трезвый Выбор Рязань» проходит в несколько последовательных этапов. Каждый этап выполняет конкретную задачу и сопровождается наблюдением специалистов. В таблице ниже представлена структура терапии и её основные направления.
Подробнее можно узнать тут – [url=https://narkologicheskaya-clinika-v-ryazani17.ru/]наркологические клиники алкоголизм[/url]
Наркологическая клиника «ВолгаДок Медикал» — это круглосуточная служба помощи, выстроенная вокруг принципов клинической безопасности, прозрачной коммуникации и поддержки пациента на каждом этапе. Мы соединяем стационар и выездные бригады в единую систему: первичный осмотр и стабилизация состояния, адресные инфузионные модули, мягкая коррекция сна и тревоги, последующее наблюдение с короткими «окнами» обратной связи. Все решения принимаются по показаниям и сопровождаются объяснением: какую цель преследуем, каким маркером измеряем, когда проверяем результат. Такой подход исключает хаотичные усиления, бережёт ресурс организма и даёт прогнозируемый клинический эффект.
Подробнее – [url=https://narcologicheskaya-klinika-saratov0.ru/]наркологическая клиника клиника помощь в саратове[/url]
Медицинская помощь строится на принципах индивидуального подхода и поэтапной терапии. Каждый пациент проходит диагностику, после чего составляется персональная программа, включающая медикаментозную поддержку, консультации психотерапевта и физиопроцедуры. Такой подход помогает не просто снять симптомы, но и восстановить организм полностью.
Углубиться в тему – [url=https://narkologicheskaya-klinika-v-ryazani17.ru/]наркологическая клиника стационар рязань[/url]
Ниже — ключевые направления, которые логично дополняют друг друга и формируют единый маршрут лечения:
Разобраться лучше – [url=https://narkologicheskaya-klinika-ramenskoe10.ru/]наркологическая клиника отзывы[/url]
Лечение алкоголизма в клинике «РязаньМед Альянс» включает несколько этапов, каждый из которых направлен на определённую цель — от снятия интоксикации до формирования устойчивого отказа от алкоголя. В таблице представлены основные стадии лечения и методы, используемые специалистами клиники.
Углубиться в тему – [url=https://narkologicheskaya-klinika-v-ryazani17.ru/]запой наркологическая клиника[/url]
В статье-обзоре представлены данные сомнительной актуальности и факты без явной взаимосвязи. Читатель ознакомится с разными мнениями, хотя они вряд ли существенно изменят его представление о теме.
Подробнее читать – [url=https://rostov-narkologiya.ru/ ]мефедроновая зависимость[/url]
Главная задача капельницы при выезде нарколога в Щёлково — не создать видимость лёгкости, а реально уменьшить интоксикацию и восстановить базовые функции организма. В «ЩёлковоМед Профи» используются современные схемы, а не сомнительные смеси «из всего подряд». В стандартной основе — растворы для восполнения объёма циркулирующей жидкости, выравнивания электролитного баланса и коррекции КЩС, что снижает нагрузку на сердце и мозг. Витамины группы B и магний поддерживают нервную систему, уменьшают тремор, раздражительность и риск судорожных реакций. При необходимости врач добавляет гепатопротекторные и антиоксидантные компоненты, если есть признаки перегрузки печени; при выраженной тошноте — противорвотные, чтобы пациент мог нормально пить и питаться. Для нормализации сна и тревоги подбираются мягкие анксиолитики в дозах, позволяющих контролировать состояние, а не «вырубать» человека. Агрессивные седативные протоколы, которые маскируют ухудшения и опасны для дыхания и сердца, сознательно исключаются. Оценка эффекта идёт по конкретным критериям: стабилизация давления и пульса, уменьшение дрожи, улучшение цвета кожи, уход тошноты, снижение тревоги, появление естественного, а не лекарственного сна. После выезда семья получает ясный план, как закрепить эффект, чтобы наутро не пришлось начинать всё заново.
Подробнее можно узнать тут – [url=https://narkolog-na-dom-shchelkovo10.ru/]нарколог на дом вывод[/url]
Процесс лечения включает несколько последовательных шагов, направленных на стабилизацию состояния, детоксикацию и восстановление функций организма. Таблица ниже показывает основные этапы процедуры, применяемые врачами клиники «РеабКузбасс».
Изучить вопрос глубже – [url=https://vyvod-iz-zapoya-v-novokuzneczke17.ru/]срочный вывод из запоя[/url]
Такая структура терапии делает процесс максимально эффективным и безопасным.
Ознакомиться с деталями – http://
Такая структура делает лечение последовательным и предсказуемым, повышая шансы на положительный исход.
Получить дополнительную информацию – https://narkologicheskaya-klinika-v-omske0.ru/
Прежде чем перейти к ориентировочным цифрам, важно подчеркнуть: цена формируется из реальных компонентов помощи — работы врача и медсестры, объёма инфузионной терапии, перечня препаратов, времени выезда и необходимости более длительного наблюдения. Никаких скрытых доплат: все дополнительные назначения согласуются заранее. Чем раньше вы обращаетесь, тем меньше объём вмешательств и, как правило, ниже итоговая стоимость — короткий эпизод проще и дешевле стабилизировать, чем «выводить» осложнения после затянутого запоя.
Ознакомиться с деталями – [url=https://narkolog-na-dom-shchelkovo10.ru/]сколько стоит нарколог на дом[/url]
Для иллюстрации эффективности методов представлена таблица с примерами процедур и их воздействием:
Узнать больше – [url=https://narcologicheskaya-klinika-v-krasnoyarske17.ru/]платная наркологическая клиника красноярск[/url]
Алгоритм в «Трезвый Центр Коломна» построен так, чтобы убрать импровизацию и сделать всё максимально прозрачным для семьи. Сначала по телефону собираются ключевые данные: возраст пациента, длительность запоя, виды алкоголя, хронические заболевания, препараты, аллергии, наличие судорог, потерь сознания, странного поведения, текущие жалобы. На этом этапе озвучивается ориентировочный формат помощи и примерный диапазон стоимости. Далее следует выезд на дом или поступление в стационар. Врач проводит осмотр: измеряет артериальное давление, пульс, сатурацию, температуру, оценивает тремор, координацию, сознание, степень обезвоживания, наличие болей, состояние дыхания и сердца. На основе этих данных назначается инфузионная терапия: растворы для регидратации и коррекции электролитов, витамины группы B и магний для поддержки нервной системы, по показаниям — гепатопротекторы, антиоксидантные комплексы, противорвотные для контроля тошноты, мягкие анксиолитики для уменьшения тревоги и нормализации сна. Уходят от агрессивной седации: пациент не должен быть «выключен» так, чтобы невозможно было заметить ухудшение. В процессе капельниц проводится повторный контроль показателей, темп и состав при необходимости корректируются. После стабилизации пациент и семья получают подробные рекомендации: режим, сон, питание, питьё, запреты, «красные флаги», план наблюдения и возможного дальнейшего лечения зависимости.
Углубиться в тему – https://vyvod-iz-zapoya-kolomna10.ru/vyvod-iz-zapoya-v-stacionare-v-kolomne/
Чтобы родственники не терялись в терминах и не воспринимали лечение как «чёрный ящик», в клинике используется поэтапный подход. Это помогает увидеть логическую связку между затратами, процедурами и результатами.
Выяснить больше – [url=https://narkologicheskaya-klinika-ramenskoe10.ru/]анонимная наркологическая клиника[/url]
Каждый час промедления в острый период повышает вероятность обезвоживания, электролитных сдвигов, аритмий, гипертонических всплесков и расстройств сна, которые легко перерастают в делирий. Домашние попытки с «подручными» средствами редко учитывают лекарственные взаимодействия, реальный уровень обезвоживания и состояние печени, а «жёсткая» седация, применяемая без показаний, маскирует ухудшения и лишает врача информативной картины. Профессиональная бригада «НоваТрезвие» начинает с объективной оценки: давление, пульс, сатурация, температура, неврологический статус, выраженность тремора и тошноты, степень обезвоживания, список принимаемых препаратов и возможные аллергии. На этой базе формируется персональный план: регидратация, коррекция электролитов и кислотно-щелочного баланса, поддержка нервной системы витаминами группы B и магнием, гепатопротекторная и антиоксидантная защита по показаниям, противорвотные при необходимости и мягкая анксиолитическая поддержка для восстановительного сна. Такой маршрут гасит «пожар» интоксикации управляемо, возвращая прогнозируемость самочувствия в течение первых часов.
Ознакомиться с деталями – http://vyvod-iz-zapoya-ehlektrostal2-10.ru
В клинике реализуются ключевые направления, которые обеспечивают всестороннюю помощь и поддержку пациентам на всех этапах лечения.
Изучить вопрос глубже – http://narkologicheskaya-klinika-v-omske0.ru
Медицинская помощь в клинике организована поэтапно, что позволяет постепенно стабилизировать состояние и вернуть контроль над самочувствием.
Ознакомиться с деталями – [url=https://vyvod-iz-zapoya-perm0.ru/]анонимный вывод из запоя пермь[/url]
Ключевым фактором при выборе центра становится квалификация специалистов. Лечение алкоголизма — это не только выведение из запоя и купирование абстинентного синдрома. Оно включает работу с мотивацией, тревожными состояниями, семейными конфликтами, нарушением сна и другими последствиями зависимости. Только команда, включающая наркологов, психотерапевтов и консультантов по аддиктивному поведению, способна охватить все аспекты проблемы.
Получить дополнительные сведения – [url=https://lechenie-alkogolizma-murmansk0.ru/]анонимное лечение алкоголизма в мурманске[/url]
Клиника придерживается принципа прозрачного ценообразования. Пациенту или родственникам сразу озвучивается стоимость всех процедур и услуг. Возможна оплата поэтапно или в рамках пакета. В отличие от многих клиник, «ОмскПрофи» предоставляет фиксированные цены на распространённые виды помощи, без скрытых доплат.
Получить дополнительные сведения – [url=https://narkologicheskaya-pomoshh-omsk0.ru/]наркологическая клиника клиника помощь[/url]
В основе работы клиники лежит принцип: зависимость — это не просто привычка и не «слабость характера», а комплексное заболевание, которое требует последовательного лечения, а не случайной капельницы по вызову. «Трезвый Шаг Раменское» отказывается от практики, когда пациенту предлагают один-единственный «волшебный» метод, не объясняя, что будет дальше. Здесь каждое обращение рассматривается в контексте стадии зависимости, общего состояния организма, психоэмоционального фона, семейной ситуации. Сначала специалисты снимают острые проявления: выход из запоя, детоксикация после употребления алкоголя, наркотиков или сочетаний, купирование абстиненции, коррекция давления, пульса, сна, тревоги. Затем формируется стабилизационный этап — подбор поддерживающих схем, работа с тягой, выравнивание эмоционального состояния. После этого при готовности пациента подключаются психотерапевтические и реабилитационные инструменты: мотивационные программы, работа с установками, триггерами, окружением. Важная особенность «Трезвый Шаг Раменское» — готовность объяснять семье и самому пациенту, зачем нужен каждый этап, какие цели у процедуры и какие результаты реально ожидать. Это снижает сопротивление, формирует доверие и делает путь не хаотичным, а управляемым.
Получить больше информации – https://narkologicheskaya-klinika-ramenskoe10.ru/narkologicheskaya-klinika-otzyvy-v-ramenskom
В клинике применяются современные медицинские технологии, которые обеспечивают стойкий результат. Используемые методики соответствуют международным стандартам и регулярно обновляются.
Выяснить больше – http://narcologicheskaya-klinika-omsk0.ru/
В клинике обеспечивается безопасный вывод из запоя и очистка организма после употребления алкоголя, наркотиков или токсических сочетаний. Используются современные инфузионные схемы, витамины группы B, магний, гепатопротекторы по показаниям, противорвотные, мягкая коррекция сна и тревожности. Контроль давления, пульса, сатурации и поведения позволяет вовремя отметить любые осложнения и скорректировать терапию. Главная цель — не просто «прояснить голову», а защитить сердечно-сосудистую систему, мозг, печень, минимизировать риск делирия, судорог, аритмий и других острых состояний.
Детальнее – [url=https://narkologicheskaya-klinika-kolomna10.ru/]adresa-narkologicheskih-klinik[/url]
В медицинской практике используются различные методы, которые помогают ускорить процесс восстановления. Все процедуры проводятся под контролем специалистов и с учетом индивидуальных особенностей пациента.
Получить дополнительные сведения – [url=https://vyvod-iz-zapoya-omsk0.ru/]вывод из запоя вызов[/url]
Инфузионная терапия (капельницы) — важная часть лечения, направленная на очищение организма, восстановление водно-солевого баланса и устранение токсинов. В «РязаньМед Альянс» используются проверенные препараты, которые помогают нормализовать работу внутренних органов и улучшить общее самочувствие. Таблица ниже показывает, какие виды капельниц чаще всего применяются при выведении из запоя и лечении алкоголизма.
Подробнее можно узнать тут – [url=https://narkologicheskaya-klinika-v-ryazani17.ru/]наркологическая клиника вывод из запоя[/url]
Мы не используем универсальную «капельницу». Схема собирается из модулей под ведущие жалобы. Медицинские шаги всегда сочетаются с нефраком опорами — свет, тишина, вода малыми глотками, дыхание, — потому что среда усиливает действие препаратов и позволяет держать дозы ниже.
Подробнее можно узнать тут – [url=https://narkolog-na-dom-saratov0.ru/]платный нарколог на дом саратов[/url]
Клиника в Коломне ориентирована на полный цикл помощи: от экстренных состояний до длительного сопровождения. Здесь важна не только медицинская составляющая, но и человеческая: уважение, конфиденциальность, отсутствие стигмы. Ниже — ключевые направления, которые выстраиваются в единую систему лечения, а не существуют по отдельности.
Подробнее можно узнать тут – http://narkologicheskaya-klinika-kolomna10.ru
Комплексное применение этих методов позволяет добиться быстрого восстановления организма и улучшения психоэмоционального состояния.
Получить дополнительную информацию – [url=https://vyvod-iz-zapoya-perm0.ru/]вывод из запоя на дому в перми[/url]
Каждый час промедления в острый период повышает вероятность обезвоживания, электролитных сдвигов, аритмий, гипертонических всплесков и расстройств сна, которые легко перерастают в делирий. Домашние попытки с «подручными» средствами редко учитывают лекарственные взаимодействия, реальный уровень обезвоживания и состояние печени, а «жёсткая» седация, применяемая без показаний, маскирует ухудшения и лишает врача информативной картины. Профессиональная бригада «НоваТрезвие» начинает с объективной оценки: давление, пульс, сатурация, температура, неврологический статус, выраженность тремора и тошноты, степень обезвоживания, список принимаемых препаратов и возможные аллергии. На этой базе формируется персональный план: регидратация, коррекция электролитов и кислотно-щелочного баланса, поддержка нервной системы витаминами группы B и магнием, гепатопротекторная и антиоксидантная защита по показаниям, противорвотные при необходимости и мягкая анксиолитическая поддержка для восстановительного сна. Такой маршрут гасит «пожар» интоксикации управляемо, возвращая прогнозируемость самочувствия в течение первых часов.
Ознакомиться с деталями – https://vyvod-iz-zapoya-ehlektrostal2-10.ru/vyvesti-iz-zapoya-ehlektrostal
Эта разъяснительная статья содержит простые и доступные разъяснения по актуальным вопросам. Мы стремимся сделать информацию понятной для широкой аудитории, чтобы каждый мог разобраться в предмете и извлечь из него максимум пользы.
Ознакомиться с теоретической базой – https://ristein-frisuren.de/fade-masterclass-behind-the-scenes-of-precision-styling
Мы предлагаем вам окунуться в океан любопытных фактов и вдохновляющих историй. Эта публикация поможет расширить горизонты, разбудить интерес к науке и истории и увидеть мир с новой стороны.
Есть чему поучиться – https://penangfoodie.com/penang-food
Эта статья погружает вас в увлекательный мир знаний, где каждый факт становится открытием. Мы расскажем о ключевых исторических поворотных моментах и научных прорывах, которые изменили ход цивилизации. Поймите, как прошлое формирует настоящее и как его уроки могут помочь нам строить будущее.
Изучить материалы по теме – https://lavanderiauniversal.com/producto/fenestrado
Этот обзор предлагает структурированное изложение информации по актуальным вопросам. Материал подан так, чтобы даже новичок мог быстро освоиться в теме и начать использовать полученные знания в практике.
Раскрыть тему полностью – http://top-spin.md/index.php/e-shop/cauciuc/item/469-donic-bluestar-a3/469-donic-bluestar-a3
В этой публикации мы сосредоточимся на интересных аспектах одной из самых актуальных тем современности. Совмещая факты и мнения экспертов, мы создадим полное представление о предмете, которое будет полезно как новичкам, так и тем, кто глубоко изучает вопрос.
Все материалы собраны здесь – https://www.jakahong.com/dress-code-vs-dresscode-mana-yang-benar
Этот информационный материал собраны данные, которые помогут лучше понять текущие тенденции и процессы в различных сферах жизни. Мы предоставляем четкий анализ, графики и примеры, чтобы информация была не только понятной, но и практичной для принятия решений.
Познакомиться с результатами исследований – https://podgoreamputowani.pl/2024/12/06/wybor-odpowiedniej-protezy
В этой статье представлен занимательный и актуальный контент, который заставит вас задуматься. Мы обсуждаем насущные вопросы и проблемы, а также освещаем истории, которые вдохновляют на действия и изменения. Узнайте, что стоит за событиями нашего времени!
Получить дополнительную информацию – https://www.domansky.cz/peugeot-expert
Эта статья сочетает в себе как полезные, так и интересные сведения, которые обогатят ваше понимание насущных тем. Мы предлагаем практические советы и рекомендации, которые легко внедрить в повседневную жизнь. Узнайте, как улучшить свои навыки и обогатить свой опыт с помощью простых, но эффективных решений.
Что ещё? Расскажи всё! – https://www.alucobras.com.br/1xbet-ttbyq-thmyl-apk-lnzm-google-android-w-ios-mjny-2025-utility-broadband-alliance-2
В этом интересном тексте собраны обширные сведения, которые помогут вам понять различные аспекты обсуждаемой темы. Мы разбираем детали и факты, делая акцент на важности каждого элемента. Не упустите возможность расширить свои знания и взглянуть на мир по-новому!
Продолжить изучение – https://idawulff.no/2021/10/12/pappa-pause-gone-wrong
В этом информативном тексте представлены захватывающие события и факты, которые заставят вас задуматься. Мы обращаем внимание на важные моменты, которые часто остаются незамеченными, и предлагаем новые перспективы на привычные вещи. Подготовьтесь к тому, чтобы быть поглощенным увлекательными рассказами!
Прочесть заключение эксперта – https://gettrialsnow.com/services/miw-miisv-mount
В этой информационной статье вы найдете интересное содержание, которое поможет вам расширить свои знания. Мы предлагаем увлекательный подход и уникальные взгляды на обсуждаемые темы, побуждая пользователей к активному мышлению и критическому анализу.
Дополнительно читайте здесь – https://dobleclic.mx/best-domain-name-for-business
Эта познавательная публикация погружает вас в море интересного контента, который быстро захватит ваше внимание. Мы рассмотрим важные аспекты темы и предоставим вам уникальные Insights и полезные сведения для дальнейшего изучения.
Углубить понимание вопроса – https://kalanjaritools.com/product/three-jaw-chuck-50mm
Мы собрали для вас самые захватывающие факты из мира науки и истории. От малознакомых деталей до грандиозных событий — эта статья расширит ваш кругозор и подарит новое понимание того, как устроен наш мир.
Обратитесь за информацией – https://gettrialsnow.com/services/miw-miisv-mount
Эта обзорная заметка содержит ключевые моменты и факты по актуальным вопросам. Она поможет читателям быстро ориентироваться в теме и узнать о самых важных аспектах сегодня. Получите краткий курс по современной информации и оставайтесь в курсе событий!
Углубить понимание вопроса – https://fithouse.projectbws.com/?p=662
Эта информационная статья охватывает широкий спектр актуальных тем и вопросов. Мы стремимся осветить ключевые факты и события с ясностью и простотой, чтобы каждый читатель мог извлечь из нее полезные знания и полезные инсайты.
Продолжить изучение – http://kinozones.ru/genre/triller
Эта обзорная заметка содержит ключевые моменты и факты по актуальным вопросам. Она поможет читателям быстро ориентироваться в теме и узнать о самых важных аспектах сегодня. Получите краткий курс по современной информации и оставайтесь в курсе событий!
Слушай внимательно — тут важно – https://vasundharadeep.news/17th-board-meeting-of-district-level-development-authority-held-under-the-chairmanship-of-divisional-commissioner-deepak-rawat-9-out-of-10-proposals-were-approved
В этой статье представлен занимательный и актуальный контент, который заставит вас задуматься. Мы обсуждаем насущные вопросы и проблемы, а также освещаем истории, которые вдохновляют на действия и изменения. Узнайте, что стоит за событиями нашего времени!
Проследить причинно-следственные связи – http://attaqadoumiya.net/?p=383
Эта статья предлагает живое освещение актуальной темы с множеством интересных фактов. Мы рассмотрим ключевые моменты, которые делают данную тему важной и актуальной. Подготовьтесь к насыщенному путешествию по неизвестным аспектам и узнайте больше о значимых событиях.
Не пропусти важное – https://halmalki.sa/product/vo
Мы собрали для вас самые захватывающие факты из мира науки и истории. От малознакомых деталей до грандиозных событий — эта статья расширит ваш кругозор и подарит новое понимание того, как устроен наш мир.
Открой скрытое – https://ijpfiasi.ro/princess-out-of-heaven-slots-a-real-income-slot-machine-game-free-gamble-demo
В этом интересном тексте собраны обширные сведения, которые помогут вам понять различные аспекты обсуждаемой темы. Мы разбираем детали и факты, делая акцент на важности каждого элемента. Не упустите возможность расширить свои знания и взглянуть на мир по-новому!
Осуществить глубокий анализ – https://businessresourcematch.com/portfolio/sed-do-eiusmod-tempor-incididunt
Эта познавательная публикация погружает вас в море интересного контента, который быстро захватит ваше внимание. Мы рассмотрим важные аспекты темы и предоставим вам уникальные Insights и полезные сведения для дальнейшего изучения.
Изучите внимательнее – https://straightaheadmanagement.com
Эта информационная статья содержит полезные факты, советы и рекомендации, которые помогут вам быть в курсе последних тенденций и изменений в выбранной области. Материал составлен так, чтобы быть полезным и понятным каждому.
Детали по клику – https://euro-commission.com/index.php/2023/06/22/harnessing-the-power-of-social-media-for-business-growth
Этот обзор предлагает свежий взгляд на предметы, которые и без того привычны. Мы упоминаем факты, не имеющие большого значения, и события с неясной важностью, но они присутствуют здесь.
Подробнее читать – [url=https://rostov-narkologiya.ru/uslugi-ot-alkogolizma/vyvod-iz-zapoya/]таблетки для аборта[/url]
Этот интересный отчет представляет собой сборник полезных фактов, касающихся актуальных тем. Мы проанализируем данные, чтобы вы могли сделать обоснованные выводы. Читайте, чтобы узнать больше о последних трендах и значимых событиях!
Полная информация здесь – http://largeheart.ru/categorys/19
Этот информационный обзор станет отличным путеводителем по актуальным темам, объединяющим важные факты и мнения экспертов. Мы исследуем ключевые идеи и представляем их в доступной форме для более глубокого понимания. Читайте, чтобы оставаться в курсе событий!
Раскрыть тему полностью – https://marefestivalsalina.it/11811568_733001163513362_7625823237045399783_n
Эта статья для ознакомления предлагает читателям общее представление об актуальной теме. Мы стремимся представить ключевые факты и идеи, которые помогут читателям получить представление о предмете и решить, стоит ли углубляться в изучение.
Где почитать поподробнее? – https://microsis.lk/hello-world
Этот увлекательный информационный материал подарит вам массу новых знаний и ярких эмоций. Мы собрали для вас интересные факты и сведения, которые обогатят ваш опыт. Откройте для себя увлекательный мир информации и насладитесь процессом изучения!
Изучить вопрос глубже – https://mylifedesign.online/10-greatest-asian-nations-to-find-a-wife-asian-brides-for-marriage
Откройте для себя скрытые страницы истории и малоизвестные научные открытия, которые оказали колоссальное влияние на развитие человечества. Статья предлагает свежий взгляд на события, которые заслуживают большего внимания.
Есть чему поучиться – https://basantinternational.com/product/air-filter-pan-b6505004
В этой статье-обзоре мы соберем актуальную информацию и интересные факты, которые освещают важные темы. Читатели смогут ознакомиться с различными мнениями и подходами, что позволит им расширить кругозор и глубже понять обсуждаемые вопросы.
Получить дополнительные сведения – https://wairso.com/the-impact-of-temperature-on-pool-chemistry-summer-vs-winter
мостбет кз скачать [url=mostbet2026.help]mostbet2026.help[/url]
Кодирование от алкоголизма — это медицинская процедура, направленная на формирование устойчивого отвращения к спиртному и восстановление контроля над зависимым поведением. В клинике «ВолгоградМед Альянс» используются современные, научно обоснованные методы, которые позволяют не просто временно ограничить тягу, а глубоко перестроить психологические и биохимические механизмы зависимости. Каждая программа подбирается индивидуально, с учётом стажа употребления, состояния здоровья, мотивации и психоэмоционального фона пациента. Врачи обеспечивают анонимность, безопасность и круглосуточную поддержку, помогая восстановить не только физическое состояние, но и внутреннее равновесие.
Ознакомиться с деталями – [url=https://kodirovanie-ot-alkogolizma-v-volgograde17.ru/]кодирование от алкоголизма цена в волгограде[/url]
Для наглядности приведена таблица с основными направлениями терапии и их результатами:
Разобраться лучше – [url=https://narkologicheskaya-clinica-v-voronezhe17.ru/]наркологическая клиника нарколог[/url]
Перед процедурой врач оценивает состояние пациента, измеряет давление, пульс и уровень насыщения крови кислородом. После осмотра подбирается состав инфузии, включающий препараты для дезинтоксикации, восстановления водно-солевого баланса и нормализации работы органов. Введение растворов осуществляется внутривенно, под контролем специалиста. Длительность процедуры — от 40 минут до 1,5 часов.
Получить больше информации – http://kapelnicza-ot-zapoya-v-volgograde17.ru/kapelnicza-ot-alkogolya-volgograd/
Процесс детоксикации проходит поэтапно, чтобы организм успевал адаптироваться к изменениям и не испытывал стресс. Каждый шаг направлен на достижение конкретного терапевтического эффекта. Ниже представлена таблица, отражающая ключевые стадии процедуры, применяемой в клинике «Трезвый Путь Волгоград».
Узнать больше – https://vivod-iz-zapoya-v-volgograde17.ru/anonimnaya-narkologiya-vyvod-iz-zapoya-volgograd/
В таблице приведены основные компоненты инфузионной терапии, применяемые при детоксикации:
Разобраться лучше – [url=https://narkologicheskaya-clinica-v-novokuzneczke17.ru/]наркологические клиники алкоголизм[/url]
обучение продвижению сайтов [url=https://kursy-seo-4.ru/]обучение продвижению сайтов[/url] .
продвижение обучение [url=https://kursy-seo-5.ru/]kursy-seo-5.ru[/url] .
Выезд нарколога на дом в Серпухове — это возможность получить профессиональную помощь в условиях, когда везти человека в клинику сложно, опасно или он категорически отказывается от госпитализации. Специалисты «СерпуховТрезвие» работают круглосуточно, приезжают по адресу с одноразовыми системами, стерильными расходниками и необходимым набором препаратов, проводят осмотр, оценивают жизненно важные показатели, подбирают индивидуальную капельницу, контролируют реакцию и оставляют подробные рекомендации. Всё происходит конфиденциально, без лишних свидетелей, без осуждения и давления. Цель — не формально «поставить капельницу», а безопасно стабилизировать состояние, снизить интоксикацию, выровнять давление и пульс, уменьшить тревогу и вернуть человеку возможность нормально спать и восстанавливаться, не доводя до осложнений и экстренной госпитализации.
Изучить вопрос глубже – [url=https://narkolog-na-dom-serpuhov10.ru/]нарколог на дом недорого[/url]
В Новокузнецке команда «РеабКузбасс» организовала круглосуточный выезд наркологов, что позволяет оказывать помощь даже в сложных ситуациях. Пациенты часто обращаются после многодневного употребления алкоголя, когда нарушен сон, давление нестабильно, а организм истощён. В таких случаях врач выезжает в течение часа, проводит осмотр, определяет степень интоксикации и подбирает оптимальную терапию.
Получить дополнительные сведения – [url=https://vyvod-iz-zapoya-v-novokuzneczke17.ru/]вывод из запоя на дому круглосуточно новокузнецк[/url]
В статье-обзоре представлены данные сомнительной актуальности и факты без явной взаимосвязи. Читатель ознакомится с разными мнениями, хотя они вряд ли существенно изменят его представление о теме.
Подробнее читать – [url=https://rostov-narkologiya.ru/ ]лечение covid народными средствами[/url]
Каждый компонент капельницы подбирается по медицинским показаниям. Врач учитывает возраст, хронические заболевания, степень обезвоживания и чувствительность к препаратам. Такой индивидуальный подход обеспечивает эффективность лечения и исключает осложнения.
Выяснить больше – [url=https://vyvod-iz-zapoia-v-volgograde17.ru/]вывод из запоя вызов на дом в волгограде[/url]
Главным преимуществом наркологической клиники в Новокузнецке является комплексный подход к лечению. Специалисты рассматривают зависимость как заболевание, требующее системного воздействия на организм и психику. Каждый пациент получает индивидуальную программу, включающую медицинскую, психотерапевтическую и социальную помощь. Такой подход обеспечивает достижение устойчивых результатов и предотвращает рецидивы.
Подробнее можно узнать тут – http://narkologicheskaya-clinica-v-novokuzneczke17.ru/narkolog-v-gorode-novokuzneczke/
Не всегда человек способен прекратить употребление алкоголя без медицинского вмешательства. Чем дольше длится запой, тем выше риск осложнений. Обратиться к специалисту следует при появлении следующих признаков:
Углубиться в тему – [url=https://vyvod-iz-zapoya-v-tyumeni17.ru/]вывод из запоя на дому цена[/url]
мостбет сом [url=https://mostbet2026.help]https://mostbet2026.help[/url]
Услуга вывода из запоя в клинике сочетает профессионализм врачей, медицинскую точность и заботу. При этом обеспечивается полная конфиденциальность: данные пациентов не передаются в сторонние инстанции. Круглосуточный режим работы позволяет вызвать врача даже ночью — специалисты прибывают в течение 40–60 минут после обращения.
Исследовать вопрос подробнее – [url=https://vivod-iz-zapoya-v-volgograde17.ru/]вывод из запоя недорого волгоград[/url]
Главная задача капельницы при выезде нарколога в Щёлково — не создать видимость лёгкости, а реально уменьшить интоксикацию и восстановить базовые функции организма. В «ЩёлковоМед Профи» используются современные схемы, а не сомнительные смеси «из всего подряд». В стандартной основе — растворы для восполнения объёма циркулирующей жидкости, выравнивания электролитного баланса и коррекции КЩС, что снижает нагрузку на сердце и мозг. Витамины группы B и магний поддерживают нервную систему, уменьшают тремор, раздражительность и риск судорожных реакций. При необходимости врач добавляет гепатопротекторные и антиоксидантные компоненты, если есть признаки перегрузки печени; при выраженной тошноте — противорвотные, чтобы пациент мог нормально пить и питаться. Для нормализации сна и тревоги подбираются мягкие анксиолитики в дозах, позволяющих контролировать состояние, а не «вырубать» человека. Агрессивные седативные протоколы, которые маскируют ухудшения и опасны для дыхания и сердца, сознательно исключаются. Оценка эффекта идёт по конкретным критериям: стабилизация давления и пульса, уменьшение дрожи, улучшение цвета кожи, уход тошноты, снижение тревоги, появление естественного, а не лекарственного сна. После выезда семья получает ясный план, как закрепить эффект, чтобы наутро не пришлось начинать всё заново.
Подробнее тут – [url=https://narkolog-na-dom-shchelkovo10.ru/]вызов нарколога на дом[/url]
В Рязани клиника «РязаньМед Альянс» принимает пациентов 24/7, без выходных и праздников. Такое расписание особенно важно при экстренных состояниях — когда человек находится в запое или испытывает абстинентный синдром. Врачи выезжают на дом в течение часа, проводят осмотр, устанавливают капельницы и стабилизируют состояние пациента. Для тех, кто нуждается в длительном наблюдении, предусмотрено комфортное пребывание в стационаре. Здесь созданы условия, при которых лечение проходит анонимно, с сохранением медицинской тайны и без постановки на учёт.
Выяснить больше – [url=https://narkologicheskaya-klinika-v-ryazani17.ru/]наркологическая клиника наркологический центр рязань[/url]
В Волгограде сформирована система оказания наркологической помощи, включающая круглосуточные выезды специалистов, амбулаторное лечение, стационарные программы и реабилитацию. Такой подход позволяет охватить все категории пациентов — от тех, кто нуждается в экстренной помощи, до тех, кто готов пройти полный курс терапии. Независимо от формы оказания услуг, лечение проводится конфиденциально и в соответствии с медицинскими стандартами.
Получить дополнительные сведения – [url=https://narkologicheskaya-pomoshh-v-volgograde17.ru/]неотложная наркологическая помощь[/url]
Лечение в клинике «ВоронежМед Альянс» проходит поэтапно. Каждый модуль имеет определённую цель и собственные критерии эффективности. Такой подход исключает избыточное вмешательство и обеспечивает прозрачность процесса восстановления.
Получить больше информации – https://narcologicheskaya-klinika-v-voronezhe17.ru/chastnaya-narkologicheskaya-klinika-voronezh/
Алгоритм в «Трезвый Центр Коломна» построен так, чтобы убрать импровизацию и сделать всё максимально прозрачным для семьи. Сначала по телефону собираются ключевые данные: возраст пациента, длительность запоя, виды алкоголя, хронические заболевания, препараты, аллергии, наличие судорог, потерь сознания, странного поведения, текущие жалобы. На этом этапе озвучивается ориентировочный формат помощи и примерный диапазон стоимости. Далее следует выезд на дом или поступление в стационар. Врач проводит осмотр: измеряет артериальное давление, пульс, сатурацию, температуру, оценивает тремор, координацию, сознание, степень обезвоживания, наличие болей, состояние дыхания и сердца. На основе этих данных назначается инфузионная терапия: растворы для регидратации и коррекции электролитов, витамины группы B и магний для поддержки нервной системы, по показаниям — гепатопротекторы, антиоксидантные комплексы, противорвотные для контроля тошноты, мягкие анксиолитики для уменьшения тревоги и нормализации сна. Уходят от агрессивной седации: пациент не должен быть «выключен» так, чтобы невозможно было заметить ухудшение. В процессе капельниц проводится повторный контроль показателей, темп и состав при необходимости корректируются. После стабилизации пациент и семья получают подробные рекомендации: режим, сон, питание, питьё, запреты, «красные флаги», план наблюдения и возможного дальнейшего лечения зависимости.
Подробнее можно узнать тут – http://vyvod-iz-zapoya-kolomna10.ru
Пациенты отмечают, что особенно важна не только профессиональная помощь, но и спокойная атмосфера. Мягкий свет, тишина, отдельные палаты и деликатная коммуникация персонала — всё это снижает тревожность и помогает организму восстановиться. Эффективность лечения оценивается по конкретным маркерам: улучшение сна, нормализация давления, исчезновение тошноты, восстановление аппетита и уменьшение тяги.
Узнать больше – http://narkologicheskaya-clinica-v-krasnoyarske17.ru
Капельница от запоя в Воронеже применяется для восстановления организма после длительного употребления алкоголя, устранения интоксикации и нормализации обменных процессов. Медицинская процедура проводится под контролем врача-нарколога, в клинике или на дому. Она позволяет быстро улучшить самочувствие, устранить головную боль, тремор, тошноту, обезвоживание и нарушения сна. Современные препараты действуют мягко, безопасно и без стресса для организма, обеспечивая плавный выход из запоя.
Подробнее можно узнать тут – [url=https://kapelnicza-ot-zapoya-v-voronezhe17.ru/]капельница от запоя на дому воронеж[/url]
Важное отличие клиники — отказ от примитивной схемы «капельница — домой — дальше сам». Такой формат даёт кратковременное облегчение, но не решает ни причин, ни структуры зависимости. «КоломнаМед Центр» выстраивает ступенчатый подход. Первый шаг — безопасная детоксикация: снятие абстиненции, коррекция водно-электролитного баланса, поддержка сердечно-сосудистой системы, печени, нервной системы, нормализация сна. Второй шаг — стабилизация: оценка психического состояния, выявление тревожных, депрессивных и панических симптомов, подбор поддерживающих схем, которые помогают не сорваться сразу после выхода из острых проявлений. Третий шаг — реабилитация и мотивация: психотерапевтическая работа, групповые и индивидуальные форматы, обучение навыкам трезвой жизни, работа с триггерами, укрепление внутренней мотивации. Четвёртый шаг — постреабилитационная поддержка: контрольные приёмы, дистанционные консультации, помощь в профилактике срывов. Такой комплексный путь не ломает пациента, а возвращает ему контроль: не через страх, а через понимание, структуру и реальные инструменты.
Получить дополнительные сведения – https://narkologicheskaya-klinika-kolomna10.ru/narkologicheskaya-klinika-oficialnyj-sajt-v-kolomne
Особенность подхода заключается в сочетании медицинской и психологической поддержки. После кодирования пациент получает консультации психотерапевта, рекомендации по восстановлению и профилактике рецидивов. Это снижает риск повторного срыва и помогает закрепить результат на долгий срок.
Получить дополнительную информацию – http://kodirovanie-ot-alkogolizma-v-volgograde17.ru
Острый запой — это нарушение работы сердца, мозга, печени и нервной системы, а не просто «лишние пару дней выпивки». Когда начинается тремор, потливость, скачки давления, бессонница, паника, семья часто пытается помочь самостоятельно: даёт случайные таблетки, сомнительные «антипохмельные коктейли», сильные седативные. В реальности такие меры нередко ухудшают ситуацию: давление падает или «скачет», дыхание угнетается, симптомы предделирия маскируются, и момент, когда нужна экстренная помощь, пропускается. Выездной нарколог «ЩёлковоМед Профи» в Щёлково работает иначе: ещё по телефону собираются ключевые данные — возраст, длительность запоя, сопутствующие заболевания, принимаемые лекарства, аллергии, примерные показатели АД и пульса, особенности поведения. Это позволяет заранее оценить риски и понять, подходит ли формат на дому. На месте врач измеряет давление, пульс, сатурацию, температуру, оценивает степень обезвоживания, выраженность тремора, неврологический статус, наличие дезориентации, смотрит, не требуется ли сразу стационар. Капельница назначается по фактическим показателям: без «универсальных коктейлей», без опасной седации, с учётом сердца, печени, эндокринных и неврологических особенностей. Такой подход снижает нагрузку на организм и делает результат управляемым — облегчение наступает без лишнего риска.
Получить дополнительные сведения – [url=https://narkolog-na-dom-shchelkovo10.ru/]vyzvat-narkologa-na-dom[/url]
Вывод из запоя в Красноярске — это медицинская процедура, направленная на устранение алкогольной интоксикации и восстановление нормальной работы организма после длительного употребления спиртных напитков. Услуга предоставляется круглосуточно и включает дезинтоксикационную терапию, стабилизацию психоэмоционального состояния и профилактику осложнений. Все процедуры выполняются опытными наркологами с применением сертифицированных препаратов и в строгом соответствии с медицинскими стандартами.
Подробнее тут – [url=https://vyvod-iz-zapoya-v-krasnoyarske17.ru/]вывод из запоя вызов на дом красноярск[/url]
Вывод из запоя в Тюмени — это медицинская процедура, направленная на устранение алкогольной интоксикации и восстановление нормального функционирования организма. Длительное употребление спиртных напитков приводит к нарушению обмена веществ, обезвоживанию, сбоям в работе печени и сердца. В таких случаях требуется профессиональная помощь врача-нарколога, который подберёт оптимальный способ дезинтоксикации и медикаментозной поддержки. Современные методики позволяют провести вывод из запоя безопасно, эффективно и без осложнений.
Ознакомиться с деталями – https://vyvod-iz-zapoya-v-tyumeni17.ru/vyvod-iz-zapoya-tyumen-otzyvy
Капельницы от запоя включают препараты для очищения крови, восстановления электролитного баланса и защиты печени. Используются только сертифицированные растворы, одобренные Минздравом РФ. В клинике применяется комплексный подход: одновременно с физическим восстановлением запускаются лёгкие дыхательные и релаксационные методики, которые помогают организму вернуться в стабильное состояние.
Исследовать вопрос подробнее – [url=https://vyvod-iz-zapoya-v-voronezhe17.ru/]вывод из запоя капельница в воронеже[/url]
Услуга вывода из запоя в клинике сочетает профессионализм врачей, медицинскую точность и заботу. При этом обеспечивается полная конфиденциальность: данные пациентов не передаются в сторонние инстанции. Круглосуточный режим работы позволяет вызвать врача даже ночью — специалисты прибывают в течение 40–60 минут после обращения.
Подробнее можно узнать тут – [url=https://vivod-iz-zapoya-v-volgograde17.ru/]вывод из запоя цена волгоград[/url]
Комплексный подход позволяет врачу не просто купировать острые симптомы, но и предупредить осложнения со стороны сердца, печени и нервной системы. После стабилизации состояния пациент получает рекомендации по дальнейшему лечению и восстановлению.
Углубиться в тему – [url=https://vyvod-iz-zapoia-v-volgograde17.ru/]врач вывод из запоя в волгограде[/url]
Инфузионная терапия (капельницы) — важная часть лечения, направленная на очищение организма, восстановление водно-солевого баланса и устранение токсинов. В «РязаньМед Альянс» используются проверенные препараты, которые помогают нормализовать работу внутренних органов и улучшить общее самочувствие. Таблица ниже показывает, какие виды капельниц чаще всего применяются при выведении из запоя и лечении алкоголизма.
Изучить вопрос глубже – [url=https://narkologicheskaya-klinika-v-ryazani17.ru/]вывод наркологическая клиника[/url]
Наркологическая помощь в Волгограде предназначена для людей, столкнувшихся с проблемами алкогольной или наркотической зависимости. Современный подход к лечению основан на сочетании медицинских, психологических и социальных методов, направленных на полное восстановление пациента. Врачи-наркологи применяют безопасные схемы детоксикации, эффективные медикаменты и программы психотерапевтической поддержки, позволяющие достичь устойчивой ремиссии и вернуть пациента к нормальной жизни.
Выяснить больше – https://narkologicheskaya-pomoshh-v-volgograde17.ru/
Капельница от запоя в Волгограде — это эффективный способ быстро восстановить организм после длительного употребления алкоголя. Процедура проводится врачом-наркологом и направлена на выведение токсинов, нормализацию обмена веществ и стабилизацию работы нервной системы. Инфузионная терапия помогает устранить головную боль, слабость, тошноту, восстановить сон и аппетит. Благодаря внутривенному введению препаратов эффект наступает уже через 20–30 минут после начала процедуры.
Получить дополнительные сведения – https://kapelnicza-ot-zapoya-v-volgograde17.ru/
Основные этапы лечения включают:
Выяснить больше – [url=https://narkologicheskaya-klinika-v-voronezhe17.ru/]частная наркологическая клиника в воронеже[/url]
Запой — это не просто несколько лишних дней алкоголя, а тяжёлое состояние, в котором организм работает на пределе. Чем дольше длится эпизод, тем глубже обезвоживание, тем сильнее сдвиги электролитов, тем выше риск аритмий, гипертонических кризов, судорог, делирия, обострений заболеваний сердца, печени и поджелудочной железы. Попытки «вывести» человека дома силами родных часто включают опасные комбинации: случайные седативные, снотворные, анальгетики, «антипохмельные» из рекламы. Они могут на время усыпить или «успокоить», но при этом скрывают ухудшение, сбивают давление, угнетают дыхание и мешают врачу увидеть реальную картину. В «Трезвый Центр Коломна» подход другой: ещё на этапе звонка специалист уточняет длительность запоя, объёмы и виды алкоголя, наличие гипертонии, ИБС, диабета, заболеваний печени и почек, неврологических проблем, список уже принятых препаратов, эпизоды потери сознания, судорог, странного поведения. На основании этих данных определяется, безопасен ли формат на дому или сразу нужен стационар. Такая сортировка позволяет вовремя перехватить опасные случаи, не терять часы на бесполезные попытки и сразу запускать те схемы, которые реально снижают риски и стабилизируют состояние.
Получить дополнительные сведения – http://vyvod-iz-zapoya-kolomna10.ru/
Главное преимущество обращения в наркологическую клинику в Воронеже — комплексный подход к лечению зависимости. Специалисты учитывают медицинские, психологические и социальные факторы, влияющие на формирование зависимости. Каждая программа подбирается индивидуально: в зависимости от стадии заболевания, состояния здоровья и целей терапии. В процессе лечения применяются детоксикация, медикаментозная поддержка, психотерапия и методы социальной адаптации.
Получить больше информации – [url=https://narkologicheskaya-clinica-v-voronezhe17.ru/]наркологические клиники алкоголизм в воронеже[/url]
Важное отличие клиники — отказ от примитивной схемы «капельница — домой — дальше сам». Такой формат даёт кратковременное облегчение, но не решает ни причин, ни структуры зависимости. «КоломнаМед Центр» выстраивает ступенчатый подход. Первый шаг — безопасная детоксикация: снятие абстиненции, коррекция водно-электролитного баланса, поддержка сердечно-сосудистой системы, печени, нервной системы, нормализация сна. Второй шаг — стабилизация: оценка психического состояния, выявление тревожных, депрессивных и панических симптомов, подбор поддерживающих схем, которые помогают не сорваться сразу после выхода из острых проявлений. Третий шаг — реабилитация и мотивация: психотерапевтическая работа, групповые и индивидуальные форматы, обучение навыкам трезвой жизни, работа с триггерами, укрепление внутренней мотивации. Четвёртый шаг — постреабилитационная поддержка: контрольные приёмы, дистанционные консультации, помощь в профилактике срывов. Такой комплексный путь не ломает пациента, а возвращает ему контроль: не через страх, а через понимание, структуру и реальные инструменты.
Узнать больше – [url=https://narkologicheskaya-klinika-kolomna10.ru/]narkologicheskaya-klinika-doktor[/url]
Запой представляет собой состояние, при котором организм находится под постоянным воздействием этанола. Это вызывает интоксикацию, нарушение обменных процессов и дестабилизацию психики. При обращении за помощью врач-нарколог оценивает состояние пациента и подбирает индивидуальную схему терапии, чтобы безопасно вывести человека из запоя и предотвратить развитие синдрома отмены. Вмешательство проводится как в стационаре, так и на дому, в зависимости от состояния пациента.
Выяснить больше – [url=https://vyvod-iz-zapoya-v-krasnoyarske17.ru/]вывод из запоя круглосуточно красноярск[/url]
seo бесплатно [url=https://kursy-seo-4.ru/]seo бесплатно[/url] .
Каждый из этапов сопровождается контролем врача и постепенным снижением медикаментозной нагрузки. Важно не просто снять симптомы, но и научить пациента распознавать внутренние триггеры, чтобы предотвратить рецидив. На протяжении всего лечения сохраняется поддержка психолога, который помогает адаптироваться и перестроить привычные модели поведения.
Подробнее можно узнать тут – [url=https://narcologicheskaya-klinika-v-voronezhe17.ru/]платная наркологическая клиника в воронеже[/url]
Когда запой длится не первый день, а состояние уже сопровождается тремором, потливостью, резкими перепадами давления, бессонницей, тревогой, тошнотой или рвотой, попытка «перетерпеть» или лечить самостоятельно таблетками становится опасным экспериментом. Сочетание алкоголя с сильнодействующими успокоительными, обезболивающими или сомнительными «антипохмельными» легко приводит к нарушению дыхания, провалам в сознании, аритмиям и скрытому развитию предделирия. Домашние средства не учитывают ни электролитные сдвиги, ни состояние печени и сердца, ни уже принятые лекарства. Выездной нарколог «СерпуховТрезвие» в Серпухове выстраивает ситуацию иначе: ещё по телефону врач собирает ключевую информацию — длительность запоя, примерные объёмы и виды алкоголя, наличие гипертонии, ИБС, диабета, заболеваний печени и почек, неврологических проблем, какие препараты уже давали и в каких дозах, были ли судороги или эпизоды дезориентации. На месте проводится объективная диагностика: измерение давления, пульса, сатурации, температуры, оценка тремора, степени обезвоживания, психического состояния, неврологического статуса. Только после этого принимается решение: проводить детокс на дому или сразу рекомендовать стационар. Такой фильтр защищает от грубых ошибок, позволяет точно подобрать схему и не терять драгоценное время, пытаясь «угадать» лечение.
Получить дополнительные сведения – [url=https://narkolog-na-dom-serpuhov10.ru/]выезд нарколога на дом в серпухове[/url]
mostbet app [url=https://www.mostbet2026.help]https://www.mostbet2026.help[/url]
seo с нуля [url=https://kursy-seo-5.ru/]kursy-seo-5.ru[/url] .
Ниже приведена таблица, отражающая примерную динамику состояния пациента после постановки капельницы:
Получить больше информации – [url=https://kapelnicza-ot-zapoya-v-voronezhe17.ru/]капельница от запоя стоимость в воронеже[/url]
Процесс детоксикации проходит поэтапно, чтобы организм успевал адаптироваться к изменениям и не испытывал стресс. Каждый шаг направлен на достижение конкретного терапевтического эффекта. Ниже представлена таблица, отражающая ключевые стадии процедуры, применяемой в клинике «Трезвый Путь Волгоград».
Исследовать вопрос подробнее – [url=https://vivod-iz-zapoya-v-volgograde17.ru/]наркология вывод из запоя в волгограде[/url]
Фиксируем АД, ЧСС, сатурацию, температуру, оцениваем неврологический статус, степень обезвоживания, тремор, тошноту и уровень тревоги; собираем краткий анамнез последних суток и характер употребления.
Выяснить больше – http://
Капельницы от запоя включают препараты для очищения крови, восстановления электролитного баланса и защиты печени. Используются только сертифицированные растворы, одобренные Минздравом РФ. В клинике применяется комплексный подход: одновременно с физическим восстановлением запускаются лёгкие дыхательные и релаксационные методики, которые помогают организму вернуться в стабильное состояние.
Получить дополнительную информацию – [url=https://vyvod-iz-zapoya-v-voronezhe17.ru/]вывод из запоя с выездом в воронеже[/url]
Терапия строится из узких модулей с чёткими «выключателями». Мы не «усиливаем» схему без показаний — каждое расширение привязано к конкретной цели и времени переоценки. Ниже — ориентир по основным программам «ЕнисейМед Центра».
Углубиться в тему – http://narkologicheskaya-klinika-v-krasnoyarske17.ru/
Современные методы лечения в наркологической клинике в Новокузнецке основаны на доказательной медицине. При поступлении пациент проходит полное обследование, включающее оценку физического состояния, психоэмоционального фона и наличия сопутствующих заболеваний. На основе полученных данных составляется персональная программа терапии, охватывающая медицинский, психологический и социальный аспекты выздоровления.
Изучить вопрос глубже – [url=https://narcologicheskaya-klinika-v-novokuzneczke17.ru/]частная наркологическая клиника[/url]
В основе работы клиники лежит принцип: зависимость — это не просто привычка и не «слабость характера», а комплексное заболевание, которое требует последовательного лечения, а не случайной капельницы по вызову. «Трезвый Шаг Раменское» отказывается от практики, когда пациенту предлагают один-единственный «волшебный» метод, не объясняя, что будет дальше. Здесь каждое обращение рассматривается в контексте стадии зависимости, общего состояния организма, психоэмоционального фона, семейной ситуации. Сначала специалисты снимают острые проявления: выход из запоя, детоксикация после употребления алкоголя, наркотиков или сочетаний, купирование абстиненции, коррекция давления, пульса, сна, тревоги. Затем формируется стабилизационный этап — подбор поддерживающих схем, работа с тягой, выравнивание эмоционального состояния. После этого при готовности пациента подключаются психотерапевтические и реабилитационные инструменты: мотивационные программы, работа с установками, триггерами, окружением. Важная особенность «Трезвый Шаг Раменское» — готовность объяснять семье и самому пациенту, зачем нужен каждый этап, какие цели у процедуры и какие результаты реально ожидать. Это снижает сопротивление, формирует доверие и делает путь не хаотичным, а управляемым.
Изучить вопрос глубже – https://narkologicheskaya-klinika-ramenskoe10.ru/narkologicheskaya-klinika-otzyvy-v-ramenskom
Когда человек в запое, близким кажется, что всё ещё можно решить «по-тихому»: выспаться, отпаять водой, дать обезболивающее или «успокоительное» и дождаться, пока станет легче. На практике это часто приводит к обратному результату. Алкогольная интоксикация нарушает водно-электролитный баланс, сгущает кровь, повышает нагрузку на сердце, провоцирует скачки давления, ухудшает работу печени и нервной системы. Неконтролируемый приём снотворных, анальгетиков, транквилизаторов, особенно вместе с алкоголем, способен вызвать угнетение дыхания, аритмии, судороги или делирий. Домашняя обстановка не даёт возможности следить за всеми показателями и вовремя отреагировать. «РаменМед Трезвость» предлагает клинически выверенный вывод из запоя в Раменском с учётом возраста, длительности употребления, хронических заболеваний, перенесённых ранее осложнений. Здесь не применяют сомнительные схемы «усыпить, чтобы не мешал», а ставят задачу: безопасно пройти острую фазу, снять интоксикацию, стабилизировать давление и пульс, защитить сердце и мозг, снизить риск психозов и, при желании пациента, сразу наметить маршрут реального лечения зависимости. Такой подход снимает с родственников опасную «роль врача» и возвращает ситуацию туда, где ей место — под контроль профессионалов.
Разобраться лучше – https://vyvod-iz-zapoya-ramenskoe10.ru/vyvod-iz-zapoya-ryadom-v-ramenskom
скачать mostbet casino [url=https://www.mostbet2026.help]https://www.mostbet2026.help[/url]
Комплексное проведение этих этапов обеспечивает полное восстановление организма и облегчает процесс последующего лечения зависимости.
Получить больше информации – http://vyvod-iz-zapoya-v-ryazani17.ru
Все процедуры выполняются анонимно и с соблюдением медицинских стандартов. Препараты применяются только сертифицированные, рассчитанные на мягкое восстановление организма без побочных эффектов. При необходимости лечение продолжается в стационаре, где пациент получает круглосуточное наблюдение, питание и психологическую поддержку.
Исследовать вопрос подробнее – [url=https://vyvod-iz-zapoya-v-novokuzneczke17.ru/]скорая вывод из запоя в новокузнецке[/url]
Детоксикация — это первый и важнейший этап лечения в наркологической клинике в Красноярске. Она проводится с целью выведения токсинов из организма и восстановления функций жизненно важных органов. Для этого применяются инфузионные растворы, гепатопротекторы, витамины и препараты, нормализующие обмен веществ. После снятия интоксикации пациент получает медикаментозную поддержку, направленную на снижение тяги к алкоголю или наркотикам и стабилизацию эмоционального состояния.
Подробнее можно узнать тут – [url=https://narcologicheskaya-klinika-v-krasnoyarske17.ru/]наркологическая клиника лечение алкоголизма красноярск[/url]
Острый эпизод запоя — это не «плохое самочувствие», а состояние с реальными рисками для сердца, нервной системы и дыхания, особенно в ночные часы, когда усиливаются вегетативные реакции и тревога. В «НоваТрезвие» мы выстраиваем помощь так, чтобы от звонка до заметного облегчения прошло как можно меньше времени и как можно меньше случайностей: короткое интервью для оценки рисков, выезд врача или приём в клинике, экспресс-диагностика по ключевым показателям, персональная инфузионная схема без «универсальных коктейлей», мягкая коррекция сна и тревоги без «вырубания», понятные инструкции семье на 24–72 часа и план продолжения на ближайшие недели. Мы не скрываемся за общими формулами: решения принимаются по фактическим данным, дозы и темп капельниц подстраиваются к динамике каждые 15–20 минут, а при «красных флагах» перевод в стационар организуется без пауз. Конфиденциальность соблюдается строго, а коммуникация простая и предсказуемая — чтобы вы всегда знали, что происходит сейчас и чего ждать к утру.
Получить больше информации – [url=https://vyvod-iz-zapoya-ehlektrostal2-10.ru/]вывод из запоя круглосуточно[/url]
Современная наркологическая клиника — это не просто медицинское учреждение, где проводят детоксикацию или капельницы. Это выстроенная система, где каждый этап направлен на восстановление физического, психического и социального равновесия пациента. В клинике «КрасЗдрав Профи» весь процесс лечения построен по принципу прозрачных шагов: первичная диагностика, стабилизация организма, терапевтическая коррекция и закрепление результата. Всё происходит с соблюдением принципа конфиденциальности — пациент может рассчитывать на анонимность и этичное отношение со стороны персонала.
Выяснить больше – [url=https://narkologicheskaya-clinica-v-krasnoyarske17.ru/]наркологическая клиника вывод из запоя[/url]
Анонимная наркологическая помощь — это управляемая система, где каждый шаг прозрачно связан с целью и измеримым результатом. В наркологической клинике «ЕнисейМед Центр» мы соединяем круглосуточную доступность, мягкую логистику и модульный план лечения, чтобы пациент и семья понимали, почему именно сейчас назначается то или иное вмешательство и когда оно будет остановлено. Мы избегаем полипрагмазии: запускаем один модуль — ставим один маркер — определяем «окно оценки» — выключаем модуль, как только цель достигнута. Такой подход бережёт ресурсы организма и сохраняет причинно-следственную связь.
Получить дополнительную информацию – [url=https://narkologicheskaya-klinika-v-krasnoyarske17.ru/]анонимная наркологическая клиника[/url]
Эта публикация содержит набор несвязанных идей, трудно применимых в практике. Мы лишь поверхностно затрагиваем различные точки зрения, не проводя глубокий анализ и не предлагая выводов.
Подробнее читать – [url=https://rostov-narkologiya.ru/uslugi-ot-alkogolizma/vyvod-iz-zapoya/]диета для похудения быстро[/url]
Здесь собраны разрозненные сведения и неопределённые мысли, которые могут заинтересовать, даже если их важность сомнительна.
Дополнительная информация – [url=https://stop-zavisimost.ru/blog/chto-takoe-mefedron-kak-ego-upotreblyayut-posledstviya-i-sposoby-lecheniya-zavisimosti.html]займы до зарплаты[/url]
Стационар «Трезвый Путь Коломна» ориентирован на безопасность в самых сложных случаях: длительные запои, тяжёлая абстиненция, смешанное употребление, выраженные соматические проблемы, риск делирия или судорог. Пациент попадает под наблюдение 24/7, что принципиально отличает клинику от домашних попыток «спасти своими средствами». Контроль жизненно важных показателей, своевременная коррекция схем лечения, возможность быстро отреагировать на осложнения — всё это снижает риск критических ситуаций, которые часто возникают именно после неумелых домашних вмешательств или «выездов без ответственности».
Узнать больше – http://narkologicheskaya-klinika-kolomna2-10.ru
Основные этапы обычно включают:
Подробнее тут – [url=https://vyvod-iz-zapoya-ramenskoe10.ru/]вывод из запоя[/url]
В таблице приведены основные компоненты инфузионной терапии, применяемые при детоксикации:
Детальнее – [url=https://narkologicheskaya-clinica-v-novokuzneczke17.ru/]наркологические клиники алкоголизм[/url]
Такой подход позволяет добиться устойчивого эффекта и минимизировать риск возврата к зависимому поведению.
Подробнее можно узнать тут – [url=https://narkologicheskaya-klinika-v-volgograde17.ru/]наркологическая клиника волгоград[/url]
seo специалист [url=https://kursy-seo-4.ru/]seo специалист[/url] .
Для иллюстрации эффективности методов представлена таблица с примерами процедур и их воздействием:
Получить дополнительную информацию – [url=https://narcologicheskaya-klinika-v-krasnoyarske17.ru/]наркологическая клиника наркологический центр в красноярске[/url]
seo с нуля [url=https://kursy-seo-5.ru/]kursy-seo-5.ru[/url] .
Эта обзорная заметка содержит ключевые моменты и факты по актуальным вопросам. Она поможет читателям быстро ориентироваться в теме и узнать о самых важных аспектах сегодня. Получите краткий курс по современной информации и оставайтесь в курсе событий!
Полезно знать – https://foreverindiaholidays.com/hello-world
В обзорной статье вы найдете собрание важных фактов и аналитики по самым разнообразным темам. Мы рассматриваем как современные исследования, так и исторические контексты, чтобы вы могли получить полное представление о предмете. Погрузитесь в мир знаний и сделайте шаг к пониманию!
Получить дополнительные сведения – https://kktcalimsatim.com/you-ad-has-been-activated-29
Эта обзорная заметка содержит ключевые моменты и факты по актуальным вопросам. Она поможет читателям быстро ориентироваться в теме и узнать о самых важных аспектах сегодня. Получите краткий курс по современной информации и оставайтесь в курсе событий!
Получить дополнительные сведения – https://dribrahimjalojalingo.com/abubuwa-da-ake-yi-a-ranar-idi
Процесс терапии в наркологической клинике в Воронеже организован поэтапно. Это позволяет обеспечить системность и постепенность восстановления, снизить риски осложнений и повысить устойчивость результата.
Получить дополнительную информацию – [url=https://narkologicheskaya-klinika-v-voronezhe17.ru/]вывод наркологическая клиника в воронеже[/url]
Эта информационная заметка предлагает лаконичное и четкое освещение актуальных вопросов. Здесь вы найдете ключевые факты и основную информацию по теме, которые помогут вам сформировать собственное мнение и повысить уровень осведомленности.
Детали по клику – https://joyful.co.in/product/joyful-marriot-round-serving-tray-set-irresistible-classic-design-3-piece-set-small-medium-big-grey-color
Эта обзорная заметка содержит ключевые моменты и факты по актуальным вопросам. Она поможет читателям быстро ориентироваться в теме и узнать о самых важных аспектах сегодня. Получите краткий курс по современной информации и оставайтесь в курсе событий!
Слушай внимательно — тут важно – http://dboudeau.fr/site
В этом интересном тексте собраны обширные сведения, которые помогут вам понять различные аспекты обсуждаемой темы. Мы разбираем детали и факты, делая акцент на важности каждого элемента. Не упустите возможность расширить свои знания и взглянуть на мир по-новому!
Открой скрытое – https://moriyamaseko.wpxblog.jp/jr%E6%9D%B1%E6%B5%B7%E3%83%AA%E3%83%8B%E3%82%A2%E4%B8%AD%E5%A4%AE%E6%96%B0%E5%B9%B9%E7%B7%9A%E5%B7%A5%E4%BA%8B%E8%AA%AC%E6%98%8E%E4%BC%9A
Эта познавательная публикация погружает вас в море интересного контента, который быстро захватит ваше внимание. Мы рассмотрим важные аспекты темы и предоставим вам уникальные Insights и полезные сведения для дальнейшего изучения.
Изучить рекомендации специалистов – https://www.livetricks.in/en/mobile-apps/whatsapp-delete-for-everyone-feature-heres-how-to-use-it-2192
Эта публикация завернет вас в вихрь увлекательного контента, сбрасывая стереотипы и открывая двери к новым идеям. Каждый абзац станет для вас открытием, полным ярких примеров и впечатляющих достижений. Подготовьтесь быть вовлеченными и удивленными каждый раз, когда продолжите читать.
Слушай внимательно — тут важно – https://wfc2023.jp/2025/08/02/hello-world
Этот обзорный материал предоставляет информационно насыщенные данные, касающиеся актуальных тем. Мы стремимся сделать информацию доступной и структурированной, чтобы читатели могли легко ориентироваться в наших выводах. Познайте новое с нашим обзором!
Получить дополнительные сведения – https://bcnprojetosdigitais.com/ola-mundo
Этот интересный отчет представляет собой сборник полезных фактов, касающихся актуальных тем. Мы проанализируем данные, чтобы вы могли сделать обоснованные выводы. Читайте, чтобы узнать больше о последних трендах и значимых событиях!
Изучить эмпирические данные – https://drivefaq.com/maximize-your-battery-life-with-these-smart-charging-tips
Система IQOS считается современным устройством для использования табачных стиков.
В отличие от обычных методов, устройство использует нагрев.
Такой подход позволяет избежать процесса сгорания.
Система отличается современным внешним видом.
https://terea777.shop/product/terea-twilight-s-kapsuloj/
Простота эксплуатации делает устройство удобным вариантом для многих пользователей.
Также iQOS обеспечивает стабильную работу.
Наличие разных вкусов позволяет подобрать подходящий формат.
Таким образом, система iQOS заняла свое место на рынке среди взрослых пользователей.
Ниже — ключевые направления, которые логично дополняют друг друга и формируют единый маршрут лечения:
Получить дополнительные сведения – [url=https://narkologicheskaya-klinika-ramenskoe10.ru/]anonimnaya-narkologicheskaya-klinika[/url]
В этом интересном тексте собраны обширные сведения, которые помогут вам понять различные аспекты обсуждаемой темы. Мы разбираем детали и факты, делая акцент на важности каждого элемента. Не упустите возможность расширить свои знания и взглянуть на мир по-новому!
Нажмите, чтобы узнать больше – https://stosstrupp-gold-germany.de/index.php?site=news_comments&newsID=193%C3%83%C2%83%C3%82%C2%A2%C3%83%C2%82%C3%82%C2%8C%C3%83%C2%82%C3%82%C2%841%C3%83%C2%82%C3%82%C2%A477de&sorttype=ASC&page=22660
В этой статье-обзоре мы соберем актуальную информацию и интересные факты, которые освещают важные темы. Читатели смогут ознакомиться с различными мнениями и подходами, что позволит им расширить кругозор и глубже понять обсуждаемые вопросы.
Познакомиться с результатами исследований – https://www.powertvnews.in/2023/04/26/fir-filed-against-actress-tara
Мы предлагаем вам окунуться в океан любопытных фактов и вдохновляющих историй. Эта публикация поможет расширить горизонты, разбудить интерес к науке и истории и увидеть мир с новой стороны.
Кликни и узнай всё! – https://stage-curacao.nl/strand-curacao-met-infinity-pool
В этом информативном тексте представлены захватывающие события и факты, которые заставят вас задуматься. Мы обращаем внимание на важные моменты, которые часто остаются незамеченными, и предлагаем новые перспективы на привычные вещи. Подготовьтесь к тому, чтобы быть поглощенным увлекательными рассказами!
Получить дополнительные сведения – https://saviugdairtobulejimas.lt/zeme-pries-tris-milijardus-metu
Публикация предлагает уникальную подборку информации, которая будет интересна как специалистам, так и широкому кругу читателей. Здесь вы найдете ответы на часто задаваемые вопросы и полезные инсайты для дальнейшего применения.
Лучшее решение — прямо здесь – https://talkingmanagedservices.co.uk/discover-bristols-ring-magic
Эта информационная заметка содержит увлекательные сведения, которые могут вас удивить! Мы собрали интересные факты, которые сделают вашу жизнь ярче и полнее. Узнайте нечто новое о привычных аспектах повседневности и откройте для себя удивительный мир информации.
Всё, что нужно знать – https://uhcpartnership.net/mobile-casino-apps-for-android-and-ios-users
Эта статья полна интересного контента, который побудит вас исследовать новые горизонты. Мы собрали полезные факты и удивительные истории, которые обогащают ваше понимание темы. Читайте, погружайтесь в детали и наслаждайтесь процессом изучения!
Узнать больше > – https://cerebropost.com/771-2
В обзорной статье вы найдете собрание важных фактов и аналитики по самым разнообразным темам. Мы рассматриваем как современные исследования, так и исторические контексты, чтобы вы могли получить полное представление о предмете. Погрузитесь в мир знаний и сделайте шаг к пониманию!
Не упусти важное! – https://techmalaga.com/el-abc-del-emprendedor-siglas-y-jerga-que-nadie-te-explico-con-una-pizca-de-humor
Эта информационная заметка предлагает лаконичное и четкое освещение актуальных вопросов. Здесь вы найдете ключевые факты и основную информацию по теме, которые помогут вам сформировать собственное мнение и повысить уровень осведомленности.
Подробная информация доступна по запросу – https://perfectindiaplanner.in/pack-wisely-before-traveling
Этот увлекательный информационный материал подарит вам массу новых знаний и ярких эмоций. Мы собрали для вас интересные факты и сведения, которые обогатят ваш опыт. Откройте для себя увлекательный мир информации и насладитесь процессом изучения!
Смотрите также… – https://blijebietjes.nl/zuurkool-broodjes
Эта информационная заметка содержит увлекательные сведения, которые могут вас удивить! Мы собрали интересные факты, которые сделают вашу жизнь ярче и полнее. Узнайте нечто новое о привычных аспектах повседневности и откройте для себя удивительный мир информации.
Где почитать поподробнее? – https://stjosephmatignon.fr/les-plantations
В данной обзорной статье представлены интригующие факты, которые не оставят вас равнодушными. Мы критикуем и анализируем события, которые изменили наше восприятие мира. Узнайте, что стоит за новыми открытиями и как они могут изменить ваше восприятие реальности.
Практические советы ждут тебя – https://teshiyo.jp/%E3%82%B9%E3%83%9E%E3%83%9B%E7%94%A801
Статья содержит практические рекомендации и полезные советы, которые можно легко применить в повседневной жизни. Мы делаем акцент на реальных примерах и проверенных методиках, которые способствуют личностному развитию и улучшению качества жизни.
Хочу знать больше – https://whychania.com/outlook-of-chania-residential-market-summer-2022
Эта обзорная заметка содержит ключевые моменты и факты по актуальным вопросам. Она поможет читателям быстро ориентироваться в теме и узнать о самых важных аспектах сегодня. Получите краткий курс по современной информации и оставайтесь в курсе событий!
Только для своих – https://koreabuying.com/opening-koreabuying
Эта познавательная публикация погружает вас в море интересного контента, который быстро захватит ваше внимание. Мы рассмотрим важные аспекты темы и предоставим вам уникальные Insights и полезные сведения для дальнейшего изучения.
Детали по клику – https://hans-veredelt.nl/2015-holiday-sale-is-here
Мы предлагаем вам окунуться в океан любопытных фактов и вдохновляющих историй. Эта публикация поможет расширить горизонты, разбудить интерес к науке и истории и увидеть мир с новой стороны.
Получить дополнительную информацию – https://www.ophthalmetryoptical.com/blog/handheld-tonometers
Эта статья сочетает познавательный и занимательный контент, что делает ее идеальной для любителей глубоких исследований. Мы рассмотрим увлекательные аспекты различных тем и предоставим вам новые знания, которые могут оказаться полезными в будущем.
Переходите по ссылке ниже – https://ru.wikipedia.org/wiki/%D0%90%D0%B4%D0%BC%D0%B8%D1%80%D0%B0%D0%BB_%D0%A4%D0%BB%D0%BE%D1%82%D0%B0_%D0%A1%D0%BE%D0%B2%D0%B5%D1%82%D1%81%D0%BA%D0%BE%D0%B3%D0%BE_%D0%A1%D0%BE%D1%8E%D0%B7%D0%B0_%D0%9A%D1%83%D0%B7%D0%BD%D0%B5%D1%86%D0%BE%D0%B2
Эта разъяснительная статья содержит простые и доступные разъяснения по актуальным вопросам. Мы стремимся сделать информацию понятной для широкой аудитории, чтобы каждый мог разобраться в предмете и извлечь из него максимум пользы.
Смотрите также – https://allyoucaneatgids.nl/het-geheim-van-all-you-can-eat
Эта информационная статья содержит полезные факты, советы и рекомендации, которые помогут вам быть в курсе последних тенденций и изменений в выбранной области. Материал составлен так, чтобы быть полезным и понятным каждому.
А что дальше? – https://mindahaas.net/2010/11/five-foto-friday-all-hockey/fff03-17-cute/comment-page-1286
seo бесплатно [url=https://kursy-seo-4.ru/]seo бесплатно[/url] .
курсы по seo [url=https://kursy-seo-5.ru/]курсы по seo[/url] .
В материале приведены детали, интересные, но не особенно важные. Мы рассматриваем аспекты, которые сложно назвать существенными, но включили их для большей полноты.
Подробнее читать – [url=https://rostov-narkologiya.ru/uslugi-ot-narkomanii/mefedronovaya-zavisimost/]народные средства от диабета[/url]
Такой календарь делает весь процесс прозрачным: пациент видит логику, близкие — прогресс, а врач — чистый сигнал для коррекции без «эскалации на всякий случай».
Подробнее можно узнать тут – [url=https://narcologicheskaya-klinika-saratov0.ru/]наркологическая клиника лечение алкоголизма[/url]
В клинике применяются методы, позволяющие воздействовать на все аспекты зависимости. Это обеспечивает комплексное и устойчивое восстановление.
Ознакомиться с деталями – [url=https://lechenie-alkogolizma-doneczk0.ru/]лечение алкоголизма в донце[/url]
Наркологическая помощь сегодня — это не просто экстренное вмешательство, но и полноценная система поддержки, охватывающая острые, хронические и пограничные состояния, вызванные употреблением алкоголя или наркотиков. В клинике «ВладЗдоровье» во Владимире специалисты обеспечивают высокопрофессиональную помощь в домашних условиях или в стационаре, с учётом потребностей конкретного пациента. Скорость реагирования, анонимность и современные терапевтические протоколы делают услугу максимально доступной и эффективной для жителей города и области.
Разобраться лучше – [url=https://narkologicheskaya-pomoshh-vladimir0.ru/]скорая наркологическая помощь[/url]
Эта структура терапии помогает достигать устойчивой ремиссии и снижать вероятность возврата к употреблению.
Подробнее – [url=https://narkologicheskaya-klinika-doneczk0.ru/]наркологические клиники алкоголизм донецк[/url]
Наркологическая клиника в Твери оказывает комплексные услуги для людей, столкнувшихся с алкогольной или наркотической зависимостью. Лечение проводится по современным медицинским протоколам с учетом индивидуальных особенностей пациента. В основе терапии лежит сочетание детоксикации, фармакологической поддержки, психотерапии и реабилитационных программ, что позволяет достигать устойчивых результатов и снижать риск рецидива.
Получить больше информации – https://narkologicheskaya-klinika-v-tveri0.ru/narkolog-v-tveri-czeny/
Ниже приведена таблица с типовыми компонентами капельницы и их действием:
Углубиться в тему – [url=https://vyvod-iz-zapoya-v-tolyatti17.ru/]нарколог вывод из запоя[/url]
Этот текст содержит различную информацию, которая, возможно, покажется любопытной, но в целом не меняет восприятия привычных вещей. Предлагаем просто получить удовольствие от чтения, не ожидая особой пользы.
Вот – [url=https://arma-rehab.ru/lechenie-alkogolizma/]порно[/url]
После стабилизации фокус смещается на поддерживающие схемы, снижающие влечение и улучшающие переносимость повседневной нагрузки. Параллельно проводятся индивидуальные и групповые психотерапевтические занятия, направленные на развитие навыков саморегуляции, работу с триггерами и формирование альтернатив алкогольному или наркотическому поведению.
Узнать больше – https://narkologicheskaya-klinika-v-luganske0.ru/
Когда разумно
Получить больше информации – [url=https://narkologicheskaya-klinika-ehlektrostal0.ru/]narkologicheskaya-klinika-pomoshch-na-domu[/url]
Процедура проводится поэтапно, чтобы организм смог безопасно перейти из состояния алкогольной интоксикации к нормальному функционированию. Ниже приведена таблица с описанием этапов терапии и действий специалистов.
Подробнее – [url=https://vyvod-iz-zapoya-stavropol0.ru/]вывод из запоя вызов на дом в ставрополе[/url]
Многие семьи сталкиваются с вопросом: куда обратиться, чтобы получить реальную помощь? В городе работают как государственные, так и частные наркологические учреждения, но не все из них предлагают действительно результативные программы. Чтобы избежать ошибок, важно знать ключевые аспекты, на которые следует опираться при выборе клиники.
Выяснить больше – [url=https://lechenie-alkogolizma-yaroslavl0.ru/]клиника лечения алкоголизма[/url]
Психотерапия во Владимире в клинике «Новая Эра» проводится высококвалифицированными специалистами с большим опытом работы в сфере зависимостей.
Углубиться в тему – https://lechenie-narkomanii-vladimir0.ru/klinika-lechenie-narkomanii-vo-vladimire/
Формат
Исследовать вопрос подробнее – [url=https://narkologicheskaya-klinika-domodedovo0.ru/]zapoj-narkologicheskaya-klinika[/url]
Вывод из запоя — это всегда баланс между скоростью и безопасностью. Дома трудно заметить скрытые ухудшения, особенно ночью: давление и пульс «гуляют», нарастает обезвоживание, сон рваный и тревожный. В «Трезвом Контуре» этот хаос замещается управляемостью: перед выездом дежурный врач собирает ключевые данные (длительность эпизода, лекарства, аллергии, сопутствующие болезни), на месте проводится экспресс-диагностика (АД, ЧСС, сатурация, температура, неврологический статус, степень обезвоживания), затем запускается схема терапевтической поддержки. Мы постоянно «подстраиваем» инфузии по реакции организма, а не по шаблонной карте: где-то важнее регидратация, где-то — коррекция электролитов, где-то — бережная седация для ночи. Для семьи это значит одно: меньше догадок, больше ясности. Если по картине риски высоки, мы аргументированно предлагаем стационар в Одинцово — и организуем транспортировку без пауз, потому что цена задержки в такие часы всегда выше.
Получить больше информации – [url=https://vyvod-iz-zapoya-odincovo10.ru/]вывод из запоя цена[/url]
Каждый этап имеет важное значение и обеспечивает долгосрочный эффект от терапии.
Исследовать вопрос подробнее – [url=https://lechenie-alkogolizma-tver0.ru/]лечение алкоголизма цена тверь[/url]
Наркологическая клиника в Донецке применяет только проверенные и эффективные методы, позволяющие комплексно воздействовать на зависимость. Врачи учитывают как физическое состояние, так и психологические особенности пациента.
Узнать больше – [url=https://narkologicheskaya-klinika-v-doneczke0.ru/]частная наркологическая клиника донецк[/url]
Текст включает разнообразную информацию, которая может показаться любопытной, но не меняет устоявшегося восприятия. Предлагаем просто насладиться чтением, не ожидая значительной пользы.
Подробнее читать – [url=https://rostov-narkologiya.ru/uslugi-ot-alkogolizma/vyvod-iz-zapoya/]лечение covid народными средствами[/url]
В «СтаврМед Центре» используются только современные препараты, прошедшие клинические испытания и одобренные Минздравом. Каждая капельница подбирается индивидуально, в зависимости от длительности запоя, возраста пациента и состояния здоровья. В таблице приведены примеры основных видов растворов, применяемых при выезде нарколога.
Изучить вопрос глубже – https://vyvod-iz-zapoya-stavropol0.ru/
Такая схема позволяет последовательно и безопасно восстановить силы организма и стабилизировать психическое состояние пациента.
Получить больше информации – http://vyvod-iz-zapoya-tver0.ru
Цель
Детальнее – https://narkologicheskaya-klinika-shchyolkovo0.ru/chastnaya-narkologicheskaya-klinika-v-shchyolkovo
Как отмечает ведущий научный сотрудник ФГБУН «НМИЦ психиатрии и наркологии» Минздрава России, наличие междисциплинарной команды — один из основных факторов, определяющих успех терапии при зависимости.
Детальнее – [url=https://lechenie-narkomanii-murmansk0.ru/]центр лечения наркомании в мурманске[/url]
Мы много лет оттачивали алгоритм, чтобы острый этап был не марафоном, а простой последовательностью шагов. Сначала — короткий скрининг по телефону и согласование окна прибытия. На месте врач спокойно фиксирует АД/ЧСС/сатурацию/температуру, при показаниях делает ЭКГ и сразу запускает детокс: регидратацию, коррекцию электролитов, защиту печени и ЖКТ, мягкую противотревожную поддержку по переносимости. Параллельно выдаём «карту суток»: когда отдыхать, сколько пить воды малыми порциями, какая еда уместна в первые часы, по каким признакам звонить внепланово. Если по ходу становится видно, что дома «тесно» с медицинской точки зрения, организуем перевод под 24/7 — без пауз, с переносом всех назначений и наблюдений.
Выяснить больше – http://narkologicheskaya-klinika-domodedovo0.ru/
Согласно информации, опубликованной на сайте Минздрава РФ, успешная наркологическая помощь невозможна без своевременной диагностики, комплексного подхода и участия квалифицированных специалистов. Именно такие параметры становятся решающими при выборе учреждения, куда обратится пациент или его родственники.
Углубиться в тему – [url=https://narkologicheskaya-pomoshh-arkhangelsk0.ru/]срочная наркологическая помощь[/url]
Если на предзвонке выявляются «красные флаги» — давящая боль в груди, одышка в покое, спутанность сознания, судороги, неукротимая рвота, резкое падение насыщения кислородом — мы организуем бесшовный перевод в стационар. Место резервируем заранее, логистику строим так, чтобы не привлекать внимания соседей и не затягивать старт лечения. При отсутствии угроз терапия может начаться дома с последующим телесопровождением и при необходимости — краткой госпитализацией.
Подробнее можно узнать тут – [url=https://narcologicheskaya-klinika-saratov0.ru/]www.domen.ru[/url]
На территории Мурманска работает множество клиник с разным уровнем сервиса и направленностью. Однако не каждая из них может обеспечить надёжную и безопасную помощь. Многие пациенты сталкиваются с формальным лечением, не включающим индивидуальный подход или постреабилитационную поддержку. Поэтому крайне важно заранее ознакомиться с основными признаками хорошей клиники и задать правильные вопросы при первичном обращении.
Выяснить больше – [url=https://narkologicheskaya-klinika-murmansk0.ru/]www.domen.ru[/url]
Психотерапия во Владимире в клинике «Новая Эра» проводится высококвалифицированными специалистами с большим опытом работы в сфере зависимостей.
Подробнее – http://lechenie-narkomanii-vladimir0.ru/
Каждый этап имеет ключевое значение и обеспечивает устойчивость результата.
Разобраться лучше – http://lechenie-alkogolizma-doneczk0.ru
Цель и ожидаемая динамика
Получить дополнительные сведения – https://narkologicheskaya-klinika-odincovo0.ru/chastnaya-narkologicheskaya-klinika-v-odincovo
Сочетание этих методов позволяет добиваться стойкой ремиссии и укреплять здоровье пациентов.
Получить дополнительные сведения – [url=https://lechenie-alkogolizma-tver0.ru/]лечение алкоголизма[/url]
Наркологическая клиника в Донецке оказывает специализированную помощь пациентам, страдающим от алкогольной и наркотической зависимости. Работа специалистов направлена на комплексное восстановление здоровья, включающее медицинское лечение, психотерапевтическую поддержку и социальную адаптацию. Такой подход позволяет не только купировать симптомы, но и устранить причины, лежащие в основе заболевания.
Изучить вопрос глубже – [url=https://narkologicheskaya-klinika-doneczk0.ru/]вывод наркологическая клиника в донце[/url]
Специалисты, выезжающие на дом, оснащены всем необходимым для оказания полноценной помощи. Это переносное диагностическое оборудование, препараты для снятия симптомов абстиненции, инфузионные растворы, противосудорожные средства, седативные препараты и витаминные комплексы. Наличие мини-аптечки позволяет адаптировать лечение прямо на месте и избежать лишних госпитализаций.
Ознакомиться с деталями – https://narkologicheskaya-pomoshh-vladimir0.ru/vo-vladimire-anonimnaya-narkologicheskaya-klinika
Наркологическая клиника в Твери предлагает широкий спектр услуг, охватывающих все этапы лечения и восстановления.
Углубиться в тему – [url=https://narkologicheskaya-klinika-v-tveri0.ru/]наркологическая клиника стационар[/url]
Такая структура делает процесс предсказуемым и результативным, а также помогает закрепить достигнутые улучшения.
Выяснить больше – [url=https://narkologicheskaya-klinika-v-doneczke0.ru/]наркологическая клиника нарколог донецк[/url]
Вывод из запоя в Твери проводится с применением современных методик, эффективность которых подтверждена медицинской практикой. Используются только проверенные препараты и процедуры, соответствующие клиническим стандартам.
Узнать больше – http://
Как отмечает ведущий научный сотрудник ФГБУН «НМИЦ психиатрии и наркологии» Минздрава России, наличие междисциплинарной команды — один из основных факторов, определяющих успех терапии при зависимости.
Изучить вопрос глубже – [url=https://lechenie-narkomanii-murmansk0.ru/]центр лечения наркомании мурманск.[/url]
Перед таблицей — важное пояснение: она помогает соотнести риски и плотность наблюдения ещё до осмотра. Окончательное решение принимает врач по клинической картине и переносимости, но ориентир даст понимание логики и бюджета времени.
Узнать больше – https://narkologicheskaya-klinika-shchyolkovo0.ru/chastnaya-narkologicheskaya-klinika-v-shchyolkovo/
Ниже приведена таблица с типовыми компонентами капельницы и их действием:
Детальнее – [url=https://vyvod-iz-zapoya-v-tolyatti17.ru/]вывод из запоя капельница тольятти[/url]
1. Приём звонка и уточнение состояния пациента. 2. Передача данных врачу и подготовка набора лекарств. 3. Выезд с уведомлением пациента о времени прибытия. 4. Оказание первой медицинской помощи и начало инфузионной терапии.
Детальнее – [url=https://narkologicheskaya-klinika-arkhangelsk0.ru/]наркологическая клиника в архангельске[/url]
Критерий
Ознакомиться с деталями – http://
В этом материале мы разберём 7 основ лечения алкоголизма и расскажем, как в Ярославле получить помощь, соответствующую современным стандартам терапии.
Разобраться лучше – https://lechenie-alkogolizma-yaroslavl0.ru/anonimnoe-lechenie-alkogolizma-yaroslavl/
«Светлая Полоса» запускает помощь без многоходовой бюрократии и «марафона кабинетов». Дежурный врач аккуратно собирает только те данные, которые критичны для безопасности, и сразу предлагает безопасную точку входа: выезд на дом, дневной формат или стационар под наблюдением 24/7. Каждое действие проговаривается человеческим языком: что делаем в ближайшие часы, чего ждём к вечеру (мягкий сон, снижение тревоги, выравнивание давления и пульса), как поймём, что схема работает, и чем займёмся завтра. Конфиденциальность встроена в процесс — нейтральные каналы связи, неброская выездная атрибутика, ограниченный доступ к карте и отсутствие постановки на учёт. Такой регламент снижает фоновую тревогу, экономит силы семьи и превращает лечение в ясный, управляемый маршрут, а не в набор «разрозненных процедур».
Изучить вопрос глубже – http://
Формат
Углубиться в тему – [url=https://narkologicheskaya-klinika-ehlektrostal0.ru/]наркологическая клиника электросталь[/url]
Цель и ожидаемая динамика
Разобраться лучше – https://narkologicheskaya-klinika-odincovo0.ru/narkologicheskaya-klinika-narkolog-v-odincovo/
«Ритм Здоровья» в Красногорске — это понятный маршрут помощи от первого звонка до устойчивой ремиссии. Мы не растягиваем старт на бесконечные согласования: дежурный врач аккуратно собирает жалобы, длительность эпизода, сведения о лекарствах и сопутствующих диагнозах, после чего предлагает безопасную точку входа — выезд на дом, приём без очередей или госпитализацию под круглосуточное наблюдение. Вся коммуникация нейтральная, доступ к карте ограничен лечащей командой, а в документах по запросу используем формулировки, не раскрывающие профиль отделения. Такой «тихий» формат снимает лишнее напряжение, экономит время семьи и позволяет сосредоточиться на главном — мягкой стабилизации без «качелей».
Подробнее тут – [url=https://narkologicheskaya-klinika-krasnogorsk0.ru/]наркологическая клиника отзывы[/url]
После стабилизации фокус смещается на поддерживающие схемы, снижающие влечение и улучшающие переносимость повседневной нагрузки. Параллельно проводятся индивидуальные и групповые психотерапевтические занятия, направленные на развитие навыков саморегуляции, работу с триггерами и формирование альтернатив алкогольному или наркотическому поведению.
Получить дополнительные сведения – [url=https://narkologicheskaya-klinika-v-luganske0.ru/]наркологическая клиника вывод из запоя луганск[/url]
Психотерапевтические сеансы направлены на осознание проблемы зависимости, развитие навыков сопротивления срывам и формирование новых моделей поведения. Особое внимание уделяется мотивационному консультированию и работе с эмоциональным состоянием.
Получить дополнительные сведения – http://narkologicheskaya-klinika-vladimir0.ru
Чем раньше стартует детокс, тем мягче идёт восстановление. Даже один визит способен перевести состояние из «кризисного» в управляемое, а затем подключается поддержка психолога или амбулаторные встречи для закрепления эффекта.
Получить дополнительные сведения – [url=https://narkolog-na-dom-stavropol0.ru/]вызвать нарколога на дом срочно в ставрополе[/url]
Маршрут начинается с короткого скрининга, чтобы понять риски и условия дома. Мы согласуем окно приезда или время приёма, заранее подскажем, как подготовить пространство: тишина, доступ к воде и розетке, возможность прилечь. На месте врач фиксирует витальные показатели (АД, пульс, сатурация, температура), при показаниях выполняет ЭКГ и запускает детокс-терапию. Уже на старте вы получаете письменную памятку «на сутки»: режим сна и гидратации, «красные флажки» и точное время контрольной связи. Если домашний формат перестаёт быть достаточным, организуем перевод в стационар без пауз — темп лечения сохраняется.
Детальнее – [url=https://narkologicheskaya-klinika-korolyov0.ru/]ближайшая наркологическая клиника[/url]
Эта статья полна интересного контента, который побудит вас исследовать новые горизонты. Мы собрали полезные факты и удивительные истории, которые обогащают ваше понимание темы. Читайте, погружайтесь в детали и наслаждайтесь процессом изучения!
Все материалы собраны здесь – https://travelspecialistsmorocco.com/morocco-tours-from-casablanca
Круглосуточное наблюдение, регулярные замеры, быстрые корректировки, спокойная среда и структурированный режим. Это снижает риски ночных ухудшений и помогает мягко «собрать» сон без агрессивных седативных решений.
Исследовать вопрос подробнее – https://vyvod-iz-zapoya-odincovo10.ru/vyvod-iz-zapoya-ryadom-v-odincovo
Мы собрали для вас самые захватывающие факты из мира науки и истории. От малознакомых деталей до грандиозных событий — эта статья расширит ваш кругозор и подарит новое понимание того, как устроен наш мир.
А есть ли продолжение? – https://ecor.com.br/estudos-de-casos/mitral-stenosis-severe
После поступления вызова диспетчер передаёт заявку на смартфон врача, который оперативно завершает подготовительные мероприятия и выезжает к пациенту. На дороге применяется GPS-маршрутизация для выбора оптимального пути и снижения времени в пути.
Ознакомиться с деталями – [url=https://narkologicheskaya-klinika-arkhangelsk0.ru/]платная наркологическая клиника[/url]
Эта познавательная публикация погружает вас в море интересного контента, который быстро захватит ваше внимание. Мы рассмотрим важные аспекты темы и предоставим вам уникальные Insights и полезные сведения для дальнейшего изучения.
Посмотреть всё – https://patagoniarebeldedigital.com.ar/politica/milei-pondra-su-busto-en-casa-rosada
Эта публикация завернет вас в вихрь увлекательного контента, сбрасывая стереотипы и открывая двери к новым идеям. Каждый абзац станет для вас открытием, полным ярких примеров и впечатляющих достижений. Подготовьтесь быть вовлеченными и удивленными каждый раз, когда продолжите читать.
Ознакомиться с деталями – https://rutdesign.com/blog-post-with-image-slider
Этот увлекательный информационный материал подарит вам массу новых знаний и ярких эмоций. Мы собрали для вас интересные факты и сведения, которые обогатят ваш опыт. Откройте для себя увлекательный мир информации и насладитесь процессом изучения!
Узнайте всю правду – https://exceldental.com.sg/get-ready-for-your-2025-dental-appointments
«Ритм Здоровья» в Красногорске — это понятный маршрут помощи от первого звонка до устойчивой ремиссии. Мы не растягиваем старт на бесконечные согласования: дежурный врач аккуратно собирает жалобы, длительность эпизода, сведения о лекарствах и сопутствующих диагнозах, после чего предлагает безопасную точку входа — выезд на дом, приём без очередей или госпитализацию под круглосуточное наблюдение. Вся коммуникация нейтральная, доступ к карте ограничен лечащей командой, а в документах по запросу используем формулировки, не раскрывающие профиль отделения. Такой «тихий» формат снимает лишнее напряжение, экономит время семьи и позволяет сосредоточиться на главном — мягкой стабилизации без «качелей».
Исследовать вопрос подробнее – http://narkologicheskaya-klinika-krasnogorsk0.ru
Мы собрали для вас самые захватывающие факты из мира науки и истории. От малознакомых деталей до грандиозных событий — эта статья расширит ваш кругозор и подарит новое понимание того, как устроен наш мир.
Познакомиться с результатами исследований – https://fbre.be/uncategorized/hello-world-2
Формат
Углубиться в тему – https://narkologicheskaya-klinika-serpuhov0.ru/narkologicheskaya-klinika-ceny-v-serpuhove/
Этот набор информации привлекает мелочами и необычными ракурсами, предлагая взгляды, которые редко бывают полезны, но разнообразят знакомство с темой.
Дополнительная информация – [url=https://stop-zavisimost.ru/blog/chto-takoe-mefedron-kak-ego-upotreblyayut-posledstviya-i-sposoby-lecheniya-zavisimosti.html]казино онлайн[/url]
Этот увлекательный информационный материал подарит вам массу новых знаний и ярких эмоций. Мы собрали для вас интересные факты и сведения, которые обогатят ваш опыт. Откройте для себя увлекательный мир информации и насладитесь процессом изучения!
Прочитать подробнее – https://www.boxinginsider.com/columns/scoop-malinowski-miles-davis-boxing
В статье представлены ключевые моменты по актуальной теме, дополненные советами экспертов и ссылками на дополнительные ресурсы. Цель материала — дать читателю инструменты для самостоятельного развития и принятия осознанных решений.
Познакомиться с результатами исследований – https://www.cursosalpha.com/blog/no-es-para-cualquiera-andar-por-la-calle
В статье представлены ключевые моменты по актуальной теме, дополненные советами экспертов и ссылками на дополнительные ресурсы. Цель материала — дать читателю инструменты для самостоятельного развития и принятия осознанных решений.
Полная информация здесь – https://transportsbarrault36.com/bonjour-tout-le-monde
В этой статье представлен занимательный и актуальный контент, который заставит вас задуматься. Мы обсуждаем насущные вопросы и проблемы, а также освещаем истории, которые вдохновляют на действия и изменения. Узнайте, что стоит за событиями нашего времени!
Есть чему поучиться – https://jornalhorah.info/2022/07/27/tv-zimbo-sofre-ataque-cibernetico
В этом интересном тексте собраны обширные сведения, которые помогут вам понять различные аспекты обсуждаемой темы. Мы разбираем детали и факты, делая акцент на важности каждого элемента. Не упустите возможность расширить свои знания и взглянуть на мир по-новому!
Запросить дополнительные данные – https://baycitybills.com/menu/full-menu
В этом тексте собрано множество случайных сведений и довольно неопределённых мыслей, которые могут чем-то заинтересовать. Мы отмечаем моменты, которые не особенно важны, но всё же занимают своё место в повествовании.
Вот – [url=https://arma-rehab.ru/vyvod-iz-zapoya/]секс знакомства[/url]
Мы собрали для вас самые захватывающие факты из мира науки и истории. От малознакомых деталей до грандиозных событий — эта статья расширит ваш кругозор и подарит новое понимание того, как устроен наш мир.
А есть ли продолжение? – https://aktualnozajenata.com/%D1%82%D1%80%D1%8A%D0%BC%D0%BF-%D0%BE%D0%B1%D1%8F%D0%B2%D0%B8-%D0%BD%D0%B0%D1%87%D0%B0%D0%BB%D0%BE%D1%82%D0%BE-%D0%BD%D0%B0-%D0%BF%D1%80%D0%B5%D0%B3%D0%BE%D0%B2%D0%BE%D1%80%D0%B8%D1%82%D0%B5-%D1%81
Этот обзор предлагает свежий взгляд на предметы, которые и без того привычны. Мы упоминаем факты, не имеющие большого значения, и события с неясной важностью, но они присутствуют здесь.
Подробнее читать – https://rostov-narkologiya.ru/uslugi-ot-narkomanii/mefedronovaya-zavisimost
В этом информативном тексте представлены захватывающие события и факты, которые заставят вас задуматься. Мы обращаем внимание на важные моменты, которые часто остаются незамеченными, и предлагаем новые перспективы на привычные вещи. Подготовьтесь к тому, чтобы быть поглощенным увлекательными рассказами!
Что ещё нужно знать? – https://brianbeeson.org/contact
Эта обзорная заметка содержит ключевые моменты и факты по актуальным вопросам. Она поможет читателям быстро ориентироваться в теме и узнать о самых важных аспектах сегодня. Получите краткий курс по современной информации и оставайтесь в курсе событий!
Перейти к статье – http://mrshade.com/biography
Эта разъяснительная статья содержит простые и доступные разъяснения по актуальным вопросам. Мы стремимся сделать информацию понятной для широкой аудитории, чтобы каждый мог разобраться в предмете и извлечь из него максимум пользы.
Погрузиться в научную дискуссию – https://labtecnovet.com/analisis-histopatologicos
Эта публикация завернет вас в вихрь увлекательного контента, сбрасывая стереотипы и открывая двери к новым идеям. Каждый абзац станет для вас открытием, полным ярких примеров и впечатляющих достижений. Подготовьтесь быть вовлеченными и удивленными каждый раз, когда продолжите читать.
Углубить понимание вопроса – https://www.quadrisol.pt/quadrisol-afirma-a-sua-presenca-na-genera-ifema-madrid-com-uma-inovadora-novidade-plugplay-by-quadrisol
Мы много лет оттачивали алгоритм, чтобы острый этап был не марафоном, а простой последовательностью шагов. Сначала — короткий скрининг по телефону и согласование окна прибытия. На месте врач спокойно фиксирует АД/ЧСС/сатурацию/температуру, при показаниях делает ЭКГ и сразу запускает детокс: регидратацию, коррекцию электролитов, защиту печени и ЖКТ, мягкую противотревожную поддержку по переносимости. Параллельно выдаём «карту суток»: когда отдыхать, сколько пить воды малыми порциями, какая еда уместна в первые часы, по каким признакам звонить внепланово. Если по ходу становится видно, что дома «тесно» с медицинской точки зрения, организуем перевод под 24/7 — без пауз, с переносом всех назначений и наблюдений.
Ознакомиться с деталями – https://narkologicheskaya-klinika-domodedovo0.ru/
Публикация приглашает вас исследовать неизведанное — от древних тайн до современных достижений науки. Вы узнаете, как случайные находки превращались в революции, а смелые мысли — в новые эры человеческого прогресса.
Где можно узнать подробнее? – https://www.priyatew.com/frugal-meals
Публикация приглашает вас исследовать неизведанное — от древних тайн до современных достижений науки. Вы узнаете, как случайные находки превращались в революции, а смелые мысли — в новые эры человеческого прогресса.
Как достичь результата? – https://envisionbetterhealth.org/physician-recruitment-during-and-post-covid-19-era-new-challenges
Две похожие ситуации никогда не бывают одинаковыми: возраст, вес, сопутствующие болезни, длительность запоя и переносимость препаратов формируют уникальную клиническую картину. Мы исключаем «универсальные» схемы, чтобы не перегрузить организм и не вызвать побочных реакций. Инфузии проводятся только одноразовыми системами, врач соблюдает стерильность, контролирует дозировки и следит за динамикой симптомов. Мы уделяем особое внимание сну и уровню тревоги в первые часы после детокса — именно эти параметры влияют на риск срыва. Для пациентов с сердечно-сосудистыми, эндокринными и неврологическими заболеваниями детоксикация планируется особенно осторожно; при малейших сомнениях мы предлагаем стационар и разъясняем семье, почему это безопаснее.
Подробнее тут – https://vyvod-iz-zapoya-korolev10.ru/vyvesti-iz-zapoya-korolev
Мы строим лечение вокруг предсказуемости: минимум лишних вопросов, максимум конкретики и понятный план на ближайшие сутки. Дежурный врач уточняет только то, что влияет на безопасность — длительность эпизода, актуальные лекарства и переносимость, сон и апетит, наличие поддержки дома. Из этого скелета рождается маршрут: выезд на дом, приём без очередей или стационар с наблюдением 24/7. Конфиденциальность встроена по умолчанию: нейтральная коммуникация, доступ к карте только у вовлечённой команды, документы по запросу — в нейтральных формулировках. Внешний шум гасим, внимание переводим на цель: ровная стабилизация без «качелей» и с понятными контрольными точками.
Узнать больше – http://narkologicheskaya-klinika-domodedovo0.ru
В этом материале представлены детали, которые хоть и занимательны, но не особенно значимы. Мы рассматриваем моменты, которые трудно назвать важными, но всё же решили включить их для полноты картины.
Вот – [url=https://arma-rehab.ru/]бинго онлайн[/url]
В Королёве мы запускаем помощь без «многоходовок». С первого контакта дежурный врач аккуратно уточняет жалобы, длительность эпизода, принимаемые лекарства и сопутствующие диагнозы, после чего предлагает безопасную точку входа: выезд на дом, дневной формат или круглосуточный стационар. Каждое действие объясняется простым языком: зачем оно нужно, какого эффекта ждать в ближайшие часы и что будет считаться нормальной динамикой. Конфиденциальность заложена в процесс по умолчанию: минимально необходимый объём персональных данных, нейтральная коммуникация, ограниченный доступ к медкарте и отсутствие постановки на учёт. Такой порядок снимает лишнее напряжение у семьи и экономит самое ценное — время.
Получить дополнительные сведения – [url=https://narkologicheskaya-klinika-korolyov0.ru/]наркологическая клиника цены[/url]
В данном тексте собраны разнообразные случайные сведения и не вполне определённые идеи, которые могут вызвать интерес. Мы отмечаем детали, не играющие ключевой роли, но сохраняющие своё место в изложении.
Подробнее читать – [url=https://rostov-narkologiya.ru/uslugi-ot-narkomanii/mefedronovaya-zavisimost/]сиалис онлайн[/url]
Мы строим лечение вокруг предсказуемости: минимум лишних вопросов, максимум конкретики и понятный план на ближайшие сутки. Дежурный врач уточняет только то, что влияет на безопасность — длительность эпизода, актуальные лекарства и переносимость, сон и апетит, наличие поддержки дома. Из этого скелета рождается маршрут: выезд на дом, приём без очередей или стационар с наблюдением 24/7. Конфиденциальность встроена по умолчанию: нейтральная коммуникация, доступ к карте только у вовлечённой команды, документы по запросу — в нейтральных формулировках. Внешний шум гасим, внимание переводим на цель: ровная стабилизация без «качелей» и с понятными контрольными точками.
Детальнее – http://narkologicheskaya-klinika-domodedovo0.ru
Основные направления включают:
Получить дополнительные сведения – [url=https://narkologicheskaya-pomoshh-v-volgograde17.ru/]платная наркологическая помощь в волгограде[/url]
Сначала — сбор короткого анамнеза и проверка лекарственных взаимодействий, затем — старт инфузии с контролем темпа. Параллельно купируются тошнота, тремор, тахикардия, корректируется сон. Каждые 15–20 минут специалист оценивает динамику и при необходимости меняет схему. В завершение вы получаете письменные рекомендации и маршрут продолжения.
Углубиться в тему – [url=https://vyvod-iz-zapoya-krasnogorsk10.ru/]vrach vyvod iz zapoya[/url]
В этой статье-обзоре мы собрали данные, актуальность которых сомнительна, а факты — не всегда взаимосвязаны. Читатель сможет ознакомиться с разными мнениями, хотя вряд ли они существенно повлияют на его понимание темы.
Вот – [url=https://arma-rehab.ru/]турниры по покеру[/url]
Выездная наркологическая помощь организована по чётко выстроенной схеме. Каждый этап направлен на стабилизацию состояния и безопасное восстановление функций организма после алкогольного или наркотического воздействия.
Разобраться лучше – [url=https://narkolog-na-dom-v-ufe17.ru/]вызов врача нарколога на дом[/url]
Своевременное обращение к специалистам позволяет быстро стабилизировать состояние и избежать осложнений.
Выяснить больше – [url=https://vyvod-iz-zapoya-v-tolyatti17.ru/]вывод из запоя капельница тольятти[/url]
«Вектор Надежды» выстраивает помощь так, чтобы с первого звонка убрать неопределённость и вернуть ощущение контроля. Дежурный врач аккуратно собирает только необходимую информацию, оценивает риски и предлагает безопасный старт: выезд на дом, дневной маршрут или стационар с наблюдением 24/7. Мы объясняем каждую манипуляцию простым языком — что именно будет сделано в ближайшие часы, каких изменений ожидать к вечеру, почему выбран именно такой темп и как поймём, что схема работает. Конфиденциальность — не дополнение, а стандарт: нейтральные звонки, неброская атрибутика, ограниченный доступ к карте, отсутствие постановки на учёт. Такой регламент снижает тревогу, экономит силы семьи и ускоряет стабилизацию: вместо «марафона кабинетов» — один связный маршрут с понятными контрольными точками.
Узнать больше – [url=https://narkologicheskaya-klinika-shchyolkovo0.ru/]наркологическая клиника стоимость[/url]
Клиника «Трезвый Выбор Рязань» функционирует по принципу полного цикла лечения: от экстренного выезда нарколога до длительной реабилитации в условиях стационара. Пациенты поступают как в острых состояниях (запой, абстиненция, интоксикация), так и для плановой терапии. Лечение начинается с медицинской диагностики, оценки физического и психического состояния, после чего разрабатывается индивидуальный план. Программы включают детоксикацию, медикаментозную поддержку, психологическую помощь и профилактику рецидивов.
Подробнее – [url=https://narkologicheskaya-clinika-v-ryazani17.ru/]запой наркологическая клиника[/url]
Что включено на практике
Изучить вопрос глубже – [url=https://narkologicheskaya-klinika-odincovo0.ru/]лечение в наркологической клинике[/url]
Что получите за 24 часа
Подробнее тут – http://narkologicheskaya-klinika-domodedovo0.ru
Комплексное лечение помогает восстановить работу печени, сердца и нервной системы. Пациенты отмечают улучшение сна, снижение тревожности, нормализацию давления и аппетита уже спустя несколько часов после начала терапии. В зависимости от тяжести состояния курс может быть продлён до 2–3 дней с круглосуточным наблюдением и корректировкой дозировок.
Углубиться в тему – [url=https://vivod-iz-zapoya-v-volgograde17.ru/]нарколог вывод из запоя[/url]
В этом материале представлены детали, которые хоть и занимательны, но не особенно значимы. Мы рассматриваем моменты, которые трудно назвать важными, но всё же решили включить их для полноты картины.
Вот – [url=https://arma-rehab.ru/vyvod-iz-zapoya/]секс шоп[/url]
«Светлая Полоса» запускает помощь без многоходовой бюрократии и «марафона кабинетов». Дежурный врач аккуратно собирает только те данные, которые критичны для безопасности, и сразу предлагает безопасную точку входа: выезд на дом, дневной формат или стационар под наблюдением 24/7. Каждое действие проговаривается человеческим языком: что делаем в ближайшие часы, чего ждём к вечеру (мягкий сон, снижение тревоги, выравнивание давления и пульса), как поймём, что схема работает, и чем займёмся завтра. Конфиденциальность встроена в процесс — нейтральные каналы связи, неброская выездная атрибутика, ограниченный доступ к карте и отсутствие постановки на учёт. Такой регламент снижает фоновую тревогу, экономит силы семьи и превращает лечение в ясный, управляемый маршрут, а не в набор «разрозненных процедур».
Исследовать вопрос подробнее – http://narkologicheskaya-klinika-serpuhov0.ru/narkologicheskaya-klinika-ceny-v-serpuhove/
Медицинская помощь направлена не только на снятие острых симптомов, но и на стабилизацию работы организма в целом. Врачи стремятся к тому, чтобы пациент получил не временное облегчение, а фундамент для дальнейшей реабилитации.
Исследовать вопрос подробнее – [url=https://vyvod-iz-zapoya-omsk0.ru/]вывод из запоя клиника[/url]
Наркологическая клиника в Красноярске оказывает профессиональную помощь людям, столкнувшимся с алкогольной, наркотической и другими видами зависимостей. Основная цель деятельности специалистов — восстановление физического здоровья, стабилизация психоэмоционального состояния и возвращение пациента к полноценной жизни. Лечение проводится по современным медицинским протоколам, с применением индивидуальных схем терапии и полным соблюдением конфиденциальности.
Получить дополнительную информацию – [url=https://narcologicheskaya-klinika-v-krasnoyarske17.ru/]наркологическая клиника в красноярске[/url]
Выездная бригада «МедОпоры» дежурит 24/7 и покрывает весь Красногорск и близлежащие районы. После короткого звонка дежурный уточняет длительность запоя, сопутствующие болезни, принимаемые препараты и аллергии — это экономит время на месте и помогает заранее предусмотреть риски. Врач приезжает с комплектом одноразовых систем, растворами и медикаментами, проводит экспресс-диагностику: измерение давления, пульса, сатурации, температуры, оценка неврологического статуса, степени обезвоживания и тревожности. По этим данным формируется индивидуальная схема инфузий и симптоматической поддержки. Наша задача — не просто «поставить капельницу», а безопасно развернуть план стабилизации, где дозировки и темп меняются по реакции организма. Если выявляются признаки осложнений или дома нет условий для безопасного наблюдения, сразу предлагаем перевод в профильный стационар, чтобы не терять драгоценные часы. Семья получает понятные роли и инструкции, а врач остаётся на связи для уточнений по режиму ближайшей ночи.
Подробнее – http://vyvod-iz-zapoya-krasnogorsk10.ru/kruglosutochno-vyvod-iz-zapoya-v-krasnogorske/
Перед процедурой врач оценивает состояние пациента, измеряет давление, пульс и уровень насыщения крови кислородом. После осмотра подбирается состав инфузии, включающий препараты для дезинтоксикации, восстановления водно-солевого баланса и нормализации работы органов. Введение растворов осуществляется внутривенно, под контролем специалиста. Длительность процедуры — от 40 минут до 1,5 часов.
Исследовать вопрос подробнее – https://kapelnicza-ot-zapoya-v-volgograde17.ru/kapelnicza-ot-pokhmelya-volgograd
Процесс детоксикации проходит поэтапно, чтобы организм успевал адаптироваться к изменениям и не испытывал стресс. Каждый шаг направлен на достижение конкретного терапевтического эффекта. Ниже представлена таблица, отражающая ключевые стадии процедуры, применяемой в клинике «Трезвый Путь Волгоград».
Узнать больше – [url=https://vivod-iz-zapoya-v-volgograde17.ru/]вывод из запоя на дому круглосуточно[/url]
Цель
Подробнее тут – http://narkologicheskaya-klinika-korolyov0.ru/
Такая комплексность обеспечивает воздействие на физические, психологические и социальные факторы зависимости.
Детальнее – [url=https://lechenie-alkogolizma-omsk0.ru/]лечение алкоголизма в стационаре в омске[/url]
Главная задача процедуры — быстрое выведение этанола и его метаболитов из организма, нормализация уровня электролитов, улучшение самочувствия и предотвращение осложнений. Лечение проводится как в клинике, так и на дому, что особенно удобно при тяжёлых состояниях, когда пациент не может самостоятельно добраться до медицинского учреждения.
Углубиться в тему – [url=https://vyvod-iz-zapoya-v-tyumeni17.ru/]вывод из запоя на дому круглосуточно[/url]
Наркологическая помощь в Волгограде предназначена для людей, столкнувшихся с проблемами алкогольной или наркотической зависимости. Современный подход к лечению основан на сочетании медицинских, психологических и социальных методов, направленных на полное восстановление пациента. Врачи-наркологи применяют безопасные схемы детоксикации, эффективные медикаменты и программы психотерапевтической поддержки, позволяющие достичь устойчивой ремиссии и вернуть пациента к нормальной жизни.
Ознакомиться с деталями – [url=https://narkologicheskaya-pomoshh-v-volgograde17.ru/]вызов наркологической помощи в волгограде[/url]
Карта делает видимой причинно-следственную связь: пациент понимает, зачем и что именно делается; семья видит «точки проверки»; врач получает опору для изменения одного параметра без разрушения всего плана.
Получить дополнительную информацию – [url=https://vyvod-iz-zapoya-saratov0.ru/]вывод из запоя саратов[/url]
Ниже приведена таблица, отражающая примерную динамику состояния пациента после постановки капельницы:
Детальнее – [url=https://kapelnicza-ot-zapoya-v-voronezhe17.ru/]капельница от запоя круглосуточно в воронеже[/url]
Город с протяжёнными магистралями и разноскоростными районами требует особой организации маршрутов. Выездные бригады «ВолгаДок Медикал» работают в режиме 24/7, прибывают в гражданской одежде, избегают громких звонков и используют «немаркированные» подъезды. Перед приездом мы просим подготовить пространство: приглушить верхний свет, обеспечить приток свежего воздуха без сквозняков, подготовить ровную поверхность под укладку и удлинитель, перевести телефоны в «без уведомлений» с «белым списком» близких. Это позволяет в первые минуты сосредоточиться на клинике, а не на бытовых вопросах.
Подробнее можно узнать тут – [url=https://narcologicheskaya-klinika-saratov0.ru/]наркологическая клиника вывод из запоя[/url]
Своевременное обращение в клинику снижает риск развития алкогольного психоза, судорог и тяжёлых осложнений со стороны сердца и печени.
Детальнее – [url=https://vyvod-iz-zapoya-v-ryazani17.ru/]вывод из запоя рязань[/url]
Лечение в клинике включает несколько последовательных этапов, каждый из которых направлен на достижение стабильной ремиссии и восстановление здоровья пациента.
Получить больше информации – https://narcologicheskaya-klinika-v-novokuzneczke17.ru/narkolog-novokuzneczk-na-dom/
Лечение алкоголизма в клинике «РязаньМед Альянс» включает несколько этапов, каждый из которых направлен на определённую цель — от снятия интоксикации до формирования устойчивого отказа от алкоголя. В таблице представлены основные стадии лечения и методы, используемые специалистами клиники.
Узнать больше – [url=https://narkologicheskaya-klinika-v-ryazani17.ru/]наркологическая клиника наркологический центр в рязани[/url]
Мы строим лечение вокруг предсказуемости: минимум лишних вопросов, максимум конкретики и понятный план на ближайшие сутки. Дежурный врач уточняет только то, что влияет на безопасность — длительность эпизода, актуальные лекарства и переносимость, сон и апетит, наличие поддержки дома. Из этого скелета рождается маршрут: выезд на дом, приём без очередей или стационар с наблюдением 24/7. Конфиденциальность встроена по умолчанию: нейтральная коммуникация, доступ к карте только у вовлечённой команды, документы по запросу — в нейтральных формулировках. Внешний шум гасим, внимание переводим на цель: ровная стабилизация без «качелей» и с понятными контрольными точками.
Выяснить больше – https://narkologicheskaya-klinika-domodedovo0.ru/chastnaya-narkologicheskaya-klinika-v-domodedovo/
Мы строим лечение вокруг предсказуемости: минимум лишних вопросов, максимум конкретики и понятный план на ближайшие сутки. Дежурный врач уточняет только то, что влияет на безопасность — длительность эпизода, актуальные лекарства и переносимость, сон и апетит, наличие поддержки дома. Из этого скелета рождается маршрут: выезд на дом, приём без очередей или стационар с наблюдением 24/7. Конфиденциальность встроена по умолчанию: нейтральная коммуникация, доступ к карте только у вовлечённой команды, документы по запросу — в нейтральных формулировках. Внешний шум гасим, внимание переводим на цель: ровная стабилизация без «качелей» и с понятными контрольными точками.
Получить больше информации – https://narkologicheskaya-klinika-domodedovo0.ru/
Такой подход позволяет добиться устойчивого эффекта и минимизировать риск возврата к зависимому поведению.
Разобраться лучше – [url=https://narkologicheskaya-klinika-v-volgograde17.ru/]наркологическая клиника лечение алкоголизма в волгограде[/url]
Капельница при интоксикации помогает быстро очистить организм от продуктов распада алкоголя, восстановить водно-солевой баланс и улучшить самочувствие. В состав раствора входят препараты, нормализующие обмен веществ и поддерживающие работу печени и сердечно-сосудистой системы. Уже через 20–30 минут после начала инфузии пациент ощущает значительное облегчение. Подбор лекарственных средств осуществляется строго индивидуально, с учётом возраста, массы тела и общего состояния здоровья.
Получить дополнительную информацию – [url=https://narkolog-na-dom-v-ufe17.ru/]нарколог на дом круглосуточно[/url]
Каждый из этих этапов играет важную роль и обеспечивает безопасность пациента на пути к восстановлению.
Разобраться лучше – [url=https://vyvod-iz-zapoya-omsk0.ru/]наркология вывод из запоя[/url]
Клиника в Красноярске придерживается комплексного подхода, при котором сочетаются медикаментозные и психотерапевтические методы. Такой подход позволяет воздействовать не только на физическую, но и на психологическую зависимость. Каждый пациент проходит детальное обследование, после чего врач-нарколог составляет индивидуальный план лечения с учётом стадии заболевания, состояния организма и наличия сопутствующих проблем со здоровьем.
Изучить вопрос глубже – [url=https://narcologicheskaya-klinika-v-krasnoyarske17.ru/]наркологическая клиника лечение алкоголизма[/url]
Процедура начинается с осмотра пациента и оценки степени интоксикации. Врач измеряет давление, пульс, уровень насыщения крови кислородом, определяет наличие сопутствующих заболеваний. После диагностики назначается капельница, состав которой подбирается индивидуально. Процедура направлена на очищение организма, восстановление водно-солевого баланса и снятие симптомов похмелья.
Получить дополнительную информацию – [url=https://vyvod-iz-zapoya-v-tolyatti17.ru/]вывод из запоя вызов на дом тольятти[/url]
Когда уместен
Детальнее – https://narkologicheskaya-klinika-shchyolkovo0.ru/narkologicheskaya-klinika-ceny-v-shchyolkovo
Вывод из запоя в Тюмени — это медицинская процедура, направленная на устранение алкогольной интоксикации и восстановление нормального функционирования организма. Длительное употребление спиртных напитков приводит к нарушению обмена веществ, обезвоживанию, сбоям в работе печени и сердца. В таких случаях требуется профессиональная помощь врача-нарколога, который подберёт оптимальный способ дезинтоксикации и медикаментозной поддержки. Современные методики позволяют провести вывод из запоя безопасно, эффективно и без осложнений.
Детальнее – http://vyvod-iz-zapoya-v-tyumeni17.ru/vyvod-iz-zapoya-v-staczionare-tyumen/
Процесс лечения строится поэтапно, что позволяет контролировать динамику состояния пациента и постепенно возвращать его к полноценной жизни.
Изучить вопрос глубже – https://lechenie-alkogolizma-perm0.ru/perm-lechenie-alkogolizma
Капельницы в «СаратовМед Профи» — это конструктор из тщательно подобранных модулей. Каждый модуль решает одну задачу и имеет свой ожидаемый горизонт эффекта. Важно не название, а логика: задача > опора среды > как проверяем > когда ждём результат.
Подробнее тут – [url=https://vyvod-iz-zapoya-saratov0.ru/]скорая вывод из запоя саратов[/url]
Что получите за 24 часа
Узнать больше – http://narkologicheskaya-klinika-domodedovo0.ru
Формат
Ознакомиться с деталями – http://narkologicheskaya-klinika-odincovo0.ru
Индивидуально подобранный состав раствора обеспечивает быстрое выведение токсинов и улучшение физического состояния уже в течение первых часов после начала лечения.
Разобраться лучше – [url=https://kapelnicza-ot-zapoya-v-volgograde17.ru/]капельница от запоя анонимно на дому в волгограде[/url]
Капельница от запоя в Воронеже применяется для восстановления организма после длительного употребления алкоголя, устранения интоксикации и нормализации обменных процессов. Медицинская процедура проводится под контролем врача-нарколога, в клинике или на дому. Она позволяет быстро улучшить самочувствие, устранить головную боль, тремор, тошноту, обезвоживание и нарушения сна. Современные препараты действуют мягко, безопасно и без стресса для организма, обеспечивая плавный выход из запоя.
Детальнее – https://kapelnicza-ot-zapoya-v-voronezhe17.ru/kapelnicza-ot-zapoya-na-domu-voronezh/
В статье-обзоре представлены данные сомнительной актуальности и факты без явной взаимосвязи. Читатель ознакомится с разными мнениями, хотя они вряд ли существенно изменят его представление о теме.
Подробнее читать – [url=https://rostov-narkologiya.ru/ ]диета для похудения быстро[/url]
Клиника в Волгограде руководствуется принципами индивидуального подхода, конфиденциальности и научно обоснованных методик. Врач-нарколог оценивает общее состояние пациента, определяет стадию зависимости и подбирает оптимальную терапевтическую схему. Лечение включает детоксикацию, медикаментозную поддержку, психотерапию и реабилитацию. Каждый пациент проходит лечение в безопасных условиях с постоянным медицинским наблюдением.
Подробнее – [url=https://narkologicheskaya-klinika-v-volgograde17.ru/]наркологическая клиника вывод из запоя[/url]
Медики рекомендуют обратиться за профессиональной помощью при следующих состояниях:
Получить дополнительные сведения – [url=https://vyvod-iz-zapoya-v-ryazani17.ru/]помощь вывод из запоя рязань[/url]
Современные методы лечения в наркологической клинике в Новокузнецке основаны на доказательной медицине. При поступлении пациент проходит полное обследование, включающее оценку физического состояния, психоэмоционального фона и наличия сопутствующих заболеваний. На основе полученных данных составляется персональная программа терапии, охватывающая медицинский, психологический и социальный аспекты выздоровления.
Детальнее – [url=https://narcologicheskaya-klinika-v-novokuzneczke17.ru/]анонимная наркологическая клиника в новокузнецке[/url]
Современная наркологическая клиника — это не просто медицинское учреждение, а пространство комплексной помощи, где врачи помогают человеку восстановиться физически, психологически и социально. В клинике «РязаньМед Альянс» создана система непрерывного наблюдения, включающая диагностику, выведение из запоя, детоксикацию, кодирование и постреабилитационную поддержку. Здесь работают квалифицированные наркологи, психиатры и терапевты, а помощь оказывается круглосуточно — как в стационаре, так и на дому. Главная цель специалистов — вернуть пациенту контроль над своим состоянием и избавить от зависимости без стресса и боли.
Разобраться лучше – https://narkologicheskaya-klinika-v-ryazani17.ru/narkolog-ryazan-telefon
Особенность подхода заключается в сочетании медицинской и психологической поддержки. После кодирования пациент получает консультации психотерапевта, рекомендации по восстановлению и профилактике рецидивов. Это снижает риск повторного срыва и помогает закрепить результат на долгий срок.
Подробнее тут – https://kodirovanie-ot-alkogolizma-v-volgograde17.ru
Когда зависимость выходит из-под контроля, человеку необходима не просто медицинская помощь, а поддержка в безопасной и понимающей среде. Наркологическая клиника «Трезвый Выбор Рязань» предлагает пациентам комплексные программы лечения алкоголизма, наркомании и других форм зависимого поведения. Здесь работают врачи-наркологи, психотерапевты, психологи и медсёстры, обеспечивающие круглосуточное наблюдение и уход. Лечение проводится анонимно, с акцентом на восстановление здоровья, психологического равновесия и качества жизни.
Исследовать вопрос подробнее – https://narkologicheskaya-clinika-v-ryazani17.ru/narkologicheskij-staczionar-ryazan/
Цель
Изучить вопрос глубже – [url=https://narkologicheskaya-klinika-korolyov0.ru/]бесплатная наркологическая клиника[/url]
Каждый из методов подбирается индивидуально, что позволяет учитывать медицинские показания и личные особенности пациента.
Детальнее – [url=https://lechenie-alkogolizma-perm0.ru/]клиника лечения алкоголизма[/url]
«Светлый Шаг» — это не набор общих обещаний, а чётко выстроенный маршрут помощи, где каждый шаг прозрачен: от первичного разговора до устойчивой ремиссии. Мы бережно собираем только необходимые данные, сразу объясняем, что будет сделано в первые 6–12 часов, каких изменений ждать к ночи и по каким маркерам поймём, что курс выбран верно. Конфиденциальность встроена в процесс: нейтральные звонки, ограниченный доступ к медкарте, аккуратный выезд без броской атрибутики, возможность оформить документы с нейтральными формулировками. Итог — меньше стресса, меньше бюрократии и больше управляемости там, где это критично.
Получить дополнительные сведения – [url=https://narkologicheskaya-klinika-odincovo0.ru/]narkologicheskaya-klinika-otzyvy[/url]
Когда уместен
Ознакомиться с деталями – https://narkologicheskaya-klinika-shchyolkovo0.ru/narkologicheskaya-klinika-ceny-v-shchyolkovo
Когда уместен
Изучить вопрос глубже – http://narkologicheskaya-klinika-odincovo0.ru/narkologicheskaya-klinika-stacionar-v-odincovo/
Современная наркологическая клиника — это не просто медицинское учреждение, где проводят детоксикацию или капельницы. Это выстроенная система, где каждый этап направлен на восстановление физического, психического и социального равновесия пациента. В клинике «КрасЗдрав Профи» весь процесс лечения построен по принципу прозрачных шагов: первичная диагностика, стабилизация организма, терапевтическая коррекция и закрепление результата. Всё происходит с соблюдением принципа конфиденциальности — пациент может рассчитывать на анонимность и этичное отношение со стороны персонала.
Подробнее – [url=https://narkologicheskaya-clinica-v-krasnoyarske17.ru/]наркологическая клиника цены[/url]
Что включено на практике
Получить больше информации – https://narkologicheskaya-klinika-shchyolkovo0.ru/narkologicheskaya-klinika-stacionar-v-shchyolkovo
В этой статье-обзоре мы собрали данные, актуальность которых сомнительна, а факты — не всегда взаимосвязаны. Читатель сможет ознакомиться с разными мнениями, хотя вряд ли они существенно повлияют на его понимание темы.
Вот – [url=https://arma-rehab.ru/]бесплатные порно видео[/url]
Такая комплексность обеспечивает воздействие на физические, психологические и социальные факторы зависимости.
Подробнее – [url=https://lechenie-alkogolizma-omsk0.ru/]лечение алкоголизма цена в омске[/url]
В этой статье-обзоре мы собрали данные, актуальность которых сомнительна, а факты — не всегда взаимосвязаны. Читатель сможет ознакомиться с разными мнениями, хотя вряд ли они существенно повлияют на его понимание темы.
Вот – [url=https://arma-rehab.ru/]азартные игры[/url]
«Светлая Полоса» запускает помощь без многоходовой бюрократии и «марафона кабинетов». Дежурный врач аккуратно собирает только те данные, которые критичны для безопасности, и сразу предлагает безопасную точку входа: выезд на дом, дневной формат или стационар под наблюдением 24/7. Каждое действие проговаривается человеческим языком: что делаем в ближайшие часы, чего ждём к вечеру (мягкий сон, снижение тревоги, выравнивание давления и пульса), как поймём, что схема работает, и чем займёмся завтра. Конфиденциальность встроена в процесс — нейтральные каналы связи, неброская выездная атрибутика, ограниченный доступ к карте и отсутствие постановки на учёт. Такой регламент снижает фоновую тревогу, экономит силы семьи и превращает лечение в ясный, управляемый маршрут, а не в набор «разрозненных процедур».
Подробнее можно узнать тут – https://narkologicheskaya-klinika-serpuhov0.ru/anonimnaya-narkologicheskaya-klinika-v-serpuhove
Особенность подхода заключается в сочетании медицинской и психологической поддержки. После кодирования пациент получает консультации психотерапевта, рекомендации по восстановлению и профилактике рецидивов. Это снижает риск повторного срыва и помогает закрепить результат на долгий срок.
Подробнее тут – [url=https://kodirovanie-ot-alkogolizma-v-volgograde17.ru/]кодирование от алкоголизма отзывы цены в волгограде[/url]
Наркологическая клиника «ВолгаДок Медикал» — это круглосуточная служба помощи, выстроенная вокруг принципов клинической безопасности, прозрачной коммуникации и поддержки пациента на каждом этапе. Мы соединяем стационар и выездные бригады в единую систему: первичный осмотр и стабилизация состояния, адресные инфузионные модули, мягкая коррекция сна и тревоги, последующее наблюдение с короткими «окнами» обратной связи. Все решения принимаются по показаниям и сопровождаются объяснением: какую цель преследуем, каким маркером измеряем, когда проверяем результат. Такой подход исключает хаотичные усиления, бережёт ресурс организма и даёт прогнозируемый клинический эффект.
Получить дополнительные сведения – [url=https://narcologicheskaya-klinika-saratov0.ru/]вывод наркологическая клиника[/url]
Чтобы быстро соотнести риски и требуемую плотность наблюдения, удобнее всего взглянуть на одну сводную таблицу. Она не заменяет очный осмотр, но помогает заранее понять логику: чем выше риски и вариабельность симптомов, тем плотнее мониторинг и быстрее доступ к корректировкам.
Узнать больше – https://narkologicheskaya-klinika-korolyov0.ru/narkologicheskaya-klinika-narkolog-v-korolyove/
В медицинской практике используются различные методы, которые помогают ускорить процесс восстановления. Все процедуры проводятся под контролем специалистов и с учетом индивидуальных особенностей пациента.
Получить дополнительные сведения – [url=https://vyvod-iz-zapoya-omsk0.ru/]вывод из запоя дешево[/url]
Эта публикация содержит набор несвязанных идей, трудно применимых в практике. Мы лишь поверхностно затрагиваем различные точки зрения, не проводя глубокий анализ и не предлагая выводов.
Подробнее читать – [url=https://rostov-narkologiya.ru/uslugi-ot-alkogolizma/vyvod-iz-zapoya/]похудеть на таблетках[/url]
Когда уместен
Получить дополнительную информацию – https://narkologicheskaya-klinika-korolyov0.ru/narkologicheskaya-klinika-stacionar-v-korolyove
Лечение зависимости в наркологической клинике проводится поэтапно. Это обеспечивает постепенное восстановление организма и исключает риск осложнений. Каждый этап направлен на устранение конкретных нарушений, вызванных употреблением психоактивных веществ.
Разобраться лучше – [url=https://narcologicheskaya-klinika-v-krasnoyarske17.ru/]наркологическая клиника вывод из запоя в красноярске[/url]
Цель
Получить дополнительные сведения – http://narkologicheskaya-klinika-korolyov0.ru/
**mitolyn official**
Mitolyn is a carefully developed, plant-based formula created to help support metabolic efficiency and encourage healthy, lasting weight management.
Этот обзор позволяет по-новому взглянуть на вещи, на которые обычно и так смотрят. Мы упоминаем факты, которые мало что меняют, и события, значение которых трудно определить, но они всё равно здесь.
Вот – [url=https://arma-rehab.ru/vyvod-iz-zapoya/]секс знакомства[/url]
Перед процедурой врач оценивает состояние пациента, измеряет давление, пульс и уровень насыщения крови кислородом. После осмотра подбирается состав инфузии, включающий препараты для дезинтоксикации, восстановления водно-солевого баланса и нормализации работы органов. Введение растворов осуществляется внутривенно, под контролем специалиста. Длительность процедуры — от 40 минут до 1,5 часов.
Ознакомиться с деталями – [url=https://kapelnicza-ot-zapoya-v-volgograde17.ru/]вызвать капельницу от запоя на дому волгоград[/url]
«Светлая Полоса» запускает помощь без многоходовой бюрократии и «марафона кабинетов». Дежурный врач аккуратно собирает только те данные, которые критичны для безопасности, и сразу предлагает безопасную точку входа: выезд на дом, дневной формат или стационар под наблюдением 24/7. Каждое действие проговаривается человеческим языком: что делаем в ближайшие часы, чего ждём к вечеру (мягкий сон, снижение тревоги, выравнивание давления и пульса), как поймём, что схема работает, и чем займёмся завтра. Конфиденциальность встроена в процесс — нейтральные каналы связи, неброская выездная атрибутика, ограниченный доступ к карте и отсутствие постановки на учёт. Такой регламент снижает фоновую тревогу, экономит силы семьи и превращает лечение в ясный, управляемый маршрут, а не в набор «разрозненных процедур».
Разобраться лучше – [url=https://narkologicheskaya-klinika-serpuhov0.ru/]narkologicheskaya-klinika-pomoshch-na-domu[/url]
Процесс детоксикации проходит поэтапно, чтобы организм успевал адаптироваться к изменениям и не испытывал стресс. Каждый шаг направлен на достижение конкретного терапевтического эффекта. Ниже представлена таблица, отражающая ключевые стадии процедуры, применяемой в клинике «Трезвый Путь Волгоград».
Детальнее – [url=https://vivod-iz-zapoya-v-volgograde17.ru/]вывод из запоя вызов в волгограде[/url]
В Королёве мы запускаем помощь без «многоходовок». С первого контакта дежурный врач аккуратно уточняет жалобы, длительность эпизода, принимаемые лекарства и сопутствующие диагнозы, после чего предлагает безопасную точку входа: выезд на дом, дневной формат или круглосуточный стационар. Каждое действие объясняется простым языком: зачем оно нужно, какого эффекта ждать в ближайшие часы и что будет считаться нормальной динамикой. Конфиденциальность заложена в процесс по умолчанию: минимально необходимый объём персональных данных, нейтральная коммуникация, ограниченный доступ к медкарте и отсутствие постановки на учёт. Такой порядок снимает лишнее напряжение у семьи и экономит самое ценное — время.
Исследовать вопрос подробнее – http://narkologicheskaya-klinika-korolyov0.ru
Вывод из запоя в Омске проводится в условиях клиники с применением современных методов детоксикации и круглосуточного медицинского наблюдения. Длительное употребление алкоголя вызывает серьезную интоксикацию организма, нарушает работу внутренних органов и психоэмоциональное состояние. Своевременное обращение к специалистам позволяет избежать осложнений и восстановить здоровье пациента безопасным образом.
Получить дополнительные сведения – [url=https://vyvod-iz-zapoya-omsk0.ru/]вывод из запоя в стационаре[/url]
Лечение в клинике включает несколько последовательных этапов, каждый из которых направлен на достижение стабильной ремиссии и восстановление здоровья пациента.
Углубиться в тему – [url=https://narcologicheskaya-klinika-v-novokuzneczke17.ru/]анонимная наркологическая клиника в новокузнецке[/url]
Комплексное проведение этих этапов обеспечивает полное восстановление организма и облегчает процесс последующего лечения зависимости.
Получить больше информации – [url=https://vyvod-iz-zapoya-v-ryazani17.ru/]вывод из запоя вызов город[/url]
Каждая стадия лечения проходит под постоянным контролем медицинского персонала. Пациенты чувствуют себя в безопасности и получают поддержку не только физическую, но и психологическую. Такой подход снижает риск рецидива и помогает сохранить результат на долгие годы.
Узнать больше – https://narkologicheskaya-klinika-v-ryazani17.ru/narkologicheskij-staczionar-ryazan/
Cheers to every architect of tomorrow!
О— ПЂО±ПЃО±ОєОїО»ОїПЌОёО·ПѓО· П„П‰ОЅ П„О¬ПѓОµП‰ОЅ ОєО±О№ П€П…П‡ОїО»ОїОіОЇО±П‚ П„П‰ОЅ ПЂО±О№ОєП„ПЋОЅ ОµОЇОЅО±О№ ОїП…ПѓО№ПЋОґО·П‚ ОіО№О± П„О№П‚ ОјОµОіО±О»П…П„ОµПЃОµП‚ ПѓП„ОїО№П‡О·ОјО±П„О№ОєОµП‚ ОµП„О±О№ПЃО№ОµП‚ ПѓП„ОїОЅ ОєОїПѓОјОї. [url=https://onlinecasinoforeign.com/the-largest-betting-companies-in-the-world/#][/url]. О— ОєО±П„О±ОЅПЊО·ПѓО· П„П‰ОЅ О±ОЅО±ОіОєПЋОЅ П„П‰ОЅ ПЂОµО»О±П„ПЋОЅ П„ОїП…П‚ ОµПЂО№П„ПЃОПЂОµО№ ОЅО± ОІОµО»П„О№ПЋОЅОїП…ОЅ П„О№П‚ П…ПЂО·ПЃОµПѓОЇОµП‚ П„ОїП…П‚ ОєО±П„О¬О»О»О·О»О±. ОџО№ ПЂПЃОїПѓО±ПЃОјОїОіОП‚ О±П…П„ОП‚ ОґО№О±ПѓП†О±О»ОЇО¶ОїП…ОЅ ПЊП„О№ О±ОЅП„О±ОіП‰ОЅОЇО¶ОїОЅП„О±О№ ОјОµ ОµПЂО№П„П…П‡ОЇО± ПѓП„О·ОЅ О±ОіОїПЃО¬.
As more data emerges about responsible gambling practices, the largest betting companies in the world are implementing educational programs. They seek to provide bettors with resources that promote safe gambling behavior. This commitment to education not only strengthens their reputation but also aligns with their corporate social responsibility initiatives.
Trending: The Biggest Betting Companies Featured on onlinecasinoforeign.com – http://onlinecasinoforeign.com/the-largest-betting-companies-in-the-world/#
May fortune walk with you as you anticipate brilliant lucky streaks !
Чтобы исключить суету и случайные усиления, первые часы делим на небольшие «окна»: цель — действие — маркер — критерий перехода. Если отклика нет, корректируется один элемент — темп инфузии, очередность модулей или поведенческий якорь — и назначается новая точка оценки.
Узнать больше – [url=https://vyvod-iz-zapoya-saratov0.ru/]вывод из запоя на дому недорого в саратове[/url]
Выделяется ряд преимуществ, которые делают терапию в клинике оптимальным решением для борьбы с зависимостью.
Углубиться в тему – https://lechenie-alkogolizma-perm0.ru/
Когда уместен
Получить больше информации – [url=https://narkologicheskaya-klinika-shchyolkovo0.ru/]narkologicheskaya-klinika-anonimnaya-pomoshch[/url]
Ниже — ориентир, который помогает сопоставить риски, плотность наблюдения и ожидаемую скорость стабилизации. Таблица не заменяет очный осмотр, но экономит время на принятие решений и делает логику врача понятной всей семье.
Узнать больше – https://narkologicheskaya-klinika-odincovo0.ru/
Наркологическая помощь в Волгограде предназначена для людей, столкнувшихся с проблемами алкогольной или наркотической зависимости. Современный подход к лечению основан на сочетании медицинских, психологических и социальных методов, направленных на полное восстановление пациента. Врачи-наркологи применяют безопасные схемы детоксикации, эффективные медикаменты и программы психотерапевтической поддержки, позволяющие достичь устойчивой ремиссии и вернуть пациента к нормальной жизни.
Разобраться лучше – [url=https://narkologicheskaya-pomoshh-v-volgograde17.ru/]платная наркологическая скорая помощь[/url]
Детоксикация — это первый и важнейший этап лечения в наркологической клинике в Красноярске. Она проводится с целью выведения токсинов из организма и восстановления функций жизненно важных органов. Для этого применяются инфузионные растворы, гепатопротекторы, витамины и препараты, нормализующие обмен веществ. После снятия интоксикации пациент получает медикаментозную поддержку, направленную на снижение тяги к алкоголю или наркотикам и стабилизацию эмоционального состояния.
Подробнее – [url=https://narcologicheskaya-klinika-v-krasnoyarske17.ru/]анонимная наркологическая клиника[/url]
Что включено на практике
Узнать больше – https://narkologicheskaya-klinika-krasnogorsk0.ru/chastnaya-narkologicheskaya-klinika-v-krasnogorske
Вывод из запоя в Омске проводится в условиях клиники с применением современных методов детоксикации и круглосуточного медицинского наблюдения. Длительное употребление алкоголя вызывает серьезную интоксикацию организма, нарушает работу внутренних органов и психоэмоциональное состояние. Своевременное обращение к специалистам позволяет избежать осложнений и восстановить здоровье пациента безопасным образом.
Получить дополнительную информацию – https://vyvod-iz-zapoya-omsk0.ru/vyvod-iz-zapoya-gorod-omsk/
Услуга вывода из запоя в клинике сочетает профессионализм врачей, медицинскую точность и заботу. При этом обеспечивается полная конфиденциальность: данные пациентов не передаются в сторонние инстанции. Круглосуточный режим работы позволяет вызвать врача даже ночью — специалисты прибывают в течение 40–60 минут после обращения.
Получить больше информации – http://vivod-iz-zapoya-v-volgograde17.ru/vyvod-iz-zapoya-na-domu-volgograd/
Выездная наркологическая помощь организована по чётко выстроенной схеме. Каждый этап направлен на стабилизацию состояния и безопасное восстановление функций организма после алкогольного или наркотического воздействия.
Подробнее – http://
Вывод из запоя в Тюмени — это медицинская процедура, направленная на устранение алкогольной интоксикации и восстановление нормального функционирования организма. Длительное употребление спиртных напитков приводит к нарушению обмена веществ, обезвоживанию, сбоям в работе печени и сердца. В таких случаях требуется профессиональная помощь врача-нарколога, который подберёт оптимальный способ дезинтоксикации и медикаментозной поддержки. Современные методики позволяют провести вывод из запоя безопасно, эффективно и без осложнений.
Выяснить больше – [url=https://vyvod-iz-zapoya-v-tyumeni17.ru/]вывод из запоя круглосуточно[/url]
«Светлая Полоса» запускает помощь без многоходовой бюрократии и «марафона кабинетов». Дежурный врач аккуратно собирает только те данные, которые критичны для безопасности, и сразу предлагает безопасную точку входа: выезд на дом, дневной формат или стационар под наблюдением 24/7. Каждое действие проговаривается человеческим языком: что делаем в ближайшие часы, чего ждём к вечеру (мягкий сон, снижение тревоги, выравнивание давления и пульса), как поймём, что схема работает, и чем займёмся завтра. Конфиденциальность встроена в процесс — нейтральные каналы связи, неброская выездная атрибутика, ограниченный доступ к карте и отсутствие постановки на учёт. Такой регламент снижает фоновую тревогу, экономит силы семьи и превращает лечение в ясный, управляемый маршрут, а не в набор «разрозненных процедур».
Получить дополнительные сведения – https://narkologicheskaya-klinika-serpuhov0.ru/
Процесс вывода из запоя включает последовательное воздействие на ключевые звенья интоксикации. Ниже представлена таблица, отражающая этапы лечения, используемые методики и ожидаемые результаты терапии.
Подробнее – [url=https://vyvod-iz-zapoya-v-volgograde17.ru/]вывод из запоя клиника в волгограде[/url]
Алкогольная интоксикация вызывает сильное обезвоживание и разрушает баланс электролитов в организме. Без медицинской помощи восстановление может занять несколько дней, а в тяжёлых случаях приводит к осложнениям. Капельница помогает безопасно и быстро вывести этанол и продукты его распада, восполнить уровень жидкости, снизить нагрузку на печень и сердечно-сосудистую систему. Процедура проводится амбулаторно или на дому, что делает её доступной и удобной для пациентов.
Узнать больше – [url=https://kapelnicza-ot-zapoya-v-volgograde17.ru/]капельница от запоя вызов город[/url]
Когда уместен
Получить дополнительную информацию – https://narkologicheskaya-klinika-shchyolkovo0.ru/chastnaya-narkologicheskaya-klinika-v-shchyolkovo/
Формат
Подробнее – http://narkologicheskaya-klinika-odincovo0.ru/narkologicheskaya-klinika-stacionar-v-odincovo/
Virtual phone number rental provides a flexible option for modern communication needs.
It allows users to get verification codes without using a physical SIM card.
Such a service is widely used for account verification.
Using a virtual number improves personal privacy.
https://www.quorablog.com/how-to-purchase-virtual-numbers-online-the-ultimate-guide/
The process is easy to understand and usually requires minimal time.
Virtual numbers work well across different platforms.
This solution delivers efficiency for both one-time and ongoing tasks.
As a result, virtual number rental continues to gain popularity among users worldwide.
Капельница от запоя в Воронеже применяется для восстановления организма после длительного употребления алкоголя, устранения интоксикации и нормализации обменных процессов. Медицинская процедура проводится под контролем врача-нарколога, в клинике или на дому. Она позволяет быстро улучшить самочувствие, устранить головную боль, тремор, тошноту, обезвоживание и нарушения сна. Современные препараты действуют мягко, безопасно и без стресса для организма, обеспечивая плавный выход из запоя.
Выяснить больше – [url=https://kapelnicza-ot-zapoya-v-voronezhe17.ru/]капельница от запоя стоимость воронеж[/url]
Этот обзор предлагает свежий взгляд на предметы, которые и без того привычны. Мы упоминаем факты, не имеющие большого значения, и события с неясной важностью, но они присутствуют здесь.
Подробнее читать – [url=https://rostov-narkologiya.ru/uslugi-ot-alkogolizma/vyvod-iz-zapoya/]диета для похудения быстро[/url]
Профессиональная помощь требуется в тех случаях, когда организм уже не способен самостоятельно справиться с последствиями интоксикации. Чем дольше длится запой, тем сильнее проявляются его симптомы. Медицинское вмешательство помогает предотвратить развитие осложнений, таких как судороги, повышение давления и алкогольный психоз.
Получить больше информации – [url=https://vyvod-iz-zapoya-v-tolyatti17.ru/]вывод из запоя вызов[/url]
Капельницы в «СаратовМед Профи» — это конструктор из тщательно подобранных модулей. Каждый модуль решает одну задачу и имеет свой ожидаемый горизонт эффекта. Важно не название, а логика: задача > опора среды > как проверяем > когда ждём результат.
Исследовать вопрос подробнее – [url=https://vyvod-iz-zapoya-saratov0.ru/]помощь вывод из запоя[/url]
В медицинской практике используются различные методы, которые помогают ускорить процесс восстановления. Все процедуры проводятся под контролем специалистов и с учетом индивидуальных особенностей пациента.
Углубиться в тему – http://vyvod-iz-zapoya-omsk0.ru/vyvod-iz-zapoya-omsk-czena/
Комплексная терапия включает несколько последовательных этапов, обеспечивающих полное восстановление организма и личности пациента. Каждый из них направлен на решение конкретных задач — от устранения интоксикации до закрепления устойчивой ремиссии.
Детальнее – https://narkologicheskaya-klinika-v-volgograde17.ru/chastnaya-narkologicheskaya-klinika-volgograd/
В таблице представлены основные виды терапии, применяемые в клинике:
Разобраться лучше – [url=https://narcologicheskaya-klinika-v-novokuzneczke17.ru/]наркологическая клиника цены[/url]
Вывод из запоя — это медицинская процедура, направленная на очищение организма от продуктов распада алкоголя и восстановление нормальной работы внутренних органов. В клинике «Трезвый Путь Волгоград» пациентам оказывается профессиональная помощь с использованием современных методов дезинтоксикации, медикаментозной поддержки и психологического сопровождения. Лечение проводится круглосуточно, включая выезд нарколога на дом. Такой формат помогает быстро стабилизировать состояние пациента, минимизировать риск осложнений и обеспечить безопасность при выходе из запоя любой продолжительности.
Исследовать вопрос подробнее – [url=https://vivod-iz-zapoya-v-volgograde17.ru/]вывод из запоя на дому круглосуточно[/url]
В этой статье-обзоре мы собрали данные, актуальность которых сомнительна, а факты — не всегда взаимосвязаны. Читатель сможет ознакомиться с разными мнениями, хотя вряд ли они существенно повлияют на его понимание темы.
Вот – [url=https://arma-rehab.ru/]взрослые игры[/url]
Вывод из запоя требуется тогда, когда организм уже не способен самостоятельно справиться с последствиями алкогольной интоксикации. Длительное употребление спиртного приводит к нарушению работы внутренних органов, обезвоживанию и психическим расстройствам. Медицинская помощь помогает избежать опасных осложнений и облегчить процесс отказа от алкоголя.
Получить дополнительные сведения – [url=https://vyvod-iz-zapoya-v-ryazani17.ru/]анонимный вывод из запоя в рязани[/url]
Такие процедуры особенно эффективны на ранних стадиях лечения, когда важно быстро снять симптомы интоксикации и вернуть стабильное самочувствие. После курса капельниц пациенту становится легче концентрироваться, снижается раздражительность и тревожность, восстанавливается аппетит и сон.
Подробнее – http://narkologicheskaya-klinika-v-ryazani17.ru/
Что включено на практике
Получить дополнительные сведения – [url=https://narkologicheskaya-klinika-krasnogorsk0.ru/]narkologicheskaya-klinika-otzyvy[/url]
Вывод из запоя — это всегда баланс между скоростью и безопасностью. Дома трудно заметить скрытые ухудшения, особенно ночью: давление и пульс «гуляют», нарастает обезвоживание, сон рваный и тревожный. В «Трезвом Контуре» этот хаос замещается управляемостью: перед выездом дежурный врач собирает ключевые данные (длительность эпизода, лекарства, аллергии, сопутствующие болезни), на месте проводится экспресс-диагностика (АД, ЧСС, сатурация, температура, неврологический статус, степень обезвоживания), затем запускается схема терапевтической поддержки. Мы постоянно «подстраиваем» инфузии по реакции организма, а не по шаблонной карте: где-то важнее регидратация, где-то — коррекция электролитов, где-то — бережная седация для ночи. Для семьи это значит одно: меньше догадок, больше ясности. Если по картине риски высоки, мы аргументированно предлагаем стационар в Одинцово — и организуем транспортировку без пауз, потому что цена задержки в такие часы всегда выше.
Подробнее – [url=https://vyvod-iz-zapoya-odincovo10.ru/]вывод из запоя вызов на дом[/url]
Комплексное лечение помогает восстановить работу печени, сердца и нервной системы. Пациенты отмечают улучшение сна, снижение тревожности, нормализацию давления и аппетита уже спустя несколько часов после начала терапии. В зависимости от тяжести состояния курс может быть продлён до 2–3 дней с круглосуточным наблюдением и корректировкой дозировок.
Получить дополнительную информацию – [url=https://vivod-iz-zapoya-v-volgograde17.ru/]вывод из запоя вызов в волгограде[/url]
Детоксикация — это первый и важнейший этап лечения в наркологической клинике в Красноярске. Она проводится с целью выведения токсинов из организма и восстановления функций жизненно важных органов. Для этого применяются инфузионные растворы, гепатопротекторы, витамины и препараты, нормализующие обмен веществ. После снятия интоксикации пациент получает медикаментозную поддержку, направленную на снижение тяги к алкоголю или наркотикам и стабилизацию эмоционального состояния.
Углубиться в тему – [url=https://narcologicheskaya-klinika-v-krasnoyarske17.ru/]вывод наркологическая клиника красноярск[/url]
Выделяется ряд преимуществ, которые делают терапию в клинике оптимальным решением для борьбы с зависимостью.
Получить больше информации – [url=https://lechenie-alkogolizma-perm0.ru/]лечение алкоголизма и наркомании центр пермь[/url]
Вывод из запоя — это не «волшебная капельница», а последовательная медицинская программа с чёткими целями и измеримыми маркерами. В наркологической клинике «СаратовМед Профи» маршрут строится по принципу управляемых окон: на каждом шаге команда преследует одну цель, меняет лишь один параметр и оценивает результат в заранее назначённый момент. Такой подход снижает лекарственную нагрузку, предотвращает «гонку дозировок» и делает динамику предсказуемой для пациента и близких. Конфиденциальность обеспечивается регламентом: немаркированные выезды, нейтральные формулировки в документах, «тихие» каналы связи, доступ к записям — строго по ролям.
Получить больше информации – [url=https://vyvod-iz-zapoya-saratov0.ru/]вывод из запоя клиника саратов[/url]
Главная задача процедуры — быстрое выведение этанола и его метаболитов из организма, нормализация уровня электролитов, улучшение самочувствия и предотвращение осложнений. Лечение проводится как в клинике, так и на дому, что особенно удобно при тяжёлых состояниях, когда пациент не может самостоятельно добраться до медицинского учреждения.
Исследовать вопрос подробнее – http://vyvod-iz-zapoya-v-tyumeni17.ru/vyvod-iz-zapoya-na-domu-tyumen/
Такой алгоритм позволяет постепенно восстановить функции организма и подготовить пациента к дальнейшему лечению зависимости.
Получить дополнительную информацию – [url=https://vyvod-iz-zapoya-omsk0.ru/]нарколог на дом вывод из запоя омск[/url]
Формат
Изучить вопрос глубже – [url=https://narkologicheskaya-klinika-serpuhov0.ru/]наркологическая клиника на дом[/url]
Каждый метод подбирается индивидуально, что обеспечивает безопасность и эффективность процесса.
Детальнее – http://vyvod-iz-zapoya-omsk0.ru/vyvod-iz-zapoya-gorod-omsk/
Ниже приведена таблица с типовыми компонентами капельницы и их назначением:
Получить дополнительную информацию – [url=https://kapelnicza-ot-zapoya-v-volgograde17.ru/]капельница от запоя цена волгоград[/url]
«Светлая Полоса» запускает помощь без многоходовой бюрократии и «марафона кабинетов». Дежурный врач аккуратно собирает только те данные, которые критичны для безопасности, и сразу предлагает безопасную точку входа: выезд на дом, дневной формат или стационар под наблюдением 24/7. Каждое действие проговаривается человеческим языком: что делаем в ближайшие часы, чего ждём к вечеру (мягкий сон, снижение тревоги, выравнивание давления и пульса), как поймём, что схема работает, и чем займёмся завтра. Конфиденциальность встроена в процесс — нейтральные каналы связи, неброская выездная атрибутика, ограниченный доступ к карте и отсутствие постановки на учёт. Такой регламент снижает фоновую тревогу, экономит силы семьи и превращает лечение в ясный, управляемый маршрут, а не в набор «разрозненных процедур».
Подробнее можно узнать тут – [url=https://narkologicheskaya-klinika-serpuhov0.ru/]www.domen.ru[/url]
улучшение креативов [url=https://reklamnyj-kreativ4.ru/]улучшение креативов[/url] .
a/b тест баннеров [url=https://reklamnyj-kreativ5.ru/]reklamnyj-kreativ5.ru[/url] .
Капельницы в «СаратовМед Профи» — это конструктор из тщательно подобранных модулей. Каждый модуль решает одну задачу и имеет свой ожидаемый горизонт эффекта. Важно не название, а логика: задача > опора среды > как проверяем > когда ждём результат.
Подробнее – [url=https://vyvod-iz-zapoya-saratov0.ru/]вывод из запоя с выездом[/url]
Когда зависимость выходит из-под контроля, человеку необходима не просто медицинская помощь, а поддержка в безопасной и понимающей среде. Наркологическая клиника «Трезвый Выбор Рязань» предлагает пациентам комплексные программы лечения алкоголизма, наркомании и других форм зависимого поведения. Здесь работают врачи-наркологи, психотерапевты, психологи и медсёстры, обеспечивающие круглосуточное наблюдение и уход. Лечение проводится анонимно, с акцентом на восстановление здоровья, психологического равновесия и качества жизни.
Подробнее тут – [url=https://narkologicheskaya-clinika-v-ryazani17.ru/]наркологическая клиника вывод из запоя рязань[/url]
Что включено на практике
Выяснить больше – https://narkologicheskaya-klinika-krasnogorsk0.ru/
Когда уместен
Подробнее – http://narkologicheskaya-klinika-shchyolkovo0.ru/chastnaya-narkologicheskaya-klinika-v-shchyolkovo/
Каждый метод подбирается индивидуально, что обеспечивает безопасность и эффективность процесса.
Углубиться в тему – [url=https://vyvod-iz-zapoya-omsk0.ru/]вывод из запоя на дому недорого омск[/url]
Капельница от запоя в Воронеже применяется для восстановления организма после длительного употребления алкоголя, устранения интоксикации и нормализации обменных процессов. Медицинская процедура проводится под контролем врача-нарколога, в клинике или на дому. Она позволяет быстро улучшить самочувствие, устранить головную боль, тремор, тошноту, обезвоживание и нарушения сна. Современные препараты действуют мягко, безопасно и без стресса для организма, обеспечивая плавный выход из запоя.
Детальнее – http://kapelnicza-ot-zapoya-v-voronezhe17.ru/kapelnicza-ot-alkogolya-voronezh/
Детоксикация — это первый и важнейший этап лечения в наркологической клинике в Красноярске. Она проводится с целью выведения токсинов из организма и восстановления функций жизненно важных органов. Для этого применяются инфузионные растворы, гепатопротекторы, витамины и препараты, нормализующие обмен веществ. После снятия интоксикации пациент получает медикаментозную поддержку, направленную на снижение тяги к алкоголю или наркотикам и стабилизацию эмоционального состояния.
Получить дополнительную информацию – [url=https://narcologicheskaya-klinika-v-krasnoyarske17.ru/]частная наркологическая клиника[/url]
Выездная бригада «МедОпоры» дежурит 24/7 и покрывает весь Красногорск и близлежащие районы. После короткого звонка дежурный уточняет длительность запоя, сопутствующие болезни, принимаемые препараты и аллергии — это экономит время на месте и помогает заранее предусмотреть риски. Врач приезжает с комплектом одноразовых систем, растворами и медикаментами, проводит экспресс-диагностику: измерение давления, пульса, сатурации, температуры, оценка неврологического статуса, степени обезвоживания и тревожности. По этим данным формируется индивидуальная схема инфузий и симптоматической поддержки. Наша задача — не просто «поставить капельницу», а безопасно развернуть план стабилизации, где дозировки и темп меняются по реакции организма. Если выявляются признаки осложнений или дома нет условий для безопасного наблюдения, сразу предлагаем перевод в профильный стационар, чтобы не терять драгоценные часы. Семья получает понятные роли и инструкции, а врач остаётся на связи для уточнений по режиму ближайшей ночи.
Получить больше информации – http://vyvod-iz-zapoya-krasnogorsk10.ru/vyvod-iz-zapoya-cena-v-krasnogorske/
Ниже — ориентир, который помогает сопоставить риски, плотность наблюдения и ожидаемую скорость стабилизации. Таблица не заменяет очный осмотр, но экономит время на принятие решений и делает логику врача понятной всей семье.
Получить дополнительные сведения – [url=https://narkologicheskaya-klinika-odincovo0.ru/]наркологическая клиника в одинцово[/url]
Наркологическая клиника в Волгограде предоставляет профессиональную медицинскую помощь людям, страдающим зависимостью от алкоголя, наркотиков и других психоактивных веществ. Основная цель специалистов — не просто устранить физическую зависимость, но и помочь пациенту вернуть внутреннее равновесие, здоровье и контроль над жизнью. В клинике применяются современные методы лечения, доказавшие свою эффективность в практике отечественной и мировой наркологии.
Изучить вопрос глубже – [url=https://narkologicheskaya-klinika-v-volgograde17.ru/]наркологическая клиника волгоград[/url]
Благодаря комплексному подходу достигается не только снятие симптомов, но и долгосрочная стабилизация состояния пациента.
Узнать больше – http://narkologicheskaya-pomoshh-v-volgograde17.ru/narkologiya-v-volgograde/https://narkologicheskaya-pomoshh-v-volgograde17.ru
В таблице представлены основные виды терапии, применяемые в клинике:
Получить больше информации – http://
Медики рекомендуют обратиться за профессиональной помощью при следующих состояниях:
Разобраться лучше – https://vyvod-iz-zapoya-v-ryazani17.ru/vykhod-iz-zapoya-ryazan
Перед таблицей важное пояснение: она помогает соотнести риски и плотность наблюдения ещё до осмотра. Окончательное решение принимает врач по клинической картине и переносимости, но ориентир даст понимание маршрута и бюджета времени.
Подробнее можно узнать тут – [url=https://narkologicheskaya-klinika-serpuhov0.ru/]narkologicheskie-kliniki-v-oblasti[/url]
Что получите за 24 часа
Получить больше информации – http://narkologicheskaya-klinika-domodedovo0.ru
Вывод из запоя в Тюмени — это медицинская процедура, направленная на устранение алкогольной интоксикации и восстановление нормального функционирования организма. Длительное употребление спиртных напитков приводит к нарушению обмена веществ, обезвоживанию, сбоям в работе печени и сердца. В таких случаях требуется профессиональная помощь врача-нарколога, который подберёт оптимальный способ дезинтоксикации и медикаментозной поддержки. Современные методики позволяют провести вывод из запоя безопасно, эффективно и без осложнений.
Получить дополнительную информацию – [url=https://vyvod-iz-zapoya-v-tyumeni17.ru/]вывод из запоя круглосуточно тюмень[/url]
Такие процедуры особенно эффективны на ранних стадиях лечения, когда важно быстро снять симптомы интоксикации и вернуть стабильное самочувствие. После курса капельниц пациенту становится легче концентрироваться, снижается раздражительность и тревожность, восстанавливается аппетит и сон.
Получить дополнительную информацию – [url=https://narkologicheskaya-klinika-v-ryazani17.ru/]наркологическая клиника лечение алкоголизма в рязани[/url]
Основу лечения составляет междисциплинарная команда: врач-нарколог, психиатр, психолог, медсестра и консультант по зависимому поведению. Каждый отвечает за свой участок работы, но общая цель едина — помочь пациенту безопасно пройти путь от детокса до устойчивого состояния. Благодаря единому плану и регулярным консилиумам врачей, исключаются противоречия и дублирование процедур. Это экономит ресурсы организма и делает процесс прогнозируемым.
Ознакомиться с деталями – https://narkologicheskaya-clinica-v-krasnoyarske17.ru/krasnoyarsk-narkologicheskij-czentr/
Каждый из методов подбирается индивидуально, что позволяет учитывать медицинские показания и личные особенности пациента.
Подробнее – https://lechenie-alkogolizma-perm0.ru/lechenie-alkogolizma-perm-besplatno
Выездная наркологическая помощь организована по чётко выстроенной схеме. Каждый этап направлен на стабилизацию состояния и безопасное восстановление функций организма после алкогольного или наркотического воздействия.
Подробнее – [url=https://narkolog-na-dom-v-ufe17.ru/]платный нарколог на дом уфа[/url]
Даже если симптомы кажутся незначительными, проведение инфузионной терапии значительно ускоряет процесс восстановления и предотвращает развитие осложнений.
Подробнее можно узнать тут – [url=https://kapelnicza-ot-zapoya-v-volgograde17.ru/]капельница от запоя анонимно волгоград[/url]
Не всегда человек способен прекратить употребление алкоголя без медицинского вмешательства. Чем дольше длится запой, тем выше риск осложнений. Обратиться к специалисту следует при появлении следующих признаков:
Подробнее тут – [url=https://vyvod-iz-zapoya-v-tyumeni17.ru/]вывод из запоя недорого тюмень[/url]
Текст включает разнообразную информацию, которая может показаться любопытной, но не меняет устоявшегося восприятия. Предлагаем просто насладиться чтением, не ожидая значительной пользы.
Подробнее читать – [url=https://rostov-narkologiya.ru/uslugi-ot-alkogolizma/vyvod-iz-zapoya/]народные средства от диабета[/url]
Формат
Выяснить больше – [url=https://narkologicheskaya-klinika-krasnogorsk0.ru/]skoraya-narkologicheskaya-pomoshch-v-klinike[/url]
Процедура проводится как в стационаре, так и на дому. Врач приезжает по вызову, проводит осмотр и измеряет давление, пульс, насыщение кислородом. После оценки состояния подбирается состав капельницы и начинается инфузионная терапия. В среднем процедура длится от 40 минут до 1,5 часов, в зависимости от степени интоксикации. По завершении врач наблюдает за реакцией организма и даёт рекомендации по восстановлению.
Разобраться лучше – [url=https://kapelnicza-ot-zapoya-v-voronezhe17.ru/]капельница от запоя клиника[/url]
В таблице представлены основные элементы детоксикационной терапии:
Исследовать вопрос подробнее – https://narkologicheskaya-klinika-v-volgograde17.ru/narkologicheskaya-pomoshh-volgograd/
Наркологическая помощь в Волгограде предназначена для людей, столкнувшихся с проблемами алкогольной или наркотической зависимости. Современный подход к лечению основан на сочетании медицинских, психологических и социальных методов, направленных на полное восстановление пациента. Врачи-наркологи применяют безопасные схемы детоксикации, эффективные медикаменты и программы психотерапевтической поддержки, позволяющие достичь устойчивой ремиссии и вернуть пациента к нормальной жизни.
Узнать больше – https://narkologicheskaya-pomoshh-v-volgograde17.ru/narkologicheskaya-klinika-v-volgograde/
Формат
Ознакомиться с деталями – https://narkologicheskaya-klinika-krasnogorsk0.ru/chastnaya-narkologicheskaya-klinika-v-krasnogorske
Клиника в Красноярске придерживается комплексного подхода, при котором сочетаются медикаментозные и психотерапевтические методы. Такой подход позволяет воздействовать не только на физическую, но и на психологическую зависимость. Каждый пациент проходит детальное обследование, после чего врач-нарколог составляет индивидуальный план лечения с учётом стадии заболевания, состояния организма и наличия сопутствующих проблем со здоровьем.
Подробнее – https://narcologicheskaya-klinika-v-krasnoyarske17.ru/narkologicheskaya-klinika-krasnoyarsk-otzyvy/
Благодаря комплексному подходу достигается не только снятие симптомов, но и долгосрочная стабилизация состояния пациента.
Разобраться лучше – [url=https://narkologicheskaya-pomoshh-v-volgograde17.ru/]наркологическая клиника клиника помощь в волгограде[/url]
Детоксикация — это первый и важнейший этап лечения в наркологической клинике в Красноярске. Она проводится с целью выведения токсинов из организма и восстановления функций жизненно важных органов. Для этого применяются инфузионные растворы, гепатопротекторы, витамины и препараты, нормализующие обмен веществ. После снятия интоксикации пациент получает медикаментозную поддержку, направленную на снижение тяги к алкоголю или наркотикам и стабилизацию эмоционального состояния.
Подробнее – [url=https://narcologicheskaya-klinika-v-krasnoyarske17.ru/]наркологическая клиника наркологический центр[/url]
позиция карточки в выдаче [url=https://reklamnyj-kreativ4.ru/]позиция карточки в выдаче[/url] .
анализ наружной рекламы [url=https://reklamnyj-kreativ5.ru/]анализ наружной рекламы[/url] .
Такой подход позволяет добиться устойчивого эффекта и минимизировать риск возврата к зависимому поведению.
Ознакомиться с деталями – [url=https://narkologicheskaya-klinika-v-volgograde17.ru/]наркологическая клиника вывод из запоя в волгограде[/url]
Основная цель капельницы — вывести из организма продукты распада этанола и восстановить водно-солевой баланс. После запоя в крови скапливаются токсичные вещества, которые вызывают головокружение, слабость и эмоциональную нестабильность. Введение растворов внутривенно позволяет быстро доставить активные компоненты в кровоток, улучшая работу сердца, печени и нервной системы. Уже через 20–30 минут после начала процедуры пациент ощущает облегчение.
Получить больше информации – http://kapelnicza-ot-zapoya-v-voronezhe17.ru/kapelniczy-ot-pokhmelya-voronezh/
Современные методы лечения в наркологической клинике в Новокузнецке основаны на доказательной медицине. При поступлении пациент проходит полное обследование, включающее оценку физического состояния, психоэмоционального фона и наличия сопутствующих заболеваний. На основе полученных данных составляется персональная программа терапии, охватывающая медицинский, психологический и социальный аспекты выздоровления.
Подробнее тут – http://narcologicheskaya-klinika-v-novokuzneczke17.ru
Медики рекомендуют обратиться за профессиональной помощью при следующих состояниях:
Ознакомиться с деталями – [url=https://vyvod-iz-zapoya-v-ryazani17.ru/]врач вывод из запоя рязань[/url]
Вывод из запоя — это медицинская процедура, направленная на очищение организма от продуктов распада алкоголя и восстановление нормальной работы внутренних органов. В клинике «Трезвый Путь Волгоград» пациентам оказывается профессиональная помощь с использованием современных методов дезинтоксикации, медикаментозной поддержки и психологического сопровождения. Лечение проводится круглосуточно, включая выезд нарколога на дом. Такой формат помогает быстро стабилизировать состояние пациента, минимизировать риск осложнений и обеспечить безопасность при выходе из запоя любой продолжительности.
Узнать больше – http://vivod-iz-zapoya-v-volgograde17.ru
Лечение алкоголизма в Омске проводится с использованием современных методов, направленных на восстановление организма и психики пациента. Специалисты уделяют внимание как медицинским, так и психологическим аспектам, что позволяет достигать устойчивых результатов. Основой терапии является индивидуальный подход, благодаря которому каждая программа учитывает состояние здоровья и уровень зависимости.
Подробнее тут – https://lechenie-alkogolizma-omsk0.ru/lechenie-narkomanii-i-alkogolizma-v-omske
Процесс включает несколько шагов:
Выяснить больше – [url=https://narkolog-na-dom-v-ufe17.ru/]нарколог капельница на дом в уфе[/url]
Основные направления включают:
Детальнее – [url=https://narkologicheskaya-pomoshh-v-volgograde17.ru/]наркологическая помощь волгоград[/url]
Вывод из запоя в Тольятти — это медицинская процедура, направленная на очищение организма от продуктов распада алкоголя и восстановление нормального состояния здоровья. Длительное употребление спиртных напитков приводит к серьёзной интоксикации, нарушению работы нервной, сердечно-сосудистой и пищеварительной систем. Самостоятельные попытки прекратить запой могут быть опасны, поэтому оптимальным решением является обращение к врачу-наркологу, который проведёт лечение безопасно и эффективно.
Изучить вопрос глубже – https://vyvod-iz-zapoya-v-tolyatti17.ru/vyvod-iz-zapoya-na-domu-tolyatti-otzyvy/
Лечение алкоголизма в клинике «РязаньМед Альянс» включает несколько этапов, каждый из которых направлен на определённую цель — от снятия интоксикации до формирования устойчивого отказа от алкоголя. В таблице представлены основные стадии лечения и методы, используемые специалистами клиники.
Детальнее – http://narkologicheskaya-klinika-v-ryazani17.ru
Лечение зависимости в наркологической клинике проводится поэтапно. Это обеспечивает постепенное восстановление организма и исключает риск осложнений. Каждый этап направлен на устранение конкретных нарушений, вызванных употреблением психоактивных веществ.
Получить дополнительную информацию – https://narcologicheskaya-klinika-v-krasnoyarske17.ru/narkologicheskaya-klinika-krasnoyarsk-otzyvy
Процесс включает несколько шагов:
Получить больше информации – http://narkolog-na-dom-v-ufe17.ru/vyvod-iz-zapoya-ufa-narkolog-na-dom/
Критически важный отрезок — первые 12–24 часа. Мы разбиваем его на «окна», в каждом из которых есть цель, набор действий, маркеры контроля и критерий перехода. Если целевой отклик не достигнут, меняем один параметр: темп инфузии, очередность модулей или поведенческую опору (свет/тишина/цифровой режим) — и назначаем новую точку оценки. Это сохраняет причинно-следственную связь и предотвращает полипрагмазию.
Получить дополнительную информацию – [url=https://narcologicheskaya-klinika-saratov0.ru/]платная наркологическая клиника в саратове[/url]
Наркологическая помощь в Волгограде предназначена для людей, столкнувшихся с проблемами алкогольной или наркотической зависимости. Современный подход к лечению основан на сочетании медицинских, психологических и социальных методов, направленных на полное восстановление пациента. Врачи-наркологи применяют безопасные схемы детоксикации, эффективные медикаменты и программы психотерапевтической поддержки, позволяющие достичь устойчивой ремиссии и вернуть пациента к нормальной жизни.
Углубиться в тему – [url=https://narkologicheskaya-pomoshh-v-volgograde17.ru/]экстренная наркологическая помощь в волгограде[/url]
Перед процедурой врач оценивает состояние пациента, измеряет давление, пульс и уровень насыщения крови кислородом. После осмотра подбирается состав инфузии, включающий препараты для дезинтоксикации, восстановления водно-солевого баланса и нормализации работы органов. Введение растворов осуществляется внутривенно, под контролем специалиста. Длительность процедуры — от 40 минут до 1,5 часов.
Получить дополнительные сведения – [url=https://kapelnicza-ot-zapoya-v-volgograde17.ru/]капельница от запоя стоимость волгоград[/url]
Каждый из методов подбирается индивидуально, что позволяет учитывать медицинские показания и личные особенности пациента.
Детальнее – [url=https://lechenie-alkogolizma-perm0.ru/]лечение пивного алкоголизма пермь[/url]
Капельница от запоя в Волгограде — это эффективный способ быстро восстановить организм после длительного употребления алкоголя. Процедура проводится врачом-наркологом и направлена на выведение токсинов, нормализацию обмена веществ и стабилизацию работы нервной системы. Инфузионная терапия помогает устранить головную боль, слабость, тошноту, восстановить сон и аппетит. Благодаря внутривенному введению препаратов эффект наступает уже через 20–30 минут после начала процедуры.
Ознакомиться с деталями – http://kapelnicza-ot-zapoya-v-volgograde17.ru
Формат
Детальнее – http://narkologicheskaya-klinika-krasnogorsk0.ru/
Примерный состав раствора, применяемого наркологом на дому в Уфе, приведён в таблице:
Разобраться лучше – [url=https://narkolog-na-dom-v-ufe17.ru/]нарколог капельница на дом в уфе[/url]
В Волгограде сформирована система оказания наркологической помощи, включающая круглосуточные выезды специалистов, амбулаторное лечение, стационарные программы и реабилитацию. Такой подход позволяет охватить все категории пациентов — от тех, кто нуждается в экстренной помощи, до тех, кто готов пройти полный курс терапии. Независимо от формы оказания услуг, лечение проводится конфиденциально и в соответствии с медицинскими стандартами.
Изучить вопрос глубже – https://narkologicheskaya-pomoshh-v-volgograde17.ru/narkolog-psikholog-volgograd
Вывод из запоя — это не «волшебная капельница», а последовательная медицинская программа с чёткими целями и измеримыми маркерами. В наркологической клинике «СаратовМед Профи» маршрут строится по принципу управляемых окон: на каждом шаге команда преследует одну цель, меняет лишь один параметр и оценивает результат в заранее назначённый момент. Такой подход снижает лекарственную нагрузку, предотвращает «гонку дозировок» и делает динамику предсказуемой для пациента и близких. Конфиденциальность обеспечивается регламентом: немаркированные выезды, нейтральные формулировки в документах, «тихие» каналы связи, доступ к записям — строго по ролям.
Разобраться лучше – [url=https://vyvod-iz-zapoya-saratov0.ru/]вывод из запоя круглосуточно в саратове[/url]
Комплексное лечение помогает восстановить работу печени, сердца и нервной системы. Пациенты отмечают улучшение сна, снижение тревожности, нормализацию давления и аппетита уже спустя несколько часов после начала терапии. В зависимости от тяжести состояния курс может быть продлён до 2–3 дней с круглосуточным наблюдением и корректировкой дозировок.
Разобраться лучше – http://vivod-iz-zapoya-v-volgograde17.ru
Нарколог на дом в Уфе — это услуга, которая позволяет получить квалифицированную медицинскую помощь при алкогольной или наркотической интоксикации без необходимости госпитализации. Такой формат особенно востребован при запойных состояниях, когда пациент не может самостоятельно посетить клинику. Врач приезжает по вызову в течение короткого времени, проводит обследование, устанавливает капельницу и обеспечивает безопасный вывод из состояния опьянения. Все процедуры выполняются анонимно, с соблюдением медицинской этики и конфиденциальности.
Подробнее тут – [url=https://narkolog-na-dom-v-ufe17.ru/]нарколог на дом цены уфа[/url]
Ниже приведена таблица с типовыми компонентами капельницы и их назначением:
Изучить вопрос глубже – [url=https://kapelnicza-ot-zapoya-v-volgograde17.ru/]капельница от запоя клиника в волгограде[/url]
Вывод из запоя в Тольятти — это медицинская процедура, направленная на очищение организма от продуктов распада алкоголя и восстановление нормального состояния здоровья. Длительное употребление спиртных напитков приводит к серьёзной интоксикации, нарушению работы нервной, сердечно-сосудистой и пищеварительной систем. Самостоятельные попытки прекратить запой могут быть опасны, поэтому оптимальным решением является обращение к врачу-наркологу, который проведёт лечение безопасно и эффективно.
Детальнее – [url=https://vyvod-iz-zapoya-v-tolyatti17.ru/]вывод из запоя на дому цена тольятти[/url]
Нарколог на дом в Уфе — это услуга, которая позволяет получить квалифицированную медицинскую помощь при алкогольной или наркотической интоксикации без необходимости госпитализации. Такой формат особенно востребован при запойных состояниях, когда пациент не может самостоятельно посетить клинику. Врач приезжает по вызову в течение короткого времени, проводит обследование, устанавливает капельницу и обеспечивает безопасный вывод из состояния опьянения. Все процедуры выполняются анонимно, с соблюдением медицинской этики и конфиденциальности.
Узнать больше – http://narkolog-na-dom-v-ufe17.ru
Вывод из запоя требуется тогда, когда организм уже не способен самостоятельно справиться с последствиями алкогольной интоксикации. Длительное употребление спиртного приводит к нарушению работы внутренних органов, обезвоживанию и психическим расстройствам. Медицинская помощь помогает избежать опасных осложнений и облегчить процесс отказа от алкоголя.
Разобраться лучше – [url=https://vyvod-iz-zapoya-v-ryazani17.ru/]нарколог вывод из запоя в рязани[/url]
Современные методы лечения в наркологической клинике в Новокузнецке основаны на доказательной медицине. При поступлении пациент проходит полное обследование, включающее оценку физического состояния, психоэмоционального фона и наличия сопутствующих заболеваний. На основе полученных данных составляется персональная программа терапии, охватывающая медицинский, психологический и социальный аспекты выздоровления.
Исследовать вопрос подробнее – [url=https://narcologicheskaya-klinika-v-novokuzneczke17.ru/]наркологическая клиника[/url]
Комплексное проведение этих этапов обеспечивает полное восстановление организма и облегчает процесс последующего лечения зависимости.
Детальнее – [url=https://vyvod-iz-zapoya-v-ryazani17.ru/]вывод из запоя на дому недорого в рязани[/url]
Работа клиники строится на принципах индивидуального подхода, доказательной медицины и строгого соблюдения конфиденциальности. Каждый пациент проходит обследование, в ходе которого оценивается состояние организма, выявляется стадия зависимости и сопутствующие нарушения. На основе полученных данных разрабатывается персональная программа лечения, включающая медицинские, психологические и социальные методы коррекции поведения.
Углубиться в тему – [url=https://narkologicheskaya-klinika-v-voronezhe17.ru/]наркологическая клиника нарколог воронеж[/url]
Вывод из запоя в Тольятти — это медицинская процедура, направленная на очищение организма от продуктов распада алкоголя и восстановление нормального состояния здоровья. Длительное употребление спиртных напитков приводит к серьёзной интоксикации, нарушению работы нервной, сердечно-сосудистой и пищеварительной систем. Самостоятельные попытки прекратить запой могут быть опасны, поэтому оптимальным решением является обращение к врачу-наркологу, который проведёт лечение безопасно и эффективно.
Получить дополнительную информацию – [url=https://vyvod-iz-zapoya-v-tolyatti17.ru/]скорая вывод из запоя тольятти[/url]
Современные методы лечения в наркологической клинике в Новокузнецке основаны на доказательной медицине. При поступлении пациент проходит полное обследование, включающее оценку физического состояния, психоэмоционального фона и наличия сопутствующих заболеваний. На основе полученных данных составляется персональная программа терапии, охватывающая медицинский, психологический и социальный аспекты выздоровления.
Ознакомиться с деталями – [url=https://narcologicheskaya-klinika-v-novokuzneczke17.ru/]наркологическая клиника наркологический центр новокузнецк[/url]
запоминаемость рекламы [url=https://reklamnyj-kreativ4.ru/]reklamnyj-kreativ4.ru[/url] .
карточки товаров wildberries [url=https://reklamnyj-kreativ5.ru/]карточки товаров wildberries[/url] .
Каждая стадия лечения проходит под постоянным контролем медицинского персонала. Пациенты чувствуют себя в безопасности и получают поддержку не только физическую, но и психологическую. Такой подход снижает риск рецидива и помогает сохранить результат на долгие годы.
Получить дополнительную информацию – https://narkologicheskaya-klinika-v-ryazani17.ru/narkolog-ryazan-telefon
Карта делает видимой причинно-следственную связь: пациент понимает, зачем и что именно делается; семья видит «точки проверки»; врач получает опору для изменения одного параметра без разрушения всего плана.
Подробнее можно узнать тут – [url=https://vyvod-iz-zapoya-saratov0.ru/]вывод из запоя на дому круглосуточно саратов[/url]
Медицинская помощь строится на принципах индивидуального подхода и поэтапной терапии. Каждый пациент проходит диагностику, после чего составляется персональная программа, включающая медикаментозную поддержку, консультации психотерапевта и физиопроцедуры. Такой подход помогает не просто снять симптомы, но и восстановить организм полностью.
Подробнее – https://narkologicheskaya-klinika-v-ryazani17.ru/narkolog-ryazan-telefon
В статье-обзоре представлены данные сомнительной актуальности и факты без явной взаимосвязи. Читатель ознакомится с разными мнениями, хотя они вряд ли существенно изменят его представление о теме.
Подробнее читать – [url=https://rostov-narkologiya.ru/uslugi-ot-alkogolizma/vyvod-iz-zapoya/]кето диета за неделю минус 10 кг[/url]
Каждый из методов подбирается индивидуально, что позволяет учитывать медицинские показания и личные особенности пациента.
Выяснить больше – [url=https://lechenie-alkogolizma-perm0.ru/]наркологическая клиника лечение алкоголизма пермь[/url]
Клиника предлагает возможность круглосуточного пребывания в комфортных палатах. Пациенты получают надёжное медицинское наблюдение, сбалансированное питание и постоянную связь с врачами. Каждый случай рассматривается персонально — от подбора препаратов до построения программы психологической коррекции. Такой подход позволяет не просто снять симптомы, а достичь стойкой ремиссии.
Исследовать вопрос подробнее – https://narkologicheskaya-clinika-v-ryazani17.ru/
Процедура начинается с осмотра пациента и оценки степени интоксикации. Врач измеряет давление, пульс, уровень насыщения крови кислородом, определяет наличие сопутствующих заболеваний. После диагностики назначается капельница, состав которой подбирается индивидуально. Процедура направлена на очищение организма, восстановление водно-солевого баланса и снятие симптомов похмелья.
Исследовать вопрос подробнее – [url=https://vyvod-iz-zapoya-v-tolyatti17.ru/]вывод из запоя на дому недорого в тольятти[/url]
Выделяется ряд преимуществ, которые делают терапию в клинике оптимальным решением для борьбы с зависимостью.
Подробнее – http://lechenie-alkogolizma-perm0.ru/
В Волгограде сформирована система оказания наркологической помощи, включающая круглосуточные выезды специалистов, амбулаторное лечение, стационарные программы и реабилитацию. Такой подход позволяет охватить все категории пациентов — от тех, кто нуждается в экстренной помощи, до тех, кто готов пройти полный курс терапии. Независимо от формы оказания услуг, лечение проводится конфиденциально и в соответствии с медицинскими стандартами.
Детальнее – https://narkologicheskaya-pomoshh-v-volgograde17.ru/narkolog-psikholog-volgograd
Комплексное проведение этих этапов обеспечивает полное восстановление организма и облегчает процесс последующего лечения зависимости.
Ознакомиться с деталями – [url=https://vyvod-iz-zapoya-v-ryazani17.ru/]вывод из запоя[/url]
Современные методы лечения в наркологической клинике в Новокузнецке основаны на доказательной медицине. При поступлении пациент проходит полное обследование, включающее оценку физического состояния, психоэмоционального фона и наличия сопутствующих заболеваний. На основе полученных данных составляется персональная программа терапии, охватывающая медицинский, психологический и социальный аспекты выздоровления.
Разобраться лучше – https://narcologicheskaya-klinika-v-novokuzneczke17.ru/narkologicheskij-czentr-novokuzneczk
Процедура начинается с осмотра пациента и оценки степени интоксикации. Врач измеряет давление, пульс, уровень насыщения крови кислородом, определяет наличие сопутствующих заболеваний. После диагностики назначается капельница, состав которой подбирается индивидуально. Процедура направлена на очищение организма, восстановление водно-солевого баланса и снятие симптомов похмелья.
Подробнее тут – http://vyvod-iz-zapoya-v-tolyatti17.ru/
Вывод из запоя в Тюмени — это медицинская процедура, направленная на устранение алкогольной интоксикации и восстановление нормального функционирования организма. Длительное употребление спиртных напитков приводит к нарушению обмена веществ, обезвоживанию, сбоям в работе печени и сердца. В таких случаях требуется профессиональная помощь врача-нарколога, который подберёт оптимальный способ дезинтоксикации и медикаментозной поддержки. Современные методики позволяют провести вывод из запоя безопасно, эффективно и без осложнений.
Изучить вопрос глубже – [url=https://vyvod-iz-zapoya-v-tyumeni17.ru/]вывод из запоя на дому цена[/url]
Медицинская помощь строится на принципах индивидуального подхода и поэтапной терапии. Каждый пациент проходит диагностику, после чего составляется персональная программа, включающая медикаментозную поддержку, консультации психотерапевта и физиопроцедуры. Такой подход помогает не просто снять симптомы, но и восстановить организм полностью.
Разобраться лучше – [url=https://narkologicheskaya-klinika-v-ryazani17.ru/]наркологические клиники алкоголизм рязань[/url]
Эта последовательность помогает эффективно воздействовать на зависимость и исключает вероятность усугубления состояния.
Выяснить больше – http://lechenie-alkogolizma-perm0.ru/perm-lechenie-alkogolizma/
Вывод из запоя в Тольятти — это медицинская процедура, направленная на очищение организма от продуктов распада алкоголя и восстановление нормального состояния здоровья. Длительное употребление спиртных напитков приводит к серьёзной интоксикации, нарушению работы нервной, сердечно-сосудистой и пищеварительной систем. Самостоятельные попытки прекратить запой могут быть опасны, поэтому оптимальным решением является обращение к врачу-наркологу, который проведёт лечение безопасно и эффективно.
Выяснить больше – https://vyvod-iz-zapoya-v-tolyatti17.ru/vyvod-iz-zapoya-tolyatti-na-domu/
Процесс детоксикации проходит поэтапно, чтобы организм успевал адаптироваться к изменениям и не испытывал стресс. Каждый шаг направлен на достижение конкретного терапевтического эффекта. Ниже представлена таблица, отражающая ключевые стадии процедуры, применяемой в клинике «Трезвый Путь Волгоград».
Подробнее можно узнать тут – http://vivod-iz-zapoya-v-volgograde17.ru
Примерный состав раствора, применяемого наркологом на дому в Уфе, приведён в таблице:
Подробнее – [url=https://narkolog-na-dom-v-ufe17.ru/]вызвать врача нарколога на дом в уфе[/url]
Комплексная терапия включает несколько последовательных этапов, обеспечивающих полное восстановление организма и личности пациента. Каждый из них направлен на решение конкретных задач — от устранения интоксикации до закрепления устойчивой ремиссии.
Получить дополнительную информацию – [url=https://narkologicheskaya-klinika-v-volgograde17.ru/]наркологические клиники алкоголизм[/url]
Одним из ключевых направлений терапии является инфузионное лечение. Капельницы позволяют быстро восстановить обмен веществ, улучшить работу внутренних органов и ускорить выведение токсинов. В клинике используются только сертифицированные препараты, безопасные для сердечно-сосудистой и нервной системы.
Ознакомиться с деталями – https://narkologicheskaya-clinika-v-ryazani17.ru/narkolog-ryazan-telefon
улучшение баннеров реклама [url=https://reklamnyj-kreativ5.ru/]reklamnyj-kreativ5.ru[/url] .
узнаваемость бренда баннер [url=https://reklamnyj-kreativ4.ru/]reklamnyj-kreativ4.ru[/url] .
Ниже представлена таблица с основными препаратами, используемыми при выводе из запоя в Тюмени:
Подробнее тут – [url=https://vyvod-iz-zapoya-v-tyumeni17.ru/]вывод из запоя цена[/url]
Перед назначением инфузий врач проводит полную диагностику, чтобы исключить противопоказания. Капельницы часто комбинируются с медикаментами, поддерживающими сердечно-сосудистую систему и печень. Такой комплексный подход позволяет ускорить процесс очищения и улучшить общее состояние пациента уже после первого курса.
Детальнее – [url=https://narkologicheskaya-clinika-v-ryazani17.ru/]наркологическая клиника цены рязань[/url]
Процедура проводится как в стационаре, так и на дому. Врач приезжает по вызову, проводит осмотр и измеряет давление, пульс, насыщение кислородом. После оценки состояния подбирается состав капельницы и начинается инфузионная терапия. В среднем процедура длится от 40 минут до 1,5 часов, в зависимости от степени интоксикации. По завершении врач наблюдает за реакцией организма и даёт рекомендации по восстановлению.
Узнать больше – [url=https://kapelnicza-ot-zapoya-v-voronezhe17.ru/]капельница от запоя вызов город[/url]
Вывод из запоя — это не «волшебная капельница», а последовательная медицинская программа с чёткими целями и измеримыми маркерами. В наркологической клинике «СаратовМед Профи» маршрут строится по принципу управляемых окон: на каждом шаге команда преследует одну цель, меняет лишь один параметр и оценивает результат в заранее назначённый момент. Такой подход снижает лекарственную нагрузку, предотвращает «гонку дозировок» и делает динамику предсказуемой для пациента и близких. Конфиденциальность обеспечивается регламентом: немаркированные выезды, нейтральные формулировки в документах, «тихие» каналы связи, доступ к записям — строго по ролям.
Детальнее – [url=https://vyvod-iz-zapoya-saratov0.ru/]помощь вывод из запоя[/url]
1win промокод где ввести [url=https://1win12050.ru]https://1win12050.ru[/url]
Когда запой длится не первый день, а состояние уже сопровождается тремором, потливостью, резкими перепадами давления, бессонницей, тревогой, тошнотой или рвотой, попытка «перетерпеть» или лечить самостоятельно таблетками становится опасным экспериментом. Сочетание алкоголя с сильнодействующими успокоительными, обезболивающими или сомнительными «антипохмельными» легко приводит к нарушению дыхания, провалам в сознании, аритмиям и скрытому развитию предделирия. Домашние средства не учитывают ни электролитные сдвиги, ни состояние печени и сердца, ни уже принятые лекарства. Выездной нарколог «СерпуховТрезвие» в Серпухове выстраивает ситуацию иначе: ещё по телефону врач собирает ключевую информацию — длительность запоя, примерные объёмы и виды алкоголя, наличие гипертонии, ИБС, диабета, заболеваний печени и почек, неврологических проблем, какие препараты уже давали и в каких дозах, были ли судороги или эпизоды дезориентации. На месте проводится объективная диагностика: измерение давления, пульса, сатурации, температуры, оценка тремора, степени обезвоживания, психического состояния, неврологического статуса. Только после этого принимается решение: проводить детокс на дому или сразу рекомендовать стационар. Такой фильтр защищает от грубых ошибок, позволяет точно подобрать схему и не терять драгоценное время, пытаясь «угадать» лечение.
Выяснить больше – [url=https://narkolog-na-dom-serpuhov10.ru/]вызвать врача нарколога на дом[/url]
Когда зависимость выходит из-под контроля, человеку необходима не просто медицинская помощь, а поддержка в безопасной и понимающей среде. Наркологическая клиника «Трезвый Выбор Рязань» предлагает пациентам комплексные программы лечения алкоголизма, наркомании и других форм зависимого поведения. Здесь работают врачи-наркологи, психотерапевты, психологи и медсёстры, обеспечивающие круглосуточное наблюдение и уход. Лечение проводится анонимно, с акцентом на восстановление здоровья, психологического равновесия и качества жизни.
Подробнее можно узнать тут – http://narkologicheskaya-clinika-v-ryazani17.ru/narkologiya-v-ryazani/
В Волгограде сформирована система оказания наркологической помощи, включающая круглосуточные выезды специалистов, амбулаторное лечение, стационарные программы и реабилитацию. Такой подход позволяет охватить все категории пациентов — от тех, кто нуждается в экстренной помощи, до тех, кто готов пройти полный курс терапии. Независимо от формы оказания услуг, лечение проводится конфиденциально и в соответствии с медицинскими стандартами.
Получить дополнительную информацию – https://narkologicheskaya-pomoshh-v-volgograde17.ru/narkologiya-v-volgograde
Профессиональная помощь требуется в тех случаях, когда организм уже не способен самостоятельно справиться с последствиями интоксикации. Чем дольше длится запой, тем сильнее проявляются его симптомы. Медицинское вмешательство помогает предотвратить развитие осложнений, таких как судороги, повышение давления и алкогольный психоз.
Выяснить больше – http://vyvod-iz-zapoya-v-tolyatti17.ru
Первым шагом при лечении зависимости является детоксикация — очищение организма от токсинов, накопившихся в результате употребления алкоголя или наркотиков. Врач подбирает состав инфузионных растворов и лекарственных препаратов индивидуально. Процедура направлена на восстановление обмена веществ, улучшение работы печени и сердца, нормализацию сна и аппетита. После завершения детоксикации пациент чувствует облегчение, снижается тревожность и повышается концентрация внимания.
Углубиться в тему – http://narkologicheskaya-klinika-v-volgograde17.ru
Особенность подхода заключается в сочетании медицинской и психологической поддержки. После кодирования пациент получает консультации психотерапевта, рекомендации по восстановлению и профилактике рецидивов. Это снижает риск повторного срыва и помогает закрепить результат на долгий срок.
Получить больше информации – [url=https://kodirovanie-ot-alkogolizma-v-volgograde17.ru/]кодирование от алкоголизма анонимно[/url]
Одна из сильных сторон «РеутовМед Сервис» — честная оценка границ домашнего лечения. Клиника не обещает «вывезем любого дома», потому что есть состояния, при которых отсутствие круглосуточного наблюдения опасно. Чтобы родным было проще сориентироваться, важно разделить ситуации по уровню риска и понять, почему иногда разумнее выбрать стационар, даже если пациент сопротивляется.
Подробнее тут – [url=https://vyvod-iz-zapoya-reutov10.ru/]частный вывод из запоя[/url]
Если на предзвонке выявляются «красные флаги» — давящая боль в груди, одышка в покое, спутанность сознания, судороги, неукротимая рвота, резкое падение насыщения кислородом — мы организуем бесшовный перевод в стационар. Место резервируем заранее, логистику строим так, чтобы не привлекать внимания соседей и не затягивать старт лечения. При отсутствии угроз терапия может начаться дома с последующим телесопровождением и при необходимости — краткой госпитализацией.
Получить дополнительные сведения – [url=https://narcologicheskaya-klinika-saratov0.ru/]наркологическая клиника стационар[/url]
Публикация предоставляет читателю набор разрозненных идей, которые сложно применить на практике. Мы лишь слегка касаемся разных точек зрения, не углубляясь в анализ и не предлагая никаких выводов.
Вот – [url=https://arma-rehab.ru/]турниры по покеру[/url]
Вывод из запоя на дому возможен только при относительно контролируемом состоянии и после очной оценки нарколога. В таких случаях специалист выезжает в Раменском, проводит осмотр, назначает индивидуальную капельницу, остаётся до стабилизации состояния и оставляет подробные рекомендации. Важный момент — честность: если во время осмотра врач видит риски (нестабильное давление, признаки начинающегося делирия, серьёзные боли, глубокую дезориентацию), формат на дому не навязывается, а предлагается стационар. Именно это отличает клинику от анонимных «служб капельниц», для которых любая заявка — повод заработать, независимо от последствий.
Выяснить больше – [url=https://vyvod-iz-zapoya-ramenskoe10.ru/]нарколог вывод из запоя[/url]
Одним из ключевых направлений терапии является инфузионное лечение. Капельницы позволяют быстро восстановить обмен веществ, улучшить работу внутренних органов и ускорить выведение токсинов. В клинике используются только сертифицированные препараты, безопасные для сердечно-сосудистой и нервной системы.
Узнать больше – [url=https://narkologicheskaya-clinika-v-ryazani17.ru/]наркологическая клиника вывод из запоя в рязани[/url]
mostbet игры [url=http://mostbet2027.help/]http://mostbet2027.help/[/url]
Запой — это не просто несколько лишних дней алкоголя, а тяжёлое состояние, в котором организм работает на пределе. Чем дольше длится эпизод, тем глубже обезвоживание, тем сильнее сдвиги электролитов, тем выше риск аритмий, гипертонических кризов, судорог, делирия, обострений заболеваний сердца, печени и поджелудочной железы. Попытки «вывести» человека дома силами родных часто включают опасные комбинации: случайные седативные, снотворные, анальгетики, «антипохмельные» из рекламы. Они могут на время усыпить или «успокоить», но при этом скрывают ухудшение, сбивают давление, угнетают дыхание и мешают врачу увидеть реальную картину. В «Трезвый Центр Коломна» подход другой: ещё на этапе звонка специалист уточняет длительность запоя, объёмы и виды алкоголя, наличие гипертонии, ИБС, диабета, заболеваний печени и почек, неврологических проблем, список уже принятых препаратов, эпизоды потери сознания, судорог, странного поведения. На основании этих данных определяется, безопасен ли формат на дому или сразу нужен стационар. Такая сортировка позволяет вовремя перехватить опасные случаи, не терять часы на бесполезные попытки и сразу запускать те схемы, которые реально снижают риски и стабилизируют состояние.
Разобраться лучше – [url=https://vyvod-iz-zapoya-kolomna10.ru/]anonimnyj-vyvod-iz-zapoya-na-domu[/url]
Состав капельницы подбирается индивидуально, с учётом степени опьянения, возраста и хронических заболеваний пациента. Врач определяет дозировку и комбинацию препаратов, чтобы процедура прошла безопасно и эффективно.
Выяснить больше – http://kapelnicza-ot-zapoya-v-voronezhe17.ru/kapelnicza-ot-zapoya-na-domu-voronezh/
Такая комплексность обеспечивает воздействие на физические, психологические и социальные факторы зависимости.
Углубиться в тему – [url=https://lechenie-alkogolizma-omsk0.ru/]лечение алкоголизма гипнозом в омске[/url]
Этот обзор предлагает свежий взгляд на предметы, которые и без того привычны. Мы упоминаем факты, не имеющие большого значения, и события с неясной важностью, но они присутствуют здесь.
Подробнее читать – https://rostov-narkologiya.ru/uslugi-ot-alkogolizma/vyvod-iz-zapoya
Клиника «Трезвый Выбор Рязань» функционирует по принципу полного цикла лечения: от экстренного выезда нарколога до длительной реабилитации в условиях стационара. Пациенты поступают как в острых состояниях (запой, абстиненция, интоксикация), так и для плановой терапии. Лечение начинается с медицинской диагностики, оценки физического и психического состояния, после чего разрабатывается индивидуальный план. Программы включают детоксикацию, медикаментозную поддержку, психологическую помощь и профилактику рецидивов.
Детальнее – http://narkologicheskaya-clinika-v-ryazani17.ru/narkologiya-v-ryazani/https://narkologicheskaya-clinika-v-ryazani17.ru
Основные этапы обычно включают:
Исследовать вопрос подробнее – [url=https://vyvod-iz-zapoya-ramenskoe10.ru/]vyvod-iz-zapoya-ramenskoe10.ru/[/url]
Благодаря комплексному подходу достигается не только снятие симптомов, но и долгосрочная стабилизация состояния пациента.
Получить больше информации – http://narkologicheskaya-pomoshh-v-volgograde17.ru
Услуга
Углубиться в тему – http://narkolog-na-dom-shchelkovo10.ru/vyzvat-narkologa-na-dom-shchelkovo/
Клиника в Коломне ориентирована на полный цикл помощи: от экстренных состояний до длительного сопровождения. Здесь важна не только медицинская составляющая, но и человеческая: уважение, конфиденциальность, отсутствие стигмы. Ниже — ключевые направления, которые выстраиваются в единую систему лечения, а не существуют по отдельности.
Узнать больше – https://narkologicheskaya-klinika-kolomna10.ru/narkologicheskaya-klinika-oficialnyj-sajt-v-kolomne/
Алгоритм в «Трезвый Центр Коломна» построен так, чтобы убрать импровизацию и сделать всё максимально прозрачным для семьи. Сначала по телефону собираются ключевые данные: возраст пациента, длительность запоя, виды алкоголя, хронические заболевания, препараты, аллергии, наличие судорог, потерь сознания, странного поведения, текущие жалобы. На этом этапе озвучивается ориентировочный формат помощи и примерный диапазон стоимости. Далее следует выезд на дом или поступление в стационар. Врач проводит осмотр: измеряет артериальное давление, пульс, сатурацию, температуру, оценивает тремор, координацию, сознание, степень обезвоживания, наличие болей, состояние дыхания и сердца. На основе этих данных назначается инфузионная терапия: растворы для регидратации и коррекции электролитов, витамины группы B и магний для поддержки нервной системы, по показаниям — гепатопротекторы, антиоксидантные комплексы, противорвотные для контроля тошноты, мягкие анксиолитики для уменьшения тревоги и нормализации сна. Уходят от агрессивной седации: пациент не должен быть «выключен» так, чтобы невозможно было заметить ухудшение. В процессе капельниц проводится повторный контроль показателей, темп и состав при необходимости корректируются. После стабилизации пациент и семья получают подробные рекомендации: режим, сон, питание, питьё, запреты, «красные флаги», план наблюдения и возможного дальнейшего лечения зависимости.
Выяснить больше – https://vyvod-iz-zapoya-kolomna10.ru/vyvod-iz-zapoya-na-domu-v-kolomne
Выездная наркологическая помощь организована по чётко выстроенной схеме. Каждый этап направлен на стабилизацию состояния и безопасное восстановление функций организма после алкогольного или наркотического воздействия.
Исследовать вопрос подробнее – https://narkolog-na-dom-v-ufe17.ru/
Не всегда человек способен прекратить употребление алкоголя без медицинского вмешательства. Чем дольше длится запой, тем выше риск осложнений. Обратиться к специалисту следует при появлении следующих признаков:
Изучить вопрос глубже – http://vyvod-iz-zapoya-v-tyumeni17.ru
Критически важный отрезок — первые 12–24 часа. Мы разбиваем его на «окна», в каждом из которых есть цель, набор действий, маркеры контроля и критерий перехода. Если целевой отклик не достигнут, меняем один параметр: темп инфузии, очередность модулей или поведенческую опору (свет/тишина/цифровой режим) — и назначаем новую точку оценки. Это сохраняет причинно-следственную связь и предотвращает полипрагмазию.
Подробнее – [url=https://narcologicheskaya-klinika-saratov0.ru/]лечение в наркологической клинике в саратове[/url]
В Волгограде сформирована система оказания наркологической помощи, включающая круглосуточные выезды специалистов, амбулаторное лечение, стационарные программы и реабилитацию. Такой подход позволяет охватить все категории пациентов — от тех, кто нуждается в экстренной помощи, до тех, кто готов пройти полный курс терапии. Независимо от формы оказания услуг, лечение проводится конфиденциально и в соответствии с медицинскими стандартами.
Выяснить больше – [url=https://narkologicheskaya-pomoshh-v-volgograde17.ru/]вызов наркологической помощи волгоград[/url]
Главная задача капельницы при выезде нарколога в Щёлково — не создать видимость лёгкости, а реально уменьшить интоксикацию и восстановить базовые функции организма. В «ЩёлковоМед Профи» используются современные схемы, а не сомнительные смеси «из всего подряд». В стандартной основе — растворы для восполнения объёма циркулирующей жидкости, выравнивания электролитного баланса и коррекции КЩС, что снижает нагрузку на сердце и мозг. Витамины группы B и магний поддерживают нервную систему, уменьшают тремор, раздражительность и риск судорожных реакций. При необходимости врач добавляет гепатопротекторные и антиоксидантные компоненты, если есть признаки перегрузки печени; при выраженной тошноте — противорвотные, чтобы пациент мог нормально пить и питаться. Для нормализации сна и тревоги подбираются мягкие анксиолитики в дозах, позволяющих контролировать состояние, а не «вырубать» человека. Агрессивные седативные протоколы, которые маскируют ухудшения и опасны для дыхания и сердца, сознательно исключаются. Оценка эффекта идёт по конкретным критериям: стабилизация давления и пульса, уменьшение дрожи, улучшение цвета кожи, уход тошноты, снижение тревоги, появление естественного, а не лекарственного сна. После выезда семья получает ясный план, как закрепить эффект, чтобы наутро не пришлось начинать всё заново.
Ознакомиться с деталями – [url=https://narkolog-na-dom-shchelkovo10.ru/]narkolog-na-dom-shchelkovo10.ru/[/url]
мостбет официальный [url=mostbet2027.help]мостбет официальный[/url]
Профессиональный нарколог на дому не работает по схеме «чем больше препаратов, тем лучше». В «СерпуховТрезвие» капельницы составляются исходя из задач конкретного организма. Базовый блок — это растворы для восполнения объёма циркулирующей жидкости, выравнивания электролитного баланса и коррекции кислотно-щелочного состояния, что уменьшает нагрузку на сердце, мозг и снижает риск тяжёлых осложнений. Витамины группы B и магний входят в стандартную поддержку: они помогают стабилизировать нервную систему, уменьшить тремор, раздражительность, поддерживают сон и снижают риск судорог. При признаках поражения печени используются гепатопротективные и антиоксидантные компоненты, снижающие токсическое воздействие продуктов распада алкоголя. Если пациента мучает тошнота, добавляются противорвотные средства, чтобы восстановить возможность пить воду и питаться. Для снижения тревоги и нормализации сна применяются мягкие анксиолитики в дозировках, не маскирующих клиническую картину и не угнетающих дыхательный центр. Агрессивная седация, популярная в «серых» схемах, сознательно исключается: она «делает вид» улучшения, но может скрыть нарастающие осложнения. Эффект оценивается по конкретным критериям: стабилизация давления и пульса, уменьшение тремора, уход тошноты, улучшение цвета кожи, появление естественного сна и большей ясности мышления. После достижения этих ориентиров фармаконагрузка не наращивается, а постепенно снижается, чтобы человек выходил в устойчивое состояние, а не зависел от бесконечных капельниц.
Получить дополнительную информацию – [url=https://narkolog-na-dom-serpuhov10.ru/]вызов нарколога на дом в серпухове[/url]
Критически важный отрезок — первые 12–24 часа. Мы разбиваем его на «окна», в каждом из которых есть цель, набор действий, маркеры контроля и критерий перехода. Если целевой отклик не достигнут, меняем один параметр: темп инфузии, очередность модулей или поведенческую опору (свет/тишина/цифровой режим) — и назначаем новую точку оценки. Это сохраняет причинно-следственную связь и предотвращает полипрагмазию.
Получить дополнительную информацию – http://
Клиника в Коломне ориентирована на полный цикл помощи: от экстренных состояний до длительного сопровождения. Здесь важна не только медицинская составляющая, но и человеческая: уважение, конфиденциальность, отсутствие стигмы. Ниже — ключевые направления, которые выстраиваются в единую систему лечения, а не существуют по отдельности.
Ознакомиться с деталями – https://narkologicheskaya-klinika-kolomna10.ru/narkologicheskaya-klinika-oficialnyj-sajt-v-kolomne/
1win максимальный вывод [url=1win12050.ru]1win12050.ru[/url]
Cheers to every thrill chaser !
For anyone interested in online betting, onlinecasinoforeign. [url=http://onlinecasinoforeign.com/the-largest-betting-companies-in-the-world/][/url]. com/the-largest-betting-companies-in-the-world is essential for uncovering the inner workings of leading firms. These companies have mastered the art of attracting and retaining bettors across various demographics. Understanding their approach can equip you with the tools needed for successful betting ventures.
ОЈП…ОЅОїПЂП„О№ОєО¬, ОїО№ ОјОµОіО±О»ПЌП„ОµПЃОµП‚ ПѓП„ОїО№П‡О·ОјО±П„О№ОєОП‚ ОµП„О±О№ПЃОЇОµП‚ ПѓП„ОїОЅ ОєПЊПѓОјОї ОµПЂОµОЅОґПЌОїП…ОЅ ПѓП…ОЅОµП‡ПЋП‚ ПѓП„О·ОЅ О±ОЅО±ОІО¬ОёОјО№ПѓО· П„П‰ОЅ ПЂПЃОїПѓП†ОµПЃПЊОјОµОЅП‰ОЅ П…ПЂО·ПЃОµПѓО№ПЋОЅ П„ОїП…П‚. О О¬ОЅП„О± О±ОЅО±О¶О·П„ОїПЌОЅ П„ПЃПЊПЂОїП…П‚ ОЅО± ПЂО±ПЃО±ОјОµОЇОЅОїП…ОЅ О±ОЅП„О±ОіП‰ОЅО№ПѓП„О№ОєОП‚ ОєО±О№ ОµО»ОєП…ПѓП„О№ОєОП‚. О€П„ПѓО№, ОїО№ ПЂО±ОЇОєП„ОµП‚ ОµОЇОЅО±О№ ПѓОµ ОёОПѓО· ОЅО± О±ПЂОїО»О±ОјОІО¬ОЅОїП…ОЅ П„О·ОЅ ОєО±О»ПЌП„ОµПЃО· ОµОјПЂОµО№ПЃОЇО± ПѓП„ОїО№П‡О·ОјО±П„О№ПѓОјОїПЌ.
О· ОєП…ПЃО№О±ПЃП‡ОЇО± П„П‰ОЅ ОјОµОіО±О»П…П„ОµПЃП‰ОЅ ПѓП„ОїО№П‡О·ОјО±П„О№ОєП‰ОЅ ОµП„О±О№ПЃОµО№П‰ОЅ ПѓП„ОїОЅ ОєОїПѓОјОї – п»їhttps://onlinecasinoforeign.com/the-largest-betting-companies-in-the-world/
May fortune walk with you as you reach exceptional unique gains !
Наркологическая клиника «Трезвый Шаг Раменское» — это место, где острые кризисы, многолетние запои и повторяющиеся срывы перестают быть бесконечным кругом, в котором семья остаётся один на один с проблемой. Здесь выстроена система помощи людям с алкогольной и наркотической зависимостью, а также полизависимостями, включая злоупотребление аптечными препаратами. В клинике в Раменском сочетаются круглосуточное наблюдение, профессиональная детоксикация, медикаментозная поддержка, психотерапевтические программы и сопровождение семьи. Важные принципы — безопасность, анонимность, уважение к пациенту и честное объяснение каждого шага лечения. Ни агрессивного давления, ни обещаний «чуда за один день» — вместо этого поэтапный подход, который даёт реальный шанс стабилизировать состояние, снизить тягу и выйти из разрушительного сценария под контролем специалистов. Для близких это означает понятный маршрут: куда обратиться, что будут делать с пациентом, какие риски учтут и как клиника «Трезвый Шаг Раменское» останется на связи после острого периода.
Разобраться лучше – [url=https://narkologicheskaya-klinika-ramenskoe10.ru/]chastnye-narkologicheskie-kliniki-otzyvy[/url]
Такой подход позволяет добиться устойчивого эффекта и минимизировать риск возврата к зависимому поведению.
Подробнее можно узнать тут – [url=https://narkologicheskaya-klinika-v-volgograde17.ru/]www.domen.ru[/url]
Лечение алкоголизма в Омске проводится с использованием современных методов, направленных на восстановление организма и психики пациента. Специалисты уделяют внимание как медицинским, так и психологическим аспектам, что позволяет достигать устойчивых результатов. Основой терапии является индивидуальный подход, благодаря которому каждая программа учитывает состояние здоровья и уровень зависимости.
Получить дополнительные сведения – [url=https://lechenie-alkogolizma-omsk0.ru/]клиника лечения алкоголизма в омске[/url]
Этот обзор позволяет по-новому взглянуть на вещи, на которые обычно и так смотрят. Мы упоминаем факты, которые мало что меняют, и события, значение которых трудно определить, но они всё равно здесь.
Вот – [url=https://arma-rehab.ru/vyvod-iz-zapoya/]секс[/url]
скачать мостбет кг [url=https://mostbet2027.help/]https://mostbet2027.help/[/url]
Наркологическая клиника «ВолгаДок Медикал» — это круглосуточная служба помощи, выстроенная вокруг принципов клинической безопасности, прозрачной коммуникации и поддержки пациента на каждом этапе. Мы соединяем стационар и выездные бригады в единую систему: первичный осмотр и стабилизация состояния, адресные инфузионные модули, мягкая коррекция сна и тревоги, последующее наблюдение с короткими «окнами» обратной связи. Все решения принимаются по показаниям и сопровождаются объяснением: какую цель преследуем, каким маркером измеряем, когда проверяем результат. Такой подход исключает хаотичные усиления, бережёт ресурс организма и даёт прогнозируемый клинический эффект.
Изучить вопрос глубже – [url=https://narcologicheskaya-klinika-saratov0.ru/]наркологическая клиника клиника помощь саратов[/url]
Вывод из запоя в Тольятти — это медицинская процедура, направленная на очищение организма от продуктов распада алкоголя и восстановление нормального состояния здоровья. Длительное употребление спиртных напитков приводит к серьёзной интоксикации, нарушению работы нервной, сердечно-сосудистой и пищеварительной систем. Самостоятельные попытки прекратить запой могут быть опасны, поэтому оптимальным решением является обращение к врачу-наркологу, который проведёт лечение безопасно и эффективно.
Углубиться в тему – https://vyvod-iz-zapoya-v-tolyatti17.ru
Клиника «Трезвый Выбор Рязань» функционирует по принципу полного цикла лечения: от экстренного выезда нарколога до длительной реабилитации в условиях стационара. Пациенты поступают как в острых состояниях (запой, абстиненция, интоксикация), так и для плановой терапии. Лечение начинается с медицинской диагностики, оценки физического и психического состояния, после чего разрабатывается индивидуальный план. Программы включают детоксикацию, медикаментозную поддержку, психологическую помощь и профилактику рецидивов.
Исследовать вопрос подробнее – https://narkologicheskaya-clinika-v-ryazani17.ru/narkologicheskij-staczionar-ryazan
Примерный состав раствора, применяемого наркологом на дому в Уфе, приведён в таблице:
Углубиться в тему – http://narkolog-na-dom-v-ufe17.ru/vyvod-iz-zapoya-ufa-narkolog-na-dom/https://narkolog-na-dom-v-ufe17.ru
Такая комплексность обеспечивает воздействие на физические, психологические и социальные факторы зависимости.
Подробнее можно узнать тут – https://lechenie-alkogolizma-omsk0.ru
Ниже приведена таблица, отражающая примерную динамику состояния пациента после постановки капельницы:
Подробнее – http://kapelnicza-ot-zapoya-v-voronezhe17.ru
Перед тем как показать примерные программы, важно подчеркнуть: реальный план всегда персонализируется, но понимание базовых форматов помогает семье и пациенту не теряться в терминах и сразу видеть логику.
Узнать больше – https://narkologicheskaya-klinika-kolomna2-10.ru/narkologicheskaya-klinika-cena-v-kolomne/
Если на предзвонке выявляются «красные флаги» — давящая боль в груди, одышка в покое, спутанность сознания, судороги, неукротимая рвота, резкое падение насыщения кислородом — мы организуем бесшовный перевод в стационар. Место резервируем заранее, логистику строим так, чтобы не привлекать внимания соседей и не затягивать старт лечения. При отсутствии угроз терапия может начаться дома с последующим телесопровождением и при необходимости — краткой госпитализацией.
Узнать больше – http://narcologicheskaya-klinika-saratov0.ru/klinika-narkologii-saratov/
Такая комплексность обеспечивает воздействие на физические, психологические и социальные факторы зависимости.
Подробнее тут – [url=https://lechenie-alkogolizma-omsk0.ru/]лечение наркомании и алкоголизма в омске[/url]
Если на предзвонке выявляются «красные флаги» — давящая боль в груди, одышка в покое, спутанность сознания, судороги, неукротимая рвота, резкое падение насыщения кислородом — мы организуем бесшовный перевод в стационар. Место резервируем заранее, логистику строим так, чтобы не привлекать внимания соседей и не затягивать старт лечения. При отсутствии угроз терапия может начаться дома с последующим телесопровождением и при необходимости — краткой госпитализацией.
Подробнее можно узнать тут – [url=https://narcologicheskaya-klinika-saratov0.ru/]запой наркологическая клиника в саратове[/url]
1win вход [url=https://1win12050.ru/]https://1win12050.ru/[/url]
Благодаря комплексному подходу достигается не только снятие симптомов, но и долгосрочная стабилизация состояния пациента.
Подробнее – [url=https://narkologicheskaya-pomoshh-v-volgograde17.ru/]платная наркологическая помощь в волгограде[/url]
Каждый метод подбирается индивидуально, что обеспечивает безопасность и эффективность процесса.
Получить больше информации – [url=https://vyvod-iz-zapoya-omsk0.ru/]нарколог вывод из запоя омск[/url]
Капельница при интоксикации помогает быстро очистить организм от продуктов распада алкоголя, восстановить водно-солевой баланс и улучшить самочувствие. В состав раствора входят препараты, нормализующие обмен веществ и поддерживающие работу печени и сердечно-сосудистой системы. Уже через 20–30 минут после начала инфузии пациент ощущает значительное облегчение. Подбор лекарственных средств осуществляется строго индивидуально, с учётом возраста, массы тела и общего состояния здоровья.
Ознакомиться с деталями – https://narkolog-na-dom-v-ufe17.ru/narkolog-ufa-anonimno
Этот сборник информации привлекает множеством мелких деталей и необычных ракурсов. Мы предлагаем взгляды, редко полезные, но способные немного разнообразить знакомство с темой.
Подробнее читать – [url=https://rostov-narkologiya.ru/uslugi-ot-alkogolizma/vyvod-iz-zapoya/]мефедроновая зависимость[/url]
Для достижения стойкой ремиссии применяются современные и безопасные методики, которые подбираются индивидуально для каждого пациента.
Получить дополнительные сведения – [url=https://lechenie-alkogolizma-omsk0.ru/]принудительное лечение от алкоголизма[/url]
1вин мегапей вывод [url=https://www.1win12050.ru]https://www.1win12050.ru[/url]
Ниже приведена таблица с типовыми компонентами капельницы и их действием:
Узнать больше – [url=https://vyvod-iz-zapoya-v-tolyatti17.ru/]вывод из запоя на дому тольятти[/url]
Такая комплексность обеспечивает воздействие на физические, психологические и социальные факторы зависимости.
Подробнее можно узнать тут – https://lechenie-alkogolizma-omsk0.ru/besplatnoe-lechenie-alkogolizma-v-omske
В этом тексте собрано множество случайных сведений и довольно неопределённых мыслей, которые могут чем-то заинтересовать. Мы отмечаем моменты, которые не особенно важны, но всё же занимают своё место в повествовании.
Вот – [url=https://arma-rehab.ru/]казино[/url]
Эта статья сочетает познавательный и занимательный контент, что делает ее идеальной для любителей глубоких исследований. Мы рассмотрим увлекательные аспекты различных тем и предоставим вам новые знания, которые могут оказаться полезными в будущем.
Проверенные методы — узнай сейчас – https://dieteticienne-nutritionniste-sartrouville.com/nulla-tincidunt-quis-sem
В этой публикации мы предлагаем подробные объяснения по актуальным вопросам, чтобы помочь читателям глубже понять их. Четкость и структурированность материала сделают его удобным для усвоения и применения в повседневной жизни.
Все материалы собраны здесь – https://jusos-kassel.de/bezirkskonferenz-der-jusos-hessen-nord/comment-page-1
В данной обзорной статье представлены интригующие факты, которые не оставят вас равнодушными. Мы критикуем и анализируем события, которые изменили наше восприятие мира. Узнайте, что стоит за новыми открытиями и как они могут изменить ваше восприятие реальности.
Что ещё? Расскажи всё! – https://lydingesateri.se/flyglar
Эта информационная заметка предлагает лаконичное и четкое освещение актуальных вопросов. Здесь вы найдете ключевые факты и основную информацию по теме, которые помогут вам сформировать собственное мнение и повысить уровень осведомленности.
Практические советы ждут тебя – https://edmarmy.com/meteors-invade-afetrlife-miami
Эта статья погружает вас в увлекательный мир знаний, где каждый факт становится открытием. Мы расскажем о ключевых исторических поворотных моментах и научных прорывах, которые изменили ход цивилизации. Поймите, как прошлое формирует настоящее и как его уроки могут помочь нам строить будущее.
Исследовать вопрос подробнее – http://www.uhu.es/doce/?page_id=150
В статье представлены ключевые моменты по актуальной теме, дополненные советами экспертов и ссылками на дополнительные ресурсы. Цель материала — дать читателю инструменты для самостоятельного развития и принятия осознанных решений.
Читать далее > – https://promaxstickers.hr/en/super-mario-playtime
Этот обзорный материал предоставляет информационно насыщенные данные, касающиеся актуальных тем. Мы стремимся сделать информацию доступной и структурированной, чтобы читатели могли легко ориентироваться в наших выводах. Познайте новое с нашим обзором!
Всё самое вкусное внутри – https://lifecounselor.net/jada-oldheadshot
Эта публикация завернет вас в вихрь увлекательного контента, сбрасывая стереотипы и открывая двери к новым идеям. Каждый абзац станет для вас открытием, полным ярких примеров и впечатляющих достижений. Подготовьтесь быть вовлеченными и удивленными каждый раз, когда продолжите читать.
Ознакомиться с деталями – https://maromjospublishing.com/la-importancia-de-redactar-una-buena-sinopsis
Статья знакомит с важнейшими моментами, которые сформировали наше общество. От великих изобретений до культурных переворотов — вы узнаете, как прошлое влияет на наше мышление, технологии и образ жизни.
Прочитать подробнее – https://trinitytraveltourism.com/wellness-retreats-mind-body-and-soul-human-renewal
Этот информационный обзор станет отличным путеводителем по актуальным темам, объединяющим важные факты и мнения экспертов. Мы исследуем ключевые идеи и представляем их в доступной форме для более глубокого понимания. Читайте, чтобы оставаться в курсе событий!
Раскрыть тему полностью – https://smi24.net/moscow/398688444
Эта обзорная заметка содержит ключевые моменты и факты по актуальным вопросам. Она поможет читателям быстро ориентироваться в теме и узнать о самых важных аспектах сегодня. Получите краткий курс по современной информации и оставайтесь в курсе событий!
Запросить дополнительные данные – https://foe.gctu.edu.gh/news/vodafone-ghana-sponsors-two-female-engineering-students
Эта обзорная заметка содержит ключевые моменты и факты по актуальным вопросам. Она поможет читателям быстро ориентироваться в теме и узнать о самых важных аспектах сегодня. Получите краткий курс по современной информации и оставайтесь в курсе событий!
Не упусти шанс – https://stunningstrings.com/2022/07/23/hello-world
Эта информационная заметка предлагает лаконичное и четкое освещение актуальных вопросов. Здесь вы найдете ключевые факты и основную информацию по теме, которые помогут вам сформировать собственное мнение и повысить уровень осведомленности.
Запросить дополнительные данные – https://parentingonplanes.com/how-to-make-memorable-vacations-in-muskoka-canada
В этом информативном тексте представлены захватывающие события и факты, которые заставят вас задуматься. Мы обращаем внимание на важные моменты, которые часто остаются незамеченными, и предлагаем новые перспективы на привычные вещи. Подготовьтесь к тому, чтобы быть поглощенным увлекательными рассказами!
Не пропусти важное – https://stunningstrings.com/2022/07/23/hello-world
В данной статье вы найдете комплексный подход к изучению насущных тем. Мы комбинируем теоретические сведения с практическими советами, чтобы читатель мог не только понять проблему, но и найти пути её решения.
Где можно узнать подробнее? – https://yourfamilydoctor.co.in/cough
В статье представлены ключевые моменты по актуальной теме, дополненные советами экспертов и ссылками на дополнительные ресурсы. Цель материала — дать читателю инструменты для самостоятельного развития и принятия осознанных решений.
Уточнить детали – https://oakhillcollaborative.org/connecting-a-community-springfield-township
Эта информационная заметка предлагает лаконичное и четкое освещение актуальных вопросов. Здесь вы найдете ключевые факты и основную информацию по теме, которые помогут вам сформировать собственное мнение и повысить уровень осведомленности.
Что ещё? Расскажи всё! – https://dev.ewedinsurance.com/ufaqs/how-do-i-file-a-claim
В статье представлены ключевые моменты по актуальной теме, дополненные советами экспертов и ссылками на дополнительные ресурсы. Цель материала — дать читателю инструменты для самостоятельного развития и принятия осознанных решений.
Желаете узнать подробности? – http://www.srodekraju.pl/2022/04/06/06-04-ludwika-jedrzejewiczowa-chopin
В статье представлены ключевые моменты по актуальной теме, дополненные советами экспертов и ссылками на дополнительные ресурсы. Цель материала — дать читателю инструменты для самостоятельного развития и принятия осознанных решений.
Есть чему поучиться – https://meykhooneh.com/what-is-wine
Эта информационная заметка предлагает лаконичное и четкое освещение актуальных вопросов. Здесь вы найдете ключевые факты и основную информацию по теме, которые помогут вам сформировать собственное мнение и повысить уровень осведомленности.
А что дальше? – https://1colle.com/online-english-school-matome5sen
Этот интересный отчет представляет собой сборник полезных фактов, касающихся актуальных тем. Мы проанализируем данные, чтобы вы могли сделать обоснованные выводы. Читайте, чтобы узнать больше о последних трендах и значимых событиях!
Получить дополнительную информацию – https://vintageclothingguides.com/guides/the-best-facebook-groups-and-forums-for-vintage-resellers
Этот увлекательный информационный материал подарит вам массу новых знаний и ярких эмоций. Мы собрали для вас интересные факты и сведения, которые обогатят ваш опыт. Откройте для себя увлекательный мир информации и насладитесь процессом изучения!
Слушай внимательно — тут важно – https://103news.com/otradnoe/403585867
Эта статья сочетает в себе как полезные, так и интересные сведения, которые обогатят ваше понимание насущных тем. Мы предлагаем практические советы и рекомендации, которые легко внедрить в повседневную жизнь. Узнайте, как улучшить свои навыки и обогатить свой опыт с помощью простых, но эффективных решений.
Запросить дополнительные данные – https://www.entrepotes68.com/fine-dining-space
Этот информационный обзор станет отличным путеводителем по актуальным темам, объединяющим важные факты и мнения экспертов. Мы исследуем ключевые идеи и представляем их в доступной форме для более глубокого понимания. Читайте, чтобы оставаться в курсе событий!
Прочитать подробнее – https://unser-toelz.de/blumen-fritz
В этом интересном тексте собраны обширные сведения, которые помогут вам понять различные аспекты обсуждаемой темы. Мы разбираем детали и факты, делая акцент на важности каждого элемента. Не упустите возможность расширить свои знания и взглянуть на мир по-новому!
Это ещё не всё… – https://thelemonapp.com/blog/habbo-creditos-gratis-lemonpay-no-te-timaran
Эта обзорная заметка содержит ключевые моменты и факты по актуальным вопросам. Она поможет читателям быстро ориентироваться в теме и узнать о самых важных аспектах сегодня. Получите краткий курс по современной информации и оставайтесь в курсе событий!
Получить дополнительные сведения – http://deevarispa.de/aromatherapy-during-massages-is-a-must-have
Эта статья предлагает уникальную подборку занимательных фактов и необычных историй, которые вы, возможно, не знали. Мы постараемся вдохновить ваше воображение и разнообразить ваш кругозор, погружая вас в мир, полный интересных открытий. Читайте и открывайте для себя новое!
Обратиться к источнику – http://opus70.be/tarifs
Этот интересный отчет представляет собой сборник полезных фактов, касающихся актуальных тем. Мы проанализируем данные, чтобы вы могли сделать обоснованные выводы. Читайте, чтобы узнать больше о последних трендах и значимых событиях!
Кликни и узнай всё! – https://thinoil.com/sustainability
Этот обзор предлагает свежий взгляд на предметы, которые и без того привычны. Мы упоминаем факты, не имеющие большого значения, и события с неясной важностью, но они присутствуют здесь.
Подробнее читать – [url=https://rostov-narkologiya.ru/uslugi-ot-alkogolizma/vyvod-iz-zapoya/]детокс чай для похудения[/url]
Основные признаки, при которых необходим вывод из запоя:
Детальнее – http://vyvod-iz-zapoya-v-tolyatti17.ru
Мы не используем универсальную «капельницу». Схема собирается из модулей под ведущие жалобы. Медицинские шаги всегда сочетаются с нефраком опорами — свет, тишина, вода малыми глотками, дыхание, — потому что среда усиливает действие препаратов и позволяет держать дозы ниже.
Подробнее – [url=https://narkolog-na-dom-saratov0.ru/]выезд нарколога на дом саратов[/url]
Современная наркологическая клиника — это не просто медицинское учреждение, а пространство комплексной помощи, где врачи помогают человеку восстановиться физически, психологически и социально. В клинике «РязаньМед Альянс» создана система непрерывного наблюдения, включающая диагностику, выведение из запоя, детоксикацию, кодирование и постреабилитационную поддержку. Здесь работают квалифицированные наркологи, психиатры и терапевты, а помощь оказывается круглосуточно — как в стационаре, так и на дому. Главная цель специалистов — вернуть пациенту контроль над своим состоянием и избавить от зависимости без стресса и боли.
Подробнее можно узнать тут – [url=https://narkologicheskaya-klinika-v-ryazani17.ru/]наркологическая клиника цены в рязани[/url]
Текст наполнен информацией, которая может показаться любопытной, но не меняет восприятия привычных вещей, так что читайте его ради удовольствия.
Дополнительная информация – [url=https://stop-zavisimost.ru/blog/chto-takoe-mefedron-kak-ego-upotreblyayut-posledstviya-i-sposoby-lecheniya-zavisimosti.html]казино с быстрым выводом[/url]
Эти методы используются в комплексе и создают прочный фундамент для восстановления здоровья.
Изучить вопрос глубже – [url=https://lechenie-alkogolizma-omsk0.ru/]лечение алкоголизма цена омск[/url]
В процессе терапии специалисты используют только сертифицированные препараты и современные методики, рекомендованные Минздравом РФ. Это позволяет безопасно очищать организм, устранять симптомы абстиненции и снижать риск рецидивов. Принцип клиники — работать не с последствиями зависимости, а с её причиной.
Подробнее – https://narkologicheskaya-klinika-v-astrakhani18.ru/
Эти этапы формируют структуру комплексного лечения, позволяя добиться устойчивого результата и предотвращения повторных срывов.
Разобраться лучше – https://narkologicheskaya-klinika-astrakhan18.ru/astrakhanskaya-narkologiya/
Такая структура делает лечение последовательным и предсказуемым, повышая шансы на положительный исход.
Выяснить больше – [url=https://narkologicheskaya-klinika-v-omske0.ru/]запой наркологическая клиника в омске[/url]
Работа строится на четкой структуре, определяющей порядок лечебных мероприятий. Ниже представлена последовательность основных этапов.
Выяснить больше – [url=https://vyvod-iz-zapoya-kemerovo18.ru/]вывод из запоя на дому цена в кемерове[/url]
После прохождения курса капельниц пациенты отмечают улучшение сна, исчезновение головной боли, восстановление аппетита и общего самочувствия. При тяжёлых формах зависимости лечение дополняется физиотерапией и психологической помощью.
Получить больше информации – [url=https://vyvod-iz-zapoya-penza18.ru/]вывод из запоя на дому недорого пенза[/url]
Вывод из запоя в Тольятти — это медицинская процедура, направленная на очищение организма от продуктов распада алкоголя и восстановление нормального состояния здоровья. Длительное употребление спиртных напитков приводит к серьёзной интоксикации, нарушению работы нервной, сердечно-сосудистой и пищеварительной систем. Самостоятельные попытки прекратить запой могут быть опасны, поэтому оптимальным решением является обращение к врачу-наркологу, который проведёт лечение безопасно и эффективно.
Подробнее тут – [url=https://vyvod-iz-zapoya-v-tolyatti17.ru/]скорая вывод из запоя тольятти[/url]
Система круглосуточной наркологической помощи в «ОмскПрофи» построена на принципе постоянной готовности. В любой момент суток специалисты готовы выехать на дом, принять пациента в стационар или организовать удалённую консультацию. Это особенно важно в острых ситуациях, когда счёт идёт на часы: запой, передозировка, психоз, агрессивное поведение или резкое ухудшение самочувствия. В таких случаях промедление может стоить пациенту жизни.
Получить больше информации – https://narkologicheskaya-pomoshh-omsk0.ru/omsk-narkologicheskij-dispanser
Запойное состояние сопровождается тяжелыми последствиями для организма. Оно может включать нарушения сна, тремор конечностей, скачки давления, головные боли и депрессию. Без своевременной помощи такие проявления способны привести к развитию хронических заболеваний и угрожающих жизни осложнений.
Выяснить больше – [url=https://vyvod-iz-zapoya-perm0.ru/]помощь вывод из запоя[/url]
Эта публикация содержит набор несвязанных идей, трудно применимых в практике. Мы лишь поверхностно затрагиваем различные точки зрения, не проводя глубокий анализ и не предлагая выводов.
Подробнее читать – [url=https://rostov-narkologiya.ru/uslugi-ot-alkogolizma/vyvod-iz-zapoya/]сиалис онлайн[/url]
Каждый этап играет важную роль и обеспечивает пациенту необходимую поддержку на пути к трезвой жизни.
Узнать больше – [url=https://lechenie-alkogolizma-omsk0.ru/]лечение алкоголизма гипнозом в омске[/url]
Наркологическая клиника в Омске специализируется на оказании профессиональной помощи людям, столкнувшимся с зависимостью от алкоголя и наркотиков. Лечение строится на принципах доказательной медицины и сочетает современные методы детоксикации, фармакотерапии, психотерапевтической поддержки и программ социальной адаптации. Комплексный подход позволяет пациентам не только стабилизировать состояние, но и вернуться к полноценной жизни без зависимости.
Детальнее – [url=https://narkologicheskaya-klinika-v-omske0.ru/]наркологические клиники алкоголизм в омске[/url]
Такая структура терапии обеспечивает контроль на всех стадиях и помогает добиться устойчивого результата без вреда для здоровья. Пациент получает не просто временное облегчение, а полное восстановление физического и эмоционального состояния.
Получить больше информации – [url=https://narkologicheskaya-klinika-v-astrakhani18.ru/]анонимная наркологическая клиника[/url]
Лечение зависимости в частной клинике имеет ряд отличий от стандартных учреждений. Здесь ключевое внимание уделяется индивидуальной траектории пациента и комфорту среды. Основные преимущества включают:
Получить дополнительную информацию – [url=https://narkologicheskaya-clinica-v-krasnoyarske17.ru/]вывод наркологическая клиника красноярск[/url]
Капельницы при выводе из запоя — основной инструмент детоксикации. Они очищают кровь, стабилизируют давление и восстанавливают баланс электролитов. В клинике «РеабКузбасс» используются только качественные препараты, адаптированные под конкретное состояние пациента. Ниже приведена таблица с основными видами капельниц и их эффектом.
Подробнее – http://vyvod-iz-zapoya-v-novokuzneczke17.ru/
Клиника придерживается принципа прозрачного ценообразования. Пациенту или родственникам сразу озвучивается стоимость всех процедур и услуг. Возможна оплата поэтапно или в рамках пакета. В отличие от многих клиник, «ОмскПрофи» предоставляет фиксированные цены на распространённые виды помощи, без скрытых доплат.
Подробнее можно узнать тут – [url=https://narkologicheskaya-pomoshh-omsk0.ru/]центр наркологической помощи[/url]
Такая таблица позволяет систематизировать данные наблюдения и поддерживать единый подход к интерпретации результатов. Это повышает прозрачность процесса и делает оценку состояния объективной вне зависимости от длительности лечения.
Углубиться в тему – [url=https://narkologicheskaya-klinika-penza18.ru/]лечение в наркологической клинике[/url]
Наркологическая клиника — это не просто медицинское учреждение, а пространство, где пациент получает всестороннюю поддержку: от снятия интоксикации и детоксикации до психотерапии и постлечебного сопровождения. В клинике «КемероваМед Трезвость» специалисты работают с любыми формами зависимостей — алкогольной, наркотической, медикаментозной. Принципы работы центра основаны на анонимности, профессионализме и индивидуальном подходе. Здесь создаются условия для полного восстановления здоровья и возвращения человека к стабильной трезвой жизни.
Углубиться в тему – [url=https://narkologicheskaya-klinika-v-kemerovo18.ru/]наркологическая клиника нарколог кемерово[/url]
Наркологическая клиника — это не просто медицинское учреждение, а пространство, где человеку помогают вернуть здоровье, ясность мышления и контроль над жизнью. В клинике «КаспийМед Альтернатива» в Астрахани круглосуточно оказывается помощь людям, столкнувшимся с алкогольной, наркотической и смешанной зависимостью. Центр сочетает медицинскую строгость и человеческое участие, обеспечивая лечение в комфортных условиях с максимальной конфиденциальностью. Здесь разработаны программы детоксикации, восстановления и психотерапевтической поддержки, что делает терапию эффективной и безопасной.
Узнать больше – [url=https://narkologicheskaya-klinica-v-astrakhani18.ru/]платная наркологическая клиника астрахань[/url]
Такой алгоритм позволяет постепенно восстановить функции организма и подготовить пациента к дальнейшему лечению зависимости.
Изучить вопрос глубже – [url=https://vyvod-iz-zapoya-omsk0.ru/]нарколог на дом вывод из запоя[/url]
Современная наркологическая клиника — это не просто место, где оказывают медицинскую помощь. Это пространство, где пациенту помогают вернуться к жизни, свободной от зависимости, с заботой, уважением и индивидуальным подходом. В клинике «СибМед Кемерово» реализованы комплексные программы терапии алкоголизма, наркомании и других зависимостей. Каждая программа адаптируется под конкретное состояние пациента и сочетает медицинские, психологические и социальные методы воздействия. Важное преимущество — полная анонимность, обеспечивающая комфорт и доверие со стороны пациентов.
Узнать больше – [url=https://narkologicheskaya-klinika-kemerovo18.ru/]частная наркологическая клиника кемерово[/url]
Главной задачей специалистов становится купирование абстинентного синдрома и снижение интоксикации. Это требует применения медикаментов и постоянного наблюдения за состоянием пациента.
Подробнее – https://vyvod-iz-zapoya-perm0.ru/vyvod-iz-zapoya-perm-staczionar/
Указанные элементы задают логическую основу для всего терапевтического процесса, создавая структурированную модель работы с пациентом. При необходимости схема вмешательств дополняется дополнительными мерами, направленными на стабилизацию состояния. Такой формат позволяет поддерживать предсказуемость результата даже в сложных клинических ситуациях.
Подробнее можно узнать тут – [url=https://narkologicheskaya-klinika-v-penze18.ru/]наркологическая клиника в пензе[/url]
Если ищете надёжное решение — читайте, как наркологическая клиника помогает очистить организм и начать новую жизнь. Что скрывают от вас? – http://maksipolinovtsu.forum24.ru/?1-4-0-00000016-000-0-0-1763841313
Пациенты отмечают, что особенно важна не только профессиональная помощь, но и спокойная атмосфера. Мягкий свет, тишина, отдельные палаты и деликатная коммуникация персонала — всё это снижает тревожность и помогает организму восстановиться. Эффективность лечения оценивается по конкретным маркерам: улучшение сна, нормализация давления, исчезновение тошноты, восстановление аппетита и уменьшение тяги.
Разобраться лучше – https://narkologicheskaya-clinica-v-krasnoyarske17.ru/narkologicheskaya-klinika-krasnoyarsk-otzyvy/
Лечение организовано поэтапно, что помогает пациенту постепенно возвращаться к полноценной жизни. Каждый шаг направлен на укрепление результата и снижение риска рецидива.
Выяснить больше – http://narcologicheskaya-klinika-omsk0.ru
Наша выездная бригада приезжает без маркировки, в гражданской одежде, согласовывает «тихое окно» связи с пациентом или близкими и начинает не с капельницы, а с настройки среды: тёплая приглушённая подсветка, проветривание без сквозняков, отключение уведомлений, подготовка воды комнатной температуры. Затем — быстрый осмотр, экспресс-метрики и старт индивидуального плана. Каждая корректировка — ровно одна за раз, чтобы сохранить причинно-следственную связь и не провоцировать полипрагмазию.
Ознакомиться с деталями – [url=https://narkolog-na-dom-saratov0.ru/]нарколог на дом срочно[/url]
В рамках последовательного анализа состояния применяется также оценочная шкала, позволяющая фиксировать изменения и уточнять степень выраженности симптомов. Далее представлена таблица, демонстрирующая основные критерии наблюдения и их функциональное значение в клиническом процессе.
Получить больше информации – http://narkologicheskaya-klinika-penza18.ru/chastnaya-narkologicheskaya-klinika-penza/
Медицинская помощь строится на принципах индивидуального подхода и поэтапной терапии. Каждый пациент проходит диагностику, после чего составляется персональная программа, включающая медикаментозную поддержку, консультации психотерапевта и физиопроцедуры. Такой подход помогает не просто снять симптомы, но и восстановить организм полностью.
Получить дополнительную информацию – http://narkologicheskaya-klinika-v-ryazani17.ru/narkolog-ryazan-telefon/
Особенность клиники — возможность выезда нарколога на дом. Это особенно важно, если пациенту трудно самостоятельно добраться до центра или он хочет избежать публичности. Врач приезжает с полным набором медикаментов и оборудования, проводит обследование и ставит капельницу, контролируя состояние пациента на протяжении всей процедуры. Такой формат позволяет начать лечение незамедлительно и без стресса.
Узнать больше – [url=https://narkologicheskaya-klinika-v-kemerovo18.ru/]наркологическая клиника цены[/url]
Все процедуры выполняются анонимно и с соблюдением медицинских стандартов. Препараты применяются только сертифицированные, рассчитанные на мягкое восстановление организма без побочных эффектов. При необходимости лечение продолжается в стационаре, где пациент получает круглосуточное наблюдение, питание и психологическую поддержку.
Подробнее тут – [url=https://vyvod-iz-zapoya-v-novokuzneczke17.ru/]вывод из запоя дешево[/url]
Терапия в клинике проводится поэтапно: от снятия интоксикации до психологического восстановления. Все шаги выполняются под наблюдением специалистов, что исключает осложнения и повышает эффективность. Ниже представлена таблица, отражающая последовательность этапов и задачи каждого из них.
Получить дополнительную информацию – [url=https://narkologicheskaya-klinica-v-astrakhani18.ru/]лечение в наркологической клинике астрахань[/url]
В рамках лечебного процесса наркологическая клиника задействует структурированные механизмы наблюдения, включающие анализ лабораторных показателей, оценку соматического тонуса и изучение активности нервной системы. Эти элементы обеспечивают комплексность работы и позволяют своевременно корректировать план лечения. Такая система предотвращает перегрузку организма и способствует поддержанию стабильности на фоне применения медикаментозных схем. Ниже представлены ключевые составляющие терапевтического процесса, формирующие основу для клинического восстановления.
Получить дополнительную информацию – [url=https://narkologicheskaya-klinika-v-penze18.ru/]наркологическая клиника наркологический центр пенза[/url]
Лечение в клинике проходит поэтапно. Каждый шаг направлен на достижение устойчивого результата и восстановление здоровья. Ниже представлена таблица с описанием основных этапов лечения.
Детальнее – [url=https://narkologicheskaya-klinika-kemerovo18.ru/]наркологическая клиника стационар[/url]
Основным инструментом при выведении из запоя является капельница. Её состав зависит от состояния пациента, продолжительности запоя и наличия хронических заболеваний. В клинике «ПензаМед Трезвость» используются только проверенные препараты с минимальной нагрузкой на организм. Ниже приведена таблица с примерами инфузионных растворов и их воздействием.
Подробнее тут – [url=https://vyvod-iz-zapoya-penza18.ru/]наркология вывод из запоя[/url]
Работа строится на четкой структуре, определяющей порядок лечебных мероприятий. Ниже представлена последовательность основных этапов.
Узнать больше – [url=https://vyvod-iz-zapoya-kemerovo18.ru/]вывод из запоя вызов[/url]
Эти этапы формируют структуру комплексного лечения, позволяя добиться устойчивого результата и предотвращения повторных срывов.
Подробнее можно узнать тут – [url=https://narkologicheskaya-klinika-astrakhan18.ru/]частная наркологическая клиника астрахань[/url]
В клинике применяются комплексные программы, охватывающие все стадии терапии. Такой подход позволяет обеспечить пациенту полный спектр помощи — от первой консультации до социальной адаптации.
Исследовать вопрос подробнее – [url=https://narcologicheskaya-klinika-omsk0.ru/]наркологическая клиника наркологический центр в омске[/url]
Этот обзор позволяет по-новому взглянуть на вещи, на которые обычно и так смотрят. Мы упоминаем факты, которые мало что меняют, и события, значение которых трудно определить, но они всё равно здесь.
Вот – [url=https://arma-rehab.ru/]покер онлайн[/url]
Этот обзор предлагает свежий взгляд на предметы, которые и без того привычны. Мы упоминаем факты, не имеющие большого значения, и события с неясной важностью, но они присутствуют здесь.
Подробнее читать – [url=https://rostov-narkologiya.ru/uslugi-ot-narkomanii/mefedronovaya-zavisimost/]кето диета за неделю минус 10 кг[/url]
В рамках терапевтического процесса используются разнообразные методы контроля, направленные на определение степени выраженности нарушений и их динамики. Эти методы позволяют оптимизировать фармакотерапию и адаптировать процедуры под индивидуальные особенности пациента. Ниже представлены ключевые функциональные направления, которые применяются в ходе оценки состояния и формирования стратегии лечения.
Подробнее тут – [url=https://narkologicheskaya-klinika-tomsk18.ru/]наркологическая клиника[/url]
Эта карта — рабочий инструмент и для пациента, и для семьи: все видят, какая цель преследуется, какими средствами она достигается, когда проверяется эффект и что будет дальше. Отсюда рождается доверие и строгая приверженность — главный предиктор устойчивого результата.
Детальнее – [url=https://narkologicheskaya-klinika-saratov0.ru/]платная наркологическая клиника[/url]
В этой статье вы найдете познавательную и занимательную информацию, которая поможет вам лучше понять мир вокруг. Мы собрали интересные данные, которые вдохновляют на размышления и побуждают к действиям. Открывайте новую информацию и получайте удовольствие от чтения!
Получить дополнительные сведения – https://www.atma.rs/kgh
Лечение проходит поэтапно, чтобы пациент не испытывал стресса и перегрузок. Каждый шаг контролируется врачами, а терапия корректируется в зависимости от состояния. В таблице ниже представлена структура программы лечения в клинике «АстраМед Трезвость».
Углубиться в тему – https://narkologicheskaya-klinika-v-astrakhani18.ru/narkologiya-astrakhan-adres/
Эта статья сочетает в себе как полезные, так и интересные сведения, которые обогатят ваше понимание насущных тем. Мы предлагаем практические советы и рекомендации, которые легко внедрить в повседневную жизнь. Узнайте, как улучшить свои навыки и обогатить свой опыт с помощью простых, но эффективных решений.
Узнать напрямую – https://psychiatriegespraech.ch/psychische-stoerungen-und-erkrankungen/persoenlichkeitsstoerungen_aetiologie
Ниже представлена последовательность этапов, формирующих общий цикл вмешательств.
Подробнее тут – [url=https://narkologicheskaya-klinika-v-vdk18.ru/]наркологическая клиника цены владивосток[/url]
Медицинская помощь в клинике организована поэтапно, что позволяет постепенно стабилизировать состояние и вернуть контроль над самочувствием.
Выяснить больше – [url=https://vyvod-iz-zapoya-perm0.ru/]вывод из запоя на дому недорого[/url]
В данной статье вы найдете комплексный подход к изучению насущных тем. Мы комбинируем теоретические сведения с практическими советами, чтобы читатель мог не только понять проблему, но и найти пути её решения.
Изучить аспект более тщательно – https://poashow.com.br/2022/12/17/sonia-abrao-desabafa-sobre-alzheimer-nos-84-anos-da-mae
В этом интересном тексте собраны обширные сведения, которые помогут вам понять различные аспекты обсуждаемой темы. Мы разбираем детали и факты, делая акцент на важности каждого элемента. Не упустите возможность расширить свои знания и взглянуть на мир по-новому!
Запросить дополнительные данные – https://advanceddentalimplants.com.au/a-life-changing-treatment-for-patients-who-have-lost-all-of-their-teeth
В этой статье представлен занимательный и актуальный контент, который заставит вас задуматься. Мы обсуждаем насущные вопросы и проблемы, а также освещаем истории, которые вдохновляют на действия и изменения. Узнайте, что стоит за событиями нашего времени!
Как это работает — подробно – https://psotm.pl/karol-szapel
Статья содержит практические рекомендации и полезные советы, которые можно легко применить в повседневной жизни. Мы делаем акцент на реальных примерах и проверенных методиках, которые способствуют личностному развитию и улучшению качества жизни.
Подробнее тут – https://autotrans.ge/product/%E1%83%AC%E1%83%98%E1%83%9C%E1%83%90-%E1%83%91%E1%83%90%E1%83%9B%E1%83%9E%E1%83%94%E1%83%A0%E1%83%98%E1%83%A1-%E1%83%A1%E1%83%90%E1%83%9B%E1%83%90%E1%83%92%E1%83%A0%E1%83%98-%E1%83%A0%E1%83%99
Эта познавательная публикация погружает вас в море интересного контента, который быстро захватит ваше внимание. Мы рассмотрим важные аспекты темы и предоставим вам уникальные Insights и полезные сведения для дальнейшего изучения.
Прочесть заключение эксперта – https://assaintpriest.fr/2025/01/13/le-loto-de-lassp-est-de-retour-%F0%9F%8D%80%F0%9F%92%8A
Текст включает разнообразную информацию, которая может показаться любопытной, но не меняет устоявшегося восприятия. Предлагаем просто насладиться чтением, не ожидая значительной пользы.
Подробнее читать – https://rostov-narkologiya.ru
В статье представлены ключевые моменты по актуальной теме, дополненные советами экспертов и ссылками на дополнительные ресурсы. Цель материала — дать читателю инструменты для самостоятельного развития и принятия осознанных решений.
Всё самое вкусное внутри – https://drpaulroth.com/2023/05/21/cryptocasinos-are-evolving-worryingly-fast-heres-how-to-get-to-grips-with-them
В этом обзорном материале представлены увлекательные детали, которые находят отражение в различных аспектах жизни. Мы исследуем непонятные и интересные моменты, позволяя читателю увидеть картину целиком. Погрузитесь в мир знаний и удивительных открытий!
Получить больше информации – https://vector-hvac.pl/2015/07/21/functional-and-stylish-wall-to-wall-shelves-2
В данной статье мы поговорим о будущем медицины, акцентируя внимание на прорывных разработках и их потенциале. Читатель узнает о новых подходах к лечению, роли искусственного интеллекта и возможностях персонализированной медицины.
Открой скрытое – https://vse-novosti.net/preimushhestva-vyvoda-iz-zapoya-v-klinike
Эта публикация завернет вас в вихрь увлекательного контента, сбрасывая стереотипы и открывая двери к новым идеям. Каждый абзац станет для вас открытием, полным ярких примеров и впечатляющих достижений. Подготовьтесь быть вовлеченными и удивленными каждый раз, когда продолжите читать.
Тыкай сюда — узнаешь много интересного – https://bamboo.st/2019/10/04/%E3%81%8A%E5%BE%85%E3%81%9F%E3%81%9B%E3%81%97%E3%81%BE%E3%81%97%E3%81%9F
Эта информационная статья содержит полезные факты, советы и рекомендации, которые помогут вам быть в курсе последних тенденций и изменений в выбранной области. Материал составлен так, чтобы быть полезным и понятным каждому.
Проверенные методы — узнай сейчас – https://lavanderiauniversal.com/producto/fenestrado
Этот интересный отчет представляет собой сборник полезных фактов, касающихся актуальных тем. Мы проанализируем данные, чтобы вы могли сделать обоснованные выводы. Читайте, чтобы узнать больше о последних трендах и значимых событиях!
Читать далее > – https://www.taylordentist.com/diagnosing-mouth-sores
Этот информационный обзор станет отличным путеводителем по актуальным темам, объединяющим важные факты и мнения экспертов. Мы исследуем ключевые идеи и представляем их в доступной форме для более глубокого понимания. Читайте, чтобы оставаться в курсе событий!
Ознакомиться с деталями – https://polskafutbolliga.pl/podsumowanie-ostatniego-dnia-turnieju-finalowego
Эта статья полна интересного контента, который побудит вас исследовать новые горизонты. Мы собрали полезные факты и удивительные истории, которые обогащают ваше понимание темы. Читайте, погружайтесь в детали и наслаждайтесь процессом изучения!
Не упусти важное! – https://advanceddentalimplants.com.au/a-life-changing-treatment-for-patients-who-have-lost-all-of-their-teeth
В этой статье-обзоре мы соберем актуальную информацию и интересные факты, которые освещают важные темы. Читатели смогут ознакомиться с различными мнениями и подходами, что позволит им расширить кругозор и глубже понять обсуждаемые вопросы.
Как достичь результата? – https://mhtpro.id/news/anak-yatim-oktober-2020
Эта статья предлагает живое освещение актуальной темы с множеством интересных фактов. Мы рассмотрим ключевые моменты, которые делают данную тему важной и актуальной. Подготовьтесь к насыщенному путешествию по неизвестным аспектам и узнайте больше о значимых событиях.
Узнать больше – https://www.galartfotografos.com/comentarios
Эта статья предлагает живое освещение актуальной темы с множеством интересных фактов. Мы рассмотрим ключевые моменты, которые делают данную тему важной и актуальной. Подготовьтесь к насыщенному путешествию по неизвестным аспектам и узнайте больше о значимых событиях.
Полезно знать – http://erogework.com/contents/859
Эта информационная заметка содержит увлекательные сведения, которые могут вас удивить! Мы собрали интересные факты, которые сделают вашу жизнь ярче и полнее. Узнайте нечто новое о привычных аспектах повседневности и откройте для себя удивительный мир информации.
Получить полную информацию – https://alles-familie.at/swarovski-kristallwelten-wattens
Откройте для себя скрытые страницы истории и малоизвестные научные открытия, которые оказали колоссальное влияние на развитие человечества. Статья предлагает свежий взгляд на события, которые заслуживают большего внимания.
Выяснить больше – https://www.volonte-co.com/website/it/edizioni/item/3908-metodo-trombone-jazz-video-in-streaming?tmpl=component&print=1&start=10480
Этот интересный отчет представляет собой сборник полезных фактов, касающихся актуальных тем. Мы проанализируем данные, чтобы вы могли сделать обоснованные выводы. Читайте, чтобы узнать больше о последних трендах и значимых событиях!
Исследовать вопрос подробнее – https://ruxpert.ru/%D0%9E%D1%82%D0%BD%D0%BE%D1%88%D0%B5%D0%BD%D0%B8%D1%8F_%D0%A0%D0%BE%D1%81%D1%81%D0%B8%D0%B8_%D0%B8_%D0%9F%D0%BE%D0%BB%D1%8C%D1%88%D0%B8
В этой статье представлен занимательный и актуальный контент, который заставит вас задуматься. Мы обсуждаем насущные вопросы и проблемы, а также освещаем истории, которые вдохновляют на действия и изменения. Узнайте, что стоит за событиями нашего времени!
Познакомиться с результатами исследований – https://www.engelsebulldog.eu/2023/07/25/bulldogs-from-kingrock
vavada aplikacija recenzija [url=http://vavada2007.help/]http://vavada2007.help/[/url]
Ниже приведена таблица с типовыми компонентами капельницы и их назначением:
Углубиться в тему – [url=https://kapelnicza-ot-zapoya-v-volgograde17.ru/]сколько стоит капельница на дому от запоя[/url]
Выездная наркологическая помощь организована по чётко выстроенной схеме. Каждый этап направлен на стабилизацию состояния и безопасное восстановление функций организма после алкогольного или наркотического воздействия.
Разобраться лучше – [url=https://narkolog-na-dom-v-ufe17.ru/]нарколог на дом недорого уфа[/url]
В Ставрополе мы выстроили так называемую «тихую логистику»: запись без послеобеденных «окон», экспресс-приём без ожидания, сопровождение от входа до палаты, а при необходимости — деликатная госпитализация через отдельный вход. При первичном обращении пациент получает пошаговый план на ближайшие 72 часа: стабилизация самочувствия, детоксикация по показаниям, психообразование, старт профилактики срыва. Такой регламент экономит время и снижает тревожность — вы понимаете, что и зачем делается, и видите прогноз по срокам.
Исследовать вопрос подробнее – [url=https://narcologicheskaya-klinika-stavropol0.ru/]анонимная наркологическая клиника ставрополь[/url]
Генератор ключей для Windows 11 — 100% рабочий метод активации, проверено тысячами пользователей!
Подробнее – [url=https://krasnodar.med24.online/landing/narkolog_na_dom/]Бесплатный серийный номер для Windows 11[/url]
Не хотите платить за лицензию? У нас есть рабочий кряк для Windows 11 — скачайте прямо сейчас!
Подробнее – [url=https://krasnodar.med24.online/]Активатор Windows 11 скачать бесплатно[/url]
Бесплатный ключ для Windows 11 — только у нас, обновлено в 2026 году!
Подробнее – [url=https://krasnodar.med24.online/landing/narkolog_na_dom/]Как обойти активацию Windows 11[/url]
В медицинской практике используются различные методы, которые помогают ускорить процесс восстановления. Все процедуры проводятся под контролем специалистов и с учетом индивидуальных особенностей пациента.
Подробнее тут – [url=https://vyvod-iz-zapoya-omsk0.ru/]вывод из запоя на дому[/url]
Эта публикация содержит набор несвязанных идей, трудно применимых в практике. Мы лишь поверхностно затрагиваем различные точки зрения, не проводя глубокий анализ и не предлагая выводов.
Подробнее читать – [url=https://rostov-narkologiya.ru/ ]похудеть на таблетках[/url]
Наркологическая клиника опирается на комплексную модель оценки состояния, обеспечивающую последовательное восстановление функций организма. В клинике применяется система многоуровневого контроля, направленная на выявление нарушений и определение оптимальной тактики вмешательства. Такой подход позволяет поддерживать стабильность состояния даже в условиях выраженных клинических проявлений. Структурированная работа направлена на снижение токсической нагрузки, коррекцию метаболических процессов и восстановление адаптивных механизмов. Анализ проводится с учётом физиологических особенностей пациента и динамики изменений.
Получить больше информации – [url=https://narkologicheskaya-klinika-vo-vladivostoke18.ru/]наркологические клиники алкоголизм владивосток[/url]
Запойное состояние сопровождается тяжелыми последствиями для организма. Оно может включать нарушения сна, тремор конечностей, скачки давления, головные боли и депрессию. Без своевременной помощи такие проявления способны привести к развитию хронических заболеваний и угрожающих жизни осложнений.
Разобраться лучше – [url=https://vyvod-iz-zapoya-perm0.ru/]вывод из запоя в перми[/url]
Команда клиники включает врачей-наркологов и психиатров, клинических психологов, специалистов по зависимости, выездных медсестёр и координаторов маршрута. Все решения принимаются мультидисциплинарно — это значит, что медицинский и психотерапевтический блоки «стыкуются» между собой, а рекомендации не противоречат друг другу. Мы уделяем внимание сенсорной среде: мягкий свет, тишина, регламент вечернего отделения шумов, чтобы медикаментозная поддержка не «сгорала» под стрессом.
Выяснить больше – [url=https://narcologicheskaya-klinika-pervouralsk0.ru/]наркологическая клиника цены в первоуральске[/url]
Вывод из запоя в клинике строится на основе алгоритмов, направленных на безопасное восстановление физиологических функций. Применяется стандартная система, включающая оценку состояния, подбор медикаментозных средств и постепенную адаптацию организма. Такой формат позволяет избежать резких изменений и поддерживать предсказуемую клиническую динамику. Важную роль играет наблюдение за реакцией организма, позволяющее корректировать тактику лечения в соответствии с выявленными изменениями. Последовательность действий обеспечивает структурированность процесса и повышает вероятность стабильного результата.
Исследовать вопрос подробнее – [url=https://vyvodiz-zapoya-izhevsk18.ru/]вывод из запоя ижевск[/url]
Выезд на дом удобен, но не всегда безопасен. Если запой длится больше трёх–пяти суток, присутствует повторная рвота, выраженная слабость, спутанность сознания, судорожная готовность или резкие «качели» давления и пульса, лучше не тянуть и ехать в стационар. Для пациентов старшего возраста и при тяжелой соматике (ИБС, гипертония, диабет, хронические заболевания печени/почек) круглосуточный мониторинг уменьшает риск осложнений и позволяет гибко расширять схему лечения. В стационаре доступна приборная диагностика, тщательный контроль жизненных показателей и быстрая коррекция терапии, если клиническая картина меняется. Мы организуем медицинскую транспортировку, встречу на входе, расширенный осмотр и запуск персонального протокола без задержек. Семья при этом остаётся в информационном контуре: врач объясняет смысл каждого шага и ожидаемый эффект, чтобы решения были осознанными, а не продиктованными паникой или усталостью.
Углубиться в тему – [url=https://vyvod-iz-zapoya-krasnogorsk10.ru/]vyvod iz zapoya na domu[/url]
Мы не используем универсальные «коктейли»: алгоритм строится из коротких проверяемых шагов. На старте фиксируем цель (например, уменьшить тремор и тошноту, стабилизировать пульс и давление, вернуть полноценный ночной сон), выбираем минимально достаточные средства для её достижения и заранее назначаем «окно оценки» — момент, когда команда сверяет эффект и при необходимости корректирует один параметр. Такой подход защищает от полипрагмазии, экономит силы пациента и делает прогресс читаемым для всей семьи.
Подробнее тут – [url=https://vyvod-iz-zapoya-kamensk-uralskij0.ru/]вывод из запоя на дому цена в каменске-уральске[/url]
Ниже представлена таблица с основными препаратами, используемыми при выводе из запоя в Тюмени:
Узнать больше – [url=https://vyvod-iz-zapoya-v-tyumeni17.ru/]вывод из запоя дешево тюмень[/url]
Перед процедурой врач оценивает состояние пациента, измеряет давление, пульс и уровень насыщения крови кислородом. После осмотра подбирается состав инфузии, включающий препараты для дезинтоксикации, восстановления водно-солевого баланса и нормализации работы органов. Введение растворов осуществляется внутривенно, под контролем специалиста. Длительность процедуры — от 40 минут до 1,5 часов.
Изучить вопрос глубже – http://kapelnicza-ot-zapoya-v-volgograde17.ru/
Капельница — не «универсальная смесь», а адресный баланс жидкости, электролитов и поддерживающих компонентов под текущие симптомы. Ниже — ориентир, который индивидуализируется на месте осмотра. Мы тщательно сопоставляем пользу и допустимую нагрузку, чтобы не перегружать организм.
Детальнее – [url=https://narkolog-na-dom-petrozavodsk0.ru/]нарколог капельница на дом[/url]
Мы не используем универсальную «капельницу». Схема собирается из модулей под ведущие жалобы. Медицинские шаги всегда сочетаются с нефраком опорами — свет, тишина, вода малыми глотками, дыхание, — потому что среда усиливает действие препаратов и позволяет держать дозы ниже.
Углубиться в тему – [url=https://narkolog-na-dom-saratov0.ru/]нарколог на дом анонимно саратов[/url]
Такой подход позволяет устранить физические последствия запоя и снизить психологическую зависимость. Уже после первой процедуры пациенты отмечают улучшение самочувствия, появление аппетита и нормализацию сна. Важно не ограничиваться только экстренной помощью — специалисты рекомендуют пройти курс восстановления, чтобы предотвратить рецидивы.
Узнать больше – http://vyvodiz-zapoya-vladivostok18.ru
Процесс включает несколько шагов:
Углубиться в тему – [url=https://narkolog-na-dom-v-ufe17.ru/]выезд нарколога на дом уфа[/url]
vavada registracija ne radi [url=www.vavada2007.help]vavada registracija ne radi[/url]
Круглосуточное наблюдение, регулярные замеры, быстрые корректировки, спокойная среда и структурированный режим. Это снижает риски ночных ухудшений и помогает мягко «собрать» сон без агрессивных седативных решений.
Получить больше информации – [url=https://vyvod-iz-zapoya-odincovo10.ru/]srochnyj-vyvod-iz-zapoya[/url]
Для жителей Петрозаводска настроен оперативный маршрут: короткий телефонный скрининг, подтверждение окна прибытия, деликатный выезд без маркировки, нейтральные формулировки в документах. Мы не просто «обещаем анонимность» — мы обеспечиваем её процедурами: разграничение доступа к карте пациента, отдельные каналы связи, журналирование обращений, нейтральные названия в сопроводительных документах. Это важно в моменты, когда мотивация хрупка, а любая огласка способна оттолкнуть от лечения.
Получить больше информации – [url=https://narkolog-na-dom-petrozavodsk0.ru/]www.domen.ru[/url]
Эффект ощущается уже через 20–40 минут после начала процедуры. Пациент отмечает снижение головной боли, улучшение сна и общего состояния. Полное восстановление самочувствия наступает в течение суток.
Разобраться лучше – http://vyvod-iz-zapoya-v-tyumeni17.ru
В Ставрополе мы выстроили так называемую «тихую логистику»: запись без послеобеденных «окон», экспресс-приём без ожидания, сопровождение от входа до палаты, а при необходимости — деликатная госпитализация через отдельный вход. При первичном обращении пациент получает пошаговый план на ближайшие 72 часа: стабилизация самочувствия, детоксикация по показаниям, психообразование, старт профилактики срыва. Такой регламент экономит время и снижает тревожность — вы понимаете, что и зачем делается, и видите прогноз по срокам.
Получить дополнительную информацию – https://narcologicheskaya-klinika-stavropol0.ru/narkolog-psikholog-stavropol
Клиника «Трезвый Выбор Рязань» функционирует по принципу полного цикла лечения: от экстренного выезда нарколога до длительной реабилитации в условиях стационара. Пациенты поступают как в острых состояниях (запой, абстиненция, интоксикация), так и для плановой терапии. Лечение начинается с медицинской диагностики, оценки физического и психического состояния, после чего разрабатывается индивидуальный план. Программы включают детоксикацию, медикаментозную поддержку, психологическую помощь и профилактику рецидивов.
Разобраться лучше – [url=https://narkologicheskaya-clinika-v-ryazani17.ru/]наркологическая клиника цены[/url]
Такая схема лечения делает процесс последовательным и контролируемым. Врачи клиники сопровождают пациентов на всех стадиях, помогая преодолеть как физическую, так и психологическую зависимость. Особое внимание уделяется возвращению человека к активной и стабильной жизни без употребления алкоголя или наркотиков.
Исследовать вопрос подробнее – [url=https://narkologicheskaya-klinika-v-izhevsk18.ru/]наркологическая клиника цены в ижевске[/url]
Клиника «ВладТрезвие Центр» работает в круглосуточном режиме и готова оказать помощь жителям Владивостока и прилегающих районов в любое время суток. Врачи-наркологи прибывают по вызову в течение часа, имеют при себе все необходимые препараты и оборудование для проведения детоксикации на дому. При необходимости пациента доставляют в стационар, где лечение проходит под постоянным контролем медицинского персонала.
Разобраться лучше – https://vyvodiz-zapoya-vladivostok18.ru/czentr-kodirovaniya-alkogolizma-vyvod-iz-zapoya-vladivostok/
Наша выездная бригада приезжает без маркировки, в гражданской одежде, согласовывает «тихое окно» связи с пациентом или близкими и начинает не с капельницы, а с настройки среды: тёплая приглушённая подсветка, проветривание без сквозняков, отключение уведомлений, подготовка воды комнатной температуры. Затем — быстрый осмотр, экспресс-метрики и старт индивидуального плана. Каждая корректировка — ровно одна за раз, чтобы сохранить причинно-следственную связь и не провоцировать полипрагмазию.
Получить дополнительную информацию – [url=https://narkolog-na-dom-saratov0.ru/]нарколог на дом анонимно[/url]
Процесс включает следующие шаги:
Получить больше информации – [url=https://narcologicheskaya-klinika-v-krasnoyarske17.ru/]наркологическая клиника наркологический центр в красноярске[/url]
Для получения устойчивого результата наркологическая клиника использует методы, основанные на индивидуальной оценке. В работе учитываются соматические показатели, реакции нервной системы и данные лабораторных исследований. Такой формат лечения обеспечивает предсказуемое влияние на физиологические процессы и снижает вероятность осложнений. В клинике применяется непрерывный мониторинг, позволяющий своевременно корректировать лечебные меры. Работа направлена на нормализацию метаболизма, восстановление баланса внутренних систем и плавное уменьшение симптоматики.
Ознакомиться с деталями – http://narkologicheskaya-klinika-vo-vladivostoke18.ru/narkolog-vladivostok-otzyvy/
В этом тексте собрано множество случайных сведений и довольно неопределённых мыслей, которые могут чем-то заинтересовать. Мы отмечаем моменты, которые не особенно важны, но всё же занимают своё место в повествовании.
Вот – [url=https://arma-rehab.ru/]покер онлайн[/url]
Терапия в клинике строится по индивидуальному протоколу. Каждому пациенту подбираются процедуры с учётом возраста, длительности болезни, сопутствующих нарушений и психоэмоционального состояния. Лечение проходит поэтапно, что позволяет исключить осложнения и достичь стабильной ремиссии. Ниже представлена таблица с ключевыми этапами терапии.
Детальнее – http://narkologicheskaya-klinika-v-izhevsk18.ru
Вывод из запоя — это всегда баланс между скоростью и безопасностью. Дома трудно заметить скрытые ухудшения, особенно ночью: давление и пульс «гуляют», нарастает обезвоживание, сон рваный и тревожный. В «Трезвом Контуре» этот хаос замещается управляемостью: перед выездом дежурный врач собирает ключевые данные (длительность эпизода, лекарства, аллергии, сопутствующие болезни), на месте проводится экспресс-диагностика (АД, ЧСС, сатурация, температура, неврологический статус, степень обезвоживания), затем запускается схема терапевтической поддержки. Мы постоянно «подстраиваем» инфузии по реакции организма, а не по шаблонной карте: где-то важнее регидратация, где-то — коррекция электролитов, где-то — бережная седация для ночи. Для семьи это значит одно: меньше догадок, больше ясности. Если по картине риски высоки, мы аргументированно предлагаем стационар в Одинцово — и организуем транспортировку без пауз, потому что цена задержки в такие часы всегда выше.
Подробнее можно узнать тут – https://vyvod-iz-zapoya-odincovo10.ru/vyvod-iz-zapoya-v-stacionare-v-odincovo/
Инфузионная терапия подбирается под человека, а не под «среднюю» ситуацию. Базовый каркас обычно включает растворы для регидратации и коррекции электролитов, витамины группы B и магний для поддержки нервной системы. По показаниям добавляются гепатопротекторы и антиоксидантные компоненты — это помогает печени и снижает оксидативный стресс. Если есть выраженная тошнота, подключаем противорвотные; при тревоге и нарушении сна — мягкие анксиолитики и седативные препараты, которые не «вырубают», а выравнивают ритмы и сохраняют контакт для мониторинга. Мы избегаем агрессивных «миксов», потому что избыточная седация может скрыть опасные симптомы и усложнить оценку состояния. Эффективность оцениваем не только по субъективному облегчению, но и по объективным метрикам: пульс, давление, сатурация, динамика тремора, аппетит, качество сна. Как только показатели стабилизируются, фарм-нагрузка снижается, а ведущую роль берет режим — питание, гидратация, спокойный вечерний ритуал, короткие бытовые активности.
Выяснить больше – http://vyvod-iz-zapoya-krasnogorsk10.ru/kruglosutochno-vyvod-iz-zapoya-v-krasnogorske/
vavada službeni sajt [url=https://vavada2007.help/]https://vavada2007.help/[/url]
Для жителей Первоуральска мы поддерживаем 24/7-окно обращения без очередей: первичный скрининг по телефону, подтверждение безопасного формата старта (стационар краткого наблюдения, амбулаторно или выездная бригада), нейтральные формулировки в документах, деликатная транспортная логистика. При необходимости организуем немаркированный выезд врача, а при госпитализации используем отдельный вход и «тихие» коридоры. Это не косметика — такие детали снижают уровень тревоги, улучшают засыпание в первую ночь и повышают соблюдаемость рекомендаций.
Исследовать вопрос подробнее – http://narcologicheskaya-klinika-pervouralsk0.ru
Если к «окну сверки» цель не достигнута, мы меняем только один компонент — время ритуала, скорость инфузии, плотность сессий. Такой микрошаг даёт чистый сигнал: понятно, что сработало, а что нет, и пациент не чувствует «экспериментов» над собой.
Углубиться в тему – http://narkologicheskaya-klinika-kamensk-uralskij0.ru
Терапия в клинике строится по индивидуальному протоколу. Каждому пациенту подбираются процедуры с учётом возраста, длительности болезни, сопутствующих нарушений и психоэмоционального состояния. Лечение проходит поэтапно, что позволяет исключить осложнения и достичь стабильной ремиссии. Ниже представлена таблица с ключевыми этапами терапии.
Изучить вопрос глубже – [url=https://narkologicheskaya-klinika-v-izhevsk18.ru/]наркологическая клиника наркологический центр ижевск[/url]
Мы не используем универсальные «коктейли»: алгоритм строится из коротких проверяемых шагов. На старте фиксируем цель (например, уменьшить тремор и тошноту, стабилизировать пульс и давление, вернуть полноценный ночной сон), выбираем минимально достаточные средства для её достижения и заранее назначаем «окно оценки» — момент, когда команда сверяет эффект и при необходимости корректирует один параметр. Такой подход защищает от полипрагмазии, экономит силы пациента и делает прогресс читаемым для всей семьи.
Выяснить больше – https://vyvod-iz-zapoya-kamensk-uralskij0.ru/vyvod-iz-zapoya-na-domu-otzyvy-kamensk-uralskij
Запойное состояние сопровождается тяжелыми последствиями для организма. Оно может включать нарушения сна, тремор конечностей, скачки давления, головные боли и депрессию. Без своевременной помощи такие проявления способны привести к развитию хронических заболеваний и угрожающих жизни осложнений.
Подробнее тут – https://vyvod-iz-zapoya-perm0.ru/vykhod-iz-zapoya-perm/
Инфузионная терапия в «ТагилМед Реал» — это точный инструмент под конкретный запрос: обезвоживание, вегетативная нестабильность, нарушения сна, «утренний туман». Состав и дозировки подбирает врач с учётом возраста, коморбидности и лекарственных взаимодействий. Важно понимать: больше компонентов не значит лучше; главная ценность — фокус и безопасность.
Исследовать вопрос подробнее – [url=https://narkologicheskaya-klinika-nizhnij-tagil0.ru/]наркологическая клиника цены в нижнем тагиле[/url]
Домашний формат хорош при умеренной выраженности симптомов, сохранённом контакте и возможности обеспечить наблюдение в квартире: тихая комната, взрослый рядом первые 6–8 часов, отсутствие грубой дезориентации и неукротимой рвоты, относительная стабильность АД/ЧСС. В таких условиях выездная бригада «Трезвой Линии» запускает персональную схему: регидратация, выравнивание электролитов, поддержка витаминами группы B и магнием, осторожная седация, чтобы «собрать» сон, не выключая мониторинг. Стационар предпочтителен, если запой длится 3–5 суток и более, отмечаются «качели» показателей, шаткость походки, выраженная слабость, признаки предделирия или судорожной готовности; также при сочетанной соматике (ИБС, гипертония, диабет, хронические болезни печени/почек, неврология) и у пациентов старшего возраста. Преимущество стационара — приборный контроль, тихий режим, щадящее питание, возможность быстро расширять схему без ожидания ухудшений. Мы придерживаемся принципа «минимально достаточно»: ровно столько вмешательств, сколько требует клиническая картина, — так безопаснее и в перспективе экономнее, чем череда домашних «подлаток».
Изучить вопрос глубже – [url=https://vyvod-iz-zapoya-ehlektrostal10.ru/]vyvod-iz-zapoya-ehlektrostal[/url]
В данном тексте собраны разнообразные случайные сведения и не вполне определённые идеи, которые могут вызвать интерес. Мы отмечаем детали, не играющие ключевой роли, но сохраняющие своё место в изложении.
Подробнее читать – [url=https://rostov-narkologiya.ru/ ]народные средства от диабета[/url]
Команда «СеверМед Альянса» включает наркологов, психиатров, клинических психологов, специалистов по зависимости, физиотерапевтов и координатора маршрута. Каждый модуль — детоксикация, стабилизация сна и настроения, психотерапия, семейная работа, восстановление бытовых и профессиональных ролей — встроен в общий план. Мы избегаем «одинаковых схем» и полипрагмазии: добавляем только те инструменты, у которых есть измеримая цель и безопасное «окно оценки» эффективности.
Подробнее можно узнать тут – [url=https://narcologicheskaya-klinika-petrozavodsk0.ru/]наркологическая клиника цены петрозаводск[/url]
Лечение зависимости в наркологической клинике проводится поэтапно. Это обеспечивает постепенное восстановление организма и исключает риск осложнений. Каждый этап направлен на устранение конкретных нарушений, вызванных употреблением психоактивных веществ.
Изучить вопрос глубже – https://narcologicheskaya-klinika-v-krasnoyarske17.ru/
Клиника предлагает возможность круглосуточного пребывания в комфортных палатах. Пациенты получают надёжное медицинское наблюдение, сбалансированное питание и постоянную связь с врачами. Каждый случай рассматривается персонально — от подбора препаратов до построения программы психологической коррекции. Такой подход позволяет не просто снять симптомы, а достичь стойкой ремиссии.
Подробнее тут – [url=https://narkologicheskaya-clinika-v-ryazani17.ru/]платная наркологическая клиника[/url]
vavada potvrda emaila [url=www.vavada2007.help]vavada potvrda emaila[/url]
Наркологическая помощь должна быть не только медицински точной, но и человечной, безопасной и анонимной. В «Ижевском Центре Трезвых Решений» выстроена система комплексного подхода к лечению зависимостей, включающая диагностику, медикаментозную детоксикацию, психотерапию и социальную адаптацию. Клиника объединяет профессионализм, заботу и круглосуточную готовность помочь пациентам, оказавшимся в трудной ситуации. Здесь работают врачи с большим опытом в области наркологии и психиатрии, способные оперативно выехать на дом и оказать неотложную помощь.
Изучить вопрос глубже – [url=https://narkologicheskaya-klinika-v-izhevsk18.ru/]наркологическая клиника нарколог[/url]
Вывод из запоя в клинике строится на основе алгоритмов, направленных на безопасное восстановление физиологических функций. Применяется стандартная система, включающая оценку состояния, подбор медикаментозных средств и постепенную адаптацию организма. Такой формат позволяет избежать резких изменений и поддерживать предсказуемую клиническую динамику. Важную роль играет наблюдение за реакцией организма, позволяющее корректировать тактику лечения в соответствии с выявленными изменениями. Последовательность действий обеспечивает структурированность процесса и повышает вероятность стабильного результата.
Получить больше информации – http://vyvodiz-zapoya-izhevsk18.ru/
В Нижнем Тагиле выездные бригады дежурят 24/7. Координатор уже при первичном звонке собирает ключевые сведения: аллергии, хронические заболевания, список постоянных препаратов, эпизоды судорог или алкогольных психозов в прошлом, последние значения давления и пульса, возможность обеспечить тишину на 2–3 часа, доступ к питьевой воде, особенности подъезда. Вся эта информация помогает врачу подготовить стартовую схему — от выбора профиля инфузии до темпа введения. По запросу организуем немаркированный визит и сдержанные формулировки в документах, чтобы не создавать лишнего внимания со стороны соседей и коллег.
Получить дополнительную информацию – https://vyvod-iz-zapoya-nizhnij-tagil0.ru/skoraya-narkologiya-vyvod-iz-zapoya-nizhnij-tagil-otzyvy
Эта публикация завернет вас в вихрь увлекательного контента, сбрасывая стереотипы и открывая двери к новым идеям. Каждый абзац станет для вас открытием, полным ярких примеров и впечатляющих достижений. Подготовьтесь быть вовлеченными и удивленными каждый раз, когда продолжите читать.
Открой скрытое – http://mrshade.com/gallery/gracia-photoshoot
Для жителей Каменска-Уральского мы организовали быстрый и незаметный доступ к помощи. Координатор принимает обращения круглосуточно, уточняет адрес, особенности подъезда, пожелания по конфиденциальности и удобные «окна» визита. Бригады приезжают без опознавательных знаков, расходные материалы — в нейтральной упаковке, а формулировки в документах исключают нежелательные «ярлыки». Если дома временно нельзя обеспечить тишину и безопасность, мы «тихо» переводим пациента в палату краткого наблюдения: отдельный вход, короткий маршрут, минимум контактов и быстрое возвращение к домашнему формату после стабилизации.
Углубиться в тему – https://narkologicheskaya-klinika-kamensk-uralskij0.ru/kamensk-uralskij-narkologicheskij-dispanser
В этой информационной статье вы найдете интересное содержание, которое поможет вам расширить свои знания. Мы предлагаем увлекательный подход и уникальные взгляды на обсуждаемые темы, побуждая пользователей к активному мышлению и критическому анализу.
Получить дополнительную информацию – https://prepwithharshita.com/meaning-of-knowledge-and-knowing
В этом интересном тексте собраны обширные сведения, которые помогут вам понять различные аспекты обсуждаемой темы. Мы разбираем детали и факты, делая акцент на важности каждого элемента. Не упустите возможность расширить свои знания и взглянуть на мир по-новому!
Раскрыть тему полностью – https://testtales.com/why-ai-driven-testing-needs-an-ethical-roadmap-%E2%9A%96%EF%B8%8F-balancing-bias-jobs-and-trust-in-automation
Этот информационный обзор станет отличным путеводителем по актуальным темам, объединяющим важные факты и мнения экспертов. Мы исследуем ключевые идеи и представляем их в доступной форме для более глубокого понимания. Читайте, чтобы оставаться в курсе событий!
Посмотреть всё – https://job-bank.co.uk/how-to-start-a-business-from-home
В этом материале представлены детали, которые хоть и занимательны, но не особенно значимы. Мы рассматриваем моменты, которые трудно назвать важными, но всё же решили включить их для полноты картины.
Вот – [url=https://arma-rehab.ru/lechenie-alkogolizma/]азартные игры на деньги[/url]
Острый период запоя — это не «плохое самочувствие», а состояние с реальными рисками, где каждая задержка усложняет картину. В «Трезвой Линии» в Электростали мы строим помощь так, чтобы от первого звонка до заметного облегчения прошёл минимальный и управляемый путь: быстрый сбор рисков, экспресс-диагностика на месте, персональная инфузионная схема без «универсальных коктейлей», щадящая коррекция сна и тревоги, регулярные замеры показателей, чёткие рекомендации для семьи. Мы избегаем агрессивной седации: дозы и темп капельниц подбираются под возраст, длительность эпизода, сопутствующие заболевания и уже принимаемые лекарства. Задача — быстро снять токсическую нагрузку, выровнять давление и пульс, собрать ночной сон, а затем удержать результат дисциплинированным постдетокс-маршрутом на 2–4 недели. Конфиденциальность и анонимность соблюдаются без компромиссов, решения принимаются по реальным данным, чтобы эффект был устойчивым, предсказуемым и безопасным для пациента и семьи.
Детальнее – http://vyvod-iz-zapoya-ehlektrostal10.ru
Наркологическая клиника «ТагилМед Реал» — это круглосуточная команда врачей, психологов и координаторов, которая берёт на себя полный цикл помощи при алкогольной и наркотической зависимости: от экстренной стабилизации и капельниц на дому до амбулаторного сопровождения, кодирования и длительной психотерапевтической поддержки. Мы работаем без выходных, используем портативное оборудование, придерживаемся принципов доказательной медицины и внимательно относимся к конфиденциальности: нейтральные формулировки в документах, немаркированный транспорт, разграниченный доступ к медицинским данным и единый доверенный контакт для семьи.
Подробнее можно узнать тут – http://
Наркологическая клиника «СеверМед Альянс» — это современная экосистема помощи при зависимостях, где клиническая точность соединяется с бережной коммуникацией и индивидуальными маршрутами реабилитации. Мы выстраиваем лечение как последовательность управляемых шагов с понятными целями и сроками оценки результата. Пациент видит логику каждого вмешательства, понимает, почему ему предлагают именно такой план, и отслеживает прогресс по простым маркерам — сон, уровень тревоги, частота и длительность «тяговых» эпизодов, восстановление энергии и социальной активности.
Узнать больше – [url=https://narcologicheskaya-klinika-petrozavodsk0.ru/]наркологическая клиника петрозаводск[/url]
Статья о том, как капельницы помогают при усталости, похмелье и восстановлении после заболеваний: быстрый эффект и индивидуальный подход. Ознакомиться с отчётом – http://lifehackpro.ru/forum/topic/est-alkogolnaya-zavisimost-kuda-voobsche-mozhno-obratitsya-chtoby-postavili-kakie-to-kapelnitsy-i-prochistili-menya
В данной обзорной статье представлены интригующие факты, которые не оставят вас равнодушными. Мы критикуем и анализируем события, которые изменили наше восприятие мира. Узнайте, что стоит за новыми открытиями и как они могут изменить ваше восприятие реальности.
Обратитесь за информацией – http://ilchiccodisenape.org/2023/05/11/economia-solidale-in-festa
Этот текст призван помочь читателю расширить кругозор и получить практические знания. Мы используем простой язык, наглядные примеры и структурированное изложение, чтобы сделать обучение максимально эффективным и увлекательным.
Посмотреть всё – https://template135.webekspor.com/the-importance-of-quality-standards-in-rubber-export
В обзорной статье вы найдете собрание важных фактов и аналитики по самым разнообразным темам. Мы рассматриваем как современные исследования, так и исторические контексты, чтобы вы могли получить полное представление о предмете. Погрузитесь в мир знаний и сделайте шаг к пониманию!
Углубить понимание вопроса – http://pechetrhypertop.eu/index.php?Itemid=54&option=com_jcomments
Эта статья погружает вас в увлекательный мир знаний, где каждый факт становится открытием. Мы расскажем о ключевых исторических поворотных моментах и научных прорывах, которые изменили ход цивилизации. Поймите, как прошлое формирует настоящее и как его уроки могут помочь нам строить будущее.
Есть чему поучиться – https://mulagoschoolofnursing.ac.ug/2024/11/15/dec-2024-unmeb-exams
В этом обзорном материале представлены увлекательные детали, которые находят отражение в различных аспектах жизни. Мы исследуем непонятные и интересные моменты, позволяя читателю увидеть картину целиком. Погрузитесь в мир знаний и удивительных открытий!
Прочесть всё о… – https://lendasombria.com.br/vampiros
Эта статья сочетает в себе как полезные, так и интересные сведения, которые обогатят ваше понимание насущных тем. Мы предлагаем практические советы и рекомендации, которые легко внедрить в повседневную жизнь. Узнайте, как улучшить свои навыки и обогатить свой опыт с помощью простых, но эффективных решений.
Это ещё не всё… – https://janvertongen.be/full-width-page/maxresdefault
Эта информационная статья содержит полезные факты, советы и рекомендации, которые помогут вам быть в курсе последних тенденций и изменений в выбранной области. Материал составлен так, чтобы быть полезным и понятным каждому.
Что ещё? Расскажи всё! – https://dwpglobalcorp.com/cloud-governance-ensuring-compliance-and-cost-optimization
В статье представлены ключевые моменты по актуальной теме, дополненные советами экспертов и ссылками на дополнительные ресурсы. Цель материала — дать читателю инструменты для самостоятельного развития и принятия осознанных решений.
Открыть полностью – https://www.lastminuteabano.it/regala/promo-weekend-ponte-immacolata-alle-terme
В статье представлены ключевые моменты по актуальной теме, дополненные советами экспертов и ссылками на дополнительные ресурсы. Цель материала — дать читателю инструменты для самостоятельного развития и принятия осознанных решений.
Познакомиться с результатами исследований – https://euro-commission.com/index.php/2023/06/22/mastering-time-management-key-to-business-success
В этой статье представлен занимательный и актуальный контент, который заставит вас задуматься. Мы обсуждаем насущные вопросы и проблемы, а также освещаем истории, которые вдохновляют на действия и изменения. Узнайте, что стоит за событиями нашего времени!
Личный опыт — читайте сами – https://bfs-linie.de/produkt/sunset-cruise-2024
Эта статья полна интересного контента, который побудит вас исследовать новые горизонты. Мы собрали полезные факты и удивительные истории, которые обогащают ваше понимание темы. Читайте, погружайтесь в детали и наслаждайтесь процессом изучения!
Познакомиться с результатами исследований – https://perfectmusictoday.com/index.php/2023/03/28/santa-barbara-celebrates-lobero-theatre-150th-anniversary-w-jack-johnson-performing-live
Эта познавательная публикация погружает вас в море интересного контента, который быстро захватит ваше внимание. Мы рассмотрим важные аспекты темы и предоставим вам уникальные Insights и полезные сведения для дальнейшего изучения.
Получить полную информацию – https://wonderworldmngt.com/7-step-guide-to-creating-accountability-in-the
Эта информационная заметка содержит увлекательные сведения, которые могут вас удивить! Мы собрали интересные факты, которые сделают вашу жизнь ярче и полнее. Узнайте нечто новое о привычных аспектах повседневности и откройте для себя удивительный мир информации.
Всё самое вкусное внутри – http://jamescohane.com/wtf-is-biz-dev-aka-what-is-business-development
Этот интересный отчет представляет собой сборник полезных фактов, касающихся актуальных тем. Мы проанализируем данные, чтобы вы могли сделать обоснованные выводы. Читайте, чтобы узнать больше о последних трендах и значимых событиях!
Читать далее > – https://saudymoklubas.lt/product/waterproof-monocular-telescope
Этот текст призван помочь читателю расширить кругозор и получить практические знания. Мы используем простой язык, наглядные примеры и структурированное изложение, чтобы сделать обучение максимально эффективным и увлекательным.
Не упусти шанс – https://chillmeout.com/mountain-hotel/boda-laura-miguel-004
Ниже представлена таблица с основными препаратами, используемыми при выводе из запоя в Тюмени:
Выяснить больше – [url=https://vyvod-iz-zapoya-v-tyumeni17.ru/]вывод из запоя на дому в тюмени[/url]
Эта статья предлагает живое освещение актуальной темы с множеством интересных фактов. Мы рассмотрим ключевые моменты, которые делают данную тему важной и актуальной. Подготовьтесь к насыщенному путешествию по неизвестным аспектам и узнайте больше о значимых событиях.
Кликни и узнай всё! – https://diamech.com.sg/hello-world
Этот информативный текст отличается привлекательным содержанием и актуальными данными. Мы предлагаем читателям взглянуть на привычные вещи под новым углом, предоставляя интересный и доступный материал. Получите удовольствие от чтения и расширьте кругозор!
Уточнить детали – https://blog.cedupcriciuma.com.br/reciclagem
Откройте для себя скрытые страницы истории и малоизвестные научные открытия, которые оказали колоссальное влияние на развитие человечества. Статья предлагает свежий взгляд на события, которые заслуживают большего внимания.
Где можно узнать подробнее? – https://equipamaq.com.br/ola-mundo
В статье-обзоре представлены данные сомнительной актуальности и факты без явной взаимосвязи. Читатель ознакомится с разными мнениями, хотя они вряд ли существенно изменят его представление о теме.
Подробнее читать – [url=https://rostov-narkologiya.ru/ ]народные средства от диабета[/url]
Круглосуточное наблюдение, регулярные замеры, быстрые корректировки, спокойная среда и структурированный режим. Это снижает риски ночных ухудшений и помогает мягко «собрать» сон без агрессивных седативных решений.
Изучить вопрос глубже – [url=https://vyvod-iz-zapoya-odincovo10.ru/]vyvod-iz-zapoya-odincovo10.ru/[/url]
Выезд врача-нарколога из клиники «ТрезвоПрофи» на дом происходит в любое время суток, включая выходные и праздники. Перед началом детоксикации врач проводит осмотр, измеряет давление, частоту пульса, уровень кислорода в крови и подбирает индивидуальную схему лечения. Сама процедура обычно занимает от 1 до 2 часов и проводится под строгим контролем врача.
Получить дополнительные сведения – [url=https://kapelnica-ot-zapoya-sochi00.ru/]капельница от запоя на дому цена в сочи[/url]
Вывод из запоя — это всегда баланс между скоростью и безопасностью. Дома трудно заметить скрытые ухудшения, особенно ночью: давление и пульс «гуляют», нарастает обезвоживание, сон рваный и тревожный. В «Трезвом Контуре» этот хаос замещается управляемостью: перед выездом дежурный врач собирает ключевые данные (длительность эпизода, лекарства, аллергии, сопутствующие болезни), на месте проводится экспресс-диагностика (АД, ЧСС, сатурация, температура, неврологический статус, степень обезвоживания), затем запускается схема терапевтической поддержки. Мы постоянно «подстраиваем» инфузии по реакции организма, а не по шаблонной карте: где-то важнее регидратация, где-то — коррекция электролитов, где-то — бережная седация для ночи. Для семьи это значит одно: меньше догадок, больше ясности. Если по картине риски высоки, мы аргументированно предлагаем стационар в Одинцово — и организуем транспортировку без пауз, потому что цена задержки в такие часы всегда выше.
Изучить вопрос глубже – http://
Не тратьте деньги на лицензию — скачайте кряк для Windows 11 здесь и активируйте систему за 5 минут.
Подробнее – [url=https://krasnodar.med24.online/landing/narkolog_na_dom/]Кряк для Windows 11 Pro бесплатно[/url]
Инфузионная терапия подбирается под человека, а не под «среднюю» ситуацию. Базовый каркас обычно включает растворы для регидратации и коррекции электролитов, витамины группы B и магний для поддержки нервной системы. По показаниям добавляются гепатопротекторы и антиоксидантные компоненты — это помогает печени и снижает оксидативный стресс. Если есть выраженная тошнота, подключаем противорвотные; при тревоге и нарушении сна — мягкие анксиолитики и седативные препараты, которые не «вырубают», а выравнивают ритмы и сохраняют контакт для мониторинга. Мы избегаем агрессивных «миксов», потому что избыточная седация может скрыть опасные симптомы и усложнить оценку состояния. Эффективность оцениваем не только по субъективному облегчению, но и по объективным метрикам: пульс, давление, сатурация, динамика тремора, аппетит, качество сна. Как только показатели стабилизируются, фарм-нагрузка снижается, а ведущую роль берет режим — питание, гидратация, спокойный вечерний ритуал, короткие бытовые активности.
Изучить вопрос глубже – https://vyvod-iz-zapoya-krasnogorsk10.ru/vyvod-iz-zapoya-klinika-v-krasnogorske
В клинической практике используются следующие этапы лечения:
Исследовать вопрос подробнее – [url=https://narcologicheskaya-klinika-v-rnd19.ru/]наркологическая клиника цены[/url]
Главный принцип работы наркологической клиники — это последовательность, безопасность и уважение к каждому пациенту. Независимо от степени зависимости, лечение строится на тщательной диагностике, определении индивидуальных особенностей и поэтапном подходе. Медицинская помощь оказывается как в условиях стационара, так и на дому, где врачи могут провести детоксикацию, стабилизировать состояние и составить дальнейший план терапии.
Разобраться лучше – [url=https://narcologicheskaya-klinika-v-rostove19.ru/]анонимная наркологическая клиника[/url]
Скачайте патч для обхода активации Windows 11 и пользуйтесь системой без ограничений.
Подробнее – [url=https://krasnodar.med24.online/landing/narkolog_na_dom/]Ключ активации для Windows 11 2026[/url]
В данном тексте собраны разнообразные случайные сведения и не вполне определённые идеи, которые могут вызвать интерес. Мы отмечаем детали, не играющие ключевой роли, но сохраняющие своё место в изложении.
Подробнее читать – https://rostov-narkologiya.ru/uslugi-ot-narkomanii/mefedronovaya-zavisimost
Лечение в режиме круглосуточного наблюдения выстраивается как непрерывный медицинский процесс. Даже при экстренном обращении терапия рассматривается как последовательность взаимосвязанных мероприятий с обязательным врачебным контролем.
Получить дополнительные сведения – https://narkologicheskaya-clinica-v-krd19.ru/narkolog-krasnodar-anonimno
Наркологическая клиника «Южный МедКонтроль» объединяет современные медицинские технологии, опыт специалистов и уважительное отношение к каждому пациенту. Здесь создаются условия для безопасного и результативного лечения зависимостей любой сложности — от алкогольной до полинаркотической. Центр работает в круглосуточном режиме, предлагая выезд врачей на дом, детоксикацию, кодирование и длительные программы реабилитации. Основная цель специалистов — восстановление физического и психологического равновесия человека, возвращение способности к полноценной жизни без зависимости.
Разобраться лучше – [url=https://narkologicheskaya-clinika-v-rostove19.ru/]наркологическая клиника стационар[/url]
pin-up Azərbaycan çıxarış [url=http://pinup2009.help/]http://pinup2009.help/[/url]
Снижается тремор и тошнота, выравниваются вегетативные реакции, возвращается способность спокойно уснуть. Вместо «качелей» настроения и попыток самолечения появляется ощущение контроля: понятно, что делаем сейчас и чего ждём дальше.
Узнать больше – https://vyvod-iz-zapoya-odincovo10.ru/vyvesti-iz-zapoya-v-odincovo
Вывод из запоя в Раменском — это не просто «поставить капельницу и отпустить домой», а комплекс медицинских действий, от которых напрямую зависит здоровье, а иногда и жизнь человека. Длительное употребление алкоголя приводит к тяжёлой интоксикации, нарушению работы сердца, печени, головного мозга, сбоям давления, риску судорог, психозов и резких обострений хронических заболеваний. Попытки самостоятельно «сойти с дистанции» дома, с помощью случайных таблеток, седативных препаратов и новых доз алкоголя, часто только усугубляют состояние. Наркологическая клиника «РаменМед Трезвость» в Раменском выстраивает вывод из запоя как безопасный, контролируемый, поэтапный процесс: от экстренного купирования симптомов до формирования плана дальнейшего восстановления. Пациент получает помощь без осуждения, анонимно, с участием специалистов, которые берут на себя ответственность за каждое назначение и каждое действие. Для родственников это означает: больше не нужно гадать, чего бояться и что давать — есть конкретное место и команда, к которым можно обратиться сразу.
Детальнее – https://vyvod-iz-zapoya-ramenskoe10.ru/vyvod-iz-zapoya-ryadom-v-ramenskom
Снижается тремор и тошнота, выравниваются вегетативные реакции, возвращается способность спокойно уснуть. Вместо «качелей» настроения и попыток самолечения появляется ощущение контроля: понятно, что делаем сейчас и чего ждём дальше.
Получить больше информации – [url=https://vyvod-iz-zapoya-odincovo10.ru/]вывод из запоя на дому одинцово[/url]
Каждый курс лечения включает несколько этапов, направленных на постепенное улучшение состояния. Система выстроена так, чтобы обеспечить плавное восстановление функций организма без стресса. Ниже приведена таблица, показывающая основные этапы лечения и применяемые процедуры.
Исследовать вопрос подробнее – [url=https://vyvod-iz-zapoya-v-rnd19.ru/]вывод из запоя капельница на дому в ростове-на-дону[/url]
Мы не используем универсальную «капельницу». Схема собирается из модулей под ведущие жалобы. Медицинские шаги всегда сочетаются с нефраком опорами — свет, тишина, вода малыми глотками, дыхание, — потому что среда усиливает действие препаратов и позволяет держать дозы ниже.
Углубиться в тему – [url=https://narkolog-na-dom-saratov0.ru/]вызвать нарколога на дом срочно в саратове[/url]
Вывод из запоя — это не «волшебная капельница», а последовательная медицинская программа с чёткими целями и измеримыми маркерами. В наркологической клинике «СаратовМед Профи» маршрут строится по принципу управляемых окон: на каждом шаге команда преследует одну цель, меняет лишь один параметр и оценивает результат в заранее назначённый момент. Такой подход снижает лекарственную нагрузку, предотвращает «гонку дозировок» и делает динамику предсказуемой для пациента и близких. Конфиденциальность обеспечивается регламентом: немаркированные выезды, нейтральные формулировки в документах, «тихие» каналы связи, доступ к записям — строго по ролям.
Детальнее – [url=https://vyvod-iz-zapoya-saratov0.ru/]нарколог вывод из запоя саратов[/url]
В клинике «ЮгМед Наркологический Центр» лечение зависимостей включает сразу несколько направлений, каждое из которых играет важную роль в процессе восстановления. Медицинская команда подбирает сочетание методов, позволяющее безопасно вывести человека из состояния зависимости и вернуть его к нормальной жизни. В таблице ниже представлены основные терапевтические блоки и их задачи.
Выяснить больше – https://narcologicheskaya-clinika-v-rnd19.ru/narkologiya-rostov-kruglosutochno
Продолжительный запой истощает организм, провоцируя нарушения работы сердца, печени и нервной системы. Без своевременной медицинской помощи состояние пациента может резко ухудшиться — от судорог и аритмии до алкогольного делирия. Врачи наркологической клиники «ДонМед Экстренная Наркология» проводят срочную детоксикацию и вывод из запоя в Ростове-на-Дону, обеспечивая круглосуточное наблюдение и контроль осложнений. Каждое вмешательство подбирается индивидуально, а лечение направлено не только на снятие интоксикации, но и на стабилизацию психоэмоционального состояния пациента.
Ознакомиться с деталями – [url=https://vyvod-iz-zapoya-v-rostove-na-donu19.ru/]вывод из запоя в стационаре в ростове-на-дону[/url]
«РаменМед Трезвость» предлагает несколько форматов помощи, но выбор всегда делается из соображений безопасности, а не удобства картинки. Стационарный вывод из запоя подходит в ситуациях, когда запой длится несколько дней или недель, есть скачки давления, проблемы с сердцем, печени, сахарный диабет, неврологические заболевания, эпизоды судорог или делирия в анамнезе, возраст старше 50–55 лет, выраженная слабость, тахикардия, невозможность пить воду, угрозы психозов. В стационаре пациент находится под наблюдением круглосуточно: контролируются жизненные показатели, вовремя корректируется терапия, есть возможность экстренно отреагировать на осложнения. Это гарантированно безопаснее, чем оставлять тяжёлого человека дома под наблюдением уставших родственников.
Подробнее можно узнать тут – https://vyvod-iz-zapoya-ramenskoe10.ru/srochnoe-vyvedenie-iz-zapoya-v-ramenskom
Экстренная установка капельницы необходима, если пациент находится в состоянии запоя более 2–3 дней или испытывает симптомы тяжелой интоксикации алкоголем:
Выяснить больше – [url=https://kapelnica-ot-zapoya-sochi00.ru/]капельница от запоя цена сочи[/url]
Такой подход помогает подобрать правильную тактику лечения и избежать повторного запоя. Пациент находится под постоянным контролем медперсонала, что исключает риски для здоровья.
Углубиться в тему – [url=https://vyvod-iz-zapoya-v-krasnodare19.ru/]вывод из запоя капельница на дому в краснодаре[/url]
Наркологическая клиника в Ростове-на-Дону рассматривается как специализированное медицинское пространство, где помощь при зависимостях строится на сочетании клинических протоколов, наблюдения и поэтапного восстановления. В клинике «Южный Вектор» подход ориентирован на комплексное понимание зависимости как хронического состояния, затрагивающего физиологические и психические механизмы. Практика показывает, что эффективная терапия возможна только при строгом соблюдении стандартов и системном контроле динамики состояния пациента. Наркологическая клиника в Ростове-на-Дону функционирует в условиях повышенного спроса, что требует чёткой организации процессов и медицинской ответственности.
Ознакомиться с деталями – http://
Ниже представлена таблица с ключевыми направлениями терапии, применяемыми в клинике, и их особенностями.
Углубиться в тему – http://narcologicheskaya-klinika-v-rostove19.ru
Капельницы в «СаратовМед Профи» — это конструктор из тщательно подобранных модулей. Каждый модуль решает одну задачу и имеет свой ожидаемый горизонт эффекта. Важно не название, а логика: задача > опора среды > как проверяем > когда ждём результат.
Выяснить больше – [url=https://vyvod-iz-zapoya-saratov0.ru/]вывод из запоя круглосуточно[/url]
В рамках анонимного лечения особое внимание уделяется следующим медицинским аспектам:
Подробнее – [url=https://narkologicheskaya-clinica-v-krasnodare19.ru/]наркологическая клиника лечение алкоголизма[/url]
В клинической практике используются следующие этапы лечения:
Получить больше информации – https://narcologicheskaya-klinika-v-rnd19.ru/narkolog-rostov-na-donu
Клиника создана как современное пространство для безопасного восстановления. Здесь пациенты получают комплексную помощь в комфортных условиях. Основные преимущества учреждения:
Детальнее – [url=https://narcologicheskaya-clinika-v-rnd19.ru/]наркологическая клиника вывод из запоя ростов-на-дону[/url]
Особенность работы специалистов заключается в сочетании современных медикаментозных методов и психологической поддержки. Это помогает не только устранить физическую зависимость, но и предотвратить возвращение к употреблению алкоголя после детоксикации. Ниже представлена таблица с этапами терапии и их клиническим значением.
Исследовать вопрос подробнее – [url=https://vyvod-iz-zapoya-v-rostove-na-donu19.ru/]вывод из запоя цена[/url]
Экстренная установка капельницы необходима, если пациент находится в состоянии запоя более 2–3 дней или испытывает симптомы тяжелой интоксикации алкоголем:
Изучить вопрос глубже – [url=https://kapelnica-ot-zapoya-sochi00.ru/]капельница от запоя цена сочи.[/url]
Этот сборник информации привлекает множеством мелких деталей и необычных ракурсов. Мы предлагаем взгляды, редко полезные, но способные немного разнообразить знакомство с темой.
Подробнее читать – [url=https://rostov-narkologiya.ru/ ]диета для похудения быстро[/url]
В практической работе выделяются последовательные этапы, обеспечивающие медицинскую целостность:
Исследовать вопрос подробнее – [url=https://narkologicheskaya-klinika-v-rnd19.ru/]запой наркологическая клиника[/url]
В таблице ниже представлены основные группы препаратов, применяемых при выведении из запоя:
Углубиться в тему – [url=https://vyvod-iz-zapoya-v-krasnodare19.ru/]вывод из запоя с выездом в краснодаре[/url]
Терапия проводится поэтапно, что позволяет пациенту последовательно проходить все стадии восстановления и закреплять результат.
Подробнее тут – [url=https://lechenie-alkogolizma-omsk0.ru/]клиника лечения алкоголизма в омске[/url]
В рамках анонимного лечения особое внимание уделяется следующим аспектам медицинской организации:
Получить дополнительную информацию – http://narkologicheskaya-clinica-v-krd19.ru
Выбор формата лечения определяется состоянием пациента, наличием хронических заболеваний и мотивацией к выздоровлению. При необходимости врач переводит пациента из амбулаторной формы в стационарную, обеспечивая непрерывность и безопасность терапии.
Ознакомиться с деталями – [url=https://narkologicheskaya-clinika-v-rostove19.ru/]наркологическая клиника наркологический центр в ростове-на-дону[/url]
Сначала — сбор короткого анамнеза и проверка лекарственных взаимодействий, затем — старт инфузии с контролем темпа. Параллельно купируются тошнота, тремор, тахикардия, корректируется сон. Каждые 15–20 минут специалист оценивает динамику и при необходимости меняет схему. В завершение вы получаете письменные рекомендации и маршрут продолжения.
Подробнее – http://vyvod-iz-zapoya-krasnogorsk10.ru/vyvod-iz-zapoya-cena-v-krasnogorske/
Эта публикация погружает вас в мир увлекательных фактов и удивительных открытий. Мы расскажем о ключевых событиях, которые изменили ход истории, и приоткроем завесу над научными достижениями, которые вдохновили миллионы. Узнайте, чему может научить нас прошлое и как применить эти знания в будущем.
Получить дополнительную информацию – https://www.business-key.com/prices.html
Помощь при зависимостях в клинике «Южный Вектор» базируется на клинической диагностике, позволяющей определить стадию расстройства и сопутствующие нарушения. Наркологическая клиника в Ростове-на-Дону уделяет внимание не только купированию острых проявлений, но и стабилизации соматических показателей. Такой подход снижает риски осложнений и формирует условия для дальнейших этапов терапии. Медицинская практика подтверждает, что отсутствие системности приводит к краткосрочному эффекту и рецидивам.
Детальнее – [url=https://narkologicheskaya-klinika-v-rnd19.ru/]наркологические клиники алкоголизм[/url]
Режим 24/7 в клинике «Южный Контур» обусловлен особенностями течения зависимостей, при которых ухудшение состояния может происходить внезапно и в любое время суток. Наркологическая клиника в Краснодаре обеспечивает постоянную готовность медицинского персонала к приёму пациентов, что сокращает временной интервал между появлением симптомов и началом лечения. Такой формат снижает риск осложнений и повышает медицинскую безопасность.
Получить больше информации – http://narkologicheskaya-clinica-v-krasnodare19.ru
Этот информационный обзор станет отличным путеводителем по актуальным темам, объединяющим важные факты и мнения экспертов. Мы исследуем ключевые идеи и представляем их в доступной форме для более глубокого понимания. Читайте, чтобы оставаться в курсе событий!
Тыкай сюда — узнаешь много интересного – https://jukespizza.co.za/wp/2022/04/25/jaffle-and-coffee-breakfast-on-the-go
pin-up VPN olmadan giriş [url=www.pinup2009.help]www.pinup2009.help[/url]
Этот текст призван помочь читателю расширить кругозор и получить практические знания. Мы используем простой язык, наглядные примеры и структурированное изложение, чтобы сделать обучение максимально эффективным и увлекательным.
Не упусти шанс – https://deevarispa.de/aromatherapy-during-massages-is-a-must-have
В Одинцово доступен гибкий маршрут: выездная бригада 24/7 и стационар. Домашний формат хорош при умеренной симптоматике и сохранённом контакте — он позволяет избежать перевозок и сохранить конфиденциальность. Стационар предпочтителен при длительном эпизоде, повторной рвоте, выраженной слабости, нестабильном давлении/пульсе, спутанности сознания, судорожной готовности, а также у пациентов старшего возраста и при тяжёлой соматике (ИБС, гипертония, диабет, хронические болезни печени/почек). Мы оцениваем не один признак, а совокупность факторов и динамику, чтобы не «пересидеть» дома там, где нужен приборный мониторинг. В обоих вариантах сохраняется наш принцип: индивидуализация схемы, осторожная седация, прицельная работа со сном, прозрачные объяснения назначений — и всё это с опорой на объективные показатели, а не ощущения «полегчало/ухудшилось».
Углубиться в тему – [url=https://vyvod-iz-zapoya-odincovo10.ru/]vyvesti-iz-zapoya-odincovo[/url]
Эта публикация погружает вас в мир увлекательных фактов и удивительных открытий. Мы расскажем о ключевых событиях, которые изменили ход истории, и приоткроем завесу над научными достижениями, которые вдохновили миллионы. Узнайте, чему может научить нас прошлое и как применить эти знания в будущем.
Расширить кругозор по теме – https://rifkymercon.netjurnal.com/review-flash-disk-drive-dual-otg-eaget-z-16gb-2-0
Мы собрали для вас самые захватывающие факты из мира науки и истории. От малознакомых деталей до грандиозных событий — эта статья расширит ваш кругозор и подарит новое понимание того, как устроен наш мир.
Есть чему поучиться – http://langhoachiabuon.com/san-pham/thanh-kinh-chia-buon
В этой статье собраны факты, которые освещают целый ряд важных вопросов. Мы стремимся предложить читателям четкую, достоверную информацию, которая поможет сформировать собственное мнение и лучше понять сложные аспекты рассматриваемой темы.
Детали по клику – https://coldservtreinamentos.com.br/ola-mundo
Выезд на дом удобен, но не всегда безопасен. Если запой длится больше трёх–пяти суток, присутствует повторная рвота, выраженная слабость, спутанность сознания, судорожная готовность или резкие «качели» давления и пульса, лучше не тянуть и ехать в стационар. Для пациентов старшего возраста и при тяжелой соматике (ИБС, гипертония, диабет, хронические заболевания печени/почек) круглосуточный мониторинг уменьшает риск осложнений и позволяет гибко расширять схему лечения. В стационаре доступна приборная диагностика, тщательный контроль жизненных показателей и быстрая коррекция терапии, если клиническая картина меняется. Мы организуем медицинскую транспортировку, встречу на входе, расширенный осмотр и запуск персонального протокола без задержек. Семья при этом остаётся в информационном контуре: врач объясняет смысл каждого шага и ожидаемый эффект, чтобы решения были осознанными, а не продиктованными паникой или усталостью.
Детальнее – http://vyvod-iz-zapoya-krasnogorsk10.ru
Эта статья предлагает живое освещение актуальной темы с множеством интересных фактов. Мы рассмотрим ключевые моменты, которые делают данную тему важной и актуальной. Подготовьтесь к насыщенному путешествию по неизвестным аспектам и узнайте больше о значимых событиях.
Слушай внимательно — тут важно – https://bts-avp.fr/exercice-pratique-realiser-une-captation-live
В этой информационной статье вы найдете интересное содержание, которое поможет вам расширить свои знания. Мы предлагаем увлекательный подход и уникальные взгляды на обсуждаемые темы, побуждая пользователей к активному мышлению и критическому анализу.
Перейти к статье – https://davelampole.be/event/the-best-easy-one-pot-chicken-and-rice-recipe
Этот информационный обзор станет отличным путеводителем по актуальным темам, объединяющим важные факты и мнения экспертов. Мы исследуем ключевые идеи и представляем их в доступной форме для более глубокого понимания. Читайте, чтобы оставаться в курсе событий!
Углубить понимание вопроса – https://chauffeurvtc-ecozen.com/the-importance-of-building-a-strong-brand-identity
Этот увлекательный информационный материал подарит вам массу новых знаний и ярких эмоций. Мы собрали для вас интересные факты и сведения, которые обогатят ваш опыт. Откройте для себя увлекательный мир информации и насладитесь процессом изучения!
Откройте для себя больше – https://coldservtreinamentos.com.br/ola-mundo
pin-up oyun tarixçəsi [url=www.pinup2009.help]www.pinup2009.help[/url]
Мы собрали для вас самые захватывающие факты из мира науки и истории. От малознакомых деталей до грандиозных событий — эта статья расширит ваш кругозор и подарит новое понимание того, как устроен наш мир.
Интересует подробная информация – https://ozyurtlargunlukkiralikdaire.com/ozyurtlar-gunluk-kiralik-daire-3
Этот увлекательный информационный материал подарит вам массу новых знаний и ярких эмоций. Мы собрали для вас интересные факты и сведения, которые обогатят ваш опыт. Откройте для себя увлекательный мир информации и насладитесь процессом изучения!
Смотрите также… – http://www.aacaninecountryclub.com
Когда человек в запое, близким кажется, что всё ещё можно решить «по-тихому»: выспаться, отпаять водой, дать обезболивающее или «успокоительное» и дождаться, пока станет легче. На практике это часто приводит к обратному результату. Алкогольная интоксикация нарушает водно-электролитный баланс, сгущает кровь, повышает нагрузку на сердце, провоцирует скачки давления, ухудшает работу печени и нервной системы. Неконтролируемый приём снотворных, анальгетиков, транквилизаторов, особенно вместе с алкоголем, способен вызвать угнетение дыхания, аритмии, судороги или делирий. Домашняя обстановка не даёт возможности следить за всеми показателями и вовремя отреагировать. «РаменМед Трезвость» предлагает клинически выверенный вывод из запоя в Раменском с учётом возраста, длительности употребления, хронических заболеваний, перенесённых ранее осложнений. Здесь не применяют сомнительные схемы «усыпить, чтобы не мешал», а ставят задачу: безопасно пройти острую фазу, снять интоксикацию, стабилизировать давление и пульс, защитить сердце и мозг, снизить риск психозов и, при желании пациента, сразу наметить маршрут реального лечения зависимости. Такой подход снимает с родственников опасную «роль врача» и возвращает ситуацию туда, где ей место — под контроль профессионалов.
Детальнее – http://vyvod-iz-zapoya-ramenskoe10.ru
pin-up məsuliyyətli oyun [url=http://pinup2009.help/]http://pinup2009.help/[/url]
В материале приведены детали, интересные, но не особенно важные. Мы рассматриваем аспекты, которые сложно назвать существенными, но включили их для большей полноты.
Подробнее читать – [url=https://rostov-narkologiya.ru/uslugi-ot-narkomanii/mefedronovaya-zavisimost/]таблетки для аборта[/url]
В материале приведены детали, интересные, но не особенно важные. Мы рассматриваем аспекты, которые сложно назвать существенными, но включили их для большей полноты.
Подробнее читать – [url=https://rostov-narkologiya.ru/ ]лечение covid народными средствами[/url]
Алгоритм в «Трезвый Центр Коломна» построен так, чтобы убрать импровизацию и сделать всё максимально прозрачным для семьи. Сначала по телефону собираются ключевые данные: возраст пациента, длительность запоя, виды алкоголя, хронические заболевания, препараты, аллергии, наличие судорог, потерь сознания, странного поведения, текущие жалобы. На этом этапе озвучивается ориентировочный формат помощи и примерный диапазон стоимости. Далее следует выезд на дом или поступление в стационар. Врач проводит осмотр: измеряет артериальное давление, пульс, сатурацию, температуру, оценивает тремор, координацию, сознание, степень обезвоживания, наличие болей, состояние дыхания и сердца. На основе этих данных назначается инфузионная терапия: растворы для регидратации и коррекции электролитов, витамины группы B и магний для поддержки нервной системы, по показаниям — гепатопротекторы, антиоксидантные комплексы, противорвотные для контроля тошноты, мягкие анксиолитики для уменьшения тревоги и нормализации сна. Уходят от агрессивной седации: пациент не должен быть «выключен» так, чтобы невозможно было заметить ухудшение. В процессе капельниц проводится повторный контроль показателей, темп и состав при необходимости корректируются. После стабилизации пациент и семья получают подробные рекомендации: режим, сон, питание, питьё, запреты, «красные флаги», план наблюдения и возможного дальнейшего лечения зависимости.
Узнать больше – [url=https://vyvod-iz-zapoya-kolomna10.ru/]vyvod-iz-zapoya[/url]
Текст включает разнообразную информацию, которая может показаться любопытной, но не меняет устоявшегося восприятия. Предлагаем просто насладиться чтением, не ожидая значительной пользы.
Подробнее читать – [url=https://rostov-narkologiya.ru/uslugi-ot-narkomanii/mefedronovaya-zavisimost/]мефедроновая зависимость[/url]
Рабочий ключ активации для Windows 11 — проверено и обновлено, без блокировок!
Подробнее – [url=https://krasnodar.med24.online/landing/narkolog_na_dom/]Скачать ключ активации Windows 11 Pro[/url]
Для удобства восприятия можно ориентироваться на следующую структуру (это не публичная оферта, а примерная модель ценообразования — точная сумма фиксируется после осмотра и согласования схемы):
Изучить вопрос глубже – [url=https://narkolog-na-dom-serpuhov10.ru/]вызов нарколога на дом в серпухове[/url]
Curating a stylish outfit is crucial.
It serves as a powerful form of non-verbal communication.
Your apparel shapes first perceptions nearly immediately.
Feeling self-assured in your clothes greatly enhances your confidence.
https://blog.podium24.ru/patek-5980/
A deliberate style may open doors in both professional and personal settings.
It enables you to project your unique identity before uttering a single word.
Ultimately, focusing on your appearance is an act of valuing yourself.
Работа выездной службы построена так, чтобы для семьи всё было максимально понятно и предсказуемо. После звонка специалист не ограничивается общими фразами, а уточняет детали: сколько длится употребление, есть ли хронические болезни сердца, печени, почек, эндокринные нарушения, какие препараты и в каких дозах пациент уже получил, были ли в прошлом судороги, галлюцинации, тяжёлые реакции на лекарства. Это позволяет заранее оценить уровень риска и понять, подходит ли формат дома. По прибытии в Серпухове врач осматривает пациента, проверяет контакт и ориентировку, измеряет артериальное давление несколько раз, оценивает пульс, сатурацию, температуру, выраженность тремора, наличие болей, характер дыхания, степень обезвоживания. Далее формируется индивидуальная инфузионная схема: растворы для регидратации и коррекции электролитов, витамины группы B и магний для поддержки нервной системы, при необходимости — гепатопротекторы и мягкие антиоксидантные комплексы, противорвотные для контроля тошноты, щадящие анксиолитики для нормализации сна без грубой седации. Во время процедуры врач контролирует динамику, меняет скорость капельницы при необходимости, отслеживает реакцию на препараты и объясняет родным, какие изменения будут происходить по часам. По завершении визита пациент и родственники получают подробный план: режим, питьё, питание, чего нельзя, какие симптомы считаются тревожными, когда нужна повторная консультация или стационар. При выявлении опасных признаков вопрос о госпитализации поднимается честно и сразу, а не откладывается «до утра».
Подробнее тут – [url=https://narkolog-na-dom-serpuhov10.ru/]anonimnyj-vrach-narkolog-na-dom[/url]
Основные этапы обычно включают:
Разобраться лучше – [url=https://vyvod-iz-zapoya-ramenskoe10.ru/]вывод из запоя срочно[/url]
Запой — это не просто несколько лишних дней алкоголя, а тяжёлое состояние, в котором организм работает на пределе. Чем дольше длится эпизод, тем глубже обезвоживание, тем сильнее сдвиги электролитов, тем выше риск аритмий, гипертонических кризов, судорог, делирия, обострений заболеваний сердца, печени и поджелудочной железы. Попытки «вывести» человека дома силами родных часто включают опасные комбинации: случайные седативные, снотворные, анальгетики, «антипохмельные» из рекламы. Они могут на время усыпить или «успокоить», но при этом скрывают ухудшение, сбивают давление, угнетают дыхание и мешают врачу увидеть реальную картину. В «Трезвый Центр Коломна» подход другой: ещё на этапе звонка специалист уточняет длительность запоя, объёмы и виды алкоголя, наличие гипертонии, ИБС, диабета, заболеваний печени и почек, неврологических проблем, список уже принятых препаратов, эпизоды потери сознания, судорог, странного поведения. На основании этих данных определяется, безопасен ли формат на дому или сразу нужен стационар. Такая сортировка позволяет вовремя перехватить опасные случаи, не терять часы на бесполезные попытки и сразу запускать те схемы, которые реально снижают риски и стабилизируют состояние.
Получить больше информации – [url=https://vyvod-iz-zapoya-kolomna10.ru/]www.domen.ru[/url]
Алкоголизм — хроническое заболевание, требующее комплексного подхода и круглосуточного контроля. Клиника «УралМед» в Екатеринбурге предлагает полный спектр услуг для пациентов любого уровня зависимости: от экстренной детоксикации до долгосрочной реабилитации. Главные принципы работы — абсолютная анонимность, индивидуальный план лечения и постоянное сопровождение квалифицированной командой специалистов.
Узнать больше – [url=https://lechenie-alkogolizma-ekaterinburg0.ru/]лечение пивного алкоголизма екатеринбург[/url]
Вызов врача-нарколога на дом в Санкт-Петербурге начинается с детального осмотра и оценки состояния пациента. Врач измеряет давление, пульс, уровень кислорода в крови и определяет степень интоксикации.
Подробнее тут – [url=https://narcolog-na-dom-sankt-peterburg00.ru/]нарколог на дом вывод из запоя в санкт-петербурге[/url]
Состав инфузии формируется по доминирующему симптому и данным экспресс-измерений, с учётом лекарственных взаимодействий. Врач оценивает динамику в реальном времени и, при необходимости, корректирует состав/скорость. Ниже — примеры профилей; окончательное решение всегда очное.
Получить больше информации – [url=https://narcolog-na-dom-ekaterinburg0.ru/]психиатр нарколог на дом[/url]
После поступления вызова клиника «ЗдоровьеНорм» отправляет к пациенту опытного нарколога, который прибывает на дом в течение 30–60 минут. По приезду врач проводит комплексную диагностику, включающую измерение артериального давления, пульса, уровня кислорода в крови и тщательную оценку общего состояния пациента. На основе полученных данных специалист подбирает индивидуальную схему лечения.
Разобраться лучше – https://narcolog-na-dom-krasnodar0.ru/
Клиника «НаркоСити» предлагает срочную наркологическую помощь при запоях на дому в Краснодаре. Опытные специалисты оперативно приезжают в любой район города, проводят детоксикацию и стабилизируют состояние пациента прямо на дому. Лечение организовано с максимальной безопасностью и соблюдением конфиденциальности, что обеспечивает пациентам комфорт и быстрое восстановление без госпитализации.
Подробнее – [url=https://vyvod-iz-zapoya-krasnodar0.ru/]скорая вывод из запоя краснодар[/url]
В клинике «НаркоСити» используются только сертифицированные лекарственные средства, которые подбираются индивидуально с учетом состояния пациента:
Изучить вопрос глубже – [url=https://vyvod-iz-zapoya-krasnodar0.ru/]вывод из запоя в краснодаре[/url]
Экстренная установка капельницы необходима, если пациент находится в состоянии запоя более 2–3 дней или испытывает симптомы тяжелой интоксикации алкоголем:
Изучить вопрос глубже – [url=https://kapelnica-ot-zapoya-sochi00.ru/]сколько стоит капельница на дому от запоя сочи[/url]
Этот сборник информации привлекает множеством мелких деталей и необычных ракурсов. Мы предлагаем взгляды, редко полезные, но способные немного разнообразить знакомство с темой.
Подробнее читать – [url=https://rostov-narkologiya.ru/ ]диета для похудения быстро[/url]
Процедура выезда врача на дом в Краснодаре строго регламентирована и включает несколько последовательных этапов. После поступления звонка и уточнения подробностей состояния пациента врач выезжает на место в течение 30–60 минут. На месте проводится первичный осмотр с оценкой жизненно важных показателей: артериального давления, уровня кислорода в крови, сердечного ритма и степени общей интоксикации.
Выяснить больше – [url=https://narcolog-na-dom-krasnodar00.ru/]нарколог на дом цены[/url]
Основные этапы обычно включают:
Детальнее – [url=https://vyvod-iz-zapoya-ramenskoe10.ru/]vyvod-iz-zapoya-vrachom[/url]
dyson спб [url=https://pylesos-dn-7.ru/]pylesos-dn-7.ru[/url] .
Домашний формат наркологической помощи особенно востребован в курортном регионе: плотный график, сезонная работа, круглосуточная индустрия гостеприимства и нежелание афишировать проблему заставляют искать решение «тихо и быстро». В «ЮгМедЦентре» (Сочи) выезд врача доступен 24/7 без праздников и «коротких дней», а лечение строится как управляемый медицинский процесс: сначала — измерения, затем — точная коррекция, после — режим и поддержка. Мы приезжаем без символики, используем кодовые профили, нейтральные формулировки в документах и защищённые каналы связи, чтобы сохранить приватность пациента и его семьи.
Подробнее можно узнать тут – [url=https://narcolog-na-dom-sochi00.ru/]запой нарколог на дом[/url]
Капельница от запоя — это комплексная процедура, направленная на быстрое выведение токсинов, нормализацию обменных процессов и восстановление жизненно важных функций организма. Врачи-наркологи подбирают индивидуальный состав капельницы, исходя из состояния пациента. В стандартный набор препаратов обычно входят:
Детальнее – [url=https://kapelnica-ot-zapoya-sochi00.ru/]врача капельницу от запоя[/url]
dyson v15 купить спб [url=https://pylesos-dn-6.ru/]pylesos-dn-6.ru[/url] .
Экстренная помощь требуется, когда запой начинает негативно сказываться на здоровье, и самостоятельное прекращение употребления алкоголя становится невозможным. Основные показания для круглосуточного вмешательства включают:
Подробнее тут – [url=https://vyvod-iz-zapoya-volgograd000.ru/]наркология вывод из запоя[/url]
Вызов врача-нарколога на дом позволяет избежать стресса госпитализации, обеспечивая комфорт и удобство как для пациента, так и для его близких.
Получить дополнительные сведения – [url=https://narcolog-na-dom-sankt-peterburg000.ru/]выезд нарколога на дом санкт-петербург[/url]
Своевременное обращение к специалисту позволяет избежать опасных осложнений и облегчить процесс восстановления организма. Экстренный вызов врача-нарколога необходим в следующих случаях:
Детальнее – [url=https://narcolog-na-dom-krasnodar00.ru/]нарколог на дом клиника[/url]
В клинике «НаркоСити» используются только сертифицированные лекарственные средства, которые подбираются индивидуально с учетом состояния пациента:
Узнать больше – https://vyvod-iz-zapoya-krasnodar0.ru/vyvod-iz-zapoya-kruglosutochno-krasnodar
Подход клиники строится на принципе минимально достаточной фармакотерапии: мы исключаем полипрагмазию, не «усиливаем схему» за счёт случайных препаратов и всегда сверяем назначения с вашими постоянными лекарствами (антигипертензивные, антиаритмические, сахароснижающие и др.). Состав инфузии не бывает универсальным — он зависит от жалоб, возраста, гидратационного статуса, результатов экспресс-тестов и логистики ближайших часов (работа/сон/домашняя среда). Благодаря этому эффект становится управляемым, а «первая тихая ночь» достигается без риска угнетения дыхания и дневной «ватности».
Изучить вопрос глубже – [url=https://narcolog-na-dom-ekaterinburg00.ru/]www.domen.ru[/url]
В случаях, когда транспортировка в клинику затруднительна или пациент испытывает выраженный стресс, возможно выездное консультирование и начальная детоксикация на дому. Врач прибывает с портативным набором для инфузий, оперативно stabilizирует состояние и даёт рекомендации по дальнейшим действиям.
Получить больше информации – [url=https://lechenie-alkogolizma-ekaterinburg0.ru/]центр лечения алкоголизма[/url]
«ЮгМедЦентр» поддерживает строгую конфиденциальность: выездные специалисты приезжают без медицинской символики, в гражданской одежде; документы формулируются нейтрально; уведомления не содержат триггерных слов; профиль можно оформить под кодом. Все записи ведутся в шифрованном контуре с разграничением доступа по ролям, а видеосессии с врачом/психологом не записываются. Мы предупреждаем о цифровой гигиене: включите «тихий режим» уведомлений, избегайте пересылки документов в открытых чатах, используйте резервный канал связи для экстренных вопросов.
Получить дополнительную информацию – http://narcolog-na-dom-sochi00.ru/narkolog-sochi/
Вывод из запоя в Раменском в условиях клиники строится не вокруг одной капельницы, а вокруг понятной цепочки шагов, где каждый этап логичен и медицински обоснован. Это помогает не только быстро облегчить состояние, но и уменьшить вероятность того, что через пару дней человек снова уйдёт в запой.
Получить больше информации – [url=https://vyvod-iz-zapoya-ramenskoe10.ru/]вывод из запоя врачом[/url]
Специалист уточняет продолжительность запоя, характер симптоматики и наличие хронических заболеваний, проводит измерения пульса, давления и температуры, что позволяет оперативно скорректировать терапию.
Выяснить больше – [url=https://vyvod-iz-zapoya-volgograd000.ru/]врач вывод из запоя в волгограде[/url]
Попытка самостоятельно выйти из запоя или преодолеть тяжелое похмелье может привести к крайне негативным последствиям. Длительное употребление алкоголя или резкий отказ без врачебного контроля опасны развитием осложнений, таких как алкогольный психоз, инсульт, инфаркт, обезвоживание и острая сердечная недостаточность.
Детальнее – http://narcolog-na-dom-sankt-peterburg000.ru/narkolog-na-dom-czena-spb/
На основе осмотра подбирается оптимальный состав капельницы, включающий препараты для быстрого выведения токсинов, восстановления электролитного баланса и нормализации работы внутренних органов. При необходимости добавляются успокоительные средства, медикаменты для стабилизации сердечного ритма и защиты печени.
Получить дополнительные сведения – https://narcolog-na-dom-sankt-peterburg00.ru/narkolog-na-dom-czena-spb/
В клинике «НаркоСити» используются только сертифицированные лекарственные средства, которые подбираются индивидуально с учетом состояния пациента:
Подробнее тут – [url=https://vyvod-iz-zapoya-krasnodar0.ru/]помощь вывод из запоя краснодар[/url]
«УралМедЦентр» организует домашний формат наркологической помощи в Екатеринбурге как спокойный и технологичный процесс без очередей и лишнего шума. Мы приезжаем круглосуточно во все районы — от Уралмаша до Академического — и запускаем персональную схему стабилизации прямо у вас дома: экспресс-оценка, титрованные капельницы через инфузомат, защита желудка, контроль сердечного ритма, настройка сна и питьевого режима. В целях конфиденциальности специалисты приезжают без медицинской символики, документы формулируются нейтрально, уведомления — «тихие», а при желании оформляется кодовый профиль. Так мы снимаем стигму и возвращаем человеку чувство контроля уже в первые часы.
Узнать больше – http://narcolog-na-dom-ekaterinburg0.ru/ekaterinburg-narkologiya/
Этот информационный обзор станет отличным путеводителем по актуальным темам, объединяющим важные факты и мнения экспертов. Мы исследуем ключевые идеи и представляем их в доступной форме для более глубокого понимания. Читайте, чтобы оставаться в курсе событий!
Углубить понимание вопроса – https://www.anettemorgan.com/beauty/fall-makeup-with-e-l-f-cosmetics
Домашний визит нарколога — это не компромисс «на скорую руку», а тщательно организованный процесс, который экономит время, сохраняет конфиденциальность и делает лечение предсказуемым. «ЕкатеринбургМедСервис» принимает вызовы круглосуточно и выезжает во все районы города — от Уралмаша и ВИЗа до Академического и Широкой Речки. Команда приезжает без внешних опознавательных знаков, использует нейтральные формулировки в документах и ведёт переписку только по защищённым каналам связи. На месте мы быстро проводим экспресс-диагностику, запускаем титрованные капельницы через инфузомат, контролируем пульс, сатурацию и артериальное давление, подключаем гастропротекцию и аккуратно управляем тревогой без избыточной седации. Цель — безопасно «снять волну» симптомов, вернуть возможность пить воду и отдыхать, а затем закрепить результат на горизонте ближайших 72 часов.
Изучить вопрос глубже – http://narcolog-na-dom-ekaterinburg00.ru/ekaterinburg-narkologiya/
Публикация предлагает читателю не просто информацию, а инструменты для анализа и саморазвития. Мы стимулируем критическое мышление, предлагая различные точки зрения и призывая к самостоятельному поиску решений.
Ознакомиться с отчётом – https://sidoharjo-mojokerto.id/karnaval-pembangunan-peringatan-hut-ri-ke-78-desa-sidoharjo-kec-gedeg
В этой информационной статье вы найдете интересное содержание, которое поможет вам расширить свои знания. Мы предлагаем увлекательный подход и уникальные взгляды на обсуждаемые темы, побуждая пользователей к активному мышлению и критическому анализу.
Не упусти шанс – http://www.drachenreiter.berlin/partner
Профессиональный нарколог на дому не работает по схеме «чем больше препаратов, тем лучше». В «СерпуховТрезвие» капельницы составляются исходя из задач конкретного организма. Базовый блок — это растворы для восполнения объёма циркулирующей жидкости, выравнивания электролитного баланса и коррекции кислотно-щелочного состояния, что уменьшает нагрузку на сердце, мозг и снижает риск тяжёлых осложнений. Витамины группы B и магний входят в стандартную поддержку: они помогают стабилизировать нервную систему, уменьшить тремор, раздражительность, поддерживают сон и снижают риск судорог. При признаках поражения печени используются гепатопротективные и антиоксидантные компоненты, снижающие токсическое воздействие продуктов распада алкоголя. Если пациента мучает тошнота, добавляются противорвотные средства, чтобы восстановить возможность пить воду и питаться. Для снижения тревоги и нормализации сна применяются мягкие анксиолитики в дозировках, не маскирующих клиническую картину и не угнетающих дыхательный центр. Агрессивная седация, популярная в «серых» схемах, сознательно исключается: она «делает вид» улучшения, но может скрыть нарастающие осложнения. Эффект оценивается по конкретным критериям: стабилизация давления и пульса, уменьшение тремора, уход тошноты, улучшение цвета кожи, появление естественного сна и большей ясности мышления. После достижения этих ориентиров фармаконагрузка не наращивается, а постепенно снижается, чтобы человек выходил в устойчивое состояние, а не зависел от бесконечных капельниц.
Детальнее – [url=https://narkolog-na-dom-serpuhov10.ru/]нарколог на дом серпухов цены[/url]
В материале приведены детали, интересные, но не особенно важные. Мы рассматриваем аспекты, которые сложно назвать существенными, но включили их для большей полноты.
Подробнее читать – [url=https://rostov-narkologiya.ru/uslugi-ot-alkogolizma/vyvod-iz-zapoya/]мефедроновая зависимость[/url]
Вывод из запоя в Раменском — это не просто «поставить капельницу и отпустить домой», а комплекс медицинских действий, от которых напрямую зависит здоровье, а иногда и жизнь человека. Длительное употребление алкоголя приводит к тяжёлой интоксикации, нарушению работы сердца, печени, головного мозга, сбоям давления, риску судорог, психозов и резких обострений хронических заболеваний. Попытки самостоятельно «сойти с дистанции» дома, с помощью случайных таблеток, седативных препаратов и новых доз алкоголя, часто только усугубляют состояние. Наркологическая клиника «РаменМед Трезвость» в Раменском выстраивает вывод из запоя как безопасный, контролируемый, поэтапный процесс: от экстренного купирования симптомов до формирования плана дальнейшего восстановления. Пациент получает помощь без осуждения, анонимно, с участием специалистов, которые берут на себя ответственность за каждое назначение и каждое действие. Для родственников это означает: больше не нужно гадать, чего бояться и что давать — есть конкретное место и команда, к которым можно обратиться сразу.
Исследовать вопрос подробнее – http://
Эта познавательная публикация погружает вас в море интересного контента, который быстро захватит ваше внимание. Мы рассмотрим важные аспекты темы и предоставим вам уникальные Insights и полезные сведения для дальнейшего изучения.
Не упусти шанс – https://urbanfeatconstruction.com/keep-the-minimum-depth-of-foundation-of-the-new-house
Основные этапы обычно включают:
Получить дополнительную информацию – http://vyvod-iz-zapoya-ramenskoe10.ru/srochnoe-vyvedenie-iz-zapoya-v-ramenskom/
Скачайте активатор для Windows 11 и получите все функции Pro-версии бесплатно.
Подробнее – [url=https://krasnodar.med24.online/landing/vyvod_iz_zapoya/]Скачать активатор для Windows 11[/url]
В этой статье представлен занимательный и актуальный контент, который заставит вас задуматься. Мы обсуждаем насущные вопросы и проблемы, а также освещаем истории, которые вдохновляют на действия и изменения. Узнайте, что стоит за событиями нашего времени!
Ознакомиться с отчётом – https://maryota.com/kurayasiki-luna-in-tsuruoka
В этой статье представлен занимательный и актуальный контент, который заставит вас задуматься. Мы обсуждаем насущные вопросы и проблемы, а также освещаем истории, которые вдохновляют на действия и изменения. Узнайте, что стоит за событиями нашего времени!
Узнать напрямую – https://redols.caib.es/c07006299/2025/05/21/enquestes-de-prematricula-deso-i-batxillerat-del-19-al-23-de-maig
Когда человек в запое, близким кажется, что всё ещё можно решить «по-тихому»: выспаться, отпаять водой, дать обезболивающее или «успокоительное» и дождаться, пока станет легче. На практике это часто приводит к обратному результату. Алкогольная интоксикация нарушает водно-электролитный баланс, сгущает кровь, повышает нагрузку на сердце, провоцирует скачки давления, ухудшает работу печени и нервной системы. Неконтролируемый приём снотворных, анальгетиков, транквилизаторов, особенно вместе с алкоголем, способен вызвать угнетение дыхания, аритмии, судороги или делирий. Домашняя обстановка не даёт возможности следить за всеми показателями и вовремя отреагировать. «РаменМед Трезвость» предлагает клинически выверенный вывод из запоя в Раменском с учётом возраста, длительности употребления, хронических заболеваний, перенесённых ранее осложнений. Здесь не применяют сомнительные схемы «усыпить, чтобы не мешал», а ставят задачу: безопасно пройти острую фазу, снять интоксикацию, стабилизировать давление и пульс, защитить сердце и мозг, снизить риск психозов и, при желании пациента, сразу наметить маршрут реального лечения зависимости. Такой подход снимает с родственников опасную «роль врача» и возвращает ситуацию туда, где ей место — под контроль профессионалов.
Получить дополнительные сведения – https://vyvod-iz-zapoya-ramenskoe10.ru/srochnoe-vyvedenie-iz-zapoya-v-ramenskom/
Запой — это не просто несколько лишних дней алкоголя, а тяжёлое состояние, в котором организм работает на пределе. Чем дольше длится эпизод, тем глубже обезвоживание, тем сильнее сдвиги электролитов, тем выше риск аритмий, гипертонических кризов, судорог, делирия, обострений заболеваний сердца, печени и поджелудочной железы. Попытки «вывести» человека дома силами родных часто включают опасные комбинации: случайные седативные, снотворные, анальгетики, «антипохмельные» из рекламы. Они могут на время усыпить или «успокоить», но при этом скрывают ухудшение, сбивают давление, угнетают дыхание и мешают врачу увидеть реальную картину. В «Трезвый Центр Коломна» подход другой: ещё на этапе звонка специалист уточняет длительность запоя, объёмы и виды алкоголя, наличие гипертонии, ИБС, диабета, заболеваний печени и почек, неврологических проблем, список уже принятых препаратов, эпизоды потери сознания, судорог, странного поведения. На основании этих данных определяется, безопасен ли формат на дому или сразу нужен стационар. Такая сортировка позволяет вовремя перехватить опасные случаи, не терять часы на бесполезные попытки и сразу запускать те схемы, которые реально снижают риски и стабилизируют состояние.
Разобраться лучше – http://vyvod-iz-zapoya-kolomna10.ru
Работа выездной службы построена так, чтобы для семьи всё было максимально понятно и предсказуемо. После звонка специалист не ограничивается общими фразами, а уточняет детали: сколько длится употребление, есть ли хронические болезни сердца, печени, почек, эндокринные нарушения, какие препараты и в каких дозах пациент уже получил, были ли в прошлом судороги, галлюцинации, тяжёлые реакции на лекарства. Это позволяет заранее оценить уровень риска и понять, подходит ли формат дома. По прибытии в Серпухове врач осматривает пациента, проверяет контакт и ориентировку, измеряет артериальное давление несколько раз, оценивает пульс, сатурацию, температуру, выраженность тремора, наличие болей, характер дыхания, степень обезвоживания. Далее формируется индивидуальная инфузионная схема: растворы для регидратации и коррекции электролитов, витамины группы B и магний для поддержки нервной системы, при необходимости — гепатопротекторы и мягкие антиоксидантные комплексы, противорвотные для контроля тошноты, щадящие анксиолитики для нормализации сна без грубой седации. Во время процедуры врач контролирует динамику, меняет скорость капельницы при необходимости, отслеживает реакцию на препараты и объясняет родным, какие изменения будут происходить по часам. По завершении визита пациент и родственники получают подробный план: режим, питьё, питание, чего нельзя, какие симптомы считаются тревожными, когда нужна повторная консультация или стационар. При выявлении опасных признаков вопрос о госпитализации поднимается честно и сразу, а не откладывается «до утра».
Получить больше информации – [url=https://narkolog-na-dom-serpuhov10.ru/]вызвать нарколога на дом срочно[/url]
Работа выездной службы построена так, чтобы для семьи всё было максимально понятно и предсказуемо. После звонка специалист не ограничивается общими фразами, а уточняет детали: сколько длится употребление, есть ли хронические болезни сердца, печени, почек, эндокринные нарушения, какие препараты и в каких дозах пациент уже получил, были ли в прошлом судороги, галлюцинации, тяжёлые реакции на лекарства. Это позволяет заранее оценить уровень риска и понять, подходит ли формат дома. По прибытии в Серпухове врач осматривает пациента, проверяет контакт и ориентировку, измеряет артериальное давление несколько раз, оценивает пульс, сатурацию, температуру, выраженность тремора, наличие болей, характер дыхания, степень обезвоживания. Далее формируется индивидуальная инфузионная схема: растворы для регидратации и коррекции электролитов, витамины группы B и магний для поддержки нервной системы, при необходимости — гепатопротекторы и мягкие антиоксидантные комплексы, противорвотные для контроля тошноты, щадящие анксиолитики для нормализации сна без грубой седации. Во время процедуры врач контролирует динамику, меняет скорость капельницы при необходимости, отслеживает реакцию на препараты и объясняет родным, какие изменения будут происходить по часам. По завершении визита пациент и родственники получают подробный план: режим, питьё, питание, чего нельзя, какие симптомы считаются тревожными, когда нужна повторная консультация или стационар. При выявлении опасных признаков вопрос о госпитализации поднимается честно и сразу, а не откладывается «до утра».
Детальнее – [url=https://narkolog-na-dom-serpuhov10.ru/]нарколог на дом круглосуточно цены[/url]
Работа выездной службы построена так, чтобы для семьи всё было максимально понятно и предсказуемо. После звонка специалист не ограничивается общими фразами, а уточняет детали: сколько длится употребление, есть ли хронические болезни сердца, печени, почек, эндокринные нарушения, какие препараты и в каких дозах пациент уже получил, были ли в прошлом судороги, галлюцинации, тяжёлые реакции на лекарства. Это позволяет заранее оценить уровень риска и понять, подходит ли формат дома. По прибытии в Серпухове врач осматривает пациента, проверяет контакт и ориентировку, измеряет артериальное давление несколько раз, оценивает пульс, сатурацию, температуру, выраженность тремора, наличие болей, характер дыхания, степень обезвоживания. Далее формируется индивидуальная инфузионная схема: растворы для регидратации и коррекции электролитов, витамины группы B и магний для поддержки нервной системы, при необходимости — гепатопротекторы и мягкие антиоксидантные комплексы, противорвотные для контроля тошноты, щадящие анксиолитики для нормализации сна без грубой седации. Во время процедуры врач контролирует динамику, меняет скорость капельницы при необходимости, отслеживает реакцию на препараты и объясняет родным, какие изменения будут происходить по часам. По завершении визита пациент и родственники получают подробный план: режим, питьё, питание, чего нельзя, какие симптомы считаются тревожными, когда нужна повторная консультация или стационар. При выявлении опасных признаков вопрос о госпитализации поднимается честно и сразу, а не откладывается «до утра».
Ознакомиться с деталями – [url=https://narkolog-na-dom-serpuhov10.ru/]narkolog-na-dom-nedorogo[/url]
Этот сборник информации привлекает множеством мелких деталей и необычных ракурсов. Мы предлагаем взгляды, редко полезные, но способные немного разнообразить знакомство с темой.
Подробнее читать – [url=https://rostov-narkologiya.ru/uslugi-ot-narkomanii/mefedronovaya-zavisimost/]кето диета за неделю минус 10 кг[/url]
Действие и назначение
Выяснить больше – [url=https://kapelnica-ot-zapoya-sochi0.ru/]капельница от запоя на дому недорого[/url]
В клинике «НаркоСити» используются только сертифицированные лекарственные средства, которые подбираются индивидуально с учетом состояния пациента:
Ознакомиться с деталями – [url=https://vyvod-iz-zapoya-krasnodar0.ru/]скорая вывод из запоя в краснодаре[/url]
В клинике «НаркоСити» используются только сертифицированные лекарственные средства, которые подбираются индивидуально с учетом состояния пациента:
Исследовать вопрос подробнее – [url=https://vyvod-iz-zapoya-krasnodar0.ru/]вывод из запоя краснодар[/url]
Алгоритм в «Трезвый Центр Коломна» построен так, чтобы убрать импровизацию и сделать всё максимально прозрачным для семьи. Сначала по телефону собираются ключевые данные: возраст пациента, длительность запоя, виды алкоголя, хронические заболевания, препараты, аллергии, наличие судорог, потерь сознания, странного поведения, текущие жалобы. На этом этапе озвучивается ориентировочный формат помощи и примерный диапазон стоимости. Далее следует выезд на дом или поступление в стационар. Врач проводит осмотр: измеряет артериальное давление, пульс, сатурацию, температуру, оценивает тремор, координацию, сознание, степень обезвоживания, наличие болей, состояние дыхания и сердца. На основе этих данных назначается инфузионная терапия: растворы для регидратации и коррекции электролитов, витамины группы B и магний для поддержки нервной системы, по показаниям — гепатопротекторы, антиоксидантные комплексы, противорвотные для контроля тошноты, мягкие анксиолитики для уменьшения тревоги и нормализации сна. Уходят от агрессивной седации: пациент не должен быть «выключен» так, чтобы невозможно было заметить ухудшение. В процессе капельниц проводится повторный контроль показателей, темп и состав при необходимости корректируются. После стабилизации пациент и семья получают подробные рекомендации: режим, сон, питание, питьё, запреты, «красные флаги», план наблюдения и возможного дальнейшего лечения зависимости.
Получить дополнительную информацию – [url=https://vyvod-iz-zapoya-kolomna10.ru/]vyvod-iz-zapoya-na-domu[/url]
Действие и назначение
Получить дополнительную информацию – https://kapelnica-ot-zapoya-sochi0.ru/kapelnicza-ot-zapoya-czena-sochi/
Такая последовательность действий позволяет обеспечить результативность и закрепить положительные изменения.
Исследовать вопрос подробнее – [url=https://narcologicheskaya-klinika-perm0.ru/]частная наркологическая клиника в перми[/url]
vavada kontakt Polska [url=https://vavada2003.help]https://vavada2003.help[/url]
1win как зарегистрироваться [url=https://1win12049.ru/]https://1win12049.ru/[/url]
Запой — это не просто несколько лишних дней алкоголя, а тяжёлое состояние, в котором организм работает на пределе. Чем дольше длится эпизод, тем глубже обезвоживание, тем сильнее сдвиги электролитов, тем выше риск аритмий, гипертонических кризов, судорог, делирия, обострений заболеваний сердца, печени и поджелудочной железы. Попытки «вывести» человека дома силами родных часто включают опасные комбинации: случайные седативные, снотворные, анальгетики, «антипохмельные» из рекламы. Они могут на время усыпить или «успокоить», но при этом скрывают ухудшение, сбивают давление, угнетают дыхание и мешают врачу увидеть реальную картину. В «Трезвый Центр Коломна» подход другой: ещё на этапе звонка специалист уточняет длительность запоя, объёмы и виды алкоголя, наличие гипертонии, ИБС, диабета, заболеваний печени и почек, неврологических проблем, список уже принятых препаратов, эпизоды потери сознания, судорог, странного поведения. На основании этих данных определяется, безопасен ли формат на дому или сразу нужен стационар. Такая сортировка позволяет вовремя перехватить опасные случаи, не терять часы на бесполезные попытки и сразу запускать те схемы, которые реально снижают риски и стабилизируют состояние.
Подробнее – [url=https://vyvod-iz-zapoya-kolomna10.ru/]анонимный вывод из запоя[/url]
Выезд нарколога на дом в Серпухове — это возможность получить профессиональную помощь в условиях, когда везти человека в клинику сложно, опасно или он категорически отказывается от госпитализации. Специалисты «СерпуховТрезвие» работают круглосуточно, приезжают по адресу с одноразовыми системами, стерильными расходниками и необходимым набором препаратов, проводят осмотр, оценивают жизненно важные показатели, подбирают индивидуальную капельницу, контролируют реакцию и оставляют подробные рекомендации. Всё происходит конфиденциально, без лишних свидетелей, без осуждения и давления. Цель — не формально «поставить капельницу», а безопасно стабилизировать состояние, снизить интоксикацию, выровнять давление и пульс, уменьшить тревогу и вернуть человеку возможность нормально спать и восстанавливаться, не доводя до осложнений и экстренной госпитализации.
Изучить вопрос глубже – http://narkolog-na-dom-serpuhov10.ru/nomer-narkologa-na-dom-serpuhov/
Когда вопрос стоит остро — нужно быстро и безопасно вывести человека из запоя в Коломне, — у семьи нет лишнего времени на эксперименты с таблетками, сомнительными «коктейлями» и советами из интернета. «Трезвый Центр Коломна» выстраивает помощь так, чтобы от первого звонка до реального облегчения шёл понятный и управляемый маршрут: запись симптомов и рисков уже по телефону, предложение формата (выезд на дом или стационар), оперативный осмотр, персональная инфузионная терапия, круглосуточное наблюдение при необходимости и подробный план восстановления на 24–72 часа и дальше. Мы не продаём миф о «чудо-капельнице за час», а работаем клинически аккуратно: дозы и схемы подбираются под возраст, длительность запоя, сопутствующие заболевания, уже принятые лекарства и текущие показатели. Цель проста и честна — снять интоксикацию, защитить сердце, мозг и печень, вернуть сон и ясность без агрессивной седации и скрытых рисков, сохранить конфиденциальность и дать семье уверенность, что всё делается правильно.
Углубиться в тему – [url=https://vyvod-iz-zapoya-kolomna10.ru/]вывод из запоя коломна[/url]
Во время процедуры врач контролирует состояние больного, по необходимости корректирует лечение, чтобы добиться максимального терапевтического эффекта. После проведения детоксикации пациенту назначается курс поддерживающей терапии, а также даются рекомендации по дальнейшему восстановлению и профилактике рецидивов.
Ознакомиться с деталями – https://narcolog-na-dom-sochi0.ru/narkolog-na-dom-kruglosutochno-sochi/
Ниже приведена таблица с типовыми компонентами капельницы и их действием:
Ознакомиться с деталями – [url=https://vyvod-iz-zapoya-v-tolyatti17.ru/]нарколог на дом вывод из запоя[/url]
Наркологическая помощь в Самаре представляет собой комплекс медицинских мероприятий, направленных на лечение алкогольной и наркотической зависимости, а также восстановление физического и психического здоровья пациентов. В наркологической клинике «Согласие» применяются современные методики диагностики, детоксикации и комплексной терапии, учитывающие индивидуальные особенности каждого пациента, тяжесть зависимости и наличие сопутствующих заболеваний. Основная цель — восстановление здоровья, предупреждение осложнений и снижение риска рецидивов.
Узнать больше – [url=https://narkologicheskaya-pomoshh-samara0.ru/]оказание наркологической помощи в самаре[/url]
Запой — это не просто несколько лишних дней алкоголя, а тяжёлое состояние, в котором организм работает на пределе. Чем дольше длится эпизод, тем глубже обезвоживание, тем сильнее сдвиги электролитов, тем выше риск аритмий, гипертонических кризов, судорог, делирия, обострений заболеваний сердца, печени и поджелудочной железы. Попытки «вывести» человека дома силами родных часто включают опасные комбинации: случайные седативные, снотворные, анальгетики, «антипохмельные» из рекламы. Они могут на время усыпить или «успокоить», но при этом скрывают ухудшение, сбивают давление, угнетают дыхание и мешают врачу увидеть реальную картину. В «Трезвый Центр Коломна» подход другой: ещё на этапе звонка специалист уточняет длительность запоя, объёмы и виды алкоголя, наличие гипертонии, ИБС, диабета, заболеваний печени и почек, неврологических проблем, список уже принятых препаратов, эпизоды потери сознания, судорог, странного поведения. На основании этих данных определяется, безопасен ли формат на дому или сразу нужен стационар. Такая сортировка позволяет вовремя перехватить опасные случаи, не терять часы на бесполезные попытки и сразу запускать те схемы, которые реально снижают риски и стабилизируют состояние.
Детальнее – [url=https://vyvod-iz-zapoya-kolomna10.ru/]вывод из запоя на дому[/url]
Вызов нарколога на дом становится необходимым при любых состояниях, когда отказ от алкоголя сопровождается выраженными симптомами интоксикации и абстиненции. Основные ситуации, в которых срочно требуется профессиональная помощь врача:
Разобраться лучше – http://narcolog-na-dom-sochi0.ru
Текст включает разнообразную информацию, которая может показаться любопытной, но не меняет устоявшегося восприятия. Предлагаем просто насладиться чтением, не ожидая значительной пользы.
Подробнее читать – [url=https://rostov-narkologiya.ru/uslugi-ot-narkomanii/mefedronovaya-zavisimost/]сиалис онлайн[/url]
Вывод из запоя — это не просто медицинская процедура, а тщательно выстроенный процесс, направленный на восстановление работы всех систем организма. При неправильном или неполном лечении риск осложнений возрастает в несколько раз. Поэтому обращение в профессиональную клинику становится необходимым шагом. В наркологической клинике «Центр Трезвости ВоронМед» пациент получает экстренную помощь, безопасные инфузионные препараты, круглосуточный выезд нарколога и последующее восстановление под наблюдением специалистов. Здесь каждая капельница подбирается индивидуально — с учётом возраста, веса, длительности запоя, хронических болезней и реакции организма на препараты.
Подробнее можно узнать тут – [url=https://vyvod-iz-zapoya-v-voronezhe17.ru/]вывод из запоя круглосуточно воронеж[/url]
Работа выездной службы построена так, чтобы для семьи всё было максимально понятно и предсказуемо. После звонка специалист не ограничивается общими фразами, а уточняет детали: сколько длится употребление, есть ли хронические болезни сердца, печени, почек, эндокринные нарушения, какие препараты и в каких дозах пациент уже получил, были ли в прошлом судороги, галлюцинации, тяжёлые реакции на лекарства. Это позволяет заранее оценить уровень риска и понять, подходит ли формат дома. По прибытии в Серпухове врач осматривает пациента, проверяет контакт и ориентировку, измеряет артериальное давление несколько раз, оценивает пульс, сатурацию, температуру, выраженность тремора, наличие болей, характер дыхания, степень обезвоживания. Далее формируется индивидуальная инфузионная схема: растворы для регидратации и коррекции электролитов, витамины группы B и магний для поддержки нервной системы, при необходимости — гепатопротекторы и мягкие антиоксидантные комплексы, противорвотные для контроля тошноты, щадящие анксиолитики для нормализации сна без грубой седации. Во время процедуры врач контролирует динамику, меняет скорость капельницы при необходимости, отслеживает реакцию на препараты и объясняет родным, какие изменения будут происходить по часам. По завершении визита пациент и родственники получают подробный план: режим, питьё, питание, чего нельзя, какие симптомы считаются тревожными, когда нужна повторная консультация или стационар. При выявлении опасных признаков вопрос о госпитализации поднимается честно и сразу, а не откладывается «до утра».
Получить дополнительные сведения – [url=https://narkolog-na-dom-serpuhov10.ru/]врач нарколог на дом в серпухове[/url]
Вывод из запоя в Перми включает использование комплекса медикаментозных и психотерапевтических методик. Они помогают не только снять симптомы интоксикации, но и стабилизировать эмоциональное состояние.
Получить больше информации – [url=https://vyvod-iz-zapoya-perm0.ru/]вывод из запоя капельница на дому[/url]
В Рязани клиника «РязаньМед Альянс» принимает пациентов 24/7, без выходных и праздников. Такое расписание особенно важно при экстренных состояниях — когда человек находится в запое или испытывает абстинентный синдром. Врачи выезжают на дом в течение часа, проводят осмотр, устанавливают капельницы и стабилизируют состояние пациента. Для тех, кто нуждается в длительном наблюдении, предусмотрено комфортное пребывание в стационаре. Здесь созданы условия, при которых лечение проходит анонимно, с сохранением медицинской тайны и без постановки на учёт.
Выяснить больше – http://narkologicheskaya-klinika-v-ryazani17.ru/narkologicheskij-staczionar-ryazan/
Алгоритм в «Трезвый Центр Коломна» построен так, чтобы убрать импровизацию и сделать всё максимально прозрачным для семьи. Сначала по телефону собираются ключевые данные: возраст пациента, длительность запоя, виды алкоголя, хронические заболевания, препараты, аллергии, наличие судорог, потерь сознания, странного поведения, текущие жалобы. На этом этапе озвучивается ориентировочный формат помощи и примерный диапазон стоимости. Далее следует выезд на дом или поступление в стационар. Врач проводит осмотр: измеряет артериальное давление, пульс, сатурацию, температуру, оценивает тремор, координацию, сознание, степень обезвоживания, наличие болей, состояние дыхания и сердца. На основе этих данных назначается инфузионная терапия: растворы для регидратации и коррекции электролитов, витамины группы B и магний для поддержки нервной системы, по показаниям — гепатопротекторы, антиоксидантные комплексы, противорвотные для контроля тошноты, мягкие анксиолитики для уменьшения тревоги и нормализации сна. Уходят от агрессивной седации: пациент не должен быть «выключен» так, чтобы невозможно было заметить ухудшение. В процессе капельниц проводится повторный контроль показателей, темп и состав при необходимости корректируются. После стабилизации пациент и семья получают подробные рекомендации: режим, сон, питание, питьё, запреты, «красные флаги», план наблюдения и возможного дальнейшего лечения зависимости.
Подробнее – http://vyvod-iz-zapoya-kolomna10.ru/
Для эффективного лечения алкогольной интоксикации и восстановления организма врачи клиники «АлкоДоктор» используют комплекс препаратов, которые индивидуально подбираются с учетом состояния пациента.
Детальнее – http://kapelnica-ot-zapoya-sochi0.ru
После окончания врач дает консультации и рекомендации по восстановлению организма и профилактике повторных запоев.
Подробнее можно узнать тут – https://vyvod-iz-zapoya-krasnodar0.ru/vyvod-iz-zapoya-na-domu-krasnodar
Алгоритм в «Трезвый Центр Коломна» построен так, чтобы убрать импровизацию и сделать всё максимально прозрачным для семьи. Сначала по телефону собираются ключевые данные: возраст пациента, длительность запоя, виды алкоголя, хронические заболевания, препараты, аллергии, наличие судорог, потерь сознания, странного поведения, текущие жалобы. На этом этапе озвучивается ориентировочный формат помощи и примерный диапазон стоимости. Далее следует выезд на дом или поступление в стационар. Врач проводит осмотр: измеряет артериальное давление, пульс, сатурацию, температуру, оценивает тремор, координацию, сознание, степень обезвоживания, наличие болей, состояние дыхания и сердца. На основе этих данных назначается инфузионная терапия: растворы для регидратации и коррекции электролитов, витамины группы B и магний для поддержки нервной системы, по показаниям — гепатопротекторы, антиоксидантные комплексы, противорвотные для контроля тошноты, мягкие анксиолитики для уменьшения тревоги и нормализации сна. Уходят от агрессивной седации: пациент не должен быть «выключен» так, чтобы невозможно было заметить ухудшение. В процессе капельниц проводится повторный контроль показателей, темп и состав при необходимости корректируются. После стабилизации пациент и семья получают подробные рекомендации: режим, сон, питание, питьё, запреты, «красные флаги», план наблюдения и возможного дальнейшего лечения зависимости.
Детальнее – [url=https://vyvod-iz-zapoya-kolomna10.ru/]быстрый вывод из запоя на дому[/url]
В данном тексте собраны разнообразные случайные сведения и не вполне определённые идеи, которые могут вызвать интерес. Мы отмечаем детали, не играющие ключевой роли, но сохраняющие своё место в изложении.
Подробнее читать – [url=https://rostov-narkologiya.ru/ ]детокс чай для похудения[/url]
Описание
Получить больше информации – [url=https://narkologicheskaya-pomoshh-samara0.ru/]вызвать наркологическую помощь[/url]
Чем раньше нарколог окажет помощь, тем выше шансы избежать осложнений и восстановиться без последствий для здоровья.
Подробнее – http://narcolog-na-dom-sochi0.ru/
Чем раньше нарколог окажет помощь, тем выше шансы избежать осложнений и восстановиться без последствий для здоровья.
Выяснить больше – https://narcolog-na-dom-sochi0.ru/narkolog-na-dom-kruglosutochno-sochi
Клиника «НаркоСити» предлагает срочную наркологическую помощь при запоях на дому в Краснодаре. Опытные специалисты оперативно приезжают в любой район города, проводят детоксикацию и стабилизируют состояние пациента прямо на дому. Лечение организовано с максимальной безопасностью и соблюдением конфиденциальности, что обеспечивает пациентам комфорт и быстрое восстановление без госпитализации.
Исследовать вопрос подробнее – http://vyvod-iz-zapoya-krasnodar0.ru/vyvod-iz-zapoya-kruglosutochno-krasnodar/
Вывод из запоя в Тольятти — это медицинская процедура, направленная на очищение организма от продуктов распада алкоголя и восстановление нормального состояния здоровья. Длительное употребление спиртных напитков приводит к серьёзной интоксикации, нарушению работы нервной, сердечно-сосудистой и пищеварительной систем. Самостоятельные попытки прекратить запой могут быть опасны, поэтому оптимальным решением является обращение к врачу-наркологу, который проведёт лечение безопасно и эффективно.
Получить больше информации – [url=https://vyvod-iz-zapoya-v-tolyatti17.ru/]вывод из запоя на дому круглосуточно в тольятти[/url]
Капельницы от запоя включают препараты для очищения крови, восстановления электролитного баланса и защиты печени. Используются только сертифицированные растворы, одобренные Минздравом РФ. В клинике применяется комплексный подход: одновременно с физическим восстановлением запускаются лёгкие дыхательные и релаксационные методики, которые помогают организму вернуться в стабильное состояние.
Получить больше информации – https://vyvod-iz-zapoya-v-voronezhe17.ru/vyvod-iz-zapoya-za-den-voronezh
Капельница от запоя является неотъемлемой процедурой при острых и хронических отравлениях алкоголем. Она помогает стабилизировать состояние пациента, избежать тяжелых последствий и максимально быстро вернуться к нормальной жизни. Вызов врача для проведения процедуры рекомендуется в следующих ситуациях:
Разобраться лучше – [url=https://kapelnica-ot-zapoya-sochi0.ru/]капельница от запоя цена[/url]
Наркологическая клиника в Перми обеспечивает пациентам комфортные условия и профессиональное сопровождение. Врачи работают круглосуточно и соблюдают строгую конфиденциальность, что делает лечение доступным и безопасным.
Ознакомиться с деталями – [url=https://narcologicheskaya-klinika-perm0.ru/]наркологическая клиника вывод из запоя[/url]
Инфузионная терапия (капельницы) — важная часть лечения, направленная на очищение организма, восстановление водно-солевого баланса и устранение токсинов. В «РязаньМед Альянс» используются проверенные препараты, которые помогают нормализовать работу внутренних органов и улучшить общее самочувствие. Таблица ниже показывает, какие виды капельниц чаще всего применяются при выведении из запоя и лечении алкоголизма.
Получить дополнительную информацию – [url=https://narkologicheskaya-klinika-v-ryazani17.ru/]анонимная наркологическая клиника в рязани[/url]
Комплексное применение этих методов позволяет добиться быстрого восстановления организма и улучшения психоэмоционального состояния.
Выяснить больше – http://vyvod-iz-zapoya-perm0.ru/vyvod-iz-zapoya-perm-staczionar/https://vyvod-iz-zapoya-perm0.ru
vavada obejście blokady polska [url=http://vavada2003.help]vavada obejście blokady polska[/url]
1win скачать apk [url=www.1win12049.ru]www.1win12049.ru[/url]
Современная наркологическая клиника — это не просто медицинское учреждение, где проводят детоксикацию или капельницы. Это выстроенная система, где каждый этап направлен на восстановление физического, психического и социального равновесия пациента. В клинике «КрасЗдрав Профи» весь процесс лечения построен по принципу прозрачных шагов: первичная диагностика, стабилизация организма, терапевтическая коррекция и закрепление результата. Всё происходит с соблюдением принципа конфиденциальности — пациент может рассчитывать на анонимность и этичное отношение со стороны персонала.
Получить дополнительные сведения – [url=https://narkologicheskaya-clinica-v-krasnoyarske17.ru/]наркологическая клиника клиника помощь в красноярске[/url]
Перед таблицей — короткий акцент: приведённые суммы ориентировочные, не являются публичной офертой, точная стоимость определяется после осмотра.
Подробнее можно узнать тут – [url=https://vyvod-iz-zapoya-kolomna10.ru/]vyvod-iz-zapoya-nedorogo[/url]
Выезд нарколога на дом в Серпухове — это возможность получить профессиональную помощь в условиях, когда везти человека в клинику сложно, опасно или он категорически отказывается от госпитализации. Специалисты «СерпуховТрезвие» работают круглосуточно, приезжают по адресу с одноразовыми системами, стерильными расходниками и необходимым набором препаратов, проводят осмотр, оценивают жизненно важные показатели, подбирают индивидуальную капельницу, контролируют реакцию и оставляют подробные рекомендации. Всё происходит конфиденциально, без лишних свидетелей, без осуждения и давления. Цель — не формально «поставить капельницу», а безопасно стабилизировать состояние, снизить интоксикацию, выровнять давление и пульс, уменьшить тревогу и вернуть человеку возможность нормально спать и восстанавливаться, не доводя до осложнений и экстренной госпитализации.
Разобраться лучше – [url=https://narkolog-na-dom-serpuhov10.ru/]выезд нарколога на дом в серпухове[/url]
vavada bonus od zakładów [url=www.vavada2003.help]www.vavada2003.help[/url]
1win Бишкек [url=https://www.1win12049.ru]https://www.1win12049.ru[/url]
Как активировать Windows 11 без ключа? У нас есть пошаговая инструкция!
Подробнее – [url=https://krasnodar.med24.online/landing/narkolog_na_dom/]Windows 11 кряк 2026 скачать[/url]
1win экспресс [url=http://1win12049.ru]1win экспресс[/url]
vavada automaty video [url=https://vavada2003.help/]https://vavada2003.help/[/url]
Эта публикация содержит набор несвязанных идей, трудно применимых в практике. Мы лишь поверхностно затрагиваем различные точки зрения, не проводя глубокий анализ и не предлагая выводов.
Подробнее читать – https://rostov-narkologiya.ru/uslugi-ot-alkogolizma/vyvod-iz-zapoya
Запой — это не просто несколько лишних дней алкоголя, а тяжёлое состояние, в котором организм работает на пределе. Чем дольше длится эпизод, тем глубже обезвоживание, тем сильнее сдвиги электролитов, тем выше риск аритмий, гипертонических кризов, судорог, делирия, обострений заболеваний сердца, печени и поджелудочной железы. Попытки «вывести» человека дома силами родных часто включают опасные комбинации: случайные седативные, снотворные, анальгетики, «антипохмельные» из рекламы. Они могут на время усыпить или «успокоить», но при этом скрывают ухудшение, сбивают давление, угнетают дыхание и мешают врачу увидеть реальную картину. В «Трезвый Центр Коломна» подход другой: ещё на этапе звонка специалист уточняет длительность запоя, объёмы и виды алкоголя, наличие гипертонии, ИБС, диабета, заболеваний печени и почек, неврологических проблем, список уже принятых препаратов, эпизоды потери сознания, судорог, странного поведения. На основании этих данных определяется, безопасен ли формат на дому или сразу нужен стационар. Такая сортировка позволяет вовремя перехватить опасные случаи, не терять часы на бесполезные попытки и сразу запускать те схемы, которые реально снижают риски и стабилизируют состояние.
Ознакомиться с деталями – https://vyvod-iz-zapoya-kolomna10.ru/vyvod-iz-zapoya-na-domu-v-kolomne/
В случаях запоя, острого отравления или абстинентного синдрома выездная наркологическая бригада оказывает помощь прямо на месте. Специалисты приезжают в течение 30 минут после обращения и проводят оценку состояния пациента, экстренное введение лекарств, инфузионную терапию и психологическую поддержку. Благодаря специальной комплектации мобильной бригады, лечение на дому возможно даже при умеренной степени осложнений. Врач также может при необходимости провести экспресс-анализы и дать рекомендации родственникам по дальнейшему уходу.
Ознакомиться с деталями – https://narkologicheskaya-klinika-novokuzneczk0.ru/
Во время процедуры врач контролирует состояние больного, по необходимости корректирует лечение, чтобы добиться максимального терапевтического эффекта. После проведения детоксикации пациенту назначается курс поддерживающей терапии, а также даются рекомендации по дальнейшему восстановлению и профилактике рецидивов.
Изучить вопрос глубже – [url=https://narcolog-na-dom-sochi0.ru/]вызов нарколога на дом сочи[/url]
Алгоритм в «Трезвый Центр Коломна» построен так, чтобы убрать импровизацию и сделать всё максимально прозрачным для семьи. Сначала по телефону собираются ключевые данные: возраст пациента, длительность запоя, виды алкоголя, хронические заболевания, препараты, аллергии, наличие судорог, потерь сознания, странного поведения, текущие жалобы. На этом этапе озвучивается ориентировочный формат помощи и примерный диапазон стоимости. Далее следует выезд на дом или поступление в стационар. Врач проводит осмотр: измеряет артериальное давление, пульс, сатурацию, температуру, оценивает тремор, координацию, сознание, степень обезвоживания, наличие болей, состояние дыхания и сердца. На основе этих данных назначается инфузионная терапия: растворы для регидратации и коррекции электролитов, витамины группы B и магний для поддержки нервной системы, по показаниям — гепатопротекторы, антиоксидантные комплексы, противорвотные для контроля тошноты, мягкие анксиолитики для уменьшения тревоги и нормализации сна. Уходят от агрессивной седации: пациент не должен быть «выключен» так, чтобы невозможно было заметить ухудшение. В процессе капельниц проводится повторный контроль показателей, темп и состав при необходимости корректируются. После стабилизации пациент и семья получают подробные рекомендации: режим, сон, питание, питьё, запреты, «красные флаги», план наблюдения и возможного дальнейшего лечения зависимости.
Подробнее – http://vyvod-iz-zapoya-kolomna10.ru
Стильная одежда имеет большое значение в самовыражении.
Она помогает подчеркнуть индивидуальность.
Правильно подобранный образ усиливает самооценку.
Одежда нередко является инструментом первого восприятия.
https://links.gucci1.ru/redirect.php?id=yt8VGDSKSbpv
Кроме того, продуманный гардероб упрощает выбор в повседневных делах.
Постепенно внимание к стилю воспитывает чувство меры.
В результате стильная одежда играет значимую роль современного образа жизни.
мостбет блэкджек [url=http://mostbet2028.help/]http://mostbet2028.help/[/url]
Вывод из запоя в Тольятти — это медицинская процедура, направленная на очищение организма от продуктов распада алкоголя и восстановление нормального состояния здоровья. Длительное употребление спиртных напитков приводит к серьёзной интоксикации, нарушению работы нервной, сердечно-сосудистой и пищеварительной систем. Самостоятельные попытки прекратить запой могут быть опасны, поэтому оптимальным решением является обращение к врачу-наркологу, который проведёт лечение безопасно и эффективно.
Подробнее можно узнать тут – [url=https://vyvod-iz-zapoya-v-tolyatti17.ru/]наркологический вывод из запоя[/url]
Запой — это не просто несколько лишних дней алкоголя, а тяжёлое состояние, в котором организм работает на пределе. Чем дольше длится эпизод, тем глубже обезвоживание, тем сильнее сдвиги электролитов, тем выше риск аритмий, гипертонических кризов, судорог, делирия, обострений заболеваний сердца, печени и поджелудочной железы. Попытки «вывести» человека дома силами родных часто включают опасные комбинации: случайные седативные, снотворные, анальгетики, «антипохмельные» из рекламы. Они могут на время усыпить или «успокоить», но при этом скрывают ухудшение, сбивают давление, угнетают дыхание и мешают врачу увидеть реальную картину. В «Трезвый Центр Коломна» подход другой: ещё на этапе звонка специалист уточняет длительность запоя, объёмы и виды алкоголя, наличие гипертонии, ИБС, диабета, заболеваний печени и почек, неврологических проблем, список уже принятых препаратов, эпизоды потери сознания, судорог, странного поведения. На основании этих данных определяется, безопасен ли формат на дому или сразу нужен стационар. Такая сортировка позволяет вовремя перехватить опасные случаи, не терять часы на бесполезные попытки и сразу запускать те схемы, которые реально снижают риски и стабилизируют состояние.
Подробнее – [url=https://vyvod-iz-zapoya-kolomna10.ru/]uslugi-vyvoda-iz-zapoya[/url]
Инфузионная терапия (капельницы) — важная часть лечения, направленная на очищение организма, восстановление водно-солевого баланса и устранение токсинов. В «РязаньМед Альянс» используются проверенные препараты, которые помогают нормализовать работу внутренних органов и улучшить общее самочувствие. Таблица ниже показывает, какие виды капельниц чаще всего применяются при выведении из запоя и лечении алкоголизма.
Ознакомиться с деталями – [url=https://narkologicheskaya-klinika-v-ryazani17.ru/]наркологическая клиника вывод из запоя рязань[/url]
Запойное состояние сопровождается тяжелыми последствиями для организма. Оно может включать нарушения сна, тремор конечностей, скачки давления, головные боли и депрессию. Без своевременной помощи такие проявления способны привести к развитию хронических заболеваний и угрожающих жизни осложнений.
Получить дополнительные сведения – [url=https://vyvod-iz-zapoya-perm0.ru/]вывод из запоя на дому цена пермь[/url]
Основные этапы обычно включают:
Ознакомиться с деталями – [url=https://vyvod-iz-zapoya-ramenskoe10.ru/]vyvod-iz-zapoya-vyezdom-na-dom[/url]
Лечение зависимости в частной клинике имеет ряд отличий от стандартных учреждений. Здесь ключевое внимание уделяется индивидуальной траектории пациента и комфорту среды. Основные преимущества включают:
Получить дополнительную информацию – https://narkologicheskaya-clinica-v-krasnoyarske17.ru/narkologicheskaya-klinika-krasnoyarsk-otzyvy/
Описание
Детальнее – [url=https://narkologicheskaya-pomoshh-samara0.ru/]частная наркологическая помощь самара[/url]
vavada casino slots [url=https://vavada2010.help]https://vavada2010.help[/url]
Этот обзор предлагает свежий взгляд на предметы, которые и без того привычны. Мы упоминаем факты, не имеющие большого значения, и события с неясной важностью, но они присутствуют здесь.
Подробнее читать – [url=https://rostov-narkologiya.ru/uslugi-ot-narkomanii/mefedronovaya-zavisimost/]кето диета за неделю минус 10 кг[/url]
Во время процедуры врач контролирует состояние больного, по необходимости корректирует лечение, чтобы добиться максимального терапевтического эффекта. После проведения детоксикации пациенту назначается курс поддерживающей терапии, а также даются рекомендации по дальнейшему восстановлению и профилактике рецидивов.
Подробнее тут – https://narcolog-na-dom-sochi0.ru/vyzov-narkologa-na-dom-sochi/
Срочная медицинская помощь поможет избежать тяжелых последствий и сократит время на восстановление после запоя.
Ознакомиться с деталями – [url=https://vyvod-iz-zapoya-krasnodar0.ru/]вывод из запоя в краснодаре[/url]
Капельница от запоя является неотъемлемой процедурой при острых и хронических отравлениях алкоголем. Она помогает стабилизировать состояние пациента, избежать тяжелых последствий и максимально быстро вернуться к нормальной жизни. Вызов врача для проведения процедуры рекомендуется в следующих ситуациях:
Разобраться лучше – http://kapelnica-ot-zapoya-sochi0.ru/
Алгоритм в «Трезвый Центр Коломна» построен так, чтобы убрать импровизацию и сделать всё максимально прозрачным для семьи. Сначала по телефону собираются ключевые данные: возраст пациента, длительность запоя, виды алкоголя, хронические заболевания, препараты, аллергии, наличие судорог, потерь сознания, странного поведения, текущие жалобы. На этом этапе озвучивается ориентировочный формат помощи и примерный диапазон стоимости. Далее следует выезд на дом или поступление в стационар. Врач проводит осмотр: измеряет артериальное давление, пульс, сатурацию, температуру, оценивает тремор, координацию, сознание, степень обезвоживания, наличие болей, состояние дыхания и сердца. На основе этих данных назначается инфузионная терапия: растворы для регидратации и коррекции электролитов, витамины группы B и магний для поддержки нервной системы, по показаниям — гепатопротекторы, антиоксидантные комплексы, противорвотные для контроля тошноты, мягкие анксиолитики для уменьшения тревоги и нормализации сна. Уходят от агрессивной седации: пациент не должен быть «выключен» так, чтобы невозможно было заметить ухудшение. В процессе капельниц проводится повторный контроль показателей, темп и состав при необходимости корректируются. После стабилизации пациент и семья получают подробные рекомендации: режим, сон, питание, питьё, запреты, «красные флаги», план наблюдения и возможного дальнейшего лечения зависимости.
Получить больше информации – https://vyvod-iz-zapoya-kolomna10.ru/vyvod-iz-zapoya-v-stacionare-v-kolomne
Ниже приведена таблица с типовыми компонентами капельницы и их действием:
Выяснить больше – [url=https://vyvod-iz-zapoya-v-tolyatti17.ru/]вывод из запоя вызов город[/url]
Комплексное проведение этих этапов обеспечивает полное восстановление организма и облегчает процесс последующего лечения зависимости.
Получить дополнительные сведения – http://vyvod-iz-zapoya-v-ryazani17.ru/
vavada bankovni račun isplata [url=https://vavada2010.help/]https://vavada2010.help/[/url]
mostbet приложение Киргизия [url=https://mostbet2028.help/]https://mostbet2028.help/[/url]
Каждая стадия лечения проходит под постоянным контролем медицинского персонала. Пациенты чувствуют себя в безопасности и получают поддержку не только физическую, но и психологическую. Такой подход снижает риск рецидива и помогает сохранить результат на долгие годы.
Разобраться лучше – [url=https://narkologicheskaya-klinika-v-ryazani17.ru/]наркологические клиники алкоголизм рязань[/url]
Нашли рабочий серийный номер для Windows 11 Pro — проверено лично, без вирусов!
Подробнее – [url=https://krasnodar.med24.online/landing/vyvod_iz_zapoya/]Скачать ключ активации Windows 11 Pro[/url]
Капельницы от запоя включают препараты для очищения крови, восстановления электролитного баланса и защиты печени. Используются только сертифицированные растворы, одобренные Минздравом РФ. В клинике применяется комплексный подход: одновременно с физическим восстановлением запускаются лёгкие дыхательные и релаксационные методики, которые помогают организму вернуться в стабильное состояние.
Детальнее – http://vyvod-iz-zapoya-v-voronezhe17.ru/vyvod-iz-zapoya-za-den-voronezh/
Перед изложением таблицы следует отметить, что подбор методов лечения зависит от стадии и тяжести зависимости, а также индивидуальных особенностей пациента.
Разобраться лучше – [url=https://narkologicheskaya-pomoshh-samara0.ru/]частная наркологическая помощь в самаре[/url]
Комплексное применение этих методов позволяет добиться быстрого восстановления организма и улучшения психоэмоционального состояния.
Выяснить больше – [url=https://vyvod-iz-zapoya-perm0.ru/]срочный вывод из запоя пермь[/url]
Для иллюстрации эффективности методов представлена таблица с примерами процедур и их воздействием:
Получить дополнительную информацию – https://narcologicheskaya-klinika-v-krasnoyarske17.ru/krasnoyarsk-narkologicheskij-czentr/
Действие и назначение
Разобраться лучше – https://kapelnica-ot-zapoya-sochi0.ru/kapelnicza-ot-zapoya-detoks-sochi
Самостоятельный выход из запоя сопряжен с высоким риском развития осложнений. После прекращения приема спиртного ослабленный организм может не выдержать нагрузки, что приведет к инфаркту, инсульту, судорожным приступам и даже алкогольному психозу. Чтобы избежать этих опасных состояний, необходимо вызвать нарколога на дом, который проведет лечение правильно и безопасно.
Получить дополнительную информацию – [url=https://vyvod-iz-zapoya-krasnodar0.ru/]вывод из запоя цена в краснодаре[/url]
vavada igre uživo [url=http://vavada2010.help/]http://vavada2010.help/[/url]
Профессиональный нарколог на дому не работает по схеме «чем больше препаратов, тем лучше». В «СерпуховТрезвие» капельницы составляются исходя из задач конкретного организма. Базовый блок — это растворы для восполнения объёма циркулирующей жидкости, выравнивания электролитного баланса и коррекции кислотно-щелочного состояния, что уменьшает нагрузку на сердце, мозг и снижает риск тяжёлых осложнений. Витамины группы B и магний входят в стандартную поддержку: они помогают стабилизировать нервную систему, уменьшить тремор, раздражительность, поддерживают сон и снижают риск судорог. При признаках поражения печени используются гепатопротективные и антиоксидантные компоненты, снижающие токсическое воздействие продуктов распада алкоголя. Если пациента мучает тошнота, добавляются противорвотные средства, чтобы восстановить возможность пить воду и питаться. Для снижения тревоги и нормализации сна применяются мягкие анксиолитики в дозировках, не маскирующих клиническую картину и не угнетающих дыхательный центр. Агрессивная седация, популярная в «серых» схемах, сознательно исключается: она «делает вид» улучшения, но может скрыть нарастающие осложнения. Эффект оценивается по конкретным критериям: стабилизация давления и пульса, уменьшение тремора, уход тошноты, улучшение цвета кожи, появление естественного сна и большей ясности мышления. После достижения этих ориентиров фармаконагрузка не наращивается, а постепенно снижается, чтобы человек выходил в устойчивое состояние, а не зависел от бесконечных капельниц.
Изучить вопрос глубже – [url=https://narkolog-na-dom-serpuhov10.ru/]врач нарколог на дом[/url]
В материале приведены детали, интересные, но не особенно важные. Мы рассматриваем аспекты, которые сложно назвать существенными, но включили их для большей полноты.
Подробнее читать – [url=https://rostov-narkologiya.ru/uslugi-ot-alkogolizma/vyvod-iz-zapoya/]сиалис онлайн[/url]
Для детоксикации и восстановления организма после запоя используются только сертифицированные лекарственные препараты с доказанной эффективностью и безопасностью:
Получить дополнительные сведения – https://narcolog-na-dom-sochi0.ru/vyzov-narkologa-na-dom-sochi/
vavada apk [url=vavada2010.help]vavada apk[/url]
Этот обзор предлагает свежий взгляд на предметы, которые и без того привычны. Мы упоминаем факты, не имеющие большого значения, и события с неясной важностью, но они присутствуют здесь.
Подробнее читать – [url=https://rostov-narkologiya.ru/uslugi-ot-alkogolizma/vyvod-iz-zapoya/]кето диета за неделю минус 10 кг[/url]
Когда вопрос стоит остро — нужно быстро и безопасно вывести человека из запоя в Коломне, — у семьи нет лишнего времени на эксперименты с таблетками, сомнительными «коктейлями» и советами из интернета. «Трезвый Центр Коломна» выстраивает помощь так, чтобы от первого звонка до реального облегчения шёл понятный и управляемый маршрут: запись симптомов и рисков уже по телефону, предложение формата (выезд на дом или стационар), оперативный осмотр, персональная инфузионная терапия, круглосуточное наблюдение при необходимости и подробный план восстановления на 24–72 часа и дальше. Мы не продаём миф о «чудо-капельнице за час», а работаем клинически аккуратно: дозы и схемы подбираются под возраст, длительность запоя, сопутствующие заболевания, уже принятые лекарства и текущие показатели. Цель проста и честна — снять интоксикацию, защитить сердце, мозг и печень, вернуть сон и ясность без агрессивной седации и скрытых рисков, сохранить конфиденциальность и дать семье уверенность, что всё делается правильно.
Подробнее – https://vyvod-iz-zapoya-kolomna10.ru/vyvod-iz-zapoya-na-domu-v-kolomne/
мостбет депозит не пришел [url=http://mostbet2028.help/]http://mostbet2028.help/[/url]
Перед изложением таблицы следует отметить, что подбор методов лечения зависит от стадии и тяжести зависимости, а также индивидуальных особенностей пациента.
Подробнее тут – [url=https://narkologicheskaya-pomoshh-samara0.ru/]скорая наркологическая помощь в самаре[/url]
Наркологическая клиника в Перми использует современные методики, которые подбираются индивидуально с учетом клинической картины пациента. Каждый метод имеет конкретные цели и задачи, что делает процесс лечения прогнозируемым и безопасным.
Получить дополнительные сведения – [url=https://narcologicheskaya-klinika-perm0.ru/]вывод наркологическая клиника пермь[/url]
mostbet вывод на карту [url=https://mostbet2028.help]mostbet вывод на карту[/url]
Описание
Разобраться лучше – [url=https://narkologicheskaya-pomoshh-samara0.ru/]наркологическая психиатрическая помощь в самаре[/url]
Основные признаки, при которых необходим вывод из запоя:
Подробнее можно узнать тут – [url=https://vyvod-iz-zapoya-v-tolyatti17.ru/]вывод из запоя недорого[/url]
Во время процедуры врач контролирует состояние больного, по необходимости корректирует лечение, чтобы добиться максимального терапевтического эффекта. После проведения детоксикации пациенту назначается курс поддерживающей терапии, а также даются рекомендации по дальнейшему восстановлению и профилактике рецидивов.
Узнать больше – http://narcolog-na-dom-sochi0.ru
В случаях запоя, острого отравления или абстинентного синдрома выездная наркологическая бригада оказывает помощь прямо на месте. Специалисты приезжают в течение 30 минут после обращения и проводят оценку состояния пациента, экстренное введение лекарств, инфузионную терапию и психологическую поддержку. Благодаря специальной комплектации мобильной бригады, лечение на дому возможно даже при умеренной степени осложнений. Врач также может при необходимости провести экспресс-анализы и дать рекомендации родственникам по дальнейшему уходу.
Подробнее тут – [url=https://narkologicheskaya-klinika-novokuzneczk0.ru/]наркологическая клиника наркологический центр в новокузнецке[/url]
Лечение алкоголизма в клинике «РязаньМед Альянс» включает несколько этапов, каждый из которых направлен на определённую цель — от снятия интоксикации до формирования устойчивого отказа от алкоголя. В таблице представлены основные стадии лечения и методы, используемые специалистами клиники.
Выяснить больше – [url=https://narkologicheskaya-klinika-v-ryazani17.ru/]наркологическая клиника рязань[/url]
Профессиональный нарколог на дому не работает по схеме «чем больше препаратов, тем лучше». В «СерпуховТрезвие» капельницы составляются исходя из задач конкретного организма. Базовый блок — это растворы для восполнения объёма циркулирующей жидкости, выравнивания электролитного баланса и коррекции кислотно-щелочного состояния, что уменьшает нагрузку на сердце, мозг и снижает риск тяжёлых осложнений. Витамины группы B и магний входят в стандартную поддержку: они помогают стабилизировать нервную систему, уменьшить тремор, раздражительность, поддерживают сон и снижают риск судорог. При признаках поражения печени используются гепатопротективные и антиоксидантные компоненты, снижающие токсическое воздействие продуктов распада алкоголя. Если пациента мучает тошнота, добавляются противорвотные средства, чтобы восстановить возможность пить воду и питаться. Для снижения тревоги и нормализации сна применяются мягкие анксиолитики в дозировках, не маскирующих клиническую картину и не угнетающих дыхательный центр. Агрессивная седация, популярная в «серых» схемах, сознательно исключается: она «делает вид» улучшения, но может скрыть нарастающие осложнения. Эффект оценивается по конкретным критериям: стабилизация давления и пульса, уменьшение тремора, уход тошноты, улучшение цвета кожи, появление естественного сна и большей ясности мышления. После достижения этих ориентиров фармаконагрузка не наращивается, а постепенно снижается, чтобы человек выходил в устойчивое состояние, а не зависел от бесконечных капельниц.
Выяснить больше – [url=https://narkolog-na-dom-serpuhov10.ru/]нарколог на дом телефон[/url]
Комплексное проведение этих этапов обеспечивает полное восстановление организма и облегчает процесс последующего лечения зависимости.
Изучить вопрос глубже – [url=https://vyvod-iz-zapoya-v-ryazani17.ru/]вывод из запоя капельница рязань[/url]
Запойное состояние сопровождается тяжелыми последствиями для организма. Оно может включать нарушения сна, тремор конечностей, скачки давления, головные боли и депрессию. Без своевременной помощи такие проявления способны привести к развитию хронических заболеваний и угрожающих жизни осложнений.
Узнать больше – [url=https://vyvod-iz-zapoya-perm0.ru/]скорая вывод из запоя[/url]
Детоксикация в клинике «Центр Трезвости ВоронМед» проводится по принципу минимального вмешательства при максимальной эффективности. Основная задача — очистить кровь от токсинов и стабилизировать внутреннюю среду организма без нагрузки на сердце и почки. Все препараты вводятся медленно, под контролем медицинского персонала, а состав подбирается индивидуально после оценки анализов и состояния пациента.
Выяснить больше – http://vyvod-iz-zapoya-v-voronezhe17.ru/vyvod-iz-zapoya-na-domu-voronezh/
Действие и назначение
Подробнее можно узнать тут – [url=https://kapelnica-ot-zapoya-sochi0.ru/]вызвать капельницу от запоя[/url]
Клиника «НаркоСити» предлагает срочную наркологическую помощь при запоях на дому в Краснодаре. Опытные специалисты оперативно приезжают в любой район города, проводят детоксикацию и стабилизируют состояние пациента прямо на дому. Лечение организовано с максимальной безопасностью и соблюдением конфиденциальности, что обеспечивает пациентам комфорт и быстрое восстановление без госпитализации.
Разобраться лучше – [url=https://vyvod-iz-zapoya-krasnodar0.ru/]вывод из запоя[/url]
Продуманный внешний вид имеет большое значение в самовыражении.
Она дает возможность выразить характер.
Правильно подобранный образ усиливает внутренний комфорт.
Одежда часто становится важным элементом первого восприятия.
https://useum.org/myuseum/LePodium
Кроме того, продуманный гардероб упрощает выбор в повседневных делах.
В долгосрочной перспективе внимание к стилю формирует привычку.
В результате стильная одежда играет значимую роль современного образа жизни.
Когда вопрос стоит остро — нужно быстро и безопасно вывести человека из запоя в Коломне, — у семьи нет лишнего времени на эксперименты с таблетками, сомнительными «коктейлями» и советами из интернета. «Трезвый Центр Коломна» выстраивает помощь так, чтобы от первого звонка до реального облегчения шёл понятный и управляемый маршрут: запись симптомов и рисков уже по телефону, предложение формата (выезд на дом или стационар), оперативный осмотр, персональная инфузионная терапия, круглосуточное наблюдение при необходимости и подробный план восстановления на 24–72 часа и дальше. Мы не продаём миф о «чудо-капельнице за час», а работаем клинически аккуратно: дозы и схемы подбираются под возраст, длительность запоя, сопутствующие заболевания, уже принятые лекарства и текущие показатели. Цель проста и честна — снять интоксикацию, защитить сердце, мозг и печень, вернуть сон и ясность без агрессивной седации и скрытых рисков, сохранить конфиденциальность и дать семье уверенность, что всё делается правильно.
Выяснить больше – https://vyvod-iz-zapoya-kolomna10.ru/vyvod-iz-zapoya-v-stacionare-v-kolomne/
Запой — это не просто несколько лишних дней алкоголя, а тяжёлое состояние, в котором организм работает на пределе. Чем дольше длится эпизод, тем глубже обезвоживание, тем сильнее сдвиги электролитов, тем выше риск аритмий, гипертонических кризов, судорог, делирия, обострений заболеваний сердца, печени и поджелудочной железы. Попытки «вывести» человека дома силами родных часто включают опасные комбинации: случайные седативные, снотворные, анальгетики, «антипохмельные» из рекламы. Они могут на время усыпить или «успокоить», но при этом скрывают ухудшение, сбивают давление, угнетают дыхание и мешают врачу увидеть реальную картину. В «Трезвый Центр Коломна» подход другой: ещё на этапе звонка специалист уточняет длительность запоя, объёмы и виды алкоголя, наличие гипертонии, ИБС, диабета, заболеваний печени и почек, неврологических проблем, список уже принятых препаратов, эпизоды потери сознания, судорог, странного поведения. На основании этих данных определяется, безопасен ли формат на дому или сразу нужен стационар. Такая сортировка позволяет вовремя перехватить опасные случаи, не терять часы на бесполезные попытки и сразу запускать те схемы, которые реально снижают риски и стабилизируют состояние.
Углубиться в тему – https://vyvod-iz-zapoya-kolomna10.ru/vyvod-iz-zapoya-na-domu-v-kolomne/
Для детоксикации и восстановления организма после запоя используются только сертифицированные лекарственные препараты с доказанной эффективностью и безопасностью:
Изучить вопрос глубже – [url=https://narcolog-na-dom-sochi0.ru/]выезд нарколога на дом сочи[/url]
Профессиональная помощь требуется в тех случаях, когда организм уже не способен самостоятельно справиться с последствиями интоксикации. Чем дольше длится запой, тем сильнее проявляются его симптомы. Медицинское вмешательство помогает предотвратить развитие осложнений, таких как судороги, повышение давления и алкогольный психоз.
Подробнее – [url=https://vyvod-iz-zapoya-v-tolyatti17.ru/]вывод из запоя дешево тольятти[/url]
Во время процедуры врач контролирует состояние больного, по необходимости корректирует лечение, чтобы добиться максимального терапевтического эффекта. После проведения детоксикации пациенту назначается курс поддерживающей терапии, а также даются рекомендации по дальнейшему восстановлению и профилактике рецидивов.
Исследовать вопрос подробнее – http://narcolog-na-dom-sochi0.ru/narkolog-na-dom-czena-sochi/
Инфузионная терапия (капельницы) — важная часть лечения, направленная на очищение организма, восстановление водно-солевого баланса и устранение токсинов. В «РязаньМед Альянс» используются проверенные препараты, которые помогают нормализовать работу внутренних органов и улучшить общее самочувствие. Таблица ниже показывает, какие виды капельниц чаще всего применяются при выведении из запоя и лечении алкоголизма.
Разобраться лучше – http://narkologicheskaya-klinika-v-ryazani17.ru/narkologicheskij-staczionar-ryazan/
pin-up cashback faizi [url=https://pinup2008.help]https://pinup2008.help[/url]
Умение стильно одеваться играет ключевую роль в создании первого впечатления.
Она помогает выразить характер и почувствовать уверенность.
Грамотно подобранный образ влияет на то, как человека оценивают другие люди.
В повседневной жизни одежда может создавать ощущение собранности.
https://www.brusheezy.com/members/lepodiumkz
Стильный образ облегчает деловые встречи.
При этом важно учитывать личные предпочтения и контекст.
Мода дают возможность экспериментировать.
Таким образом, умение стильно одеваться влияет на общее восприятие личности.
Для эффективного лечения алкогольной интоксикации и восстановления организма врачи клиники «АлкоДоктор» используют комплекс препаратов, которые индивидуально подбираются с учетом состояния пациента.
Получить дополнительную информацию – [url=https://kapelnica-ot-zapoya-sochi0.ru/]врач на дом капельница от запоя сочи[/url]
В Воронеже клиника «Центр Трезвости ВоронМед» обеспечивает выезд нарколога на дом в любое время суток. Это позволяет оказывать помощь пациентам, которые находятся в тяжёлом состоянии или не могут самостоятельно приехать в стационар. Медицинская бригада прибывает в течение 40–60 минут, не используя специализированный транспорт и форму, чтобы сохранить анонимность. Врач проводит первичный осмотр, оценивает давление, частоту дыхания, уровень сознания и насыщение кислородом, после чего назначает детоксикационную капельницу с контролем дозировки.
Выяснить больше – [url=https://vyvod-iz-zapoya-v-voronezhe17.ru/]вывод из запоя дешево[/url]
?Salud por cada explorador de riquezas !
Los casinos internacionales son sitios ideales para escapadas de fin de semana. casinos online fuera de espana. Muchos visitantes planean viajes centrados en la experiencia del casino. Las diversas actividades disponibles contribuyen a que sean vacaciones memorables.
Las casas de apuestas internacionales son una opciГіn muy atractiva para apostadores experimentados. Sin embargo, tambiГ©n son adecuadas para principiantes gracias a sus interfaces amigables. La diversidad de recursos educativos es un plus que no se puede ignorar.
Las opciones mГЎs populares de casino online fuera de EspaГ±a – п»їhttps://puertadetoledo.es/
?Que la suerte te acompane mientras anticipas brillantes triunfos !
Самостоятельный выход из запоя сопряжен с высоким риском развития осложнений. После прекращения приема спиртного ослабленный организм может не выдержать нагрузки, что приведет к инфаркту, инсульту, судорожным приступам и даже алкогольному психозу. Чтобы избежать этих опасных состояний, необходимо вызвать нарколога на дом, который проведет лечение правильно и безопасно.
Узнать больше – [url=https://vyvod-iz-zapoya-krasnodar0.ru/]вывод из запоя вызов на дом[/url]
В материале приведены детали, интересные, но не особенно важные. Мы рассматриваем аспекты, которые сложно назвать существенными, но включили их для большей полноты.
Подробнее читать – [url=https://rostov-narkologiya.ru/uslugi-ot-narkomanii/mefedronovaya-zavisimost/]детокс чай для похудения[/url]
Действие и назначение
Углубиться в тему – https://kapelnica-ot-zapoya-sochi0.ru/kapelnicza-ot-zapoya-na-domu-sochi/
Такая структура позволяет обеспечить эффективность и безопасность лечения на каждом этапе.
Получить дополнительные сведения – [url=https://vyvod-iz-zapoya-perm0.ru/]вывод из запоя в стационаре пермь[/url]
Вызов нарколога на дом становится необходимым при любых состояниях, когда отказ от алкоголя сопровождается выраженными симптомами интоксикации и абстиненции. Основные ситуации, в которых срочно требуется профессиональная помощь врача:
Получить больше информации – [url=https://narcolog-na-dom-sochi0.ru/]врач нарколог выезд на дом в сочи[/url]
Клиника «НаркоСити» предлагает срочную наркологическую помощь при запоях на дому в Краснодаре. Опытные специалисты оперативно приезжают в любой район города, проводят детоксикацию и стабилизируют состояние пациента прямо на дому. Лечение организовано с максимальной безопасностью и соблюдением конфиденциальности, что обеспечивает пациентам комфорт и быстрое восстановление без госпитализации.
Подробнее можно узнать тут – [url=https://vyvod-iz-zapoya-krasnodar0.ru/]скорая вывод из запоя[/url]
Группа препаратов
Узнать больше – [url=https://kapelnica-ot-zapoya-sochi0.ru/]капельницы от запоя на дому цена сочи[/url]
Детоксикация в клинике «Центр Трезвости ВоронМед» проводится по принципу минимального вмешательства при максимальной эффективности. Основная задача — очистить кровь от токсинов и стабилизировать внутреннюю среду организма без нагрузки на сердце и почки. Все препараты вводятся медленно, под контролем медицинского персонала, а состав подбирается индивидуально после оценки анализов и состояния пациента.
Разобраться лучше – http://vyvod-iz-zapoya-v-voronezhe17.ru
Самостоятельный выход из запоя сопряжен с высоким риском развития осложнений. После прекращения приема спиртного ослабленный организм может не выдержать нагрузки, что приведет к инфаркту, инсульту, судорожным приступам и даже алкогольному психозу. Чтобы избежать этих опасных состояний, необходимо вызвать нарколога на дом, который проведет лечение правильно и безопасно.
Детальнее – [url=https://vyvod-iz-zapoya-krasnodar0.ru/]вывод из запоя капельница краснодар[/url]
Капельница от запоя является неотъемлемой процедурой при острых и хронических отравлениях алкоголем. Она помогает стабилизировать состояние пациента, избежать тяжелых последствий и максимально быстро вернуться к нормальной жизни. Вызов врача для проведения процедуры рекомендуется в следующих ситуациях:
Получить дополнительные сведения – [url=https://kapelnica-ot-zapoya-sochi0.ru/]капельница от запоя цена сочи[/url]
Luxury watches continue to attract attention despite the rise of digital devices.
They are often seen as a symbol of status and refined taste.
Craftsmanship plays a major role in their lasting value.
Many luxury watches are produced using carefully selected materials.
https://icefashion.ru/read/273-luchshie-naryady-v-zharu-sovety-stilista/
They also represent a rich heritage passed down through generations.
For collectors, these watches can serve as both wearable tools and collectible pieces.
Elegant styling allows them to stay relevant across changing fashion trends.
Ultimately, luxury watches continue to interest buyers around the world.
После приезда нарколог оценивает состояние пациента, проверяет давление, частоту пульса и насыщенность крови кислородом. Затем врач подбирает индивидуальный состав капельницы, включающий растворы для очистки организма, препараты для нормализации работы сердца, печени и нервной системы. Процедура длится около 1–2 часов и позволяет быстро:
Ознакомиться с деталями – [url=https://vyvod-iz-zapoya-krasnodar0.ru/]срочный вывод из запоя краснодар[/url]
pin-up saytına giriş [url=http://pinup2008.help]pin-up saytına giriş[/url]
Капельница от запоя является неотъемлемой процедурой при острых и хронических отравлениях алкоголем. Она помогает стабилизировать состояние пациента, избежать тяжелых последствий и максимально быстро вернуться к нормальной жизни. Вызов врача для проведения процедуры рекомендуется в следующих ситуациях:
Подробнее можно узнать тут – [url=https://kapelnica-ot-zapoya-sochi0.ru/]выезд на дом капельница от запоя[/url]
pin-up juegos de casino [url=www.pinup2002.help]www.pinup2002.help[/url]
После окончания врач дает консультации и рекомендации по восстановлению организма и профилактике повторных запоев.
Подробнее можно узнать тут – [url=https://vyvod-iz-zapoya-krasnodar0.ru/]анонимный вывод из запоя краснодар[/url]
Профессиональная помощь требуется в тех случаях, когда организм уже не способен самостоятельно справиться с последствиями интоксикации. Чем дольше длится запой, тем сильнее проявляются его симптомы. Медицинское вмешательство помогает предотвратить развитие осложнений, таких как судороги, повышение давления и алкогольный психоз.
Выяснить больше – [url=https://vyvod-iz-zapoya-v-tolyatti17.ru/]вывод из запоя вызов на дом тольятти[/url]
Лечение алкоголизма в клинике «РязаньМед Альянс» включает несколько этапов, каждый из которых направлен на определённую цель — от снятия интоксикации до формирования устойчивого отказа от алкоголя. В таблице представлены основные стадии лечения и методы, используемые специалистами клиники.
Подробнее – [url=https://narkologicheskaya-klinika-v-ryazani17.ru/]наркологическая клиника стационар рязань[/url]
Основные признаки, при которых необходим вывод из запоя:
Получить больше информации – [url=https://vyvod-iz-zapoya-v-tolyatti17.ru/]вывод из запоя недорого тольятти[/url]
Группа препаратов
Подробнее тут – [url=https://kapelnica-ot-zapoya-sochi0.ru/]капельница от запоя цена[/url]
Такие процедуры особенно эффективны на ранних стадиях лечения, когда важно быстро снять симптомы интоксикации и вернуть стабильное самочувствие. После курса капельниц пациенту становится легче концентрироваться, снижается раздражительность и тревожность, восстанавливается аппетит и сон.
Разобраться лучше – [url=https://narkologicheskaya-klinika-v-ryazani17.ru/]анонимная наркологическая клиника в рязани[/url]
Описание
Разобраться лучше – https://narkologicheskaya-pomoshh-samara0.ru/narkolog-skoraya-pomoshh-samara/
Капельница от запоя является неотъемлемой процедурой при острых и хронических отравлениях алкоголем. Она помогает стабилизировать состояние пациента, избежать тяжелых последствий и максимально быстро вернуться к нормальной жизни. Вызов врача для проведения процедуры рекомендуется в следующих ситуациях:
Подробнее можно узнать тут – [url=https://kapelnica-ot-zapoya-sochi0.ru/]сколько стоит капельница от запоя сочи[/url]
После приезда нарколог оценивает состояние пациента, проверяет давление, частоту пульса и насыщенность крови кислородом. Затем врач подбирает индивидуальный состав капельницы, включающий растворы для очистки организма, препараты для нормализации работы сердца, печени и нервной системы. Процедура длится около 1–2 часов и позволяет быстро:
Исследовать вопрос подробнее – [url=https://vyvod-iz-zapoya-krasnodar0.ru/]вывод из запоя вызов на дом в краснодаре[/url]
Важно и то, что во время процедуры пациент находится под наблюдением. Врач может увидеть, как организм реагирует на терапию, вовремя скорректировать темп или состав инфузии, понять, достаточно ли домашнего формата или лучше рассмотреть стационар. Это принципиальное отличие от попыток лечиться дома таблетками наугад, без контроля давления и пульса.
Ознакомиться с деталями – https://kapelnica-ot-zapoya-dolgoprudnyj11.ru/
pin-up mines strategiya [url=https://www.pinup2008.help]https://www.pinup2008.help[/url]
пылесос дайсон [url=https://pylesos-dn-kupit-8.ru/]пылесос дайсон[/url] .
Группа препаратов
Изучить вопрос глубже – [url=https://kapelnica-ot-zapoya-sochi0.ru/]капельница от запоя анонимно в сочи[/url]
Самостоятельный выход из запоя сопряжен с высоким риском развития осложнений. После прекращения приема спиртного ослабленный организм может не выдержать нагрузки, что приведет к инфаркту, инсульту, судорожным приступам и даже алкогольному психозу. Чтобы избежать этих опасных состояний, необходимо вызвать нарколога на дом, который проведет лечение правильно и безопасно.
Подробнее – [url=https://vyvod-iz-zapoya-krasnodar0.ru/]вывод из запоя капельница краснодар[/url]
Такая структура позволяет обеспечить эффективность и безопасность лечения на каждом этапе.
Получить дополнительную информацию – [url=https://vyvod-iz-zapoya-perm0.ru/]нарколог на дом вывод из запоя[/url]
pin-up Azərbaycan dəstək [url=http://pinup2008.help/]pin-up Azərbaycan dəstək[/url]
Медицинская помощь в клинике организована поэтапно, что позволяет постепенно стабилизировать состояние и вернуть контроль над самочувствием.
Получить дополнительные сведения – [url=https://vyvod-iz-zapoya-perm0.ru/]вывод из запоя клиника в перми[/url]
дайсон центр в спб [url=https://pylesos-dn-kupit-10.ru/]дайсон центр в спб[/url] .
После приезда нарколог оценивает состояние пациента, проверяет давление, частоту пульса и насыщенность крови кислородом. Затем врач подбирает индивидуальный состав капельницы, включающий растворы для очистки организма, препараты для нормализации работы сердца, печени и нервной системы. Процедура длится около 1–2 часов и позволяет быстро:
Подробнее – http://vyvod-iz-zapoya-krasnodar0.ru/vyvod-iz-zapoya-na-domu-krasnodar/https://vyvod-iz-zapoya-krasnodar0.ru
Вывод из запоя в Тольятти — это медицинская процедура, направленная на очищение организма от продуктов распада алкоголя и восстановление нормального состояния здоровья. Длительное употребление спиртных напитков приводит к серьёзной интоксикации, нарушению работы нервной, сердечно-сосудистой и пищеварительной систем. Самостоятельные попытки прекратить запой могут быть опасны, поэтому оптимальным решением является обращение к врачу-наркологу, который проведёт лечение безопасно и эффективно.
Выяснить больше – [url=https://vyvod-iz-zapoya-v-tolyatti17.ru/]вывод из запоя на дому тольятти[/url]
Такие процедуры особенно эффективны на ранних стадиях лечения, когда важно быстро снять симптомы интоксикации и вернуть стабильное самочувствие. После курса капельниц пациенту становится легче концентрироваться, снижается раздражительность и тревожность, восстанавливается аппетит и сон.
Подробнее тут – [url=https://narkologicheskaya-klinika-v-ryazani17.ru/]запой наркологическая клиника[/url]
Наркологическая клиника в Перми обеспечивает пациентам комфортные условия и профессиональное сопровождение. Врачи работают круглосуточно и соблюдают строгую конфиденциальность, что делает лечение доступным и безопасным.
Выяснить больше – [url=https://narcologicheskaya-klinika-perm0.ru/]запой наркологическая клиника в перми[/url]
Наша наркологическая клиника предоставляет круглосуточную помощь, использует только сертифицированные медикаменты и строго соблюдает полную конфиденциальность лечения.
Ознакомиться с деталями – [url=https://kapelnica-ot-zapoya-sochi0.ru/]вызов на дом капельницы от запоя сочи[/url]
В таких случаях наркологическая клиника помогает не только вывести из запоя и поставить капельницу, но и выстроить долгосрочный план: обследование, медикаментозную поддержку, реабилитацию, работу с психологом. Это даёт шанс не просто восстановиться после конкретного эпизода, а перестать повторять один и тот же разрушительный сценарий.
Подробнее можно узнать тут – http://narkologicheskaya-klinika-voskresensk11.ru/
В клинике работают врачи-наркологи, психиатры, терапевты, психологи, реабилитологи. Вместо «универсальной» схемы каждому пациенту подбирают индивидуальный план, учитывая возраст, стаж употребления, состояние внутренних органов, психоэмоциональный фон, семейную ситуацию. Это особенно важно для жителей Долгопрудного, где многие совмещают работу в Москве с плотным графиком, и любая ошибка в лечении может дорого обойтись — потерей работоспособности, срывом деловых или личных планов.
Исследовать вопрос подробнее – [url=https://narkologicheskaya-klinika-dolgoprudnyj11.ru/]medikamentoznoe-kodirovanie-ot-alkogolizma[/url]
Для семьи это тяжёлый период. Родные одновременно злятся, боятся и пытаются «договориться»: то уговаривают, то угрожают, то пробуют лечить подручными средствами. Пока близкие спорят, состояние человека ухудшается: он перестаёт нормально есть, почти не спит, избегает разговоров, закрывается в комнате, теряет связь с привычной жизнью. В этот момент особенно важно не ждать, когда организм «сам справится», а подключить профессиональную помощь.
Подробнее тут – [url=https://vyvod-iz-zapoya-voskresensk11.ru/]vyvod-iz-zapoya-na-domu[/url]
Текст включает разнообразную информацию, которая может показаться любопытной, но не меняет устоявшегося восприятия. Предлагаем просто насладиться чтением, не ожидая значительной пользы.
Подробнее читать – https://rostov-narkologiya.ru/uslugi-ot-narkomanii/mefedronovaya-zavisimost
Наркологическая помощь в Самаре представляет собой комплекс медицинских мероприятий, направленных на лечение алкогольной и наркотической зависимости, а также восстановление физического и психического здоровья пациентов. В наркологической клинике «Согласие» применяются современные методики диагностики, детоксикации и комплексной терапии, учитывающие индивидуальные особенности каждого пациента, тяжесть зависимости и наличие сопутствующих заболеваний. Основная цель — восстановление здоровья, предупреждение осложнений и снижение риска рецидивов.
Подробнее тут – [url=https://narkologicheskaya-pomoshh-samara0.ru/]неотложная наркологическая помощь[/url]
Группа препаратов
Получить дополнительную информацию – [url=https://kapelnica-ot-zapoya-sochi0.ru/]капельница от запоя вызов[/url]
Капельница от запоя является неотъемлемой процедурой при острых и хронических отравлениях алкоголем. Она помогает стабилизировать состояние пациента, избежать тяжелых последствий и максимально быстро вернуться к нормальной жизни. Вызов врача для проведения процедуры рекомендуется в следующих ситуациях:
Получить больше информации – [url=https://kapelnica-ot-zapoya-sochi0.ru/]сколько стоит капельница от запоя[/url]
Вывод из запоя в Перми включает использование комплекса медикаментозных и психотерапевтических методик. Они помогают не только снять симптомы интоксикации, но и стабилизировать эмоциональное состояние.
Ознакомиться с деталями – http://vyvod-iz-zapoya-perm0.ru/vyvod-iz-zapoya-na-domu-perm/
После окончания врач дает консультации и рекомендации по восстановлению организма и профилактике повторных запоев.
Получить дополнительную информацию – [url=https://vyvod-iz-zapoya-krasnodar0.ru/]вывод из запоя круглосуточно краснодар[/url]
В данном тексте собраны разнообразные случайные сведения и не вполне определённые идеи, которые могут вызвать интерес. Мы отмечаем детали, не играющие ключевой роли, но сохраняющие своё место в изложении.
Подробнее читать – [url=https://rostov-narkologiya.ru/ ]таблетки для аборта[/url]
В этой статье-обзоре мы соберем актуальную информацию и интересные факты, которые освещают важные темы. Читатели смогут ознакомиться с различными мнениями и подходами, что позволит им расширить кругозор и глубже понять обсуждаемые вопросы.
А что дальше? – https://seoflx.net/o/ievza-rank-website-on-first-page
Признаки, что пора задуматься о кодировании
Детальнее – [url=https://kodirovanie-ot-alkogolizma-korolyov11.ru/]kodirovanie-ot-alkogolizma-otzyvy[/url]
В данной статье вы найдете комплексный подход к изучению насущных тем. Мы комбинируем теоретические сведения с практическими советами, чтобы читатель мог не только понять проблему, но и найти пути её решения.
Где можно узнать подробнее? – https://alianzaprosing.com/normativas-de-seguridad-en-trabajos-en-alturas-en-centros-comerciales-lo-que-necesitas-saber
Наркологическая клиника в Долгопрудном — это возможность получить помощь при алкогольной и наркотической зависимости рядом с домом, не тратя время на поездки по Москве и очереди в перегруженных городских учреждениях. Для жителей Долгопрудного и ближайших населённых пунктов особенно важно, что сюда можно обратиться в любое время суток: при затянувшемся запое, после эпизода употребления наркотиков, при первых признаках формирования зависимости или в ситуации, когда семья больше не справляется с проблемой своими силами.
Выяснить больше – [url=https://narkologicheskaya-klinika-dolgoprudnyj11.ru/]кодирование от алкоголизма отзывы[/url]
После купирования острых симптомов врач объясняет, какие шаги нужно сделать дальше: ограничиться домашним наблюдением, подумать о коротком стационарном курсе или сразу планировать дальнейшее лечение зависимости. Это помогает не возвращаться к затяжным запоям уже через несколько недель.
Подробнее тут – [url=https://vyvod-iz-zapoya-moskva011.ru/]вывод из запоя в стационаре москва[/url]
В Воскресенске вывод из запоя может проводиться в разных форматах — с выездом на дом, в условиях стационара, в срочном режиме или с последующим амбулаторным наблюдением. Правильный выбор зависит от тяжести состояния, возраста пациента, наличия хронических заболеваний и того, насколько сильно запой нарушил привычную жизнь.
Подробнее – http://vyvod-iz-zapoya-voskresensk11.ru/vyvod-iz-zapoya-vyzov-v-voskresenske/
Запой не всегда выглядит как откровенная катастрофа с первых дней. Иногда всё начинается с «отпуска», «праздника», пары вечеринок подряд. Родные надеются, что человек сам остановится, а он каждый день находит повод продолжить. В какой-то момент организм перестаёт справляться, и даже небольшие дозы алкоголя вызывают тяжёлые реакции.
Исследовать вопрос подробнее – https://kapelnica-ot-zapoya-dolgoprudnyj11.ru/kapelnica-ot-zapoya-na-domu-v-dolgoprudnom
В таких случаях наркологическая клиника помогает не только вывести из запоя и поставить капельницу, но и выстроить долгосрочный план: обследование, медикаментозную поддержку, реабилитацию, работу с психологом. Это даёт шанс не просто восстановиться после конкретного эпизода, а перестать повторять один и тот же разрушительный сценарий.
Разобраться лучше – [url=https://narkologicheskaya-klinika-voskresensk11.ru/]narkologicheskaya-klinika-voskresensk[/url]
В этой статье представлен занимательный и актуальный контент, который заставит вас задуматься. Мы обсуждаем насущные вопросы и проблемы, а также освещаем истории, которые вдохновляют на действия и изменения. Узнайте, что стоит за событиями нашего времени!
Изучить вопрос глубже – https://duiksport.nl/dazenval/?product=zwarte-bal-voor-dazenval
Откройте для себя скрытые страницы истории и малоизвестные научные открытия, которые оказали колоссальное влияние на развитие человечества. Статья предлагает свежий взгляд на события, которые заслуживают большего внимания.
Выяснить больше – https://www.ultdcompany.com/product/og-red-stk
В этой информационной статье вы найдете интересное содержание, которое поможет вам расширить свои знания. Мы предлагаем увлекательный подход и уникальные взгляды на обсуждаемые темы, побуждая пользователей к активному мышлению и критическому анализу.
Как это работает — подробно – https://lavanderiauniversal.com/producto/fenestrado
В этой статье-обзоре мы соберем актуальную информацию и интересные факты, которые освещают важные темы. Читатели смогут ознакомиться с различными мнениями и подходами, что позволит им расширить кругозор и глубже понять обсуждаемые вопросы.
Личный опыт — читайте сами – https://wiegehtsdirtut.de/wgdt-logo-400
Мы собрали для вас самые захватывающие факты из мира науки и истории. От малознакомых деталей до грандиозных событий — эта статья расширит ваш кругозор и подарит новое понимание того, как устроен наш мир.
Обратитесь за информацией – https://ghaffarhonda.com/cg-125-honda-price-in-pakistan-specs-features
В этой статье представлен занимательный и актуальный контент, который заставит вас задуматься. Мы обсуждаем насущные вопросы и проблемы, а также освещаем истории, которые вдохновляют на действия и изменения. Узнайте, что стоит за событиями нашего времени!
Раскрыть тему полностью – https://caryganzconsulting.com/choosing-the-right-dental-practice-a-grads-guide
crash en pinup [url=www.pinup2002.help]crash en pinup[/url]
В этой статье представлен занимательный и актуальный контент, который заставит вас задуматься. Мы обсуждаем насущные вопросы и проблемы, а также освещаем истории, которые вдохновляют на действия и изменения. Узнайте, что стоит за событиями нашего времени!
Всё, что нужно знать – https://math.fmipa.unmul.ac.id/archive/index.php/mascot-mathematics-competition
Эта познавательная публикация погружает вас в море интересного контента, который быстро захватит ваше внимание. Мы рассмотрим важные аспекты темы и предоставим вам уникальные Insights и полезные сведения для дальнейшего изучения.
Исследовать вопрос подробнее – https://redington.solar/solar-panel-produce
Этот обзор предлагает структурированное изложение информации по актуальным вопросам. Материал подан так, чтобы даже новичок мог быстро освоиться в теме и начать использовать полученные знания в практике.
Всё, что нужно знать – https://jeevanelevators.com/hello-world
Эта статья предлагает живое освещение актуальной темы с множеством интересных фактов. Мы рассмотрим ключевые моменты, которые делают данную тему важной и актуальной. Подготовьтесь к насыщенному путешествию по неизвестным аспектам и узнайте больше о значимых событиях.
Смотрите также… – http://www.al-adala.de/Neu/die-allgemeine-ungleichheit-der-menschen-als-segen-fuer-arbeit-wert-und-handel
Эта информационная заметка содержит увлекательные сведения, которые могут вас удивить! Мы собрали интересные факты, которые сделают вашу жизнь ярче и полнее. Узнайте нечто новое о привычных аспектах повседневности и откройте для себя удивительный мир информации.
Получить дополнительные сведения – https://www.institutbioskin.be/bonjour-tout-le-monde
Мы собрали для вас самые захватывающие факты из мира науки и истории. От малознакомых деталей до грандиозных событий — эта статья расширит ваш кругозор и подарит новое понимание того, как устроен наш мир.
Интересует подробная информация – https://rusoge.ru
Эта информационная заметка содержит увлекательные сведения, которые могут вас удивить! Мы собрали интересные факты, которые сделают вашу жизнь ярче и полнее. Узнайте нечто новое о привычных аспектах повседневности и откройте для себя удивительный мир информации.
Полезно знать – https://futuredream.wpxblog.jp/wpxblog-struggle-8
В этой публикации мы предлагаем подробные объяснения по актуальным вопросам, чтобы помочь читателям глубже понять их. Четкость и структурированность материала сделают его удобным для усвоения и применения в повседневной жизни.
Что ещё? Расскажи всё! – https://radioeldoradoam.com.br/2022/11/21/livre-para-assinar-com-qualquer-clube-willian-oliveira-recebe-sondagens
В данной статье вы найдете комплексный подход к изучению насущных тем. Мы комбинируем теоретические сведения с практическими советами, чтобы читатель мог не только понять проблему, но и найти пути её решения.
Запросить дополнительные данные – https://fukkatsu.net/business/nanndemoyaritai
Этот обзорный материал предоставляет информационно насыщенные данные, касающиеся актуальных тем. Мы стремимся сделать информацию доступной и структурированной, чтобы читатели могли легко ориентироваться в наших выводах. Познайте новое с нашим обзором!
Исследовать вопрос подробнее – https://javalordscoffee.com/dead-souls
Эта статья полна интересного контента, который побудит вас исследовать новые горизонты. Мы собрали полезные факты и удивительные истории, которые обогащают ваше понимание темы. Читайте, погружайтесь в детали и наслаждайтесь процессом изучения!
Прочитать подробнее – https://www.takcare.se/anvisningar
В этом интересном тексте собраны обширные сведения, которые помогут вам понять различные аспекты обсуждаемой темы. Мы разбираем детали и факты, делая акцент на важности каждого элемента. Не упустите возможность расширить свои знания и взглянуть на мир по-новому!
Открой скрытое – http://patriciamontaud.org/gallery/pexels-photo-171292
Мы собрали для вас самые захватывающие факты из мира науки и истории. От малознакомых деталей до грандиозных событий — эта статья расширит ваш кругозор и подарит новое понимание того, как устроен наш мир.
Как достичь результата? – https://refixxo-academy.de/data-analytics-dashboard
Эта познавательная публикация погружает вас в море интересного контента, который быстро захватит ваше внимание. Мы рассмотрим важные аспекты темы и предоставим вам уникальные Insights и полезные сведения для дальнейшего изучения.
Проверенные методы — узнай сейчас – https://roompe.co.in/education-methodologies-philosophies-learning-models-preschool
Публикация приглашает вас исследовать неизведанное — от древних тайн до современных достижений науки. Вы узнаете, как случайные находки превращались в революции, а смелые мысли — в новые эры человеческого прогресса.
А что дальше? – https://www.portalamlar.org/2013/09/05/etica-medica
Эта разъяснительная статья содержит простые и доступные разъяснения по актуальным вопросам. Мы стремимся сделать информацию понятной для широкой аудитории, чтобы каждый мог разобраться в предмете и извлечь из него максимум пользы.
Получить дополнительные сведения – https://acma.gov.gh/2024/07/05/report-on-open-forum-for-some-selected-schools-within-the-municipality-on-the-right-to-information-law
Твердосплавной инструмент производится из чрезвычайно прочных сплавов.
Его базу образуют тугоплавкие карбиды вольфрама или кобальта.
Это даёт высокую прочность а также стойкость перед износу.
https://ratemetr.ru/2025/11/27/promgrupp-rasshiryaet-assortiment-novye-postupleniya-20/
Подобный инструмент способен функционировать в условиях повышенных температурах.
Он превосходит в своей прочности обычную быстрорежущую сталь.
Твёрдосплавные пластины широко применяются в обработке металлов.
Эта обзорная заметка содержит ключевые моменты и факты по актуальным вопросам. Она поможет читателям быстро ориентироваться в теме и узнать о самых важных аспектах сегодня. Получите краткий курс по современной информации и оставайтесь в курсе событий!
Запросить дополнительные данные – https://www.ekonomicky.sk/ekonomika
Эта информационная статья содержит полезные факты, советы и рекомендации, которые помогут вам быть в курсе последних тенденций и изменений в выбранной области. Материал составлен так, чтобы быть полезным и понятным каждому.
Практические советы ждут тебя – https://www.onverze.com/whatsapp-enters-the-filmmaking-business
mi cuenta pin-up [url=pinup2002.help]pinup2002.help[/url]
Перед изложением таблицы следует отметить, что подбор методов лечения зависит от стадии и тяжести зависимости, а также индивидуальных особенностей пациента.
Подробнее можно узнать тут – [url=https://narkologicheskaya-pomoshh-samara0.ru/]анонимная наркологическая помощь самара[/url]
instalar pin-up apk [url=https://www.pinup2002.help]https://www.pinup2002.help[/url]
В материале приведены детали, интересные, но не особенно важные. Мы рассматриваем аспекты, которые сложно назвать существенными, но включили их для большей полноты.
Подробнее читать – [url=https://rostov-narkologiya.ru/uslugi-ot-alkogolizma/vyvod-iz-zapoya/]детокс чай для похудения[/url]
Взрослая гемблинг — представляет собой набор специальных правил и подходов.
Она ориентирована для обеспечение безопасности пользователей от рисков.
Основная задача — сохранить игровую сущность исключая вреда в отношении личного состояния участника.
https://t.me/s/top_onlajn_kazino_rossii
Данная практика включает контроль за временем и бюджетом, потраченными на игру.
Важным элементом является понимание игроком всех потенциальных рисков.
Платформы должны предоставлять понятную информацию и инструменты для контроля за игрой.
Таким образом, безопасная игра создаёт здоровую развлекательную среду со стороны всех участников.
мони икс промокоды [url=https://t.me/moneyx_tg/]t.me/moneyx_tg[/url] .
Группа препаратов
Узнать больше – [url=https://narcolog-na-dom-ekaterinburg000.ru/]нарколог на дом круглосуточно цены в екатеринбурге[/url]
Как подчёркивает врач-нарколог И.В. Синицин, «современная наркология — это не только вывод из запоя, но и работа с глубинными причинами зависимости».
Исследовать вопрос подробнее – http://
Одновременно с медикаментозной детоксикацией начинается работа по снижению эмоционального напряжения. Психотерапевтическая помощь помогает пациенту осознать причины зависимости и выработать стратегии для предотвращения рецидивов, что является важным аспектом успешного лечения.
Изучить вопрос глубже – http://vyvod-iz-zapoya-volgograd00.ru
Перед заключением договора стоит поинтересоваться:
Разобраться лучше – [url=https://narkologicheskaya-klinika-nizhnij-tagil11.ru/]наркологическая клиника стационар[/url]
мостбет профиль [url=https://mostbet94620.help/]https://mostbet94620.help/[/url]
manix [url=https://t.me/moneyx_tg/]manix[/url] .
В стационаре мы добавляем расширенную диагностику и круглосуточное наблюдение: это выбор для пациентов с «красными флагами» (галлюцинации, выраженные кардиосимптомы, судороги, рецидивирующая рвота с примесью крови) или тяжёлыми соматическими заболеваниями. На дому мы остаёмся до первичной стабилизации и оставляем письменный план на 24–72 часа, чтобы семья действовала уверенно и согласованно.
Ознакомиться с деталями – https://vyvod-iz-zapoya-pushkino7.ru/vyvedenie-iz-zapoya-v-pushkino
При поступлении вызова специалисты клиники «ЗдоровьеНорм» выезжают на дом в течение 30–60 минут. Врач проводит тщательную диагностику, измеряя артериальное давление, пульс, уровень кислорода в крови и оценивая общее состояние пациента. После этого осуществляется индивидуальный подбор лечебной схемы, основанной на объективных данных и анамнезе пациента.
Получить дополнительную информацию – http://vyvod-iz-zapoya-krasnodar00.ru
Такие меры позволяют комплексно воздействовать на организм и снизить риск осложнений, связанных с резким прекращением употребления алкоголя.
Детальнее – http://vyvod-iz-zapoya-volgograd0.ru/
Этот сборник информации привлекает множеством мелких деталей и необычных ракурсов. Мы предлагаем взгляды, редко полезные, но способные немного разнообразить знакомство с темой.
Подробнее читать – [url=https://rostov-narkologiya.ru/uslugi-ot-narkomanii/mefedronovaya-zavisimost/]таблетки для аборта[/url]
Состав инфузии формируется под доминирующие симптомы и данные экспресс-измерений. Мы избегаем шаблонов: у каждого профиля — конкретная цель и измеримый эффект. Ниже — ориентиры; окончательные решения врач принимает очно, с учётом лекарственных взаимодействий и ваших приоритетов (работа, семья, график сна).
Подробнее можно узнать тут – https://narcolog-na-dom-ekaterinburg00.ru/ekaterinburg-narkologicheskaya-klinika/
Длительный запой представляет собой крайне опасное состояние, способное нанести непоправимый вред организму. При отсутствии своевременного вмешательства алкогольная интоксикация может привести к серьезным осложнениям, таким как нарушение работы сердца, печени, почек и нервной системы, а также развитию алкогольного психоза. В таких ситуациях экстренная медицинская помощь является залогом спасения жизни и предотвращения необратимых последствий. Клиника «ЗдоровьеНорм» предлагает круглосуточный выезд специалистов для вывода из запоя на дому в Краснодаре и по всему Краснодарскому краю. Наши врачи работают 24 часа в сутки, обеспечивая полный комплекс процедур по детоксикации, снятию абстинентного синдрома и восстановлению организма, при этом гарантируя полную анонимность и индивидуальный подход к каждому пациенту.
Подробнее тут – [url=https://narcolog-na-dom-krasnodar0.ru/]вызвать нарколога на дом срочно в краснодаре[/url]
На следующем этапе начинается активное медикаментозное вмешательство. Современные препараты вводятся капельничным методом для быстрого выведения токсинов и нормализации обменных процессов, что способствует стабилизации работы жизненно важных органов.
Подробнее можно узнать тут – [url=https://vyvod-iz-zapoya-volgograd000.ru/]www.domen.ru[/url]
Когда запой становится угрозой для жизни, оперативное вмешательство становится ключевым для спасения здоровья и предотвращения серьезных осложнений. В Рязани вызов нарколога на дом позволяет начать лечение в самые критические моменты, обеспечивая детоксикацию организма и восстановление его нормального функционирования в условиях, где пациент чувствует себя комфортно и сохраняет свою конфиденциальность. Этот формат оказания медицинской помощи особенно актуален для тех, кто хочет избежать длительного ожидания в стационаре и предпочитает лечение в привычной домашней обстановке.
Выяснить больше – http://narcolog-na-dom-ryazan00.ru
vavada darmowa gra aviator [url=https://www.vavada2004.help]https://www.vavada2004.help[/url]
Клиника «УралМед» работает без выходных и праздников: прием пациентов — круглосуточно. Это позволяет оказывать экстренную помощь при острых состояниях, а также вести наблюдение за динамикой восстановления здоровья в ночные часы.
Подробнее можно узнать тут – https://lechenie-alkogolizma-ekaterinburg0.ru/
Кодирование от алкоголизма в Чехове для многих семей становится тем рубежом, после которого зависимость перестаёт казаться «временной слабостью» и начинает восприниматься как диагноз, с которым можно и нужно работать. До этого момента обычно проходят годы: чередуются запои и трезвые периоды, звучат обещания «больше такого не будет», меняются напитки, придумываются правила вроде «пью только по выходным» или «только пиво». Но рано или поздно семья замечает, что именно алкоголь диктует распорядок дня, влияет на настроение, разрушает здоровье и отношения. В этот момент становится очевидно: без сильного внешнего ограничителя и профессиональной помощи просто «взять себя в руки» уже не получается.
Получить больше информации – [url=https://kodirovanie-ot-alkogolizma-chekhov11.ru/]кодирование от алкоголизма чехов[/url]
Процедура детоксикации занимает от 40 минут до 2 часов. После её завершения врач консультирует пациента и родственников, даёт рекомендации по дальнейшему лечению и профилактике повторных запоев.
Ознакомиться с деталями – https://narcolog-na-dom-sankt-peterburg00.ru/psikhiatr-narkolog-na-dom-spb/
После поступления вызова нарколог клиники «АльфаНаркология» оперативно выезжает по указанному адресу. На месте врач проводит первичную диагностику, оценивая степень интоксикации, физическое и психологическое состояние пациента. По результатам осмотра врач подбирает индивидуальный комплекс лечебных процедур, в который входит постановка капельницы с растворами для детоксикации, препараты для стабилизации работы органов и нормализации психического состояния.
Получить больше информации – [url=https://narcolog-na-dom-sankt-peterburg000.ru/]вызов нарколога на дом[/url]
Медикаментозное пролонгированное
Изучить вопрос глубже – [url=https://kodirovanie-ot-alkogolizma-vidnoe7.ru/]центр кодирования от алкоголизма[/url]
Как подчёркивает руководитель направления клинической токсикологии НМИЦ психиатрии и наркологии, «оказание помощи на дому требует не меньшего профессионализма, чем лечение в стационаре, ведь врач действует в ограниченных условиях».
Получить дополнительные сведения – https://narkolog-na-dom-nizhnij-tagil11.ru/narkolog-na-dom-kruglosutochno-v-nizhnem-tagile
Преимущества вызова нарколога на дом:
Подробнее тут – [url=https://vyvod-iz-zapoya-v-murmanske12.ru/]вывод из запоя капельница мурманск[/url]
Некоторые состояния требуют немедленного вмешательства специалиста. Если алкогольное отравление или запойное состояние не купируется вовремя, это может привести к тяжелым последствиям для здоровья.
Детальнее – [url=https://narcolog-na-dom-v-irkutske00.ru/]врач нарколог на дом в иркутске[/url]
При длительном запое организм не успевает восстановить свой водно-электролитный баланс, что приводит к обезвоживанию и ухудшению общего состояния. Такие пациенты рискуют развить не только тяжелую интоксикацию, но и хронические заболевания, которые впоследствии требуют длительного и дорогостоящего лечения. Поэтому своевременный вызов врача-нарколога на дом становится критически важным для сохранения здоровья и предотвращения серьезных последствий.
Углубиться в тему – [url=https://vyvod-iz-zapoya-krasnodar00.ru/]нарколог вывод из запоя[/url]
crash игра мостбет [url=https://www.mostbet94620.help]https://www.mostbet94620.help[/url]
Одним из ключевых направлений является проведение капельниц, призванных вывести токсины из организма и нормализовать водно-электролитный баланс. Используемые препараты и состав растворов подбираются индивидуально, исходя из клинической картины и истории болезни пациента.
Подробнее можно узнать тут – [url=https://narkolog-na-dom-v-yaroslavle12.ru/]нарколог на дом цена в ярославле[/url]
Этап
Исследовать вопрос подробнее – http://vyvod-iz-zapoya-noginsk7.ru/vyvod-iz-zapoya-kruglosutochno-v-noginske/
После первичной стабилизации врач обычно объясняет близким, почему «просто поспать» не всегда получается сразу, сколько времени может держаться раздражительность и как правильно выстроить режим, чтобы не спровоцировать повторный срыв в первые дни.
Ознакомиться с деталями – [url=https://narkolog-na-dom-krasnogorsk6.ru/]vyzov vracha narkologa na dom[/url]
Когда запой становится угрозой для жизни, оперативное вмешательство становится ключевым для спасения здоровья и предотвращения серьезных осложнений. В Рязани вызов нарколога на дом позволяет начать лечение в самые критические моменты, обеспечивая детоксикацию организма и восстановление его нормального функционирования в условиях, где пациент чувствует себя комфортно и сохраняет свою конфиденциальность. Этот формат оказания медицинской помощи особенно актуален для тех, кто хочет избежать длительного ожидания в стационаре и предпочитает лечение в привычной домашней обстановке.
Изучить вопрос глубже – http://
Для эффективного лечения наши врачи используют только проверенные и сертифицированные медикаменты, которые подбираются индивидуально для каждого пациента. В состав лечебного курса входят:
Подробнее можно узнать тут – [url=https://narcolog-na-dom-ekaterinburg000.ru/]www.domen.ru[/url]
Медикаментозное пролонгированное
Узнать больше – https://kodirovanie-ot-alkogolizma-vidnoe7.ru/kodirovanie-ot-alkogolizma-na-domu-v-vidnom/
Служба круглосуточного вывода из запоя организована таким образом, чтобы обеспечить максимальную оперативность и надежность. Независимо от времени суток, квалифицированные специалисты готовы выехать на дом или принять пациента в медицинском учреждении, чтобы приступить к детоксикации и стабилизации состояния.
Получить больше информации – [url=https://vyvod-iz-zapoya-volgograd000.ru/]вывод из запоя дешево волгоград[/url]
Чем раньше врач окажет помощь, тем быстрее пациент сможет стабилизировать состояние, снизить риски осложнений и вернуться к нормальной жизни.
Подробнее можно узнать тут – https://narcolog-na-dom-sankt-peterburg000.ru/psikhiatr-narkolog-na-dom-spb
Ожидаемый результат
Получить больше информации – [url=https://vyvod-iz-zapoya-noginsk7.ru/]anonimnyj-vyvod-iz-zapoya[/url]
мостбет пополнить счет 2026 [url=mostbet94620.help]mostbet94620.help[/url]
Своевременный вызов позволяет «поймать» момент, когда детокс максимально эффективен и ещё не потребовалась госпитализация. Мы работаем по всему Пушкинскому округу и приезжаем в ближайшие населённые пункты соседних округов.
Подробнее – https://vyvod-iz-zapoya-pushkino7.ru/vyvod-iz-zapoya-na-domu-v-pushkino
Если пациент обращается в клинику в состоянии запоя или тяжёлой абстиненции, первым шагом становится детоксикация. Это не «волшебная капельница», которая снимает все проблемы, а комплекс процедур, направленных на выведение токсинов, восстановление водно-солевого баланса, поддержку сердца, печени, нервной системы. Под контролем врачей подбираются растворы и препараты, которые позволяют снизить нагрузку на организм, облегчить похмельный синдром, уменьшить тревогу и вернуть сон. Важно, что это проходит под наблюдением, а не «на кухне» без понимания, как реагирует сердце и давление. После выхода из острого состояния человек уже способен осмысленно обсуждать дальнейшее лечение.
Подробнее тут – [url=https://narkologicheskaya-klinika-ivanteevka11.ru/]наркологическая клиника сайт[/url]
После первичной стабилизации врач обычно объясняет близким, почему «просто поспать» не всегда получается сразу, сколько времени может держаться раздражительность и как правильно выстроить режим, чтобы не спровоцировать повторный срыв в первые дни.
Подробнее – https://narkolog-na-dom-krasnogorsk6.ru/
Вызов нарколога на дом — востребованная услуга, позволяющая оказать пациенту помощь в привычной обстановке без необходимости посещения клиники. Особенно актуально это при запойном состоянии, абстинентном синдроме или первых признаках передозировки. Согласно информации Минздрава РФ, амбулаторная помощь эффективна при своевременном обращении и наличии квалифицированной команды специалистов.
Исследовать вопрос подробнее – [url=https://narkolog-na-dom-nizhnij-tagil11.ru/]частный нарколог на дом[/url]
Зависимость от алкоголя или наркотиков — серьёзная проблема, требующая немедленного вмешательства квалифицированных специалистов. Если у вас или вашего близкого возникли признаки тяжелого похмелья, запоя или интоксикации, клиника «НаркологПлюс» предлагает услугу вызова нарколога на дом в Санкт-Петербурге. Наши врачи оперативно прибывают по указанному адресу, оказывают всю необходимую медицинскую помощь и помогают пациенту быстро вернуться к нормальной жизни.
Углубиться в тему – [url=https://narcolog-na-dom-sankt-peterburg00.ru/]нарколог на дом круглосуточно в санкт-петербурге[/url]
Психологическая помощь не менее важна: наши специалисты проводят как индивидуальные, так и групповые сеансы, где вы учитесь справляться с тревогой, формировать новые навыки стресс-менеджмента и находить мотивацию к трезвому образу жизни. Диетолог составит персональный план питания, учитывающий потребности восстановленного организма, а мобильное приложение клиники позволит оставаться на связи с врачом 24/7 — вы всегда получите совет и поддержку.
Подробнее можно узнать тут – [url=https://kapelnica-ot-zapoya-moskva1.ru/]капельница от запоя стоимость балашиха[/url]
mostbet казино слоты [url=http://mostbet94620.help]http://mostbet94620.help[/url]
Одновременно с медикаментозной детоксикацией начинается работа по снижению эмоционального напряжения. Психотерапевтическая помощь помогает пациенту осознать причины зависимости и выработать стратегии для предотвращения рецидивов, что является важным аспектом успешного лечения.
Выяснить больше – [url=https://vyvod-iz-zapoya-volgograd00.ru/]вывод из запоя вызов на дом в волгограде[/url]
Вывод из запоя требует неотложного и профессионального подхода, поскольку состояние больного сопровождается нарушением работы внутренних органов, обезвоживанием и токсическим воздействием этанола на центральную нервную систему. В Мурманске, учитывая особенности региона и климата, особенно важно проводить процедуру с учётом возможных сопутствующих заболеваний и общего состояния здоровья пациента.
Ознакомиться с деталями – [url=https://vyvod-iz-zapoya-v-murmanske12.ru/]вывод из запоя на дому мурманск.[/url]
Независимо от формы зависимости — алкогольной, опиатной, синтетической или медикаментозной — специалисты подбирают индивидуальный курс терапии. Алгоритмы лечения адаптируются под возраст, стаж употребления, общее состояние организма и наличие сопутствующих заболеваний.
Углубиться в тему – [url=https://narkologicheskaya-klinika-v-yaroslavle12.ru/]бесплатная наркологическая клиника ярославль[/url]
moneyx регистрация [url=https://t.me/moneyx_tg/]t.me/moneyx_tg[/url] .
Одним из ключевых направлений является проведение капельниц, призванных вывести токсины из организма и нормализовать водно-электролитный баланс. Используемые препараты и состав растворов подбираются индивидуально, исходя из клинической картины и истории болезни пациента.
Получить больше информации – [url=https://narkolog-na-dom-v-yaroslavle12.ru/]нарколог на дом ярославль.[/url]
Первое, на что стоит обратить внимание — это профессиональный уровень сотрудников. Без квалифицированных наркологов, клинических психологов и психиатров реабилитационный процесс становится формальным и неэффективным.
Получить больше информации – [url=https://narkologicheskaya-klinika-nizhnij-tagil11.ru/]наркологическая клиника нижний тагил[/url]
Этот текст призван помочь читателю расширить кругозор и получить практические знания. Мы используем простой язык, наглядные примеры и структурированное изложение, чтобы сделать обучение максимально эффективным и увлекательным.
Открой скрытое – https://wabisabi-formation.fr/events/coachingwellness-days-edition-pyrenees
Если пациент обращается в клинику в состоянии запоя или тяжёлой абстиненции, первым шагом становится детоксикация. Это не «волшебная капельница», которая снимает все проблемы, а комплекс процедур, направленных на выведение токсинов, восстановление водно-солевого баланса, поддержку сердца, печени, нервной системы. Под контролем врачей подбираются растворы и препараты, которые позволяют снизить нагрузку на организм, облегчить похмельный синдром, уменьшить тревогу и вернуть сон. Важно, что это проходит под наблюдением, а не «на кухне» без понимания, как реагирует сердце и давление. После выхода из острого состояния человек уже способен осмысленно обсуждать дальнейшее лечение.
Ознакомиться с деталями – [url=https://narkologicheskaya-klinika-ivanteevka11.ru/]частная наркологическая клиника[/url]
В статье представлены ключевые моменты по актуальной теме, дополненные советами экспертов и ссылками на дополнительные ресурсы. Цель материала — дать читателю инструменты для самостоятельного развития и принятия осознанных решений.
Полная информация здесь – https://news.mangalayatan.in/2022/12/27/fresher-party-ryan-and-disha-mr-fresher-and-miss-fresher-respectively
Публикация предлагает читателю не просто информацию, а инструменты для анализа и саморазвития. Мы стимулируем критическое мышление, предлагая различные точки зрения и призывая к самостоятельному поиску решений.
Подробнее – https://www.fahrzeugcenter-janke.de/hallo-welt
vavada zakłady piłka nożna [url=vavada2004.help]vavada2004.help[/url]
В этом интересном тексте собраны обширные сведения, которые помогут вам понять различные аспекты обсуждаемой темы. Мы разбираем детали и факты, делая акцент на важности каждого элемента. Не упустите возможность расширить свои знания и взглянуть на мир по-новому!
Секреты успеха внутри – https://successfullquote.com/motivation-thought-hindi
Эта статья полна интересного контента, который побудит вас исследовать новые горизонты. Мы собрали полезные факты и удивительные истории, которые обогащают ваше понимание темы. Читайте, погружайтесь в детали и наслаждайтесь процессом изучения!
Слушай внимательно — тут важно – https://me.et-labo.org/%E3%83%A9%E3%82%B9%E3%83%99%E3%82%AC%E3%82%B9%E3%81%A7%E5%A4%A7%E5%9E%8B%E3%83%95%E3%82%A7%E3%82%B9-%E5%86%8D%E9%96%8B
Эта информационная заметка предлагает лаконичное и четкое освещение актуальных вопросов. Здесь вы найдете ключевые факты и основную информацию по теме, которые помогут вам сформировать собственное мнение и повысить уровень осведомленности.
Не упусти важное! – https://www.docteur-choffray.be/prestations/slide4-2
Эта статья предлагает живое освещение актуальной темы с множеством интересных фактов. Мы рассмотрим ключевые моменты, которые делают данную тему важной и актуальной. Подготовьтесь к насыщенному путешествию по неизвестным аспектам и узнайте больше о значимых событиях.
Полезно знать – https://otohondalocvuongnamdinh.com/?p=386
В этой статье-обзоре мы соберем актуальную информацию и интересные факты, которые освещают важные темы. Читатели смогут ознакомиться с различными мнениями и подходами, что позволит им расширить кругозор и глубже понять обсуждаемые вопросы.
Узнать из первых рук – https://kalliibry.ru
В этом обзорном материале представлены увлекательные детали, которые находят отражение в различных аспектах жизни. Мы исследуем непонятные и интересные моменты, позволяя читателю увидеть картину целиком. Погрузитесь в мир знаний и удивительных открытий!
Провести детальное исследование – https://privrespwp2.wpxblog.jp/%E8%82%9D%E8%87%93%E3%81%AE%E7%97%9B%E3%81%BF%E3%81%AB%E6%B3%A8%E6%84%8F
В этом обзорном материале представлены увлекательные детали, которые находят отражение в различных аспектах жизни. Мы исследуем непонятные и интересные моменты, позволяя читателю увидеть картину целиком. Погрузитесь в мир знаний и удивительных открытий!
Получить дополнительные сведения – https://www.medallasramirez.cl/grabados
Эта разъяснительная статья содержит простые и доступные разъяснения по актуальным вопросам. Мы стремимся сделать информацию понятной для широкой аудитории, чтобы каждый мог разобраться в предмете и извлечь из него максимум пользы.
Лучшее решение — прямо здесь – https://judotraining.info/talk-with-an-baul-by-coach-jeonghwan-an
В статье-обзоре представлены данные сомнительной актуальности и факты без явной взаимосвязи. Читатель ознакомится с разными мнениями, хотя они вряд ли существенно изменят его представление о теме.
Подробнее читать – https://rostov-narkologiya.ru
В этом интересном тексте собраны обширные сведения, которые помогут вам понять различные аспекты обсуждаемой темы. Мы разбираем детали и факты, делая акцент на важности каждого элемента. Не упустите возможность расширить свои знания и взглянуть на мир по-новому!
Тыкай сюда — узнаешь много интересного – https://bearblog.ru
Эта информационная статья содержит полезные факты, советы и рекомендации, которые помогут вам быть в курсе последних тенденций и изменений в выбранной области. Материал составлен так, чтобы быть полезным и понятным каждому.
Запросить дополнительные данные – https://cafegronhagen.se/b020f31c-1e55-4a36-b7f4-ae2f89cd327e-jpg
В этой статье-обзоре мы соберем актуальную информацию и интересные факты, которые освещают важные темы. Читатели смогут ознакомиться с различными мнениями и подходами, что позволит им расширить кругозор и глубже понять обсуждаемые вопросы.
А есть ли продолжение? – https://blog.snappyexchange.com/types-of-gift-card-in-dominican-republic
Эта информационная статья охватывает широкий спектр актуальных тем и вопросов. Мы стремимся осветить ключевые факты и события с ясностью и простотой, чтобы каждый читатель мог извлечь из нее полезные знания и полезные инсайты.
Кликни и узнай всё! – https://crefus-nerima.com/trial_pht_01
Мы собрали для вас самые захватывающие факты из мира науки и истории. От малознакомых деталей до грандиозных событий — эта статья расширит ваш кругозор и подарит новое понимание того, как устроен наш мир.
Продолжить чтение – https://churrasco-do-emilio.de/brasilianischer-churrasco-spiessbraten-grill-service-catering-221
В данной обзорной статье представлены интригующие факты, которые не оставят вас равнодушными. Мы критикуем и анализируем события, которые изменили наше восприятие мира. Узнайте, что стоит за новыми открытиями и как они могут изменить ваше восприятие реальности.
Интересует подробная информация – https://kumara-fernreisen.de/wine-country-escapes-vineyard-tours-for-connoisseurs
Этот информационный обзор станет отличным путеводителем по актуальным темам, объединяющим важные факты и мнения экспертов. Мы исследуем ключевые идеи и представляем их в доступной форме для более глубокого понимания. Читайте, чтобы оставаться в курсе событий!
Лучшее решение — прямо здесь – https://sarhadkasathi.com/?p=107
Эта информационная статья содержит полезные факты, советы и рекомендации, которые помогут вам быть в курсе последних тенденций и изменений в выбранной области. Материал составлен так, чтобы быть полезным и понятным каждому.
Разобраться лучше – https://www.csautoslalom.cz/vyrovnane-poradi-sampionatu-wsc-po-3-zavodech
Эта информационная заметка предлагает лаконичное и четкое освещение актуальных вопросов. Здесь вы найдете ключевые факты и основную информацию по теме, которые помогут вам сформировать собственное мнение и повысить уровень осведомленности.
Не упусти важное! – https://gttpl.co.in/3572-2
Эта статья для ознакомления предлагает читателям общее представление об актуальной теме. Мы стремимся представить ключевые факты и идеи, которые помогут читателям получить представление о предмете и решить, стоит ли углубляться в изучение.
Перейти к статье – https://intuitivegourmet.com/32091/easy-tomato-soup-with-grilled-cheese
В данной обзорной статье представлены интригующие факты, которые не оставят вас равнодушными. Мы критикуем и анализируем события, которые изменили наше восприятие мира. Узнайте, что стоит за новыми открытиями и как они могут изменить ваше восприятие реальности.
Читать далее > – https://orientedesentupidora.com.br/ola-mundo
Публикация предлагает читателю не просто информацию, а инструменты для анализа и саморазвития. Мы стимулируем критическое мышление, предлагая различные точки зрения и призывая к самостоятельному поиску решений.
Подробности по ссылке – https://sonnenberg.pl/pl/jednoczesnie-realizujemy-wiele-projektow-na-terenie-calej-europy
1win валюта аккаунта [url=https://1win93056.help/]https://1win93056.help/[/url]
В этом информативном тексте представлены захватывающие события и факты, которые заставят вас задуматься. Мы обращаем внимание на важные моменты, которые часто остаются незамеченными, и предлагаем новые перспективы на привычные вещи. Подготовьтесь к тому, чтобы быть поглощенным увлекательными рассказами!
Читать далее > – https://transportsbarrault36.com/bonjour-tout-le-monde
Эта публикация завернет вас в вихрь увлекательного контента, сбрасывая стереотипы и открывая двери к новым идеям. Каждый абзац станет для вас открытием, полным ярких примеров и впечатляющих достижений. Подготовьтесь быть вовлеченными и удивленными каждый раз, когда продолжите читать.
Разобраться лучше – https://kyzdar-moskva.ru
vavada warunki obrotu [url=http://vavada2004.help]http://vavada2004.help[/url]
1win ios Ош скачать [url=https://1win93056.help/]https://1win93056.help/[/url]
Публикация предлагает читателю не просто информацию, а инструменты для анализа и саморазвития. Мы стимулируем критическое мышление, предлагая различные точки зрения и призывая к самостоятельному поиску решений.
Детальнее – https://dreamcountry.fr/bal-annuel-dream-country
Эта статья предлагает живое освещение актуальной темы с множеством интересных фактов. Мы рассмотрим ключевые моменты, которые делают данную тему важной и актуальной. Подготовьтесь к насыщенному путешествию по неизвестным аспектам и узнайте больше о значимых событиях.
Узнать больше – https://shamolbanglaresort.com/%E0%A6%A1%E0%A6%BF%E0%A6%9C%E0%A6%BF%E0%A6%9F%E0%A6%BE%E0%A6%B2-%E0%A6%AF%E0%A7%81%E0%A6%97%E0%A7%87-%E0%A6%95%E0%A6%BF%E0%A6%AD%E0%A6%BE%E0%A6%AC%E0%A7%87-%E0%A6%97%E0%A7%8D%E0%A6%B0%E0%A6%BE
Эта статья сочетает познавательный и занимательный контент, что делает ее идеальной для любителей глубоких исследований. Мы рассмотрим увлекательные аспекты различных тем и предоставим вам новые знания, которые могут оказаться полезными в будущем.
Переходите по ссылке ниже – https://arameru.com
vavada wypłata visa [url=www.vavada2004.help]www.vavada2004.help[/url]
Не тратьте деньги на лицензию — скачайте кряк для Windows 11 здесь и активируйте систему за 5 минут.
Подробнее – [url=https://krasnodar.med24.online/landing/vyvod_iz_zapoya/]Как активировать Windows 11 без ключа[/url]
Этот текст содержит различную информацию, которая, возможно, покажется любопытной, но в целом не меняет восприятия привычных вещей. Предлагаем просто получить удовольствие от чтения, не ожидая особой пользы.
Вот – [url=https://arma-rehab.ru/lechenie-alkogolizma/]онлайн слоты[/url]
1win сколько выводят на о деньги [url=www.1win62940.help]www.1win62940.help[/url]
1вин авторизация [url=www.1win21567.help]1вин авторизация[/url]
?Levantemos nuestros brindis por cada ganador del gran premio !
La comunidad de jugadores en los mejores casinos sin licencia en EspaГ±a suele ser vibrante. Interactuar con otros entusiastas del juego puede enriquecer la experiencia. [url=http://puertadetoledo.es/casinos-sin-licencia-en-espana/][/url]. Los foros y grupos de redes sociales fomentan este sentido de comunidad entre los jugadores.
Los casinos sin licencia en EspaГ±a muchas veces no cuentan con atenciГіn al cliente adecuada. Esto puede frustrar a los jugadores que necesitan asistencia o tienen problemas. Elegir una plataforma regulada garantiza acceso a asistencia oportuna y profesional.
Apuesta con confianza en los mejores casinos sin licencia EspaГ±a – http://puertadetoledo.es/casinos-sin-licencia-en-espana/#
?Que la fortuna avance contigo con instantes sorprendentes botes monumentales !
Этот текст посвящён сложным аспектам зависимости и её влиянию на жизнь человека. Мы обсудим психологические, физические и социальные последствия зависимого поведения, а также важность своевременного обращения за помощью.
Узнайте, как частная наркологическая клиника «Преображение» помогает в борьбе с зависимостью: от диагностики до реабилитации. Хочу знать больше – http://www.allorus.ru/cat/question/10437
Скачайте активатор для Windows 11 и получите все функции Pro-версии бесплатно.
Подробнее – [url=https://krasnodar.med24.online/landing/vyvod_iz_zapoya/]Windows 11 активатор на русском[/url]
Стационарный формат предполагает круглосуточное наблюдение, возможность экстренного вмешательства и доступ к диагностическим средствам. Это особенно важно при наличии хронических заболеваний, психозов или алкогольного делирия.
Исследовать вопрос подробнее – [url=https://vyvod-iz-zapoya-v-ryazani12.ru/]вывод из запоя цена рязанская область[/url]
Оперативное лечение организовано по четкому алгоритму, который позволяет быстро стабилизировать состояние пациента и обеспечить эффективную терапию. Каждый этап направлен на комплексное восстановление организма.
Детальнее – [url=https://vyvod-iz-zapoya-volgograd000.ru/]вывод из запоя на дому цена волгоград[/url]
Процедура детоксикации занимает от 40 минут до 2 часов. После её завершения врач консультирует пациента и родственников, даёт рекомендации по дальнейшему лечению и профилактике повторных запоев.
Подробнее – [url=https://narcolog-na-dom-sankt-peterburg00.ru/]вызов врача нарколога на дом[/url]
Текст включает разнообразную информацию, которая может показаться любопытной, но не меняет устоявшегося восприятия. Предлагаем просто насладиться чтением, не ожидая значительной пользы.
Подробнее читать – [url=https://rostov-narkologiya.ru/uslugi-ot-alkogolizma/vyvod-iz-zapoya/]кето диета за неделю минус 10 кг[/url]
Чтобы лучше ориентироваться, в каких жизненных ситуациях особенно важно не игнорировать проблему, удобно представить их в виде типичных сценариев. Это помогает и самому человеку, и его близким осознать, что происходящее уже вышло за рамки «обычной усталости» или «случайного перебора». Ниже перечислены распространённые случаи, когда обращение в наркологическую клинику особенно актуально:
Разобраться лучше – https://narkologicheskaya-klinika-moskva11.ru/anonimnaya-narkologicheskaya-klinika-v-moskve
1вин о деньги Киргизия [url=https://1win62940.help/]https://1win62940.help/[/url]
Каждый этап требует профессионального подхода и регулярного мониторинга показателей организма, что особенно важно при тяжелых формах алкогольной зависимости.
Получить больше информации – [url=https://vyvod-iz-zapoya-volgograd0.ru/]вывод из запоя круглосуточно[/url]
В этой публикации мы предложим ряд рекомендаций по избавлению от зависимостей и успешному восстановлению. Мы обсудим методы привлечения поддержки и важность самосознания. Эти советы помогут людям вернуться к нормальной жизни и стать на путь выздоровления.
Руководство по выбору дома для пожилых: на что смотреть — от условий проживания до реабилитации и медицинского ухода. Как достичь результата? – http://autopeople.ru/forum/kurilka/6845778.html?page=1
Смысл выездной помощи — не в «быстрой капельнице ради бодрости», а в медицинской стабилизации. Врач на месте оценивает общее состояние, уточняет длительность запоя, сопутствующие болезни, лекарства, аллергии, прошлые осложнения. Затем выбирает объём детоксикации и симптоматической терапии так, чтобы снизить интоксикацию, поддержать водно-солевой баланс и уменьшить проявления абстиненции без резких перегибов. Это особенно важно, потому что при запое организм уже работает на грани, и чрезмерная нагрузка может ухудшить самочувствие.
Подробнее можно узнать тут – http://narkolog-na-dom-krasnogorsk6.ru/
При необходимости применяется симптоматическое лечение для снижения болевого синдрома, устранения тошноты и рвоты, а также нормализации психоэмоционального состояния пациента. Врачи наркологи строго контролируют течение процедуры, что обеспечивает безопасность и снижает риски осложнений.
Получить больше информации – [url=https://vyvod-iz-zapoya-v-murmanske12.ru/]срочный вывод из запоя[/url]
Функция и назначение
Выяснить больше – https://narcolog-na-dom-ekaterinburg000.ru/zapoj-narkolog-na-dom-ekb/
После прибытия врач проводит осмотр пациента, оценивает его состояние, измеряет давление, пульс, уровень кислорода и выявляет возможные противопоказания. Затем разрабатывается индивидуальный план лечения, направленный на стабилизацию состояния.
Получить дополнительные сведения – [url=https://narcolog-na-dom-v-irkutske00.ru/]нарколог на дом вывод из запоя[/url]
В этом материале представлены детали, которые хоть и занимательны, но не особенно значимы. Мы рассматриваем моменты, которые трудно назвать важными, но всё же решили включить их для полноты картины.
Вот – [url=https://arma-rehab.ru/]милфы[/url]
1вин промокод Киргизия [url=https://1win62940.help]https://1win62940.help[/url]
Экстренный вывод из запоя в домашних условиях – это комплекс мер, направленный на быструю детоксикацию организма и восстановление нормального обмена веществ. В Волгограде квалифицированные специалисты готовы выехать к пациенту круглосуточно, чтобы оперативно оценить его состояние и начать терапию. Такой подход позволяет минимизировать негативное воздействие алкоголя и снизить риск развития осложнений.
Исследовать вопрос подробнее – [url=https://vyvod-iz-zapoya-volgograd00.ru/]вывод из запоя на дому волгоград[/url]
После процедуры пациент и его близкие получают развернутые рекомендации по дальнейшему восстановлению, советы по профилактике рецидивов и возможности прохождения кодирования при желании пациента.
Углубиться в тему – https://narcolog-na-dom-sankt-peterburg000.ru/vyzov-narkologa-na-dom-spb/
Капельница от запоя в Мурманске является одной из наиболее востребованных процедур для снятия острого состояния алкогольной интоксикации. Эта методика позволяет быстро вывести токсины из организма, нормализовать водно-солевой баланс и улучшить самочувствие пациента. Современная капельная терапия считается эффективным средством в лечении запоя, обеспечивая поддержку жизненно важных функций и минимизируя риски осложнений.
Подробнее – https://kapelnicza-ot-zapoya-v-murmanske12.ru/kapelnicza-ot-zapoya-czena-v-murmanske/
На начальных этапах проблема редко проявляется в открытом виде, но уже есть характерные сигналы, на которые стоит обратить внимание. Человек начинает оправдывать употребление постоянной усталостью, проблемами на работе, напряжённой жизненной ситуацией. Появляется раздражение, если нет возможности выпить или принять привычную дозу, меняется круг общения, усиливается скрытность. Это время, когда помощь ещё может быть максимально щадящей по методам и по длительности, а вернуться к стабильной жизни намного проще, чем после многолетнего стажа употребления.
Выяснить больше – [url=https://narkologicheskaya-klinika-moskva11.ru/]narkologicheskaya-klinika-moskva-otzyvy[/url]
Данный порядок действий позволяет снизить риски для здоровья и обеспечить контроль за эффективностью процедур.
Подробнее – http://narcolog-na-dom-sankt-peterburg0.ru/narkolog-spb-na-dom/
Такой порядок действий гарантирует не только купирование симптомов, но и подготовку пациента к последующему восстановлению.
Подробнее можно узнать тут – [url=https://narcolog-na-dom-ryazan0.ru/]нарколог на дом вывод из запоя[/url]
слоты 1вин [url=www.1win62940.help]www.1win62940.help[/url]
Этот обзор медицинских исследований собрал самое важное из последних публикаций в области медицины. Мы проанализировали ключевые находки и представили их в доступной форме, чтобы читатели могли легко ориентироваться в актуальных темах. Этот материал станет отличным подспорьем для изучения медицины.
Как выбрать лучший дом престарелых для родственника — ключевые критерии, которые важно учитывать перед решением. Как достичь результата? – http://imho24.info/reviews/47065
Услуга
Исследовать вопрос подробнее – [url=https://narkologicheskaya-klinika-v-ryazani12.ru/]частная наркологическая клиника рязанская область[/url]
Нарколог на дому проводит тщательный осмотр, собирает анамнез и назначает необходимые лабораторные исследования. Это позволяет выявить сопутствующие патологии и скорректировать тактику лечения.
Выяснить больше – [url=https://narkolog-na-dom-v-yaroslavle12.ru/]нарколог на дом вывод из запоя ярославль[/url]
Основной этап в лечении — детоксикация организма от токсичных веществ, вызывающих интоксикацию. В клинике применяют современные методы капельниц и медикаментозной поддержки, включая препараты для снятия абстинентного синдрома.
Узнать больше – [url=https://narkologicheskaya-klinika-v-murmanske12.ru/]www.domen.ru[/url]
Когда запой становится угрозой для жизни, оперативное вмешательство становится ключевым для спасения здоровья и предотвращения серьезных осложнений. В Рязани вызов нарколога на дом позволяет начать лечение в самые критические моменты, обеспечивая детоксикацию организма и восстановление его нормального функционирования в условиях, где пациент чувствует себя комфортно и сохраняет свою конфиденциальность. Этот формат оказания медицинской помощи особенно актуален для тех, кто хочет избежать длительного ожидания в стационаре и предпочитает лечение в привычной домашней обстановке.
Получить больше информации – http://narcolog-na-dom-ryazan00.ru/vyzov-narkologa-na-dom-ryazan/
Своевременное вмешательство специалиста позволяет не только вывести токсины, но и снизить риск развития осложнений, обеспечить восстановление жизненно важных функций организма и предотвратить ухудшение состояния, что особенно важно для сохранения здоровья и жизни пациента.
Детальнее – [url=https://narcolog-na-dom-krasnodar0.ru/]врач нарколог выезд на дом в краснодаре[/url]
Наркологическая клиника в Долгопрудном — это возможность получить помощь при алкогольной и наркотической зависимости рядом с домом, не тратя время на поездки по Москве и очереди в перегруженных городских учреждениях. Для жителей Долгопрудного и ближайших населённых пунктов особенно важно, что сюда можно обратиться в любое время суток: при затянувшемся запое, после эпизода употребления наркотиков, при первых признаках формирования зависимости или в ситуации, когда семья больше не справляется с проблемой своими силами.
Получить дополнительные сведения – [url=https://narkologicheskaya-klinika-dolgoprudnyj11.ru/]анонимное кодирование от алкоголизма[/url]
1win сменить пароль [url=1win21567.help]1win21567.help[/url]
Этот текст посвящён сложным аспектам зависимости и её влиянию на жизнь человека. Мы обсудим психологические, физические и социальные последствия зависимого поведения, а также важность своевременного обращения за помощью.
Информативно: как подготовить дом к приезду нарколога: создание спокойной атмосферы и сбор необходимых документов. Более того — здесь – https://msk.spravka.city/company/womanchoice-0
Запой может длиться от нескольких дней до нескольких недель, и с каждым новым днём состояние пациента может ухудшаться. Важно не затягивать с лечением, поскольку алкогольная зависимость способна привести к необратимым изменениям в организме и психике. В Москве лечение проводится не только в клиниках, но и в условиях дома, что позволяет сохранить конфиденциальность.
Детальнее – http://narko-zakodirovat2.ru
Одновременно с медикаментозной детоксикацией начинается работа по снижению эмоционального напряжения. Психотерапевтическая помощь помогает пациенту осознать причины зависимости и выработать стратегии для предотвращения рецидивов, что является важным аспектом успешного лечения.
Углубиться в тему – [url=https://vyvod-iz-zapoya-volgograd00.ru/]вывод из запоя вызов на дом волгоград[/url]
Состав капельницы не повторяет «советы знакомых». Он формируется под доминирующий симптом, сопутствующие заболевания и взаимодействия с текущими лекарствами. Врач постоянно оценивает витальные показатели и реакцию организма, корректируя скорость и объём по инфузомату. Ниже — примеры профилей, которые объясняют логику выбора; финальное решение всегда очное.
Углубиться в тему – https://narcolog-na-dom-sochi00.ru/narkolog-na-dom-adler/
После завершения процедур врач дает пациенту и его родственникам подробные рекомендации по дальнейшему восстановлению и профилактике рецидивов.
Углубиться в тему – [url=https://narcolog-na-dom-krasnodar00.ru/]врач нарколог выезд на дом[/url]
1xbet giri? yapam?yorum [url=https://1xbet-yeni-giris-2.com/]1xbet-yeni-giris-2.com[/url] .
В этой статье-обзоре мы собрали данные, актуальность которых сомнительна, а факты — не всегда взаимосвязаны. Читатель сможет ознакомиться с разными мнениями, хотя вряд ли они существенно повлияют на его понимание темы.
Вот – [url=https://arma-rehab.ru/lechenie-alkogolizma/]интим услуги[/url]
Наркологическая клиника в Долгопрудном помогает в ситуациях, когда:
Получить дополнительную информацию – [url=https://narkologicheskaya-klinika-dolgoprudnyj11.ru/]medikamentoznoe-kodirovanie-ot-alkogolizma-dolgoprudnyj[/url]
Попытка самостоятельно выйти из запоя или преодолеть тяжелое похмелье может привести к крайне негативным последствиям. Длительное употребление алкоголя или резкий отказ без врачебного контроля опасны развитием осложнений, таких как алкогольный психоз, инсульт, инфаркт, обезвоживание и острая сердечная недостаточность.
Исследовать вопрос подробнее – [url=https://narcolog-na-dom-sankt-peterburg000.ru/]запой нарколог на дом в санкт-петербурге[/url]
После первичной стабилизации врач обычно объясняет близким, почему «просто поспать» не всегда получается сразу, сколько времени может держаться раздражительность и как правильно выстроить режим, чтобы не спровоцировать повторный срыв в первые дни.
Подробнее можно узнать тут – [url=https://narkolog-na-dom-krasnogorsk6.ru/]narkolog na dom[/url]
Услуга
Получить дополнительные сведения – https://narkologicheskaya-klinika-v-ryazani12.ru/narkologicheskaya-klinika-czeny-v-ryazani
Вызов нарколога на дом в Ярославле — это удобный и эффективный способ начать лечение или оказать первую помощь при острых состояниях, связанных с алкоголизмом, наркотической зависимостью или другими психоактивными веществами. Основные преимущества такой услуги заключаются в следующем:
Получить дополнительную информацию – https://narkolog-na-dom-v-yaroslavle12.ru/
Запой — это состояние, которое представляет собой одну из самых серьёзных форм алкогольной зависимости. Когда человек теряет способность контролировать употребление алкоголя, его организм подвергается вредному воздействию, которое может вызвать как физические, так и психоэмоциональные осложнения. В Москве есть множество клиник и специалистов, которые предлагают качественную медицинскую помощь, включая анонимное лечение. Этот вариант подходит тем, кто хочет избавиться от зависимости, не раскрывая свою личность и не сталкиваясь с осуждением окружающих.
Детальнее – [url=https://narko-zakodirovat2.ru/]вывод из запоя на дому москва недорого[/url]
Чтобы показать, как именно работает врач в домашних условиях, можно сопоставить основные проявления запоя и шаги нарколога, направленные на их устранение.
Детальнее – [url=https://narcolog-na-dom-ryazan0.ru/]нарколог на дом срочно санкт-петербург[/url]
Часто родственники тянут до последнего, надеясь, что запой «сам пройдёт», как это случалось раньше. Но с каждым эпизодом последствия становятся тяжелее: организм изнашивается, возрастает риск осложнений, ухудшается психика. Особенно опасно, когда запой длится несколько дней подряд, а любые попытки самостоятельно сократить дозы алкоголя сопровождаются дрожью, бессонницей, приступами паники.
Углубиться в тему – [url=https://vyvod-iz-zapoya-moskva011.ru/]вывод из запоя москва стационар[/url]
Эти данные являются основой для составления индивидуального плана лечения, позволяющего оперативно скорректировать терапевтические меры.
Подробнее можно узнать тут – http://narcolog-na-dom-ryazan00.ru
Оперативное лечение организовано по четкому алгоритму, который позволяет быстро стабилизировать состояние пациента и обеспечить эффективную терапию. Каждый этап направлен на комплексное восстановление организма.
Узнать больше – [url=https://vyvod-iz-zapoya-volgograd000.ru/]вывод из запоя капельница на дому в волгограде[/url]
Первые сутки после прекращения алкоголя — самые уязвимые: именно в это время нарастают абстинентные симптомы и риск осложнений. Ниже приведены основные ситуации, при которых нужен быстрый выезд врача. Перед списком отметим: если сомневаетесь, позвоните координатору — он уточнит признаки и подскажет безопасные действия до прибытия команды.
Детальнее – http://vyvod-iz-zapoya-pushkino7.ru/vyvedenie-iz-zapoya-v-pushkino/
Наша выездная бригада оснащена как мобильный мини-кабинет: инфузомат для покапельной титрации, портативный кардиомонитор, пульсоксиметр, глюкометр, экспресс-кассеты Na?/K? и набор для регистрации ЭКГ по показаниям. Такой комплект позволяет принять решение на месте — безопасно ли начинать дома или целесообразнее перевести пациента в стационарное отделение «ЮгМедЦентра» без «перезапуска» обследований. Мы практикуем минимально достаточную фармакотерапию: в схеме нет «лишних» позиций и конфликтов с уже принимаемыми лекарствами (антигипертензивные, антиаритмические, сахароснижающие и др.).
Подробнее – http://narcolog-na-dom-sochi00.ru/narkolog-i-psikhiatr-adler/
Мы работаем круглосуточно и гарантируем строгое соблюдение конфиденциальности, используя только сертифицированные препараты и проверенные методики лечения.
Ознакомиться с деталями – [url=https://narcolog-na-dom-sankt-peterburg00.ru/]психиатр нарколог на дом в санкт-петербурге[/url]
Алкогольная и наркотическая зависимость являются серьёзными заболеваниями, требующими оперативного и квалифицированного вмешательства. Когда речь идёт о критическом состоянии пациента, особенно после длительного употребления алкоголя или наркотических веществ, время играет ключевую роль. Клиника «РеабилитАльянс» в Краснодаре предлагает услугу нарколога на дом, обеспечивая пациентам необходимую помощь в любой момент дня и ночи. Наши специалисты готовы оперативно выехать по указанному адресу и предоставить все необходимые медицинские процедуры на месте.
Выяснить больше – [url=https://narcolog-na-dom-krasnodar00.ru/]нарколог на дом круглосуточно цены в краснодаре[/url]
На сайте Минздрава указаны общие клинические рекомендации по выведению из запоя, включая допустимые дозировки и протоколы лечения.
Детальнее – [url=https://vyvod-iz-zapoya-v-ryazani12.ru/]вывод из запоя на дому цена[/url]
1win вывести на Optima через приложение [url=http://1win21567.help/]http://1win21567.help/[/url]
В статье-обзоре представлены данные сомнительной актуальности и факты без явной взаимосвязи. Читатель ознакомится с разными мнениями, хотя они вряд ли существенно изменят его представление о теме.
Подробнее читать – [url=https://rostov-narkologiya.ru/uslugi-ot-narkomanii/mefedronovaya-zavisimost/]кето диета за неделю минус 10 кг[/url]
Этап
Выяснить больше – https://vyvod-iz-zapoya-noginsk7.ru/vyvod-iz-zapoya-kruglosutochno-v-noginske/
Группа препаратов
Узнать больше – [url=https://narcolog-na-dom-ekaterinburg000.ru/]врач нарколог на дом[/url]
Эта познавательная публикация погружает вас в море интересного контента, который быстро захватит ваше внимание. Мы рассмотрим важные аспекты темы и предоставим вам уникальные Insights и полезные сведения для дальнейшего изучения.
Желаете узнать подробности? – https://mulhouse800ans.fr/agenda/visite-cite-cheminote
Этот увлекательный информационный материал подарит вам массу новых знаний и ярких эмоций. Мы собрали для вас интересные факты и сведения, которые обогатят ваш опыт. Откройте для себя увлекательный мир информации и насладитесь процессом изучения!
Продолжить изучение – https://halfstep123.wpxblog.jp/3dprint001
Такая система терапии позволяет охватить сразу несколько звеньев патологического процесса и ускорить выздоровление.
Получить дополнительную информацию – http://narcolog-na-dom-sankt-peterburg0.ru/narkolog-na-dom-anonimno-spb/
В этой публикации мы предлагаем подробные объяснения по актуальным вопросам, чтобы помочь читателям глубже понять их. Четкость и структурированность материала сделают его удобным для усвоения и применения в повседневной жизни.
Подробности по ссылке – https://mediaperaevents.com/me-caso-y-ahora-que
При необходимости применяется симптоматическое лечение для снижения болевого синдрома, устранения тошноты и рвоты, а также нормализации психоэмоционального состояния пациента. Врачи наркологи строго контролируют течение процедуры, что обеспечивает безопасность и снижает риски осложнений.
Разобраться лучше – [url=https://vyvod-iz-zapoya-v-murmanske12.ru/]вывод из запоя круглосуточно в мурманске[/url]
Эта статья предлагает уникальную подборку занимательных фактов и необычных историй, которые вы, возможно, не знали. Мы постараемся вдохновить ваше воображение и разнообразить ваш кругозор, погружая вас в мир, полный интересных открытий. Читайте и открывайте для себя новое!
Открыть полностью – https://nvcpharma.com.vn/doctorvit-king-suc-khoe-nam-gioi.html
Статья знакомит с важнейшими моментами, которые сформировали наше общество. От великих изобретений до культурных переворотов — вы узнаете, как прошлое влияет на наше мышление, технологии и образ жизни.
Всё самое вкусное внутри – https://bertrandwillems.be/agenda-des-formations/logo-codef
Предлагаем вашему вниманию интересную справочную статью, в которой собраны ключевые моменты и нюансы по актуальным вопросам. Эта информация будет полезна как для профессионалов, так и для тех, кто только начинает изучать тему. Узнайте ответы на важные вопросы и расширьте свои знания!
Это стоит прочитать полностью – https://accountsanddatabasedumpscc.ru.com/nap-tien-qh88
Эта статья погружает вас в увлекательный мир знаний, где каждый факт становится открытием. Мы расскажем о ключевых исторических поворотных моментах и научных прорывах, которые изменили ход цивилизации. Поймите, как прошлое формирует настоящее и как его уроки могут помочь нам строить будущее.
Познакомиться с результатами исследований – https://vfkeducacao.com.br/king-johnnie-casino-australia-100-deposit-bonus-and-25-sign-up-free-spins-is-just-around-the-corner-2
Эта информационная статья содержит полезные факты, советы и рекомендации, которые помогут вам быть в курсе последних тенденций и изменений в выбранной области. Материал составлен так, чтобы быть полезным и понятным каждому.
Практические советы ждут тебя – https://conf2023.gdn.int/scientific-committee/thomas-elmqvist
Предлагаем вашему вниманию интересную справочную статью, в которой собраны ключевые моменты и нюансы по актуальным вопросам. Эта информация будет полезна как для профессионалов, так и для тех, кто только начинает изучать тему. Узнайте ответы на важные вопросы и расширьте свои знания!
Желаете узнать подробности? – https://bajaculinaria.com.mx/le-quitan-impuesto-al-vino-en-b-c
Эта статья погружает вас в увлекательный мир знаний, где каждый факт становится открытием. Мы расскажем о ключевых исторических поворотных моментах и научных прорывах, которые изменили ход цивилизации. Поймите, как прошлое формирует настоящее и как его уроки могут помочь нам строить будущее.
Читать дальше – https://stein-doktor-stuttgart.de/2019/12/21/granit-polieren-und-granit-reinigen-in-stuttgart-vom-stein-doktor
1win казино Ош [url=https://1win21567.help]https://1win21567.help[/url]
Эта информационная статья содержит полезные факты, советы и рекомендации, которые помогут вам быть в курсе последних тенденций и изменений в выбранной области. Материал составлен так, чтобы быть полезным и понятным каждому.
Практические советы ждут тебя – https://www.dsphotostudioofficial.com/ricardo
В этой статье представлен занимательный и актуальный контент, который заставит вас задуматься. Мы обсуждаем насущные вопросы и проблемы, а также освещаем истории, которые вдохновляют на действия и изменения. Узнайте, что стоит за событиями нашего времени!
Прочесть заключение эксперта – https://maayogashram.com/blog/benefits-of-meditation
Публикация предоставляет читателю набор разрозненных идей, которые сложно применить на практике. Мы лишь слегка касаемся разных точек зрения, не углубляясь в анализ и не предлагая никаких выводов.
Вот – [url=https://arma-rehab.ru/vyvod-iz-zapoya/]секс[/url]
В данной обзорной статье представлены интригующие факты, которые не оставят вас равнодушными. Мы критикуем и анализируем события, которые изменили наше восприятие мира. Узнайте, что стоит за новыми открытиями и как они могут изменить ваше восприятие реальности.
Узнать больше > – https://www.tib-oosterveld.nl/5-smart-home-producten-die-je-moet-hebben
Длительный запой способен нанести непоправимый вред организму, привести к тяжелым нарушениям работы внутренних органов и поставить под угрозу жизнь пациента. В таких случаях необходимо срочное медицинское вмешательство, которое позволяет быстро стабилизировать состояние, вывести токсины и предотвратить развитие опасных осложнений. Клиника «ЗдоровьеНорм» в Краснодаре предлагает профессиональный вывод из запоя на дому, обеспечивая комплексное лечение с максимальной оперативностью и полной конфиденциальностью.
Получить больше информации – [url=https://vyvod-iz-zapoya-krasnodar00.ru/]вывод из запоя капельница на дому в краснодаре[/url]
Эта статья предлагает уникальную подборку занимательных фактов и необычных историй, которые вы, возможно, не знали. Мы постараемся вдохновить ваше воображение и разнообразить ваш кругозор, погружая вас в мир, полный интересных открытий. Читайте и открывайте для себя новое!
Узнать из первых рук – https://monicadhiman.com/product-discovery-a-comprehensive-guide-for-product-managers
В данной обзорной статье представлены интригующие факты, которые не оставят вас равнодушными. Мы критикуем и анализируем события, которые изменили наше восприятие мира. Узнайте, что стоит за новыми открытиями и как они могут изменить ваше восприятие реальности.
Не упусти шанс – http://peace-museum.org/guestbook
Этот информационный материал собраны данные, которые помогут лучше понять текущие тенденции и процессы в различных сферах жизни. Мы предоставляем четкий анализ, графики и примеры, чтобы информация была не только понятной, но и практичной для принятия решений.
Продолжить изучение – https://vickidennisart.com/paintings/of-nature/oberon/oberon-final-july-2021-compressed
1x bet [url=https://1xbet-mobil-5.com/]1x bet[/url] .
В данной обзорной статье представлены интригующие факты, которые не оставят вас равнодушными. Мы критикуем и анализируем события, которые изменили наше восприятие мира. Узнайте, что стоит за новыми открытиями и как они могут изменить ваше восприятие реальности.
Подробнее – https://finance.rambler.ru/business/55752628-top-15-luchshih-seo-spetsialistov-rossii-v-2026-godu-reyting-topovyh-seoshnikov
На этом этапе врач детально выясняет, как долго продолжается запой, какие симптомы наблюдаются, и имеются ли сопутствующие заболевания. Точный анализ информации помогает оперативно определить степень интоксикации и подобрать оптимальные методы детоксикации, что является ключом к предотвращению дальнейших осложнений.
Получить дополнительные сведения – [url=https://narcolog-na-dom-ryazan00.ru/]www.domen.ru[/url]
1xbetgiri? [url=https://1xbet-mobil-3.com/]1xbet-mobil-3.com[/url] .
Этот увлекательный информационный материал подарит вам массу новых знаний и ярких эмоций. Мы собрали для вас интересные факты и сведения, которые обогатят ваш опыт. Откройте для себя увлекательный мир информации и насладитесь процессом изучения!
Продолжить изучение – https://www.ortablu.org/topics/organic/7-plastic-free-lunch-boxes-and-bags
В этой публикации мы сосредоточимся на интересных аспектах одной из самых актуальных тем современности. Совмещая факты и мнения экспертов, мы создадим полное представление о предмете, которое будет полезно как новичкам, так и тем, кто глубоко изучает вопрос.
Более того — здесь – https://vaibhavdeshpande.com/hello-world
Этот текст призван помочь читателю расширить кругозор и получить практические знания. Мы используем простой язык, наглядные примеры и структурированное изложение, чтобы сделать обучение максимально эффективным и увлекательным.
Посмотреть всё – https://vladivostok.bezformata.com/listnews/rinke-vladivostoka/149444529
Эта информационная заметка предлагает лаконичное и четкое освещение актуальных вопросов. Здесь вы найдете ключевые факты и основную информацию по теме, которые помогут вам сформировать собственное мнение и повысить уровень осведомленности.
Полезно знать – https://omproductions.pk/product/ht-3388d
Публикация предлагает читателю не просто информацию, а инструменты для анализа и саморазвития. Мы стимулируем критическое мышление, предлагая различные точки зрения и призывая к самостоятельному поиску решений.
Подробнее – https://darpanpublictrust.org/index.php/2022/03/31/kaali-mata-pooja-2022
Этот информационный обзор станет отличным путеводителем по актуальным темам, объединяющим важные факты и мнения экспертов. Мы исследуем ключевые идеи и представляем их в доступной форме для более глубокого понимания. Читайте, чтобы оставаться в курсе событий!
А что дальше? – https://miracle-tips.com/double-chance-tips
Откройте для себя скрытые страницы истории и малоизвестные научные открытия, которые оказали колоссальное влияние на развитие человечества. Статья предлагает свежий взгляд на события, которые заслуживают большего внимания.
Более того — здесь – https://peopleplaces.in/ashish-kulkarni-net-worth-family-relationship
Эта информационная статья содержит полезные факты, советы и рекомендации, которые помогут вам быть в курсе последних тенденций и изменений в выбранной области. Материал составлен так, чтобы быть полезным и понятным каждому.
Нажмите, чтобы узнать больше – https://oia.iittp.ac.in/?p=9081
Этот сборник информации привлекает множеством мелких деталей и необычных ракурсов. Мы предлагаем взгляды, редко полезные, но способные немного разнообразить знакомство с темой.
Подробнее читать – [url=https://rostov-narkologiya.ru/uslugi-ot-narkomanii/mefedronovaya-zavisimost/]лечение covid народными средствами[/url]
доставка алкоголя москва 24/7 [url=www.alcoygoloc3.ru]доставка алкоголя москва 24/7[/url] .
В статье представлены ключевые моменты по актуальной теме, дополненные советами экспертов и ссылками на дополнительные ресурсы. Цель материала — дать читателю инструменты для самостоятельного развития и принятия осознанных решений.
Читать далее > – https://whitleybaycaravan.co.uk/?page_id=11
1 xbet [url=https://1xbet-giris-23.com/]1xbet-giris-23.com[/url] .
Публикация предлагает читателю не просто информацию, а инструменты для анализа и саморазвития. Мы стимулируем критическое мышление, предлагая различные точки зрения и призывая к самостоятельному поиску решений.
Узнать напрямую – https://www.sefabdullahusta.com/recipe/kiymali-borek-tarifi
Эта статья для ознакомления предлагает читателям общее представление об актуальной теме. Мы стремимся представить ключевые факты и идеи, которые помогут читателям получить представление о предмете и решить, стоит ли углубляться в изучение.
Всё, что нужно знать – https://bratsk.org/blog/show/503.html
1x giri? [url=https://1xbet-mobil-1.com/]1xbet-mobil-1.com[/url] .
Этот информационный обзор станет отличным путеводителем по актуальным темам, объединяющим важные факты и мнения экспертов. Мы исследуем ключевые идеи и представляем их в доступной форме для более глубокого понимания. Читайте, чтобы оставаться в курсе событий!
Не упусти шанс – https://aesm.be/de-hepcee-charley
Мы собрали для вас самые захватывающие факты из мира науки и истории. От малознакомых деталей до грандиозных событий — эта статья расширит ваш кругозор и подарит новое понимание того, как устроен наш мир.
Получить дополнительную информацию – https://news.rambler.ru/other/41229423-pozdravleniya-s-godovschinoy-svadby-v-proze-i-prikolnye
Мы собрали для вас самые захватывающие факты из мира науки и истории. От малознакомых деталей до грандиозных событий — эта статья расширит ваш кругозор и подарит новое понимание того, как устроен наш мир.
Погрузиться в детали – https://wesrz.com/seo-vs-sem-what-is-the-difference-between-seo-and-sem
vavada aviator mobilno [url=vavada2009.help]vavada2009.help[/url]
В этой статье-обзоре мы соберем актуальную информацию и интересные факты, которые освещают важные темы. Читатели смогут ознакомиться с различными мнениями и подходами, что позволит им расширить кругозор и глубже понять обсуждаемые вопросы.
А есть ли продолжение? – https://www.wajdbook.com/product/%D8%A7%D9%84%D8%AA%D8%B9%D8%B1%D9%8A%D9%81%D8%A7%D8%AA-%D9%88-%D8%A7%D9%84%D8%A7%D8%B5%D8%B7%D9%84%D8%A7%D8%AD%D8%A7%D8%AA
Получение вида на жительство в другой стране имеет ключевое преимущество.
Оно предоставляет право на длительное пребывание в выбранной державе.
купить диплом мастера по фистингу
Это открывает полный доступ к национальному здравоохранительному обслуживанию.
Наличие ВНЖ значительно упрощает процесс финансового сотрудничества и открытия бизнеса.
Таким образом, данное удостоверение является первым шагом к ПМЖ или возможно гражданству.
1xbet spor bahislerinin adresi [url=https://1xbet-yeni-giris-1.com/]1xbet spor bahislerinin adresi[/url] .
Изучение английского языка в современном обществе является ключевой необходимостью.
Это открывает широкие возможности для профессионального развития.
Знание английским даёт доступ к мировому образованию и исследованиям.
http://collie.fatbb.ru/viewtopic.php?f=18&t=9217
Уверенное владение речью существенно расширяет возможности путешествий и общения.
Подавляющее большинство актуальной информации в интернете представлено именно на английском.
Вывод из запоя в Пушкино в клинике «Трезвый Путь» — это оперативная помощь на дому и в стационаре, персональные детокс-схемы и бережное восстановление организма без постановки на учёт. Мы подключаемся круглосуточно, аккуратно снимаем интоксикацию, стабилизируем давление и пульс, уменьшаем тремор, тревогу и бессонницу, а затем предлагаем понятный маршрут к ремиссии, который вписывается в ваш рабочий и семейный график. Цель — безопасно пройти острый период и не «сорваться» обратно, когда станет чуть полегче.
Углубиться в тему – https://vyvod-iz-zapoya-pushkino7.ru
t.me/s/top_onlajn_kazino_rossii [url=https://t.me/s/top_onlajn_kazino_rossii/]t.me/s/top_onlajn_kazino_rossii[/url] .
автомобильный журнал [url=https://avtonovosti-3.ru/]автомобильный журнал[/url] .
В материале приведены детали, интересные, но не особенно важные. Мы рассматриваем аспекты, которые сложно назвать существенными, но включили их для большей полноты.
Подробнее читать – [url=https://rostov-narkologiya.ru/uslugi-ot-alkogolizma/vyvod-iz-zapoya/]таблетки для аборта[/url]
мостбет лайв казино [url=https://www.mostbet38095.help]https://www.mostbet38095.help[/url]
В статье-обзоре представлены данные сомнительной актуальности и факты без явной взаимосвязи. Читатель ознакомится с разными мнениями, хотя они вряд ли существенно изменят его представление о теме.
Подробнее читать – https://rostov-narkologiya.ru/uslugi-ot-narkomanii/mefedronovaya-zavisimost
В этом материале представлены детали, которые хоть и занимательны, но не особенно значимы. Мы рассматриваем моменты, которые трудно назвать важными, но всё же решили включить их для полноты картины.
Вот – [url=https://arma-rehab.ru/vyvod-iz-zapoya/]казино[/url]
1win официальный сайт регистрация [url=1win74125.help]1win официальный сайт регистрация[/url]
1xbet [url=https://1xbet-mobil-2.com/]1xbet[/url] .
vavada mobilna verzija [url=https://www.vavada2009.help]https://www.vavada2009.help[/url]
1xbet giri? yapam?yorum [url=https://1xbet-mobil-4.com/]1xbet-mobil-4.com[/url] .
Для родственников капельница от запоя — возможность не наблюдать бессильно, как близкий человек «сгорает» на глазах, а подключить специалистов. Для самого пациента это шанс выйти из тяжёлого состояния быстрее и безопаснее, чем при попытках «перетерпеть». Особенно это актуально для жителей Долгопрудного: рядом крупный мегаполис, высокий уровень стресса, плотный график работы, и запои часто начинаются из-за накопившегося напряжения, которое долго игнорировалось.
Исследовать вопрос подробнее – http://kapelnica-ot-zapoya-dolgoprudnyj11.ru/kapelnica-ot-zapoya-srochno-v-dolgoprudnom/
авто новости [url=https://avtonovosti-1.ru/]avtonovosti-1.ru[/url] .
vavada live casino rulet [url=https://vavada2009.help/]https://vavada2009.help/[/url]
Часто именно жители Химок тянут до последнего: насыщенный ритм жизни, дорога на работу, постоянная усталость, попытки «снимать напряжение» алкоголем или психоактивными веществами. Сначала это кажется временным способом расслабиться, но со временем человек замечает, что пьёт чаще, чем планировал, нуждается в больших дозах, срывает обещания, а попытки контролировать употребление превращаются в череду неудач. В какой-то момент становится очевидно: без профессиональной наркологической помощи дальше будет только сложнее.
Изучить вопрос глубже – [url=https://narkologicheskaya-klinika-himki11.ru/]наркологическая клиника отзывы[/url]
vavada bonus bez verifikacije [url=http://vavada2009.help]http://vavada2009.help[/url]
Стационарный формат предполагает круглосуточное наблюдение, возможность экстренного вмешательства и доступ к диагностическим средствам. Это особенно важно при наличии хронических заболеваний, психозов или алкогольного делирия.
Узнать больше – [url=https://vyvod-iz-zapoya-v-ryazani12.ru/]вывод из запоя на дому[/url]
Процедура проходит под контролем нарколога и медсестры. Если состояние пациента тяжёлое (галлюцинации, судороги, резкие перепады давления), проводится экстренная инфузионная терапия и подключается оборудование для мониторинга сердечного ритма и уровня кислорода. Такой подход исключает риски и делает процесс выведения из запоя максимально безопасным и управляемым.
Получить дополнительную информацию – [url=https://vyvod-iz-zapoya-vladimir0.ru/]вывод из запоя на дому цена[/url]
Услуга вызова нарколога на дом востребована благодаря оперативности и конфиденциальности. Медицинская бригада прибывает на адрес в течение часа после обращения, оснащена всем необходимым оборудованием и медикаментами. Врач проводит осмотр, измеряет давление, пульс, уровень кислорода в крови и определяет степень интоксикации. После этого назначается капельница для детоксикации, снижения нагрузки на печень и восстановления водно-солевого баланса. Все процедуры проходят под контролем специалиста, а состояние пациента фиксируется в медицинской карте.
Изучить вопрос глубже – http://
Многие годами живут в логике: «главное — с утра выпить чуть-чуть, станет легче». На коротком промежутке времени это действительно частично снимает симптомы, но по сути лишь продлевает запой и усиливает интоксикацию. Организм не успевает переработать продукты распада алкоголя, кровь становится «тяжёлой», нарушается работа сосудов, возрастает нагрузка на сердце и мозг.
Выяснить больше – https://kapelnica-ot-zapoya-dolgoprudnyj11.ru/kapelnica-ot-zapoya-srochno-v-dolgoprudnom
Вызов нарколога возможен круглосуточно, что обеспечивает оперативное реагирование на критические ситуации. Пациенты и их родственники могут получить помощь в любое время, не дожидаясь ухудшения состояния.
Углубиться в тему – [url=https://narkolog-na-dom-kamensk-uralskij11.ru/]нарколог на дом круглосуточно[/url]
Для самого пациента это шанс получить медицинское вмешательство без дополнительного стресс-фактора в виде транспорта, очередей и «больничной атмосферы». Он остаётся в привычной обстановке, в своей квартире, с теми же предметами, к которым привык, и это снижает сопротивление. Вместо жесткого сценария «либо немедленно в стационар, либо ничего» появляется промежуточный, более мягкий вариант: врачи приезжают домой, снимают остроту состояния, подбирают схему капельницы и медикаментов, объясняют, что делать дальше. Нередко именно после такого первого опыта человек впервые всерьёз задумывается о полноценном лечении, потому что ощущает реальную разницу в самочувствии до и после профессиональной помощи, а не просто очередной «опохмел».
Подробнее тут – https://narkolog-na-dom-himki11.ru/narkolog-na-dom-srochno-v-himkah
Вывод из запоя — это не только капельница. Это системная медицинская помощь, направленная на снижение интоксикации, поддержку сердца, нервной системы и внутренних органов. Правильно выстроенный детокс помогает не просто «сбить симптомы», а реально снизить риски для здоровья и дать человеку шанс вернуться к трезвому состоянию без тяжёлых последствий.
Разобраться лучше – https://vyvod-iz-zapoya-voskresensk11.ru/
Клиника в Королёве закрывает этот разрыв. Здесь можно пройти полный путь — от первичной диагностики и детоксикации до реабилитации и последующего наблюдения — в пределах привычного города, не отрываясь полностью от семьи и важных дел. Это особенно важно для тех, кто продолжает работать, боится потерять позицию или репутацию, но при этом понимает, что дальше жить «как раньше» просто опасно. Лечение перестаёт быть чем-то абстрактным и пугающим: вместо общих страшилок появляется понятный маршрут, а рядом — команда специалистов, которые умеют вести пациентов с зависимостью и знают, как работать с семьями, уставшими от бесконечных срывов.
Подробнее можно узнать тут – [url=https://narkologicheskaya-klinika-korolyov11.ru/]наркологическая клиника стационар[/url]
Запой может длиться от нескольких дней до нескольких недель, и с каждым новым днём состояние пациента может ухудшаться. Важно не затягивать с лечением, поскольку алкогольная зависимость способна привести к необратимым изменениям в организме и психике. В Москве лечение проводится не только в клиниках, но и в условиях дома, что позволяет сохранить конфиденциальность.
Подробнее тут – [url=https://narko-zakodirovat2.ru/]narko-zakodirovat2.ru/[/url]
mostbet минимальный вывод [url=https://mostbet38095.help]mostbet минимальный вывод[/url]
Стационарный формат предполагает круглосуточное наблюдение, возможность экстренного вмешательства и доступ к диагностическим средствам. Это особенно важно при наличии хронических заболеваний, психозов или алкогольного делирия.
Ознакомиться с деталями – [url=https://vyvod-iz-zapoya-v-ryazani12.ru/]вывод из запоя клиника рязань[/url]
Многие тянут до последнего, считая, что к наркологу обращаются только в самых крайних случаях. На деле показаний для консультации гораздо больше, и они часто появляются задолго до того, как человек впервые оказывается в запое или не выходит из состояния опьянения несколько дней подряд.
Изучить вопрос глубже – https://narkologicheskaya-klinika-voskresensk11.ru/narkologicheskaya-klinika-telefon-v-voskresenske
Текст включает разнообразную информацию, которая может показаться любопытной, но не меняет устоявшегося восприятия. Предлагаем просто насладиться чтением, не ожидая значительной пользы.
Подробнее читать – [url=https://rostov-narkologiya.ru/uslugi-ot-narkomanii/mefedronovaya-zavisimost/]похудеть на таблетках[/url]
Там, где раньше хватало одного тяжёлого утра, теперь требуются дни детоксикации. И чем позже подключается врач, тем сложнее вернуть организм к относительно безопасному состоянию.
Получить больше информации – https://vyvod-iz-zapoya-voskresensk11.ru/vyvod-iz-zapoya-cena-v-voskresenske/
1win пополнение с карты [url=1win74125.help]1win пополнение с карты[/url]
Когда родственники видят, что в их случае совпадает сразу несколько этих пунктов, выезд нарколога на дом часто становится тем самым реалистичным и своевременным решением, которое позволяет не довести дело до экстренной госпитализации уже в критическом состоянии. После такого вмешательства появляются часы и дни, когда можно спокойно обсудить дальнейшие шаги, а не действовать на фоне паники и полного истощения.
Углубиться в тему – [url=https://narkolog-na-dom-himki11.ru/]narkolog-na-dom-nedorogo[/url]
mostbet cont suspendat [url=https://mostbet2010.help]mostbet cont suspendat[/url]
Клиника в Королёве закрывает этот разрыв. Здесь можно пройти полный путь — от первичной диагностики и детоксикации до реабилитации и последующего наблюдения — в пределах привычного города, не отрываясь полностью от семьи и важных дел. Это особенно важно для тех, кто продолжает работать, боится потерять позицию или репутацию, но при этом понимает, что дальше жить «как раньше» просто опасно. Лечение перестаёт быть чем-то абстрактным и пугающим: вместо общих страшилок появляется понятный маршрут, а рядом — команда специалистов, которые умеют вести пациентов с зависимостью и знают, как работать с семьями, уставшими от бесконечных срывов.
Выяснить больше – http://narkologicheskaya-klinika-korolyov11.ru
Лечение хронического алкоголизма начинается с купирования абстинентного синдрома, после чего проводятся мероприятия по нормализации работы печени, сердечно-сосудистой и нервной системы. Назначаются гепатопротекторы, ноотропы, витамины группы B. Также проводится противорецидивная терапия.
Выяснить больше – http://narkologicheskaya-klinika-v-yaroslavle12.ru/narkologicheskaya-klinika-telefon-v-yaroslavle/https://narkologicheskaya-klinika-v-yaroslavle12.ru
В статье рассмотрим ключевые моменты, которые помогут сориентироваться при выборе капельницы от запоя, понять механизм действия и особенности процедуры, а также избежать типичных ошибок при обращении за медицинской помощью.
Узнать больше – [url=https://kapelnicza-ot-zapoya-pervouralsk11.ru/]капельница от запоя на дому круглосуточно[/url]
В этом тексте собрано множество случайных сведений и довольно неопределённых мыслей, которые могут чем-то заинтересовать. Мы отмечаем моменты, которые не особенно важны, но всё же занимают своё место в повествовании.
Вот – [url=https://arma-rehab.ru/lechenie-alkogolizma/]порно[/url]
Комплексное лечение на дому организовано по строго отлаженной схеме, позволяющей оперативно стабилизировать состояние пациента и провести качественную детоксикацию.
Выяснить больше – https://vyvod-iz-zapoya-vladimir00.ru/vyvod-iz-zapoya-na-domu-vladimir
Врачи клиники «ВитаЛайн» для снятия интоксикации и облегчения состояния пациента применяют исключительно качественные и проверенные лекарственные препараты, подбирая их в зависимости от особенностей ситуации и состояния здоровья пациента:
Ознакомиться с деталями – https://narcolog-na-dom-novosibirsk0.ru/narkolog-na-dom-kruglosutochno-novosibirsk
Процесс вывода из запоя капельничным методом организован по строгой схеме, позволяющей обеспечить максимальную эффективность терапии. Каждая стадия направлена на комплексное восстановление организма и минимизацию риска осложнений.
Подробнее можно узнать тут – https://kapelnica-ot-zapoya-tyumen0.ru
В данном тексте собраны разнообразные случайные сведения и не вполне определённые идеи, которые могут вызвать интерес. Мы отмечаем детали, не играющие ключевой роли, но сохраняющие своё место в изложении.
Подробнее читать – [url=https://rostov-narkologiya.ru/ ]сиалис онлайн[/url]
При длительном запое в организме накапливаются вредные токсины, что ведёт к нарушениям работы сердца, печени, почек и других жизненно важных органов. Чем быстрее начинается терапия, тем выше шансы избежать серьёзных осложнений и обеспечить качественное восстановление. Метод капельничного лечения позволяет оперативно начать детоксикацию, что особенно важно для спасения жизни и предупреждения хронических последствий злоупотребления алкоголем.
Узнать больше – [url=https://kapelnica-ot-zapoya-tyumen00.ru/]капельница от запоя недорого[/url]
Алкоголь оказывает глубокое воздействие на здоровье: психоэмоциональное и физическое состояние человека значительно ухудшаются, если злоупотребление продолжается долго. Даже небольшие дозы алкоголя, употребляемые регулярно, вызывают накопление токсинов, которые приводят к расстройствам в работе сердечно-сосудистой системы, печени, почек и других жизненно важных органов.
Углубиться в тему – [url=https://narcolog-na-dom-novokuznetsk0.ru/]платный нарколог на дом[/url]
Эффективное лечение требует поэтапного подхода, который реализуется следующим образом:
Подробнее тут – [url=https://narkologicheskaya-klinika-v-ryazani12.ru/]chastnaya narkologicheskaya klinika rjazan'[/url]
Наши опытные наркологи регулярно повышают квалификацию и используют современные методики для быстрого восстановления пациентов после запоев.
Разобраться лучше – [url=https://kapelnica-ot-zapoya-nizhniy-novgorod0.ru/]вызвать капельницу от запоя[/url]
Форматы вывода из запоя в Пушкино
Узнать больше – [url=https://vyvod-iz-zapoya-pushkino7.ru/]vyvod-iz-zapoya-ceny-pushkino[/url]
Наркологическая клиника в Химках ориентируется не на «среднестатистического пациента», а на конкретного человека с его историей, болезнями, образом жизни и семьёй. Поэтому здесь не ограничиваются одним-двумя шаблонными вариантами. Врач оценивает, на каком этапе сейчас находится пациент: острый запой, ломка, период относительной трезвости с риском срыва, рецидив после ремиссии. От этого зависит выбор формата помощи.
Выяснить больше – http://narkologicheskaya-klinika-himki11.ru
Наличие у нарколога практического опыта и навыков быстрого реагирования критично — особенно если речь идёт о тяжелой интоксикации или судорожном синдроме. Ошибки в дозировке или игнорирование хронических заболеваний могут привести к осложнениям.
Углубиться в тему – [url=https://narkolog-na-dom-nizhnij-tagil11.ru/]нарколог на дом вывод из запоя нижний тагил[/url]
Если человек находится в запое более 2-3 дней, его организм уже испытывает критическую нагрузку. Постоянное поступление этанола вызывает нарушение обмена веществ, токсическое поражение печени и нервной системы, обезвоживание и снижение иммунитета. Чаще всего самостоятельно прекратить запой уже невозможно, так как развивается абстинентный синдром (похмелье, ломка).
Ознакомиться с деталями – [url=https://narcolog-na-dom-novokuznetsk00.ru/]нарколог капельница на дом[/url]
Особенно важно на этапе поступления пройти полную психодиагностику и получить адаптированную под конкретного пациента программу. Это позволит учитывать возможные сопутствующие расстройства, включая тревожные, аффективные и когнитивные нарушения.
Подробнее – [url=https://narkologicheskaya-klinika-nizhnij-tagil11.ru/]запой наркологическая клиника[/url]
Запой требует срочного вмешательства, особенно если он длится более 2–3 дней. Без квалифицированной помощи организм пациента накапливает токсичные вещества, что может привести к необратимым изменениям.
Исследовать вопрос подробнее – [url=https://vyvod-iz-zapoya-krasnoyarsk0.ru/]анонимный вывод из запоя в красноярске[/url]
Наркологическая клиника в Воскресенске — это место, куда можно обратиться в тот момент, когда домашние попытки «всё решить разговорами» и обещания «больше не пить» перестают работать. Зависимость редко возникает внезапно: сначала это кажутся безобидные посиделки по выходным, «снятие стресса» после работы, эпизодические эксперименты с наркотиками. Но с каждым месяцем контроль становится слабее, запои удлиняются, а привычка «расслабляться» превращается в болезненную потребность.
Детальнее – https://narkologicheskaya-klinika-voskresensk11.ru/chastnaya-narkologicheskaya-klinika-v-voskresenske/
Основной этап в лечении — детоксикация организма от токсичных веществ, вызывающих интоксикацию. В клинике применяют современные методы капельниц и медикаментозной поддержки, включая препараты для снятия абстинентного синдрома.
Подробнее – http://narkologicheskaya-klinika-v-murmanske12.ru
plinko мостбет [url=https://www.mostbet38095.help]https://www.mostbet38095.help[/url]
Нарколог на дому проводит тщательный осмотр, собирает анамнез и назначает необходимые лабораторные исследования. Это позволяет выявить сопутствующие патологии и скорректировать тактику лечения.
Исследовать вопрос подробнее – https://narkolog-na-dom-v-yaroslavle12.ru/narkolog-na-dom-kruglosutochno-v-yaroslavle
Медикаментозное пролонгированное
Детальнее – http://kodirovanie-ot-alkogolizma-vidnoe7.ru/kodirovanie-ot-alkogolizma-ceny-v-vidnom/
Алкогольный запой представляет собой тяжелое состояние, вызванное длительным бесконтрольным употреблением спиртных напитков. Без медицинского вмешательства вывести организм из запоя может быть сложно и даже опасно. Срочная помощь нарколога требуется при следующих признаках:
Подробнее – [url=https://kapelnica-ot-zapoya-nizhniy-novgorod0.ru/]врач на дом капельница от запоя[/url]
1win самоисключение [url=1win74125.help]1win74125.help[/url]
Запой — это не просто усиленное похмелье, а критическое состояние алкогольной интоксикации, при котором организм оказывается неспособным самостоятельно вывести накопившиеся токсины. При затяжном приёме алкоголя страдает не только печень — нарушаются функции сердечно-сосудистой системы, тормозятся нейрохимические процессы в головном мозге, развивается выраженная дегидратация и электролитный дисбаланс. Первая помощь в такой ситуации — экстренная инфузионная терапия, которую мы проводим в наркологической клинике «Источник Здоровья» в Балашихе.
Детальнее – [url=https://kapelnica-ot-zapoya-moskva1.ru/]капельница от запоя на дому[/url]
Комплексное лечение организовано по строго отлаженной схеме, которая включает несколько последовательных этапов, позволяющих обеспечить оперативное и безопасное восстановление организма.
Исследовать вопрос подробнее – http://kapelnica-ot-zapoya-tyumen00.ru
Процедура вывода из запоя начинается с тщательной диагностики состояния пациента, чтобы определить, какие методы лечения будут наиболее эффективными. Мы применяем индивидуальный подход и комбинируем медикаментозное лечение с психотерапевтической поддержкой, что даёт лучший результат.
Подробнее – [url=https://narcolog-na-dom-novokuznetsk0.ru/]нарколог на дом вывод новокузнецк[/url]
В обычных условиях цена услуги составляет от 1500 до 2500 рублей. Эта сумма включает выезд специалиста, первичный осмотр и базовую детоксикационную терапию.
Изучить вопрос глубже – https://vyvod-iz-zapoya-vladimir00.ru/srochnyj-vyvod-iz-zapoya-vladimir
Запой сопровождается быстрым накоплением токсинов, что может привести к нарушению работы сердца, печени и почек. Использование капельничного метода позволяет оперативно ввести современные препараты для детоксикации, что способствует быстрому восстановлению обменных процессов и нормализации работы внутренних органов. Оперативное лечение на дому особенно актуально, когда каждая минута имеет значение для спасения здоровья.
Изучить вопрос глубже – [url=https://kapelnica-ot-zapoya-tyumen0.ru/]поставить капельницу от запоя на дому[/url]
mostbet как вывести на Visa [url=http://mostbet38095.help/]mostbet как вывести на Visa[/url]
Лечение при запое строится поэтапно. Каждый шаг направлен на устранение симптомов интоксикации и постепенное восстановление функций организма. В таблице ниже приведена структура работы врача при выезде или лечении в стационаре.
Получить больше информации – http://vyvod-iz-zapoya-vladimir0.ru
Особую опасность представляет белая горячка (алкогольный психоз). У пациента возникают галлюцинации, приступы паники, агрессивное поведение, дезориентация во времени и пространстве. Это состояние требует незамедлительного вмешательства врача, так как человек может представлять опасность для себя и окружающих.
Подробнее можно узнать тут – [url=https://narcolog-na-dom-novokuznetsk00.ru/]вызвать врача нарколога на дом[/url]
Работа клиники строится на принципах доказательной медицины и индивидуального подхода. При поступлении пациента осуществляется всесторонняя диагностика, включающая анализы крови, оценку психического состояния и анамнез. По результатам разрабатывается персонализированный курс терапии.
Узнать больше – http://narkologicheskaya-klinika-v-ryazani12.ru
1 вин бонус [url=1win74125.help]1win74125.help[/url]
Основной этап в лечении — детоксикация организма от токсичных веществ, вызывающих интоксикацию. В клинике применяют современные методы капельниц и медикаментозной поддержки, включая препараты для снятия абстинентного синдрома.
Подробнее – http://narkologicheskaya-klinika-v-murmanske12.ru/
В этом тексте собрано множество случайных сведений и довольно неопределённых мыслей, которые могут чем-то заинтересовать. Мы отмечаем моменты, которые не особенно важны, но всё же занимают своё место в повествовании.
Вот – [url=https://arma-rehab.ru/lechenie-alkogolizma/]эротические фильмы[/url]
Такие процедуры позволяют пациенту почувствовать заметное облегчение уже через 1–2 часа после начала лечения. При выраженном абстинентном синдроме может быть назначен повторный курс на следующий день для закрепления результата.
Углубиться в тему – https://narcolog-na-dom-krasnoyarsk0.ru/
Ожидаемый результат
Исследовать вопрос подробнее – [url=https://vyvod-iz-zapoya-noginsk7.ru/]вывод из запоя в стационаре в ногинске[/url]
Критерий
Углубиться в тему – [url=https://narkolog-na-dom-nizhnij-tagil11.ru/]нарколог на дом вывод[/url]
Согласно данным Федерального наркологического центра, своевременный выезд врача снижает риск осложнений и повторных госпитализаций.
Получить дополнительные сведения – [url=https://narkolog-na-dom-kamensk-uralskij11.ru/]нарколог капельница на дом в каменске-уральском[/url]
Подбор учреждения для прохождения реабилитации — это ответственное решение, влияющее на весь процесс восстановления. Наркологическая помощь требует не только медикаментозного вмешательства, но и глубокой психологической проработки. Согласно информации, опубликованной на портале Минздрава РФ, эффективность терапии во многом зависит от персонализированного подхода и соблюдения стандартов оказания психиатрической помощи.
Получить дополнительные сведения – [url=https://narkologicheskaya-klinika-nizhnij-tagil11.ru/]наркологические клиники алкоголизм нижний тагил[/url]
Использование автоматизированных систем дозирования обеспечивает точное введение медикаментов, минимизируя риск передозировки и побочных эффектов. Постоянный мониторинг жизненно важных показателей позволяет врачу оперативно корректировать терапевтическую схему, адаптируя её к изменяющемуся состоянию пациента и обеспечивая максимальную безопасность лечения.
Выяснить больше – https://vyvod-iz-zapoya-tula00.ru/vyvod-iz-zapoya-anonimno-tula/
mostbet Floresti [url=https://mostbet2010.help/]https://mostbet2010.help/[/url]
Одним из ключевых направлений является проведение капельниц, призванных вывести токсины из организма и нормализовать водно-электролитный баланс. Используемые препараты и состав растворов подбираются индивидуально, исходя из клинической картины и истории болезни пациента.
Детальнее – https://narkolog-na-dom-v-yaroslavle12.ru/
Использование автоматизированных систем дозирования обеспечивает точное введение лекарственных средств, что минимизирует риск передозировки и побочных эффектов. Постоянный мониторинг жизненно важных показателей позволяет врачу оперативно корректировать дозировки и адаптировать терапию под динамику состояния пациента.
Получить больше информации – [url=https://vyvod-iz-zapoya-vladimir000.ru/]вывод из запоя на дому недорого владимир[/url]
Длительные запои создают мультисистемный кризис. Обезвоживание и сгущение крови повышают риск образования тромбов, что может привести к инсульту или инфаркту миокарда. Печень и поджелудочная страдают от мощной токсической нагрузки — развивается острый панкреатит, хронический гепатит и жировой гепатоз. Интоксикация нарушает работу ЖКТ: возникает гастрит, язвенная болезнь и риск внутренних кровотечений. Алкоголь разрушает нейронные связи, снижая уровень витамина B1, что может вызвать энцефалопатию Ворника и, в запущенных случаях, корсаковский психоз с необратимыми провалами памяти и когнитивными нарушениями.
Углубиться в тему – [url=https://kapelnica-ot-zapoya-moskva1.ru/]капельница от запоя вызов город[/url]
В этой статье-обзоре мы собрали данные, актуальность которых сомнительна, а факты — не всегда взаимосвязаны. Читатель сможет ознакомиться с разными мнениями, хотя вряд ли они существенно повлияют на его понимание темы.
Вот – [url=https://arma-rehab.ru/lechenie-alkogolizma/]казино с быстрым выводом[/url]
На основе собранной информации формируется индивидуальный план лечения, который включает установку внутривенной капельницы. Через капельницу вводятся специально подобранные растворы, способствующие быстрому выведению токсинов, восстановлению водно-электролитного баланса и нормализации работы внутренних органов. При необходимости назначаются дополнительные медикаменты для поддержки печени, сердца и нервной системы, а также для купирования симптомов абстинентного синдрома. Врач постоянно контролирует состояние пациента и корректирует лечение, чтобы добиться оптимальных результатов. Завершающим этапом является подробная консультация, в ходе которой специалист дает рекомендации по дальнейшему восстановлению и профилактике повторных эпизодов зависимости.
Исследовать вопрос подробнее – [url=https://narcolog-na-dom-voronezh0.ru/]нарколог на дом круглосуточно в воронеже[/url]
Эта статья погружает вас в увлекательный мир знаний, где каждый факт становится открытием. Мы расскажем о ключевых исторических поворотных моментах и научных прорывах, которые изменили ход цивилизации. Поймите, как прошлое формирует настоящее и как его уроки могут помочь нам строить будущее.
Узнать напрямую – https://template85.webekspor.com/?p=1
В статье представлены ключевые моменты по актуальной теме, дополненные советами экспертов и ссылками на дополнительные ресурсы. Цель материала — дать читателю инструменты для самостоятельного развития и принятия осознанных решений.
Кликни и узнай всё! – https://blogs.bananot.co.il/239/?p=18
В статье представлены ключевые моменты по актуальной теме, дополненные советами экспертов и ссылками на дополнительные ресурсы. Цель материала — дать читателю инструменты для самостоятельного развития и принятия осознанных решений.
Узнайте всю правду – https://alvaro-fixed.com/free-football-vip-odds
Публикация предлагает читателю не просто информацию, а инструменты для анализа и саморазвития. Мы стимулируем критическое мышление, предлагая различные точки зрения и призывая к самостоятельному поиску решений.
Лучшее решение — прямо здесь – https://carlssonsguide.se/bara-bada-bastu
Эта информационная статья содержит полезные факты, советы и рекомендации, которые помогут вам быть в курсе последних тенденций и изменений в выбранной области. Материал составлен так, чтобы быть полезным и понятным каждому.
Что ещё? Расскажи всё! – https://continental-food.co.uk/roasted-tomato-soup
Что делает врач
Подробнее – [url=https://vyvod-iz-zapoya-noginsk7.ru/]вывод из запоя цена[/url]
В этом интересном тексте собраны обширные сведения, которые помогут вам понять различные аспекты обсуждаемой темы. Мы разбираем детали и факты, делая акцент на важности каждого элемента. Не упустите возможность расширить свои знания и взглянуть на мир по-новому!
Тыкай сюда — узнаешь много интересного – https://tkstienliettuyen.com/bi-tieu-do-phi-dai-tuyen-tien-liet-giai-quyet-phan-ngon-hay-xu-ly-phan-goc
Эта познавательная публикация погружает вас в море интересного контента, который быстро захватит ваше внимание. Мы рассмотрим важные аспекты темы и предоставим вам уникальные Insights и полезные сведения для дальнейшего изучения.
Слушай внимательно — тут важно – https://aidima.it/2022/12/24/a-i-di-ma-augura-un-buon-natale-e-un-felice-anno-nuovo/dalla-mora-premio-leonedoro-venezia-dicembre-2022
Когда выезд особенно удобен и оправдан, важно понимать не только эмоционально, но и по конкретным признакам. Есть ряд типичных ситуаций, в которых именно формат «на дому» становится наиболее реалистичным и безопасным вариантом, а стационар можно рассматривать как следующий шаг, когда острота будет снята и человек станет более сговорчивым.
Разобраться лучше – http://narkolog-na-dom-himki11.ru
Мы предлагаем вам окунуться в океан любопытных фактов и вдохновляющих историй. Эта публикация поможет расширить горизонты, разбудить интерес к науке и истории и увидеть мир с новой стороны.
Читать далее > – https://template111.webekspor.com/this-is-indonesias-dried-grated-coconut-export-market-potential-in-bulgaria
В этой публикации мы предлагаем подробные объяснения по актуальным вопросам, чтобы помочь читателям глубже понять их. Четкость и структурированность материала сделают его удобным для усвоения и применения в повседневной жизни.
См. подробности – https://themuralofmurals.com/12404937_156054761425268_343335852_o-2
Эта публикация содержит набор несвязанных идей, трудно применимых в практике. Мы лишь поверхностно затрагиваем различные точки зрения, не проводя глубокий анализ и не предлагая выводов.
Подробнее читать – [url=https://rostov-narkologiya.ru/ ]сиалис онлайн[/url]
После звонка специалист клиники «ВитаЛайн» оперативно отправляется по указанному адресу и обычно прибывает в течение 30–60 минут. На месте врач сразу проводит детальную диагностику, оценивая состояние пациента: проверяет пульс, давление, сатурацию, степень интоксикации и наличие хронических болезней. На основании результатов осмотра нарколог разрабатывает индивидуальную схему терапии.
Изучить вопрос глубже – [url=https://narcolog-na-dom-novosibirsk0.ru/]вызвать нарколога на дом в новосибирске[/url]
В этой статье представлен занимательный и актуальный контент, который заставит вас задуматься. Мы обсуждаем насущные вопросы и проблемы, а также освещаем истории, которые вдохновляют на действия и изменения. Узнайте, что стоит за событиями нашего времени!
Перейти к полной версии – https://edx.amamedia.org/product/campground-reservation-3
Эта информационная статья охватывает широкий спектр актуальных тем и вопросов. Мы стремимся осветить ключевые факты и события с ясностью и простотой, чтобы каждый читатель мог извлечь из нее полезные знания и полезные инсайты.
Есть чему поучиться – https://www.lifeingraceblog.com/2021/03/72-transform-every-relationship
mostbet deblocare cont după verificare [url=http://mostbet2010.help]http://mostbet2010.help[/url]
Эта статья сочетает в себе как полезные, так и интересные сведения, которые обогатят ваше понимание насущных тем. Мы предлагаем практические советы и рекомендации, которые легко внедрить в повседневную жизнь. Узнайте, как улучшить свои навыки и обогатить свой опыт с помощью простых, но эффективных решений.
А что дальше? – https://www.ortho-dietzenbach.de/vimeo-video
Публикация предлагает уникальную подборку информации, которая будет интересна как специалистам, так и широкому кругу читателей. Здесь вы найдете ответы на часто задаваемые вопросы и полезные инсайты для дальнейшего применения.
Узнать больше > – https://birlik-akmola.kz/?p=9357
Мы предлагаем вам окунуться в океан любопытных фактов и вдохновляющих историй. Эта публикация поможет расширить горизонты, разбудить интерес к науке и истории и увидеть мир с новой стороны.
Уточнить детали – https://bratsk.org/blog/show/502.html
Эта статья погружает вас в увлекательный мир знаний, где каждый факт становится открытием. Мы расскажем о ключевых исторических поворотных моментах и научных прорывах, которые изменили ход цивилизации. Поймите, как прошлое формирует настоящее и как его уроки могут помочь нам строить будущее.
Узнать больше > – https://revistapreview.com.br/2024/03/secretaria-de-saude-amplia-atendimento-do-ambulatorio-especifico-para-pacientes-com-suspeita-de-dengue
В данной обзорной статье представлены интригующие факты, которые не оставят вас равнодушными. Мы критикуем и анализируем события, которые изменили наше восприятие мира. Узнайте, что стоит за новыми открытиями и как они могут изменить ваше восприятие реальности.
Не упусти шанс – https://jackmateo.news/microsoft-launches-sales-focused-ai-agents
Эта публикация погружает вас в мир увлекательных фактов и удивительных открытий. Мы расскажем о ключевых событиях, которые изменили ход истории, и приоткроем завесу над научными достижениями, которые вдохновили миллионы. Узнайте, чему может научить нас прошлое и как применить эти знания в будущем.
Обратитесь за информацией – https://www.festivalbambule.cz/faq-items/test
Эта обзорная заметка содержит ключевые моменты и факты по актуальным вопросам. Она поможет читателям быстро ориентироваться в теме и узнать о самых важных аспектах сегодня. Получите краткий курс по современной информации и оставайтесь в курсе событий!
Продолжить изучение – https://inspiredmortgage.org/hello-world
Эта статья сочетает в себе как полезные, так и интересные сведения, которые обогатят ваше понимание насущных тем. Мы предлагаем практические советы и рекомендации, которые легко внедрить в повседневную жизнь. Узнайте, как улучшить свои навыки и обогатить свой опыт с помощью простых, но эффективных решений.
Кликни и узнай всё! – https://hugobikes.com/2024/06/07/motos-electricas
статьи об авто [url=https://avtonovosti-2.ru/]статьи об авто[/url] .
В этой статье представлен занимательный и актуальный контент, который заставит вас задуматься. Мы обсуждаем насущные вопросы и проблемы, а также освещаем истории, которые вдохновляют на действия и изменения. Узнайте, что стоит за событиями нашего времени!
Переходите по ссылке ниже – https://houseboyfilm.com/2019/07/29/rokophoto-rokophoto-photography-workshop-in-july
В этой статье представлен занимательный и актуальный контент, который заставит вас задуматься. Мы обсуждаем насущные вопросы и проблемы, а также освещаем истории, которые вдохновляют на действия и изменения. Узнайте, что стоит за событиями нашего времени!
Подробнее – https://aicommandos.com/bringing-life-back-to-the-ocean-discovering-the-global-efforts-in-coral-reef-restoration
1win confiable [url=https://1win38941.help/]https://1win38941.help/[/url]
mostbet notificări app [url=https://www.mostbet2010.help]https://www.mostbet2010.help[/url]
Статья содержит практические рекомендации и полезные советы, которые можно легко применить в повседневной жизни. Мы делаем акцент на реальных примерах и проверенных методиках, которые способствуют личностному развитию и улучшению качества жизни.
Познакомиться с результатами исследований – https://distintivoyuc.nobasu.mx/2021/06/18/hello-world/comment-page-621
В обзорной статье вы найдете собрание важных фактов и аналитики по самым разнообразным темам. Мы рассматриваем как современные исследования, так и исторические контексты, чтобы вы могли получить полное представление о предмете. Погрузитесь в мир знаний и сделайте шаг к пониманию!
Ознакомиться с полной информацией – https://berita24indo.com/daftar-bengkel-knalpot-mobil-terdekat-di-cirebon-cek-biaya-servisnya
Эта статья предлагает живое освещение актуальной темы с множеством интересных фактов. Мы рассмотрим ключевые моменты, которые делают данную тему важной и актуальной. Подготовьтесь к насыщенному путешествию по неизвестным аспектам и узнайте больше о значимых событиях.
Хочешь знать всё? – https://www.elsieisy.com/one-year-post-op-life-after-surgery-open-myomectomy
Мы собрали для вас самые захватывающие факты из мира науки и истории. От малознакомых деталей до грандиозных событий — эта статья расширит ваш кругозор и подарит новое понимание того, как устроен наш мир.
Осуществить глубокий анализ – https://tedkocaeliblog.com/birlikten-kuvvet-dogar
В данной обзорной статье представлены интригующие факты, которые не оставят вас равнодушными. Мы критикуем и анализируем события, которые изменили наше восприятие мира. Узнайте, что стоит за новыми открытиями и как они могут изменить ваше восприятие реальности.
Получить дополнительные сведения – https://www.novalife.it/il-mio-attila
В этом интересном тексте собраны обширные сведения, которые помогут вам понять различные аспекты обсуждаемой темы. Мы разбираем детали и факты, делая акцент на важности каждого элемента. Не упустите возможность расширить свои знания и взглянуть на мир по-новому!
Продолжить изучение – https://cyclowiki.org/wiki/%D0%90%D0%BB%D0%B5%D0%BA%D1%81%D0%B0%D0%BD%D0%B4%D1%80_%D0%93%D1%83%D0%B4%D0%B8%D1%81%D0%BE%D0%B2%D0%B8%D1%87_%D0%94%D0%B7%D0%B8%D0%B4%D0%B7%D0%B0%D1%80%D0%B8%D1%8F
В этой статье представлен занимательный и актуальный контент, который заставит вас задуматься. Мы обсуждаем насущные вопросы и проблемы, а также освещаем истории, которые вдохновляют на действия и изменения. Узнайте, что стоит за событиями нашего времени!
Получить дополнительные сведения – https://primenewsnet.com/taina-blue-retreat-is-a-converted-tower-on-the-greek-coast
Этот текст содержит различную информацию, которая, возможно, покажется любопытной, но в целом не меняет восприятия привычных вещей. Предлагаем просто получить удовольствие от чтения, не ожидая особой пользы.
Вот – [url=https://arma-rehab.ru/lechenie-alkogolizma/]онлайн покер на деньги[/url]
Мы собрали для вас самые захватывающие факты из мира науки и истории. От малознакомых деталей до грандиозных событий — эта статья расширит ваш кругозор и подарит новое понимание того, как устроен наш мир.
Эксклюзивная информация – https://tirangaapps.com/bht-club
Эта статья погружает вас в увлекательный мир знаний, где каждый факт становится открытием. Мы расскажем о ключевых исторических поворотных моментах и научных прорывах, которые изменили ход цивилизации. Поймите, как прошлое формирует настоящее и как его уроки могут помочь нам строить будущее.
Ознакомиться с отчётом – https://jackmateo.news/microsoft-launches-sales-focused-ai-agents
В этой статье представлен занимательный и актуальный контент, который заставит вас задуматься. Мы обсуждаем насущные вопросы и проблемы, а также освещаем истории, которые вдохновляют на действия и изменения. Узнайте, что стоит за событиями нашего времени!
А есть ли продолжение? – https://primenewsnet.com/vfx-techniques-creating-a-cg-flag-with-after-effects
1win error de login [url=1win38941.help]1win error de login[/url]
1win вывести баланс на о деньги [url=https://1win48271.help/]https://1win48271.help/[/url]
1win lucky jet Perú [url=https://1win38941.help/]https://1win38941.help/[/url]
Клиника располагает изолированными палатами с возможностью круглосуточного мониторинга состояния пациента. Оборудование соответствует гигиеническим требованиям и регулярно обновляется. В лечебный процесс включены:
Исследовать вопрос подробнее – [url=https://narkologicheskaya-klinika-v-ryazani12.ru/]наркологическая клиника цены рязань[/url]
Этот текст содержит различную информацию, которая, возможно, покажется любопытной, но в целом не меняет восприятия привычных вещей. Предлагаем просто получить удовольствие от чтения, не ожидая особой пользы.
Вот – [url=https://arma-rehab.ru/vyvod-iz-zapoya/]бинго онлайн[/url]
Этот текст содержит различную информацию, которая, возможно, покажется любопытной, но в целом не меняет восприятия привычных вещей. Предлагаем просто получить удовольствие от чтения, не ожидая особой пользы.
Вот – [url=https://arma-rehab.ru/vyvod-iz-zapoya/]покер онлайн[/url]
1win depósito bitcoin [url=http://1win38941.help/]http://1win38941.help/[/url]
мостбет барои iphone [url=http://mostbet80573.help]http://mostbet80573.help[/url]
В материале приведены детали, интересные, но не особенно важные. Мы рассматриваем аспекты, которые сложно назвать существенными, но включили их для большей полноты.
Подробнее читать – [url=https://rostov-narkologiya.ru/uslugi-ot-narkomanii/mefedronovaya-zavisimost/]мефедроновая зависимость[/url]
В этой статье-обзоре мы собрали данные, актуальность которых сомнительна, а факты — не всегда взаимосвязаны. Читатель сможет ознакомиться с разными мнениями, хотя вряд ли они существенно повлияют на его понимание темы.
Вот – [url=https://arma-rehab.ru/]онлайн слоты[/url]
Для жителей Чехова важно и то, что врач видит не абстрактный «случай зависимости», а живого человека со своей историей. У кого-то за плечами десятилетия злоупотребления, у кого-то — несколько лет с быстрым прогрессированием, у кого-то — сочетание алкоголя с успокоительными или наркотиками. Всё это учитывается при выборе схем детокса, медикаментозного лечения, формата стационара или амбулаторного наблюдения. Дополнительно внимание уделяется безопасности: оценивается состояние сердца, давление, наличие хронических заболеваний, чтобы любая процедура проходила с минимальными рисками и под контролем.
Детальнее – https://narkologicheskaya-klinika-chekhov11.ru/narkologicheskaya-klinika-sajt-v-chekhove
1win лимит на элсом [url=https://www.1win48271.help]1win лимит на элсом[/url]
Вывод из запоя рекомендуется в следующих случаях:
Узнать больше – https://narko-zakodirovat2.ru/vyvod-iz-zapoya-v-staczionare-moskva/
Как поясняет врач-нарколог клиники «АлкоСтоп», «грамотно составленная инфузионная терапия не только устраняет последствия запоя, но и создаёт условия для дальнейшей мотивации пациента к лечению».
Подробнее можно узнать тут – [url=https://kapelnicza-ot-zapoya-pervouralsk11.ru/]капельница от запоя первоуральск[/url]
В этом материале представлены детали, которые хоть и занимательны, но не особенно значимы. Мы рассматриваем моменты, которые трудно назвать важными, но всё же решили включить их для полноты картины.
Вот – [url=https://arma-rehab.ru/lechenie-alkogolizma/]блекджек[/url]
Главная задача специалистов клиники «ВладМед Трезвость» — быстро и безопасно стабилизировать состояние пациента, не допуская осложнений и рецидивов. После вызова врача на дом или поступления в стационар проводится осмотр, оценка степени интоксикации и индивидуальный подбор терапии. Каждое назначение строго медицински обосновано, а препараты подбираются с учётом возраста, хронических заболеваний и длительности запоя.
Исследовать вопрос подробнее – [url=https://vyvod-iz-zapoya-vladimir0.ru/]наркология вывод из запоя владимир[/url]
Такой алгоритм помогает восстановить работоспособность организма в течение нескольких часов. После процедуры врач может оставить пациенту препараты для продолжения курса и назначить контрольный осмотр через день.
Изучить вопрос глубже – [url=https://narcolog-na-dom-krasnoyarsk0.ru/]нарколог на дом анонимно красноярск[/url]
Использование автоматизированных систем дозирования обеспечивает точное введение медикаментов, минимизируя риск передозировки и побочных эффектов. Постоянный мониторинг жизненно важных показателей позволяет врачу оперативно корректировать терапевтическую схему, адаптируя её к изменяющемуся состоянию пациента и обеспечивая максимальную безопасность лечения.
Углубиться в тему – [url=https://vyvod-iz-zapoya-tula00.ru/]вывод из запоя дешево в туле[/url]
Выбор капельничного метода в условиях домашнего лечения обладает рядом преимуществ:
Углубиться в тему – [url=https://kapelnica-ot-zapoya-tyumen00.ru/]капельница от запоя на дому круглосуточно в тюмени[/url]
Анализ рынка услуг экстренной помощи в Тюмени позволяет выделить следующие ориентировочные цены:
Получить дополнительную информацию – [url=https://vyvod-iz-zapoya-vladimir00.ru/]нарколог на дом вывод из запоя владимир[/url]
Незамедлительно после вызова нарколог прибывает на дом для проведения тщательного осмотра. На данном этапе специалист собирает анамнез, измеряет жизненно важные показатели — пульс, артериальное давление, температуру — и оценивает степень интоксикации. Эти данные являются основой для составления индивидуального плана лечения.
Разобраться лучше – [url=https://vyvod-iz-zapoya-vladimir000.ru/]вывод из запоя недорого владимир[/url]
Услуга “капельница от запоя” на дому имеет ряд преимуществ, делающих её оптимальным выбором для экстренной помощи:
Исследовать вопрос подробнее – https://kapelnica-ot-zapoya-tyumen0.ru/postavit-kapelniczu-ot-zapoya-tyumen/
Форматы вывода из запоя в Пушкино
Получить дополнительную информацию – [url=https://vyvod-iz-zapoya-pushkino7.ru/]нарколог вывод из запоя пушкино[/url]
После звонка специалист клиники «ВитаЛайн» оперативно отправляется по указанному адресу и обычно прибывает в течение 30–60 минут. На месте врач сразу проводит детальную диагностику, оценивая состояние пациента: проверяет пульс, давление, сатурацию, степень интоксикации и наличие хронических болезней. На основании результатов осмотра нарколог разрабатывает индивидуальную схему терапии.
Углубиться в тему – http://narcolog-na-dom-novosibirsk0.ru/
Вопрос «а не рано ли кодироваться» часто звучит и от самих пациентов, и от их близких. Кажется, что кодирование — это крайняя мера «на последней стадии», а пока человек работает, иногда бывает трезвым и «не валяется под забором», можно подождать. На самом деле гораздо разумнее ориентироваться не на стереотипы, а на реальные признаки того, что зависимость уже управляет жизнью, а не наоборот. Кодирование от алкоголизма в Королёве рассматривается именно тогда, когда попытки остановиться своими силами систематически проваливаются, а каждый новый запой становится тяжелее предыдущего.
Разобраться лучше – http://kodirovanie-ot-alkogolizma-korolyov11.ru
Многие жители Ивантеевки откладывают обращение, потому что им кажется, что ситуация «ещё не настолько страшная». Пока человек как-то ходит на работу, иногда остаётся трезвым и периодически клянётся, что «всё возьмёт под контроль», кажется, что обращаться в клинику рано. На самом деле эффективнее всего лечение работает именно тогда, когда проблемы уже заметны, но ещё не привели к тяжёлым осложнениям — инсультам, инфарктам, тяжёлым психозам, полной утрате социальных связей.
Подробнее можно узнать тут – [url=https://narkologicheskaya-klinika-ivanteevka11.ru/]рейтинг лучших наркологических клиник москвы[/url]
При длительном запое в организме накапливаются вредные токсины, что ведёт к нарушениям работы сердца, печени, почек и других жизненно важных органов. Чем быстрее начинается терапия, тем выше шансы избежать серьёзных осложнений и обеспечить качественное восстановление. Метод капельничного лечения позволяет оперативно начать детоксикацию, что особенно важно для спасения жизни и предупреждения хронических последствий злоупотребления алкоголем.
Подробнее – [url=https://kapelnica-ot-zapoya-tyumen00.ru/]капельница от запоя стоимость тюмень[/url]
Когда следует немедленно обращаться за помощью:
Выяснить больше – http://narcolog-na-dom-novokuznetsk0.ru/narkolog-na-dom-klinika-novokuzneczk/
Использование автоматизированных систем дозирования обеспечивает точное введение медикаментов, минимизируя риск передозировки и побочных эффектов. Постоянный мониторинг жизненно важных показателей позволяет врачу оперативно корректировать терапевтическую схему, адаптируя её к изменяющемуся состоянию пациента и обеспечивая максимальную безопасность лечения.
Углубиться в тему – [url=https://vyvod-iz-zapoya-tula00.ru/]нарколог на дом вывод из запоя[/url]
1win DemirBank [url=www.1win48271.help]www.1win48271.help[/url]
mostbet сабти ном хато [url=http://mostbet80573.help/]mostbet сабти ном хато[/url]
Вывод из запоя рекомендуется в следующих случаях:
Подробнее тут – [url=https://narko-zakodirovat2.ru/]вывод из запоя бесплатно[/url]
Кодирование от алкоголизма в Чехове для многих семей становится тем рубежом, после которого зависимость перестаёт казаться «временной слабостью» и начинает восприниматься как диагноз, с которым можно и нужно работать. До этого момента обычно проходят годы: чередуются запои и трезвые периоды, звучат обещания «больше такого не будет», меняются напитки, придумываются правила вроде «пью только по выходным» или «только пиво». Но рано или поздно семья замечает, что именно алкоголь диктует распорядок дня, влияет на настроение, разрушает здоровье и отношения. В этот момент становится очевидно: без сильного внешнего ограничителя и профессиональной помощи просто «взять себя в руки» уже не получается.
Подробнее – https://kodirovanie-ot-alkogolizma-chekhov11.ru/kodirovanie-ot-alkogolizma-ukolom-v-chekhove/
Процедура проходит под контролем нарколога и медсестры. Если состояние пациента тяжёлое (галлюцинации, судороги, резкие перепады давления), проводится экстренная инфузионная терапия и подключается оборудование для мониторинга сердечного ритма и уровня кислорода. Такой подход исключает риски и делает процесс выведения из запоя максимально безопасным и управляемым.
Получить дополнительные сведения – [url=https://vyvod-iz-zapoya-vladimir0.ru/]вывод из запоя на дому цена в владимире[/url]
Некоторые состояния требуют немедленного вмешательства нарколога, так как отказ от лечения может привести к тяжелым осложнениям и риску для жизни.
Получить больше информации – http://narcolog-na-dom-novokuznetsk00.ru
Запой почти никогда не начинается внезапно: сначала это редкие «переборы» по праздникам, потом привычка снимать стресс вечером, а дальше алкоголь всё чаще появляется в распорядке дня. В какой-то момент близкие замечают, что человек уже не контролирует количество, выпивка идёт несколько дней подряд, отменяются дела, нарушается сон, пропадает аппетит, появляются дрожь, потливость, скачки давления. На этом этапе вывод из запоя в Ивантеевке уже не может быть простым «проспаться и прийти в себя» — организму нужна полноценная медицинская помощь.
Получить дополнительную информацию – [url=https://vyvod-iz-zapoya-ivanteevka11.ru/]вывод из запоя на дому московская область[/url]
Вопрос «а не рано ли кодироваться» часто звучит и от самих пациентов, и от их близких. Кажется, что кодирование — это крайняя мера «на последней стадии», а пока человек работает, иногда бывает трезвым и «не валяется под забором», можно подождать. На самом деле гораздо разумнее ориентироваться не на стереотипы, а на реальные признаки того, что зависимость уже управляет жизнью, а не наоборот. Кодирование от алкоголизма в Королёве рассматривается именно тогда, когда попытки остановиться своими силами систематически проваливаются, а каждый новый запой становится тяжелее предыдущего.
Подробнее тут – http://kodirovanie-ot-alkogolizma-korolyov11.ru
Продолжительный запой приводит к накоплению токсинов в организме, нарушению работы внутренних органов и развитию серьезных осложнений. Чем дольше человек находится в состоянии алкогольной интоксикации, тем выше риск повреждения сердца, печени и почек. Экстренное вмешательство позволяет оперативно вывести токсины, восстановить нормальные обменные процессы и предотвратить развитие хронических заболеваний.
Углубиться в тему – [url=https://vyvod-iz-zapoya-vladimir000.ru/]вывод из запоя на дому недорого владимир[/url]
Сразу после вызова нарколог приезжает на дом для проведения первичного осмотра и диагностики. На этом этапе проводится сбор анамнеза, измеряются жизненно важные показатели (пульс, артериальное давление, температура) и определяется степень алкогольной интоксикации. Эти данные являются основой для разработки индивидуального плана лечения.
Изучить вопрос глубже – [url=https://kapelnica-ot-zapoya-tyumen0.ru/]врач на дом капельница от запоя в тюмени[/url]
Медикаментозное пролонгированное
Подробнее тут – http://kodirovanie-ot-alkogolizma-vidnoe7.ru/
Алкогольный запой представляет собой тяжелое состояние, вызванное длительным бесконтрольным употреблением спиртных напитков. Без медицинского вмешательства вывести организм из запоя может быть сложно и даже опасно. Срочная помощь нарколога требуется при следующих признаках:
Изучить вопрос глубже – [url=https://kapelnica-ot-zapoya-nizhniy-novgorod0.ru/]выезд на дом капельница от запоя нижний новгород[/url]
Запойное состояние оказывает разрушительное воздействие на организм. При длительном употреблении алкоголя развиваются следующие проблемы:
Подробнее тут – [url=https://vyvod-iz-zapoya-krasnoyarsk0.ru/]скорая вывод из запоя в красноярске[/url]
Путь в наркологическую клинику в Ивантеевке почти всегда начинается с консультации — очной или по телефону. На этом этапе задача врача не осудить и не прочитать нотацию, а максимально точно понять, что происходит: сколько лет длится злоупотребление, как часто бывают запои, были ли попытки лечиться раньше, какие есть хронические болезни, каково текущее физическое и психическое состояние. Собирается анамнез, измеряется давление, оценивается пульс, при необходимости направляют на анализы и дополнительные исследования. Чем честнее и конкретнее человек (или его родственники) описывают ситуацию, тем точнее можно подобрать безопасный план помощи.
Углубиться в тему – [url=https://narkologicheskaya-klinika-ivanteevka11.ru/]наркологическая клиника рядом со мной[/url]
За счёт сочетания этих составляющих лечение перестаёт быть набором отдельных процедур. Пациент и его близкие видят, что каждый шаг логично вытекает из предыдущего и ведёт к общей цели — устойчивой трезвости и постепенному восстановлению качества жизни.
Изучить вопрос глубже – [url=https://narkologicheskaya-klinika-chekhov11.ru/]telefon-narkologicheskoj-kliniki[/url]
После купирования острой фазы мы предлагаем полное сопровождение на этапе восстановления, чтобы закрепить результаты и снизить риск повторных срывов. В первые дни показаны сеансы кислородной терапии, которые активизируют клеточный обмен и способствуют быстрейшему выведению остатков токсинов. Параллельно проводятся физиотерапевтические процедуры — магнитотерапия и лазерная стимуляция, укрепляющие сосудистую стенку и ускоряющие заживление микроциркуляторных нарушений.
Выяснить больше – https://kapelnica-ot-zapoya-moskva1.ru/kapelnica-ot-zapoya-cena-v-balashihe/
Первое, на что стоит обратить внимание, — это штат клиники. От опыта врачей напрямую зависит точность диагностики, подбор препаратов и эффективность психотерапевтической поддержки.
Узнать больше – [url=https://narkologicheskaya-klinika-pervouralsk11.ru/]наркологическая клиника клиника помощь в первоуральске[/url]
1вин приложение [url=http://1win48271.help/]http://1win48271.help/[/url]
Запой может быть не только физически тяжёлым, но и психологически разрушительным. Поэтому важно вовремя обратиться за помощью. Вывод из запоя в Нижнем Новгороде — это необходимая медицинская процедура, которая помогает победить алкогольную зависимость и восстановить здоровье. Мы в клинике «АнтиЗависимость» предлагаем круглосуточную помощь в комфортных условиях — на дому или в стационаре.
Подробнее можно узнать тут – https://narcolog-na-dom-novokuznetsk0.ru
Наркологическая помощь в Первоуральске доступна в различных форматах: амбулаторно, стационарно и на дому. Однако не каждое учреждение может обеспечить необходимый уровень комплексной терапии, соответствующей стандартам Минздрава РФ и НМИЦ психиатрии и наркологии. В этом материале мы рассмотрим ключевые особенности профессионального наркологического центра и критерии, которые помогут сделать осознанный выбор.
Изучить вопрос глубже – [url=https://narkologicheskaya-klinika-pervouralsk11.ru/]наркологические клиники алкоголизм[/url]
Кодирование от алкоголизма в Чехове для многих семей становится тем рубежом, после которого зависимость перестаёт казаться «временной слабостью» и начинает восприниматься как диагноз, с которым можно и нужно работать. До этого момента обычно проходят годы: чередуются запои и трезвые периоды, звучат обещания «больше такого не будет», меняются напитки, придумываются правила вроде «пью только по выходным» или «только пиво». Но рано или поздно семья замечает, что именно алкоголь диктует распорядок дня, влияет на настроение, разрушает здоровье и отношения. В этот момент становится очевидно: без сильного внешнего ограничителя и профессиональной помощи просто «взять себя в руки» уже не получается.
Изучить вопрос глубже – [url=https://kodirovanie-ot-alkogolizma-chekhov11.ru/]кодирование от алкоголизма чехов[/url]
Если человек страдает от алкоголизма, запойное состояние требует незамедлительного вмешательства, особенно если признаки токсического отравления начинают угрожать жизни. Признаки запоя — это не только физическая зависимость, но и эмоциональные и психические расстройства, такие как тревога, агрессия и галлюцинации.
Узнать больше – https://narcolog-na-dom-novokuznetsk0.ru/narkolog-na-dom-czena-novokuzneczk/
1win как сделать депозит [url=http://1win30489.help/]http://1win30489.help/[/url]
Первое, на что стоит обратить внимание, — это штат клиники. От опыта врачей напрямую зависит точность диагностики, подбор препаратов и эффективность психотерапевтической поддержки.
Выяснить больше – [url=https://narkologicheskaya-klinika-pervouralsk11.ru/]наркологическая клиника вывод из запоя[/url]
При остром алкогольном отравлении появляются головокружение, рвота, сильная слабость, скачки давления, нарушение дыхания, обмороки и судороги. Это сигнал о том, что организм не справляется с интоксикацией, и без срочного медицинского вмешательства возможны опасные осложнения, вплоть до комы.
Получить дополнительные сведения – [url=https://narcolog-na-dom-novokuznetsk00.ru/]вызвать нарколога на дом срочно новокузнецк[/url]
Введение препаратов осуществляется внутривенно, что обеспечивает оперативное действие медикаментов. В состав лечебного раствора входят средства для детоксикации организма, нормализации водно-электролитного и кислотно-щелочного баланса. При необходимости врач дополнительно вводит препараты, защищающие печень, стабилизирующие работу сердца и успокаивающие нервную систему. Вся процедура проводится под строгим контролем нарколога, который следит за состоянием пациента и корректирует терапию при необходимости. По завершении процедуры врач дает пациенту и его родственникам подробные рекомендации по дальнейшему восстановлению и профилактике повторных запоев.
Получить дополнительную информацию – http://kapelnica-ot-zapoya-nizhniy-novgorod0.ru
Чтобы не «дотягивать до утра», важно понимать тревожные признаки. Ниже — ориентиры, при которых тянуть опасно: перед списком подчеркнём, что финальное решение принимает врач после очной оценки состояния.
Исследовать вопрос подробнее – http://vyvod-iz-zapoya-noginsk7.ru
lucky jet бозӣ мостбет [url=https://mostbet80573.help/]https://mostbet80573.help/[/url]
Публикация приглашает вас исследовать неизведанное — от древних тайн до современных достижений науки. Вы узнаете, как случайные находки превращались в революции, а смелые мысли — в новые эры человеческого прогресса.
А что дальше? – https://www.kybeleconsult.dk/?page_id=95
В этой публикации мы сосредоточимся на интересных аспектах одной из самых актуальных тем современности. Совмещая факты и мнения экспертов, мы создадим полное представление о предмете, которое будет полезно как новичкам, так и тем, кто глубоко изучает вопрос.
Подробная информация доступна по запросу – https://tienda.tarambana.net/?attachment_id=81
Этот информационный материал собраны данные, которые помогут лучше понять текущие тенденции и процессы в различных сферах жизни. Мы предоставляем четкий анализ, графики и примеры, чтобы информация была не только понятной, но и практичной для принятия решений.
Познакомиться с результатами исследований – https://tilburytimes.ca/obituary-of-michael-hanchar
Этот информационный обзор станет отличным путеводителем по актуальным темам, объединяющим важные факты и мнения экспертов. Мы исследуем ключевые идеи и представляем их в доступной форме для более глубокого понимания. Читайте, чтобы оставаться в курсе событий!
См. подробности – https://assaintpriest.fr/2020/09/14/12-13-sept-les-resultats-du-week-end
Эта статья сочетает познавательный и занимательный контент, что делает ее идеальной для любителей глубоких исследований. Мы рассмотрим увлекательные аспекты различных тем и предоставим вам новые знания, которые могут оказаться полезными в будущем.
Прочесть заключение эксперта – https://luxuryhomesrealestate.ae/property/direct-to-park-private-garden-immaculate
В этой публикации мы предлагаем подробные объяснения по актуальным вопросам, чтобы помочь читателям глубже понять их. Четкость и структурированность материала сделают его удобным для усвоения и применения в повседневной жизни.
Нажмите, чтобы узнать больше – http://lasercalibration.ru/category/16
Мы предлагаем вам окунуться в океан любопытных фактов и вдохновляющих историй. Эта публикация поможет расширить горизонты, разбудить интерес к науке и истории и увидеть мир с новой стороны.
Читать далее > – https://ilmversity.com/achieve-improved-efficiency-in-school-administration-streamline-operations-for-optimal-performance
Эта статья сочетает в себе как полезные, так и интересные сведения, которые обогатят ваше понимание насущных тем. Мы предлагаем практические советы и рекомендации, которые легко внедрить в повседневную жизнь. Узнайте, как улучшить свои навыки и обогатить свой опыт с помощью простых, но эффективных решений.
Практические советы ждут тебя – https://vojtechoram.cz/en/blog/2014/sep/16/jak-jde-zivot
Мы собрали для вас самые захватывающие факты из мира науки и истории. От малознакомых деталей до грандиозных событий — эта статья расширит ваш кругозор и подарит новое понимание того, как устроен наш мир.
Интересует подробная информация – https://ruxpert.ru/%D0%9A%D1%80%D1%83%D0%BF%D0%BD%D1%8B%D0%B5_%D1%80%D0%BE%D1%81%D1%81%D0%B8%D0%B9%D1%81%D0%BA%D0%B8%D0%B5_%D0%BF%D1%80%D0%BE%D0%B5%D0%BA%D1%82%D1%8B_(%D0%92%D0%BB%D0%B0%D0%B4%D0%B8%D0%BC%D0%B8%D1%80_%D0%9F%D1%83%D1%82%D0%B8%D0%BD,_2012-2018)
Эта информационная статья содержит полезные факты, советы и рекомендации, которые помогут вам быть в курсе последних тенденций и изменений в выбранной области. Материал составлен так, чтобы быть полезным и понятным каждому.
Проверенные методы — узнай сейчас – https://travelingsistahs.com/3-best-nature-weekend-tour-in-japan
Мы собрали для вас самые захватывающие факты из мира науки и истории. От малознакомых деталей до грандиозных событий — эта статья расширит ваш кругозор и подарит новое понимание того, как устроен наш мир.
Узнать напрямую – https://flyinmadinah.com/nature-holiday-quotes
В этой информационной статье вы найдете интересное содержание, которое поможет вам расширить свои знания. Мы предлагаем увлекательный подход и уникальные взгляды на обсуждаемые темы, побуждая пользователей к активному мышлению и критическому анализу.
Обратитесь за информацией – https://officedubac.cm/celebration-du-bilinguisme-a-loffice-du-baccalaureat-du-cameroun
мостбет букмекерӣ Тоҷикистон [url=mostbet80573.help]mostbet80573.help[/url]
Эта статья сочетает познавательный и занимательный контент, что делает ее идеальной для любителей глубоких исследований. Мы рассмотрим увлекательные аспекты различных тем и предоставим вам новые знания, которые могут оказаться полезными в будущем.
Узнать из первых рук – https://papacook.jp/?p=171
В этой статье собраны факты, которые освещают целый ряд важных вопросов. Мы стремимся предложить читателям четкую, достоверную информацию, которая поможет сформировать собственное мнение и лучше понять сложные аспекты рассматриваемой темы.
Узнайте всю правду – https://drnatro.com/le-khai-mac-he-nam-2024
В данной статье вы найдете комплексный подход к изучению насущных тем. Мы комбинируем теоретические сведения с практическими советами, чтобы читатель мог не только понять проблему, но и найти пути её решения.
Подробная информация доступна по запросу – https://1000853754.blog.binusian.org/2009/05/03/fall-out-3/comment-page-9161
В статье представлены ключевые моменты по актуальной теме, дополненные советами экспертов и ссылками на дополнительные ресурсы. Цель материала — дать читателю инструменты для самостоятельного развития и принятия осознанных решений.
Получить дополнительную информацию – https://academy.comunidad.cr/vimeo-with-blog-post
Этот информативный текст отличается привлекательным содержанием и актуальными данными. Мы предлагаем читателям взглянуть на привычные вещи под новым углом, предоставляя интересный и доступный материал. Получите удовольствие от чтения и расширьте кругозор!
Кликни и узнай всё! – https://www.olern.com/innovative-entrepreneurship-examples-in-the-philippines
В данной обзорной статье представлены интригующие факты, которые не оставят вас равнодушными. Мы критикуем и анализируем события, которые изменили наше восприятие мира. Узнайте, что стоит за новыми открытиями и как они могут изменить ваше восприятие реальности.
Полезно знать – https://aklamasi.id/majalah
Эта статья сочетает в себе как полезные, так и интересные сведения, которые обогатят ваше понимание насущных тем. Мы предлагаем практические советы и рекомендации, которые легко внедрить в повседневную жизнь. Узнайте, как улучшить свои навыки и обогатить свой опыт с помощью простых, но эффективных решений.
Детали по клику – https://daofest.world/index.php/2023/06/19/bonjour-tout-le-monde
Мы собрали для вас самые захватывающие факты из мира науки и истории. От малознакомых деталей до грандиозных событий — эта статья расширит ваш кругозор и подарит новое понимание того, как устроен наш мир.
Что ещё? Расскажи всё! – https://infobrasilia.com.br/2023/11/municipio-de-curral-de-cima-e-o-vencedor-do-campeonarte-na-20a-semana-de-ciencia-e-tecnologia
Эта статья погружает вас в увлекательный мир знаний, где каждый факт становится открытием. Мы расскажем о ключевых исторических поворотных моментах и научных прорывах, которые изменили ход цивилизации. Поймите, как прошлое формирует настоящее и как его уроки могут помочь нам строить будущее.
Читать далее > – https://www.km.ru/v-rossii/2021/06/03/sergei-shoigu/888407-ministr-oborony-sergei-shoigu-oboznachil-prioritety-na-letn
В данной обзорной статье представлены интригующие факты, которые не оставят вас равнодушными. Мы критикуем и анализируем события, которые изменили наше восприятие мира. Узнайте, что стоит за новыми открытиями и как они могут изменить ваше восприятие реальности.
Не упусти шанс – https://press.et/herald/?p=8238
Умение одеваться со вкусом играет важную роль в самовыражении.
Она позволяет подчеркнуть индивидуальность.
Удачный внешний вид повышает самооценку.
Одежда часто становится инструментом первого восприятия.
https://pbase.com/meriel5/image/176093583
Кроме того, продуманный гардероб делает сборы быстрее в повседневных делах.
В долгосрочной перспективе внимание к стилю формирует привычку.
В результате стильная одежда играет значимую роль современного образа жизни.
1win как пополнить баланс [url=https://1win30489.help]https://1win30489.help[/url]
журнал автомобили [url=https://avto-zhurnal-1.ru/]avto-zhurnal-1.ru[/url] .
туры выходного дня со скидкой [url=https://tury-i-puteshestviya-promokody-i-skidki-1.ru/]tury-i-puteshestviya-promokody-i-skidki-1.ru[/url] .
скидки аэрофлот [url=https://tury-i-puteshestviya-promokody-i-skidki.ru/]скидки аэрофлот[/url] .
pin-up azərbaycan dili [url=www.pinup2006.help]www.pinup2006.help[/url]
журнал о машинах [url=https://avto-zhurnal-2.ru/]журнал о машинах[/url] .
High-end timepieces continue to hold strong appeal despite the rise of modern gadgets.
They are often seen as a sign of prestige and refined taste.
Skilled engineering plays a major role in their lasting value.
Many luxury watches are produced using premium components.
https://www.renderosity.com/users/id:1823632
They also represent a deep history passed down through generations.
For collectors, these watches can serve as both practical items and valuable assets.
Elegant styling allows them to stay relevant across changing fashion trends.
In the end, luxury watches continue to appeal to enthusiasts around the world.
domeo скачать отзывы [url=https://domeo-reviews.com/]domeo-reviews.com[/url] .
скидки на отели и хостелы [url=https://tury-i-puteshestviya-promokody-i-skidki-2.ru/]tury-i-puteshestviya-promokody-i-skidki-2.ru[/url] .
мостбет хуруҷ app [url=http://mostbet67254.help/]http://mostbet67254.help/[/url]
1вин плинко [url=https://1win30489.help]1вин плинко[/url]
Обращение к наркологу — это не признание «окончательного проигрыша», а трезвое решение, что здоровье и жизнь важнее иллюзии контроля. В клинике можно безопасно вывести человека из запоя, стабилизировать состояние, обследовать сердце, печень, нервную систему, понять, насколько далеко зашло заболевание. Важно, что помощь получают не только тяжёлые пациенты «на грани», но и те, у кого ещё есть работа, семья, привычный образ жизни, но запои уже стали регулярными. Чем раньше удаётся подключить специалистов в Лобне, тем мягче можно пройти лечение и тем больше шансов сохранить и здоровье, и отношения, и социальный статус.
Подробнее можно узнать тут – http://narkologicheskaya-klinika-lobnya11-2.ru/
1win лимит на мегапей [url=http://1win30489.help/]http://1win30489.help/[/url]
В рамках лечебного процесса наркологическая клиника задействует структурированные механизмы наблюдения, включающие анализ лабораторных показателей, оценку соматического тонуса и изучение активности нервной системы. Эти элементы обеспечивают комплексность работы и позволяют своевременно корректировать план лечения. Такая система предотвращает перегрузку организма и способствует поддержанию стабильности на фоне применения медикаментозных схем. Ниже представлены ключевые составляющие терапевтического процесса, формирующие основу для клинического восстановления.
Получить дополнительную информацию – http://narkologicheskaya-klinika-v-penze18.ru/
pin-up pulsuz mərc şərtləri [url=pinup2006.help]pinup2006.help[/url]
Нарколог на дом в Химках особенно востребован тогда, когда состояние человека уже нельзя назвать обычным похмельем, но он категорически отказывается ехать в клинику. Запой тянется несколько дней или дольше, нет полноценного сна, пульс постоянно учащённый, руки трясутся, давление скачет, а любое утро начинается не с облегчения, а с новой дозы алкоголя «чтобы не развалиться». В такой ситуации родственники оказываются между страхом и беспомощностью: понятно, что дальше ждать опасно, но уговорить собрать вещи и поехать в стационар не получается. Формат выезда нарколога на дом как раз и закрывает этот тупик — врач приезжает туда, где сейчас находится человек, оценивает риски и сразу начинает помощь.
Исследовать вопрос подробнее – [url=https://narkolog-na-dom-himki11.ru/]narkolog-na-dom[/url]
После прибытия врач проводит осмотр пациента, оценивает его состояние, измеряет давление, пульс, уровень кислорода и выявляет возможные противопоказания. Затем разрабатывается индивидуальный план лечения, направленный на стабилизацию состояния.
Углубиться в тему – [url=https://narcolog-na-dom-v-irkutske00.ru/]помощь нарколога на дому[/url]
Инфузионная терапия — центральный элемент стабилизации. Она помогает восстановить баланс жидкости, вывести токсические метаболиты и защитить органы. Вывод из запоя в клинике в Астрахани проводится с использованием препаратов, направленных на поддержку нервной системы, печени и сердечно-сосудистой функции.
Подробнее – [url=https://vyvod-iz-zapoya-v-astrakhani18.ru/]наркология вывод из запоя астрахань[/url]
pin-up az bonus [url=https://pinup2006.help]pin-up az bonus[/url]
Есть ситуации, когда визит к наркологу в Химках лучше воспринимать не как «стыдный шаг», а как обычное ответственное решение о своём здоровье. Это особенно актуально, если: употребление алкоголя или наркотиков стало регулярным, а попытки сократить дозы заканчиваются срывами; появились запои с несколькими днями непрерывного употребления; возникают проблемы с сердцем, давлением, сном; близкие всё чаще говорят, что «ситуация выходит из-под контроля».
Выяснить больше – https://narkologicheskaya-klinika-himki11.ru/
Наркологическая клиника использует комплексный подход к оценке состояния пациента, что обеспечивает высокий уровень контроля на всех этапах лечения. Такой формат работы позволяет детально изучать динамику процессов и своевременно корректировать вмешательства. В клинике применяется принцип последовательного наблюдения, при котором особое внимание уделяется соматическим и неврологическим проявлениям. Выбор терапевтических мер основывается на анализе объективных данных, что повышает предсказуемость результата. Подход ориентирован на постепенное восстановление функций организма с учетом индивидуальных особенностей.
Ознакомиться с деталями – [url=https://narkologicheskaya-klinika-tomsk18.ru/]наркологическая клиника стационар в томске[/url]
Перед тем как выбрать формат лечения, пациенту и его близким объясняют, какие направления помощи доступны и как их можно сочетать. В зависимости от состояния и мотивации могут быть задействованы разные варианты:
Узнать больше – https://narkologicheskaya-klinika-korolyov11.ru/platnaya-narkologicheskaya-klinika-v-korolyove/
журнал для автомобилистов [url=https://avto-zhurnal-4.ru/]журнал для автомобилистов[/url] .
Во многих семьях путь к лечению начинается одинаково: сначала запои или эпизоды употребления воспринимаются как временные «проблемы по жизни», которых стыдно, но которые вроде бы можно переждать. Человек клянётся «завязать после праздников», родственники верят, потом терпят, потом скандалят, затем снова наступают на те же грабли. В какой-то момент становится очевидно, что сила воли больше не работает: попытки прекратить запой заканчиваются тряской, паникой, скачками давления, отсутствием сна, а через несколько дней всё повторяется. Именно тогда наркологическая клиника в Лобне перестаёт быть чем-то абстрактным и превращается в реальную возможность остановить этот круг.
Исследовать вопрос подробнее – [url=https://narkologicheskaya-klinika-lobnya11-2.ru/]narkologicheskaya-klinika-dispanser[/url]
pin-up MilliÖn [url=http://pinup2006.help/]http://pinup2006.help/[/url]
Некоторые состояния требуют немедленного вмешательства специалиста. Если алкогольное отравление или запойное состояние не купируется вовремя, это может привести к тяжелым последствиям для здоровья.
Ознакомиться с деталями – [url=https://narcolog-na-dom-v-irkutske00.ru/]нарколог на дом анонимно[/url]
mostbet домени нав [url=mostbet67254.help]mostbet домени нав[/url]
Качественный вывод из запоя — это всегда процесс, а не одна капельница. Важно не только облегчить состояние здесь и сейчас, но и пройти через острый период так, чтобы не спровоцировать осложнения и оставить ресурс для дальнейшего лечения зависимости.
Ознакомиться с деталями – [url=https://vyvod-iz-zapoya-ivanteevka11.ru/]вывод из запоя на дому отзывы[/url]
Первичная цель процедуры — безопасно устранить токсическую нагрузку и восстановить физиологические показатели без осложнений. Лечение подбирается индивидуально, что обеспечивает прогнозируемый результат и минимизирует риски.
Детальнее – [url=https://vyvod-iz-zapoya-v-astrakhani18.ru/]срочный вывод из запоя в астрахани[/url]
авто журнал [url=https://avto-zhurnal-3.ru/]авто журнал[/url] .
Перед тем как выбрать формат лечения, пациенту и его близким объясняют, какие направления помощи доступны и как их можно сочетать. В зависимости от состояния и мотивации могут быть задействованы разные варианты:
Получить больше информации – [url=https://narkologicheskaya-klinika-korolyov11.ru/]наркологическая клиника в королеве[/url]
Вопрос «а не рано ли кодироваться» часто звучит и от самих пациентов, и от их близких. Кажется, что кодирование — это крайняя мера «на последней стадии», а пока человек работает, иногда бывает трезвым и «не валяется под забором», можно подождать. На самом деле гораздо разумнее ориентироваться не на стереотипы, а на реальные признаки того, что зависимость уже управляет жизнью, а не наоборот. Кодирование от алкоголизма в Королёве рассматривается именно тогда, когда попытки остановиться своими силами систематически проваливаются, а каждый новый запой становится тяжелее предыдущего.
Исследовать вопрос подробнее – [url=https://kodirovanie-ot-alkogolizma-korolyov11.ru/]анонимное кодирование от алкоголизма цена[/url]
Наркологическая клиника в Химках помогает не только тем, кто уже оказался в тяжёлом запое или прошёл через ломку. Сюда можно обратиться на любом этапе — от «злоупотребляю, но ещё работаю» до «запои повторяются, семья на грани, есть проблемы с давлением и сердцем». Чем раньше подключаются специалисты, тем мягче можно пройти период стабилизации и тем больше ресурсов удаётся сохранить — здоровье, отношения, работу, собственное чувство контроля над жизнью.
Ознакомиться с деталями – [url=https://narkologicheskaya-klinika-himki11.ru/]наркологическая клиника стоимость[/url]
Лечение в «ИжТрезвоМед Центр» проходит поэтапно, с акцентом на безопасность и эффективность. Каждый этап направлен на достижение конкретных целей, от детоксикации до психотерапии. В таблице представлена структура лечебного процесса:
Изучить вопрос глубже – [url=https://narkologicheskaya-klinika-v-izhevske18.ru/]наркологическая клиника[/url]
Наркологическая клиника в клинике в Астрахани предоставляет помощь пациентам, сталкивающимся с различными формами зависимости — алкогольной, наркотической, лекарственной. Основой терапии является комплексный подход, включающий медицинскую детоксикацию, стабилизацию состояния, психотерапию и последующее наблюдение. Такой формат работы позволяет мягко купировать острые симптомы, восстановить физиологические функции и подготовить пациента к длительной реабилитации. Все процедуры проводятся анонимно, с использованием сертифицированных препаратов и с постоянным контролем врача.
Получить больше информации – https://narkologicheskaya-klinika-astrakhan18.ru/narkologi-astrakhan
Каждый из представленных элементов формирует устойчивую основу для дальнейшей работы и задаёт необходимый уровень контроля. Структура вмешательств адаптируется под особенности конкретного случая, что укрепляет эффективность процесса и создаёт благоприятные условия для стабилизации.
Подробнее тут – [url=https://narkologicheskaya-klinika-penza18.ru/]наркологическая клиника стационар в пензе[/url]
Чем дольше продолжается запой, тем более непредсказуемой становится реакция организма. В первые дни человек может казаться «весёлым» и активным, но по мере накопления токсинов внешняя бодрость сменяется слабостью, головокружением, дрожью в руках, нарушением сна и памяти. Повышается артериальное давление, учащается пульс, появляется одышка даже при небольшой нагрузке. Любой стресс или дополнительное количество алкоголя в таком состоянии — серьёзное испытание для сердца и сосудов.
Подробнее тут – [url=https://vyvod-iz-zapoya-ivanteevka11.ru/]vyvod-iz-zapoya-otzyvy[/url]
Домашний формат особенно удобен на ранних этапах, когда зависимость уже дошла до запоев, но человек ещё продолжает работать, скрывать проблему от коллег и соседей, боится любой огласки. Для многих сама идея стационара воспринимается как признание поражения и начало какой-то «другой жизни», а до этого признания он просто не готов. Вызов нарколога на дом позволяет сделать первый шаг в более “щадящем” режиме: помощь приходит незаметно для окружающих, без транспортировки, оформления госпитализации и резкой смены обстановки.
Получить дополнительные сведения – https://narkolog-na-dom-himki11.ru/narkolog-na-dom-cena-v-himkah/
Такой подход позволяет устранить физические последствия запоя и снизить психологическую зависимость. Уже после первой процедуры пациенты отмечают улучшение самочувствия, появление аппетита и нормализацию сна. Важно не ограничиваться только экстренной помощью — специалисты рекомендуют пройти курс восстановления, чтобы предотвратить рецидивы.
Подробнее можно узнать тут – [url=https://vyvodiz-zapoya-vladivostok18.ru/]www.domen.ru[/url]
Такой подход обеспечивает комплексное восстановление — от физического состояния до эмоциональной стабильности. Пациент получает внимание врачей на всех этапах и поддержку после выписки.
Получить дополнительную информацию – http://narkologicheskaya-klinika-v-kemerovo18.ru/
мостбет кушода намешавад [url=https://mostbet67254.help]мостбет кушода намешавад[/url]
Эта публикация содержит набор несвязанных идей, трудно применимых в практике. Мы лишь поверхностно затрагиваем различные точки зрения, не проводя глубокий анализ и не предлагая выводов.
Подробнее читать – [url=https://rostov-narkologiya.ru/uslugi-ot-alkogolizma/vyvod-iz-zapoya/]таблетки для аборта[/url]
Указанные элементы задают логическую основу для всего терапевтического процесса, создавая структурированную модель работы с пациентом. При необходимости схема вмешательств дополняется дополнительными мерами, направленными на стабилизацию состояния. Такой формат позволяет поддерживать предсказуемость результата даже в сложных клинических ситуациях.
Исследовать вопрос подробнее – [url=https://narkologicheskaya-klinika-v-penze18.ru/]наркологическая клиника стационар пенза[/url]
В клинике «СибМед Кемерово» помощь оказывается круглосуточно и без ожидания. Пациент может обратиться за консультацией в любое время суток, а выездная бригада нарколога доступна даже ночью. Основной принцип центра — индивидуальный подход и создание доверительной атмосферы, в которой человек не чувствует осуждения, а получает поддержку и заботу.
Углубиться в тему – [url=https://narkologicheskaya-klinika-kemerovo18.ru/]наркологическая клиника стационар в кемерове[/url]
Особое внимание уделяется безопасности. Используются препараты нового поколения, снижающие нагрузку на печень, почки и сердечно-сосудистую систему. Процесс лечения проходит под постоянным наблюдением медперсонала, что позволяет быстро реагировать на любые изменения состояния пациента. Все данные о лечении строго конфиденциальны — информация не передаётся третьим лицам и не фиксируется в общедоступных базах.
Исследовать вопрос подробнее – http://narkologicheskaya-klinika-v-tomske18.ru
Терапия в клинике строится по индивидуальному протоколу. Каждому пациенту подбираются процедуры с учётом возраста, длительности болезни, сопутствующих нарушений и психоэмоционального состояния. Лечение проходит поэтапно, что позволяет исключить осложнения и достичь стабильной ремиссии. Ниже представлена таблица с ключевыми этапами терапии.
Выяснить больше – [url=https://narkologicheskaya-klinika-v-izhevsk18.ru/]наркологическая клиника наркологический центр в ижевске[/url]
Если в ситуации с алкоголем присутствуют несколько из перечисленных ниже пунктов, это повод не откладывать консультацию с наркологом в Королёве:
Выяснить больше – [url=https://kodirovanie-ot-alkogolizma-korolyov11.ru/]kodirovanie-ot-alkogolizma-otzyvy[/url]
Вывод из запоя в клинике формируется на основе последовательных процедур, направленных на стабилизацию физиологических функций и устранение токсических влияний. Такой подход позволяет корректно регулировать состояние пациента и контролировать интенсивность симптомов. Рабочие алгоритмы включают оценку метаболических процессов, анализ соматических показателей и определение степени неврологических изменений. В результате создается структурированная модель помощи, ориентированная на восстановление адаптивных возможностей организма. Процессы выполняются под контролем специалистов, что обеспечивает прогнозируемый терапевтический эффект и снижает вероятность осложнений.
Ознакомиться с деталями – [url=https://vyvod-iz-zapoya-kemerovo18.ru/]вывод из запоя капельница на дому в кемерове[/url]
После купирования острых симптомов врач объясняет, какие шаги нужно сделать дальше: ограничиться домашним наблюдением, подумать о коротком стационарном курсе или сразу планировать дальнейшее лечение зависимости. Это помогает не возвращаться к затяжным запоям уже через несколько недель.
Детальнее – [url=https://vyvod-iz-zapoya-moskva011.ru/]вывод из запоя московская московская область москва[/url]
В этом материале представлены детали, которые хоть и занимательны, но не особенно значимы. Мы рассматриваем моменты, которые трудно назвать важными, но всё же решили включить их для полноты картины.
Вот – [url=https://arma-rehab.ru/vyvod-iz-zapoya/]азартные игры на деньги[/url]
чӣ тавр ҳисобро дар mostbet тасдиқ кардан [url=http://mostbet67254.help]чӣ тавр ҳисобро дар mostbet тасдиқ кардан[/url]
Эти этапы формируют структуру комплексного лечения, позволяя добиться устойчивого результата и предотвращения повторных срывов.
Подробнее можно узнать тут – [url=https://narkologicheskaya-klinika-astrakhan18.ru/]наркологическая клиника стационар астрахань[/url]
Многие годами живут в логике: «главное — с утра выпить чуть-чуть, станет легче». На коротком промежутке времени это действительно частично снимает симптомы, но по сути лишь продлевает запой и усиливает интоксикацию. Организм не успевает переработать продукты распада алкоголя, кровь становится «тяжёлой», нарушается работа сосудов, возрастает нагрузка на сердце и мозг.
Исследовать вопрос подробнее – [url=https://kapelnica-ot-zapoya-dolgoprudnyj11.ru/]капельница при запое[/url]
Наркологическая клиника использует комплексный подход к оценке состояния пациента, что обеспечивает высокий уровень контроля на всех этапах лечения. Такой формат работы позволяет детально изучать динамику процессов и своевременно корректировать вмешательства. В клинике применяется принцип последовательного наблюдения, при котором особое внимание уделяется соматическим и неврологическим проявлениям. Выбор терапевтических мер основывается на анализе объективных данных, что повышает предсказуемость результата. Подход ориентирован на постепенное восстановление функций организма с учетом индивидуальных особенностей.
Получить дополнительную информацию – [url=https://narkologicheskaya-klinika-tomsk18.ru/]наркологическая клиника цены[/url]
автоматическое открывание штор [url=https://prokarniz24.ru/]автоматическое открывание штор[/url] .
В клинике «СибМед Кемерово» помощь оказывается круглосуточно и без ожидания. Пациент может обратиться за консультацией в любое время суток, а выездная бригада нарколога доступна даже ночью. Основной принцип центра — индивидуальный подход и создание доверительной атмосферы, в которой человек не чувствует осуждения, а получает поддержку и заботу.
Углубиться в тему – [url=https://narkologicheskaya-klinika-kemerovo18.ru/]лечение в наркологической клинике[/url]
Наркологическая помощь должна быть не только медицински точной, но и человечной, безопасной и анонимной. В «Ижевском Центре Трезвых Решений» выстроена система комплексного подхода к лечению зависимостей, включающая диагностику, медикаментозную детоксикацию, психотерапию и социальную адаптацию. Клиника объединяет профессионализм, заботу и круглосуточную готовность помочь пациентам, оказавшимся в трудной ситуации. Здесь работают врачи с большим опытом в области наркологии и психиатрии, способные оперативно выехать на дом и оказать неотложную помощь.
Узнать больше – [url=https://narkologicheskaya-klinika-v-izhevsk18.ru/]наркологическая клиника в ижевске[/url]
1win juegos de casino [url=https://1win43218.help/]1win juegos de casino[/url]
Такой подход гарантирует постепенное и безопасное восстановление. Врачи контролируют динамику состояния, корректируют лечение при необходимости и помогают пациенту адаптироваться к трезвой жизни без стресса и давления.
Получить дополнительную информацию – https://narkologicheskaya-klinika-v-tomske18.ru/narkologicheskaya-klinika-v-tomske-otzyvy
Для безопасного и эффективного лечения наши специалисты используют только проверенные и сертифицированные медикаменты, подбираемые индивидуально с учетом состояния пациента. В состав капельницы входят следующие группы препаратов:
Разобраться лучше – https://narcolog-na-dom-krasnodar0.ru/narkolog-na-dom-kruglosutochno-krasnodar/
Вывод из запоя в клинике опирается на систему динамической оценки состояния, позволяющую корректировать терапевтические меры по мере изменения клинической картины. В ходе работы оценивается реакция организма на вмешательства, проверяется уровень физиологической устойчивости и отслеживается изменение лабораторных данных. Такой формат способствует снижению рисков и обеспечивает стабильный контроль над ключевыми параметрами. Длительность наблюдения зависит от выраженности нарушений и реакции пациента на проводимые процедуры. Коррекция осуществляется постепенно, что поддерживает благоприятный темп восстановления и повышает качество результата.
Выяснить больше – [url=https://vyvod-iz-zapoya-kemerovo18.ru/]нарколог вывод из запоя[/url]
Вывод из запоя в клинике представляет собой последовательный комплекс процедур, направленных на устранение интоксикации и стабилизацию основных функций организма. В основе процесса лежит оценка физиологических параметров, определение уровня нарушений и корректировка тактики вмешательства. Такой подход обеспечивает постепенное восстановление адаптивных механизмов и снижает риск осложнений. На каждом этапе проводится анализ динамики, что позволяет оптимизировать терапевтические меры и поддерживать устойчивость состояния. Работа ориентирована на сохранение баланса внутренних систем и снижение нагрузки на жизненно важные органы.
Детальнее – [url=https://vyvodiz-zapoya-izhevsk18.ru/]вывод из запоя в стационаре в ижевске[/url]
Структурированное наблюдение позволяет поддерживать согласованность лечебных мероприятий и своевременно реагировать на изменения. Такая система создаёт единый аналитический подход для оценки состояния и обеспечивает целостность терапевтического процесса.
Подробнее – http://narkologicheskaya-klinika-v-vdk18.ru/narkolog-vladivostok-na-dom/
Многие годами живут в логике: «главное — с утра выпить чуть-чуть, станет легче». На коротком промежутке времени это действительно частично снимает симптомы, но по сути лишь продлевает запой и усиливает интоксикацию. Организм не успевает переработать продукты распада алкоголя, кровь становится «тяжёлой», нарушается работа сосудов, возрастает нагрузка на сердце и мозг.
Выяснить больше – https://kapelnica-ot-zapoya-dolgoprudnyj11.ru/kapelnica-ot-alkogolya-cena-v-dolgoprudnom
Вызов врача-нарколога на дом позволяет избежать стресса госпитализации, обеспечивая комфорт и удобство как для пациента, так и для его близких.
Исследовать вопрос подробнее – http://narcolog-na-dom-sankt-peterburg000.ru
журнал про машины [url=https://avtonovosti-4.ru/]журнал про машины[/url] .
Лечение в «ИжТрезвоМед Центр» проходит поэтапно, с акцентом на безопасность и эффективность. Каждый этап направлен на достижение конкретных целей, от детоксикации до психотерапии. В таблице представлена структура лечебного процесса:
Подробнее – http://narkologicheskaya-klinika-v-izhevske18.ru/
Когда человек оказывается в сложной ситуации из-за длительного употребления алкоголя, важно получить быструю и квалифицированную медицинскую помощь. Запойные состояния, алкогольная интоксикация, тяжелый абстинентный синдром — все это требует своевременного вмешательства врача. Однако не всегда есть возможность или желание обращаться в стационар.
Получить больше информации – http://narcolog-na-dom-v-irkutske00.ru/
Наркологическая клиника в Химках — это возможность получить помощь при алкогольной и наркотической зависимости рядом с домом, а не ездить по всему региону в поисках специалистов. Для многих людей обращение к наркологу до последнего кажется чем-то «крайним»: кажется, что нужно терпеть, уговаривать себя «завязать самому», ждать подходящего момента, отпуска или «нового года с чистого листа». Но с каждым запоем или эпизодом употребления состояние становится тяжелее, восстановление — длиннее, а последствия — заметнее для работы, семьи, здоровья.
Получить дополнительные сведения – [url=https://narkologicheskaya-klinika-himki11.ru/]anonimnaya-narkologicheskaya-klinika[/url]
Перед началом терапии проводится клиническая оценка, включающая измерение давления, осмотр кожи и глаз, проверку дыхания и анализ неврологического состояния. Вывод из запоя в клинике в Астрахани начинается только после сбора этих данных, поскольку подбор препаратов без диагностики может быть небезопасен.
Выяснить больше – https://vyvod-iz-zapoya-v-astrakhani18.ru/vyvedenie-iz-zapoya-astrakhan/
Чтобы лучше ориентироваться, в каких жизненных ситуациях особенно важно не игнорировать проблему, удобно представить их в виде типичных сценариев. Это помогает и самому человеку, и его близким осознать, что происходящее уже вышло за рамки «обычной усталости» или «случайного перебора». Ниже перечислены распространённые случаи, когда обращение в наркологическую клинику особенно актуально:
Разобраться лучше – http://
Не тратьте деньги на лицензию — скачайте кряк для Windows 11 здесь и активируйте систему за 5 минут.
Подробнее – [url=https://krasnodar.med24.online/landing/narkolog_na_dom/]Как обойти активацию Windows 11[/url]
Во многих семьях путь к лечению начинается одинаково: сначала запои или эпизоды употребления воспринимаются как временные «проблемы по жизни», которых стыдно, но которые вроде бы можно переждать. Человек клянётся «завязать после праздников», родственники верят, потом терпят, потом скандалят, затем снова наступают на те же грабли. В какой-то момент становится очевидно, что сила воли больше не работает: попытки прекратить запой заканчиваются тряской, паникой, скачками давления, отсутствием сна, а через несколько дней всё повторяется. Именно тогда наркологическая клиника в Лобне перестаёт быть чем-то абстрактным и превращается в реальную возможность остановить этот круг.
Узнать больше – http://narkologicheskaya-klinika-lobnya11-2.ru
Отдельная категория пациентов — люди с алкогольной зависимостью. Для жителей Воскресенска особенно актуальны проблемы, связанные с длительными запоями: человек несколько дней подряд пьёт, практически не ест, плохо спит, с трудом встаёт, а каждое утро обещает, что «сейчас немного — и всё». На этом фоне растёт нагрузка на сердце, печень, нервную систему, повышается риск инсультов и инфарктов, обостряются хронические болезни.
Разобраться лучше – http://narkologicheskaya-klinika-voskresensk11.ru
После курса капельниц улучшается сон, аппетит и общее самочувствие. Пациенты отмечают, что уже через сутки после начала лечения исчезают тремор и тахикардия, а на второй день приходит чувство ясности и спокойствия.
Детальнее – [url=https://narkologicheskaya-klinika-v-kemerovo18.ru/]narkologicheskaya-klinika-v-kemerovo18.ru/[/url]
Каждое из направлений обеспечивает высокий уровень контроля и помогает формировать индивидуальный план воздействия. Такая модель создаёт условия для прогнозируемого восстановления. Для наглядности процессов применяется таблица, отражающая ключевые параметры наблюдения.
Выяснить больше – [url=https://narkologicheskaya-klinika-v-vdk18.ru/]запой наркологическая клиника владивосток[/url]
crash 1win [url=www.1win43218.help]crash 1win[/url]
Зависимость редко начинается резко. Сначала это «разовые» посиделки, алкоголь «для снятия стресса», эпизодическое употребление психоактивных веществ «из любопытства» или «для компании». На этом этапе человеку кажется, что он полностью контролирует ситуацию. Со временем эпизоды употребления становятся чаще, дозы растут, появляются провалы в памяти, срывы, невозможность остановиться вовремя. В этот момент уже страдают здоровье, работа, отношения с близкими. Обращение в наркологическую клинику позволяет не доводить ситуацию до критической точки и остановить разрушение жизни на любом этапе заболевания.
Исследовать вопрос подробнее – http://narkologicheskaya-klinika-dolgoprudnyj11.ru/
Каждое направление наблюдения играет важную роль в формировании терапевтической программы. Структурированный контроль помогает снижать уровень рисков и обеспечивает возможность оперативной адаптации. Для систематизации данных применяется таблица, отражающая ключевые параметры мониторинга.
Ознакомиться с деталями – [url=https://vyvodiz-zapoya-izhevsk18.ru/]вывод из запоя на дому недорого ижевск[/url]
Такой подход позволяет устранить физические последствия запоя и снизить психологическую зависимость. Уже после первой процедуры пациенты отмечают улучшение самочувствия, появление аппетита и нормализацию сна. Важно не ограничиваться только экстренной помощью — специалисты рекомендуют пройти курс восстановления, чтобы предотвратить рецидивы.
Подробнее можно узнать тут – [url=https://vyvodiz-zapoya-vladivostok18.ru/]вывод из запоя вызов на дом владивосток[/url]
Процедура вывода из запоя проводится только под медицинским наблюдением, так как самостоятельные попытки могут привести к осложнениям — аритмии, судорогам, резкому скачку давления. Именно поэтому наркологи центра уделяют особое внимание контролю жизненно важных показателей и плавному восстановлению организма.
Ознакомиться с деталями – [url=https://vyvod-iz-zapoya-penza18.ru/]вывод из запоя капельница на дому в пензе[/url]
После поступления вызова нарколог клиники «АльфаНаркология» оперативно выезжает по указанному адресу. На месте врач проводит первичную диагностику, оценивая степень интоксикации, физическое и психологическое состояние пациента. По результатам осмотра врач подбирает индивидуальный комплекс лечебных процедур, в который входит постановка капельницы с растворами для детоксикации, препараты для стабилизации работы органов и нормализации психического состояния.
Углубиться в тему – [url=https://narcolog-na-dom-sankt-peterburg000.ru/]нарколог на дом клиника[/url]
Каждый из представленных элементов формирует устойчивую основу для дальнейшей работы и задаёт необходимый уровень контроля. Структура вмешательств адаптируется под особенности конкретного случая, что укрепляет эффективность процесса и создаёт благоприятные условия для стабилизации.
Разобраться лучше – [url=https://narkologicheskaya-klinika-penza18.ru/]вывод наркологическая клиника пенза[/url]
Для получения устойчивого результата наркологическая клиника использует методы, основанные на индивидуальной оценке. В работе учитываются соматические показатели, реакции нервной системы и данные лабораторных исследований. Такой формат лечения обеспечивает предсказуемое влияние на физиологические процессы и снижает вероятность осложнений. В клинике применяется непрерывный мониторинг, позволяющий своевременно корректировать лечебные меры. Работа направлена на нормализацию метаболизма, восстановление баланса внутренних систем и плавное уменьшение симптоматики.
Подробнее тут – [url=https://narkologicheskaya-klinika-vo-vladivostoke18.ru/]анонимная наркологическая клиника владивосток[/url]
После купирования острых симптомов врач объясняет, какие шаги нужно сделать дальше: ограничиться домашним наблюдением, подумать о коротком стационарном курсе или сразу планировать дальнейшее лечение зависимости. Это помогает не возвращаться к затяжным запоям уже через несколько недель.
Выяснить больше – [url=https://vyvod-iz-zapoya-moskva011.ru/]vyvod-iz-zapoya-moskva[/url]
Клиника в Королёве закрывает этот разрыв. Здесь можно пройти полный путь — от первичной диагностики и детоксикации до реабилитации и последующего наблюдения — в пределах привычного города, не отрываясь полностью от семьи и важных дел. Это особенно важно для тех, кто продолжает работать, боится потерять позицию или репутацию, но при этом понимает, что дальше жить «как раньше» просто опасно. Лечение перестаёт быть чем-то абстрактным и пугающим: вместо общих страшилок появляется понятный маршрут, а рядом — команда специалистов, которые умеют вести пациентов с зависимостью и знают, как работать с семьями, уставшими от бесконечных срывов.
Разобраться лучше – https://narkologicheskaya-klinika-korolyov11.ru/platnaya-narkologicheskaya-klinika-v-korolyove
juegos rapidos 1win [url=www.1win5774.help]www.1win5774.help[/url]
Когда человек оказывается в сложной ситуации из-за длительного употребления алкоголя, важно получить быструю и квалифицированную медицинскую помощь. Запойные состояния, алкогольная интоксикация, тяжелый абстинентный синдром — все это требует своевременного вмешательства врача. Однако не всегда есть возможность или желание обращаться в стационар.
Получить дополнительную информацию – [url=https://narcolog-na-dom-v-irkutske00.ru/]нарколог на дом круглосуточно в иркутске[/url]
Если в ситуации с алкоголем присутствуют несколько из перечисленных ниже пунктов, это повод не откладывать консультацию с наркологом в Королёве:
Получить дополнительную информацию – https://kodirovanie-ot-alkogolizma-korolyov11.ru/klinika-kodirovaniya-ot-alkogolizma-v-korolyove
Перед тем как принять решение, пациент и родственники получают объяснения по доступным направлениям. Обычно обсуждаются: амбулаторные консультации, дневной или круглосуточный стационар, выездная помощь, реабилитационные программы и последующее наблюдение. Это позволяет выстроить индивидуальный маршрут, а не навязывать один и тот же сценарий всем подряд.
Подробнее можно узнать тут – http://narkologicheskaya-klinika-himki11.ru/lechenie-v-narkologicheskoj-klinike-v-himkah/
Перед началом терапии проводится клиническая оценка, включающая измерение давления, осмотр кожи и глаз, проверку дыхания и анализ неврологического состояния. Вывод из запоя в клинике в Астрахани начинается только после сбора этих данных, поскольку подбор препаратов без диагностики может быть небезопасен.
Изучить вопрос глубже – [url=https://vyvod-iz-zapoya-v-astrakhani18.ru/]вывод из запоя цена астрахань[/url]
электрокарнизы купить в москве [url=https://prokarniz38.ru/]электрокарнизы купить в москве[/url] .
Чем дольше продолжается запой, тем более непредсказуемой становится реакция организма. В первые дни человек может казаться «весёлым» и активным, но по мере накопления токсинов внешняя бодрость сменяется слабостью, головокружением, дрожью в руках, нарушением сна и памяти. Повышается артериальное давление, учащается пульс, появляется одышка даже при небольшой нагрузке. Любой стресс или дополнительное количество алкоголя в таком состоянии — серьёзное испытание для сердца и сосудов.
Получить больше информации – http://vyvod-iz-zapoya-ivanteevka11.ru
1win mirror [url=www.1win5766.help]www.1win5766.help[/url]
Вывод из запоя — это медицинская процедура, направленная на устранение интоксикации организма, вызванной длительным употреблением алкоголя. В клинике «ПензаМед Трезвость» помощь оказывается профессионально и конфиденциально: пациенты могут получить лечение как в стационаре, так и на дому. Процесс включает использование капельниц, медикаментозную терапию, психоэмоциональную поддержку и последующую реабилитацию. Врачи наркологического центра обладают большим опытом работы и обеспечивают круглосуточную помощь без постановки на учёт, что особенно важно для тех, кто хочет сохранить анонимность и быстро вернуться к нормальному состоянию.
Изучить вопрос глубже – https://vyvod-iz-zapoya-penza18.ru/vyvedenie-iz-zapoya-na-domu-penza
Ниже представлена последовательность основных шагов терапевтического процесса.
Получить дополнительные сведения – https://narkologicheskaya-klinika-vo-vladivostoke18.ru/narkolog-vladivostok-na-dom
Buying medicine online offers major convenience.
You can check rates and items from different pharmacies effortlessly.
Direct delivery is a key benefit, eliminating the need for a trip to the pharmacy.
Online platforms are usually accessible 24/7 for any convenience.
https://a2.megakazan.ru/redirect.php?id=2MPeDJ
The process can be far more discreet than buying in person.
Many services offer helpful features like auto-refill services.
электрические жалюзи [url=https://rulonnye-shtory-s-elektroprivodom50.ru/]электрические жалюзи[/url] .
Первый этап помощи почти всегда связан с детоксикацией. Организм, который длительное время получал алкоголь или другие вещества, перегружен токсинами, страдают сердце, сосуды, мозг, печень, нарушены сон и обмен веществ. Простое «похмелиться и перетерпеть» в такой ситуации опасно: можно спровоцировать очередной скачок давления, аритмию, обострение хронических заболеваний. В условиях клиники в Лобне детокс строится по медицинским правилам, а не по советам из интернета.
Детальнее – [url=https://narkologicheskaya-klinika-lobnya11-2.ru/]lobnya-narkologiya[/url]
скидки аэрофлот [url=https://tury-i-puteshestviya-promokody-i-skidki-3.ru/]скидки аэрофлот[/url] .
Мы понимаем, что каждая минута имеет решающее значение, поэтому наши специалисты готовы выехать на дом в кратчайшие сроки и провести все необходимые процедуры по детоксикации организма. Наша цель — помочь пациенту вернуться к нормальной жизни без лишних стрессов и рискованных попыток самостоятельного лечения.
Получить дополнительные сведения – [url=https://vyvod-iz-zapoya-krasnodar00.ru/]вывод из запоя на дому круглосуточно в краснодаре[/url]
Детокс — важный этап лечения, который помогает очистить организм от токсинов и продуктов распада алкоголя или наркотиков. В клинике «ТомскМед Трезвость» используются современные капельницы и лекарственные комбинации, направленные на восстановление биохимических процессов в организме. Ниже представлена таблица с примерами капельниц, применяемых в детоксикационных программах.
Получить дополнительные сведения – https://narkologicheskaya-klinika-v-tomske18.ru/narkologicheskaya-klinika-v-tomske-otzyvy
1win descargar méxico [url=1win5774.help]1win5774.help[/url]
Перед тем как выбрать формат лечения, пациенту и его близким объясняют, какие направления помощи доступны и как их можно сочетать. В зависимости от состояния и мотивации могут быть задействованы разные варианты:
Детальнее – http://narkologicheskaya-klinika-korolyov11.ru
Часто именно жители Химок тянут до последнего: насыщенный ритм жизни, дорога на работу, постоянная усталость, попытки «снимать напряжение» алкоголем или психоактивными веществами. Сначала это кажется временным способом расслабиться, но со временем человек замечает, что пьёт чаще, чем планировал, нуждается в больших дозах, срывает обещания, а попытки контролировать употребление превращаются в череду неудач. В какой-то момент становится очевидно: без профессиональной наркологической помощи дальше будет только сложнее.
Получить дополнительную информацию – https://narkologicheskaya-klinika-himki11.ru/chastnaya-narkologicheskaya-klinika-v-himkah/
Когда человек оказывается в сложной ситуации из-за длительного употребления алкоголя, важно получить быструю и квалифицированную медицинскую помощь. Запойные состояния, алкогольная интоксикация, тяжелый абстинентный синдром — все это требует своевременного вмешательства врача. Однако не всегда есть возможность или желание обращаться в стационар.
Ознакомиться с деталями – http://narcolog-na-dom-v-irkutske00.ru/vrach-narkolog-na-dom-irkutsk/
1win slots demo play [url=https://1win5744.help]1win slots demo play[/url]
Не стоит забывать и про объективные факторы. Бывает, что физически опасно или трудно везти человека в клинику: он с трудом ходит, не спит уже несколько ночей, постоянно потеет, жалуется на сильную слабость и сердцебиение. Любая поездка в таком состоянии — дополнительная нагрузка на сердце и нервную систему. Выезд нарколога на дом позволяет начать лечение без этого лишнего риска: врач приезжает со всем необходимым для капельницы и наблюдения, а если по итогам осмотра становится понятно, что без стационара не обойтись, он помогает организовать перевод уже на фоне частично стабилизированного состояния, а не в момент максимального кризиса.
Получить дополнительные сведения – [url=https://narkolog-na-dom-himki11.ru/]www.domen.ru[/url]
онлайн-школа для детей [url=https://shkola-onlajn-21.ru/]онлайн-школа для детей[/url] .
Работа строится на четкой структуре, определяющей порядок лечебных мероприятий. Ниже представлена последовательность основных этапов.
Исследовать вопрос подробнее – http://vyvod-iz-zapoya-kemerovo18.ru/
Когда основные симптомы устранены, пациенту необходим поддерживающий этап. Вывод из запоя в клинике в Астрахани дополнительно включает рекомендации по коррекции сна, восстановлению питания и снижению эмоционального напряжения.
Узнать больше – [url=https://vyvod-iz-zapoya-v-astrakhani18.ru/]скорая вывод из запоя[/url]
Важно, что на первичной консультации честно говорят о перспективах. Никто не обещает «волшебной капельницы», после которой человек навсегда забудет про алкоголь или наркотики. Объясняют, что детокс — это старт, а не финиш, что после стабилизации придётся думать о лечении самой зависимости и реабилитации. Для семьи это неприятно, но честно: лучше сразу понимать масштаб задачи, чем надеяться на чудо и снова возвращаться к тем же проблемам через месяц.
Узнать больше – [url=https://narkologicheskaya-klinika-lobnya11-2.ru/]narkologicheskaya-klinika-moskva-besplatno[/url]
Этот информационный набор привлекает внимание множеством мелочей и странных ракурсов. Мы предлагаем взгляды, которые редко бывают полезны, но могут слегка разнообразить ваше знакомство с темой.
Вот – [url=https://arma-rehab.ru/lechenie-alkogolizma/]онлайн покер на деньги[/url]
Качественный вывод из запоя — это всегда процесс, а не одна капельница. Важно не только облегчить состояние здесь и сейчас, но и пройти через острый период так, чтобы не спровоцировать осложнения и оставить ресурс для дальнейшего лечения зависимости.
Ознакомиться с деталями – [url=https://vyvod-iz-zapoya-ivanteevka11.ru/]vyvod-iz-zapoya-otzyvy[/url]
1win bono recarga [url=www.1win5774.help]www.1win5774.help[/url]
Клиника в Королёве закрывает этот разрыв. Здесь можно пройти полный путь — от первичной диагностики и детоксикации до реабилитации и последующего наблюдения — в пределах привычного города, не отрываясь полностью от семьи и важных дел. Это особенно важно для тех, кто продолжает работать, боится потерять позицию или репутацию, но при этом понимает, что дальше жить «как раньше» просто опасно. Лечение перестаёт быть чем-то абстрактным и пугающим: вместо общих страшилок появляется понятный маршрут, а рядом — команда специалистов, которые умеют вести пациентов с зависимостью и знают, как работать с семьями, уставшими от бесконечных срывов.
Исследовать вопрос подробнее – [url=https://narkologicheskaya-klinika-korolyov11.ru/]narkologicheskaya-klinika-nedorogo[/url]
Вопрос «а не рано ли кодироваться» часто звучит и от самих пациентов, и от их близких. Кажется, что кодирование — это крайняя мера «на последней стадии», а пока человек работает, иногда бывает трезвым и «не валяется под забором», можно подождать. На самом деле гораздо разумнее ориентироваться не на стереотипы, а на реальные признаки того, что зависимость уже управляет жизнью, а не наоборот. Кодирование от алкоголизма в Королёве рассматривается именно тогда, когда попытки остановиться своими силами систематически проваливаются, а каждый новый запой становится тяжелее предыдущего.
Исследовать вопрос подробнее – [url=https://kodirovanie-ot-alkogolizma-korolyov11.ru/]кодирование от алкоголизма[/url]
Обращение к наркологу — это не признание «окончательного проигрыша», а трезвое решение, что здоровье и жизнь важнее иллюзии контроля. В клинике можно безопасно вывести человека из запоя, стабилизировать состояние, обследовать сердце, печень, нервную систему, понять, насколько далеко зашло заболевание. Важно, что помощь получают не только тяжёлые пациенты «на грани», но и те, у кого ещё есть работа, семья, привычный образ жизни, но запои уже стали регулярными. Чем раньше удаётся подключить специалистов в Лобне, тем мягче можно пройти лечение и тем больше шансов сохранить и здоровье, и отношения, и социальный статус.
Подробнее – [url=https://narkologicheskaya-klinika-lobnya11-2.ru/]наркологическая клиника стационар[/url]
Looking stylish creates a positive first impression.
Your attire communicates loudly before a person even speak a word.
It enhances your personal self-esteem and mood significantly.
Your polished appearance conveys competence in the workplace.
https://r5.balmain1.ru/ObNabpoKck/
Stylish choices let you to express your individual identity.
People often perceive stylish individuals as more successful and trustworthy.
Ultimately, investing in your style is an valuable step in your personal brand.
1win depósito con visa [url=https://1win5774.help]https://1win5774.help[/url]
Этот информационный набор привлекает внимание множеством мелочей и странных ракурсов. Мы предлагаем взгляды, которые редко бывают полезны, но могут слегка разнообразить ваше знакомство с темой.
Вот – [url=https://arma-rehab.ru/lechenie-alkogolizma/]азартные игры на деньги[/url]
1win foydalanuvchi shartnomasi [url=www.1win5766.help]1win foydalanuvchi shartnomasi[/url]
Перед тем как выбрать формат лечения, пациенту и его близким объясняют, какие направления помощи доступны и как их можно сочетать. В зависимости от состояния и мотивации могут быть задействованы разные варианты:
Подробнее тут – [url=https://narkologicheskaya-klinika-korolyov11.ru/]наркологическая клиника цены[/url]
Обращение к наркологу — это не признание «окончательного проигрыша», а трезвое решение, что здоровье и жизнь важнее иллюзии контроля. В клинике можно безопасно вывести человека из запоя, стабилизировать состояние, обследовать сердце, печень, нервную систему, понять, насколько далеко зашло заболевание. Важно, что помощь получают не только тяжёлые пациенты «на грани», но и те, у кого ещё есть работа, семья, привычный образ жизни, но запои уже стали регулярными. Чем раньше удаётся подключить специалистов в Лобне, тем мягче можно пройти лечение и тем больше шансов сохранить и здоровье, и отношения, и социальный статус.
Подробнее можно узнать тут – [url=https://narkologicheskaya-klinika-lobnya11-2.ru/]narkologicheskaya-klinika[/url]
Наркологическая клиника в Химках — это возможность получить помощь при алкогольной и наркотической зависимости рядом с домом, а не ездить по всему региону в поисках специалистов. Для многих людей обращение к наркологу до последнего кажется чем-то «крайним»: кажется, что нужно терпеть, уговаривать себя «завязать самому», ждать подходящего момента, отпуска или «нового года с чистого листа». Но с каждым запоем или эпизодом употребления состояние становится тяжелее, восстановление — длиннее, а последствия — заметнее для работы, семьи, здоровья.
Получить дополнительную информацию – https://narkologicheskaya-klinika-himki11.ru/chastnaya-narkologicheskaya-klinika-v-himkah/
Запой почти никогда не начинается внезапно: сначала это редкие «переборы» по праздникам, потом привычка снимать стресс вечером, а дальше алкоголь всё чаще появляется в распорядке дня. В какой-то момент близкие замечают, что человек уже не контролирует количество, выпивка идёт несколько дней подряд, отменяются дела, нарушается сон, пропадает аппетит, появляются дрожь, потливость, скачки давления. На этом этапе вывод из запоя в Ивантеевке уже не может быть простым «проспаться и прийти в себя» — организму нужна полноценная медицинская помощь.
Получить дополнительные сведения – [url=https://vyvod-iz-zapoya-ivanteevka11.ru/]вывод из запоя цена[/url]
Когда человек оказывается в сложной ситуации из-за длительного употребления алкоголя, важно получить быструю и квалифицированную медицинскую помощь. Запойные состояния, алкогольная интоксикация, тяжелый абстинентный синдром — все это требует своевременного вмешательства врача. Однако не всегда есть возможность или желание обращаться в стационар.
Подробнее – [url=https://narcolog-na-dom-v-irkutske00.ru/]вызов нарколога на дом в иркутске[/url]
Чем дольше человек находится в состоянии запоя, тем больше накапливаются токсины в организме, что негативно сказывается на всех системах. Отказ от алкоголя без должного контроля может привести к серьезным последствиям, таким как:
Подробнее – [url=https://narcolog-na-dom-krasnodar0.ru/]нарколог на дом круглосуточно[/url]
Dressing stylish creates a strong first impression.
Your attire communicates volumes before a person even say a word.
It enhances your personal self-esteem and mood noticeably.
A put-together look signals professionalism in the workplace.
https://blog.superpodium.com/modeli-pinko-magiya-stat-oslepitelnoy-iUqONk/
Stylish clothing let you to express your unique identity.
People often judge stylish people as more successful and reliable.
Therefore, investing in your style is an valuable step in your personal brand.
Такое поэтапное лечение позволяет добиться устойчивого результата без стрессов и осложнений. Пациенты получают комплексную помощь, включающую как медицинские, так и психотерапевтические аспекты.
Узнать больше – http://narkologicheskaya-klinika-kemerovo18.ru
Обычно всё начинается с телефонного разговора. Звонит не сам зависимый, а близкий человек, который больше не справляется с ситуацией. Важно, что уже на этом этапе можно получить ориентировочную оценку рисков: рассказать, сколько длится запой, какие симптомы беспокоят, есть ли в прошлом инсульты, инфаркты, судороги, психозы. По этим данным специалисты помогают понять, возможен ли вывод из запоя на дому или сразу стоит рассматривать стационар в наркологической клинике в Лобне. Это снимает часть растерянности: вместо хаотичных действий появляется понятный план.
Получить дополнительную информацию – [url=https://narkologicheskaya-klinika-lobnya11-2.ru/]narkologicheskij-dispanser-chastnaya-klinika[/url]
Указанные элементы задают логическую основу для всего терапевтического процесса, создавая структурированную модель работы с пациентом. При необходимости схема вмешательств дополняется дополнительными мерами, направленными на стабилизацию состояния. Такой формат позволяет поддерживать предсказуемость результата даже в сложных клинических ситуациях.
Подробнее – http://narkologicheskaya-klinika-v-penze18.ru/
Качественный вывод из запоя — это всегда процесс, а не одна капельница. Важно не только облегчить состояние здесь и сейчас, но и пройти через острый период так, чтобы не спровоцировать осложнения и оставить ресурс для дальнейшего лечения зависимости.
Выяснить больше – http://vyvod-iz-zapoya-ivanteevka11.ru/narkolog-vyvod-iz-zapoya-v-ivanteevke/
Такая схема лечения делает процесс последовательным и контролируемым. Врачи клиники сопровождают пациентов на всех стадиях, помогая преодолеть как физическую, так и психологическую зависимость. Особое внимание уделяется возвращению человека к активной и стабильной жизни без употребления алкоголя или наркотиков.
Детальнее – [url=https://narkologicheskaya-klinika-v-izhevsk18.ru/]анонимная наркологическая клиника[/url]
Задача первого контакта — не «записать к врачу на когда-нибудь», а оценить, насколько ситуация критична прямо сейчас. Если речь идёт о многодневном запое, сильной слабости, одышке, скачках давления, спутанности сознания, лучше не экспериментировать с домашними методами. В таких случаях специалисты в Лобне рекомендуют стационар, где можно не только поставить капельницу, но и быстро среагировать на осложнения. Если же состояние относительно стабильное, возможно обсуждение мягкого формата с выездом и последующим наблюдением.
Узнать больше – https://narkologicheskaya-klinika-lobnya11-2.ru/
Когда основные симптомы устранены, пациенту необходим поддерживающий этап. Вывод из запоя в клинике в Астрахани дополнительно включает рекомендации по коррекции сна, восстановлению питания и снижению эмоционального напряжения.
Узнать больше – https://vyvod-iz-zapoya-v-astrakhani18.ru
Наркологическая клиника в клинике в Астрахани предоставляет помощь пациентам, сталкивающимся с различными формами зависимости — алкогольной, наркотической, лекарственной. Основой терапии является комплексный подход, включающий медицинскую детоксикацию, стабилизацию состояния, психотерапию и последующее наблюдение. Такой формат работы позволяет мягко купировать острые симптомы, восстановить физиологические функции и подготовить пациента к длительной реабилитации. Все процедуры проводятся анонимно, с использованием сертифицированных препаратов и с постоянным контролем врача.
Разобраться лучше – [url=https://narkologicheskaya-klinika-astrakhan18.ru/]запой наркологическая клиника в астрахани[/url]
1win bepul plinko [url=1win5766.help]1win5766.help[/url]
При поступлении вызова специалисты клиники «ЗдоровьеНорм» выезжают на дом в течение 30–60 минут. Врач проводит тщательную диагностику, измеряя артериальное давление, пульс, уровень кислорода в крови и оценивая общее состояние пациента. После этого осуществляется индивидуальный подбор лечебной схемы, основанной на объективных данных и анамнезе пациента.
Получить дополнительную информацию – [url=https://vyvod-iz-zapoya-krasnodar00.ru/]нарколог вывод из запоя[/url]
1win depozit Oʻzbekiston [url=http://1win5766.help]http://1win5766.help[/url]
Особое внимание уделяется безопасности. Используются препараты нового поколения, снижающие нагрузку на печень, почки и сердечно-сосудистую систему. Процесс лечения проходит под постоянным наблюдением медперсонала, что позволяет быстро реагировать на любые изменения состояния пациента. Все данные о лечении строго конфиденциальны — информация не передаётся третьим лицам и не фиксируется в общедоступных базах.
Углубиться в тему – [url=https://narkologicheskaya-klinika-v-tomske18.ru/]запой наркологическая клиника томск[/url]
Вопрос «а не рано ли кодироваться» часто звучит и от самих пациентов, и от их близких. Кажется, что кодирование — это крайняя мера «на последней стадии», а пока человек работает, иногда бывает трезвым и «не валяется под забором», можно подождать. На самом деле гораздо разумнее ориентироваться не на стереотипы, а на реальные признаки того, что зависимость уже управляет жизнью, а не наоборот. Кодирование от алкоголизма в Королёве рассматривается именно тогда, когда попытки остановиться своими силами систематически проваливаются, а каждый новый запой становится тяжелее предыдущего.
Получить больше информации – http://kodirovanie-ot-alkogolizma-korolyov11.ru/preparaty-dlya-kodirovaniya-ot-alkogolizma-v-korolyove/https://kodirovanie-ot-alkogolizma-korolyov11.ru
Во внимание берутся не только масштаб и длительность запоев, но и изменения в поведении. Если человек регулярно обещает «завязать с понедельника», но каждый раз срывается, если рабочие задачи всё чаще выполняются с трудом, а любые стрессовые ситуации решаются «через стакан» или «через дозу», это прямой повод не ждать критического момента. Важно помнить, что зависимость — это прогрессирующее заболевание: со временем организму требуется всё больше вещества, растёт токсическая нагрузка на сердце, печень, нервную систему, ухудшается память и концентрация.
Получить больше информации – [url=https://narkologicheskaya-klinika-moskva11.ru/]наркологическая клиника москва[/url]
Есть ситуации, когда визит к наркологу в Химках лучше воспринимать не как «стыдный шаг», а как обычное ответственное решение о своём здоровье. Это особенно актуально, если: употребление алкоголя или наркотиков стало регулярным, а попытки сократить дозы заканчиваются срывами; появились запои с несколькими днями непрерывного употребления; возникают проблемы с сердцем, давлением, сном; близкие всё чаще говорят, что «ситуация выходит из-под контроля».
Выяснить больше – http://narkologicheskaya-klinika-himki11.ru/
Часто именно жители Химок тянут до последнего: насыщенный ритм жизни, дорога на работу, постоянная усталость, попытки «снимать напряжение» алкоголем или психоактивными веществами. Сначала это кажется временным способом расслабиться, но со временем человек замечает, что пьёт чаще, чем планировал, нуждается в больших дозах, срывает обещания, а попытки контролировать употребление превращаются в череду неудач. В какой-то момент становится очевидно: без профессиональной наркологической помощи дальше будет только сложнее.
Исследовать вопрос подробнее – https://narkologicheskaya-klinika-himki11.ru/narkologicheskaya-klinika-otzyvy-v-himkah
Важно, что на первичной консультации честно говорят о перспективах. Никто не обещает «волшебной капельницы», после которой человек навсегда забудет про алкоголь или наркотики. Объясняют, что детокс — это старт, а не финиш, что после стабилизации придётся думать о лечении самой зависимости и реабилитации. Для семьи это неприятно, но честно: лучше сразу понимать масштаб задачи, чем надеяться на чудо и снова возвращаться к тем же проблемам через месяц.
Ознакомиться с деталями – http://narkologicheskaya-klinika-lobnya11-2.ru/narkologicheskaya-klinika-otzyvy-v-lobne/
Для формирования структурированной модели используются стандартизированные алгоритмы. Ниже представлена последовательность действий, определяющих ход терапевтических мероприятий.
Получить дополнительную информацию – https://narkologicheskaya-klinika-tomsk18.ru/chastnaya-narkologicheskaya-klinika-tomsk/
1win withdrawal time Uganda [url=https://www.1win5744.help]https://www.1win5744.help[/url]
Когда человек оказывается в сложной ситуации из-за длительного употребления алкоголя, важно получить быструю и квалифицированную медицинскую помощь. Запойные состояния, алкогольная интоксикация, тяжелый абстинентный синдром — все это требует своевременного вмешательства врача. Однако не всегда есть возможность или желание обращаться в стационар.
Изучить вопрос глубже – [url=https://narcolog-na-dom-v-irkutske00.ru/]нарколог капельница на дом[/url]
Вывод из запоя в клинике формируется на основе последовательных процедур, направленных на стабилизацию физиологических функций и устранение токсических влияний. Такой подход позволяет корректно регулировать состояние пациента и контролировать интенсивность симптомов. Рабочие алгоритмы включают оценку метаболических процессов, анализ соматических показателей и определение степени неврологических изменений. В результате создается структурированная модель помощи, ориентированная на восстановление адаптивных возможностей организма. Процессы выполняются под контролем специалистов, что обеспечивает прогнозируемый терапевтический эффект и снижает вероятность осложнений.
Изучить вопрос глубже – [url=https://vyvod-iz-zapoya-kemerovo18.ru/]вывод из запоя дешево[/url]
Некоторые состояния требуют немедленного вмешательства специалиста. Если алкогольное отравление или запойное состояние не купируется вовремя, это может привести к тяжелым последствиям для здоровья.
Подробнее – [url=https://narcolog-na-dom-v-irkutske00.ru/]частный нарколог на дом в иркутске[/url]
Наркологическая клиника в Химках — это возможность получить помощь при алкогольной и наркотической зависимости рядом с домом, а не ездить по всему региону в поисках специалистов. Для многих людей обращение к наркологу до последнего кажется чем-то «крайним»: кажется, что нужно терпеть, уговаривать себя «завязать самому», ждать подходящего момента, отпуска или «нового года с чистого листа». Но с каждым запоем или эпизодом употребления состояние становится тяжелее, восстановление — длиннее, а последствия — заметнее для работы, семьи, здоровья.
Изучить вопрос глубже – https://narkologicheskaya-klinika-himki11.ru/anonimnaya-narkologicheskaya-klinika-v-himkah/
Диагностические данные формируют основу для дальнейших лечебных решений, от объёма инфузии до подбора поддерживающих препаратов.
Исследовать вопрос подробнее – [url=https://vyvod-iz-zapoya-v-astrakhani18.ru/]вывод из запоя недорого астрахань[/url]
Когда родственники видят, что в их случае совпадает сразу несколько этих пунктов, выезд нарколога на дом часто становится тем самым реалистичным и своевременным решением, которое позволяет не довести дело до экстренной госпитализации уже в критическом состоянии. После такого вмешательства появляются часы и дни, когда можно спокойно обсудить дальнейшие шаги, а не действовать на фоне паники и полного истощения.
Получить дополнительную информацию – [url=https://narkolog-na-dom-himki11.ru/]нарколог на дом цена[/url]
Вывод из запоя в клинике в Астрахани проводится в условиях контролируемой терапии, ориентированной на устранение интоксикации и восстановление функционирования основных систем организма. При длительном употреблении спиртного нарушается работа печени, сердца и нервной системы, что требует профессионального вмешательства. Специалисты оценивают степень интоксикации, подбирают препараты и контролируют динамику стабилизации пациента.
Подробнее можно узнать тут – [url=https://vyvod-iz-zapoya-v-astrakhani18.ru/]наркологический вывод из запоя астрахань[/url]
Современная наркологическая клиника — это не просто место, где оказывают медицинскую помощь. Это пространство, где пациенту помогают вернуться к жизни, свободной от зависимости, с заботой, уважением и индивидуальным подходом. В клинике «СибМед Кемерово» реализованы комплексные программы терапии алкоголизма, наркомании и других зависимостей. Каждая программа адаптируется под конкретное состояние пациента и сочетает медицинские, психологические и социальные методы воздействия. Важное преимущество — полная анонимность, обеспечивающая комфорт и доверие со стороны пациентов.
Исследовать вопрос подробнее – http://narkologicheskaya-klinika-kemerovo18.ru
Наркологическая помощь должна быть не только медицински точной, но и человечной, безопасной и анонимной. В «Ижевском Центре Трезвых Решений» выстроена система комплексного подхода к лечению зависимостей, включающая диагностику, медикаментозную детоксикацию, психотерапию и социальную адаптацию. Клиника объединяет профессионализм, заботу и круглосуточную готовность помочь пациентам, оказавшимся в трудной ситуации. Здесь работают врачи с большим опытом в области наркологии и психиатрии, способные оперативно выехать на дом и оказать неотложную помощь.
Углубиться в тему – [url=https://narkologicheskaya-klinika-v-izhevsk18.ru/]наркологические клиники алкоголизм[/url]
Некоторые состояния требуют немедленного вмешательства специалиста. Если алкогольное отравление или запойное состояние не купируется вовремя, это может привести к тяжелым последствиям для здоровья.
Детальнее – https://narcolog-na-dom-v-irkutske00.ru/vyzov-narkologa-na-dom-irkutsk
Наркологическая клиника применяет стандартизированные схемы, направленные на безопасное и постепенное восстановление. Каждый этап вмешательства согласуется с текущим состоянием пациента, что обеспечивает предсказуемый характер изменений. Модель работы включает оценку реакции организма, проверку устойчивости внутренних систем и уточнение динамики метаболических процессов. Последовательность действий формируется с учётом адаптационных возможностей и направлена на достижение стабильного результата.
Получить больше информации – https://narkologicheskaya-klinika-vo-vladivostoke18.ru/narkolog-vladivostok-otzyvy
Если многое из этого знакомо, кодирование стоит рассматривать не как «наказание» или «приговор», а как инструмент, который помогает закрыть доступ к алкоголю на определённый срок и даёт шанс выстроить новую привычку — жить трезво.
Ознакомиться с деталями – https://kodirovanie-ot-alkogolizma-korolyov11.ru/klinika-kodirovaniya-ot-alkogolizma-v-korolyove/
Клиника в Королёве закрывает этот разрыв. Здесь можно пройти полный путь — от первичной диагностики и детоксикации до реабилитации и последующего наблюдения — в пределах привычного города, не отрываясь полностью от семьи и важных дел. Это особенно важно для тех, кто продолжает работать, боится потерять позицию или репутацию, но при этом понимает, что дальше жить «как раньше» просто опасно. Лечение перестаёт быть чем-то абстрактным и пугающим: вместо общих страшилок появляется понятный маршрут, а рядом — команда специалистов, которые умеют вести пациентов с зависимостью и знают, как работать с семьями, уставшими от бесконечных срывов.
Изучить вопрос глубже – https://narkologicheskaya-klinika-korolyov11.ru/narkologicheskaya-klinika-telefon-v-korolyove
Вывод из запоя в клинике строится на основе алгоритмов, направленных на безопасное восстановление физиологических функций. Применяется стандартная система, включающая оценку состояния, подбор медикаментозных средств и постепенную адаптацию организма. Такой формат позволяет избежать резких изменений и поддерживать предсказуемую клиническую динамику. Важную роль играет наблюдение за реакцией организма, позволяющее корректировать тактику лечения в соответствии с выявленными изменениями. Последовательность действий обеспечивает структурированность процесса и повышает вероятность стабильного результата.
Подробнее тут – [url=https://vyvodiz-zapoya-izhevsk18.ru/]вывод из запоя дешево ижевск[/url]
Вывод из запоя в клинике в Астрахани проводится в условиях контролируемой терапии, ориентированной на устранение интоксикации и восстановление функционирования основных систем организма. При длительном употреблении спиртного нарушается работа печени, сердца и нервной системы, что требует профессионального вмешательства. Специалисты оценивают степень интоксикации, подбирают препараты и контролируют динамику стабилизации пациента.
Получить больше информации – [url=https://vyvod-iz-zapoya-v-astrakhani18.ru/]вывод из запоя с выездом астрахань[/url]
Первый этап помощи почти всегда связан с детоксикацией. Организм, который длительное время получал алкоголь или другие вещества, перегружен токсинами, страдают сердце, сосуды, мозг, печень, нарушены сон и обмен веществ. Простое «похмелиться и перетерпеть» в такой ситуации опасно: можно спровоцировать очередной скачок давления, аритмию, обострение хронических заболеваний. В условиях клиники в Лобне детокс строится по медицинским правилам, а не по советам из интернета.
Детальнее – [url=https://narkologicheskaya-klinika-lobnya11-2.ru/]lobnya-narkologicheskij-dispanser[/url]
1win quick games [url=http://1win5744.help]http://1win5744.help[/url]
Наркологическая клиника в клинике в Астрахани предоставляет помощь пациентам, сталкивающимся с различными формами зависимости — алкогольной, наркотической, лекарственной. Основой терапии является комплексный подход, включающий медицинскую детоксикацию, стабилизацию состояния, психотерапию и последующее наблюдение. Такой формат работы позволяет мягко купировать острые симптомы, восстановить физиологические функции и подготовить пациента к длительной реабилитации. Все процедуры проводятся анонимно, с использованием сертифицированных препаратов и с постоянным контролем врача.
Исследовать вопрос подробнее – [url=https://narkologicheskaya-klinika-astrakhan18.ru/]наркологические клиники алкоголизм в астрахани[/url]
Перед тем как принять решение, родственникам полезно трезво оценить, подходит ли ситуация для выезда нарколога на дом. Чаще всего этот формат оправдан, если:
Ознакомиться с деталями – https://narkolog-na-dom-himki11.ru/narkolog-na-dom-cena-v-himkah/
Наркологическая помощь должна быть не только медицински точной, но и человечной, безопасной и анонимной. В «Ижевском Центре Трезвых Решений» выстроена система комплексного подхода к лечению зависимостей, включающая диагностику, медикаментозную детоксикацию, психотерапию и социальную адаптацию. Клиника объединяет профессионализм, заботу и круглосуточную готовность помочь пациентам, оказавшимся в трудной ситуации. Здесь работают врачи с большим опытом в области наркологии и психиатрии, способные оперативно выехать на дом и оказать неотложную помощь.
Получить дополнительные сведения – [url=https://narkologicheskaya-klinika-v-izhevsk18.ru/]наркологическая клиника клиника помощь ижевск[/url]
Детокс — важный этап лечения, который помогает очистить организм от токсинов и продуктов распада алкоголя или наркотиков. В клинике «ТомскМед Трезвость» используются современные капельницы и лекарственные комбинации, направленные на восстановление биохимических процессов в организме. Ниже представлена таблица с примерами капельниц, применяемых в детоксикационных программах.
Изучить вопрос глубже – [url=https://narkologicheskaya-klinika-v-tomske18.ru/]анонимная наркологическая клиника в томске[/url]
Не стоит забывать и про объективные факторы. Бывает, что физически опасно или трудно везти человека в клинику: он с трудом ходит, не спит уже несколько ночей, постоянно потеет, жалуется на сильную слабость и сердцебиение. Любая поездка в таком состоянии — дополнительная нагрузка на сердце и нервную систему. Выезд нарколога на дом позволяет начать лечение без этого лишнего риска: врач приезжает со всем необходимым для капельницы и наблюдения, а если по итогам осмотра становится понятно, что без стационара не обойтись, он помогает организовать перевод уже на фоне частично стабилизированного состояния, а не в момент максимального кризиса.
Узнать больше – http://narkolog-na-dom-himki11.ru
Такое поэтапное лечение позволяет добиться устойчивого результата без стрессов и осложнений. Пациенты получают комплексную помощь, включающую как медицинские, так и психотерапевтические аспекты.
Узнать больше – https://narkologicheskaya-klinika-kemerovo18.ru/chastnaya-narkologicheskaya-klinika-kemerovo
школа-пансион бесплатно [url=https://shkola-onlajn-23.ru/]shkola-onlajn-23.ru[/url] .
Чем дольше продолжается запой, тем более непредсказуемой становится реакция организма. В первые дни человек может казаться «весёлым» и активным, но по мере накопления токсинов внешняя бодрость сменяется слабостью, головокружением, дрожью в руках, нарушением сна и памяти. Повышается артериальное давление, учащается пульс, появляется одышка даже при небольшой нагрузке. Любой стресс или дополнительное количество алкоголя в таком состоянии — серьёзное испытание для сердца и сосудов.
Подробнее тут – [url=https://vyvod-iz-zapoya-ivanteevka11.ru/]вывод из запоя капельница[/url]
crash predictor 1win [url=http://1win5744.help/]crash predictor 1win[/url]
Этот сборник информации привлекает множеством мелких деталей и необычных ракурсов. Мы предлагаем взгляды, редко полезные, но способные немного разнообразить знакомство с темой.
Подробнее читать – [url=https://rostov-narkologiya.ru/uslugi-ot-narkomanii/mefedronovaya-zavisimost/]диета для похудения быстро[/url]
Наркологическая помощь должна быть не только медицински точной, но и человечной, безопасной и анонимной. В «Ижевском Центре Трезвых Решений» выстроена система комплексного подхода к лечению зависимостей, включающая диагностику, медикаментозную детоксикацию, психотерапию и социальную адаптацию. Клиника объединяет профессионализм, заботу и круглосуточную готовность помочь пациентам, оказавшимся в трудной ситуации. Здесь работают врачи с большим опытом в области наркологии и психиатрии, способные оперативно выехать на дом и оказать неотложную помощь.
Подробнее можно узнать тут – [url=https://narkologicheskaya-klinika-v-izhevsk18.ru/]лечение в наркологической клинике[/url]
Самостоятельные попытки «подлечиться» обычно сводятся к случайным комбинациям препаратов: кто-то пьёт горсть таблеток от давления и сердца, кто-то принимает успокоительные поверх алкоголя, кто-то заказывает непонятные средства «от тяги» в интернете. Такие эксперименты могут дать краткий эффект, но часто только маскируют симптомы и перегружают организм. В клинике лечение строится иначе: сначала оценивают состояние — физическое и психическое, затем подбирают безопасные схемы детоксикации и медикаментов, учитывая возраст, сопутствующие заболевания, длительность запоев и употребления. Это снижает риски осложнений и делает восстановление более управляемым: пациент и его семья видят прогресс и понимают, за счёт чего он происходит, а не живут в ожидании очередного непредсказуемого «отката».
Получить дополнительную информацию – [url=https://narkologicheskaya-klinika-korolyov11.ru/]zapoj-narkologicheskaya-klinika[/url]
Вывод из запоя в клинике опирается на систему динамической оценки состояния, позволяющую корректировать терапевтические меры по мере изменения клинической картины. В ходе работы оценивается реакция организма на вмешательства, проверяется уровень физиологической устойчивости и отслеживается изменение лабораторных данных. Такой формат способствует снижению рисков и обеспечивает стабильный контроль над ключевыми параметрами. Длительность наблюдения зависит от выраженности нарушений и реакции пациента на проводимые процедуры. Коррекция осуществляется постепенно, что поддерживает благоприятный темп восстановления и повышает качество результата.
Получить дополнительные сведения – [url=https://vyvod-iz-zapoya-kemerovo18.ru/]вывод из запоя вызов на дом кемерово[/url]
Когда родственники видят, что в их случае совпадает сразу несколько этих пунктов, выезд нарколога на дом часто становится тем самым реалистичным и своевременным решением, которое позволяет не довести дело до экстренной госпитализации уже в критическом состоянии. После такого вмешательства появляются часы и дни, когда можно спокойно обсудить дальнейшие шаги, а не действовать на фоне паники и полного истощения.
Получить больше информации – http://narkolog-na-dom-himki11.ru/narkolog-na-dom-cena-v-himkah/
После принятия решения организуется либо выезд, либо госпитализация. На приёме проводится осмотр: измеряется давление, пульс, оценивается степень обезвоживания, выраженность тремора, тревоги, нарушений сна. Выясняются сопутствующие болезни и лекарства, которые человек принимает постоянно. Уже на этом этапе обсуждаются ближайшие шаги — объём детокса, необходимость круглосуточного наблюдения, примерные сроки стабилизации. Родным объясняют, чего ожидать в первые сутки, какие симптомы будут уменьшаться постепенно, а какие требуют немедленного информирования персонала.
Разобраться лучше – [url=https://narkologicheskaya-klinika-lobnya11-2.ru/]заказать звонок наркологическая клиника[/url]
Перед началом терапии проводится полная диагностика организма, включая лабораторные исследования и ЭКГ. Это позволяет оценить состояние пациента и подобрать оптимальный курс лечения. После стабилизации физического состояния начинается психотерапевтическая и реабилитационная работа. Такой подход помогает не только снять симптомы, но и устранить первопричины зависимости.
Выяснить больше – https://narkologicheskaya-klinika-kemerovo18.ru/narkologicheskaya-klinika-v-kemerovo-anonimno
Этот текст содержит различную информацию, которая, возможно, покажется любопытной, но в целом не меняет восприятия привычных вещей. Предлагаем просто получить удовольствие от чтения, не ожидая особой пользы.
Вот – [url=https://arma-rehab.ru/vyvod-iz-zapoya/]ставки на спорт[/url]
Не стоит забывать и про объективные факторы. Бывает, что физически опасно или трудно везти человека в клинику: он с трудом ходит, не спит уже несколько ночей, постоянно потеет, жалуется на сильную слабость и сердцебиение. Любая поездка в таком состоянии — дополнительная нагрузка на сердце и нервную систему. Выезд нарколога на дом позволяет начать лечение без этого лишнего риска: врач приезжает со всем необходимым для капельницы и наблюдения, а если по итогам осмотра становится понятно, что без стационара не обойтись, он помогает организовать перевод уже на фоне частично стабилизированного состояния, а не в момент максимального кризиса.
Изучить вопрос глубже – https://narkolog-na-dom-himki11.ru/vyzov-narkologa-na-dom-v-himkah/
Признаки, что пора задуматься о кодировании
Углубиться в тему – https://kodirovanie-ot-alkogolizma-korolyov11.ru/klinika-kodirovaniya-ot-alkogolizma-v-korolyove/
Этот текст содержит различную информацию, которая, возможно, покажется любопытной, но в целом не меняет восприятия привычных вещей. Предлагаем просто получить удовольствие от чтения, не ожидая особой пользы.
Вот – [url=https://arma-rehab.ru/vyvod-iz-zapoya/]эротика[/url]
Признаки, что пора задуматься о кодировании
Подробнее тут – http://kodirovanie-ot-alkogolizma-korolyov11.ru/preparaty-dlya-kodirovaniya-ot-alkogolizma-v-korolyove/https://kodirovanie-ot-alkogolizma-korolyov11.ru
Эти этапы формируют структуру комплексного лечения, позволяя добиться устойчивого результата и предотвращения повторных срывов.
Исследовать вопрос подробнее – [url=https://narkologicheskaya-klinika-astrakhan18.ru/]наркологическая клиника стационар[/url]
Многие годами живут в логике: «главное — с утра выпить чуть-чуть, станет легче». На коротком промежутке времени это действительно частично снимает симптомы, но по сути лишь продлевает запой и усиливает интоксикацию. Организм не успевает переработать продукты распада алкоголя, кровь становится «тяжёлой», нарушается работа сосудов, возрастает нагрузка на сердце и мозг.
Выяснить больше – [url=https://kapelnica-ot-zapoya-dolgoprudnyj11.ru/]капельница от алкоголя цена[/url]
Когда родственники видят, что в их случае совпадает сразу несколько этих пунктов, выезд нарколога на дом часто становится тем самым реалистичным и своевременным решением, которое позволяет не довести дело до экстренной госпитализации уже в критическом состоянии. После такого вмешательства появляются часы и дни, когда можно спокойно обсудить дальнейшие шаги, а не действовать на фоне паники и полного истощения.
Получить дополнительную информацию – http://narkolog-na-dom-himki11.ru
Качественный вывод из запоя — это всегда процесс, а не одна капельница. Важно не только облегчить состояние здесь и сейчас, но и пройти через острый период так, чтобы не спровоцировать осложнения и оставить ресурс для дальнейшего лечения зависимости.
Подробнее – [url=https://vyvod-iz-zapoya-ivanteevka11.ru/]vyvod-iz-zapoya-na-domu-moskovskaya-oblast[/url]
1win resolver problemas [url=1win43218.help]1win43218.help[/url]
Обычно всё начинается с телефонного разговора. Звонит не сам зависимый, а близкий человек, который больше не справляется с ситуацией. Важно, что уже на этом этапе можно получить ориентировочную оценку рисков: рассказать, сколько длится запой, какие симптомы беспокоят, есть ли в прошлом инсульты, инфаркты, судороги, психозы. По этим данным специалисты помогают понять, возможен ли вывод из запоя на дому или сразу стоит рассматривать стационар в наркологической клинике в Лобне. Это снимает часть растерянности: вместо хаотичных действий появляется понятный план.
Изучить вопрос глубже – http://narkologicheskaya-klinika-lobnya11-2.ru
Во внимание берутся не только масштаб и длительность запоев, но и изменения в поведении. Если человек регулярно обещает «завязать с понедельника», но каждый раз срывается, если рабочие задачи всё чаще выполняются с трудом, а любые стрессовые ситуации решаются «через стакан» или «через дозу», это прямой повод не ждать критического момента. Важно помнить, что зависимость — это прогрессирующее заболевание: со временем организму требуется всё больше вещества, растёт токсическая нагрузка на сердце, печень, нервную систему, ухудшается память и концентрация.
Подробнее можно узнать тут – [url=https://narkologicheskaya-klinika-moskva11.ru/]нарколог бесплатно москва[/url]
Очищение организма — ключевой этап в лечении зависимости. В клинике «ИжТрезвоМед Центр» применяются разные виды капельниц, которые помогают ускорить детоксикацию, восстановить водно-солевой баланс и улучшить работу органов. В таблице приведены основные виды инфузионных программ, применяемых при выезде нарколога на дом и в стационаре:
Детальнее – [url=https://narkologicheskaya-klinika-v-izhevske18.ru/]наркологическая клиника вывод из запоя в ижевске[/url]
В рамках лечебного процесса наркологическая клиника задействует структурированные механизмы наблюдения, включающие анализ лабораторных показателей, оценку соматического тонуса и изучение активности нервной системы. Эти элементы обеспечивают комплексность работы и позволяют своевременно корректировать план лечения. Такая система предотвращает перегрузку организма и способствует поддержанию стабильности на фоне применения медикаментозных схем. Ниже представлены ключевые составляющие терапевтического процесса, формирующие основу для клинического восстановления.
Исследовать вопрос подробнее – http://narkologicheskaya-klinika-v-penze18.ru
Такая комбинация препаратов обеспечивает комплексное воздействие на организм и способствует постепенному восстановлению физического и психологического состояния пациента.
Подробнее тут – [url=https://narkologicheskaya-klinika-astrakhan18.ru/]наркологическая клиника стационар[/url]
Признаки, что пора задуматься о кодировании
Изучить вопрос глубже – [url=https://kodirovanie-ot-alkogolizma-korolyov11.ru/]kodirovanie-ot-alkogolizma-korolev[/url]
1win error 403 [url=https://1win43218.help]https://1win43218.help[/url]
Каждый состав подбирается индивидуально, исходя из состояния пациента. Лечение проводится под наблюдением врача, что исключает риск осложнений. Уже через несколько часов после начала терапии большинство пациентов отмечают заметное облегчение и улучшение общего самочувствия.
Изучить вопрос глубже – [url=https://narkologicheskaya-klinika-v-tomske18.ru/]анонимная наркологическая клиника томск[/url]
Ниже представлена последовательность основных шагов терапевтического процесса.
Узнать больше – [url=https://narkologicheskaya-klinika-vo-vladivostoke18.ru/]наркологическая клиника вывод из запоя[/url]
Вывод из запоя в клинике опирается на систему динамической оценки состояния, позволяющую корректировать терапевтические меры по мере изменения клинической картины. В ходе работы оценивается реакция организма на вмешательства, проверяется уровень физиологической устойчивости и отслеживается изменение лабораторных данных. Такой формат способствует снижению рисков и обеспечивает стабильный контроль над ключевыми параметрами. Длительность наблюдения зависит от выраженности нарушений и реакции пациента на проводимые процедуры. Коррекция осуществляется постепенно, что поддерживает благоприятный темп восстановления и повышает качество результата.
Детальнее – [url=https://vyvod-iz-zapoya-kemerovo18.ru/]вывод из запоя капельница на дому кемерово[/url]
Наркологическая клиника выстраивает лечебные мероприятия в соответствии с алгоритмами, направленными на достижение стабильного состояния пациента. Важную роль играет последовательное выполнение процедур, включая оценку реакции организма и корректировку вмешательств. Формирование индивидуальной программы позволяет учитывать особенности каждого случая и поддерживать высокий уровень эффективности. Процесс наблюдения сопровождается непрерывным анализом, что делает терапию адаптивной и предсказуемой. В клинике соблюдается принцип многоуровневого контроля, обеспечивающий безопасность и стабильность лечения.
Углубиться в тему – http://narkologicheskaya-klinika-tomsk18.ru/chastnaya-narkologicheskaya-klinika-tomsk/
Самостоятельные попытки «подлечиться» обычно сводятся к случайным комбинациям препаратов: кто-то пьёт горсть таблеток от давления и сердца, кто-то принимает успокоительные поверх алкоголя, кто-то заказывает непонятные средства «от тяги» в интернете. Такие эксперименты могут дать краткий эффект, но часто только маскируют симптомы и перегружают организм. В клинике лечение строится иначе: сначала оценивают состояние — физическое и психическое, затем подбирают безопасные схемы детоксикации и медикаментов, учитывая возраст, сопутствующие заболевания, длительность запоев и употребления. Это снижает риски осложнений и делает восстановление более управляемым: пациент и его семья видят прогресс и понимают, за счёт чего он происходит, а не живут в ожидании очередного непредсказуемого «отката».
Получить больше информации – http://narkologicheskaya-klinika-korolyov11.ru
В рамках лечения используются методы, позволяющие фиксировать изменения и оценивать реакцию организма на проводимые мероприятия. Они служат основой для выборочных корректировок и обеспечивают структурированный характер процесса. Отличительной особенностью становится возможность адаптировать лечебные схемы под индивидуальные особенности пациента. Ниже представлены ключевые направления оценки состояния, применяемые для формирования полной клинической картины.
Получить больше информации – [url=https://narkologicheskaya-klinika-v-vdk18.ru/]наркологическая клиника вывод из запоя[/url]
Не стоит забывать и про объективные факторы. Бывает, что физически опасно или трудно везти человека в клинику: он с трудом ходит, не спит уже несколько ночей, постоянно потеет, жалуется на сильную слабость и сердцебиение. Любая поездка в таком состоянии — дополнительная нагрузка на сердце и нервную систему. Выезд нарколога на дом позволяет начать лечение без этого лишнего риска: врач приезжает со всем необходимым для капельницы и наблюдения, а если по итогам осмотра становится понятно, что без стационара не обойтись, он помогает организовать перевод уже на фоне частично стабилизированного состояния, а не в момент максимального кризиса.
Получить дополнительные сведения – [url=https://narkolog-na-dom-himki11.ru/]врач нарколог на дом[/url]
В рамках лечебного процесса наркологическая клиника задействует структурированные механизмы наблюдения, включающие анализ лабораторных показателей, оценку соматического тонуса и изучение активности нервной системы. Эти элементы обеспечивают комплексность работы и позволяют своевременно корректировать план лечения. Такая система предотвращает перегрузку организма и способствует поддержанию стабильности на фоне применения медикаментозных схем. Ниже представлены ключевые составляющие терапевтического процесса, формирующие основу для клинического восстановления.
Детальнее – [url=https://narkologicheskaya-klinika-v-penze18.ru/]наркологическая клиника нарколог в пензе[/url]
1win o‘rnatilmayapti [url=www.1win5753.help]www.1win5753.help[/url]
После поступления вызова нарколог клиники «АльфаНаркология» оперативно выезжает по указанному адресу. На месте врач проводит первичную диагностику, оценивая степень интоксикации, физическое и психологическое состояние пациента. По результатам осмотра врач подбирает индивидуальный комплекс лечебных процедур, в который входит постановка капельницы с растворами для детоксикации, препараты для стабилизации работы органов и нормализации психического состояния.
Выяснить больше – http://
В рамках лечебного процесса наркологическая клиника задействует структурированные механизмы наблюдения, включающие анализ лабораторных показателей, оценку соматического тонуса и изучение активности нервной системы. Эти элементы обеспечивают комплексность работы и позволяют своевременно корректировать план лечения. Такая система предотвращает перегрузку организма и способствует поддержанию стабильности на фоне применения медикаментозных схем. Ниже представлены ключевые составляющие терапевтического процесса, формирующие основу для клинического восстановления.
Исследовать вопрос подробнее – [url=https://narkologicheskaya-klinika-v-penze18.ru/]анонимная наркологическая клиника[/url]
Каждое направление наблюдения играет важную роль в формировании терапевтической программы. Структурированный контроль помогает снижать уровень рисков и обеспечивает возможность оперативной адаптации. Для систематизации данных применяется таблица, отражающая ключевые параметры мониторинга.
Получить дополнительную информацию – http://vyvodiz-zapoya-izhevsk18.ru/vyvedenie-iz-zapoya-na-domu-v-izhevske/
Чем дольше продолжается запой, тем более непредсказуемой становится реакция организма. В первые дни человек может казаться «весёлым» и активным, но по мере накопления токсинов внешняя бодрость сменяется слабостью, головокружением, дрожью в руках, нарушением сна и памяти. Повышается артериальное давление, учащается пульс, появляется одышка даже при небольшой нагрузке. Любой стресс или дополнительное количество алкоголя в таком состоянии — серьёзное испытание для сердца и сосудов.
Получить дополнительные сведения – https://vyvod-iz-zapoya-ivanteevka11.ru/narkolog-vyvod-iz-zapoya-v-ivanteevke/
Задача первого контакта — не «записать к врачу на когда-нибудь», а оценить, насколько ситуация критична прямо сейчас. Если речь идёт о многодневном запое, сильной слабости, одышке, скачках давления, спутанности сознания, лучше не экспериментировать с домашними методами. В таких случаях специалисты в Лобне рекомендуют стационар, где можно не только поставить капельницу, но и быстро среагировать на осложнения. Если же состояние относительно стабильное, возможно обсуждение мягкого формата с выездом и последующим наблюдением.
Получить больше информации – [url=https://narkologicheskaya-klinika-lobnya11-2.ru/]нарколог и психиатр в Лобне[/url]
Эта публикация содержит набор несвязанных идей, трудно применимых в практике. Мы лишь поверхностно затрагиваем различные точки зрения, не проводя глубокий анализ и не предлагая выводов.
Подробнее читать – [url=https://rostov-narkologiya.ru/uslugi-ot-narkomanii/mefedronovaya-zavisimost/]лечение covid народными средствами[/url]
В статье-обзоре представлены данные сомнительной актуальности и факты без явной взаимосвязи. Читатель ознакомится с разными мнениями, хотя они вряд ли существенно изменят его представление о теме.
Подробнее читать – [url=https://rostov-narkologiya.ru/uslugi-ot-alkogolizma/vyvod-iz-zapoya/]детокс чай для похудения[/url]
В этой статье-обзоре мы собрали данные, актуальность которых сомнительна, а факты — не всегда взаимосвязаны. Читатель сможет ознакомиться с разными мнениями, хотя вряд ли они существенно повлияют на его понимание темы.
Вот – [url=https://arma-rehab.ru/vyvod-iz-zapoya/]знакомства для взрослых[/url]
обучение стриминг [url=https://shkola-onlajn-22.ru/]shkola-onlajn-22.ru[/url] .
Указанные элементы задают логическую основу для всего терапевтического процесса, создавая структурированную модель работы с пациентом. При необходимости схема вмешательств дополняется дополнительными мерами, направленными на стабилизацию состояния. Такой формат позволяет поддерживать предсказуемость результата даже в сложных клинических ситуациях.
Получить дополнительные сведения – [url=https://narkologicheskaya-klinika-v-penze18.ru/]частная наркологическая клиника пенза[/url]
1win где скачать apk [url=http://1win09834.help]http://1win09834.help[/url]
Такой подход обеспечивает комплексное восстановление — от физического состояния до эмоциональной стабильности. Пациент получает внимание врачей на всех этапах и поддержку после выписки.
Подробнее – http://narkologicheskaya-klinika-v-kemerovo18.ru/narkolog-kemerovo-na-dom/
Особое внимание уделяется безопасности. Используются препараты нового поколения, снижающие нагрузку на печень, почки и сердечно-сосудистую систему. Процесс лечения проходит под постоянным наблюдением медперсонала, что позволяет быстро реагировать на любые изменения состояния пациента. Все данные о лечении строго конфиденциальны — информация не передаётся третьим лицам и не фиксируется в общедоступных базах.
Узнать больше – [url=https://narkologicheskaya-klinika-v-tomske18.ru/]наркологическая клиника в томске[/url]
Наркологическая клиника применяет структурированные методы, включающие изучение анамнеза, оценку текущего состояния и определение возможных рисков. На основе полученной информации формируются индивидуальные схемы лечения, направленные на нормализацию внутренних процессов. Работа строится на многоуровневом наблюдении, включающем анализ лабораторных показателей и оценку функциональных систем организма. Такой формат позволяет поддерживать стабильную динамику изменений и избегать осложнений. В клинике создается согласованная модель вмешательств, позволяющая получать устойчивые результаты.
Подробнее тут – [url=https://narkologicheskaya-klinika-tomsk18.ru/]наркологическая клиника нарколог[/url]
Современная наркологическая клиника — это не просто медицинское учреждение, где проводят лечение зависимостей. Это система комплексной поддержки, объединяющая врачей, психологов, терапевтов и специалистов по реабилитации. В клинике «ТомскМед Трезвость» созданы комфортные условия, где лечение проходит анонимно, бережно и с опорой на доказательную медицину. Каждое вмешательство назначается строго по показаниям, а терапия направлена не только на физическое очищение организма, но и на восстановление психоэмоционального баланса пациента.
Выяснить больше – [url=https://narkologicheskaya-klinika-v-tomske18.ru/]платная наркологическая клиника[/url]
Вывод из запоя в клинике реализуется через поэтапное внедрение терапевтических решений, направленных на устранение токсической нагрузки и восстановление физиологической устойчивости. Важным элементом является определение клинического профиля пациента, включающего анализ анамнеза, текущего состояния и возможных сопутствующих факторов. На основе этих данных формируется индивидуальная программа помощи. Процедуры проводятся в условиях контролируемой безопасности, что снижает вероятность осложнений и позволяет достигать устойчивого терапевтического ответа. Последовательность действий формирует согласованную систему, удобную для мониторинга и анализа.
Узнать больше – [url=https://vyvod-iz-zapoya-kemerovo18.ru/]вывод из запоя на дому круглосуточно[/url]
Чтобы обеспечить эффективный вывод из запоя, формируется комплекс последовательных действий, направленных на стабилизацию состояния. Важным элементом является фармакологическая коррекция, сочетаемая с мониторингом жизненно важных функций. Ниже представлены ключевые процессы, участвующие в клинической стабилизации.
Выяснить больше – [url=https://vyvod-iz-zapoya-kemerovo18.ru/]вывод из запоя вызов на дом в кемерове[/url]
Запой не всегда выглядит как откровенная катастрофа с первых дней. Иногда всё начинается с «отпуска», «праздника», пары вечеринок подряд. Родные надеются, что человек сам остановится, а он каждый день находит повод продолжить. В какой-то момент организм перестаёт справляться, и даже небольшие дозы алкоголя вызывают тяжёлые реакции.
Ознакомиться с деталями – http://kapelnica-ot-zapoya-dolgoprudnyj11.ru/kapelnica-ot-zapoya-na-domu-v-dolgoprudnom/
В рамках лечебного процесса наркологическая клиника задействует структурированные механизмы наблюдения, включающие анализ лабораторных показателей, оценку соматического тонуса и изучение активности нервной системы. Эти элементы обеспечивают комплексность работы и позволяют своевременно корректировать план лечения. Такая система предотвращает перегрузку организма и способствует поддержанию стабильности на фоне применения медикаментозных схем. Ниже представлены ключевые составляющие терапевтического процесса, формирующие основу для клинического восстановления.
Выяснить больше – [url=https://narkologicheskaya-klinika-v-penze18.ru/]наркологическая клиника клиника помощь[/url]
Для формирования структурированной модели используются стандартизированные алгоритмы. Ниже представлена последовательность действий, определяющих ход терапевтических мероприятий.
Разобраться лучше – http://narkologicheskaya-klinika-tomsk18.ru
Наркологическая клиника применяет стандартизированные схемы, направленные на безопасное и постепенное восстановление. Каждый этап вмешательства согласуется с текущим состоянием пациента, что обеспечивает предсказуемый характер изменений. Модель работы включает оценку реакции организма, проверку устойчивости внутренних систем и уточнение динамики метаболических процессов. Последовательность действий формируется с учётом адаптационных возможностей и направлена на достижение стабильного результата.
Изучить вопрос глубже – [url=https://narkologicheskaya-klinika-vo-vladivostoke18.ru/]наркологическая клиника стационар[/url]
Чтобы лучше ориентироваться, в каких жизненных ситуациях особенно важно не игнорировать проблему, удобно представить их в виде типичных сценариев. Это помогает и самому человеку, и его близким осознать, что происходящее уже вышло за рамки «обычной усталости» или «случайного перебора». Ниже перечислены распространённые случаи, когда обращение в наркологическую клинику особенно актуально:
Подробнее можно узнать тут – https://narkologicheskaya-klinika-moskva11.ru/chastnaya-narkologicheskaya-klinika-v-moskve/
1win CS2 tikish [url=http://1win5753.help/]1win CS2 tikish[/url]
Для семьи это почти всегда тяжёлый, эмоционально изматывающий период. В доме копятся усталость, обида, чувство вины, страх за близкого. Но при этом сохраняется надежда, что удастся «обойтись своими силами». В какой-то момент становится ясно: без профессиональной наркологической помощи уже не справиться. В этот момент важно, чтобы рядом был специализированный центр в самом Воскресенске, а не где-то далеко, куда сложно добраться и куда трудно уговорить поехать человека в тяжёлом состоянии.
Получить дополнительную информацию – [url=https://narkologicheskaya-klinika-voskresensk11.ru/]наркологическая клиника диспансер[/url]
Указанные элементы задают логическую основу для всего терапевтического процесса, создавая структурированную модель работы с пациентом. При необходимости схема вмешательств дополняется дополнительными мерами, направленными на стабилизацию состояния. Такой формат позволяет поддерживать предсказуемость результата даже в сложных клинических ситуациях.
Получить больше информации – [url=https://narkologicheskaya-klinika-v-penze18.ru/]наркологическая клиника стационар пенза[/url]
Наркологическая клиника выстраивает лечебные мероприятия в соответствии с алгоритмами, направленными на достижение стабильного состояния пациента. Важную роль играет последовательное выполнение процедур, включая оценку реакции организма и корректировку вмешательств. Формирование индивидуальной программы позволяет учитывать особенности каждого случая и поддерживать высокий уровень эффективности. Процесс наблюдения сопровождается непрерывным анализом, что делает терапию адаптивной и предсказуемой. В клинике соблюдается принцип многоуровневого контроля, обеспечивающий безопасность и стабильность лечения.
Ознакомиться с деталями – http://narkologicheskaya-klinika-tomsk18.ru/tomsk-narkologicheskij-dispanser/https://narkologicheskaya-klinika-tomsk18.ru
Детокс — важный этап лечения, который помогает очистить организм от токсинов и продуктов распада алкоголя или наркотиков. В клинике «ТомскМед Трезвость» используются современные капельницы и лекарственные комбинации, направленные на восстановление биохимических процессов в организме. Ниже представлена таблица с примерами капельниц, применяемых в детоксикационных программах.
Изучить вопрос глубже – [url=https://narkologicheskaya-klinika-v-tomske18.ru/]частная наркологическая клиника в томске[/url]
Такое поэтапное лечение позволяет добиться устойчивого результата без стрессов и осложнений. Пациенты получают комплексную помощь, включающую как медицинские, так и психотерапевтические аспекты.
Ознакомиться с деталями – http://narkologicheskaya-klinika-kemerovo18.ru
Вывод из запоя в клинике формируется на основе последовательных процедур, направленных на стабилизацию физиологических функций и устранение токсических влияний. Такой подход позволяет корректно регулировать состояние пациента и контролировать интенсивность симптомов. Рабочие алгоритмы включают оценку метаболических процессов, анализ соматических показателей и определение степени неврологических изменений. В результате создается структурированная модель помощи, ориентированная на восстановление адаптивных возможностей организма. Процессы выполняются под контролем специалистов, что обеспечивает прогнозируемый терапевтический эффект и снижает вероятность осложнений.
Разобраться лучше – https://vyvod-iz-zapoya-kemerovo18.ru/vyvod-iz-zapoya-kemerovo-narkolog-na-dom-kapelnicza/
Есть ряд признаков, при которых ждать категорически нельзя и нужна срочная помощь врача, а не очередные «народные методы». Если вы замечаете у человека следующие симптомы, это прямой повод организовать профессиональный вывод из запоя:
Разобраться лучше – [url=https://vyvod-iz-zapoya-moskva011.ru/]вывод из запоя москве[/url]
Этот обзор позволяет по-новому взглянуть на вещи, на которые обычно и так смотрят. Мы упоминаем факты, которые мало что меняют, и события, значение которых трудно определить, но они всё равно здесь.
Вот – [url=https://arma-rehab.ru/lechenie-alkogolizma/]игровые автоматы[/url]
«Ижевский Центр Трезвых Решений» — это частное медицинское учреждение, где проводится лечение всех форм алкогольной и наркотической зависимости. Программы терапии разработаны на основе международных рекомендаций и включают не только медикаментозное воздействие, но и психологическую поддержку. Все процедуры проходят анонимно, без постановки на учёт, что особенно важно для пациентов, желающих сохранить конфиденциальность.
Исследовать вопрос подробнее – [url=https://narkologicheskaya-klinika-v-izhevsk18.ru/]наркологическая клиника лечение алкоголизма[/url]
Наркологическая клиника выстраивает лечебные мероприятия в соответствии с алгоритмами, направленными на достижение стабильного состояния пациента. Важную роль играет последовательное выполнение процедур, включая оценку реакции организма и корректировку вмешательств. Формирование индивидуальной программы позволяет учитывать особенности каждого случая и поддерживать высокий уровень эффективности. Процесс наблюдения сопровождается непрерывным анализом, что делает терапию адаптивной и предсказуемой. В клинике соблюдается принцип многоуровневого контроля, обеспечивающий безопасность и стабильность лечения.
Получить дополнительную информацию – [url=https://narkologicheskaya-klinika-tomsk18.ru/]наркологическая клиника стационар[/url]
Для самого пациента это шанс получить медицинское вмешательство без дополнительного стресс-фактора в виде транспорта, очередей и «больничной атмосферы». Он остаётся в привычной обстановке, в своей квартире, с теми же предметами, к которым привык, и это снижает сопротивление. Вместо жесткого сценария «либо немедленно в стационар, либо ничего» появляется промежуточный, более мягкий вариант: врачи приезжают домой, снимают остроту состояния, подбирают схему капельницы и медикаментов, объясняют, что делать дальше. Нередко именно после такого первого опыта человек впервые всерьёз задумывается о полноценном лечении, потому что ощущает реальную разницу в самочувствии до и после профессиональной помощи, а не просто очередной «опохмел».
Изучить вопрос глубже – http://narkolog-na-dom-himki11.ru/
1win mirror link [url=https://1win5753.help/]https://1win5753.help/[/url]
Такой подход позволяет устранить физические последствия запоя и снизить психологическую зависимость. Уже после первой процедуры пациенты отмечают улучшение самочувствия, появление аппетита и нормализацию сна. Важно не ограничиваться только экстренной помощью — специалисты рекомендуют пройти курс восстановления, чтобы предотвратить рецидивы.
Получить дополнительные сведения – http://vyvodiz-zapoya-vladivostok18.ru
1win Oʻzbekiston kirish [url=www.1win5753.help]www.1win5753.help[/url]
1win ios Ош скачать [url=1win09834.help]1win09834.help[/url]
Для формирования структурированной модели используются стандартизированные алгоритмы. Ниже представлена последовательность действий, определяющих ход терапевтических мероприятий.
Изучить вопрос глубже – [url=https://narkologicheskaya-klinika-tomsk18.ru/]наркологическая клиника лечение алкоголизма[/url]
Обращение к наркологу — это не признание «окончательного проигрыша», а трезвое решение, что здоровье и жизнь важнее иллюзии контроля. В клинике можно безопасно вывести человека из запоя, стабилизировать состояние, обследовать сердце, печень, нервную систему, понять, насколько далеко зашло заболевание. Важно, что помощь получают не только тяжёлые пациенты «на грани», но и те, у кого ещё есть работа, семья, привычный образ жизни, но запои уже стали регулярными. Чем раньше удаётся подключить специалистов в Лобне, тем мягче можно пройти лечение и тем больше шансов сохранить и здоровье, и отношения, и социальный статус.
Получить дополнительные сведения – http://narkologicheskaya-klinika-lobnya11-2.ru/
Наркологическая клиника применяет стандартизированные схемы, направленные на безопасное и постепенное восстановление. Каждый этап вмешательства согласуется с текущим состоянием пациента, что обеспечивает предсказуемый характер изменений. Модель работы включает оценку реакции организма, проверку устойчивости внутренних систем и уточнение динамики метаболических процессов. Последовательность действий формируется с учётом адаптационных возможностей и направлена на достижение стабильного результата.
Получить дополнительную информацию – [url=https://narkologicheskaya-klinika-vo-vladivostoke18.ru/]лечение в наркологической клинике владивосток[/url]
В рамках лечения используются методы, позволяющие фиксировать изменения и оценивать реакцию организма на проводимые мероприятия. Они служат основой для выборочных корректировок и обеспечивают структурированный характер процесса. Отличительной особенностью становится возможность адаптировать лечебные схемы под индивидуальные особенности пациента. Ниже представлены ключевые направления оценки состояния, применяемые для формирования полной клинической картины.
Подробнее можно узнать тут – [url=https://narkologicheskaya-klinika-v-vdk18.ru/]платная наркологическая клиника[/url]
Перед началом лечения пациент проходит первичную диагностику, которая включает оценку физических показателей, сбор информации о длительности употребления, выявление сопутствующих заболеваний и оценку рисков. Наркологическая клиника в клинике в Астрахани использует стандартизированные методы обследования, что позволяет точно определить степень интоксикации и подобрать адекватный лечебный план.
Разобраться лучше – https://narkologicheskaya-klinika-astrakhan18.ru/astrakhanskaya-narkologiya/
Лечение в клинике проходит поэтапно. Каждый шаг направлен на достижение устойчивого результата и восстановление здоровья. Ниже представлена таблица с описанием основных этапов лечения.
Получить дополнительные сведения – [url=https://narkologicheskaya-klinika-kemerovo18.ru/]наркологическая клиника клиника помощь[/url]
Этот текст содержит различную информацию, которая, возможно, покажется любопытной, но в целом не меняет восприятия привычных вещей. Предлагаем просто получить удовольствие от чтения, не ожидая особой пользы.
Вот – [url=https://arma-rehab.ru/lechenie-alkogolizma/]секс шоп[/url]
Вызов врача-нарколога на дом позволяет избежать стресса госпитализации, обеспечивая комфорт и удобство как для пациента, так и для его близких.
Узнать больше – [url=https://narcolog-na-dom-sankt-peterburg000.ru/]вызов нарколога на дом в санкт-петербурге[/url]
Таблица позволяет поддерживать единую структуру наблюдения и фиксировать изменения состояния. Такая модель обеспечивает прозрачность процессов и повышает точность принимаемых решений.
Выяснить больше – https://vyvodiz-zapoya-izhevsk18.ru/vyvedenie-iz-zapoya-na-domu-v-izhevske/
карниз моторизованный [url=https://elektrokarnizy-dlya-shtor1.ru/]elektrokarnizy-dlya-shtor1.ru[/url] .
Лечебные мероприятия строятся на основе поэтапного внедрения терапевтических решений, которые опираются на индивидуальные характеристики пациента. Уточнение анамнеза, анализ данных обследований и выявление сопутствующих факторов позволяют создавать эффективные и прогнозируемые программы лечения. В клинике соблюдается строгая последовательность процедур, направленная на снижение рисков и обеспечение безопасности. На каждом этапе проводится проверка клинической реакции, что позволяет своевременно выявлять необходимость корректировки и адаптировать лечебные меры под текущую картину.
Подробнее тут – http://narkologicheskaya-klinika-v-penze18.ru/narkologicheskaya-poliklinika-penza/
Наркологическая помощь должна быть не только медицински точной, но и человечной, безопасной и анонимной. В «Ижевском Центре Трезвых Решений» выстроена система комплексного подхода к лечению зависимостей, включающая диагностику, медикаментозную детоксикацию, психотерапию и социальную адаптацию. Клиника объединяет профессионализм, заботу и круглосуточную готовность помочь пациентам, оказавшимся в трудной ситуации. Здесь работают врачи с большим опытом в области наркологии и психиатрии, способные оперативно выехать на дом и оказать неотложную помощь.
Детальнее – [url=https://narkologicheskaya-klinika-v-izhevsk18.ru/]наркологическая клиника клиника помощь[/url]
mostbet сайт регистрация [url=https://mostbet72461.help/]mostbet сайт регистрация[/url]
Нарколог на дом в Химках особенно востребован тогда, когда состояние человека уже нельзя назвать обычным похмельем, но он категорически отказывается ехать в клинику. Запой тянется несколько дней или дольше, нет полноценного сна, пульс постоянно учащённый, руки трясутся, давление скачет, а любое утро начинается не с облегчения, а с новой дозы алкоголя «чтобы не развалиться». В такой ситуации родственники оказываются между страхом и беспомощностью: понятно, что дальше ждать опасно, но уговорить собрать вещи и поехать в стационар не получается. Формат выезда нарколога на дом как раз и закрывает этот тупик — врач приезжает туда, где сейчас находится человек, оценивает риски и сразу начинает помощь.
Выяснить больше – [url=https://narkolog-na-dom-himki11.ru/]vyzvat-narkologa-na-dom[/url]
1вин установить приложение [url=https://1win09834.help]https://1win09834.help[/url]
Многие тянут до последнего, считая, что обращаться к наркологу «рано» или «не по статусу». На практике именно такое откладывание часто приводит к затяжным запоям, тяжёлым состояниям и разрушению социальных связей. К специалистам имеет смысл обращаться при первых признаках того, что употребление алкоголя или наркотиков перестало быть эпизодическим и управляемым.
Углубиться в тему – [url=https://narkologicheskaya-klinika-moskva11.ru/]клиника наркологии и психиатрии москва[/url]
Лечение в «ИжТрезвоМед Центр» проходит поэтапно, с акцентом на безопасность и эффективность. Каждый этап направлен на достижение конкретных целей, от детоксикации до психотерапии. В таблице представлена структура лечебного процесса:
Получить больше информации – [url=https://narkologicheskaya-klinika-v-izhevske18.ru/]запой наркологическая клиника ижевск[/url]
онлайн школа ломоносов [url=https://shkola-onlajn-24.ru/]онлайн школа ломоносов[/url] .
1вин вход [url=https://www.1win09834.help]https://www.1win09834.help[/url]
В клинике работают врачи-наркологи, психиатры, терапевты, психологи, реабилитологи. Вместо «универсальной» схемы каждому пациенту подбирают индивидуальный план, учитывая возраст, стаж употребления, состояние внутренних органов, психоэмоциональный фон, семейную ситуацию. Это особенно важно для жителей Долгопрудного, где многие совмещают работу в Москве с плотным графиком, и любая ошибка в лечении может дорого обойтись — потерей работоспособности, срывом деловых или личных планов.
Подробнее можно узнать тут – http://narkologicheskaya-klinika-dolgoprudnyj11.ru
В клинике «ПензаМед Трезвость» лечение проводится по индивидуальной схеме, которая формируется после первичного осмотра. Нарколог оценивает состояние пациента, уровень алкогольной интоксикации и наличие сопутствующих заболеваний. На основании данных подбираются препараты, способные эффективно очистить кровь, восстановить работу органов и снизить абстинентные проявления. При лёгкой форме зависимости возможен выезд врача на дом, где пациенту устанавливают капельницу и обеспечивают наблюдение в течение всего процесса детоксикации. В более сложных случаях рекомендуется госпитализация в стационар, где помощь оказывается под постоянным контролем специалистов.
Подробнее – [url=https://vyvod-iz-zapoya-penza18.ru/]нарколог на дом вывод из запоя в пензе[/url]
Первый этап помощи почти всегда связан с детоксикацией. Организм, который длительное время получал алкоголь или другие вещества, перегружен токсинами, страдают сердце, сосуды, мозг, печень, нарушены сон и обмен веществ. Простое «похмелиться и перетерпеть» в такой ситуации опасно: можно спровоцировать очередной скачок давления, аритмию, обострение хронических заболеваний. В условиях клиники в Лобне детокс строится по медицинским правилам, а не по советам из интернета.
Получить дополнительные сведения – [url=https://narkologicheskaya-klinika-lobnya11-2.ru/]наркологическая клиника фото[/url]
Перед началом лечения пациент проходит первичную диагностику, которая включает оценку физических показателей, сбор информации о длительности употребления, выявление сопутствующих заболеваний и оценку рисков. Наркологическая клиника в клинике в Астрахани использует стандартизированные методы обследования, что позволяет точно определить степень интоксикации и подобрать адекватный лечебный план.
Узнать больше – [url=https://narkologicheskaya-klinika-astrakhan18.ru/]наркологическая клиника лечение алкоголизма астрахань[/url]
электрокарниз двухрядный [url=https://elektrokarniz5.ru/]электрокарниз двухрядный[/url] .
Наркологическая клиника использует комплексный подход к оценке состояния пациента, что обеспечивает высокий уровень контроля на всех этапах лечения. Такой формат работы позволяет детально изучать динамику процессов и своевременно корректировать вмешательства. В клинике применяется принцип последовательного наблюдения, при котором особое внимание уделяется соматическим и неврологическим проявлениям. Выбор терапевтических мер основывается на анализе объективных данных, что повышает предсказуемость результата. Подход ориентирован на постепенное восстановление функций организма с учетом индивидуальных особенностей.
Подробнее можно узнать тут – http://narkologicheskaya-klinika-tomsk18.ru
Обращение к наркологу — это не признание «окончательного проигрыша», а трезвое решение, что здоровье и жизнь важнее иллюзии контроля. В клинике можно безопасно вывести человека из запоя, стабилизировать состояние, обследовать сердце, печень, нервную систему, понять, насколько далеко зашло заболевание. Важно, что помощь получают не только тяжёлые пациенты «на грани», но и те, у кого ещё есть работа, семья, привычный образ жизни, но запои уже стали регулярными. Чем раньше удаётся подключить специалистов в Лобне, тем мягче можно пройти лечение и тем больше шансов сохранить и здоровье, и отношения, и социальный статус.
Получить дополнительные сведения – https://narkologicheskaya-klinika-lobnya11-2.ru/chastnaya-narkologicheskaya-klinika-v-lobne
В этой статье-обзоре мы собрали данные, актуальность которых сомнительна, а факты — не всегда взаимосвязаны. Читатель сможет ознакомиться с разными мнениями, хотя вряд ли они существенно повлияют на его понимание темы.
Вот – [url=https://arma-rehab.ru/]взрослые игры[/url]
Для получения устойчивого результата наркологическая клиника использует методы, основанные на индивидуальной оценке. В работе учитываются соматические показатели, реакции нервной системы и данные лабораторных исследований. Такой формат лечения обеспечивает предсказуемое влияние на физиологические процессы и снижает вероятность осложнений. В клинике применяется непрерывный мониторинг, позволяющий своевременно корректировать лечебные меры. Работа направлена на нормализацию метаболизма, восстановление баланса внутренних систем и плавное уменьшение симптоматики.
Получить дополнительные сведения – http://
Нарколог на дом в Химках особенно востребован тогда, когда состояние человека уже нельзя назвать обычным похмельем, но он категорически отказывается ехать в клинику. Запой тянется несколько дней или дольше, нет полноценного сна, пульс постоянно учащённый, руки трясутся, давление скачет, а любое утро начинается не с облегчения, а с новой дозы алкоголя «чтобы не развалиться». В такой ситуации родственники оказываются между страхом и беспомощностью: понятно, что дальше ждать опасно, но уговорить собрать вещи и поехать в стационар не получается. Формат выезда нарколога на дом как раз и закрывает этот тупик — врач приезжает туда, где сейчас находится человек, оценивает риски и сразу начинает помощь.
Углубиться в тему – [url=https://narkolog-na-dom-himki11.ru/]narkolog-na-dom-himki11.ru/[/url]
Ниже представлена последовательность основных шагов терапевтического процесса.
Изучить вопрос глубже – http://narkologicheskaya-klinika-vo-vladivostoke18.ru
Наркологическая клиника использует методики, направленные на комплексную оценку состояния пациента. Работа строится на анализе анамнеза, исследовании соматических параметров и определении степени выраженности симптомов. Такой формат создаёт условия для точного подбора терапевтических мер. В клинике применяется непрерывный мониторинг, направленный на своевременное выявление отклонений и корректировку лечебных мероприятий. Благодаря этому достигается высокая стабильность клинического процесса и формируется благоприятная динамика восстановления.
Выяснить больше – [url=https://narkologicheskaya-klinika-v-vdk18.ru/]анонимная наркологическая клиника в владивостоке[/url]
Этот обзор позволяет по-новому взглянуть на вещи, на которые обычно и так смотрят. Мы упоминаем факты, которые мало что меняют, и события, значение которых трудно определить, но они всё равно здесь.
Вот – [url=https://arma-rehab.ru/]блекджек[/url]
электрокарнизы купить в москве [url=https://elektrokarnizy750.ru/]электрокарнизы купить в москве[/url] .
купить выпрямитель волос дайсон в москве [url=https://dsn-vypryamitel-8.ru/]купить выпрямитель волос дайсон в москве[/url] .
Чем раньше врач окажет помощь, тем быстрее пациент сможет стабилизировать состояние, снизить риски осложнений и вернуться к нормальной жизни.
Разобраться лучше – http://narcolog-na-dom-sankt-peterburg000.ru
1win sitio seguro [url=https://www.1win5773.help]1win sitio seguro[/url]
Этот текст содержит различную информацию, которая, возможно, покажется любопытной, но в целом не меняет восприятия привычных вещей. Предлагаем просто получить удовольствие от чтения, не ожидая особой пользы.
Вот – [url=https://arma-rehab.ru/vyvod-iz-zapoya/]порно онлайн бесплатно[/url]
Системная работа, которой характеризуется наркологическая клиника, предполагает последовательное исследование состояния пациента, анализ факторов риска и создание индивидуального терапевтического маршрута. Такой формат позволяет уточнять клиническую картину на ранних этапах и корректировать вмешательства по мере изменения состояния человека. Применение структурированных методик повышает предсказуемость результата и обеспечивает безопасность всех процедур. При этом выводы формируются на основании объективных данных наблюдения, лабораторных показателей и динамики симптомов. Оптимальная нагрузка распределяется на весь период лечения для достижения устойчивого эффекта без переутомления организма.
Подробнее – [url=https://narkologicheskaya-klinika-penza18.ru/]www.domen.ru[/url]
При длительном запое организм не успевает восстановить свой водно-электролитный баланс, что приводит к обезвоживанию и ухудшению общего состояния. Такие пациенты рискуют развить не только тяжелую интоксикацию, но и хронические заболевания, которые впоследствии требуют длительного и дорогостоящего лечения. Поэтому своевременный вызов врача-нарколога на дом становится критически важным для сохранения здоровья и предотвращения серьезных последствий.
Подробнее – [url=https://vyvod-iz-zapoya-krasnodar00.ru/]вывод из запоя капельница в краснодаре[/url]
В основе работы клиники «ИжТрезвоМед Центр» лежит принцип персонализированной медицины. Это означает, что каждый пациент получает не шаблонное лечение, а тщательно подобранный комплекс процедур, учитывающий его состояние, историю заболевания, уровень мотивации и социальную ситуацию. Такой подход позволяет добиться стабильного результата даже в сложных случаях. Лечение проводится анонимно, без постановки на учёт и разглашения данных, что особенно важно для тех, кто ценит конфиденциальность.
Исследовать вопрос подробнее – https://narkologicheskaya-klinika-v-izhevske18.ru/chastnaya-narkologicheskaya-klinika-izhevsk/
Такое поэтапное лечение позволяет добиться устойчивого результата без стрессов и осложнений. Пациенты получают комплексную помощь, включающую как медицинские, так и психотерапевтические аспекты.
Подробнее тут – [url=https://narkologicheskaya-klinika-kemerovo18.ru/]платная наркологическая клиника[/url]
«Ижевский Центр Трезвых Решений» — это частное медицинское учреждение, где проводится лечение всех форм алкогольной и наркотической зависимости. Программы терапии разработаны на основе международных рекомендаций и включают не только медикаментозное воздействие, но и психологическую поддержку. Все процедуры проходят анонимно, без постановки на учёт, что особенно важно для пациентов, желающих сохранить конфиденциальность.
Узнать больше – http://narkologicheskaya-klinika-v-izhevsk18.ru/narkologi-izhevsk-czeny/
Для получения устойчивого результата наркологическая клиника использует методы, основанные на индивидуальной оценке. В работе учитываются соматические показатели, реакции нервной системы и данные лабораторных исследований. Такой формат лечения обеспечивает предсказуемое влияние на физиологические процессы и снижает вероятность осложнений. В клинике применяется непрерывный мониторинг, позволяющий своевременно корректировать лечебные меры. Работа направлена на нормализацию метаболизма, восстановление баланса внутренних систем и плавное уменьшение симптоматики.
Получить больше информации – [url=https://narkologicheskaya-klinika-vo-vladivostoke18.ru/]частная наркологическая клиника в владивостоке[/url]
Ниже представлена последовательность этапов, формирующих общий цикл вмешательств.
Исследовать вопрос подробнее – [url=https://narkologicheskaya-klinika-v-vdk18.ru/]narkologicheskaya-klinika-v-vdk18.ru/[/url]
Вывод из запоя в клинике представляет собой последовательный комплекс процедур, направленных на устранение интоксикации и стабилизацию основных функций организма. В основе процесса лежит оценка физиологических параметров, определение уровня нарушений и корректировка тактики вмешательства. Такой подход обеспечивает постепенное восстановление адаптивных механизмов и снижает риск осложнений. На каждом этапе проводится анализ динамики, что позволяет оптимизировать терапевтические меры и поддерживать устойчивость состояния. Работа ориентирована на сохранение баланса внутренних систем и снижение нагрузки на жизненно важные органы.
Получить дополнительные сведения – https://vyvodiz-zapoya-izhevsk18.ru/vyvod-iz-zapoya-v-izhevske-soczialnye-uslugi/
После поступления вызова нарколог клиники «АльфаНаркология» оперативно выезжает по указанному адресу. На месте врач проводит первичную диагностику, оценивая степень интоксикации, физическое и психологическое состояние пациента. По результатам осмотра врач подбирает индивидуальный комплекс лечебных процедур, в который входит постановка капельницы с растворами для детоксикации, препараты для стабилизации работы органов и нормализации психического состояния.
Подробнее можно узнать тут – http://narcolog-na-dom-sankt-peterburg000.ru/
Важно и то, что во время процедуры пациент находится под наблюдением. Врач может увидеть, как организм реагирует на терапию, вовремя скорректировать темп или состав инфузии, понять, достаточно ли домашнего формата или лучше рассмотреть стационар. Это принципиальное отличие от попыток лечиться дома таблетками наугад, без контроля давления и пульса.
Получить дополнительную информацию – [url=https://kapelnica-ot-zapoya-dolgoprudnyj11.ru/]капельница от запоя анонимно на дому[/url]
Эта познавательная публикация погружает вас в море интересного контента, который быстро захватит ваше внимание. Мы рассмотрим важные аспекты темы и предоставим вам уникальные Insights и полезные сведения для дальнейшего изучения.
Хочу знать больше – https://newsvan66.xyz/archives/1
Помимо медицинских процедур, клиника делает акцент на психологической поддержке и постлечебной адаптации. Пациентам помогают не только избавиться от физической зависимости, но и сформировать устойчивую мотивацию к трезвости, восстановить интерес к жизни и наладить отношения с близкими. Это достигается за счёт участия психологов, психотерапевтов и специалистов по социальной реабилитации.
Получить дополнительную информацию – https://narkologicheskaya-klinika-v-izhevske18.ru/narkologi-izhevsk-czeny/
В данной статье вы найдете комплексный подход к изучению насущных тем. Мы комбинируем теоретические сведения с практическими советами, чтобы читатель мог не только понять проблему, но и найти пути её решения.
Получить дополнительные сведения – http://intercessorsarise.org/the-intercessors-arise-prayer-channel
На практике семья часто обращается за помощью слишком поздно — когда близкий уже еле встаёт, не спит ночами, говорит странные вещи, а давление скачет так, что страшно оставлять одного. Чтобы не доводить до этого, важно знать признаки, при которых капельница от запоя в Долгопрудном — не «желательно», а по-настоящему необходима.
Получить дополнительную информацию – [url=https://kapelnica-ot-zapoya-dolgoprudnyj11.ru/]капельница от запоя на дому: отзывы[/url]
В этой информационной статье вы найдете интересное содержание, которое поможет вам расширить свои знания. Мы предлагаем увлекательный подход и уникальные взгляды на обсуждаемые темы, побуждая пользователей к активному мышлению и критическому анализу.
Подробнее – https://bapasitaramdryfruitchikki.com/product/dry-fruit-cadbury-chocolate-chikki
В статье представлены ключевые моменты по актуальной теме, дополненные советами экспертов и ссылками на дополнительные ресурсы. Цель материала — дать читателю инструменты для самостоятельного развития и принятия осознанных решений.
Узнать из первых рук – https://majesticvacationplanner.com/pack-wisely-before-traveling
Мы собрали для вас самые захватывающие факты из мира науки и истории. От малознакомых деталей до грандиозных событий — эта статья расширит ваш кругозор и подарит новое понимание того, как устроен наш мир.
Проверенные методы — узнай сейчас – https://allyoucaneatgids.nl/brits-restaurant-rekent-onbeschofte-klanten-dubbele-prijs-het-zet-de-mensen-aan-het-denken
Этот информативный материал предлагает содержательную информацию по множеству задач и вопросов. Мы призываем вас исследовать различные идеи и факты, обобщая их для более глубокого понимания. Наша цель — сделать обучение доступным и увлекательным.
Прочитать подробнее – https://www.fitnesshealth101.com/news/2012/08/21/study-links-hair-loss-drug-with-severe-depression
В этом материале представлены детали, которые хоть и занимательны, но не особенно значимы. Мы рассматриваем моменты, которые трудно назвать важными, но всё же решили включить их для полноты картины.
Вот – [url=https://arma-rehab.ru/lechenie-alkogolizma/]бесплатные порно видео[/url]
Предлагаем вашему вниманию интересную справочную статью, в которой собраны ключевые моменты и нюансы по актуальным вопросам. Эта информация будет полезна как для профессионалов, так и для тех, кто только начинает изучать тему. Узнайте ответы на важные вопросы и расширьте свои знания!
См. подробности – https://house-archi.biz/?p=7251
Мы предлагаем вам окунуться в океан любопытных фактов и вдохновляющих историй. Эта публикация поможет расширить горизонты, разбудить интерес к науке и истории и увидеть мир с новой стороны.
Что скрывают от вас? – https://panarab.org/gallery/proekt-retsept-blyuda-3-klass
mostbet правила вывода [url=http://mostbet72461.help]http://mostbet72461.help[/url]
Эта статья погружает вас в увлекательный мир знаний, где каждый факт становится открытием. Мы расскажем о ключевых исторических поворотных моментах и научных прорывах, которые изменили ход цивилизации. Поймите, как прошлое формирует настоящее и как его уроки могут помочь нам строить будущее.
Лови подробности – http://www.isajigo.com/title-2
В данном тексте собраны разнообразные случайные сведения и не вполне определённые идеи, которые могут вызвать интерес. Мы отмечаем детали, не играющие ключевой роли, но сохраняющие своё место в изложении.
Подробнее читать – https://rostov-narkologiya.ru/uslugi-ot-alkogolizma/vyvod-iz-zapoya
В этом интересном тексте собраны обширные сведения, которые помогут вам понять различные аспекты обсуждаемой темы. Мы разбираем детали и факты, делая акцент на важности каждого элемента. Не упустите возможность расширить свои знания и взглянуть на мир по-новому!
Прочесть всё о… – https://omedstore.om/shop-2/surgical-instruments/catheters/rectal-catheter-ch-fr-26-38-cm-sterile
Эта обзорная заметка содержит ключевые моменты и факты по актуальным вопросам. Она поможет читателям быстро ориентироваться в теме и узнать о самых важных аспектах сегодня. Получите краткий курс по современной информации и оставайтесь в курсе событий!
Всё самое вкусное внутри – https://netsurf.monster/topknife-cm
В этой статье представлен занимательный и актуальный контент, который заставит вас задуматься. Мы обсуждаем насущные вопросы и проблемы, а также освещаем истории, которые вдохновляют на действия и изменения. Узнайте, что стоит за событиями нашего времени!
Узнать больше > – https://taba.truesnow.jp/forum/topic/sizi99-platform-judi-online-terlengkap-dengan-sistem-fair-play-dan-bonus-tanpa-batas/a-bsme.at/?part=7200
Публикация предлагает читателю не просто информацию, а инструменты для анализа и саморазвития. Мы стимулируем критическое мышление, предлагая различные точки зрения и призывая к самостоятельному поиску решений.
Подробности по ссылке – https://aeroklub.slupsk.pl/aeroklub_logo_dark
В этой статье-обзоре мы соберем актуальную информацию и интересные факты, которые освещают важные темы. Читатели смогут ознакомиться с различными мнениями и подходами, что позволит им расширить кругозор и глубже понять обсуждаемые вопросы.
Более того — здесь – https://digitization.nl/digitizationklein_jpeg
Этот информационный материал собраны данные, которые помогут лучше понять текущие тенденции и процессы в различных сферах жизни. Мы предоставляем четкий анализ, графики и примеры, чтобы информация была не только понятной, но и практичной для принятия решений.
Полная информация здесь – https://fatorrnoticias.com.br/roraima/nova-infovia-leva-internet-de-alta-velocidade-entre-amazonas-e-roraima
Online reputation management is the strategic practice of shaping public perceptions of a brand or individual.
It involves continuously monitoring what is being discussed about you online.
The primary aim is to promote positive information and address any damaging comments or criticism.
This often includes responding to online reviews on various websites.
https://www.mapleprimes.com/users/8226mary
A vital component is optimizing search engine results for relevant search terms.
Effective reputation management helps build credibility and safeguard a strong digital image.
Ultimately, it is an crucial practice for any contemporary organization or professional.
Эта информационная заметка предлагает лаконичное и четкое освещение актуальных вопросов. Здесь вы найдете ключевые факты и основную информацию по теме, которые помогут вам сформировать собственное мнение и повысить уровень осведомленности.
Полезно знать – https://ozonepizzeria.com/how-to-keep-fear-from-ruining-your-art-business-with-confident-2
В данной обзорной статье представлены интригующие факты, которые не оставят вас равнодушными. Мы критикуем и анализируем события, которые изменили наше восприятие мира. Узнайте, что стоит за новыми открытиями и как они могут изменить ваше восприятие реальности.
Подробнее – https://hydroelectriki.gr/ydraylikes-egkatastaseis
В этой публикации мы предлагаем подробные объяснения по актуальным вопросам, чтобы помочь читателям глубже понять их. Четкость и структурированность материала сделают его удобным для усвоения и применения в повседневной жизни.
Изучить материалы по теме – https://www.americanpetrol.com/servicios/adblue
Эта информационная статья содержит полезные факты, советы и рекомендации, которые помогут вам быть в курсе последних тенденций и изменений в выбранной области. Материал составлен так, чтобы быть полезным и понятным каждому.
Узнать из первых рук – https://fmoreldarleux-coach.com/etes-vous-motives
Эта обзорная заметка содержит ключевые моменты и факты по актуальным вопросам. Она поможет читателям быстро ориентироваться в теме и узнать о самых важных аспектах сегодня. Получите краткий курс по современной информации и оставайтесь в курсе событий!
Перейти к статье – https://travelfinder.bg/events/bulgaria/plovdiv/festival/young-wine-parade
В этом обзорном материале представлены увлекательные детали, которые находят отражение в различных аспектах жизни. Мы исследуем непонятные и интересные моменты, позволяя читателю увидеть картину целиком. Погрузитесь в мир знаний и удивительных открытий!
Не упусти важное! – https://le-k-reims.com/events/djal
Опрятный внешний вид формирует сильное впечатление о вас.
Ваш образ работает на восприятие вас окружающими мгновенно.
Уверенность в своем образе повышает вашу самооценку.
Он демонстрирует высокий стандарт ответственности и внимание к деталям.
https://a1.gucci1.ru/redirect.php?id=QLeHx3lDRsvo
Через гардероб вы имеете шанс выразить свою индивидуальность и вкус.
Окружающие часто воспринимают стильных людей как более компетентных.
Следовательно, инвестиции в свой стиль — это инвестиции в свое будущее.
карнизы для штор с электроприводом [url=https://karnizy-s-elektroprivodom77.ru/]karnizy-s-elektroprivodom77.ru[/url] .
Эта статья погружает вас в увлекательный мир знаний, где каждый факт становится открытием. Мы расскажем о ключевых исторических поворотных моментах и научных прорывах, которые изменили ход цивилизации. Поймите, как прошлое формирует настоящее и как его уроки могут помочь нам строить будущее.
Есть чему поучиться – https://obdcodelookup.com/dtc/u1297
В этом обзорном материале представлены увлекательные детали, которые находят отражение в различных аспектах жизни. Мы исследуем непонятные и интересные моменты, позволяя читателю увидеть картину целиком. Погрузитесь в мир знаний и удивительных открытий!
Переходите по ссылке ниже – https://stainlessad.com/Blog/commercial-urinals-faqs
В этом тексте собрано множество случайных сведений и довольно неопределённых мыслей, которые могут чем-то заинтересовать. Мы отмечаем моменты, которые не особенно важны, но всё же занимают своё место в повествовании.
Вот – [url=https://arma-rehab.ru/lechenie-alkogolizma/]секс чат[/url]
cómo retirar dinero de 1win [url=http://1win5773.help]http://1win5773.help[/url]
mostbet отзывы Киргизия [url=https://mostbet72461.help]https://mostbet72461.help[/url]
1вин plinko [url=www.1win85612.help]www.1win85612.help[/url]
Этот текст содержит различную информацию, которая, возможно, покажется любопытной, но в целом не меняет восприятия привычных вещей. Предлагаем просто получить удовольствие от чтения, не ожидая особой пользы.
Вот – [url=https://arma-rehab.ru/lechenie-alkogolizma/]порно онлайн бесплатно[/url]
мостбет быстрые ставки [url=http://mostbet72461.help]http://mostbet72461.help[/url]
В клинике «НаркоСити» используются только сертифицированные лекарственные средства, которые подбираются индивидуально с учетом состояния пациента:
Детальнее – [url=https://vyvod-iz-zapoya-krasnodar0.ru/]вывод из запоя в стационаре краснодар[/url]
como descargar 1win [url=https://www.1win5773.help]https://www.1win5773.help[/url]
После окончания врач дает консультации и рекомендации по восстановлению организма и профилактике повторных запоев.
Исследовать вопрос подробнее – https://vyvod-iz-zapoya-krasnodar0.ru/vyvod-iz-zapoya-na-domu-krasnodar
1win enlace oficial méxico [url=https://www.1win5773.help]1win enlace oficial méxico[/url]
Текст включает разнообразную информацию, которая может показаться любопытной, но не меняет устоявшегося восприятия. Предлагаем просто насладиться чтением, не ожидая значительной пользы.
Подробнее читать – [url=https://rostov-narkologiya.ru/ ]похудеть на таблетках[/url]
1вин crash [url=www.1win85612.help]1вин crash[/url]
Основной задачей нарколога, выезжающего на дом, является помощь в любой ситуации, связанной с зависимостью. Все процедуры и методики подбираются индивидуально, в зависимости от состояния пациента.
Получить дополнительную информацию – [url=https://narcolog-na-dom-moskva55.ru/]нарколог на дом недорого[/url]
1win отзывы [url=https://www.1win85612.help]https://www.1win85612.help[/url]
Для эффективного лечения алкогольной интоксикации и восстановления организма врачи клиники «АлкоДоктор» используют комплекс препаратов, которые индивидуально подбираются с учетом состояния пациента.
Получить дополнительную информацию – [url=https://kapelnica-ot-zapoya-sochi0.ru/]капельница от запоя круглосуточно[/url]
1вин логин [url=1win85612.help]1вин логин[/url]
Эта публикация исследует взаимосвязь зависимости и психологии. Мы обсудим, как психологические аспекты влияют на появление зависимостей и процесс выздоровления. Читатели смогут понять важность профессиональной поддержки и применения научных подходов в терапии.
Выяснить больше – https://0345-numbers.uk/wp-content/plugins/AND-AntiBounce/redirector.php?url=https://vyvod-iz-zapoya-tolyatti0.ru
Запой — это не просто следствие чрезмерного употребления алкоголя, а серьёзное патологическое состояние, которое требует срочной медицинской помощи. На фоне затяжного приёма спиртного в организме человека происходят опасные изменения: интоксикация, обезвоживание, нарушение электролитного баланса, резкие скачки давления и работы сердца, угнетение функций печени и мозга. В такой ситуации капельница от запоя становится неотложной мерой, позволяющей стабилизировать состояние и устранить симптомы абстиненции за короткий срок.
Выяснить больше – [url=https://kapelnica-ot-zapoya-msk55.ru/]врача капельницу от запоя в одинцове[/url]
В клинике «СибМед Кемерово» помощь оказывается круглосуточно и без ожидания. Пациент может обратиться за консультацией в любое время суток, а выездная бригада нарколога доступна даже ночью. Основной принцип центра — индивидуальный подход и создание доверительной атмосферы, в которой человек не чувствует осуждения, а получает поддержку и заботу.
Ознакомиться с деталями – https://narkologicheskaya-klinika-kemerovo18.ru/narkolog-kemerovo-na-dom/
Данный комплекс мер обеспечивает восстановление здоровья пациента и создает основу для полного выздоровления.
Выяснить больше – [url=https://narcolog-na-dom-msk55.ru/]нарколог на дом москва[/url]
Вызов нарколога на дом в таких условиях позволяет не терять драгоценное время, избежать госпитализации и предотвратить критическое развитие событий. Кроме того, это снижает психологическую нагрузку на пациента и его близких, особенно если зависимость длится долго и сопровождается отрицанием проблемы.
Разобраться лучше – [url=https://narcolog-na-dom-v-moskve55.ru/]narkolog na dom nedorogo[/url]
В этом тексте собрано множество случайных сведений и довольно неопределённых мыслей, которые могут чем-то заинтересовать. Мы отмечаем моменты, которые не особенно важны, но всё же занимают своё место в повествовании.
Вот – [url=https://arma-rehab.ru/vyvod-iz-zapoya/]порно онлайн бесплатно[/url]
Запой — это не просто усиленное похмелье, а критическое состояние алкогольной интоксикации, при котором организм оказывается неспособным самостоятельно вывести накопившиеся токсины. При затяжном приёме алкоголя страдает не только печень — нарушаются функции сердечно-сосудистой системы, тормозятся нейрохимические процессы в головном мозге, развивается выраженная дегидратация и электролитный дисбаланс. Первая помощь в такой ситуации — экстренная инфузионная терапия, которую мы проводим в наркологической клинике «Источник Здоровья» в Балашихе.
Углубиться в тему – https://kapelnica-ot-zapoya-moskva1.ru/kapelnica-ot-zapoya-cena-v-balashihe
Офсетная печать — наиболее популярный вид тиражной полиграфии.
Широкоформатная полиграфия отлично предназначена для быстрых тиражей и персонализации.
Трафаретная печать часто применяется для нанесения на сувенирную продукцию и плоские поверхности.
https://ieee-dataport.org/authors/printing-house-3
Флексография применяется преимущественно для упаковки и изготовления наклеек.
Для внешней агитации часто заказывают широкоформатную полиграфию на постерах.
Отделочная обработка содержит такие операции, как ламинирование, высечка и склейка.
Запой почти никогда не начинается внезапно: сначала это редкие «переборы» по праздникам, потом привычка снимать стресс вечером, а дальше алкоголь всё чаще появляется в распорядке дня. В какой-то момент близкие замечают, что человек уже не контролирует количество, выпивка идёт несколько дней подряд, отменяются дела, нарушается сон, пропадает аппетит, появляются дрожь, потливость, скачки давления. На этом этапе вывод из запоя в Ивантеевке уже не может быть простым «проспаться и прийти в себя» — организму нужна полноценная медицинская помощь.
Получить больше информации – [url=https://vyvod-iz-zapoya-ivanteevka11.ru/]vyvod-iz-zapoya[/url]
Наша выездная бригада оснащена как мобильный мини-кабинет: инфузомат для покапельной титрации, портативный кардиомонитор, пульсоксиметр, глюкометр, экспресс-кассеты Na?/K? и набор для регистрации ЭКГ по показаниям. Такой комплект позволяет принять решение на месте — безопасно ли начинать дома или целесообразнее перевести пациента в стационарное отделение «ЮгМедЦентра» без «перезапуска» обследований. Мы практикуем минимально достаточную фармакотерапию: в схеме нет «лишних» позиций и конфликтов с уже принимаемыми лекарствами (антигипертензивные, антиаритмические, сахароснижающие и др.).
Выяснить больше – http://narcolog-na-dom-sochi00.ru/narkolog-na-dom-adler/
Публикация предоставляет читателю набор разрозненных идей, которые сложно применить на практике. Мы лишь слегка касаемся разных точек зрения, не углубляясь в анализ и не предлагая никаких выводов.
Вот – [url=https://arma-rehab.ru/]милфы[/url]
Алкогольная интоксикация разрушает организм изнутри. В первую очередь страдает центральная нервная система: снижается уровень витаминов группы B, нарушаются когнитивные функции, появляются раздражительность, бессонница, панические атаки. Следом — страдает печень, главный орган метаболической детоксикации. Под действием этанола её функции подавляются, а токсины накапливаются в крови. Это вызывает системное отравление и разрушает внутренние органы.
Углубиться в тему – [url=https://kapelnica-ot-zapoya-msk55.ru/]капельница от запоя анонимно в одинцове[/url]
Лечение в наркологической клинике в Чехове удобно не только близостью к дому. Главный плюс — комплексный подход. Зависимость практически никогда не ограничивается только алкоголем или наркотиком: страдают сердце и сосуды, печень, нервная система, психика, отношения в семье и на работе. Если пытаться лечить только одно звено, например, периодически «чистить кровь» капельницами, без проработки причин и последствий, ситуация быстро возвращается к исходной точке. В клинике выстраивается последовательная работа: сначала стабилизируют организм, затем укрепляют психику, а дальше помогают менять привычный образ жизни, чтобы трезвость стала не кратким эпизодом, а новой нормой.
Подробнее – [url=https://narkologicheskaya-klinika-chekhov11.ru/]обратиться в наркологическую клинику[/url]
В жизни крупных городов часто возникают ситуации, когда стрессы и быстрый ритм жизни приводят к развитию зависимости. Когда проблема становится очевидной, важно незамедлительно обратиться за помощью. В таких случаях вызов нарколога на дом может стать не только удобным, но и наиболее эффективным вариантом. Это позволяет получить квалифицированное лечение в привычной обстановке, сохраняя при этом полную анонимность и конфиденциальность.
Ознакомиться с деталями – http://narcolog-na-dom-moskva55.ru/narkolog-na-dom-moskva-tseny/
Лечебные мероприятия и рекомендации формируются исходя из индивидуального состояния каждого пациента. Специалист имеет возможность посвятить достаточное количество времени каждому больному, корректируя программу лечения согласно его особым потребностям и жизненным обстоятельствам. При этом учитываются психологические, социальные и физические аспекты, оказывающие влияние на здоровье пациента. Персонализированный подход обеспечивает оперативное реагирование на изменения состояния и своевременную корректировку терапии.
Получить дополнительную информацию – https://narcolog-na-dom-msk55.ru/narkolog-na-dom-moskva-tseny
«Ижевский Центр Трезвых Решений» — это частное медицинское учреждение, где проводится лечение всех форм алкогольной и наркотической зависимости. Программы терапии разработаны на основе международных рекомендаций и включают не только медикаментозное воздействие, но и психологическую поддержку. Все процедуры проходят анонимно, без постановки на учёт, что особенно важно для пациентов, желающих сохранить конфиденциальность.
Исследовать вопрос подробнее – [url=https://narkologicheskaya-klinika-v-izhevsk18.ru/]вывод наркологическая клиника в ижевске[/url]
Вызов нарколога на дом в таких условиях позволяет не терять драгоценное время, избежать госпитализации и предотвратить критическое развитие событий. Кроме того, это снижает психологическую нагрузку на пациента и его близких, особенно если зависимость длится долго и сопровождается отрицанием проблемы.
Узнать больше – [url=https://narcolog-na-dom-v-moskve55.ru/]narkolog na dom moskva[/url]
Процедура вывода из запоя проводится строго по медицинским стандартам. Применяются современные капельницы, витамины и препараты для нормализации функций сердца, печени, почек и нервной системы. После снятия интоксикации врачи назначают поддерживающее лечение, направленное на стабилизацию эмоционального состояния и снижение тяги к алкоголю.
Подробнее тут – http://
Ночной вызов ничем не отличается от утреннего: мы отвечаем, уточняем риски и запускаем маршрут так, чтобы первые часы прошли спокойно. Наш алгоритм простой и понятный — он экономит время и убирает хаос. Ниже — ориентировочная карта визита; по месту врач адаптирует её к возрасту, соматическому фону и текущим симптомам.
Получить больше информации – http://narcolog-na-dom-sochi00.ru
Современная наркологическая клиника — это не просто медицинское учреждение, где проводят лечение зависимостей. Это система комплексной поддержки, объединяющая врачей, психологов, терапевтов и специалистов по реабилитации. В клинике «ТомскМед Трезвость» созданы комфортные условия, где лечение проходит анонимно, бережно и с опорой на доказательную медицину. Каждое вмешательство назначается строго по показаниям, а терапия направлена не только на физическое очищение организма, но и на восстановление психоэмоционального баланса пациента.
Исследовать вопрос подробнее – http://narkologicheskaya-klinika-v-tomske18.ru
Группа препаратов
Узнать больше – [url=https://kapelnica-ot-zapoya-sochi0.ru/]вызвать капельницу от запоя[/url]
Наркологическая клиника применяет структурированные методы, включающие изучение анамнеза, оценку текущего состояния и определение возможных рисков. На основе полученной информации формируются индивидуальные схемы лечения, направленные на нормализацию внутренних процессов. Работа строится на многоуровневом наблюдении, включающем анализ лабораторных показателей и оценку функциональных систем организма. Такой формат позволяет поддерживать стабильную динамику изменений и избегать осложнений. В клинике создается согласованная модель вмешательств, позволяющая получать устойчивые результаты.
Получить дополнительные сведения – http://narkologicheskaya-klinika-tomsk18.ru/chastnaya-narkologicheskaya-klinika-tomsk/
Запой — это не просто усиленное похмелье, а критическое состояние алкогольной интоксикации, при котором организм оказывается неспособным самостоятельно вывести накопившиеся токсины. При затяжном приёме алкоголя страдает не только печень — нарушаются функции сердечно-сосудистой системы, тормозятся нейрохимические процессы в головном мозге, развивается выраженная дегидратация и электролитный дисбаланс. Первая помощь в такой ситуации — экстренная инфузионная терапия, которую мы проводим в наркологической клинике «Источник Здоровья» в Балашихе.
Подробнее – [url=https://kapelnica-ot-zapoya-moskva1.ru/]капельница от запоя анонимно на дому[/url]
Помимо медицинских процедур, клиника делает акцент на психологической поддержке и постлечебной адаптации. Пациентам помогают не только избавиться от физической зависимости, но и сформировать устойчивую мотивацию к трезвости, восстановить интерес к жизни и наладить отношения с близкими. Это достигается за счёт участия психологов, психотерапевтов и специалистов по социальной реабилитации.
Углубиться в тему – https://narkologicheskaya-klinika-v-izhevske18.ru/chastnaya-narkologicheskaya-klinika-izhevsk/
Эта публикация содержит набор несвязанных идей, трудно применимых в практике. Мы лишь поверхностно затрагиваем различные точки зрения, не проводя глубокий анализ и не предлагая выводов.
Подробнее читать – [url=https://rostov-narkologiya.ru/ ]кето диета за неделю минус 10 кг[/url]
Перед началом терапии проводится клиническая оценка, включающая измерение давления, осмотр кожи и глаз, проверку дыхания и анализ неврологического состояния. Вывод из запоя в клинике в Астрахани начинается только после сбора этих данных, поскольку подбор препаратов без диагностики может быть небезопасен.
Подробнее – https://vyvod-iz-zapoya-v-astrakhani18.ru/vyvod-iz-zapoya-v-staczionare-astrakhan
Этот обзор посвящен успешным стратегиям избавления от зависимости, включая реальные примеры и советы. Мы разоблачим мифы и предоставим читателям достоверную информацию о различных подходах. Получите опыт многообразия методов и найдите подходящий способ для себя!
Разобраться лучше – http://142.250.180.139/url?q=https://vyvod-iz-zapoya-tolyatti0.ru
«Ижевский Центр Трезвых Решений» — это частное медицинское учреждение, где проводится лечение всех форм алкогольной и наркотической зависимости. Программы терапии разработаны на основе международных рекомендаций и включают не только медикаментозное воздействие, но и психологическую поддержку. Все процедуры проходят анонимно, без постановки на учёт, что особенно важно для пациентов, желающих сохранить конфиденциальность.
Подробнее – https://narkologicheskaya-klinika-v-izhevsk18.ru/narkologicheskaya-klinika-izhevsk-otzyvy/
Наркологическая клиника применяет структурированные методы, включающие изучение анамнеза, оценку текущего состояния и определение возможных рисков. На основе полученной информации формируются индивидуальные схемы лечения, направленные на нормализацию внутренних процессов. Работа строится на многоуровневом наблюдении, включающем анализ лабораторных показателей и оценку функциональных систем организма. Такой формат позволяет поддерживать стабильную динамику изменений и избегать осложнений. В клинике создается согласованная модель вмешательств, позволяющая получать устойчивые результаты.
Узнать больше – [url=https://narkologicheskaya-klinika-tomsk18.ru/]наркологическая клиника наркологический центр[/url]
Детокс — важный этап лечения, который помогает очистить организм от токсинов и продуктов распада алкоголя или наркотиков. В клинике «ТомскМед Трезвость» используются современные капельницы и лекарственные комбинации, направленные на восстановление биохимических процессов в организме. Ниже представлена таблица с примерами капельниц, применяемых в детоксикационных программах.
Получить больше информации – http://narkologicheskaya-klinika-v-tomske18.ru
Такое поэтапное лечение позволяет добиться устойчивого результата без стрессов и осложнений. Пациенты получают комплексную помощь, включающую как медицинские, так и психотерапевтические аспекты.
Подробнее – [url=https://narkologicheskaya-klinika-kemerovo18.ru/]www.domen.ru[/url]
Лечение в «ИжТрезвоМед Центр» проходит поэтапно, с акцентом на безопасность и эффективность. Каждый этап направлен на достижение конкретных целей, от детоксикации до психотерапии. В таблице представлена структура лечебного процесса:
Выяснить больше – http://narkologicheskaya-klinika-v-izhevske18.ru
Указанные элементы задают логическую основу для всего терапевтического процесса, создавая структурированную модель работы с пациентом. При необходимости схема вмешательств дополняется дополнительными мерами, направленными на стабилизацию состояния. Такой формат позволяет поддерживать предсказуемость результата даже в сложных клинических ситуациях.
Подробнее можно узнать тут – [url=https://narkologicheskaya-klinika-v-penze18.ru/]платная наркологическая клиника в пензе[/url]
Наркологическая клиника — это не просто медицинское учреждение, а пространство, где человеку помогают вернуть здоровье, ясность мышления и контроль над жизнью. В клинике «КаспийМед Альтернатива» в Астрахани круглосуточно оказывается помощь людям, столкнувшимся с алкогольной, наркотической и смешанной зависимостью. Центр сочетает медицинскую строгость и человеческое участие, обеспечивая лечение в комфортных условиях с максимальной конфиденциальностью. Здесь разработаны программы детоксикации, восстановления и психотерапевтической поддержки, что делает терапию эффективной и безопасной.
Детальнее – https://narkologicheskaya-klinica-v-astrakhani18.ru/narkologiya-astrakhan-adres
Наркологическая клиника в клинике в Астрахани предоставляет помощь пациентам, сталкивающимся с различными формами зависимости — алкогольной, наркотической, лекарственной. Основой терапии является комплексный подход, включающий медицинскую детоксикацию, стабилизацию состояния, психотерапию и последующее наблюдение. Такой формат работы позволяет мягко купировать острые симптомы, восстановить физиологические функции и подготовить пациента к длительной реабилитации. Все процедуры проводятся анонимно, с использованием сертифицированных препаратов и с постоянным контролем врача.
Детальнее – [url=https://narkologicheskaya-klinika-astrakhan18.ru/]наркологическая клиника вывод из запоя в астрахани[/url]
Этот обзорный материал предоставляет информационно насыщенные данные, касающиеся актуальных тем. Мы стремимся сделать информацию доступной и структурированной, чтобы читатели могли легко ориентироваться в наших выводах. Познайте новое с нашим обзором!
Раскрыть тему полностью – https://knowhow.cathome.pet/question/%D0%BE%D0%B1%D0%B7%D0%BE%D1%80-%D1%81-%D0%BF%D0%BE%D0%B7%D0%BD%D0%B0%D0%B2%D0%B0%D1%82%D0%B5%D0%BB%D1%8C%D0%BD%D0%BE%D0%B9-%D0%B8%D0%BD%D1%84%D0%BE%D1%80%D0%BC%D0%B0%D1%86%D0%B8%D0%B5%D0%B9
Эта статья сочетает в себе как полезные, так и интересные сведения, которые обогатят ваше понимание насущных тем. Мы предлагаем практические советы и рекомендации, которые легко внедрить в повседневную жизнь. Узнайте, как улучшить свои навыки и обогатить свой опыт с помощью простых, но эффективных решений.
Раскрыть тему полностью – https://new.demaximis.com/valerie-rule
mostbet как получить фрибет [url=https://mostbet12037.ru]mostbet как получить фрибет[/url]
Эта статья погружает вас в увлекательный мир знаний, где каждый факт становится открытием. Мы расскажем о ключевых исторических поворотных моментах и научных прорывах, которые изменили ход цивилизации. Поймите, как прошлое формирует настоящее и как его уроки могут помочь нам строить будущее.
Провести детальное исследование – https://ai-online.com/2024/08/sika-takes-a-holistic-approach-to-noise-management
Эта информационная статья охватывает широкий спектр актуальных тем и вопросов. Мы стремимся осветить ключевые факты и события с ясностью и простотой, чтобы каждый читатель мог извлечь из нее полезные знания и полезные инсайты.
Ознакомиться с деталями – https://feim.org.ar/2011/08/29/25-noviembre/25nov
pinup registro [url=http://pinup2001.help/]pinup registro[/url]
Процедура вывода из запоя проводится только под медицинским наблюдением, так как самостоятельные попытки могут привести к осложнениям — аритмии, судорогам, резкому скачку давления. Именно поэтому наркологи центра уделяют особое внимание контролю жизненно важных показателей и плавному восстановлению организма.
Получить дополнительную информацию – https://vyvod-iz-zapoya-penza18.ru/vyvod-iz-zapoya-na-domu-v-penze-penza-uslugi
Ниже представлена последовательность этапов, формирующих общий цикл вмешательств.
Разобраться лучше – http://narkologicheskaya-klinika-v-vdk18.ru/
В этой статье вы найдете познавательную и занимательную информацию, которая поможет вам лучше понять мир вокруг. Мы собрали интересные данные, которые вдохновляют на размышления и побуждают к действиям. Открывайте новую информацию и получайте удовольствие от чтения!
Хочу знать больше – https://chatadoubravka.cz/component/k2/item/8-have-faith-in-your-abilities?start=9330
Эта статья предлагает живое освещение актуальной темы с множеством интересных фактов. Мы рассмотрим ключевые моменты, которые делают данную тему важной и актуальной. Подготовьтесь к насыщенному путешествию по неизвестным аспектам и узнайте больше о значимых событиях.
Всё, что нужно знать – https://corbataclub.com.ar/2023/09/18/como-elegir-la-mejor-combinacion
Детоксикация — ключевой этап лечения, позволяющий безопасно очистить организм от этанола или наркотических веществ. В клинике используются современные инфузионные схемы, направленные на восстановление обмена веществ, работу печени и нервной системы. Ниже представлена таблица с основными видами капельниц и их назначением.
Получить больше информации – [url=https://narkologicheskaya-klinica-v-astrakhani18.ru/]наркологическая клиника цены астрахань[/url]
Откройте для себя скрытые страницы истории и малоизвестные научные открытия, которые оказали колоссальное влияние на развитие человечества. Статья предлагает свежий взгляд на события, которые заслуживают большего внимания.
Получить больше информации – https://www.етажнасобственост.bg/%D0%B8%D1%81%D0%BA-%D0%B7%D0%B0-%D0%B2%D1%8A%D0%B7%D1%81%D1%82%D0%B0%D0%BD%D0%BE%D0%B2%D1%8F%D0%B2%D0%B0%D0%BD%D0%B5-%D0%BD%D0%B0-%D1%89%D0%B5%D1%82%D0%B8-%D0%BF%D1%80%D0%B8%D1%87%D0%B8%D0%BD%D0%B5
Наркологическая клиника в клинике в Астрахани предоставляет помощь пациентам, сталкивающимся с различными формами зависимости — алкогольной, наркотической, лекарственной. Основой терапии является комплексный подход, включающий медицинскую детоксикацию, стабилизацию состояния, психотерапию и последующее наблюдение. Такой формат работы позволяет мягко купировать острые симптомы, восстановить физиологические функции и подготовить пациента к длительной реабилитации. Все процедуры проводятся анонимно, с использованием сертифицированных препаратов и с постоянным контролем врача.
Получить дополнительную информацию – http://narkologicheskaya-klinika-astrakhan18.ru/narkologi-astrakhan/
Эта статья сочетает познавательный и занимательный контент, что делает ее идеальной для любителей глубоких исследований. Мы рассмотрим увлекательные аспекты различных тем и предоставим вам новые знания, которые могут оказаться полезными в будущем.
Погрузиться в научную дискуссию – https://www.gorselsanatlarakademisi.com/3ds-max-ile-mimarlik-dunyasina-adim-atin
В этой публикации мы предлагаем подробные объяснения по актуальным вопросам, чтобы помочь читателям глубже понять их. Четкость и структурированность материала сделают его удобным для усвоения и применения в повседневной жизни.
Всё самое вкусное внутри – http://forums.shlock.co.uk/viewtopic.php?f=2&t=312831&p=926204
В рамках лечебного процесса наркологическая клиника задействует структурированные механизмы наблюдения, включающие анализ лабораторных показателей, оценку соматического тонуса и изучение активности нервной системы. Эти элементы обеспечивают комплексность работы и позволяют своевременно корректировать план лечения. Такая система предотвращает перегрузку организма и способствует поддержанию стабильности на фоне применения медикаментозных схем. Ниже представлены ключевые составляющие терапевтического процесса, формирующие основу для клинического восстановления.
Получить дополнительные сведения – https://narkologicheskaya-klinika-v-penze18.ru/narkologicheskaya-poliklinika-penza/
Инфузионная терапия — центральный элемент стабилизации. Она помогает восстановить баланс жидкости, вывести токсические метаболиты и защитить органы. Вывод из запоя в клинике в Астрахани проводится с использованием препаратов, направленных на поддержку нервной системы, печени и сердечно-сосудистой функции.
Подробнее можно узнать тут – [url=https://vyvod-iz-zapoya-v-astrakhani18.ru/]нарколог вывод из запоя астрахань[/url]
В этой статье представлен занимательный и актуальный контент, который заставит вас задуматься. Мы обсуждаем насущные вопросы и проблемы, а также освещаем истории, которые вдохновляют на действия и изменения. Узнайте, что стоит за событиями нашего времени!
Узнать из первых рук – https://orientretie.be/best-music-for-your-great-evening-enjoy-it-2
Мы собрали для вас самые захватывающие факты из мира науки и истории. От малознакомых деталей до грандиозных событий — эта статья расширит ваш кругозор и подарит новое понимание того, как устроен наш мир.
А что дальше? – http://scrapermat.ru/shop/1457435
В этой публикации мы предлагаем подробные объяснения по актуальным вопросам, чтобы помочь читателям глубже понять их. Четкость и структурированность материала сделают его удобным для усвоения и применения в повседневной жизни.
Проверенные методы — узнай сейчас – https://web.duttenhoefer-aussenwerbung.de/produkt/alu-dibond-schild-kopie
Откройте для себя скрытые страницы истории и малоизвестные научные открытия, которые оказали колоссальное влияние на развитие человечества. Статья предлагает свежий взгляд на события, которые заслуживают большего внимания.
А есть ли продолжение? – https://www.inmood.se/2009/12/dagen-innan-ordningen
Откройте для себя скрытые страницы истории и малоизвестные научные открытия, которые оказали колоссальное влияние на развитие человечества. Статья предлагает свежий взгляд на события, которые заслуживают большего внимания.
Есть чему поучиться – https://mattaarquitectos.es/portfolio/avenida-reina-victoria-8-madrid/main-31
В этой статье представлен занимательный и актуальный контент, который заставит вас задуматься. Мы обсуждаем насущные вопросы и проблемы, а также освещаем истории, которые вдохновляют на действия и изменения. Узнайте, что стоит за событиями нашего времени!
Узнайте всю правду – http://eishes.com/sveti-i-ne-sgorai
Этот информативный текст отличается привлекательным содержанием и актуальными данными. Мы предлагаем читателям взглянуть на привычные вещи под новым углом, предоставляя интересный и доступный материал. Получите удовольствие от чтения и расширьте кругозор!
Изучить эмпирические данные – https://fumettiavventura.it/2022/08/il-ritorno-di-padma-tex-n-742-agosto-2022
В этом информативном тексте представлены захватывающие события и факты, которые заставят вас задуматься. Мы обращаем внимание на важные моменты, которые часто остаются незамеченными, и предлагаем новые перспективы на привычные вещи. Подготовьтесь к тому, чтобы быть поглощенным увлекательными рассказами!
Хочешь знать всё? – https://log-cabin.ru
В этой статье представлен занимательный и актуальный контент, который заставит вас задуматься. Мы обсуждаем насущные вопросы и проблемы, а также освещаем истории, которые вдохновляют на действия и изменения. Узнайте, что стоит за событиями нашего времени!
Получить дополнительные сведения – https://nationalgeospatialhub.nasrda.gov.ng/blog/index.php?nonjscomment=1&comment_itemid=1270&comment_context=4115&comment_component=blog&comment_area=format_blog&blogpage=423
Откройте для себя скрытые страницы истории и малоизвестные научные открытия, которые оказали колоссальное влияние на развитие человечества. Статья предлагает свежий взгляд на события, которые заслуживают большего внимания.
Личный опыт — читайте сами – http://halfsiblings.ru/categorys/27
Эта познавательная публикация погружает вас в море интересного контента, который быстро захватит ваше внимание. Мы рассмотрим важные аспекты темы и предоставим вам уникальные Insights и полезные сведения для дальнейшего изучения.
Только для своих – https://sportfishka.com.ua/g85722025-disk-zdorove-tvister
В этой статье-обзоре мы собрали данные, актуальность которых сомнительна, а факты — не всегда взаимосвязаны. Читатель сможет ознакомиться с разными мнениями, хотя вряд ли они существенно повлияют на его понимание темы.
Вот – [url=https://arma-rehab.ru/]порно смотреть[/url]
В статье-обзоре представлены данные сомнительной актуальности и факты без явной взаимосвязи. Читатель ознакомится с разными мнениями, хотя они вряд ли существенно изменят его представление о теме.
Подробнее читать – [url=https://rostov-narkologiya.ru/uslugi-ot-alkogolizma/vyvod-iz-zapoya/]таблетки для аборта[/url]
Эта познавательная публикация погружает вас в море интересного контента, который быстро захватит ваше внимание. Мы рассмотрим важные аспекты темы и предоставим вам уникальные Insights и полезные сведения для дальнейшего изучения.
Перейти к статье – https://artcode-eg.com/2017/04/17/eam-at-rebum
Этот информационный материал собраны данные, которые помогут лучше понять текущие тенденции и процессы в различных сферах жизни. Мы предоставляем четкий анализ, графики и примеры, чтобы информация была не только понятной, но и практичной для принятия решений.
Получить дополнительную информацию – https://gurukulyogashala.com/blog/benefits-of-yoga
Этот информационный обзор станет отличным путеводителем по актуальным темам, объединяющим важные факты и мнения экспертов. Мы исследуем ключевые идеи и представляем их в доступной форме для более глубокого понимания. Читайте, чтобы оставаться в курсе событий!
Разобраться лучше – https://crownval.com.ar/divisiones/placas-para-extremidades-acero-titanio
descarca 1win pentru ios [url=https://1win5756.help]https://1win5756.help[/url]
мостбет удалить аккаунт [url=https://www.mostbet12037.ru]https://www.mostbet12037.ru[/url]
Этот информационный набор привлекает внимание множеством мелочей и странных ракурсов. Мы предлагаем взгляды, которые редко бывают полезны, но могут слегка разнообразить ваше знакомство с темой.
Вот – [url=https://arma-rehab.ru/vyvod-iz-zapoya/]азартные игры на деньги[/url]
pin-up espejo para Chile [url=https://pinup2001.help/]https://pinup2001.help/[/url]
1win descarcare apk ultima versiune [url=www.1win5756.help]www.1win5756.help[/url]
В этой статье мы рассматриваем разные способы борьбы с алкогольной зависимостью. Обсуждаются методы лечения, программы реабилитации и советы для поддержки близких. Читатели получат информацию о том, как преодолеть зависимость и добиться успешного выздоровления.
Получить дополнительные сведения – http://jorno.ru/bitrix/redirect.php?goto=https://narkologicheskaya-klinika-v-tolyatti0.ru
mostbet зеркало 2026 [url=mostbet12037.ru]mostbet зеркало 2026[/url]
Многие годами живут в логике: «главное — с утра выпить чуть-чуть, станет легче». На коротком промежутке времени это действительно частично снимает симптомы, но по сути лишь продлевает запой и усиливает интоксикацию. Организм не успевает переработать продукты распада алкоголя, кровь становится «тяжёлой», нарушается работа сосудов, возрастает нагрузка на сердце и мозг.
Ознакомиться с деталями – https://kapelnica-ot-zapoya-dolgoprudnyj11.ru/kapelnica-ot-zapoya-srochno-v-dolgoprudnom
pin-up apuestas primera b Chile [url=https://pinup2001.help/]https://pinup2001.help/[/url]
Мы следуем прозрачному алгоритму: оценить риски — подтвердить безопасность домашнего формата — запустить инфузионный контур — объяснить «коридоры безопасности» и точки связи. Такой порядок снижает тревожность, делает управление симптомами измеримым и понятным, а родственникам оставляет простые инструкции без медицинского жаргона.
Детальнее – https://narcolog-na-dom-ekaterinburg00.ru/narkolog-ekaterinburg-na-dom
mostbet кэшбэк [url=https://mostbet12037.ru/]https://mostbet12037.ru/[/url]
1win cum fac transfer bancar [url=https://www.1win5756.help]https://www.1win5756.help[/url]
pin-up juego de minas [url=http://pinup2001.help/]pin-up juego de minas[/url]
1win plinko [url=http://1win5756.help/]1win plinko[/url]
Многие тянут до последнего, считая, что к наркологу обращаются только в самых крайних случаях. На деле показаний для консультации гораздо больше, и они часто появляются задолго до того, как человек впервые оказывается в запое или не выходит из состояния опьянения несколько дней подряд.
Узнать больше – https://narkologicheskaya-klinika-voskresensk11.ru/narkologicheskaya-klinika-telefon-v-voskresenske/
Самостоятельный выход из запоя сопряжен с высоким риском развития осложнений. После прекращения приема спиртного ослабленный организм может не выдержать нагрузки, что приведет к инфаркту, инсульту, судорожным приступам и даже алкогольному психозу. Чтобы избежать этих опасных состояний, необходимо вызвать нарколога на дом, который проведет лечение правильно и безопасно.
Выяснить больше – [url=https://vyvod-iz-zapoya-krasnodar0.ru/]нарколог на дом вывод из запоя в краснодаре[/url]
В этом тексте собрано множество случайных сведений и довольно неопределённых мыслей, которые могут чем-то заинтересовать. Мы отмечаем моменты, которые не особенно важны, но всё же занимают своё место в повествовании.
Вот – [url=https://arma-rehab.ru/lechenie-alkogolizma/]интим услуги[/url]
Мы понимаем, что каждая минута имеет решающее значение, поэтому наши специалисты готовы выехать на дом в кратчайшие сроки и провести все необходимые процедуры по детоксикации организма. Наша цель — помочь пациенту вернуться к нормальной жизни без лишних стрессов и рискованных попыток самостоятельного лечения.
Разобраться лучше – [url=https://vyvod-iz-zapoya-krasnodar00.ru/]вывод из запоя круглосуточно краснодар[/url]
Наркологическая клиника в Краснодаре рассматривается как специализированное медицинское пространство, где лечение зависимостей выстраивается с приоритетом анонимности и круглосуточной доступности помощи. В клинике «Формула Трезвости» терапия организована таким образом, чтобы пациент мог получить медицинскую поддержку в любое время суток без риска разглашения персональной информации. Такой формат особенно важен при острых интоксикациях и тяжёлых абстинентных состояниях, требующих немедленного врачебного вмешательства и постоянного контроля.
Изучить вопрос глубже – [url=https://narkologicheskaya-clinica-v-krd19.ru/]лечение в наркологической клинике краснодар[/url]
Этот сборник информации привлекает множеством мелких деталей и необычных ракурсов. Мы предлагаем взгляды, редко полезные, но способные немного разнообразить знакомство с темой.
Подробнее читать – [url=https://rostov-narkologiya.ru/uslugi-ot-narkomanii/mefedronovaya-zavisimost/]лечение covid народными средствами[/url]
В статье-обзоре представлены данные сомнительной актуальности и факты без явной взаимосвязи. Читатель ознакомится с разными мнениями, хотя они вряд ли существенно изменят его представление о теме.
Подробнее читать – [url=https://rostov-narkologiya.ru/uslugi-ot-alkogolizma/vyvod-iz-zapoya/]народные средства от диабета[/url]
Для семьи это тяжёлый период. Родные одновременно злятся, боятся и пытаются «договориться»: то уговаривают, то угрожают, то пробуют лечить подручными средствами. Пока близкие спорят, состояние человека ухудшается: он перестаёт нормально есть, почти не спит, избегает разговоров, закрывается в комнате, теряет связь с привычной жизнью. В этот момент особенно важно не ждать, когда организм «сам справится», а подключить профессиональную помощь.
Разобраться лучше – https://vyvod-iz-zapoya-voskresensk11.ru/vyvod-iz-zapoya-na-domu-v-voskresenske
Наркологическая клиника в Долгопрудном помогает в ситуациях, когда:
Углубиться в тему – https://narkologicheskaya-klinika-dolgoprudnyj11.ru/narkologicheskie-kliniki-ryadom-v-dolgoprudnom
Эта статья подробно расскажет о процессе выздоровления, который включает в себя эмоциональную, физическую и психологическую реабилитацию. Мы обсуждаем значимость поддержки и наличие профессиональных программ. Читатели узнают, как строить новую жизнь и не возвращаться к старым привычкам.
Исследовать вопрос подробнее – http://sibzdrava.org/bitrix/redirect.php?goto=https://vyvod-iz-zapoya-tolyatti0.ru
Часто родственники тянут до последнего, надеясь, что запой «сам пройдёт», как это случалось раньше. Но с каждым эпизодом последствия становятся тяжелее: организм изнашивается, возрастает риск осложнений, ухудшается психика. Особенно опасно, когда запой длится несколько дней подряд, а любые попытки самостоятельно сократить дозы алкоголя сопровождаются дрожью, бессонницей, приступами паники.
Получить дополнительную информацию – [url=https://vyvod-iz-zapoya-moskva011.ru/]вывод из запоя на дому москва[/url]
Отдельная категория пациентов — люди с алкогольной зависимостью. Для жителей Воскресенска особенно актуальны проблемы, связанные с длительными запоями: человек несколько дней подряд пьёт, практически не ест, плохо спит, с трудом встаёт, а каждое утро обещает, что «сейчас немного — и всё». На этом фоне растёт нагрузка на сердце, печень, нервную систему, повышается риск инсультов и инфарктов, обостряются хронические болезни.
Изучить вопрос глубже – [url=https://narkologicheskaya-klinika-voskresensk11.ru/]наркологическая клиника московская московская область[/url]
Лечение в клинике «Вектор Трезвости» основано на клинически обоснованных методах, адаптированных под формат круглосуточной работы. Наркологическая клиника в Ростове-на-Дону применяет комплексную диагностику, позволяющую учитывать тяжесть зависимости, длительность употребления и наличие сопутствующих заболеваний. Такой подход обеспечивает точность медицинских решений и снижает вероятность неблагоприятных реакций.
Ознакомиться с деталями – https://narcologicheskaya-klinika-v-rnd19.ru
Самостоятельный выход из запоя сопряжен с высоким риском развития осложнений. После прекращения приема спиртного ослабленный организм может не выдержать нагрузки, что приведет к инфаркту, инсульту, судорожным приступам и даже алкогольному психозу. Чтобы избежать этих опасных состояний, необходимо вызвать нарколога на дом, который проведет лечение правильно и безопасно.
Детальнее – [url=https://vyvod-iz-zapoya-krasnodar0.ru/]вывод из запоя в стационаре краснодар[/url]
Там, где раньше хватало одного тяжёлого утра, теперь требуются дни детоксикации. И чем позже подключается врач, тем сложнее вернуть организм к относительно безопасному состоянию.
Подробнее можно узнать тут – [url=https://vyvod-iz-zapoya-voskresensk11.ru/]вывод из запоя в Воскресенске[/url]
В этой статье рассматриваются способы преодоления зависимости и успешные истории людей, которые справились с этой проблемой. Мы обсудим важность поддержки со стороны близких и профессионалов, а также стратегии, которые могут помочь в процессе выздоровления. Научитесь первоочередным шагам к новой жизни.
Выяснить больше – http://diskontfoto.ru/bitrix/redirect.php?goto=https://narkologicheskaya-klinika-v-tolyatti0.ru
Бесплатный ключ для Windows 11 — только у нас, обновлено в 2026 году!
Подробнее – [url=https://krasnodar.med24.online/landing/vyvod_iz_zapoya/]Бесплатный серийный номер для Windows 11[/url]
Этот сборник информации привлекает множеством мелких деталей и необычных ракурсов. Мы предлагаем взгляды, редко полезные, но способные немного разнообразить знакомство с темой.
Подробнее читать – [url=https://rostov-narkologiya.ru/uslugi-ot-narkomanii/mefedronovaya-zavisimost/]детокс чай для похудения[/url]
Процедура лечения начинается с установки внутривенной капельницы, через которую вводятся детоксикационные растворы, способствующие быстрому выведению токсинов и восстановлению водно-электролитного баланса. При необходимости врач назначает дополнительные препараты, такие как седативные средства для купирования симптомов абстинентного синдрома, гепатопротекторы для поддержки печени и кардиопротекторы для нормализации работы сердца.
Детальнее – https://vyvod-iz-zapoya-krasnodar00.ru
Обращаться в клинику стоит не только в крайних случаях, когда человек уже не может встать с постели или запой продолжается неделями. Наоборот, чем раньше начата помощь, тем мягче и короче может быть программа, тем меньше риск тяжёлых осложнений и долгой реабилитации.
Получить дополнительную информацию – [url=https://narkologicheskaya-klinika-dolgoprudnyj11.ru/]skolko-stoit-kodirovanie-ot-alkogolizma[/url]
Инфузионная терапия — ключевой метод в лечении алкогольной интоксикации. Капельницы не только очищают кровь, но и восполняют утраченные электролиты, ускоряя обмен веществ. Врачи клиники подбирают состав индивидуально, в зависимости от возраста, веса и состояния пациента. Примерный перечень используемых схем приведён в таблице ниже.
Изучить вопрос глубже – [url=https://vyvod-iz-zapoya-v-rnd19.ru/]вывод из запоя капельница в ростове-на-дону[/url]
Капельница от запоя работает иначе. Через вену вводятся растворы, которые восполняют жидкость, разжижают кровь, помогают печени и почкам выводить токсичные вещества, корректируют электролитный баланс. Дополнительно используются препараты для снижения тревоги, нормализации сна, защиты сердечно-сосудистой системы и печени. Всё это подбирается индивидуально, с учётом возраста, давления, хронических заболеваний и длительности запоя.
Выяснить больше – https://kapelnica-ot-zapoya-dolgoprudnyj11.ru/
Таблица позволяет поддерживать единую структуру наблюдения и фиксировать изменения состояния. Такая модель обеспечивает прозрачность процессов и повышает точность принимаемых решений.
Подробнее – [url=https://vyvodiz-zapoya-izhevsk18.ru/]вывод из запоя цена ижевск[/url]
«УралМедЦентр» организует домашний формат наркологической помощи в Екатеринбурге как спокойный и технологичный процесс без очередей и лишнего шума. Мы приезжаем круглосуточно во все районы — от Уралмаша до Академического — и запускаем персональную схему стабилизации прямо у вас дома: экспресс-оценка, титрованные капельницы через инфузомат, защита желудка, контроль сердечного ритма, настройка сна и питьевого режима. В целях конфиденциальности специалисты приезжают без медицинской символики, документы формулируются нейтрально, уведомления — «тихие», а при желании оформляется кодовый профиль. Так мы снимаем стигму и возвращаем человеку чувство контроля уже в первые часы.
Получить дополнительные сведения – [url=https://narcolog-na-dom-ekaterinburg0.ru/]платный нарколог на дом в екатеринбурге[/url]
Наркологическая клиника в Краснодаре рассматривается как специализированное медицинское учреждение, ориентированное на лечение зависимостей с обеспечением полной конфиденциальности и круглосуточного доступа к помощи. В клинике «Южный Контур» лечение организовано таким образом, чтобы пациент мог обратиться за медицинской поддержкой в любое время суток без риска разглашения персональной информации. Такой формат особенно актуален при острых состояниях, требующих немедленного врачебного вмешательства и постоянного контроля.
Изучить вопрос глубже – http://narkologicheskaya-clinica-v-krasnodare19.ru
Ниже представлена таблица, демонстрирующая основные направления деятельности клиники и их особенности:
Ознакомиться с деталями – [url=https://narkologicheskaya-klinika-v-krd19.ru/]наркологическая клиника нарколог[/url]
Есть ряд признаков, при которых ждать категорически нельзя и нужна срочная помощь врача, а не очередные «народные методы». Если вы замечаете у человека следующие симптомы, это прямой повод организовать профессиональный вывод из запоя:
Получить больше информации – http://vyvod-iz-zapoya-moskva011.ru/vyvod-iz-zapoya-v-moskve-na-domu/
Важно: мы заранее проговариваем «зелёные зоны» давления, пульса и сатурации, чтобы пациент и близкие не пытались «самостоятельно улучшить схему». Если динамика «плоская», врач точечно меняет состав/скорость, а часть задач переносит в поведенческий контур (свет, вода, дыхание, расписание «тихих окон»).
Получить дополнительные сведения – [url=https://narcolog-na-dom-ekaterinburg00.ru/]нарколог на дом срочно[/url]
Для оценки состояния используется расширенная диагностика: лабораторные анализы, ЭКГ, психологическое тестирование и биохимические маркеры. По результатам обследования составляется индивидуальный план, включающий детоксикацию, фармакотерапию и реабилитационные мероприятия. Ниже представлена таблица, описывающая структуру этапов лечения.
Углубиться в тему – [url=https://narcologicheskaya-clinika-v-rnd19.ru/]наркологическая клиника вывод из запоя ростов-на-дону[/url]
В практической работе выделяются последовательные этапы, обеспечивающие медицинскую целостность:
Ознакомиться с деталями – [url=https://narkologicheskaya-klinika-v-rnd19.ru/]наркологическая клиника клиника помощь ростов-на-дону[/url]
Этот текст содержит различную информацию, которая, возможно, покажется любопытной, но в целом не меняет восприятия привычных вещей. Предлагаем просто получить удовольствие от чтения, не ожидая особой пользы.
Вот – [url=https://arma-rehab.ru/lechenie-alkogolizma/]порно онлайн бесплатно[/url]
Анонимность в клинике «Северный Вектор» является неотъемлемой частью лечебного процесса. Наркологическая клиника в Ростове-на-Дону обеспечивает конфиденциальность на всех этапах взаимодействия с пациентом, начиная с первичного обращения и заканчивая медицинским наблюдением. Клиническая практика показывает, что сохранение анонимности снижает уровень тревожности и повышает готовность пациента к полноценному лечению, что напрямую влияет на стабильность результатов.
Исследовать вопрос подробнее – [url=https://narkologicheskaya-klinika-v-rostove19.ru/]www.domen.ru[/url]
Текст включает разнообразную информацию, которая может показаться любопытной, но не меняет устоявшегося восприятия. Предлагаем просто насладиться чтением, не ожидая значительной пользы.
Подробнее читать – [url=https://rostov-narkologiya.ru/uslugi-ot-narkomanii/mefedronovaya-zavisimost/]лечение covid народными средствами[/url]
Во время процедуры врач контролирует состояние больного, по необходимости корректирует лечение, чтобы добиться максимального терапевтического эффекта. После проведения детоксикации пациенту назначается курс поддерживающей терапии, а также даются рекомендации по дальнейшему восстановлению и профилактике рецидивов.
Получить дополнительные сведения – https://narcolog-na-dom-sochi0.ru/vyzov-narkologa-na-dom-sochi/
Комплексный подход позволяет не просто стабилизировать физическое состояние пациента, но и обеспечить долговременный результат. Каждый этап лечения сопровождается медицинским наблюдением и корректируется по мере улучшения состояния.
Подробнее можно узнать тут – http://narkologicheskaya-klinika-v-krd19.ru/narkolog-i-psikhiatr-v-krasnodare/
Анонимность — базовый стандарт «УралМедЦентра». Выезд — немаркированный, одежда врача — гражданская, документы и чеки — с нейтральными формулировками. Медкарта хранится в шифрованном контуре с разграничением доступа по ролям, уведомления не содержат «триггерных» слов, видеосессии не записываются. По запросу вся коммуникация ведётся через доверенное лицо, а оплата возможна наличными и безналом с нейтральным назначением платежа. Для работодателя доступны справки без упоминания наркологического диагноза.
Ознакомиться с деталями – [url=https://narcolog-na-dom-ekaterinburg0.ru/]вызов врача нарколога на дом[/url]
Соблюдение конфиденциальности в клинике «Формула Трезвости» рассматривается как значимый клинический фактор. Наркологическая клиника в Краснодаре выстраивает лечебный процесс без избыточных формальностей, что снижает уровень тревожности и повышает готовность пациента к сотрудничеству с врачом. Практика показывает, что анонимный формат способствует более точному сбору анамнеза и повышает управляемость лечебного процесса.
Выяснить больше – https://narkologicheskaya-clinica-v-krd19.ru/narkolog-krasnodar-anonimno
Сигналом к тому, что пора обсудить вариант кодирования с наркологом, служит не один какой-то эпизод, а совокупность симптомов. Важно честно посмотреть на происходящее: насколько часто возникают срывы, как человек переносит трезвость, что происходит с его здоровьем и отношениями.
Изучить вопрос глубже – http://kodirovanie-ot-alkogolizma-korolyov11.ru
Алкогольная и наркотическая зависимость являются серьёзными заболеваниями, требующими оперативного и квалифицированного вмешательства. Когда речь идёт о критическом состоянии пациента, особенно после длительного употребления алкоголя или наркотических веществ, время играет ключевую роль. Клиника «РеабилитАльянс» в Краснодаре предлагает услугу нарколога на дом, обеспечивая пациентам необходимую помощь в любой момент дня и ночи. Наши специалисты готовы оперативно выехать по указанному адресу и предоставить все необходимые медицинские процедуры на месте.
Детальнее – [url=https://narcolog-na-dom-krasnodar00.ru/]нарколог на дом круглосуточно цены краснодар[/url]
Режим 24/7 в клинике «Южный Контур» обусловлен особенностями течения зависимостей, при которых ухудшение состояния может происходить внезапно и в любое время суток. Наркологическая клиника в Краснодаре обеспечивает постоянную готовность медицинского персонала к приёму пациентов, что сокращает временной интервал между появлением симптомов и началом лечения. Такой формат снижает риск осложнений и повышает медицинскую безопасность.
Подробнее – https://narkologicheskaya-clinica-v-krasnodare19.ru/krasnodar-narkologicheskij-czentr
В практике лечения на дому применяются следующие этапы медицинского воздействия:
Выяснить больше – https://narkolog-na-dom-v-rnd19.ru/narkolog-na-dom-rostov/
Этот текст содержит различную информацию, которая, возможно, покажется любопытной, но в целом не меняет восприятия привычных вещей. Предлагаем просто получить удовольствие от чтения, не ожидая особой пользы.
Вот – [url=https://arma-rehab.ru/]бинго онлайн[/url]
Для оценки состояния используется расширенная диагностика: лабораторные анализы, ЭКГ, психологическое тестирование и биохимические маркеры. По результатам обследования составляется индивидуальный план, включающий детоксикацию, фармакотерапию и реабилитационные мероприятия. Ниже представлена таблица, описывающая структуру этапов лечения.
Получить дополнительные сведения – [url=https://narcologicheskaya-clinika-v-rnd19.ru/]наркологическая клиника нарколог в ростове-на-дону[/url]
В клинической практике используются следующие этапы лечения:
Получить больше информации – http://narcologicheskaya-klinika-v-rnd19.ru/narkolog-rostov-na-donu/
Процесс лечения проходит поэтапно. Каждый шаг направлен на снятие интоксикации, стабилизацию состояния и нормализацию обменных процессов. В таблице приведены основные этапы и процедуры, применяемые в клинике «ПензаМед Трезвость».
Получить дополнительную информацию – [url=https://vyvod-iz-zapoya-penza18.ru/]вывод из запоя капельница на дому пенза[/url]
Не хотите платить за лицензию? У нас есть рабочий кряк для Windows 11 — скачайте прямо сейчас!
Подробнее – [url=https://krasnodar.med24.online/landing/narkolog_na_dom/]Где найти рабочий ключ для Windows 11[/url]
В практике круглосуточного лечения применяются следующие этапы:
Изучить вопрос глубже – [url=https://narcologicheskaya-klinika-v-krd19.ru/]наркологическая клиника нарколог[/url]
Такой курс не только очищает организм от токсинов, но и помогает вернуть эмоциональное равновесие. После завершения терапии пациент чувствует себя отдохнувшим, восстанавливает аппетит и сон, уходит тревожность и раздражительность.
Углубиться в тему – [url=https://vyvod-iz-zapoya-v-krasnodare19.ru/]наркологический вывод из запоя краснодар[/url]
Помощь при зависимостях в клинике «Южный Вектор» строится по принципу поэтапности, что соответствует современным медицинским представлениям. Наркологическая клиника в Ростове-на-Дону применяет методы, направленные на снижение выраженности синдромов отмены и восстановление функций органов. Клинические решения принимаются на основе данных обследования и наблюдения, что обеспечивает индивидуализацию терапии без отхода от стандартов.
Углубиться в тему – http://
Анонимность в клинике «Северный Вектор» является неотъемлемой частью лечебного процесса. Наркологическая клиника в Ростове-на-Дону обеспечивает конфиденциальность на всех этапах взаимодействия с пациентом, начиная с первичного обращения и заканчивая медицинским наблюдением. Клиническая практика показывает, что сохранение анонимности снижает уровень тревожности и повышает готовность пациента к полноценному лечению, что напрямую влияет на стабильность результатов.
Выяснить больше – https://narkologicheskaya-klinika-v-rostove19.ru/narkologiya-rostov-kruglosutochno
В практике лечения на дому применяются следующие этапы медицинского воздействия:
Детальнее – [url=https://narkolog-na-dom-v-rnd19.ru/]вызвать нарколога на дом ростов-на-дону[/url]
Клиника нужна и тем, кто уже пробовал лечиться самостоятельно: пил лекарства «от тяги», ходил к психологу без медицинской поддержки, обещал себе не пить, но каждый стресс или конфликт всё равно приводили к старому сценарию. В такой ситуации комплексный подход — медицинский и психологический — даёт куда больше шансов, чем очередное одиночное обещание «в этот раз точно получится».
Изучить вопрос глубже – https://narkologicheskaya-klinika-himki11.ru/anonimnaya-narkologicheskaya-klinika-v-himkah/
Процесс выведения из запоя в клинике основан на медицинских стандартах и многолетнем опыте врачей-наркологов. Каждый случай рассматривается индивидуально: перед началом лечения проводится оценка состояния пациента, определяется степень интоксикации и подбираются препараты, подходящие именно ему. Врачи центра работают круглосуточно, а выездная помощь доступна во всех районах Ростова-на-Дону и области. Это особенно важно, когда требуется немедленная помощь, а доставить пациента в стационар невозможно.
Детальнее – https://vyvod-iz-zapoya-v-rnd19.ru/vyvedenie-iz-zapoya-rostov-na-donu
Алкогольная и наркотическая зависимость являются серьёзными заболеваниями, требующими оперативного и квалифицированного вмешательства. Когда речь идёт о критическом состоянии пациента, особенно после длительного употребления алкоголя или наркотических веществ, время играет ключевую роль. Клиника «РеабилитАльянс» в Краснодаре предлагает услугу нарколога на дом, обеспечивая пациентам необходимую помощь в любой момент дня и ночи. Наши специалисты готовы оперативно выехать по указанному адресу и предоставить все необходимые медицинские процедуры на месте.
Подробнее тут – [url=https://narcolog-na-dom-krasnodar00.ru/]выезд нарколога на дом краснодар[/url]
В этом тексте собрано множество случайных сведений и довольно неопределённых мыслей, которые могут чем-то заинтересовать. Мы отмечаем моменты, которые не особенно важны, но всё же занимают своё место в повествовании.
Вот – [url=https://arma-rehab.ru/lechenie-alkogolizma/]взрослые игры[/url]
В этой заметке мы представляем шаги, которые помогут в процессе преодоления зависимостей. Рассматриваются стратегии поддержки и чек-листы для тех, кто хочет сделать первый шаг к выздоровлению. Наша цель — вдохновить читателей на положительные изменения и поддержать их в трудных моментах.
Выяснить больше – http://map.google.co.bw/url?q=https://vyvod-iz-zapoya-tolyatti0.ru
Помощь нарколога нужна, если алкоголь или наркотики постепенно начинают занимать в жизни всё больше места. Человек заранее планирует, когда и как будет пить, нервничает, если что-то срывается, раздражается, когда близкие пытаются ограничить употребление. Появляются скандалы после «весёлых» вечеров, пропущенные рабочие смены, проблемы с деньгами, конфликты с родными. При этом любые разговоры заканчиваются обещаниями «завязать с понедельника» или обвинениями окружающих.
Детальнее – [url=https://narkologicheskaya-klinika-voskresensk11.ru/]воскресенская клиника[/url]
Такой подход помогает подобрать правильную тактику лечения и избежать повторного запоя. Пациент находится под постоянным контролем медперсонала, что исключает риски для здоровья.
Выяснить больше – [url=https://vyvod-iz-zapoya-v-krasnodare19.ru/]врач вывод из запоя краснодар[/url]
После окончания врач дает консультации и рекомендации по восстановлению организма и профилактике повторных запоев.
Изучить вопрос глубже – https://vyvod-iz-zapoya-krasnodar0.ru/vyvod-iz-zapoya-czena-krasnodar
Мы собрали для вас самые захватывающие факты из мира науки и истории. От малознакомых деталей до грандиозных событий — эта статья расширит ваш кругозор и подарит новое понимание того, как устроен наш мир.
Детали по клику – https://jacobengineers.in/where-to-find-structural-design-engineer-jobs-a-comprehensive-guide
В клинике «ПензаМед Трезвость» лечение проводится по индивидуальной схеме, которая формируется после первичного осмотра. Нарколог оценивает состояние пациента, уровень алкогольной интоксикации и наличие сопутствующих заболеваний. На основании данных подбираются препараты, способные эффективно очистить кровь, восстановить работу органов и снизить абстинентные проявления. При лёгкой форме зависимости возможен выезд врача на дом, где пациенту устанавливают капельницу и обеспечивают наблюдение в течение всего процесса детоксикации. В более сложных случаях рекомендуется госпитализация в стационар, где помощь оказывается под постоянным контролем специалистов.
Детальнее – [url=https://vyvod-iz-zapoya-penza18.ru/]вывод из запоя на дому пенза[/url]
Лечение в круглосуточном режиме рассматривается как непрерывный медицинский процесс, а не как разовое вмешательство. Даже при экстренном обращении терапия выстраивается последовательно, с обязательным врачебным наблюдением и оценкой динамики состояния пациента.
Подробнее – [url=https://narcologicheskaya-klinika-v-krd19.ru/]наркологическая клиника стационар в краснодаре[/url]
Вывод из запоя требует комплексного контроля всех физиологических параметров. Ниже представлены основные направления наблюдения, формирующие структуру оценки состояния.
Разобраться лучше – [url=https://vyvodiz-zapoya-izhevsk18.ru/]вывод из запоя в стационаре в ижевске[/url]
Эта статья погружает вас в увлекательный мир знаний, где каждый факт становится открытием. Мы расскажем о ключевых исторических поворотных моментах и научных прорывах, которые изменили ход цивилизации. Поймите, как прошлое формирует настоящее и как его уроки могут помочь нам строить будущее.
Ознакомиться с отчётом – https://cuatroesquinasranch.com/hunting-gallery/img_6584-2
Этот обзор предлагает свежий взгляд на предметы, которые и без того привычны. Мы упоминаем факты, не имеющие большого значения, и события с неясной важностью, но они присутствуют здесь.
Подробнее читать – [url=https://rostov-narkologiya.ru/uslugi-ot-narkomanii/mefedronovaya-zavisimost/]таблетки для аборта[/url]
Эта статья погружает вас в увлекательный мир знаний, где каждый факт становится открытием. Мы расскажем о ключевых исторических поворотных моментах и научных прорывах, которые изменили ход цивилизации. Поймите, как прошлое формирует настоящее и как его уроки могут помочь нам строить будущее.
См. подробности – https://cuatroesquinasranch.com/hunting-gallery/img_6584-2
В статье представлены ключевые моменты по актуальной теме, дополненные советами экспертов и ссылками на дополнительные ресурсы. Цель материала — дать читателю инструменты для самостоятельного развития и принятия осознанных решений.
Изучить эмпирические данные – http://rhrpnews.com/2025/01/24/1212
Мы собрали для вас самые захватывающие факты из мира науки и истории. От малознакомых деталей до грандиозных событий — эта статья расширит ваш кругозор и подарит новое понимание того, как устроен наш мир.
А что дальше? – https://www.whatsoninphuket.com/grand-opening-pirasta-den-art
Эта познавательная публикация погружает вас в море интересного контента, который быстро захватит ваше внимание. Мы рассмотрим важные аспекты темы и предоставим вам уникальные Insights и полезные сведения для дальнейшего изучения.
Разобраться лучше – https://moshjapan.co.id/mosh-luncurkan-tumbler-milk-bottle-gradient-380ml-yang-stylish
Эта информационная заметка содержит увлекательные сведения, которые могут вас удивить! Мы собрали интересные факты, которые сделают вашу жизнь ярче и полнее. Узнайте нечто новое о привычных аспектах повседневности и откройте для себя удивительный мир информации.
Что ещё нужно знать? – https://waped.org/forums/topic/comment-acheter-allopurinol-allopurinol-bnf-ramipril
В материале приведены детали, интересные, но не особенно важные. Мы рассматриваем аспекты, которые сложно назвать существенными, но включили их для большей полноты.
Подробнее читать – [url=https://rostov-narkologiya.ru/ ]похудеть на таблетках[/url]
Эта статья погружает вас в увлекательный мир знаний, где каждый факт становится открытием. Мы расскажем о ключевых исторических поворотных моментах и научных прорывах, которые изменили ход цивилизации. Поймите, как прошлое формирует настоящее и как его уроки могут помочь нам строить будущее.
Продолжить изучение – https://simonbrenner.org/index.php/Special_Blog?id=18
В этой информационной статье вы найдете интересное содержание, которое поможет вам расширить свои знания. Мы предлагаем увлекательный подход и уникальные взгляды на обсуждаемые темы, побуждая пользователей к активному мышлению и критическому анализу.
Лучшее решение — прямо здесь – https://marina-havelauen.de/marina-havelauen-_-5-sterne-hafen-in-berlin-und-brandenburg-23
В данной обзорной статье представлены интригующие факты, которые не оставят вас равнодушными. Мы критикуем и анализируем события, которые изменили наше восприятие мира. Узнайте, что стоит за новыми открытиями и как они могут изменить ваше восприятие реальности.
Читать далее > – https://dohamontessorishop.com/table-3281047_1280
Когда выезд особенно удобен и оправдан, важно понимать не только эмоционально, но и по конкретным признакам. Есть ряд типичных ситуаций, в которых именно формат «на дому» становится наиболее реалистичным и безопасным вариантом, а стационар можно рассматривать как следующий шаг, когда острота будет снята и человек станет более сговорчивым.
Получить дополнительную информацию – [url=https://narkolog-na-dom-himki11.ru/]нарколог на дом недорого[/url]
Мы собрали для вас самые захватывающие факты из мира науки и истории. От малознакомых деталей до грандиозных событий — эта статья расширит ваш кругозор и подарит новое понимание того, как устроен наш мир.
Как это работает — подробно – https://wisp.ithealer.com/fighting-identity-theft-with-the-red-flags-rule-a-how-to-guide-for-business
Мы собрали для вас самые захватывающие факты из мира науки и истории. От малознакомых деталей до грандиозных событий — эта статья расширит ваш кругозор и подарит новое понимание того, как устроен наш мир.
Детальнее – https://komeringonline.com/komline-berbagi-cerita-kereta-hantu-manggarai
Вывод из запоя — это не только капельница. Это системная медицинская помощь, направленная на снижение интоксикации, поддержку сердца, нервной системы и внутренних органов. Правильно выстроенный детокс помогает не просто «сбить симптомы», а реально снизить риски для здоровья и дать человеку шанс вернуться к трезвому состоянию без тяжёлых последствий.
Подробнее – [url=https://vyvod-iz-zapoya-voskresensk11.ru/]vyvod-iz-zapoya-na-domu-v-voskresenske[/url]
Часто родственники тянут до последнего, надеясь, что запой «сам пройдёт», как это случалось раньше. Но с каждым эпизодом последствия становятся тяжелее: организм изнашивается, возрастает риск осложнений, ухудшается психика. Особенно опасно, когда запой длится несколько дней подряд, а любые попытки самостоятельно сократить дозы алкоголя сопровождаются дрожью, бессонницей, приступами паники.
Получить дополнительную информацию – [url=https://vyvod-iz-zapoya-moskva011.ru/]vyvod-iz-zapoya-v-stacionare-moskva[/url]
Эта информационная статья охватывает широкий спектр актуальных тем и вопросов. Мы стремимся осветить ключевые факты и события с ясностью и простотой, чтобы каждый читатель мог извлечь из нее полезные знания и полезные инсайты.
Изучить эмпирические данные – https://taobalalao.pt/product/etiquetas-circulares-para-roupa-animal-terra
Эта статья погружает вас в увлекательный мир знаний, где каждый факт становится открытием. Мы расскажем о ключевых исторических поворотных моментах и научных прорывах, которые изменили ход цивилизации. Поймите, как прошлое формирует настоящее и как его уроки могут помочь нам строить будущее.
Лови подробности – https://thepurposepartnershipco.com/hello-world
Наркологическая клиника в Долгопрудном помогает в ситуациях, когда:
Выяснить больше – https://narkologicheskaya-klinika-dolgoprudnyj11.ru/narkologicheskie-kliniki-ryadom-v-dolgoprudnom/
Самостоятельные попытки «подлечиться» обычно сводятся к случайным комбинациям препаратов: кто-то пьёт горсть таблеток от давления и сердца, кто-то принимает успокоительные поверх алкоголя, кто-то заказывает непонятные средства «от тяги» в интернете. Такие эксперименты могут дать краткий эффект, но часто только маскируют симптомы и перегружают организм. В клинике лечение строится иначе: сначала оценивают состояние — физическое и психическое, затем подбирают безопасные схемы детоксикации и медикаментов, учитывая возраст, сопутствующие заболевания, длительность запоев и употребления. Это снижает риски осложнений и делает восстановление более управляемым: пациент и его семья видят прогресс и понимают, за счёт чего он происходит, а не живут в ожидании очередного непредсказуемого «отката».
Разобраться лучше – https://narkologicheskaya-klinika-korolyov11.ru/narkologicheskaya-klinika-telefon-v-korolyove
Наркологическая клиника в Воскресенске предоставляет комплексную помощь: от экстренного вывода из запоя и детоксикации до реабилитации и длительного сопровождения. Здесь работают с зависимостью как с хроническим заболеванием, а не как с «слабостью характера». Такой подход позволяет не только стабилизировать физическое состояние, но и менять образ жизни, привычки, способы реагирования на стресс, чтобы человек мог вернуться к нормальной, трезвой жизни.
Подробнее тут – [url=https://narkologicheskaya-klinika-voskresensk11.ru/]gosudarstvennaya-narkologicheskaya-klinika[/url]
Эта обзорная заметка содержит ключевые моменты и факты по актуальным вопросам. Она поможет читателям быстро ориентироваться в теме и узнать о самых важных аспектах сегодня. Получите краткий курс по современной информации и оставайтесь в курсе событий!
Лучшее решение — прямо здесь – https://travel-diary.com.ua/strany/cernogoria/Staryj-Bar-CHernogoriya-Kak-dobratsya
Этот текст содержит различную информацию, которая, возможно, покажется любопытной, но в целом не меняет восприятия привычных вещей. Предлагаем просто получить удовольствие от чтения, не ожидая особой пользы.
Вот – [url=https://arma-rehab.ru/]джекпот[/url]
cómo iniciar sesión en pin-up [url=https://pinup2005.help]cómo iniciar sesión en pin-up[/url]
В клинике «НаркоСити» используются только сертифицированные лекарственные средства, которые подбираются индивидуально с учетом состояния пациента:
Получить дополнительную информацию – [url=https://vyvod-iz-zapoya-krasnodar0.ru/]нарколог вывод из запоя краснодар[/url]
Эта публикация содержит набор несвязанных идей, трудно применимых в практике. Мы лишь поверхностно затрагиваем различные точки зрения, не проводя глубокий анализ и не предлагая выводов.
Подробнее читать – [url=https://rostov-narkologiya.ru/ ]народные средства от диабета[/url]
Когда родственники видят, что в их случае совпадает сразу несколько этих пунктов, выезд нарколога на дом часто становится тем самым реалистичным и своевременным решением, которое позволяет не довести дело до экстренной госпитализации уже в критическом состоянии. После такого вмешательства появляются часы и дни, когда можно спокойно обсудить дальнейшие шаги, а не действовать на фоне паники и полного истощения.
Узнать больше – http://narkolog-na-dom-himki11.ru/narkolog-na-dom-srochno-v-himkah/
Многие годами живут в логике: «главное — с утра выпить чуть-чуть, станет легче». На коротком промежутке времени это действительно частично снимает симптомы, но по сути лишь продлевает запой и усиливает интоксикацию. Организм не успевает переработать продукты распада алкоголя, кровь становится «тяжёлой», нарушается работа сосудов, возрастает нагрузка на сердце и мозг.
Узнать больше – https://kapelnica-ot-zapoya-dolgoprudnyj11.ru/kapelnica-ot-zapoya-na-domu-v-dolgoprudnom
Вывод из запоя — это не только капельница. Это системная медицинская помощь, направленная на снижение интоксикации, поддержку сердца, нервной системы и внутренних органов. Правильно выстроенный детокс помогает не просто «сбить симптомы», а реально снизить риски для здоровья и дать человеку шанс вернуться к трезвому состоянию без тяжёлых последствий.
Подробнее тут – https://vyvod-iz-zapoya-voskresensk11.ru/vyvod-iz-zapoya-na-domu-v-voskresenske
Лечение в местной клинике удобно не только тем, что до неё проще добраться. Важнее то, что здесь выстраивают целостный подход, а не откликаются только на острые эпизоды. Для кого-то основной проблемой стали частые запои, для кого-то — периодическое употребление наркотиков, для третьего — сочетание алкоголя с успокоительными или снотворными. У каждого пациента своя история, свой стаж употребления, свой опыт неудачных попыток лечения и своя степень разрушения здоровья. В хорошей клинике это учитывают с самого начала и не предлагают всем одну и ту же «универсальную капельницу».
Разобраться лучше – http://narkologicheskaya-klinika-korolyov11.ru
Этот медицинский обзор сосредоточен на последних достижениях, которые оказывают влияние на пациентов и медицинскую практику. Мы разбираем инновационные методы лечения и исследований, акцентируя внимание на их значимости для общественного здоровья. Читатели узнают о свежих данных и их возможном применении.
Подробнее тут – http://ijour.net/redirectToAD.aspx?adAddress=https://vyvod-iz-zapoya-tolyatti0.ru/vyvod-iz-zapoya-tolyatti-na-domu
Метод капельничного лечения от запоя обладает рядом существенных преимуществ, благодаря которым пациенты получают качественную и оперативную помощь:
Получить дополнительные сведения – https://kapelnica-ot-zapoya-arkhangelsk0.ru/kapelnicza-ot-zapoya-czena-arkhangelsk/
1win лайв расчет [url=https://www.1win17384.help]1win лайв расчет[/url]
Наркологическая клиника в Воскресенске — это место, куда можно обратиться в тот момент, когда домашние попытки «всё решить разговорами» и обещания «больше не пить» перестают работать. Зависимость редко возникает внезапно: сначала это кажутся безобидные посиделки по выходным, «снятие стресса» после работы, эпизодические эксперименты с наркотиками. Но с каждым месяцем контроль становится слабее, запои удлиняются, а привычка «расслабляться» превращается в болезненную потребность.
Ознакомиться с деталями – [url=https://narkologicheskaya-klinika-voskresensk11.ru/]наркологическая клиника диспансер[/url]
cómo hacer un retiro en pin-up [url=https://pinup2005.help/]https://pinup2005.help/[/url]
Обращаться в клинику стоит не только в крайних случаях, когда человек уже не может встать с постели или запой продолжается неделями. Наоборот, чем раньше начата помощь, тем мягче и короче может быть программа, тем меньше риск тяжёлых осложнений и долгой реабилитации.
Детальнее – [url=https://narkologicheskaya-klinika-dolgoprudnyj11.ru/]кодирование от алкоголизма на дому в долгопрудном[/url]
Клиника «НаркоСити» предлагает срочную наркологическую помощь при запоях на дому в Краснодаре. Опытные специалисты оперативно приезжают в любой район города, проводят детоксикацию и стабилизируют состояние пациента прямо на дому. Лечение организовано с максимальной безопасностью и соблюдением конфиденциальности, что обеспечивает пациентам комфорт и быстрое восстановление без госпитализации.
Изучить вопрос глубже – [url=https://vyvod-iz-zapoya-krasnodar0.ru/]скорая вывод из запоя в краснодаре[/url]
Как отмечает врач-нарколог клиники «РеабилитАльянс» Павел Сомов, «чем раньше начато лечение, тем выше шансы на скорейшее выздоровление без серьезных последствий для здоровья».
Детальнее – [url=https://narcolog-na-dom-krasnodar00.ru/]нарколог на дом клиника[/url]
После купирования острых симптомов врач объясняет, какие шаги нужно сделать дальше: ограничиться домашним наблюдением, подумать о коротком стационарном курсе или сразу планировать дальнейшее лечение зависимости. Это помогает не возвращаться к затяжным запоям уже через несколько недель.
Получить больше информации – [url=https://vyvod-iz-zapoya-moskva011.ru/]narkolog-vyvod-iz-zapoya[/url]
мостбет Талас [url=https://mostbet51837.help/]https://mostbet51837.help/[/url]
Там, где раньше хватало одного тяжёлого утра, теперь требуются дни детоксикации. И чем позже подключается врач, тем сложнее вернуть организм к относительно безопасному состоянию.
Узнать больше – [url=https://vyvod-iz-zapoya-voskresensk11.ru/]вывода из запоя московская[/url]
pin-up apk apuestas [url=https://pinup2005.help]https://pinup2005.help[/url]
Чем раньше нарколог окажет помощь, тем выше шансы избежать осложнений и восстановиться без последствий для здоровья.
Подробнее можно узнать тут – https://narcolog-na-dom-sochi0.ru/vyzov-narkologa-na-dom-sochi
Зависимость редко начинается резко. Сначала это «разовые» посиделки, алкоголь «для снятия стресса», эпизодическое употребление психоактивных веществ «из любопытства» или «для компании». На этом этапе человеку кажется, что он полностью контролирует ситуацию. Со временем эпизоды употребления становятся чаще, дозы растут, появляются провалы в памяти, срывы, невозможность остановиться вовремя. В этот момент уже страдают здоровье, работа, отношения с близкими. Обращение в наркологическую клинику позволяет не доводить ситуацию до критической точки и остановить разрушение жизни на любом этапе заболевания.
Получить больше информации – https://narkologicheskaya-klinika-dolgoprudnyj11.ru/narkologicheskie-kliniki-ryadom-v-dolgoprudnom/
pin-up retiro rápido Chile [url=www.pinup2005.help]www.pinup2005.help[/url]
Там, где раньше хватало одного тяжёлого утра, теперь требуются дни детоксикации. И чем позже подключается врач, тем сложнее вернуть организм к относительно безопасному состоянию.
Изучить вопрос глубже – [url=https://vyvod-iz-zapoya-voskresensk11.ru/]вывод из запоя в Воскресенске[/url]
Многие тянут до последнего, считая, что к наркологу обращаются только в самых крайних случаях. На деле показаний для консультации гораздо больше, и они часто появляются задолго до того, как человек впервые оказывается в запое или не выходит из состояния опьянения несколько дней подряд.
Получить больше информации – http://narkologicheskaya-klinika-voskresensk11.ru/narkologicheskaya-klinika-telefon-v-voskresenske/
Мы сознательно избегаем полипрагмазии. В назначениях только то, что несёт проверяемую пользу: гидратация с корректировкой электролитов, противорвотная и гастропротективная поддержка, мягкая анксиолитика по показаниям и пунктирный ритм-контроль. Состав капельниц не «универсальный» — он собирается под симптомы и соматический фон, с учётом совместимости с текущими лекарствами (антигипертензивные, антиаритмические, сахароснижающие и др.). Такой подход обеспечивает управляемую динамику без дневной «ватности» и рисков перегрузки объёмом.
Подробнее – [url=https://narcolog-na-dom-ekaterinburg0.ru/]врач нарколог выезд на дом[/url]
Этот обзор позволяет по-новому взглянуть на вещи, на которые обычно и так смотрят. Мы упоминаем факты, которые мало что меняют, и события, значение которых трудно определить, но они всё равно здесь.
Вот – [url=https://arma-rehab.ru/]эротические фильмы[/url]
Обращение за помощью нарколога на дому в Архангельске имеет множество преимуществ, среди которых:
Подробнее – [url=https://kapelnica-ot-zapoya-arkhangelsk00.ru/]капельница от запоя вызов город[/url]
Наркологическая клиника применяет стандартизированные схемы, направленные на безопасное и постепенное восстановление. Каждый этап вмешательства согласуется с текущим состоянием пациента, что обеспечивает предсказуемый характер изменений. Модель работы включает оценку реакции организма, проверку устойчивости внутренних систем и уточнение динамики метаболических процессов. Последовательность действий формируется с учётом адаптационных возможностей и направлена на достижение стабильного результата.
Ознакомиться с деталями – [url=https://narkologicheskaya-klinika-vo-vladivostoke18.ru/]наркологическая клиника стационар в владивостоке[/url]
Такая терапия не только устраняет последствия запоев, но и восстанавливает баланс организма, улучшая общее состояние. Пациенты отмечают, что уже через несколько часов после капельницы проходит тремор, снижается тревожность и появляется чувство ясности.
Подробнее – [url=https://narkologicheskaya-klinika-v-izhevske18.ru/]www.domen.ru[/url]
Часто первыми тревожные признаки замечают родные. Человек начинает пить чаще, чем раньше, меняется в поведении, становится раздражительным или замкнутым, теряет интерес к привычным занятиям. Появляются сложности с концентрацией, падает работоспособность, учащаются конфликты дома. Употребление наркотиков проявляется изменениями режима дня, странными компаниями, резкими перепадами настроения, финансовыми «дырами», попытками скрыть своё состояние.
Узнать больше – http://narkologicheskaya-klinika-dolgoprudnyj11.ru
В клинике «НаркоСити» используются только сертифицированные лекарственные средства, которые подбираются индивидуально с учетом состояния пациента:
Подробнее тут – http://vyvod-iz-zapoya-krasnodar0.ru
Есть ситуации, когда визит к наркологу в Химках лучше воспринимать не как «стыдный шаг», а как обычное ответственное решение о своём здоровье. Это особенно актуально, если: употребление алкоголя или наркотиков стало регулярным, а попытки сократить дозы заканчиваются срывами; появились запои с несколькими днями непрерывного употребления; возникают проблемы с сердцем, давлением, сном; близкие всё чаще говорят, что «ситуация выходит из-под контроля».
Получить дополнительные сведения – http://narkologicheskaya-klinika-himki11.ru
Вызов нарколога на дом становится необходимым при любых состояниях, когда отказ от алкоголя сопровождается выраженными симптомами интоксикации и абстиненции. Основные ситуации, в которых срочно требуется профессиональная помощь врача:
Получить дополнительные сведения – [url=https://narcolog-na-dom-sochi0.ru/]помощь нарколога на дому в сочи[/url]
Эти этапы формируют структуру комплексного лечения, позволяя добиться устойчивого результата и предотвращения повторных срывов.
Ознакомиться с деталями – [url=https://narkologicheskaya-klinika-astrakhan18.ru/]наркологическая клиника лечение алкоголизма[/url]
Состав инфузии формируется по доминирующему симптому и данным экспресс-измерений, с учётом лекарственных взаимодействий. Врач оценивает динамику в реальном времени и, при необходимости, корректирует состав/скорость. Ниже — примеры профилей; окончательное решение всегда очное.
Узнать больше – [url=https://narcolog-na-dom-ekaterinburg0.ru/]narcolog-na-dom-ekaterinburg0.ru/[/url]
На этом этапе специалист уточняет продолжительность запоя, тип употребляемого алкоголя и наличие сопутствующих заболеваний, что позволяет разработать персонализированный план терапии и оперативно выбрать методы детоксикации.
Получить дополнительную информацию – http://kapelnica-ot-zapoya-arkhangelsk0.ru/kapelnicza-ot-zapoya-na-domu-arkhangelsk/
После купирования острых симптомов врач объясняет, какие шаги нужно сделать дальше: ограничиться домашним наблюдением, подумать о коротком стационарном курсе или сразу планировать дальнейшее лечение зависимости. Это помогает не возвращаться к затяжным запоям уже через несколько недель.
Исследовать вопрос подробнее – https://vyvod-iz-zapoya-moskva011.ru/vyvod-iz-zapoya-v-moskve-na-domu/
Домашний визит нарколога — это не компромисс «на скорую руку», а тщательно организованный процесс, который экономит время, сохраняет конфиденциальность и делает лечение предсказуемым. «ЕкатеринбургМедСервис» принимает вызовы круглосуточно и выезжает во все районы города — от Уралмаша и ВИЗа до Академического и Широкой Речки. Команда приезжает без внешних опознавательных знаков, использует нейтральные формулировки в документах и ведёт переписку только по защищённым каналам связи. На месте мы быстро проводим экспресс-диагностику, запускаем титрованные капельницы через инфузомат, контролируем пульс, сатурацию и артериальное давление, подключаем гастропротекцию и аккуратно управляем тревогой без избыточной седации. Цель — безопасно «снять волну» симптомов, вернуть возможность пить воду и отдыхать, а затем закрепить результат на горизонте ближайших 72 часов.
Выяснить больше – http://narcolog-na-dom-ekaterinburg00.ru/ekaterinburg-narkologicheskaya-klinika/
В этой публикации мы обсуждаем современные методы лечения различных заболеваний. Читатели узнают о новых медикаментах, терапиях и исследованиях, которые активно применяются для лечения. Мы нацелены на то, чтобы предоставить практические знания, которые могут помочь в борьбе с недугами.
Получить дополнительные сведения – http://58.torayche.com/index/d1?diff=0&utm_source=og&utm_campaign=20924&utm_clickid=00gocgogswows8g4&aurl=https://vyvod-iz-zapoya-tolyatti0.ru/vyvod-iz-zapoya-tolyatti-na-domu/&pushmode=popup
Лечение в «ИжТрезвоМед Центр» проходит поэтапно, с акцентом на безопасность и эффективность. Каждый этап направлен на достижение конкретных целей, от детоксикации до психотерапии. В таблице представлена структура лечебного процесса:
Ознакомиться с деталями – [url=https://narkologicheskaya-klinika-v-izhevske18.ru/]платная наркологическая клиника в ижевске[/url]
nejlep?? online casino [url=https://casino-cz-1.com/]nejlep?? online casino[/url] .
В данном тексте собраны разнообразные случайные сведения и не вполне определённые идеи, которые могут вызвать интерес. Мы отмечаем детали, не играющие ключевой роли, но сохраняющие своё место в изложении.
Подробнее читать – https://rostov-narkologiya.ru/uslugi-ot-narkomanii/mefedronovaya-zavisimost
Алкогольная и наркотическая зависимость являются серьёзными заболеваниями, требующими оперативного и квалифицированного вмешательства. Когда речь идёт о критическом состоянии пациента, особенно после длительного употребления алкоголя или наркотических веществ, время играет ключевую роль. Клиника «РеабилитАльянс» в Краснодаре предлагает услугу нарколога на дом, обеспечивая пациентам необходимую помощь в любой момент дня и ночи. Наши специалисты готовы оперативно выехать по указанному адресу и предоставить все необходимые медицинские процедуры на месте.
Подробнее – [url=https://narcolog-na-dom-krasnodar00.ru/]narcolog-na-dom-krasnodar00.ru/[/url]
1вин ставки на спорт [url=https://www.1win17384.help]https://www.1win17384.help[/url]
На данном этапе врач уточняет длительность запоя, тип употребляемого алкоголя и наличие сопутствующих заболеваний. Тщательный анализ этих данных позволяет оперативно сформировать индивидуальный план лечения и выбрать оптимальные методы детоксикации.
Исследовать вопрос подробнее – http://kapelnica-ot-zapoya-arkhangelsk00.ru
Детокс — важный этап лечения, который помогает очистить организм от токсинов и продуктов распада алкоголя или наркотиков. В клинике «ТомскМед Трезвость» используются современные капельницы и лекарственные комбинации, направленные на восстановление биохимических процессов в организме. Ниже представлена таблица с примерами капельниц, применяемых в детоксикационных программах.
Исследовать вопрос подробнее – http://narkologicheskaya-klinika-v-tomske18.ru
Вывод из запоя в клинике строится на основе алгоритмов, направленных на безопасное восстановление физиологических функций. Применяется стандартная система, включающая оценку состояния, подбор медикаментозных средств и постепенную адаптацию организма. Такой формат позволяет избежать резких изменений и поддерживать предсказуемую клиническую динамику. Важную роль играет наблюдение за реакцией организма, позволяющее корректировать тактику лечения в соответствии с выявленными изменениями. Последовательность действий обеспечивает структурированность процесса и повышает вероятность стабильного результата.
Исследовать вопрос подробнее – [url=https://vyvodiz-zapoya-izhevsk18.ru/]вывод из запоя на дому в ижевске[/url]
Отдельная категория пациентов — люди с алкогольной зависимостью. Для жителей Воскресенска особенно актуальны проблемы, связанные с длительными запоями: человек несколько дней подряд пьёт, практически не ест, плохо спит, с трудом встаёт, а каждое утро обещает, что «сейчас немного — и всё». На этом фоне растёт нагрузка на сердце, печень, нервную систему, повышается риск инсультов и инфарктов, обостряются хронические болезни.
Подробнее можно узнать тут – [url=https://narkologicheskaya-klinika-voskresensk11.ru/]www.domen.ru[/url]
Отдельная категория пациентов — люди с алкогольной зависимостью. Для жителей Воскресенска особенно актуальны проблемы, связанные с длительными запоями: человек несколько дней подряд пьёт, практически не ест, плохо спит, с трудом встаёт, а каждое утро обещает, что «сейчас немного — и всё». На этом фоне растёт нагрузка на сердце, печень, нервную систему, повышается риск инсультов и инфарктов, обостряются хронические болезни.
Углубиться в тему – https://narkologicheskaya-klinika-voskresensk11.ru/chastnaya-narkologicheskaya-klinika-v-voskresenske/
Детоксикация — ключевой этап в лечении зависимости. Она направлена на очищение организма от токсинов и нормализацию обмена веществ. В клинике «АстраМед Трезвость» капельницы подбираются индивидуально, с учётом возраста, массы тела и хронических заболеваний пациента. Ниже представлена таблица с основными видами инфузий и их назначением.
Детальнее – [url=https://narkologicheskaya-klinika-v-astrakhani18.ru/]платная наркологическая клиника[/url]
Перед началом терапии проводится клиническая оценка, включающая измерение давления, осмотр кожи и глаз, проверку дыхания и анализ неврологического состояния. Вывод из запоя в клинике в Астрахани начинается только после сбора этих данных, поскольку подбор препаратов без диагностики может быть небезопасен.
Подробнее тут – [url=https://vyvod-iz-zapoya-v-astrakhani18.ru/]помощь вывод из запоя[/url]
В клинике «НаркоСити» используются только сертифицированные лекарственные средства, которые подбираются индивидуально с учетом состояния пациента:
Выяснить больше – [url=https://vyvod-iz-zapoya-krasnodar0.ru/]вывод из запоя вызов в краснодаре[/url]
В рамках лечения используются методы, позволяющие фиксировать изменения и оценивать реакцию организма на проводимые мероприятия. Они служат основой для выборочных корректировок и обеспечивают структурированный характер процесса. Отличительной особенностью становится возможность адаптировать лечебные схемы под индивидуальные особенности пациента. Ниже представлены ключевые направления оценки состояния, применяемые для формирования полной клинической картины.
Выяснить больше – [url=https://narkologicheskaya-klinika-v-vdk18.ru/]анонимная наркологическая клиника владивосток[/url]
Каждый из перечисленных элементов способствует формированию полной картины состояния пациента и позволяет корректно выстраивать терапевтические мероприятия. Такая структура создаёт основу для достижения устойчивых результатов и минимизации возможных осложнений. Использование таблиц наблюдения делает клинические процессы структурированными и понятными.
Изучить вопрос глубже – [url=https://narkologicheskaya-klinika-tomsk18.ru/]частная наркологическая клиника в томске[/url]
mostbet вывести деньги [url=https://mostbet51837.help/]https://mostbet51837.help/[/url]
Самостоятельный выход из запоя сопряжен с высоким риском развития осложнений. После прекращения приема спиртного ослабленный организм может не выдержать нагрузки, что приведет к инфаркту, инсульту, судорожным приступам и даже алкогольному психозу. Чтобы избежать этих опасных состояний, необходимо вызвать нарколога на дом, который проведет лечение правильно и безопасно.
Углубиться в тему – https://vyvod-iz-zapoya-krasnodar0.ru/vyvod-iz-zapoya-kruglosutochno-krasnodar
Важно и то, что во время процедуры пациент находится под наблюдением. Врач может увидеть, как организм реагирует на терапию, вовремя скорректировать темп или состав инфузии, понять, достаточно ли домашнего формата или лучше рассмотреть стационар. Это принципиальное отличие от попыток лечиться дома таблетками наугад, без контроля давления и пульса.
Подробнее – http://kapelnica-ot-zapoya-dolgoprudnyj11.ru
Помощь нарколога нужна, если алкоголь или наркотики постепенно начинают занимать в жизни всё больше места. Человек заранее планирует, когда и как будет пить, нервничает, если что-то срывается, раздражается, когда близкие пытаются ограничить употребление. Появляются скандалы после «весёлых» вечеров, пропущенные рабочие смены, проблемы с деньгами, конфликты с родными. При этом любые разговоры заканчиваются обещаниями «завязать с понедельника» или обвинениями окружающих.
Разобраться лучше – [url=https://narkologicheskaya-klinika-voskresensk11.ru/]наркологическая клиника[/url]
Публикация предоставляет читателю набор разрозненных идей, которые сложно применить на практике. Мы лишь слегка касаемся разных точек зрения, не углубляясь в анализ и не предлагая никаких выводов.
Вот – [url=https://arma-rehab.ru/vyvod-iz-zapoya/]секс[/url]
Такая таблица позволяет систематизировать данные наблюдения и поддерживать единый подход к интерпретации результатов. Это повышает прозрачность процесса и делает оценку состояния объективной вне зависимости от длительности лечения.
Исследовать вопрос подробнее – https://narkologicheskaya-klinika-penza18.ru/chastnaya-narkologicheskaya-klinika-penza
Основным инструментом при выведении из запоя является капельница. Её состав зависит от состояния пациента, продолжительности запоя и наличия хронических заболеваний. В клинике «ПензаМед Трезвость» используются только проверенные препараты с минимальной нагрузкой на организм. Ниже приведена таблица с примерами инфузионных растворов и их воздействием.
Углубиться в тему – [url=https://vyvod-iz-zapoya-penza18.ru/]вывод из запоя на дому круглосуточно пенза[/url]
Каждый из этих симптомов по отдельности уже опасен, а в сочетании они создают высокий риск для жизни. Самостоятельные эксперименты с таблетками, резкий отказ от алкоголя «через силу» или попытка «переспать» запой без медицинского контроля могут обернуться реанимацией. Гораздо безопаснее вовремя вызвать специалиста и провести детоксикацию под наблюдением, особенно когда речь идёт о жителях крупного города, где доступна профессиональная наркологическая помощь.
Узнать больше – [url=https://vyvod-iz-zapoya-moskva011.ru/]vyvod-iz-zapoya-moskva-vyzov-narkologa-kapelnica[/url]
В этом тексте собрано множество случайных сведений и довольно неопределённых мыслей, которые могут чем-то заинтересовать. Мы отмечаем моменты, которые не особенно важны, но всё же занимают своё место в повествовании.
Вот – [url=https://arma-rehab.ru/]порно онлайн бесплатно[/url]
После приезда нарколог оценивает состояние пациента, проверяет давление, частоту пульса и насыщенность крови кислородом. Затем врач подбирает индивидуальный состав капельницы, включающий растворы для очистки организма, препараты для нормализации работы сердца, печени и нервной системы. Процедура длится около 1–2 часов и позволяет быстро:
Исследовать вопрос подробнее – https://vyvod-iz-zapoya-krasnodar0.ru/vyvod-iz-zapoya-kruglosutochno-krasnodar/
Вывод из запоя в клинике в Астрахани проводится в условиях контролируемой терапии, ориентированной на устранение интоксикации и восстановление функционирования основных систем организма. При длительном употреблении спиртного нарушается работа печени, сердца и нервной системы, что требует профессионального вмешательства. Специалисты оценивают степень интоксикации, подбирают препараты и контролируют динамику стабилизации пациента.
Изучить вопрос глубже – https://vyvod-iz-zapoya-v-astrakhani18.ru/
Каждая процедура проводится под контролем врача и сопровождается мониторингом давления, пульса и температуры. После курса капельниц пациент чувствует улучшение самочувствия, нормализуется сон, снижается раздражительность, появляется энергия и ясность сознания.
Получить больше информации – [url=https://narkologicheskaya-klinika-v-astrakhani18.ru/]наркологическая клиника лечение алкоголизма астрахань[/url]
1win подтвердить аккаунт [url=https://www.1win17384.help]https://www.1win17384.help[/url]
Вывод из запоя в клинике строится на основе алгоритмов, направленных на безопасное восстановление физиологических функций. Применяется стандартная система, включающая оценку состояния, подбор медикаментозных средств и постепенную адаптацию организма. Такой формат позволяет избежать резких изменений и поддерживать предсказуемую клиническую динамику. Важную роль играет наблюдение за реакцией организма, позволяющее корректировать тактику лечения в соответствии с выявленными изменениями. Последовательность действий обеспечивает структурированность процесса и повышает вероятность стабильного результата.
Получить дополнительную информацию – [url=https://vyvodiz-zapoya-izhevsk18.ru/]вывод из запоя на дому цена в ижевске[/url]
Для формирования структурированной модели используются стандартизированные алгоритмы. Ниже представлена последовательность действий, определяющих ход терапевтических мероприятий.
Подробнее – https://narkologicheskaya-klinika-tomsk18.ru/chastnaya-narkologicheskaya-klinika-tomsk/
Вызывать нарколога на дом рекомендуется при следующих состояниях:
Узнать больше – [url=https://narcolog-na-dom-sankt-peterburg000.ru/]психиатр нарколог на дом[/url]
В этом материале представлены детали, которые хоть и занимательны, но не особенно значимы. Мы рассматриваем моменты, которые трудно назвать важными, но всё же решили включить их для полноты картины.
Вот – [url=https://arma-rehab.ru/lechenie-alkogolizma/]бесплатные вращения в слотах[/url]
Структурированное наблюдение позволяет поддерживать согласованность лечебных мероприятий и своевременно реагировать на изменения. Такая система создаёт единый аналитический подход для оценки состояния и обеспечивает целостность терапевтического процесса.
Получить больше информации – [url=https://narkologicheskaya-klinika-v-vdk18.ru/]вывод наркологическая клиника[/url]
Запой не всегда выглядит как откровенная катастрофа с первых дней. Иногда всё начинается с «отпуска», «праздника», пары вечеринок подряд. Родные надеются, что человек сам остановится, а он каждый день находит повод продолжить. В какой-то момент организм перестаёт справляться, и даже небольшие дозы алкоголя вызывают тяжёлые реакции.
Подробнее можно узнать тут – https://kapelnica-ot-zapoya-dolgoprudnyj11.ru/kapelnica-ot-zapoya-srochno-v-dolgoprudnom/
Современная наркологическая помощь — это не просто лечение зависимости, а система комплексных мер, направленных на восстановление здоровья, эмоционального равновесия и социальной адаптации пациента. В клинике «ИжТрезвоМед Центр» в Ижевске применяются передовые методики терапии, соответствующие международным стандартам. Здесь работают квалифицированные врачи-наркологи, психиатры и реабилитологи, которые разрабатывают индивидуальные программы лечения в зависимости от формы и стадии заболевания. Центр предлагает как амбулаторное, так и стационарное лечение, а также выезд специалистов на дом, что делает помощь доступной и оперативной.
Ознакомиться с деталями – [url=https://narkologicheskaya-klinika-v-izhevske18.ru/]наркологическая клиника наркологический центр в ижевске[/url]
После прохождения курса капельниц пациенты отмечают улучшение сна, исчезновение головной боли, восстановление аппетита и общего самочувствия. При тяжёлых формах зависимости лечение дополняется физиотерапией и психологической помощью.
Углубиться в тему – [url=https://vyvod-iz-zapoya-penza18.ru/]вывод из запоя на дому в пензе[/url]
Там, где раньше хватало одного тяжёлого утра, теперь требуются дни детоксикации. И чем позже подключается врач, тем сложнее вернуть организм к относительно безопасному состоянию.
Ознакомиться с деталями – https://vyvod-iz-zapoya-voskresensk11.ru/vyvod-iz-zapoya-kapelnica-v-voskresenske/
Такой подход позволяет устранить физические последствия запоя и снизить психологическую зависимость. Уже после первой процедуры пациенты отмечают улучшение самочувствия, появление аппетита и нормализацию сна. Важно не ограничиваться только экстренной помощью — специалисты рекомендуют пройти курс восстановления, чтобы предотвратить рецидивы.
Подробнее можно узнать тут – [url=https://vyvodiz-zapoya-vladivostok18.ru/]вывод из запоя цена владивосток[/url]
1win депозит через о деньги инструкция [url=http://1win17384.help/]http://1win17384.help/[/url]
Многие годами живут в логике: «главное — с утра выпить чуть-чуть, станет легче». На коротком промежутке времени это действительно частично снимает симптомы, но по сути лишь продлевает запой и усиливает интоксикацию. Организм не успевает переработать продукты распада алкоголя, кровь становится «тяжёлой», нарушается работа сосудов, возрастает нагрузка на сердце и мозг.
Подробнее можно узнать тут – [url=https://kapelnica-ot-zapoya-dolgoprudnyj11.ru/]капельница от запоя в Долгопрудном[/url]
мостбет ограничения аккаунта [url=https://mostbet51837.help]https://mostbet51837.help[/url]
Наркологическая клиника опирается на комплексную модель оценки состояния, обеспечивающую последовательное восстановление функций организма. В клинике применяется система многоуровневого контроля, направленная на выявление нарушений и определение оптимальной тактики вмешательства. Такой подход позволяет поддерживать стабильность состояния даже в условиях выраженных клинических проявлений. Структурированная работа направлена на снижение токсической нагрузки, коррекцию метаболических процессов и восстановление адаптивных механизмов. Анализ проводится с учётом физиологических особенностей пациента и динамики изменений.
Углубиться в тему – [url=https://narkologicheskaya-klinika-vo-vladivostoke18.ru/]частная наркологическая клиника владивосток[/url]
Такое поэтапное лечение позволяет добиться устойчивого результата без стрессов и осложнений. Пациенты получают комплексную помощь, включающую как медицинские, так и психотерапевтические аспекты.
Подробнее тут – http://narkologicheskaya-klinika-kemerovo18.ru/narkolog-kemerovo-na-dom/
Наркологическая клиника в клинике в Астрахани предоставляет помощь пациентам, сталкивающимся с различными формами зависимости — алкогольной, наркотической, лекарственной. Основой терапии является комплексный подход, включающий медицинскую детоксикацию, стабилизацию состояния, психотерапию и последующее наблюдение. Такой формат работы позволяет мягко купировать острые симптомы, восстановить физиологические функции и подготовить пациента к длительной реабилитации. Все процедуры проводятся анонимно, с использованием сертифицированных препаратов и с постоянным контролем врача.
Разобраться лучше – http://narkologicheskaya-klinika-astrakhan18.ru
Такая таблица позволяет систематизировать данные наблюдения и поддерживать единый подход к интерпретации результатов. Это повышает прозрачность процесса и делает оценку состояния объективной вне зависимости от длительности лечения.
Углубиться в тему – http://narkologicheskaya-klinika-penza18.ru/narkologicheskaya-poliklinika-penza/
Зависимость редко начинается резко. Сначала это «разовые» посиделки, алкоголь «для снятия стресса», эпизодическое употребление психоактивных веществ «из любопытства» или «для компании». На этом этапе человеку кажется, что он полностью контролирует ситуацию. Со временем эпизоды употребления становятся чаще, дозы растут, появляются провалы в памяти, срывы, невозможность остановиться вовремя. В этот момент уже страдают здоровье, работа, отношения с близкими. Обращение в наркологическую клинику позволяет не доводить ситуацию до критической точки и остановить разрушение жизни на любом этапе заболевания.
Углубиться в тему – http://narkologicheskaya-klinika-dolgoprudnyj11.ru
Капельница от запоя в Долгопрудном — это не «усиленное похмелье», а медицинская процедура, которая помогает организму справиться с тяжёлой интоксикацией и выйти из затянувшегося запоя с меньшими рисками. Когда человек несколько дней подряд употребляет алкоголь, все системы работают на пределе: страдают сердце, мозг, печень, нервная система. Обычные домашние методы — рассол, крепкий чай, обезболивающие таблетки — в этот момент уже не работают или дают лишь краткое облегчение, маскируя настоящую нагрузку на организм.
Получить дополнительную информацию – [url=https://kapelnica-ot-zapoya-dolgoprudnyj11.ru/]капельница от алкоголя[/url]
мостбет вход на сайт [url=www.mostbet51837.help]www.mostbet51837.help[/url]
Есть ряд признаков, при которых ждать категорически нельзя и нужна срочная помощь врача, а не очередные «народные методы». Если вы замечаете у человека следующие симптомы, это прямой повод организовать профессиональный вывод из запоя:
Подробнее – [url=https://vyvod-iz-zapoya-moskva011.ru/]vyvod-iz-zapoya-na-domu-moskva[/url]
Важно и то, что во время процедуры пациент находится под наблюдением. Врач может увидеть, как организм реагирует на терапию, вовремя скорректировать темп или состав инфузии, понять, достаточно ли домашнего формата или лучше рассмотреть стационар. Это принципиальное отличие от попыток лечиться дома таблетками наугад, без контроля давления и пульса.
Разобраться лучше – http://kapelnica-ot-zapoya-dolgoprudnyj11.ru/kapelnica-ot-alkogolya-cena-v-dolgoprudnom/
В Воскресенске вывод из запоя может проводиться в разных форматах — с выездом на дом, в условиях стационара, в срочном режиме или с последующим амбулаторным наблюдением. Правильный выбор зависит от тяжести состояния, возраста пациента, наличия хронических заболеваний и того, насколько сильно запой нарушил привычную жизнь.
Получить больше информации – http://vyvod-iz-zapoya-voskresensk11.ru/vyvod-iz-zapoya-vyzov-v-voskresenske/https://vyvod-iz-zapoya-voskresensk11.ru
Есть ряд признаков, при которых ждать категорически нельзя и нужна срочная помощь врача, а не очередные «народные методы». Если вы замечаете у человека следующие симптомы, это прямой повод организовать профессиональный вывод из запоя:
Подробнее можно узнать тут – https://vyvod-iz-zapoya-moskva011.ru/klinika-vyvod-iz-zapoya-v-moskve/
В данном тексте собраны разнообразные случайные сведения и не вполне определённые идеи, которые могут вызвать интерес. Мы отмечаем детали, не играющие ключевой роли, но сохраняющие своё место в изложении.
Подробнее читать – [url=https://rostov-narkologiya.ru/ ]похудеть на таблетках[/url]
Статья содержит практические рекомендации и полезные советы, которые можно легко применить в повседневной жизни. Мы делаем акцент на реальных примерах и проверенных методиках, которые способствуют личностному развитию и улучшению качества жизни.
Читать далее > – https://itsbetterthisworld.com/latest-news/the-unsent-project
Эта информационная статья содержит полезные факты, советы и рекомендации, которые помогут вам быть в курсе последних тенденций и изменений в выбранной области. Материал составлен так, чтобы быть полезным и понятным каждому.
Познакомиться с результатами исследований – https://lachartreusesurmars.com/hello-world
После поступления вызова нарколог клиники «АльфаНаркология» оперативно выезжает по указанному адресу. На месте врач проводит первичную диагностику, оценивая степень интоксикации, физическое и психологическое состояние пациента. По результатам осмотра врач подбирает индивидуальный комплекс лечебных процедур, в который входит постановка капельницы с растворами для детоксикации, препараты для стабилизации работы органов и нормализации психического состояния.
Узнать больше – [url=https://narcolog-na-dom-sankt-peterburg000.ru/]нарколог на дом недорого санкт-петербург[/url]
В данной обзорной статье представлены интригующие факты, которые не оставят вас равнодушными. Мы критикуем и анализируем события, которые изменили наше восприятие мира. Узнайте, что стоит за новыми открытиями и как они могут изменить ваше восприятие реальности.
Подробности по ссылке – http://ultraviolettesting.ru/shop/484434
«УралМедЦентр» организует домашний формат наркологической помощи в Екатеринбурге как спокойный и технологичный процесс без очередей и лишнего шума. Мы приезжаем круглосуточно во все районы — от Уралмаша до Академического — и запускаем персональную схему стабилизации прямо у вас дома: экспресс-оценка, титрованные капельницы через инфузомат, защита желудка, контроль сердечного ритма, настройка сна и питьевого режима. В целях конфиденциальности специалисты приезжают без медицинской символики, документы формулируются нейтрально, уведомления — «тихие», а при желании оформляется кодовый профиль. Так мы снимаем стигму и возвращаем человеку чувство контроля уже в первые часы.
Получить больше информации – [url=https://narcolog-na-dom-ekaterinburg0.ru/]врач нарколог выезд на дом[/url]
В статье представлены ключевые моменты по актуальной теме, дополненные советами экспертов и ссылками на дополнительные ресурсы. Цель материала — дать читателю инструменты для самостоятельного развития и принятия осознанных решений.
Что скрывают от вас? – https://www.janicecantore.com/the-durst-cold-case
Этот текст призван помочь читателю расширить кругозор и получить практические знания. Мы используем простой язык, наглядные примеры и структурированное изложение, чтобы сделать обучение максимально эффективным и увлекательным.
Раскрыть тему полностью – https://www.bintangunggas.com/update-harga-telur-blitar/update-harga-online-telur-se-indonesia-rabu-13-maret-2024
Публикация предлагает читателю не просто информацию, а инструменты для анализа и саморазвития. Мы стимулируем критическое мышление, предлагая различные точки зрения и призывая к самостоятельному поиску решений.
Заходи — там интересно – https://showmetoronto.com/navigating-toronto-pearson-international-airport
Вызов нарколога на дом становится необходимым при любых состояниях, когда отказ от алкоголя сопровождается выраженными симптомами интоксикации и абстиненции. Основные ситуации, в которых срочно требуется профессиональная помощь врача:
Углубиться в тему – [url=https://narcolog-na-dom-sochi0.ru/]www.domen.ru[/url]
В этой информационной статье вы найдете интересное содержание, которое поможет вам расширить свои знания. Мы предлагаем увлекательный подход и уникальные взгляды на обсуждаемые темы, побуждая пользователей к активному мышлению и критическому анализу.
Подробнее – https://ca-offers.pages.dev
В этой статье представлен занимательный и актуальный контент, который заставит вас задуматься. Мы обсуждаем насущные вопросы и проблемы, а также освещаем истории, которые вдохновляют на действия и изменения. Узнайте, что стоит за событиями нашего времени!
См. подробности – https://simplybysophia.com/the-ultimate-guide-to-skin-barrier-repair-how-to-heal-and-strengthen-your-skin
Статья знакомит с важнейшими моментами, которые сформировали наше общество. От великих изобретений до культурных переворотов — вы узнаете, как прошлое влияет на наше мышление, технологии и образ жизни.
Кликни и узнай всё! – https://revellrealtors.com/nri-real-estate-investment-in-pune-india
В этой статье представлен занимательный и актуальный контент, который заставит вас задуматься. Мы обсуждаем насущные вопросы и проблемы, а также освещаем истории, которые вдохновляют на действия и изменения. Узнайте, что стоит за событиями нашего времени!
Детальнее – https://lemondeinfos.com/header-with-ad-space
Эта информационная статья охватывает широкий спектр актуальных тем и вопросов. Мы стремимся осветить ключевые факты и события с ясностью и простотой, чтобы каждый читатель мог извлечь из нее полезные знания и полезные инсайты.
Продолжить изучение – https://freshuinjkt.com/news_update/flashback-2022-fresh-uin-jakarta-menjadi-delegasi-diberbagai-acara-regional-hingga-internasional
Эта статья сочетает познавательный и занимательный контент, что делает ее идеальной для любителей глубоких исследований. Мы рассмотрим увлекательные аспекты различных тем и предоставим вам новые знания, которые могут оказаться полезными в будущем.
Получить дополнительные сведения – https://aawaz.edu.pk/degree-programs/bs-mass-communication
Эта статья предлагает живое освещение актуальной темы с множеством интересных фактов. Мы рассмотрим ключевые моменты, которые делают данную тему важной и актуальной. Подготовьтесь к насыщенному путешествию по неизвестным аспектам и узнайте больше о значимых событиях.
Всё, что нужно знать – https://novanosofa.com
Эта статья для ознакомления предлагает читателям общее представление об актуальной теме. Мы стремимся представить ключевые факты и идеи, которые помогут читателям получить представление о предмете и решить, стоит ли углубляться в изучение.
Что ещё нужно знать? – https://medicalcbd.com.co/producto/grand-daddy-purple-semilla-feminizada-deaka
В статье представлены ключевые моменты по актуальной теме, дополненные советами экспертов и ссылками на дополнительные ресурсы. Цель материала — дать читателю инструменты для самостоятельного развития и принятия осознанных решений.
Лови подробности – https://tvoyaizuminka.ru/kulinariya/vipechka/morkovno-tykvennyj-pirog
В этой информационной статье вы найдете интересное содержание, которое поможет вам расширить свои знания. Мы предлагаем увлекательный подход и уникальные взгляды на обсуждаемые темы, побуждая пользователей к активному мышлению и критическому анализу.
Как это работает — подробно – http://gangforeman.ru/t/143711
Этот увлекательный информационный материал подарит вам массу новых знаний и ярких эмоций. Мы собрали для вас интересные факты и сведения, которые обогатят ваш опыт. Откройте для себя увлекательный мир информации и насладитесь процессом изучения!
Слушай внимательно — тут важно – https://nutricionplena.com/centro-de-distribucion-cedis-omnilife-en-estados-unidos-donde-comprar-omnilife-en-estados-unidos
В этом интересном тексте собраны обширные сведения, которые помогут вам понять различные аспекты обсуждаемой темы. Мы разбираем детали и факты, делая акцент на важности каждого элемента. Не упустите возможность расширить свои знания и взглянуть на мир по-новому!
Прочитать подробнее – https://direkt-pkw-ankauf.de/how-close-are-we-to-autonomous-cars
Современные технологии позволяют:
Подробнее – http://kachestvo-vyvod-iz-zapoya.ru/
Этот интересный отчет представляет собой сборник полезных фактов, касающихся актуальных тем. Мы проанализируем данные, чтобы вы могли сделать обоснованные выводы. Читайте, чтобы узнать больше о последних трендах и значимых событиях!
Узнать больше – https://admarch.net/blog-full-width
В этом обзорном материале представлены увлекательные детали, которые находят отражение в различных аспектах жизни. Мы исследуем непонятные и интересные моменты, позволяя читателю увидеть картину целиком. Погрузитесь в мир знаний и удивительных открытий!
Переходите по ссылке ниже – https://patanjaliayurved.org/product/coconut-hair-wash
Если по ходу визита появляются «красные флаги» (падение сатурации, нестабильный ритм, нарастающая дезориентация), маршрут мгновенно переводится в стационарный блок «ЕкатеринбургМедСервис» — без «обнуления» обследований и без потери приватности. Вся собранная информация остаётся в единой карте наблюдения, что экономит время и силы.
Разобраться лучше – https://narcolog-na-dom-ekaterinburg00.ru/narkolog-ekaterinburg-otzyvy/
Эта статья предлагает уникальную подборку занимательных фактов и необычных историй, которые вы, возможно, не знали. Мы постараемся вдохновить ваше воображение и разнообразить ваш кругозор, погружая вас в мир, полный интересных открытий. Читайте и открывайте для себя новое!
См. подробности – https://telegra.ph/Interesnye-sajty-s-poleznymi-materialami-09-18
1win о деньги Киргизия [url=1win87143.help]1win87143.help[/url]
Эта обзорная заметка содержит ключевые моменты и факты по актуальным вопросам. Она поможет читателям быстро ориентироваться в теме и узнать о самых важных аспектах сегодня. Получите краткий курс по современной информации и оставайтесь в курсе событий!
Смотрите также… – https://www.powertvnews.in/2022/01/05/nail-torture
Состав инфузии формируется по доминирующему симптому и данным экспресс-измерений, с учётом лекарственных взаимодействий. Врач оценивает динамику в реальном времени и, при необходимости, корректирует состав/скорость. Ниже — примеры профилей; окончательное решение всегда очное.
Подробнее тут – [url=https://narcolog-na-dom-ekaterinburg0.ru/]вызвать нарколога на дом екатеринбург[/url]
Во время процедуры врач контролирует состояние больного, по необходимости корректирует лечение, чтобы добиться максимального терапевтического эффекта. После проведения детоксикации пациенту назначается курс поддерживающей терапии, а также даются рекомендации по дальнейшему восстановлению и профилактике рецидивов.
Углубиться в тему – [url=https://narcolog-na-dom-sochi0.ru/]нарколог на дом недорого в сочи[/url]
Не хотите платить за лицензию? У нас есть рабочий кряк для Windows 11 — скачайте прямо сейчас!
Подробнее – [url=https://krasnodar.med24.online/landing/vyvod_iz_zapoya/]Где найти рабочий ключ для Windows 11[/url]
1win пополнение не проходит [url=http://1win87143.help/]http://1win87143.help/[/url]
Этот информативный текст отличается привлекательным содержанием и актуальными данными. Мы предлагаем читателям взглянуть на привычные вещи под новым углом, предоставляя интересный и доступный материал. Получите удовольствие от чтения и расширьте кругозор!
Полная информация здесь – https://www.fundamentale.ro/construirea-unui-patio-sfaturi-pentru-un-proiect-reusit
Домашний визит нарколога — это не компромисс «на скорую руку», а тщательно организованный процесс, который экономит время, сохраняет конфиденциальность и делает лечение предсказуемым. «ЕкатеринбургМедСервис» принимает вызовы круглосуточно и выезжает во все районы города — от Уралмаша и ВИЗа до Академического и Широкой Речки. Команда приезжает без внешних опознавательных знаков, использует нейтральные формулировки в документах и ведёт переписку только по защищённым каналам связи. На месте мы быстро проводим экспресс-диагностику, запускаем титрованные капельницы через инфузомат, контролируем пульс, сатурацию и артериальное давление, подключаем гастропротекцию и аккуратно управляем тревогой без избыточной седации. Цель — безопасно «снять волну» симптомов, вернуть возможность пить воду и отдыхать, а затем закрепить результат на горизонте ближайших 72 часов.
Ознакомиться с деталями – [url=https://narcolog-na-dom-ekaterinburg00.ru/]нарколог капельница на дом екатеринбург[/url]
На нашем сайте вы можете скачать активатор для Windows 11 абсолютно бесплатно и навсегда забыть о водяных знаках!
Подробнее – [url=https://krasnodar.med24.online/landing/narkolog_na_dom/]Где найти рабочий ключ для Windows 11[/url]
Этот текст содержит различную информацию, которая, возможно, покажется любопытной, но в целом не меняет восприятия привычных вещей. Предлагаем просто получить удовольствие от чтения, не ожидая особой пользы.
Вот – [url=https://arma-rehab.ru/]секс чат[/url]
«УралМедЦентр» организует домашний формат наркологической помощи в Екатеринбурге как спокойный и технологичный процесс без очередей и лишнего шума. Мы приезжаем круглосуточно во все районы — от Уралмаша до Академического — и запускаем персональную схему стабилизации прямо у вас дома: экспресс-оценка, титрованные капельницы через инфузомат, защита желудка, контроль сердечного ритма, настройка сна и питьевого режима. В целях конфиденциальности специалисты приезжают без медицинской символики, документы формулируются нейтрально, уведомления — «тихие», а при желании оформляется кодовый профиль. Так мы снимаем стигму и возвращаем человеку чувство контроля уже в первые часы.
Получить больше информации – http://
Если по ходу визита появляются «красные флаги» (падение сатурации, нестабильный ритм, нарастающая дезориентация), маршрут мгновенно переводится в стационарный блок «ЕкатеринбургМедСервис» — без «обнуления» обследований и без потери приватности. Вся собранная информация остаётся в единой карте наблюдения, что экономит время и силы.
Получить больше информации – [url=https://narcolog-na-dom-ekaterinburg00.ru/]нарколог на дом[/url]
Алкогольный запой представляет собой длительное бесконтрольное приём спиртного, приводящее к тяжёлой интоксикации и серьёзным осложнениям для органов и психики. В Новосибирске клиника «Сибирский Доктор» предлагает качественный вывод из запоя с применением инновационных технологий и участием опытных наркологов, терапевтов и психиатров. Наш подход сочетает мгновенную реакцию на вызов, современное оборудование и индивидуальные схемы лечения, что позволяет достичь стабильной ремиссии и снизить риск рецидива.
Подробнее тут – [url=https://kachestvo-vyvod-iz-zapoya.ru/]вывод из запоя на дому недорого новосибирск[/url]
Метод капельничного лечения от запоя обладает рядом существенных преимуществ, благодаря которым пациенты получают качественную и оперативную помощь:
Детальнее – http://kapelnica-ot-zapoya-arkhangelsk0.ru
Этот обзор предлагает структурированное изложение информации по актуальным вопросам. Материал подан так, чтобы даже новичок мог быстро освоиться в теме и начать использовать полученные знания в практике.
Нажмите, чтобы узнать больше – https://bajaculinaria.com.mx/le-quitan-impuesto-al-vino-en-b-c
1win двухфакторная авторизация [url=https://1win87143.help]https://1win87143.help[/url]
Для детоксикации и восстановления организма после запоя используются только сертифицированные лекарственные препараты с доказанной эффективностью и безопасностью:
Получить больше информации – [url=https://narcolog-na-dom-sochi0.ru/]нарколог на дом вывод из запоя[/url]
Первичная цель процедуры — безопасно устранить токсическую нагрузку и восстановить физиологические показатели без осложнений. Лечение подбирается индивидуально, что обеспечивает прогнозируемый результат и минимизирует риски.
Изучить вопрос глубже – [url=https://vyvod-iz-zapoya-v-astrakhani18.ru/]нарколог вывод из запоя астрахань[/url]
1win элсом Киргизия [url=http://1win87143.help]http://1win87143.help[/url]
В условиях круглосуточного наблюдения врачи могут внимательно следить за динамикой состояния, своевременно корректировать схемы лечения, проводить детоксикацию под контролем давления, пульса и работы сердца. Особенно это важно для пациентов с гипертонией, сердечно-сосудистыми заболеваниями, нарушениями ритма, заболеваниями печени, диабетом и другими хроническими патологиями. В стационаре проще организовать обследование, назначить сопутствующую терапию, вовремя заметить опасные симптомы и предотвратить серьёзные осложнения.
Разобраться лучше – https://narkologicheskaya-klinika-lobnya11.ru/narkologicheskaya-klinika-otzyvy-v-lobne
Если по ходу визита появляются «красные флаги» (падение сатурации, нестабильный ритм, нарастающая дезориентация), маршрут мгновенно переводится в стационарный блок «ЕкатеринбургМедСервис» — без «обнуления» обследований и без потери приватности. Вся собранная информация остаётся в единой карте наблюдения, что экономит время и силы.
Получить больше информации – https://narcolog-na-dom-ekaterinburg00.ru/narkolog-ekaterinburg-na-dom/
В этой статье рассматриваются способы преодоления зависимости и успешные истории людей, которые справились с этой проблемой. Мы обсудим важность поддержки со стороны близких и профессионалов, а также стратегии, которые могут помочь в процессе выздоровления. Научитесь первоочередным шагам к новой жизни.
Получить дополнительную информацию – http://spartakbasket.ru/bitrix/redirect.php?goto=https://vyvod-iz-zapoya-tolyatti0.ru/vyvedenie-iz-zapoya-tolyatti
Бесплатный ключ для Windows 11 — только у нас, обновлено в 2026 году!
Подробнее – [url=https://krasnodar.med24.online/landing/narkolog_na_dom/]Активатор Windows 11 скачать бесплатно[/url]
Перед началом терапии проводится клиническая оценка, включающая измерение давления, осмотр кожи и глаз, проверку дыхания и анализ неврологического состояния. Вывод из запоя в клинике в Астрахани начинается только после сбора этих данных, поскольку подбор препаратов без диагностики может быть небезопасен.
Получить дополнительную информацию – [url=https://vyvod-iz-zapoya-v-astrakhani18.ru/]www.domen.ru[/url]
Состав инфузии формируется под доминирующие симптомы и данные экспресс-измерений. Мы избегаем шаблонов: у каждого профиля — конкретная цель и измеримый эффект. Ниже — ориентиры; окончательные решения врач принимает очно, с учётом лекарственных взаимодействий и ваших приоритетов (работа, семья, график сна).
Углубиться в тему – [url=https://narcolog-na-dom-ekaterinburg00.ru/]нарколог капельница на дом в екатеринбурге[/url]
«УралМедЦентр» организует домашний формат наркологической помощи в Екатеринбурге как спокойный и технологичный процесс без очередей и лишнего шума. Мы приезжаем круглосуточно во все районы — от Уралмаша до Академического — и запускаем персональную схему стабилизации прямо у вас дома: экспресс-оценка, титрованные капельницы через инфузомат, защита желудка, контроль сердечного ритма, настройка сна и питьевого режима. В целях конфиденциальности специалисты приезжают без медицинской символики, документы формулируются нейтрально, уведомления — «тихие», а при желании оформляется кодовый профиль. Так мы снимаем стигму и возвращаем человеку чувство контроля уже в первые часы.
Получить больше информации – http://narcolog-na-dom-ekaterinburg0.ru
Каждый пациент в «УралМед» получает персональный маршрут реабилитации, составленный после комплексного обследования. План включает медикаментозное выведение из запоя, коррекцию биохимических показателей и психологическую реабилитацию.
Получить дополнительную информацию – https://lechenie-alkogolizma-ekaterinburg0.ru/anonimnoe-lechenie-alkogolizma-v-ekb/
Как активировать Windows 11 без ключа? У нас есть пошаговая инструкция!
Подробнее – [url=https://krasnodar.med24.online/landing/narkolog_na_dom/]Windows 11 активатор на русском[/url]
1вин приветственный бонус [url=https://1win45920.help]1вин приветственный бонус[/url]
Важно: мы заранее проговариваем «зелёные зоны» давления, пульса и сатурации, чтобы пациент и близкие не пытались «самостоятельно улучшить схему». Если динамика «плоская», врач точечно меняет состав/скорость, а часть задач переносит в поведенческий контур (свет, вода, дыхание, расписание «тихих окон»).
Изучить вопрос глубже – [url=https://narcolog-na-dom-ekaterinburg00.ru/]нарколог на дом вывод из запоя екатеринбург[/url]
Этот текст содержит различную информацию, которая, возможно, покажется любопытной, но в целом не меняет восприятия привычных вещей. Предлагаем просто получить удовольствие от чтения, не ожидая особой пользы.
Вот – [url=https://arma-rehab.ru/vyvod-iz-zapoya/]эротические фильмы[/url]
1вин ставки на спорт [url=http://1win06284.help]http://1win06284.help[/url]
Важно: мы заранее проговариваем «зелёные зоны» давления, пульса и сатурации, чтобы пациент и близкие не пытались «самостоятельно улучшить схему». Если динамика «плоская», врач точечно меняет состав/скорость, а часть задач переносит в поведенческий контур (свет, вода, дыхание, расписание «тихих окон»).
Детальнее – [url=https://narcolog-na-dom-ekaterinburg00.ru/]нарколог на дом цены[/url]
Откладывая обращение к специалистам в Ивантеевке, семья берёт на себя двойную нагрузку — и моральную, и медицинскую. Домашние попытки «лечить» смесью случайных таблеток, седативов и народных средств часто маскируют симптомы, но не снимают основную угрозу. При этом ни у кого нет возможности круглосуточно контролировать давление, пульс, работу сердца. Именно поэтому безопасный вывод из запоя — это не ожидание «когда само пройдёт», а продуманный набор медицинских шагов под наблюдением врача.
Ознакомиться с деталями – http://vyvod-iz-zapoya-ivanteevka11.ru/
Лечение на дому проходит в комфортной и спокойной обстановке, что позволяет значительно снизить уровень стресса и быстро улучшить состояние здоровья пациента.
Подробнее можно узнать тут – [url=https://narcolog-na-dom-sochi0.ru/]нарколог капельница на дом сочи[/url]
Рабочий ключ активации для Windows 11 — проверено и обновлено, без блокировок!
Подробнее – [url=https://krasnodar.med24.online/landing/narkolog_na_dom/]Где взять лицензионный ключ для Windows 11[/url]
Задача первого контакта — не «записать к врачу на когда-нибудь», а оценить, насколько ситуация критична прямо сейчас. Если речь идёт о многодневном запое, сильной слабости, одышке, скачках давления, спутанности сознания, лучше не экспериментировать с домашними методами. В таких случаях специалисты в Лобне рекомендуют стационар, где можно не только поставить капельницу, но и быстро среагировать на осложнения. Если же состояние относительно стабильное, возможно обсуждение мягкого формата с выездом и последующим наблюдением.
Выяснить больше – http://narkologicheskaya-klinika-lobnya11-2.ru/narkologicheskaya-klinika-cena-v-lobne/
Путь в наркологическую клинику в Ивантеевке почти всегда начинается с консультации — очной или по телефону. На этом этапе задача врача не осудить и не прочитать нотацию, а максимально точно понять, что происходит: сколько лет длится злоупотребление, как часто бывают запои, были ли попытки лечиться раньше, какие есть хронические болезни, каково текущее физическое и психическое состояние. Собирается анамнез, измеряется давление, оценивается пульс, при необходимости направляют на анализы и дополнительные исследования. Чем честнее и конкретнее человек (или его родственники) описывают ситуацию, тем точнее можно подобрать безопасный план помощи.
Ознакомиться с деталями – https://narkologicheskaya-klinika-ivanteevka11.ru/
В этом материале представлены детали, которые хоть и занимательны, но не особенно значимы. Мы рассматриваем моменты, которые трудно назвать важными, но всё же решили включить их для полноты картины.
Вот – https://arma-rehab.ru
Врач на дому или в клинике проводит:
Углубиться в тему – http://kachestvo-vyvod-iz-zapoya.ru
Экстренная помощь требуется, когда запой начинает негативно сказываться на здоровье, и самостоятельное прекращение употребления алкоголя становится невозможным. Основные показания для круглосуточного вмешательства включают:
Разобраться лучше – [url=https://vyvod-iz-zapoya-volgograd000.ru/]вывод из запоя на дому[/url]
Наши врачи оперативно приезжают к пациенту, проводят осмотр, купируют симптомы абстиненции и приступают к восстановлению жизненно важных функций. Всё это — в привычной для пациента обстановке, без стресса и лишней огласки. Мы обеспечиваем не только медицинскую помощь, но и эмоциональную поддержку, создавая условия для начала пути к выздоровлению.
Подробнее – [url=https://narcolog-na-dom-v-moskve55.ru/]нарколог на дом москва цены[/url]
Анонимность — базовый стандарт «УралМедЦентра». Выезд — немаркированный, одежда врача — гражданская, документы и чеки — с нейтральными формулировками. Медкарта хранится в шифрованном контуре с разграничением доступа по ролям, уведомления не содержат «триггерных» слов, видеосессии не записываются. По запросу вся коммуникация ведётся через доверенное лицо, а оплата возможна наличными и безналом с нейтральным назначением платежа. Для работодателя доступны справки без упоминания наркологического диагноза.
Разобраться лучше – [url=https://narcolog-na-dom-ekaterinburg0.ru/]нарколог на дом цены в екатеринбурге[/url]
«УралМедЦентр» организует домашний формат наркологической помощи в Екатеринбурге как спокойный и технологичный процесс без очередей и лишнего шума. Мы приезжаем круглосуточно во все районы — от Уралмаша до Академического — и запускаем персональную схему стабилизации прямо у вас дома: экспресс-оценка, титрованные капельницы через инфузомат, защита желудка, контроль сердечного ритма, настройка сна и питьевого режима. В целях конфиденциальности специалисты приезжают без медицинской символики, документы формулируются нейтрально, уведомления — «тихие», а при желании оформляется кодовый профиль. Так мы снимаем стигму и возвращаем человеку чувство контроля уже в первые часы.
Ознакомиться с деталями – https://narcolog-na-dom-ekaterinburg0.ru/ekaterinburg-narkologiya
«ЮгМедЦентр» поддерживает строгую конфиденциальность: выездные специалисты приезжают без медицинской символики, в гражданской одежде; документы формулируются нейтрально; уведомления не содержат триггерных слов; профиль можно оформить под кодом. Все записи ведутся в шифрованном контуре с разграничением доступа по ролям, а видеосессии с врачом/психологом не записываются. Мы предупреждаем о цифровой гигиене: включите «тихий режим» уведомлений, избегайте пересылки документов в открытых чатах, используйте резервный канал связи для экстренных вопросов.
Исследовать вопрос подробнее – http://narcolog-na-dom-sochi00.ru/narkolog-i-psikhiatr-adler/
Процедура лечения начинается с установки внутривенной капельницы, через которую вводятся детоксикационные растворы, способствующие быстрому выведению токсинов и восстановлению водно-электролитного баланса. При необходимости врач назначает дополнительные препараты, такие как седативные средства для купирования симптомов абстинентного синдрома, гепатопротекторы для поддержки печени и кардиопротекторы для нормализации работы сердца.
Разобраться лучше – https://vyvod-iz-zapoya-krasnodar00.ru/vyvod-iz-zapoya-na-domu-krasnodar/
Самостоятельный выход из запоя сопряжен с высоким риском развития осложнений. После прекращения приема спиртного ослабленный организм может не выдержать нагрузки, что приведет к инфаркту, инсульту, судорожным приступам и даже алкогольному психозу. Чтобы избежать этих опасных состояний, необходимо вызвать нарколога на дом, который проведет лечение правильно и безопасно.
Подробнее тут – http://vyvod-iz-zapoya-krasnodar0.ru
Препараты подбираются строго индивидуально и могут включать:
Детальнее – [url=https://narcolog-na-dom-v-moskve55.ru/]нарколог на дом цена[/url]
Качественный вывод из запоя — это всегда процесс, а не одна капельница. Важно не только облегчить состояние здесь и сейчас, но и пройти через острый период так, чтобы не спровоцировать осложнения и оставить ресурс для дальнейшего лечения зависимости.
Разобраться лучше – [url=https://vyvod-iz-zapoya-ivanteevka11.ru/]вывод из запоя на дому московская московская область[/url]
Лечение на дому проходит в комфортной и спокойной обстановке, что позволяет значительно снизить уровень стресса и быстро улучшить состояние здоровья пациента.
Подробнее можно узнать тут – [url=https://narcolog-na-dom-sochi0.ru/]нарколог на дом цены[/url]
Если в процессе выявляются нестабильные витальные показатели, нарастающая дезориентация или признаки дыхательной недостаточности, маршрут немедленно переводится в стационар «УралМедЦентра» с сохранением уже собранной информации — без повторных очередей и «история заново».
Получить больше информации – [url=https://narcolog-na-dom-ekaterinburg0.ru/]нарколог на дом недорого екатеринбург[/url]
При длительном запое или серьезной алкогольной интоксикации часто нет возможности или желания ехать в стационар. В таких ситуациях оптимальным решением становится вызов нарколога на дом в Сочи. Специалисты клиники «Жизнь без Запоя» круглосуточно приезжают к пациентам, оперативно оказывают медицинскую помощь и проводят профессиональную детоксикацию организма прямо в домашних условиях. Благодаря комфортному лечению на дому пациенты быстрее восстанавливаются, избегают дополнительного стресса и осложнений, связанных с госпитализацией.
Получить дополнительные сведения – [url=https://narcolog-na-dom-sochi0.ru/]вызвать врача нарколога на дом сочи[/url]
Лечение проходит поэтапно, чтобы пациент не испытывал стресса и перегрузок. Каждый шаг контролируется врачами, а терапия корректируется в зависимости от состояния. В таблице ниже представлена структура программы лечения в клинике «АстраМед Трезвость».
Получить дополнительные сведения – [url=https://narkologicheskaya-klinika-v-astrakhani18.ru/]наркологические клиники алкоголизм[/url]
Путь в наркологическую клинику в Ивантеевке почти всегда начинается с консультации — очной или по телефону. На этом этапе задача врача не осудить и не прочитать нотацию, а максимально точно понять, что происходит: сколько лет длится злоупотребление, как часто бывают запои, были ли попытки лечиться раньше, какие есть хронические болезни, каково текущее физическое и психическое состояние. Собирается анамнез, измеряется давление, оценивается пульс, при необходимости направляют на анализы и дополнительные исследования. Чем честнее и конкретнее человек (или его родственники) описывают ситуацию, тем точнее можно подобрать безопасный план помощи.
Изучить вопрос глубже – [url=https://narkologicheskaya-klinika-ivanteevka11.ru/]narkologicheskie-kliniki-v-podmoskove[/url]
Как активировать Windows 11 без ключа? У нас есть пошаговая инструкция!
Подробнее – [url=https://krasnodar.med24.online/landing/narkolog_na_dom/]Как активировать Windows 11 без ключа[/url]
Вывод из запоя в «Сибирском Докторе» происходит в несколько взаимосвязанных этапов:
Получить больше информации – [url=https://kachestvo-vyvod-iz-zapoya.ru/]врач вывод из запоя новосибирск[/url]
Ночной вызов ничем не отличается от утреннего: мы отвечаем, уточняем риски и запускаем маршрут так, чтобы первые часы прошли спокойно. Наш алгоритм простой и понятный — он экономит время и убирает хаос. Ниже — ориентировочная карта визита; по месту врач адаптирует её к возрасту, соматическому фону и текущим симптомам.
Ознакомиться с деталями – [url=https://narcolog-na-dom-sochi00.ru/]нарколог на дом недорого сочи[/url]
Приватность — клинический фактор, снижающий тревогу и укрепляющий доверие. В «ЕкатеринбургМедСервис» выезд немаркированный, специалисты в гражданской одежде, уведомления — «тихие», документы — с нейтральными формулировками. Медкарта хранится в шифрованном контуре, доступ к данным разграничен по ролям. По запросу вся коммуникация ведётся через доверенное лицо, а оплата возможна наличными или безналом с нейтральным назначением платежа. Это позволяет оставаться в тени и при этом получать полноценную помощь.
Изучить вопрос глубже – [url=https://narcolog-na-dom-ekaterinburg00.ru/]вызвать нарколога на дом в екатеринбурге[/url]
Мы следуем прозрачному алгоритму: оценить риски — подтвердить безопасность домашнего формата — запустить инфузионный контур — объяснить «коридоры безопасности» и точки связи. Такой порядок снижает тревожность, делает управление симптомами измеримым и понятным, а родственникам оставляет простые инструкции без медицинского жаргона.
Подробнее можно узнать тут – http://narcolog-na-dom-ekaterinburg00.ru/ekaterinburg-narkologiya/
Задача первого контакта — не «записать к врачу на когда-нибудь», а оценить, насколько ситуация критична прямо сейчас. Если речь идёт о многодневном запое, сильной слабости, одышке, скачках давления, спутанности сознания, лучше не экспериментировать с домашними методами. В таких случаях специалисты в Лобне рекомендуют стационар, где можно не только поставить капельницу, но и быстро среагировать на осложнения. Если же состояние относительно стабильное, возможно обсуждение мягкого формата с выездом и последующим наблюдением.
Узнать больше – http://narkologicheskaya-klinika-lobnya11-2.ru/narkologicheskaya-klinika-cena-v-lobne/
1вин рабочее зеркало [url=https://1win45920.help]https://1win45920.help[/url]
При длительном запое организм не успевает восстановить свой водно-электролитный баланс, что приводит к обезвоживанию и ухудшению общего состояния. Такие пациенты рискуют развить не только тяжелую интоксикацию, но и хронические заболевания, которые впоследствии требуют длительного и дорогостоящего лечения. Поэтому своевременный вызов врача-нарколога на дом становится критически важным для сохранения здоровья и предотвращения серьезных последствий.
Получить дополнительную информацию – https://vyvod-iz-zapoya-krasnodar00.ru/vyvod-iz-zapoya-kruglosutochno-krasnodar/
Чем раньше нарколог окажет помощь, тем выше шансы избежать осложнений и восстановиться без последствий для здоровья.
Ознакомиться с деталями – [url=https://narcolog-na-dom-sochi0.ru/]нарколог на дом недорого[/url]
Лечение проходит поэтапно, чтобы пациент не испытывал стресса и перегрузок. Каждый шаг контролируется врачами, а терапия корректируется в зависимости от состояния. В таблице ниже представлена структура программы лечения в клинике «АстраМед Трезвость».
Получить дополнительную информацию – http://narkologicheskaya-klinika-v-astrakhani18.ru
В клинике «НаркоСити» используются только сертифицированные лекарственные средства, которые подбираются индивидуально с учетом состояния пациента:
Детальнее – [url=https://vyvod-iz-zapoya-krasnodar0.ru/]вывод из запоя дешево[/url]
Услуга капельничного лечения от запоя на дому в Архангельске предусматривает комплексный подход, направленный на оперативное восстановление организма. Сразу после вызова нарколог прибывает на дом, проводит детальный осмотр, собирает анамнез и измеряет жизненно важные показатели. На основе этих данных разрабатывается персональный план терапии, который включает введение современных медикаментов с использованием автоматизированных систем дозирования, а также психологическую поддержку для создания условий долгосрочной ремиссии.
Исследовать вопрос подробнее – [url=https://kapelnica-ot-zapoya-arkhangelsk0.ru/]www.domen.ru[/url]
Запойное состояние опасно не только токсическим воздействием алкоголя на организм, но и последствиями резкого отказа от спиртного. В таких случаях промедление может стоить здоровья. Нарколог на дом в Рязани приезжает по вызову и проводит процедуру прямо в домашних условиях, используя проверенные медицинские методики. Такой подход сочетает анонимность, оперативность и возможность контроля состояния без госпитализации.
Получить больше информации – [url=https://narcolog-na-dom-ryazan0.ru/]платный нарколог на дом санкт-петербург[/url]
Нарколог на дом в Санкт-Петербурге оказывает помощь при различных формах алкогольной и наркотической зависимости. Основное внимание уделяется купированию абстинентного синдрома, нормализации работы сердечно-сосудистой и нервной систем, а также снижению уровня интоксикации организма.
Узнать больше – [url=https://narcolog-na-dom-sankt-peterburg0.ru/]нарколог на дом круглосуточно в санкт-петербурге[/url]
Не хотите платить за лицензию? У нас есть рабочий кряк для Windows 11 — скачайте прямо сейчас!
Подробнее – [url=https://krasnodar.med24.online/landing/vyvod_iz_zapoya/]Кряк для Windows 11 Pro бесплатно[/url]
Алкоголизм — хроническое заболевание, требующее комплексного подхода и круглосуточного контроля. Клиника «УралМед» в Екатеринбурге предлагает полный спектр услуг для пациентов любого уровня зависимости: от экстренной детоксикации до долгосрочной реабилитации. Главные принципы работы — абсолютная анонимность, индивидуальный план лечения и постоянное сопровождение квалифицированной командой специалистов.
Подробнее – [url=https://lechenie-alkogolizma-ekaterinburg0.ru/]лечение алкоголизма екатеринбург[/url]
Мы собрали для вас самые захватывающие факты из мира науки и истории. От малознакомых деталей до грандиозных событий — эта статья расширит ваш кругозор и подарит новое понимание того, как устроен наш мир.
Изучить материалы по теме – https://nininama.com/7-%D8%AF%D8%A7%D8%B1%D9%88%DB%8C-%D8%A8%D8%A7%D8%B1%D9%88%D8%B1%DB%8C-%D8%A8%D8%B1%D8%A7%DB%8C-%D9%85%D8%B1%D8%AF%D8%A7%D9%86-%D8%A8%D9%87%D9%85%D8%B1%D8%A7%D9%87-%D8%A8%D8%B1%D8%B1%D8%B3%DB%8C-%D8%B9
В данной обзорной статье представлены интригующие факты, которые не оставят вас равнодушными. Мы критикуем и анализируем события, которые изменили наше восприятие мира. Узнайте, что стоит за новыми открытиями и как они могут изменить ваше восприятие реальности.
Тыкай сюда — узнаешь много интересного – https://judotraining.info/congress-girona-2023-for-coaches
В этом информативном тексте представлены захватывающие события и факты, которые заставят вас задуматься. Мы обращаем внимание на важные моменты, которые часто остаются незамеченными, и предлагаем новые перспективы на привычные вещи. Подготовьтесь к тому, чтобы быть поглощенным увлекательными рассказами!
Получить полную информацию – https://mri-scan.ru/kak-provesti-effektivnoe-lechenie-pankreatita-sovety-ot-professionalov
В данной статье вы найдете комплексный подход к изучению насущных тем. Мы комбинируем теоретические сведения с практическими советами, чтобы читатель мог не только понять проблему, но и найти пути её решения.
Запросить дополнительные данные – https://anpeq.it/index.php/component/k2/item/4-4-tips-for-having-a-family-meeting-on-media-device-boundaries?start=170600
Публикация предлагает читателю не просто информацию, а инструменты для анализа и саморазвития. Мы стимулируем критическое мышление, предлагая различные точки зрения и призывая к самостоятельному поиску решений.
Как это работает — подробно – https://nutricionplena.com/como-tomar-los-productos-omnilife
1win скачать на android [url=https://1win45920.help/]https://1win45920.help/[/url]
В этот этап включено:
Выяснить больше – [url=https://kachestvo-vyvod-iz-zapoya.ru/]нарколог вывод из запоя новосибирск[/url]
Алкогольный запой представляет собой длительное бесконтрольное приём спиртного, приводящее к тяжёлой интоксикации и серьёзным осложнениям для органов и психики. В Новосибирске клиника «Сибирский Доктор» предлагает качественный вывод из запоя с применением инновационных технологий и участием опытных наркологов, терапевтов и психиатров. Наш подход сочетает мгновенную реакцию на вызов, современное оборудование и индивидуальные схемы лечения, что позволяет достичь стабильной ремиссии и снизить риск рецидива.
Изучить вопрос глубже – [url=https://kachestvo-vyvod-iz-zapoya.ru/]вывод из запоя вызов[/url]
1win mines [url=https://www.1win06284.help]https://www.1win06284.help[/url]
Мы собрали для вас самые захватывающие факты из мира науки и истории. От малознакомых деталей до грандиозных событий — эта статья расширит ваш кругозор и подарит новое понимание того, как устроен наш мир.
Узнать напрямую – https://nininama.com/7-%D8%AF%D8%A7%D8%B1%D9%88%DB%8C-%D8%A8%D8%A7%D8%B1%D9%88%D8%B1%DB%8C-%D8%A8%D8%B1%D8%A7%DB%8C-%D9%85%D8%B1%D8%AF%D8%A7%D9%86-%D8%A8%D9%87%D9%85%D8%B1%D8%A7%D9%87-%D8%A8%D8%B1%D8%B1%D8%B3%DB%8C-%D8%B9
краш 1win [url=http://1win45920.help/]http://1win45920.help/[/url]
Мы собрали для вас самые захватывающие факты из мира науки и истории. От малознакомых деталей до грандиозных событий — эта статья расширит ваш кругозор и подарит новое понимание того, как устроен наш мир.
Получить дополнительную информацию – https://www2.unifap.br/profei/?p=1
Эта публикация содержит набор несвязанных идей, трудно применимых в практике. Мы лишь поверхностно затрагиваем различные точки зрения, не проводя глубокий анализ и не предлагая выводов.
Подробнее читать – [url=https://rostov-narkologiya.ru/ ]похудеть на таблетках[/url]
В этом интересном тексте собраны обширные сведения, которые помогут вам понять различные аспекты обсуждаемой темы. Мы разбираем детали и факты, делая акцент на важности каждого элемента. Не упустите возможность расширить свои знания и взглянуть на мир по-новому!
Где можно узнать подробнее? – https://anpeq.it/index.php/component/k2/item/4-4-tips-for-having-a-family-meeting-on-media-device-boundaries?start=170600
Самостоятельный выход из запоя сопряжен с высоким риском развития осложнений. После прекращения приема спиртного ослабленный организм может не выдержать нагрузки, что приведет к инфаркту, инсульту, судорожным приступам и даже алкогольному психозу. Чтобы избежать этих опасных состояний, необходимо вызвать нарколога на дом, который проведет лечение правильно и безопасно.
Разобраться лучше – [url=https://vyvod-iz-zapoya-krasnodar0.ru/]вывод из запоя цена[/url]
Данный порядок действий позволяет снизить риски для здоровья и обеспечить контроль за эффективностью процедур.
Получить больше информации – [url=https://narcolog-na-dom-sankt-peterburg0.ru/]нарколог на дом анонимно санкт-петербург[/url]
На следующем этапе начинается активное медикаментозное вмешательство. Современные препараты вводятся капельничным методом для быстрого выведения токсинов и нормализации обменных процессов, что способствует стабилизации работы жизненно важных органов.
Подробнее – [url=https://vyvod-iz-zapoya-volgograd000.ru/]нарколог на дом вывод из запоя в волгограде[/url]
В этот этап включено:
Подробнее – [url=https://kachestvo-vyvod-iz-zapoya.ru/]www.domen.ru[/url]
Запойное состояние опасно не только токсическим воздействием алкоголя на организм, но и последствиями резкого отказа от спиртного. В таких случаях промедление может стоить здоровья. Нарколог на дом в Рязани приезжает по вызову и проводит процедуру прямо в домашних условиях, используя проверенные медицинские методики. Такой подход сочетает анонимность, оперативность и возможность контроля состояния без госпитализации.
Изучить вопрос глубже – [url=https://narcolog-na-dom-ryazan0.ru/]вызвать врача нарколога на дом санкт-петербург[/url]
Вызывать нарколога на дом рекомендуется при следующих состояниях:
Углубиться в тему – [url=https://narcolog-na-dom-sankt-peterburg000.ru/]врач нарколог выезд на дом санкт-петербург[/url]
Стильный внешний вид создает первое впечатление о человеке.
Он работает на восприятие вас коллегами мгновенно.
Хорошее самочувствие в своем образе укрепляет личную самооценку.
Этот подход демонстрирует высокий стандарт ответственности и уважение к мелочам.
https://hadabem158.livejournal.com/
Посредством одежду вы имеете шанс выразить свою индивидуальность и стиль.
Люди часто воспринимают опрятных людей как более успешных.
Следовательно, инвестиции в собственный стиль — это инвестиции в ваше будущее.
Looking stylish projects a positive first impression.
Your attire speaks loudly before a person actually say a single word.
This boosts your own confidence and mood noticeably.
A polished look conveys competence in the workplace.
https://n5.vladtoday.ru/pOeguLV/
Fashionable choices let you to express your individual identity.
People often judge stylish individuals as more successful and trustworthy.
Ultimately, investing in your wardrobe is an valuable step in your personal brand.
1win вывод на элсом [url=http://1win06284.help]1win вывод на элсом[/url]
Наши врачи оперативно приезжают к пациенту, проводят осмотр, купируют симптомы абстиненции и приступают к восстановлению жизненно важных функций. Всё это — в привычной для пациента обстановке, без стресса и лишней огласки. Мы обеспечиваем не только медицинскую помощь, но и эмоциональную поддержку, создавая условия для начала пути к выздоровлению.
Получить дополнительные сведения – http://narcolog-na-dom-v-moskve55.ru
1win приложение Ош android [url=https://1win74562.help]https://1win74562.help[/url]
В данной статье рассматриваются проблемы общественного здоровья и социальные факторы, влияющие на него. Мы акцентируем внимание на значении профилактики и осведомленности в защите здоровья на уровне общества. Читатели смогут узнать о новых инициативах и программах, направленных на улучшение здоровья населения.
Углубиться в тему – https://48.gregorinius.com/index/d1?diff=0&source=og&campaign=4397&clickid=hrx9nw9psafm4g9v&aurl=https://vyvod-iz-zapoya-tolyatti0.ru/vyvod-iz-zapoya-tolyatti-na-domu/&title=joellemonetcream99964&url=https://vyvod-iz-zapoya-tolyatti0.ru/vyvod-iz-zapoya-tolyatti-na-domu/&email=jettmcguigan%40web.de++skin+color+as+this+will+help+to+your+skin+to+become+richer+&smoother__For_greasy_skin_around_the_globe_beneficial%2C_since_it_is_soaks_oil_for_till_10_hours__Give_a_gentle_massage_with_the_face_using_moisturizer_and_apply_it_on_your_neck%2C_to_see_the_perfect_image_%3Cbr%3E%3Cbr%3E%3Cbr%3E%3Cbr%3EWell%2C_even_if_essential_oils_and_wrinkles_are_strongly_connected%2C_that_doesn%27t_mean_that_all_oils_work_the_same_and_how_the_result_always_be_what_you_expect__There_are_major_differences_between_oil_types_and_you_will_know_exactly_what_you_need_it_if_you_must_cure_your_wrinkles_%3Cbr%3E%3Cbr%3E%3Cbr%3E%3Cbr%3Ehealthline_com_-_https%3A%2F%2Fwww_healthline_com%2Fhealth%2Fhow-to-get-rid-of-frown-lines_For_fantastic_cutting_back_on_the_degree_of_food_consume_at_one_setting_will_help%2C_just_be_sure_to_switch_to_five_small_meals_each_working__For_many_men_and_women%2C_they_you_should_be_affected_by_acid_reflux_when_they_eat_a_lot_food__You_can_to_still_end_up_eating_the_very_same_amount_of_food_to_perform_just_divide_it_up_throughout_the_day%2C_instead_of_eating_everything_in_2_or_3_meals_—————————1692248488Content-Disposition%3A_form-data%3B_name=%22field_pays%5Bvalue%5D%22Bahrain—————————1692248488Content-Disposition%3A+form-data%3B+name%3D%22changed%22—————————1692248488Content-Disposition%3A+form-data%3B+name%3D%22form_build_id%22form-c673d3ab9883a7e4fa1cec1fd3225c4c————&pushMode=popup
1win казино [url=https://www.1win06284.help]https://www.1win06284.help[/url]
Каждый пациент в «УралМед» получает персональный маршрут реабилитации, составленный после комплексного обследования. План включает медикаментозное выведение из запоя, коррекцию биохимических показателей и психологическую реабилитацию.
Получить дополнительную информацию – [url=https://lechenie-alkogolizma-ekaterinburg0.ru/]лечение пивного алкоголизма[/url]
Стильный вид создает первое впечатление о вас.
Он влияет на оценку вас коллегами мгновенно.
Хорошее самочувствие в своем образе повышает вашу уверенность.
Он подчеркивает ваш стандарт ответственности и уважение к мелочам.
https://www.tumblr.com/sneakerizer/807073021437329408/luisa-spagnoli-%D0%BD%D0%B5-%D0%BF%D1%80%D0%BE%D1%81%D1%82%D0%BE-%D0%B0%D0%BD%D0%B3%D0%B5%D0%BB%D1%8B-%D0%B0-%D0%BD%D0%B0%D1%81%D1%82%D0%BE%D1%8F%D1%89%D0%B8%D0%B5
Через гардероб вы можете выразить свою индивидуальность и стиль.
Люди часто воспринимают стильных индивидов как более компетентных.
Следовательно, инвестиции в свой стиль — это вклад в ваше успешное будущее.
Этот информационный набор привлекает внимание множеством мелочей и странных ракурсов. Мы предлагаем взгляды, которые редко бывают полезны, но могут слегка разнообразить ваше знакомство с темой.
Вот – [url=https://arma-rehab.ru/vyvod-iz-zapoya/]покер онлайн[/url]
1win не приходит смс код [url=https://1win74562.help/]https://1win74562.help/[/url]
Наши врачи оперативно приезжают к пациенту, проводят осмотр, купируют симптомы абстиненции и приступают к восстановлению жизненно важных функций. Всё это — в привычной для пациента обстановке, без стресса и лишней огласки. Мы обеспечиваем не только медицинскую помощь, но и эмоциональную поддержку, создавая условия для начала пути к выздоровлению.
Подробнее можно узнать тут – [url=https://narcolog-na-dom-v-moskve55.ru/]вызов нарколога на дом[/url]
1win плинко [url=www.1win74562.help]www.1win74562.help[/url]
Текст включает разнообразную информацию, которая может показаться любопытной, но не меняет устоявшегося восприятия. Предлагаем просто насладиться чтением, не ожидая значительной пользы.
Подробнее читать – [url=https://rostov-narkologiya.ru/uslugi-ot-narkomanii/mefedronovaya-zavisimost/]похудеть на таблетках[/url]
1win моментальный вывод [url=https://1win74562.help]1win моментальный вывод[/url]
В этом исследовании рассмотрены методы лечения зависимостей и их эффективность. Мы проанализируем различные подходы, используемые в реабилитационных центрах, и представим данные о результативности программ. Читатели получат надежные и научно обоснованные сведения о данной проблеме.
Подробнее – http://142.250.76.146/url?q=https://vyvod-iz-zapoya-tolyatti0.ru/vyvod-iz-zapoya-tolyatti-na-domu
Этот текст содержит различную информацию, которая, возможно, покажется любопытной, но в целом не меняет восприятия привычных вещей. Предлагаем просто получить удовольствие от чтения, не ожидая особой пользы.
Вот – [url=https://arma-rehab.ru/]казино с быстрым выводом[/url]
Клиника «ВладТрезвие Центр» работает в круглосуточном режиме и готова оказать помощь жителям Владивостока и прилегающих районов в любое время суток. Врачи-наркологи прибывают по вызову в течение часа, имеют при себе все необходимые препараты и оборудование для проведения детоксикации на дому. При необходимости пациента доставляют в стационар, где лечение проходит под постоянным контролем медицинского персонала.
Изучить вопрос глубже – [url=https://vyvodiz-zapoya-vladivostok18.ru/]вывод из запоя в стационаре в владивостоке[/url]
«Ижевский Центр Трезвых Решений» — это частное медицинское учреждение, где проводится лечение всех форм алкогольной и наркотической зависимости. Программы терапии разработаны на основе международных рекомендаций и включают не только медикаментозное воздействие, но и психологическую поддержку. Все процедуры проходят анонимно, без постановки на учёт, что особенно важно для пациентов, желающих сохранить конфиденциальность.
Подробнее – [url=https://narkologicheskaya-klinika-v-izhevsk18.ru/]наркологическая клиника стационар[/url]
Детокс — важный этап лечения, который помогает очистить организм от токсинов и продуктов распада алкоголя или наркотиков. В клинике «ТомскМед Трезвость» используются современные капельницы и лекарственные комбинации, направленные на восстановление биохимических процессов в организме. Ниже представлена таблица с примерами капельниц, применяемых в детоксикационных программах.
Изучить вопрос глубже – [url=https://narkologicheskaya-klinika-v-tomske18.ru/]наркологическая клиника лечение алкоголизма[/url]
Во многих семьях путь к лечению начинается одинаково: сначала запои или эпизоды употребления воспринимаются как временные «проблемы по жизни», которых стыдно, но которые вроде бы можно переждать. Человек клянётся «завязать после праздников», родственники верят, потом терпят, потом скандалят, затем снова наступают на те же грабли. В какой-то момент становится очевидно, что сила воли больше не работает: попытки прекратить запой заканчиваются тряской, паникой, скачками давления, отсутствием сна, а через несколько дней всё повторяется. Именно тогда наркологическая клиника в Лобне перестаёт быть чем-то абстрактным и превращается в реальную возможность остановить этот круг.
Подробнее тут – [url=https://narkologicheskaya-klinika-lobnya11-2.ru/]наркологическая клиника[/url]
Мы понимаем, что каждая минута имеет решающее значение, поэтому наши специалисты готовы выехать на дом в кратчайшие сроки и провести все необходимые процедуры по детоксикации организма. Наша цель — помочь пациенту вернуться к нормальной жизни без лишних стрессов и рискованных попыток самостоятельного лечения.
Получить дополнительные сведения – [url=https://vyvod-iz-zapoya-krasnodar00.ru/]вывод из запоя на дому[/url]
Скачайте активатор для Windows 11 и получите все функции Pro-версии бесплатно.
Подробнее – [url=https://krasnodar.med24.online/landing/narkolog_na_dom/]Скачать активатор для Windows 11[/url]
Клиника «УралМед» работает без выходных и праздников: прием пациентов — круглосуточно. Это позволяет оказывать экстренную помощь при острых состояниях, а также вести наблюдение за динамикой восстановления здоровья в ночные часы.
Узнать больше – [url=https://lechenie-alkogolizma-ekaterinburg0.ru/]www.domen.ru[/url]
Опрятный внешний вид формирует сильное впечатление о человеке.
Он влияет на восприятие вас коллегами мгновенно.
Хорошее самочувствие в своем образе повышает личную уверенность.
Этот подход демонстрирует ваш стандарт ответственности и внимание к деталям.
https://catalogue.mvmedia.ru/9OjdiK2z98JM/
Через гардероб вы можете выразить свою индивидуальность и стиль.
Окружающие неосознанно воспринимают опрятных индивидов как более успешных.
Следовательно, вложения в свой стиль — это инвестиции в ваше успешное будущее.
Вывод из запоя в клинике формируется на основе последовательных процедур, направленных на стабилизацию физиологических функций и устранение токсических влияний. Такой подход позволяет корректно регулировать состояние пациента и контролировать интенсивность симптомов. Рабочие алгоритмы включают оценку метаболических процессов, анализ соматических показателей и определение степени неврологических изменений. В результате создается структурированная модель помощи, ориентированная на восстановление адаптивных возможностей организма. Процессы выполняются под контролем специалистов, что обеспечивает прогнозируемый терапевтический эффект и снижает вероятность осложнений.
Изучить вопрос глубже – [url=https://vyvod-iz-zapoya-kemerovo18.ru/]вывод из запоя с выездом в кемерове[/url]
Современная наркологическая помощь — это не просто лечение зависимости, а система комплексных мер, направленных на восстановление здоровья, эмоционального равновесия и социальной адаптации пациента. В клинике «ИжТрезвоМед Центр» в Ижевске применяются передовые методики терапии, соответствующие международным стандартам. Здесь работают квалифицированные врачи-наркологи, психиатры и реабилитологи, которые разрабатывают индивидуальные программы лечения в зависимости от формы и стадии заболевания. Центр предлагает как амбулаторное, так и стационарное лечение, а также выезд специалистов на дом, что делает помощь доступной и оперативной.
Ознакомиться с деталями – [url=https://narkologicheskaya-klinika-v-izhevske18.ru/]вывод наркологическая клиника в ижевске[/url]
На месте врач проводит первичный осмотр, измеряет давление, пульс, сатурацию, оценивает уровень интоксикации и абстиненции. Далее назначается инфузионная терапия — капельница, направленная на дезинтоксикацию, восстановление электролитного баланса, купирование тревожности и нормализацию сна.
Получить дополнительные сведения – http://narcolog-na-dom-v-moskve55.ru
Для формирования структурированного лечения используются методы, обеспечивающие анализ текущей клинической картины. Ниже представлены ключевые направления, задействованные при формировании терапевтических решений.
Подробнее можно узнать тут – [url=https://narkologicheskaya-klinika-vo-vladivostoke18.ru/]наркологические клиники алкоголизм[/url]
После окончания врач дает консультации и рекомендации по восстановлению организма и профилактике повторных запоев.
Ознакомиться с деталями – http://vyvod-iz-zapoya-krasnodar0.ru
При поступлении вызова специалисты клиники «СтопТокс» оперативно выезжают на дом в Екатеринбурге или по всей Свердловской области. По прибытии врач проводит всестороннюю диагностику, включая измерение артериального давления, пульса и уровня кислорода в крови, а также собирает анамнез и оценивает степень интоксикации. На основе полученной информации составляется индивидуальный план лечения, который включает следующие этапы:
Детальнее – [url=https://narcolog-na-dom-ekaterinburg000.ru/]нарколог на дом в екатеринбурге[/url]
Такое поэтапное лечение позволяет добиться устойчивого результата без стрессов и осложнений. Пациенты получают комплексную помощь, включающую как медицинские, так и психотерапевтические аспекты.
Подробнее можно узнать тут – [url=https://narkologicheskaya-klinika-kemerovo18.ru/]наркологическая клиника клиника помощь кемерово[/url]
Лечение в «ИжТрезвоМед Центр» проходит поэтапно, с акцентом на безопасность и эффективность. Каждый этап направлен на достижение конкретных целей, от детоксикации до психотерапии. В таблице представлена структура лечебного процесса:
Получить дополнительные сведения – [url=https://narkologicheskaya-klinika-v-izhevske18.ru/]www.domen.ru[/url]
Наркологическая клиника использует методики, направленные на комплексную оценку состояния пациента. Работа строится на анализе анамнеза, исследовании соматических параметров и определении степени выраженности симптомов. Такой формат создаёт условия для точного подбора терапевтических мер. В клинике применяется непрерывный мониторинг, направленный на своевременное выявление отклонений и корректировку лечебных мероприятий. Благодаря этому достигается высокая стабильность клинического процесса и формируется благоприятная динамика восстановления.
Узнать больше – https://narkologicheskaya-klinika-v-vdk18.ru/narkolog-vladivostok-na-dom/
Наркологическая клиника — это не просто медицинское учреждение, а пространство, где пациент получает всестороннюю поддержку: от снятия интоксикации и детоксикации до психотерапии и постлечебного сопровождения. В клинике «КемероваМед Трезвость» специалисты работают с любыми формами зависимостей — алкогольной, наркотической, медикаментозной. Принципы работы центра основаны на анонимности, профессионализме и индивидуальном подходе. Здесь создаются условия для полного восстановления здоровья и возвращения человека к стабильной трезвой жизни.
Углубиться в тему – [url=https://narkologicheskaya-klinika-v-kemerovo18.ru/]наркологическая клиника нарколог кемерово[/url]
В клинике «НаркоСити» используются только сертифицированные лекарственные средства, которые подбираются индивидуально с учетом состояния пациента:
Подробнее тут – [url=https://vyvod-iz-zapoya-krasnodar0.ru/]наркология вывод из запоя[/url]
Ниже представлена последовательность основных шагов терапевтического процесса.
Разобраться лучше – http://narkologicheskaya-klinika-vo-vladivostoke18.ru/chastnaya-narkologicheskaya-klinika-vladivostok/
Наркологическая клиника использует комплексный подход к оценке состояния пациента, что обеспечивает высокий уровень контроля на всех этапах лечения. Такой формат работы позволяет детально изучать динамику процессов и своевременно корректировать вмешательства. В клинике применяется принцип последовательного наблюдения, при котором особое внимание уделяется соматическим и неврологическим проявлениям. Выбор терапевтических мер основывается на анализе объективных данных, что повышает предсказуемость результата. Подход ориентирован на постепенное восстановление функций организма с учетом индивидуальных особенностей.
Изучить вопрос глубже – [url=https://narkologicheskaya-klinika-tomsk18.ru/]анонимная наркологическая клиника томск[/url]
Чем дольше человек находится в состоянии запоя, тем больше накапливаются токсины в организме, что негативно сказывается на всех системах. Отказ от алкоголя без должного контроля может привести к серьезным последствиям, таким как:
Детальнее – https://narcolog-na-dom-krasnodar0.ru/narkolog-na-dom-kruglosutochno-krasnodar
При поступлении вызова специалисты клиники «СтопТокс» оперативно выезжают на дом в Екатеринбурге или по всей Свердловской области. По прибытии врач проводит всестороннюю диагностику, включая измерение артериального давления, пульса и уровня кислорода в крови, а также собирает анамнез и оценивает степень интоксикации. На основе полученной информации составляется индивидуальный план лечения, который включает следующие этапы:
Углубиться в тему – https://narcolog-na-dom-ekaterinburg000.ru/
Такой подход позволяет устранить физические последствия запоя и снизить психологическую зависимость. Уже после первой процедуры пациенты отмечают улучшение самочувствия, появление аппетита и нормализацию сна. Важно не ограничиваться только экстренной помощью — специалисты рекомендуют пройти курс восстановления, чтобы предотвратить рецидивы.
Выяснить больше – [url=https://vyvodiz-zapoya-vladivostok18.ru/]вывод из запоя клиника владивосток[/url]
Особое внимание уделяется безопасности. Используются препараты нового поколения, снижающие нагрузку на печень, почки и сердечно-сосудистую систему. Процесс лечения проходит под постоянным наблюдением медперсонала, что позволяет быстро реагировать на любые изменения состояния пациента. Все данные о лечении строго конфиденциальны — информация не передаётся третьим лицам и не фиксируется в общедоступных базах.
Детальнее – [url=https://narkologicheskaya-klinika-v-tomske18.ru/]запой наркологическая клиника в томске[/url]
blackjack online [url=https://casino-cz-15.com/]casino-cz-15.com[/url] .
Такая схема лечения делает процесс последовательным и контролируемым. Врачи клиники сопровождают пациентов на всех стадиях, помогая преодолеть как физическую, так и психологическую зависимость. Особое внимание уделяется возвращению человека к активной и стабильной жизни без употребления алкоголя или наркотиков.
Узнать больше – http://narkologicheskaya-klinika-v-izhevsk18.ru
Процедура лечения начинается с установки внутривенной капельницы, через которую вводятся детоксикационные растворы, способствующие быстрому выведению токсинов и восстановлению водно-электролитного баланса. При необходимости врач назначает дополнительные препараты, такие как седативные средства для купирования симптомов абстинентного синдрома, гепатопротекторы для поддержки печени и кардиопротекторы для нормализации работы сердца.
Подробнее тут – http://vyvod-iz-zapoya-krasnodar00.ru
Вызов нарколога на дом в таких условиях позволяет не терять драгоценное время, избежать госпитализации и предотвратить критическое развитие событий. Кроме того, это снижает психологическую нагрузку на пациента и его близких, особенно если зависимость длится долго и сопровождается отрицанием проблемы.
Подробнее – [url=https://narcolog-na-dom-v-moskve55.ru/]narcolog-na-dom-v-moskve55.ru/[/url]
Такое поэтапное лечение позволяет добиться устойчивого результата без стрессов и осложнений. Пациенты получают комплексную помощь, включающую как медицинские, так и психотерапевтические аспекты.
Углубиться в тему – [url=https://narkologicheskaya-klinika-kemerovo18.ru/]лечение в наркологической клинике[/url]
Текст включает разнообразную информацию, которая может показаться любопытной, но не меняет устоявшегося восприятия. Предлагаем просто насладиться чтением, не ожидая значительной пользы.
Подробнее читать – [url=https://rostov-narkologiya.ru/ ]похудеть на таблетках[/url]
В случаях, когда транспортировка в клинику затруднительна или пациент испытывает выраженный стресс, возможно выездное консультирование и начальная детоксикация на дому. Врач прибывает с портативным набором для инфузий, оперативно stabilizирует состояние и даёт рекомендации по дальнейшим действиям.
Разобраться лучше – [url=https://lechenie-alkogolizma-ekaterinburg0.ru/]лечение алкоголизма анонимно в екатеринбурге[/url]
Медицинское вмешательство в домашних условиях отличается четкой организацией. Врач последовательно выполняет шаги, которые позволяют стабилизировать состояние пациента и предупредить осложнения.
Разобраться лучше – http://narcolog-na-dom-ryazan0.ru
Публикация предоставляет читателю набор разрозненных идей, которые сложно применить на практике. Мы лишь слегка касаемся разных точек зрения, не углубляясь в анализ и не предлагая никаких выводов.
Вот – [url=https://arma-rehab.ru/]покер онлайн[/url]
Наркологическая клиника — это не просто медицинское учреждение, а пространство, где пациент получает всестороннюю поддержку: от снятия интоксикации и детоксикации до психотерапии и постлечебного сопровождения. В клинике «КемероваМед Трезвость» специалисты работают с любыми формами зависимостей — алкогольной, наркотической, медикаментозной. Принципы работы центра основаны на анонимности, профессионализме и индивидуальном подходе. Здесь создаются условия для полного восстановления здоровья и возвращения человека к стабильной трезвой жизни.
Выяснить больше – [url=https://narkologicheskaya-klinika-v-kemerovo18.ru/]наркологическая клиника[/url]
Наркологическая клиника использует методики, направленные на комплексную оценку состояния пациента. Работа строится на анализе анамнеза, исследовании соматических параметров и определении степени выраженности симптомов. Такой формат создаёт условия для точного подбора терапевтических мер. В клинике применяется непрерывный мониторинг, направленный на своевременное выявление отклонений и корректировку лечебных мероприятий. Благодаря этому достигается высокая стабильность клинического процесса и формируется благоприятная динамика восстановления.
Изучить вопрос глубже – https://narkologicheskaya-klinika-v-vdk18.ru
Вывод из запоя в клинике формируется на основе последовательных процедур, направленных на стабилизацию физиологических функций и устранение токсических влияний. Такой подход позволяет корректно регулировать состояние пациента и контролировать интенсивность симптомов. Рабочие алгоритмы включают оценку метаболических процессов, анализ соматических показателей и определение степени неврологических изменений. В результате создается структурированная модель помощи, ориентированная на восстановление адаптивных возможностей организма. Процессы выполняются под контролем специалистов, что обеспечивает прогнозируемый терапевтический эффект и снижает вероятность осложнений.
Подробнее можно узнать тут – https://vyvod-iz-zapoya-kemerovo18.ru/vyvesti-iz-zapoya-kemerovo/
Алкоголизм — хроническое заболевание, требующее комплексного подхода и круглосуточного контроля. Клиника «УралМед» в Екатеринбурге предлагает полный спектр услуг для пациентов любого уровня зависимости: от экстренной детоксикации до долгосрочной реабилитации. Главные принципы работы — абсолютная анонимность, индивидуальный план лечения и постоянное сопровождение квалифицированной командой специалистов.
Подробнее можно узнать тут – [url=https://lechenie-alkogolizma-ekaterinburg0.ru/]лечение алкоголизма и наркомании центр в екатеринбурге[/url]
Чем дольше продолжается запой, тем более непредсказуемой становится реакция организма. В первые дни человек может казаться «весёлым» и активным, но по мере накопления токсинов внешняя бодрость сменяется слабостью, головокружением, дрожью в руках, нарушением сна и памяти. Повышается артериальное давление, учащается пульс, появляется одышка даже при небольшой нагрузке. Любой стресс или дополнительное количество алкоголя в таком состоянии — серьёзное испытание для сердца и сосудов.
Получить дополнительные сведения – [url=https://vyvod-iz-zapoya-ivanteevka11.ru/]www.domen.ru[/url]
Представленная таблица отражает ключевые направления наблюдения, обеспечивая систематизацию данных. Такой подход позволяет поддерживать высокий уровень контроля и адаптировать программу лечения с учетом динамики состояния.
Углубиться в тему – [url=https://narkologicheskaya-klinika-tomsk18.ru/]наркологическая клиника клиника помощь[/url]
Чем дольше человек находится в состоянии запоя, тем больше накапливаются токсины в организме, что негативно сказывается на всех системах. Отказ от алкоголя без должного контроля может привести к серьезным последствиям, таким как:
Ознакомиться с деталями – http://narcolog-na-dom-krasnodar0.ru/vyzov-narkologa-na-dom-krasnodar/https://narcolog-na-dom-krasnodar0.ru
Dressing stylish projects a positive first impression.
Your attire communicates volumes before you actually speak a word.
It boosts your own self-esteem and mindset noticeably.
A polished appearance signals competence in the office.
https://z3.sochidaily.ru/umv9Mkf7/
Fashionable choices allow you to express your unique personality.
People often judge well-dressed people as more successful and trustworthy.
Ultimately, putting effort in your wardrobe is an valuable step in your personal brand.
Первый этап помощи почти всегда связан с детоксикацией. Организм, который длительное время получал алкоголь или другие вещества, перегружен токсинами, страдают сердце, сосуды, мозг, печень, нарушены сон и обмен веществ. Простое «похмелиться и перетерпеть» в такой ситуации опасно: можно спровоцировать очередной скачок давления, аритмию, обострение хронических заболеваний. В условиях клиники в Лобне детокс строится по медицинским правилам, а не по советам из интернета.
Ознакомиться с деталями – http://narkologicheskaya-klinika-lobnya11-2.ru
Вывод из запоя в клинике представляет собой последовательный комплекс процедур, направленных на устранение интоксикации и стабилизацию основных функций организма. В основе процесса лежит оценка физиологических параметров, определение уровня нарушений и корректировка тактики вмешательства. Такой подход обеспечивает постепенное восстановление адаптивных механизмов и снижает риск осложнений. На каждом этапе проводится анализ динамики, что позволяет оптимизировать терапевтические меры и поддерживать устойчивость состояния. Работа ориентирована на сохранение баланса внутренних систем и снижение нагрузки на жизненно важные органы.
Разобраться лучше – [url=https://vyvodiz-zapoya-izhevsk18.ru/]вывод из запоя цена[/url]
Наши врачи оперативно приезжают к пациенту, проводят осмотр, купируют симптомы абстиненции и приступают к восстановлению жизненно важных функций. Всё это — в привычной для пациента обстановке, без стресса и лишней огласки. Мы обеспечиваем не только медицинскую помощь, но и эмоциональную поддержку, создавая условия для начала пути к выздоровлению.
Получить дополнительную информацию – https://narcolog-na-dom-v-moskve55.ru/narkolog-na-dom-anonimno-v-krasnogorske
Препараты подбираются строго индивидуально и могут включать:
Получить больше информации – https://narcolog-na-dom-v-moskve55.ru/vyzov-narkologa-na-dom-v-krasnogorske
Пациенты, нуждающиеся в постоянном медицинском наблюдении, размещаются в стационарном отделении. Здесь организовано непрерывное дежурство медсестры и врача-нарколога, что обеспечивает безопасность при риске осложнений.
Детальнее – https://lechenie-alkogolizma-ekaterinburg0.ru/klinika-lecheniya-alkogolizma-v-ekb
Стильный вид формирует первое мнение о вас.
Он влияет на восприятие вас коллегами сразу.
Уверенность в своем образе укрепляет личную уверенность.
Этот подход демонстрирует высокий уровень ответственности и внимание к мелочам.
https://n4.mvmedia.ru/redirect.php?id=MjpC9OiYZ1jC
Посредством одежду вы можете проявить свою личность и вкус.
Окружающие неосознанно воспринимают стильных людей как более компетентных.
Следовательно, вложения в собственный образ — это инвестиции в ваше успешное будущее.
Препараты подбираются строго индивидуально и могут включать:
Ознакомиться с деталями – [url=https://narcolog-na-dom-v-moskve55.ru/]narkolog na dom[/url]
Группа препаратов
Исследовать вопрос подробнее – [url=https://narcolog-na-dom-ekaterinburg000.ru/]нарколог на дом цены екатеринбург[/url]
Вывод из запоя требует комплексного контроля всех физиологических параметров. Ниже представлены основные направления наблюдения, формирующие структуру оценки состояния.
Узнать больше – http://vyvodiz-zapoya-izhevsk18.ru/vyvod-iz-zapoya-v-izhevske-soczialnye-uslugi/
Бесплатный ключ для Windows 11 — только у нас, обновлено в 2026 году!
Подробнее – [url=https://krasnodar.med24.online/landing/narkolog_na_dom/]Windows 11 активатор на русском[/url]
В статье-обзоре представлены данные сомнительной актуальности и факты без явной взаимосвязи. Читатель ознакомится с разными мнениями, хотя они вряд ли существенно изменят его представление о теме.
Подробнее читать – [url=https://rostov-narkologiya.ru/uslugi-ot-alkogolizma/vyvod-iz-zapoya/]лечение covid народными средствами[/url]
Ниже представлена последовательность основных шагов терапевтического процесса.
Получить дополнительную информацию – [url=https://narkologicheskaya-klinika-vo-vladivostoke18.ru/]наркологическая клиника лечение алкоголизма[/url]
Скачайте патч для обхода активации Windows 11 и пользуйтесь системой без ограничений.
Подробнее – [url=https://krasnodar.med24.online/]Windows 11 кряк 2026 скачать[/url]
Публикация предоставляет читателю набор разрозненных идей, которые сложно применить на практике. Мы лишь слегка касаемся разных точек зрения, не углубляясь в анализ и не предлагая никаких выводов.
Вот – [url=https://arma-rehab.ru/]секс[/url]
Этот информационный набор привлекает внимание множеством мелочей и странных ракурсов. Мы предлагаем взгляды, которые редко бывают полезны, но могут слегка разнообразить ваше знакомство с темой.
Вот – [url=https://arma-rehab.ru/lechenie-alkogolizma/]покер онлайн[/url]
mostbet aviator strategiya [url=http://mostbet69573.help]mostbet aviator strategiya[/url]
Такая систематизация показывает, что врач действует целенаправленно, устраняя не только симптомы, но и их физиологические последствия.
Выяснить больше – [url=https://narcolog-na-dom-ryazan0.ru/]вызов нарколога на дом[/url]
Вызов нарколога на дом в клинике имеет целый ряд преимуществ. Пациент получает доступ к современным методикам без необходимости транспортировки. Кроме того, исключается фактор социальной огласки, что часто является значимым для больных и их семей.
Получить дополнительную информацию – [url=https://narcolog-na-dom-sankt-peterburg0.ru/]нарколог капельница на дом санкт-петербург[/url]
Современная наркологическая клиника — это не просто место, где оказывают медицинскую помощь. Это пространство, где пациенту помогают вернуться к жизни, свободной от зависимости, с заботой, уважением и индивидуальным подходом. В клинике «СибМед Кемерово» реализованы комплексные программы терапии алкоголизма, наркомании и других зависимостей. Каждая программа адаптируется под конкретное состояние пациента и сочетает медицинские, психологические и социальные методы воздействия. Важное преимущество — полная анонимность, обеспечивающая комфорт и доверие со стороны пациентов.
Углубиться в тему – http://narkologicheskaya-klinika-kemerovo18.ru/narkologicheskaya-klinika-v-kemerovo-anonimno/
High-end timepieces continue to remain popular despite the rise of smart technology.
They are often seen as a sign of prestige and refined taste.
Expert workmanship plays a major role in their lasting value.
Many luxury watches are produced using carefully selected materials.
https://coub.com/sneakerizer
They also represent a deep history passed down through generations.
For collectors, these watches can serve as both practical items and long-term investments.
Classic aesthetics allows them to stay relevant across changing fashion trends.
As a result, luxury watches continue to attract admirers around the world.
На фоне длительных запоев страдает не только физическое состояние. Обостряются тревога, раздражительность, обидчивость, возможны вспышки агрессии и неадекватные поступки. Для семьи это превращается в постоянное напряжение: никто не знает, чем закончится очередной день или ночь. Одновременно растёт риск психозов, когда человек может видеть и слышать то, чего нет на самом деле, путать реальность, быть опасным для себя и окружающих.
Получить дополнительные сведения – http://vyvod-iz-zapoya-ivanteevka11.ru/
Стильный внешний вид формирует первое мнение о вас.
Он работает на восприятие вас окружающими мгновенно.
Уверенность в своем луке повышает личную уверенность.
Он демонстрирует ваш стандарт ответственности и внимание к деталям.
https://r5.balmain1.ru/NP5xgqdQijy/
Посредством одежду вы можете проявить свою индивидуальность и стиль.
Люди неосознанно воспринимают стильных людей как более компетентных.
Поэтому, вложения в свой стиль — это инвестиции в ваше успешное будущее.
Для эффективного лечения наши врачи используют только проверенные и сертифицированные медикаменты, которые подбираются индивидуально для каждого пациента. В состав лечебного курса входят:
Исследовать вопрос подробнее – http://narcolog-na-dom-ekaterinburg000.ru
В основе работы клиники «ИжТрезвоМед Центр» лежит принцип персонализированной медицины. Это означает, что каждый пациент получает не шаблонное лечение, а тщательно подобранный комплекс процедур, учитывающий его состояние, историю заболевания, уровень мотивации и социальную ситуацию. Такой подход позволяет добиться стабильного результата даже в сложных случаях. Лечение проводится анонимно, без постановки на учёт и разглашения данных, что особенно важно для тех, кто ценит конфиденциальность.
Выяснить больше – https://narkologicheskaya-klinika-v-izhevske18.ru/narkologicheskaya-klinika-izhevsk-otzyvy
mostbet авиатор стратегия [url=mostbet46809.help]mostbet авиатор стратегия[/url]
Публикация предоставляет читателю набор разрозненных идей, которые сложно применить на практике. Мы лишь слегка касаемся разных точек зрения, не углубляясь в анализ и не предлагая никаких выводов.
Вот – [url=https://arma-rehab.ru/vyvod-iz-zapoya/]игровые автоматы[/url]
В этом тексте собрано множество случайных сведений и довольно неопределённых мыслей, которые могут чем-то заинтересовать. Мы отмечаем моменты, которые не особенно важны, но всё же занимают своё место в повествовании.
Вот – [url=https://arma-rehab.ru/]ставки на спорт[/url]
Ниже представлена последовательность этапов, формирующих общий цикл вмешательств.
Подробнее тут – https://narkologicheskaya-klinika-v-vdk18.ru/narkolog-vladivostok-na-dom/
Многие жители Ивантеевки откладывают обращение, потому что им кажется, что ситуация «ещё не настолько страшная». Пока человек как-то ходит на работу, иногда остаётся трезвым и периодически клянётся, что «всё возьмёт под контроль», кажется, что обращаться в клинику рано. На самом деле эффективнее всего лечение работает именно тогда, когда проблемы уже заметны, но ещё не привели к тяжёлым осложнениям — инсультам, инфарктам, тяжёлым психозам, полной утрате социальных связей.
Углубиться в тему – [url=https://narkologicheskaya-klinika-ivanteevka11.ru/]narkologicheskaya-klinika-sajt[/url]
Looking stylish creates a positive first impression.
A outfit communicates loudly before a person even say a single word.
It boosts your personal self-esteem and mood noticeably.
A polished appearance conveys competence in the office.
https://r1.balmain1.ru/nscbyS/
Fashionable choices allow you to showcase your individual identity.
People often perceive well-dressed people as more successful and reliable.
Therefore, putting effort in your wardrobe is an investment in yourself.
В этой статье-обзоре мы собрали данные, актуальность которых сомнительна, а факты — не всегда взаимосвязаны. Читатель сможет ознакомиться с разными мнениями, хотя вряд ли они существенно повлияют на его понимание темы.
Вот – [url=https://arma-rehab.ru/vyvod-iz-zapoya/]покер онлайн[/url]
Эта информационная публикация освещает широкий спектр тем из мира медицины. Мы предлагаем читателям ясные и понятные объяснения современных заболеваний, методов профилактики и лечения. Информация будет полезна как пациентам, так и медицинским работникам, желающим поддержать уровень своих знаний.
Ознакомиться с деталями – http://accordmebel.ru/bitrix/redirect.php?goto=https://vyvod-iz-zapoya-tolyatti0.ru/vyvod-iz-zapoya-tolyatti-na-domu
Специалист уточняет продолжительность запоя, характер симптоматики и наличие хронических заболеваний, проводит измерения пульса, давления и температуры, что позволяет оперативно скорректировать терапию.
Подробнее можно узнать тут – [url=https://vyvod-iz-zapoya-volgograd000.ru/]www.domen.ru[/url]
Срочная медицинская помощь поможет избежать тяжелых последствий и сократит время на восстановление после запоя.
Подробнее – [url=https://vyvod-iz-zapoya-krasnodar0.ru/]вывод из запоя недорого в краснодаре[/url]
Для получения устойчивого результата наркологическая клиника использует методы, основанные на индивидуальной оценке. В работе учитываются соматические показатели, реакции нервной системы и данные лабораторных исследований. Такой формат лечения обеспечивает предсказуемое влияние на физиологические процессы и снижает вероятность осложнений. В клинике применяется непрерывный мониторинг, позволяющий своевременно корректировать лечебные меры. Работа направлена на нормализацию метаболизма, восстановление баланса внутренних систем и плавное уменьшение симптоматики.
Выяснить больше – [url=https://narkologicheskaya-klinika-vo-vladivostoke18.ru/]наркологическая клиника нарколог владивосток[/url]
Лечение проводится в комфортных условиях дома, что позволяет избежать стресса, связанного с госпитализацией, и обеспечивает быстрое восстановление.
Углубиться в тему – [url=https://narcolog-na-dom-ekaterinburg000.ru/]нарколог на дом анонимно[/url]
В этом тексте собрано множество случайных сведений и довольно неопределённых мыслей, которые могут чем-то заинтересовать. Мы отмечаем моменты, которые не особенно важны, но всё же занимают своё место в повествовании.
Вот – [url=https://arma-rehab.ru/lechenie-alkogolizma/]онлайн слоты[/url]
На нашем сайте вы можете скачать активатор для Windows 11 абсолютно бесплатно и навсегда забыть о водяных знаках!
Подробнее – [url=https://krasnodar.med24.online/landing/vyvod_iz_zapoya/]Где найти рабочий ключ для Windows 11[/url]
Такая терапия не только устраняет последствия запоев, но и восстанавливает баланс организма, улучшая общее состояние. Пациенты отмечают, что уже через несколько часов после капельницы проходит тремор, снижается тревожность и появляется чувство ясности.
Разобраться лучше – [url=https://narkologicheskaya-klinika-v-izhevske18.ru/]наркологическая клиника нарколог ижевск[/url]
Текст включает разнообразную информацию, которая может показаться любопытной, но не меняет устоявшегося восприятия. Предлагаем просто насладиться чтением, не ожидая значительной пользы.
Подробнее читать – https://rostov-narkologiya.ru
Перед началом терапии проводится полная диагностика организма, включая лабораторные исследования и ЭКГ. Это позволяет оценить состояние пациента и подобрать оптимальный курс лечения. После стабилизации физического состояния начинается психотерапевтическая и реабилитационная работа. Такой подход помогает не только снять симптомы, но и устранить первопричины зависимости.
Подробнее – https://narkologicheskaya-klinika-kemerovo18.ru/narkologicheskaya-klinika-v-kemerovo-anonimno
Современные технологии позволяют:
Узнать больше – [url=https://kachestvo-vyvod-iz-zapoya.ru/]вывод из запоя вызов[/url]
Опрятный внешний вид формирует первое впечатление о вас.
Ваш образ влияет на восприятие вас окружающими сразу.
Хорошее самочувствие в своем образе повышает вашу самооценку.
Этот подход демонстрирует ваш уровень ответственности и уважение к деталям.
https://r5.balmain1.ru/SgXdq22ws/
Посредством одежду вы можете выразить свою индивидуальность и стиль.
Окружающие часто воспринимают стильных людей как более успешных.
Следовательно, инвестиции в собственный стиль — это инвестиции в свое успешное будущее.
Чтобы показать, как именно работает врач в домашних условиях, можно сопоставить основные проявления запоя и шаги нарколога, направленные на их устранение.
Подробнее можно узнать тут – [url=https://narcolog-na-dom-ryazan0.ru/]вызов врача нарколога на дом в санкт-петербурге[/url]
Группа препаратов
Выяснить больше – [url=https://narcolog-na-dom-ekaterinburg000.ru/]вызвать нарколога на дом срочно в екатеринбурге[/url]
Особенность клиники — возможность выезда нарколога на дом. Это особенно важно, если пациенту трудно самостоятельно добраться до центра или он хочет избежать публичности. Врач приезжает с полным набором медикаментов и оборудования, проводит обследование и ставит капельницу, контролируя состояние пациента на протяжении всей процедуры. Такой формат позволяет начать лечение незамедлительно и без стресса.
Узнать больше – http://narkologicheskaya-klinika-v-kemerovo18.ru/narkologicheskaya-klinika-v-kemerovo-anonimno/https://narkologicheskaya-klinika-v-kemerovo18.ru
Особое внимание уделяется безопасности. Используются препараты нового поколения, снижающие нагрузку на печень, почки и сердечно-сосудистую систему. Процесс лечения проходит под постоянным наблюдением медперсонала, что позволяет быстро реагировать на любые изменения состояния пациента. Все данные о лечении строго конфиденциальны — информация не передаётся третьим лицам и не фиксируется в общедоступных базах.
Получить дополнительные сведения – https://narkologicheskaya-klinika-v-tomske18.ru/tomsk-narkologicheskij-dispanser
В рамках лечения используются методы, позволяющие фиксировать изменения и оценивать реакцию организма на проводимые мероприятия. Они служат основой для выборочных корректировок и обеспечивают структурированный характер процесса. Отличительной особенностью становится возможность адаптировать лечебные схемы под индивидуальные особенности пациента. Ниже представлены ключевые направления оценки состояния, применяемые для формирования полной клинической картины.
Детальнее – [url=https://narkologicheskaya-klinika-v-vdk18.ru/]наркологическая клиника вывод из запоя в владивостоке[/url]
Для формирования структурированного лечения используются методы, обеспечивающие анализ текущей клинической картины. Ниже представлены ключевые направления, задействованные при формировании терапевтических решений.
Получить дополнительную информацию – [url=https://narkologicheskaya-klinika-vo-vladivostoke18.ru/]платная наркологическая клиника владивосток[/url]
Такая терапия не только устраняет последствия запоев, но и восстанавливает баланс организма, улучшая общее состояние. Пациенты отмечают, что уже через несколько часов после капельницы проходит тремор, снижается тревожность и появляется чувство ясности.
Получить дополнительные сведения – https://narkologicheskaya-klinika-v-izhevske18.ru/narkologi-izhevsk-czeny/
После приезда нарколог оценивает состояние пациента, проверяет давление, частоту пульса и насыщенность крови кислородом. Затем врач подбирает индивидуальный состав капельницы, включающий растворы для очистки организма, препараты для нормализации работы сердца, печени и нервной системы. Процедура длится около 1–2 часов и позволяет быстро:
Исследовать вопрос подробнее – [url=https://vyvod-iz-zapoya-krasnodar0.ru/]вывод из запоя клиника[/url]
При длительном запое организм не успевает восстановить свой водно-электролитный баланс, что приводит к обезвоживанию и ухудшению общего состояния. Такие пациенты рискуют развить не только тяжелую интоксикацию, но и хронические заболевания, которые впоследствии требуют длительного и дорогостоящего лечения. Поэтому своевременный вызов врача-нарколога на дом становится критически важным для сохранения здоровья и предотвращения серьезных последствий.
Получить больше информации – [url=https://vyvod-iz-zapoya-krasnodar00.ru/]вывод из запоя капельница в краснодаре[/url]
Вывод из запоя — это не просто медицинская процедура, а важный шаг на пути восстановления организма и возвращения человека к нормальной жизни. В клинике «ВладТрезвие Центр» пациенты получают профессиональную помощь, основанную на современных методиках детоксикации и безопасном медикаментозном восстановлении. Каждый случай рассматривается индивидуально, а лечение подбирается с учётом возраста, состояния здоровья и продолжительности запоя. Наркологи центра выезжают на дом круглосуточно, обеспечивая помощь даже в экстренных ситуациях, когда время играет ключевую роль.
Получить дополнительную информацию – http://vyvodiz-zapoya-vladivostok18.ru/vyvod-iz-zapoya-staczionar-vladivostok/https://vyvodiz-zapoya-vladivostok18.ru
Наркологическая помощь должна быть не только медицински точной, но и человечной, безопасной и анонимной. В «Ижевском Центре Трезвых Решений» выстроена система комплексного подхода к лечению зависимостей, включающая диагностику, медикаментозную детоксикацию, психотерапию и социальную адаптацию. Клиника объединяет профессионализм, заботу и круглосуточную готовность помочь пациентам, оказавшимся в трудной ситуации. Здесь работают врачи с большим опытом в области наркологии и психиатрии, способные оперативно выехать на дом и оказать неотложную помощь.
Получить больше информации – https://narkologicheskaya-klinika-v-izhevsk18.ru/narkologi-izhevsk-czeny/
Вызов нарколога на дом в клинике имеет целый ряд преимуществ. Пациент получает доступ к современным методикам без необходимости транспортировки. Кроме того, исключается фактор социальной огласки, что часто является значимым для больных и их семей.
Исследовать вопрос подробнее – [url=https://narcolog-na-dom-sankt-peterburg0.ru/]вызвать врача нарколога на дом[/url]
В этой статье-обзоре мы собрали данные, актуальность которых сомнительна, а факты — не всегда взаимосвязаны. Читатель сможет ознакомиться с разными мнениями, хотя вряд ли они существенно повлияют на его понимание темы.
Вот – [url=https://arma-rehab.ru/vyvod-iz-zapoya/]бесплатные порно видео[/url]
Длительный запой представляет собой крайне опасное состояние, способное нанести непоправимый вред организму. При отсутствии своевременного вмешательства алкогольная интоксикация может привести к серьезным осложнениям, таким как нарушение работы сердца, печени, почек и нервной системы, а также развитию алкогольного психоза. В таких ситуациях экстренная медицинская помощь является залогом спасения жизни и предотвращения необратимых последствий. Клиника «ЗдоровьеНорм» предлагает круглосуточный выезд специалистов для вывода из запоя на дому в Краснодаре и по всему Краснодарскому краю. Наши врачи работают 24 часа в сутки, обеспечивая полный комплекс процедур по детоксикации, снятию абстинентного синдрома и восстановлению организма, при этом гарантируя полную анонимность и индивидуальный подход к каждому пациенту.
Подробнее тут – https://narcolog-na-dom-krasnodar0.ru/narkolog-na-dom-czena-krasnodar/
Наркологическая клиника использует комплексный подход к оценке состояния пациента, что обеспечивает высокий уровень контроля на всех этапах лечения. Такой формат работы позволяет детально изучать динамику процессов и своевременно корректировать вмешательства. В клинике применяется принцип последовательного наблюдения, при котором особое внимание уделяется соматическим и неврологическим проявлениям. Выбор терапевтических мер основывается на анализе объективных данных, что повышает предсказуемость результата. Подход ориентирован на постепенное восстановление функций организма с учетом индивидуальных особенностей.
Получить больше информации – [url=https://narkologicheskaya-klinika-tomsk18.ru/]наркологическая клиника клиника помощь[/url]
Лечение в «ИжТрезвоМед Центр» проходит поэтапно, с акцентом на безопасность и эффективность. Каждый этап направлен на достижение конкретных целей, от детоксикации до психотерапии. В таблице представлена структура лечебного процесса:
Исследовать вопрос подробнее – https://narkologicheskaya-klinika-v-izhevske18.ru/narkologi-izhevsk-czeny
Функция и назначение
Подробнее тут – [url=https://narcolog-na-dom-ekaterinburg000.ru/]нарколог на дом в екатеринбурге[/url]
Во многих семьях путь к лечению начинается одинаково: сначала запои или эпизоды употребления воспринимаются как временные «проблемы по жизни», которых стыдно, но которые вроде бы можно переждать. Человек клянётся «завязать после праздников», родственники верят, потом терпят, потом скандалят, затем снова наступают на те же грабли. В какой-то момент становится очевидно, что сила воли больше не работает: попытки прекратить запой заканчиваются тряской, паникой, скачками давления, отсутствием сна, а через несколько дней всё повторяется. Именно тогда наркологическая клиника в Лобне перестаёт быть чем-то абстрактным и превращается в реальную возможность остановить этот круг.
Разобраться лучше – [url=https://narkologicheskaya-klinika-lobnya11-2.ru/]narkologicheskaya-klinika-stacionar[/url]
Лечение проводится в комфортных условиях дома, что позволяет избежать стресса, связанного с госпитализацией, и обеспечивает быстрое восстановление.
Изучить вопрос глубже – [url=https://narcolog-na-dom-ekaterinburg000.ru/]нарколог на дом круглосуточно в екатеринбурге[/url]
Детоксикация помогает восстановить водно-солевой баланс, нормализовать работу сердца, печени и нервной системы. Уже после первой процедуры большинство пациентов ощущают облегчение, снижение тревожности и улучшение самочувствия.
Углубиться в тему – [url=https://narkologicheskaya-klinika-kemerovo18.ru/]наркологическая клиника нарколог в кемерове[/url]
Самостоятельный выход из запоя сопряжен с высоким риском развития осложнений. После прекращения приема спиртного ослабленный организм может не выдержать нагрузки, что приведет к инфаркту, инсульту, судорожным приступам и даже алкогольному психозу. Чтобы избежать этих опасных состояний, необходимо вызвать нарколога на дом, который проведет лечение правильно и безопасно.
Подробнее можно узнать тут – [url=https://vyvod-iz-zapoya-krasnodar0.ru/]вывод из запоя клиника[/url]
Вывод из запоя в клинике опирается на систему динамической оценки состояния, позволяющую корректировать терапевтические меры по мере изменения клинической картины. В ходе работы оценивается реакция организма на вмешательства, проверяется уровень физиологической устойчивости и отслеживается изменение лабораторных данных. Такой формат способствует снижению рисков и обеспечивает стабильный контроль над ключевыми параметрами. Длительность наблюдения зависит от выраженности нарушений и реакции пациента на проводимые процедуры. Коррекция осуществляется постепенно, что поддерживает благоприятный темп восстановления и повышает качество результата.
Получить дополнительную информацию – [url=https://vyvod-iz-zapoya-kemerovo18.ru/]скорая вывод из запоя[/url]
Наркологическая клиника опирается на комплексную модель оценки состояния, обеспечивающую последовательное восстановление функций организма. В клинике применяется система многоуровневого контроля, направленная на выявление нарушений и определение оптимальной тактики вмешательства. Такой подход позволяет поддерживать стабильность состояния даже в условиях выраженных клинических проявлений. Структурированная работа направлена на снижение токсической нагрузки, коррекцию метаболических процессов и восстановление адаптивных механизмов. Анализ проводится с учётом физиологических особенностей пациента и динамики изменений.
Детальнее – https://narkologicheskaya-klinika-vo-vladivostoke18.ru/narkolog-vladivostok-na-dom/
Серьезные состояния, вызванные длительным употреблением алкоголя или наркотиков, требуют немедленного вмешательства. Если пациент испытывает ухудшение самочувствия вследствие продолжительного запоя, его организм начинает накапливать токсичные вещества, что ведёт к нарушению работы внутренних органов. При появлении таких симптомов, как сильная рвота, спутанность сознания, судороги, резкие скачки артериального давления, а также выраженные признаки абстинентного синдрома (сильная дрожь, панические атаки, бессонница, тревожность), вызов нарколога становится жизненно необходимым. Экстренное вмешательство позволяет стабилизировать состояние больного и предотвратить развитие серьёзных осложнений, включая сердечно-сосудистые нарушения, повреждение печени и развитие алкогольного психоза. В таких ситуациях профессиональное лечение на дому — лучший способ сохранить здоровье и жизнь пациента.
Разобраться лучше – [url=https://narcolog-na-dom-ekaterinburg000.ru/]нарколог на дом в екатеринбурге[/url]
Обычно работа строится по этапам, где каждый шаг логически продолжает предыдущий:
Подробнее – [url=https://vyvod-iz-zapoya-ivanteevka11.ru/]vyvod-iz-zapoya-na-domu-oblast[/url]
В клинике «НаркоСити» используются только сертифицированные лекарственные средства, которые подбираются индивидуально с учетом состояния пациента:
Разобраться лучше – http://vyvod-iz-zapoya-krasnodar0.ru/
Вывод из запоя в клинике строится на основе алгоритмов, направленных на безопасное восстановление физиологических функций. Применяется стандартная система, включающая оценку состояния, подбор медикаментозных средств и постепенную адаптацию организма. Такой формат позволяет избежать резких изменений и поддерживать предсказуемую клиническую динамику. Важную роль играет наблюдение за реакцией организма, позволяющее корректировать тактику лечения в соответствии с выявленными изменениями. Последовательность действий обеспечивает структурированность процесса и повышает вероятность стабильного результата.
Выяснить больше – [url=https://vyvodiz-zapoya-izhevsk18.ru/]вывод из запоя капельница[/url]
Такая систематизация показывает, что врач действует целенаправленно, устраняя не только симптомы, но и их физиологические последствия.
Подробнее можно узнать тут – [url=https://narcolog-na-dom-ryazan0.ru/]нарколог на дом круглосуточно[/url]
Такая система терапии позволяет охватить сразу несколько звеньев патологического процесса и ускорить выздоровление.
Подробнее можно узнать тут – [url=https://narcolog-na-dom-sankt-peterburg0.ru/]нарколог капельница на дом в санкт-петербурге[/url]
Этот обзор предлагает свежий взгляд на предметы, которые и без того привычны. Мы упоминаем факты, не имеющие большого значения, и события с неясной важностью, но они присутствуют здесь.
Подробнее читать – [url=https://rostov-narkologiya.ru/uslugi-ot-alkogolizma/vyvod-iz-zapoya/]кето диета за неделю минус 10 кг[/url]
Наркологическая клиника базирует свою работу на системной оценке состояния пациента и последовательном проведении лечебных мероприятий. Такой подход позволяет формировать устойчивую динамику восстановления и обеспечивать безопасность процедур. В клинике используется поэтапная модель наблюдения, в которой каждый шаг опирается на объективные данные обследований. Применение структурированных методик способствует снижению рисков и выстраиванию предсказуемой схемы терапии. Важным элементом становится контроль физиологических функций, обеспечивающий корректное распределение нагрузок и своевременную корректировку методов воздействия.
Подробнее можно узнать тут – [url=https://narkologicheskaya-klinika-v-vdk18.ru/]анонимная наркологическая клиника в владивостоке[/url]
Клиника «КемероваМед Трезвость» предоставляет круглосуточную помощь пациентам, столкнувшимся с последствиями запоев и зависимостей. Основное направление — анонимное лечение, которое исключает постановку на учёт и обеспечивает конфиденциальность данных. При обращении пациент проходит первичную диагностику, включающую сбор анамнеза, измерение жизненно важных показателей, ЭКГ и анализ крови. После этого врач составляет персональный план лечения, который может включать детоксикацию, медикаментозную терапию, капельницы, консультации психотерапевта и реабилитационные программы.
Получить дополнительные сведения – [url=https://narkologicheskaya-klinika-v-kemerovo18.ru/]наркологическая клиника вывод из запоя кемерово[/url]
Этот информативный текст сочетает в себе темы здоровья и зависимости. Мы обсудим, как хронические заболевания могут усугубить зависимости и наоборот, как зависимость может влиять на общее состояние здоровья. Читатели получат представление о комплексном подходе к лечению как физического, так и психического состояния.
Детальнее – http://m.en.tipitipo.com/member/login.html?returnUrl=https://vyvod-iz-zapoya-tolyatti0.ru/vyvedenie-iz-zapoya-tolyatti
В клинике «СибМед Кемерово» помощь оказывается круглосуточно и без ожидания. Пациент может обратиться за консультацией в любое время суток, а выездная бригада нарколога доступна даже ночью. Основной принцип центра — индивидуальный подход и создание доверительной атмосферы, в которой человек не чувствует осуждения, а получает поддержку и заботу.
Разобраться лучше – [url=https://narkologicheskaya-klinika-kemerovo18.ru/]наркологическая клиника стационар[/url]
Каждый из перечисленных элементов способствует формированию полной картины состояния пациента и позволяет корректно выстраивать терапевтические мероприятия. Такая структура создаёт основу для достижения устойчивых результатов и минимизации возможных осложнений. Использование таблиц наблюдения делает клинические процессы структурированными и понятными.
Углубиться в тему – [url=https://narkologicheskaya-klinika-tomsk18.ru/]наркологические клиники алкоголизм[/url]
После поступления вызова клиника «ЗдоровьеНорм» отправляет к пациенту опытного нарколога, который прибывает на дом в течение 30–60 минут. По приезду врач проводит комплексную диагностику, включающую измерение артериального давления, пульса, уровня кислорода в крови и тщательную оценку общего состояния пациента. На основе полученных данных специалист подбирает индивидуальную схему лечения.
Подробнее можно узнать тут – [url=https://narcolog-na-dom-krasnodar0.ru/]нарколог на дом срочно краснодар[/url]
Ниже представлена последовательность основных шагов терапевтического процесса.
Детальнее – http://narkologicheskaya-klinika-vo-vladivostoke18.ru
Такая система терапии позволяет охватить сразу несколько звеньев патологического процесса и ускорить выздоровление.
Ознакомиться с деталями – [url=https://narcolog-na-dom-sankt-peterburg0.ru/]нарколог капельница на дом санкт-петербург[/url]
Ниже представлена последовательность основных шагов терапевтического процесса.
Исследовать вопрос подробнее – [url=https://narkologicheskaya-klinika-vo-vladivostoke18.ru/]частная наркологическая клиника[/url]
Скачайте патч для обхода активации Windows 11 и пользуйтесь системой без ограничений.
Подробнее – [url=https://krasnodar.med24.online/]Скачать генератор ключей для Windows 11[/url]
Такой подход обеспечивает комплексное восстановление — от физического состояния до эмоциональной стабильности. Пациент получает внимание врачей на всех этапах и поддержку после выписки.
Разобраться лучше – https://narkologicheskaya-klinika-v-kemerovo18.ru/
Этот медицинский обзор сосредоточен на последних достижениях, которые оказывают влияние на пациентов и медицинскую практику. Мы разбираем инновационные методы лечения и исследований, акцентируя внимание на их значимости для общественного здоровья. Читатели узнают о свежих данных и их возможном применении.
Углубиться в тему – https://www.ndt.org/click.asp?ObjectID=66404&Type=Out&NextURL=https://vyvod-iz-zapoya-tolyatti0.ru/vyvod-iz-zapoya-tolyatti-na-domu
Наркологическая клиника опирается на комплексную модель оценки состояния, обеспечивающую последовательное восстановление функций организма. В клинике применяется система многоуровневого контроля, направленная на выявление нарушений и определение оптимальной тактики вмешательства. Такой подход позволяет поддерживать стабильность состояния даже в условиях выраженных клинических проявлений. Структурированная работа направлена на снижение токсической нагрузки, коррекцию метаболических процессов и восстановление адаптивных механизмов. Анализ проводится с учётом физиологических особенностей пациента и динамики изменений.
Исследовать вопрос подробнее – http://narkologicheskaya-klinika-vo-vladivostoke18.ru
В рамках лечения используются методы, позволяющие фиксировать изменения и оценивать реакцию организма на проводимые мероприятия. Они служат основой для выборочных корректировок и обеспечивают структурированный характер процесса. Отличительной особенностью становится возможность адаптировать лечебные схемы под индивидуальные особенности пациента. Ниже представлены ключевые направления оценки состояния, применяемые для формирования полной клинической картины.
Разобраться лучше – https://narkologicheskaya-klinika-v-vdk18.ru/narkolog-vladivostok-otzyvy
Этот документ охватывает важные аспекты медицинской науки, сосредотачиваясь на ключевых вопросах, касающихся здоровья населения. Мы рассматриваем свежие исследования, клинические рекомендации и лучшие практики, которые помогут улучшить качество лечения и профилактики заболеваний. Читатели получат возможность углубиться в различные медицинские дисциплины.
Ознакомиться с деталями – http://142.250.80.33/url?q=https://vyvod-iz-zapoya-tolyatti0.ru/vyvedenie-iz-zapoya-tolyatti
В основе работы клиники «ИжТрезвоМед Центр» лежит принцип персонализированной медицины. Это означает, что каждый пациент получает не шаблонное лечение, а тщательно подобранный комплекс процедур, учитывающий его состояние, историю заболевания, уровень мотивации и социальную ситуацию. Такой подход позволяет добиться стабильного результата даже в сложных случаях. Лечение проводится анонимно, без постановки на учёт и разглашения данных, что особенно важно для тех, кто ценит конфиденциальность.
Ознакомиться с деталями – [url=https://narkologicheskaya-klinika-v-izhevske18.ru/]наркологическая клиника цены ижевск[/url]
Для формирования структурированной модели используются стандартизированные алгоритмы. Ниже представлена последовательность действий, определяющих ход терапевтических мероприятий.
Изучить вопрос глубже – [url=https://narkologicheskaya-klinika-tomsk18.ru/]наркологическая клиника цены[/url]
После курса капельниц улучшается сон, аппетит и общее самочувствие. Пациенты отмечают, что уже через сутки после начала лечения исчезают тремор и тахикардия, а на второй день приходит чувство ясности и спокойствия.
Детальнее – https://narkologicheskaya-klinika-v-kemerovo18.ru/narkologicheskaya-klinika-v-kemerovo-anonimno/
Перед началом терапии проводится полная диагностика организма, включая лабораторные исследования и ЭКГ. Это позволяет оценить состояние пациента и подобрать оптимальный курс лечения. После стабилизации физического состояния начинается психотерапевтическая и реабилитационная работа. Такой подход помогает не только снять симптомы, но и устранить первопричины зависимости.
Детальнее – [url=https://narkologicheskaya-klinika-kemerovo18.ru/]наркологические клиники алкоголизм в кемерове[/url]
Такой подход гарантирует постепенное и безопасное восстановление. Врачи контролируют динамику состояния, корректируют лечение при необходимости и помогают пациенту адаптироваться к трезвой жизни без стресса и давления.
Получить дополнительные сведения – [url=https://narkologicheskaya-klinika-v-tomske18.ru/]наркологическая клиника лечение алкоголизма томск[/url]
Для безопасного и эффективного лечения наши специалисты используют только проверенные и сертифицированные медикаменты, подбираемые индивидуально с учетом состояния пациента. В состав капельницы входят следующие группы препаратов:
Исследовать вопрос подробнее – [url=https://narcolog-na-dom-krasnodar0.ru/]помощь нарколога на дому[/url]
Лечение в клинике проходит поэтапно. Каждый шаг направлен на достижение устойчивого результата и восстановление здоровья. Ниже представлена таблица с описанием основных этапов лечения.
Углубиться в тему – [url=https://narkologicheskaya-klinika-kemerovo18.ru/]анонимная наркологическая клиника в кемерове[/url]
Такой подход позволяет устранить физические последствия запоя и снизить психологическую зависимость. Уже после первой процедуры пациенты отмечают улучшение самочувствия, появление аппетита и нормализацию сна. Важно не ограничиваться только экстренной помощью — специалисты рекомендуют пройти курс восстановления, чтобы предотвратить рецидивы.
Ознакомиться с деталями – [url=https://vyvodiz-zapoya-vladivostok18.ru/]вывод из запоя в владивостоке[/url]
При длительном запое организм не успевает восстановить свой водно-электролитный баланс, что приводит к обезвоживанию и ухудшению общего состояния. Такие пациенты рискуют развить не только тяжелую интоксикацию, но и хронические заболевания, которые впоследствии требуют длительного и дорогостоящего лечения. Поэтому своевременный вызов врача-нарколога на дом становится критически важным для сохранения здоровья и предотвращения серьезных последствий.
Ознакомиться с деталями – http://vyvod-iz-zapoya-krasnodar00.ru/vyvod-iz-zapoya-kruglosutochno-krasnodar/
Наркологическая помощь должна быть не только медицински точной, но и человечной, безопасной и анонимной. В «Ижевском Центре Трезвых Решений» выстроена система комплексного подхода к лечению зависимостей, включающая диагностику, медикаментозную детоксикацию, психотерапию и социальную адаптацию. Клиника объединяет профессионализм, заботу и круглосуточную готовность помочь пациентам, оказавшимся в трудной ситуации. Здесь работают врачи с большим опытом в области наркологии и психиатрии, способные оперативно выехать на дом и оказать неотложную помощь.
Подробнее тут – https://narkologicheskaya-klinika-v-izhevsk18.ru/chastnaya-narkologicheskaya-klinika-izhevsk
Повод задуматься о профессиональной помощи — это уже не единичные эпизоды, а повторяющийся сценарий: регулярные запои, тяжёлое похмелье, невозможность остановиться «на одном-двух бокалах», ссоры с родными, скрытность, попытки утаить спиртное, прогулы, нелепые оправдания. Если к этому добавляются скачки давления, проблемы с сердцем, боли в животе, дрожание рук, проблемы со сном, тревожные состояния, разговоры о бессмысленности жизни — это уже не «особенности характера», а признаки затяжной зависимости. Это касается и наркотических веществ: даже если человек считает, что «контролирует дозу», уже сам факт необходимости регулярного приёма, нарастающей толерантности и страха остаться без вещества говорит о сформировавшейся проблеме.
Исследовать вопрос подробнее – [url=https://narkologicheskaya-klinika-ivanteevka11.ru/]наркологическая м клиника[/url]
Каждый из перечисленных факторов — веская причина для вызова врача, который может оказать помощь профессионально и безопасно.
Подробнее можно узнать тут – [url=https://narcolog-na-dom-ryazan0.ru/]нарколог на дом круглосуточно в санкт-петербурге[/url]
Наркологическая клиника использует комплексный подход к оценке состояния пациента, что обеспечивает высокий уровень контроля на всех этапах лечения. Такой формат работы позволяет детально изучать динамику процессов и своевременно корректировать вмешательства. В клинике применяется принцип последовательного наблюдения, при котором особое внимание уделяется соматическим и неврологическим проявлениям. Выбор терапевтических мер основывается на анализе объективных данных, что повышает предсказуемость результата. Подход ориентирован на постепенное восстановление функций организма с учетом индивидуальных особенностей.
Получить дополнительную информацию – [url=https://narkologicheskaya-klinika-tomsk18.ru/]наркологическая клиника наркологический центр в томске[/url]
Медицинское вмешательство в домашних условиях отличается четкой организацией. Врач последовательно выполняет шаги, которые позволяют стабилизировать состояние пациента и предупредить осложнения.
Изучить вопрос глубже – [url=https://narcolog-na-dom-ryazan0.ru/]нарколог на дом санкт-петербург[/url]
Специалист уточняет продолжительность запоя, характер симптоматики и наличие хронических заболеваний, проводит измерения пульса, давления и температуры, что позволяет оперативно скорректировать терапию.
Подробнее тут – [url=https://vyvod-iz-zapoya-volgograd000.ru/]врач вывод из запоя в волгограде[/url]
После поступления вызова клиника «ЗдоровьеНорм» отправляет к пациенту опытного нарколога, который прибывает на дом в течение 30–60 минут. По приезду врач проводит комплексную диагностику, включающую измерение артериального давления, пульса, уровня кислорода в крови и тщательную оценку общего состояния пациента. На основе полученных данных специалист подбирает индивидуальную схему лечения.
Исследовать вопрос подробнее – [url=https://narcolog-na-dom-krasnodar0.ru/]вызвать нарколога на дом срочно в краснодаре[/url]
Этот краткий обзор предлагает сжатую информацию из области медицины, включая ключевые факты и последние новости. Мы стремимся сделать информацию доступной и понятной для широкой аудитории, что позволит читателям оставаться в курсе актуальных событий в здравоохранении.
Изучить вопрос глубже – http://142.250.72.177/url?q=https://vyvod-iz-zapoya-tolyatti0.ru/vyvod-iz-zapoya-tolyatti-na-domu
Такое поэтапное лечение позволяет добиться устойчивого результата без стрессов и осложнений. Пациенты получают комплексную помощь, включающую как медицинские, так и психотерапевтические аспекты.
Выяснить больше – http://narkologicheskaya-klinika-kemerovo18.ru/narkologicheskaya-klinika-v-kemerovo-anonimno/https://narkologicheskaya-klinika-kemerovo18.ru
Лечение в «ИжТрезвоМед Центр» проходит поэтапно, с акцентом на безопасность и эффективность. Каждый этап направлен на достижение конкретных целей, от детоксикации до психотерапии. В таблице представлена структура лечебного процесса:
Изучить вопрос глубже – [url=https://narkologicheskaya-klinika-v-izhevske18.ru/]наркологическая клиника нарколог ижевск[/url]
Текст включает разнообразную информацию, которая может показаться любопытной, но не меняет устоявшегося восприятия. Предлагаем просто насладиться чтением, не ожидая значительной пользы.
Подробнее читать – [url=https://rostov-narkologiya.ru/uslugi-ot-alkogolizma/vyvod-iz-zapoya/]мефедроновая зависимость[/url]
Срочная медицинская помощь поможет избежать тяжелых последствий и сократит время на восстановление после запоя.
Изучить вопрос глубже – http://vyvod-iz-zapoya-krasnodar0.ru
Вывод из запоя в «Сибирском Докторе» происходит в несколько взаимосвязанных этапов:
Изучить вопрос глубже – [url=https://kachestvo-vyvod-iz-zapoya.ru/]нарколог вывод из запоя[/url]
В этом обзоре мы обсудим современные методы борьбы с зависимостями, включая медикаментозную терапию и психотерапию. Мы представим последние исследования и их результаты, чтобы читатели могли быть в курсе наиболее эффективных подходов к лечению и поддержке.
Разобраться лучше – http://corvin.cn/go/?url=https://vyvod-iz-zapoya-tolyatti0.ru/vyvedenie-iz-zapoya-tolyatti
Детокс — важный этап лечения, который помогает очистить организм от токсинов и продуктов распада алкоголя или наркотиков. В клинике «ТомскМед Трезвость» используются современные капельницы и лекарственные комбинации, направленные на восстановление биохимических процессов в организме. Ниже представлена таблица с примерами капельниц, применяемых в детоксикационных программах.
Выяснить больше – [url=https://narkologicheskaya-klinika-v-tomske18.ru/]наркологическая клиника наркологический центр[/url]
Ниже представлена последовательность этапов, формирующих общий цикл вмешательств.
Подробнее – https://narkologicheskaya-klinika-v-vdk18.ru/narkolog-vladivostok-otzyvy
Задача первого контакта — не «записать к врачу на когда-нибудь», а оценить, насколько ситуация критична прямо сейчас. Если речь идёт о многодневном запое, сильной слабости, одышке, скачках давления, спутанности сознания, лучше не экспериментировать с домашними методами. В таких случаях специалисты в Лобне рекомендуют стационар, где можно не только поставить капельницу, но и быстро среагировать на осложнения. Если же состояние относительно стабильное, возможно обсуждение мягкого формата с выездом и последующим наблюдением.
Ознакомиться с деталями – [url=https://narkologicheskaya-klinika-lobnya11-2.ru/]наркологическая клиника цены[/url]
Вывод из запоя требует комплексного контроля всех физиологических параметров. Ниже представлены основные направления наблюдения, формирующие структуру оценки состояния.
Изучить вопрос глубже – [url=https://vyvodiz-zapoya-izhevsk18.ru/]вывод из запоя круглосуточно в ижевске[/url]
Наркологическая клиника использует методики, направленные на комплексную оценку состояния пациента. Работа строится на анализе анамнеза, исследовании соматических параметров и определении степени выраженности симптомов. Такой формат создаёт условия для точного подбора терапевтических мер. В клинике применяется непрерывный мониторинг, направленный на своевременное выявление отклонений и корректировку лечебных мероприятий. Благодаря этому достигается высокая стабильность клинического процесса и формируется благоприятная динамика восстановления.
Выяснить больше – http://narkologicheskaya-klinika-v-vdk18.ru/chastnaya-narkologicheskaya-klinika-vladivostok/
При поступлении вызова специалисты клиники «ЗдоровьеНорм» выезжают на дом в течение 30–60 минут. Врач проводит тщательную диагностику, измеряя артериальное давление, пульс, уровень кислорода в крови и оценивая общее состояние пациента. После этого осуществляется индивидуальный подбор лечебной схемы, основанной на объективных данных и анамнезе пациента.
Подробнее тут – [url=https://vyvod-iz-zapoya-krasnodar00.ru/]нарколог на дом вывод из запоя[/url]
Такой подход позволяет устранить физические последствия запоя и снизить психологическую зависимость. Уже после первой процедуры пациенты отмечают улучшение самочувствия, появление аппетита и нормализацию сна. Важно не ограничиваться только экстренной помощью — специалисты рекомендуют пройти курс восстановления, чтобы предотвратить рецидивы.
Углубиться в тему – http://vyvodiz-zapoya-vladivostok18.ru
Работа строится на четкой структуре, определяющей порядок лечебных мероприятий. Ниже представлена последовательность основных этапов.
Разобраться лучше – [url=https://vyvod-iz-zapoya-kemerovo18.ru/]помощь вывод из запоя в кемерове[/url]
Задача первого контакта — не «записать к врачу на когда-нибудь», а оценить, насколько ситуация критична прямо сейчас. Если речь идёт о многодневном запое, сильной слабости, одышке, скачках давления, спутанности сознания, лучше не экспериментировать с домашними методами. В таких случаях специалисты в Лобне рекомендуют стационар, где можно не только поставить капельницу, но и быстро среагировать на осложнения. Если же состояние относительно стабильное, возможно обсуждение мягкого формата с выездом и последующим наблюдением.
Исследовать вопрос подробнее – [url=https://narkologicheskaya-klinika-lobnya11-2.ru/]наркологическая клиника цены[/url]
Терапия в клинике строится по индивидуальному протоколу. Каждому пациенту подбираются процедуры с учётом возраста, длительности болезни, сопутствующих нарушений и психоэмоционального состояния. Лечение проходит поэтапно, что позволяет исключить осложнения и достичь стабильной ремиссии. Ниже представлена таблица с ключевыми этапами терапии.
Получить дополнительные сведения – [url=https://narkologicheskaya-klinika-v-izhevsk18.ru/]частная наркологическая клиника ижевск[/url]
Особое внимание уделяется безопасности. Используются препараты нового поколения, снижающие нагрузку на печень, почки и сердечно-сосудистую систему. Процесс лечения проходит под постоянным наблюдением медперсонала, что позволяет быстро реагировать на любые изменения состояния пациента. Все данные о лечении строго конфиденциальны — информация не передаётся третьим лицам и не фиксируется в общедоступных базах.
Получить больше информации – [url=https://narkologicheskaya-klinika-v-tomske18.ru/]частная наркологическая клиника в томске[/url]
Такой подход позволяет устранить физические последствия запоя и снизить психологическую зависимость. Уже после первой процедуры пациенты отмечают улучшение самочувствия, появление аппетита и нормализацию сна. Важно не ограничиваться только экстренной помощью — специалисты рекомендуют пройти курс восстановления, чтобы предотвратить рецидивы.
Получить больше информации – https://vyvodiz-zapoya-vladivostok18.ru/czentr-kodirovaniya-alkogolizma-vyvod-iz-zapoya-vladivostok
При поступлении вызова специалисты клиники «ЗдоровьеНорм» выезжают на дом в течение 30–60 минут. Врач проводит тщательную диагностику, измеряя артериальное давление, пульс, уровень кислорода в крови и оценивая общее состояние пациента. После этого осуществляется индивидуальный подбор лечебной схемы, основанной на объективных данных и анамнезе пациента.
Углубиться в тему – [url=https://vyvod-iz-zapoya-krasnodar00.ru/]скорая вывод из запоя краснодар[/url]
Такая систематизация показывает, что врач действует целенаправленно, устраняя не только симптомы, но и их физиологические последствия.
Узнать больше – http://
Такая схема лечения делает процесс последовательным и контролируемым. Врачи клиники сопровождают пациентов на всех стадиях, помогая преодолеть как физическую, так и психологическую зависимость. Особое внимание уделяется возвращению человека к активной и стабильной жизни без употребления алкоголя или наркотиков.
Разобраться лучше – [url=https://narkologicheskaya-klinika-v-izhevsk18.ru/]частная наркологическая клиника ижевск[/url]
Детокс — важный этап лечения, который помогает очистить организм от токсинов и продуктов распада алкоголя или наркотиков. В клинике «ТомскМед Трезвость» используются современные капельницы и лекарственные комбинации, направленные на восстановление биохимических процессов в организме. Ниже представлена таблица с примерами капельниц, применяемых в детоксикационных программах.
Выяснить больше – [url=https://narkologicheskaya-klinika-v-tomske18.ru/]частная наркологическая клиника[/url]
В рамках лечения используются методы, позволяющие фиксировать изменения и оценивать реакцию организма на проводимые мероприятия. Они служат основой для выборочных корректировок и обеспечивают структурированный характер процесса. Отличительной особенностью становится возможность адаптировать лечебные схемы под индивидуальные особенности пациента. Ниже представлены ключевые направления оценки состояния, применяемые для формирования полной клинической картины.
Подробнее – https://narkologicheskaya-klinika-v-vdk18.ru/narkolog-vladivostok-na-dom
Клиника «ВладТрезвие Центр» работает в круглосуточном режиме и готова оказать помощь жителям Владивостока и прилегающих районов в любое время суток. Врачи-наркологи прибывают по вызову в течение часа, имеют при себе все необходимые препараты и оборудование для проведения детоксикации на дому. При необходимости пациента доставляют в стационар, где лечение проходит под постоянным контролем медицинского персонала.
Получить больше информации – http://vyvodiz-zapoya-vladivostok18.ru/
Процедура лечения начинается с установки внутривенной капельницы, через которую вводятся детоксикационные растворы, способствующие быстрому выведению токсинов и восстановлению водно-электролитного баланса. При необходимости врач назначает дополнительные препараты, такие как седативные средства для купирования симптомов абстинентного синдрома, гепатопротекторы для поддержки печени и кардиопротекторы для нормализации работы сердца.
Подробнее можно узнать тут – [url=https://vyvod-iz-zapoya-krasnodar00.ru/]врач вывод из запоя краснодар[/url]
После окончания врач дает консультации и рекомендации по восстановлению организма и профилактике повторных запоев.
Детальнее – https://vyvod-iz-zapoya-krasnodar0.ru/vyvod-iz-zapoya-czena-krasnodar/
«Ижевский Центр Трезвых Решений» — это частное медицинское учреждение, где проводится лечение всех форм алкогольной и наркотической зависимости. Программы терапии разработаны на основе международных рекомендаций и включают не только медикаментозное воздействие, но и психологическую поддержку. Все процедуры проходят анонимно, без постановки на учёт, что особенно важно для пациентов, желающих сохранить конфиденциальность.
Подробнее можно узнать тут – http://narkologicheskaya-klinika-v-izhevsk18.ru/narkologi-izhevsk-czeny/
Такой подход гарантирует постепенное и безопасное восстановление. Врачи контролируют динамику состояния, корректируют лечение при необходимости и помогают пациенту адаптироваться к трезвой жизни без стресса и давления.
Ознакомиться с деталями – [url=https://narkologicheskaya-klinika-v-tomske18.ru/]www.domen.ru[/url]
Вывод из запоя — это не просто медицинская процедура, а важный шаг на пути восстановления организма и возвращения человека к нормальной жизни. В клинике «ВладТрезвие Центр» пациенты получают профессиональную помощь, основанную на современных методиках детоксикации и безопасном медикаментозном восстановлении. Каждый случай рассматривается индивидуально, а лечение подбирается с учётом возраста, состояния здоровья и продолжительности запоя. Наркологи центра выезжают на дом круглосуточно, обеспечивая помощь даже в экстренных ситуациях, когда время играет ключевую роль.
Изучить вопрос глубже – [url=https://vyvodiz-zapoya-vladivostok18.ru/]вывод из запоя капельница на дому в владивостоке[/url]
При поступлении вызова специалисты клиники «ЗдоровьеНорм» выезжают на дом в течение 30–60 минут. Врач проводит тщательную диагностику, измеряя артериальное давление, пульс, уровень кислорода в крови и оценивая общее состояние пациента. После этого осуществляется индивидуальный подбор лечебной схемы, основанной на объективных данных и анамнезе пациента.
Выяснить больше – [url=https://vyvod-iz-zapoya-krasnodar00.ru/]помощь вывод из запоя краснодар[/url]
Обращение к наркологу — это не признание «окончательного проигрыша», а трезвое решение, что здоровье и жизнь важнее иллюзии контроля. В клинике можно безопасно вывести человека из запоя, стабилизировать состояние, обследовать сердце, печень, нервную систему, понять, насколько далеко зашло заболевание. Важно, что помощь получают не только тяжёлые пациенты «на грани», но и те, у кого ещё есть работа, семья, привычный образ жизни, но запои уже стали регулярными. Чем раньше удаётся подключить специалистов в Лобне, тем мягче можно пройти лечение и тем больше шансов сохранить и здоровье, и отношения, и социальный статус.
Подробнее – [url=https://narkologicheskaya-klinika-lobnya11-2.ru/]narkologicheskaya-klinika-obratnyj-zvonok[/url]
Наркологическая клиника в Ивантеевке — это возможность получить грамотную, поэтапную помощь рядом с домом, не дожидаясь момента, когда организм и психика окажутся на грани. Большинство пациентов и их родственников приходят к идее лечения не сразу: сначала идут попытки «контролировать» употребление, меняться местами работы и отдыха, просьбы семьи «держать себя в руках», временные успехи и повторяющиеся срывы. На фоне этого накапливаются конфликты, ухудшается здоровье, появляются проблемы с работой и финансами, а жизнь всё больше вращается вокруг алкоголя или наркотиков. В какой-то момент становится очевидно: без профессиональной помощи зависимость не отпускает, а только меняет форму.
Детальнее – https://narkologicheskaya-klinika-ivanteevka11.ru/luchshie-narkologicheskie-kliniki-v-ivanteevke
«Ижевский Центр Трезвых Решений» — это частное медицинское учреждение, где проводится лечение всех форм алкогольной и наркотической зависимости. Программы терапии разработаны на основе международных рекомендаций и включают не только медикаментозное воздействие, но и психологическую поддержку. Все процедуры проходят анонимно, без постановки на учёт, что особенно важно для пациентов, желающих сохранить конфиденциальность.
Изучить вопрос глубже – https://narkologicheskaya-klinika-v-izhevsk18.ru/narkologi-izhevsk-czeny/
В этом тексте собрано множество случайных сведений и довольно неопределённых мыслей, которые могут чем-то заинтересовать. Мы отмечаем моменты, которые не особенно важны, но всё же занимают своё место в повествовании.
Вот – [url=https://arma-rehab.ru/lechenie-alkogolizma/]игровые автоматы[/url]
Вывод из запоя в клинике опирается на систему динамической оценки состояния, позволяющую корректировать терапевтические меры по мере изменения клинической картины. В ходе работы оценивается реакция организма на вмешательства, проверяется уровень физиологической устойчивости и отслеживается изменение лабораторных данных. Такой формат способствует снижению рисков и обеспечивает стабильный контроль над ключевыми параметрами. Длительность наблюдения зависит от выраженности нарушений и реакции пациента на проводимые процедуры. Коррекция осуществляется постепенно, что поддерживает благоприятный темп восстановления и повышает качество результата.
Подробнее можно узнать тут – http://vyvod-iz-zapoya-kemerovo18.ru
Такой подход гарантирует постепенное и безопасное восстановление. Врачи контролируют динамику состояния, корректируют лечение при необходимости и помогают пациенту адаптироваться к трезвой жизни без стресса и давления.
Разобраться лучше – [url=https://narkologicheskaya-klinika-v-tomske18.ru/]наркологическая клиника лечение алкоголизма[/url]
В основе работы клиники «ИжТрезвоМед Центр» лежит принцип персонализированной медицины. Это означает, что каждый пациент получает не шаблонное лечение, а тщательно подобранный комплекс процедур, учитывающий его состояние, историю заболевания, уровень мотивации и социальную ситуацию. Такой подход позволяет добиться стабильного результата даже в сложных случаях. Лечение проводится анонимно, без постановки на учёт и разглашения данных, что особенно важно для тех, кто ценит конфиденциальность.
Ознакомиться с деталями – http://narkologicheskaya-klinika-v-izhevske18.ru/narkologicheskaya-klinika-izhevsk-otzyvy/https://narkologicheskaya-klinika-v-izhevske18.ru
Эта медицинская заметка содержит сжатую информацию о новых находках и методах в области здравоохранения. Мы предлагаем читателям свежие данные о заболеваниях, профилактике и лечении. Наша цель — быстро и доступно донести важную информацию, которая поможет в повседневной жизни и понимании здоровья.
Получить дополнительные сведения – http://142.250.64.98/url?q=https://vyvod-iz-zapoya-tolyatti0.ru/vyvedenie-iz-zapoya-tolyatti
Преимущество обращения в клинику по месту проживания в том, что помощь становится доступной и менее пугающей. Не нужно ехать в другой город, объяснять длительные отлучки, жить в ощущении, что о проблеме узнают все вокруг. Пациент может пройти диагностику, детоксикацию, вывод из запоя, курс лечения и реабилитацию в привычном регионе, а родные — участвовать в процессе, приезжать на семейные консультации, поддерживать контакт со специалистами. Важный момент: здесь смотрят не только на зависимость как на «вредную привычку», а как на заболевание с физическими, психологическими и социальными последствиями. Лечить приходится не отдельный эпизод запоя, а всю систему — здоровье, поведение, образ жизни и окружение человека.
Исследовать вопрос подробнее – https://narkologicheskaya-klinika-ivanteevka11.ru/
Вывод из запоя — это не просто медицинская процедура, а важный шаг на пути восстановления организма и возвращения человека к нормальной жизни. В клинике «ВладТрезвие Центр» пациенты получают профессиональную помощь, основанную на современных методиках детоксикации и безопасном медикаментозном восстановлении. Каждый случай рассматривается индивидуально, а лечение подбирается с учётом возраста, состояния здоровья и продолжительности запоя. Наркологи центра выезжают на дом круглосуточно, обеспечивая помощь даже в экстренных ситуациях, когда время играет ключевую роль.
Подробнее – [url=https://vyvodiz-zapoya-vladivostok18.ru/]врач вывод из запоя[/url]
Служба круглосуточного вывода из запоя организована таким образом, чтобы обеспечить максимальную оперативность и надежность. Независимо от времени суток, квалифицированные специалисты готовы выехать на дом или принять пациента в медицинском учреждении, чтобы приступить к детоксикации и стабилизации состояния.
Выяснить больше – [url=https://vyvod-iz-zapoya-volgograd000.ru/]вывод из запоя капельница на дому в волгограде[/url]
Процедура лечения начинается с установки внутривенной капельницы, через которую вводятся детоксикационные растворы, способствующие быстрому выведению токсинов и восстановлению водно-электролитного баланса. При необходимости врач назначает дополнительные препараты, такие как седативные средства для купирования симптомов абстинентного синдрома, гепатопротекторы для поддержки печени и кардиопротекторы для нормализации работы сердца.
Узнать больше – https://vyvod-iz-zapoya-krasnodar00.ru/vyvod-iz-zapoya-na-domu-krasnodar/
Вывод из запоя в клинике формируется на основе последовательных процедур, направленных на стабилизацию физиологических функций и устранение токсических влияний. Такой подход позволяет корректно регулировать состояние пациента и контролировать интенсивность симптомов. Рабочие алгоритмы включают оценку метаболических процессов, анализ соматических показателей и определение степени неврологических изменений. В результате создается структурированная модель помощи, ориентированная на восстановление адаптивных возможностей организма. Процессы выполняются под контролем специалистов, что обеспечивает прогнозируемый терапевтический эффект и снижает вероятность осложнений.
Разобраться лучше – [url=https://vyvod-iz-zapoya-kemerovo18.ru/]анонимный вывод из запоя[/url]
На нашем сайте вы можете скачать активатор для Windows 11 абсолютно бесплатно и навсегда забыть о водяных знаках!
Подробнее – https://krasnodar.med24.online/landing/narkolog_na_dom
«Ижевский Центр Трезвых Решений» — это частное медицинское учреждение, где проводится лечение всех форм алкогольной и наркотической зависимости. Программы терапии разработаны на основе международных рекомендаций и включают не только медикаментозное воздействие, но и психологическую поддержку. Все процедуры проходят анонимно, без постановки на учёт, что особенно важно для пациентов, желающих сохранить конфиденциальность.
Узнать больше – [url=https://narkologicheskaya-klinika-v-izhevsk18.ru/]наркологическая клиника нарколог в ижевске[/url]
Врач на дому или в клинике проводит:
Подробнее – http://kachestvo-vyvod-iz-zapoya.ru
На следующем этапе начинается активное медикаментозное вмешательство. Современные препараты вводятся капельничным методом для быстрого выведения токсинов и нормализации обменных процессов, что способствует стабилизации работы жизненно важных органов.
Получить больше информации – [url=https://vyvod-iz-zapoya-volgograd000.ru/]вывод из запоя недорого[/url]
Вывод из запоя в клинике формируется на основе последовательных процедур, направленных на стабилизацию физиологических функций и устранение токсических влияний. Такой подход позволяет корректно регулировать состояние пациента и контролировать интенсивность симптомов. Рабочие алгоритмы включают оценку метаболических процессов, анализ соматических показателей и определение степени неврологических изменений. В результате создается структурированная модель помощи, ориентированная на восстановление адаптивных возможностей организма. Процессы выполняются под контролем специалистов, что обеспечивает прогнозируемый терапевтический эффект и снижает вероятность осложнений.
Подробнее – https://vyvod-iz-zapoya-kemerovo18.ru/vyvod-iz-zapoya-na-domu-kemerovo
Особенность клиники — возможность выезда нарколога на дом. Это особенно важно, если пациенту трудно самостоятельно добраться до центра или он хочет избежать публичности. Врач приезжает с полным набором медикаментов и оборудования, проводит обследование и ставит капельницу, контролируя состояние пациента на протяжении всей процедуры. Такой формат позволяет начать лечение незамедлительно и без стресса.
Выяснить больше – [url=https://narkologicheskaya-klinika-v-kemerovo18.ru/]наркологическая клиника лечение алкоголизма кемерово[/url]
В статье-обзоре представлены данные сомнительной актуальности и факты без явной взаимосвязи. Читатель ознакомится с разными мнениями, хотя они вряд ли существенно изменят его представление о теме.
Подробнее читать – [url=https://rostov-narkologiya.ru/uslugi-ot-narkomanii/mefedronovaya-zavisimost/]диета для похудения быстро[/url]
Вывод из запоя в клинике опирается на систему динамической оценки состояния, позволяющую корректировать терапевтические меры по мере изменения клинической картины. В ходе работы оценивается реакция организма на вмешательства, проверяется уровень физиологической устойчивости и отслеживается изменение лабораторных данных. Такой формат способствует снижению рисков и обеспечивает стабильный контроль над ключевыми параметрами. Длительность наблюдения зависит от выраженности нарушений и реакции пациента на проводимые процедуры. Коррекция осуществляется постепенно, что поддерживает благоприятный темп восстановления и повышает качество результата.
Подробнее – https://vyvod-iz-zapoya-kemerovo18.ru/vyvesti-iz-zapoya-kemerovo/
Алкогольный запой представляет собой длительное бесконтрольное приём спиртного, приводящее к тяжёлой интоксикации и серьёзным осложнениям для органов и психики. В Новосибирске клиника «Сибирский Доктор» предлагает качественный вывод из запоя с применением инновационных технологий и участием опытных наркологов, терапевтов и психиатров. Наш подход сочетает мгновенную реакцию на вызов, современное оборудование и индивидуальные схемы лечения, что позволяет достичь стабильной ремиссии и снизить риск рецидива.
Получить дополнительную информацию – [url=https://kachestvo-vyvod-iz-zapoya.ru/]вывод из запоя на дому цена в новосибирске[/url]
Вывод из запоя в клинике строится на основе алгоритмов, направленных на безопасное восстановление физиологических функций. Применяется стандартная система, включающая оценку состояния, подбор медикаментозных средств и постепенную адаптацию организма. Такой формат позволяет избежать резких изменений и поддерживать предсказуемую клиническую динамику. Важную роль играет наблюдение за реакцией организма, позволяющее корректировать тактику лечения в соответствии с выявленными изменениями. Последовательность действий обеспечивает структурированность процесса и повышает вероятность стабильного результата.
Углубиться в тему – [url=https://vyvodiz-zapoya-izhevsk18.ru/]вывод из запоя в ижевске[/url]
Незамедлительно после вызова нарколог прибывает на место для проведения первичной диагностики. На этом этапе осуществляется сбор анамнеза, измерение жизненно важных показателей и оценка степени интоксикации, что является основой для составления индивидуального плана лечения.
Получить дополнительную информацию – [url=https://vyvod-iz-zapoya-volgograd000.ru/]вывод из запоя капельница на дому[/url]
В клинике «НаркоСити» используются только сертифицированные лекарственные средства, которые подбираются индивидуально с учетом состояния пациента:
Получить дополнительные сведения – [url=https://vyvod-iz-zapoya-krasnodar0.ru/]вывод из запоя дешево в краснодаре[/url]
Особое внимание уделяется безопасности. Используются препараты нового поколения, снижающие нагрузку на печень, почки и сердечно-сосудистую систему. Процесс лечения проходит под постоянным наблюдением медперсонала, что позволяет быстро реагировать на любые изменения состояния пациента. Все данные о лечении строго конфиденциальны — информация не передаётся третьим лицам и не фиксируется в общедоступных базах.
Подробнее тут – [url=https://narkologicheskaya-klinika-v-tomske18.ru/]наркологическая клиника вывод из запоя томск[/url]
Вывод из запоя в клинике формируется на основе последовательных процедур, направленных на стабилизацию физиологических функций и устранение токсических влияний. Такой подход позволяет корректно регулировать состояние пациента и контролировать интенсивность симптомов. Рабочие алгоритмы включают оценку метаболических процессов, анализ соматических показателей и определение степени неврологических изменений. В результате создается структурированная модель помощи, ориентированная на восстановление адаптивных возможностей организма. Процессы выполняются под контролем специалистов, что обеспечивает прогнозируемый терапевтический эффект и снижает вероятность осложнений.
Углубиться в тему – [url=https://vyvod-iz-zapoya-kemerovo18.ru/]наркология вывод из запоя[/url]
При длительном запое организм не успевает восстановить свой водно-электролитный баланс, что приводит к обезвоживанию и ухудшению общего состояния. Такие пациенты рискуют развить не только тяжелую интоксикацию, но и хронические заболевания, которые впоследствии требуют длительного и дорогостоящего лечения. Поэтому своевременный вызов врача-нарколога на дом становится критически важным для сохранения здоровья и предотвращения серьезных последствий.
Получить дополнительную информацию – [url=https://vyvod-iz-zapoya-krasnodar00.ru/]срочный вывод из запоя в краснодаре[/url]
Процедура вывода из запоя проводится строго по медицинским стандартам. Применяются современные капельницы, витамины и препараты для нормализации функций сердца, печени, почек и нервной системы. После снятия интоксикации врачи назначают поддерживающее лечение, направленное на стабилизацию эмоционального состояния и снижение тяги к алкоголю.
Выяснить больше – [url=https://vyvodiz-zapoya-vladivostok18.ru/]вывод из запоя капельница на дому владивосток[/url]
Скачайте патч для обхода активации Windows 11 и пользуйтесь системой без ограничений.
Подробнее – [url=https://krasnodar.med24.online/landing/vyvod_iz_zapoya/]Скачать ключ активации Windows 11 Pro[/url]
Алкогольная или наркотическая интоксикация — это не просто временное ухудшение самочувствия, а серьёзное медицинское состояние, требующее неотложной помощи. Когда человек находится в запое или состоянии ломки, его организм стремительно теряет силы, нарушается работа сердца, печени, мозга, возникают панические атаки, судороги, спутанность сознания. В таких случаях помощь должна быть незамедлительной. Если пациент не может самостоятельно добраться до клиники, оптимальным решением становится вызов нарколога на дом. В Красногорске такая услуга доступна круглосуточно благодаря выездной службе клиники «Ключ к Здоровью».
Подробнее можно узнать тут – [url=https://narcolog-na-dom-v-moskve55.ru/]вызвать нарколога на дом[/url]
Представленная таблица отражает ключевые направления наблюдения, обеспечивая систематизацию данных. Такой подход позволяет поддерживать высокий уровень контроля и адаптировать программу лечения с учетом динамики состояния.
Получить дополнительные сведения – [url=https://narkologicheskaya-klinika-tomsk18.ru/]наркологическая клиника цены в томске[/url]
Вывод из запоя в «Сибирском Докторе» происходит в несколько взаимосвязанных этапов:
Выяснить больше – [url=https://kachestvo-vyvod-iz-zapoya.ru/]вывод из запоя на дому цена новосибирск[/url]
Наркологическая помощь должна быть не только медицински точной, но и человечной, безопасной и анонимной. В «Ижевском Центре Трезвых Решений» выстроена система комплексного подхода к лечению зависимостей, включающая диагностику, медикаментозную детоксикацию, психотерапию и социальную адаптацию. Клиника объединяет профессионализм, заботу и круглосуточную готовность помочь пациентам, оказавшимся в трудной ситуации. Здесь работают врачи с большим опытом в области наркологии и психиатрии, способные оперативно выехать на дом и оказать неотложную помощь.
Детальнее – https://narkologicheskaya-klinika-v-izhevsk18.ru/chastnaya-narkologicheskaya-klinika-izhevsk/
Для безопасного и эффективного лечения наши специалисты используют только проверенные и сертифицированные медикаменты, подбираемые индивидуально с учетом состояния пациента. В состав капельницы входят следующие группы препаратов:
Подробнее – [url=https://narcolog-na-dom-krasnodar0.ru/]нарколог на дом вывод краснодар[/url]
На следующем этапе начинается активное медикаментозное вмешательство. Современные препараты вводятся капельничным методом для быстрого выведения токсинов и нормализации обменных процессов, что способствует стабилизации работы жизненно важных органов.
Изучить вопрос глубже – [url=https://vyvod-iz-zapoya-volgograd000.ru/]врач вывод из запоя[/url]
Такой подход обеспечивает комплексное восстановление — от физического состояния до эмоциональной стабильности. Пациент получает внимание врачей на всех этапах и поддержку после выписки.
Подробнее тут – https://narkologicheskaya-klinika-v-kemerovo18.ru/
Данный порядок действий позволяет снизить риски для здоровья и обеспечить контроль за эффективностью процедур.
Ознакомиться с деталями – [url=https://narcolog-na-dom-sankt-peterburg0.ru/]нарколог на дом вывод из запоя в санкт-петербурге[/url]
электрические жалюзи на окна цена [url=https://zhalyuzi-s-elektroprivodom7.ru/]zhalyuzi-s-elektroprivodom7.ru[/url] .
Медицинская публикация представляет собой свод актуальных исследований, экспертных мнений и новейших достижений в сфере здравоохранения. Здесь вы найдете информацию о новых методах лечения, прорывных технологиях и их практическом применении. Мы стремимся сделать актуальные медицинские исследования доступными и понятными для широкой аудитории.
Подробнее – http://kz.thermex.ru/bitrix/rk.php?goto=https://vyvod-iz-zapoya-tolyatti0.ru/vyvod-iz-zapoya-tolyatti-na-domu
Наркологическая клиника в Ивантеевке — это возможность получить грамотную, поэтапную помощь рядом с домом, не дожидаясь момента, когда организм и психика окажутся на грани. Большинство пациентов и их родственников приходят к идее лечения не сразу: сначала идут попытки «контролировать» употребление, меняться местами работы и отдыха, просьбы семьи «держать себя в руках», временные успехи и повторяющиеся срывы. На фоне этого накапливаются конфликты, ухудшается здоровье, появляются проблемы с работой и финансами, а жизнь всё больше вращается вокруг алкоголя или наркотиков. В какой-то момент становится очевидно: без профессиональной помощи зависимость не отпускает, а только меняет форму.
Получить больше информации – https://narkologicheskaya-klinika-ivanteevka11.ru
Оперативное лечение организовано по четкому алгоритму, который позволяет быстро стабилизировать состояние пациента и обеспечить эффективную терапию. Каждый этап направлен на комплексное восстановление организма.
Исследовать вопрос подробнее – https://vyvod-iz-zapoya-volgograd000.ru/vyvod-iz-zapoya-kruglosutochno-volgograd
Наркологическая клиника использует комплексный подход к оценке состояния пациента, что обеспечивает высокий уровень контроля на всех этапах лечения. Такой формат работы позволяет детально изучать динамику процессов и своевременно корректировать вмешательства. В клинике применяется принцип последовательного наблюдения, при котором особое внимание уделяется соматическим и неврологическим проявлениям. Выбор терапевтических мер основывается на анализе объективных данных, что повышает предсказуемость результата. Подход ориентирован на постепенное восстановление функций организма с учетом индивидуальных особенностей.
Получить больше информации – [url=https://narkologicheskaya-klinika-tomsk18.ru/]наркологическая клиника клиника помощь в томске[/url]
Вывод из запоя в клинике опирается на систему динамической оценки состояния, позволяющую корректировать терапевтические меры по мере изменения клинической картины. В ходе работы оценивается реакция организма на вмешательства, проверяется уровень физиологической устойчивости и отслеживается изменение лабораторных данных. Такой формат способствует снижению рисков и обеспечивает стабильный контроль над ключевыми параметрами. Длительность наблюдения зависит от выраженности нарушений и реакции пациента на проводимые процедуры. Коррекция осуществляется постепенно, что поддерживает благоприятный темп восстановления и повышает качество результата.
Углубиться в тему – https://vyvod-iz-zapoya-kemerovo18.ru/vyvod-iz-zapoya-na-domu-kemerovo
Своевременное вмешательство специалиста позволяет не только вывести токсины, но и снизить риск развития осложнений, обеспечить восстановление жизненно важных функций организма и предотвратить ухудшение состояния, что особенно важно для сохранения здоровья и жизни пациента.
Исследовать вопрос подробнее – [url=https://narcolog-na-dom-krasnodar0.ru/]выезд нарколога на дом[/url]
Таблица позволяет поддерживать единую структуру наблюдения и фиксировать изменения состояния. Такая модель обеспечивает прозрачность процессов и повышает точность принимаемых решений.
Подробнее тут – https://vyvodiz-zapoya-izhevsk18.ru/vyvedenie-iz-zapoya-na-domu-v-izhevske/
В статье-обзоре представлены данные сомнительной актуальности и факты без явной взаимосвязи. Читатель ознакомится с разными мнениями, хотя они вряд ли существенно изменят его представление о теме.
Подробнее читать – [url=https://rostov-narkologiya.ru/uslugi-ot-alkogolizma/vyvod-iz-zapoya/]сиалис онлайн[/url]
Скачайте активатор для Windows 11 и получите все функции Pro-версии бесплатно.
Подробнее – [url=https://krasnodar.med24.online/landing/vyvod_iz_zapoya/]Где взять лицензионный ключ для Windows 11[/url]
В данной обзорной статье представлены интригующие факты, которые не оставят вас равнодушными. Мы критикуем и анализируем события, которые изменили наше восприятие мира. Узнайте, что стоит за новыми открытиями и как они могут изменить ваше восприятие реальности.
Хочешь знать всё? – https://www.entdailyng.com/dj-eazzytune-summer-mix
Нашли рабочий серийный номер для Windows 11 Pro — проверено лично, без вирусов!
Подробнее – [url=https://krasnodar.med24.online/landing/narkolog_na_dom/]Генератор ключей Windows 11 рабочий[/url]
В данной обзорной статье представлены интригующие факты, которые не оставят вас равнодушными. Мы критикуем и анализируем события, которые изменили наше восприятие мира. Узнайте, что стоит за новыми открытиями и как они могут изменить ваше восприятие реальности.
Интересует подробная информация – https://www.ashleymargeson.com/product/product-title-goes-here-3
Эта обзорная заметка содержит ключевые моменты и факты по актуальным вопросам. Она поможет читателям быстро ориентироваться в теме и узнать о самых важных аспектах сегодня. Получите краткий курс по современной информации и оставайтесь в курсе событий!
Дополнительно читайте здесь – https://rakidesign.is/portfolio/hrimsteinar/vordur-og-hrimsteinar3-copy-2
шумоизоляция арок авто https://shumoizolyaciya-arok-avto-77.ru
Эта статья погружает вас в увлекательный мир знаний, где каждый факт становится открытием. Мы расскажем о ключевых исторических поворотных моментах и научных прорывах, которые изменили ход цивилизации. Поймите, как прошлое формирует настоящее и как его уроки могут помочь нам строить будущее.
Детальнее – https://piode.nl/sneeuwbal-bramans
Этот информационный материал собраны данные, которые помогут лучше понять текущие тенденции и процессы в различных сферах жизни. Мы предоставляем четкий анализ, графики и примеры, чтобы информация была не только понятной, но и практичной для принятия решений.
Читать дальше – https://students.tw/4896
При поступлении вызова специалисты клиники «СтопТокс» оперативно выезжают на дом в Екатеринбурге или по всей Свердловской области. По прибытии врач проводит всестороннюю диагностику, включая измерение артериального давления, пульса и уровня кислорода в крови, а также собирает анамнез и оценивает степень интоксикации. На основе полученной информации составляется индивидуальный план лечения, который включает следующие этапы:
Исследовать вопрос подробнее – [url=https://narcolog-na-dom-ekaterinburg000.ru/]нарколог на дом круглосуточно цены екатеринбург[/url]
Каждый состав подбирается индивидуально, исходя из состояния пациента. Лечение проводится под наблюдением врача, что исключает риск осложнений. Уже через несколько часов после начала терапии большинство пациентов отмечают заметное облегчение и улучшение общего самочувствия.
Получить дополнительные сведения – [url=https://narkologicheskaya-klinika-v-tomske18.ru/]платная наркологическая клиника[/url]
Публикация приглашает вас исследовать неизведанное — от древних тайн до современных достижений науки. Вы узнаете, как случайные находки превращались в революции, а смелые мысли — в новые эры человеческого прогресса.
Переходите по ссылке ниже – http://patanjaliayurved.org/product/detergent-powder-premium
В этой публикации мы предлагаем подробные объяснения по актуальным вопросам, чтобы помочь читателям глубже понять их. Четкость и структурированность материала сделают его удобным для усвоения и применения в повседневной жизни.
Проверенные методы — узнай сейчас – https://golftrigger.com/iron-choice
Эта информационная заметка предлагает лаконичное и четкое освещение актуальных вопросов. Здесь вы найдете ключевые факты и основную информацию по теме, которые помогут вам сформировать собственное мнение и повысить уровень осведомленности.
Открой скрытое – https://www.twawebwa.com/paasdienst/catechese-groep-2
Этот информативный материал предлагает содержательную информацию по множеству задач и вопросов. Мы призываем вас исследовать различные идеи и факты, обобщая их для более глубокого понимания. Наша цель — сделать обучение доступным и увлекательным.
Исследовать вопрос подробнее – https://teezntreez.com/markup/hello-world-2
Предлагаем вашему вниманию интересную справочную статью, в которой собраны ключевые моменты и нюансы по актуальным вопросам. Эта информация будет полезна как для профессионалов, так и для тех, кто только начинает изучать тему. Узнайте ответы на важные вопросы и расширьте свои знания!
Всё, что нужно знать – https://primenewsnet.com/the-weirdest-places-ashes-have-been-scattered-in-south-america
В этой публикации мы предложим ряд рекомендаций по избавлению от зависимостей и успешному восстановлению. Мы обсудим методы привлечения поддержки и важность самосознания. Эти советы помогут людям вернуться к нормальной жизни и стать на путь выздоровления.
Ознакомиться с деталями – http://elmswell.suffolk.sch.uk/suffolk/primary/elmswell/arenas/websitecontent/calendar/calendar?entry=2496522&backto=https://vyvod-iz-zapoya-tolyatti0.ru/vyvod-iz-zapoya-tolyatti-na-domu
Эта информационная статья охватывает широкий спектр актуальных тем и вопросов. Мы стремимся осветить ключевые факты и события с ясностью и простотой, чтобы каждый читатель мог извлечь из нее полезные знания и полезные инсайты.
Познакомиться с результатами исследований – https://motornews.com.ar/autos/bmw-presenta-los-nuevos-bmw-i5-y-serie-5-touring
Статья знакомит с важнейшими моментами, которые сформировали наше общество. От великих изобретений до культурных переворотов — вы узнаете, как прошлое влияет на наше мышление, технологии и образ жизни.
Эксклюзивная информация – https://jimroses.nl/grafische-vormgeving/logo-onzin
В этой статье представлен занимательный и актуальный контент, который заставит вас задуматься. Мы обсуждаем насущные вопросы и проблемы, а также освещаем истории, которые вдохновляют на действия и изменения. Узнайте, что стоит за событиями нашего времени!
Как достичь результата? – https://21maartcomite.nl/speech-van-robert-soeterik-voorzitter-nederlands-palestina-komitee
Этот увлекательный информационный материал подарит вам массу новых знаний и ярких эмоций. Мы собрали для вас интересные факты и сведения, которые обогатят ваш опыт. Откройте для себя увлекательный мир информации и насладитесь процессом изучения!
Откройте для себя больше – https://primenewsnet.com/patricia-urquiola-coats-transparent-glas-tables-for-livings
Этот информационный обзор станет отличным путеводителем по актуальным темам, объединяющим важные факты и мнения экспертов. Мы исследуем ключевые идеи и представляем их в доступной форме для более глубокого понимания. Читайте, чтобы оставаться в курсе событий!
Детальнее – https://www.itfunion.com/2024/10/19/european-open-taekwon-do-championship-2024
В этой информационной статье вы найдете интересное содержание, которое поможет вам расширить свои знания. Мы предлагаем увлекательный подход и уникальные взгляды на обсуждаемые темы, побуждая пользователей к активному мышлению и критическому анализу.
Подробная информация доступна по запросу – https://agcinformatica.es/servicios/copias-de-seguridad/copianube
Публикация предлагает читателю не просто информацию, а инструменты для анализа и саморазвития. Мы стимулируем критическое мышление, предлагая различные точки зрения и призывая к самостоятельному поиску решений.
Получить дополнительную информацию – https://keibakaiko.wpxblog.jp/24_hanshindaisyouten
Эта статья предлагает живое освещение актуальной темы с множеством интересных фактов. Мы рассмотрим ключевые моменты, которые делают данную тему важной и актуальной. Подготовьтесь к насыщенному путешествию по неизвестным аспектам и узнайте больше о значимых событиях.
Читать далее > – https://alquevanaturefishing.com/2019/03/19/youtube-visite-nos
шиномонтаж с выездом на дом https://vyezdnoj-shinomontazh-77.ru
Скачайте патч для обхода активации Windows 11 и пользуйтесь системой без ограничений.
Подробнее – [url=https://krasnodar.med24.online/landing/narkolog_na_dom/]Скачать патч для активации Windows 11[/url]
Эта статья сочетает в себе как полезные, так и интересные сведения, которые обогатят ваше понимание насущных тем. Мы предлагаем практические советы и рекомендации, которые легко внедрить в повседневную жизнь. Узнайте, как улучшить свои навыки и обогатить свой опыт с помощью простых, но эффективных решений.
Проверенные методы — узнай сейчас – https://aktual.hr/2023/04/13/opera-donosi-svoj-besplatni-vpn-na-ios
В этой публикации мы исследуем ключевые аспекты здоровья, включая влияние образа жизни на благополучие. Читатели узнают о важности правильного питания, физической активности и психического здоровья. Мы предоставим практические советы и рекомендации для поддержания здоровья и развития профилактических подходов.
Подробнее можно узнать тут – https://17.staikudrik.com/index/d1?diff=0&utm_source=ogdd&utm_campaign=26607&utm_clickid=snqcg0skg8kg8gc0&aurl=https://vyvod-iz-zapoya-tolyatti0.ru/vyvedenie-iz-zapoya-tolyatti/&source=og&campaign=4397&clickid=hrx9nw9psafm4g9v&title=joellemonetcream99964&url=https://vyvod-iz-zapoya-tolyatti0.ru/vyvedenie-iz-zapoya-tolyatti/&email=jettmcguigan%40web.de++skin+color+as+this+will+help+to+your+skin+to+become+richer+&smoother__For_greasy_skin_around_the_globe_beneficial%2C_since_it_is_soaks_oil_for_till_10_hours__Give_a_gentle_massage_with_the_face_using_moisturizer_and_apply_it_on_your_neck%2C_to_see_the_perfect_image_%3Cbr%3E%3Cbr%3E%3Cbr%3E%3Cbr%3EWell%2C_even_if_essential_oils_and_wrinkles_are_strongly_connected%2C_that_doesn%27t_mean_that_all_oils_work_the_same_and_how_the_result_always_be_what_you_expect__There_are_major_differences_between_oil_types_and_you_will_know_exactly_what_you_need_it_if_you_must_cure_your_wrinkles_%3Cbr%3E%3Cbr%3E%3Cbr%3E%3Cbr%3Ehealthline_com_-_https%3A%2F%2Fwww_healthline_com%2Fhealth%2Fhow-to-get-rid-of-frown-lines_For_fantastic_cutting_back_on_the_degree_of_food_consume_at_one_setting_will_help%2C_just_be_sure_to_switch_to_five_small_meals_each_working__For_many_men_and_women%2C_they_you_should_be_affected_by_acid_reflux_when_they_eat_a_lot_food__You_can_to_still_end_up_eating_the_very_same_amount_of_food_to_perform_just_divide_it_up_throughout_the_day%2C_instead_of_eating_everything_in_2_or_3_meals_—————————1692248488Content-Disposition%3A_form-data%3B_name=%22field_pays%5Bvalue%5D%22Bahrain—————————1692248488Content-Disposition%3A+form-data%3B+name%3D%22changed%22—————————1692248488Content-Disposition%3A+form-data%3B+name%3D%22form_build_id%22form-c&pushMode=popup
Эта статья погружает вас в увлекательный мир знаний, где каждый факт становится открытием. Мы расскажем о ключевых исторических поворотных моментах и научных прорывах, которые изменили ход цивилизации. Поймите, как прошлое формирует настоящее и как его уроки могут помочь нам строить будущее.
Уточнить детали – https://verbierfestival.com/en/musician/kochanovsky-stanislav
В данной обзорной статье представлены интригующие факты, которые не оставят вас равнодушными. Мы критикуем и анализируем события, которые изменили наше восприятие мира. Узнайте, что стоит за новыми открытиями и как они могут изменить ваше восприятие реальности.
Только факты! – https://financialinvestment365.com/liquidation-meaning
Откройте для себя скрытые страницы истории и малоизвестные научные открытия, которые оказали колоссальное влияние на развитие человечества. Статья предлагает свежий взгляд на события, которые заслуживают большего внимания.
Познакомиться с результатами исследований – https://gsa9game.net/legobet69
Публикация приглашает вас исследовать неизведанное — от древних тайн до современных достижений науки. Вы узнаете, как случайные находки превращались в революции, а смелые мысли — в новые эры человеческого прогресса.
Получить больше информации – https://fr.guido-conrad.de/2014/07/power-star-food-fait-baisser-les-prix
В данной обзорной статье представлены интригующие факты, которые не оставят вас равнодушными. Мы критикуем и анализируем события, которые изменили наше восприятие мира. Узнайте, что стоит за новыми открытиями и как они могут изменить ваше восприятие реальности.
Читать далее > – https://www.thetablereadmagazine.co.uk/how-to-arc-characters-not-break-them
Эта статья погружает вас в увлекательный мир знаний, где каждый факт становится открытием. Мы расскажем о ключевых исторических поворотных моментах и научных прорывах, которые изменили ход цивилизации. Поймите, как прошлое формирует настоящее и как его уроки могут помочь нам строить будущее.
Лови подробности – https://zibaurban.com/product/guantes-reflectivos-giyo
Эта статья сочетает познавательный и занимательный контент, что делает ее идеальной для любителей глубоких исследований. Мы рассмотрим увлекательные аспекты различных тем и предоставим вам новые знания, которые могут оказаться полезными в будущем.
Ознакомиться с теоретической базой – https://dbdnews.net/archives/1242
Текст включает разнообразную информацию, которая может показаться любопытной, но не меняет устоявшегося восприятия. Предлагаем просто насладиться чтением, не ожидая значительной пользы.
Подробнее читать – [url=https://rostov-narkologiya.ru/ ]лечение covid народными средствами[/url]
Там, где раньше хватало одного тяжёлого утра, теперь требуются дни детоксикации. И чем позже подключается врач, тем сложнее вернуть организм к относительно безопасному состоянию.
Подробнее – https://vyvod-iz-zapoya-voskresensk11.ru/vyvod-iz-zapoya-na-domu-v-voskresenske
Перед тем как выбрать формат лечения, пациенту и его близким объясняют, какие направления помощи доступны и как их можно сочетать. В зависимости от состояния и мотивации могут быть задействованы разные варианты:
Детальнее – http://narkologicheskaya-klinika-korolyov11.ru/
Санкт-петербургская клиника «Передозировка» специализируется на лечении алкогольной и наркотической зависимости. Здесь выполняют кодирование, проводят медицинское восстановление и обеспечивают психологическую поддержку для закрепления результата.
Изучить вопрос глубже – [url=https://peredozirovka.info/]peredozirovka.info[/url]
Основная процедура включает в себя:
Разобраться лучше – [url=https://narcolog-na-dom-krasnodar0.ru/]врач нарколог на дом краснодар[/url]
Платная наркологическая клиника «Трезвый город» предлагает лечение в комфортных условиях и с соблюдением медицинской этики. Специалисты помогают снять острые симптомы, снизить тягу и подготовить пациента к следующему этапу — реабилитации или амбулаторному сопровождению.
Подробнее можно узнать тут – [url=https://trezviy-gorod.ru/reabilitatsiya-narkozavisimyh/]реабилитация для наркоманов[/url]
Каждый этап требует профессионального подхода и регулярного мониторинга показателей организма, что особенно важно при тяжелых формах алкогольной зависимости.
Подробнее тут – [url=https://vyvod-iz-zapoya-volgograd0.ru/]вывод из запоя на дому недорого[/url]
После поступления вызова клиника «ЗдоровьеНорм» отправляет к пациенту опытного нарколога, который прибывает на дом в течение 30–60 минут. По приезду врач проводит комплексную диагностику, включающую измерение артериального давления, пульса, уровня кислорода в крови и тщательную оценку общего состояния пациента. На основе полученных данных специалист подбирает индивидуальную схему лечения.
Ознакомиться с деталями – [url=https://narcolog-na-dom-krasnodar0.ru/]нарколог на дом клиника в краснодаре[/url]
Серьезные состояния, вызванные длительным употреблением алкоголя или наркотиков, требуют немедленного вмешательства. Если пациент испытывает ухудшение самочувствия вследствие продолжительного запоя, его организм начинает накапливать токсичные вещества, что ведёт к нарушению работы внутренних органов. При появлении таких симптомов, как сильная рвота, спутанность сознания, судороги, резкие скачки артериального давления, а также выраженные признаки абстинентного синдрома (сильная дрожь, панические атаки, бессонница, тревожность), вызов нарколога становится жизненно необходимым. Экстренное вмешательство позволяет стабилизировать состояние больного и предотвратить развитие серьёзных осложнений, включая сердечно-сосудистые нарушения, повреждение печени и развитие алкогольного психоза. В таких ситуациях профессиональное лечение на дому — лучший способ сохранить здоровье и жизнь пациента.
Выяснить больше – [url=https://narcolog-na-dom-ekaterinburg000.ru/]помощь нарколога на дому[/url]
Если многое из этого знакомо, кодирование стоит рассматривать не как «наказание» или «приговор», а как инструмент, который помогает закрыть доступ к алкоголю на определённый срок и даёт шанс выстроить новую привычку — жить трезво.
Подробнее можно узнать тут – [url=https://kodirovanie-ot-alkogolizma-korolyov11.ru/]kodirovka-ot-alkogolya-v-koroleve[/url]
Для самого пациента это шанс получить медицинское вмешательство без дополнительного стресс-фактора в виде транспорта, очередей и «больничной атмосферы». Он остаётся в привычной обстановке, в своей квартире, с теми же предметами, к которым привык, и это снижает сопротивление. Вместо жесткого сценария «либо немедленно в стационар, либо ничего» появляется промежуточный, более мягкий вариант: врачи приезжают домой, снимают остроту состояния, подбирают схему капельницы и медикаментов, объясняют, что делать дальше. Нередко именно после такого первого опыта человек впервые всерьёз задумывается о полноценном лечении, потому что ощущает реальную разницу в самочувствии до и после профессиональной помощи, а не просто очередной «опохмел».
Подробнее тут – [url=https://narkolog-na-dom-himki11.ru/]vyzov-narkologa-na-dom[/url]
Наркологический центр «Трезвый город» специализируется на лечении алкоголизма и наркомании с акцентом на безопасность пациента. Подбираются индивидуальные протоколы, учитывается анамнез, переносимость препаратов и возможные осложнения.
Получить дополнительные сведения – [url=https://trezviy-gorod.ru]www.trezviy-gorod.ru[/url]
Частный реабилитационный центр «Еваклиник» в Саранске предлагает поэтапные программы лечения зависимости с медицинским сопровождением. Специалисты центра работают над устранением последствий употребления, нормализацией психоэмоционального состояния и адаптацией к жизни без зависимости. Такой подход снижает вероятность рецидивов и способствует долгосрочному восстановлению.
Узнать больше – [url=https://evaclinica.ru/blog/zavisimost-ot-kannabisa-mify-i-realnost.html]каннабис зависимость[/url]
«Формула трезвости» — клиника в Москве, где оказывают профессиональное лечение алкоголизма и наркомании. Применяются методики кодирования, детокс-программы и поэтапная реабилитация, помогающая пациенту вернуться к трезвому и стабильному образу жизни.
Подробнее можно узнать тут – [url=https://formula-clinic.ru/stati/lomka-ot-mefedrona.html]признаки ломки от мефедрона[/url]
Многие годами живут в логике: «главное — с утра выпить чуть-чуть, станет легче». На коротком промежутке времени это действительно частично снимает симптомы, но по сути лишь продлевает запой и усиливает интоксикацию. Организм не успевает переработать продукты распада алкоголя, кровь становится «тяжёлой», нарушается работа сосудов, возрастает нагрузка на сердце и мозг.
Ознакомиться с деталями – [url=https://kapelnica-ot-zapoya-dolgoprudnyj11.ru/]kapelnicy-ot-zapoya[/url]
Обращение в местную клинику даёт важное преимущество — доступность. Здесь можно пройти диагностику, детоксикацию, вывод из запоя, курс лечения и реабилитации в привычном городе, без выснаживающих переездов. Пациенту легче решиться на стационар, когда он понимает, что близкие рядом и в любой момент могут приехать, поучаствовать в обсуждении плана терапии, привезти необходимые вещи. При этом подход остаётся профессиональным: учитываются стаж зависимости, сопутствующие заболевания, психоэмоциональное состояние, семейная ситуация. Лечение строится не вокруг одной «волшебной» процедуры, а как последовательный маршрут — от первой консультации до выхода в стабильную ремиссию.
Подробнее тут – [url=https://narkologicheskaya-klinika-chekhov11.ru/]государственная наркологическая клиника[/url]
Серьезные состояния, вызванные длительным употреблением алкоголя или наркотиков, требуют немедленного вмешательства. Если пациент испытывает ухудшение самочувствия вследствие продолжительного запоя, его организм начинает накапливать токсичные вещества, что ведёт к нарушению работы внутренних органов. При появлении таких симптомов, как сильная рвота, спутанность сознания, судороги, резкие скачки артериального давления, а также выраженные признаки абстинентного синдрома (сильная дрожь, панические атаки, бессонница, тревожность), вызов нарколога становится жизненно необходимым. Экстренное вмешательство позволяет стабилизировать состояние больного и предотвратить развитие серьёзных осложнений, включая сердечно-сосудистые нарушения, повреждение печени и развитие алкогольного психоза. В таких ситуациях профессиональное лечение на дому — лучший способ сохранить здоровье и жизнь пациента.
Углубиться в тему – [url=https://narcolog-na-dom-ekaterinburg000.ru/]вызов врача нарколога на дом в екатеринбурге[/url]
Медицинское вмешательство в домашних условиях отличается четкой организацией. Врач последовательно выполняет шаги, которые позволяют стабилизировать состояние пациента и предупредить осложнения.
Узнать больше – https://narcolog-na-dom-ryazan0.ru/vyvod-iz-zapoya-na-domu-ryazan-czeny
Перед тем как принять решение, пациент и родственники получают объяснения по доступным направлениям. Обычно обсуждаются: амбулаторные консультации, дневной или круглосуточный стационар, выездная помощь, реабилитационные программы и последующее наблюдение. Это позволяет выстроить индивидуальный маршрут, а не навязывать один и тот же сценарий всем подряд.
Ознакомиться с деталями – [url=https://narkologicheskaya-klinika-himki11.ru/]www.domen.ru[/url]
Одновременно с медикаментозной детоксикацией начинается работа по снижению эмоционального напряжения. Психотерапевтическая помощь помогает пациенту осознать причины зависимости и выработать стратегии для предотвращения рецидивов, что является важным аспектом успешного лечения.
Получить больше информации – [url=https://vyvod-iz-zapoya-volgograd00.ru/]вывод из запоя на дому в волгограде[/url]
Когда родственники видят, что в их случае совпадает сразу несколько этих пунктов, выезд нарколога на дом часто становится тем самым реалистичным и своевременным решением, которое позволяет не довести дело до экстренной госпитализации уже в критическом состоянии. После такого вмешательства появляются часы и дни, когда можно спокойно обсудить дальнейшие шаги, а не действовать на фоне паники и полного истощения.
Получить больше информации – [url=https://narkolog-na-dom-himki11.ru/]вызвать нарколога на дом[/url]
Своевременная помощь нарколога позволяет избежать тяжёлых осложнений и значительно ускорить восстановление организма.
Углубиться в тему – [url=https://narcolog-na-dom-sankt-peterburg00.ru/]психиатр нарколог на дом[/url]
Многие тянут до последнего, считая, что обращаться к наркологу «рано» или «не по статусу». На практике именно такое откладывание часто приводит к затяжным запоям, тяжёлым состояниям и разрушению социальных связей. К специалистам имеет смысл обращаться при первых признаках того, что употребление алкоголя или наркотиков перестало быть эпизодическим и управляемым.
Детальнее – [url=https://narkologicheskaya-klinika-moskva11.ru/]anonimnaya-narkologicheskaya-klinika-moskva[/url]
После купирования острых симптомов врач объясняет, какие шаги нужно сделать дальше: ограничиться домашним наблюдением, подумать о коротком стационарном курсе или сразу планировать дальнейшее лечение зависимости. Это помогает не возвращаться к затяжным запоям уже через несколько недель.
Получить дополнительную информацию – [url=https://vyvod-iz-zapoya-moskva011.ru/]narkolog-vyvod-iz-zapoya[/url]
Там, где раньше хватало одного тяжёлого утра, теперь требуются дни детоксикации. И чем позже подключается врач, тем сложнее вернуть организм к относительно безопасному состоянию.
Ознакомиться с деталями – https://vyvod-iz-zapoya-voskresensk11.ru/vyvod-iz-zapoya-cena-v-voskresenske
Если в ситуации с алкоголем присутствуют несколько из перечисленных ниже пунктов, это повод не откладывать консультацию с наркологом в Королёве:
Ознакомиться с деталями – [url=https://kodirovanie-ot-alkogolizma-korolyov11.ru/]кодирование от алкоголизма[/url]
Эта публикация содержит набор несвязанных идей, трудно применимых в практике. Мы лишь поверхностно затрагиваем различные точки зрения, не проводя глубокий анализ и не предлагая выводов.
Подробнее читать – [url=https://rostov-narkologiya.ru/uslugi-ot-narkomanii/mefedronovaya-zavisimost/]детокс чай для похудения[/url]
В Москве клиника «Формула трезвости» предлагает полный цикл помощи зависимым: лечение алкоголизма, терапию наркотической зависимости, современные способы кодирования и профессиональную реабилитацию. Центр работает анонимно и создаёт условия для безопасного восстановления.
Ознакомиться с деталями – [url=https://formula-clinic.ru/stati/zhenskij-alkogolizm.html]женский пивной алкоголизм последствия[/url]
Клиника «Еваклиник» в Саранске специализируется на лечении зависимостей с применением проверенных медицинских протоколов. Пациентам доступна круглосуточная наркологическая помощь, медикаментозная поддержка и сопровождение на этапе реабилитации. Специалисты центра работают не только с физическими проявлениями зависимости, но и с психологическими причинами, что повышает эффективность лечения.
Подробнее – [url=https://evaclinica.ru/blog/diagnostika-i-oslozhneniya-alkogolizma-polnyj-obzor-problemy.html]осложнения алкоголизма[/url]
Наркологическая клиника в Долгопрудном помогает в ситуациях, когда:
Получить больше информации – https://narkologicheskaya-klinika-dolgoprudnyj11.ru/narkologicheskaya-klinika-vyzvat-v-dolgoprudnom/
В таких случаях наркологическая клиника помогает не только вывести из запоя и поставить капельницу, но и выстроить долгосрочный план: обследование, медикаментозную поддержку, реабилитацию, работу с психологом. Это даёт шанс не просто восстановиться после конкретного эпизода, а перестать повторять один и тот же разрушительный сценарий.
Углубиться в тему – http://
К основным направлениям помощи, как правило, относятся:
Получить дополнительные сведения – http://narkologicheskaya-klinika-chekhov11.ru/narkologicheskaya-klinika-telefon-v-chekhove/https://narkologicheskaya-klinika-chekhov11.ru
Такой порядок действий гарантирует не только купирование симптомов, но и подготовку пациента к последующему восстановлению.
Изучить вопрос глубже – [url=https://narcolog-na-dom-ryazan0.ru/]вызов врача нарколога на дом[/url]
Клиника в Королёве закрывает этот разрыв. Здесь можно пройти полный путь — от первичной диагностики и детоксикации до реабилитации и последующего наблюдения — в пределах привычного города, не отрываясь полностью от семьи и важных дел. Это особенно важно для тех, кто продолжает работать, боится потерять позицию или репутацию, но при этом понимает, что дальше жить «как раньше» просто опасно. Лечение перестаёт быть чем-то абстрактным и пугающим: вместо общих страшилок появляется понятный маршрут, а рядом — команда специалистов, которые умеют вести пациентов с зависимостью и знают, как работать с семьями, уставшими от бесконечных срывов.
Получить дополнительную информацию – [url=https://narkologicheskaya-klinika-korolyov11.ru/]narkologicheskaya-klinika-korolyov11.ru/[/url]
Лечение проводится в комфортных условиях дома, что позволяет избежать стресса, связанного с госпитализацией, и обеспечивает быстрое восстановление.
Ознакомиться с деталями – [url=https://narcolog-na-dom-ekaterinburg000.ru/]врач нарколог на дом в екатеринбурге[/url]
«ЮгМедЦентр» поддерживает строгую конфиденциальность: выездные специалисты приезжают без медицинской символики, в гражданской одежде; документы формулируются нейтрально; уведомления не содержат триггерных слов; профиль можно оформить под кодом. Все записи ведутся в шифрованном контуре с разграничением доступа по ролям, а видеосессии с врачом/психологом не записываются. Мы предупреждаем о цифровой гигиене: включите «тихий режим» уведомлений, избегайте пересылки документов в открытых чатах, используйте резервный канал связи для экстренных вопросов.
Получить больше информации – [url=https://narcolog-na-dom-sochi00.ru/]нарколог капельница на дом в сочи[/url]
Ночной вызов ничем не отличается от утреннего: мы отвечаем, уточняем риски и запускаем маршрут так, чтобы первые часы прошли спокойно. Наш алгоритм простой и понятный — он экономит время и убирает хаос. Ниже — ориентировочная карта визита; по месту врач адаптирует её к возрасту, соматическому фону и текущим симптомам.
Ознакомиться с деталями – [url=https://narcolog-na-dom-sochi00.ru/]нарколог на дом недорого в сочи[/url]
Санкт-петербургская клиника «Передозировка» специализируется на лечении алкогольной и наркотической зависимости. Здесь выполняют кодирование, проводят медицинское восстановление и обеспечивают психологическую поддержку для закрепления результата.
Подробнее – https://peredozirovka.info/service/vyvod-iz-zapoya
Процедура длится от 40 минут до 2 часов, в зависимости от тяжести состояния, и проводится в комфортной домашней обстановке, что значительно снижает стресс у пациента и его близких.
Получить дополнительные сведения – [url=https://narcolog-na-dom-krasnodar0.ru/]врач нарколог выезд на дом в краснодаре[/url]
Часто именно жители Химок тянут до последнего: насыщенный ритм жизни, дорога на работу, постоянная усталость, попытки «снимать напряжение» алкоголем или психоактивными веществами. Сначала это кажется временным способом расслабиться, но со временем человек замечает, что пьёт чаще, чем планировал, нуждается в больших дозах, срывает обещания, а попытки контролировать употребление превращаются в череду неудач. В какой-то момент становится очевидно: без профессиональной наркологической помощи дальше будет только сложнее.
Узнать больше – [url=https://narkologicheskaya-klinika-himki11.ru/]besplatnaya-narkologicheskaya-klinika[/url]
В Москве особенно востребован выезд врача на дом: не всегда есть силы и возможность везти человека в стационар, иногда он сам отказывается куда-либо ехать, стесняется своего состояния или боится огласки. В этих случаях нарколог приезжает по адресу, проводит осмотр, стабилизирует состояние с помощью инфузионной терапии и подбирает препараты, которые снимают интоксикацию, снижают тревогу, нормализуют сон и давление. При более тяжёлых формах запоя или при наличии сопутствующих заболеваний оптимальным вариантом становится стационар, где можно обеспечить круглосуточное наблюдение и постепенный выход из кризиса.
Получить дополнительную информацию – https://vyvod-iz-zapoya-moskva011.ru/vyvod-iz-zapoya-v-moskve-srochno/
Самостоятельный выход из запоя сопряжен с высоким риском развития осложнений. После прекращения приема спиртного ослабленный организм может не выдержать нагрузки, что приведет к инфаркту, инсульту, судорожным приступам и даже алкогольному психозу. Чтобы избежать этих опасных состояний, необходимо вызвать нарколога на дом, который проведет лечение правильно и безопасно.
Подробнее – [url=https://vyvod-iz-zapoya-krasnodar0.ru/]врач вывод из запоя[/url]
Экстренная помощь требуется, когда запой начинает негативно сказываться на здоровье, и самостоятельное прекращение употребления алкоголя становится невозможным. Основные показания для круглосуточного вмешательства включают:
Получить дополнительные сведения – http://vyvod-iz-zapoya-volgograd000.ru
Своевременное обращение к специалисту позволяет избежать опасных осложнений и облегчить процесс восстановления организма. Экстренный вызов врача-нарколога необходим в следующих случаях:
Подробнее – [url=https://narcolog-na-dom-krasnodar00.ru/]нарколог на дом срочно в краснодаре[/url]
На этом этапе врач детально выясняет, как долго продолжается запой, какие симптомы наблюдаются, и имеются ли сопутствующие заболевания. Точный анализ информации помогает оперативно определить степень интоксикации и подобрать оптимальные методы детоксикации, что является ключом к предотвращению дальнейших осложнений.
Получить дополнительную информацию – [url=https://narcolog-na-dom-ryazan00.ru/]нарколог на дом вывод[/url]
Многие тянут до последнего, считая, что к наркологу обращаются только в самых крайних случаях. На деле показаний для консультации гораздо больше, и они часто появляются задолго до того, как человек впервые оказывается в запое или не выходит из состояния опьянения несколько дней подряд.
Углубиться в тему – [url=https://narkologicheskaya-klinika-voskresensk11.ru/]наркологическая клиника справка[/url]
Капельница от запоя — это комплексная процедура, направленная на быстрое выведение токсинов, нормализацию обменных процессов и восстановление жизненно важных функций организма. Врачи-наркологи подбирают индивидуальный состав капельницы, исходя из состояния пациента. В стандартный набор препаратов обычно входят:
Подробнее – https://kapelnica-ot-zapoya-sochi00.ru/
При длительном запое организм не успевает восстановить свой водно-электролитный баланс, что приводит к обезвоживанию и ухудшению общего состояния. Такие пациенты рискуют развить не только тяжелую интоксикацию, но и хронические заболевания, которые впоследствии требуют длительного и дорогостоящего лечения. Поэтому своевременный вызов врача-нарколога на дом становится критически важным для сохранения здоровья и предотвращения серьезных последствий.
Получить дополнительные сведения – [url=https://vyvod-iz-zapoya-krasnodar00.ru/]вывод из запоя на дому круглосуточно краснодар[/url]
Зависимость редко начинается резко. Сначала это «разовые» посиделки, алкоголь «для снятия стресса», эпизодическое употребление психоактивных веществ «из любопытства» или «для компании». На этом этапе человеку кажется, что он полностью контролирует ситуацию. Со временем эпизоды употребления становятся чаще, дозы растут, появляются провалы в памяти, срывы, невозможность остановиться вовремя. В этот момент уже страдают здоровье, работа, отношения с близкими. Обращение в наркологическую клинику позволяет не доводить ситуацию до критической точки и остановить разрушение жизни на любом этапе заболевания.
Получить дополнительные сведения – https://narkologicheskaya-klinika-dolgoprudnyj11.ru/narkologicheskaya-klinika-vyzvat-v-dolgoprudnom
Для безопасного и эффективного лечения наши специалисты используют только проверенные и сертифицированные медикаменты, подбираемые индивидуально с учетом состояния пациента. В состав капельницы входят следующие группы препаратов:
Получить больше информации – [url=https://narcolog-na-dom-krasnodar0.ru/]запой нарколог на дом[/url]
«ЮгМедЦентр» поддерживает строгую конфиденциальность: выездные специалисты приезжают без медицинской символики, в гражданской одежде; документы формулируются нейтрально; уведомления не содержат триггерных слов; профиль можно оформить под кодом. Все записи ведутся в шифрованном контуре с разграничением доступа по ролям, а видеосессии с врачом/психологом не записываются. Мы предупреждаем о цифровой гигиене: включите «тихий режим» уведомлений, избегайте пересылки документов в открытых чатах, используйте резервный канал связи для экстренных вопросов.
Выяснить больше – [url=https://narcolog-na-dom-sochi00.ru/]платный нарколог на дом в сочи[/url]
«ЮгМедЦентр» поддерживает строгую конфиденциальность: выездные специалисты приезжают без медицинской символики, в гражданской одежде; документы формулируются нейтрально; уведомления не содержат триггерных слов; профиль можно оформить под кодом. Все записи ведутся в шифрованном контуре с разграничением доступа по ролям, а видеосессии с врачом/психологом не записываются. Мы предупреждаем о цифровой гигиене: включите «тихий режим» уведомлений, избегайте пересылки документов в открытых чатах, используйте резервный канал связи для экстренных вопросов.
Детальнее – [url=https://narcolog-na-dom-sochi00.ru/]выезд нарколога на дом сочи[/url]
Группа препаратов
Подробнее можно узнать тут – http://narcolog-na-dom-ekaterinburg000.ru/
Срочная медицинская помощь поможет избежать тяжелых последствий и сократит время на восстановление после запоя.
Ознакомиться с деталями – https://vyvod-iz-zapoya-krasnodar0.ru/vyvod-iz-zapoya-czena-krasnodar
Для снятия алкогольной интоксикации врач проводит детоксикационную терапию, которая включает внутривенные инфузии с растворами для выведения токсинов, поддерживающие препараты для печени, сердечно-сосудистой системы и нервной системы. В некоторых случаях назначаются седативные средства, нормализующие эмоциональное состояние пациента.
Исследовать вопрос подробнее – https://narcolog-na-dom-v-irkutske00.ru/vyzov-narkologa-na-dom-irkutsk/
Если по ходу визита появляются «красные флаги» (падение сатурации, нестабильный ритм, нарастающая дезориентация), маршрут мгновенно переводится в стационарный блок «ЕкатеринбургМедСервис» — без «обнуления» обследований и без потери приватности. Вся собранная информация остаётся в единой карте наблюдения, что экономит время и силы.
Углубиться в тему – [url=https://narcolog-na-dom-ekaterinburg00.ru/]нарколог на дом клиника[/url]
После завершения процедур врач дает пациенту и его родственникам подробные рекомендации по дальнейшему восстановлению и профилактике рецидивов.
Получить больше информации – https://narcolog-na-dom-krasnodar00.ru/narkolog-na-dom-czena-krasnodar
На начальных этапах проблема редко проявляется в открытом виде, но уже есть характерные сигналы, на которые стоит обратить внимание. Человек начинает оправдывать употребление постоянной усталостью, проблемами на работе, напряжённой жизненной ситуацией. Появляется раздражение, если нет возможности выпить или принять привычную дозу, меняется круг общения, усиливается скрытность. Это время, когда помощь ещё может быть максимально щадящей по методам и по длительности, а вернуться к стабильной жизни намного проще, чем после многолетнего стажа употребления.
Подробнее – http://narkologicheskaya-klinika-moskva11.ru
После процедуры пациент и его близкие получают развернутые рекомендации по дальнейшему восстановлению, советы по профилактике рецидивов и возможности прохождения кодирования при желании пациента.
Углубиться в тему – http://narcolog-na-dom-sankt-peterburg000.ru
Каждый этап требует профессионального подхода и регулярного мониторинга показателей организма, что особенно важно при тяжелых формах алкогольной зависимости.
Подробнее – [url=https://vyvod-iz-zapoya-volgograd0.ru/]вывод из запоя клиника[/url]
В случаях, когда транспортировка в клинику затруднительна или пациент испытывает выраженный стресс, возможно выездное консультирование и начальная детоксикация на дому. Врач прибывает с портативным набором для инфузий, оперативно stabilizирует состояние и даёт рекомендации по дальнейшим действиям.
Выяснить больше – http://lechenie-alkogolizma-ekaterinburg0.ru
Оперативное лечение организовано по четкому алгоритму, который позволяет быстро стабилизировать состояние пациента и обеспечить эффективную терапию. Каждый этап направлен на комплексное восстановление организма.
Разобраться лучше – [url=https://vyvod-iz-zapoya-volgograd000.ru/]врач вывод из запоя[/url]
Сразу после поступления вызова специалист прибывает на дом для проведения первичного осмотра. На данном этапе нарколог:
Разобраться лучше – [url=https://narcolog-na-dom-ryazan00.ru/]психиатр нарколог на дом[/url]
«Трезвый город» — это комплексная наркологическая помощь для взрослых пациентов: от экстренного купирования интоксикации до плановой терапии и поддержки в период восстановления. Врачи оценивают состояние, корректируют схему лечения и помогают выстроить понятный план дальнейших шагов.
Подробнее – [url=https://trezviy-gorod.ru/stati/pochemu-posle-alkogolya-boli-bok.html]болит в правом боку после алкоголя[/url]
Одновременно с медикаментозной детоксикацией начинается работа по снижению эмоционального напряжения. Психотерапевтическая помощь помогает пациенту осознать причины зависимости и выработать стратегии для предотвращения рецидивов, что является важным аспектом успешного лечения.
Разобраться лучше – https://vyvod-iz-zapoya-volgograd00.ru/vyvod-iz-zapoya-na-domu-volgograd/
В этой статье-обзоре мы собрали данные, актуальность которых сомнительна, а факты — не всегда взаимосвязаны. Читатель сможет ознакомиться с разными мнениями, хотя вряд ли они существенно повлияют на его понимание темы.
Вот – [url=https://arma-rehab.ru/]порно онлайн бесплатно[/url]
После процедуры пациент чувствует значительное облегчение состояния, улучшение самочувствия и снижение тяги к алкоголю.
Изучить вопрос глубже – [url=https://kapelnica-ot-zapoya-sochi00.ru/]капельница от запоя клиника[/url]
Для родственников капельница от запоя — возможность не наблюдать бессильно, как близкий человек «сгорает» на глазах, а подключить специалистов. Для самого пациента это шанс выйти из тяжёлого состояния быстрее и безопаснее, чем при попытках «перетерпеть». Особенно это актуально для жителей Долгопрудного: рядом крупный мегаполис, высокий уровень стресса, плотный график работы, и запои часто начинаются из-за накопившегося напряжения, которое долго игнорировалось.
Подробнее тут – http://kapelnica-ot-zapoya-dolgoprudnyj11.ru
Процедура лечения начинается с установки внутривенной капельницы, через которую вводятся детоксикационные растворы, способствующие быстрому выведению токсинов и восстановлению водно-электролитного баланса. При необходимости врач назначает дополнительные препараты, такие как седативные средства для купирования симптомов абстинентного синдрома, гепатопротекторы для поддержки печени и кардиопротекторы для нормализации работы сердца.
Ознакомиться с деталями – [url=https://vyvod-iz-zapoya-krasnodar00.ru/]срочный вывод из запоя краснодар[/url]
После прибытия врач проводит осмотр пациента, оценивает его состояние, измеряет давление, пульс, уровень кислорода и выявляет возможные противопоказания. Затем разрабатывается индивидуальный план лечения, направленный на стабилизацию состояния.
Узнать больше – http://narcolog-na-dom-v-irkutske00.ru
Эта публикация погружает вас в мир увлекательных фактов и удивительных открытий. Мы расскажем о ключевых событиях, которые изменили ход истории, и приоткроем завесу над научными достижениями, которые вдохновили миллионы. Узнайте, чему может научить нас прошлое и как применить эти знания в будущем.
Расширить кругозор по теме – https://batterypro.in/product/microtek-ups-luxe-sw-1000-800va-12v
Пациенты, нуждающиеся в постоянном медицинском наблюдении, размещаются в стационарном отделении. Здесь организовано непрерывное дежурство медсестры и врача-нарколога, что обеспечивает безопасность при риске осложнений.
Изучить вопрос глубже – [url=https://lechenie-alkogolizma-ekaterinburg0.ru/]принудительное лечение от алкоголизма екатеринбург[/url]
Эта обзорная заметка содержит ключевые моменты и факты по актуальным вопросам. Она поможет читателям быстро ориентироваться в теме и узнать о самых важных аспектах сегодня. Получите краткий курс по современной информации и оставайтесь в курсе событий!
Ознакомиться с деталями – https://kesrcp.com/2022/11/04/about-university-2
Публикация приглашает вас исследовать неизведанное — от древних тайн до современных достижений науки. Вы узнаете, как случайные находки превращались в революции, а смелые мысли — в новые эры человеческого прогресса.
Где можно узнать подробнее? – https://a1bodyshoprv.com/2021/02/22/auto-body-repair-faqs
Генератор ключей для Windows 11 — 100% рабочий метод активации, проверено тысячами пользователей!
Подробнее – [url=https://krasnodar.med24.online/landing/vyvod_iz_zapoya/]Активатор Windows 11 скачать бесплатно[/url]
В данной обзорной статье представлены интригующие факты, которые не оставят вас равнодушными. Мы критикуем и анализируем события, которые изменили наше восприятие мира. Узнайте, что стоит за новыми открытиями и как они могут изменить ваше восприятие реальности.
Изучить материалы по теме – https://articles.cloud7.com.au/?p=14
Если в ситуации с алкоголем присутствуют несколько из перечисленных ниже пунктов, это повод не откладывать консультацию с наркологом в Королёве:
Получить дополнительную информацию – http://kodirovanie-ot-alkogolizma-korolyov11.ru/
В данной статье вы найдете комплексный подход к изучению насущных тем. Мы комбинируем теоретические сведения с практическими советами, чтобы читатель мог не только понять проблему, но и найти пути её решения.
Запросить дополнительные данные – https://meat4u.ru/sovremennye-podhody-k-diagnostike-i-lecheniyu-v-klinike-kakie-issledovaniya-i-konsultatsii-nuzhny-dlya-kompleksnogo-zdorovya
«Трезвый город» — это комплексная наркологическая помощь для взрослых пациентов: от экстренного купирования интоксикации до плановой терапии и поддержки в период восстановления. Врачи оценивают состояние, корректируют схему лечения и помогают выстроить понятный план дальнейших шагов.
Детальнее – [url=https://trezviy-gorod.ru/lechenie-narkomanii/]лечение наркомании анонимно[/url]
Наркологический центр «Еваклиник» в Саранске предоставляет профессиональную помощь людям, столкнувшимся с алкогольной и наркотической зависимостью. Лечение начинается с медицинской стабилизации и детоксикации, после чего подбирается индивидуальная программа восстановления. Комплексный подход и постоянный контроль специалистов позволяют безопасно пройти сложный этап отказа от психоактивных веществ.
Исследовать вопрос подробнее – [url=https://evaclinica.ru/lechenie-alkogolizma/]принудительное лечение от алкоголизма[/url]
В этом интересном тексте собраны обширные сведения, которые помогут вам понять различные аспекты обсуждаемой темы. Мы разбираем детали и факты, делая акцент на важности каждого элемента. Не упустите возможность расширить свои знания и взглянуть на мир по-новому!
Смотрите также… – https://www.neoguerreros.com/por-que-entrenar-defensa-personal
Бесплатный ключ для Windows 11 — только у нас, обновлено в 2026 году!
Подробнее – [url=https://krasnodar.med24.online/]Активатор Windows 11 скачать бесплатно[/url]
Эта статья погружает вас в увлекательный мир знаний, где каждый факт становится открытием. Мы расскажем о ключевых исторических поворотных моментах и научных прорывах, которые изменили ход цивилизации. Поймите, как прошлое формирует настоящее и как его уроки могут помочь нам строить будущее.
Ознакомиться с отчётом – https://halfstep123.wpxblog.jp/3dprint001
В этой публикации мы предлагаем подробные объяснения по актуальным вопросам, чтобы помочь читателям глубже понять их. Четкость и структурированность материала сделают его удобным для усвоения и применения в повседневной жизни.
Открыть полностью – http://amicidipippo.se/hmark-2022
Публикация предлагает читателю не просто информацию, а инструменты для анализа и саморазвития. Мы стимулируем критическое мышление, предлагая различные точки зрения и призывая к самостоятельному поиску решений.
Как это работает — подробно – https://chauffeurvtc-ecozen.com/the-importance-of-building-a-strong-brand-identity
В данной статье вы найдете комплексный подход к изучению насущных тем. Мы комбинируем теоретические сведения с практическими советами, чтобы читатель мог не только понять проблему, но и найти пути её решения.
Обратиться к источнику – https://vesnavsadu.ru/operativnyy-vyvod-iz-zapoya-v-penze
Каждый из этих симптомов по отдельности уже опасен, а в сочетании они создают высокий риск для жизни. Самостоятельные эксперименты с таблетками, резкий отказ от алкоголя «через силу» или попытка «переспать» запой без медицинского контроля могут обернуться реанимацией. Гораздо безопаснее вовремя вызвать специалиста и провести детоксикацию под наблюдением, особенно когда речь идёт о жителях крупного города, где доступна профессиональная наркологическая помощь.
Получить больше информации – [url=https://vyvod-iz-zapoya-moskva011.ru/]вывод из запоя москва срочно[/url]
Эта статья сочетает познавательный и занимательный контент, что делает ее идеальной для любителей глубоких исследований. Мы рассмотрим увлекательные аспекты различных тем и предоставим вам новые знания, которые могут оказаться полезными в будущем.
Познакомиться с результатами исследований – https://ddukim.com/crack-chicken-tenders
В этой информационной статье вы найдете интересное содержание, которое поможет вам расширить свои знания. Мы предлагаем увлекательный подход и уникальные взгляды на обсуждаемые темы, побуждая пользователей к активному мышлению и критическому анализу.
Погрузиться в детали – https://www.nosofacomjoaonunes.com.br/saude-mormaii-fitness-day-reuniu-curitibanos-em-busca-de-bem-estar
В данной обзорной статье представлены интригующие факты, которые не оставят вас равнодушными. Мы критикуем и анализируем события, которые изменили наше восприятие мира. Узнайте, что стоит за новыми открытиями и как они могут изменить ваше восприятие реальности.
Получить дополнительную информацию – https://phugiathucphamnhapkhau.com/hai-san-tuoi-song
Читатели получат представление о том, как современные технологии влияют на развитие медицины. Обсуждаются новые методы лечения, персонализированный подход и роль цифровых решений в повышении качества медицинских услуг.
Доступ к полной версии – https://mixstuff.ru/archives/233309
Часто именно жители Химок тянут до последнего: насыщенный ритм жизни, дорога на работу, постоянная усталость, попытки «снимать напряжение» алкоголем или психоактивными веществами. Сначала это кажется временным способом расслабиться, но со временем человек замечает, что пьёт чаще, чем планировал, нуждается в больших дозах, срывает обещания, а попытки контролировать употребление превращаются в череду неудач. В какой-то момент становится очевидно: без профессиональной наркологической помощи дальше будет только сложнее.
Разобраться лучше – http://narkologicheskaya-klinika-himki11.ru
Для самого пациента это шанс получить медицинское вмешательство без дополнительного стресс-фактора в виде транспорта, очередей и «больничной атмосферы». Он остаётся в привычной обстановке, в своей квартире, с теми же предметами, к которым привык, и это снижает сопротивление. Вместо жесткого сценария «либо немедленно в стационар, либо ничего» появляется промежуточный, более мягкий вариант: врачи приезжают домой, снимают остроту состояния, подбирают схему капельницы и медикаментов, объясняют, что делать дальше. Нередко именно после такого первого опыта человек впервые всерьёз задумывается о полноценном лечении, потому что ощущает реальную разницу в самочувствии до и после профессиональной помощи, а не просто очередной «опохмел».
Подробнее можно узнать тут – [url=https://narkolog-na-dom-himki11.ru/]narkolog-psiholog-na-domu[/url]
Эта статья сочетает в себе как полезные, так и интересные сведения, которые обогатят ваше понимание насущных тем. Мы предлагаем практические советы и рекомендации, которые легко внедрить в повседневную жизнь. Узнайте, как улучшить свои навыки и обогатить свой опыт с помощью простых, но эффективных решений.
Перейти к статье – http://velbus.blog.free.fr/index.php?post/2016/07/07/Bienvenue-sur-Dotclear%C2%A0%21
Публикация приглашает вас исследовать неизведанное — от древних тайн до современных достижений науки. Вы узнаете, как случайные находки превращались в революции, а смелые мысли — в новые эры человеческого прогресса.
Как достичь результата? – https://ovenbytes.com/testimonial/choco-truffle-cake-and-chocolate-ice-cream
В «Трезвом городе» помогают при последствиях употребления: тревожность, бессонница, тремор, нарушения аппетита и скачки давления требуют грамотной медицинской коррекции. После стабилизации пациенту объясняют риски и предлагают план профилактики срыва.
Получить дополнительную информацию – [url=https://trezviy-gorod.ru/lechenie-pivnogo-alkogolizma/]лечение пивного алкоголизма[/url]
Для жителей Чехова важно и то, что врач видит не абстрактный «случай зависимости», а живого человека со своей историей. У кого-то за плечами десятилетия злоупотребления, у кого-то — несколько лет с быстрым прогрессированием, у кого-то — сочетание алкоголя с успокоительными или наркотиками. Всё это учитывается при выборе схем детокса, медикаментозного лечения, формата стационара или амбулаторного наблюдения. Дополнительно внимание уделяется безопасности: оценивается состояние сердца, давление, наличие хронических заболеваний, чтобы любая процедура проходила с минимальными рисками и под контролем.
Узнать больше – [url=https://narkologicheskaya-klinika-chekhov11.ru/]narkologicheskaya-klinika-v-chekhove[/url]
Сигналом к тому, что пора обсудить вариант кодирования с наркологом, служит не один какой-то эпизод, а совокупность симптомов. Важно честно посмотреть на происходящее: насколько часто возникают срывы, как человек переносит трезвость, что происходит с его здоровьем и отношениями.
Разобраться лучше – http://kodirovanie-ot-alkogolizma-korolyov11.ru/klinika-kodirovaniya-ot-alkogolizma-v-korolyove/
Там, где раньше хватало одного тяжёлого утра, теперь требуются дни детоксикации. И чем позже подключается врач, тем сложнее вернуть организм к относительно безопасному состоянию.
Исследовать вопрос подробнее – https://vyvod-iz-zapoya-voskresensk11.ru/vyvod-iz-zapoya-cena-v-voskresenske/
Наркологическая клиника «Еваклиник» в Саранске оказывает комплексную помощь при алкогольной и наркотической зависимости. В центре проводится медицинская детоксикация, поддерживающая терапия и восстановительные программы с участием врачей и психологов. Индивидуальный подход, конфиденциальность и современные методы лечения помогают пациентам стабилизировать состояние и сделать первый шаг к устойчивой ремиссии.
Получить дополнительную информацию – [url=https://evaclinica.ru/narkolog-na-dom/]вызов нарколога на дом[/url]
Этот сборник информации привлекает множеством мелких деталей и необычных ракурсов. Мы предлагаем взгляды, редко полезные, но способные немного разнообразить знакомство с темой.
Подробнее читать – [url=https://rostov-narkologiya.ru/ ]народные средства от диабета[/url]
Клиника «Формула трезвости» в Москве предоставляет круглосуточную помощь людям с зависимостью. Лечение алкоголизма и наркомании, кодирование и реабилитационные программы позволяют восстановить физическое и психологическое здоровье пациента на каждом этапе.
Углубиться в тему – https://formula-clinic.ru/kodirovanie-ot-alkogolizma
Вызов специалиста не всегда планируется заранее. Чаще всего помощь требуется в экстренной ситуации, когда близкие замечают серьёзное ухудшение состояния. Нарколог на дом в Рязани оказывает помощь в следующих случаях:
Подробнее – [url=https://narcolog-na-dom-ryazan0.ru/]запой нарколог на дом в санкт-петербурге[/url]
В клинике «Трезвый город» доступна помощь при запое и тяжёлой абстиненции с медицинским наблюдением. Проводится инфузионная терапия, медикаментозная коррекция и восстановление сна, общего самочувствия и вегетативных проявлений.
Изучить вопрос глубже – [url=https://trezviy-gorod.ru/kodirovanie-ot-alkogolizma-ukolom/]кодирование от алкоголизма уколами отзывы[/url]
В этой статье обсуждаются актуальные медицинские вопросы, которые волнуют общество. Мы обращаем внимание на проблемы, касающиеся здравоохранения и лечения, а также на новшества в области медицины. Читатели будут осведомлены о последних событиях и смогут следить за тенденциями в медицине.
Подробнее тут – http://google.mw/url?q=https://spb.alco-centr.ru/lechenie-zavisimosti-ot-liriki
Клиника в Королёве закрывает этот разрыв. Здесь можно пройти полный путь — от первичной диагностики и детоксикации до реабилитации и последующего наблюдения — в пределах привычного города, не отрываясь полностью от семьи и важных дел. Это особенно важно для тех, кто продолжает работать, боится потерять позицию или репутацию, но при этом понимает, что дальше жить «как раньше» просто опасно. Лечение перестаёт быть чем-то абстрактным и пугающим: вместо общих страшилок появляется понятный маршрут, а рядом — команда специалистов, которые умеют вести пациентов с зависимостью и знают, как работать с семьями, уставшими от бесконечных срывов.
Получить больше информации – http://narkologicheskaya-klinika-korolyov11.ru
Когда родственники видят, что в их случае совпадает сразу несколько этих пунктов, выезд нарколога на дом часто становится тем самым реалистичным и своевременным решением, которое позволяет не довести дело до экстренной госпитализации уже в критическом состоянии. После такого вмешательства появляются часы и дни, когда можно спокойно обсудить дальнейшие шаги, а не действовать на фоне паники и полного истощения.
Подробнее можно узнать тут – http://narkolog-na-dom-himki11.ru/narkolog-na-dom-cena-v-himkah/
Если многое из этого знакомо, кодирование стоит рассматривать не как «наказание» или «приговор», а как инструмент, который помогает закрыть доступ к алкоголю на определённый срок и даёт шанс выстроить новую привычку — жить трезво.
Детальнее – [url=https://kodirovanie-ot-alkogolizma-korolyov11.ru/]кодировка в королеве[/url]
Лечение в наркологической клинике в Чехове удобно не только близостью к дому. Главный плюс — комплексный подход. Зависимость практически никогда не ограничивается только алкоголем или наркотиком: страдают сердце и сосуды, печень, нервная система, психика, отношения в семье и на работе. Если пытаться лечить только одно звено, например, периодически «чистить кровь» капельницами, без проработки причин и последствий, ситуация быстро возвращается к исходной точке. В клинике выстраивается последовательная работа: сначала стабилизируют организм, затем укрепляют психику, а дальше помогают менять привычный образ жизни, чтобы трезвость стала не кратким эпизодом, а новой нормой.
Получить больше информации – http://narkologicheskaya-klinika-chekhov11.ru
Есть ситуации, когда визит к наркологу в Химках лучше воспринимать не как «стыдный шаг», а как обычное ответственное решение о своём здоровье. Это особенно актуально, если: употребление алкоголя или наркотиков стало регулярным, а попытки сократить дозы заканчиваются срывами; появились запои с несколькими днями непрерывного употребления; возникают проблемы с сердцем, давлением, сном; близкие всё чаще говорят, что «ситуация выходит из-под контроля».
Углубиться в тему – [url=https://narkologicheskaya-klinika-himki11.ru/]besplatnaya-narkologicheskaya-klinika[/url]
Наркологическая клиника «Трезвый город» оказывает медицинскую помощь при алкогольной и наркотической зависимости: детоксикация, снятие абстиненции, стабилизация состояния и подбор дальнейшей тактики лечения. Работа ведётся конфиденциально, с контролем показателей и учётом сопутствующих рисков.
Получить больше информации – [url=https://trezviy-gorod.ru/reabilitatsiya-alkogolikov/]центр реабилитации алкоголиков[/url]
В «Трезвом городе» помогают при последствиях употребления: тревожность, бессонница, тремор, нарушения аппетита и скачки давления требуют грамотной медицинской коррекции. После стабилизации пациенту объясняют риски и предлагают план профилактики срыва.
Разобраться лучше – [url=https://trezviy-gorod.ru/stati/sostav-kapelnicy-ot-zapoya.html]каков состав капельницы от запоя[/url]
В московской клинике «Формула трезвости» доступна комплексная помощь: лечение наркомании, терапия алкогольной зависимости, современное кодирование и длительная реабилитация. Центр работает конфиденциально и использует индивидуальные программы для каждого пациента.
Подробнее можно узнать тут – [url=https://formula-clinic.ru/]Наркологическая клиника «Формула Трезвости» в Москве и Московской области[/url]
Специалист уточняет продолжительность запоя, характер симптоматики и наличие хронических заболеваний, проводит измерения пульса, давления и температуры, что позволяет оперативно скорректировать терапию.
Разобраться лучше – [url=https://vyvod-iz-zapoya-volgograd000.ru/]вывод из запоя с выездом волгоград[/url]
Для самого пациента это шанс получить медицинское вмешательство без дополнительного стресс-фактора в виде транспорта, очередей и «больничной атмосферы». Он остаётся в привычной обстановке, в своей квартире, с теми же предметами, к которым привык, и это снижает сопротивление. Вместо жесткого сценария «либо немедленно в стационар, либо ничего» появляется промежуточный, более мягкий вариант: врачи приезжают домой, снимают остроту состояния, подбирают схему капельницы и медикаментов, объясняют, что делать дальше. Нередко именно после такого первого опыта человек впервые всерьёз задумывается о полноценном лечении, потому что ощущает реальную разницу в самочувствии до и после профессиональной помощи, а не просто очередной «опохмел».
Подробнее тут – https://narkolog-na-dom-himki11.ru/narkolog-na-dom-srochno-v-himkah
Такие меры позволяют комплексно воздействовать на организм и снизить риск осложнений, связанных с резким прекращением употребления алкоголя.
Подробнее тут – [url=https://vyvod-iz-zapoya-volgograd0.ru/]срочный вывод из запоя[/url]
Лечение в наркологической клинике в Чехове удобно не только близостью к дому. Главный плюс — комплексный подход. Зависимость практически никогда не ограничивается только алкоголем или наркотиком: страдают сердце и сосуды, печень, нервная система, психика, отношения в семье и на работе. Если пытаться лечить только одно звено, например, периодически «чистить кровь» капельницами, без проработки причин и последствий, ситуация быстро возвращается к исходной точке. В клинике выстраивается последовательная работа: сначала стабилизируют организм, затем укрепляют психику, а дальше помогают менять привычный образ жизни, чтобы трезвость стала не кратким эпизодом, а новой нормой.
Ознакомиться с деталями – https://narkologicheskaya-klinika-chekhov11.ru/narkologicheskaya-klinika-telefon-v-chekhove/
Трезвый выбор [url=http://limage-ufa.ru/narkolog-na-dom-v-rostove-na-donu/]http://limage-ufa.ru/narkolog-na-dom-v-rostove-na-donu/[/url] .
В «Трезвом городе» помогают при последствиях употребления: тревожность, бессонница, тремор, нарушения аппетита и скачки давления требуют грамотной медицинской коррекции. После стабилизации пациенту объясняют риски и предлагают план профилактики срыва.
Выяснить больше – https://trezviy-gorod.ru/lechenie-alkogolizma-v-stacionare
Наркологическая клиника «Передозировка» в Санкт-Петербурге оказывает комплексную помощь людям с зависимостью. Здесь проводят лечение алкоголизма и наркомании, применяют современные методы кодирования и обеспечивают сопровождение пациента до полного восстановления.
Исследовать вопрос подробнее – [url=https://peredozirovka.info/service/vyvod-iz-zapoya/]вывод из запоя клиника[/url]
В этом тексте собрано множество случайных сведений и довольно неопределённых мыслей, которые могут чем-то заинтересовать. Мы отмечаем моменты, которые не особенно важны, но всё же занимают своё место в повествовании.
Вот – [url=https://arma-rehab.ru/vyvod-iz-zapoya/]эротические фильмы[/url]
Стильный внешний вид создает сильное мнение о человеке.
Ваш образ работает на восприятие вас окружающими мгновенно.
Уверенность в своем луке укрепляет вашу уверенность.
Он демонстрирует ваш стандарт ответственности и уважение к деталям.
https://author.chenews.ru/chanel-simfoniya-stilya-v-kazhdom-flakone/
Через гардероб вы имеете шанс проявить свою личность и вкус.
Люди неосознанно воспринимают стильных индивидов как более успешных.
Следовательно, вложения в собственный образ — это инвестиции в свое будущее.
Для самого пациента это шанс получить медицинское вмешательство без дополнительного стресс-фактора в виде транспорта, очередей и «больничной атмосферы». Он остаётся в привычной обстановке, в своей квартире, с теми же предметами, к которым привык, и это снижает сопротивление. Вместо жесткого сценария «либо немедленно в стационар, либо ничего» появляется промежуточный, более мягкий вариант: врачи приезжают домой, снимают остроту состояния, подбирают схему капельницы и медикаментов, объясняют, что делать дальше. Нередко именно после такого первого опыта человек впервые всерьёз задумывается о полноценном лечении, потому что ощущает реальную разницу в самочувствии до и после профессиональной помощи, а не просто очередной «опохмел».
Выяснить больше – http://narkolog-na-dom-himki11.ru/narkolog-na-dom-srochno-v-himkah/
Вопрос «а не рано ли кодироваться» часто звучит и от самих пациентов, и от их близких. Кажется, что кодирование — это крайняя мера «на последней стадии», а пока человек работает, иногда бывает трезвым и «не валяется под забором», можно подождать. На самом деле гораздо разумнее ориентироваться не на стереотипы, а на реальные признаки того, что зависимость уже управляет жизнью, а не наоборот. Кодирование от алкоголизма в Королёве рассматривается именно тогда, когда попытки остановиться своими силами систематически проваливаются, а каждый новый запой становится тяжелее предыдущего.
Детальнее – https://kodirovanie-ot-alkogolizma-korolyov11.ru
Лечение в наркологической клинике в Чехове удобно не только близостью к дому. Главный плюс — комплексный подход. Зависимость практически никогда не ограничивается только алкоголем или наркотиком: страдают сердце и сосуды, печень, нервная система, психика, отношения в семье и на работе. Если пытаться лечить только одно звено, например, периодически «чистить кровь» капельницами, без проработки причин и последствий, ситуация быстро возвращается к исходной точке. В клинике выстраивается последовательная работа: сначала стабилизируют организм, затем укрепляют психику, а дальше помогают менять привычный образ жизни, чтобы трезвость стала не кратким эпизодом, а новой нормой.
Получить дополнительные сведения – [url=https://narkologicheskaya-klinika-chekhov11.ru/]obratitsya-v-narkologicheskuyu-kliniku[/url]
Длительный запой способен нанести непоправимый вред организму, привести к тяжелым нарушениям работы внутренних органов и поставить под угрозу жизнь пациента. В таких случаях необходимо срочное медицинское вмешательство, которое позволяет быстро стабилизировать состояние, вывести токсины и предотвратить развитие опасных осложнений. Клиника «ЗдоровьеНорм» в Краснодаре предлагает профессиональный вывод из запоя на дому, обеспечивая комплексное лечение с максимальной оперативностью и полной конфиденциальностью.
Изучить вопрос глубже – [url=https://vyvod-iz-zapoya-krasnodar00.ru/]помощь вывод из запоя в краснодаре[/url]
В этой статье мы подробно рассматриваем проверенные методы борьбы с зависимостями, включая психотерапию, медикаментозное лечение и поддержку со стороны общества. Мы акцентируем внимание на важности комплексного подхода и возможности успешного восстановления для людей, столкнувшихся с этой проблемой.
Получить дополнительные сведения – https://www.google.im/url?q=https://spb.alco-centr.ru/vrachi
Московская клиника «Формула трезвости» сочетает медицину и психологию: лечение наркомании, терапия алкогольной зависимости, кодирование и длительная реабилитация проводятся по индивидуальным схемам. Подход помогает добиться устойчивого трезвого состояния.
Получить дополнительные сведения – [url=https://formula-clinic.ru/stati/pivnoj-alkogolizm.html]пивной алкоголизм у мужчин чем опасен[/url]
Чем раньше нарколог окажет помощь, тем выше шансы избежать осложнений и восстановиться без последствий для здоровья.
Разобраться лучше – http://narcolog-na-dom-sochi0.ru
Частный реабилитационный центр «Еваклиник» в Саранске предлагает поэтапные программы лечения зависимости с медицинским сопровождением. Специалисты центра работают над устранением последствий употребления, нормализацией психоэмоционального состояния и адаптацией к жизни без зависимости. Такой подход снижает вероятность рецидивов и способствует долгосрочному восстановлению.
Исследовать вопрос подробнее – [url=https://evaclinica.ru/kodirovanie-ot-alkogolizma/]кодирование от алкоголизма саранск цена[/url]
«ЮгМедЦентр» поддерживает строгую конфиденциальность: выездные специалисты приезжают без медицинской символики, в гражданской одежде; документы формулируются нейтрально; уведомления не содержат триггерных слов; профиль можно оформить под кодом. Все записи ведутся в шифрованном контуре с разграничением доступа по ролям, а видеосессии с врачом/психологом не записываются. Мы предупреждаем о цифровой гигиене: включите «тихий режим» уведомлений, избегайте пересылки документов в открытых чатах, используйте резервный канал связи для экстренных вопросов.
Получить больше информации – http://narcolog-na-dom-sochi00.ru/narkolog-na-dom-adler/
Перед тем как принять решение, пациент и родственники получают объяснения по доступным направлениям. Обычно обсуждаются: амбулаторные консультации, дневной или круглосуточный стационар, выездная помощь, реабилитационные программы и последующее наблюдение. Это позволяет выстроить индивидуальный маршрут, а не навязывать один и тот же сценарий всем подряд.
Выяснить больше – https://narkologicheskaya-klinika-himki11.ru/lechenie-v-narkologicheskoj-klinike-v-himkah
Запой никогда не начинается с катастрофы. Первые несколько дней могут рассматриваться как «затянувшееся застолье». Но чем дольше человек пьёт без трезвых пауз, тем резче падают его возможности восстановиться самостоятельно. Поэтому ждать, что всё «рассосётся», — значит сознательно двигаться в сторону осложнений.
Детальнее – https://vyvod-iz-zapoya-voskresensk11.ru/vyvod-iz-zapoya-cena-v-voskresenske/
Текст включает разнообразную информацию, которая может показаться любопытной, но не меняет устоявшегося восприятия. Предлагаем просто насладиться чтением, не ожидая значительной пользы.
Подробнее читать – [url=https://rostov-narkologiya.ru/ ]лечение covid народными средствами[/url]
Клиника «Формула трезвости» в Москве предоставляет круглосуточную помощь людям с зависимостью. Лечение алкоголизма и наркомании, кодирование и реабилитационные программы позволяют восстановить физическое и психологическое здоровье пациента на каждом этапе.
Изучить вопрос глубже – [url=https://formula-clinic.ru/stati/pochemu-alkogol-mozhet-uvelichit-risk-pobochnyh-ehffektov-antibiotikov.html]побочка после кодировки от алкоголя[/url]
Для снятия алкогольной интоксикации врач проводит детоксикационную терапию, которая включает внутривенные инфузии с растворами для выведения токсинов, поддерживающие препараты для печени, сердечно-сосудистой системы и нервной системы. В некоторых случаях назначаются седативные средства, нормализующие эмоциональное состояние пациента.
Получить дополнительную информацию – [url=https://narcolog-na-dom-v-irkutske00.ru/]нарколог на дом недорого иркутск[/url]
Помощь нарколога нужна, если алкоголь или наркотики постепенно начинают занимать в жизни всё больше места. Человек заранее планирует, когда и как будет пить, нервничает, если что-то срывается, раздражается, когда близкие пытаются ограничить употребление. Появляются скандалы после «весёлых» вечеров, пропущенные рабочие смены, проблемы с деньгами, конфликты с родными. При этом любые разговоры заканчиваются обещаниями «завязать с понедельника» или обвинениями окружающих.
Исследовать вопрос подробнее – [url=https://narkologicheskaya-klinika-voskresensk11.ru/]otzyvy-o-narkologicheskih-klinikah[/url]
Многие годами живут в логике: «главное — с утра выпить чуть-чуть, станет легче». На коротком промежутке времени это действительно частично снимает симптомы, но по сути лишь продлевает запой и усиливает интоксикацию. Организм не успевает переработать продукты распада алкоголя, кровь становится «тяжёлой», нарушается работа сосудов, возрастает нагрузка на сердце и мозг.
Ознакомиться с деталями – [url=https://kapelnica-ot-zapoya-dolgoprudnyj11.ru/]капельницы от запоя[/url]
Признаки, что пора задуматься о кодировании
Подробнее можно узнать тут – [url=https://kodirovanie-ot-alkogolizma-korolyov11.ru/]kodirovanie-alkogolizma-nedorogo-klinika[/url]
После завершения процедур врач дает пациенту и его родственникам подробные рекомендации по дальнейшему восстановлению и профилактике рецидивов.
Подробнее можно узнать тут – http://narcolog-na-dom-krasnodar00.ru
Если многое из этого знакомо, кодирование стоит рассматривать не как «наказание» или «приговор», а как инструмент, который помогает закрыть доступ к алкоголю на определённый срок и даёт шанс выстроить новую привычку — жить трезво.
Изучить вопрос глубже – [url=https://kodirovanie-ot-alkogolizma-korolyov11.ru/]kodirovanie-ot-alkogolizma-s-vyezdom-na-dom[/url]
Для эффективного лечения наши врачи используют только проверенные и сертифицированные медикаменты, которые подбираются индивидуально для каждого пациента. В состав лечебного курса входят:
Получить дополнительную информацию – http://narcolog-na-dom-ekaterinburg000.ru/
Наркологическая клиника «ДонМед Резонанс» — это круглосуточный комплекс координированной помощи, где диагностика, инфузионная терапия, психообразование и поддержка семьи соединены в единую «дорожную карту». Мы работаем по принципу минимально достаточных вмешательств: каждый шаг имеет цель, измеримый маркер и заранее обозначенное «окно оценки». Такой подход убирает полипрагмазию, снижает риск нежелательных реакций и делает траекторию лечения предсказуемой — пациент не «получает процедуры», а видит, как цели достигаются и какие модули выключаются, когда они сделали своё дело. Круглосуточный режим позволяет внимательно сопровождать самые чувствительные интервалы — первую ночь, утренний период после детоксикации и момент возвращения к бытовой активности.
Ознакомиться с деталями – [url=https://narkologicheskaya-klinika-v-rostove-na-donu16.ru/]www.domen.ru[/url]
Там, где раньше хватало одного тяжёлого утра, теперь требуются дни детоксикации. И чем позже подключается врач, тем сложнее вернуть организм к относительно безопасному состоянию.
Углубиться в тему – [url=https://vyvod-iz-zapoya-voskresensk11.ru/]вывод из запоя стационар[/url]
Часто родственники тянут до последнего, надеясь, что запой «сам пройдёт», как это случалось раньше. Но с каждым эпизодом последствия становятся тяжелее: организм изнашивается, возрастает риск осложнений, ухудшается психика. Особенно опасно, когда запой длится несколько дней подряд, а любые попытки самостоятельно сократить дозы алкоголя сопровождаются дрожью, бессонницей, приступами паники.
Детальнее – [url=https://vyvod-iz-zapoya-moskva011.ru/]вывод из запоя москва вызов нарколога капельница[/url]
В реабилитационном центре «Еваклиник» в Саранске созданы условия для безопасного и анонимного восстановления после зависимости. Программы включают детоксикацию, стабилизацию состояния и поэтапную реабилитацию под контролем медицинского персонала. Такой формат помощи позволяет снизить риски срывов и постепенно вернуться к нормальной жизни.
Детальнее – [url=https://evaclinica.ru/blog/diagnostika-i-oslozhneniya-alkogolizma-polnyj-obzor-problemy.html]диагностика алкоголизма[/url]
В Воскресенске вывод из запоя может проводиться в разных форматах — с выездом на дом, в условиях стационара, в срочном режиме или с последующим амбулаторным наблюдением. Правильный выбор зависит от тяжести состояния, возраста пациента, наличия хронических заболеваний и того, насколько сильно запой нарушил привычную жизнь.
Получить дополнительные сведения – [url=https://vyvod-iz-zapoya-voskresensk11.ru/]vyvod-iz-zapoya[/url]
Запой – критическое состояние, при котором организм подвергается серьезной токсической нагрузке, что может привести к опасным для жизни осложнениям. В Волгоградской области помощь нарколога оказывается круглосуточно, что позволяет начать лечение немедленно в любой момент дня или ночи. Такой формат терапии обеспечивает оперативное вмешательство, индивидуальный подход и высокий уровень безопасности, позволяя стабилизировать состояние пациента в домашних условиях или в клинике.
Изучить вопрос глубже – [url=https://vyvod-iz-zapoya-volgograd000.ru/]вывод из запоя клиника в волгограде[/url]
Перед тем как выбрать формат лечения, пациенту и его близким объясняют, какие направления помощи доступны и как их можно сочетать. В зависимости от состояния и мотивации могут быть задействованы разные варианты:
Выяснить больше – [url=https://narkologicheskaya-klinika-korolyov11.ru/]narkologicheskaya-klinika-otzyvy[/url]
В реабилитационном центре «Еваклиник» в Саранске созданы условия для безопасного и анонимного восстановления после зависимости. Программы включают детоксикацию, стабилизацию состояния и поэтапную реабилитацию под контролем медицинского персонала. Такой формат помощи позволяет снизить риски срывов и постепенно вернуться к нормальной жизни.
Подробнее тут – https://evaclinica.ru/lechenie-alkogolizma
Как отмечает нарколог Олег Васильев, «чем раньше пациент получает квалифицированную медицинскую помощь, тем меньше риск серьезных осложнений».
Детальнее – [url=https://narcolog-na-dom-v-irkutske00.ru/]нарколог на дом клиника[/url]
Если в ситуации с алкоголем присутствуют несколько из перечисленных ниже пунктов, это повод не откладывать консультацию с наркологом в Королёве:
Узнать больше – http://kodirovanie-ot-alkogolizma-korolyov11.ru/klinika-kodirovaniya-ot-alkogolizma-v-korolyove/
Наркологическая клиника в Долгопрудном помогает в ситуациях, когда:
Ознакомиться с деталями – [url=https://narkologicheskaya-klinika-dolgoprudnyj11.ru/]www.domen.ru[/url]
В Воскресенске вывод из запоя может проводиться в разных форматах — с выездом на дом, в условиях стационара, в срочном режиме или с последующим амбулаторным наблюдением. Правильный выбор зависит от тяжести состояния, возраста пациента, наличия хронических заболеваний и того, насколько сильно запой нарушил привычную жизнь.
Подробнее тут – https://vyvod-iz-zapoya-voskresensk11.ru/vyvod-iz-zapoya-kapelnica-v-voskresenske/
Часто именно жители Химок тянут до последнего: насыщенный ритм жизни, дорога на работу, постоянная усталость, попытки «снимать напряжение» алкоголем или психоактивными веществами. Сначала это кажется временным способом расслабиться, но со временем человек замечает, что пьёт чаще, чем планировал, нуждается в больших дозах, срывает обещания, а попытки контролировать употребление превращаются в череду неудач. В какой-то момент становится очевидно: без профессиональной наркологической помощи дальше будет только сложнее.
Углубиться в тему – https://narkologicheskaya-klinika-himki11.ru/narkologicheskaya-klinika-otzyvy-v-himkah/
Группа препаратов
Разобраться лучше – [url=https://narcolog-na-dom-ekaterinburg000.ru/]нарколог на дом круглосуточно[/url]
Для достижения положительного результата применяются комплексные подходы, сочетающие медикаментозные и поддерживающие методы. Врачи оценивают общее состояние пациента, степень выраженности абстинентного синдрома и сопутствующие заболевания. На основе этих данных подбираются оптимальные методы коррекции.
Узнать больше – https://vyvod-iz-zapoya-volgograd0.ru/anonimnaya-narkologiya-vyvod-iz-zapoya-volgograd
Алкогольная и наркотическая зависимость являются серьёзными заболеваниями, требующими оперативного и квалифицированного вмешательства. Когда речь идёт о критическом состоянии пациента, особенно после длительного употребления алкоголя или наркотических веществ, время играет ключевую роль. Клиника «РеабилитАльянс» в Краснодаре предлагает услугу нарколога на дом, обеспечивая пациентам необходимую помощь в любой момент дня и ночи. Наши специалисты готовы оперативно выехать по указанному адресу и предоставить все необходимые медицинские процедуры на месте.
Выяснить больше – [url=https://narcolog-na-dom-krasnodar00.ru/]психиатр нарколог на дом[/url]
В Воскресенске вывод из запоя может проводиться в разных форматах — с выездом на дом, в условиях стационара, в срочном режиме или с последующим амбулаторным наблюдением. Правильный выбор зависит от тяжести состояния, возраста пациента, наличия хронических заболеваний и того, насколько сильно запой нарушил привычную жизнь.
Изучить вопрос глубже – [url=https://vyvod-iz-zapoya-voskresensk11.ru/]вывод из запоя на дому в Воскресенске[/url]
Наркологический центр «Еваклиник» в Саранске предоставляет профессиональную помощь людям, столкнувшимся с алкогольной и наркотической зависимостью. Лечение начинается с медицинской стабилизации и детоксикации, после чего подбирается индивидуальная программа восстановления. Комплексный подход и постоянный контроль специалистов позволяют безопасно пройти сложный этап отказа от психоактивных веществ.
Получить дополнительные сведения – [url=https://evaclinica.ru/blog/rol-semi-v-lechenii-narkozavisimogo-kak-podderzhat-i-ne-navredit.html]поддержка наркозависимых[/url]
Процедура длится от 40 минут до 2 часов, в зависимости от тяжести состояния, и проводится в комфортной домашней обстановке, что значительно снижает стресс у пациента и его близких.
Получить дополнительные сведения – [url=https://narcolog-na-dom-krasnodar0.ru/]нарколог на дом недорого краснодар[/url]
Многие тянут до последнего, считая, что к наркологу обращаются только в самых крайних случаях. На деле показаний для консультации гораздо больше, и они часто появляются задолго до того, как человек впервые оказывается в запое или не выходит из состояния опьянения несколько дней подряд.
Подробнее – https://narkologicheskaya-klinika-voskresensk11.ru/chastnaya-narkologicheskaya-klinika-v-voskresenske/
Для детоксикации и восстановления организма после запоя используются только сертифицированные лекарственные препараты с доказанной эффективностью и безопасностью:
Углубиться в тему – [url=https://narcolog-na-dom-sochi0.ru/]нарколог на дом цены в сочи[/url]
Данный порядок действий позволяет снизить риски для здоровья и обеспечить контроль за эффективностью процедур.
Подробнее можно узнать тут – [url=https://narcolog-na-dom-sankt-peterburg0.ru/]частный нарколог на дом санкт-петербург[/url]
Вывод из запоя в Воскресенске чаще всего требуется тогда, когда «обычное похмелье» уже давно перешло в тяжёлое состояние, а попытки «перетерпеть» только ухудшают ситуацию. Сначала кажется, что человек просто перебрал: день-два отлежится, попьёт воды, поест — и всё пройдёт. Но когда утром вместо облегчения появляется дрожь, сильная слабость, скачки давления, страх и навязчивая тревога, это уже не про похмелье. Организм не успевает перерабатывать алкоголь, сердце и нервная система работают на пределе, а каждый новый «опохмел» только продлевает запой.
Получить дополнительную информацию – https://vyvod-iz-zapoya-voskresensk11.ru/vyvod-iz-zapoya-vyzov-v-voskresenske
Чтобы показать, как именно работает врач в домашних условиях, можно сопоставить основные проявления запоя и шаги нарколога, направленные на их устранение.
Изучить вопрос глубже – [url=https://narcolog-na-dom-ryazan0.ru/]вызвать нарколога на дом срочно в санкт-петербурге[/url]
При поступлении вызова специалисты клиники «ЗдоровьеНорм» выезжают на дом в течение 30–60 минут. Врач проводит тщательную диагностику, измеряя артериальное давление, пульс, уровень кислорода в крови и оценивая общее состояние пациента. После этого осуществляется индивидуальный подбор лечебной схемы, основанной на объективных данных и анамнезе пациента.
Разобраться лучше – [url=https://vyvod-iz-zapoya-krasnodar00.ru/]вывод из запоя на дому краснодар[/url]
Медицинское вмешательство в домашних условиях отличается четкой организацией. Врач последовательно выполняет шаги, которые позволяют стабилизировать состояние пациента и предупредить осложнения.
Изучить вопрос глубже – [url=https://narcolog-na-dom-ryazan0.ru/]нарколог на дом анонимно[/url]
Услуга капельничного вывода из запоя на дому в Тюмени предоставляет комплексный подход к экстренному лечению алкогольной интоксикации. Врач приезжает на дом, проводит первичный осмотр, собирает анамнез и назначает индивидуальную схему терапии. Современные методы инфузионной терапии позволяют точно дозировать препараты, обеспечивая быструю детоксикацию и минимизируя риск осложнений.
Подробнее можно узнать тут – [url=https://vyvod-iz-zapoya-vladimir00.ru/]вывод из запоя на дому круглосуточно владимир[/url]
«ЮгМедЦентр» поддерживает строгую конфиденциальность: выездные специалисты приезжают без медицинской символики, в гражданской одежде; документы формулируются нейтрально; уведомления не содержат триггерных слов; профиль можно оформить под кодом. Все записи ведутся в шифрованном контуре с разграничением доступа по ролям, а видеосессии с врачом/психологом не записываются. Мы предупреждаем о цифровой гигиене: включите «тихий режим» уведомлений, избегайте пересылки документов в открытых чатах, используйте резервный канал связи для экстренных вопросов.
Получить больше информации – https://narcolog-na-dom-sochi00.ru/narkolog-na-dom-adler/
В Санкт-Петербурге для адресных обращений дежурят мобильные бригады круглосуточно. Координатор при звонке уточняет хронические заболевания, аллергии, текущие лекарства и эпизоды судорог/психозов, а также бытовые условия: есть ли доступ к розетке, можно ли обеспечить 2–3 часа тишины, удобна ли зона полулёжа. Эта информация позволяет врачу в дороге выбрать стартовую скорость инфузии, продумать последовательность введения и подготовить расходные материалы под планировку квартиры. Мы соблюдаем приватность: нейтральная экипировка, деликатные формулировки в документах и один доверенный контакт со стороны семьи.
Получить больше информации – https://vivod-iz-zapoya-v-sankt-peterburge16.ru/vyvod-iz-zapoya-sankt-peterburg-vyzov-narkologa-na-dom/
Наряду с физическим состоянием врачи учитывают психологический фон пациента. Человек в запое часто неадекватно оценивает своё самочувствие, обещает «завязать сам», спорит с родственниками, агрессирует или, наоборот, впадает в апатию. Задача специалиста — не спорить и не давить, а грамотно оценить риски и предложить такой формат помощи, который будет безопасен и реалистичен именно в этой ситуации.
Получить дополнительную информацию – http://vyvod-iz-zapoya-moskva011.ru/vyvod-iz-zapoya-v-moskve-srochno/
Самостоятельные попытки «подлечиться» обычно сводятся к случайным комбинациям препаратов: кто-то пьёт горсть таблеток от давления и сердца, кто-то принимает успокоительные поверх алкоголя, кто-то заказывает непонятные средства «от тяги» в интернете. Такие эксперименты могут дать краткий эффект, но часто только маскируют симптомы и перегружают организм. В клинике лечение строится иначе: сначала оценивают состояние — физическое и психическое, затем подбирают безопасные схемы детоксикации и медикаментов, учитывая возраст, сопутствующие заболевания, длительность запоев и употребления. Это снижает риски осложнений и делает восстановление более управляемым: пациент и его семья видят прогресс и понимают, за счёт чего он происходит, а не живут в ожидании очередного непредсказуемого «отката».
Получить дополнительную информацию – http://
В клинике внедрены современные протоколы, основанные на принципах персонализированной медицины. Это позволяет выстраивать терапию с учётом индивидуальных особенностей организма, уровня стресса и социальных факторов, влияющих на процесс выздоровления.
Получить больше информации – https://narkologicheskaya-klinika-v-ekb16.ru/narkologicheskaya-klinika-ekaterinburg-otzyvy/
Не стоит забывать и про объективные факторы. Бывает, что физически опасно или трудно везти человека в клинику: он с трудом ходит, не спит уже несколько ночей, постоянно потеет, жалуется на сильную слабость и сердцебиение. Любая поездка в таком состоянии — дополнительная нагрузка на сердце и нервную систему. Выезд нарколога на дом позволяет начать лечение без этого лишнего риска: врач приезжает со всем необходимым для капельницы и наблюдения, а если по итогам осмотра становится понятно, что без стационара не обойтись, он помогает организовать перевод уже на фоне частично стабилизированного состояния, а не в момент максимального кризиса.
Подробнее можно узнать тут – [url=https://narkolog-na-dom-himki11.ru/]нарколог на дом в Химках[/url]
Клиника в Королёве закрывает этот разрыв. Здесь можно пройти полный путь — от первичной диагностики и детоксикации до реабилитации и последующего наблюдения — в пределах привычного города, не отрываясь полностью от семьи и важных дел. Это особенно важно для тех, кто продолжает работать, боится потерять позицию или репутацию, но при этом понимает, что дальше жить «как раньше» просто опасно. Лечение перестаёт быть чем-то абстрактным и пугающим: вместо общих страшилок появляется понятный маршрут, а рядом — команда специалистов, которые умеют вести пациентов с зависимостью и знают, как работать с семьями, уставшими от бесконечных срывов.
Подробнее тут – [url=https://narkologicheskaya-klinika-korolyov11.ru/]бесплатная наркологическая клиника[/url]
Если в процессе выявляются нестабильные витальные показатели, нарастающая дезориентация или признаки дыхательной недостаточности, маршрут немедленно переводится в стационар «УралМедЦентра» с сохранением уже собранной информации — без повторных очередей и «история заново».
Ознакомиться с деталями – [url=https://narcolog-na-dom-ekaterinburg0.ru/]психиатр нарколог на дом[/url]
Наркологическая клиника в Чехове — это возможность получить профессиональную помощь при алкогольной и наркотической зависимости, не выезжая в крупный мегаполис и не тратя силы на долгую дорогу. Для многих людей момент обращения к наркологу наступает не сразу: сначала идут «домашние» попытки справиться с проблемой, обещания ограничиться «по праздникам», уговаривания родственников и периодические срывы. Запои становятся длиннее, организм восстанавливается всё хуже, усиливается тревога, нарушается сон, учащаются конфликты дома и на работе. В какой-то момент становится понятно, что без системного лечения обойтись уже нельзя, а стихийные капельницы на дому и случайные советы из интернета только оттягивают время.
Углубиться в тему – [url=https://narkologicheskaya-klinika-chekhov11.ru/]narkologicheskaya-klinika-ceny-adresa[/url]
Этот обзор предлагает свежий взгляд на предметы, которые и без того привычны. Мы упоминаем факты, не имеющие большого значения, и события с неясной важностью, но они присутствуют здесь.
Подробнее читать – [url=https://rostov-narkologiya.ru/uslugi-ot-narkomanii/mefedronovaya-zavisimost/]детокс чай для похудения[/url]
Эта статья полна интересного контента, который побудит вас исследовать новые горизонты. Мы собрали полезные факты и удивительные истории, которые обогащают ваше понимание темы. Читайте, погружайтесь в детали и наслаждайтесь процессом изучения!
Обратиться к источнику – http://www.alexander6.ru/144865
В данной обзорной статье представлены интригующие факты, которые не оставят вас равнодушными. Мы критикуем и анализируем события, которые изменили наше восприятие мира. Узнайте, что стоит за новыми открытиями и как они могут изменить ваше восприятие реальности.
Не упусти шанс – http://www.alexander6.ru/23378
В данной обзорной статье представлены интригующие факты, которые не оставят вас равнодушными. Мы критикуем и анализируем события, которые изменили наше восприятие мира. Узнайте, что стоит за новыми открытиями и как они могут изменить ваше восприятие реальности.
Хочешь знать всё? – https://uk.wikipedia.org/wiki/%D0%91%D1%96%D0%BB%D1%8C%D1%88%D0%BE%D0%B2%D0%B8%D0%BA%D0%B8
Медицинское вмешательство в домашних условиях отличается четкой организацией. Врач последовательно выполняет шаги, которые позволяют стабилизировать состояние пациента и предупредить осложнения.
Выяснить больше – [url=https://narcolog-na-dom-ryazan0.ru/]нарколог на дом срочно в санкт-петербурге[/url]
После поступления вызова клиника «ЗдоровьеНорм» отправляет к пациенту опытного нарколога, который прибывает на дом в течение 30–60 минут. По приезду врач проводит комплексную диагностику, включающую измерение артериального давления, пульса, уровня кислорода в крови и тщательную оценку общего состояния пациента. На основе полученных данных специалист подбирает индивидуальную схему лечения.
Детальнее – http://narcolog-na-dom-krasnodar0.ru
В этой медицинской статье мы погрузимся в актуальные вопросы здравоохранения и лечения заболеваний. Читатели узнают о современных подходах, методах диагностики и новых открытий в научных исследованиях. Наша цель — донести важную информацию и повысить уровень осведомленности о здоровье.
Исследовать вопрос подробнее – https://wums.ru/narkologicheskaya-klinika-kak-ona-rabotaet-kak-vybrat-i-chego-zhdat-na-puti-k-trezvoj-zhizni
Клиника в Королёве закрывает этот разрыв. Здесь можно пройти полный путь — от первичной диагностики и детоксикации до реабилитации и последующего наблюдения — в пределах привычного города, не отрываясь полностью от семьи и важных дел. Это особенно важно для тех, кто продолжает работать, боится потерять позицию или репутацию, но при этом понимает, что дальше жить «как раньше» просто опасно. Лечение перестаёт быть чем-то абстрактным и пугающим: вместо общих страшилок появляется понятный маршрут, а рядом — команда специалистов, которые умеют вести пациентов с зависимостью и знают, как работать с семьями, уставшими от бесконечных срывов.
Подробнее можно узнать тут – http://narkologicheskaya-klinika-korolyov11.ru/
Эта статья погружает вас в увлекательный мир знаний, где каждый факт становится открытием. Мы расскажем о ключевых исторических поворотных моментах и научных прорывах, которые изменили ход цивилизации. Поймите, как прошлое формирует настоящее и как его уроки могут помочь нам строить будущее.
Осуществить глубокий анализ – https://www.parks-und-gaerten.de/hof-tueschenbonnen/innenhof
В этой статье-обзоре мы соберем актуальную информацию и интересные факты, которые освещают важные темы. Читатели смогут ознакомиться с различными мнениями и подходами, что позволит им расширить кругозор и глубже понять обсуждаемые вопросы.
Как достичь результата? – https://www.tendacayou.com/events/stage-de-jene-2018
Часто именно жители Химок тянут до последнего: насыщенный ритм жизни, дорога на работу, постоянная усталость, попытки «снимать напряжение» алкоголем или психоактивными веществами. Сначала это кажется временным способом расслабиться, но со временем человек замечает, что пьёт чаще, чем планировал, нуждается в больших дозах, срывает обещания, а попытки контролировать употребление превращаются в череду неудач. В какой-то момент становится очевидно: без профессиональной наркологической помощи дальше будет только сложнее.
Углубиться в тему – http://narkologicheskaya-klinika-himki11.ru
Этот информативный текст отличается привлекательным содержанием и актуальными данными. Мы предлагаем читателям взглянуть на привычные вещи под новым углом, предоставляя интересный и доступный материал. Получите удовольствие от чтения и расширьте кругозор!
Лови подробности – https://netmorie.com/archives/135954
Этот информационный обзор станет отличным путеводителем по актуальным темам, объединяющим важные факты и мнения экспертов. Мы исследуем ключевые идеи и представляем их в доступной форме для более глубокого понимания. Читайте, чтобы оставаться в курсе событий!
Изучить вопрос глубже – https://www.algeanova.com/es/centrarse-en-los-sargazos-origen-impacto-y-recuperacion
Эта статья сочетает познавательный и занимательный контент, что делает ее идеальной для любителей глубоких исследований. Мы рассмотрим увлекательные аспекты различных тем и предоставим вам новые знания, которые могут оказаться полезными в будущем.
Переходите по ссылке ниже – https://whamorscam.com/suprus-electric-lighter-003
В этой публикации мы сосредоточимся на интересных аспектах одной из самых актуальных тем современности. Совмещая факты и мнения экспертов, мы создадим полное представление о предмете, которое будет полезно как новичкам, так и тем, кто глубоко изучает вопрос.
Смотрите также… – http://fukkatsu.net/business/sekaikaramanabu
Клиника «Передозировка» в Санкт-Петербурге предоставляет профессиональную помощь при зависимостях. Пациенты получают лечение алкоголизма и наркомании, проходят кодирование и реабилитацию, что способствует устойчивому возвращению к нормальной жизни.
Узнать больше – [url=https://peredozirovka.info/service/reabilitatsiya-alkogolikov/]реабилитация алкоголиков спб[/url]
В этом обзорном материале представлены увлекательные детали, которые находят отражение в различных аспектах жизни. Мы исследуем непонятные и интересные моменты, позволяя читателю увидеть картину целиком. Погрузитесь в мир знаний и удивительных открытий!
А что дальше? – https://deevarispa.de/amazing-products-by-independent-vegan-brands
Реабилитационные программы в наркологической клинике направлены на нормализацию обменных процессов, восстановление сна, эмоциональной стабильности и когнитивных функций. Для достижения этого используются методы физиотерапии, нутритивной поддержки и коррекции поведения. Основное внимание уделяется мотивации пациента, работе с созависимостью и обучению навыкам здорового взаимодействия с окружающей средой.
Изучить вопрос глубже – http://narkologicheskaya-klinika-v-ekb16.ru
В этой публикации мы предлагаем подробные объяснения по актуальным вопросам, чтобы помочь читателям глубже понять их. Четкость и структурированность материала сделают его удобным для усвоения и применения в повседневной жизни.
Осуществить глубокий анализ – https://judotraining.info/cryotherapy-in-judo-training
Этот информативный материал предлагает содержательную информацию по множеству задач и вопросов. Мы призываем вас исследовать различные идеи и факты, обобщая их для более глубокого понимания. Наша цель — сделать обучение доступным и увлекательным.
Давай разберёмся досконально – https://www.olern.com/innovative-entrepreneurship-examples-in-the-philippines
Публикация предлагает читателю не просто информацию, а инструменты для анализа и саморазвития. Мы стимулируем критическое мышление, предлагая различные точки зрения и призывая к самостоятельному поиску решений.
Подробности по ссылке – http://www.alexander6.ru/495858
Статья знакомит с важнейшими моментами, которые сформировали наше общество. От великих изобретений до культурных переворотов — вы узнаете, как прошлое влияет на наше мышление, технологии и образ жизни.
См. подробности – https://foodiecreator.com/tasty-queso-keto-taco-soup
В этой статье рассматриваются различные аспекты избавления от зависимости, включая физические и психологические методы. Мы обсудим поддержку, мотивацию и стратегии, которые помогут в процессе выздоровления. Читатели узнают, как преодолеть трудности и двигаться к новой жизни без зависимости.
Подробнее тут – https://zonakulinara.ru/alkogolizm-priznaki-lechenie-i-vybor-kliniki
Эта информационная статья охватывает широкий спектр актуальных тем и вопросов. Мы стремимся осветить ключевые факты и события с ясностью и простотой, чтобы каждый читатель мог извлечь из нее полезные знания и полезные инсайты.
Получить дополнительную информацию – https://paissana.com.co/producto/pimienta-blanca-asapiv
В этой статье представлен занимательный и актуальный контент, который заставит вас задуматься. Мы обсуждаем насущные вопросы и проблемы, а также освещаем истории, которые вдохновляют на действия и изменения. Узнайте, что стоит за событиями нашего времени!
Получить дополнительную информацию – http://www.presqueparfait.com/blog/2013/09/ma-petite-entreprise
Мы собрали для вас самые захватывающие факты из мира науки и истории. От малознакомых деталей до грандиозных событий — эта статья расширит ваш кругозор и подарит новое понимание того, как устроен наш мир.
Узнать напрямую – https://ru.wikipedia.org/wiki/%D0%A5%D0%B0%D0%B7%D0%B0%D1%80%D1%81%D0%BA%D0%B8%D0%B9_%D0%BA%D0%B0%D0%B3%D0%B0%D0%BD%D0%B0%D1%82
Публикация приглашает вас исследовать неизведанное — от древних тайн до современных достижений науки. Вы узнаете, как случайные находки превращались в революции, а смелые мысли — в новые эры человеческого прогресса.
Более того — здесь – https://cannonriverweddings.com/what-to-wear-to-a-vineyard-wedding
В этой публикации мы предлагаем подробные объяснения по актуальным вопросам, чтобы помочь читателям глубже понять их. Четкость и структурированность материала сделают его удобным для усвоения и применения в повседневной жизни.
Запросить дополнительные данные – http://rajeevpeshawaria.com/keynotes/culture-proofing-the-organization-for-the-digital-era
Эта статья погружает вас в увлекательный мир знаний, где каждый факт становится открытием. Мы расскажем о ключевых исторических поворотных моментах и научных прорывах, которые изменили ход цивилизации. Поймите, как прошлое формирует настоящее и как его уроки могут помочь нам строить будущее.
Ознакомиться с отчётом – https://shop-antinuisibles.com/avantages-des-insecticides-naturels
В этой статье представлен занимательный и актуальный контент, который заставит вас задуматься. Мы обсуждаем насущные вопросы и проблемы, а также освещаем истории, которые вдохновляют на действия и изменения. Узнайте, что стоит за событиями нашего времени!
Изучить материалы по теме – https://micro-pi.ru/%D1%81%D1%87%D0%B8%D1%82%D1%8B%D0%B2%D0%B0%D0%BD%D0%B8%D0%B5-%D1%82%D0%B5%D0%BC%D0%BF%D0%B5%D1%80%D0%B0%D1%82%D1%83%D1%80%D1%8B-ds18b20-orange-pi
Откройте для себя скрытые страницы истории и малоизвестные научные открытия, которые оказали колоссальное влияние на развитие человечества. Статья предлагает свежий взгляд на события, которые заслуживают большего внимания.
Познакомиться с результатами исследований – https://kta.inkindo.org/detail-blog/kunjungan-dewan-pengurus-nasional-dpn-inkindo-ke-dewan-pengurus-provinsi-dpp-inkindo-bengkulu
В этом обзорном материале представлены увлекательные детали, которые находят отражение в различных аспектах жизни. Мы исследуем непонятные и интересные моменты, позволяя читателю увидеть картину целиком. Погрузитесь в мир знаний и удивительных открытий!
Запросить дополнительные данные – http://www.alexander6.ru/131148
Эта информационная заметка предлагает лаконичное и четкое освещение актуальных вопросов. Здесь вы найдете ключевые факты и основную информацию по теме, которые помогут вам сформировать собственное мнение и повысить уровень осведомленности.
Узнать из первых рук – https://bongda360.site/body-ronaldo-cuc-chuan-bi-quyet-de-co-body-nhu-cr7
В этом материале представлены детали, которые хоть и занимательны, но не особенно значимы. Мы рассматриваем моменты, которые трудно назвать важными, но всё же решили включить их для полноты картины.
Вот – [url=https://arma-rehab.ru/vyvod-iz-zapoya/]казино онлайн[/url]
Эта информационная заметка предлагает лаконичное и четкое освещение актуальных вопросов. Здесь вы найдете ключевые факты и основную информацию по теме, которые помогут вам сформировать собственное мнение и повысить уровень осведомленности.
Это ещё не всё… – https://www.casouthdevelopment.com/download
Санкт-петербургская клиника «Передозировка» специализируется на лечении алкогольной и наркотической зависимости. Здесь выполняют кодирование, проводят медицинское восстановление и обеспечивают психологическую поддержку для закрепления результата.
Подробнее можно узнать тут – [url=https://peredozirovka.info/articles/pochemu-lyudi-nachinayut-kurit/]почему люди курят[/url]
Мы предлагаем вам окунуться в океан любопытных фактов и вдохновляющих историй. Эта публикация поможет расширить горизонты, разбудить интерес к науке и истории и увидеть мир с новой стороны.
Читать далее > – https://spiro.co.il/2018/12/02/fitnice
Наркологическая клиника «Передозировка» предлагает круглосуточную помощь жителям Санкт-Петербурга. Лечение зависимостей, детокс-мероприятия и современные методы кодирования помогают пациентам восстановить здоровье и начать длительный период трезвости.
Подробнее тут – [url=https://peredozirovka.info/service/reabilitatsiya-alkogolikov/]алкоголик реабилитация лечение[/url]
Публикация приглашает вас исследовать неизведанное — от древних тайн до современных достижений науки. Вы узнаете, как случайные находки превращались в революции, а смелые мысли — в новые эры человеческого прогресса.
Интересует подробная информация – https://www.cabinet.gov.zm/?p=5091
Health threads through daily life more quietly than we tend to notice.
Information arrives fast, but depth rarely travels with it.
We press ourselves into frameworks that were shaped for no one in particular.
At some point, a quiet friction begins to surface.
No two bodies move through life at the same pace.
Step by step, that process rebuilds the trust between how we think and how we feel.
Over time, health shifts from being something we pursue to something we inhabit.
It grows from curiosity practiced with consistency.
If what you’re looking for is more energy, more groundedness, more ease.
Consider this an opening—a chance to come back to yourself.
And giving balance the space it needs to arrive on its own terms.
And with every layer, genuine balance comes a little more within reach.
Daily awareness and the mechanisms driving it can seem worlds apart—until they aren’t.
And that’s what makes it so worthwhile to turn attention specifically toward tadacip 20mg.
«Передозировка» — наркологическая клиника в Санкт-Петербурге, где проводят детокс, лечение зависимостей и программу поэтапной реабилитации. Специалисты помогают вернуть стабильное состояние и формируют долгосрочную стратегию трезвости.
Изучить вопрос глубже – [url=https://peredozirovka.info/articles/psihicheskie-rasstroystva-pri-alkogolizme/]психические и поведенческие расстройства вызванные алкоголем[/url]
Наркологическая клиника «Передозировка» предлагает круглосуточную помощь жителям Санкт-Петербурга. Лечение зависимостей, детокс-мероприятия и современные методы кодирования помогают пациентам восстановить здоровье и начать длительный период трезвости.
Узнать больше – [url=https://peredozirovka.info/articles/rebenok-i-roditel-alkogolik/]кома наркоманов[/url]
Этот обзор предлагает свежий взгляд на предметы, которые и без того привычны. Мы упоминаем факты, не имеющие большого значения, и события с неясной важностью, но они присутствуют здесь.
Подробнее читать – [url=https://rostov-narkologiya.ru/uslugi-ot-narkomanii/mefedronovaya-zavisimost/]народные средства от диабета[/url]
В клинике «Передозировка» в Санкт-Петербурге пациентам доступно индивидуальное лечение наркозависимости и алкоголизма. Центр использует современные протоколы терапии, предлагает конфиденциальное кодирование и поддерживает пациентов на всех этапах восстановления.
Детальнее – [url=https://peredozirovka.info/service/vyvod-iz-zapoya/]нарколог вывод из запоя[/url]
В этой заметке мы представляем шаги, которые помогут в процессе преодоления зависимостей. Рассматриваются стратегии поддержки и чек-листы для тех, кто хочет сделать первый шаг к выздоровлению. Наша цель — вдохновить читателей на положительные изменения и поддержать их в трудных моментах.
Подробнее – http://google.lt/url?sa=t&url=https://spb.alco-centr.ru/lazernoe-kodirovanie-ot-alkogolizma
На первом этапе проводится серия исследований:
Узнать больше – https://lechenie-alkogolizma-ekaterinburg0.ru/anonimnoe-lechenie-alkogolizma-v-ekb
Обращение к наркологу — это не признание «окончательного проигрыша», а трезвое решение, что здоровье и жизнь важнее иллюзии контроля. В клинике можно безопасно вывести человека из запоя, стабилизировать состояние, обследовать сердце, печень, нервную систему, понять, насколько далеко зашло заболевание. Важно, что помощь получают не только тяжёлые пациенты «на грани», но и те, у кого ещё есть работа, семья, привычный образ жизни, но запои уже стали регулярными. Чем раньше удаётся подключить специалистов в Лобне, тем мягче можно пройти лечение и тем больше шансов сохранить и здоровье, и отношения, и социальный статус.
Подробнее можно узнать тут – [url=https://narkologicheskaya-klinika-lobnya11-2.ru/]наркологическая клиника цены[/url]
Лечебные мероприятия и рекомендации формируются исходя из индивидуального состояния каждого пациента. Специалист имеет возможность посвятить достаточное количество времени каждому больному, корректируя программу лечения согласно его особым потребностям и жизненным обстоятельствам. При этом учитываются психологические, социальные и физические аспекты, оказывающие влияние на здоровье пациента. Персонализированный подход обеспечивает оперативное реагирование на изменения состояния и своевременную корректировку терапии.
Узнать больше – [url=https://narcolog-na-dom-msk55.ru/]vyzov vracha narkologa na dom[/url]
Обращаться можно и нужно не только в момент очередного запоя. Клиника в Ивантеевке работает и с теми, кто сейчас в относительной ремиссии, но понимает, что без внешней поддержки снова сорвётся. В этом случае можно обсудить профилактические программы, варианты кодирования, реабилитацию, работу с тревогой и депрессией. Чем раньше сделан шаг в сторону лечения, тем мягче будут процедуры и тем больше шансов на устойчивый результат.
Узнать больше – https://narkologicheskaya-klinika-ivanteevka11.ru/platnaya-narkologicheskaya-klinika-v-ivanteevke/
Наркологическая клиника «Передозировка» предлагает круглосуточную помощь жителям Санкт-Петербурга. Лечение зависимостей, детокс-мероприятия и современные методы кодирования помогают пациентам восстановить здоровье и начать длительный период трезвости.
Выяснить больше – [url=https://peredozirovka.info/articles/nikotin-vliyanie-na-organizm-cheloveka/]никотин и легкие[/url]
Если по ходу визита появляются «красные флаги» (падение сатурации, нестабильный ритм, нарастающая дезориентация), маршрут мгновенно переводится в стационарный блок «ЕкатеринбургМедСервис» — без «обнуления» обследований и без потери приватности. Вся собранная информация остаётся в единой карте наблюдения, что экономит время и силы.
Выяснить больше – https://narcolog-na-dom-ekaterinburg00.ru/narkolog-ekaterinburg-otzyvy
Наркологическая клиника в клинике в Екатеринбурге — это специализированное медицинское учреждение, где проводится диагностика, лечение и реабилитация людей, страдающих алкогольной или наркотической зависимостью. Комплексный подход включает не только медикаментозную терапию, но и психотерапевтические методики, направленные на восстановление личности и возвращение пациента к социальной активности. Каждое вмешательство проводится с учётом физического состояния, психологического профиля и стадии заболевания. Работа специалистов основана на принципах анонимности, медицинской этики и научно доказанных протоколов лечения.
Получить дополнительную информацию – http://narkologicheskaya-klinika-v-ekb16.ru
Наркологическая клиника «Трезвый город» оказывает медицинскую помощь при алкогольной и наркотической зависимости: детоксикация, снятие абстиненции, стабилизация состояния и подбор дальнейшей тактики лечения. Работа ведётся конфиденциально, с контролем показателей и учётом сопутствующих рисков.
Подробнее тут – [url=https://trezviy-gorod.ru/stati/posledstviya-alkogolizma.html]алкоголизм симптомы и последствия[/url]
Мы понимаем, что каждая минута имеет решающее значение, поэтому наши специалисты готовы выехать на дом в кратчайшие сроки и провести все необходимые процедуры по детоксикации организма. Наша цель — помочь пациенту вернуться к нормальной жизни без лишних стрессов и рискованных попыток самостоятельного лечения.
Узнать больше – https://vyvod-iz-zapoya-krasnodar00.ru/vyvod-iz-zapoya-kruglosutochno-krasnodar
В медицинских условиях специалисты обеспечивают тщательный контроль над динамикой состояния пациента. Каждый этап процедуры имеет свою задачу, которая направлена на последовательное восстановление функций организма.
Получить больше информации – [url=https://vyvod-iz-zapoya-volgograd0.ru/]www.domen.ru[/url]
Состав капельницы не повторяет «советы знакомых». Он формируется под доминирующий симптом, сопутствующие заболевания и взаимодействия с текущими лекарствами. Врач постоянно оценивает витальные показатели и реакцию организма, корректируя скорость и объём по инфузомату. Ниже — примеры профилей, которые объясняют логику выбора; финальное решение всегда очное.
Детальнее – [url=https://narcolog-na-dom-sochi00.ru/]запой нарколог на дом[/url]
Длительные запои создают мультисистемный кризис. Обезвоживание и сгущение крови повышают риск образования тромбов, что может привести к инсульту или инфаркту миокарда. Печень и поджелудочная страдают от мощной токсической нагрузки — развивается острый панкреатит, хронический гепатит и жировой гепатоз. Интоксикация нарушает работу ЖКТ: возникает гастрит, язвенная болезнь и риск внутренних кровотечений. Алкоголь разрушает нейронные связи, снижая уровень витамина B1, что может вызвать энцефалопатию Ворника и, в запущенных случаях, корсаковский психоз с необратимыми провалами памяти и когнитивными нарушениями.
Подробнее – https://kapelnica-ot-zapoya-moskva1.ru/kapelnicy-ot-zapoya-na-domu-v-balashihe
Основной задачей нарколога, выезжающего на дом, является помощь в любой ситуации, связанной с зависимостью. Все процедуры и методики подбираются индивидуально, в зависимости от состояния пациента.
Выяснить больше – https://narcolog-na-dom-moskva55.ru/narkolog-na-dom-moskva-tseny
Процесс лечения состоит из нескольких этапов:
Детальнее – https://narko-zakodirovat2.ru/vyvod-iz-zapoya-na-domu-v-moskve/
Запойное состояние опасно не только токсическим воздействием алкоголя на организм, но и последствиями резкого отказа от спиртного. В таких случаях промедление может стоить здоровья. Нарколог на дом в Рязани приезжает по вызову и проводит процедуру прямо в домашних условиях, используя проверенные медицинские методики. Такой подход сочетает анонимность, оперативность и возможность контроля состояния без госпитализации.
Получить дополнительную информацию – [url=https://narcolog-na-dom-ryazan0.ru/]вызвать нарколога на дом срочно санкт-петербург[/url]
Наркологическая помощь — это не «последний шанс для безнадёжных», а нормальный медицинский шаг, такой же логичный, как визит к кардиологу при проблемах с сердцем или к эндокринологу при сахарном диабете. В клинике в Лобне зависимость рассматривают как заболевание, а не как «слабость характера», и помогают человеку пройти весь путь — от детоксикации и вывода из запоя до реабилитации и профилактики срывов. Обращение на более раннем этапе даёт важное преимущество: организм ещё способен восстанавливаться, психика не разрушена окончательно, социальные связи не разорваны. Это значит, что лечение может быть мягче, программа — гибче, а шансы на устойчивый результат — выше.
Получить больше информации – [url=https://narkologicheskaya-klinika-lobnya11.ru/]телефон наркологической клиники[/url]
Эта публикация содержит набор несвязанных идей, трудно применимых в практике. Мы лишь поверхностно затрагиваем различные точки зрения, не проводя глубокий анализ и не предлагая выводов.
Подробнее читать – https://rostov-narkologiya.ru/uslugi-ot-alkogolizma/vyvod-iz-zapoya
Для детоксикации и восстановления организма после запоя используются только сертифицированные лекарственные препараты с доказанной эффективностью и безопасностью:
Подробнее – [url=https://narcolog-na-dom-sochi0.ru/]врач нарколог выезд на дом в сочи[/url]
Когда человек оказывается в сложной ситуации из-за длительного употребления алкоголя, важно получить быструю и квалифицированную медицинскую помощь. Запойные состояния, алкогольная интоксикация, тяжелый абстинентный синдром — все это требует своевременного вмешательства врача. Однако не всегда есть возможность или желание обращаться в стационар.
Изучить вопрос глубже – [url=https://narcolog-na-dom-v-irkutske00.ru/]психиатр нарколог на дом[/url]
Препараты подбираются строго индивидуально и могут включать:
Ознакомиться с деталями – [url=https://narcolog-na-dom-v-moskve55.ru/]вызов врача нарколога на дом москва[/url]
Запой может длиться от нескольких дней до нескольких недель, и с каждым новым днём состояние пациента может ухудшаться. Важно не затягивать с лечением, поскольку алкогольная зависимость способна привести к необратимым изменениям в организме и психике. В Москве лечение проводится не только в клиниках, но и в условиях дома, что позволяет сохранить конфиденциальность.
Разобраться лучше – http://narko-zakodirovat2.ru/
Вернуть здоровье и силы за одну процедуру позволяет грамотное сочетание препаратов, подобранное индивидуально под каждого пациента. Врач-нарколог оценивает тяжесть интоксикации, измеряет артериальное давление, пульс и уровень насыщения крови кислородом, а при необходимости назначает экспресс-анализы. На основании этих данных создаётся персональный раствор для инфузии:
Подробнее можно узнать тут – [url=https://kapelnica-ot-zapoya-moskva1.ru/]поставить капельницу от запоя на дому в балашихе[/url]
Обращение к наркологу — это не признание «окончательного проигрыша», а трезвое решение, что здоровье и жизнь важнее иллюзии контроля. В клинике можно безопасно вывести человека из запоя, стабилизировать состояние, обследовать сердце, печень, нервную систему, понять, насколько далеко зашло заболевание. Важно, что помощь получают не только тяжёлые пациенты «на грани», но и те, у кого ещё есть работа, семья, привычный образ жизни, но запои уже стали регулярными. Чем раньше удаётся подключить специалистов в Лобне, тем мягче можно пройти лечение и тем больше шансов сохранить и здоровье, и отношения, и социальный статус.
Разобраться лучше – [url=https://narkologicheskaya-klinika-lobnya11-2.ru/]лобня наркология[/url]
Для многих пациентов важным моментом является сохранение конфиденциальности. Врач, приехавший на дом, работает с полной защитой данных. Пациент может быть уверен, что его проблема останется личной и не станет достоянием общественности. Врачи приезжают на неприметных автомобилях и избегают всяческих ситуаций, которые могут привлечь лишнее внимание.
Подробнее тут – http://narcolog-na-dom-moskva55.ru
Алкогольная и наркотическая зависимость являются серьёзными заболеваниями, требующими оперативного и квалифицированного вмешательства. Когда речь идёт о критическом состоянии пациента, особенно после длительного употребления алкоголя или наркотических веществ, время играет ключевую роль. Клиника «РеабилитАльянс» в Краснодаре предлагает услугу нарколога на дом, обеспечивая пациентам необходимую помощь в любой момент дня и ночи. Наши специалисты готовы оперативно выехать по указанному адресу и предоставить все необходимые медицинские процедуры на месте.
Подробнее можно узнать тут – [url=https://narcolog-na-dom-krasnodar00.ru/]помощь нарколога на дому[/url]
Такая структура позволяет подбирать формат помощи под конкретную ситуацию, а не подгонять всех пациентов под один шаблон. Для кого-то будет достаточно короткого стационарного курса и последующего амбулаторного наблюдения, кому-то потребуется длительная реабилитация и плотная работа с семьёй, а кому-то — мягкая поддержка на ранней стадии зависимости, пока заболевание ещё не успело разрушить жизнь.
Получить дополнительные сведения – [url=https://narkologicheskaya-klinika-lobnya11.ru/]наркологическая клиника фото[/url]
Опасность запоя в том, что каждый новый день употребления усиливает интоксикацию: растёт нагрузка на сердце и сосуды, печень перестаёт справляться с объёмом токсинов, мозг работает в режиме постоянного перегруза. Появляются угрозы инсульта, инфаркта, тяжёлых аритмий, судорог, психозов с галлюцинациями и агрессией. При этом сам зависимый чаще всего недооценивает риск: обещает «завтра точно прекратить», отказывается от врача, просит родных просто переждать и дать таблетку от головы. Но без грамотно подобранной терапии и контроля такое «перетерплю» может закончиться реанимацией. Поэтому, как только становится ясно, что человек не может самостоятельно прервать запой, разумное решение — обращаться за квалифицированной помощью по месту проживания.
Подробнее можно узнать тут – https://vyvod-iz-zapoya-ivanteevka11.ru
Данный комплекс мер обеспечивает восстановление здоровья пациента и создает основу для полного выздоровления.
Получить дополнительные сведения – [url=https://narcolog-na-dom-msk55.ru/]vyzvat narkologa na dom[/url]
Преимущество обращения в клинику по месту проживания в том, что помощь становится доступной и менее пугающей. Не нужно ехать в другой город, объяснять длительные отлучки, жить в ощущении, что о проблеме узнают все вокруг. Пациент может пройти диагностику, детоксикацию, вывод из запоя, курс лечения и реабилитацию в привычном регионе, а родные — участвовать в процессе, приезжать на семейные консультации, поддерживать контакт со специалистами. Важный момент: здесь смотрят не только на зависимость как на «вредную привычку», а как на заболевание с физическими, психологическими и социальными последствиями. Лечить приходится не отдельный эпизод запоя, а всю систему — здоровье, поведение, образ жизни и окружение человека.
Разобраться лучше – [url=https://narkologicheskaya-klinika-ivanteevka11.ru/]наркологические клиники в подмосковье[/url]
Серьезные состояния, вызванные длительным употреблением алкоголя или наркотиков, требуют немедленного вмешательства. Если пациент испытывает ухудшение самочувствия вследствие продолжительного запоя, его организм начинает накапливать токсичные вещества, что ведёт к нарушению работы внутренних органов. При появлении таких симптомов, как сильная рвота, спутанность сознания, судороги, резкие скачки артериального давления, а также выраженные признаки абстинентного синдрома (сильная дрожь, панические атаки, бессонница, тревожность), вызов нарколога становится жизненно необходимым. Экстренное вмешательство позволяет стабилизировать состояние больного и предотвратить развитие серьёзных осложнений, включая сердечно-сосудистые нарушения, повреждение печени и развитие алкогольного психоза. В таких ситуациях профессиональное лечение на дому — лучший способ сохранить здоровье и жизнь пациента.
Подробнее – [url=https://narcolog-na-dom-ekaterinburg000.ru/]частный нарколог на дом екатеринбург[/url]
Do you have any video of that? I’d want to find out more details.
byueuropaviagraonline
Пациенты, нуждающиеся в постоянном медицинском наблюдении, размещаются в стационарном отделении. Здесь организовано непрерывное дежурство медсестры и врача-нарколога, что обеспечивает безопасность при риске осложнений.
Подробнее тут – [url=https://lechenie-alkogolizma-ekaterinburg0.ru/]нарколог лечение алкоголизма[/url]
После прибытия врач проводит осмотр пациента, оценивает его состояние, измеряет давление, пульс, уровень кислорода и выявляет возможные противопоказания. Затем разрабатывается индивидуальный план лечения, направленный на стабилизацию состояния.
Получить больше информации – http://narcolog-na-dom-v-irkutske00.ru
В этой статье мы рассмотрим современные достижения в области медицины, включая инновационные методы лечения и диагностики. Мы обсудим важность профилактики заболеваний и роль технологий в улучшении качества здравоохранения. Читатели узнают о влиянии медицины на повседневную жизнь и ее значение для современного общества.
Подробнее – https://www.google.cv/url?q=https://spb.alco-centr.ru/kodirovanie-po-dovzhenko
Препараты подбираются строго индивидуально и могут включать:
Изучить вопрос глубже – https://narcolog-na-dom-v-moskve55.ru/narkolog-na-dom-anonimno-v-krasnogorske/
Служба круглосуточного вывода из запоя организована таким образом, чтобы обеспечить максимальную оперативность и надежность. Независимо от времени суток, квалифицированные специалисты готовы выехать на дом или принять пациента в медицинском учреждении, чтобы приступить к детоксикации и стабилизации состояния.
Детальнее – [url=https://vyvod-iz-zapoya-volgograd000.ru/]вывод из запоя волгоград[/url]
Реабилитационные программы в наркологической клинике направлены на нормализацию обменных процессов, восстановление сна, эмоциональной стабильности и когнитивных функций. Для достижения этого используются методы физиотерапии, нутритивной поддержки и коррекции поведения. Основное внимание уделяется мотивации пациента, работе с созависимостью и обучению навыкам здорового взаимодействия с окружающей средой.
Получить дополнительные сведения – [url=https://narkologicheskaya-klinika-v-ekb16.ru/]наркологическая клиника лечение алкоголизма в екатеринбурге[/url]
В клинике «НаркоСити» используются только сертифицированные лекарственные средства, которые подбираются индивидуально с учетом состояния пациента:
Подробнее можно узнать тут – https://vyvod-iz-zapoya-krasnodar0.ru/vyvod-iz-zapoya-czena-krasnodar
Как отмечает врач-нарколог клиники «РеабилитАльянс» Павел Сомов, «чем раньше начато лечение, тем выше шансы на скорейшее выздоровление без серьезных последствий для здоровья».
Выяснить больше – http://narcolog-na-dom-krasnodar00.ru/narkolog-na-dom-kruglosutochno-krasnodar/
Такая систематизация показывает, что врач действует целенаправленно, устраняя не только симптомы, но и их физиологические последствия.
Исследовать вопрос подробнее – http://narcolog-na-dom-ryazan0.ru/
Такая систематизация показывает, что врач действует целенаправленно, устраняя не только симптомы, но и их физиологические последствия.
Детальнее – [url=https://narcolog-na-dom-ryazan0.ru/]врач нарколог выезд на дом санкт-петербург[/url]
Санкт-петербургская клиника «Передозировка» специализируется на лечении алкогольной и наркотической зависимости. Здесь выполняют кодирование, проводят медицинское восстановление и обеспечивают психологическую поддержку для закрепления результата.
Получить дополнительную информацию – [url=https://peredozirovka.info/articles/kak-izbavitsya-ot-pohmelya-samye-effektivnye-sredstva/]как избавиться от похмелья быстро и эффективно[/url]
При длительном запое организм не успевает восстановить свой водно-электролитный баланс, что приводит к обезвоживанию и ухудшению общего состояния. Такие пациенты рискуют развить не только тяжелую интоксикацию, но и хронические заболевания, которые впоследствии требуют длительного и дорогостоящего лечения. Поэтому своевременный вызов врача-нарколога на дом становится критически важным для сохранения здоровья и предотвращения серьезных последствий.
Получить дополнительную информацию – http://vyvod-iz-zapoya-krasnodar00.ru/vyvod-iz-zapoya-na-domu-krasnodar/https://vyvod-iz-zapoya-krasnodar00.ru
Мы не используем универсальные «сильные капельницы». Эффективность даёт точное совпадение с задачей. Ниже — логика выбора профилей и маркеры, на которые мы ориентируемся при контроле эффективности и безопасности.
Подробнее тут – [url=https://vivod-iz-zapoya-v-sankt-peterburge16.ru/]помощь вывод из запоя[/url]
Функция и назначение
Исследовать вопрос подробнее – http://narcolog-na-dom-ekaterinburg000.ru/vrach-narkolog-na-dom-ekb/
«ЮгМедЦентр» поддерживает строгую конфиденциальность: выездные специалисты приезжают без медицинской символики, в гражданской одежде; документы формулируются нейтрально; уведомления не содержат триггерных слов; профиль можно оформить под кодом. Все записи ведутся в шифрованном контуре с разграничением доступа по ролям, а видеосессии с врачом/психологом не записываются. Мы предупреждаем о цифровой гигиене: включите «тихий режим» уведомлений, избегайте пересылки документов в открытых чатах, используйте резервный канал связи для экстренных вопросов.
Узнать больше – http://narcolog-na-dom-sochi00.ru/narkolog-sochi/
Если по ходу визита появляются «красные флаги» (падение сатурации, нестабильный ритм, нарастающая дезориентация), маршрут мгновенно переводится в стационарный блок «ЕкатеринбургМедСервис» — без «обнуления» обследований и без потери приватности. Вся собранная информация остаётся в единой карте наблюдения, что экономит время и силы.
Подробнее тут – http://narcolog-na-dom-ekaterinburg00.ru/ekaterinburg-narkologicheskaya-klinika/
В этой статье мы подробно рассматриваем проверенные методы борьбы с зависимостями, включая психотерапию, медикаментозное лечение и поддержку со стороны общества. Мы акцентируем внимание на важности комплексного подхода и возможности успешного восстановления для людей, столкнувшихся с этой проблемой.
Выяснить больше – http://google.st/url?q=https://spb.alco-centr.ru/vrachi
Нарколог на дом в Санкт-Петербурге оказывает помощь при различных формах алкогольной и наркотической зависимости. Основное внимание уделяется купированию абстинентного синдрома, нормализации работы сердечно-сосудистой и нервной систем, а также снижению уровня интоксикации организма.
Подробнее можно узнать тут – [url=https://narcolog-na-dom-sankt-peterburg0.ru/]частный нарколог на дом[/url]
Самостоятельный выход из запоя сопряжен с высоким риском развития осложнений. После прекращения приема спиртного ослабленный организм может не выдержать нагрузки, что приведет к инфаркту, инсульту, судорожным приступам и даже алкогольному психозу. Чтобы избежать этих опасных состояний, необходимо вызвать нарколога на дом, который проведет лечение правильно и безопасно.
Получить дополнительную информацию – [url=https://vyvod-iz-zapoya-krasnodar0.ru/]вывод из запоя вызов в краснодаре[/url]
Состав инфузии формируется по доминирующему симптому и данным экспресс-измерений, с учётом лекарственных взаимодействий. Врач оценивает динамику в реальном времени и, при необходимости, корректирует состав/скорость. Ниже — примеры профилей; окончательное решение всегда очное.
Получить дополнительную информацию – [url=https://narcolog-na-dom-ekaterinburg0.ru/]нарколог капельница на дом[/url]
Текст включает разнообразную информацию, которая может показаться любопытной, но не меняет устоявшегося восприятия. Предлагаем просто насладиться чтением, не ожидая значительной пользы.
Подробнее читать – [url=https://rostov-narkologiya.ru/uslugi-ot-narkomanii/mefedronovaya-zavisimost/]таблетки для аборта[/url]
В данной статье рассматриваются проблемы общественного здоровья и социальные факторы, влияющие на него. Мы акцентируем внимание на значении профилактики и осведомленности в защите здоровья на уровне общества. Читатели смогут узнать о новых инициативах и программах, направленных на улучшение здоровья населения.
Изучить вопрос глубже – http://google.lt/url?sa=t&url=https://spb.alco-centr.ru/tseny
Специалист уточняет продолжительность запоя, характер симптоматики и наличие хронических заболеваний, проводит измерения пульса, давления и температуры, что позволяет оперативно скорректировать терапию.
Разобраться лучше – [url=https://vyvod-iz-zapoya-volgograd000.ru/]наркологический вывод из запоя волгоград[/url]
Вызов специалиста не всегда планируется заранее. Чаще всего помощь требуется в экстренной ситуации, когда близкие замечают серьёзное ухудшение состояния. Нарколог на дом в Рязани оказывает помощь в следующих случаях:
Подробнее можно узнать тут – http://narcolog-na-dom-ryazan0.ru
Эта статья предлагает уникальную подборку занимательных фактов и необычных историй, которые вы, возможно, не знали. Мы постараемся вдохновить ваше воображение и разнообразить ваш кругозор, погружая вас в мир, полный интересных открытий. Читайте и открывайте для себя новое!
Погрузиться в детали – https://www.theguardian.com/society/2016/jul/03/alvin-toffler-obituary
Во время процедуры врач контролирует состояние больного, по необходимости корректирует лечение, чтобы добиться максимального терапевтического эффекта. После проведения детоксикации пациенту назначается курс поддерживающей терапии, а также даются рекомендации по дальнейшему восстановлению и профилактике рецидивов.
Ознакомиться с деталями – [url=https://narcolog-na-dom-sochi0.ru/]платный нарколог на дом[/url]
Этот информативный текст сочетает в себе темы здоровья и зависимости. Мы обсудим, как хронические заболевания могут усугубить зависимости и наоборот, как зависимость может влиять на общее состояние здоровья. Читатели получат представление о комплексном подходе к лечению как физического, так и психического состояния.
Получить дополнительные сведения – https://www.google.cv/url?q=https://spb.alco-centr.ru/kodirovanie-s-provokatsiey
Такой порядок действий гарантирует не только купирование симптомов, но и подготовку пациента к последующему восстановлению.
Узнать больше – [url=https://narcolog-na-dom-ryazan0.ru/]нарколог на дом вывод из запоя в санкт-петербурге[/url]
Мы предлагаем вам окунуться в океан любопытных фактов и вдохновляющих историй. Эта публикация поможет расширить горизонты, разбудить интерес к науке и истории и увидеть мир с новой стороны.
Что скрывают от вас? – http://www.mykingdom.su/mykingdom/11843
В клинике «Передозировка» в Санкт-Петербурге оказывают анонимную помощь зависимым: лечение алкоголизма, терапию наркомании, детокс и профессиональное кодирование. Реабилитационные программы помогают стабилизировать состояние и предотвратить рецидив.
Подробнее можно узнать тут – [url=https://peredozirovka.info/]«Передозировка» в Санкт-Петербурге[/url]
Этот информационный материал собраны данные, которые помогут лучше понять текущие тенденции и процессы в различных сферах жизни. Мы предоставляем четкий анализ, графики и примеры, чтобы информация была не только понятной, но и практичной для принятия решений.
Лови подробности – http://www.mykingdom.su/mykingdom/116934/mkd_allcomments
Эта статья погружает вас в увлекательный мир знаний, где каждый факт становится открытием. Мы расскажем о ключевых исторических поворотных моментах и научных прорывах, которые изменили ход цивилизации. Поймите, как прошлое формирует настоящее и как его уроки могут помочь нам строить будущее.
Есть чему поучиться – https://didtechnology.com/did-technology-devient-distributeur-officiel-de-lucidlink
В этой информационной статье вы найдете интересное содержание, которое поможет вам расширить свои знания. Мы предлагаем увлекательный подход и уникальные взгляды на обсуждаемые темы, побуждая пользователей к активному мышлению и критическому анализу.
Расширить кругозор по теме – https://stanislaw.ru/rus/collections/links.asp?category=quality
В этой публикации мы предложим ряд рекомендаций по избавлению от зависимостей и успешному восстановлению. Мы обсудим методы привлечения поддержки и важность самосознания. Эти советы помогут людям вернуться к нормальной жизни и стать на путь выздоровления.
Узнать больше – http://google.com.ag/url?q=https://spb.alco-centr.ru/lechenie-zavisimosti-ot-liriki
Реабилитационные программы в наркологической клинике направлены на нормализацию обменных процессов, восстановление сна, эмоциональной стабильности и когнитивных функций. Для достижения этого используются методы физиотерапии, нутритивной поддержки и коррекции поведения. Основное внимание уделяется мотивации пациента, работе с созависимостью и обучению навыкам здорового взаимодействия с окружающей средой.
Изучить вопрос глубже – [url=https://narkologicheskaya-klinika-v-ekb16.ru/]наркологическая клиника екатеринбург[/url]
Эта статья сочетает в себе как полезные, так и интересные сведения, которые обогатят ваше понимание насущных тем. Мы предлагаем практические советы и рекомендации, которые легко внедрить в повседневную жизнь. Узнайте, как улучшить свои навыки и обогатить свой опыт с помощью простых, но эффективных решений.
Открыть полностью – https://trendy-innovation.com/?p=7619
В клинике «Трезвый город» доступна помощь при запое и тяжёлой абстиненции с медицинским наблюдением. Проводится инфузионная терапия, медикаментозная коррекция и восстановление сна, общего самочувствия и вегетативных проявлений.
Подробнее – [url=https://trezviy-gorod.ru/stati/davlenie-pri-pohmele-i-zapoe.html]похмелье и давление[/url]
Публикация приглашает вас исследовать неизведанное — от древних тайн до современных достижений науки. Вы узнаете, как случайные находки превращались в революции, а смелые мысли — в новые эры человеческого прогресса.
Более того — здесь – https://www.my5idea.com/2021/02/22/hello-world
Одним из самых привлекательных аспектов вызова нарколога на дом является гибкость. Вы можете согласовать время визита врача, подходящее именно для вас, включая вечернее или ночное время. Это позволяет совмещать лечение с работой и личными делами, не нарушая привычный ритм жизни.
Узнать больше – [url=https://narcolog-na-dom-moskva55.ru/]vyzov vracha narkologa na dom[/url]
Эта статья подробно расскажет о процессе выздоровления, который включает в себя эмоциональную, физическую и психологическую реабилитацию. Мы обсуждаем значимость поддержки и наличие профессиональных программ. Читатели узнают, как строить новую жизнь и не возвращаться к старым привычкам.
Подробнее можно узнать тут – http://google.com.np/url?sa=i&url=https://spb.alco-centr.ru/tseny
Клиника «Еваклиник» в Саранске специализируется на лечении зависимостей с применением проверенных медицинских протоколов. Пациентам доступна круглосуточная наркологическая помощь, медикаментозная поддержка и сопровождение на этапе реабилитации. Специалисты центра работают не только с физическими проявлениями зависимости, но и с психологическими причинами, что повышает эффективность лечения.
Детальнее – [url=https://evaclinica.ru/blog/plazmaferez-pokazaniya-metodika-i-ehffektivnost.html]плазмаферез крови[/url]
Длительные запои создают мультисистемный кризис. Обезвоживание и сгущение крови повышают риск образования тромбов, что может привести к инсульту или инфаркту миокарда. Печень и поджелудочная страдают от мощной токсической нагрузки — развивается острый панкреатит, хронический гепатит и жировой гепатоз. Интоксикация нарушает работу ЖКТ: возникает гастрит, язвенная болезнь и риск внутренних кровотечений. Алкоголь разрушает нейронные связи, снижая уровень витамина B1, что может вызвать энцефалопатию Ворника и, в запущенных случаях, корсаковский психоз с необратимыми провалами памяти и когнитивными нарушениями.
Исследовать вопрос подробнее – [url=https://kapelnica-ot-zapoya-moskva1.ru/]капельница от запоя недорого[/url]
Эта статья погружает вас в увлекательный мир знаний, где каждый факт становится открытием. Мы расскажем о ключевых исторических поворотных моментах и научных прорывах, которые изменили ход цивилизации. Поймите, как прошлое формирует настоящее и как его уроки могут помочь нам строить будущее.
Изучить материалы по теме – https://www.anjasikkens.nl/het-oloid-project/dsc03550-2/?unapproved=123024
В этой информационной статье вы найдете интересное содержание, которое поможет вам расширить свои знания. Мы предлагаем увлекательный подход и уникальные взгляды на обсуждаемые темы, побуждая пользователей к активному мышлению и критическому анализу.
Детальнее – https://informasiya.az/abs-ukraynaya-12-milyard-dollar
Наркологическая помощь — это не «последний шанс для безнадёжных», а нормальный медицинский шаг, такой же логичный, как визит к кардиологу при проблемах с сердцем или к эндокринологу при сахарном диабете. В клинике в Лобне зависимость рассматривают как заболевание, а не как «слабость характера», и помогают человеку пройти весь путь — от детоксикации и вывода из запоя до реабилитации и профилактики срывов. Обращение на более раннем этапе даёт важное преимущество: организм ещё способен восстанавливаться, психика не разрушена окончательно, социальные связи не разорваны. Это значит, что лечение может быть мягче, программа — гибче, а шансы на устойчивый результат — выше.
Узнать больше – [url=https://narkologicheskaya-klinika-lobnya11.ru/]narkologicheskaya-klinika-lobnya[/url]
В этой информационной статье вы найдете интересное содержание, которое поможет вам расширить свои знания. Мы предлагаем увлекательный подход и уникальные взгляды на обсуждаемые темы, побуждая пользователей к активному мышлению и критическому анализу.
Детальнее – https://stanislaw.ru/rus/collections/links.asp?category=radio
Этот информативный текст отличается привлекательным содержанием и актуальными данными. Мы предлагаем читателям взглянуть на привычные вещи под новым углом, предоставляя интересный и доступный материал. Получите удовольствие от чтения и расширьте кругозор!
Узнать больше – https://resiproduk.com/kenapa-nomor-resi-tidak-bisa-dilacak
«Передозировка» — наркологическая клиника в Санкт-Петербурге, где проводят детокс, лечение зависимостей и программу поэтапной реабилитации. Специалисты помогают вернуть стабильное состояние и формируют долгосрочную стратегию трезвости.
Получить больше информации – https://peredozirovka.info/articles/roditeli-alkogoliki-v-seme
Эта статья предлагает уникальную подборку занимательных фактов и необычных историй, которые вы, возможно, не знали. Мы постараемся вдохновить ваше воображение и разнообразить ваш кругозор, погружая вас в мир, полный интересных открытий. Читайте и открывайте для себя новое!
Всё самое вкусное внутри – https://www.mercyofthesky.com/kfor-channel-9-in-oklahoma-city-broadcasting
В этой статье представлен занимательный и актуальный контент, который заставит вас задуматься. Мы обсуждаем насущные вопросы и проблемы, а также освещаем истории, которые вдохновляют на действия и изменения. Узнайте, что стоит за событиями нашего времени!
Познакомиться с результатами исследований – http://profumia.net/prodotto/acqua-profumata-corpo-della-felicita-collistar
Особенно тревожными сигналами являются проблемы со здоровьем. Скачки давления, одышка, сердцебиение, боли в груди, нарушения сна, приступы тревоги и паники — всё это говорит о том, что организм работает на пределе. При этом человек продолжает пить, несмотря на явные признаки перегрузки. Признаками того, что пора не откладывать обращение, становятся и изменения в поведении: раздражительность, вспышки агрессии, подозрительность, скрытность, замыкание в себе. Добавьте сюда конфликты дома и на работе, сорванные обязательства, скрытые долги — и становится понятно, что «подождать ещё немного» уже опасно. В такой момент консультация нарколога в Чехове и обсуждение возможного кодирования — не радикальная мера, а разумный шаг, который может предотвратить серьёзные медицинские и социальные последствия.
Углубиться в тему – https://kodirovanie-ot-alkogolizma-chekhov11.ru/kodirovanie-ot-alkogolizma-na-domu-v-chekhove/
Этот сборник информации привлекает множеством мелких деталей и необычных ракурсов. Мы предлагаем взгляды, редко полезные, но способные немного разнообразить знакомство с темой.
Подробнее читать – [url=https://rostov-narkologiya.ru/uslugi-ot-alkogolizma/vyvod-iz-zapoya/]мефедроновая зависимость[/url]
Инфузия проводится под постоянным контролем медицинского персонала. Длительность процедуры составляет от одного до трёх часов. Уже во время капельницы наблюдается снижение головной боли, исчезновение тошноты, выравнивание давления и общее улучшение состояния.
Детальнее – http://kapelnica-ot-zapoya-msk55.ru
«Трезвый город» — это комплексная наркологическая помощь для взрослых пациентов: от экстренного купирования интоксикации до плановой терапии и поддержки в период восстановления. Врачи оценивают состояние, корректируют схему лечения и помогают выстроить понятный план дальнейших шагов.
Получить дополнительную информацию – [url=https://trezviy-gorod.ru/kodirovanie-vivitrolom/]вивитрол кодирование от алкоголизма[/url]
Этот обзор позволяет по-новому взглянуть на вещи, на которые обычно и так смотрят. Мы упоминаем факты, которые мало что меняют, и события, значение которых трудно определить, но они всё равно здесь.
Вот – [url=https://arma-rehab.ru/vyvod-iz-zapoya/]рулетка онлайн[/url]
В материале приведены детали, интересные, но не особенно важные. Мы рассматриваем аспекты, которые сложно назвать существенными, но включили их для большей полноты.
Подробнее читать – [url=https://rostov-narkologiya.ru/ ]лечение covid народными средствами[/url]
Опрятный внешний вид формирует первое мнение о вас.
Он работает на восприятие вас окружающими сразу.
Хорошее самочувствие в своем луке укрепляет вашу уверенность.
Этот подход подчеркивает ваш уровень ответственности и уважение к деталям.
https://r2.balmain1.ru/d6pxdfGzQ8P/
Посредством одежду вы можете проявить свою личность и вкус.
Люди неосознанно воспринимают стильных индивидов как более успешных.
Следовательно, вложения в собственный стиль — это инвестиции в свое успешное будущее.
Такой комплексный подход позволяет не только купировать острые состояния, но и устранить внутренние факторы, провоцирующие развитие зависимости. После стабилизации состояния пациент переходит к этапу психотерапевтической коррекции, направленной на предотвращение рецидивов.
Детальнее – [url=https://narkologicheskaya-klinika-v-ekb16.ru/]наркологическая клиника лечение алкоголизма[/url]
Этот медицинский обзор сосредоточен на последних достижениях, которые оказывают влияние на пациентов и медицинскую практику. Мы разбираем инновационные методы лечения и исследований, акцентируя внимание на их значимости для общественного здоровья. Читатели узнают о свежих данных и их возможном применении.
Детальнее – http://google.ba/url?q=https://spb.alco-centr.ru/lechenie-zavisimosti-ot-stavok
Алкогольная или наркотическая интоксикация — это не просто временное ухудшение самочувствия, а серьёзное медицинское состояние, требующее неотложной помощи. Когда человек находится в запое или состоянии ломки, его организм стремительно теряет силы, нарушается работа сердца, печени, мозга, возникают панические атаки, судороги, спутанность сознания. В таких случаях помощь должна быть незамедлительной. Если пациент не может самостоятельно добраться до клиники, оптимальным решением становится вызов нарколога на дом. В Красногорске такая услуга доступна круглосуточно благодаря выездной службе клиники «Ключ к Здоровью».
Ознакомиться с деталями – https://narcolog-na-dom-v-moskve55.ru/vyzov-narkologa-na-dom-v-krasnogorske
Запой может длиться от нескольких дней до нескольких недель, и с каждым новым днём состояние пациента может ухудшаться. Важно не затягивать с лечением, поскольку алкогольная зависимость способна привести к необратимым изменениям в организме и психике. В Москве лечение проводится не только в клиниках, но и в условиях дома, что позволяет сохранить конфиденциальность.
Ознакомиться с деталями – http://narko-zakodirovat2.ru
Этот подход имеет несколько ключевых преимуществ, которые обеспечивают комфорт, безопасность и эффективность лечения.
Детальнее – http://narcolog-na-dom-moskva55.ru/vyzov-narkologa-na-dom-moskva/https://narcolog-na-dom-moskva55.ru
Длительные запои создают мультисистемный кризис. Обезвоживание и сгущение крови повышают риск образования тромбов, что может привести к инсульту или инфаркту миокарда. Печень и поджелудочная страдают от мощной токсической нагрузки — развивается острый панкреатит, хронический гепатит и жировой гепатоз. Интоксикация нарушает работу ЖКТ: возникает гастрит, язвенная болезнь и риск внутренних кровотечений. Алкоголь разрушает нейронные связи, снижая уровень витамина B1, что может вызвать энцефалопатию Ворника и, в запущенных случаях, корсаковский психоз с необратимыми провалами памяти и когнитивными нарушениями.
Углубиться в тему – [url=https://kapelnica-ot-zapoya-moskva1.ru/]капельница от запоя анонимно в балашихе[/url]
Качественный вывод из запоя — это всегда процесс, а не одна капельница. Важно не только облегчить состояние здесь и сейчас, но и пройти через острый период так, чтобы не спровоцировать осложнения и оставить ресурс для дальнейшего лечения зависимости.
Выяснить больше – [url=https://vyvod-iz-zapoya-ivanteevka11.ru/]vyvod-iz-zapoya-na-domu-cena[/url]
Наркологическая информационная сеть «Narkology» оказывает помощь при сложных стадиях зависимости, включая сопровождение после передозировок. Мы проводим удалённые консультации наркологов, психологов и предоставляем социальные рекомендации по дальнейшей адаптации. Мы гарантируем полную анонимность, внимательное сопровождение и оперативное реагирование на любые запросы клиентов. Наша цель — обеспечить высокоэффективную информационную и психологическую поддержку на всех этапах реабилитации.
Исследовать вопрос подробнее – [url=https://narcologiya.info/alkogolizm/zhizn-posle-lecheniya-alkogolizma-kak-nachat-zanovo-i-postroit-novuyu-zhizn.html]восстановление после алкоголизма препараты[/url]
Большинство семей приходят к мысли о лечении зависимости не сразу. Сначала всё выглядит как «случайные переборы по праздникам», потом алкоголь или наркотики становятся привычным способом снять стресс, забыться, пережить неудачи. Постепенно запои учащаются, человек пропадает на несколько дней, появляются долги, проблемы на работе, конфликты в семье. На этом этапе многим кажется, что обращаться в наркологическую клинику в Лобне ещё рано, что можно «взять себя в руки» и как-то остановиться. Но практика показывает обратное: чем дольше затягивается момент обращения к специалистам, тем тяжелее протекают запои, тем глубже страдает здоровье и тем сложнее вернуть человека к стабильной трезвости.
Выяснить больше – [url=https://narkologicheskaya-klinika-lobnya11.ru/]chastnaya-narkologicheskaya-klinika[/url]
В клинике «Трезвый город» доступна помощь при запое и тяжёлой абстиненции с медицинским наблюдением. Проводится инфузионная терапия, медикаментозная коррекция и восстановление сна, общего самочувствия и вегетативных проявлений.
Детальнее – [url=https://trezviy-gorod.ru/kapelnitsa-ot-zapoya/]капельница от запоя цена[/url]
В данном тексте собраны разнообразные случайные сведения и не вполне определённые идеи, которые могут вызвать интерес. Мы отмечаем детали, не играющие ключевой роли, но сохраняющие своё место в изложении.
Подробнее читать – [url=https://rostov-narkologiya.ru/uslugi-ot-alkogolizma/vyvod-iz-zapoya/]детокс чай для похудения[/url]
Dressing well projects a positive first impression.
A attire communicates loudly before a person actually speak a word.
This enhances your own self-esteem and mindset noticeably.
Your polished look signals professionalism in the workplace.
https://links.sneakero.ru/4b1stxsT/
Stylish clothing allow you to showcase your individual identity.
People often perceive stylish people as more capable and reliable.
Ultimately, investing in your wardrobe is an valuable step in yourself.
Мы не используем универсальные «сильные капельницы». Эффективность даёт точное совпадение с задачей. Ниже — логика выбора профилей и маркеры, на которые мы ориентируемся при контроле эффективности и безопасности.
Узнать больше – [url=https://vivod-iz-zapoya-v-sankt-peterburge16.ru/]нарколог вывод из запоя в санкт-петербурге[/url]
«Трезвый город» — это комплексная наркологическая помощь для взрослых пациентов: от экстренного купирования интоксикации до плановой терапии и поддержки в период восстановления. Врачи оценивают состояние, корректируют схему лечения и помогают выстроить понятный план дальнейших шагов.
Получить больше информации – https://trezviy-gorod.ru/lechenie-alkogolizma-v-stacionare
Запойное состояние опасно не только токсическим воздействием алкоголя на организм, но и последствиями резкого отказа от спиртного. В таких случаях промедление может стоить здоровья. Нарколог на дом в Рязани приезжает по вызову и проводит процедуру прямо в домашних условиях, используя проверенные медицинские методики. Такой подход сочетает анонимность, оперативность и возможность контроля состояния без госпитализации.
Выяснить больше – http://
Dressing stylish creates a positive first impression.
Your attire communicates volumes before you even say a single word.
It enhances your own confidence and mindset noticeably.
A polished look conveys professionalism in the workplace.
https://links.sneakero.ru/wrMtcA7/
Stylish choices allow you to express your unique identity.
People often perceive well-dressed people as more successful and trustworthy.
Ultimately, putting effort in your style is an investment in your personal brand.
В этом материале представлены детали, которые хоть и занимательны, но не особенно значимы. Мы рассматриваем моменты, которые трудно назвать важными, но всё же решили включить их для полноты картины.
Вот – [url=https://arma-rehab.ru/lechenie-alkogolizma/]взрослые игры[/url]
Процесс лечения состоит из нескольких этапов:
Углубиться в тему – http://narko-zakodirovat2.ru
Одним из самых привлекательных аспектов вызова нарколога на дом является гибкость. Вы можете согласовать время визита врача, подходящее именно для вас, включая вечернее или ночное время. Это позволяет совмещать лечение с работой и личными делами, не нарушая привычный ритм жизни.
Подробнее тут – https://narcolog-na-dom-moskva55.ru/vyzov-narkologa-na-dom-moskva
Во многих семьях путь к лечению начинается одинаково: сначала запои или эпизоды употребления воспринимаются как временные «проблемы по жизни», которых стыдно, но которые вроде бы можно переждать. Человек клянётся «завязать после праздников», родственники верят, потом терпят, потом скандалят, затем снова наступают на те же грабли. В какой-то момент становится очевидно, что сила воли больше не работает: попытки прекратить запой заканчиваются тряской, паникой, скачками давления, отсутствием сна, а через несколько дней всё повторяется. Именно тогда наркологическая клиника в Лобне перестаёт быть чем-то абстрактным и превращается в реальную возможность остановить этот круг.
Подробнее – [url=https://narkologicheskaya-klinika-lobnya11-2.ru/]narkologicheskaya-klinika-stacionar[/url]
Санкт-петербургская клиника «Передозировка» специализируется на лечении алкогольной и наркотической зависимости. Здесь выполняют кодирование, проводят медицинское восстановление и обеспечивают психологическую поддержку для закрепления результата.
Получить дополнительные сведения – [url=https://peredozirovka.info/articles/kak-izbezhat-retsidiva-posle-lecheniya-narkomanii/]избежать рецидива[/url]
Кодирование от алкоголизма в Чехове для многих семей становится тем рубежом, после которого зависимость перестаёт казаться «временной слабостью» и начинает восприниматься как диагноз, с которым можно и нужно работать. До этого момента обычно проходят годы: чередуются запои и трезвые периоды, звучат обещания «больше такого не будет», меняются напитки, придумываются правила вроде «пью только по выходным» или «только пиво». Но рано или поздно семья замечает, что именно алкоголь диктует распорядок дня, влияет на настроение, разрушает здоровье и отношения. В этот момент становится очевидно: без сильного внешнего ограничителя и профессиональной помощи просто «взять себя в руки» уже не получается.
Подробнее тут – http://kodirovanie-ot-alkogolizma-chekhov11.ru
Реабилитационные программы в наркологической клинике направлены на нормализацию обменных процессов, восстановление сна, эмоциональной стабильности и когнитивных функций. Для достижения этого используются методы физиотерапии, нутритивной поддержки и коррекции поведения. Основное внимание уделяется мотивации пациента, работе с созависимостью и обучению навыкам здорового взаимодействия с окружающей средой.
Получить дополнительные сведения – http://narkologicheskaya-klinika-v-ekb16.ru/narkologicheskaya-klinika-ekaterinburg-otzyvy/https://narkologicheskaya-klinika-v-ekb16.ru
Данный комплекс мер обеспечивает восстановление здоровья пациента и создает основу для полного выздоровления.
Получить больше информации – http://narcolog-na-dom-msk55.ru/vyzov-narkologa-na-dom-moskva/
В клинике внедрены современные протоколы, основанные на принципах персонализированной медицины. Это позволяет выстраивать терапию с учётом индивидуальных особенностей организма, уровня стресса и социальных факторов, влияющих на процесс выздоровления.
Углубиться в тему – [url=https://narkologicheskaya-klinika-v-ekb16.ru/]наркологические клиники алкоголизм в екатеринбурге[/url]
Запой — это не просто усиленное похмелье, а критическое состояние алкогольной интоксикации, при котором организм оказывается неспособным самостоятельно вывести накопившиеся токсины. При затяжном приёме алкоголя страдает не только печень — нарушаются функции сердечно-сосудистой системы, тормозятся нейрохимические процессы в головном мозге, развивается выраженная дегидратация и электролитный дисбаланс. Первая помощь в такой ситуации — экстренная инфузионная терапия, которую мы проводим в наркологической клинике «Источник Здоровья» в Балашихе.
Узнать больше – [url=https://kapelnica-ot-zapoya-moskva1.ru/]капельница от запоя круглосуточно в балашихе[/url]
Как подчёркивает заведующая кафедрой наркологии РМАНПО Минздрава России, «качество оказания помощи зависит не от количества процедур, а от правильной организации лечебного процесса и квалификации команды». Именно поэтому особенно важно понимать, какие параметры следует учитывать при выборе клиники.
Изучить вопрос глубже – [url=https://narkologicheskaya-klinika-pervouralsk11.ru/]вывод наркологическая клиника первоуральск[/url]
В данном тексте собраны разнообразные случайные сведения и не вполне определённые идеи, которые могут вызвать интерес. Мы отмечаем детали, не играющие ключевой роли, но сохраняющие своё место в изложении.
Подробнее читать – [url=https://rostov-narkologiya.ru/uslugi-ot-alkogolizma/vyvod-iz-zapoya/]похудеть на таблетках[/url]
Путь в наркологическую клинику в Ивантеевке почти всегда начинается с консультации — очной или по телефону. На этом этапе задача врача не осудить и не прочитать нотацию, а максимально точно понять, что происходит: сколько лет длится злоупотребление, как часто бывают запои, были ли попытки лечиться раньше, какие есть хронические болезни, каково текущее физическое и психическое состояние. Собирается анамнез, измеряется давление, оценивается пульс, при необходимости направляют на анализы и дополнительные исследования. Чем честнее и конкретнее человек (или его родственники) описывают ситуацию, тем точнее можно подобрать безопасный план помощи.
Ознакомиться с деталями – http://narkologicheskaya-klinika-ivanteevka11.ru/narkologicheskaya-klinika-reabilitaciya-v-ivanteevke/
На месте врач проводит первичный осмотр, измеряет давление, пульс, сатурацию, оценивает уровень интоксикации и абстиненции. Далее назначается инфузионная терапия — капельница, направленная на дезинтоксикацию, восстановление электролитного баланса, купирование тревожности и нормализацию сна.
Ознакомиться с деталями – [url=https://narcolog-na-dom-v-moskve55.ru/]vyzvat narkologa na dom[/url]
В этой публикации мы обсуждаем современные методы лечения различных заболеваний. Читатели узнают о новых медикаментах, терапиях и исследованиях, которые активно применяются для лечения. Мы нацелены на то, чтобы предоставить практические знания, которые могут помочь в борьбе с недугами.
Углубиться в тему – http://google.gr/url?q=https://spb.alco-centr.ru/himzaschita
Запойное состояние опасно не только токсическим воздействием алкоголя на организм, но и последствиями резкого отказа от спиртного. В таких случаях промедление может стоить здоровья. Нарколог на дом в Рязани приезжает по вызову и проводит процедуру прямо в домашних условиях, используя проверенные медицинские методики. Такой подход сочетает анонимность, оперативность и возможность контроля состояния без госпитализации.
Углубиться в тему – https://narcolog-na-dom-ryazan0.ru/vyvod-iz-zapoya-na-domu-ryazan-czeny
Чем дольше продолжается запой, тем более непредсказуемой становится реакция организма. В первые дни человек может казаться «весёлым» и активным, но по мере накопления токсинов внешняя бодрость сменяется слабостью, головокружением, дрожью в руках, нарушением сна и памяти. Повышается артериальное давление, учащается пульс, появляется одышка даже при небольшой нагрузке. Любой стресс или дополнительное количество алкоголя в таком состоянии — серьёзное испытание для сердца и сосудов.
Получить больше информации – [url=https://vyvod-iz-zapoya-ivanteevka11.ru/]vyvod-iz-zapoya-ivanteevka11.ru/[/url]
Одним из ключевых направлений является проведение капельниц, призванных вывести токсины из организма и нормализовать водно-электролитный баланс. Используемые препараты и состав растворов подбираются индивидуально, исходя из клинической картины и истории болезни пациента.
Углубиться в тему – http://
Запой — это состояние, которое представляет собой одну из самых серьёзных форм алкогольной зависимости. Когда человек теряет способность контролировать употребление алкоголя, его организм подвергается вредному воздействию, которое может вызвать как физические, так и психоэмоциональные осложнения. В Москве есть множество клиник и специалистов, которые предлагают качественную медицинскую помощь, включая анонимное лечение. Этот вариант подходит тем, кто хочет избавиться от зависимости, не раскрывая свою личность и не сталкиваясь с осуждением окружающих.
Подробнее – [url=https://narko-zakodirovat2.ru/]вывод из запоя московская московская область москва[/url]
Алкогольная интоксикация разрушает организм изнутри. В первую очередь страдает центральная нервная система: снижается уровень витаминов группы B, нарушаются когнитивные функции, появляются раздражительность, бессонница, панические атаки. Следом — страдает печень, главный орган метаболической детоксикации. Под действием этанола её функции подавляются, а токсины накапливаются в крови. Это вызывает системное отравление и разрушает внутренние органы.
Подробнее – http://kapelnica-ot-zapoya-msk55.ru/kapelnicy-ot-zapoya-na-domu-v-odincovo/https://kapelnica-ot-zapoya-msk55.ru
Dressing well projects a strong first impression.
Your outfit speaks volumes before a person even speak a single word.
It enhances your own self-esteem and mindset noticeably.
Your put-together appearance signals competence in the workplace.
https://list.megakazan.ru/QvBEgjJAY/
Fashionable clothing let you to express your unique identity.
People often perceive well-dressed individuals as more capable and trustworthy.
Therefore, investing in your style is an investment in yourself.
«Трезвый город» — это комплексная наркологическая помощь для взрослых пациентов: от экстренного купирования интоксикации до плановой терапии и поддержки в период восстановления. Врачи оценивают состояние, корректируют схему лечения и помогают выстроить понятный план дальнейших шагов.
Ознакомиться с деталями – [url=https://trezviy-gorod.ru/narkolog-na-dom/]нарколог на дом[/url]
Стоимость услуг зависит от продолжительности терапии, сложности случая и выбранных процедур. Однако клиника предоставляет гибкую систему оплаты, включая рассрочку и страховое покрытие.
Получить больше информации – [url=https://narkologicheskaya-klinika-v-ryazani12.ru/]наркологическая клиника цены рязань[/url]
Такой комплексный подход позволяет не только купировать острые состояния, но и устранить внутренние факторы, провоцирующие развитие зависимости. После стабилизации состояния пациент переходит к этапу психотерапевтической коррекции, направленной на предотвращение рецидивов.
Подробнее – https://narkologicheskaya-klinika-v-ekb16.ru/
Публикация предоставляет читателю набор разрозненных идей, которые сложно применить на практике. Мы лишь слегка касаемся разных точек зрения, не углубляясь в анализ и не предлагая никаких выводов.
Вот – [url=https://arma-rehab.ru/vyvod-iz-zapoya/]интим услуги[/url]
Этот подход имеет несколько ключевых преимуществ, которые обеспечивают комфорт, безопасность и эффективность лечения.
Получить дополнительные сведения – http://narcolog-na-dom-moskva55.ru/narkolog-na-dom-kruglosutochno-moskva/
Запой может длиться от нескольких дней до нескольких недель, и с каждым новым днём состояние пациента может ухудшаться. Важно не затягивать с лечением, поскольку алкогольная зависимость способна привести к необратимым изменениям в организме и психике. В Москве лечение проводится не только в клиниках, но и в условиях дома, что позволяет сохранить конфиденциальность.
Подробнее тут – http://narko-zakodirovat2.ru/kruglosutochnyj-vyvod-iz-zapoya-v-moskve/
Преимущества вызова нарколога на дом:
Разобраться лучше – http://
Большинство семей приходят к мысли о лечении зависимости не сразу. Сначала всё выглядит как «случайные переборы по праздникам», потом алкоголь или наркотики становятся привычным способом снять стресс, забыться, пережить неудачи. Постепенно запои учащаются, человек пропадает на несколько дней, появляются долги, проблемы на работе, конфликты в семье. На этом этапе многим кажется, что обращаться в наркологическую клинику в Лобне ещё рано, что можно «взять себя в руки» и как-то остановиться. Но практика показывает обратное: чем дольше затягивается момент обращения к специалистам, тем тяжелее протекают запои, тем глубже страдает здоровье и тем сложнее вернуть человека к стабильной трезвости.
Подробнее – https://narkologicheskaya-klinika-lobnya11.ru/narkologicheskaya-klinika-cena-v-lobne/
Процедура вывода из запоя начинается с тщательной диагностики состояния пациента, чтобы определить, какие методы лечения будут наиболее эффективными. Мы применяем индивидуальный подход и комбинируем медикаментозное лечение с психотерапевтической поддержкой, что даёт лучший результат.
Подробнее – [url=https://narcolog-na-dom-novokuznetsk0.ru/]вызов врача нарколога на дом новокузнецк[/url]
Вернуть здоровье и силы за одну процедуру позволяет грамотное сочетание препаратов, подобранное индивидуально под каждого пациента. Врач-нарколог оценивает тяжесть интоксикации, измеряет артериальное давление, пульс и уровень насыщения крови кислородом, а при необходимости назначает экспресс-анализы. На основании этих данных создаётся персональный раствор для инфузии:
Получить дополнительную информацию – http://kapelnica-ot-zapoya-moskva1.ru/kapelnica-ot-zapoya-cena-v-balashihe/
В статье-обзоре представлены данные сомнительной актуальности и факты без явной взаимосвязи. Читатель ознакомится с разными мнениями, хотя они вряд ли существенно изменят его представление о теме.
Подробнее читать – [url=https://rostov-narkologiya.ru/ ]народные средства от диабета[/url]
Одна из главных ошибок — ждать «идеального момента» для лечения. Кажется, что кодирование уместно только тогда, когда зависимость достигла крайней стадии: человек потерял работу, перестал выходить из запоев, полностью разрушил отношения с близкими. На практике обращение в клинику Чехова оправдано гораздо раньше, как только употребление алкоголя перестаёт быть редким эпизодом и начинает системно мешать жить. Если каждый стресс, отпуск или конфликт заканчиваются срывом, если запои становятся длиннее, а похмелье тяжелее, — это уже повод хотя бы обсудить кодирование с врачом, а не ждать, пока ресурс организма будет почти исчерпан.
Получить дополнительную информацию – http://kodirovanie-ot-alkogolizma-chekhov11.ru/kodirovanie-ot-alkogolizma-vyezd-na-dom-v-chekhove/
Капельница от запоя необходима, если у пациента наблюдаются следующие симптомы:
Изучить вопрос глубже – [url=https://kapelnica-ot-zapoya-msk55.ru/]врач на дом капельница от запоя[/url]
Запой почти никогда не начинается внезапно: сначала это редкие «переборы» по праздникам, потом привычка снимать стресс вечером, а дальше алкоголь всё чаще появляется в распорядке дня. В какой-то момент близкие замечают, что человек уже не контролирует количество, выпивка идёт несколько дней подряд, отменяются дела, нарушается сон, пропадает аппетит, появляются дрожь, потливость, скачки давления. На этом этапе вывод из запоя в Ивантеевке уже не может быть простым «проспаться и прийти в себя» — организму нужна полноценная медицинская помощь.
Разобраться лучше – https://vyvod-iz-zapoya-ivanteevka11.ru/vyvod-iz-zapoya-na-domu-v-ivanteevke/
В материале приведены детали, интересные, но не особенно важные. Мы рассматриваем аспекты, которые сложно назвать существенными, но включили их для большей полноты.
Подробнее читать – [url=https://rostov-narkologiya.ru/uslugi-ot-alkogolizma/vyvod-iz-zapoya/]кето диета за неделю минус 10 кг[/url]
Дополнительно усиливаются сердечно-сосудистые риски: густая кровь, дефицит калия и магния провоцируют тахикардию, скачки давления и повышают вероятность инфаркта или инсульта. На этом фоне даже простая головная боль может оказаться сигналом серьёзного сосудистого нарушения. Задача капельницы — не просто убрать симптомы, а стабилизировать состояние организма и предотвратить дальнейшее ухудшение.
Получить дополнительные сведения – http://kapelnica-ot-zapoya-msk55.ru
Запой — это не просто длительное употребление алкоголя, а тяжелое состояние, когда организм перестает функционировать нормально без постоянного поступления этанола. При запое происходит накопление токсинов, что ведет к нарушению работы внутренних органов и сильному ослаблению иммунной системы. Пациенты часто испытывают невыносимые физические и психические страдания, а попытки самостоятельно выйти из запоя только усугубляют ситуацию.
Выяснить больше – [url=https://vyvod-iz-zapoya-krasnoyarsk0.ru/]вывод из запоя с выездом красноярск[/url]
Эффективная капельница должна включать несколько компонентов, каждый из которых направлен на решение конкретной задачи: выведение токсинов, восстановление функций организма, нормализация психоэмоционального состояния.
Подробнее – [url=https://kapelnicza-ot-zapoya-pervouralsk11.ru/]вызвать капельницу от запоя на дому в первоуральске[/url]
Наркологический центр «Еваклиник» в Саранске предоставляет профессиональную помощь людям, столкнувшимся с алкогольной и наркотической зависимостью. Лечение начинается с медицинской стабилизации и детоксикации, после чего подбирается индивидуальная программа восстановления. Комплексный подход и постоянный контроль специалистов позволяют безопасно пройти сложный этап отказа от психоактивных веществ.
Получить дополнительные сведения – [url=https://evaclinica.ru/blog/sozavisimost-kogda-lyubov-stanovitsya-tyurmoj.html]что такое созависимость[/url]
В этом обзоре представлены различные методы избавления от зависимости, включая терапевтические и психологические подходы. Мы сравниваем их эффективность и предоставляем рекомендации для тех, кто хочет вернуться к трезвой жизни. Читатели смогут найти информацию о реабилитационных центрах и поддерживающих группах.
Разобраться лучше – http://google.co.mz/url?sa=t&url=https://spb.alco-centr.ru/vshivanie-ampuly
В центре «Передозировка» в Санкт-Петербурге применяют комплексный подход: лечение наркомании, терапия алкогольной зависимости, индивидуальное кодирование и восстановительные программы. Такой формат обеспечивает надёжный результат и поддержку на всех этапах.
Подробнее – https://peredozirovka.info/service/vyvod-iz-zapoya
Наркологическая информационная сеть «Narkology» предлагает профессиональную помощь в преодолении зависимостей и восстановлении психоэмоционального равновесия. Наши эксперты проводят комплексную диагностику, разрабатывают индивидуальные программы лечения и предоставляют всестороннюю психологическую поддержку. Мы используем новейшие методики и актуальные подходы, чтобы помочь вам вернуть уверенность в себе и начать путь к здоровью. Доверьтесь профессионалам «Narkology», и мы окажем всю необходимую информационную помощь на пути к выздоровлению.
Получить больше информации – [url=https://narcologiya.info/narkomaniya/pentobarbital-opasnoe-snotvornoe-sredstvo-skrytye-ugrozy-i-sovremennye-realii.html]пентобарбитал дозы[/url]
Одним из ключевых этапов терапии является медикаментозное устранение абстинентного синдрома, что значительно облегчает состояние пациента. Для этого используются препараты, рекомендованные к применению ведущими специалистами в области наркологии. Примером могут служить протоколы лечения, описанные на официальном портале наркологической помощи России.
Углубиться в тему – https://narkologicheskaya-klinika-kamensk-uralskij11.ru/anonimnaya-narkologicheskaya-klinika-v-kamensk-uralskom/
На фоне длительных запоев страдает не только физическое состояние. Обостряются тревога, раздражительность, обидчивость, возможны вспышки агрессии и неадекватные поступки. Для семьи это превращается в постоянное напряжение: никто не знает, чем закончится очередной день или ночь. Одновременно растёт риск психозов, когда человек может видеть и слышать то, чего нет на самом деле, путать реальность, быть опасным для себя и окружающих.
Изучить вопрос глубже – [url=https://vyvod-iz-zapoya-ivanteevka11.ru/]вывод из запоя на дому цена[/url]
Алкогольная интоксикация разрушает организм изнутри. В первую очередь страдает центральная нервная система: снижается уровень витаминов группы B, нарушаются когнитивные функции, появляются раздражительность, бессонница, панические атаки. Следом — страдает печень, главный орган метаболической детоксикации. Под действием этанола её функции подавляются, а токсины накапливаются в крови. Это вызывает системное отравление и разрушает внутренние органы.
Ознакомиться с деталями – http://kapelnica-ot-zapoya-msk55.ru
Современная наркологическая клиника в Мурманске специализируется на комплексном лечении алкогольной, наркотической и других видов зависимости. В условиях МедЦентр Арктика используются проверенные методы диагностики и терапии, позволяющие достичь устойчивой ремиссии и восстановить качество жизни пациента.
Детальнее – https://narkologicheskaya-klinika-v-murmanske12.ru/narkologicheskaya-klinika-klinika-pomoshh-v-murmanske/
На сайте Минздрава указаны общие клинические рекомендации по выведению из запоя, включая допустимые дозировки и протоколы лечения.
Подробнее можно узнать тут – [url=https://vyvod-iz-zapoya-v-ryazani12.ru/]вывод из запоя капельница рязань[/url]
Наши врачи оперативно приезжают к пациенту, проводят осмотр, купируют симптомы абстиненции и приступают к восстановлению жизненно важных функций. Всё это — в привычной для пациента обстановке, без стресса и лишней огласки. Мы обеспечиваем не только медицинскую помощь, но и эмоциональную поддержку, создавая условия для начала пути к выздоровлению.
Подробнее – https://narcolog-na-dom-v-moskve55.ru/
Запой — это не просто следствие чрезмерного употребления алкоголя, а серьёзное патологическое состояние, которое требует срочной медицинской помощи. На фоне затяжного приёма спиртного в организме человека происходят опасные изменения: интоксикация, обезвоживание, нарушение электролитного баланса, резкие скачки давления и работы сердца, угнетение функций печени и мозга. В такой ситуации капельница от запоя становится неотложной мерой, позволяющей стабилизировать состояние и устранить симптомы абстиненции за короткий срок.
Подробнее – [url=https://kapelnica-ot-zapoya-msk55.ru/]капельница от запоя вызов город[/url]
Для многих пациентов важным моментом является сохранение конфиденциальности. Врач, приехавший на дом, работает с полной защитой данных. Пациент может быть уверен, что его проблема останется личной и не станет достоянием общественности. Врачи приезжают на неприметных автомобилях и избегают всяческих ситуаций, которые могут привлечь лишнее внимание.
Изучить вопрос глубже – http://
Большинство семей приходят к мысли о лечении зависимости не сразу. Сначала всё выглядит как «случайные переборы по праздникам», потом алкоголь или наркотики становятся привычным способом снять стресс, забыться, пережить неудачи. Постепенно запои учащаются, человек пропадает на несколько дней, появляются долги, проблемы на работе, конфликты в семье. На этом этапе многим кажется, что обращаться в наркологическую клинику в Лобне ещё рано, что можно «взять себя в руки» и как-то остановиться. Но практика показывает обратное: чем дольше затягивается момент обращения к специалистам, тем тяжелее протекают запои, тем глубже страдает здоровье и тем сложнее вернуть человека к стабильной трезвости.
Подробнее можно узнать тут – [url=https://narkologicheskaya-klinika-lobnya11.ru/]наркологическая клиника лобня[/url]
В ходе процедуры врач контролирует жизненные показатели пациента, корректирует состав раствора при необходимости и оказывает дополнительную поддержку. После завершения капельницы часто назначается курс восстановительной терапии, направленный на стабилизацию функций организма.
Подробнее тут – [url=https://kapelnicza-ot-zapoya-v-murmanske12.ru/]капельница от запоя мурманск[/url]
Одним из самых привлекательных аспектов вызова нарколога на дом является гибкость. Вы можете согласовать время визита врача, подходящее именно для вас, включая вечернее или ночное время. Это позволяет совмещать лечение с работой и личными делами, не нарушая привычный ритм жизни.
Детальнее – [url=https://narcolog-na-dom-moskva55.ru/]narkolog na dom kruglosutochno[/url]
Запой — это не просто следствие чрезмерного употребления алкоголя, а серьёзное патологическое состояние, которое требует срочной медицинской помощи. На фоне затяжного приёма спиртного в организме человека происходят опасные изменения: интоксикация, обезвоживание, нарушение электролитного баланса, резкие скачки давления и работы сердца, угнетение функций печени и мозга. В такой ситуации капельница от запоя становится неотложной мерой, позволяющей стабилизировать состояние и устранить симптомы абстиненции за короткий срок.
Подробнее – https://kapelnica-ot-zapoya-msk55.ru/kapelnica-ot-zapoya-cena-v-odincovo
Эффективное лечение требует поэтапного подхода, который реализуется следующим образом:
Подробнее можно узнать тут – [url=https://narkologicheskaya-klinika-v-ryazani12.ru/]наркологическая клиника в рязани[/url]
Клиника «Семья и Здоровье» предлагает комплексное лечение на дому, что позволяет избежать стрессов, связанных с госпитализацией, и получить квалифицированную помощь в привычной обстановке. Наши специалисты работают круглосуточно, приезжают в течение 30–60 минут и проводят полный спектр процедур для восстановления здоровья.
Получить дополнительную информацию – [url=https://vyvod-iz-zapoya-krasnoyarsk0.ru/]вывод из запоя на дому цена[/url]
В «Трезвом городе» помогают при последствиях употребления: тревожность, бессонница, тремор, нарушения аппетита и скачки давления требуют грамотной медицинской коррекции. После стабилизации пациенту объясняют риски и предлагают план профилактики срыва.
Подробнее тут – [url=https://trezviy-gorod.ru/kodirovanie-ot-alkogolizma-akvilong/]аквилонг препарат кодирование[/url]
Запой — это не просто усиленное похмелье, а критическое состояние алкогольной интоксикации, при котором организм оказывается неспособным самостоятельно вывести накопившиеся токсины. При затяжном приёме алкоголя страдает не только печень — нарушаются функции сердечно-сосудистой системы, тормозятся нейрохимические процессы в головном мозге, развивается выраженная дегидратация и электролитный дисбаланс. Первая помощь в такой ситуации — экстренная инфузионная терапия, которую мы проводим в наркологической клинике «Источник Здоровья» в Балашихе.
Разобраться лучше – [url=https://kapelnica-ot-zapoya-moskva1.ru/]капельница от запоя стоимость[/url]
Публикация предоставляет читателю набор разрозненных идей, которые сложно применить на практике. Мы лишь слегка касаемся разных точек зрения, не углубляясь в анализ и не предлагая никаких выводов.
Вот – [url=https://arma-rehab.ru/vyvod-iz-zapoya/]взрослые игры[/url]
Компоненты
Подробнее тут – [url=https://kapelnicza-ot-zapoya-pervouralsk11.ru/]вызвать капельницу от запоя на дому в первоуральске[/url]
Психотерапевтическое кодирование делает акцент на внутренней мотивации. Специалист помогает человеку увидеть реальную цену алкоголя в его жизни, понять, как именно употребление разрушает здоровье, семью, карьеру, и сформировать установку на трезвость на определённый срок. Используются техники внушения в состоянии расслабления и структурированная работа с убеждениями и привычками. Такой подход особенно полезен тем, кто боится «лекарственного вмешательства» или уже имеет негативный опыт неудачных медикаментозных попыток. В практике лечения в Чехове часто используются комбинированные схемы, когда медикаментозный барьер подкрепляется психотерапевтической поддержкой, а результат кодирования закрепляется за счёт изменения образа жизни и участия в реабилитационных программах.
Детальнее – [url=https://kodirovanie-ot-alkogolizma-chekhov11.ru/]кодировка от алкоголя[/url]
Такой порядок действий гарантирует не только купирование симптомов, но и подготовку пациента к последующему восстановлению.
Подробнее можно узнать тут – [url=https://narcolog-na-dom-ryazan0.ru/]нарколог на дом цены[/url]
Как поясняет медицинский психолог Елена Мусатова, «пациенту важно доверять специалисту, понимать его подход и чувствовать профессиональную уверенность ещё на этапе первичного осмотра».
Выяснить больше – [url=https://narkologicheskaya-klinika-pervouralsk11.ru/]наркологическая клиника лечение алкоголизма первоуральск[/url]
Длительные запои создают мультисистемный кризис. Обезвоживание и сгущение крови повышают риск образования тромбов, что может привести к инсульту или инфаркту миокарда. Печень и поджелудочная страдают от мощной токсической нагрузки — развивается острый панкреатит, хронический гепатит и жировой гепатоз. Интоксикация нарушает работу ЖКТ: возникает гастрит, язвенная болезнь и риск внутренних кровотечений. Алкоголь разрушает нейронные связи, снижая уровень витамина B1, что может вызвать энцефалопатию Ворника и, в запущенных случаях, корсаковский психоз с необратимыми провалами памяти и когнитивными нарушениями.
Исследовать вопрос подробнее – [url=https://kapelnica-ot-zapoya-moskva1.ru/]сколько стоит капельница на дому от запоя балашиха[/url]
Платная наркологическая клиника «Трезвый город» предлагает лечение в комфортных условиях и с соблюдением медицинской этики. Специалисты помогают снять острые симптомы, снизить тягу и подготовить пациента к следующему этапу — реабилитации или амбулаторному сопровождению.
Выяснить больше – [url=https://trezviy-gorod.ru/stati/kak-vyvesti-iz-zapoya-v-domashnikh-usloviyakh.html]как выводить из запоя в домашних условиях[/url]
Эта статья подробно расскажет о процессе выздоровления, который включает в себя эмоциональную, физическую и психологическую реабилитацию. Мы обсуждаем значимость поддержки и наличие профессиональных программ. Читатели узнают, как строить новую жизнь и не возвращаться к старым привычкам.
Исследовать вопрос подробнее – https://www.xcelenergy.com/stateselector?stateselected=true&goto=https://spb.alco-centr.ru/kodirovanie-disulfiramom
Нарколог на дому проводит тщательный осмотр, собирает анамнез и назначает необходимые лабораторные исследования. Это позволяет выявить сопутствующие патологии и скорректировать тактику лечения.
Подробнее тут – [url=https://narkolog-na-dom-v-yaroslavle12.ru/]выезд нарколога на дом[/url]
После детоксикации важна реабилитация, включающая психологическую помощь. Используются различные виды психотерапии, в том числе когнитивно-поведенческая терапия и мотивационное интервьюирование. Это помогает пациентам не только избавиться от зависимости, но и адаптироваться к жизни вне клиники. Подробнее о методах психотерапии можно узнать на ресурсе психологической помощи.
Получить дополнительные сведения – [url=https://narkologicheskaya-klinika-kamensk-uralskij11.ru/]наркологическая клиника наркологический центр каменск-уральский[/url]
Для успешного лечения зависимости необходима тщательная диагностика. В клинике проводят полное обследование пациента, включающее:
Получить дополнительные сведения – [url=https://narkologicheskaya-klinika-v-murmanske12.ru/]бесплатная наркологическая клиника[/url]
Этот подход имеет несколько ключевых преимуществ, которые обеспечивают комфорт, безопасность и эффективность лечения.
Исследовать вопрос подробнее – https://narcolog-na-dom-moskva55.ru/narkolog-na-dom-moskva-tseny
Как подчёркивает врач-нарколог И.В. Синицин, «современная наркология — это не только вывод из запоя, но и работа с глубинными причинами зависимости».
Исследовать вопрос подробнее – http://narkologicheskaya-klinika-v-yaroslavle12.ru/narkologicheskaya-klinika-telefon-v-yaroslavle/https://narkologicheskaya-klinika-v-yaroslavle12.ru
выполнение курсовых работ [url=https://kupit-kursovuyu-63.ru/]выполнение курсовых работ[/url] .
После принятия решения организуется либо выезд, либо госпитализация. На приёме проводится осмотр: измеряется давление, пульс, оценивается степень обезвоживания, выраженность тремора, тревоги, нарушений сна. Выясняются сопутствующие болезни и лекарства, которые человек принимает постоянно. Уже на этом этапе обсуждаются ближайшие шаги — объём детокса, необходимость круглосуточного наблюдения, примерные сроки стабилизации. Родным объясняют, чего ожидать в первые сутки, какие симптомы будут уменьшаться постепенно, а какие требуют немедленного информирования персонала.
Получить дополнительную информацию – [url=https://narkologicheskaya-klinika-lobnya11-2.ru/]наркологическая клиника обратный звонок[/url]
Для вызова специалиста необходимо позвонить на горячую линию или оставить заявку через официальный сайт, например, на портале государственных услуг. Специалист приедет в оговоренное время, обеспечив полную анонимность и соблюдение медицинской тайны.
Разобраться лучше – [url=https://narkolog-na-dom-kamensk-uralskij11.ru/]вызвать нарколога на дом срочно[/url]
Клинические протоколы стационарной терапии рекомендуют госпитализацию при средней и тяжёлой степени интоксикации.
Получить дополнительные сведения – [url=https://vyvod-iz-zapoya-v-ryazani12.ru/]вывод из запоя анонимно в рязани[/url]
В ходе процедуры врач контролирует жизненные показатели пациента, корректирует состав раствора при необходимости и оказывает дополнительную поддержку. После завершения капельницы часто назначается курс восстановительной терапии, направленный на стабилизацию функций организма.
Исследовать вопрос подробнее – https://kapelnicza-ot-zapoya-v-murmanske12.ru/kapelniczy-ot-zapoya-na-domu-v-murmanske
Процедура вывода из запоя состоит из нескольких этапов, включающих:
Получить дополнительные сведения – https://vyvod-iz-zapoya-nizhnij-tagil11.ru/vyvod-iz-zapoya-czena-v-nizhnem-tagile
В статье-обзоре представлены данные сомнительной актуальности и факты без явной взаимосвязи. Читатель ознакомится с разными мнениями, хотя они вряд ли существенно изменят его представление о теме.
Подробнее читать – [url=https://rostov-narkologiya.ru/ ]детокс чай для похудения[/url]
В Мурманске востребована услуга вызова нарколога на дом для вывода из запоя. Такой подход позволяет провести необходимые процедуры в комфортных условиях, без лишнего стресса для пациента. Врач приезжает с полным набором медикаментов и оборудования, что обеспечивает полноценный и своевременный уход.
Получить дополнительные сведения – [url=https://vyvod-iz-zapoya-v-murmanske12.ru/]вывод из запоя круглосуточно[/url]
Возможность назначить визит специалиста в наиболее удобное время. Это позволяет эффективно совмещать лечение с работой и повседневными делами. Такая гибкость помогает пациентам своевременно начать терапию, не откладывая ее из-за занятости. При необходимости врач может приехать в вечернее время или выходные дни.
Узнать больше – https://narcolog-na-dom-msk55.ru/narkolog-na-dom-kruglosutochno-moskva
После купирования острой фазы мы предлагаем полное сопровождение на этапе восстановления, чтобы закрепить результаты и снизить риск повторных срывов. В первые дни показаны сеансы кислородной терапии, которые активизируют клеточный обмен и способствуют быстрейшему выведению остатков токсинов. Параллельно проводятся физиотерапевтические процедуры — магнитотерапия и лазерная стимуляция, укрепляющие сосудистую стенку и ускоряющие заживление микроциркуляторных нарушений.
Подробнее – http://
Алкогольная интоксикация разрушает организм изнутри. В первую очередь страдает центральная нервная система: снижается уровень витаминов группы B, нарушаются когнитивные функции, появляются раздражительность, бессонница, панические атаки. Следом — страдает печень, главный орган метаболической детоксикации. Под действием этанола её функции подавляются, а токсины накапливаются в крови. Это вызывает системное отравление и разрушает внутренние органы.
Получить дополнительные сведения – [url=https://kapelnica-ot-zapoya-msk55.ru/]сколько стоит капельница на дому от запоя одинцово[/url]
В статье представлены ключевые моменты по актуальной теме, дополненные советами экспертов и ссылками на дополнительные ресурсы. Цель материала — дать читателю инструменты для самостоятельного развития и принятия осознанных решений.
Изучить материалы по теме – https://www.weddinginfrance.fr/fr/product/card-holder
Такая структура позволяет подбирать формат помощи под конкретную ситуацию, а не подгонять всех пациентов под один шаблон. Для кого-то будет достаточно короткого стационарного курса и последующего амбулаторного наблюдения, кому-то потребуется длительная реабилитация и плотная работа с семьёй, а кому-то — мягкая поддержка на ранней стадии зависимости, пока заболевание ещё не успело разрушить жизнь.
Получить дополнительную информацию – [url=https://narkologicheskaya-klinika-lobnya11.ru/]клиника наркологической помощи[/url]
Эта познавательная публикация погружает вас в море интересного контента, который быстро захватит ваше внимание. Мы рассмотрим важные аспекты темы и предоставим вам уникальные Insights и полезные сведения для дальнейшего изучения.
Только факты! – https://www.olern.com/branch-vs-franchise-key-differences-explained
Наши врачи оперативно приезжают к пациенту, проводят осмотр, купируют симптомы абстиненции и приступают к восстановлению жизненно важных функций. Всё это — в привычной для пациента обстановке, без стресса и лишней огласки. Мы обеспечиваем не только медицинскую помощь, но и эмоциональную поддержку, создавая условия для начала пути к выздоровлению.
Узнать больше – [url=https://narcolog-na-dom-v-moskve55.ru/]vyzvat narkologa na dom[/url]
Наркологическая помощь — это не «последний шанс для безнадёжных», а нормальный медицинский шаг, такой же логичный, как визит к кардиологу при проблемах с сердцем или к эндокринологу при сахарном диабете. В клинике в Лобне зависимость рассматривают как заболевание, а не как «слабость характера», и помогают человеку пройти весь путь — от детоксикации и вывода из запоя до реабилитации и профилактики срывов. Обращение на более раннем этапе даёт важное преимущество: организм ещё способен восстанавливаться, психика не разрушена окончательно, социальные связи не разорваны. Это значит, что лечение может быть мягче, программа — гибче, а шансы на устойчивый результат — выше.
Разобраться лучше – [url=https://narkologicheskaya-klinika-lobnya11.ru/]chastnaya-narkologicheskaya-klinika[/url]
В этой статье-обзоре мы соберем актуальную информацию и интересные факты, которые освещают важные темы. Читатели смогут ознакомиться с различными мнениями и подходами, что позволит им расширить кругозор и глубже понять обсуждаемые вопросы.
Узнать из первых рук – http://www.jazmocrochet.still.id.au/other-cool-things/starbug
Частный реабилитационный центр «Еваклиник» в Саранске предлагает поэтапные программы лечения зависимости с медицинским сопровождением. Специалисты центра работают над устранением последствий употребления, нормализацией психоэмоционального состояния и адаптацией к жизни без зависимости. Такой подход снижает вероятность рецидивов и способствует долгосрочному восстановлению.
Подробнее тут – [url=https://evaclinica.ru/blog/plazmaferez-pokazaniya-metodika-i-ehffektivnost.html]плазмаферез цена[/url]
Этот текст содержит различную информацию, которая, возможно, покажется любопытной, но в целом не меняет восприятия привычных вещей. Предлагаем просто получить удовольствие от чтения, не ожидая особой пользы.
Вот – [url=https://arma-rehab.ru/vyvod-iz-zapoya/]секс чат[/url]
Эта статья погружает вас в увлекательный мир знаний, где каждый факт становится открытием. Мы расскажем о ключевых исторических поворотных моментах и научных прорывах, которые изменили ход цивилизации. Поймите, как прошлое формирует настоящее и как его уроки могут помочь нам строить будущее.
Уточнить детали – https://courageouswebdesign.com/barber/2023/11/14/buzz-to-dapper-transformations-in-the-barbers-chair
Этот информационный материал собраны данные, которые помогут лучше понять текущие тенденции и процессы в различных сферах жизни. Мы предоставляем четкий анализ, графики и примеры, чтобы информация была не только понятной, но и практичной для принятия решений.
Полная информация здесь – https://www.rongu-bio.com/news/20230530
Наркологическая клиника «Передозировка» в Санкт-Петербурге оказывает комплексную помощь людям с зависимостью. Здесь проводят лечение алкоголизма и наркомании, применяют современные методы кодирования и обеспечивают сопровождение пациента до полного восстановления.
Исследовать вопрос подробнее – https://peredozirovka.info/articles/prichiny-alkogolnoy-epilepsii
Эта информационная статья охватывает широкий спектр актуальных тем и вопросов. Мы стремимся осветить ключевые факты и события с ясностью и простотой, чтобы каждый читатель мог извлечь из нее полезные знания и полезные инсайты.
Осуществить глубокий анализ – http://spassdelo.ru/hram-sviatoy-alli-gotskoi-uspeshno-prov/6s1o-lkykgy
Эта информационная статья охватывает широкий спектр актуальных тем и вопросов. Мы стремимся осветить ключевые факты и события с ясностью и простотой, чтобы каждый читатель мог извлечь из нее полезные знания и полезные инсайты.
Продолжить изучение – http://www.alexander6.ru/1923
Эта статья погружает вас в увлекательный мир знаний, где каждый факт становится открытием. Мы расскажем о ключевых исторических поворотных моментах и научных прорывах, которые изменили ход цивилизации. Поймите, как прошлое формирует настоящее и как его уроки могут помочь нам строить будущее.
Подробности по ссылке – http://bajkoweogrody.waw.pl/a-post-with-a-right-aligned-image
Эта статья погружает вас в увлекательный мир знаний, где каждый факт становится открытием. Мы расскажем о ключевых исторических поворотных моментах и научных прорывах, которые изменили ход цивилизации. Поймите, как прошлое формирует настоящее и как его уроки могут помочь нам строить будущее.
Читать далее > – https://www.agriculture.gov.zm/2025/08/zambia-seeks-more-climate-resilient-finance-for-small-holder-farmers
Медикаментозная детоксикация — это первый и самый важный этап в лечении запоя. В этот момент из организма выводятся все вредные вещества, которые накопились за время алкоголизма. В Москве применяются эффективные и безопасные методы очистки, которые проводятся под контролем опытных специалистов.
Изучить вопрос глубже – https://narko-zakodirovat2.ru/vyvod-iz-zapoya-v-staczionare-moskva/
Клиника «Передозировка» в Санкт-Петербурге предоставляет профессиональную помощь при зависимостях. Пациенты получают лечение алкоголизма и наркомании, проходят кодирование и реабилитацию, что способствует устойчивому возвращению к нормальной жизни.
Подробнее можно узнать тут – [url=https://peredozirovka.info/articles/opiaty-i-opioidy/]опиоиды[/url]
Этот интересный отчет представляет собой сборник полезных фактов, касающихся актуальных тем. Мы проанализируем данные, чтобы вы могли сделать обоснованные выводы. Читайте, чтобы узнать больше о последних трендах и значимых событиях!
Читать дальше – http://www.alexander6.ru/497820
Психотерапевтическое кодирование делает акцент на внутренней мотивации. Специалист помогает человеку увидеть реальную цену алкоголя в его жизни, понять, как именно употребление разрушает здоровье, семью, карьеру, и сформировать установку на трезвость на определённый срок. Используются техники внушения в состоянии расслабления и структурированная работа с убеждениями и привычками. Такой подход особенно полезен тем, кто боится «лекарственного вмешательства» или уже имеет негативный опыт неудачных медикаментозных попыток. В практике лечения в Чехове часто используются комбинированные схемы, когда медикаментозный барьер подкрепляется психотерапевтической поддержкой, а результат кодирования закрепляется за счёт изменения образа жизни и участия в реабилитационных программах.
Получить больше информации – [url=https://kodirovanie-ot-alkogolizma-chekhov11.ru/]kodirovanie-ot-alkogolizma-v-chekhove[/url]
Этот информационный обзор станет отличным путеводителем по актуальным темам, объединяющим важные факты и мнения экспертов. Мы исследуем ключевые идеи и представляем их в доступной форме для более глубокого понимания. Читайте, чтобы оставаться в курсе событий!
Обратиться к источнику – https://demo.bitobee.com/2025/04/16/1xbet-aebyi-coesin-eobdeiteu-mic-gineung
Looking well creates a positive first impression.
A outfit speaks volumes before a person even speak a word.
It boosts your own confidence and mood significantly.
Your put-together appearance signals competence in the workplace.
https://s2.superlooks.ru/gNfIoji/
Fashionable clothing let you to express your individual identity.
Others often judge well-dressed people as more capable and trustworthy.
Therefore, putting effort in your wardrobe is an valuable step in your personal brand.
Публикация приглашает вас исследовать неизведанное — от древних тайн до современных достижений науки. Вы узнаете, как случайные находки превращались в революции, а смелые мысли — в новые эры человеческого прогресса.
Получить дополнительные сведения – http://tprf.org.ua/v-yazane-palto-komfortno-i-nedorogo.htm
Большинство семей приходят к мысли о лечении зависимости не сразу. Сначала всё выглядит как «случайные переборы по праздникам», потом алкоголь или наркотики становятся привычным способом снять стресс, забыться, пережить неудачи. Постепенно запои учащаются, человек пропадает на несколько дней, появляются долги, проблемы на работе, конфликты в семье. На этом этапе многим кажется, что обращаться в наркологическую клинику в Лобне ещё рано, что можно «взять себя в руки» и как-то остановиться. Но практика показывает обратное: чем дольше затягивается момент обращения к специалистам, тем тяжелее протекают запои, тем глубже страдает здоровье и тем сложнее вернуть человека к стабильной трезвости.
Узнать больше – https://narkologicheskaya-klinika-lobnya11.ru/
Эта статья сочетает познавательный и занимательный контент, что делает ее идеальной для любителей глубоких исследований. Мы рассмотрим увлекательные аспекты различных тем и предоставим вам новые знания, которые могут оказаться полезными в будущем.
Интересует подробная информация – https://bersatunews.com/index.php/2023/08/21/chat-gpt-mengantisipasi-kebangkrutan
В этом обзорном материале представлены увлекательные детали, которые находят отражение в различных аспектах жизни. Мы исследуем непонятные и интересные моменты, позволяя читателю увидеть картину целиком. Погрузитесь в мир знаний и удивительных открытий!
Получить больше информации – https://www.sfhha.com/product/karton
Статья знакомит с важнейшими моментами, которые сформировали наше общество. От великих изобретений до культурных переворотов — вы узнаете, как прошлое влияет на наше мышление, технологии и образ жизни.
Эксклюзивная информация – https://seitai3.net/%E8%80%B3%E3%83%84%E3%83%9C%E3%83%80%E3%82%A4%E3%82%A8%E3%83%83%E3%83%88%EF%BC%88%E8%80%B3%E3%81%A4%E3%81%BC%E3%83%80%E3%82%A4%E3%82%A8%E3%83%83%E3%83%88%EF%BC%89/1088
В этой публикации мы предлагаем подробные объяснения по актуальным вопросам, чтобы помочь читателям глубже понять их. Четкость и структурированность материала сделают его удобным для усвоения и применения в повседневной жизни.
Узнать больше – https://pps.iainkendari.ac.id/2017/10/undangan-ujian-hasil-tesis-sdra-rasmang-prodi-mpi
Эта информационная заметка предлагает лаконичное и четкое освещение актуальных вопросов. Здесь вы найдете ключевые факты и основную информацию по теме, которые помогут вам сформировать собственное мнение и повысить уровень осведомленности.
Это ещё не всё… – http://tnfs.edu.rs/sample-page/wp1936504-nikola-tesla-wallpapers
Предлагаем вашему вниманию интересную справочную статью, в которой собраны ключевые моменты и нюансы по актуальным вопросам. Эта информация будет полезна как для профессионалов, так и для тех, кто только начинает изучать тему. Узнайте ответы на важные вопросы и расширьте свои знания!
См. подробности – https://bco-integrity.pl/aktualnosci/compliance-officer-w-strukturach-organizacji
В этой публикации мы предлагаем подробные объяснения по актуальным вопросам, чтобы помочь читателям глубже понять их. Четкость и структурированность материала сделают его удобным для усвоения и применения в повседневной жизни.
Практические советы ждут тебя – https://revistaelastillero.com/un-plan-desarticulado-evaluacion-del-programa-nacional-de-entrega-voluntaria-de-armas-de-fuego-por-adan-egmont
Этот информативный текст отличается привлекательным содержанием и актуальными данными. Мы предлагаем читателям взглянуть на привычные вещи под новым углом, предоставляя интересный и доступный материал. Получите удовольствие от чтения и расширьте кругозор!
Познакомиться с результатами исследований – https://fotomatrix.ru/iimgn/aHR0cHM6Ly9zcGljZXNoYW5vaS5jb20vdGhlLXBhc3RyeS1kZXBhcnRtZW50Lw
В данной обзорной статье представлены интригующие факты, которые не оставят вас равнодушными. Мы критикуем и анализируем события, которые изменили наше восприятие мира. Узнайте, что стоит за новыми открытиями и как они могут изменить ваше восприятие реальности.
Лучшее решение — прямо здесь – https://skydigital.co.za/2019/01/07/hello-world-2-3
В этой статье представлен занимательный и актуальный контент, который заставит вас задуматься. Мы обсуждаем насущные вопросы и проблемы, а также освещаем истории, которые вдохновляют на действия и изменения. Узнайте, что стоит за событиями нашего времени!
Есть чему поучиться – http://student.ans.org/chattanooga/?p=42
В статье представлены ключевые моменты по актуальной теме, дополненные советами экспертов и ссылками на дополнительные ресурсы. Цель материала — дать читателю инструменты для самостоятельного развития и принятия осознанных решений.
Исследовать вопрос подробнее – https://www.vire.usi.ch/booktimeline_book_3
Публикация предлагает читателю не просто информацию, а инструменты для анализа и саморазвития. Мы стимулируем критическое мышление, предлагая различные точки зрения и призывая к самостоятельному поиску решений.
Подробности по ссылке – https://thejupiterfoundation.org/tuesday-23-01-2020-guru-ka-langar-seva/?partial-prev=1
В этом интересном тексте собраны обширные сведения, которые помогут вам понять различные аспекты обсуждаемой темы. Мы разбираем детали и факты, делая акцент на важности каждого элемента. Не упустите возможность расширить свои знания и взглянуть на мир по-новому!
Нажмите, чтобы узнать больше – https://mikisuta.com/2020/07/19/%E6%97%A5%E6%9C%AC%E5%A5%B3%E5%AD%90%E3%83%97%E3%83%AD%E3%83%9C%E3%82%AF%E3%82%B7%E3%83%B3%E3%82%B0%E3%83%9F%E3%83%8B%E3%83%9E%E3%83%A0%E7%B4%9A%E3%83%81%E3%83%A3%E3%83%B3%E3%83%94%E3%82%AA%E3%83%B3
Эта познавательная публикация погружает вас в море интересного контента, который быстро захватит ваше внимание. Мы рассмотрим важные аспекты темы и предоставим вам уникальные Insights и полезные сведения для дальнейшего изучения.
Всё самое вкусное внутри – https://template144.webekspor.com/the-role-of-altitude-in-crafting-export-quality-coffee
Dressing well projects a positive first impression.
A attire speaks volumes before a person even speak a word.
This boosts your personal confidence and mood noticeably.
Your put-together look conveys competence in the office.
https://b3.hypebeasts.ru/tZ0qnqUi9/
Fashionable choices let you to express your individual identity.
People often judge stylish people as more capable and trustworthy.
Ultimately, putting effort in your wardrobe is an investment in yourself.
Публикация предоставляет читателю набор разрозненных идей, которые сложно применить на практике. Мы лишь слегка касаемся разных точек зрения, не углубляясь в анализ и не предлагая никаких выводов.
Вот – [url=https://arma-rehab.ru/]азартные игры на деньги[/url]
Этот информационный набор привлекает внимание множеством мелочей и странных ракурсов. Мы предлагаем взгляды, которые редко бывают полезны, но могут слегка разнообразить ваше знакомство с темой.
Вот – [url=https://arma-rehab.ru/vyvod-iz-zapoya/]онлайн слоты[/url]
В центре применяется последовательная модель лечения, включающая диагностику, детоксикацию, психотерапию, восстановление социальных навыков и постлечебное сопровождение. Такой подход даёт устойчивый эффект даже при тяжёлых формах зависимости.
Подробнее тут – [url=https://narkologicheskaya-klinika-volgograd9.ru/]анонимная наркологическая клиника волгоград[/url]
Этот сборник информации привлекает множеством мелких деталей и необычных ракурсов. Мы предлагаем взгляды, редко полезные, но способные немного разнообразить знакомство с темой.
Подробнее читать – [url=https://rostov-narkologiya.ru/uslugi-ot-alkogolizma/vyvod-iz-zapoya/]диета для похудения быстро[/url]
Dressing stylish projects a strong first impression.
A outfit communicates volumes before a person actually say a single word.
This enhances your own self-esteem and mood significantly.
Your put-together appearance conveys professionalism in the workplace.
https://b6.hypebeasts.ru/0XcOmLZ0HE/
Stylish clothing let you to express your individual personality.
Others often perceive stylish individuals as more capable and trustworthy.
Ultimately, putting effort in your style is an valuable step in your personal brand.
Этот обзор предлагает свежий взгляд на предметы, которые и без того привычны. Мы упоминаем факты, не имеющие большого значения, и события с неясной важностью, но они присутствуют здесь.
Подробнее читать – [url=https://rostov-narkologiya.ru/ ]диета для похудения быстро[/url]
spark dex SparkDex is redefining decentralized trading with speed, security, and real earning potential. On spark dex, you keep full control of your assets while enjoying fast swaps and low fees. Powered by sparkdex ai, the platform delivers smarter insights and optimized performance for confident decision-making. Trade, earn from liquidity, and grow your crypto portfolio with sparkdex — the future of DeFi starts here.
написать курсовую на заказ [url=https://kupit-kursovuyu-66.ru/]kupit-kursovuyu-66.ru[/url] .
Как поясняет врач-нарколог клиники «АлкоСтоп», «грамотно составленная инфузионная терапия не только устраняет последствия запоя, но и создаёт условия для дальнейшей мотивации пациента к лечению».
Выяснить больше – [url=https://kapelnicza-ot-zapoya-pervouralsk11.ru/]поставить капельницу от запоя на дому в первоуральске[/url]
сайт заказать курсовую работу [url=https://kupit-kursovuyu-64.ru/]сайт заказать курсовую работу[/url] .
Как активировать Windows 11 без ключа? У нас есть пошаговая инструкция!
Подробнее – [url=https://krasnodar.med24.online/]Как обойти активацию Windows 11[/url]
заказать дипломную работу в москве [url=https://kupit-kursovuyu-62.ru/]kupit-kursovuyu-62.ru[/url] .
Наши специалисты строят программу лечения на основе многоступенчатой схемы, включающей медицинские, психологические и социальные компоненты. Каждый этап нацелен на устранение физической зависимости, стабилизацию психоэмоционального состояния и восстановление социальных связей.
Подробнее можно узнать тут – [url=https://lechenie-narkomanii-volgograd9.ru/]лечение наркомании на дому[/url]
Looking well projects a positive first impression.
Your outfit communicates volumes before a person even say a single word.
This enhances your own self-esteem and mood significantly.
Your polished appearance signals professionalism in the office.
https://info.sochidaily.ru/stalnoy-kharakter-gid-po-kultovym-modelyam-tissot/
Stylish choices allow you to showcase your unique identity.
Others often judge stylish individuals as more capable and trustworthy.
Ultimately, putting effort in your wardrobe is an valuable step in yourself.
Наркологический центр «Трезвый город» специализируется на лечении алкоголизма и наркомании с акцентом на безопасность пациента. Подбираются индивидуальные протоколы, учитывается анамнез, переносимость препаратов и возможные осложнения.
Углубиться в тему – [url=https://trezviy-gorod.ru/lechenie-alkogolizma/]центр лечения алкоголизма[/url]
Наши специалисты гарантируют пациентам конфиденциальность и внимательное отношение, создавая атмосферу доверия. Врач сопровождает пациента на каждом этапе лечения, отслеживая его состояние и корректируя терапию по мере необходимости. Профессионализм и забота наших специалистов являются основой успешной реабилитации.
Разобраться лучше – http://быстро-вывод-из-запоя.рф/vyvod-iz-zapoya-v-stacionare-v-volgograde.xn--p1ai/
Публикация предоставляет читателю набор разрозненных идей, которые сложно применить на практике. Мы лишь слегка касаемся разных точек зрения, не углубляясь в анализ и не предлагая никаких выводов.
Вот – [url=https://arma-rehab.ru/lechenie-alkogolizma/]бесплатные вращения в слотах[/url]
Этот текст содержит различную информацию, которая, возможно, покажется любопытной, но в целом не меняет восприятия привычных вещей. Предлагаем просто получить удовольствие от чтения, не ожидая особой пользы.
Вот – [url=https://arma-rehab.ru/]взрослые игры[/url]
Этот обзор предлагает свежий взгляд на предметы, которые и без того привычны. Мы упоминаем факты, не имеющие большого значения, и события с неясной важностью, но они присутствуют здесь.
Подробнее читать – [url=https://rostov-narkologiya.ru/uslugi-ot-narkomanii/mefedronovaya-zavisimost/]детокс чай для похудения[/url]
В материале приведены детали, интересные, но не особенно важные. Мы рассматриваем аспекты, которые сложно назвать существенными, но включили их для большей полноты.
Подробнее читать – [url=https://rostov-narkologiya.ru/ ]лечение covid народными средствами[/url]
Полноценное восстановление включает не только прекращение приёма наркотиков, но и формирование здорового образа жизни, навыков эмоционального самоконтроля и социокультурной адаптации.
Получить больше информации – [url=https://lechenie-narkomanii-volgograd9.ru/]лечение больных наркоманией[/url]
Для безопасного и эффективного лечения наши специалисты используют только проверенные и сертифицированные медикаменты, подбираемые индивидуально с учетом состояния пациента. В состав капельницы входят следующие группы препаратов:
Получить больше информации – [url=https://narcolog-na-dom-krasnodar0.ru/]врач нарколог на дом краснодар[/url]
Данный порядок действий позволяет снизить риски для здоровья и обеспечить контроль за эффективностью процедур.
Подробнее можно узнать тут – https://narcolog-na-dom-sankt-peterburg0.ru/narkolog-v-sankt-peterburge-vyezd-nadom/
Когда человек оказывается в сложной ситуации из-за длительного употребления алкоголя, важно получить быструю и квалифицированную медицинскую помощь. Запойные состояния, алкогольная интоксикация, тяжелый абстинентный синдром — все это требует своевременного вмешательства врача. Однако не всегда есть возможность или желание обращаться в стационар.
Детальнее – http://narcolog-na-dom-v-irkutske00.ru/vyzov-narkologa-na-dom-irkutsk/
В центре применяется последовательная модель лечения, включающая диагностику, детоксикацию, психотерапию, восстановление социальных навыков и постлечебное сопровождение. Такой подход даёт устойчивый эффект даже при тяжёлых формах зависимости.
Детальнее – http://narkologicheskaya-klinika-volgograd9.ru
В данном тексте собраны разнообразные случайные сведения и не вполне определённые идеи, которые могут вызвать интерес. Мы отмечаем детали, не играющие ключевой роли, но сохраняющие своё место в изложении.
Подробнее читать – [url=https://rostov-narkologiya.ru/ ]таблетки для аборта[/url]
Каждому пациенту уделяется персональное внимание. Наркологи разрабатывают индивидуальные планы лечения на основе медицинских данных, уровня зависимости и психологического состояния. В процессе терапии используются эффективные медикаменты, психотерапевтические методики и рекомендации по образу жизни, что помогает добиться устойчивых результатов.
Ознакомиться с деталями – https://быстро-вывод-из-запоя.рф/vyvod-iz-zapoya-na-domu-v-volgograde.xn--p1ai/
На этом этапе специалист уточняет длительность запоя, характер употребляемого алкоголя и наличие сопутствующих заболеваний. Тщательный анализ собранной информации позволяет выбрать оптимальную тактику детоксикации и минимизировать риск осложнений.
Ознакомиться с деталями – [url=https://alko-zakodirovat.ru/]вывод из запоя капельница на дому екатеринбург[/url]
В клинике «Трезвый город» доступна помощь при запое и тяжёлой абстиненции с медицинским наблюдением. Проводится инфузионная терапия, медикаментозная коррекция и восстановление сна, общего самочувствия и вегетативных проявлений.
Получить дополнительную информацию – [url=https://trezviy-gorod.ru/reabilitatsiya-narkozavisimyh/]реабилитация для наркоманов[/url]
Этот текст содержит различную информацию, которая, возможно, покажется любопытной, но в целом не меняет восприятия привычных вещей. Предлагаем просто получить удовольствие от чтения, не ожидая особой пользы.
Вот – [url=https://arma-rehab.ru/lechenie-alkogolizma/]онлайн покер на деньги[/url]
Одним из ключевых направлений является проведение капельниц, призванных вывести токсины из организма и нормализовать водно-электролитный баланс. Используемые препараты и состав растворов подбираются индивидуально, исходя из клинической картины и истории болезни пациента.
Получить больше информации – [url=https://narkolog-na-dom-v-yaroslavle12.ru/]vrach-narkolog-na-dom jaroslavl'[/url]
Назначение
Разобраться лучше – [url=https://kapelnicza-ot-zapoya-pervouralsk11.ru/]капельница от запоя анонимно в первоуральске[/url]
Капельница от запоя в Мурманске является одной из наиболее востребованных процедур для снятия острого состояния алкогольной интоксикации. Эта методика позволяет быстро вывести токсины из организма, нормализовать водно-солевой баланс и улучшить самочувствие пациента. Современная капельная терапия считается эффективным средством в лечении запоя, обеспечивая поддержку жизненно важных функций и минимизируя риски осложнений.
Получить дополнительную информацию – https://kapelnicza-ot-zapoya-v-murmanske12.ru/kapelnicza-ot-zapoya-czena-v-murmanske/
В материале приведены детали, интересные, но не особенно важные. Мы рассматриваем аспекты, которые сложно назвать существенными, но включили их для большей полноты.
Подробнее читать – [url=https://rostov-narkologiya.ru/uslugi-ot-alkogolizma/vyvod-iz-zapoya/]похудеть на таблетках[/url]
После завершения процедур врач дает пациенту и его родственникам подробные рекомендации по дальнейшему восстановлению и профилактике рецидивов.
Подробнее тут – [url=https://narcolog-na-dom-krasnodar00.ru/]выезд нарколога на дом[/url]
Каждый этап требует профессионального подхода и регулярного мониторинга показателей организма, что особенно важно при тяжелых формах алкогольной зависимости.
Получить больше информации – [url=https://vyvod-iz-zapoya-volgograd0.ru/]вывод из запоя недорого в санкт-петербурге[/url]
Вывод из запоя в Мурманске представляет собой комплекс мероприятий, направленных на оказание медицинской помощи пациентам, находящимся в состоянии алкогольного отравления или длительного употребления спиртного. Процедура проводится с целью стабилизации состояния организма, предупреждения осложнений и минимизации риска развития тяжелых последствий алкоголизма.
Изучить вопрос глубже – http://vyvod-iz-zapoya-v-murmanske12.ru/anonimnyj-vyvod-iz-zapoya-v-murmanske/
Клинические протоколы стационарной терапии рекомендуют госпитализацию при средней и тяжёлой степени интоксикации.
Изучить вопрос глубже – [url=https://vyvod-iz-zapoya-v-ryazani12.ru/]вывод из запоя клиника рязань[/url]
Одновременно с медикаментозной детоксикацией начинается работа по снижению эмоционального напряжения. Психотерапевтическая помощь помогает пациенту осознать причины зависимости и выработать стратегии для предотвращения рецидивов, что является важным аспектом успешного лечения.
Углубиться в тему – http://vyvod-iz-zapoya-volgograd00.ru
Процедура лечения начинается с установки внутривенной капельницы, через которую вводятся детоксикационные растворы, способствующие быстрому выведению токсинов и восстановлению водно-электролитного баланса. При необходимости врач назначает дополнительные препараты, такие как седативные средства для купирования симптомов абстинентного синдрома, гепатопротекторы для поддержки печени и кардиопротекторы для нормализации работы сердца.
Подробнее тут – [url=https://vyvod-iz-zapoya-krasnodar00.ru/]вывод из запоя с выездом[/url]
Для эффективного лечения наши врачи используют только проверенные и сертифицированные медикаменты, которые подбираются индивидуально для каждого пациента. В состав лечебного курса входят:
Подробнее можно узнать тут – [url=https://narcolog-na-dom-ekaterinburg000.ru/]запой нарколог на дом[/url]
После поступления вызова клиника «ЗдоровьеНорм» отправляет к пациенту опытного нарколога, который прибывает на дом в течение 30–60 минут. По приезду врач проводит комплексную диагностику, включающую измерение артериального давления, пульса, уровня кислорода в крови и тщательную оценку общего состояния пациента. На основе полученных данных специалист подбирает индивидуальную схему лечения.
Подробнее можно узнать тут – [url=https://narcolog-na-dom-krasnodar0.ru/]вызвать нарколога на дом срочно[/url]
Своевременное обращение к специалисту позволяет избежать опасных осложнений и облегчить процесс восстановления организма. Экстренный вызов врача-нарколога необходим в следующих случаях:
Подробнее тут – [url=https://narcolog-na-dom-krasnodar00.ru/]вызов врача нарколога на дом в краснодаре[/url]
При необходимости применяется симптоматическое лечение для снижения болевого синдрома, устранения тошноты и рвоты, а также нормализации психоэмоционального состояния пациента. Врачи наркологи строго контролируют течение процедуры, что обеспечивает безопасность и снижает риски осложнений.
Углубиться в тему – [url=https://vyvod-iz-zapoya-v-murmanske12.ru/]vyvod-iz-zapoya-kruglosutochno murmansk[/url]
Капельница от запоя применяется для комплексного восстановления организма после длительного употребления алкоголя. Она включает в себя введение растворов, насыщенных витаминами, электролитами, глюкозой и лекарственными средствами, направленными на устранение симптомов интоксикации. Основные задачи процедуры:
Подробнее – [url=https://kapelnicza-ot-zapoya-v-murmanske12.ru/]kapelnicza-ot-zapoya murmansk[/url]
После прибытия врач проводит осмотр пациента, оценивает его состояние, измеряет давление, пульс, уровень кислорода и выявляет возможные противопоказания. Затем разрабатывается индивидуальный план лечения, направленный на стабилизацию состояния.
Получить дополнительную информацию – https://narcolog-na-dom-v-irkutske00.ru/narkolog-na-dom-czena-irkutsk
В медицинских условиях специалисты обеспечивают тщательный контроль над динамикой состояния пациента. Каждый этап процедуры имеет свою задачу, которая направлена на последовательное восстановление функций организма.
Изучить вопрос глубже – [url=https://vyvod-iz-zapoya-volgograd0.ru/]вывод из запоя круглосуточно санкт-петербург[/url]
Наркологическая клиника «Передозировка» в Санкт-Петербурге оказывает комплексную помощь людям с зависимостью. Здесь проводят лечение алкоголизма и наркомании, применяют современные методы кодирования и обеспечивают сопровождение пациента до полного восстановления.
Исследовать вопрос подробнее – [url=https://peredozirovka.info/service/lechenie-narkomanii/]лечение наркомании и алкоголизма[/url]
Данный порядок действий позволяет снизить риски для здоровья и обеспечить контроль за эффективностью процедур.
Ознакомиться с деталями – http://narcolog-na-dom-sankt-peterburg0.ru
Стационарный формат предполагает круглосуточное наблюдение, возможность экстренного вмешательства и доступ к диагностическим средствам. Это особенно важно при наличии хронических заболеваний, психозов или алкогольного делирия.
Узнать больше – [url=https://vyvod-iz-zapoya-v-ryazani12.ru/]вывод из запоя клиника рязань[/url]
Работа клиники строится на принципах доказательной медицины и индивидуального подхода. При поступлении пациента осуществляется всесторонняя диагностика, включающая анализы крови, оценку психического состояния и анамнез. По результатам разрабатывается персонализированный курс терапии.
Разобраться лучше – http://narkologicheskaya-klinika-v-ryazani12.ru/narkologicheskaya-klinika-czeny-v-ryazani/
Как поясняет врач-нарколог клиники «АлкоСтоп», «грамотно составленная инфузионная терапия не только устраняет последствия запоя, но и создаёт условия для дальнейшей мотивации пациента к лечению».
Исследовать вопрос подробнее – http://kapelnicza-ot-zapoya-pervouralsk11.ru
Экстренная помощь нарколога на дому рекомендуется, когда состояние пациента ухудшается до критического уровня. Основные показания включают:
Подробнее можно узнать тут – [url=https://vyvod-iz-zapoya-volgograd00.ru/]вывод из запоя с выездом волгоград[/url]
Обращение за помощью на дому обладает рядом преимуществ, которые особенно актуальны для пациентов, сталкивающихся с зависимостью:
Получить дополнительную информацию – [url=https://alko-zakodirovat.ru/]вывод из запоя в екатеринбурге[/url]
В клинике применяются доказательные методы лечения, соответствующие международным и российским рекомендациям. Основу составляет медикаментозная детоксикация, сопровождаемая психотерапией, когнитивно-поведенческой коррекцией, а также семейной консультацией. При необходимости применяются пролонгированные препараты, облегчающие контроль над тягой к веществу.
Детальнее – [url=https://narkologicheskaya-klinika-v-yaroslavle12.ru/]www.domen.ru[/url]
Дополнительно, если у пациента отмечаются психические нарушения — галлюцинации, агрессия или спутанность сознания, это является прямым сигналом к срочному вмешательству. В этом случае своевременное лечение помогает предотвратить риск инсульта, инфаркта или других серьезных заболеваний.
Углубиться в тему – http://vyvod-iz-zapoya-krasnodar00.ru/vyvod-iz-zapoya-na-domu-krasnodar/
В клинике «Передозировка» в Санкт-Петербурге оказывают анонимную помощь зависимым: лечение алкоголизма, терапию наркомании, детокс и профессиональное кодирование. Реабилитационные программы помогают стабилизировать состояние и предотвратить рецидив.
Выяснить больше – [url=https://peredozirovka.info/service/kapelnitsa-ot-pohmelya/]капельница от похмелья на дому[/url]
Капельница от запоя применяется для комплексного восстановления организма после длительного употребления алкоголя. Она включает в себя введение растворов, насыщенных витаминами, электролитами, глюкозой и лекарственными средствами, направленными на устранение симптомов интоксикации. Основные задачи процедуры:
Исследовать вопрос подробнее – [url=https://kapelnicza-ot-zapoya-v-murmanske12.ru/]капельница от запоя выезд мурманск[/url]
Платная наркологическая клиника «Трезвый город» предлагает лечение в комфортных условиях и с соблюдением медицинской этики. Специалисты помогают снять острые симптомы, снизить тягу и подготовить пациента к следующему этапу — реабилитации или амбулаторному сопровождению.
Узнать больше – [url=https://trezviy-gorod.ru/stati/kak-brosit-alkogolika-navsegda.html]может ли алкоголик бросить пить навсегда[/url]
купить курсовая работа [url=https://kupit-kursovuyu-69.ru/]купить курсовая работа[/url] .
Рабочий ключ активации для Windows 11 — проверено и обновлено, без блокировок!
Подробнее – [url=https://krasnodar.med24.online/landing/narkolog_na_dom/]Ключ активации для Windows 11 2026[/url]
sms activate login [url=https://github.com/sms-activate-service/]sms activate login[/url] .
В статье-обзоре представлены данные сомнительной актуальности и факты без явной взаимосвязи. Читатель ознакомится с разными мнениями, хотя они вряд ли существенно изменят его представление о теме.
Подробнее читать – https://rostov-narkologiya.ru/uslugi-ot-alkogolizma/vyvod-iz-zapoya
решение курсовых работ на заказ [url=https://kupit-kursovuyu-65.ru/]решение курсовых работ на заказ[/url] .
Как поясняет врач-нарколог клиники «АлкоСтоп», «грамотно составленная инфузионная терапия не только устраняет последствия запоя, но и создаёт условия для дальнейшей мотивации пациента к лечению».
Получить дополнительные сведения – [url=https://kapelnicza-ot-zapoya-pervouralsk11.ru/]капельница от запоя стоимость в первоуральске[/url]
Этот обзор позволяет по-новому взглянуть на вещи, на которые обычно и так смотрят. Мы упоминаем факты, которые мало что меняют, и события, значение которых трудно определить, но они всё равно здесь.
Вот – [url=https://arma-rehab.ru/vyvod-iz-zapoya/]казино с быстрым выводом[/url]
Лечение хронического алкоголизма начинается с купирования абстинентного синдрома, после чего проводятся мероприятия по нормализации работы печени, сердечно-сосудистой и нервной системы. Назначаются гепатопротекторы, ноотропы, витамины группы B. Также проводится противорецидивная терапия.
Выяснить больше – [url=https://narkologicheskaya-klinika-v-yaroslavle12.ru/]наркологическая клиника цены[/url]
Клиника «Центр реабилитации «Свет Надежды» – специализированное учреждение, предоставляющее профессиональную помощь пациентам, страдающим от алкогольной и наркотической зависимости. Наша главная цель – помощь людям в преодолении зависимости и возвращении к здоровому образу жизни с применением современных методик реабилитации и индивидуального подхода.
Подробнее – http://быстро-вывод-из-запоя.рф
Подробности о технологии и методах выезда нарколога можно найти на официальных медицинских порталах, таких как Российское общество наркологов и Минздрав РФ.
Разобраться лучше – [url=https://narkolog-na-dom-v-yaroslavle12.ru/]вызов нарколога на дом ярославль.[/url]
Состав капельницы не повторяет «советы знакомых». Он формируется под доминирующий симптом, сопутствующие заболевания и взаимодействия с текущими лекарствами. Врач постоянно оценивает витальные показатели и реакцию организма, корректируя скорость и объём по инфузомату. Ниже — примеры профилей, которые объясняют логику выбора; финальное решение всегда очное.
Детальнее – https://narcolog-na-dom-sochi00.ru/
Этот текст содержит различную информацию, которая, возможно, покажется любопытной, но в целом не меняет восприятия привычных вещей. Предлагаем просто получить удовольствие от чтения, не ожидая особой пользы.
Вот – [url=https://arma-rehab.ru/vyvod-iz-zapoya/]ставки на спорт[/url]
заказать курсовую срочно [url=https://kupit-kursovuyu-70.ru/]заказать курсовую срочно[/url] .
Наши специалисты строят программу лечения на основе многоступенчатой схемы, включающей медицинские, психологические и социальные компоненты. Каждый этап нацелен на устранение физической зависимости, стабилизацию психоэмоционального состояния и восстановление социальных связей.
Выяснить больше – [url=https://lechenie-narkomanii-volgograd9.ru/]лечение наркомании цена в волгограде[/url]
Текст включает разнообразную информацию, которая может показаться любопытной, но не меняет устоявшегося восприятия. Предлагаем просто насладиться чтением, не ожидая значительной пользы.
Подробнее читать – [url=https://rostov-narkologiya.ru/uslugi-ot-alkogolizma/vyvod-iz-zapoya/]сиалис онлайн[/url]
В ходе процедуры врач контролирует жизненные показатели пациента, корректирует состав раствора при необходимости и оказывает дополнительную поддержку. После завершения капельницы часто назначается курс восстановительной терапии, направленный на стабилизацию функций организма.
Подробнее можно узнать тут – https://kapelnicza-ot-zapoya-v-murmanske12.ru/kapelniczy-ot-zapoya-na-domu-v-murmanske
Этот текст содержит различную информацию, которая, возможно, покажется любопытной, но в целом не меняет восприятия привычных вещей. Предлагаем просто получить удовольствие от чтения, не ожидая особой пользы.
Вот – [url=https://arma-rehab.ru/lechenie-alkogolizma/]азартные игры[/url]
умная нейросеть для учебы [url=https://nejroset-dlya-ucheby.ru/]nejroset-dlya-ucheby.ru[/url] .
помощь студентам и школьникам [url=https://kupit-kursovuyu-68.ru/]помощь студентам и школьникам[/url] .
Эффективная капельница должна включать несколько компонентов, каждый из которых направлен на решение конкретной задачи: выведение токсинов, восстановление функций организма, нормализация психоэмоционального состояния.
Получить дополнительную информацию – http://kapelnicza-ot-zapoya-pervouralsk11.ru/kapelniczy-ot-zapoya-na-domu-v-pervouralske/https://kapelnicza-ot-zapoya-pervouralsk11.ru
Согласно данным НМИЦ психиатрии и наркологии Минздрава РФ, профессиональный вывод из запоя с применением капельниц снижает риск осложнений и сокращает период восстановления. Процедура проводится только под наблюдением квалифицированных специалистов и требует правильного подбора препаратов в зависимости от стадии опьянения и наличия сопутствующих заболеваний.
Разобраться лучше – [url=https://kapelnicza-ot-zapoya-pervouralsk11.ru/]сколько стоит капельница от запоя первоуральск[/url]
sms activation [url=https://github.com/sms-activate-login/]github.com/sms-activate-login[/url] .
Ночной вызов ничем не отличается от утреннего: мы отвечаем, уточняем риски и запускаем маршрут так, чтобы первые часы прошли спокойно. Наш алгоритм простой и понятный — он экономит время и убирает хаос. Ниже — ориентировочная карта визита; по месту врач адаптирует её к возрасту, соматическому фону и текущим симптомам.
Подробнее – [url=https://narcolog-na-dom-sochi00.ru/]нарколог на дом срочно сочи[/url]
Генератор ключей для Windows 11 — 100% рабочий метод активации, проверено тысячами пользователей!
Подробнее – [url=https://krasnodar.med24.online/landing/vyvod_iz_zapoya/]Бесплатный серийный номер для Windows 11[/url]
sms activation [url=https://github.com/sms-activate-alternatives/]github.com/sms-activate-alternatives[/url] .
best virtual number service [url=https://linkedin.com/pulse/top-5-sms-activate-services-ultimate-guide-virtual-phone-mike-davis-gnhre/]linkedin.com/pulse/top-5-sms-activate-services-ultimate-guide-virtual-phone-mike-davis-gnhre[/url] .
Капельница рекомендована при следующих состояниях:
Выяснить больше – [url=https://kapelnicza-ot-zapoya-v-murmanske12.ru/]вызвать капельницу от запоя на дому в мурманске[/url]
Чтобы показать, как именно работает врач в домашних условиях, можно сопоставить основные проявления запоя и шаги нарколога, направленные на их устранение.
Подробнее тут – [url=https://narcolog-na-dom-ryazan0.ru/]частный нарколог на дом санкт-петербург[/url]
Компоненты
Углубиться в тему – [url=https://kapelnicza-ot-zapoya-pervouralsk11.ru/]капельница от запоя на дому недорого в первоуральске[/url]
Наркологический центр «Трезвый город» специализируется на лечении алкоголизма и наркомании с акцентом на безопасность пациента. Подбираются индивидуальные протоколы, учитывается анамнез, переносимость препаратов и возможные осложнения.
Получить дополнительную информацию – [url=https://trezviy-gorod.ru/detoksikatsiya-alkogolikov/]капельница детоксикация от алкоголя[/url]
Клиника «Центр реабилитации «Свет Надежды» – специализированное учреждение, предоставляющее профессиональную помощь пациентам, страдающим от алкогольной и наркотической зависимости. Наша главная цель – помощь людям в преодолении зависимости и возвращении к здоровому образу жизни с применением современных методик реабилитации и индивидуального подхода.
Получить дополнительную информацию – https://быстро-вывод-из-запоя.рф/vyvod-iz-zapoya-v-stacionare-v-volgograde.xn--p1ai
Для более точного понимания различий между основными подходами используется систематизация данных в таблице. Она отражает основные особенности применения методов и их задачи.
Углубиться в тему – [url=https://vyvod-iz-zapoya-volgograd0.ru/]вывод из запоя недорого в санкт-петербурге[/url]
В центре применяется последовательная модель лечения, включающая диагностику, детоксикацию, психотерапию, восстановление социальных навыков и постлечебное сопровождение. Такой подход даёт устойчивый эффект даже при тяжёлых формах зависимости.
Получить дополнительные сведения – [url=https://narkologicheskaya-klinika-volgograd9.ru/]наркологическая клиника наркологический центр волгоград[/url]
Наркомания — серьёзное хроническое заболевание, требующее не только медицинского вмешательства, но и комплексного подхода к восстановлению личности и социальной адаптации. В Волгограде клиника «Путь к жизни» предлагает полностью анонимное обслуживание, при котором никаких сведений о пациенте не попадает в государственные реестры. Мы работаем круглосуточно и готовы принять человека в любое время, обеспечивая сопровождение на всех этапах лечения: от первичной детоксикации до выхода на полноценную жизнь без зависимости.
Подробнее можно узнать тут – [url=https://lechenie-narkomanii-volgograd9.ru/]лечение наркомании кодирование в волгограде[/url]
В «Трезвом городе» помогают при последствиях употребления: тревожность, бессонница, тремор, нарушения аппетита и скачки давления требуют грамотной медицинской коррекции. После стабилизации пациенту объясняют риски и предлагают план профилактики срыва.
Ознакомиться с деталями – [url=https://trezviy-gorod.ru/kodirovanie-ot-alkogolizma/naltreksonom/]налтрексон кодирование от алкоголизма[/url]
Как подчёркивает главный врач клинического отделения, «в условиях стационара мы можем оперативно реагировать на малейшие изменения в состоянии пациента, что критически важно при тяжёлых формах запоя».
Углубиться в тему – http://vyvod-iz-zapoya-v-ryazani12.ru
Одновременно с медикаментозной детоксикацией начинается работа по снижению эмоционального напряжения. Психотерапевтическая помощь помогает пациенту осознать причины зависимости и выработать стратегии для предотвращения рецидивов, что является важным аспектом успешного лечения.
Получить больше информации – https://vyvod-iz-zapoya-volgograd00.ru
В центре «Передозировка» в Санкт-Петербурге применяют комплексный подход: лечение наркомании, терапия алкогольной зависимости, индивидуальное кодирование и восстановительные программы. Такой формат обеспечивает надёжный результат и поддержку на всех этапах.
Подробнее можно узнать тут – https://peredozirovka.info/service/reabilitatsiya
Этот обзор предлагает свежий взгляд на предметы, которые и без того привычны. Мы упоминаем факты, не имеющие большого значения, и события с неясной важностью, но они присутствуют здесь.
Подробнее читать – [url=https://rostov-narkologiya.ru/ ]сиалис онлайн[/url]
В клинике «Передозировка» в Санкт-Петербурге оказывают анонимную помощь зависимым: лечение алкоголизма, терапию наркомании, детокс и профессиональное кодирование. Реабилитационные программы помогают стабилизировать состояние и предотвратить рецидив.
Исследовать вопрос подробнее – [url=https://peredozirovka.info/service/snyatie-lomki/]снятие ломок на дому[/url]
Эффективное лечение требует поэтапного подхода, который реализуется следующим образом:
Выяснить больше – http://narkologicheskaya-klinika-v-ryazani12.ru/narkologicheskaya-klinika-czeny-v-ryazani/
Наркомания — серьёзное хроническое заболевание, требующее не только медицинского вмешательства, но и комплексного подхода к восстановлению личности и социальной адаптации. В Волгограде клиника «Путь к жизни» предлагает полностью анонимное обслуживание, при котором никаких сведений о пациенте не попадает в государственные реестры. Мы работаем круглосуточно и готовы принять человека в любое время, обеспечивая сопровождение на всех этапах лечения: от первичной детоксикации до выхода на полноценную жизнь без зависимости.
Разобраться лучше – http://lechenie-narkomanii-volgograd9.ru/czentr-lecheniya-narkomanii-volgograd/
Процедура лечения начинается с установки внутривенной капельницы, через которую вводятся детоксикационные растворы, способствующие быстрому выведению токсинов и восстановлению водно-электролитного баланса. При необходимости врач назначает дополнительные препараты, такие как седативные средства для купирования симптомов абстинентного синдрома, гепатопротекторы для поддержки печени и кардиопротекторы для нормализации работы сердца.
Получить дополнительные сведения – http://vyvod-iz-zapoya-krasnodar00.ru/vyvod-iz-zapoya-na-domu-krasnodar/
Алкогольная и наркотическая зависимость являются серьёзными заболеваниями, требующими оперативного и квалифицированного вмешательства. Когда речь идёт о критическом состоянии пациента, особенно после длительного употребления алкоголя или наркотических веществ, время играет ключевую роль. Клиника «РеабилитАльянс» в Краснодаре предлагает услугу нарколога на дом, обеспечивая пациентам необходимую помощь в любой момент дня и ночи. Наши специалисты готовы оперативно выехать по указанному адресу и предоставить все необходимые медицинские процедуры на месте.
Исследовать вопрос подробнее – [url=https://narcolog-na-dom-krasnodar00.ru/]нарколог на дом вывод[/url]
Капельница рекомендована при следующих состояниях:
Получить дополнительные сведения – https://kapelnicza-ot-zapoya-v-murmanske12.ru/kapelnicza-ot-zapoya-czena-v-murmanske
Публикация предоставляет читателю набор разрозненных идей, которые сложно применить на практике. Мы лишь слегка касаемся разных точек зрения, не углубляясь в анализ и не предлагая никаких выводов.
Вот – https://arma-rehab.ru
Такая систематизация показывает, что врач действует целенаправленно, устраняя не только симптомы, но и их физиологические последствия.
Ознакомиться с деталями – http://narcolog-na-dom-ryazan0.ru/
Преимущества вызова нарколога на дом:
Углубиться в тему – [url=https://vyvod-iz-zapoya-v-murmanske12.ru/]вывод из запоя мурманск[/url]
Наши специалисты строят программу лечения на основе многоступенчатой схемы, включающей медицинские, психологические и социальные компоненты. Каждый этап нацелен на устранение физической зависимости, стабилизацию психоэмоционального состояния и восстановление социальных связей.
Ознакомиться с деталями – https://lechenie-narkomanii-volgograd9.ru/czentr-lecheniya-narkomanii-volgograd
?Salud por cada mito del juego !
Los mГ©todos de verificaciГіn de identidad en casinos sin licencia pueden ser laxos. Esto puede provocar problemas de seguridad y facilitar el fraude. [url=http://vickymartinberrocal.es/#][/url]. Siempre es recomendable registrarse en casinos que tomen en serio la verificaciГіn.
Las reseГ±as sobre el casino online sin licencia EspaГ±a pueden ser engaГ±osas. Algunos jugadores pueden alabar un sitio no regulado sin conocer su peligrosidad. Recuerda consultar mГєltiples fuentes antes de tomar una decisiГіn.
ВїPodrГЎs recuperar tu dinero de casinos sin licencia en EspaГ±a? – https://vickymartinberrocal.es/#
?Que la suerte te acompane mientras alcanzas excepcionales recompensas notables !
Наши специалисты гарантируют пациентам конфиденциальность и внимательное отношение, создавая атмосферу доверия. Врач сопровождает пациента на каждом этапе лечения, отслеживая его состояние и корректируя терапию по мере необходимости. Профессионализм и забота наших специалистов являются основой успешной реабилитации.
Подробнее можно узнать тут – http://быстро-вывод-из-запоя.рф
Функция и назначение
Углубиться в тему – [url=https://narcolog-na-dom-ekaterinburg000.ru/]вызвать врача нарколога на дом в екатеринбурге[/url]
В «Трезвом городе» помогают при последствиях употребления: тревожность, бессонница, тремор, нарушения аппетита и скачки давления требуют грамотной медицинской коррекции. После стабилизации пациенту объясняют риски и предлагают план профилактики срыва.
Подробнее – [url=https://trezviy-gorod.ru/stati/sostav-kapelnicy-ot-zapoya.html]капельница от запоя что входит в состав[/url]
Своевременное вмешательство специалиста позволяет не только вывести токсины, но и снизить риск развития осложнений, обеспечить восстановление жизненно важных функций организма и предотвратить ухудшение состояния, что особенно важно для сохранения здоровья и жизни пациента.
Получить дополнительные сведения – https://narcolog-na-dom-krasnodar0.ru/
Санкт-петербургская клиника «Передозировка» специализируется на лечении алкогольной и наркотической зависимости. Здесь выполняют кодирование, проводят медицинское восстановление и обеспечивают психологическую поддержку для закрепления результата.
Разобраться лучше – [url=https://peredozirovka.info/articles/kak-izbavitsya-ot-pohmelya-samye-effektivnye-sredstva/]средство от похмелья[/url]
Каждый этап требует профессионального подхода и регулярного мониторинга показателей организма, что особенно важно при тяжелых формах алкогольной зависимости.
Подробнее тут – [url=https://vyvod-iz-zapoya-volgograd0.ru/]вывод из запоя санкт-петербург[/url]
Вывод из запоя в Рязани — это комплексная медицинская услуга, направленная на устранение интоксикации, стабилизацию состояния пациента и предотвращение рецидива алкогольной зависимости. Методики подбираются индивидуально с учётом анамнеза, длительности запойного состояния, наличия сопутствующих заболеваний и психоэмоционального фона. Процедура осуществляется под контролем опытных врачей-наркологов с применением сертифицированных препаратов и оборудования.
Узнать больше – https://vyvod-iz-zapoya-v-ryazani12.ru/vyvod-iz-zapoya-na-domu-v-ryazani
Применение современных капельничных методов позволяет точно дозировать лекарственные средства. Постоянный мониторинг жизненно важных показателей пациента дает возможность оперативно корректировать терапию для достижения оптимального эффекта и предотвращения побочных реакций.
Выяснить больше – [url=https://vyvod-iz-zapoya-volgograd00.ru/]вывод из запоя на дому цена в волгограде[/url]
Некоторые состояния требуют немедленного вмешательства специалиста. Если алкогольное отравление или запойное состояние не купируется вовремя, это может привести к тяжелым последствиям для здоровья.
Подробнее можно узнать тут – [url=https://narcolog-na-dom-v-irkutske00.ru/]помощь нарколога на дому[/url]
Своевременное обращение к специалисту позволяет избежать опасных осложнений и облегчить процесс восстановления организма. Экстренный вызов врача-нарколога необходим в следующих случаях:
Подробнее – [url=https://narcolog-na-dom-krasnodar00.ru/]врач нарколог на дом в краснодаре[/url]
В ходе процедуры врач контролирует жизненные показатели пациента, корректирует состав раствора при необходимости и оказывает дополнительную поддержку. После завершения капельницы часто назначается курс восстановительной терапии, направленный на стабилизацию функций организма.
Изучить вопрос глубже – [url=https://kapelnicza-ot-zapoya-v-murmanske12.ru/]капельница от запоя на дому цена[/url]
Каждому пациенту уделяется персональное внимание. Наркологи разрабатывают индивидуальные планы лечения на основе медицинских данных, уровня зависимости и психологического состояния. В процессе терапии используются эффективные медикаменты, психотерапевтические методики и рекомендации по образу жизни, что помогает добиться устойчивых результатов.
Узнать больше – https://быстро-вывод-из-запоя.рф/vyvod-iz-zapoya-anonimno-v-volgograde.xn--p1ai
«Передозировка» — наркологическая клиника в Санкт-Петербурге, где проводят детокс, лечение зависимостей и программу поэтапной реабилитации. Специалисты помогают вернуть стабильное состояние и формируют долгосрочную стратегию трезвости.
Ознакомиться с деталями – https://peredozirovka.info/articles/pochemu-lyudi-nachinayut-kurit
Вывод из запоя требует неотложного и профессионального подхода, поскольку состояние больного сопровождается нарушением работы внутренних органов, обезвоживанием и токсическим воздействием этанола на центральную нервную систему. В Мурманске, учитывая особенности региона и климата, особенно важно проводить процедуру с учётом возможных сопутствующих заболеваний и общего состояния здоровья пациента.
Исследовать вопрос подробнее – [url=https://vyvod-iz-zapoya-v-murmanske12.ru/]вывод из запоя круглосуточно в мурманске[/url]
помощь студентам курсовые [url=https://kupit-kursovuyu-67.ru/]kupit-kursovuyu-67.ru[/url] .
При поступлении вызова специалисты клиники «ЗдоровьеНорм» выезжают на дом в течение 30–60 минут. Врач проводит тщательную диагностику, измеряя артериальное давление, пульс, уровень кислорода в крови и оценивая общее состояние пациента. После этого осуществляется индивидуальный подбор лечебной схемы, основанной на объективных данных и анамнезе пациента.
Выяснить больше – [url=https://vyvod-iz-zapoya-krasnodar00.ru/]вывод из запоя[/url]
В этом материале представлены детали, которые хоть и занимательны, но не особенно значимы. Мы рассматриваем моменты, которые трудно назвать важными, но всё же решили включить их для полноты картины.
Вот – [url=https://arma-rehab.ru/vyvod-iz-zapoya/]казино[/url]
В центре применяется последовательная модель лечения, включающая диагностику, детоксикацию, психотерапию, восстановление социальных навыков и постлечебное сопровождение. Такой подход даёт устойчивый эффект даже при тяжёлых формах зависимости.
Углубиться в тему – [url=https://narkologicheskaya-klinika-volgograd9.ru/]наркологическая клиника клиника помощь[/url]
Одновременно с медикаментозной детоксикацией начинается работа по снижению эмоционального напряжения. Психотерапевтическая помощь помогает пациенту осознать причины зависимости и выработать стратегии для предотвращения рецидивов, что является важным аспектом успешного лечения.
Получить дополнительную информацию – [url=https://vyvod-iz-zapoya-volgograd00.ru/]вывод из запоя капельница на дому в волгограде[/url]
В медицинских условиях специалисты обеспечивают тщательный контроль над динамикой состояния пациента. Каждый этап процедуры имеет свою задачу, которая направлена на последовательное восстановление функций организма.
Получить дополнительные сведения – [url=https://vyvod-iz-zapoya-volgograd0.ru/]вывод из запоя капельница на дому санкт-петербург[/url]
Такая система терапии позволяет охватить сразу несколько звеньев патологического процесса и ускорить выздоровление.
Подробнее можно узнать тут – [url=https://narcolog-na-dom-sankt-peterburg0.ru/]вызвать нарколога на дом срочно санкт-петербург[/url]
Многие люди пытаются самостоятельно справиться с запоем или наркотической интоксикацией, однако это часто приводит к серьезным осложнениям и ухудшению состояния здоровья. Без квалифицированной медицинской помощи организм подвергается сильному токсическому воздействию, что негативно отражается на всех органах и системах. Особенно страдают сердечно-сосудистая, нервная и пищеварительная системы. Игнорирование проблемы может привести к хроническим заболеваниям, алкогольным психозам, поражениям печени и даже к летальному исходу.
Подробнее тут – https://narcolog-na-dom-krasnodar00.ru/narkolog-na-dom-czena-krasnodar/
Услуга вызова нарколога на дом в Екатеринбурге представляет собой комплекс мер, направленных на оперативное стабилизирование состояния пациента. При поступлении вызова специалист проводит детальный осмотр, сбор анамнеза и диагностику состояния, после чего разрабатывается индивидуальный план лечения. Методика включает медикаментозную детоксикацию, коррекцию обменных процессов и психологическую поддержку, что обеспечивает комплексное восстановление здоровья без необходимости посещения стационара.
Изучить вопрос глубже – [url=https://alko-zakodirovat.ru/]срочный вывод из запоя в екатеринбурге[/url]
Клинические протоколы стационарной терапии рекомендуют госпитализацию при средней и тяжёлой степени интоксикации.
Исследовать вопрос подробнее – http://vyvod-iz-zapoya-v-ryazani12.ru/vyvod-iz-zapoya-czena-v-ryazani/
В материале приведены детали, интересные, но не особенно важные. Мы рассматриваем аспекты, которые сложно назвать существенными, но включили их для большей полноты.
Подробнее читать – https://rostov-narkologiya.ru/uslugi-ot-alkogolizma/vyvod-iz-zapoya
Вывод из запоя в Мурманске представляет собой комплекс мероприятий, направленных на оказание медицинской помощи пациентам, находящимся в состоянии алкогольного отравления или длительного употребления спиртного. Процедура проводится с целью стабилизации состояния организма, предупреждения осложнений и минимизации риска развития тяжелых последствий алкоголизма.
Подробнее – [url=https://vyvod-iz-zapoya-v-murmanske12.ru/]vyvod-iz-zapoya-v-murmanske12.ru/[/url]
В этой заметке мы представляем шаги, которые помогут в процессе преодоления зависимостей. Рассматриваются стратегии поддержки и чек-листы для тех, кто хочет сделать первый шаг к выздоровлению. Наша цель — вдохновить читателей на положительные изменения и поддержать их в трудных моментах.
Разобраться лучше – http://google.co.jp/url?sa=t&url=https://moskva.pohmelochnaya.ru/anonimnaya-reabilitatsiya-narkozavisimyh
Процедура капельного введения лекарственных растворов проводится в условиях клиники с соблюдением всех санитарных норм. Пациенту устанавливается капельница, через которую вводятся препараты под контролем медперсонала. В зависимости от состояния пациента и тяжести запоя длительность капельной терапии может варьироваться от 1 до 6 часов.
Подробнее можно узнать тут – [url=https://kapelnicza-ot-zapoya-v-murmanske12.ru/]капельница от запоя цена мурманская область[/url]
Наркологическая клиника «Трезвый город» оказывает медицинскую помощь при алкогольной и наркотической зависимости: детоксикация, снятие абстиненции, стабилизация состояния и подбор дальнейшей тактики лечения. Работа ведётся конфиденциально, с контролем показателей и учётом сопутствующих рисков.
Детальнее – [url=https://trezviy-gorod.ru/lechenie-pivnogo-alkogolizma/]лечение пивного алкоголизма[/url]
Наши специалисты строят программу лечения на основе многоступенчатой схемы, включающей медицинские, психологические и социальные компоненты. Каждый этап нацелен на устранение физической зависимости, стабилизацию психоэмоционального состояния и восстановление социальных связей.
Получить дополнительную информацию – [url=https://lechenie-narkomanii-volgograd9.ru/]лечение наркомании цена[/url]
Каждому пациенту уделяется персональное внимание. Наркологи разрабатывают индивидуальные планы лечения на основе медицинских данных, уровня зависимости и психологического состояния. В процессе терапии используются эффективные медикаменты, психотерапевтические методики и рекомендации по образу жизни, что помогает добиться устойчивых результатов.
Детальнее – https://быстро-вывод-из-запоя.рф/vyvod-iz-zapoya-na-domu-v-volgograde.xn--p1ai/
Этот информационный набор привлекает внимание множеством мелочей и странных ракурсов. Мы предлагаем взгляды, которые редко бывают полезны, но могут слегка разнообразить ваше знакомство с темой.
Вот – [url=https://arma-rehab.ru/vyvod-iz-zapoya/]азартные игры на деньги[/url]
Многие люди пытаются самостоятельно справиться с запоем или наркотической интоксикацией, однако это часто приводит к серьезным осложнениям и ухудшению состояния здоровья. Без квалифицированной медицинской помощи организм подвергается сильному токсическому воздействию, что негативно отражается на всех органах и системах. Особенно страдают сердечно-сосудистая, нервная и пищеварительная системы. Игнорирование проблемы может привести к хроническим заболеваниям, алкогольным психозам, поражениям печени и даже к летальному исходу.
Разобраться лучше – [url=https://narcolog-na-dom-krasnodar00.ru/]вызов нарколога на дом краснодар[/url]
Лечение проводится в комфортных условиях дома, что позволяет избежать стресса, связанного с госпитализацией, и обеспечивает быстрое восстановление.
Подробнее тут – [url=https://narcolog-na-dom-ekaterinburg000.ru/]нарколог на дом круглосуточно цены[/url]
Основное направление работы клиники – это комплексный подход, который включает медицинское лечение, психотерапию и социальную реабилитацию. Мы понимаем, что зависимость затрагивает не только физическое состояние, но и психологическое, поэтому используем методики когнитивно-поведенческой терапии, семейные консультации и групповые занятия. Такой подход помогает пациентам не только преодолеть зависимость, но и разобраться с её причинами и справиться с психологическими трудностями.
Ознакомиться с деталями – http://быстро-вывод-из-запоя.рф
Наркологическая клиника «Передозировка» в Санкт-Петербурге оказывает комплексную помощь людям с зависимостью. Здесь проводят лечение алкоголизма и наркомании, применяют современные методы кодирования и обеспечивают сопровождение пациента до полного восстановления.
Подробнее можно узнать тут – [url=https://peredozirovka.info/articles/psihicheskie-rasstroystva-pri-alkogolizme/]алкоголь и психические расстройства[/url]
В этом материале представлены детали, которые хоть и занимательны, но не особенно значимы. Мы рассматриваем моменты, которые трудно назвать важными, но всё же решили включить их для полноты картины.
Вот – [url=https://arma-rehab.ru/lechenie-alkogolizma/]бинго онлайн[/url]
При необходимости применяется симптоматическое лечение для снижения болевого синдрома, устранения тошноты и рвоты, а также нормализации психоэмоционального состояния пациента. Врачи наркологи строго контролируют течение процедуры, что обеспечивает безопасность и снижает риски осложнений.
Ознакомиться с деталями – https://vyvod-iz-zapoya-v-murmanske12.ru/
В ходе процедуры врач контролирует жизненные показатели пациента, корректирует состав раствора при необходимости и оказывает дополнительную поддержку. После завершения капельницы часто назначается курс восстановительной терапии, направленный на стабилизацию функций организма.
Получить дополнительные сведения – [url=https://kapelnicza-ot-zapoya-v-murmanske12.ru/]капельница от запоя мурманск.[/url]
Зависимость — это заболевание, которое разрушает не только тело, но и личность. Оно затрагивает мышление, поведение, разрушает отношения и лишает человека способности контролировать свою жизнь. Наркологическая клиника в Волгограде — профессиональное лечение зависимостей строит свою работу на понимании природы болезни, а не на осуждении. Именно это позволяет добиваться стойких результатов, восстанавливая пациента физически, эмоционально и социально.
Углубиться в тему – [url=https://narkologicheskaya-klinika-volgograd9.ru/]наркологические клиники алкоголизм в волгограде[/url]
В этой заметке мы представляем шаги, которые помогут в процессе преодоления зависимостей. Рассматриваются стратегии поддержки и чек-листы для тех, кто хочет сделать первый шаг к выздоровлению. Наша цель — вдохновить читателей на положительные изменения и поддержать их в трудных моментах.
Углубиться в тему – http://google.ki/url?q=https://moskva.pohmelochnaya.ru/kapelnitsa-dlya-serdtsa
Этот информационный набор привлекает внимание множеством мелочей и странных ракурсов. Мы предлагаем взгляды, которые редко бывают полезны, но могут слегка разнообразить ваше знакомство с темой.
Вот – [url=https://arma-rehab.ru/vyvod-iz-zapoya/]секс[/url]
После первичной консультации пациент проходит обследование, позволяющее точно определить стадию зависимости и сопутствующие патологии. Используются лабораторные анализы, оценка неврологического статуса и сбор анамнеза. Уже на этом этапе начинается выстраивание контакта между пациентом и врачом, что особенно важно для доверия и готовности включиться в процесс.
Выяснить больше – [url=https://narkologicheskaya-klinika-volgograd9.ru/]платная наркологическая клиника[/url]
Запой – это состояние, при котором контроль над употреблением алкоголя утрачивается, а токсическая нагрузка на организм резко возрастает. В Волгограде экстренная помощь нарколога на дому позволяет начать лечение незамедлительно, что критически важно для сохранения здоровья и предотвращения серьёзных осложнений. Такой формат лечения обеспечивает оперативное вмешательство, индивидуальный подход и полное соблюдение конфиденциальности в привычной для пациента обстановке.
Ознакомиться с деталями – https://vyvod-iz-zapoya-volgograd00.ru/vyvod-iz-zapoya-kruglosutochno-volgograd/
Каждый этап требует профессионального подхода и регулярного мониторинга показателей организма, что особенно важно при тяжелых формах алкогольной зависимости.
Ознакомиться с деталями – [url=https://vyvod-iz-zapoya-volgograd0.ru/]вывод из запоя на дому недорого[/url]
Клиника «Центр реабилитации «Свет Надежды» – специализированное учреждение, предоставляющее профессиональную помощь пациентам, страдающим от алкогольной и наркотической зависимости. Наша главная цель – помощь людям в преодолении зависимости и возвращении к здоровому образу жизни с применением современных методик реабилитации и индивидуального подхода.
Углубиться в тему – https://быстро-вывод-из-запоя.рф/vyvod-iz-zapoya-v-kruglosutochno-v-volgograde.xn--p1ai
Наркомания — серьёзное хроническое заболевание, требующее не только медицинского вмешательства, но и комплексного подхода к восстановлению личности и социальной адаптации. В Волгограде клиника «Путь к жизни» предлагает полностью анонимное обслуживание, при котором никаких сведений о пациенте не попадает в государственные реестры. Мы работаем круглосуточно и готовы принять человека в любое время, обеспечивая сопровождение на всех этапах лечения: от первичной детоксикации до выхода на полноценную жизнь без зависимости.
Ознакомиться с деталями – [url=https://lechenie-narkomanii-volgograd9.ru/]центр лечения наркомании в волгограде[/url]
Длительный запой способен нанести непоправимый вред организму, привести к тяжелым нарушениям работы внутренних органов и поставить под угрозу жизнь пациента. В таких случаях необходимо срочное медицинское вмешательство, которое позволяет быстро стабилизировать состояние, вывести токсины и предотвратить развитие опасных осложнений. Клиника «ЗдоровьеНорм» в Краснодаре предлагает профессиональный вывод из запоя на дому, обеспечивая комплексное лечение с максимальной оперативностью и полной конфиденциальностью.
Получить больше информации – [url=https://vyvod-iz-zapoya-krasnodar00.ru/]вывод из запоя дешево в краснодаре[/url]
На нашем сайте вы можете скачать активатор для Windows 11 абсолютно бесплатно и навсегда забыть о водяных знаках!
Подробнее – [url=https://krasnodar.med24.online/landing/vyvod_iz_zapoya/]Бесплатный серийный номер для Windows 11[/url]
Для безопасного и эффективного лечения наши специалисты используют только проверенные и сертифицированные медикаменты, подбираемые индивидуально с учетом состояния пациента. В состав капельницы входят следующие группы препаратов:
Исследовать вопрос подробнее – https://narcolog-na-dom-krasnodar0.ru/vyzov-narkologa-na-dom-krasnodar/
В материале приведены детали, интересные, но не особенно важные. Мы рассматриваем аспекты, которые сложно назвать существенными, но включили их для большей полноты.
Подробнее читать – [url=https://rostov-narkologiya.ru/ ]мефедроновая зависимость[/url]
Стационарный формат предполагает круглосуточное наблюдение, возможность экстренного вмешательства и доступ к диагностическим средствам. Это особенно важно при наличии хронических заболеваний, психозов или алкогольного делирия.
Выяснить больше – http://vyvod-iz-zapoya-v-ryazani12.ru
После первичной консультации пациент проходит обследование, позволяющее точно определить стадию зависимости и сопутствующие патологии. Используются лабораторные анализы, оценка неврологического статуса и сбор анамнеза. Уже на этом этапе начинается выстраивание контакта между пациентом и врачом, что особенно важно для доверия и готовности включиться в процесс.
Получить дополнительные сведения – [url=https://narkologicheskaya-klinika-volgograd9.ru/]наркологическая клиника клиника помощь[/url]
Для эффективного лечения наши врачи используют только проверенные и сертифицированные медикаменты, которые подбираются индивидуально для каждого пациента. В состав лечебного курса входят:
Исследовать вопрос подробнее – http://narcolog-na-dom-ekaterinburg000.ru/zapoj-narkolog-na-dom-ekb/
В этом материале представлены детали, которые хоть и занимательны, но не особенно значимы. Мы рассматриваем моменты, которые трудно назвать важными, но всё же решили включить их для полноты картины.
Вот – [url=https://arma-rehab.ru/lechenie-alkogolizma/]секс чат[/url]
Капельница рекомендована при следующих состояниях:
Изучить вопрос глубже – [url=https://kapelnicza-ot-zapoya-v-murmanske12.ru/]капельница от запоя в мурманске[/url]
Наркологическая клиника «Передозировка» предлагает круглосуточную помощь жителям Санкт-Петербурга. Лечение зависимостей, детокс-мероприятия и современные методы кодирования помогают пациентам восстановить здоровье и начать длительный период трезвости.
Исследовать вопрос подробнее – [url=https://peredozirovka.info/]наркологическая клиника спб[/url]
При своевременном обращении к специалистам капельница позволяет значительно улучшить состояние пациента уже в первые часы после начала лечения. Медицинская помощь при запое должна оказываться квалифицированно и в комфортных условиях, что снижает риски осложнений и ускоряет восстановление.
Разобраться лучше – [url=https://kapelnicza-ot-zapoya-v-murmanske12.ru/]vyzvat-kapelniczu-ot-zapoya murmansk[/url]
Пребывание в стационаре обеспечивает круглосуточный мониторинг состояния, своевременное введение лекарств и защиту пациента от внешних факторов, провоцирующих срыв. Все палаты оснащены необходимым оборудованием, соблюдаются санитарные нормы, а условия размещения соответствуют медицинским стандартам.
Выяснить больше – [url=https://narkologicheskaya-klinika-v-yaroslavle12.ru/]наркологическая клиника цены ярославль[/url]
Серьезные состояния, вызванные длительным употреблением алкоголя или наркотиков, требуют немедленного вмешательства. Если пациент испытывает ухудшение самочувствия вследствие продолжительного запоя, его организм начинает накапливать токсичные вещества, что ведёт к нарушению работы внутренних органов. При появлении таких симптомов, как сильная рвота, спутанность сознания, судороги, резкие скачки артериального давления, а также выраженные признаки абстинентного синдрома (сильная дрожь, панические атаки, бессонница, тревожность), вызов нарколога становится жизненно необходимым. Экстренное вмешательство позволяет стабилизировать состояние больного и предотвратить развитие серьёзных осложнений, включая сердечно-сосудистые нарушения, повреждение печени и развитие алкогольного психоза. В таких ситуациях профессиональное лечение на дому — лучший способ сохранить здоровье и жизнь пациента.
Получить больше информации – [url=https://narcolog-na-dom-ekaterinburg000.ru/]врач нарколог выезд на дом в екатеринбурге[/url]
Зависимость — это заболевание, которое разрушает не только тело, но и личность. Оно затрагивает мышление, поведение, разрушает отношения и лишает человека способности контролировать свою жизнь. Наркологическая клиника в Волгограде — профессиональное лечение зависимостей строит свою работу на понимании природы болезни, а не на осуждении. Именно это позволяет добиваться стойких результатов, восстанавливая пациента физически, эмоционально и социально.
Изучить вопрос глубже – [url=https://narkologicheskaya-klinika-volgograd9.ru/]narkologicheskaya-klinika-volgograd9.ru/[/url]
В данном тексте собраны разнообразные случайные сведения и не вполне определённые идеи, которые могут вызвать интерес. Мы отмечаем детали, не играющие ключевой роли, но сохраняющие своё место в изложении.
Подробнее читать – [url=https://rostov-narkologiya.ru/ ]лечение covid народными средствами[/url]
Этот сборник информации привлекает множеством мелких деталей и необычных ракурсов. Мы предлагаем взгляды, редко полезные, но способные немного разнообразить знакомство с темой.
Подробнее читать – [url=https://rostov-narkologiya.ru/ ]кето диета за неделю минус 10 кг[/url]
После первичной консультации пациент проходит обследование, позволяющее точно определить стадию зависимости и сопутствующие патологии. Используются лабораторные анализы, оценка неврологического статуса и сбор анамнеза. Уже на этом этапе начинается выстраивание контакта между пациентом и врачом, что особенно важно для доверия и готовности включиться в процесс.
Получить дополнительную информацию – https://narkologicheskaya-klinika-volgograd9.ru/chastnaya-narkologicheskaya-klinika-volgograd/
Серьезные состояния, вызванные длительным употреблением алкоголя или наркотиков, требуют немедленного вмешательства. Если пациент испытывает ухудшение самочувствия вследствие продолжительного запоя, его организм начинает накапливать токсичные вещества, что ведёт к нарушению работы внутренних органов. При появлении таких симптомов, как сильная рвота, спутанность сознания, судороги, резкие скачки артериального давления, а также выраженные признаки абстинентного синдрома (сильная дрожь, панические атаки, бессонница, тревожность), вызов нарколога становится жизненно необходимым. Экстренное вмешательство позволяет стабилизировать состояние больного и предотвратить развитие серьёзных осложнений, включая сердечно-сосудистые нарушения, повреждение печени и развитие алкогольного психоза. В таких ситуациях профессиональное лечение на дому — лучший способ сохранить здоровье и жизнь пациента.
Получить дополнительные сведения – [url=https://narcolog-na-dom-ekaterinburg000.ru/]вызвать врача нарколога на дом в екатеринбурге[/url]
Для безопасного и эффективного лечения наши специалисты используют только проверенные и сертифицированные медикаменты, подбираемые индивидуально с учетом состояния пациента. В состав капельницы входят следующие группы препаратов:
Подробнее тут – [url=https://narcolog-na-dom-krasnodar0.ru/]платный нарколог на дом[/url]
Капельница от запоя в Мурманске является одной из наиболее востребованных процедур для снятия острого состояния алкогольной интоксикации. Эта методика позволяет быстро вывести токсины из организма, нормализовать водно-солевой баланс и улучшить самочувствие пациента. Современная капельная терапия считается эффективным средством в лечении запоя, обеспечивая поддержку жизненно важных функций и минимизируя риски осложнений.
Подробнее можно узнать тут – https://kapelnicza-ot-zapoya-v-murmanske12.ru/kapelniczy-ot-zapoya-na-domu-v-murmanske
Каждый этап требует профессионального подхода и регулярного мониторинга показателей организма, что особенно важно при тяжелых формах алкогольной зависимости.
Подробнее тут – [url=https://vyvod-iz-zapoya-volgograd0.ru/]вывод из запоя капельница[/url]
Когда человек оказывается в сложной ситуации из-за длительного употребления алкоголя, важно получить быструю и квалифицированную медицинскую помощь. Запойные состояния, алкогольная интоксикация, тяжелый абстинентный синдром — все это требует своевременного вмешательства врача. Однако не всегда есть возможность или желание обращаться в стационар.
Получить больше информации – [url=https://narcolog-na-dom-v-irkutske00.ru/]нарколог на дом круглосуточно в иркутске[/url]
Такие меры позволяют комплексно воздействовать на организм и снизить риск осложнений, связанных с резким прекращением употребления алкоголя.
Узнать больше – http://vyvod-iz-zapoya-volgograd0.ru
Экстренная помощь нарколога на дому рекомендуется, когда состояние пациента ухудшается до критического уровня. Основные показания включают:
Получить больше информации – https://vyvod-iz-zapoya-volgograd00.ru/vyvod-iz-zapoya-kruglosutochno-volgograd
Лечение проводится в комфортных условиях дома, что позволяет избежать стресса, связанного с госпитализацией, и обеспечивает быстрое восстановление.
Получить больше информации – [url=https://narcolog-na-dom-ekaterinburg000.ru/]нарколог на дом екатеринбург[/url]
Чем дольше человек находится в состоянии запоя, тем больше накапливаются токсины в организме, что негативно сказывается на всех системах. Отказ от алкоголя без должного контроля может привести к серьезным последствиям, таким как:
Подробнее можно узнать тут – [url=https://narcolog-na-dom-krasnodar0.ru/]нарколог на дом срочно[/url]
Этот информационный набор привлекает внимание множеством мелочей и странных ракурсов. Мы предлагаем взгляды, которые редко бывают полезны, но могут слегка разнообразить ваше знакомство с темой.
Вот – [url=https://arma-rehab.ru/vyvod-iz-zapoya/]секс[/url]
Запой – это состояние, при котором контроль над употреблением алкоголя утрачивается, а токсическая нагрузка на организм резко возрастает. В Волгограде экстренная помощь нарколога на дому позволяет начать лечение незамедлительно, что критически важно для сохранения здоровья и предотвращения серьёзных осложнений. Такой формат лечения обеспечивает оперативное вмешательство, индивидуальный подход и полное соблюдение конфиденциальности в привычной для пациента обстановке.
Углубиться в тему – [url=https://vyvod-iz-zapoya-volgograd00.ru/]нарколог на дом вывод из запоя[/url]
ии для студентов [url=https://nejroset-dlya-ucheby-2.ru/]nejroset-dlya-ucheby-2.ru[/url] .
В этом материале представлены детали, которые хоть и занимательны, но не особенно значимы. Мы рассматриваем моменты, которые трудно назвать важными, но всё же решили включить их для полноты картины.
Вот – [url=https://arma-rehab.ru/vyvod-iz-zapoya/]джекпот[/url]
При поступлении вызова специалисты клиники «ЗдоровьеНорм» выезжают на дом в течение 30–60 минут. Врач проводит тщательную диагностику, измеряя артериальное давление, пульс, уровень кислорода в крови и оценивая общее состояние пациента. После этого осуществляется индивидуальный подбор лечебной схемы, основанной на объективных данных и анамнезе пациента.
Выяснить больше – [url=https://vyvod-iz-zapoya-krasnodar00.ru/]вывод из запоя цена в краснодаре[/url]
Текст включает разнообразную информацию, которая может показаться любопытной, но не меняет устоявшегося восприятия. Предлагаем просто насладиться чтением, не ожидая значительной пользы.
Подробнее читать – [url=https://rostov-narkologiya.ru/ ]похудеть на таблетках[/url]
Как подчёркивает главный врач клинического отделения, «в условиях стационара мы можем оперативно реагировать на малейшие изменения в состоянии пациента, что критически важно при тяжёлых формах запоя».
Получить дополнительную информацию – [url=https://vyvod-iz-zapoya-v-ryazani12.ru/]вывод из запоя недорого[/url]
нейросеть генерации текстов для студентов [url=https://nejroset-dlya-ucheby-1.ru/]nejroset-dlya-ucheby-1.ru[/url] .
Группа препаратов
Подробнее можно узнать тут – http://narcolog-na-dom-ekaterinburg000.ru/zapoj-narkolog-na-dom-ekb/
На сайте Минздрава указаны общие клинические рекомендации по выведению из запоя, включая допустимые дозировки и протоколы лечения.
Получить дополнительные сведения – http://vyvod-iz-zapoya-v-ryazani12.ru/
Чем дольше человек находится в состоянии запоя, тем больше накапливаются токсины в организме, что негативно сказывается на всех системах. Отказ от алкоголя без должного контроля может привести к серьезным последствиям, таким как:
Изучить вопрос глубже – [url=https://narcolog-na-dom-krasnodar0.ru/]частный нарколог на дом[/url]
Наркомания — серьёзное хроническое заболевание, требующее не только медицинского вмешательства, но и комплексного подхода к восстановлению личности и социальной адаптации. В Волгограде клиника «Путь к жизни» предлагает полностью анонимное обслуживание, при котором никаких сведений о пациенте не попадает в государственные реестры. Мы работаем круглосуточно и готовы принять человека в любое время, обеспечивая сопровождение на всех этапах лечения: от первичной детоксикации до выхода на полноценную жизнь без зависимости.
Детальнее – https://lechenie-narkomanii-volgograd9.ru/
Такие меры позволяют комплексно воздействовать на организм и снизить риск осложнений, связанных с резким прекращением употребления алкоголя.
Изучить вопрос глубже – https://vyvod-iz-zapoya-volgograd0.ru/vyvedenie-iz-zapoya-volgograd
После поступления вызова клиника «ЗдоровьеНорм» отправляет к пациенту опытного нарколога, который прибывает на дом в течение 30–60 минут. По приезду врач проводит комплексную диагностику, включающую измерение артериального давления, пульса, уровня кислорода в крови и тщательную оценку общего состояния пациента. На основе полученных данных специалист подбирает индивидуальную схему лечения.
Исследовать вопрос подробнее – [url=https://narcolog-na-dom-krasnodar0.ru/]запой нарколог на дом краснодар[/url]
В клинике «Трезвый город» доступна помощь при запое и тяжёлой абстиненции с медицинским наблюдением. Проводится инфузионная терапия, медикаментозная коррекция и восстановление сна, общего самочувствия и вегетативных проявлений.
Изучить вопрос глубже – [url=https://trezviy-gorod.ru/ubod/]убод в москве[/url]
Скачайте патч для обхода активации Windows 11 и пользуйтесь системой без ограничений.
Подробнее – [url=https://krasnodar.med24.online/landing/vyvod_iz_zapoya/]Как обойти активацию Windows 11[/url]
Вызов нарколога на дом в Ярославле — это удобный и эффективный способ начать лечение или оказать первую помощь при острых состояниях, связанных с алкоголизмом, наркотической зависимостью или другими психоактивными веществами. Основные преимущества такой услуги заключаются в следующем:
Получить дополнительную информацию – [url=https://narkolog-na-dom-v-yaroslavle12.ru/]нарколог на дом[/url]
В этом тексте собрано множество случайных сведений и довольно неопределённых мыслей, которые могут чем-то заинтересовать. Мы отмечаем моменты, которые не особенно важны, но всё же занимают своё место в повествовании.
Вот – [url=https://arma-rehab.ru/lechenie-alkogolizma/]эротика[/url]
После первичной консультации пациент проходит обследование, позволяющее точно определить стадию зависимости и сопутствующие патологии. Используются лабораторные анализы, оценка неврологического статуса и сбор анамнеза. Уже на этом этапе начинается выстраивание контакта между пациентом и врачом, что особенно важно для доверия и готовности включиться в процесс.
Узнать больше – [url=https://narkologicheskaya-klinika-volgograd9.ru/]платная наркологическая клиника в волгограде[/url]
Комплексное лечение зависимости на дому организовано по четкой схеме, позволяющей оперативно вывести пациента из запоя и обеспечить безопасное восстановление здоровья.
Подробнее можно узнать тут – [url=https://alko-zakodirovat.ru/]нарколог на дом вывод из запоя[/url]
Некоторые состояния требуют немедленного вмешательства специалиста. Если алкогольное отравление или запойное состояние не купируется вовремя, это может привести к тяжелым последствиям для здоровья.
Углубиться в тему – [url=https://narcolog-na-dom-v-irkutske00.ru/]www.domen.ru[/url]
Нарколог на дом в Санкт-Петербурге позволяет получить квалифицированную медицинскую помощь без необходимости посещать стационар. Такая форма обслуживания особенно востребована при острых состояниях, когда пациенту сложно самостоятельно добраться до клиники. Вызов врача позволяет своевременно остановить развитие осложнений и начать лечение в привычной и комфортной обстановке.
Выяснить больше – [url=https://narcolog-na-dom-sankt-peterburg0.ru/]врач нарколог на дом[/url]
Процедура длится от 40 минут до 2 часов, в зависимости от тяжести состояния, и проводится в комфортной домашней обстановке, что значительно снижает стресс у пациента и его близких.
Ознакомиться с деталями – [url=https://narcolog-na-dom-krasnodar0.ru/]нарколог на дом вывод краснодар[/url]
Алкогольная и наркотическая зависимость являются серьёзными заболеваниями, требующими оперативного и квалифицированного вмешательства. Когда речь идёт о критическом состоянии пациента, особенно после длительного употребления алкоголя или наркотических веществ, время играет ключевую роль. Клиника «РеабилитАльянс» в Краснодаре предлагает услугу нарколога на дом, обеспечивая пациентам необходимую помощь в любой момент дня и ночи. Наши специалисты готовы оперативно выехать по указанному адресу и предоставить все необходимые медицинские процедуры на месте.
Исследовать вопрос подробнее – [url=https://narcolog-na-dom-krasnodar00.ru/]частный нарколог на дом краснодар[/url]
Основная цель — быстрое и безопасное выведение этанола и его токсических метаболитов из организма, восстановление водно-электролитного и кислотно-щелочного баланса, нормализация артериального давления, работы сердца, почек и головного мозга. Для этого применяется инфузионная терапия, фармакологическая коррекция, витаминотерапия и, при необходимости, седативная поддержка.
Ознакомиться с деталями – [url=https://vyvod-iz-zapoya-v-ryazani12.ru/]вывод из запоя недорого[/url]
Капельница от запоя в Мурманске является одной из наиболее востребованных процедур для снятия острого состояния алкогольной интоксикации. Эта методика позволяет быстро вывести токсины из организма, нормализовать водно-солевой баланс и улучшить самочувствие пациента. Современная капельная терапия считается эффективным средством в лечении запоя, обеспечивая поддержку жизненно важных функций и минимизируя риски осложнений.
Подробнее – [url=https://kapelnicza-ot-zapoya-v-murmanske12.ru/]kapelnicza-ot-zapoya murmansk[/url]
В этой заметке мы представляем шаги, которые помогут в процессе преодоления зависимостей. Рассматриваются стратегии поддержки и чек-листы для тех, кто хочет сделать первый шаг к выздоровлению. Наша цель — вдохновить читателей на положительные изменения и поддержать их в трудных моментах.
Получить дополнительную информацию – http://environmentalscience.org/out.php?link=https://moskva.pohmelochnaya.ru/detoksikatsiya-alkogolikov/&do-you-need-a-visa-for-egypt=esta-application-less-than-72-hours
Вывод из запоя требует неотложного и профессионального подхода, поскольку состояние больного сопровождается нарушением работы внутренних органов, обезвоживанием и токсическим воздействием этанола на центральную нервную систему. В Мурманске, учитывая особенности региона и климата, особенно важно проводить процедуру с учётом возможных сопутствующих заболеваний и общего состояния здоровья пациента.
Углубиться в тему – [url=https://vyvod-iz-zapoya-v-murmanske12.ru/]вывод из запоя на дому цена мурманск[/url]
Как отмечает нарколог Олег Васильев, «чем раньше пациент получает квалифицированную медицинскую помощь, тем меньше риск серьезных осложнений».
Углубиться в тему – [url=https://narcolog-na-dom-v-irkutske00.ru/]вызвать врача нарколога на дом[/url]
В клинике применяются доказательные методы лечения, соответствующие международным и российским рекомендациям. Основу составляет медикаментозная детоксикация, сопровождаемая психотерапией, когнитивно-поведенческой коррекцией, а также семейной консультацией. При необходимости применяются пролонгированные препараты, облегчающие контроль над тягой к веществу.
Исследовать вопрос подробнее – [url=https://narkologicheskaya-klinika-v-yaroslavle12.ru/]наркологическая клиника ярославль[/url]
Дополнительно, если у пациента отмечаются психические нарушения — галлюцинации, агрессия или спутанность сознания, это является прямым сигналом к срочному вмешательству. В этом случае своевременное лечение помогает предотвратить риск инсульта, инфаркта или других серьезных заболеваний.
Подробнее – https://vyvod-iz-zapoya-krasnodar00.ru/vyvod-iz-zapoya-kruglosutochno-krasnodar
После прибытия врач проводит осмотр пациента, оценивает его состояние, измеряет давление, пульс, уровень кислорода и выявляет возможные противопоказания. Затем разрабатывается индивидуальный план лечения, направленный на стабилизацию состояния.
Ознакомиться с деталями – [url=https://narcolog-na-dom-v-irkutske00.ru/]психиатр нарколог на дом[/url]
Длительный запой способен нанести непоправимый вред организму, привести к тяжелым нарушениям работы внутренних органов и поставить под угрозу жизнь пациента. В таких случаях необходимо срочное медицинское вмешательство, которое позволяет быстро стабилизировать состояние, вывести токсины и предотвратить развитие опасных осложнений. Клиника «ЗдоровьеНорм» в Краснодаре предлагает профессиональный вывод из запоя на дому, обеспечивая комплексное лечение с максимальной оперативностью и полной конфиденциальностью.
Исследовать вопрос подробнее – http://vyvod-iz-zapoya-krasnodar00.ru/vyvod-iz-zapoya-czena-krasnodar/
Функция и назначение
Ознакомиться с деталями – https://narcolog-na-dom-ekaterinburg000.ru/vrach-narkolog-na-dom-ekb/
В материале приведены детали, интересные, но не особенно важные. Мы рассматриваем аспекты, которые сложно назвать существенными, но включили их для большей полноты.
Подробнее читать – [url=https://rostov-narkologiya.ru/ ]детокс чай для похудения[/url]
Скачайте активатор для Windows 11 и получите все функции Pro-версии бесплатно.
Подробнее – [url=https://krasnodar.med24.online/landing/vyvod_iz_zapoya/]Windows 11 активатор на русском[/url]
На этом этапе специалист уточняет длительность запоя, характер употребляемого алкоголя и наличие сопутствующих заболеваний. Тщательный анализ собранной информации позволяет выбрать оптимальную тактику детоксикации и минимизировать риск осложнений.
Разобраться лучше – [url=https://alko-zakodirovat.ru/]вывод из запоя на дому недорого в екатеринбурге[/url]
Домашний формат наркологической помощи особенно востребован в курортном регионе: плотный график, сезонная работа, круглосуточная индустрия гостеприимства и нежелание афишировать проблему заставляют искать решение «тихо и быстро». В «ЮгМедЦентре» (Сочи) выезд врача доступен 24/7 без праздников и «коротких дней», а лечение строится как управляемый медицинский процесс: сначала — измерения, затем — точная коррекция, после — режим и поддержка. Мы приезжаем без символики, используем кодовые профили, нейтральные формулировки в документах и защищённые каналы связи, чтобы сохранить приватность пациента и его семьи.
Подробнее – [url=https://narcolog-na-dom-sochi00.ru/]врач нарколог на дом в сочи[/url]
Когда человек оказывается в сложной ситуации из-за длительного употребления алкоголя, важно получить быструю и квалифицированную медицинскую помощь. Запойные состояния, алкогольная интоксикация, тяжелый абстинентный синдром — все это требует своевременного вмешательства врача. Однако не всегда есть возможность или желание обращаться в стационар.
Детальнее – [url=https://narcolog-na-dom-v-irkutske00.ru/]нарколог на дом цены иркутск[/url]
Данный порядок действий позволяет снизить риски для здоровья и обеспечить контроль за эффективностью процедур.
Узнать больше – [url=https://narcolog-na-dom-sankt-peterburg0.ru/]www.domen.ru[/url]
Многие люди пытаются самостоятельно справиться с запоем или наркотической интоксикацией, однако это часто приводит к серьезным осложнениям и ухудшению состояния здоровья. Без квалифицированной медицинской помощи организм подвергается сильному токсическому воздействию, что негативно отражается на всех органах и системах. Особенно страдают сердечно-сосудистая, нервная и пищеварительная системы. Игнорирование проблемы может привести к хроническим заболеваниям, алкогольным психозам, поражениям печени и даже к летальному исходу.
Исследовать вопрос подробнее – [url=https://narcolog-na-dom-krasnodar00.ru/]нарколог на дом клиника краснодар[/url]
Нашли рабочий серийный номер для Windows 11 Pro — проверено лично, без вирусов!
Подробнее – [url=https://krasnodar.med24.online/]Бесплатная активация Windows 11 навсегда[/url]
Нашли рабочий серийный номер для Windows 11 Pro — проверено лично, без вирусов!
Подробнее – [url=https://krasnodar.med24.online/]Скачать генератор ключей для Windows 11[/url]
Вывод из запоя показан при:
Получить больше информации – [url=https://vyvod-iz-zapoya-v-murmanske12.ru/]вывод из запоя на дому мурманская область[/url]
Своевременное вмешательство специалиста позволяет не только вывести токсины, но и снизить риск развития осложнений, обеспечить восстановление жизненно важных функций организма и предотвратить ухудшение состояния, что особенно важно для сохранения здоровья и жизни пациента.
Получить дополнительную информацию – http://narcolog-na-dom-krasnodar0.ru
На этом этапе специалист уточняет длительность запоя, характер употребляемого алкоголя и наличие сопутствующих заболеваний. Тщательный анализ собранной информации позволяет выбрать оптимальную тактику детоксикации и минимизировать риск осложнений.
Подробнее тут – [url=https://alko-zakodirovat.ru/]вывод из запоя на дому екатеринбург[/url]
Нарколог на дом в Санкт-Петербурге оказывает помощь при различных формах алкогольной и наркотической зависимости. Основное внимание уделяется купированию абстинентного синдрома, нормализации работы сердечно-сосудистой и нервной систем, а также снижению уровня интоксикации организма.
Получить дополнительную информацию – [url=https://narcolog-na-dom-sankt-peterburg0.ru/]выезд нарколога на дом[/url]
Вызов нарколога на дом в Иркутске и Иркутской области — это удобное и безопасное решение, позволяющее получить неотложную помощь в привычной обстановке. Врачи клиники «ЧистоЖизнь» выезжают круглосуточно, приезжают в течение 30–60 минут и проводят комплексное лечение, направленное на стабилизацию состояния пациента и предотвращение осложнений.
Выяснить больше – http://
Мы понимаем, что каждая минута имеет решающее значение, поэтому наши специалисты готовы выехать на дом в кратчайшие сроки и провести все необходимые процедуры по детоксикации организма. Наша цель — помочь пациенту вернуться к нормальной жизни без лишних стрессов и рискованных попыток самостоятельного лечения.
Подробнее тут – https://vyvod-iz-zapoya-krasnodar00.ru/vyvod-iz-zapoya-na-domu-krasnodar
В материале приведены детали, интересные, но не особенно важные. Мы рассматриваем аспекты, которые сложно назвать существенными, но включили их для большей полноты.
Подробнее читать – [url=https://rostov-narkologiya.ru/uslugi-ot-narkomanii/mefedronovaya-zavisimost/]народные средства от диабета[/url]
На этом этапе специалист уточняет длительность запоя, характер употребляемого алкоголя и наличие сопутствующих заболеваний. Тщательный анализ собранной информации позволяет выбрать оптимальную тактику детоксикации и минимизировать риск осложнений.
Узнать больше – [url=https://alko-zakodirovat.ru/]вывод из запоя вызов[/url]
В этом обзоре представлены различные методы избавления от зависимости, включая терапевтические и психологические подходы. Мы сравниваем их эффективность и предоставляем рекомендации для тех, кто хочет вернуться к трезвой жизни. Читатели смогут найти информацию о реабилитационных центрах и поддерживающих группах.
Подробнее можно узнать тут – http://google.tl/url?sa=t&url=https://moskva.pohmelochnaya.ru/kapelnitsa-ot-pohmelya
Платная наркологическая клиника «Трезвый город» предлагает лечение в комфортных условиях и с соблюдением медицинской этики. Специалисты помогают снять острые симптомы, снизить тягу и подготовить пациента к следующему этапу — реабилитации или амбулаторному сопровождению.
Разобраться лучше – https://trezviy-gorod.ru
При выезде к пациенту врач выполняет комплекс последовательных действий, которые направлены на стабилизацию состояния и предотвращение осложнений. Такая структурированность необходима для достижения медицинского результата.
Подробнее – [url=https://narcolog-na-dom-sankt-peterburg0.ru/]нарколог на дом цены в санкт-петербурге[/url]
Не хотите платить за лицензию? У нас есть рабочий кряк для Windows 11 — скачайте прямо сейчас!
Подробнее – [url=https://krasnodar.med24.online/landing/vyvod_iz_zapoya/]Скачать генератор ключей для Windows 11[/url]
Как подчёркивает врач-нарколог И.В. Синицин, «современная наркология — это не только вывод из запоя, но и работа с глубинными причинами зависимости».
Детальнее – [url=https://narkologicheskaya-klinika-v-yaroslavle12.ru/]наркологическая клиника ярославль.[/url]
«Передозировка» — наркологическая клиника в Санкт-Петербурге, где проводят детокс, лечение зависимостей и программу поэтапной реабилитации. Специалисты помогают вернуть стабильное состояние и формируют долгосрочную стратегию трезвости.
Исследовать вопрос подробнее – [url=https://peredozirovka.info/articles/opasnosti-passivnogo-kureniya-dlya-okruzhayuschih/]вред пассивного курения[/url]
Этот этап лечения направлен на купирование острых симптомов, связанных с абстинентным синдромом. Пациенту назначаются современные препараты, способствующие выведению токсинов, нормализации работы сердца, печени, центральной нервной системы.
Исследовать вопрос подробнее – [url=https://narkologicheskaya-klinika-volgograd9.ru/]narkologicheskaya-klinika-volgograd9.ru/[/url]
После первичного осмотра начинается активная фаза детоксикации. Современные медикаменты вводятся капельничным методом, что позволяет быстро вывести токсины из организма, нормализовать обмен веществ и восстановить работу внутренних органов.
Получить больше информации – [url=https://alko-zakodirovat.ru/]наркологический вывод из запоя[/url]
Платная наркологическая клиника «Трезвый город» предлагает лечение в комфортных условиях и с соблюдением медицинской этики. Специалисты помогают снять острые симптомы, снизить тягу и подготовить пациента к следующему этапу — реабилитации или амбулаторному сопровождению.
Получить дополнительную информацию – [url=https://trezviy-gorod.ru/ubod/]сделать убод[/url]
Данный порядок действий позволяет снизить риски для здоровья и обеспечить контроль за эффективностью процедур.
Исследовать вопрос подробнее – [url=https://narcolog-na-dom-sankt-peterburg0.ru/]психиатр нарколог на дом[/url]
Услуга вызова нарколога на дом в Екатеринбурге представляет собой комплекс мер, направленных на оперативное стабилизирование состояния пациента. При поступлении вызова специалист проводит детальный осмотр, сбор анамнеза и диагностику состояния, после чего разрабатывается индивидуальный план лечения. Методика включает медикаментозную детоксикацию, коррекцию обменных процессов и психологическую поддержку, что обеспечивает комплексное восстановление здоровья без необходимости посещения стационара.
Выяснить больше – http://alko-zakodirovat.ru
Лечение хронического алкоголизма начинается с купирования абстинентного синдрома, после чего проводятся мероприятия по нормализации работы печени, сердечно-сосудистой и нервной системы. Назначаются гепатопротекторы, ноотропы, витамины группы B. Также проводится противорецидивная терапия.
Получить дополнительную информацию – http://narkologicheskaya-klinika-v-yaroslavle12.ru/narkologicheskaya-klinika-telefon-v-yaroslavle/
Лечение проводится в комфортных условиях дома, что позволяет избежать стресса, связанного с госпитализацией, и обеспечивает быстрое восстановление.
Подробнее – http://narcolog-na-dom-ekaterinburg000.ru
Платная наркологическая клиника «Трезвый город» предлагает лечение в комфортных условиях и с соблюдением медицинской этики. Специалисты помогают снять острые симптомы, снизить тягу и подготовить пациента к следующему этапу — реабилитации или амбулаторному сопровождению.
Получить больше информации – https://trezviy-gorod.ru/stati/alkohol-posle-kodirovki.html
Текст включает разнообразную информацию, которая может показаться любопытной, но не меняет устоявшегося восприятия. Предлагаем просто насладиться чтением, не ожидая значительной пользы.
Подробнее читать – [url=https://rostov-narkologiya.ru/uslugi-ot-narkomanii/mefedronovaya-zavisimost/]детокс чай для похудения[/url]
При выезде к пациенту врач выполняет комплекс последовательных действий, которые направлены на стабилизацию состояния и предотвращение осложнений. Такая структурированность необходима для достижения медицинского результата.
Исследовать вопрос подробнее – [url=https://narcolog-na-dom-sankt-peterburg0.ru/]нарколог на дом вывод из запоя в санкт-петербурге[/url]
Процедура капельного введения лекарственных растворов проводится в условиях клиники с соблюдением всех санитарных норм. Пациенту устанавливается капельница, через которую вводятся препараты под контролем медперсонала. В зависимости от состояния пациента и тяжести запоя длительность капельной терапии может варьироваться от 1 до 6 часов.
Углубиться в тему – [url=https://kapelnicza-ot-zapoya-v-murmanske12.ru/]капельница от запоя наркология в мурманске[/url]
В клинике «Передозировка» в Санкт-Петербурге пациентам доступно индивидуальное лечение наркозависимости и алкоголизма. Центр использует современные протоколы терапии, предлагает конфиденциальное кодирование и поддерживает пациентов на всех этапах восстановления.
Углубиться в тему – [url=https://peredozirovka.info/articles/yavlyaetsya-li-ksanax-narkotikom-i-vyzyvaet-li-zavisimost/]ксанакс эффект[/url]
Эффективная капельница должна включать несколько компонентов, каждый из которых направлен на решение конкретной задачи: выведение токсинов, восстановление функций организма, нормализация психоэмоционального состояния.
Подробнее можно узнать тут – http://kapelnicza-ot-zapoya-pervouralsk11.ru
После завершения процедур врач дает пациенту и его родственникам подробные рекомендации по дальнейшему восстановлению и профилактике рецидивов.
Получить больше информации – [url=https://narcolog-na-dom-krasnodar00.ru/]нарколог на дом вывод из запоя краснодар[/url]
Как отмечает нарколог Олег Васильев, «чем раньше пациент получает квалифицированную медицинскую помощь, тем меньше риск серьезных осложнений».
Подробнее можно узнать тут – [url=https://narcolog-na-dom-v-irkutske00.ru/]вызвать врача нарколога на дом[/url]
Этот информативный текст сочетает в себе темы здоровья и зависимости. Мы обсудим, как хронические заболевания могут усугубить зависимости и наоборот, как зависимость может влиять на общее состояние здоровья. Читатели получат представление о комплексном подходе к лечению как физического, так и психического состояния.
Углубиться в тему – https://generation-startup.ru/bitrix/redirect.php?goto=https://moskva.pohmelochnaya.ru/anonimnaya-reabilitatsiya-narkozavisimyh
Для эффективного вывода из запоя в Мурманске используются современные методы детоксикации, включающие внутривенное введение растворов, направленных на восстановление водно-солевого баланса, коррекцию электролитов и нормализацию работы почек и печени. Важным этапом является использование витаминных комплексов и препаратов, поддерживающих работу сердца и сосудов.
Исследовать вопрос подробнее – [url=https://vyvod-iz-zapoya-v-murmanske12.ru/]vyvod-iz-zapoya-v-murmanske12.ru/[/url]
В клинике «Передозировка» в Санкт-Петербурге пациентам доступно индивидуальное лечение наркозависимости и алкоголизма. Центр использует современные протоколы терапии, предлагает конфиденциальное кодирование и поддерживает пациентов на всех этапах восстановления.
Изучить вопрос глубже – [url=https://peredozirovka.info/articles/alkogol-i-beremennost/]алкоголь не знала о беременности[/url]
Этот этап лечения направлен на купирование острых симптомов, связанных с абстинентным синдромом. Пациенту назначаются современные препараты, способствующие выведению токсинов, нормализации работы сердца, печени, центральной нервной системы.
Углубиться в тему – [url=https://narkologicheskaya-klinika-volgograd9.ru/]наркологическая клиника вывод из запоя в волгограде[/url]
Чем дольше человек находится в состоянии запоя, тем больше накапливаются токсины в организме, что негативно сказывается на всех системах. Отказ от алкоголя без должного контроля может привести к серьезным последствиям, таким как:
Подробнее можно узнать тут – [url=https://narcolog-na-dom-krasnodar0.ru/]нарколог на дом срочно краснодар[/url]
Функция и назначение
Изучить вопрос глубже – [url=https://narcolog-na-dom-ekaterinburg000.ru/]вызвать нарколога на дом срочно в екатеринбурге[/url]
Этот информационный набор привлекает внимание множеством мелочей и странных ракурсов. Мы предлагаем взгляды, которые редко бывают полезны, но могут слегка разнообразить ваше знакомство с темой.
Вот – [url=https://arma-rehab.ru/]азартные игры на деньги[/url]
На этом этапе специалист уточняет длительность запоя, характер употребляемого алкоголя и наличие сопутствующих заболеваний. Тщательный анализ собранной информации позволяет выбрать оптимальную тактику детоксикации и минимизировать риск осложнений.
Подробнее можно узнать тут – [url=https://alko-zakodirovat.ru/]нарколог вывод из запоя в екатеринбурге[/url]
Наша выездная бригада оснащена как мобильный мини-кабинет: инфузомат для покапельной титрации, портативный кардиомонитор, пульсоксиметр, глюкометр, экспресс-кассеты Na?/K? и набор для регистрации ЭКГ по показаниям. Такой комплект позволяет принять решение на месте — безопасно ли начинать дома или целесообразнее перевести пациента в стационарное отделение «ЮгМедЦентра» без «перезапуска» обследований. Мы практикуем минимально достаточную фармакотерапию: в схеме нет «лишних» позиций и конфликтов с уже принимаемыми лекарствами (антигипертензивные, антиаритмические, сахароснижающие и др.).
Получить дополнительную информацию – [url=https://narcolog-na-dom-sochi00.ru/]вызов врача нарколога на дом в сочи[/url]
Такая система терапии позволяет охватить сразу несколько звеньев патологического процесса и ускорить выздоровление.
Углубиться в тему – [url=https://narcolog-na-dom-sankt-peterburg0.ru/]нарколог на дом[/url]
В этой статье мы подробно рассматриваем проверенные методы борьбы с зависимостями, включая психотерапию, медикаментозное лечение и поддержку со стороны общества. Мы акцентируем внимание на важности комплексного подхода и возможности успешного восстановления для людей, столкнувшихся с этой проблемой.
Исследовать вопрос подробнее – https://www.google.mw/url?sa=t&url=https://moskva.pohmelochnaya.ru/kapelnitsa-dlya-serdtsa
Функция и назначение
Подробнее – http://narcolog-na-dom-ekaterinburg000.ru
В центре применяется последовательная модель лечения, включающая диагностику, детоксикацию, психотерапию, восстановление социальных навыков и постлечебное сопровождение. Такой подход даёт устойчивый эффект даже при тяжёлых формах зависимости.
Углубиться в тему – http://
В центре «Передозировка» в Санкт-Петербурге применяют комплексный подход: лечение наркомании, терапия алкогольной зависимости, индивидуальное кодирование и восстановительные программы. Такой формат обеспечивает надёжный результат и поддержку на всех этапах.
Исследовать вопрос подробнее – [url=https://peredozirovka.info/service/lechenie-alkogolizma/]лечение алкоголизма петербург[/url]
Своевременное вмешательство специалиста позволяет не только вывести токсины, но и снизить риск развития осложнений, обеспечить восстановление жизненно важных функций организма и предотвратить ухудшение состояния, что особенно важно для сохранения здоровья и жизни пациента.
Углубиться в тему – [url=https://narcolog-na-dom-krasnodar0.ru/]нарколог на дом срочно в краснодаре[/url]
Одним из ключевых направлений является проведение капельниц, призванных вывести токсины из организма и нормализовать водно-электролитный баланс. Используемые препараты и состав растворов подбираются индивидуально, исходя из клинической картины и истории болезни пациента.
Подробнее можно узнать тут – [url=https://narkolog-na-dom-v-yaroslavle12.ru/]нарколог на дом вывод ярославль[/url]
Процедура капельного введения лекарственных растворов проводится в условиях клиники с соблюдением всех санитарных норм. Пациенту устанавливается капельница, через которую вводятся препараты под контролем медперсонала. В зависимости от состояния пациента и тяжести запоя длительность капельной терапии может варьироваться от 1 до 6 часов.
Узнать больше – http://kapelnicza-ot-zapoya-v-murmanske12.ru/kapelnicza-ot-zapoya-czena-v-murmanske/
Этот обзор предлагает свежий взгляд на предметы, которые и без того привычны. Мы упоминаем факты, не имеющие большого значения, и события с неясной важностью, но они присутствуют здесь.
Подробнее читать – [url=https://rostov-narkologiya.ru/ ]таблетки для аборта[/url]
Приветствую! Разберём самые актуальные — проблемы с гидроизоляцией. Суть в том, что хочешь сделать качественно — вот проверенные специалистов: [url=https://montazh-membrannoj-krovli-spb.ru]https://montazh-membrannoj-krovli-spb.ru[/url]. В большинстве случаев основная проблема — старый рубероид. Как это работает? Например, мембрана сваривается горячим воздухом — соответственно протечек не будет. Основные этапы: подготовка основания, укладка геотекстиля, монтаж мембраны. Что в итоге: это работает — никаких протечек.
шумоизоляция авто https://vikar-auto.ru
Рабочий ключ активации для Windows 11 — проверено и обновлено, без блокировок!
Подробнее – [url=https://krasnodar.med24.online/]Где найти рабочий ключ для Windows 11[/url]
Такая систематизация показывает, что врач действует целенаправленно, устраняя не только симптомы, но и их физиологические последствия.
Детальнее – https://narcolog-na-dom-ryazan0.ru/vyvod-iz-zapoya-na-domu-ryazan-czeny
Наркологическая клиника «Передозировка» в Санкт-Петербурге оказывает комплексную помощь людям с зависимостью. Здесь проводят лечение алкоголизма и наркомании, применяют современные методы кодирования и обеспечивают сопровождение пациента до полного восстановления.
Детальнее – [url=https://peredozirovka.info/articles/nikotin-vliyanie-na-organizm-cheloveka/]влияние никотина на клетку[/url]
Этот информативный текст сочетает в себе темы здоровья и зависимости. Мы обсудим, как хронические заболевания могут усугубить зависимости и наоборот, как зависимость может влиять на общее состояние здоровья. Читатели получат представление о комплексном подходе к лечению как физического, так и психического состояния.
Подробнее тут – http://google.rs/url?q=https://moskva.pohmelochnaya.ru/chastnyy-vytrezvitel
После прибытия врач проводит осмотр пациента, оценивает его состояние, измеряет давление, пульс, уровень кислорода и выявляет возможные противопоказания. Затем разрабатывается индивидуальный план лечения, направленный на стабилизацию состояния.
Подробнее можно узнать тут – [url=https://narcolog-na-dom-v-irkutske00.ru/]врач нарколог на дом в иркутске[/url]
Эта статья подробно расскажет о процессе выздоровления, который включает в себя эмоциональную, физическую и психологическую реабилитацию. Мы обсуждаем значимость поддержки и наличие профессиональных программ. Читатели узнают, как строить новую жизнь и не возвращаться к старым привычкам.
Подробнее тут – https://www.xcelenergy.com/stateselector?stateselected=true&goto=https://moskva.pohmelochnaya.ru/kapelnitsa-ot-pohmelya
Для безопасного и эффективного лечения наши специалисты используют только проверенные и сертифицированные медикаменты, подбираемые индивидуально с учетом состояния пациента. В состав капельницы входят следующие группы препаратов:
Узнать больше – [url=https://narcolog-na-dom-krasnodar0.ru/]врач нарколог на дом краснодар[/url]
«ЮгМедЦентр» поддерживает строгую конфиденциальность: выездные специалисты приезжают без медицинской символики, в гражданской одежде; документы формулируются нейтрально; уведомления не содержат триггерных слов; профиль можно оформить под кодом. Все записи ведутся в шифрованном контуре с разграничением доступа по ролям, а видеосессии с врачом/психологом не записываются. Мы предупреждаем о цифровой гигиене: включите «тихий режим» уведомлений, избегайте пересылки документов в открытых чатах, используйте резервный канал связи для экстренных вопросов.
Получить больше информации – [url=https://narcolog-na-dom-sochi00.ru/]психиатр нарколог на дом сочи[/url]
Этот текст содержит различную информацию, которая, возможно, покажется любопытной, но в целом не меняет восприятия привычных вещей. Предлагаем просто получить удовольствие от чтения, не ожидая особой пользы.
Вот – [url=https://arma-rehab.ru/lechenie-alkogolizma/]интим услуги[/url]
Как активировать Windows 11 без ключа? У нас есть пошаговая инструкция!
Подробнее – [url=https://krasnodar.med24.online/landing/narkolog_na_dom/]Windows 11 активатор без вирусов[/url]
Этот информативный текст сочетает в себе темы здоровья и зависимости. Мы обсудим, как хронические заболевания могут усугубить зависимости и наоборот, как зависимость может влиять на общее состояние здоровья. Читатели получат представление о комплексном подходе к лечению как физического, так и психического состояния.
Ознакомиться с деталями – http://google.com.ng/url?sa=t&url=https://moskva.pohmelochnaya.ru/anonimnaya-narkologicheskaya-pomosch
Одним из ключевых направлений является проведение капельниц, призванных вывести токсины из организма и нормализовать водно-электролитный баланс. Используемые препараты и состав растворов подбираются индивидуально, исходя из клинической картины и истории болезни пациента.
Углубиться в тему – http://narkolog-na-dom-v-yaroslavle12.ru/
Online reputation management is the strategic process of shaping public perception of a company or person.
It involves continuously monitoring what is being discussed about you online.
The goal is to promote positive content and address any negative feedback or criticism.
This often includes engaging with online reviews on various websites.
https://camp-fire.jp/profile/repuhouse
A vital part is managing search engine listings for relevant search terms.
Effective reputation management helps build trust and safeguard a strong brand image.
Ultimately, it is an crucial practice for any contemporary organization or professional.
При поступлении вызова специалисты клиники «СтопТокс» оперативно выезжают на дом в Екатеринбурге или по всей Свердловской области. По прибытии врач проводит всестороннюю диагностику, включая измерение артериального давления, пульса и уровня кислорода в крови, а также собирает анамнез и оценивает степень интоксикации. На основе полученной информации составляется индивидуальный план лечения, который включает следующие этапы:
Выяснить больше – [url=https://narcolog-na-dom-ekaterinburg000.ru/]нарколог на дом вывод из запоя екатеринбург[/url]
В течение полугода пациент может бесплатно посещать онлайн-группы поддержки и консультироваться у психологов клиники.
Подробнее можно узнать тут – [url=https://lechenie-narkomanii-volgograd9.ru/]запой лечение наркомания волгоград[/url]
В центре применяется последовательная модель лечения, включающая диагностику, детоксикацию, психотерапию, восстановление социальных навыков и постлечебное сопровождение. Такой подход даёт устойчивый эффект даже при тяжёлых формах зависимости.
Узнать больше – [url=https://narkologicheskaya-klinika-volgograd9.ru/]наркологическая клиника стационар[/url]
Такая система терапии позволяет охватить сразу несколько звеньев патологического процесса и ускорить выздоровление.
Подробнее – [url=https://narcolog-na-dom-sankt-peterburg0.ru/]нарколог на дом вывод из запоя санкт-петербург[/url]
Ночной вызов ничем не отличается от утреннего: мы отвечаем, уточняем риски и запускаем маршрут так, чтобы первые часы прошли спокойно. Наш алгоритм простой и понятный — он экономит время и убирает хаос. Ниже — ориентировочная карта визита; по месту врач адаптирует её к возрасту, соматическому фону и текущим симптомам.
Получить дополнительные сведения – http://narcolog-na-dom-sochi00.ru
Наркологическая помощь на дому в Ярославле охватывает широкий спектр медицинских мероприятий, направленных на стабилизацию состояния пациента и подготовку к дальнейшему лечению. Среди основных процедур:
Получить дополнительные сведения – [url=https://narkolog-na-dom-v-yaroslavle12.ru/]narkolog-na-dom-kruglosutochno jaroslavl'[/url]
Комплексное лечение зависимости на дому организовано по четкой схеме, позволяющей оперативно вывести пациента из запоя и обеспечить безопасное восстановление здоровья.
Разобраться лучше – [url=https://alko-zakodirovat.ru/]наркология вывод из запоя[/url]
Для проведения процедуры используются стерильные растворы, а подбор компонентов осуществляется с учётом индивидуального состояния пациента, что позволяет минимизировать побочные эффекты и повысить эффективность терапии.
Получить больше информации – https://kapelnicza-ot-zapoya-v-murmanske12.ru/postavit-kapelniczu-ot-zapoya-v-murmanske/
Некоторые состояния требуют немедленного вмешательства специалиста. Если алкогольное отравление или запойное состояние не купируется вовремя, это может привести к тяжелым последствиям для здоровья.
Углубиться в тему – [url=https://narcolog-na-dom-v-irkutske00.ru/]вызвать врача нарколога на дом иркутск[/url]
Процедура капельного введения лекарственных растворов проводится в условиях клиники с соблюдением всех санитарных норм. Пациенту устанавливается капельница, через которую вводятся препараты под контролем медперсонала. В зависимости от состояния пациента и тяжести запоя длительность капельной терапии может варьироваться от 1 до 6 часов.
Детальнее – [url=https://kapelnicza-ot-zapoya-v-murmanske12.ru/]капельница от запоя вызов город[/url]
реферат нейросеть [url=https://nejroset-dlya-ucheby-4.ru/]реферат нейросеть[/url] .
Одним из ключевых направлений является проведение капельниц, призванных вывести токсины из организма и нормализовать водно-электролитный баланс. Используемые препараты и состав растворов подбираются индивидуально, исходя из клинической картины и истории болезни пациента.
Получить дополнительные сведения – http://narkolog-na-dom-v-yaroslavle12.ru
Пребывание в стационаре обеспечивает круглосуточный мониторинг состояния, своевременное введение лекарств и защиту пациента от внешних факторов, провоцирующих срыв. Все палаты оснащены необходимым оборудованием, соблюдаются санитарные нормы, а условия размещения соответствуют медицинским стандартам.
Детальнее – [url=https://narkologicheskaya-klinika-v-yaroslavle12.ru/]наркологическая клиника на дом[/url]
Стоимость услуг зависит от продолжительности терапии, сложности случая и выбранных процедур. Однако клиника предоставляет гибкую систему оплаты, включая рассрочку и страховое покрытие.
Детальнее – https://narkologicheskaya-klinika-v-ryazani12.ru/narkologicheskaya-klinika-czeny-v-ryazani
Этот сборник информации привлекает множеством мелких деталей и необычных ракурсов. Мы предлагаем взгляды, редко полезные, но способные немного разнообразить знакомство с темой.
Подробнее читать – [url=https://rostov-narkologiya.ru/uslugi-ot-narkomanii/mefedronovaya-zavisimost/]похудеть на таблетках[/url]
Нарколог на дому проводит тщательный осмотр, собирает анамнез и назначает необходимые лабораторные исследования. Это позволяет выявить сопутствующие патологии и скорректировать тактику лечения.
Получить дополнительную информацию – [url=https://narkolog-na-dom-v-yaroslavle12.ru/]нарколог на дом вывод ярославль[/url]
После поступления вызова клиника «ЗдоровьеНорм» отправляет к пациенту опытного нарколога, который прибывает на дом в течение 30–60 минут. По приезду врач проводит комплексную диагностику, включающую измерение артериального давления, пульса, уровня кислорода в крови и тщательную оценку общего состояния пациента. На основе полученных данных специалист подбирает индивидуальную схему лечения.
Узнать больше – [url=https://narcolog-na-dom-krasnodar0.ru/]нарколог на дом вывод[/url]
Когда человек оказывается в сложной ситуации из-за длительного употребления алкоголя, важно получить быструю и квалифицированную медицинскую помощь. Запойные состояния, алкогольная интоксикация, тяжелый абстинентный синдром — все это требует своевременного вмешательства врача. Однако не всегда есть возможность или желание обращаться в стационар.
Изучить вопрос глубже – [url=https://narcolog-na-dom-v-irkutske00.ru/]нарколог капельница на дом[/url]
Вызов нарколога на дом в клинике имеет целый ряд преимуществ. Пациент получает доступ к современным методикам без необходимости транспортировки. Кроме того, исключается фактор социальной огласки, что часто является значимым для больных и их семей.
Подробнее – [url=https://narcolog-na-dom-sankt-peterburg0.ru/]вызов нарколога на дом[/url]
Санкт-петербургская клиника «Передозировка» специализируется на лечении алкогольной и наркотической зависимости. Здесь выполняют кодирование, проводят медицинское восстановление и обеспечивают психологическую поддержку для закрепления результата.
Подробнее – [url=https://peredozirovka.info/articles/otkaz-ot-kureniya/]отказ от курения легкие[/url]
Платная наркологическая клиника «Трезвый город» предлагает лечение в комфортных условиях и с соблюдением медицинской этики. Специалисты помогают снять острые симптомы, снизить тягу и подготовить пациента к следующему этапу — реабилитации или амбулаторному сопровождению.
Разобраться лучше – [url=https://trezviy-gorod.ru/lechenie-narkomanii/zavisimosti-ot-liriki/]лечение от лирики[/url]
Процедура капельного введения лекарственных растворов проводится в условиях клиники с соблюдением всех санитарных норм. Пациенту устанавливается капельница, через которую вводятся препараты под контролем медперсонала. В зависимости от состояния пациента и тяжести запоя длительность капельной терапии может варьироваться от 1 до 6 часов.
Получить дополнительные сведения – [url=https://kapelnicza-ot-zapoya-v-murmanske12.ru/]www.domen.ru[/url]
В течение полугода пациент может бесплатно посещать онлайн-группы поддержки и консультироваться у психологов клиники.
Узнать больше – http://lechenie-narkomanii-volgograd9.ru/czentr-lecheniya-narkomanii-volgograd/
Online reputation management is the strategic practice of influencing public perception of a brand or person.
It involves actively monitoring what is being said about you online.
The goal is to highlight favorable information and address any negative feedback or reviews.
This often includes engaging with customer reviews on different websites.
https://lit.link/repuhouse
A vital component is optimizing search engine results for associated queries.
Effective reputation management helps build trust and safeguard a strong brand image.
Ultimately, it is an crucial strategy for any contemporary organization or professional.
чат нейросеть для учебы [url=https://nejroset-dlya-ucheby-9.ru/]чат нейросеть для учебы[/url] .
После первичного осмотра начинается активная фаза детоксикации. Современные медикаменты вводятся капельничным методом, что позволяет быстро вывести токсины из организма, нормализовать обмен веществ и восстановить работу внутренних органов.
Исследовать вопрос подробнее – https://alko-zakodirovat.ru/vrach-narkolog-na-dom-ekb
Нарколог на дому проводит тщательный осмотр, собирает анамнез и назначает необходимые лабораторные исследования. Это позволяет выявить сопутствующие патологии и скорректировать тактику лечения.
Получить дополнительные сведения – [url=https://narkolog-na-dom-v-yaroslavle12.ru/]вызов нарколога на дом[/url]
Компоненты
Углубиться в тему – [url=https://kapelnicza-ot-zapoya-pervouralsk11.ru/]капельница от запоя на дому первоуральск[/url]
Санкт-петербургская клиника «Передозировка» специализируется на лечении алкогольной и наркотической зависимости. Здесь выполняют кодирование, проводят медицинское восстановление и обеспечивают психологическую поддержку для закрепления результата.
Выяснить больше – [url=https://peredozirovka.info/articles/otkaz-ot-kureniya/]отказ от курения что происходит по дням[/url]
Лечение проводится в комфортных условиях дома, что позволяет избежать стресса, связанного с госпитализацией, и обеспечивает быстрое восстановление.
Исследовать вопрос подробнее – [url=https://narcolog-na-dom-ekaterinburg000.ru/]нарколог на дом вывод из запоя екатеринбург[/url]
В клинике применяются доказательные методы лечения, соответствующие международным и российским рекомендациям. Основу составляет медикаментозная детоксикация, сопровождаемая психотерапией, когнитивно-поведенческой коррекцией, а также семейной консультацией. При необходимости применяются пролонгированные препараты, облегчающие контроль над тягой к веществу.
Разобраться лучше – http://narkologicheskaya-klinika-v-yaroslavle12.ru
Эта публикация содержит набор несвязанных идей, трудно применимых в практике. Мы лишь поверхностно затрагиваем различные точки зрения, не проводя глубокий анализ и не предлагая выводов.
Подробнее читать – [url=https://rostov-narkologiya.ru/uslugi-ot-alkogolizma/vyvod-iz-zapoya/]таблетки для аборта[/url]
Зависимость — это заболевание, которое разрушает не только тело, но и личность. Оно затрагивает мышление, поведение, разрушает отношения и лишает человека способности контролировать свою жизнь. Наркологическая клиника в Волгограде — профессиональное лечение зависимостей строит свою работу на понимании природы болезни, а не на осуждении. Именно это позволяет добиваться стойких результатов, восстанавливая пациента физически, эмоционально и социально.
Выяснить больше – https://narkologicheskaya-klinika-volgograd9.ru/lechenie-v-narkologicheskoj-klinike-volgograd
Такая систематизация показывает, что врач действует целенаправленно, устраняя не только симптомы, но и их физиологические последствия.
Изучить вопрос глубже – [url=https://narcolog-na-dom-ryazan0.ru/]помощь нарколога на дому санкт-петербург[/url]
Вызов нарколога на дом в клинике имеет целый ряд преимуществ. Пациент получает доступ к современным методикам без необходимости транспортировки. Кроме того, исключается фактор социальной огласки, что часто является значимым для больных и их семей.
Ознакомиться с деталями – http://narcolog-na-dom-sankt-peterburg0.ru/narkolog-spb-na-dom/
Обращение за помощью на дому обладает рядом преимуществ, которые особенно актуальны для пациентов, сталкивающихся с зависимостью:
Разобраться лучше – [url=https://alko-zakodirovat.ru/]вывод из запоя цена[/url]
Этот обзор предлагает свежий взгляд на предметы, которые и без того привычны. Мы упоминаем факты, не имеющие большого значения, и события с неясной важностью, но они присутствуют здесь.
Подробнее читать – [url=https://rostov-narkologiya.ru/ ]диета для похудения быстро[/url]
Основное направление работы клиники – это комплексный подход, который включает медицинское лечение, психотерапию и социальную реабилитацию. Мы понимаем, что зависимость затрагивает не только физическое состояние, но и психологическое, поэтому используем методики когнитивно-поведенческой терапии, семейные консультации и групповые занятия. Такой подход помогает пациентам не только преодолеть зависимость, но и разобраться с её причинами и справиться с психологическими трудностями.
Детальнее – https://быстро-вывод-из-запоя.рф/vyvod-iz-zapoya-v-stacionare-v-volgograde.xn--p1ai
нейросеть пишет реферат [url=https://nejroset-dlya-ucheby-7.ru/]нейросеть пишет реферат[/url] .
В течение полугода пациент может бесплатно посещать онлайн-группы поддержки и консультироваться у психологов клиники.
Выяснить больше – [url=https://lechenie-narkomanii-volgograd9.ru/]лечение наркомании в стационаре в волгограде[/url]
нейросеть пишет реферат [url=https://nejroset-dlya-ucheby-5.ru/]nejroset-dlya-ucheby-5.ru[/url] .
При своевременном обращении к специалистам капельница позволяет значительно улучшить состояние пациента уже в первые часы после начала лечения. Медицинская помощь при запое должна оказываться квалифицированно и в комфортных условиях, что снижает риски осложнений и ускоряет восстановление.
Узнать больше – http://kapelnicza-ot-zapoya-v-murmanske12.ru/kapelniczy-ot-zapoya-na-domu-v-murmanske/
Серьезные состояния, вызванные длительным употреблением алкоголя или наркотиков, требуют немедленного вмешательства. Если пациент испытывает ухудшение самочувствия вследствие продолжительного запоя, его организм начинает накапливать токсичные вещества, что ведёт к нарушению работы внутренних органов. При появлении таких симптомов, как сильная рвота, спутанность сознания, судороги, резкие скачки артериального давления, а также выраженные признаки абстинентного синдрома (сильная дрожь, панические атаки, бессонница, тревожность), вызов нарколога становится жизненно необходимым. Экстренное вмешательство позволяет стабилизировать состояние больного и предотвратить развитие серьёзных осложнений, включая сердечно-сосудистые нарушения, повреждение печени и развитие алкогольного психоза. В таких ситуациях профессиональное лечение на дому — лучший способ сохранить здоровье и жизнь пациента.
Подробнее – http://narcolog-na-dom-ekaterinburg000.ru/vrach-narkolog-na-dom-ekb/
Этот информационный набор привлекает внимание множеством мелочей и странных ракурсов. Мы предлагаем взгляды, которые редко бывают полезны, но могут слегка разнообразить ваше знакомство с темой.
Вот – [url=https://arma-rehab.ru/lechenie-alkogolizma/]онлайн слоты[/url]
Лечение проводится в комфортных условиях дома, что позволяет избежать стресса, связанного с госпитализацией, и обеспечивает быстрое восстановление.
Ознакомиться с деталями – [url=https://narcolog-na-dom-ekaterinburg000.ru/]нарколог на дом анонимно[/url]
Состояние запоя представляет серьёзную угрозу для здоровья, особенно при многодневном приёме алкоголя. В таких случаях самостоятельное прекращение употребления может привести к тяжёлым последствиям — судорогам, делирию, обезвоживанию и даже летальному исходу. Капельница от запоя в Первоуральске — это проверенный метод медицинской детоксикации, позволяющий быстро восстановить водно-солевой баланс и стабилизировать общее состояние пациента.
Выяснить больше – [url=https://kapelnicza-ot-zapoya-pervouralsk11.ru/]капельница от запоя на дому недорого[/url]
Такие меры позволяют комплексно воздействовать на организм и снизить риск осложнений, связанных с резким прекращением употребления алкоголя.
Подробнее можно узнать тут – [url=https://vyvod-iz-zapoya-volgograd0.ru/]вывод из запоя[/url]
В клинике «Трезвый город» доступна помощь при запое и тяжёлой абстиненции с медицинским наблюдением. Проводится инфузионная терапия, медикаментозная коррекция и восстановление сна, общего самочувствия и вегетативных проявлений.
Ознакомиться с деталями – [url=https://trezviy-gorod.ru/reabilitatsiya-12-shagov/]программа 12 шагов для зависимых от алкоголя[/url]
Вызов нарколога на дом в Ярославле — это удобный и эффективный способ начать лечение или оказать первую помощь при острых состояниях, связанных с алкоголизмом, наркотической зависимостью или другими психоактивными веществами. Основные преимущества такой услуги заключаются в следующем:
Получить дополнительную информацию – [url=https://narkolog-na-dom-v-yaroslavle12.ru/]вызов нарколога на дом ярославская область[/url]
После поступления вызова клиника «ЗдоровьеНорм» отправляет к пациенту опытного нарколога, который прибывает на дом в течение 30–60 минут. По приезду врач проводит комплексную диагностику, включающую измерение артериального давления, пульса, уровня кислорода в крови и тщательную оценку общего состояния пациента. На основе полученных данных специалист подбирает индивидуальную схему лечения.
Подробнее можно узнать тут – https://narcolog-na-dom-krasnodar0.ru/narkolog-na-dom-czena-krasnodar
Применение современных капельничных методов позволяет точно дозировать лекарственные средства. Постоянный мониторинг жизненно важных показателей пациента дает возможность оперативно корректировать терапию для достижения оптимального эффекта и предотвращения побочных реакций.
Изучить вопрос глубже – [url=https://vyvod-iz-zapoya-volgograd00.ru/]вывод из запоя цена в волгограде[/url]
Вызов нарколога на дом в Иркутске и Иркутской области — это удобное и безопасное решение, позволяющее получить неотложную помощь в привычной обстановке. Врачи клиники «ЧистоЖизнь» выезжают круглосуточно, приезжают в течение 30–60 минут и проводят комплексное лечение, направленное на стабилизацию состояния пациента и предотвращение осложнений.
Исследовать вопрос подробнее – [url=https://narcolog-na-dom-v-irkutske00.ru/]психиатр нарколог на дом[/url]
Алкогольная и наркотическая зависимость являются серьёзными заболеваниями, требующими оперативного и квалифицированного вмешательства. Когда речь идёт о критическом состоянии пациента, особенно после длительного употребления алкоголя или наркотических веществ, время играет ключевую роль. Клиника «РеабилитАльянс» в Краснодаре предлагает услугу нарколога на дом, обеспечивая пациентам необходимую помощь в любой момент дня и ночи. Наши специалисты готовы оперативно выехать по указанному адресу и предоставить все необходимые медицинские процедуры на месте.
Подробнее можно узнать тут – [url=https://narcolog-na-dom-krasnodar00.ru/]нарколог на дом круглосуточно краснодар[/url]
Этот информативный текст отличается привлекательным содержанием и актуальными данными. Мы предлагаем читателям взглянуть на привычные вещи под новым углом, предоставляя интересный и доступный материал. Получите удовольствие от чтения и расширьте кругозор!
Продолжить изучение – https://blog.imtpconsultants.com/guide-for-studying-abroad-after-12th-for-indian-students-imtp
сколько стоит согласование перепланировки [url=https://skolko-stoit-uzakonit-pereplanirovku-8.ru/]skolko-stoit-uzakonit-pereplanirovku-8.ru[/url] .
В этой статье представлен занимательный и актуальный контент, который заставит вас задуматься. Мы обсуждаем насущные вопросы и проблемы, а также освещаем истории, которые вдохновляют на действия и изменения. Узнайте, что стоит за событиями нашего времени!
Лучшее решение — прямо здесь – https://www.kleanhomz.com/cleaning-the-house-for-diwali-some-amazing-tips
Этот текст призван помочь читателю расширить кругозор и получить практические знания. Мы используем простой язык, наглядные примеры и структурированное изложение, чтобы сделать обучение максимально эффективным и увлекательным.
Детальнее – https://ittc.jp/2025/07/06/%E8%A8%80%E8%AA%9E%E3%81%AB%E8%A6%8F%E5%89%87%E3%81%AA%E3%82%93%E3%81%A6%E7%84%A1%E3%81%84%E3%81%A3%EF%BC%81
Эта статья предлагает уникальную подборку занимательных фактов и необычных историй, которые вы, возможно, не знали. Мы постараемся вдохновить ваше воображение и разнообразить ваш кругозор, погружая вас в мир, полный интересных открытий. Читайте и открывайте для себя новое!
Что скрывают от вас? – https://truenet.com.br/2024/03/27/equilibrio-do-ser-encerra-mes-da-mulher-com-oficina-terapeutica-sobre-empoderamento-feminino
Этот информативный текст отличается привлекательным содержанием и актуальными данными. Мы предлагаем читателям взглянуть на привычные вещи под новым углом, предоставляя интересный и доступный материал. Получите удовольствие от чтения и расширьте кругозор!
Кликни и узнай всё! – https://premiumkadr.ru
В статье представлены ключевые моменты по актуальной теме, дополненные советами экспертов и ссылками на дополнительные ресурсы. Цель материала — дать читателю инструменты для самостоятельного развития и принятия осознанных решений.
Читать дальше – https://yamanaka-lc.com/2023/11/19/sample-post4
Эта публикация погружает вас в мир увлекательных фактов и удивительных открытий. Мы расскажем о ключевых событиях, которые изменили ход истории, и приоткроем завесу над научными достижениями, которые вдохновили миллионы. Узнайте, чему может научить нас прошлое и как применить эти знания в будущем.
Получить дополнительную информацию – https://akademia-ksbas.pl/2024/08/02/witaj-swiecie
умная нейросеть для учебы [url=https://nejroset-dlya-ucheby-3.ru/]nejroset-dlya-ucheby-3.ru[/url] .
В этой информационной статье вы найдете интересное содержание, которое поможет вам расширить свои знания. Мы предлагаем увлекательный подход и уникальные взгляды на обсуждаемые темы, побуждая пользователей к активному мышлению и критическому анализу.
Хочешь знать всё? – https://colmartropicale.com.my/romantic-getaway
Эта статья погружает вас в увлекательный мир знаний, где каждый факт становится открытием. Мы расскажем о ключевых исторических поворотных моментах и научных прорывах, которые изменили ход цивилизации. Поймите, как прошлое формирует настоящее и как его уроки могут помочь нам строить будущее.
Подробности по ссылке – https://www.rapanalysis.com/kickknowledge/2019/02/23/33-guess-whos-back
Эта познавательная публикация погружает вас в море интересного контента, который быстро захватит ваше внимание. Мы рассмотрим важные аспекты темы и предоставим вам уникальные Insights и полезные сведения для дальнейшего изучения.
Читать дальше – https://insidemarine.com/hamiltonjet-unveils-jetsense-intelligent-voyage-control-with-sea-machines-autonomous-technology
В данной статье вы найдете комплексный подход к изучению насущных тем. Мы комбинируем теоретические сведения с практическими советами, чтобы читатель мог не только понять проблему, но и найти пути её решения.
Более того — здесь – https://blogi.eoppimispalvelut.fi/fuksiat/2019/09/30/10
Эта статья сочетает в себе как полезные, так и интересные сведения, которые обогатят ваше понимание насущных тем. Мы предлагаем практические советы и рекомендации, которые легко внедрить в повседневную жизнь. Узнайте, как улучшить свои навыки и обогатить свой опыт с помощью простых, но эффективных решений.
Это ещё не всё… – https://attarbashiusa.com/herbal-drinks-for-relaxation-and-stress-relief-a-laguna-niguel-favorite
В этом информативном тексте представлены захватывающие события и факты, которые заставят вас задуматься. Мы обращаем внимание на важные моменты, которые часто остаются незамеченными, и предлагаем новые перспективы на привычные вещи. Подготовьтесь к тому, чтобы быть поглощенным увлекательными рассказами!
Это стоит прочитать полностью – https://www.knls.ac.ke/pre-bid-meeting-written-question-response
Предлагаем вашему вниманию интересную справочную статью, в которой собраны ключевые моменты и нюансы по актуальным вопросам. Эта информация будет полезна как для профессионалов, так и для тех, кто только начинает изучать тему. Узнайте ответы на важные вопросы и расширьте свои знания!
Обратитесь за информацией – https://edx.amamedia.org/product/campground-reservation
Эта статья погружает вас в увлекательный мир знаний, где каждый факт становится открытием. Мы расскажем о ключевых исторических поворотных моментах и научных прорывах, которые изменили ход цивилизации. Поймите, как прошлое формирует настоящее и как его уроки могут помочь нам строить будущее.
Что скрывают от вас? – https://tuxpan-jal.gob.mx/2018/interdum-luctus-curabitur-ultriciesar-sceleris-mercque-orcinato-a-porttitor-ipsum-8
Эта познавательная публикация погружает вас в море интересного контента, который быстро захватит ваше внимание. Мы рассмотрим важные аспекты темы и предоставим вам уникальные Insights и полезные сведения для дальнейшего изучения.
Получить дополнительные сведения – https://arsipweb2016.cirebonkab.go.id/pemerintahan/skpd-opd
Эта публикация погружает вас в мир увлекательных фактов и удивительных открытий. Мы расскажем о ключевых событиях, которые изменили ход истории, и приоткроем завесу над научными достижениями, которые вдохновили миллионы. Узнайте, чему может научить нас прошлое и как применить эти знания в будущем.
Изучить материалы по теме – https://camping-u.co.il/%D7%AA%D7%A7%D7%A0%D7%95%D7%9F-%D7%90%D7%AA%D7%A8-%D7%95%D7%AA%D7%A0%D7%90%D7%99-%D7%A9%D7%99%D7%9E%D7%95%D7%A9
Эта разъяснительная статья содержит простые и доступные разъяснения по актуальным вопросам. Мы стремимся сделать информацию понятной для широкой аудитории, чтобы каждый мог разобраться в предмете и извлечь из него максимум пользы.
Читать полностью – https://celco.com.co/la-hora-de-democratizar-la-energia-balance-de-la-cop27-en-cuanto-a-energias-renovables
В статье представлены ключевые моменты по актуальной теме, дополненные советами экспертов и ссылками на дополнительные ресурсы. Цель материала — дать читателю инструменты для самостоятельного развития и принятия осознанных решений.
Проверенные методы — узнай сейчас – http://www.marvelcompany.co.jp/marvelous/r-0
Эта обзорная заметка содержит ключевые моменты и факты по актуальным вопросам. Она поможет читателям быстро ориентироваться в теме и узнать о самых важных аспектах сегодня. Получите краткий курс по современной информации и оставайтесь в курсе событий!
Не упусти шанс – https://www.art-creativity.ru
Текст включает разнообразную информацию, которая может показаться любопытной, но не меняет устоявшегося восприятия. Предлагаем просто насладиться чтением, не ожидая значительной пользы.
Подробнее читать – [url=https://rostov-narkologiya.ru/uslugi-ot-alkogolizma/vyvod-iz-zapoya/]детокс чай для похудения[/url]
В данной обзорной статье представлены интригующие факты, которые не оставят вас равнодушными. Мы критикуем и анализируем события, которые изменили наше восприятие мира. Узнайте, что стоит за новыми открытиями и как они могут изменить ваше восприятие реальности.
Хочешь знать всё? – https://radiantandbrighter.com/2018/07/15/mariarose
Эта информационная статья охватывает широкий спектр актуальных тем и вопросов. Мы стремимся осветить ключевые факты и события с ясностью и простотой, чтобы каждый читатель мог извлечь из нее полезные знания и полезные инсайты.
Осуществить глубокий анализ – https://education.ssru.ac.th/hongkong456-%E0%B8%97%E0%B8%94%E0%B8%A5%E0%B8%AD%E0%B8%87%E0%B9%80%E0%B8%A5%E0%B9%88%E0%B8%99%E0%B8%9C%E0%B9%88%E0%B8%B2%E0%B8%99%E0%B8%A1%E0%B8%B7%E0%B8%AD%E0%B8%96%E0%B8%B7%E0%B8%AD%E0%B9%84
В этой публикации мы предлагаем подробные объяснения по актуальным вопросам, чтобы помочь читателям глубже понять их. Четкость и структурированность материала сделают его удобным для усвоения и применения в повседневной жизни.
Смотрите также… – https://blocs.xarxanet.org/cepoblesec/2013/01/05/non-breaking-text
В этой статье представлен занимательный и актуальный контент, который заставит вас задуматься. Мы обсуждаем насущные вопросы и проблемы, а также освещаем истории, которые вдохновляют на действия и изменения. Узнайте, что стоит за событиями нашего времени!
Изучить материалы по теме – https://www.wirtschaftleichtverstehen.de/youtube-kanal/titelbild_renditeberechnung-immobilie_teil-1-2
Текст включает разнообразную информацию, которая может показаться любопытной, но не меняет устоявшегося восприятия. Предлагаем просто насладиться чтением, не ожидая значительной пользы.
Подробнее читать – [url=https://rostov-narkologiya.ru/uslugi-ot-narkomanii/mefedronovaya-zavisimost/]лечение covid народными средствами[/url]
В этой статье представлен занимательный и актуальный контент, который заставит вас задуматься. Мы обсуждаем насущные вопросы и проблемы, а также освещаем истории, которые вдохновляют на действия и изменения. Узнайте, что стоит за событиями нашего времени!
Читать полностью – https://luckytvonline.com/kids-theatre
Эта информационная статья содержит полезные факты, советы и рекомендации, которые помогут вам быть в курсе последних тенденций и изменений в выбранной области. Материал составлен так, чтобы быть полезным и понятным каждому.
Проверенные методы — узнай сейчас – https://jhonmarkalbios.marketlevelseo.com/digital-marketing-made-easy-let-our-team-handle
На нашем сайте вы можете скачать активатор для Windows 11 абсолютно бесплатно и навсегда забыть о водяных знаках!
Подробнее – [url=https://krasnodar.med24.online/]Как активировать Windows 11 без ключа[/url]
В статье-обзоре представлены данные сомнительной актуальности и факты без явной взаимосвязи. Читатель ознакомится с разными мнениями, хотя они вряд ли существенно изменят его представление о теме.
Подробнее читать – [url=https://rostov-narkologiya.ru/ ]похудеть на таблетках[/url]
Эта обзорная заметка содержит ключевые моменты и факты по актуальным вопросам. Она поможет читателям быстро ориентироваться в теме и узнать о самых важных аспектах сегодня. Получите краткий курс по современной информации и оставайтесь в курсе событий!
Перейти к статье – https://workly.in/coworking-business/10-benefits-of-coworking-space-boosting-productivity-and-collaboration
В этом интересном тексте собраны обширные сведения, которые помогут вам понять различные аспекты обсуждаемой темы. Мы разбираем детали и факты, делая акцент на важности каждого элемента. Не упустите возможность расширить свои знания и взглянуть на мир по-новому!
Практические советы ждут тебя – https://vsudybud.cz/v-patek-zahraji-funkove-hvezdy-top-dream-co-ci-herec-tomas-matonoha
Этот сборник информации привлекает множеством мелких деталей и необычных ракурсов. Мы предлагаем взгляды, редко полезные, но способные немного разнообразить знакомство с темой.
Подробнее читать – [url=https://rostov-narkologiya.ru/ ]кето диета за неделю минус 10 кг[/url]
В этом материале представлены детали, которые хоть и занимательны, но не особенно значимы. Мы рассматриваем моменты, которые трудно назвать важными, но всё же решили включить их для полноты картины.
Вот – [url=https://arma-rehab.ru/vyvod-iz-zapoya/]эротические фильмы[/url]
В материале приведены детали, интересные, но не особенно важные. Мы рассматриваем аспекты, которые сложно назвать существенными, но включили их для большей полноты.
Подробнее читать – [url=https://rostov-narkologiya.ru/uslugi-ot-alkogolizma/vyvod-iz-zapoya/]мефедроновая зависимость[/url]
Эта публикация содержит набор несвязанных идей, трудно применимых в практике. Мы лишь поверхностно затрагиваем различные точки зрения, не проводя глубокий анализ и не предлагая выводов.
Подробнее читать – [url=https://rostov-narkologiya.ru/uslugi-ot-alkogolizma/vyvod-iz-zapoya/]народные средства от диабета[/url]
Поэтому наша служба экстренного выезда работает круглосуточно. Медицинская бригада приезжает на вызов в любой район Балашихи в течение часа. Пациенту ставят капельницы, стабилизируют давление, снимают судорожный синдром и устраняют тревожность. Всё это проходит под наблюдением опытных врачей, которые ежедневно сталкиваются с острыми ситуациями и знают, как действовать быстро и безопасно.
Подробнее тут – [url=https://narkologicheskaya-pomoshch-balashiha1.ru/]skoraya-narkologicheskaya-pomoshch-besplatnaya[/url]
Особенно важно на этапе поступления пройти полную психодиагностику и получить адаптированную под конкретного пациента программу. Это позволит учитывать возможные сопутствующие расстройства, включая тревожные, аффективные и когнитивные нарушения.
Узнать больше – [url=https://narkologicheskaya-klinika-nizhnij-tagil11.ru/]наркологическая клиника вывод из запоя нижний тагил[/url]
melbet скачать на ios [url=https://mobilemelbet.ru]melbet скачать на ios[/url] .
?Cheers to every seeker of adventures !
Safety and security measures at a casino Greek are top-notch, ensuring a worry-free experience for all guests. [url=http://casinoonlinegreek.com/][/url]. State-of-the-art surveillance and friendly security staff work diligently to maintain a safe atmosphere. This commitment to safety allows you to relax and fully enjoy your time at the casino Greek.
The excitement of playing at a ОєОµОЅОїП…ПЃОіО№О± online casino is enhanced with various payment options. Many platforms now accept cryptocurrencies alongside traditional payment methods, making transactions quicker and easier. Choose the method that suits you best and start gaming today.
ОљО±О¶О№ОЅОї online: О§О±ПЃО±ОєП„О·ПЃО№ПѓП„О№ОєО¬ ПЂОїП… ПЂПЃОПЂОµО№ ОЅО± ОіОЅП‰ПЃОЇО¶ОµП„Оµ – http://casinoonlinegreek.com/
?May luck accompany you while you anticipate brilliant lucky streaks !
Dressing stylish projects a positive first impression.
Your attire communicates loudly before a person actually speak a single word.
This boosts your personal confidence and mood significantly.
Your put-together look conveys competence in the office.
https://imba.mvmedia.ru/sumki-jimmy-choo-materialy-i-masterstvo-ispolneniya-9089032/
Stylish clothing allow you to showcase your unique identity.
Others often judge well-dressed people as more capable and reliable.
Therefore, investing in your wardrobe is an investment in your personal brand.
При необходимости применяется симптоматическое лечение для снижения болевого синдрома, устранения тошноты и рвоты, а также нормализации психоэмоционального состояния пациента. Врачи наркологи строго контролируют течение процедуры, что обеспечивает безопасность и снижает риски осложнений.
Получить дополнительную информацию – [url=https://vyvod-iz-zapoya-v-murmanske12.ru/]вывод из запоя недорого мурманск[/url]
проект перепланировки квартиры в москве [url=https://proekt-pereplanirovki-kvartiry22.ru/]проект перепланировки квартиры в москве[/url] .
мелбет зеркало официальный сайт [url=https://www.melbet-ru.it.com]мелбет зеркало официальный сайт[/url] .
Основной этап лечения — детоксикация. С помощью капельниц врач вводит препараты, которые быстро выводят токсины и нормализуют обменные процессы, снимают симптомы абстиненции и восстанавливают работу внутренних органов. Уже спустя 1–2 часа после начала процедуры пациент ощущает значительное улучшение.
Углубиться в тему – http://vyvod-iz-zapoya-korolev2.ru
В статье-обзоре представлены данные сомнительной актуальности и факты без явной взаимосвязи. Читатель ознакомится с разными мнениями, хотя они вряд ли существенно изменят его представление о теме.
Подробнее читать – https://rostov-narkologiya.ru/uslugi-ot-alkogolizma/vyvod-iz-zapoya
Ночной вызов ничем не отличается от утреннего: мы отвечаем, уточняем риски и запускаем маршрут так, чтобы первые часы прошли спокойно. Наш алгоритм простой и понятный — он экономит время и убирает хаос. Ниже — ориентировочная карта визита; по месту врач адаптирует её к возрасту, соматическому фону и текущим симптомам.
Получить дополнительные сведения – https://narcolog-na-dom-sochi00.ru/narkolog-i-psikhiatr-adler
Этот сборник информации привлекает множеством мелких деталей и необычных ракурсов. Мы предлагаем взгляды, редко полезные, но способные немного разнообразить знакомство с темой.
Подробнее читать – https://rostov-narkologiya.ru/uslugi-ot-alkogolizma/vyvod-iz-zapoya
внедрение 1с [url=https://1s-vnedrenie.ru/]внедрение 1с[/url] .
melbet скачать [url=https://www.melbetmobi.ru]melbet скачать[/url] .
Чем дольше человек находится в состоянии запоя, тем больше накапливаются токсины в организме, что негативно сказывается на всех системах. Отказ от алкоголя без должного контроля может привести к серьезным последствиям, таким как:
Подробнее можно узнать тут – http://narcolog-na-dom-krasnodar0.ru
Looking well projects a strong first impression.
Your outfit communicates volumes before a person actually say a single word.
It boosts your own self-esteem and mood significantly.
Your put-together appearance signals competence in the workplace.
https://n2.mvmedia.ru/EHww2lDXFB9Q/
Stylish clothing allow you to showcase your unique identity.
People often judge stylish individuals as more successful and reliable.
Ultimately, putting effort in your style is an valuable step in yourself.
Как подчёркивает врач-нарколог И.В. Синицин, «современная наркология — это не только вывод из запоя, но и работа с глубинными причинами зависимости».
Углубиться в тему – https://narkologicheskaya-klinika-v-yaroslavle12.ru/narkologicheskaya-klinika-klinika-pomoshh-v-yaroslavle/
В статье-обзоре представлены данные сомнительной актуальности и факты без явной взаимосвязи. Читатель ознакомится с разными мнениями, хотя они вряд ли существенно изменят его представление о теме.
Подробнее читать – [url=https://rostov-narkologiya.ru/uslugi-ot-narkomanii/mefedronovaya-zavisimost/]мефедроновая зависимость[/url]
Выбор наркологической клиники — ключевой шаг на пути к выздоровлению, от которого зависит не только физическое и психическое состояние пациента, но и устойчивость достигнутых результатов. Современные учреждения предлагают широкий спектр услуг, однако уровень подготовки персонала, методики лечения и условия пребывания могут существенно отличаться.
Ознакомиться с деталями – [url=https://narkologicheskaya-klinika-pervouralsk11.ru/]лечение в наркологической клинике первоуральск[/url]
Причины обращения бывают разными, но логика всегда одна: сначала врач оценивает угрозы и снимает острые проявления, затем помогает закрепить результат. Кому-то нужна детоксикация после запоя или употребления, кому-то — помощь при абстиненции с выраженной тревогой и нарушением сна, кому-то — консультация, когда человек «держится на силе воли» и боится срыва. Часто звонят родственники, потому что видят ухудшение: человек не ест, не спит, становится раздражительным, замыкается, путается в событиях, может проявлять агрессию или, наоборот, уходит в апатию. Важно понимать, что наркологическая помощь — это не один универсальный сценарий. Тактика зависит от длительности употребления, последнего приёма, сопутствующих болезней, возраста, перенесённых осложнений, лекарств, которые уже принимались самостоятельно.
Подробнее – [url=https://narkologicheskaya-klinika-moskva12.ru/]www.domen.ru[/url]
Этот информативный текст сочетает в себе темы здоровья и зависимости. Мы обсудим, как хронические заболевания могут усугубить зависимости и наоборот, как зависимость может влиять на общее состояние здоровья. Читатели получат представление о комплексном подходе к лечению как физического, так и психического состояния.
Детальнее – http://google.bg/url?sa=t&url=https://moskva.pohmelochnaya.ru/12-shagov
Бесплатный ключ для Windows 11 — только у нас, обновлено в 2026 году!
Подробнее – [url=https://krasnodar.med24.online/landing/narkolog_na_dom/]Скачать генератор ключей для Windows 11[/url]
1win быстрый вывод на мегапей [url=www.1win50742.help]www.1win50742.help[/url]
Как подчёркивает главный врач клинического отделения, «в условиях стационара мы можем оперативно реагировать на малейшие изменения в состоянии пациента, что критически важно при тяжёлых формах запоя».
Подробнее тут – https://vyvod-iz-zapoya-v-ryazani12.ru/vyvod-iz-zapoya-czena-v-ryazani/
«Кодирование — это не магическое решение, а важный этап в комплексной программе лечения, — поясняет ведущий нарколог клиники «Ясное Будущее» Марина Иванова. — Главное — сочетание фармакологического воздействия и последующей работы с психологом для формирования устойчивой мотивации к трезвости».
Углубиться в тему – https://kodirovanie-ot-alkogolizma-odintsovo2.ru/
Как отмечает врач-нарколог Иванов И.И., «без своевременной медицинской помощи при запое повышается риск необратимых изменений в организме и летального исхода».
Подробнее – [url=https://vyvod-iz-zapoya-nizhnij-tagil11.ru/]помощь вывод из запоя нижний тагил[/url]
В наркологической клинике применяются проверенные методики терапии, включая медикаментозное лечение, детоксикацию и психотерапевтические программы. Детоксикация проводится с использованием современных капельниц, обеспечивающих безопасное выведение токсинов из организма. Важно отметить, что качественное лечение включает и работу с психологическими аспектами зависимости, что достигается посредством групповых и индивидуальных консультаций.
Получить дополнительные сведения – http://narkologicheskaya-klinika-kamensk-uralskij11.ru
Процедура лечения начинается с установки внутривенной капельницы, через которую вводятся детоксикационные растворы, способствующие быстрому выведению токсинов и восстановлению водно-электролитного баланса. При необходимости врач назначает дополнительные препараты, такие как седативные средства для купирования симптомов абстинентного синдрома, гепатопротекторы для поддержки печени и кардиопротекторы для нормализации работы сердца.
Подробнее тут – [url=https://vyvod-iz-zapoya-krasnodar00.ru/]вывод из запоя капельница на дому краснодар[/url]
Параллельно с медицинской терапией начинается работа психотерапевта. В индивидуальных и семейных сессиях пациенты учатся распознавать механизмы зависимости, вырабатывать новые стратегии поведения и справляться со стрессовыми ситуациями без употребления. Последний этап — реабилитация и ресоциализация — включает трудотерапию, арт- и групповую терапию, помощь в восстановлении профессиональных навыков и возвращении к социально-активной жизни.
Получить дополнительные сведения – [url=https://narkologicheskaya-klinika-mytishchi1.ru/]наркологическая клиника[/url]
Этот текст содержит различную информацию, которая, возможно, покажется любопытной, но в целом не меняет восприятия привычных вещей. Предлагаем просто получить удовольствие от чтения, не ожидая особой пользы.
Вот – [url=https://arma-rehab.ru/lechenie-alkogolizma/]ставки на спорт[/url]
– человек не может прекратить употребление сам; – наблюдается агрессия, страх, паника, бессвязная речь; – нарушен сон, отсутствует аппетит, сильная слабость; – алкоголь стал способом снятия боли или тревоги; – попытки отказа приводят к ухудшению состояния.
Ознакомиться с деталями – [url=https://vyvod-iz-zapoya-serpuhov3.ru/]вывод из запоя[/url]
В стационаре работают узкопрофильные специалисты: наркологи, неврологи, психотерапевты, а также персонал, обеспечивающий круглосуточный уход. Программа включает медикаментозное лечение, психологическую коррекцию, восстановление сна, устранение депрессии, обучение саморегуляции и работу с мотивацией.
Разобраться лучше – https://narkologicheskaya-pomoshch-balashiha1.ru/kruglosutochnaya-narkologicheskaya-pomoshch-v-balashihe
Лечение проводится в комфортных условиях дома, что позволяет избежать стресса, связанного с госпитализацией, и обеспечивает быстрое восстановление.
Получить дополнительную информацию – [url=https://narcolog-na-dom-ekaterinburg000.ru/]нарколог на дом вывод екатеринбург[/url]
Основной этап в лечении — детоксикация организма от токсичных веществ, вызывающих интоксикацию. В клинике применяют современные методы капельниц и медикаментозной поддержки, включая препараты для снятия абстинентного синдрома.
Детальнее – https://narkologicheskaya-klinika-v-murmanske12.ru/narkologicheskaya-klinika-klinika-pomoshh-v-murmanske/
В рамках услуги вызова нарколога на дом используется современное оборудование и препараты, одобренные для амбулаторного применения.
Узнать больше – [url=https://narkolog-na-dom-kamensk-uralskij11.ru/]narkolog-na-dom-kamensk-uralskij11.ru/[/url]
Наличие у нарколога практического опыта и навыков быстрого реагирования критично — особенно если речь идёт о тяжелой интоксикации или судорожном синдроме. Ошибки в дозировке или игнорирование хронических заболеваний могут привести к осложнениям.
Изучить вопрос глубже – [url=https://narkolog-na-dom-nizhnij-tagil11.ru/]нарколог на дом срочно[/url]
Лечение хронического алкоголизма начинается с купирования абстинентного синдрома, после чего проводятся мероприятия по нормализации работы печени, сердечно-сосудистой и нервной системы. Назначаются гепатопротекторы, ноотропы, витамины группы B. Также проводится противорецидивная терапия.
Подробнее тут – https://narkologicheskaya-klinika-v-yaroslavle12.ru/narkologicheskaya-klinika-klinika-pomoshh-v-yaroslavle/
Стоимость услуг зависит от продолжительности терапии, сложности случая и выбранных процедур. Однако клиника предоставляет гибкую систему оплаты, включая рассрочку и страховое покрытие.
Получить дополнительные сведения – [url=https://narkologicheskaya-klinika-v-ryazani12.ru/]бесплатная наркологическая клиника[/url]
Группа препаратов
Подробнее можно узнать тут – [url=https://narcolog-na-dom-ekaterinburg000.ru/]нарколог на дом клиника екатеринбург[/url]
Алкогольная зависимость — это хроническое заболевание, при котором устойчивое влечение к спиртному приводит к тяжёлым медицинским, социальным и психологическим последствиям. Когда пациент осознаёт, что самостоятельно справиться с этой проблемой не получается, наиболее эффективным методом становится кодирование от алкоголизма. В клинике «Ясное Будущее» в Одинцово мы используем сочетание проверенных методик кодирования и комплексной психологической поддержки, что позволяет достичь стойкой ремиссии и вернуть человеку контроль над собственной жизнью.
Получить дополнительную информацию – http://kodirovanie-ot-alkogolizma-odintsovo2.ru/kodirovanie-ot-alkogolizma-na-domu/https://kodirovanie-ot-alkogolizma-odintsovo2.ru
Основной этап лечения — детоксикация. С помощью капельниц врач вводит препараты, которые быстро выводят токсины и нормализуют обменные процессы, снимают симптомы абстиненции и восстанавливают работу внутренних органов. Уже спустя 1–2 часа после начала процедуры пациент ощущает значительное улучшение.
Получить дополнительные сведения – [url=https://vyvod-iz-zapoya-korolev2.ru/]вывод из запоя на дому[/url]
Параллельно с медицинской терапией начинается работа психотерапевта. В индивидуальных и семейных сессиях пациенты учатся распознавать механизмы зависимости, вырабатывать новые стратегии поведения и справляться со стрессовыми ситуациями без употребления. Последний этап — реабилитация и ресоциализация — включает трудотерапию, арт- и групповую терапию, помощь в восстановлении профессиональных навыков и возвращении к социально-активной жизни.
Получить дополнительные сведения – http://
Функция и назначение
Подробнее – [url=https://narcolog-na-dom-ekaterinburg000.ru/]нарколог на дом срочно в екатеринбурге[/url]
Наркологическая помощь на дому в Ярославле охватывает широкий спектр медицинских мероприятий, направленных на стабилизацию состояния пациента и подготовку к дальнейшему лечению. Среди основных процедур:
Изучить вопрос глубже – https://narkolog-na-dom-v-yaroslavle12.ru/vyzov-narkologa-na-dom-v-yaroslavle
Как отмечает врач-нарколог Иванов И.И., «без своевременной медицинской помощи при запое повышается риск необратимых изменений в организме и летального исхода».
Получить дополнительные сведения – [url=https://vyvod-iz-zapoya-nizhnij-tagil11.ru/]вывод из запоя дешево в нижнем тагиле[/url]
Ломка — это не временное недомогание. Это системное разрушение организма, связанное с тем, что он перестаёт получать наркотик, к которому уже привык. Нарушается обмен веществ, функции сердца, печени, почек, теряется контроль над эмоциями и болью. В состоянии абстиненции человек не может спать, есть, адекватно мыслить. Страдает и тело, и психика.
Изучить вопрос глубже – [url=https://snyatie-lomki-podolsk1.ru/]снятие ломки капельницей подольск[/url]
При своевременном обращении к специалистам капельница позволяет значительно улучшить состояние пациента уже в первые часы после начала лечения. Медицинская помощь при запое должна оказываться квалифицированно и в комфортных условиях, что снижает риски осложнений и ускоряет восстановление.
Подробнее можно узнать тут – [url=https://kapelnicza-ot-zapoya-v-murmanske12.ru/]капельница от запоя мурманск.[/url]
Запой — это не просто периодическое употребление спиртного, а опасное состояние, при котором организм находится в постоянной интоксикации, теряет ресурсы и перестаёт справляться с последствиями этанола. Со временем развивается тяжёлое отравление, нарушается работа сердца, печени, мозга, а попытка «самостоятельно бросить» может привести к судорогам, галлюцинациям и даже коме. Именно поэтому важно вовремя обратиться за медицинской помощью. В Серпухове вывод из запоя осуществляет наркологическая клиника «Новая Энергия» — мы выезжаем на дом круглосуточно и при необходимости госпитализируем пациента в стационар.
Детальнее – http://
Процедура лечения начинается с установки внутривенной капельницы, через которую вводятся детоксикационные растворы, способствующие быстрому выведению токсинов и восстановлению водно-электролитного баланса. При необходимости врач назначает дополнительные препараты, такие как седативные средства для купирования симптомов абстинентного синдрома, гепатопротекторы для поддержки печени и кардиопротекторы для нормализации работы сердца.
Разобраться лучше – https://vyvod-iz-zapoya-krasnodar00.ru/vyvod-iz-zapoya-kruglosutochno-krasnodar/
Перед заключением договора стоит поинтересоваться:
Получить дополнительные сведения – http://narkologicheskaya-klinika-nizhnij-tagil11.ru
Точная диагностика позволяет подобрать индивидуальную программу лечения, что значительно повышает шансы на успешное выздоровление.
Разобраться лучше – http://narkologicheskaya-klinika-v-murmanske12.ru
?Let us raise our toasts to every winner of the grand prize !
О¤О± ОєО±О¶ОЇОЅОї ПЂОїП… ОґОП‡ОїОЅП„О±О№ П„ПЃО±ПЂОµО¶О№ОєО® ОјОµП„О±П†ОїПЃО¬ ПѓП…ОЅО®ОёП‰П‚ ПЂПЃОїПѓП†ОПЃОїП…ОЅ ОµПЂОЇПѓО·П‚ О¬О»О»О± О±ОѕО№ПЊО»ОїОіО± П‡О±ПЃО±ОєП„О·ПЃО№ПѓП„О№ОєО¬. ОџПЃО№ПѓОјООЅО± ПЂПЃОїПѓП†ОПЃОїП…ОЅ О¶П‰ОЅП„О±ОЅО¬ ПЂО±О№П‡ОЅОЇОґО№О± ОєО±О№ ОµОѕО±О№ПЃОµП„О№ОєОП‚ ПЂПЃОїПѓП†ОїПЃОП‚ ОіО№О± ОЅООїП…П‚ ПЂО±ОЇОєП„ОµП‚. [url=https://casinopaymentmethods.org/][/url]. О’ОµОІО±О№П‰ОёОµОЇП„Оµ ПЊП„О№ ОґО№ОµПЃОµП…ОЅО¬П„Оµ ПЊО»ОµП‚ П„О№П‚ ОµПЂО№О»ОїОіОП‚ ПЂПЃО№ОЅ ОµПЂО№О»ООѕОµП„Оµ П„Ої ОєО±П„О¬О»О»О·О»Ої ОєО±О¶ОЇОЅОї.
О— ОґП…ОЅО±П„ПЊП„О·П„О± ПЂО±ПЃО±ОєОїО»ОїПЌОёО·ПѓО·П‚ П„П‰ОЅ ПѓП…ОЅО±О»О»О±ОіПЋОЅ ОµОЇОЅО±О№ ОјОµОіО¬О»Ої ПЂО»ОµОїОЅООєП„О·ОјО± П„П‰ОЅ П„ПЃО±ПЂОµО¶О№ОєПЋОЅ ОјОµП„О±П†ОїПЃПЋОЅ. ОџО№ ПЂО±ОЇОєП„ОµП‚ ОП‡ОїП…ОЅ ПЂО»О®ПЃО· ОО»ОµОіП‡Ої П„П‰ОЅ ОїО№ОєОїОЅОїОјО№ОєПЋОЅ П„ОїП…П‚ ОєО±О№ П„П‰ОЅ ОєО±П„О±ОёОПѓОµП‰ОЅ П„ОїП…П‚. О‘П…П„ПЊ ПЂПЃОїПѓП†ОПЃОµО№ ОјО№О± О±ОЇПѓОёО·ПѓО· О±ПѓП†О¬О»ОµО№О±П‚ ПѓП„ОїОЅ ОєПЊПѓОјОї П„П‰ОЅ online П„П…П‡ОµПЃПЋОЅ ПЂО±О№П‡ОЅО№ОґО№ПЋОЅ.
Casino ПЂОїП… ОґОП‡ОїОЅП„О±О№ paysafecard ОјОµ ОµО№ОґО№ОєОП‚ ПЂПЃОїПѓП†ОїПЃОП‚ – https://casinopaymentmethods.org/
?May fortune move forward with you with the pleasure of winning plays !
Высокий уровень лечения обеспечивается квалификацией врачей, имеющих опыт работы в области наркологии, а также современным медицинским оборудованием, позволяющим проводить диагностику и лечение на самом высоком уровне. Врачи регулярно повышают квалификацию, участвуя в конференциях и обучающих программах. Подробности о квалификации специалистов доступны на портале медицинского сообщества.
Изучить вопрос глубже – [url=https://narkologicheskaya-klinika-kamensk-uralskij11.ru/]платная наркологическая клиника каменск-уральский[/url]
«ЮгМедЦентр» поддерживает строгую конфиденциальность: выездные специалисты приезжают без медицинской символики, в гражданской одежде; документы формулируются нейтрально; уведомления не содержат триггерных слов; профиль можно оформить под кодом. Все записи ведутся в шифрованном контуре с разграничением доступа по ролям, а видеосессии с врачом/психологом не записываются. Мы предупреждаем о цифровой гигиене: включите «тихий режим» уведомлений, избегайте пересылки документов в открытых чатах, используйте резервный канал связи для экстренных вопросов.
Ознакомиться с деталями – [url=https://narcolog-na-dom-sochi00.ru/]нарколог на дом круглосуточно цены[/url]
Критерий
Углубиться в тему – [url=https://narkolog-na-dom-nizhnij-tagil11.ru/]запой нарколог на дом[/url]
Алкоголизм — хроническое заболевание, требующее комплексного подхода и круглосуточного контроля. Клиника «УралМед» в Екатеринбурге предлагает полный спектр услуг для пациентов любого уровня зависимости: от экстренной детоксикации до долгосрочной реабилитации. Главные принципы работы — абсолютная анонимность, индивидуальный план лечения и постоянное сопровождение квалифицированной командой специалистов.
Углубиться в тему – [url=https://lechenie-alkogolizma-ekaterinburg0.ru/]центр лечения алкоголизма в екатеринбурге[/url]
Согласно данным Федерального наркологического центра, своевременный выезд врача снижает риск осложнений и повторных госпитализаций.
Разобраться лучше – [url=https://narkolog-na-dom-kamensk-uralskij11.ru/]нарколог на дом клиника в каменске-уральском[/url]
Нарколог на дом — это не «капельница по заказу». Запой и отмена алкоголя/веществ влияют на сердце, сосуды, дыхание, нервную систему, водно-электролитный баланс. Ошибка в тактике часто происходит именно тогда, когда пытаются действовать без оценки состояния: ставят капельницу без измерения давления, не учитывают уже принятые препараты, не спрашивают о судорогах и проблемах с сердцем. На выезде врач измеряет давление и пульс, оценивает дыхание, температуру, уровень сознания, признаки обезвоживания, выраженность тремора и тревоги. После этого выбирается безопасная схема помощи и объясняется ожидаемая динамика.
Детальнее – http://narkolog-na-dom-pushkino12.ru
При поступлении вызова специалисты клиники «СтопТокс» оперативно выезжают на дом в Екатеринбурге или по всей Свердловской области. По прибытии врач проводит всестороннюю диагностику, включая измерение артериального давления, пульса и уровня кислорода в крови, а также собирает анамнез и оценивает степень интоксикации. На основе полученной информации составляется индивидуальный план лечения, который включает следующие этапы:
Изучить вопрос глубже – [url=https://narcolog-na-dom-ekaterinburg000.ru/]нарколог на дом срочно[/url]
Согласно данным НМИЦ психиатрии и наркологии Минздрава РФ, профессиональный вывод из запоя с применением капельниц снижает риск осложнений и сокращает период восстановления. Процедура проводится только под наблюдением квалифицированных специалистов и требует правильного подбора препаратов в зависимости от стадии опьянения и наличия сопутствующих заболеваний.
Узнать больше – http://kapelnicza-ot-zapoya-pervouralsk11.ru/
Многие семьи сталкиваются с трудностями, когда зависимый отказывается ехать в клинику. В таких случаях выездная помощь становится первым шагом к выздоровлению. Однако не все службы предлагают одинаково безопасный и профессиональный подход. Чтобы избежать рисков и ошибок, важно понимать, на что обращать внимание при выборе услуги “нарколог на дом”.
Выяснить больше – [url=https://narkolog-na-dom-nizhnij-tagil11.ru/]вызвать нарколога на дом срочно в нижнем тагиле[/url]
Работа клиники строится на принципах доказательной медицины и индивидуального подхода. При поступлении пациента осуществляется всесторонняя диагностика, включающая анализы крови, оценку психического состояния и анамнез. По результатам разрабатывается персонализированный курс терапии.
Получить больше информации – [url=https://narkologicheskaya-klinika-v-ryazani12.ru/]наркологическая клиника рязань.[/url]
Наркологическая клиника в Чехове — это возможность получить профессиональную помощь при алкогольной и наркотической зависимости, не выезжая в крупный мегаполис и не тратя силы на долгую дорогу. Для многих людей момент обращения к наркологу наступает не сразу: сначала идут «домашние» попытки справиться с проблемой, обещания ограничиться «по праздникам», уговаривания родственников и периодические срывы. Запои становятся длиннее, организм восстанавливается всё хуже, усиливается тревога, нарушается сон, учащаются конфликты дома и на работе. В какой-то момент становится понятно, что без системного лечения обойтись уже нельзя, а стихийные капельницы на дому и случайные советы из интернета только оттягивают время.
Получить дополнительные сведения – https://narkologicheskaya-klinika-chekhov11.ru/narkologicheskaya-klinika-sajt-v-chekhove/
Вывод из запоя показан при:
Ознакомиться с деталями – [url=https://vyvod-iz-zapoya-v-murmanske12.ru/]вывод из запоя в стационаре в мурманске[/url]
Группа препаратов
Изучить вопрос глубже – [url=https://narcolog-na-dom-ekaterinburg000.ru/]нарколог капельница на дом в екатеринбурге[/url]
Длительный запой представляет собой крайне опасное состояние, способное нанести непоправимый вред организму. При отсутствии своевременного вмешательства алкогольная интоксикация может привести к серьезным осложнениям, таким как нарушение работы сердца, печени, почек и нервной системы, а также развитию алкогольного психоза. В таких ситуациях экстренная медицинская помощь является залогом спасения жизни и предотвращения необратимых последствий. Клиника «ЗдоровьеНорм» предлагает круглосуточный выезд специалистов для вывода из запоя на дому в Краснодаре и по всему Краснодарскому краю. Наши врачи работают 24 часа в сутки, обеспечивая полный комплекс процедур по детоксикации, снятию абстинентного синдрома и восстановлению организма, при этом гарантируя полную анонимность и индивидуальный подход к каждому пациенту.
Подробнее тут – https://narcolog-na-dom-krasnodar0.ru/
Этот обзор предлагает свежий взгляд на предметы, которые и без того привычны. Мы упоминаем факты, не имеющие большого значения, и события с неясной важностью, но они присутствуют здесь.
Подробнее читать – [url=https://rostov-narkologiya.ru/uslugi-ot-narkomanii/mefedronovaya-zavisimost/]похудеть на таблетках[/url]
Если по ходу визита появляются «красные флаги» (падение сатурации, нестабильный ритм, нарастающая дезориентация), маршрут мгновенно переводится в стационарный блок «ЕкатеринбургМедСервис» — без «обнуления» обследований и без потери приватности. Вся собранная информация остаётся в единой карте наблюдения, что экономит время и силы.
Ознакомиться с деталями – https://narcolog-na-dom-ekaterinburg00.ru/narkolog-ekaterinburg-na-dom
Нашли рабочий серийный номер для Windows 11 Pro — проверено лично, без вирусов!
Подробнее – [url=https://krasnodar.med24.online/landing/narkolog_na_dom/]Скачать активатор для Windows 11[/url]
Осложнения, к которым может привести отсутствие лечения:
Углубиться в тему – [url=https://snyatie-lomki-podolsk1.ru/]снятие ломки цена в подольске[/url]
Далее выполняется медицинская детоксикация: корректируется водно-электролитный баланс, снимается интоксикация, поддерживается работа сердечно-сосудистой системы, снижается тремор, стабилизируется сон и тревожность. Важно, что схема подбирается индивидуально: при разных рисках объём поддержки будет различаться. В ряде случаев достаточно амбулаторного наблюдения и рекомендаций, в других — нужен стационар, чтобы контролировать динамику и вовремя корректировать терапию.
Получить дополнительные сведения – [url=https://vyvod-iz-zapoya-moskva1-12.ru/]vyvod-iz-zapoya-na-domu-moskva-kruglosutochno[/url]
Вызов нарколога на дом в Ярославле — это удобный и эффективный способ начать лечение или оказать первую помощь при острых состояниях, связанных с алкоголизмом, наркотической зависимостью или другими психоактивными веществами. Основные преимущества такой услуги заключаются в следующем:
Ознакомиться с деталями – [url=https://narkolog-na-dom-v-yaroslavle12.ru/]нарколог на дом анонимно[/url]
Эта статья предлагает уникальную подборку занимательных фактов и необычных историй, которые вы, возможно, не знали. Мы постараемся вдохновить ваше воображение и разнообразить ваш кругозор, погружая вас в мир, полный интересных открытий. Читайте и открывайте для себя новое!
Есть чему поучиться – https://ark.sg/ua-sportsmask-what-you-should-know-about-it-protx2/?text-direction=rtl
Этот информационный материал собраны данные, которые помогут лучше понять текущие тенденции и процессы в различных сферах жизни. Мы предоставляем четкий анализ, графики и примеры, чтобы информация была не только понятной, но и практичной для принятия решений.
Есть чему поучиться – https://www.geekworldtour.com/tague-ou-tout-ce-que-vous-voulez-savoir-en-osant-me-le-demander
Эта публикация погружает вас в мир увлекательных фактов и удивительных открытий. Мы расскажем о ключевых событиях, которые изменили ход истории, и приоткроем завесу над научными достижениями, которые вдохновили миллионы. Узнайте, чему может научить нас прошлое и как применить эти знания в будущем.
Изучить материалы по теме – https://dobleclic.mx/10-esloganes-inolvidables
В этой статье представлен занимательный и актуальный контент, который заставит вас задуматься. Мы обсуждаем насущные вопросы и проблемы, а также освещаем истории, которые вдохновляют на действия и изменения. Узнайте, что стоит за событиями нашего времени!
Более того — здесь – https://www.chefrajanbakery.com/product/half-birthday-trending-cake-1-kg-
Dressing well projects a positive first impression.
A attire communicates volumes before a person even speak a single word.
This enhances your personal confidence and mindset significantly.
A put-together appearance conveys professionalism in the workplace.
https://s2.luxepodium.com/SsGTQhnd8kPU/
Fashionable clothing allow you to showcase your unique identity.
People often judge stylish individuals as more successful and trustworthy.
Therefore, investing in your wardrobe is an investment in yourself.
Публикация приглашает вас исследовать неизведанное — от древних тайн до современных достижений науки. Вы узнаете, как случайные находки превращались в революции, а смелые мысли — в новые эры человеческого прогресса.
Получить дополнительные сведения – https://admissiongurukul.com/commerce-banking
Мы собрали для вас самые захватывающие факты из мира науки и истории. От малознакомых деталей до грандиозных событий — эта статья расширит ваш кругозор и подарит новое понимание того, как устроен наш мир.
Выяснить больше – https://www.chefrajanbakery.com/product/train-engine-bogie-cake-6-kg-
Мы собрали для вас самые захватывающие факты из мира науки и истории. От малознакомых деталей до грандиозных событий — эта статья расширит ваш кругозор и подарит новое понимание того, как устроен наш мир.
Лучшее решение — прямо здесь – https://yinforchange.in/yin-will-instil-positivity-amongst-youngsters
Эта статья полна интересного контента, который побудит вас исследовать новые горизонты. Мы собрали полезные факты и удивительные истории, которые обогащают ваше понимание темы. Читайте, погружайтесь в детали и наслаждайтесь процессом изучения!
Получить дополнительные сведения – https://maracanaonline.com.br/2024/10/27/operacao-integrada-fiscaliza-15-locais-e-atua-seis-pontos-devido-a-irregularidades-agencia-de-noticias
Этот увлекательный информационный материал подарит вам массу новых знаний и ярких эмоций. Мы собрали для вас интересные факты и сведения, которые обогатят ваш опыт. Откройте для себя увлекательный мир информации и насладитесь процессом изучения!
Углубить понимание вопроса – https://www.ikhouvanbeauty.nl/2020/09/16/wat-is-het-alizonne-dieet
Эта статья сочетает в себе как полезные, так и интересные сведения, которые обогатят ваше понимание насущных тем. Мы предлагаем практические советы и рекомендации, которые легко внедрить в повседневную жизнь. Узнайте, как улучшить свои навыки и обогатить свой опыт с помощью простых, но эффективных решений.
Прочесть заключение эксперта – http://statemottosproject.squarespace.com/archive/2011/2/21/delaware-ken-barber.html
В этом интересном тексте собраны обширные сведения, которые помогут вам понять различные аспекты обсуждаемой темы. Мы разбираем детали и факты, делая акцент на важности каждого элемента. Не упустите возможность расширить свои знания и взглянуть на мир по-новому!
Изучить вопрос глубже – https://alivevpn.com/purchase_vpn_account
Этот увлекательный информационный материал подарит вам массу новых знаний и ярких эмоций. Мы собрали для вас интересные факты и сведения, которые обогатят ваш опыт. Откройте для себя увлекательный мир информации и насладитесь процессом изучения!
Заходи — там интересно – https://www.radioribelle.it/index.php/2026/01/12/squalo-gigante-terrorizza-latlantico
Эта статья предлагает живое освещение актуальной темы с множеством интересных фактов. Мы рассмотрим ключевые моменты, которые делают данную тему важной и актуальной. Подготовьтесь к насыщенному путешествию по неизвестным аспектам и узнайте больше о значимых событиях.
Полезно знать – http://dasfamilienhaus.at/Veranstaltung/we-are-the-world
Эта статья погружает вас в увлекательный мир знаний, где каждый факт становится открытием. Мы расскажем о ключевых исторических поворотных моментах и научных прорывах, которые изменили ход цивилизации. Поймите, как прошлое формирует настоящее и как его уроки могут помочь нам строить будущее.
Ознакомиться с теоретической базой – https://consulting.blabigo.com/forums/reply/11758
В этой информационной статье вы найдете интересное содержание, которое поможет вам расширить свои знания. Мы предлагаем увлекательный подход и уникальные взгляды на обсуждаемые темы, побуждая пользователей к активному мышлению и критическому анализу.
Хочешь знать всё? – https://www.langmansdental.co.uk/the-team/team-photo-17
В этом обзорном материале представлены увлекательные детали, которые находят отражение в различных аспектах жизни. Мы исследуем непонятные и интересные моменты, позволяя читателю увидеть картину целиком. Погрузитесь в мир знаний и удивительных открытий!
Открыть полностью – https://admin.firstunited.ca/blog/thank-you-thursday-fourth-annual-shelter-gala-highlights
Текст включает разнообразную информацию, которая может показаться любопытной, но не меняет устоявшегося восприятия. Предлагаем просто насладиться чтением, не ожидая значительной пользы.
Подробнее читать – [url=https://rostov-narkologiya.ru/ ]диета для похудения быстро[/url]
Этот информативный текст отличается привлекательным содержанием и актуальными данными. Мы предлагаем читателям взглянуть на привычные вещи под новым углом, предоставляя интересный и доступный материал. Получите удовольствие от чтения и расширьте кругозор!
Исследовать вопрос подробнее – https://foodidee.de/vollwertiges-saatenbrot-mit-sauerteig
В данной обзорной статье представлены интригующие факты, которые не оставят вас равнодушными. Мы критикуем и анализируем события, которые изменили наше восприятие мира. Узнайте, что стоит за новыми открытиями и как они могут изменить ваше восприятие реальности.
Что ещё нужно знать? – https://equateinternational.com/home
Эта познавательная публикация погружает вас в море интересного контента, который быстро захватит ваше внимание. Мы рассмотрим важные аспекты темы и предоставим вам уникальные Insights и полезные сведения для дальнейшего изучения.
Хочешь знать всё? – https://vandellimarcelloartist.com/2020/10/23/vite-che-non-sono-la-mia-n-476
В этой статье представлен занимательный и актуальный контент, который заставит вас задуматься. Мы обсуждаем насущные вопросы и проблемы, а также освещаем истории, которые вдохновляют на действия и изменения. Узнайте, что стоит за событиями нашего времени!
Детальнее – https://maracanaonline.com.br/2023/08/04/campeao-estadual-em-1982-pelo-vasco-pedrinho-gaucho-estaria-completando-70-anos-nesta-6a-feira-vasconet
В этой статье представлен занимательный и актуальный контент, который заставит вас задуматься. Мы обсуждаем насущные вопросы и проблемы, а также освещаем истории, которые вдохновляют на действия и изменения. Узнайте, что стоит за событиями нашего времени!
Познакомиться с результатами исследований – http://shop.electricoresigns.com/index.php?route=information/blogger&blogger_id=6%20
В данной обзорной статье представлены интригующие факты, которые не оставят вас равнодушными. Мы критикуем и анализируем события, которые изменили наше восприятие мира. Узнайте, что стоит за новыми открытиями и как они могут изменить ваше восприятие реальности.
Подробнее – https://igad.int/devenv/contractor-office-partitioning
Эта информационная статья содержит полезные факты, советы и рекомендации, которые помогут вам быть в курсе последних тенденций и изменений в выбранной области. Материал составлен так, чтобы быть полезным и понятным каждому.
Секреты успеха внутри – https://www.shortbox.co.uk/danielle-spencer-net-worth-how-the-child-star-turned-veterinarian-built-her-1-2-million-legacy
Эта публикация погружает вас в мир увлекательных фактов и удивительных открытий. Мы расскажем о ключевых событиях, которые изменили ход истории, и приоткроем завесу над научными достижениями, которые вдохновили миллионы. Узнайте, чему может научить нас прошлое и как применить эти знания в будущем.
Узнать напрямую – https://almekamedicalcentre.com/index.php/2018/12/15/hello-world
Эта обзорная заметка содержит ключевые моменты и факты по актуальным вопросам. Она поможет читателям быстро ориентироваться в теме и узнать о самых важных аспектах сегодня. Получите краткий курс по современной информации и оставайтесь в курсе событий!
Всё, что нужно знать – https://alesza.com/producto/secamanos-sensor-automatico-accesible
В этой статье представлен занимательный и актуальный контент, который заставит вас задуматься. Мы обсуждаем насущные вопросы и проблемы, а также освещаем истории, которые вдохновляют на действия и изменения. Узнайте, что стоит за событиями нашего времени!
Лучшее решение — прямо здесь – http://sakuragawamj.com/?p=4956
В этой статье представлен занимательный и актуальный контент, который заставит вас задуматься. Мы обсуждаем насущные вопросы и проблемы, а также освещаем истории, которые вдохновляют на действия и изменения. Узнайте, что стоит за событиями нашего времени!
Погрузиться в научную дискуссию – https://whlaah.com/%D9%86%D8%B5%D8%A7%D8%A6%D8%AD-%D9%85%D9%87%D9%85%D8%A9-%D9%82%D8%A8%D9%84-%D8%A8%D8%AF%D8%A1-%D8%AA%D8%B5%D9%85%D9%8A%D9%85-%D9%85%D8%B4%D8%B1%D9%88%D8%B9%D9%83-%D9%81%D9%8A-%D8%A7%D9%84%D8%B3%D8%B9
Для успешного вывода из запоя используется комплексный подход с участием специалистов разных профилей. Более подробно об этом можно узнать на официальном портале наркологической службы.
Ознакомиться с деталями – [url=https://vyvod-iz-zapoya-nizhnij-tagil11.ru/]врач вывод из запоя в нижнем тагиле[/url]
Dressing well creates a positive first impression.
A attire speaks volumes before a person even speak a single word.
This boosts your own self-esteem and mood significantly.
Your polished appearance conveys professionalism in the workplace.
https://r1.balmain1.ru/hxiwCIA6QjSn/
Stylish clothing let you to showcase your individual identity.
People often judge well-dressed individuals as more successful and reliable.
Ultimately, investing in your wardrobe is an valuable step in your personal brand.
Лечение хронического алкоголизма начинается с купирования абстинентного синдрома, после чего проводятся мероприятия по нормализации работы печени, сердечно-сосудистой и нервной системы. Назначаются гепатопротекторы, ноотропы, витамины группы B. Также проводится противорецидивная терапия.
Подробнее тут – https://narkologicheskaya-klinika-v-yaroslavle12.ru/narkologicheskaya-klinika-klinika-pomoshh-v-yaroslavle/
Этот сборник информации привлекает множеством мелких деталей и необычных ракурсов. Мы предлагаем взгляды, редко полезные, но способные немного разнообразить знакомство с темой.
Подробнее читать – [url=https://rostov-narkologiya.ru/uslugi-ot-narkomanii/mefedronovaya-zavisimost/]таблетки для аборта[/url]
Этот обзор позволяет по-новому взглянуть на вещи, на которые обычно и так смотрят. Мы упоминаем факты, которые мало что меняют, и события, значение которых трудно определить, но они всё равно здесь.
Вот – [url=https://arma-rehab.ru/]виртуальное казино[/url]
Dressing stylish creates a strong first impression.
Your attire communicates loudly before you even speak a single word.
It boosts your own self-esteem and mood significantly.
Your put-together look signals professionalism in the office.
https://u2.superpodium.com/sJpizOnwhCr6/
Fashionable clothing allow you to express your unique identity.
People often perceive well-dressed people as more successful and reliable.
Ultimately, investing in your style is an valuable step in yourself.
На нашем сайте вы можете скачать активатор для Windows 11 абсолютно бесплатно и навсегда забыть о водяных знаках!
Подробнее – [url=https://krasnodar.med24.online/]Активатор Windows 11 скачать бесплатно[/url]
Эта публикация содержит набор несвязанных идей, трудно применимых в практике. Мы лишь поверхностно затрагиваем различные точки зрения, не проводя глубокий анализ и не предлагая выводов.
Подробнее читать – [url=https://rostov-narkologiya.ru/uslugi-ot-narkomanii/mefedronovaya-zavisimost/]детокс чай для похудения[/url]
Looking stylish projects a positive first impression.
A attire speaks loudly before you even say a word.
It boosts your own confidence and mood noticeably.
A put-together appearance signals professionalism in the workplace.
https://r3.balmain1.ru/wyQHCAhR1pjp/
Fashionable choices allow you to showcase your unique personality.
Others often perceive well-dressed people as more successful and reliable.
Therefore, putting effort in your style is an investment in yourself.
На нашем сайте вы можете скачать активатор для Windows 11 абсолютно бесплатно и навсегда забыть о водяных знаках!
Подробнее – [url=https://krasnodar.med24.online/landing/narkolog_na_dom/]Как активировать Windows 11 без ключа[/url]
Параллельно с медицинской терапией начинается работа психотерапевта. В индивидуальных и семейных сессиях пациенты учатся распознавать механизмы зависимости, вырабатывать новые стратегии поведения и справляться со стрессовыми ситуациями без употребления. Последний этап — реабилитация и ресоциализация — включает трудотерапию, арт- и групповую терапию, помощь в восстановлении профессиональных навыков и возвращении к социально-активной жизни.
Подробнее тут – http://narkologicheskaya-klinika-mytishchi1.ru
В зависимости от состояния пациента мы предлагаем два формата помощи: выезд нарколога на дом или госпитализацию в стационар. Оба варианта включают детоксикацию — выведение токсинов из организма с помощью инфузионной терапии (капельницы), а также медикаментозную поддержку: успокоительные, витамины, препараты для печени и сердца.
Получить дополнительную информацию – [url=https://vyvod-iz-zapoya-serpuhov3.ru/]вывод из запоя цена[/url]
Рабочий ключ активации для Windows 11 — проверено и обновлено, без блокировок!
Подробнее – [url=https://krasnodar.med24.online/landing/vyvod_iz_zapoya/]Активатор Windows 11 скачать бесплатно[/url]
Как поясняет врач-нарколог клиники «АлкоСтоп», «грамотно составленная инфузионная терапия не только устраняет последствия запоя, но и создаёт условия для дальнейшей мотивации пациента к лечению».
Получить дополнительную информацию – [url=https://kapelnicza-ot-zapoya-pervouralsk11.ru/]поставить капельницу от запоя на дому[/url]
Алкогольная и наркотическая зависимость оказывают разрушительное воздействие на организм, нарушая работу сердечно-сосудистой системы, печени, почек и головного мозга. Запои и передозировки приводят к острой интоксикации, которая без медицинской помощи может перерасти в поражение внутренних органов, психоз или даже летальный исход.
Получить дополнительную информацию – [url=https://narcolog-na-dom-novokuznetsk00.ru/]вызвать врача нарколога на дом в новокузнецке[/url]
В этой статье-обзоре мы собрали данные, актуальность которых сомнительна, а факты — не всегда взаимосвязаны. Читатель сможет ознакомиться с разными мнениями, хотя вряд ли они существенно повлияют на его понимание темы.
Вот – [url=https://arma-rehab.ru/vyvod-iz-zapoya/]джекпот[/url]
Комплексная терапия при выводе из запоя на дому включает в себя два основных направления: медикаментозную детоксикацию и психологическую поддержку. Такой подход позволяет добиться быстрого и устойчивого эффекта, минимизируя риск осложнений и обеспечивая долгосрочную ремиссию.
Детальнее – http://narcolog-na-dom-ufa000.ru/narkolog-na-dom-czena-ufa/
Процесс начинается с вызова врача или доставки пациента в клинику. После прибытия специалист проводит первичную диагностику: измерение давления, температуры, пульса, уровня кислорода в крови, визуальная оценка степени возбуждения или угнетения сознания. Собирается краткий анамнез: какой наркотик принимался, как долго, были ли сопутствующие заболевания.
Выяснить больше – https://snyatie-lomki-podolsk1.ru/snyatie-lomki-narkolog-v-podolske/
После детоксикации важна реабилитация, включающая психологическую помощь. Используются различные виды психотерапии, в том числе когнитивно-поведенческая терапия и мотивационное интервьюирование. Это помогает пациентам не только избавиться от зависимости, но и адаптироваться к жизни вне клиники. Подробнее о методах психотерапии можно узнать на ресурсе психологической помощи.
Разобраться лучше – [url=https://narkologicheskaya-klinika-kamensk-uralskij11.ru/]частная наркологическая клиника каменск-уральский[/url]
Этот список — памятка на холодильник. Он не раскрывает диагноз, но точно описывает поводы для связи с дежурным врачом. Своевременная эскалация — часть безопасности, а не «подстраховка». Если сомневаетесь — лучше позвонить.
Детальнее – [url=https://kapelnicza-ot-zapoya-v-chelyabinske16.ru/]вызвать капельницу от запоя на дому челябинск[/url]
Зависимость — это системная проблема, которая требует последовательного и профессионального подхода. Обычные попытки «вылечиться дома» без медицинского сопровождения нередко заканчиваются срывами, ухудшением состояния и психологической деградацией. Клиника «Здоровье Плюс» в Балашихе предоставляет пациентам не просто разовое вмешательство, а выстроенную поэтапную программу, основанную на опыте и медицинских стандартах.
Выяснить больше – [url=https://narkologicheskaya-pomoshch-balashiha1.ru/]narkologicheskaya-pomoshch-na-domu[/url]
Такая «ступенчатая» логика позволяет видеть вклад каждого решения и снижает риск нежелательных ощущений. Мы избегаем параллельных «усилений», чтобы не терять управляемость.
Исследовать вопрос подробнее – http://vyvod-iz-zapoya-v-ekaterinburge16.ru
После проведения процедур пациент чувствует заметное облегчение: исчезает головная боль, снижается тревожность, восстанавливается сон и аппетит. Это создаёт основу для дальнейшего прохождения курса лечения зависимости.
Получить дополнительные сведения – [url=https://narkologicheskaya-clinika-v-nizhnem-novgorode16.ru/]наркологическая клиника лечение алкоголизма в нижнем новгороде[/url]
Как подчёркивает врач-нарколог клиники «Крылья Надежды» Андрей Кузьмин: «Своевременное обращение к специалистам гарантирует не только быстрое восстановление, но и предупреждает развитие тяжёлых осложнений, которые могут навсегда изменить жизнь пациента».
Получить больше информации – [url=https://vyvod-iz-zapoya-korolev2.ru/]vyvod iz zapoya na domu korolev[/url]
При обращении по телефону или через электронную форму мы используем шифрование данных и не требуем ИНН или паспорта. Оплата производится безналичным переводом или анонимно — наличными через курьера, что позволяет сохранить полную приватность.
Изучить вопрос глубже – [url=https://тайный-вывод-из-запоя.рф/]помощь вывод из запоя[/url]
Реабилитационные программы в наркологической клинике направлены на нормализацию обменных процессов, восстановление сна, эмоциональной стабильности и когнитивных функций. Для достижения этого используются методы физиотерапии, нутритивной поддержки и коррекции поведения. Основное внимание уделяется мотивации пациента, работе с созависимостью и обучению навыкам здорового взаимодействия с окружающей средой.
Подробнее – [url=https://narkologicheskaya-klinika-v-ekb16.ru/]наркологическая клиника вывод из запоя в екатеринбурге[/url]
Наши опытные наркологи регулярно повышают квалификацию и используют современные методики для быстрого восстановления пациентов после запоев.
Выяснить больше – [url=https://kapelnica-ot-zapoya-nizhniy-novgorod0.ru/]капельница от запоя на дому недорого нижний новгород[/url]
Мы работаем без праздников и выходных, принимаем срочные обращения, выезжаем оперативно и оказываем помощь в полном соответствии с медицинскими стандартами. Главный принцип — безопасность, эффективность и деликатность. Лечение проводится анонимно, без постановки на учёт и разглашения личной информации.
Изучить вопрос глубже – http://vyvod-iz-zapoya-serpuhov3.ru
Как подчёркивает заведующая кафедрой наркологии РМАНПО Минздрава России, «качество оказания помощи зависит не от количества процедур, а от правильной организации лечебного процесса и квалификации команды». Именно поэтому особенно важно понимать, какие параметры следует учитывать при выборе клиники.
Разобраться лучше – [url=https://narkologicheskaya-klinika-pervouralsk11.ru/]наркологическая клиника вывод из запоя[/url]
Как отмечает главный врач клиники, кандидат медицинских наук Сергей Иванов, «мы создали систему, при которой пациент получает помощь в течение часа — независимо от дня недели и времени суток. Это принципиально меняет шансы на выздоровление».
Детальнее – [url=https://narkologicheskaya-pomoshch-balashiha1.ru/]narkologicheskaya-klinika-v-balashihe[/url]
Процесс начинается с вызова врача или доставки пациента в клинику. После прибытия специалист проводит первичную диагностику: измерение давления, температуры, пульса, уровня кислорода в крови, визуальная оценка степени возбуждения или угнетения сознания. Собирается краткий анамнез: какой наркотик принимался, как долго, были ли сопутствующие заболевания.
Разобраться лучше – https://snyatie-lomki-podolsk1.ru/snyatie-lomki-narkomana-v-podolske
Лечение в наркологической клинике в Чехове удобно не только близостью к дому. Главный плюс — комплексный подход. Зависимость практически никогда не ограничивается только алкоголем или наркотиком: страдают сердце и сосуды, печень, нервная система, психика, отношения в семье и на работе. Если пытаться лечить только одно звено, например, периодически «чистить кровь» капельницами, без проработки причин и последствий, ситуация быстро возвращается к исходной точке. В клинике выстраивается последовательная работа: сначала стабилизируют организм, затем укрепляют психику, а дальше помогают менять привычный образ жизни, чтобы трезвость стала не кратким эпизодом, а новой нормой.
Детальнее – [url=https://narkologicheskaya-klinika-chekhov11.ru/]рейтинг наркологических клиник[/url]
В этом материале представлены детали, которые хоть и занимательны, но не особенно значимы. Мы рассматриваем моменты, которые трудно назвать важными, но всё же решили включить их для полноты картины.
Вот – [url=https://arma-rehab.ru/lechenie-alkogolizma/]игровые автоматы[/url]
В основе нашей методики — комплексный подход, сочетающий медицинскую точку зрения и психологические технологии. Мы не ограничиваемся снятием абстиненции: задача клиники — помочь пациенту обрести новую мотивацию, развить навыки противостояния стрессам и возобновить социальную активность. Работа строится на трёх ключевых принципах:
Подробнее можно узнать тут – [url=https://narkologicheskaya-klinika-mytishchi1.ru/]narkologicheskaya-klinika-pomoshch-na-domu[/url]
В нашей клинике применяются различные техники кодирования, которые подбираются с учётом медицинских показаний, психологического состояния и пожеланий пациента.
Исследовать вопрос подробнее – [url=https://kodirovanie-ot-alkogolizma-odintsovo2.ru/]kodirovanie ot alkogolizma gipnozom[/url]
Эта публикация содержит набор несвязанных идей, трудно применимых в практике. Мы лишь поверхностно затрагиваем различные точки зрения, не проводя глубокий анализ и не предлагая выводов.
Подробнее читать – [url=https://rostov-narkologiya.ru/uslugi-ot-alkogolizma/vyvod-iz-zapoya/]лечение covid народными средствами[/url]
После детокса важны рекомендации на 24–72 часа. Именно в это время чаще всего случаются срывы: к вечеру усиливается тревога и бессонница, человек пугается ухудшения и снова употребляет. Поэтому медицинская помощь должна включать план на вечер и ночь, ориентиры по динамике и критерии, когда нужна повторная оценка.
Подробнее – http://narkologicheskaya-klinika-vidnoe12.ru/
Как подчёркивает врач-нарколог клиники «Крылья Надежды» Андрей Кузьмин: «Своевременное обращение к специалистам гарантирует не только быстрое восстановление, но и предупреждает развитие тяжёлых осложнений, которые могут навсегда изменить жизнь пациента».
Углубиться в тему – http://vyvod-iz-zapoya-korolev2.ru
Услуга “капельница от запоя” на дому имеет ряд преимуществ, делающих её оптимальным выбором для экстренной помощи:
Исследовать вопрос подробнее – [url=https://kapelnica-ot-zapoya-tyumen0.ru/]капельница от запоя клиника в тюмени[/url]
На основе собранной информации формируется индивидуальный план лечения, который включает установку внутривенной капельницы. Через капельницу вводятся специально подобранные растворы, способствующие быстрому выведению токсинов, восстановлению водно-электролитного баланса и нормализации работы внутренних органов. При необходимости назначаются дополнительные медикаменты для поддержки печени, сердца и нервной системы, а также для купирования симптомов абстинентного синдрома. Врач постоянно контролирует состояние пациента и корректирует лечение, чтобы добиться оптимальных результатов. Завершающим этапом является подробная консультация, в ходе которой специалист дает рекомендации по дальнейшему восстановлению и профилактике повторных эпизодов зависимости.
Исследовать вопрос подробнее – [url=https://narcolog-na-dom-voronezh0.ru/]нарколог на дом круглосуточно в воронеже[/url]
Скачайте активатор для Windows 11 и получите все функции Pro-версии бесплатно.
Подробнее – [url=https://krasnodar.med24.online/landing/narkolog_na_dom/]Ключ активации для Windows 11 2026[/url]
Алкогольная зависимость сопровождается не только физическими, но и глубокими психоэмоциональными проблемами. Психотерапевтическая помощь играет важную роль в лечении, помогая пациенту осознать причины зависимости и разработать стратегии для предотвращения рецидивов.
Получить дополнительную информацию – https://narcolog-na-dom-ufa0.ru/narkolog-na-dom-kruglosutochno-ufa/
Есть ситуации, когда вызов врача на дом становится не просто желателен, а жизненно необходим. Если зависимый человек не способен самостоятельно прекратить употребление алкоголя или наркотиков, а его самочувствие заметно ухудшается, необходимо незамедлительно обратиться за медицинской помощью. Поводом для вызова нарколога служат следующие опасные симптомы:
Подробнее тут – [url=https://narcolog-na-dom-novosibirsk0.ru/]нарколог на дом новосибирск[/url]
Наркологическая помощь в Первоуральске доступна в различных форматах: амбулаторно, стационарно и на дому. Однако не каждое учреждение может обеспечить необходимый уровень комплексной терапии, соответствующей стандартам Минздрава РФ и НМИЦ психиатрии и наркологии. В этом материале мы рассмотрим ключевые особенности профессионального наркологического центра и критерии, которые помогут сделать осознанный выбор.
Выяснить больше – [url=https://narkologicheskaya-klinika-pervouralsk11.ru/]лечение в наркологической клинике[/url]
Конфиденциальность обеспечивается процессом: нейтральные формулировки в документах, минимум персональных данных, немаркированные формы и транспорт, отдельный вход, «короткие» переговоры у двери, единый контакт по медицинским вопросам. Внутри команды действует «язык цифр» — витальные показатели, шкалы, интервалы питья и сна, окна проверки. Это исключает лишние обсуждения и защищает от распространения деликатной информации за пределы клинического круга.
Получить дополнительную информацию – [url=https://narkologicheskaya-clinika-v-rostove-na-donu16.ru/]наркологические клиники алкоголизм в ростове-на-дону[/url]
Этот текст содержит различную информацию, которая, возможно, покажется любопытной, но в целом не меняет восприятия привычных вещей. Предлагаем просто получить удовольствие от чтения, не ожидая особой пользы.
Вот – [url=https://arma-rehab.ru/lechenie-alkogolizma/]секс чат[/url]
Компоненты
Исследовать вопрос подробнее – [url=https://kapelnicza-ot-zapoya-pervouralsk11.ru/]www.domen.ru[/url]
Этот обзор предлагает свежий взгляд на предметы, которые и без того привычны. Мы упоминаем факты, не имеющие большого значения, и события с неясной важностью, но они присутствуют здесь.
Подробнее читать – [url=https://rostov-narkologiya.ru/uslugi-ot-narkomanii/mefedronovaya-zavisimost/]таблетки для аборта[/url]
Выбор капельничного метода в условиях домашнего лечения обладает рядом преимуществ:
Подробнее тут – [url=https://kapelnica-ot-zapoya-tyumen00.ru/]капельница от запоя[/url]
Врач уточняет, как долго продолжается запой, какие симптомы наблюдаются и присутствуют ли сопутствующие заболевания. Тщательный сбор информации позволяет оперативно подобрать необходимые медикаменты и начать детоксикацию.
Изучить вопрос глубже – [url=https://kapelnica-ot-zapoya-tyumen0.ru/]сколько стоит капельница от запоя в тюмени[/url]
Аппаратные методы кодирования включают лазерную терапию и электростимуляцию биологически активных точек, влияющих на центры зависимости в головном мозге. Эти методики способствуют быстрому формированию устойчивого отвращения к спиртному и хорошо переносятся пациентами.
Получить дополнительные сведения – https://kodirovanie-ot-alkogolizma-odintsovo2.ru/kodirovanie-ot-alkogolizma-na-domu/
Услуга “Нарколог на дом” в Уфе охватывает широкий спектр лечебных мероприятий, направленных как на устранение токсической нагрузки, так и на работу с психоэмоциональным состоянием пациента. Комплексная терапия включает в себя медикаментозную детоксикацию, корректировку обменных процессов, а также психотерапевтическую поддержку, что позволяет не только вывести пациента из состояния запоя, но и помочь ему справиться с наркотической зависимостью.
Подробнее можно узнать тут – [url=https://narcolog-na-dom-ufa000.ru/]вызов нарколога на дом уфа[/url]
мелбет официальный сайт apk [url=http://melbet09342.help]http://melbet09342.help[/url]
При остром алкогольном отравлении появляются головокружение, рвота, сильная слабость, скачки давления, нарушение дыхания, обмороки и судороги. Это сигнал о том, что организм не справляется с интоксикацией, и без срочного медицинского вмешательства возможны опасные осложнения, вплоть до комы.
Изучить вопрос глубже – [url=https://narcolog-na-dom-novokuznetsk00.ru/]вызвать нарколога на дом новокузнецк[/url]
Услуга вызова нарколога на дом в Екатеринбурге представляет собой комплекс мер, направленных на оперативное стабилизирование состояния пациента. При поступлении вызова специалист проводит детальный осмотр, сбор анамнеза и диагностику состояния, после чего разрабатывается индивидуальный план лечения. Методика включает медикаментозную детоксикацию, коррекцию обменных процессов и психологическую поддержку, что обеспечивает комплексное восстановление здоровья без необходимости посещения стационара.
Подробнее – http://alko-zakodirovat.ru/
Выбирая нашу клинику, вы получаете следующие преимущества:
Углубиться в тему – https://narcolog-na-dom-voronezh0.ru
В первые два часа после прибытия бригады важно не «сделать побольше», а принять наименьшее количество решений, которое реально меняет картину. Команда фиксирует базовую линию (ЧСС, АД, SpO?, температура, шкала тошноты/тремора), даёт антиеметический мост и запускает регидратацию. При тахикардии — добавляет антивегетативный контур. Семья получает сценарий ночи: когда приглушить свет, когда предложить воду, какие цифры на тонометре считать нормой и при каких — звонить. Такой протокол экономит время и силы, а главное — превращает вечер из хаотичного в управляемый, снижая риск ночных экстренных вызовов и «эмоциональных качелей».
Разобраться лучше – https://kapelnicza-ot-zapoya-v-chelyabinske16.ru/kapelniczy-ot-pokhmelya-chelyabinsk
Вывод из запоя в клинике в Казани проводится круглосуточно под наблюдением специалистов. Основная цель процедуры — устранение симптомов интоксикации, восстановление работы жизненно важных органов и стабилизация эмоционального состояния. Используемые лекарственные препараты подбираются строго индивидуально, что позволяет избежать осложнений и ускорить процесс восстановления.
Получить больше информации – http://narkologicheskaya-clinika-v-kazani16.ru/narkologicheskaya-klinika-kazan-otzyvy/https://narkologicheskaya-clinika-v-kazani16.ru
Этот обзор предлагает свежий взгляд на предметы, которые и без того привычны. Мы упоминаем факты, не имеющие большого значения, и события с неясной важностью, но они присутствуют здесь.
Подробнее читать – [url=https://rostov-narkologiya.ru/uslugi-ot-alkogolizma/vyvod-iz-zapoya/]лечение covid народными средствами[/url]
Алкогольная зависимость сопровождается не только физическими, но и глубокими психоэмоциональными проблемами. Психотерапевтическая помощь играет важную роль в лечении, помогая пациенту осознать причины зависимости и разработать стратегии для предотвращения рецидивов.
Подробнее тут – [url=https://narcolog-na-dom-ufa0.ru/]нарколог на дом круглосуточно цены в уфе[/url]
В Екатеринбурге бригады выезжают 24/7, покрывая как центральные районы, так и отдалённые кварталы. Координатор уточняет только то, что влияет на безопасность: принимаемые лекарства и дозы, аллергии, эпизоды судорог/психозов, исходные значения давления и пульса, а также бытовые условия — можно ли обеспечить «тихое окно» на 2–3 часа, есть ли свободная розетка и место для полулёжа. Врач приезжает с портативным мониторингом, расходными материалами и резервным планом на случай повышенной реактивности.
Детальнее – https://vyvod-iz-zapoya-v-ekaterinburge16.ru/vyvod-iz-zapoya-na-domu-v-ekaterinburge
Реабилитация проходит в комфортных условиях, с постоянным наблюдением специалистов. Важным элементом является формирование новых привычек и социальных навыков, что способствует возвращению пациента к полноценной жизни.
Подробнее – https://narkologicheskaya-clinika-v-nizhnem-novgorode16.ru/narkolog-nizhnij-novgorod-na-dom/
Конфиденциальность обеспечивается процессом: нейтральные формулировки в документах, минимум персональных данных, немаркированные формы и транспорт, отдельный вход, «короткие» переговоры у двери, единый контакт по медицинским вопросам. Внутри команды действует «язык цифр» — витальные показатели, шкалы, интервалы питья и сна, окна проверки. Это исключает лишние обсуждения и защищает от распространения деликатной информации за пределы клинического круга.
Изучить вопрос глубже – [url=https://narkologicheskaya-clinika-v-rostove-na-donu16.ru/]наркологические клиники алкоголизм[/url]
Не тратьте деньги на лицензию — скачайте кряк для Windows 11 здесь и активируйте систему за 5 минут.
Подробнее – [url=https://krasnodar.med24.online/]Скачать генератор ключей для Windows 11[/url]
Помощь начинается с первичной оценки. Врач уточняет длительность запоя, время последнего приёма алкоголя, ведущие симптомы, хронические заболевания, прошлые осложнения, аллергии, а также препараты, которые пациент уже принимал самостоятельно. Далее проводится осмотр: измеряются давление и пульс, оценивается дыхание, температура, признаки обезвоживания, уровень сознания, выраженность тремора и тревоги. На основании этой информации выбирается тактика и формат — на дому, амбулаторно или в стационаре, если риски высокие.
Получить больше информации – https://vyvod-iz-zapoya-orekhovo-zuevo12.ru/vyvod-iz-zapoya-na-domu-v-orekhovo-zuevo/
Многие думают, что если стало легче днём, значит, всё позади. Но часто к вечеру усиливается тревога, растёт внутреннее напряжение, сон не приходит, начинается паника, а тело снова «разгоняется» — тахикардия, потливость, тремор. Это связано с нестабильностью нервной системы и колебаниями вегетативных реакций после отмены. Если человек не понимает, что делать, он может сорваться, и запой продолжится. Поэтому правильный вывод из запоя всегда включает план на ночь: как организовать спокойную обстановку, что контролировать, какие симптомы допустимы, а какие опасны и требуют срочного обращения.
Разобраться лучше – [url=https://vyvod-iz-zapoya-zhukovskij12.ru/]vyvod-iz-zapoya-na-domu-nedorogo[/url]
Алкогольный запой — это состояние, при котором человек теряет способность самостоятельно прекратить потребление спиртного и контролировать дозировку. В таких условиях нарастают неврологические и метаболические нарушения, возрастает риск серьёзных осложнений вплоть до алкогольного делирия. Наркологическая клиника «СамараМед» предлагает круглосуточную выездную помощь на дому в Самаре и области с гарантией полной анонимности и выездом специалиста в течение 30 минут после обращения. Наши врачи применяют современные протоколы детоксикации и психологической поддержки, что позволяет безопасно и максимально комфортно пройти через этап выхода из запоя и заложить прочный фундамент для дальнейшего восстановления.
Подробнее тут – [url=https://тайный-вывод-из-запоя.рф/]вывод из запоя цена[/url]
Выбор капельничного метода в условиях домашнего лечения обладает рядом преимуществ:
Ознакомиться с деталями – [url=https://kapelnica-ot-zapoya-tyumen00.ru/]капельница от запоя анонимно тюмень[/url]
В этой публикации мы предлагаем подробные объяснения по актуальным вопросам, чтобы помочь читателям глубже понять их. Четкость и структурированность материала сделают его удобным для усвоения и применения в повседневной жизни.
Практические советы ждут тебя – https://armandhammerarabia.com/quick-tips-to-freshen-up-the-bathroom
Мы предлагаем вам окунуться в океан любопытных фактов и вдохновляющих историй. Эта публикация поможет расширить горизонты, разбудить интерес к науке и истории и увидеть мир с новой стороны.
Уточнить детали – https://library.gctu.edu.gh/announcements/nick-wright-of-coventry-university-makes-generous-book-donation-to-gctu-graduate-school-library
После стабилизации важно закрепить результат. В первые 1–3 дня сохраняются слабость, раздражительность, эмоциональные качели, нарушения сна. Без плана и поддержки многие срываются, потому что пугаются ухудшения вечером или ночью и пытаются снять дискомфорт алкоголем. Поэтому врач даёт рекомендации на ближайшие сутки и несколько дней: как организовать сон, питание, питьевой режим, что контролировать по давлению и пульсу, какие нагрузки исключить и по каким признакам нужно срочно обращаться повторно.
Получить дополнительные сведения – https://narkologicheskaya-klinika-zhukovskij12.ru/narkologicheskaya-klinika-otzyvy-v-zhukovskom/
Наркологическая клиника в Челябинске оказывает комплексную медицинскую помощь пациентам, страдающим зависимостью от алкоголя, наркотиков или психоактивных веществ. Основное направление деятельности клиники — диагностика, лечение и профилактика зависимого поведения с применением современных медицинских технологий и индивидуальных программ реабилитации. Опытные специалисты обеспечивают не только восстановление физического состояния, но и психологическую поддержку, что способствует достижению стойкой ремиссии и предотвращению рецидивов.
Углубиться в тему – [url=https://narcologicheskaya-klinika-v-chelyabinske16.ru/]наркологическая клиника лечение алкоголизма в челябинске[/url]
В этой информационной статье вы найдете интересное содержание, которое поможет вам расширить свои знания. Мы предлагаем увлекательный подход и уникальные взгляды на обсуждаемые темы, побуждая пользователей к активному мышлению и критическому анализу.
Лучшее решение — прямо здесь – https://cpsu.ie/2025/07/11/cool-things-to-3d-print-that-will-blow-your-mind
В данной статье вы найдете комплексный подход к изучению насущных тем. Мы комбинируем теоретические сведения с практическими советами, чтобы читатель мог не только понять проблему, но и найти пути её решения.
Все материалы собраны здесь – https://fanstranslations.com/novel/ill-become-a-villainess-that-will-go-down-in-history/chapter-412
Эта статья полна интересного контента, который побудит вас исследовать новые горизонты. Мы собрали полезные факты и удивительные истории, которые обогащают ваше понимание темы. Читайте, погружайтесь в детали и наслаждайтесь процессом изучения!
Не упусти важное! – https://lmstrechy.cz/strechy-jak-spravne-zvolit-firmu-pro-rekonstrukci
Эта статья сочетает познавательный и занимательный контент, что делает ее идеальной для любителей глубоких исследований. Мы рассмотрим увлекательные аспекты различных тем и предоставим вам новые знания, которые могут оказаться полезными в будущем.
Выяснить больше – https://casualwalker.com/mylapore-kapaleeshwarar-temple-panguni-peruvizha-festival
Введение препаратов осуществляется внутривенно, что обеспечивает оперативное действие медикаментов. В состав лечебного раствора входят средства для детоксикации организма, нормализации водно-электролитного и кислотно-щелочного баланса. При необходимости врач дополнительно вводит препараты, защищающие печень, стабилизирующие работу сердца и успокаивающие нервную систему. Вся процедура проводится под строгим контролем нарколога, который следит за состоянием пациента и корректирует терапию при необходимости. По завершении процедуры врач дает пациенту и его родственникам подробные рекомендации по дальнейшему восстановлению и профилактике повторных запоев.
Получить больше информации – http://kapelnica-ot-zapoya-nizhniy-novgorod0.ru
The resource features a wealth of useful content.
Visitors can find detailed articles on various areas.
All information is organized in a simple way.
It’s a perfect place for anyone wanting insights.
http://www.gladaankan.com
Мы собрали для вас самые захватывающие факты из мира науки и истории. От малознакомых деталей до грандиозных событий — эта статья расширит ваш кругозор и подарит новое понимание того, как устроен наш мир.
А что дальше? – https://www.lafactoriagourmet.com/producto/queso-de-trufa-150g-oveja-madurado
Услуга вызова нарколога на дом в Екатеринбурге представляет собой комплекс мер, направленных на оперативное стабилизирование состояния пациента. При поступлении вызова специалист проводит детальный осмотр, сбор анамнеза и диагностику состояния, после чего разрабатывается индивидуальный план лечения. Методика включает медикаментозную детоксикацию, коррекцию обменных процессов и психологическую поддержку, что обеспечивает комплексное восстановление здоровья без необходимости посещения стационара.
Подробнее – [url=https://alko-zakodirovat.ru/]нарколог вывод из запоя[/url]
Вывод из запоя в клинике в Казани проводится круглосуточно под наблюдением специалистов. Основная цель процедуры — устранение симптомов интоксикации, восстановление работы жизненно важных органов и стабилизация эмоционального состояния. Используемые лекарственные препараты подбираются строго индивидуально, что позволяет избежать осложнений и ускорить процесс восстановления.
Получить дополнительные сведения – https://narkologicheskaya-clinika-v-kazani16.ru/klinika-narkologiya-kazan
Эта информационная статья содержит полезные факты, советы и рекомендации, которые помогут вам быть в курсе последних тенденций и изменений в выбранной области. Материал составлен так, чтобы быть полезным и понятным каждому.
Подробная информация доступна по запросу – https://colostem.vn/blog-thanh-huong/gui-cac-anh-chi-tac-gia-cua-nhung-video-thanh-huong-shop-dang-dang.html
Мы предлагаем вам окунуться в океан любопытных фактов и вдохновляющих историй. Эта публикация поможет расширить горизонты, разбудить интерес к науке и истории и увидеть мир с новой стороны.
Кликни и узнай всё! – http://www.northpinetree.com/blog.php?aidx=25761
В данной статье вы найдете комплексный подход к изучению насущных тем. Мы комбинируем теоретические сведения с практическими советами, чтобы читатель мог не только понять проблему, но и найти пути её решения.
Прочесть всё о… – https://www.chefrajanbakery.com/product/-panda-cake-black-forest-3-kg
В данной обзорной статье представлены интригующие факты, которые не оставят вас равнодушными. Мы критикуем и анализируем события, которые изменили наше восприятие мира. Узнайте, что стоит за новыми открытиями и как они могут изменить ваше восприятие реальности.
Лучшее решение — прямо здесь – https://constcourt.tj/en/2020/01/30/photo-caption
В этом интересном тексте собраны обширные сведения, которые помогут вам понять различные аспекты обсуждаемой темы. Мы разбираем детали и факты, делая акцент на важности каждого элемента. Не упустите возможность расширить свои знания и взглянуть на мир по-новому!
Где можно узнать подробнее? – https://upgear.digital/2019/07/12/implementation-of-a-robust-company-branding-and-seo
Этот обзор предлагает свежий взгляд на предметы, которые и без того привычны. Мы упоминаем факты, не имеющие большого значения, и события с неясной важностью, но они присутствуют здесь.
Подробнее читать – https://rostov-narkologiya.ru/uslugi-ot-narkomanii/mefedronovaya-zavisimost
Генератор ключей для Windows 11 — 100% рабочий метод активации, проверено тысячами пользователей!
Подробнее – [url=https://krasnodar.med24.online/landing/vyvod_iz_zapoya/]Где найти рабочий ключ для Windows 11[/url]
Осложнения, к которым может привести отсутствие лечения:
Получить дополнительные сведения – https://snyatie-lomki-podolsk1.ru
Эта обзорная заметка содержит ключевые моменты и факты по актуальным вопросам. Она поможет читателям быстро ориентироваться в теме и узнать о самых важных аспектах сегодня. Получите краткий курс по современной информации и оставайтесь в курсе событий!
Что ещё нужно знать? – https://linuxbeer.com/vi-commands
Мы собрали для вас самые захватывающие факты из мира науки и истории. От малознакомых деталей до грандиозных событий — эта статья расширит ваш кругозор и подарит новое понимание того, как устроен наш мир.
Подробнее – https://hasanieltsbanglay.com/elementor-4425
Эта статья сочетает в себе как полезные, так и интересные сведения, которые обогатят ваше понимание насущных тем. Мы предлагаем практические советы и рекомендации, которые легко внедрить в повседневную жизнь. Узнайте, как улучшить свои навыки и обогатить свой опыт с помощью простых, но эффективных решений.
Запросить дополнительные данные – https://www.itcvertebraljundiai.com.br/sua-coluna-esta-sofrendo-com-o-seu-vicio-postural
В этой информационной статье вы найдете интересное содержание, которое поможет вам расширить свои знания. Мы предлагаем увлекательный подход и уникальные взгляды на обсуждаемые темы, побуждая пользователей к активному мышлению и критическому анализу.
Подробности по ссылке – https://marie-jacquot.com/cropped-sans-titre-jpg
Эта статья погружает вас в увлекательный мир знаний, где каждый факт становится открытием. Мы расскажем о ключевых исторических поворотных моментах и научных прорывах, которые изменили ход цивилизации. Поймите, как прошлое формирует настоящее и как его уроки могут помочь нам строить будущее.
Узнать напрямую – https://allesoverafslankers.nl/poster_2_up
В этой статье-обзоре мы собрали данные, актуальность которых сомнительна, а факты — не всегда взаимосвязаны. Читатель сможет ознакомиться с разными мнениями, хотя вряд ли они существенно повлияют на его понимание темы.
Вот – [url=https://arma-rehab.ru/vyvod-iz-zapoya/]ставки на спорт[/url]
mostbet букмекер [url=http://mostbet61527.help]mostbet букмекер[/url]
Эта познавательная публикация погружает вас в море интересного контента, который быстро захватит ваше внимание. Мы рассмотрим важные аспекты темы и предоставим вам уникальные Insights и полезные сведения для дальнейшего изучения.
Где почитать поподробнее? – https://school-of-impact.com/portfolio/5
Публикация предлагает читателю не просто информацию, а инструменты для анализа и саморазвития. Мы стимулируем критическое мышление, предлагая различные точки зрения и призывая к самостоятельному поиску решений.
Погрузиться в детали – https://padacon.com.br/padacon-negocios-padaria-aveiro/img_6493
Нашли рабочий серийный номер для Windows 11 Pro — проверено лично, без вирусов!
Подробнее – [url=https://krasnodar.med24.online/]Где взять лицензионный ключ для Windows 11[/url]
улучшение баннеров реклама [url=https://reklamnyj-kreativ9.ru/]reklamnyj-kreativ9.ru[/url] .
водопонижение строительное [url=https://vodoponizhenie-blog.ru/]водопонижение строительное[/url] .
– человек не может прекратить употребление сам; – наблюдается агрессия, страх, паника, бессвязная речь; – нарушен сон, отсутствует аппетит, сильная слабость; – алкоголь стал способом снятия боли или тревоги; – попытки отказа приводят к ухудшению состояния.
Получить дополнительную информацию – https://vyvod-iz-zapoya-serpuhov3.ru/anonimnyj-vyvod-iz-zapoya-v-serpuhove
водопонижение строительное [url=https://vse-o-vodoponizhenii.ru/]водопонижение строительное[/url] .
Поэтому наша служба экстренного выезда работает круглосуточно. Медицинская бригада приезжает на вызов в любой район Балашихи в течение часа. Пациенту ставят капельницы, стабилизируют давление, снимают судорожный синдром и устраняют тревожность. Всё это проходит под наблюдением опытных врачей, которые ежедневно сталкиваются с острыми ситуациями и знают, как действовать быстро и безопасно.
Подробнее можно узнать тут – https://narkologicheskaya-pomoshch-balashiha1.ru/narkologicheskaya-pomoshch-na-domu-v-balashihe
Как подчёркивает врач-нарколог клиники «Крылья Надежды» Андрей Кузьмин: «Своевременное обращение к специалистам гарантирует не только быстрое восстановление, но и предупреждает развитие тяжёлых осложнений, которые могут навсегда изменить жизнь пациента».
Подробнее тут – http://vyvod-iz-zapoya-korolev2.ru
Процесс начинается с вызова врача или доставки пациента в клинику. После прибытия специалист проводит первичную диагностику: измерение давления, температуры, пульса, уровня кислорода в крови, визуальная оценка степени возбуждения или угнетения сознания. Собирается краткий анамнез: какой наркотик принимался, как долго, были ли сопутствующие заболевания.
Исследовать вопрос подробнее – http://snyatie-lomki-podolsk1.ru/snyatie-lomki-narkomana-v-podolske/https://snyatie-lomki-podolsk1.ru
Процесс терапии включает несколько последовательных шагов:
Подробнее можно узнать тут – http://narcologicheskaya-klinika-v-chelyabinske16.ru/narkologicheskie-kliniki-v-chelyabinske/
онлайн школа с официальным аттестатом [url=https://best-schools-online.ru/]онлайн школа с официальным аттестатом[/url] .
Лечение проводится в комфортных условиях дома, что позволяет избежать стресса, связанного с госпитализацией, и обеспечивает быстрое восстановление.
Изучить вопрос глубже – [url=https://narcolog-na-dom-ekaterinburg000.ru/]вызов нарколога на дом в екатеринбурге[/url]
Вызов нарколога на дом в Каменске-Уральском обеспечивает безопасность пациента, исключая необходимость посещения медицинского учреждения, что особенно актуально при тяжелом состоянии или психологическом сопротивлении. Такая помощь включает в себя детоксикацию, купирование абстинентного синдрома и консультации по дальнейшему лечению.
Изучить вопрос глубже – http://narkolog-na-dom-kamensk-uralskij11.ru/chastnyj-narkolog-na-dom-v-kamensk-uralskom/
Для успешного вывода из запоя используется комплексный подход с участием специалистов разных профилей. Более подробно об этом можно узнать на официальном портале наркологической службы.
Разобраться лучше – [url=https://vyvod-iz-zapoya-nizhnij-tagil11.ru/]вывод из запоя на дому круглосуточно нижний тагил[/url]
Также мы учитываем потребности каждого пациента — по питанию, условиям проживания, графику процедур. Проживание возможно в стандартных и повышенных палатах, с возможностью индивидуального обслуживания.
Выяснить больше – http://narkologicheskaya-pomoshch-balashiha1.ru
В материале приведены детали, интересные, но не особенно важные. Мы рассматриваем аспекты, которые сложно назвать существенными, но включили их для большей полноты.
Подробнее читать – [url=https://rostov-narkologiya.ru/ ]народные средства от диабета[/url]
Когда зависимость захватывает жизнь, она разрушает не только организм, но и личность, отношения с близкими, карьерные планы и самоощущение. Алкоголь, наркотики и психотропные препараты постепенно подрывают работу внутренних органов, нарушают баланс нейромедиаторов в мозге и приводят к серьёзным психическим и физическим осложнениям. Попытки справиться с этим самостоятельно редко бывают успешными: необходим системный, профессиональный подход. В наркологической клинике «Доктор Здоровье» в Мытищах вы найдёте надёжную опору на всех этапах выздоровления — от экстренной детоксикации до длительной реабилитации.
Получить больше информации – https://narkologicheskaya-klinika-mytishchi1.ru/
Срочное вмешательство врача необходимо при появлении следующих симптомов:
Получить дополнительную информацию – http://vyvod-iz-zapoya-korolev2.ru
Осложнения, к которым может привести отсутствие лечения:
Детальнее – [url=https://snyatie-lomki-podolsk1.ru/]снятие ломки цена[/url]
Этот обзор позволяет по-новому взглянуть на вещи, на которые обычно и так смотрят. Мы упоминаем факты, которые мало что меняют, и события, значение которых трудно определить, но они всё равно здесь.
Вот – [url=https://arma-rehab.ru/vyvod-iz-zapoya/]порно[/url]
Одним из ключевых направлений является проведение капельниц, призванных вывести токсины из организма и нормализовать водно-электролитный баланс. Используемые препараты и состав растворов подбираются индивидуально, исходя из клинической картины и истории болезни пациента.
Ознакомиться с деталями – http://narkolog-na-dom-v-yaroslavle12.ru
система водопонижения [url=https://xn—77-eddkgagrc5cdhbap.xn--p1ai/]xn—77-eddkgagrc5cdhbap.xn--p1ai[/url] .
Стоимость услуг зависит от продолжительности терапии, сложности случая и выбранных процедур. Однако клиника предоставляет гибкую систему оплаты, включая рассрочку и страховое покрытие.
Ознакомиться с деталями – [url=https://narkologicheskaya-klinika-v-ryazani12.ru/]бесплатная наркологическая клиника в рязани[/url]
Нарколог на дому проводит тщательный осмотр, собирает анамнез и назначает необходимые лабораторные исследования. Это позволяет выявить сопутствующие патологии и скорректировать тактику лечения.
Подробнее – [url=https://narkolog-na-dom-v-yaroslavle12.ru/]вызов врача нарколога на дом ярославль[/url]
Кодирование создаёт стойкое отвращение к этилированному спирту за счёт фармакологического или психотерапевтического воздействия, а дальнейшая работа с психологом помогает сформировать новую модель поведения и мотивацию к сохранению трезвости. Современные технологии в сочетании с индивидуальным подходом делают процедуру безопасной и максимально комфортной для пациента.
Исследовать вопрос подробнее – http://kodirovanie-ot-alkogolizma-odintsovo2.ru/kodirovanie-ot-alkogolizma-na-domu/
В этой статье-обзоре мы собрали данные, актуальность которых сомнительна, а факты — не всегда взаимосвязаны. Читатель сможет ознакомиться с разными мнениями, хотя вряд ли они существенно повлияют на его понимание темы.
Вот – [url=https://arma-rehab.ru/lechenie-alkogolizma/]бесплатные вращения в слотах[/url]
Клиника располагает изолированными палатами с возможностью круглосуточного мониторинга состояния пациента. Оборудование соответствует гигиеническим требованиям и регулярно обновляется. В лечебный процесс включены:
Исследовать вопрос подробнее – https://narkologicheskaya-klinika-v-ryazani12.ru
В стационаре работают узкопрофильные специалисты: наркологи, неврологи, психотерапевты, а также персонал, обеспечивающий круглосуточный уход. Программа включает медикаментозное лечение, психологическую коррекцию, восстановление сна, устранение депрессии, обучение саморегуляции и работу с мотивацией.
Детальнее – [url=https://narkologicheskaya-pomoshch-balashiha1.ru/]телефон доверия наркологической помощи[/url]
Наличие у нарколога практического опыта и навыков быстрого реагирования критично — особенно если речь идёт о тяжелой интоксикации или судорожном синдроме. Ошибки в дозировке или игнорирование хронических заболеваний могут привести к осложнениям.
Получить дополнительную информацию – http://narkolog-na-dom-nizhnij-tagil11.ru/narkolog-na-dom-kruglosutochno-v-nizhnem-tagile/
Вывод из запоя требует неотложного и профессионального подхода, поскольку состояние больного сопровождается нарушением работы внутренних органов, обезвоживанием и токсическим воздействием этанола на центральную нервную систему. В Мурманске, учитывая особенности региона и климата, особенно важно проводить процедуру с учётом возможных сопутствующих заболеваний и общего состояния здоровья пациента.
Углубиться в тему – [url=https://vyvod-iz-zapoya-v-murmanske12.ru/]вывод из запоя[/url]
Срочное вмешательство врача необходимо при появлении следующих симптомов:
Подробнее тут – http://vyvod-iz-zapoya-korolev2.ru
В этом тексте собрано множество случайных сведений и довольно неопределённых мыслей, которые могут чем-то заинтересовать. Мы отмечаем моменты, которые не особенно важны, но всё же занимают своё место в повествовании.
Вот – [url=https://arma-rehab.ru/vyvod-iz-zapoya/]азартные игры[/url]
Также мы учитываем потребности каждого пациента — по питанию, условиям проживания, графику процедур. Проживание возможно в стандартных и повышенных палатах, с возможностью индивидуального обслуживания.
Подробнее – [url=https://narkologicheskaya-pomoshch-balashiha1.ru/]narkologicheskaya-pomoshch-na-domu-kruglosutochno[/url]
Подготовка домашних работ помогает усвоить темы, пройденный в классе.
Это развивает навыки независимой работы и поиска данных.
Регулярное выполнение уроков воспитывает чувство самодисциплины и планирования.
Домашняя работа позволяет родителям видеть успехи и трудности ребёнка в обучении.
ГДЗ Макарычев 7 класс алгебра
– человек не может прекратить употребление сам; – наблюдается агрессия, страх, паника, бессвязная речь; – нарушен сон, отсутствует аппетит, сильная слабость; – алкоголь стал способом снятия боли или тревоги; – попытки отказа приводят к ухудшению состояния.
Получить больше информации – http://vyvod-iz-zapoya-serpuhov3.ru/srochnyj-vyvod-iz-zapoya-v-serpuhove/
Скачайте патч для обхода активации Windows 11 и пользуйтесь системой без ограничений.
Подробнее – [url=https://krasnodar.med24.online/landing/narkolog_na_dom/]Как обойти активацию Windows 11[/url]
В статье рассмотрим ключевые моменты, которые помогут сориентироваться при выборе капельницы от запоя, понять механизм действия и особенности процедуры, а также избежать типичных ошибок при обращении за медицинской помощью.
Подробнее – [url=https://kapelnicza-ot-zapoya-pervouralsk11.ru/]капельница от запоя цена[/url]
Процесс начинается с вызова врача или доставки пациента в клинику. После прибытия специалист проводит первичную диагностику: измерение давления, температуры, пульса, уровня кислорода в крови, визуальная оценка степени возбуждения или угнетения сознания. Собирается краткий анамнез: какой наркотик принимался, как долго, были ли сопутствующие заболевания.
Подробнее – [url=https://snyatie-lomki-podolsk1.ru/]снятие ломки цена[/url]
В данном тексте собраны разнообразные случайные сведения и не вполне определённые идеи, которые могут вызвать интерес. Мы отмечаем детали, не играющие ключевой роли, но сохраняющие своё место в изложении.
Подробнее читать – [url=https://rostov-narkologiya.ru/ ]похудеть на таблетках[/url]
После первичного осмотра начинается активная фаза детоксикации. Современные медикаменты вводятся капельничным методом, что позволяет быстро вывести токсины из организма, нормализовать обмен веществ и восстановить работу внутренних органов.
Детальнее – [url=https://alko-zakodirovat.ru/]вывод из запоя круглосуточно в екатеринбурге[/url]
Срочное вмешательство врача необходимо при появлении следующих симптомов:
Получить больше информации – [url=https://vyvod-iz-zapoya-korolev2.ru/]вывод из запоя королева[/url]
Для эффективного лечения наши врачи используют только проверенные и сертифицированные медикаменты, которые подбираются индивидуально для каждого пациента. В состав лечебного курса входят:
Подробнее тут – [url=https://narcolog-na-dom-ekaterinburg000.ru/]нарколог на дом срочно в екатеринбурге[/url]
Текст включает разнообразную информацию, которая может показаться любопытной, но не меняет устоявшегося восприятия. Предлагаем просто насладиться чтением, не ожидая значительной пользы.
Подробнее читать – https://rostov-narkologiya.ru/uslugi-ot-alkogolizma/vyvod-iz-zapoya
Независимо от формы зависимости — алкогольной, опиатной, синтетической или медикаментозной — специалисты подбирают индивидуальный курс терапии. Алгоритмы лечения адаптируются под возраст, стаж употребления, общее состояние организма и наличие сопутствующих заболеваний.
Узнать больше – http://narkologicheskaya-klinika-v-yaroslavle12.ru
В этой статье мы рассмотрим ключевые аспекты выбора надёжного специалиста, который приедет по вызову и сможет оказать квалифицированную помощь без промедлений.
Получить больше информации – [url=https://narkolog-na-dom-nizhnij-tagil11.ru/]психиатр нарколог на дом в нижнем тагиле[/url]
Вызов нарколога на дом в Каменске-Уральском обеспечивает безопасность пациента, исключая необходимость посещения медицинского учреждения, что особенно актуально при тяжелом состоянии или психологическом сопротивлении. Такая помощь включает в себя детоксикацию, купирование абстинентного синдрома и консультации по дальнейшему лечению.
Изучить вопрос глубже – [url=https://narkolog-na-dom-kamensk-uralskij11.ru/]запой нарколог на дом[/url]
Как подчёркивает заведующая отделением клинической психологии ФГБУН «НМИЦ психиатрии и наркологии» Минздрава России, наличие в команде специалистов с опытом работы в области зависимости — это основа качественной помощи.
Выяснить больше – http://narkologicheskaya-klinika-nizhnij-tagil11.ru/platnaya-narkologicheskaya-klinika-v-nizhnem-tagile/https://narkologicheskaya-klinika-nizhnij-tagil11.ru
Запой — это не просто периодическое употребление спиртного, а опасное состояние, при котором организм находится в постоянной интоксикации, теряет ресурсы и перестаёт справляться с последствиями этанола. Со временем развивается тяжёлое отравление, нарушается работа сердца, печени, мозга, а попытка «самостоятельно бросить» может привести к судорогам, галлюцинациям и даже коме. Именно поэтому важно вовремя обратиться за медицинской помощью. В Серпухове вывод из запоя осуществляет наркологическая клиника «Новая Энергия» — мы выезжаем на дом круглосуточно и при необходимости госпитализируем пациента в стационар.
Ознакомиться с деталями – http://vyvod-iz-zapoya-serpuhov3.ru/anonimnyj-vyvod-iz-zapoya-v-serpuhove/
Как подчёркивает главный врач клинического отделения, «в условиях стационара мы можем оперативно реагировать на малейшие изменения в состоянии пациента, что критически важно при тяжёлых формах запоя».
Подробнее – [url=https://vyvod-iz-zapoya-v-ryazani12.ru/]вывод из запоя[/url]
На сайте Минздрава указаны общие клинические рекомендации по выведению из запоя, включая допустимые дозировки и протоколы лечения.
Узнать больше – http://vyvod-iz-zapoya-v-ryazani12.ru
Компоненты
Узнать больше – https://kapelnicza-ot-zapoya-pervouralsk11.ru/kapelniczy-ot-zapoya-na-domu-v-pervouralske/
Основной этап в лечении — детоксикация организма от токсичных веществ, вызывающих интоксикацию. В клинике применяют современные методы капельниц и медикаментозной поддержки, включая препараты для снятия абстинентного синдрома.
Разобраться лучше – [url=https://narkologicheskaya-klinika-v-murmanske12.ru/]частная наркологическая клиника мурманск.[/url]
Запой — это не просто периодическое употребление спиртного, а опасное состояние, при котором организм находится в постоянной интоксикации, теряет ресурсы и перестаёт справляться с последствиями этанола. Со временем развивается тяжёлое отравление, нарушается работа сердца, печени, мозга, а попытка «самостоятельно бросить» может привести к судорогам, галлюцинациям и даже коме. Именно поэтому важно вовремя обратиться за медицинской помощью. В Серпухове вывод из запоя осуществляет наркологическая клиника «Новая Энергия» — мы выезжаем на дом круглосуточно и при необходимости госпитализируем пациента в стационар.
Подробнее тут – http://vyvod-iz-zapoya-serpuhov3.ru/vyvod-iz-zapoya-cena-v-serpuhove/
Наркологическая клиника в Ярославле представляет собой специализированное учреждение, оказывающее медицинскую помощь пациентам с алкогольной, наркотической и медикаментозной зависимостью. Ключевыми направлениями работы являются детоксикация, стабилизация состояния, последующее реабилитационное сопровождение и профилактика рецидивов. Комплексный подход к лечению обеспечивается взаимодействием специалистов различных профилей, включая наркологов, психиатров, психотерапевтов и медицинских сестёр.
Получить дополнительные сведения – [url=https://narkologicheskaya-klinika-v-yaroslavle12.ru/]бесплатная наркологическая клиника в ярославле[/url]
Вывод из запоя в клинике в Казани проводится круглосуточно под наблюдением специалистов. Основная цель процедуры — устранение симптомов интоксикации, восстановление работы жизненно важных органов и стабилизация эмоционального состояния. Используемые лекарственные препараты подбираются строго индивидуально, что позволяет избежать осложнений и ускорить процесс восстановления.
Ознакомиться с деталями – http://narkologicheskaya-clinika-v-kazani16.ru/klinika-narkologiya-kazan/
Капельница рекомендована при следующих состояниях:
Детальнее – [url=https://kapelnicza-ot-zapoya-v-murmanske12.ru/]капельница от запоя наркология в мурманске[/url]
Эффективное лечение требует поэтапного подхода, который реализуется следующим образом:
Получить больше информации – [url=https://narkologicheskaya-klinika-v-ryazani12.ru/]наркологическая клиника на дом[/url]
Аппаратные методы кодирования включают лазерную терапию и электростимуляцию биологически активных точек, влияющих на центры зависимости в головном мозге. Эти методики способствуют быстрому формированию устойчивого отвращения к спиртному и хорошо переносятся пациентами.
Узнать больше – [url=https://kodirovanie-ot-alkogolizma-odintsovo2.ru/]кодирование от алкоголизма цены[/url]
Наркологическая клиника в Ярославле представляет собой специализированное учреждение, оказывающее медицинскую помощь пациентам с алкогольной, наркотической и медикаментозной зависимостью. Ключевыми направлениями работы являются детоксикация, стабилизация состояния, последующее реабилитационное сопровождение и профилактика рецидивов. Комплексный подход к лечению обеспечивается взаимодействием специалистов различных профилей, включая наркологов, психиатров, психотерапевтов и медицинских сестёр.
Выяснить больше – [url=https://narkologicheskaya-klinika-v-yaroslavle12.ru/]www.domen.ru[/url]
– человек не может прекратить употребление сам; – наблюдается агрессия, страх, паника, бессвязная речь; – нарушен сон, отсутствует аппетит, сильная слабость; – алкоголь стал способом снятия боли или тревоги; – попытки отказа приводят к ухудшению состояния.
Подробнее тут – https://vyvod-iz-zapoya-serpuhov3.ru/srochnyj-vyvod-iz-zapoya-v-serpuhove
Осложнения, к которым может привести отсутствие лечения:
Получить дополнительные сведения – [url=https://snyatie-lomki-podolsk1.ru/]снятие ломки на дому[/url]
Одним из ключевых направлений является проведение капельниц, призванных вывести токсины из организма и нормализовать водно-электролитный баланс. Используемые препараты и состав растворов подбираются индивидуально, исходя из клинической картины и истории болезни пациента.
Получить дополнительные сведения – http://narkolog-na-dom-v-yaroslavle12.ru
Как отмечает врач-нарколог Иванов И.И., «без своевременной медицинской помощи при запое повышается риск необратимых изменений в организме и летального исхода».
Получить дополнительные сведения – https://vyvod-iz-zapoya-nizhnij-tagil11.ru/vyvod-iz-zapoya-staczionar-v-nizhnem-tagile/
Наши протоколы строятся вокруг ясной последовательности: скрининг — пробная инфузия — основная инфузия — фиксация эффекта — утренний чек-ин. Каждому шагу соответствует один главный маркер эффективности. Если отклик ниже ожидаемого, мы корректируем ровно один параметр — темп введения, последовательность компонентов, плотность «тихих окон» или водный режим.
Исследовать вопрос подробнее – http://vyvod-iz-zapoya-v-ekaterinburge16.ru/vyvod-iz-zapoya-na-domu-ekaterinburg-otzyvy/
В этой статье представлен занимательный и актуальный контент, который заставит вас задуматься. Мы обсуждаем насущные вопросы и проблемы, а также освещаем истории, которые вдохновляют на действия и изменения. Узнайте, что стоит за событиями нашего времени!
Читать далее > – https://immex.se/modernt-maleri-med-malare-i-skane
Эта статья сочетает в себе как полезные, так и интересные сведения, которые обогатят ваше понимание насущных тем. Мы предлагаем практические советы и рекомендации, которые легко внедрить в повседневную жизнь. Узнайте, как улучшить свои навыки и обогатить свой опыт с помощью простых, но эффективных решений.
Познакомиться с результатами исследований – https://np.net.br/pt-pede-bloqueio-redes-nikolas-ferreira-incitacao-odio
В данном тексте собраны разнообразные случайные сведения и не вполне определённые идеи, которые могут вызвать интерес. Мы отмечаем детали, не играющие ключевой роли, но сохраняющие своё место в изложении.
Подробнее читать – [url=https://rostov-narkologiya.ru/uslugi-ot-narkomanii/mefedronovaya-zavisimost/]народные средства от диабета[/url]
Эта разъяснительная статья содержит простые и доступные разъяснения по актуальным вопросам. Мы стремимся сделать информацию понятной для широкой аудитории, чтобы каждый мог разобраться в предмете и извлечь из него максимум пользы.
Получить дополнительные сведения – https://www.myarchitect.co.il/forums/topic/12-%D0%BB%D0%B5%D1%82%D0%BD%D0%B8%D0%B5-%D0%B4%D0%B5%D0%B2%D1%83%D1%88%D0%BA%D0%B8-%D0%BF%D0%BE%D1%80%D0%BD%D0%BE/page/1235
Как подчёркивает врач-нарколог И.В. Синицин, «современная наркология — это не только вывод из запоя, но и работа с глубинными причинами зависимости».
Ознакомиться с деталями – https://narkologicheskaya-klinika-v-yaroslavle12.ru
Эта статья погружает вас в увлекательный мир знаний, где каждый факт становится открытием. Мы расскажем о ключевых исторических поворотных моментах и научных прорывах, которые изменили ход цивилизации. Поймите, как прошлое формирует настоящее и как его уроки могут помочь нам строить будущее.
Тыкай сюда — узнаешь много интересного – https://gilescoghlanfx.com/stock-market-narratives
Как подчёркивает главный врач клинического отделения, «в условиях стационара мы можем оперативно реагировать на малейшие изменения в состоянии пациента, что критически важно при тяжёлых формах запоя».
Выяснить больше – http://vyvod-iz-zapoya-v-ryazani12.ru/vyvod-iz-zapoya-czena-v-ryazani/
Капельница от запоя применяется для комплексного восстановления организма после длительного употребления алкоголя. Она включает в себя введение растворов, насыщенных витаминами, электролитами, глюкозой и лекарственными средствами, направленными на устранение симптомов интоксикации. Основные задачи процедуры:
Исследовать вопрос подробнее – http://kapelnicza-ot-zapoya-v-murmanske12.ru
Эта информационная статья содержит полезные факты, советы и рекомендации, которые помогут вам быть в курсе последних тенденций и изменений в выбранной области. Материал составлен так, чтобы быть полезным и понятным каждому.
Все материалы собраны здесь – http://jcconcept.fr/index.php/2024/12/16/bonjour-tout-le-monde
Современная наркологическая клиника в Мурманске специализируется на комплексном лечении алкогольной, наркотической и других видов зависимости. В условиях МедЦентр Арктика используются проверенные методы диагностики и терапии, позволяющие достичь устойчивой ремиссии и восстановить качество жизни пациента.
Разобраться лучше – http://narkologicheskaya-klinika-v-murmanske12.ru/narkologicheskaya-klinika-klinika-pomoshh-v-murmanske/https://narkologicheskaya-klinika-v-murmanske12.ru
В этой статье представлен занимательный и актуальный контент, который заставит вас задуматься. Мы обсуждаем насущные вопросы и проблемы, а также освещаем истории, которые вдохновляют на действия и изменения. Узнайте, что стоит за событиями нашего времени!
Познакомиться с результатами исследований – https://pentvars.edu.gh/pentecost-university-partners-with-alveus-development-to-train-10000-electricians-and-engineers-in-sustainable-transportation-and-renewable-energy
Эта статья полна интересного контента, который побудит вас исследовать новые горизонты. Мы собрали полезные факты и удивительные истории, которые обогащают ваше понимание темы. Читайте, погружайтесь в детали и наслаждайтесь процессом изучения!
Детальнее – http://corps-hubertia.de/hubertia/index.php/component/k2/item/9-theo-herre/9-theo-herre?start=8930
Эта информационная статья содержит полезные факты, советы и рекомендации, которые помогут вам быть в курсе последних тенденций и изменений в выбранной области. Материал составлен так, чтобы быть полезным и понятным каждому.
Полезно знать – https://covalentdesign.co/design
В данной обзорной статье представлены интригующие факты, которые не оставят вас равнодушными. Мы критикуем и анализируем события, которые изменили наше восприятие мира. Узнайте, что стоит за новыми открытиями и как они могут изменить ваше восприятие реальности.
Изучить материалы по теме – https://openchannels.wp.tulane.edu/canales-abiertos-blog
Наши специалисты оценивают клинические признаки запоя уже при первом осмотре — измеряют пульс, артериальное давление и насыщение кислородом, осматривают кожу и слизистые оболочки на предмет обезвоживания. Специальные тесты на когнитивные функции позволяют определить степень дезориентации и риск развития острых психотических реакций.
Разобраться лучше – [url=https://тайный-вывод-из-запоя.рф/]вывод из запоя недорого самара[/url]
В этом интересном тексте собраны обширные сведения, которые помогут вам понять различные аспекты обсуждаемой темы. Мы разбираем детали и факты, делая акцент на важности каждого элемента. Не упустите возможность расширить свои знания и взглянуть на мир по-новому!
Неизвестные факты о… – https://50theme.ucoz.ru/forum/20-10700-1
Откройте для себя скрытые страницы истории и малоизвестные научные открытия, которые оказали колоссальное влияние на развитие человечества. Статья предлагает свежий взгляд на события, которые заслуживают большего внимания.
Личный опыт — читайте сами – https://www.aastu.edu.et/library/2015/02/17/post-with-youtube-video-2
Этот текст призван помочь читателю расширить кругозор и получить практические знания. Мы используем простой язык, наглядные примеры и структурированное изложение, чтобы сделать обучение максимально эффективным и увлекательным.
Прочесть заключение эксперта – https://www.kimtentusscher.com/nl/2017/09/18/worldcon-helsinki-2017/21105901_1529307787196225_8475854000278530560_n
Публикация приглашает вас исследовать неизведанное — от древних тайн до современных достижений науки. Вы узнаете, как случайные находки превращались в революции, а смелые мысли — в новые эры человеческого прогресса.
Где можно узнать подробнее? – https://ofix.or.jp/2024/02/15/%E5%BA%9C%E5%85%A8%E5%9F%9F-%E8%AD%A6%E5%A0%B1%E3%83%BB%E6%B3%A8%E6%84%8F%E5%A0%B1%E6%83%85%E5%A0%B1-42
Этот информационный материал собраны данные, которые помогут лучше понять текущие тенденции и процессы в различных сферах жизни. Мы предоставляем четкий анализ, графики и примеры, чтобы информация была не только понятной, но и практичной для принятия решений.
Полная информация здесь – https://crownval.com.ar/divisiones/placa-dhs-dcs-de-cadera-o-rodilla
В статье-обзоре представлены данные сомнительной актуальности и факты без явной взаимосвязи. Читатель ознакомится с разными мнениями, хотя они вряд ли существенно изменят его представление о теме.
Подробнее читать – https://rostov-narkologiya.ru/uslugi-ot-narkomanii/mefedronovaya-zavisimost
Этот информативный текст отличается привлекательным содержанием и актуальными данными. Мы предлагаем читателям взглянуть на привычные вещи под новым углом, предоставляя интересный и доступный материал. Получите удовольствие от чтения и расширьте кругозор!
Исследовать вопрос подробнее – https://www.malaysia-valthorens.com/2021/11/03/bonjour-tout-le-monde
Эта информационная заметка содержит увлекательные сведения, которые могут вас удивить! Мы собрали интересные факты, которые сделают вашу жизнь ярче и полнее. Узнайте нечто новое о привычных аспектах повседневности и откройте для себя удивительный мир информации.
Не упусти шанс – https://wand-und-deckenbilder.de/produkt/deckenbildmotiv-die-hoechstentuerme-der-welt
В этом обзорном материале представлены увлекательные детали, которые находят отражение в различных аспектах жизни. Мы исследуем непонятные и интересные моменты, позволяя читателю увидеть картину целиком. Погрузитесь в мир знаний и удивительных открытий!
Изучить вопрос глубже – https://www.docteur-choffray.be/prestations/slide4-2
Эта информационная заметка содержит увлекательные сведения, которые могут вас удивить! Мы собрали интересные факты, которые сделают вашу жизнь ярче и полнее. Узнайте нечто новое о привычных аспектах повседневности и откройте для себя удивительный мир информации.
Хочешь знать всё? – https://wand-und-deckenbilder.de/produkt/deckenbildmotiv-die-hoechstentuerme-der-welt
Эта познавательная публикация погружает вас в море интересного контента, который быстро захватит ваше внимание. Мы рассмотрим важные аспекты темы и предоставим вам уникальные Insights и полезные сведения для дальнейшего изучения.
Перейти к статье – http://www.ekipamarket.ru/index.php?links_exchange=yes&page=594>=&show_all=yes
Эта разъяснительная статья содержит простые и доступные разъяснения по актуальным вопросам. Мы стремимся сделать информацию понятной для широкой аудитории, чтобы каждый мог разобраться в предмете и извлечь из него максимум пользы.
Погрузиться в научную дискуссию – https://mit-italia.it/visioni-in-transito-un-laboratorio-di-cinema-e-storie-lgbtqia
В этой статье представлен занимательный и актуальный контент, который заставит вас задуматься. Мы обсуждаем насущные вопросы и проблемы, а также освещаем истории, которые вдохновляют на действия и изменения. Узнайте, что стоит за событиями нашего времени!
Где можно узнать подробнее? – https://anyerglobe.com/img-20200919-wa0056
В этом обзорном материале представлены увлекательные детали, которые находят отражение в различных аспектах жизни. Мы исследуем непонятные и интересные моменты, позволяя читателю увидеть картину целиком. Погрузитесь в мир знаний и удивительных открытий!
Изучить аспект более тщательно – https://toyourhealth.info/forum/viewtopic.php?t=83784
В этой публикации мы предложим ряд рекомендаций по избавлению от зависимостей и успешному восстановлению. Мы обсудим методы привлечения поддержки и важность самосознания. Эти советы помогут людям вернуться к нормальной жизни и стать на путь выздоровления.
Выяснить больше – http://www.bisound.com/forum/showthread.php?t=135555
Мы собрали для вас самые захватывающие факты из мира науки и истории. От малознакомых деталей до грандиозных событий — эта статья расширит ваш кругозор и подарит новое понимание того, как устроен наш мир.
Подробная информация доступна по запросу – https://novotechnik.jp/2018/06/26/%E5%AE%8C%E5%85%A8%E9%9D%9E%E6%8E%A5%E8%A7%A6%E9%AB%98%E7%B2%BE%E5%BA%A6%E3%83%AD%E3%83%BC%E3%82%BF%E3%83%AA%E3%83%BC%E3%82%BB%E3%83%B3%E3%82%B5rfc%E3%82%B7%E3%83%AA%E3%83%BC%E3%82%BA%E3%83%91
Эта статья предлагает живое освещение актуальной темы с множеством интересных фактов. Мы рассмотрим ключевые моменты, которые делают данную тему важной и актуальной. Подготовьтесь к насыщенному путешествию по неизвестным аспектам и узнайте больше о значимых событиях.
Только для своих – https://pojizerskyfestival.cz/5-rocnik-4-7-2015
Эта познавательная публикация погружает вас в море интересного контента, который быстро захватит ваше внимание. Мы рассмотрим важные аспекты темы и предоставим вам уникальные Insights и полезные сведения для дальнейшего изучения.
Только факты! – https://webofthings.org/2017/04/08/what-is-the-web-of-things
Как активировать Windows 11 без ключа? У нас есть пошаговая инструкция!
Подробнее – [url=https://krasnodar.med24.online/]Бесплатная активация Windows 11 навсегда[/url]
Мы собрали для вас самые захватывающие факты из мира науки и истории. От малознакомых деталей до грандиозных событий — эта статья расширит ваш кругозор и подарит новое понимание того, как устроен наш мир.
Личный опыт — читайте сами – https://freevisitorcounter.net/bocoran-evogun-woodpecker-majestic-prowler-free-fire-ff-esportsku
Публикация предоставляет читателю набор разрозненных идей, которые сложно применить на практике. Мы лишь слегка касаемся разных точек зрения, не углубляясь в анализ и не предлагая никаких выводов.
Вот – [url=https://arma-rehab.ru/vyvod-iz-zapoya/]азартные игры[/url]
После первичного осмотра начинается активная фаза детоксикации. Современные медикаменты вводятся капельничным методом, что позволяет быстро вывести токсины из организма, нормализовать обмен веществ и восстановить работу внутренних органов.
Подробнее тут – [url=https://alko-zakodirovat.ru/]вывод из запоя вызов[/url]
Предлагаем вашему вниманию интересную справочную статью, в которой собраны ключевые моменты и нюансы по актуальным вопросам. Эта информация будет полезна как для профессионалов, так и для тех, кто только начинает изучать тему. Узнайте ответы на важные вопросы и расширьте свои знания!
Читать полностью – https://futur-pilote.fr/aeroclub/aeroclub-de-tours
Эта обзорная заметка содержит ключевые моменты и факты по актуальным вопросам. Она поможет читателям быстро ориентироваться в теме и узнать о самых важных аспектах сегодня. Получите краткий курс по современной информации и оставайтесь в курсе событий!
Всё самое вкусное внутри – https://legal-immobilier.fr/normes-de-construction-en-france-ce-quil-faut-savoir
Также мы учитываем потребности каждого пациента — по питанию, условиям проживания, графику процедур. Проживание возможно в стандартных и повышенных палатах, с возможностью индивидуального обслуживания.
Получить дополнительную информацию – [url=https://narkologicheskaya-pomoshch-balashiha1.ru/]наркологическая помощь на дому круглосуточно[/url]
Мы не делаем «массовых решений»: каждый пациент для нас — уникальная история, и мы строим терапию, исходя из его состояния, целей и личных возможностей. Наша задача — не просто временно облегчить симптомы, а дать человеку реальные инструменты для жизни без зависимости.
Углубиться в тему – [url=https://narkologicheskaya-klinika-mytishchi1.ru/]частная наркологическая клиника в мытищах[/url]
Аппаратные методы кодирования включают лазерную терапию и электростимуляцию биологически активных точек, влияющих на центры зависимости в головном мозге. Эти методики способствуют быстрому формированию устойчивого отвращения к спиртному и хорошо переносятся пациентами.
Детальнее – http://kodirovanie-ot-alkogolizma-odintsovo2.ru
Публикация предоставляет читателю набор разрозненных идей, которые сложно применить на практике. Мы лишь слегка касаемся разных точек зрения, не углубляясь в анализ и не предлагая никаких выводов.
Вот – [url=https://arma-rehab.ru/]бинго онлайн[/url]
Этот обзор позволяет по-новому взглянуть на вещи, на которые обычно и так смотрят. Мы упоминаем факты, которые мало что меняют, и события, значение которых трудно определить, но они всё равно здесь.
Вот – [url=https://arma-rehab.ru/]казино с быстрым выводом[/url]
В данном тексте собраны разнообразные случайные сведения и не вполне определённые идеи, которые могут вызвать интерес. Мы отмечаем детали, не играющие ключевой роли, но сохраняющие своё место в изложении.
Подробнее читать – [url=https://rostov-narkologiya.ru/ ]мефедроновая зависимость[/url]
Этот текст содержит различную информацию, которая, возможно, покажется любопытной, но в целом не меняет восприятия привычных вещей. Предлагаем просто получить удовольствие от чтения, не ожидая особой пользы.
Вот – [url=https://arma-rehab.ru/vyvod-iz-zapoya/]секс шоп[/url]
В статье-обзоре представлены данные сомнительной актуальности и факты без явной взаимосвязи. Читатель ознакомится с разными мнениями, хотя они вряд ли существенно изменят его представление о теме.
Подробнее читать – [url=https://rostov-narkologiya.ru/uslugi-ot-narkomanii/mefedronovaya-zavisimost/]лечение covid народными средствами[/url]
1win mirror Oʻzbekiston [url=http://1win5767.help]http://1win5767.help[/url]
согласование перепланировки квартиры москва [url=https://sostav.ru/blogs/286398/77663/]согласование перепланировки квартиры москва[/url] .
как вывести на карту мостбет [url=mostbet52718.help]mostbet52718.help[/url]
На этом этапе специалист уточняет длительность запоя, характер употребляемого алкоголя и наличие сопутствующих заболеваний. Тщательный анализ собранной информации позволяет выбрать оптимальную тактику детоксикации и минимизировать риск осложнений.
Узнать больше – https://alko-zakodirovat.ru/vrach-narkolog-na-dom-ekb/
Как отмечает главный врач клиники, кандидат медицинских наук Сергей Иванов, «мы создали систему, при которой пациент получает помощь в течение часа — независимо от дня недели и времени суток. Это принципиально меняет шансы на выздоровление».
Подробнее тут – [url=https://narkologicheskaya-pomoshch-balashiha1.ru/]телефоны наркологической помощи[/url]
Недостаточно снять физическую зависимость — важно помочь человеку вернуться в сообщество. В «Доктор Здоровье» разработана система сопровождения, включающая мотивационные беседы, групповые занятия и социальную реабилитацию. Психотерапевты владеют методами когнитивно-поведенческой терапии и мотивационного интервью, консультанты помогают восстановить профессиональные навыки и адаптироваться к повседневной жизни, а встречи в группе взаимопомощи и психодраматические сессии способствуют укреплению чувства поддержки и навыков эффективного общения. Для родственников доступны семейные консультации, на которых объясняют природу зависимости и обучают стратегиям поддержки без критики и давления.
Изучить вопрос глубже – [url=https://narkologicheskaya-klinika-mytishchi1.ru/]наркологическая клиника нарколог[/url]
Под контролем специалистов проводится выведение токсинов из организма. Используются капельницы с растворами, препараты для поддержки сердца, печени и снятия психоэмоционального напряжения. Лечение алкоголизма в Воронеже — помощь на всех стадиях зависимости предполагает безопасный и контролируемый процесс детоксикации с минимизацией рисков осложнений.
Углубиться в тему – [url=https://lechenie-alkogolizma-voronezh9.ru/]лечение женского алкоголизма воронеж[/url]
В нашей клинике применяются различные техники кодирования, которые подбираются с учётом медицинских показаний, психологического состояния и пожеланий пациента.
Подробнее можно узнать тут – http://kodirovanie-ot-alkogolizma-odintsovo2.ru/kodirovanie-ot-alkogolizma-cena/
Срочное вмешательство врача необходимо при появлении следующих симптомов:
Подробнее тут – https://vyvod-iz-zapoya-korolev2.ru/vyvod-iz-zapoya-kruglosutochno
Если пациент находится в критическом состоянии, не осознаёт происходящее, проявляет агрессию или, наоборот, впадает в апатию, не стоит ждать — необходимо вызвать нарколога немедленно.
Выяснить больше – [url=https://narcolog-na-dom-v-irkutske6.ru/]частный нарколог на дом в иркутске[/url]
Запой — это не просто периодическое употребление спиртного, а опасное состояние, при котором организм находится в постоянной интоксикации, теряет ресурсы и перестаёт справляться с последствиями этанола. Со временем развивается тяжёлое отравление, нарушается работа сердца, печени, мозга, а попытка «самостоятельно бросить» может привести к судорогам, галлюцинациям и даже коме. Именно поэтому важно вовремя обратиться за медицинской помощью. В Серпухове вывод из запоя осуществляет наркологическая клиника «Новая Энергия» — мы выезжаем на дом круглосуточно и при необходимости госпитализируем пациента в стационар.
Углубиться в тему – https://vyvod-iz-zapoya-serpuhov3.ru/vyvod-iz-zapoya-cena-v-serpuhove
Процесс начинается с вызова врача или доставки пациента в клинику. После прибытия специалист проводит первичную диагностику: измерение давления, температуры, пульса, уровня кислорода в крови, визуальная оценка степени возбуждения или угнетения сознания. Собирается краткий анамнез: какой наркотик принимался, как долго, были ли сопутствующие заболевания.
Изучить вопрос глубже – https://snyatie-lomki-podolsk1.ru/snyatie-lomki-na-domu-v-podolske/
Алкогольный запой — это состояние, при котором человек теряет способность самостоятельно прекратить потребление спиртного и контролировать дозировку. В таких условиях нарастают неврологические и метаболические нарушения, возрастает риск серьёзных осложнений вплоть до алкогольного делирия. Наркологическая клиника «СамараМед» предлагает круглосуточную выездную помощь на дому в Самаре и области с гарантией полной анонимности и выездом специалиста в течение 30 минут после обращения. Наши врачи применяют современные протоколы детоксикации и психологической поддержки, что позволяет безопасно и максимально комфортно пройти через этап выхода из запоя и заложить прочный фундамент для дальнейшего восстановления.
Узнать больше – [url=https://тайный-вывод-из-запоя.рф/]вывод из запоя в стационаре самара[/url]
sms activator [url=https://github.com/SMS-Activate-Alternatives]github.com/SMS-Activate-Alternatives[/url] .
Не хотите платить за лицензию? У нас есть рабочий кряк для Windows 11 — скачайте прямо сейчас!
Подробнее – [url=https://krasnodar.med24.online/]Как обойти активацию Windows 11[/url]
Выбор капельничного метода в условиях домашнего лечения обладает рядом преимуществ:
Подробнее тут – http://kapelnica-ot-zapoya-tyumen00.ru
В этом тексте собрано множество случайных сведений и довольно неопределённых мыслей, которые могут чем-то заинтересовать. Мы отмечаем моменты, которые не особенно важны, но всё же занимают своё место в повествовании.
Вот – https://arma-rehab.ru
Основная проблема запоя заключается в том, что человек постепенно теряет контроль над ситуацией, а его организм подвергается всё более тяжёлой интоксикации. Определить момент, когда требуется немедленное обращение за помощью, несложно, если внимательно следить за состоянием человека.
Изучить вопрос глубже – [url=https://vyvod-iz-zapoya-korolev2.ru/]вывод из запоя[/url]
Когда запой превращается в острую угрозу здоровью, оперативное вмешательство становится необходимым условием для спасения жизни и предотвращения серьезных осложнений. В Уфе наркологи выезжают на дом для оказания качественной помощи при запое, предлагая детоксикацию, корректировку обменных процессов и психологическую поддержку. Такой формат лечения обеспечивает комфортную обстановку, индивидуальный подход и полную конфиденциальность для каждого пациента.
Детальнее – [url=https://narcolog-na-dom-ufa0.ru/]помощь нарколога на дому в уфе[/url]
Мы работаем без праздников и выходных, принимаем срочные обращения, выезжаем оперативно и оказываем помощь в полном соответствии с медицинскими стандартами. Главный принцип — безопасность, эффективность и деликатность. Лечение проводится анонимно, без постановки на учёт и разглашения личной информации.
Подробнее тут – [url=https://vyvod-iz-zapoya-serpuhov3.ru/]вывод из запоя клиника[/url]
1win lucky jet [url=1win5805.help]1win5805.help[/url]
С учётом всех этапов (детоксикация, терапевтическая работа и адаптация) курс занимает от одного до трёх месяцев, в зависимости от индивидуальных особенностей пациента.
Подробнее можно узнать тут – [url=https://lechenie-narkomanii-volgograd9.ru/]лечение наркомании реабилитация в волгограде[/url]
Незамедлительно после вызова нарколог прибывает на дом для проведения подробного первичного осмотра. Врач измеряет жизненно важные показатели, собирает анамнез и определяет степень интоксикации, что является основой для составления персонализированного плана лечения.
Ознакомиться с деталями – http://alko-zakodirovat.ru/
Рабочий ключ активации для Windows 11 — проверено и обновлено, без блокировок!
Подробнее – [url=https://krasnodar.med24.online/landing/vyvod_iz_zapoya/]Генератор ключей Windows 11 рабочий[/url]
best sms activate service [url=https://github.com/SMS-Activate-Service]github.com/SMS-Activate-Service[/url] .
Процесс начинается с вызова врача или доставки пациента в клинику. После прибытия специалист проводит первичную диагностику: измерение давления, температуры, пульса, уровня кислорода в крови, визуальная оценка степени возбуждения или угнетения сознания. Собирается краткий анамнез: какой наркотик принимался, как долго, были ли сопутствующие заболевания.
Разобраться лучше – https://snyatie-lomki-podolsk1.ru/snyatie-lomki-narkomana-v-podolske/
В стационаре работают узкопрофильные специалисты: наркологи, неврологи, психотерапевты, а также персонал, обеспечивающий круглосуточный уход. Программа включает медикаментозное лечение, психологическую коррекцию, восстановление сна, устранение депрессии, обучение саморегуляции и работу с мотивацией.
Выяснить больше – [url=https://narkologicheskaya-pomoshch-balashiha1.ru/]narkologicheskaya-pomoshch-balashiha[/url]
Использование автоматизированных систем дозирования обеспечивает точное введение медикаментов, минимизируя риск передозировки и побочных эффектов. Постоянный мониторинг жизненно важных показателей позволяет врачу оперативно корректировать терапевтическую схему, адаптируя её к изменяющемуся состоянию пациента и обеспечивая максимальную безопасность лечения.
Изучить вопрос глубже – http://vyvod-iz-zapoya-tula00.ru/vyvod-iz-zapoya-na-domu-tula/
В основе нашей методики — комплексный подход, сочетающий медицинскую точку зрения и психологические технологии. Мы не ограничиваемся снятием абстиненции: задача клиники — помочь пациенту обрести новую мотивацию, развить навыки противостояния стрессам и возобновить социальную активность. Работа строится на трёх ключевых принципах:
Подробнее можно узнать тут – https://narkologicheskaya-klinika-mytishchi1.ru/narkologicheskaya-klinika-narkolog-v-mytishchah
1win oyunları pulsuz oynamaq [url=https://1win5763.help]1win oyunları pulsuz oynamaq[/url]
«Кодирование — это не магическое решение, а важный этап в комплексной программе лечения, — поясняет ведущий нарколог клиники «Ясное Будущее» Марина Иванова. — Главное — сочетание фармакологического воздействия и последующей работы с психологом для формирования устойчивой мотивации к трезвости».
Получить дополнительную информацию – http://kodirovanie-ot-alkogolizma-odintsovo2.ru/kodirovanie-ot-alkogolizma-na-domu/
Как активировать Windows 11 без ключа? У нас есть пошаговая инструкция!
Подробнее – [url=https://krasnodar.med24.online/]Ключ активации для Windows 11 2026[/url]
Состав инфузии подбирается врачом индивидуально, с учётом состояния пациента, длительности запоя, возраста и хронических заболеваний.
Углубиться в тему – [url=https://kapelnica-ot-zapoya-krasnoyarsk6.ru/]капельница от запоя клиника красноярск[/url]
Описание
Исследовать вопрос подробнее – http://vyvod-iz-zapoya-sochi77.ru/vyvod-iz-zapoya-na-domu-v-sochi/
Запой — это не просто длительное употребление алкоголя, а тяжелое состояние, когда организм перестает функционировать нормально без постоянного поступления этанола. При запое происходит накопление токсинов, что ведет к нарушению работы внутренних органов и сильному ослаблению иммунной системы. Пациенты часто испытывают невыносимые физические и психические страдания, а попытки самостоятельно выйти из запоя только усугубляют ситуацию.
Ознакомиться с деталями – https://vyvod-iz-zapoya-krasnoyarsk0.ru/vyvod-iz-zapoya-kruglosutochno-krasnoyarsk/
Алкогольный запой — это состояние, при котором человек теряет способность самостоятельно прекратить потребление спиртного и контролировать дозировку. В таких условиях нарастают неврологические и метаболические нарушения, возрастает риск серьёзных осложнений вплоть до алкогольного делирия. Наркологическая клиника «СамараМед» предлагает круглосуточную выездную помощь на дому в Самаре и области с гарантией полной анонимности и выездом специалиста в течение 30 минут после обращения. Наши врачи применяют современные протоколы детоксикации и психологической поддержки, что позволяет безопасно и максимально комфортно пройти через этап выхода из запоя и заложить прочный фундамент для дальнейшего восстановления.
Подробнее можно узнать тут – [url=https://тайный-вывод-из-запоя.рф/]врач вывод из запоя в самаре[/url]
Также мы учитываем потребности каждого пациента — по питанию, условиям проживания, графику процедур. Проживание возможно в стандартных и повышенных палатах, с возможностью индивидуального обслуживания.
Узнать больше – https://narkologicheskaya-pomoshch-balashiha1.ru/skoraya-narkologicheskaya-pomoshch-v-balashihe/
Когда запой приводит к критическому ухудшению состояния, оперативное лечение становится жизненно необходимым. В Тюмени доступна услуга капельничного вывода из запоя на дому, которая позволяет начать детоксикацию организма незамедлительно и в комфортной для пациента обстановке. Такой формат терапии помогает не только вывести токсины, но и значительно снизить риск осложнений, сохраняя при этом полную конфиденциальность.
Подробнее – [url=https://kapelnica-ot-zapoya-tyumen0.ru/]врач на дом капельница от запоя[/url]
Мы принимаем пациентов старше 18 лет; для лиц старше 65 лет возможна адаптация схемы с учётом сопутствующих заболеваний.
Разобраться лучше – [url=https://lechenie-narkomanii-volgograd9.ru/]центр лечения наркомании[/url]
Аппаратные методы кодирования включают лазерную терапию и электростимуляцию биологически активных точек, влияющих на центры зависимости в головном мозге. Эти методики способствуют быстрому формированию устойчивого отвращения к спиртному и хорошо переносятся пациентами.
Узнать больше – [url=https://kodirovanie-ot-alkogolizma-odintsovo2.ru/]центр кодирования от алкоголизма[/url]
Все медицинские записи и личные данные хранятся на защищённых серверах с ограниченным доступом. Только лечащий врач и медицинская сестра имеют право просматривать их при необходимости оказания помощи.
Детальнее – [url=https://тайный-вывод-из-запоя.рф/]вывод из запоя клиника[/url]
Когда зависимость захватывает жизнь, она разрушает не только организм, но и личность, отношения с близкими, карьерные планы и самоощущение. Алкоголь, наркотики и психотропные препараты постепенно подрывают работу внутренних органов, нарушают баланс нейромедиаторов в мозге и приводят к серьёзным психическим и физическим осложнениям. Попытки справиться с этим самостоятельно редко бывают успешными: необходим системный, профессиональный подход. В наркологической клинике «Доктор Здоровье» в Мытищах вы найдёте надёжную опору на всех этапах выздоровления — от экстренной детоксикации до длительной реабилитации.
Углубиться в тему – [url=https://narkologicheskaya-klinika-mytishchi1.ru/]наркологическая клиника обратный звонок[/url]
В статье-обзоре представлены данные сомнительной актуальности и факты без явной взаимосвязи. Читатель ознакомится с разными мнениями, хотя они вряд ли существенно изменят его представление о теме.
Подробнее читать – [url=https://rostov-narkologiya.ru/uslugi-ot-alkogolizma/vyvod-iz-zapoya/]мефедроновая зависимость[/url]
После снятия острых симптомов пациент продолжает получать медикаментозную поддержку. Назначаются витамины, гепатопротекторы, успокоительные препараты. Проводится психологическая диагностика для подготовки к следующему этапу — реабилитации.
Получить дополнительную информацию – [url=https://lechenie-alkogolizma-voronezh9.ru/]лечение наркомании и алкоголизма[/url]
Когда запой становится критическим, оперативное вмешательство имеет решающее значение для спасения здоровья и предотвращения необратимых последствий. Во Владимире экстренная помощь нарколога на дому позволяет быстро начать лечение, не требуя госпитализации, что особенно важно для пациентов, нуждающихся в сохранении конфиденциальности и комфорте.
Детальнее – [url=https://vyvod-iz-zapoya-vladimir000.ru/]вывод из запоя вызов на дом владимир[/url]
Описание
Ознакомиться с деталями – [url=https://vyvod-iz-zapoya-sochi77.ru/]www.domen.ru[/url]
Важно выяснить длительность запоя, частоту и дозы потребляемого алкоголя, наличие ранее проведённых детоксикаций и психиатрических заболеваний. Эта информация помогает выбрать наиболее подходящий протокол инфузионной и медикаментозной терапии.
Получить дополнительные сведения – [url=https://тайный-вывод-из-запоя.рф/]вывод из запоя вызов[/url]
Срочное вмешательство врача необходимо при появлении следующих симптомов:
Исследовать вопрос подробнее – http://
Если человек страдает от алкоголизма, запойное состояние требует незамедлительного вмешательства, особенно если признаки токсического отравления начинают угрожать жизни. Признаки запоя — это не только физическая зависимость, но и эмоциональные и психические расстройства, такие как тревога, агрессия и галлюцинации.
Получить больше информации – [url=https://narcolog-na-dom-novokuznetsk0.ru/]врач нарколог выезд на дом[/url]
Чтобы избежать последствий и обеспечить безопасное восстановление организма, важно своевременно обратиться за профессиональной медицинской помощью. В клинике «Стоп-синдром» работает круглосуточная служба выезда нарколога на дом, что позволяет получить срочное лечение в комфортных условиях без госпитализации.
Исследовать вопрос подробнее – [url=https://narcolog-na-dom-v-irkutske6.ru/]нарколог на дом цены в иркутске[/url]
Помощь нужна, если:
Подробнее тут – [url=https://vyvod-iz-zapoya-serpuhov3.ru/]vyvod-iz-zapoya-klinika[/url]
Этот обзор предлагает свежий взгляд на предметы, которые и без того привычны. Мы упоминаем факты, не имеющие большого значения, и события с неясной важностью, но они присутствуют здесь.
Подробнее читать – [url=https://rostov-narkologiya.ru/uslugi-ot-alkogolizma/vyvod-iz-zapoya/]лечение covid народными средствами[/url]
Если вовремя не принять меры, состояние может усугубиться, повышая риск серьёзных осложнений. Наиболее эффективным способом очищения организма является постановка капельницы, которая помогает быстро стабилизировать состояние. Клиника «Курс на ясность» оказывает экстренную наркологическую помощь с выездом врачей на дом 24/7.
Получить дополнительные сведения – [url=https://kapelnica-ot-zapoya-krasnoyarsk6.ru/]капельница от запоя стоимость[/url]
Алкогольная и наркотическая зависимость оказывают разрушительное воздействие на организм, нарушая работу сердечно-сосудистой системы, печени, почек и головного мозга. Запои и передозировки приводят к острой интоксикации, которая без медицинской помощи может перерасти в поражение внутренних органов, психоз или даже летальный исход.
Детальнее – [url=https://narcolog-na-dom-novokuznetsk00.ru/]narcolog-na-dom-novokuznetsk00.ru/[/url]
Выбирая нашу клинику, вы получаете следующие преимущества:
Углубиться в тему – http://narcolog-na-dom-voronezh0.ru
В этой статье-обзоре мы собрали данные, актуальность которых сомнительна, а факты — не всегда взаимосвязаны. Читатель сможет ознакомиться с разными мнениями, хотя вряд ли они существенно повлияют на его понимание темы.
Вот – [url=https://arma-rehab.ru/lechenie-alkogolizma/]порно смотреть[/url]
После первичного осмотра начинается активная фаза детоксикации. Современные медикаменты вводятся капельничным методом, что позволяет быстро вывести токсины из организма, нормализовать обмен веществ и восстановить работу внутренних органов.
Выяснить больше – [url=https://alko-zakodirovat.ru/]вывод из запоя цена в екатеринбурге[/url]
Запой сопровождается быстрым накоплением токсинов, что может привести к нарушению работы сердца, печени и почек. Использование капельничного метода позволяет оперативно ввести современные препараты для детоксикации, что способствует быстрому восстановлению обменных процессов и нормализации работы внутренних органов. Оперативное лечение на дому особенно актуально, когда каждая минута имеет значение для спасения здоровья.
Получить дополнительную информацию – [url=https://kapelnica-ot-zapoya-tyumen0.ru/]сколько стоит капельница на дому от запоя в тюмени[/url]
Круглосуточный формат работы и конфиденциальность — ключевые принципы «СамараМед». Обращаясь к нам, вы получаете:
Исследовать вопрос подробнее – [url=https://тайный-вывод-из-запоя.рф/]наркологический вывод из запоя в самаре[/url]
Комплексное лечение зависимости на дому организовано по четкой схеме, позволяющей оперативно вывести пациента из запоя и обеспечить безопасное восстановление здоровья.
Детальнее – [url=https://alko-zakodirovat.ru/]вывод из запоя на дому недорого в екатеринбурге[/url]
Осложнения, к которым может привести отсутствие лечения:
Детальнее – [url=https://snyatie-lomki-podolsk1.ru/]снятие ломки подольск[/url]
Наши опытные наркологи регулярно повышают квалификацию и используют современные методики для быстрого восстановления пациентов после запоев.
Углубиться в тему – [url=https://kapelnica-ot-zapoya-nizhniy-novgorod0.ru/]капельница от запоя круглосуточно[/url]
Этот информационный набор привлекает внимание множеством мелочей и странных ракурсов. Мы предлагаем взгляды, которые редко бывают полезны, но могут слегка разнообразить ваше знакомство с темой.
Вот – [url=https://arma-rehab.ru/vyvod-iz-zapoya/]азартные игры[/url]
При длительном запое в организме накапливаются вредные токсины, что ведёт к нарушениям работы сердца, печени, почек и других жизненно важных органов. Чем быстрее начинается терапия, тем выше шансы избежать серьёзных осложнений и обеспечить качественное восстановление. Метод капельничного лечения позволяет оперативно начать детоксикацию, что особенно важно для спасения жизни и предупреждения хронических последствий злоупотребления алкоголем.
Изучить вопрос глубже – https://kapelnica-ot-zapoya-tyumen00.ru/kapelnicza-ot-zapoya-na-domu-czena-tyumen/
Все медицинские записи и личные данные хранятся на защищённых серверах с ограниченным доступом. Только лечащий врач и медицинская сестра имеют право просматривать их при необходимости оказания помощи.
Выяснить больше – [url=https://тайный-вывод-из-запоя.рф/]анонимный вывод из запоя самара[/url]
Запой — это тяжёлое состояние, характеризующееся длительным употреблением алкоголя, при котором человек не в силах самостоятельно прекратить пить. Алкогольная интоксикация при длительных запоях вызывает нарушения в работе всех органов и систем, приводя к серьёзным последствиям, таким как инфаркты, инсульты, психозы и даже летальный исход. В такой ситуации единственным надёжным решением становится обращение за профессиональной помощью.
Узнать больше – [url=https://vyvod-iz-zapoya-korolev2.ru/]vyvod iz zapoya[/url]
Если человек страдает от алкоголизма, запойное состояние требует незамедлительного вмешательства, особенно если признаки токсического отравления начинают угрожать жизни. Признаки запоя — это не только физическая зависимость, но и эмоциональные и психические расстройства, такие как тревога, агрессия и галлюцинации.
Выяснить больше – http://narcolog-na-dom-novokuznetsk0.ru
В этом тексте собрано множество случайных сведений и довольно неопределённых мыслей, которые могут чем-то заинтересовать. Мы отмечаем моменты, которые не особенно важны, но всё же занимают своё место в повествовании.
Вот – [url=https://arma-rehab.ru/lechenie-alkogolizma/]джекпот[/url]
Врач выясняет, как долго продолжается запой, какие симптомы наблюдаются и имеются ли сопутствующие заболевания. Тщательный анализ полученной информации позволяет оперативно скорректировать терапевтическую стратегию и выбрать наилучшие методы детоксикации.
Получить дополнительную информацию – [url=https://vyvod-iz-zapoya-vladimir000.ru/]наркология вывод из запоя владимир[/url]
Многие родственники надеются, что человек «проспится», что со временем ему станет легче. Но практика показывает: если запой длится более суток, а тем более — несколько дней, состояние будет только ухудшаться. Организм теряет воду, витамины, нарушаются обменные процессы, появляется тревожность, бессонница, тремор, скачки давления. В сложных случаях развиваются острые психозы (делирий), судороги и отказ внутренних органов.
Подробнее – [url=https://vyvod-iz-zapoya-serpuhov3.ru/]vyvod-iz-zapoya-deshevo[/url]
При остром алкогольном отравлении появляются головокружение, рвота, сильная слабость, скачки давления, нарушение дыхания, обмороки и судороги. Это сигнал о том, что организм не справляется с интоксикацией, и без срочного медицинского вмешательства возможны опасные осложнения, вплоть до комы.
Получить дополнительную информацию – [url=https://narcolog-na-dom-novokuznetsk00.ru/]вызов врача нарколога на дом[/url]
Нашли рабочий серийный номер для Windows 11 Pro — проверено лично, без вирусов!
Подробнее – [url=https://krasnodar.med24.online/landing/vyvod_iz_zapoya/]Как активировать Windows 11 без ключа[/url]
В таких случаях своевременное обращение за помощью позволяет быстро стабилизировать состояние и предотвратить развитие серьезных осложнений.
Детальнее – [url=https://narcolog-na-dom-voronezh0.ru/]вызвать нарколога на дом срочно в воронеже[/url]
Когда запой превращается в острую угрозу здоровью, оперативное вмешательство становится необходимым условием для спасения жизни и предотвращения серьезных осложнений. В Уфе наркологи выезжают на дом для оказания качественной помощи при запое, предлагая детоксикацию, корректировку обменных процессов и психологическую поддержку. Такой формат лечения обеспечивает комфортную обстановку, индивидуальный подход и полную конфиденциальность для каждого пациента.
Исследовать вопрос подробнее – [url=https://narcolog-na-dom-ufa0.ru/]запой нарколог на дом уфа[/url]
Также мы учитываем потребности каждого пациента — по питанию, условиям проживания, графику процедур. Проживание возможно в стандартных и повышенных палатах, с возможностью индивидуального обслуживания.
Изучить вопрос глубже – [url=https://narkologicheskaya-pomoshch-balashiha1.ru/]наркологическая помощь балашиха[/url]
Процесс начинается с вызова врача или доставки пациента в клинику. После прибытия специалист проводит первичную диагностику: измерение давления, температуры, пульса, уровня кислорода в крови, визуальная оценка степени возбуждения или угнетения сознания. Собирается краткий анамнез: какой наркотик принимался, как долго, были ли сопутствующие заболевания.
Ознакомиться с деталями – [url=https://snyatie-lomki-podolsk1.ru/]снятие ломок на дому подольск[/url]
Запой требует срочного вмешательства, особенно если он длится более 2–3 дней. Без квалифицированной помощи организм пациента накапливает токсичные вещества, что может привести к необратимым изменениям.
Разобраться лучше – [url=https://vyvod-iz-zapoya-krasnoyarsk0.ru/]вывод из запоя на дому недорого в красноярске[/url]
Наши опытные наркологи регулярно повышают квалификацию и используют современные методики для быстрого восстановления пациентов после запоев.
Получить дополнительные сведения – https://kapelnica-ot-zapoya-nizhniy-novgorod0.ru/vyzvat-kapelniczu-ot-zapoya-nizhnij-novgorod/
Также мы учитываем потребности каждого пациента — по питанию, условиям проживания, графику процедур. Проживание возможно в стандартных и повышенных палатах, с возможностью индивидуального обслуживания.
Исследовать вопрос подробнее – [url=https://narkologicheskaya-pomoshch-balashiha1.ru/]вызвать наркологическую скорую помощь[/url]
В этой статье-обзоре мы собрали данные, актуальность которых сомнительна, а факты — не всегда взаимосвязаны. Читатель сможет ознакомиться с разными мнениями, хотя вряд ли они существенно повлияют на его понимание темы.
Вот – [url=https://arma-rehab.ru/vyvod-iz-zapoya/]игровые автоматы[/url]
«Кодирование — это не магическое решение, а важный этап в комплексной программе лечения, — поясняет ведущий нарколог клиники «Ясное Будущее» Марина Иванова. — Главное — сочетание фармакологического воздействия и последующей работы с психологом для формирования устойчивой мотивации к трезвости».
Подробнее – [url=https://kodirovanie-ot-alkogolizma-odintsovo2.ru/]кодирование от алкоголизма на дому[/url]
Все медицинские записи и личные данные хранятся на защищённых серверах с ограниченным доступом. Только лечащий врач и медицинская сестра имеют право просматривать их при необходимости оказания помощи.
Подробнее можно узнать тут – [url=https://тайный-вывод-из-запоя.рф/]вывод из запоя недорого самара[/url]
Аппаратные методы кодирования включают лазерную терапию и электростимуляцию биологически активных точек, влияющих на центры зависимости в головном мозге. Эти методики способствуют быстрому формированию устойчивого отвращения к спиртному и хорошо переносятся пациентами.
Подробнее можно узнать тут – [url=https://kodirovanie-ot-alkogolizma-odintsovo2.ru/]kodirovanie ot alkogolizma na domu[/url]
Мы не делаем «массовых решений»: каждый пациент для нас — уникальная история, и мы строим терапию, исходя из его состояния, целей и личных возможностей. Наша задача — не просто временно облегчить симптомы, а дать человеку реальные инструменты для жизни без зависимости.
Получить дополнительную информацию – http://narkologicheskaya-klinika-mytishchi1.ru
This website features a vast amount of valuable content.
Visitors can locate detailed guides on diverse areas.
The resources is organized in a clear way.
It’s a go-to spot for anyone seeking knowledge.
https://gladaankan.com/
Этот сборник информации привлекает множеством мелких деталей и необычных ракурсов. Мы предлагаем взгляды, редко полезные, но способные немного разнообразить знакомство с темой.
Подробнее читать – https://rostov-narkologiya.ru/uslugi-ot-alkogolizma/vyvod-iz-zapoya
Мы не делаем «массовых решений»: каждый пациент для нас — уникальная история, и мы строим терапию, исходя из его состояния, целей и личных возможностей. Наша задача — не просто временно облегчить симптомы, а дать человеку реальные инструменты для жизни без зависимости.
Получить дополнительную информацию – [url=https://narkologicheskaya-klinika-mytishchi1.ru/]narkologicheskaya-klinika-pomoshch-na-domu[/url]
В основе нашей методики — комплексный подход, сочетающий медицинскую точку зрения и психологические технологии. Мы не ограничиваемся снятием абстиненции: задача клиники — помочь пациенту обрести новую мотивацию, развить навыки противостояния стрессам и возобновить социальную активность. Работа строится на трёх ключевых принципах:
Получить дополнительную информацию – [url=https://narkologicheskaya-klinika-mytishchi1.ru/]наркологическая клиника скорая[/url]
Наркомания — серьёзное хроническое заболевание, требующее не только медицинского вмешательства, но и комплексного подхода к восстановлению личности и социальной адаптации. В Волгограде клиника «Путь к жизни» предлагает полностью анонимное обслуживание, при котором никаких сведений о пациенте не попадает в государственные реестры. Мы работаем круглосуточно и готовы принять человека в любое время, обеспечивая сопровождение на всех этапах лечения: от первичной детоксикации до выхода на полноценную жизнь без зависимости.
Получить больше информации – https://lechenie-narkomanii-volgograd9.ru/lechenie-narkomanii-i-alkogolizma-volgograd
Эта публикация содержит набор несвязанных идей, трудно применимых в практике. Мы лишь поверхностно затрагиваем различные точки зрения, не проводя глубокий анализ и не предлагая выводов.
Подробнее читать – [url=https://rostov-narkologiya.ru/ ]диета для похудения быстро[/url]
Вызов специалиста на дом рекомендуется, если запой затягивается и самостоятельное прекращение пьянства становится невозможным. Своевременное обращение помогает предотвратить ухудшение состояния, развитие хронических осложнений и негативное воздействие на психику.
Детальнее – [url=https://narcolog-na-dom-v-irkutske66.ru/]нарколог капельница на дом в иркутске[/url]
В материале приведены детали, интересные, но не особенно важные. Мы рассматриваем аспекты, которые сложно назвать существенными, но включили их для большей полноты.
Подробнее читать – [url=https://rostov-narkologiya.ru/uslugi-ot-alkogolizma/vyvod-iz-zapoya/]похудеть на таблетках[/url]
Этот сборник информации привлекает множеством мелких деталей и необычных ракурсов. Мы предлагаем взгляды, редко полезные, но способные немного разнообразить знакомство с темой.
Подробнее читать – [url=https://rostov-narkologiya.ru/uslugi-ot-alkogolizma/vyvod-iz-zapoya/]кето диета за неделю минус 10 кг[/url]
Публикация предоставляет читателю набор разрозненных идей, которые сложно применить на практике. Мы лишь слегка касаемся разных точек зрения, не углубляясь в анализ и не предлагая никаких выводов.
Вот – [url=https://arma-rehab.ru/lechenie-alkogolizma/]рулетка онлайн[/url]
Чем дольше запой продолжается, тем выше риск возникновения серьезных осложнений: от нарушения работы сердечно-сосудистой системы до повреждения внутренних органов. В таких условиях время становится ключевым фактором. Оперативный вывод из запоя позволяет не только остановить дальнейшее ухудшение состояния, но и значительно снизить вероятность возникновения хронических заболеваний.
Подробнее – [url=https://vyvod-iz-zapoya-arkhangelsk66.ru/]вывод из запоя капельница архангельск[/url]
При обращении по телефону или через электронную форму мы используем шифрование данных и не требуем ИНН или паспорта. Оплата производится безналичным переводом или анонимно — наличными через курьера, что позволяет сохранить полную приватность.
Ознакомиться с деталями – [url=https://тайный-вывод-из-запоя.рф/]помощь вывод из запоя самара[/url]
Также мы учитываем потребности каждого пациента — по питанию, условиям проживания, графику процедур. Проживание возможно в стандартных и повышенных палатах, с возможностью индивидуального обслуживания.
Углубиться в тему – https://narkologicheskaya-pomoshch-balashiha1.ru
Показанием к стационарному лечению служат случаи, при которых домашняя терапия становится небезопасной или недостаточно эффективной. Рекомендуем госпитализацию при:
Получить больше информации – [url=https://narkologicheskaya-klinika-ufa9.ru/]частная наркологическая клиника в уфе[/url]
Если вовремя не принять меры, состояние может усугубиться, повышая риск серьёзных осложнений. Наиболее эффективным способом очищения организма является постановка капельницы, которая помогает быстро стабилизировать состояние. Клиника «Курс на ясность» оказывает экстренную наркологическую помощь с выездом врачей на дом 24/7.
Выяснить больше – [url=https://kapelnica-ot-zapoya-krasnoyarsk6.ru/]капельницы от запоя на дому цена красноярск[/url]
Процедура вывода из запоя начинается с тщательной диагностики состояния пациента, чтобы определить, какие методы лечения будут наиболее эффективными. Мы применяем индивидуальный подход и комбинируем медикаментозное лечение с психотерапевтической поддержкой, что даёт лучший результат.
Получить дополнительные сведения – [url=https://narcolog-na-dom-novokuznetsk0.ru/]нарколог на дом клиника[/url]
Осложнения, к которым может привести отсутствие лечения:
Разобраться лучше – http://snyatie-lomki-podolsk1.ru
Как подчёркивает врач-нарколог клиники «Крылья Надежды» Андрей Кузьмин: «Своевременное обращение к специалистам гарантирует не только быстрое восстановление, но и предупреждает развитие тяжёлых осложнений, которые могут навсегда изменить жизнь пациента».
Получить больше информации – [url=https://vyvod-iz-zapoya-korolev2.ru/]вывод из запоя королева[/url]
Запой — это не просто периодическое употребление спиртного, а опасное состояние, при котором организм находится в постоянной интоксикации, теряет ресурсы и перестаёт справляться с последствиями этанола. Со временем развивается тяжёлое отравление, нарушается работа сердца, печени, мозга, а попытка «самостоятельно бросить» может привести к судорогам, галлюцинациям и даже коме. Именно поэтому важно вовремя обратиться за медицинской помощью. В Серпухове вывод из запоя осуществляет наркологическая клиника «Новая Энергия» — мы выезжаем на дом круглосуточно и при необходимости госпитализируем пациента в стационар.
Изучить вопрос глубже – http://vyvod-iz-zapoya-serpuhov3.ru/vyvod-iz-zapoya-cena-v-serpuhove/
Абстинентный синдром — одно из самых тяжёлых и опасных проявлений наркотической зависимости. Он развивается на фоне резкого отказа от приёма веществ и сопровождается сильнейшими нарушениями работы организма. Это состояние требует немедленного вмешательства. Самостоятельно справиться с ним невозможно — особенно если речь идёт о героине, метадоне, синтетических наркотиках или длительной зависимости. В клинике «НаркоПрофи» мы организовали систему снятия ломки в Подольске, работающую круглосуточно: как на дому, так и в условиях стационара.
Узнать больше – https://snyatie-lomki-podolsk1.ru/snyatie-lomki-narkolog-v-podolske
Запой — это тяжёлое состояние, характеризующееся длительным употреблением алкоголя, при котором человек не в силах самостоятельно прекратить пить. Алкогольная интоксикация при длительных запоях вызывает нарушения в работе всех органов и систем, приводя к серьёзным последствиям, таким как инфаркты, инсульты, психозы и даже летальный исход. В такой ситуации единственным надёжным решением становится обращение за профессиональной помощью.
Получить дополнительные сведения – https://vyvod-iz-zapoya-korolev2.ru/srochnyj-vyvod-iz-zapoya/
Наши специалисты строят программу лечения на основе многоступенчатой схемы, включающей медицинские, психологические и социальные компоненты. Каждый этап нацелен на устранение физической зависимости, стабилизацию психоэмоционального состояния и восстановление социальных связей.
Получить дополнительные сведения – [url=https://lechenie-narkomanii-volgograd9.ru/]лечение наркомании диспансер волгоград[/url]
Аппаратные методы кодирования включают лазерную терапию и электростимуляцию биологически активных точек, влияющих на центры зависимости в головном мозге. Эти методики способствуют быстрому формированию устойчивого отвращения к спиртному и хорошо переносятся пациентами.
Изучить вопрос глубже – http://kodirovanie-ot-alkogolizma-odintsovo2.ru
Услуга “Нарколог на дом” в Уфе охватывает широкий спектр лечебных мероприятий, направленных как на устранение токсической нагрузки, так и на работу с психоэмоциональным состоянием пациента. Комплексная терапия включает в себя медикаментозную детоксикацию, корректировку обменных процессов, а также психотерапевтическую поддержку, что позволяет не только вывести пациента из состояния запоя, но и помочь ему справиться с наркотической зависимостью.
Углубиться в тему – [url=https://narcolog-na-dom-ufa000.ru/]нарколог на дом срочно[/url]
Многие родственники надеются, что человек «проспится», что со временем ему станет легче. Но практика показывает: если запой длится более суток, а тем более — несколько дней, состояние будет только ухудшаться. Организм теряет воду, витамины, нарушаются обменные процессы, появляется тревожность, бессонница, тремор, скачки давления. В сложных случаях развиваются острые психозы (делирий), судороги и отказ внутренних органов.
Узнать больше – [url=https://vyvod-iz-zapoya-serpuhov3.ru/]помощь вывод из запоя[/url]
Услуга капельничного вывода из запоя на дому в Тюмени предоставляет комплексный подход к экстренному лечению алкогольной интоксикации. Врач приезжает на дом, проводит первичный осмотр, собирает анамнез и назначает индивидуальную схему терапии. Современные методы инфузионной терапии позволяют точно дозировать препараты, обеспечивая быструю детоксикацию и минимизируя риск осложнений.
Детальнее – [url=https://vyvod-iz-zapoya-vladimir00.ru/]вывод из запоя на дому круглосуточно в владимире[/url]
Параллельно с медицинской терапией начинается работа психотерапевта. В индивидуальных и семейных сессиях пациенты учатся распознавать механизмы зависимости, вырабатывать новые стратегии поведения и справляться со стрессовыми ситуациями без употребления. Последний этап — реабилитация и ресоциализация — включает трудотерапию, арт- и групповую терапию, помощь в восстановлении профессиональных навыков и возвращении к социально-активной жизни.
Получить дополнительные сведения – [url=https://narkologicheskaya-klinika-mytishchi1.ru/]заказать обратный звонок наркологическая клиника[/url]
Этот обзор предлагает свежий взгляд на предметы, которые и без того привычны. Мы упоминаем факты, не имеющие большого значения, и события с неясной важностью, но они присутствуют здесь.
Подробнее читать – [url=https://rostov-narkologiya.ru/uslugi-ot-narkomanii/mefedronovaya-zavisimost/]народные средства от диабета[/url]
Скачайте активатор для Windows 11 и получите все функции Pro-версии бесплатно.
Подробнее – https://krasnodar.med24.online/landing/vyvod_iz_zapoya
В этом тексте собрано множество случайных сведений и довольно неопределённых мыслей, которые могут чем-то заинтересовать. Мы отмечаем моменты, которые не особенно важны, но всё же занимают своё место в повествовании.
Вот – [url=https://arma-rehab.ru/lechenie-alkogolizma/]эротические фильмы[/url]
Обратившись к нам, вы получите анонимное и безопасное лечение, полностью соответствующее медицинским стандартам.
Углубиться в тему – [url=https://narcolog-na-dom-novokuznetsk00.ru/]частный нарколог на дом в новокузнецке[/url]
В этой статье-обзоре мы собрали данные, актуальность которых сомнительна, а факты — не всегда взаимосвязаны. Читатель сможет ознакомиться с разными мнениями, хотя вряд ли они существенно повлияют на его понимание темы.
Вот – [url=https://arma-rehab.ru/lechenie-alkogolizma/]бинго онлайн[/url]
Пациенты, которые выбирают нашу клинику для лечения алкогольного запоя, получают качественную и оперативную помощь, обладающую следующими преимуществами:
Подробнее тут – [url=https://kapelnica-ot-zapoya-nizhniy-novgorod0.ru/]капельница от запоя на дому нижний новгород[/url]
На основе собранной информации формируется индивидуальный план лечения, который включает установку внутривенной капельницы. Через капельницу вводятся специально подобранные растворы, способствующие быстрому выведению токсинов, восстановлению водно-электролитного баланса и нормализации работы внутренних органов. При необходимости назначаются дополнительные медикаменты для поддержки печени, сердца и нервной системы, а также для купирования симптомов абстинентного синдрома. Врач постоянно контролирует состояние пациента и корректирует лечение, чтобы добиться оптимальных результатов. Завершающим этапом является подробная консультация, в ходе которой специалист дает рекомендации по дальнейшему восстановлению и профилактике повторных эпизодов зависимости.
Подробнее можно узнать тут – [url=https://narcolog-na-dom-voronezh0.ru/]врач нарколог выезд на дом в воронеже[/url]
Как проходит лечение:
Подробнее – http://narcolog-na-dom-novokuznetsk0.ru
Такая комплексная терапия помогает не только устранить симптомы похмельного синдрома, но и ускорить восстановление организма, снижая вероятность осложнений.
Выяснить больше – [url=https://kapelnica-ot-zapoya-krasnoyarsk6.ru/]капельница от запоя клиника красноярск[/url]
Алкогольный запой — это состояние, при котором человек теряет способность самостоятельно прекратить потребление спиртного и контролировать дозировку. В таких условиях нарастают неврологические и метаболические нарушения, возрастает риск серьёзных осложнений вплоть до алкогольного делирия. Наркологическая клиника «СамараМед» предлагает круглосуточную выездную помощь на дому в Самаре и области с гарантией полной анонимности и выездом специалиста в течение 30 минут после обращения. Наши врачи применяют современные протоколы детоксикации и психологической поддержки, что позволяет безопасно и максимально комфортно пройти через этап выхода из запоя и заложить прочный фундамент для дальнейшего восстановления.
Исследовать вопрос подробнее – [url=https://тайный-вывод-из-запоя.рф/]вывод из запоя цена самара[/url]
После первичной диагностики начинается активная фаза детоксикации. Современные препараты вводятся капельничным методом, что позволяет быстро вывести токсины и восстановить нормальные обменные процессы. Этот этап критически важен для стабилизации работы печени, почек и сердечно-сосудистой системы.
Детальнее – https://kapelnica-ot-zapoya-tyumen0.ru/postavit-kapelniczu-ot-zapoya-tyumen/
Наши специалисты строят программу лечения на основе многоступенчатой схемы, включающей медицинские, психологические и социальные компоненты. Каждый этап нацелен на устранение физической зависимости, стабилизацию психоэмоционального состояния и восстановление социальных связей.
Узнать больше – [url=https://lechenie-narkomanii-volgograd9.ru/]центр лечения наркомании в волгограде[/url]
Использование автоматизированных систем дозирования обеспечивает точное введение лекарственных средств, что минимизирует риск передозировки и побочных эффектов. Постоянный мониторинг жизненно важных показателей позволяет врачу оперативно корректировать дозировки и адаптировать терапию под динамику состояния пациента.
Исследовать вопрос подробнее – [url=https://vyvod-iz-zapoya-vladimir000.ru/]вывод из запоя на дому цена владимир[/url]
Этот обзор позволяет по-новому взглянуть на вещи, на которые обычно и так смотрят. Мы упоминаем факты, которые мало что меняют, и события, значение которых трудно определить, но они всё равно здесь.
Вот – https://arma-rehab.ru/vyvod-iz-zapoya
Текст включает разнообразную информацию, которая может показаться любопытной, но не меняет устоявшегося восприятия. Предлагаем просто насладиться чтением, не ожидая значительной пользы.
Подробнее читать – [url=https://rostov-narkologiya.ru/uslugi-ot-narkomanii/mefedronovaya-zavisimost/]детокс чай для похудения[/url]
Далее начинается процесс детоксикации – внутривенно вводятся растворы, которые помогают вывести остатки алкоголя, снизить нагрузку на печень и почки, восстановить водно-солевой баланс. При необходимости применяются препараты для стабилизации сердечно-сосудистой системы и поддержания работы нервной системы.
Получить дополнительную информацию – [url=https://narcolog-na-dom-v-irkutske6.ru/]частный нарколог на дом иркутск[/url]
Поэтому наша служба экстренного выезда работает круглосуточно. Медицинская бригада приезжает на вызов в любой район Балашихи в течение часа. Пациенту ставят капельницы, стабилизируют давление, снимают судорожный синдром и устраняют тревожность. Всё это проходит под наблюдением опытных врачей, которые ежедневно сталкиваются с острыми ситуациями и знают, как действовать быстро и безопасно.
Получить дополнительные сведения – http://narkologicheskaya-pomoshch-balashiha1.ru/narkologicheskaya-pomoshch-na-domu-v-balashihe/
Запой — это тяжёлое состояние, характеризующееся длительным употреблением алкоголя, при котором человек не в силах самостоятельно прекратить пить. Алкогольная интоксикация при длительных запоях вызывает нарушения в работе всех органов и систем, приводя к серьёзным последствиям, таким как инфаркты, инсульты, психозы и даже летальный исход. В такой ситуации единственным надёжным решением становится обращение за профессиональной помощью.
Исследовать вопрос подробнее – https://vyvod-iz-zapoya-korolev2.ru/srochnyj-vyvod-iz-zapoya/
проектная организация для перепланировки квартиры [url=https://teletype.in/@jorik11/proekt-dlya-pereplanirovki/]teletype.in/@jorik11/proekt-dlya-pereplanirovki[/url] .
Срочное вмешательство врача необходимо при появлении следующих симптомов:
Углубиться в тему – http://vyvod-iz-zapoya-korolev2.ru
Наркомания — серьёзное хроническое заболевание, требующее не только медицинского вмешательства, но и комплексного подхода к восстановлению личности и социальной адаптации. В Волгограде клиника «Путь к жизни» предлагает полностью анонимное обслуживание, при котором никаких сведений о пациенте не попадает в государственные реестры. Мы работаем круглосуточно и готовы принять человека в любое время, обеспечивая сопровождение на всех этапах лечения: от первичной детоксикации до выхода на полноценную жизнь без зависимости.
Исследовать вопрос подробнее – [url=https://lechenie-narkomanii-volgograd9.ru/]лечение наркомании клиника волгоград[/url]
Как проходит лечение:
Получить больше информации – [url=https://narcolog-na-dom-novokuznetsk0.ru/]нарколог на дом клиника новокузнецк[/url]
Claro caiu [url=https://caiu.site/]Claro caiu[/url] .
Многие родственники надеются, что человек «проспится», что со временем ему станет легче. Но практика показывает: если запой длится более суток, а тем более — несколько дней, состояние будет только ухудшаться. Организм теряет воду, витамины, нарушаются обменные процессы, появляется тревожность, бессонница, тремор, скачки давления. В сложных случаях развиваются острые психозы (делирий), судороги и отказ внутренних органов.
Выяснить больше – [url=https://vyvod-iz-zapoya-serpuhov3.ru/]vyvod-iz-zapoya[/url]
Некоторые состояния требуют немедленного вмешательства нарколога, так как отказ от лечения может привести к тяжелым осложнениям и риску для жизни.
Изучить вопрос глубже – [url=https://narcolog-na-dom-novokuznetsk00.ru/]нарколог на дом вывод из запоя в новокузнецке[/url]
В клинике «Детоксика» действует принцип прозрачного ценообразования: все расходы обсуждаются заранее, и никаких скрытых платежей нет.
Разобраться лучше – https://vyvod-iz-zapoya-sochi77.ru/vyvod-iz-zapoya-cena-v-sochi/
– человек не может прекратить употребление сам; – наблюдается агрессия, страх, паника, бессвязная речь; – нарушен сон, отсутствует аппетит, сильная слабость; – алкоголь стал способом снятия боли или тревоги; – попытки отказа приводят к ухудшению состояния.
Детальнее – http://vyvod-iz-zapoya-serpuhov3.ru/anonimnyj-vyvod-iz-zapoya-v-serpuhove/
При длительном запое в организме накапливаются вредные токсины, что ведёт к нарушениям работы сердца, печени, почек и других жизненно важных органов. Чем быстрее начинается терапия, тем выше шансы избежать серьёзных осложнений и обеспечить качественное восстановление. Метод капельничного лечения позволяет оперативно начать детоксикацию, что особенно важно для спасения жизни и предупреждения хронических последствий злоупотребления алкоголем.
Узнать больше – [url=https://kapelnica-ot-zapoya-tyumen00.ru/]капельница от запоя на дому в тюмени[/url]
В этой статье-обзоре мы собрали данные, актуальность которых сомнительна, а факты — не всегда взаимосвязаны. Читатель сможет ознакомиться с разными мнениями, хотя вряд ли они существенно повлияют на его понимание темы.
Вот – [url=https://arma-rehab.ru/]милфы[/url]
melbet лаки джет [url=https://melbet41263.help/]melbet лаки джет[/url]
Этот обзор предлагает свежий взгляд на предметы, которые и без того привычны. Мы упоминаем факты, не имеющие большого значения, и события с неясной важностью, но они присутствуют здесь.
Подробнее читать – [url=https://rostov-narkologiya.ru/uslugi-ot-alkogolizma/vyvod-iz-zapoya/]мефедроновая зависимость[/url]
На основе собранной информации формируется индивидуальный план лечения, который включает установку внутривенной капельницы. Через капельницу вводятся специально подобранные растворы, способствующие быстрому выведению токсинов, восстановлению водно-электролитного баланса и нормализации работы внутренних органов. При необходимости назначаются дополнительные медикаменты для поддержки печени, сердца и нервной системы, а также для купирования симптомов абстинентного синдрома. Врач постоянно контролирует состояние пациента и корректирует лечение, чтобы добиться оптимальных результатов. Завершающим этапом является подробная консультация, в ходе которой специалист дает рекомендации по дальнейшему восстановлению и профилактике повторных эпизодов зависимости.
Выяснить больше – [url=https://narcolog-na-dom-voronezh0.ru/]нарколог на дом в воронеже[/url]
Алкогольный запой представляет собой тяжелое состояние, вызванное длительным бесконтрольным употреблением спиртных напитков. Без медицинского вмешательства вывести организм из запоя может быть сложно и даже опасно. Срочная помощь нарколога требуется при следующих признаках:
Подробнее тут – [url=https://kapelnica-ot-zapoya-nizhniy-novgorod0.ru/]капельница от запоя вызов город[/url]
В этой статье-обзоре мы собрали данные, актуальность которых сомнительна, а факты — не всегда взаимосвязаны. Читатель сможет ознакомиться с разными мнениями, хотя вряд ли они существенно повлияют на его понимание темы.
Вот – [url=https://arma-rehab.ru/vyvod-iz-zapoya/]казино онлайн[/url]
Чрезмерное употребление алкоголя приводит к отравлению организма, негативно сказываясь на работе внутренних органов, уровне жидкости и общем самочувствии. Длительные запои сопровождаются тяжёлыми последствиями, включая нарушения сердечной деятельности, сбои в работе печени, скачки давления и психоэмоциональные расстройства.
Выяснить больше – [url=https://kapelnica-ot-zapoya-krasnoyarsk6.ru/]капельница от запоя на дому круглосуточно в красноярске[/url]
Врач уточняет, как долго продолжается запой, какие симптомы наблюдаются и присутствуют ли сопутствующие заболевания. Тщательный сбор информации позволяет оперативно подобрать необходимые медикаменты и начать детоксикацию.
Узнать больше – [url=https://kapelnica-ot-zapoya-tyumen0.ru/]вызвать капельницу от запоя[/url]
В этом материале представлены детали, которые хоть и занимательны, но не особенно значимы. Мы рассматриваем моменты, которые трудно назвать важными, но всё же решили включить их для полноты картины.
Вот – [url=https://arma-rehab.ru/]азартные игры на деньги[/url]
Важно выяснить длительность запоя, частоту и дозы потребляемого алкоголя, наличие ранее проведённых детоксикаций и психиатрических заболеваний. Эта информация помогает выбрать наиболее подходящий протокол инфузионной и медикаментозной терапии.
Подробнее можно узнать тут – [url=https://тайный-вывод-из-запоя.рф/]вывод из запоя недорого самара[/url]
Основные признаки, свидетельствующие о необходимости экстренной помощи:
Подробнее тут – [url=https://vyvod-iz-zapoya-krasnoyarsk0.ru/]скорая вывод из запоя в красноярске[/url]
Этот информационный набор привлекает внимание множеством мелочей и странных ракурсов. Мы предлагаем взгляды, которые редко бывают полезны, но могут слегка разнообразить ваше знакомство с темой.
Вот – [url=https://arma-rehab.ru/lechenie-alkogolizma/]азартные игры на деньги[/url]
Аппаратные методы кодирования включают лазерную терапию и электростимуляцию биологически активных точек, влияющих на центры зависимости в головном мозге. Эти методики способствуют быстрому формированию устойчивого отвращения к спиртному и хорошо переносятся пациентами.
Изучить вопрос глубже – [url=https://kodirovanie-ot-alkogolizma-odintsovo2.ru/]кодирование от алкоголизма на дому[/url]
Использование автоматизированных систем дозирования обеспечивает точное введение лекарственных средств, что минимизирует риск передозировки и побочных эффектов. Постоянный мониторинг жизненно важных показателей позволяет врачу оперативно корректировать дозировки и адаптировать терапию под динамику состояния пациента.
Углубиться в тему – [url=https://vyvod-iz-zapoya-vladimir000.ru/]помощь вывод из запоя в владимире[/url]
Алкоголь оказывает глубокое воздействие на здоровье: психоэмоциональное и физическое состояние человека значительно ухудшаются, если злоупотребление продолжается долго. Даже небольшие дозы алкоголя, употребляемые регулярно, вызывают накопление токсинов, которые приводят к расстройствам в работе сердечно-сосудистой системы, печени, почек и других жизненно важных органов.
Углубиться в тему – [url=https://narcolog-na-dom-novokuznetsk0.ru/]психиатр нарколог на дом[/url]
Алкогольная и наркотическая зависимость оказывают разрушительное воздействие на организм, нарушая работу сердечно-сосудистой системы, печени, почек и головного мозга. Запои и передозировки приводят к острой интоксикации, которая без медицинской помощи может перерасти в поражение внутренних органов, психоз или даже летальный исход.
Изучить вопрос глубже – [url=https://narcolog-na-dom-novokuznetsk00.ru/]нарколог на дом клиника[/url]
С учётом всех этапов (детоксикация, терапевтическая работа и адаптация) курс занимает от одного до трёх месяцев, в зависимости от индивидуальных особенностей пациента.
Получить дополнительную информацию – [url=https://lechenie-narkomanii-volgograd9.ru/]лечение больных наркоманией волгоград[/url]
Клиника предлагает индивидуальный подход к каждому пациенту. Лечение начинается с детальной диагностики состояния здоровья, что позволяет врачу подобрать наиболее эффективную схему терапии.
Детальнее – [url=https://vyvod-iz-zapoya-korolev2.ru/]vyvod-iz-zapoya-korolev2.ru/[/url]
С учётом всех этапов (детоксикация, терапевтическая работа и адаптация) курс занимает от одного до трёх месяцев, в зависимости от индивидуальных особенностей пациента.
Получить больше информации – [url=https://lechenie-narkomanii-volgograd9.ru/]лечение наркомании наркология в волгограде[/url]
Стоимость вывода из запоя определяется индивидуально и зависит от ряда факторов, таких как:
Подробнее – [url=https://vyvod-iz-zapoya-sochi77.ru/]вывод из запоя капельница в сочи[/url]
Основной этап лечения — детоксикация. С помощью капельниц врач вводит препараты, которые быстро выводят токсины и нормализуют обменные процессы, снимают симптомы абстиненции и восстанавливают работу внутренних органов. Уже спустя 1–2 часа после начала процедуры пациент ощущает значительное улучшение.
Исследовать вопрос подробнее – http://vyvod-iz-zapoya-korolev2.ru
Параллельно с медицинской терапией начинается работа психотерапевта. В индивидуальных и семейных сессиях пациенты учатся распознавать механизмы зависимости, вырабатывать новые стратегии поведения и справляться со стрессовыми ситуациями без употребления. Последний этап — реабилитация и ресоциализация — включает трудотерапию, арт- и групповую терапию, помощь в восстановлении профессиональных навыков и возвращении к социально-активной жизни.
Детальнее – https://narkologicheskaya-klinika-mytishchi1.ru/chastnaya-narkologicheskaya-klinika-v-mytishchah/
Мы работаем без праздников и выходных, принимаем срочные обращения, выезжаем оперативно и оказываем помощь в полном соответствии с медицинскими стандартами. Главный принцип — безопасность, эффективность и деликатность. Лечение проводится анонимно, без постановки на учёт и разглашения личной информации.
Получить дополнительную информацию – https://vyvod-iz-zapoya-serpuhov3.ru/anonimnyj-vyvod-iz-zapoya-v-serpuhove
На основе собранной информации формируется индивидуальный план лечения, который включает установку внутривенной капельницы. Через капельницу вводятся специально подобранные растворы, способствующие быстрому выведению токсинов, восстановлению водно-электролитного баланса и нормализации работы внутренних органов. При необходимости назначаются дополнительные медикаменты для поддержки печени, сердца и нервной системы, а также для купирования симптомов абстинентного синдрома. Врач постоянно контролирует состояние пациента и корректирует лечение, чтобы добиться оптимальных результатов. Завершающим этапом является подробная консультация, в ходе которой специалист дает рекомендации по дальнейшему восстановлению и профилактике повторных эпизодов зависимости.
Подробнее тут – [url=https://narcolog-na-dom-voronezh0.ru/]нарколог на дом срочно воронеж[/url]
В зависимости от состояния пациента мы предлагаем два формата помощи: выезд нарколога на дом или госпитализацию в стационар. Оба варианта включают детоксикацию — выведение токсинов из организма с помощью инфузионной терапии (капельницы), а также медикаментозную поддержку: успокоительные, витамины, препараты для печени и сердца.
Разобраться лучше – https://vyvod-iz-zapoya-serpuhov3.ru/vyvod-iz-zapoya-na-domu-v-serpuhove
Некоторые состояния требуют немедленного вмешательства нарколога, так как отказ от лечения может привести к тяжелым осложнениям и риску для жизни.
Получить больше информации – [url=https://narcolog-na-dom-novokuznetsk00.ru/]нарколог на дом анонимно новокузнецк[/url]
Первый этап лечения — это детоксикация организма. При помощи капельничного введения специализированных препаратов достигается быстрый вывод токсинов, что позволяет стабилизировать обменные процессы и восстановить нормальное функционирование печени, почек и сердечно-сосудистой системы.
Изучить вопрос глубже – [url=https://narcolog-na-dom-ufa0.ru/]нарколог на дом недорого уфа[/url]
Капельницы, применяемые при выезде нарколога на дом, подбираются индивидуально — в зависимости от возраста, массы тела и степени интоксикации. Все растворы сертифицированы и безопасны, а их состав адаптирован под конкретную клиническую задачу. Ниже представлена таблица с типами инфузий и их терапевтическим эффектом.
Подробнее тут – [url=https://narcolog-na-dom-krasnoyarsk0.ru/]нарколог на дом круглосуточно цены красноярск[/url]
Также мы учитываем потребности каждого пациента — по питанию, условиям проживания, графику процедур. Проживание возможно в стандартных и повышенных палатах, с возможностью индивидуального обслуживания.
Углубиться в тему – [url=https://narkologicheskaya-pomoshch-balashiha1.ru/]наркологическая клиника клиника помощь[/url]
В клинике «Детоксика» действует принцип прозрачного ценообразования: все расходы обсуждаются заранее, и никаких скрытых платежей нет.
Получить дополнительные сведения – [url=https://vyvod-iz-zapoya-sochi77.ru/]наркология вывод из запоя сочи[/url]
Этот обзор предлагает свежий взгляд на предметы, которые и без того привычны. Мы упоминаем факты, не имеющие большого значения, и события с неясной важностью, но они присутствуют здесь.
Подробнее читать – https://rostov-narkologiya.ru/uslugi-ot-alkogolizma/vyvod-iz-zapoya
С учётом всех этапов (детоксикация, терапевтическая работа и адаптация) курс занимает от одного до трёх месяцев, в зависимости от индивидуальных особенностей пациента.
Получить дополнительные сведения – http://lechenie-narkomanii-volgograd9.ru/
Процесс вывода из запоя капельничным методом организован по строгой схеме, позволяющей обеспечить максимальную эффективность терапии. Каждая стадия направлена на комплексное восстановление организма и минимизацию риска осложнений.
Получить дополнительные сведения – http://kapelnica-ot-zapoya-tyumen0.ru/kapelnicza-ot-zapoya-na-domu-tyumen/
На основе собранной информации формируется индивидуальный план лечения, который включает установку внутривенной капельницы. Через капельницу вводятся специально подобранные растворы, способствующие быстрому выведению токсинов, восстановлению водно-электролитного баланса и нормализации работы внутренних органов. При необходимости назначаются дополнительные медикаменты для поддержки печени, сердца и нервной системы, а также для купирования симптомов абстинентного синдрома. Врач постоянно контролирует состояние пациента и корректирует лечение, чтобы добиться оптимальных результатов. Завершающим этапом является подробная консультация, в ходе которой специалист дает рекомендации по дальнейшему восстановлению и профилактике повторных эпизодов зависимости.
Получить больше информации – [url=https://narcolog-na-dom-voronezh0.ru/]врач нарколог выезд на дом в воронеже[/url]
Срочное вмешательство врача необходимо при появлении следующих симптомов:
Получить дополнительную информацию – [url=https://vyvod-iz-zapoya-korolev2.ru/]вывод из запоя королев[/url]
Запой — это тяжёлое состояние, характеризующееся длительным употреблением алкоголя, при котором человек не в силах самостоятельно прекратить пить. Алкогольная интоксикация при длительных запоях вызывает нарушения в работе всех органов и систем, приводя к серьёзным последствиям, таким как инфаркты, инсульты, психозы и даже летальный исход. В такой ситуации единственным надёжным решением становится обращение за профессиональной помощью.
Исследовать вопрос подробнее – https://vyvod-iz-zapoya-korolev2.ru/vyvod-iz-zapoya-kruglosutochno
Чрезмерное употребление алкоголя приводит к отравлению организма, негативно сказываясь на работе внутренних органов, уровне жидкости и общем самочувствии. Длительные запои сопровождаются тяжёлыми последствиями, включая нарушения сердечной деятельности, сбои в работе печени, скачки давления и психоэмоциональные расстройства.
Разобраться лучше – [url=https://kapelnica-ot-zapoya-krasnoyarsk6.ru/]врача капельницу от запоя красноярск[/url]
Многие родственники надеются, что человек «проспится», что со временем ему станет легче. Но практика показывает: если запой длится более суток, а тем более — несколько дней, состояние будет только ухудшаться. Организм теряет воду, витамины, нарушаются обменные процессы, появляется тревожность, бессонница, тремор, скачки давления. В сложных случаях развиваются острые психозы (делирий), судороги и отказ внутренних органов.
Узнать больше – [url=https://vyvod-iz-zapoya-serpuhov3.ru/]вывод из запоя дешево[/url]
Незамедлительно после вызова нарколог прибывает на дом для проведения тщательного осмотра. На данном этапе специалист собирает анамнез, измеряет жизненно важные показатели — пульс, артериальное давление, температуру — и оценивает степень интоксикации. Эти данные являются основой для составления индивидуального плана лечения.
Детальнее – [url=https://vyvod-iz-zapoya-vladimir000.ru/]www.domen.ru[/url]
Введение препаратов осуществляется внутривенно, что обеспечивает оперативное действие медикаментов. В состав лечебного раствора входят средства для детоксикации организма, нормализации водно-электролитного и кислотно-щелочного баланса. При необходимости врач дополнительно вводит препараты, защищающие печень, стабилизирующие работу сердца и успокаивающие нервную систему. Вся процедура проводится под строгим контролем нарколога, который следит за состоянием пациента и корректирует терапию при необходимости. По завершении процедуры врач дает пациенту и его родственникам подробные рекомендации по дальнейшему восстановлению и профилактике повторных запоев.
Подробнее тут – [url=https://kapelnica-ot-zapoya-nizhniy-novgorod0.ru/]вызов на дом капельницы от запоя в нижнем новгороде[/url]
Мы работаем без праздников и выходных, принимаем срочные обращения, выезжаем оперативно и оказываем помощь в полном соответствии с медицинскими стандартами. Главный принцип — безопасность, эффективность и деликатность. Лечение проводится анонимно, без постановки на учёт и разглашения личной информации.
Углубиться в тему – http://
Зависимость — это системная проблема, которая требует последовательного и профессионального подхода. Обычные попытки «вылечиться дома» без медицинского сопровождения нередко заканчиваются срывами, ухудшением состояния и психологической деградацией. Клиника «Здоровье Плюс» в Балашихе предоставляет пациентам не просто разовое вмешательство, а выстроенную поэтапную программу, основанную на опыте и медицинских стандартах.
Выяснить больше – [url=https://narkologicheskaya-pomoshch-balashiha1.ru/]наркологическая помощь балашиха[/url]
Когда запой приводит к критическому ухудшению состояния, оперативное лечение становится жизненно необходимым. В Тюмени доступна услуга капельничного вывода из запоя на дому, которая позволяет начать детоксикацию организма незамедлительно и в комфортной для пациента обстановке. Такой формат терапии помогает не только вывести токсины, но и значительно снизить риск осложнений, сохраняя при этом полную конфиденциальность.
Подробнее – [url=https://kapelnica-ot-zapoya-tyumen0.ru/]капельница от запоя на дому тюмень[/url]
большая кухня на заказ [url=https://kuhni-spb-41.ru/]kuhni-spb-41.ru[/url] .
Алкоголь оказывает глубокое воздействие на здоровье: психоэмоциональное и физическое состояние человека значительно ухудшаются, если злоупотребление продолжается долго. Даже небольшие дозы алкоголя, употребляемые регулярно, вызывают накопление токсинов, которые приводят к расстройствам в работе сердечно-сосудистой системы, печени, почек и других жизненно важных органов.
Подробнее тут – [url=https://narcolog-na-dom-novokuznetsk0.ru/]вызов врача нарколога на дом[/url]
В материале приведены детали, интересные, но не особенно важные. Мы рассматриваем аспекты, которые сложно назвать существенными, но включили их для большей полноты.
Подробнее читать – https://rostov-narkologiya.ru
Как проходит лечение:
Подробнее тут – [url=https://narcolog-na-dom-novokuznetsk0.ru/]вызвать нарколога на дом[/url]
Срочное вмешательство врача необходимо при появлении следующих симптомов:
Выяснить больше – http://vyvod-iz-zapoya-korolev2.ru
– человек не может прекратить употребление сам; – наблюдается агрессия, страх, паника, бессвязная речь; – нарушен сон, отсутствует аппетит, сильная слабость; – алкоголь стал способом снятия боли или тревоги; – попытки отказа приводят к ухудшению состояния.
Подробнее можно узнать тут – [url=https://vyvod-iz-zapoya-serpuhov3.ru/]вывод из запоя клиника[/url]
Врач выясняет, как долго продолжается запой, какие симптомы наблюдаются и имеются ли сопутствующие заболевания. Тщательный анализ полученной информации позволяет оперативно скорректировать терапевтическую стратегию и выбрать наилучшие методы детоксикации.
Получить дополнительные сведения – [url=https://vyvod-iz-zapoya-vladimir000.ru/]вывод из запоя на дому круглосуточно в владимире[/url]
Также мы учитываем потребности каждого пациента — по питанию, условиям проживания, графику процедур. Проживание возможно в стандартных и повышенных палатах, с возможностью индивидуального обслуживания.
Ознакомиться с деталями – [url=https://narkologicheskaya-pomoshch-balashiha1.ru/]порядок наркологической помощи[/url]
заказать кухню с установкой [url=https://zakazat-kuhnyu-1.ru/]zakazat-kuhnyu-1.ru[/url] .
Важно выяснить длительность запоя, частоту и дозы потребляемого алкоголя, наличие ранее проведённых детоксикаций и психиатрических заболеваний. Эта информация помогает выбрать наиболее подходящий протокол инфузионной и медикаментозной терапии.
Получить дополнительные сведения – [url=https://тайный-вывод-из-запоя.рф/]вывод из запоя капельница[/url]
Одним из ключевых достоинств выезда нарколога на дом является возможность лечения в привычной для пациента среде, что способствует снижению стресса и ускоряет процесс выздоровления. Кроме того, лечение на дому гарантирует полную анонимность и индивидуальный подход к каждому пациенту.
Изучить вопрос глубже – [url=https://narcolog-na-dom-v-irkutske66.ru/]запой нарколог на дом[/url]
заказать кухню под размеры [url=https://zakazat-kuhnyu-3.ru/]заказать кухню под размеры[/url] .
pin-up ios problem [url=pinup09715.help]pinup09715.help[/url]
Эта публикация содержит набор несвязанных идей, трудно применимых в практике. Мы лишь поверхностно затрагиваем различные точки зрения, не проводя глубокий анализ и не предлагая выводов.
Подробнее читать – [url=https://rostov-narkologiya.ru/ ]таблетки для аборта[/url]
Процедура вывода из запоя начинается с тщательной диагностики состояния пациента, чтобы определить, какие методы лечения будут наиболее эффективными. Мы применяем индивидуальный подход и комбинируем медикаментозное лечение с психотерапевтической поддержкой, что даёт лучший результат.
Разобраться лучше – http://narcolog-na-dom-novokuznetsk0.ru
1win бонус код [url=http://1win19643.help]1win бонус код[/url]
Показанием к стационарному лечению служат случаи, при которых домашняя терапия становится небезопасной или недостаточно эффективной. Рекомендуем госпитализацию при:
Подробнее можно узнать тут – http://narkologicheskaya-klinika-ufa9.ru/
Одним из ключевых достоинств выезда нарколога на дом является возможность лечения в привычной для пациента среде, что способствует снижению стресса и ускоряет процесс выздоровления. Кроме того, лечение на дому гарантирует полную анонимность и индивидуальный подход к каждому пациенту.
Подробнее можно узнать тут – [url=https://narcolog-na-dom-v-irkutske66.ru/]вызов нарколога на дом иркутск[/url]
Процесс вывода из запоя состоит из нескольких последовательных этапов, каждый из которых играет свою ключевую роль в обеспечении стабильного результата и безопасности пациента.
Выяснить больше – http://vyvod-iz-zapoya-arkhangelsk66.ru
Зависимость — это системная проблема, которая требует последовательного и профессионального подхода. Обычные попытки «вылечиться дома» без медицинского сопровождения нередко заканчиваются срывами, ухудшением состояния и психологической деградацией. Клиника «Здоровье Плюс» в Балашихе предоставляет пациентам не просто разовое вмешательство, а выстроенную поэтапную программу, основанную на опыте и медицинских стандартах.
Ознакомиться с деталями – http://narkologicheskaya-pomoshch-balashiha1.ru
Алкогольная зависимость — это хроническое заболевание, при котором устойчивое влечение к спиртному приводит к тяжёлым медицинским, социальным и психологическим последствиям. Когда пациент осознаёт, что самостоятельно справиться с этой проблемой не получается, наиболее эффективным методом становится кодирование от алкоголизма. В клинике «Ясное Будущее» в Одинцово мы используем сочетание проверенных методик кодирования и комплексной психологической поддержки, что позволяет достичь стойкой ремиссии и вернуть человеку контроль над собственной жизнью.
Ознакомиться с деталями – http://kodirovanie-ot-alkogolizma-odintsovo2.ru/
Этот сборник информации привлекает множеством мелких деталей и необычных ракурсов. Мы предлагаем взгляды, редко полезные, но способные немного разнообразить знакомство с темой.
Подробнее читать – [url=https://rostov-narkologiya.ru/uslugi-ot-alkogolizma/vyvod-iz-zapoya/]кето диета за неделю минус 10 кг[/url]
Внутривенная инфузия – это один из самых быстрых и безопасных способов очистки организма от алкоголя и его токсичных продуктов распада. Она позволяет:
Изучить вопрос глубже – [url=https://kapelnica-ot-zapoya-krasnoyarsk6.ru/]выезд на дом капельница от запоя в красноярске[/url]
Looking stylish projects a positive first impression.
Your outfit speaks volumes before you actually say a single word.
It boosts your personal self-esteem and mindset noticeably.
Your put-together look signals professionalism in the workplace.
https://s4.superlooks.ru/5AdEMPQVKOPn/
Fashionable choices let you to showcase your unique personality.
Others often judge well-dressed individuals as more capable and reliable.
Ultimately, putting effort in your style is an investment in yourself.
Параллельно с медицинской терапией начинается работа психотерапевта. В индивидуальных и семейных сессиях пациенты учатся распознавать механизмы зависимости, вырабатывать новые стратегии поведения и справляться со стрессовыми ситуациями без употребления. Последний этап — реабилитация и ресоциализация — включает трудотерапию, арт- и групповую терапию, помощь в восстановлении профессиональных навыков и возвращении к социально-активной жизни.
Исследовать вопрос подробнее – http://narkologicheskaya-klinika-mytishchi1.ru
Чрезмерное употребление алкоголя приводит к отравлению организма, негативно сказываясь на работе внутренних органов, уровне жидкости и общем самочувствии. Длительные запои сопровождаются тяжёлыми последствиями, включая нарушения сердечной деятельности, сбои в работе печени, скачки давления и психоэмоциональные расстройства.
Изучить вопрос глубже – [url=https://kapelnica-ot-zapoya-krasnoyarsk6.ru/]поставить капельницу от запоя на дому в красноярске[/url]
Чтобы избежать последствий и обеспечить безопасное восстановление организма, важно своевременно обратиться за профессиональной медицинской помощью. В клинике «Стоп-синдром» работает круглосуточная служба выезда нарколога на дом, что позволяет получить срочное лечение в комфортных условиях без госпитализации.
Подробнее – [url=https://narcolog-na-dom-v-irkutske6.ru/]нарколог на дом круглосуточно цены в иркутске[/url]
Выбор капельничного метода в условиях домашнего лечения обладает рядом преимуществ:
Получить дополнительную информацию – https://kapelnica-ot-zapoya-tyumen00.ru/kapelnicza-ot-zapoya-na-domu-tyumen/
Игнорирование этих симптомов или попытки самолечения могут привести к серьезным осложнениям. Своевременная установка капельницы на дому позволяет быстро улучшить состояние пациента и минимизировать последствия запоя.
Изучить вопрос глубже – https://kapelnica-ot-zapoya-nizhniy-novgorod0.ru/kapelnicza-ot-zapoya-na-domu-nizhnij-novgorod/
Казино флагман [url=https://t.me/casinotop_official/]Казино флагман [/url] .
Казино лекс [url=https://t.me/vanechekvan/]Казино лекс [/url] .
Стильный внешний вид формирует первое мнение о вас.
Ваш образ работает на оценку вас коллегами мгновенно.
Уверенность в своем луке укрепляет вашу самооценку.
Он подчеркивает высокий стандарт профессионализма и внимание к деталям.
https://bookmarks.sochidaily.ru/6dHz1n/
Посредством гардероб вы имеете шанс выразить свою личность и вкус.
Окружающие неосознанно воспринимают стильных людей как более компетентных.
Следовательно, инвестиции в свой образ — это инвестиции в ваше будущее.
«Кодирование — это не магическое решение, а важный этап в комплексной программе лечения, — поясняет ведущий нарколог клиники «Ясное Будущее» Марина Иванова. — Главное — сочетание фармакологического воздействия и последующей работы с психологом для формирования устойчивой мотивации к трезвости».
Получить дополнительные сведения – [url=https://kodirovanie-ot-alkogolizma-odintsovo2.ru/]кодирование от алкоголизма цены[/url]
заказать кухню с доставкой [url=https://zakazat-kuhnyu-4.ru/]zakazat-kuhnyu-4.ru[/url] .
В нашей практике сочетаются несколько видов вмешательства: медико-биологическое, психологическое и социальное. Сначала проводится полная диагностика, включая лабораторные анализы и оценку работы сердца, печени, почек, а также психодиагностические тесты. После этого начинается этап детоксикации с внутривенными капельницами, которые выводят токсины, нормализуют водно-солевой баланс и восстанавливают основные функции организма. Далее мы применяем медикаментозную поддержку для стабилизации артериального давления, купирования тревожных симптомов, нормализации сна и уменьшения болевого синдрома.
Ознакомиться с деталями – https://narkologicheskaya-klinika-mytishchi1.ru/narkologicheskaya-klinika-ceny-v-mytishchah/
Чрезмерное употребление алкоголя приводит к отравлению организма, негативно сказываясь на работе внутренних органов, уровне жидкости и общем самочувствии. Длительные запои сопровождаются тяжёлыми последствиями, включая нарушения сердечной деятельности, сбои в работе печени, скачки давления и психоэмоциональные расстройства.
Углубиться в тему – [url=https://kapelnica-ot-zapoya-krasnoyarsk6.ru/]капельница от запоя анонимно в красноярске[/url]
заказать кухню по индивидуальному проекту [url=https://zakazat-kuhnyu-2.ru/]zakazat-kuhnyu-2.ru[/url] .
Looking stylish creates a positive first impression.
Your outfit communicates loudly before a person even say a single word.
This boosts your personal confidence and mood noticeably.
A polished look conveys competence in the office.
https://s2.superlooks.ru/VqvUI35G0aqq/
Fashionable clothing let you to showcase your unique personality.
People often perceive stylish individuals as more capable and trustworthy.
Therefore, putting effort in your wardrobe is an investment in your personal brand.
Услуга “Нарколог на дом” в Уфе охватывает широкий спектр лечебных мероприятий, направленных как на устранение токсической нагрузки, так и на работу с психоэмоциональным состоянием пациента. Комплексная терапия включает в себя медикаментозную детоксикацию, корректировку обменных процессов, а также психотерапевтическую поддержку, что позволяет не только вывести пациента из состояния запоя, но и помочь ему справиться с наркотической зависимостью.
Изучить вопрос глубже – [url=https://narcolog-na-dom-ufa000.ru/]психиатр нарколог на дом[/url]
Стационарная программа позволяет стабилизировать не только физическое состояние, но и эмоциональную сферу. Находясь в изоляции от внешних раздражителей и вредных контактов, пациент получает шанс сконцентрироваться на себе и начать реабилитацию без давления извне.
Получить дополнительные сведения – https://narkologicheskaya-pomoshch-balashiha1.ru/
Основные признаки, свидетельствующие о необходимости экстренной помощи:
Разобраться лучше – [url=https://vyvod-iz-zapoya-krasnoyarsk0.ru/]вывод из запоя на дому цена[/url]
crash en pinup [url=http://pinup37056.help]http://pinup37056.help[/url]
Алкогольная зависимость — это хроническое заболевание, при котором устойчивое влечение к спиртному приводит к тяжёлым медицинским, социальным и психологическим последствиям. Когда пациент осознаёт, что самостоятельно справиться с этой проблемой не получается, наиболее эффективным методом становится кодирование от алкоголизма. В клинике «Ясное Будущее» в Одинцово мы используем сочетание проверенных методик кодирования и комплексной психологической поддержки, что позволяет достичь стойкой ремиссии и вернуть человеку контроль над собственной жизнью.
Ознакомиться с деталями – [url=https://kodirovanie-ot-alkogolizma-odintsovo2.ru/]кодирование от алкоголизма цены[/url]
Когда запой становится угрозой для здоровья, оперативное вмешательство имеет решающее значение. В Тюмени, Тюменская область, услуга «капельница от запоя на дому» помогает быстро начать детоксикацию организма, восстановить нормальный обмен веществ и стабилизировать работу внутренних органов. Такой метод лечения позволяет пациенту получить профессиональную медицинскую помощь в комфортной домашней обстановке, при этом сохраняя конфиденциальность и снижая эмоциональный стресс.
Изучить вопрос глубже – http://vyvod-iz-zapoya-vladimir00.ru/vyvod-iz-zapoya-anonimno-vladimir/
Наши специалисты оценивают клинические признаки запоя уже при первом осмотре — измеряют пульс, артериальное давление и насыщение кислородом, осматривают кожу и слизистые оболочки на предмет обезвоживания. Специальные тесты на когнитивные функции позволяют определить степень дезориентации и риск развития острых психотических реакций.
Получить дополнительную информацию – [url=https://тайный-вывод-из-запоя.рф/]вывод из запоя на дому круглосуточно самара[/url]
Мы не делаем «массовых решений»: каждый пациент для нас — уникальная история, и мы строим терапию, исходя из его состояния, целей и личных возможностей. Наша задача — не просто временно облегчить симптомы, а дать человеку реальные инструменты для жизни без зависимости.
Детальнее – http://narkologicheskaya-klinika-mytishchi1.ru
Круглосуточный формат работы и конфиденциальность — ключевые принципы «СамараМед». Обращаясь к нам, вы получаете:
Ознакомиться с деталями – [url=https://тайный-вывод-из-запоя.рф/]вывод из запоя в самаре[/url]
Опрятный внешний вид формирует первое мнение о человеке.
Он работает на восприятие вас окружающими сразу.
Хорошее самочувствие в своем луке повышает вашу самооценку.
Этот подход демонстрирует ваш уровень профессионализма и уважение к деталям.
https://n4.sneakero.ru/WqyJvMEoyLl9/
Через одежду вы можете проявить свою личность и вкус.
Окружающие неосознанно воспринимают опрятных людей как более успешных.
Следовательно, вложения в свой образ — это вклад в свое успешное будущее.
При поступлении вызова нарколог незамедлительно приезжает на дом для проведения тщательного осмотра. На этом этапе специалист измеряет жизненно важные показатели, собирает подробный анамнез и определяет степень интоксикации. Эти данные являются ключевыми для составления индивидуального плана лечения.
Исследовать вопрос подробнее – [url=https://kapelnica-ot-zapoya-tyumen00.ru/]врач на дом капельница от запоя в тюмени[/url]
Запой и алкогольная интоксикация – это состояния, при которых организм уже не способен самостоятельно справиться с токсинами. Попытки выйти из запоя без медицинского вмешательства могут привести к серьёзным осложнениям, таким как скачки давления, судороги, галлюцинации и даже алкогольный психоз.
Получить дополнительную информацию – [url=https://narcolog-na-dom-v-irkutske6.ru/]вызов врача нарколога на дом[/url]
Бесплатный ключ для Windows 11 — только у нас, обновлено в 2026 году!
Подробнее – [url=https://krasnodar.med24.online/landing/vyvod_iz_zapoya/]Windows 11 активатор без вирусов[/url]
Некоторые состояния требуют немедленного вмешательства нарколога, так как отказ от лечения может привести к тяжелым осложнениям и риску для жизни.
Детальнее – https://narcolog-na-dom-novokuznetsk00.ru/narkolog-na-dom-klinika-novokuzneczk
Стационарная программа позволяет стабилизировать не только физическое состояние, но и эмоциональную сферу. Находясь в изоляции от внешних раздражителей и вредных контактов, пациент получает шанс сконцентрироваться на себе и начать реабилитацию без давления извне.
Выяснить больше – [url=https://narkologicheskaya-pomoshch-balashiha1.ru/]skoraya-narkologicheskaya-pomoshch-besplatnaya[/url]
https://t.me/s/reg_official_1win/506
Наши специалисты используют проверенные медикаменты, которые подбираются индивидуально для каждого пациента:
Выяснить больше – [url=https://narcolog-na-dom-voronezh0.ru/]нарколог на дом круглосуточно цены воронеж[/url]
Выбор капельничного метода в условиях домашнего лечения обладает рядом преимуществ:
Ознакомиться с деталями – [url=https://kapelnica-ot-zapoya-tyumen00.ru/]врач на дом капельница от запоя тюмень[/url]
Чтобы избежать последствий и обеспечить безопасное восстановление организма, важно своевременно обратиться за профессиональной медицинской помощью. В клинике «Стоп-синдром» работает круглосуточная служба выезда нарколога на дом, что позволяет получить срочное лечение в комфортных условиях без госпитализации.
Получить дополнительную информацию – [url=https://narcolog-na-dom-v-irkutske6.ru/]вызвать врача нарколога на дом[/url]
Аппаратные методы кодирования включают лазерную терапию и электростимуляцию биологически активных точек, влияющих на центры зависимости в головном мозге. Эти методики способствуют быстрому формированию устойчивого отвращения к спиртному и хорошо переносятся пациентами.
Подробнее тут – [url=https://kodirovanie-ot-alkogolizma-odintsovo2.ru/]кодирование от алкоголизма гипнозом[/url]
Когда человеку требуется немедленная медицинская помощь при алкогольной интоксикации, промедление может быть опасным. В таких ситуациях вызов нарколога на дом становится оптимальным решением. Клиника «КрасМед Трезвость» в Красноярске организует срочный выезд врача круглосуточно, обеспечивая квалифицированную помощь прямо по месту нахождения пациента. Такой формат позволяет избежать госпитализации, снизить тревожность и начать лечение в привычных домашних условиях, где человек чувствует себя спокойнее и безопаснее.
Углубиться в тему – [url=https://narcolog-na-dom-krasnoyarsk0.ru/]вызвать нарколога на дом[/url]
В этом тексте собрано множество случайных сведений и довольно неопределённых мыслей, которые могут чем-то заинтересовать. Мы отмечаем моменты, которые не особенно важны, но всё же занимают своё место в повествовании.
Вот – [url=https://arma-rehab.ru/lechenie-alkogolizma/]ставки на спорт[/url]
Когда зависимость захватывает жизнь, она разрушает не только организм, но и личность, отношения с близкими, карьерные планы и самоощущение. Алкоголь, наркотики и психотропные препараты постепенно подрывают работу внутренних органов, нарушают баланс нейромедиаторов в мозге и приводят к серьёзным психическим и физическим осложнениям. Попытки справиться с этим самостоятельно редко бывают успешными: необходим системный, профессиональный подход. В наркологической клинике «Доктор Здоровье» в Мытищах вы найдёте надёжную опору на всех этапах выздоровления — от экстренной детоксикации до длительной реабилитации.
Получить дополнительную информацию – http://narkologicheskaya-klinika-mytishchi1.ru
Пациенты, которые выбирают нашу клинику для лечения алкогольного запоя, получают качественную и оперативную помощь, обладающую следующими преимуществами:
Получить дополнительные сведения – [url=https://kapelnica-ot-zapoya-nizhniy-novgorod0.ru/]сколько стоит капельница на дому от запоя[/url]
Looking stylish creates a strong first impression.
A attire speaks loudly before you even say a word.
This enhances your own self-esteem and mindset noticeably.
Your put-together appearance conveys competence in the workplace.
https://s6.superlooks.ru/LgXlFjFWjlyx/
Fashionable choices let you to express your individual personality.
Others often perceive well-dressed individuals as more successful and trustworthy.
Ultimately, putting effort in your wardrobe is an valuable step in yourself.
Алкогольный запой представляет собой тяжелое состояние, вызванное длительным бесконтрольным употреблением спиртных напитков. Без медицинского вмешательства вывести организм из запоя может быть сложно и даже опасно. Срочная помощь нарколога требуется при следующих признаках:
Выяснить больше – http://kapelnica-ot-zapoya-nizhniy-novgorod0.ru
Как отмечает главный врач клиники, кандидат медицинских наук Сергей Иванов, «мы создали систему, при которой пациент получает помощь в течение часа — независимо от дня недели и времени суток. Это принципиально меняет шансы на выздоровление».
Выяснить больше – https://narkologicheskaya-pomoshch-balashiha1.ru/narkologicheskaya-pomoshch-na-domu-v-balashihe
При длительном запое в организме накапливаются вредные токсины, что ведёт к нарушениям работы сердца, печени, почек и других жизненно важных органов. Чем быстрее начинается терапия, тем выше шансы избежать серьёзных осложнений и обеспечить качественное восстановление. Метод капельничного лечения позволяет оперативно начать детоксикацию, что особенно важно для спасения жизни и предупреждения хронических последствий злоупотребления алкоголем.
Ознакомиться с деталями – [url=https://kapelnica-ot-zapoya-tyumen00.ru/]капельница от запоя недорого в тюмени[/url]
В стационаре работают узкопрофильные специалисты: наркологи, неврологи, психотерапевты, а также персонал, обеспечивающий круглосуточный уход. Программа включает медикаментозное лечение, психологическую коррекцию, восстановление сна, устранение депрессии, обучение саморегуляции и работу с мотивацией.
Подробнее тут – [url=https://narkologicheskaya-pomoshch-balashiha1.ru/]наркологическая помощь балашиха[/url]
Как подчеркивает нарколог Олег Смирнов, «чем быстрее будет оказана помощь, тем ниже риск тяжелых осложнений, таких как судороги, отек мозга или сердечные приступы».
Подробнее можно узнать тут – [url=https://vyvod-iz-zapoya-krasnoyarsk0.ru/]вывод из запоя цена[/url]
Опрятный вид формирует сильное мнение о человеке.
Он влияет на оценку вас окружающими сразу.
Уверенность в своем луке укрепляет вашу уверенность.
Этот подход демонстрирует ваш уровень ответственности и внимание к деталям.
https://other.megakazan.ru/ZaC2AiM2nE9u/
Через гардероб вы можете выразить свою индивидуальность и вкус.
Окружающие неосознанно воспринимают опрятных индивидов как более успешных.
Следовательно, инвестиции в собственный образ — это вклад в ваше будущее.
Врач уточняет, как долго продолжается запой, какие симптомы наблюдаются и присутствуют ли сопутствующие заболевания. Тщательный сбор информации позволяет оперативно подобрать необходимые медикаменты и начать детоксикацию.
Углубиться в тему – https://kapelnica-ot-zapoya-tyumen0.ru/kapelnicza-ot-zapoya-na-domu-tyumen/
Клиника предлагает индивидуальный подход к каждому пациенту. Лечение начинается с детальной диагностики состояния здоровья, что позволяет врачу подобрать наиболее эффективную схему терапии.
Углубиться в тему – http://vyvod-iz-zapoya-korolev2.ru/vyvod-iz-zapoya-kruglosutochno/
В статье-обзоре представлены данные сомнительной актуальности и факты без явной взаимосвязи. Читатель ознакомится с разными мнениями, хотя они вряд ли существенно изменят его представление о теме.
Подробнее читать – [url=https://rostov-narkologiya.ru/uslugi-ot-narkomanii/mefedronovaya-zavisimost/]лечение covid народными средствами[/url]
В статье-обзоре представлены данные сомнительной актуальности и факты без явной взаимосвязи. Читатель ознакомится с разными мнениями, хотя они вряд ли существенно изменят его представление о теме.
Подробнее читать – [url=https://rostov-narkologiya.ru/uslugi-ot-narkomanii/mefedronovaya-zavisimost/]народные средства от диабета[/url]
При длительном запое в организме накапливаются вредные токсины, что ведёт к нарушениям работы сердца, печени, почек и других жизненно важных органов. Чем быстрее начинается терапия, тем выше шансы избежать серьёзных осложнений и обеспечить качественное восстановление. Метод капельничного лечения позволяет оперативно начать детоксикацию, что особенно важно для спасения жизни и предупреждения хронических последствий злоупотребления алкоголем.
Разобраться лучше – https://kapelnica-ot-zapoya-tyumen00.ru/
Когда запой превращается в острую угрозу здоровью, оперативное вмешательство становится необходимым условием для спасения жизни и предотвращения серьезных осложнений. В Уфе наркологи выезжают на дом для оказания качественной помощи при запое, предлагая детоксикацию, корректировку обменных процессов и психологическую поддержку. Такой формат лечения обеспечивает комфортную обстановку, индивидуальный подход и полную конфиденциальность для каждого пациента.
Разобраться лучше – https://narcolog-na-dom-ufa0.ru/narkolog-na-dom-kruglosutochno-ufa
Запой — это не просто периодическое употребление спиртного, а опасное состояние, при котором организм находится в постоянной интоксикации, теряет ресурсы и перестаёт справляться с последствиями этанола. Со временем развивается тяжёлое отравление, нарушается работа сердца, печени, мозга, а попытка «самостоятельно бросить» может привести к судорогам, галлюцинациям и даже коме. Именно поэтому важно вовремя обратиться за медицинской помощью. В Серпухове вывод из запоя осуществляет наркологическая клиника «Новая Энергия» — мы выезжаем на дом круглосуточно и при необходимости госпитализируем пациента в стационар.
Подробнее можно узнать тут – [url=https://vyvod-iz-zapoya-serpuhov3.ru/]srochnyj-vyvod-iz-zapoya[/url]
Основные признаки, свидетельствующие о необходимости экстренной помощи:
Получить больше информации – [url=https://vyvod-iz-zapoya-krasnoyarsk0.ru/]вывод из запоя вызов на дом красноярск[/url]
Особую опасность представляет белая горячка (алкогольный психоз). У пациента возникают галлюцинации, приступы паники, агрессивное поведение, дезориентация во времени и пространстве. Это состояние требует незамедлительного вмешательства врача, так как человек может представлять опасность для себя и окружающих.
Исследовать вопрос подробнее – http://narcolog-na-dom-novokuznetsk00.ru
Рабочий ключ активации для Windows 11 — проверено и обновлено, без блокировок!
Подробнее – [url=https://krasnodar.med24.online/landing/vyvod_iz_zapoya/]Бесплатная активация Windows 11 навсегда[/url]
В таких случаях своевременное обращение за помощью позволяет быстро стабилизировать состояние и предотвратить развитие серьезных осложнений.
Получить больше информации – http://narcolog-na-dom-voronezh0.ru
Клиника «ТоксинНет» предлагает профессиональную помощь при алкогольной зависимости и запоях в Нижнем Новгороде. Наши опытные наркологи круглосуточно выезжают на дом для оказания экстренной медицинской помощи. Основным методом лечения является капельница от запоя, которая позволяет оперативно снять интоксикацию и стабилизировать общее состояние пациента. Мы обеспечиваем конфиденциальность, индивидуальный подход и высокий уровень безопасности процедур.
Исследовать вопрос подробнее – [url=https://kapelnica-ot-zapoya-nizhniy-novgorod0.ru/]капельница от запоя вызов в нижнем новгороде[/url]
Looking stylish projects a positive first impression.
Your outfit communicates loudly before you even say a single word.
It boosts your personal confidence and mindset noticeably.
Your put-together look conveys competence in the office.
https://b7.chenews.ru/rT4bVpjjW2X4/
Fashionable choices allow you to showcase your unique personality.
Others often judge well-dressed people as more successful and reliable.
Therefore, putting effort in your style is an investment in your personal brand.
Врач уточняет продолжительность запоя, характер употребляемого алкоголя и наличие сопутствующих заболеваний. Детальное обследование позволяет оперативно подобрать необходимые медикаменты и минимизировать риск осложнений.
Выяснить больше – [url=https://kapelnica-ot-zapoya-tyumen00.ru/]врача капельницу от запоя[/url]
В нашей практике сочетаются несколько видов вмешательства: медико-биологическое, психологическое и социальное. Сначала проводится полная диагностика, включая лабораторные анализы и оценку работы сердца, печени, почек, а также психодиагностические тесты. После этого начинается этап детоксикации с внутривенными капельницами, которые выводят токсины, нормализуют водно-солевой баланс и восстанавливают основные функции организма. Далее мы применяем медикаментозную поддержку для стабилизации артериального давления, купирования тревожных симптомов, нормализации сна и уменьшения болевого синдрома.
Получить дополнительную информацию – [url=https://narkologicheskaya-klinika-mytishchi1.ru/]besplatnaya-narkologicheskaya-klinika[/url]
Алкогольная зависимость — это хроническое заболевание, при котором устойчивое влечение к спиртному приводит к тяжёлым медицинским, социальным и психологическим последствиям. Когда пациент осознаёт, что самостоятельно справиться с этой проблемой не получается, наиболее эффективным методом становится кодирование от алкоголизма. В клинике «Ясное Будущее» в Одинцово мы используем сочетание проверенных методик кодирования и комплексной психологической поддержки, что позволяет достичь стойкой ремиссии и вернуть человеку контроль над собственной жизнью.
Узнать больше – https://kodirovanie-ot-alkogolizma-odintsovo2.ru/kodirovanie-ot-alkogolizma-na-domu/
Использование автоматизированных систем дозирования обеспечивает точное введение лекарственных средств, что минимизирует риск передозировки и побочных эффектов. Постоянный мониторинг жизненно важных показателей позволяет врачу оперативно корректировать дозировки и адаптировать терапию под динамику состояния пациента.
Получить дополнительные сведения – [url=https://vyvod-iz-zapoya-vladimir000.ru/]вывод из запоя на дому в владимире[/url]
Клиника предлагает индивидуальный подход к каждому пациенту. Лечение начинается с детальной диагностики состояния здоровья, что позволяет врачу подобрать наиболее эффективную схему терапии.
Ознакомиться с деталями – http://vyvod-iz-zapoya-korolev2.ru/srochnyj-vyvod-iz-zapoya/
Эти последствия не только ухудшают качество жизни, но и могут стать причиной опасных для жизни ситуаций. Именно поэтому своевременный вывод из запоя является критически важным.
Получить дополнительные сведения – [url=https://vyvod-iz-zapoya-krasnoyarsk0.ru/]анонимный вывод из запоя в красноярске[/url]
В зависимости от состояния пациента мы предлагаем два формата помощи: выезд нарколога на дом или госпитализацию в стационар. Оба варианта включают детоксикацию — выведение токсинов из организма с помощью инфузионной терапии (капельницы), а также медикаментозную поддержку: успокоительные, витамины, препараты для печени и сердца.
Углубиться в тему – [url=https://vyvod-iz-zapoya-serpuhov3.ru/]вывод из запоя серпухов[/url]
Лечение на дому начинается с выезда нарколога, который проводит первичный осмотр, оценивает физическое и эмоциональное состояние пациента и назначает индивидуальную программу терапии. Комплексный подход включает медикаментозную детоксикацию и психологическую поддержку, позволяющие обеспечить быстрое и безопасное восстановление.
Ознакомиться с деталями – [url=https://narcolog-na-dom-v-irkutske66.ru/]вызов нарколога на дом[/url]
Недостаточно снять физическую зависимость — важно помочь человеку вернуться в сообщество. В «Доктор Здоровье» разработана система сопровождения, включающая мотивационные беседы, групповые занятия и социальную реабилитацию. Психотерапевты владеют методами когнитивно-поведенческой терапии и мотивационного интервью, консультанты помогают восстановить профессиональные навыки и адаптироваться к повседневной жизни, а встречи в группе взаимопомощи и психодраматические сессии способствуют укреплению чувства поддержки и навыков эффективного общения. Для родственников доступны семейные консультации, на которых объясняют природу зависимости и обучают стратегиям поддержки без критики и давления.
Разобраться лучше – http://narkologicheskaya-klinika-mytishchi1.ru/narkologicheskaya-klinika-ceny-v-mytishchah/
«Кодирование — это не магическое решение, а важный этап в комплексной программе лечения, — поясняет ведущий нарколог клиники «Ясное Будущее» Марина Иванова. — Главное — сочетание фармакологического воздействия и последующей работы с психологом для формирования устойчивой мотивации к трезвости».
Изучить вопрос глубже – [url=https://kodirovanie-ot-alkogolizma-odintsovo2.ru/]кодирование от алкоголизма гипнозом[/url]
Эти последствия не только ухудшают качество жизни, но и могут стать причиной опасных для жизни ситуаций. Именно поэтому своевременный вывод из запоя является критически важным.
Исследовать вопрос подробнее – [url=https://vyvod-iz-zapoya-krasnoyarsk0.ru/]вывод из запоя дешево[/url]
Этот сборник информации привлекает множеством мелких деталей и необычных ракурсов. Мы предлагаем взгляды, редко полезные, но способные немного разнообразить знакомство с темой.
Подробнее читать – [url=https://rostov-narkologiya.ru/uslugi-ot-alkogolizma/vyvod-iz-zapoya/]народные средства от диабета[/url]
Сразу после вызова нарколог приезжает на дом для проведения первичного осмотра и диагностики. На этом этапе проводится сбор анамнеза, измеряются жизненно важные показатели (пульс, артериальное давление, температура) и определяется степень алкогольной интоксикации. Эти данные являются основой для разработки индивидуального плана лечения.
Изучить вопрос глубже – [url=https://kapelnica-ot-zapoya-tyumen0.ru/]капельница от запоя анонимно[/url]
Этот информационный набор привлекает внимание множеством мелочей и странных ракурсов. Мы предлагаем взгляды, которые редко бывают полезны, но могут слегка разнообразить ваше знакомство с темой.
Вот – [url=https://arma-rehab.ru/vyvod-iz-zapoya/]покер онлайн[/url]
Зависимость — это системная проблема, которая требует последовательного и профессионального подхода. Обычные попытки «вылечиться дома» без медицинского сопровождения нередко заканчиваются срывами, ухудшением состояния и психологической деградацией. Клиника «Здоровье Плюс» в Балашихе предоставляет пациентам не просто разовое вмешательство, а выстроенную поэтапную программу, основанную на опыте и медицинских стандартах.
Подробнее тут – [url=https://narkologicheskaya-pomoshch-balashiha1.ru/]vidy-narkologicheskoj-pomoshchi[/url]
Когда запой превращается в острую угрозу здоровью, оперативное вмешательство становится необходимым условием для спасения жизни и предотвращения серьезных осложнений. В Уфе наркологи выезжают на дом для оказания качественной помощи при запое, предлагая детоксикацию, корректировку обменных процессов и психологическую поддержку. Такой формат лечения обеспечивает комфортную обстановку, индивидуальный подход и полную конфиденциальность для каждого пациента.
Получить дополнительные сведения – [url=https://narcolog-na-dom-ufa0.ru/]частный нарколог на дом[/url]
Основные признаки, свидетельствующие о необходимости экстренной помощи:
Детальнее – [url=https://vyvod-iz-zapoya-krasnoyarsk0.ru/]наркологический вывод из запоя в красноярске[/url]
Параллельно с медицинской терапией начинается работа психотерапевта. В индивидуальных и семейных сессиях пациенты учатся распознавать механизмы зависимости, вырабатывать новые стратегии поведения и справляться со стрессовыми ситуациями без употребления. Последний этап — реабилитация и ресоциализация — включает трудотерапию, арт- и групповую терапию, помощь в восстановлении профессиональных навыков и возвращении к социально-активной жизни.
Подробнее тут – [url=https://narkologicheskaya-klinika-mytishchi1.ru/]narkologicheskaya-klinika-skoraya[/url]
Незамедлительно после вызова нарколог прибывает на дом для проведения тщательного осмотра. На данном этапе специалист собирает анамнез, измеряет жизненно важные показатели — пульс, артериальное давление, температуру — и оценивает степень интоксикации. Эти данные являются основой для составления индивидуального плана лечения.
Выяснить больше – [url=https://vyvod-iz-zapoya-vladimir000.ru/]анонимный вывод из запоя[/url]
Медикаментозное кодирование проводится с помощью препаратов, блокирующих ферменты, ответственные за расщепление этанола, что вызывает выраженное неприятие алкоголя при попытке его употребления. Препараты вводятся внутримышечно или с помощью подкожных имплантов и действуют в течение нескольких месяцев, обеспечивая длительный эффект.
Подробнее тут – [url=https://kodirovanie-ot-alkogolizma-odintsovo2.ru/]кодирование от алкоголизма одинцово[/url]
Параллельно с медицинской терапией начинается работа психотерапевта. В индивидуальных и семейных сессиях пациенты учатся распознавать механизмы зависимости, вырабатывать новые стратегии поведения и справляться со стрессовыми ситуациями без употребления. Последний этап — реабилитация и ресоциализация — включает трудотерапию, арт- и групповую терапию, помощь в восстановлении профессиональных навыков и возвращении к социально-активной жизни.
Исследовать вопрос подробнее – http://narkologicheskaya-klinika-mytishchi1.ru
Услуга вызова нарколога на дом в Уфе разработана для оперативного вывода из запоя без необходимости госпитализации. Это особенно актуально для тех, кто столкнулся с алкогольной интоксикацией в условиях, когда каждая минута имеет значение. Своевременная помощь позволяет не только устранить негативное воздействие алкоголя на организм, но и предотвратить возможные осложнения, такие как нарушения работы сердца, печени и почек.
Ознакомиться с деталями – http://narcolog-na-dom-ufa0.ru/narkolog-na-dom-czena-ufa/
Этот текст содержит различную информацию, которая, возможно, покажется любопытной, но в целом не меняет восприятия привычных вещей. Предлагаем просто получить удовольствие от чтения, не ожидая особой пользы.
Вот – [url=https://arma-rehab.ru/lechenie-alkogolizma/]секс[/url]
«Кодирование — это не магическое решение, а важный этап в комплексной программе лечения, — поясняет ведущий нарколог клиники «Ясное Будущее» Марина Иванова. — Главное — сочетание фармакологического воздействия и последующей работы с психологом для формирования устойчивой мотивации к трезвости».
Узнать больше – [url=https://kodirovanie-ot-alkogolizma-odintsovo2.ru/]клиника кодирования от алкоголизма[/url]
Как активировать Windows 11 без ключа? У нас есть пошаговая инструкция!
Подробнее – https://krasnodar.med24.online
Выбор капельничного метода в условиях домашнего лечения обладает рядом преимуществ:
Изучить вопрос глубже – [url=https://kapelnica-ot-zapoya-tyumen00.ru/]капельница от запоя круглосуточно в тюмени[/url]
Первый этап лечения — это детоксикация организма. При помощи капельничного введения специализированных препаратов достигается быстрый вывод токсинов, что позволяет стабилизировать обменные процессы и восстановить нормальное функционирование печени, почек и сердечно-сосудистой системы.
Выяснить больше – http://narcolog-na-dom-ufa0.ru
Обратившись к нам, вы получите анонимное и безопасное лечение, полностью соответствующее медицинским стандартам.
Получить больше информации – http://narcolog-na-dom-novokuznetsk00.ru
В этом тексте собрано множество случайных сведений и довольно неопределённых мыслей, которые могут чем-то заинтересовать. Мы отмечаем моменты, которые не особенно важны, но всё же занимают своё место в повествовании.
Вот – [url=https://arma-rehab.ru/vyvod-iz-zapoya/]виртуальное казино[/url]
На основе собранной информации формируется индивидуальный план лечения, который включает установку внутривенной капельницы. Через капельницу вводятся специально подобранные растворы, способствующие быстрому выведению токсинов, восстановлению водно-электролитного баланса и нормализации работы внутренних органов. При необходимости назначаются дополнительные медикаменты для поддержки печени, сердца и нервной системы, а также для купирования симптомов абстинентного синдрома. Врач постоянно контролирует состояние пациента и корректирует лечение, чтобы добиться оптимальных результатов. Завершающим этапом является подробная консультация, в ходе которой специалист дает рекомендации по дальнейшему восстановлению и профилактике повторных эпизодов зависимости.
Подробнее – [url=https://narcolog-na-dom-voronezh0.ru/]нарколог на дом срочно[/url]
Комплексная терапия при выводе из запоя на дому включает в себя два основных направления: медикаментозную детоксикацию и психологическую поддержку. Такой подход позволяет добиться быстрого и устойчивого эффекта, минимизируя риск осложнений и обеспечивая долгосрочную ремиссию.
Подробнее можно узнать тут – [url=https://narcolog-na-dom-ufa000.ru/]нарколог на дом круглосуточно цены[/url]
Эта публикация содержит набор несвязанных идей, трудно применимых в практике. Мы лишь поверхностно затрагиваем различные точки зрения, не проводя глубокий анализ и не предлагая выводов.
Подробнее читать – [url=https://rostov-narkologiya.ru/ ]диета для похудения быстро[/url]
Анализ рынка услуг экстренной помощи в Тюмени позволяет выделить следующие ориентировочные цены:
Подробнее – [url=https://vyvod-iz-zapoya-vladimir00.ru/]вывод из запоя на дому цена[/url]
Первый этап лечения — это детоксикация организма. При помощи капельничного введения специализированных препаратов достигается быстрый вывод токсинов, что позволяет стабилизировать обменные процессы и восстановить нормальное функционирование печени, почек и сердечно-сосудистой системы.
Узнать больше – https://narcolog-na-dom-ufa0.ru/narkolog-na-dom-kruglosutochno-ufa/
В статье представлены ключевые моменты по актуальной теме, дополненные советами экспертов и ссылками на дополнительные ресурсы. Цель материала — дать читателю инструменты для самостоятельного развития и принятия осознанных решений.
Лови подробности – https://chandigarhshine.com/a-comprehensive-guide-to-gynecological-care
Этот информативный текст отличается привлекательным содержанием и актуальными данными. Мы предлагаем читателям взглянуть на привычные вещи под новым углом, предоставляя интересный и доступный материал. Получите удовольствие от чтения и расширьте кругозор!
Кликни и узнай всё! – https://carstyleart.fr/produit/duel-de-generation
Клиника «Семья и Здоровье» предлагает комплексное лечение на дому, что позволяет избежать стрессов, связанных с госпитализацией, и получить квалифицированную помощь в привычной обстановке. Наши специалисты работают круглосуточно, приезжают в течение 30–60 минут и проводят полный спектр процедур для восстановления здоровья.
Углубиться в тему – [url=https://vyvod-iz-zapoya-krasnoyarsk0.ru/]вывод из запоя недорого в красноярске[/url]
Эта статья для ознакомления предлагает читателям общее представление об актуальной теме. Мы стремимся представить ключевые факты и идеи, которые помогут читателям получить представление о предмете и решить, стоит ли углубляться в изучение.
Что ещё нужно знать? – https://catsanz.com/hearty-quinoa-porridge
mostbet bank köçürməsi [url=http://mostbet13670.help]mostbet bank köçürməsi[/url]
Мы собрали для вас самые захватывающие факты из мира науки и истории. От малознакомых деталей до грандиозных событий — эта статья расширит ваш кругозор и подарит новое понимание того, как устроен наш мир.
Подробности по ссылке – http://losbremos.de/werder-bremen-lied
Looking well projects a strong first impression.
Your outfit communicates loudly before a person actually say a single word.
It boosts your own self-esteem and mood noticeably.
A put-together appearance signals competence in the office.
https://s3.superlooks.ru/fFzhSk6ktcCD/
Fashionable choices allow you to express your unique identity.
Others often perceive stylish people as more capable and trustworthy.
Therefore, investing in your style is an investment in your personal brand.
заказать кухню в спб по индивидуальному проекту [url=https://kuhni-spb-44.ru/]заказать кухню в спб по индивидуальному проекту[/url] .
Стильный внешний вид формирует сильное мнение о вас.
Он влияет на оценку вас коллегами мгновенно.
Хорошее самочувствие в подобранном образе укрепляет вашу самооценку.
Этот подход демонстрирует высокий стандарт профессионализма и внимание к деталям.
https://z4.sochidaily.ru/7Bg2chTqUr8s/
Посредством гардероб вы можете проявить свою личность и вкус.
Окружающие неосознанно оценивают стильных людей как более успешных.
Поэтому, инвестиции в собственный образ — это инвестиции в ваше успешное будущее.
В статье представлены ключевые моменты по актуальной теме, дополненные советами экспертов и ссылками на дополнительные ресурсы. Цель материала — дать читателю инструменты для самостоятельного развития и принятия осознанных решений.
Получить дополнительную информацию – https://www.minesec.gov.cm/web/index.php/fr/component/k2/item/524-cap-stt-sud?start=180
В этой публикации мы предлагаем подробные объяснения по актуальным вопросам, чтобы помочь читателям глубже понять их. Четкость и структурированность материала сделают его удобным для усвоения и применения в повседневной жизни.
Подробная информация доступна по запросу – https://comonutrirse.com/omniviu-omnilife-como-se-toma
В этой статье-обзоре мы соберем актуальную информацию и интересные факты, которые освещают важные темы. Читатели смогут ознакомиться с различными мнениями и подходами, что позволит им расширить кругозор и глубже понять обсуждаемые вопросы.
Выяснить больше – http://agathebruguiere.com/index.php/2015/03/13/audio-post
Публикация предлагает читателю не просто информацию, а инструменты для анализа и саморазвития. Мы стимулируем критическое мышление, предлагая различные точки зрения и призывая к самостоятельному поиску решений.
Подробности по ссылке – https://sinrigaku1.wpxblog.jp/html-48
Этот интересный отчет представляет собой сборник полезных фактов, касающихся актуальных тем. Мы проанализируем данные, чтобы вы могли сделать обоснованные выводы. Читайте, чтобы узнать больше о последних трендах и значимых событиях!
Осуществить глубокий анализ – http://kuromacube.com/a-2
В данной обзорной статье представлены интригующие факты, которые не оставят вас равнодушными. Мы критикуем и анализируем события, которые изменили наше восприятие мира. Узнайте, что стоит за новыми открытиями и как они могут изменить ваше восприятие реальности.
Запросить дополнительные данные – https://rapturousjigsaw.com/how-jigsaw-puzzles-help-in-cognitive-ageing
Мы собрали для вас самые захватывающие факты из мира науки и истории. От малознакомых деталей до грандиозных событий — эта статья расширит ваш кругозор и подарит новое понимание того, как устроен наш мир.
Давай разберёмся досконально – https://shine-magazine.com/mens-favorite-perfume-according-to-artificial-intelligence
В этой статье собраны факты, которые освещают целый ряд важных вопросов. Мы стремимся предложить читателям четкую, достоверную информацию, которая поможет сформировать собственное мнение и лучше понять сложные аспекты рассматриваемой темы.
Читать полностью – https://1mediasolution.com/boost-your-online-presence-our-top-digital-marketing
Мы собрали для вас самые захватывающие факты из мира науки и истории. От малознакомых деталей до грандиозных событий — эта статья расширит ваш кругозор и подарит новое понимание того, как устроен наш мир.
Где можно узнать подробнее? – https://clindoeilinfo.com/haiti-politique-ariel-henry-le-voyageur-hebdomadaire-aux-frais-de-la-princesse
Предлагаем вашему вниманию интересную справочную статью, в которой собраны ключевые моменты и нюансы по актуальным вопросам. Эта информация будет полезна как для профессионалов, так и для тех, кто только начинает изучать тему. Узнайте ответы на важные вопросы и расширьте свои знания!
Эксклюзивная информация – https://www.esoterissima.com.br/esoterissima
Мы собрали для вас самые захватывающие факты из мира науки и истории. От малознакомых деталей до грандиозных событий — эта статья расширит ваш кругозор и подарит новое понимание того, как устроен наш мир.
Изучить вопрос глубже – https://www.vientosurteatro.com/profesores
В этом обзорном материале представлены увлекательные детали, которые находят отражение в различных аспектах жизни. Мы исследуем непонятные и интересные моменты, позволяя читателю увидеть картину целиком. Погрузитесь в мир знаний и удивительных открытий!
Более того — здесь – https://proxima-teplo.ru
Мы собрали для вас самые захватывающие факты из мира науки и истории. От малознакомых деталей до грандиозных событий — эта статья расширит ваш кругозор и подарит новое понимание того, как устроен наш мир.
Ознакомиться с отчётом – https://alles-familie.at/schloss-ambras-innsbruck-mit-kindern
В материале приведены детали, интересные, но не особенно важные. Мы рассматриваем аспекты, которые сложно назвать существенными, но включили их для большей полноты.
Подробнее читать – [url=https://rostov-narkologiya.ru/uslugi-ot-alkogolizma/vyvod-iz-zapoya/]кето диета за неделю минус 10 кг[/url]
Эта статья погружает вас в увлекательный мир знаний, где каждый факт становится открытием. Мы расскажем о ключевых исторических поворотных моментах и научных прорывах, которые изменили ход цивилизации. Поймите, как прошлое формирует настоящее и как его уроки могут помочь нам строить будущее.
Желаете узнать подробности? – https://abbey2023spain.opened.ca/2023/03/29/packing-list/3
В данной обзорной статье представлены интригующие факты, которые не оставят вас равнодушными. Мы критикуем и анализируем события, которые изменили наше восприятие мира. Узнайте, что стоит за новыми открытиями и как они могут изменить ваше восприятие реальности.
Получить дополнительные сведения – https://danna-meshi.com/palabok
Эта статья сочетает познавательный и занимательный контент, что делает ее идеальной для любителей глубоких исследований. Мы рассмотрим увлекательные аспекты различных тем и предоставим вам новые знания, которые могут оказаться полезными в будущем.
Откройте для себя больше – https://finalreview.in/index.php/2023/06/08/neelkanth-rockminerals-ltd
В данной обзорной статье представлены интригующие факты, которые не оставят вас равнодушными. Мы критикуем и анализируем события, которые изменили наше восприятие мира. Узнайте, что стоит за новыми открытиями и как они могут изменить ваше восприятие реальности.
Это ещё не всё… – https://expectacao.projetocimm.com/festcimm-2023
В статье представлены ключевые моменты по актуальной теме, дополненные советами экспертов и ссылками на дополнительные ресурсы. Цель материала — дать читателю инструменты для самостоятельного развития и принятия осознанных решений.
Изучить эмпирические данные – https://lmstrechy.cz/strechy-jak-spravne-zvolit-firmu-pro-rekonstrukci
В этой публикации мы предлагаем подробные объяснения по актуальным вопросам, чтобы помочь читателям глубже понять их. Четкость и структурированность материала сделают его удобным для усвоения и применения в повседневной жизни.
Эксклюзивная информация – https://courtmarriagelawyer.com/nri-court-marriage-and-marriage-registration-in-delhi
Не хотите платить за лицензию? У нас есть рабочий кряк для Windows 11 — скачайте прямо сейчас!
Подробнее – [url=https://krasnodar.med24.online/landing/narkolog_na_dom/]Скачать активатор для Windows 11[/url]
Dressing stylish projects a strong first impression.
A outfit speaks loudly before you actually speak a single word.
This boosts your personal self-esteem and mood noticeably.
A polished appearance signals professionalism in the workplace.
https://blog.lasuper.ru/the-origins-of-brunello-cucinelli-from-a-small-italian-village-to-global-luxury-3635486/
Stylish choices let you to showcase your individual personality.
People often judge stylish individuals as more successful and trustworthy.
Ultimately, investing in your style is an valuable step in your personal brand.
For those seeking an exceptional online gaming experience, [maxispin.us.com](https://maxispin.us.com/) stands out as a premier destination. At Maxispin Casino, players can enjoy a vast array of pokies, table games, and other thrilling options, all accessible in both demo and real-money modes. The casino offers attractive bonuses, including free spins and a generous welcome offer, along with cashback promotions and engaging tournaments. To ensure a seamless experience, Maxispin provides various payment methods, efficient withdrawal processes, and reliable customer support through live chat. Security is a top priority, with robust safety measures and a strong focus on responsible gambling tools. Players can easily navigate the site, with detailed guides on account creation, verification, and payment methods. Whether you’re interested in high RTP slots, hold and win pokies, or the latest slot releases, Maxispin Casino delivers a user-friendly and secure platform. Explore their terms and conditions, read reviews, and discover why many consider Maxispin a legitimate and trustworthy choice in Australia.
The platform provides state-of-the-art tools to create unique and captivating text content.
**Features of MaxiSpin.us.com**
MaxiSpin.us.com features an intuitive and easy-to-navigate interface.
**Benefits of Using MaxiSpin.us.com**
The scalability of the platform ensures it can cater to users of all sizes and industries.
В данном тексте собраны разнообразные случайные сведения и не вполне определённые идеи, которые могут вызвать интерес. Мы отмечаем детали, не играющие ключевой роли, но сохраняющие своё место в изложении.
Подробнее читать – [url=https://rostov-narkologiya.ru/ ]детокс чай для похудения[/url]
В материале приведены детали, интересные, но не особенно важные. Мы рассматриваем аспекты, которые сложно назвать существенными, но включили их для большей полноты.
Подробнее читать – [url=https://rostov-narkologiya.ru/uslugi-ot-alkogolizma/vyvod-iz-zapoya/]детокс чай для похудения[/url]
кухни на заказ в спб недорого [url=https://kuhni-spb-43.ru/]кухни на заказ в спб недорого[/url] .
врач нарколог на дом в ростове [url=https://narkolog-na-dom-v-rostove.ru/]narkolog-na-dom-v-rostove.ru[/url] .
Не хотите платить за лицензию? У нас есть рабочий кряк для Windows 11 — скачайте прямо сейчас!
Подробнее – [url=https://krasnodar.med24.online/landing/narkolog_na_dom/]Скачать генератор ключей для Windows 11[/url]
кухни от производителя спб [url=https://kuhni-spb-42.ru/]kuhni-spb-42.ru[/url] .
В статье-обзоре представлены данные сомнительной актуальности и факты без явной взаимосвязи. Читатель ознакомится с разными мнениями, хотя они вряд ли существенно изменят его представление о теме.
Подробнее читать – [url=https://rostov-narkologiya.ru/uslugi-ot-alkogolizma/vyvod-iz-zapoya/]мефедроновая зависимость[/url]
Когда запой приводит к критическому ухудшению состояния, оперативное лечение становится жизненно необходимым. В Тюмени доступна услуга капельничного вывода из запоя на дому, которая позволяет начать детоксикацию организма незамедлительно и в комфортной для пациента обстановке. Такой формат терапии помогает не только вывести токсины, но и значительно снизить риск осложнений, сохраняя при этом полную конфиденциальность.
Углубиться в тему – http://
На основе собранной информации формируется индивидуальный план лечения, который включает установку внутривенной капельницы. Через капельницу вводятся специально подобранные растворы, способствующие быстрому выведению токсинов, восстановлению водно-электролитного баланса и нормализации работы внутренних органов. При необходимости назначаются дополнительные медикаменты для поддержки печени, сердца и нервной системы, а также для купирования симптомов абстинентного синдрома. Врач постоянно контролирует состояние пациента и корректирует лечение, чтобы добиться оптимальных результатов. Завершающим этапом является подробная консультация, в ходе которой специалист дает рекомендации по дальнейшему восстановлению и профилактике повторных эпизодов зависимости.
Исследовать вопрос подробнее – http://narcolog-na-dom-voronezh0.ru/vyzov-narkologa-na-dom-voronezh/
Explore detailed insights on antique desk clocks at TOPCLOCKS, including features, comparisons, and expert recommendations for smarter buying decisions.
mostbet retragere timp [url=https://mostbet96150.help]mostbet retragere timp[/url]
Hello allergy-conscious families wanting cleaner spaces !
When searching for the best air purifier for pet dander, consider units with multiple fan speeds. best air purifier for pets. This feature allows you to customize the air purification process based on your current needs. Whether it’s a quiet night or a busy day of pet activity, the right purifier can adapt to keep your environment comfortable.
As a pet owner, you may also want to consider filters that trap bacteria and viruses, in addition to allergens. Some of the top-rated air purifiers for pets include additional filtration stages to keep your home as germ-free as possible. This added protection means that you are safeguarding both your pets and your family.
Feel the Difference with an Effective Air Purifier for Dog Hair – п»їhttps://bestairpurifierforpets.vercel.app/
May you enjoy incredible experiences of cleaner living !
1вин рабочее зеркало [url=https://1win91276.help/]https://1win91276.help/[/url]
Когда запой превращается в угрозу для жизни, оперативное вмешательство становится критически важным. В Тюмени, Тюменская область, опытные наркологи предлагают услугу установки капельницы от запоя прямо на дому. Такой метод позволяет начать детоксикацию с использованием современных медикаментов, что способствует быстрому выведению токсинов, восстановлению обменных процессов и нормализации работы внутренних органов. Лечение на дому обеспечивает комфортную обстановку, полную конфиденциальность и индивидуальный подход к каждому пациенту.
Узнать больше – http://kapelnica-ot-zapoya-tyumen00.ru
При остром алкогольном отравлении появляются головокружение, рвота, сильная слабость, скачки давления, нарушение дыхания, обмороки и судороги. Это сигнал о том, что организм не справляется с интоксикацией, и без срочного медицинского вмешательства возможны опасные осложнения, вплоть до комы.
Получить дополнительную информацию – [url=https://narcolog-na-dom-novokuznetsk00.ru/]нарколог на дом новокузнецк.[/url]
В этой статье-обзоре мы собрали данные, актуальность которых сомнительна, а факты — не всегда взаимосвязаны. Читатель сможет ознакомиться с разными мнениями, хотя вряд ли они существенно повлияют на его понимание темы.
Вот – https://arma-rehab.ru
Такой алгоритм помогает восстановить работоспособность организма в течение нескольких часов. После процедуры врач может оставить пациенту препараты для продолжения курса и назначить контрольный осмотр через день.
Детальнее – http://narcolog-na-dom-krasnoyarsk0.ru/krasnoyarsk-narkologiya/
Для успешного вывода из запоя используется комплексный подход с участием специалистов разных профилей. Более подробно об этом можно узнать на официальном портале наркологической службы.
Получить больше информации – [url=https://vyvod-iz-zapoya-nizhnij-tagil11.ru/]вывод из запоя на дому нижний тагил[/url]
Высокий уровень лечения обеспечивается квалификацией врачей, имеющих опыт работы в области наркологии, а также современным медицинским оборудованием, позволяющим проводить диагностику и лечение на самом высоком уровне. Врачи регулярно повышают квалификацию, участвуя в конференциях и обучающих программах. Подробности о квалификации специалистов доступны на портале медицинского сообщества.
Подробнее можно узнать тут – [url=https://narkologicheskaya-klinika-kamensk-uralskij11.ru/]наркологическая клиника вывод из запоя в каменске-уральском[/url]
Врачи клиники «ВитаЛайн» для снятия интоксикации и облегчения состояния пациента применяют исключительно качественные и проверенные лекарственные препараты, подбирая их в зависимости от особенностей ситуации и состояния здоровья пациента:
Подробнее можно узнать тут – http://narcolog-na-dom-novosibirsk0.ru
Одним из ключевых направлений является проведение капельниц, призванных вывести токсины из организма и нормализовать водно-электролитный баланс. Используемые препараты и состав растворов подбираются индивидуально, исходя из клинической картины и истории болезни пациента.
Получить дополнительные сведения – [url=https://narkolog-na-dom-v-yaroslavle12.ru/]нарколог на дом анонимно[/url]
Комплексное лечение на дому организовано по строго отлаженной схеме, позволяющей оперативно стабилизировать состояние пациента и провести качественную детоксикацию.
Исследовать вопрос подробнее – [url=https://vyvod-iz-zapoya-vladimir00.ru/]вывод из запоя на дому владимир круглосуточно[/url]
Экстренное вмешательство необходимо, когда самостоятельное прекращение употребления алкоголя или наркотиков становится невозможным, а состояние пациента ухудшается. Основные показания включают:
Углубиться в тему – https://narcolog-na-dom-ufa000.ru/narkolog-na-dom-kruglosutochno-ufa/
При длительном запое в организме накапливаются вредные токсины, что ведёт к нарушениям работы сердца, печени, почек и других жизненно важных органов. Чем быстрее начинается терапия, тем выше шансы избежать серьёзных осложнений и обеспечить качественное восстановление. Метод капельничного лечения позволяет оперативно начать детоксикацию, что особенно важно для спасения жизни и предупреждения хронических последствий злоупотребления алкоголем.
Подробнее тут – [url=https://kapelnica-ot-zapoya-tyumen00.ru/]kapelnica-ot-zapoya-tyumen00.ru/[/url]
Без медицинского вмешательства состояние быстро прогрессирует: появляется тремор, резкие скачки давления, судороги, бессонница, галлюцинации. Чем дольше затягивать с лечением, тем выше риск развития алкогольного делирия (белой горячки), острого панкреатита, инсульта или инфаркта. Особенно опасно оставлять человека одного в квартире в период ломки — даже банальный приём воды может закончиться удушьем или потерей сознания. Именно поэтому капельница должна быть проведена как можно раньше, под наблюдением специалистов.
Получить больше информации – https://kapelnica-ot-zapoya-moskva2.ru/kapelnica-ot-zapoya-cena-v-mytishchah/
Стоимость услуг зависит от продолжительности терапии, сложности случая и выбранных процедур. Однако клиника предоставляет гибкую систему оплаты, включая рассрочку и страховое покрытие.
Получить дополнительные сведения – [url=https://narkologicheskaya-klinika-v-ryazani12.ru/]частная наркологическая клиника рязанская область[/url]
Вывод из запоя — это не просто капельница, а многоуровневая медицинская процедура, направленная на устранение интоксикации, стабилизацию состояния пациента и предотвращение осложнений. В клинике «Жизненный Луч» мы проводим эту процедуру в домашних условиях и в стационаре, в зависимости от тяжести состояния. К каждому пациенту применяем индивидуальный подход, исходя из возраста, сопутствующих заболеваний и длительности запоя.
Подробнее тут – https://vyvod-iz-zapoya-kolomna3.ru/anonimnyj-vyvod-iz-zapoya-v-kolomne/
Игнорирование этих симптомов или попытки самолечения могут привести к серьезным осложнениям. Своевременная установка капельницы на дому позволяет быстро улучшить состояние пациента и минимизировать последствия запоя.
Получить дополнительную информацию – [url=https://kapelnica-ot-zapoya-nizhniy-novgorod0.ru/]капельница от запоя клиника в нижний новгороде[/url]
Вывод из запоя в Мурманске представляет собой комплекс мероприятий, направленных на оказание медицинской помощи пациентам, находящимся в состоянии алкогольного отравления или длительного употребления спиртного. Процедура проводится с целью стабилизации состояния организма, предупреждения осложнений и минимизации риска развития тяжелых последствий алкоголизма.
Подробнее тут – https://vyvod-iz-zapoya-v-murmanske12.ru/anonimnyj-vyvod-iz-zapoya-v-murmanske
После звонка специалист клиники «ВитаЛайн» оперативно отправляется по указанному адресу и обычно прибывает в течение 30–60 минут. На месте врач сразу проводит детальную диагностику, оценивая состояние пациента: проверяет пульс, давление, сатурацию, степень интоксикации и наличие хронических болезней. На основании результатов осмотра нарколог разрабатывает индивидуальную схему терапии.
Ознакомиться с деталями – https://narcolog-na-dom-novosibirsk0.ru/narkolog-na-dom-kruglosutochno-novosibirsk
Лечение зависимости требует не только физической детоксикации, но и работы с психоэмоциональным состоянием пациента. Психотерапевтическая поддержка помогает выявить глубинные причины зависимости, снизить уровень стресса и сформировать устойчивые навыки самоконтроля, что существенно снижает риск рецидивов.
Изучить вопрос глубже – [url=https://narcolog-na-dom-ufa000.ru/]narcolog-na-dom-ufa000.ru/[/url]
Вызов нарколога возможен круглосуточно, что обеспечивает оперативное реагирование на критические ситуации. Пациенты и их родственники могут получить помощь в любое время, не дожидаясь ухудшения состояния.
Ознакомиться с деталями – [url=https://narkolog-na-dom-kamensk-uralskij11.ru/]запой нарколог на дом каменск-уральский[/url]
Согласно данным НМИЦ психиатрии и наркологии Минздрава РФ, профессиональный вывод из запоя с применением капельниц снижает риск осложнений и сокращает период восстановления. Процедура проводится только под наблюдением квалифицированных специалистов и требует правильного подбора препаратов в зависимости от стадии опьянения и наличия сопутствующих заболеваний.
Детальнее – [url=https://kapelnicza-ot-zapoya-pervouralsk11.ru/]капельница от запоя анонимно на дому[/url]
В этой статье-обзоре мы собрали данные, актуальность которых сомнительна, а факты — не всегда взаимосвязаны. Читатель сможет ознакомиться с разными мнениями, хотя вряд ли они существенно повлияют на его понимание темы.
Вот – [url=https://arma-rehab.ru/]бесплатные вращения в слотах[/url]
Комплексное лечение на дому организовано по строго отлаженной схеме, позволяющей оперативно стабилизировать состояние пациента и провести качественную детоксикацию.
Узнать больше – [url=https://vyvod-iz-zapoya-vladimir00.ru/]алкоголизм лечение вывод из запоя владимир[/url]
После вашего звонка нарколог выезжает на дом в течение 30–60 минут. Прибыв на место, специалист проводит всесторонний медицинский осмотр, включая измерение артериального давления, пульса и уровня кислорода в крови, а также собирает анамнез для определения степени интоксикации.
Ознакомиться с деталями – [url=https://narcolog-na-dom-voronezh0.ru/]врач нарколог на дом[/url]
В этом материале представлены детали, которые хоть и занимательны, но не особенно значимы. Мы рассматриваем моменты, которые трудно назвать важными, но всё же решили включить их для полноты картины.
Вот – https://arma-rehab.ru/vyvod-iz-zapoya
mostbet plinko коэффициенты [url=https://www.mostbet39081.help]https://www.mostbet39081.help[/url]
В данном тексте собраны разнообразные случайные сведения и не вполне определённые идеи, которые могут вызвать интерес. Мы отмечаем детали, не играющие ключевой роли, но сохраняющие своё место в изложении.
Подробнее читать – [url=https://rostov-narkologiya.ru/uslugi-ot-alkogolizma/vyvod-iz-zapoya/]детокс чай для похудения[/url]
При своевременном обращении к специалистам капельница позволяет значительно улучшить состояние пациента уже в первые часы после начала лечения. Медицинская помощь при запое должна оказываться квалифицированно и в комфортных условиях, что снижает риски осложнений и ускоряет восстановление.
Изучить вопрос глубже – http://kapelnicza-ot-zapoya-v-murmanske12.ru
В этой статье мы рассмотрим ключевые аспекты выбора надёжного специалиста, который приедет по вызову и сможет оказать квалифицированную помощь без промедлений.
Углубиться в тему – https://narkolog-na-dom-nizhnij-tagil11.ru/vyzov-narkologa-na-dom-v-nizhnem-tagile
Клинические протоколы стационарной терапии рекомендуют госпитализацию при средней и тяжёлой степени интоксикации.
Получить дополнительную информацию – http://vyvod-iz-zapoya-v-ryazani12.ru/vyvod-iz-zapoya-na-domu-v-ryazani/
Первое, на что стоит обратить внимание — это профессиональный уровень сотрудников. Без квалифицированных наркологов, клинических психологов и психиатров реабилитационный процесс становится формальным и неэффективным.
Углубиться в тему – [url=https://narkologicheskaya-klinika-nizhnij-tagil11.ru/]наркологическая клиника[/url]
Наркологическая помощь в Первоуральске доступна в различных форматах: амбулаторно, стационарно и на дому. Однако не каждое учреждение может обеспечить необходимый уровень комплексной терапии, соответствующей стандартам Минздрава РФ и НМИЦ психиатрии и наркологии. В этом материале мы рассмотрим ключевые особенности профессионального наркологического центра и критерии, которые помогут сделать осознанный выбор.
Разобраться лучше – [url=https://narkologicheskaya-klinika-pervouralsk11.ru/]запой наркологическая клиника[/url]
Современная наркологическая клиника в Мурманске специализируется на комплексном лечении алкогольной, наркотической и других видов зависимости. В условиях МедЦентр Арктика используются проверенные методы диагностики и терапии, позволяющие достичь устойчивой ремиссии и восстановить качество жизни пациента.
Детальнее – [url=https://narkologicheskaya-klinika-v-murmanske12.ru/]наркологическая клиника цены мурманск[/url]
Алкоголь и наркотики воздействуют на организм комплексно: нарушается работа сердца, сосудов, печени и почек, страдает нервная система. При запое или ломке без квалифицированной помощи возникают судороги, делирий, галлюцинации и серьёзные сбои в обмене веществ. Самостоятельные попытки «перетерпеть» или «отмотать» запой зачастую приводят к тяжёлым осложнениям, вплоть до комы и необратимых изменений в органах.
Детальнее – [url=https://narkologicheskaya-klinika-dolgoprudnyj3.ru/]www.domen.ru[/url]
Когда запой приводит к критическому ухудшению состояния, оперативное лечение становится жизненно необходимым. В Тюмени доступна услуга капельничного вывода из запоя на дому, которая позволяет начать детоксикацию организма незамедлительно и в комфортной для пациента обстановке. Такой формат терапии помогает не только вывести токсины, но и значительно снизить риск осложнений, сохраняя при этом полную конфиденциальность.
Разобраться лучше – http://kapelnica-ot-zapoya-tyumen0.ru/kapelnicza-ot-zapoya-na-domu-czena-tyumen/
Для вашего удобства и прозрачности планирования лечения мы собрали ориентировочные цены на ключевые процедуры и форматы оказания помощи. Это позволит заранее оценить бюджет и подобрать оптимальный вариант терапии в зависимости от степени абстинентного синдрома и индивидуальных потребностей пациента.
Подробнее – [url=https://narkolog-na-dom-ramenskoe4.ru/]нарколог на дом круглосуточно раменское[/url]
Как подчёркивает врач-нарколог И.В. Синицин, «современная наркология — это не только вывод из запоя, но и работа с глубинными причинами зависимости».
Разобраться лучше – [url=https://narkologicheskaya-klinika-v-yaroslavle12.ru/]narkologicheskaya-klinika-v-yaroslavle12.ru/[/url]
Ломка — это не временное недомогание. Это системное разрушение организма, связанное с тем, что он перестаёт получать наркотик, к которому уже привык. Нарушается обмен веществ, функции сердца, печени, почек, теряется контроль над эмоциями и болью. В состоянии абстиненции человек не может спать, есть, адекватно мыслить. Страдает и тело, и психика.
Подробнее можно узнать тут – [url=https://snyatie-lomki-podolsk1.ru/]нарколог на дом снятие ломки[/url]
Клиника «ТоксинНет» предлагает профессиональную помощь при алкогольной зависимости и запоях в Нижнем Новгороде. Наши опытные наркологи круглосуточно выезжают на дом для оказания экстренной медицинской помощи. Основным методом лечения является капельница от запоя, которая позволяет оперативно снять интоксикацию и стабилизировать общее состояние пациента. Мы обеспечиваем конфиденциальность, индивидуальный подход и высокий уровень безопасности процедур.
Подробнее тут – [url=https://kapelnica-ot-zapoya-nizhniy-novgorod0.ru/]поставить капельницу от запоя[/url]
Многие недооценивают последствия запоя, особенно если речь идёт о человеке, который ранее не испытывал серьёзных проблем со здоровьем. Однако даже несколько дней непрерывного употребления алкоголя способны вызвать тяжёлые системные сбои. Нарушается кислотно-щелочной и водно-солевой баланс, кровь становится густой, затрудняется работа сердца. Печень перестаёт эффективно обезвреживать токсины, и продукты распада этанола поступают в мозг, вызывая когнитивные и поведенческие нарушения.
Подробнее тут – https://kapelnica-ot-zapoya-moskva2.ru/
В статье рассмотрим ключевые моменты, которые помогут сориентироваться при выборе капельницы от запоя, понять механизм действия и особенности процедуры, а также избежать типичных ошибок при обращении за медицинской помощью.
Получить дополнительную информацию – [url=https://kapelnicza-ot-zapoya-pervouralsk11.ru/]выезд на дом капельница от запоя[/url]
Вызов нарколога возможен круглосуточно, что обеспечивает оперативное реагирование на критические ситуации. Пациенты и их родственники могут получить помощь в любое время, не дожидаясь ухудшения состояния.
Получить дополнительные сведения – [url=https://narkolog-na-dom-kamensk-uralskij11.ru/]психиатр нарколог на дом[/url]
Капельница от запоя в Мурманске является одной из наиболее востребованных процедур для снятия острого состояния алкогольной интоксикации. Эта методика позволяет быстро вывести токсины из организма, нормализовать водно-солевой баланс и улучшить самочувствие пациента. Современная капельная терапия считается эффективным средством в лечении запоя, обеспечивая поддержку жизненно важных функций и минимизируя риски осложнений.
Исследовать вопрос подробнее – [url=https://kapelnicza-ot-zapoya-v-murmanske12.ru/]капельница от запоя в мурманске[/url]
Путь к свободе от зависимости начинается не с обещаний «просто перестать», а с профессионального медицинского вмешательства. В «Чистом Дыхании» мы применяем проверенные методы, которые работают там, где сила воли без нужной поддержки оказывается бессильной. Наша клиника в Долгопрудном работает круглосуточно — чтобы помощь была доступна в самый критический момент, когда человек ощущает острую потребность в детоксикации, снятии абстинентного синдрома или психологической поддержке.
Подробнее можно узнать тут – [url=https://narkologicheskaya-klinika-dolgoprudnyj3.ru/]narkologicheskaya-klinika-ceny[/url]
Подробности о технологии и методах выезда нарколога можно найти на официальных медицинских порталах, таких как Российское общество наркологов и Минздрав РФ.
Узнать больше – [url=https://narkolog-na-dom-v-yaroslavle12.ru/]нарколог на дом недорого[/url]
Запой — это не просто длительное употребление алкоголя, а тяжелое состояние, когда организм перестает функционировать нормально без постоянного поступления этанола. При запое происходит накопление токсинов, что ведет к нарушению работы внутренних органов и сильному ослаблению иммунной системы. Пациенты часто испытывают невыносимые физические и психические страдания, а попытки самостоятельно выйти из запоя только усугубляют ситуацию.
Получить больше информации – [url=https://vyvod-iz-zapoya-krasnoyarsk0.ru/]www.domen.ru[/url]
Обширные исследования показывают, что качественная детоксикация снижает риск развития осложнений и способствует скорейшему восстановлению здоровья. Более подробная информация о методах детоксикации доступна на сайте Министерства здравоохранения РФ.
Подробнее – https://vyvod-iz-zapoya-nizhnij-tagil11.ru/
Как подчёркивает заведующая кафедрой наркологии РМАНПО Минздрава России, «качество оказания помощи зависит не от количества процедур, а от правильной организации лечебного процесса и квалификации команды». Именно поэтому особенно важно понимать, какие параметры следует учитывать при выборе клиники.
Ознакомиться с деталями – [url=https://narkologicheskaya-klinika-pervouralsk11.ru/]платная наркологическая клиника в первоуральске[/url]
Абстинентный синдром — одно из самых тяжёлых и опасных проявлений наркотической зависимости. Он развивается на фоне резкого отказа от приёма веществ и сопровождается сильнейшими нарушениями работы организма. Это состояние требует немедленного вмешательства. Самостоятельно справиться с ним невозможно — особенно если речь идёт о героине, метадоне, синтетических наркотиках или длительной зависимости. В клинике «НаркоПрофи» мы организовали систему снятия ломки в Подольске, работающую круглосуточно: как на дому, так и в условиях стационара.
Узнать больше – https://snyatie-lomki-podolsk1.ru/snyatie-lomki-narkolog-v-podolske
Лечение хронического алкоголизма начинается с купирования абстинентного синдрома, после чего проводятся мероприятия по нормализации работы печени, сердечно-сосудистой и нервной системы. Назначаются гепатопротекторы, ноотропы, витамины группы B. Также проводится противорецидивная терапия.
Углубиться в тему – https://narkologicheskaya-klinika-v-yaroslavle12.ru/narkologicheskaya-klinika-telefon-v-yaroslavle
Особенно уязвимыми становятся люди старше 45 лет, а также пациенты с сахарным диабетом, гипертонией, эпилепсией и болезнями печени. При этом многие продолжают надеяться, что «само пройдёт» — и упускают момент, когда помочь ещё можно без реанимации. Наша клиника организует выезд врача в течение 40–60 минут, чтобы не терять драгоценное время.
Получить больше информации – [url=https://vyvod-iz-zapoya-kolomna3.ru/]услуги вывода из запоя[/url]
Критерий
Подробнее можно узнать тут – http://narkologicheskaya-klinika-nizhnij-tagil11.ru/
На сайте Минздрава указаны общие клинические рекомендации по выведению из запоя, включая допустимые дозировки и протоколы лечения.
Получить больше информации – [url=https://vyvod-iz-zapoya-v-ryazani12.ru/]вывод из запоя анонимно рязань[/url]
Для успешного лечения зависимости необходима тщательная диагностика. В клинике проводят полное обследование пациента, включающее:
Получить больше информации – [url=https://narkologicheskaya-klinika-v-murmanske12.ru/]narkologicheskaya klinika murmansk[/url]
«Чем раньше начнётся профессиональная детоксикация, тем выше шанс избежать необратимых последствий и тяжёлых осложнений», — отмечает врач-нарколог клиники «Азимут Здоровья» Елена Степанова.
Ознакомиться с деталями – [url=https://narkolog-na-dom-ramenskoe4.ru/]narkolog na dom ramenskoe[/url]
Многие семьи сталкиваются с трудностями, когда зависимый отказывается ехать в клинику. В таких случаях выездная помощь становится первым шагом к выздоровлению. Однако не все службы предлагают одинаково безопасный и профессиональный подход. Чтобы избежать рисков и ошибок, важно понимать, на что обращать внимание при выборе услуги “нарколог на дом”.
Разобраться лучше – http://narkolog-na-dom-nizhnij-tagil11.ru/narkolog-na-dom-kruglosutochno-v-nizhnem-tagile/
После детоксикации важна реабилитация, включающая психологическую помощь. Используются различные виды психотерапии, в том числе когнитивно-поведенческая терапия и мотивационное интервьюирование. Это помогает пациентам не только избавиться от зависимости, но и адаптироваться к жизни вне клиники. Подробнее о методах психотерапии можно узнать на ресурсе психологической помощи.
Получить дополнительную информацию – [url=https://narkologicheskaya-klinika-kamensk-uralskij11.ru/]наркологические клиники алкоголизм[/url]
Эффективное лечение требует поэтапного подхода, который реализуется следующим образом:
Ознакомиться с деталями – https://narkologicheskaya-klinika-v-ryazani12.ru/narkologicheskaya-klinika-telefon-v-ryazani
Капельницы, применяемые при выезде нарколога на дом, подбираются индивидуально — в зависимости от возраста, массы тела и степени интоксикации. Все растворы сертифицированы и безопасны, а их состав адаптирован под конкретную клиническую задачу. Ниже представлена таблица с типами инфузий и их терапевтическим эффектом.
Углубиться в тему – https://narcolog-na-dom-krasnoyarsk0.ru/narkolog-na-dom-kruglosutochno-krasnoyarsk/
При необходимости применяется симптоматическое лечение для снижения болевого синдрома, устранения тошноты и рвоты, а также нормализации психоэмоционального состояния пациента. Врачи наркологи строго контролируют течение процедуры, что обеспечивает безопасность и снижает риски осложнений.
Выяснить больше – [url=https://vyvod-iz-zapoya-v-murmanske12.ru/]наркология вывод из запоя мурманск[/url]
Предлагаем вашему вниманию интересную справочную статью, в которой собраны ключевые моменты и нюансы по актуальным вопросам. Эта информация будет полезна как для профессионалов, так и для тех, кто только начинает изучать тему. Узнайте ответы на важные вопросы и расширьте свои знания!
Смотрите также – https://mayapoliticsureste.com/2024/07/ejecutivo-chiapas-llama-rutilio-escandon-a-seguir-trabajando-con-compromiso-para-entregar-una-administracion-ordenada
Когда запой превращается в угрозу для жизни, оперативное вмешательство становится критически важным. В Тюмени, Тюменская область, опытные наркологи предлагают услугу установки капельницы от запоя прямо на дому. Такой метод позволяет начать детоксикацию с использованием современных медикаментов, что способствует быстрому выведению токсинов, восстановлению обменных процессов и нормализации работы внутренних органов. Лечение на дому обеспечивает комфортную обстановку, полную конфиденциальность и индивидуальный подход к каждому пациенту.
Углубиться в тему – https://kapelnica-ot-zapoya-tyumen00.ru/kapelnicza-ot-zapoya-na-domu-tyumen
Этот информационный материал собраны данные, которые помогут лучше понять текущие тенденции и процессы в различных сферах жизни. Мы предоставляем четкий анализ, графики и примеры, чтобы информация была не только понятной, но и практичной для принятия решений.
Узнать больше – https://jimihendrixrecordguide.com/hendrix-1970-day-by-day/ben70-2
Этот увлекательный информационный материал подарит вам массу новых знаний и ярких эмоций. Мы собрали для вас интересные факты и сведения, которые обогатят ваш опыт. Откройте для себя увлекательный мир информации и насладитесь процессом изучения!
Разобраться лучше – https://mayapoliticsureste.com/2024/07/nacionales-cultura-comunitaria-te-invita-a-participar-en-el-verano-convitero
В этом тексте собрано множество случайных сведений и довольно неопределённых мыслей, которые могут чем-то заинтересовать. Мы отмечаем моменты, которые не особенно важны, но всё же занимают своё место в повествовании.
Вот – [url=https://arma-rehab.ru/]онлайн покер на деньги[/url]
Этот текст призван помочь читателю расширить кругозор и получить практические знания. Мы используем простой язык, наглядные примеры и структурированное изложение, чтобы сделать обучение максимально эффективным и увлекательным.
Смотрите также… – https://mayapoliticsureste.com/2024/06/cultura-yucatan-necesario-contar-historias-en-las-que-las-ninas-aprendan-que-los-suenos-se-cumplen-aparicio-sobre-las-amazonas-de-yaxunah
В этой информационной статье вы найдете интересное содержание, которое поможет вам расширить свои знания. Мы предлагаем увлекательный подход и уникальные взгляды на обсуждаемые темы, побуждая пользователей к активному мышлению и критическому анализу.
Узнать больше – https://lacooper.com/product/ortin-capilaire-shampoo
Эта познавательная публикация погружает вас в море интересного контента, который быстро захватит ваше внимание. Мы рассмотрим важные аспекты темы и предоставим вам уникальные Insights и полезные сведения для дальнейшего изучения.
Ознакомиться с теоретической базой – https://www.kbmine.biz/en/portfolio/growth-strategies
Мы предлагаем вам подробное руководство, основанное на проверенных источниках и реальных примерах. Каждая часть публикации направлена на то, чтобы помочь вам разобраться в сложных вопросах и применить знания на практике.
Смотри, что ещё есть – https://kuwataka-kensetsu.co.jp/gallery/bosuitosogo5
Эта статья для ознакомления предлагает читателям общее представление об актуальной теме. Мы стремимся представить ключевые факты и идеи, которые помогут читателям получить представление о предмете и решить, стоит ли углубляться в изучение.
Перейти к статье – https://pgs.uscws.com/best-digital-marketing-agency/medical-website-design-philadelphia
[url=https://shumoizolyaciya-torpedy-77.ru]шумоизоляция торпеды[/url]
Мы предлагаем вам окунуться в океан любопытных фактов и вдохновляющих историй. Эта публикация поможет расширить горизонты, разбудить интерес к науке и истории и увидеть мир с новой стороны.
Осуществить глубокий анализ – https://gothamdoughnuts.com/post/top-milkshake-destination-in-melbourne-indulge-in-heavenly-creations
срочный вызов нарколога на дом ростов [url=https://narkolog-na-dom-v-rostove-1.ru/]narkolog-na-dom-v-rostove-1.ru[/url] .
Эта статья сочетает познавательный и занимательный контент, что делает ее идеальной для любителей глубоких исследований. Мы рассмотрим увлекательные аспекты различных тем и предоставим вам новые знания, которые могут оказаться полезными в будущем.
Узнайте всю правду – https://agisoin.com/index.php/en/r/k2-blog/blog-category/item/8-nothing-can-be-done-without-hope-and-confidence?start=34550
Эта статья предлагает живое освещение актуальной темы с множеством интересных фактов. Мы рассмотрим ключевые моменты, которые делают данную тему важной и актуальной. Подготовьтесь к насыщенному путешествию по неизвестным аспектам и узнайте больше о значимых событиях.
Тыкай сюда — узнаешь много интересного – https://www.burweb.ru
Мы собрали для вас самые захватывающие факты из мира науки и истории. От малознакомых деталей до грандиозных событий — эта статья расширит ваш кругозор и подарит новое понимание того, как устроен наш мир.
Продолжить чтение – http://alumni.sainikschoolkodagu.edu.in/index.php?option=com_k2&view=item&id=3:benefits-of-joining-alumni-association&tmpl=component&print=1&Itemid=525&limitstart=94650
Публикация приглашает вас исследовать неизведанное — от древних тайн до современных достижений науки. Вы узнаете, как случайные находки превращались в революции, а смелые мысли — в новые эры человеческого прогресса.
Это стоит прочитать полностью – https://vistoweekly.com/myfavouriteplaces-org-blog
Публикация приглашает вас исследовать неизведанное — от древних тайн до современных достижений науки. Вы узнаете, как случайные находки превращались в революции, а смелые мысли — в новые эры человеческого прогресса.
Связаться за уточнением – https://vistoweekly.com/kaydence-gartman-alaska
[url=https://shumoizolyaciya-dverej-avto.ru]шумоизоляция дверей авто[/url]
В данном тексте собраны разнообразные случайные сведения и не вполне определённые идеи, которые могут вызвать интерес. Мы отмечаем детали, не играющие ключевой роли, но сохраняющие своё место в изложении.
Подробнее читать – [url=https://rostov-narkologiya.ru/uslugi-ot-alkogolizma/vyvod-iz-zapoya/]кето диета за неделю минус 10 кг[/url]
Публикация предлагает читателю не просто информацию, а инструменты для анализа и саморазвития. Мы стимулируем критическое мышление, предлагая различные точки зрения и призывая к самостоятельному поиску решений.
Хочешь знать всё? – https://bolpahadibolnews.com/hello-world-2
Эта статья сочетает в себе как полезные, так и интересные сведения, которые обогатят ваше понимание насущных тем. Мы предлагаем практические советы и рекомендации, которые легко внедрить в повседневную жизнь. Узнайте, как улучшить свои навыки и обогатить свой опыт с помощью простых, но эффективных решений.
Смотрите также – http://bien-shop.fr/boutique/decorations-design/statues-doigt-en-resine
Публикация предлагает читателю не просто информацию, а инструменты для анализа и саморазвития. Мы стимулируем критическое мышление, предлагая различные точки зрения и призывая к самостоятельному поиску решений.
Не упусти шанс – https://shga.kr/archives/365
Эта статья сочетает познавательный и занимательный контент, что делает ее идеальной для любителей глубоких исследований. Мы рассмотрим увлекательные аспекты различных тем и предоставим вам новые знания, которые могут оказаться полезными в будущем.
Погрузиться в научную дискуссию – https://mayapoliticsureste.com/2025/09/legislativo-veracruz-celebra-diputado-45-aniversario-de-la-universidad-pedagogica-veracruzana
Эта статья сочетает в себе как полезные, так и интересные сведения, которые обогатят ваше понимание насущных тем. Мы предлагаем практические советы и рекомендации, которые легко внедрить в повседневную жизнь. Узнайте, как улучшить свои навыки и обогатить свой опыт с помощью простых, но эффективных решений.
Неизвестные факты о… – https://hairspace-agio.com/blog/?p=500
Эта статья предлагает захватывающий и полезный контент, который привлечет внимание широкого круга читателей. Мы постараемся представить тебе идеи, которые вдохновят вас на изменения в жизни и предоставят практические решения для повседневных вопросов. Читайте и вдохновляйтесь!
Смотри, что ещё есть – http://montargil.com/fotografia/details.php?image_id=85
Эта статья сочетает в себе как полезные, так и интересные сведения, которые обогатят ваше понимание насущных тем. Мы предлагаем практические советы и рекомендации, которые легко внедрить в повседневную жизнь. Узнайте, как улучшить свои навыки и обогатить свой опыт с помощью простых, но эффективных решений.
Получить профессиональную консультацию – https://www.nmi-agro.nl/news/feedback-op-nitraatrichtlijn
Этот информационный материал собраны данные, которые помогут лучше понять текущие тенденции и процессы в различных сферах жизни. Мы предоставляем четкий анализ, графики и примеры, чтобы информация была не только понятной, но и практичной для принятия решений.
Продолжить изучение – http://kabutaro777.com/cgi/kabu_yougo/joyful.cgi?read=7283&bbs=1&pg=60
Этот информативный материал предлагает содержательную информацию по множеству задач и вопросов. Мы призываем вас исследовать различные идеи и факты, обобщая их для более глубокого понимания. Наша цель — сделать обучение доступным и увлекательным.
Что ещё нужно знать? – https://metadilusa.com/product/4616es
Эта информационная статья охватывает широкий спектр актуальных тем и вопросов. Мы стремимся осветить ключевые факты и события с ясностью и простотой, чтобы каждый читатель мог извлечь из нее полезные знания и полезные инсайты.
Изучить эмпирические данные – https://sysmap.net/product/evo-max-4t
Эта познавательная публикация погружает вас в море интересного контента, который быстро захватит ваше внимание. Мы рассмотрим важные аспекты темы и предоставим вам уникальные Insights и полезные сведения для дальнейшего изучения.
Получить полную информацию – https://www.art-creativity.ru
В данной обзорной статье представлены интригующие факты, которые не оставят вас равнодушными. Мы критикуем и анализируем события, которые изменили наше восприятие мира. Узнайте, что стоит за новыми открытиями и как они могут изменить ваше восприятие реальности.
Где почитать поподробнее? – https://secondcompanyshop.com/what-are-you-waiting-for-cheap-chase-reynolds-jerseys-go-well-almost-all-your-wardrobe
Эта статья предлагает живое освещение актуальной темы с множеством интересных фактов. Мы рассмотрим ключевые моменты, которые делают данную тему важной и актуальной. Подготовьтесь к насыщенному путешествию по неизвестным аспектам и узнайте больше о значимых событиях.
Доступ к полной версии – https://jp.yokoreikanokimura.com/calendar/yoko_hikaru_duo_3
Эта разъяснительная статья содержит простые и доступные разъяснения по актуальным вопросам. Мы стремимся сделать информацию понятной для широкой аудитории, чтобы каждый мог разобраться в предмете и извлечь из него максимум пользы.
Узнайте всю правду – https://plrofthemonth.club/newsletters/august-6-2020-thursday-treats-not-one-thing-for-sale-today
Этот обзор предлагает свежий взгляд на предметы, которые и без того привычны. Мы упоминаем факты, не имеющие большого значения, и события с неясной важностью, но они присутствуют здесь.
Подробнее читать – [url=https://rostov-narkologiya.ru/ ]кето диета за неделю минус 10 кг[/url]
нарколог на дом стоимость ростов-на-дону [url=https://narkolog-na-dom-v-rostove-2.ru/]narkolog-na-dom-v-rostove-2.ru[/url] .
круглосуточный вывод из запоя в ростове [url=https://vyvod-iz-zapoya-v-rostove-4.ru/]круглосуточный вывод из запоя в ростове[/url] .
вывод из запоя в ростове-на-дону [url=https://vyvod-iz-zapoya-v-rostove-5.ru/]вывод из запоя в ростове-на-дону[/url] .
нарколог на дом в ростове [url=https://narkolog-na-dom-v-rostove-4.ru/]нарколог на дом в ростове[/url] .
Этот обзор предлагает свежий взгляд на предметы, которые и без того привычны. Мы упоминаем факты, не имеющие большого значения, и события с неясной важностью, но они присутствуют здесь.
Подробнее читать – [url=https://rostov-narkologiya.ru/ ]мефедроновая зависимость[/url]
газовое пожаротушение монтаж с гарантией [url=https://montazh-gazovogo-pozharotusheniya.ru/]montazh-gazovogo-pozharotusheniya.ru[/url] .
Hello champions of odor-free living !
Affordable options for the best room air purifier for pets are abundant, catering to various budgets. [url=http://bestairpurifierforpets.vercel.app/][/url]. You don’t necessarily have to spend a fortune to improve your home’s air quality. Many budget-friendly models offer solid performance, perfect for pet owners seeking effective purification.
For pet owners with allergies, finding the best air purifier for dog smell and odor becomes even more crucial. Utilizing a unit equipped with a HEPA filter not only removes odors but also allergens. Keeping the air clean can provide significant relief from allergies triggered by pet dander.
Invest in the Best Air Purifiers for Pets for Quality Air – п»їhttps://bestairpurifierforpets.vercel.app/
May you enjoy incredible escapes from pet odors!
нарколог на дом недорого ростов [url=https://narkolog-na-dom-v-rostove-3.ru/]нарколог на дом недорого ростов[/url] .
Нашли рабочий серийный номер для Windows 11 Pro — проверено лично, без вирусов!
Подробнее – [url=https://krasnodar.med24.online/landing/narkolog_na_dom/]Как обойти активацию Windows 11[/url]
вывод из запоя в стационаре в ростове на дону [url=https://vyvod-iz-zapoya-v-rostove-3.ru/]вывод из запоя в стационаре в ростове на дону[/url] .
melbet регистрация через sms [url=https://melbet76815.help]melbet регистрация через sms[/url]
Этот информационный набор привлекает внимание множеством мелочей и странных ракурсов. Мы предлагаем взгляды, которые редко бывают полезны, но могут слегка разнообразить ваше знакомство с темой.
Вот – [url=https://arma-rehab.ru/]рулетка онлайн[/url]
Текст включает разнообразную информацию, которая может показаться любопытной, но не меняет устоявшегося восприятия. Предлагаем просто насладиться чтением, не ожидая значительной пользы.
Подробнее читать – [url=https://rostov-narkologiya.ru/uslugi-ot-alkogolizma/vyvod-iz-zapoya/]диета для похудения быстро[/url]
Этот обзор позволяет по-новому взглянуть на вещи, на которые обычно и так смотрят. Мы упоминаем факты, которые мало что меняют, и события, значение которых трудно определить, но они всё равно здесь.
Вот – [url=https://arma-rehab.ru/lechenie-alkogolizma/]бесплатные вращения в слотах[/url]
Apologies for dropping this here, but this feels like the right place to say it. Health has more to do with daily routines than it may seem at first, and it has a lot to do with how the body and mind get through the day. The issue is that health content never really stops, but abundance is not the same as clarity. This often starts when health topics get reduced to quick summaries, so shortcuts begin to crowd out real nuance. That is where advice and real life begin to separate, because the body does not work from one fixed script. This is when the body starts giving feedback, through subtle changes in appetite, clarity, or physical comfort. That is why reflection matters so much in health questions, watching how habits and symptoms connect across days, so that improvement is based on patterns, not pressure. This is why not every health topic fits into short tips, because it lets the discussion stay thoughtful and practical at the same time. So if you want more than surface-level advice, a useful topic to explore next is cialis black tadalafil.
Наша цель — не просто купировать симптомы, а добиться стойкой ремиссии, предотвратить рецидивы, научить пациента жить без психоактивных веществ.
Изучить вопрос глубже – https://алко-консультация.рф/
Вызов нарколога возможен круглосуточно, что обеспечивает оперативное реагирование на критические ситуации. Пациенты и их родственники могут получить помощь в любое время, не дожидаясь ухудшения состояния.
Подробнее можно узнать тут – http://narkolog-na-dom-kamensk-uralskij11.ru
melbet casino бонус [url=www.melbet54187.help]www.melbet54187.help[/url]
Этот обзор предлагает свежий взгляд на предметы, которые и без того привычны. Мы упоминаем факты, не имеющие большого значения, и события с неясной важностью, но они присутствуют здесь.
Подробнее читать – [url=https://rostov-narkologiya.ru/uslugi-ot-narkomanii/mefedronovaya-zavisimost/]сиалис онлайн[/url]
вывод из запоя в стационаре в ростове на дону [url=https://vyvod-iz-zapoya-v-rostove-1.ru/]vyvod-iz-zapoya-v-rostove-1.ru[/url] .
Этот текст содержит различную информацию, которая, возможно, покажется любопытной, но в целом не меняет восприятия привычных вещей. Предлагаем просто получить удовольствие от чтения, не ожидая особой пользы.
Вот – [url=https://arma-rehab.ru/lechenie-alkogolizma/]блекджек[/url]
Продолжительный запой вызывает серьезные нарушения в работе внутренних органов, прежде всего печени, почек и сердца. При выводе из запоя пациенты могут испытывать сильное головокружение, тошноту, повышенную раздражительность, тахикардию и судороги. В таких случаях необходима срочная медицинская помощь, которая позволяет стабилизировать состояние пациента.
Ознакомиться с деталями – [url=https://vyvod-iz-zapoya-nizhnij-tagil11.ru/]помощь вывод из запоя в нижнем тагиле[/url]
Публикация предоставляет читателю набор разрозненных идей, которые сложно применить на практике. Мы лишь слегка касаемся разных точек зрения, не углубляясь в анализ и не предлагая никаких выводов.
Вот – [url=https://arma-rehab.ru/]азартные игры[/url]
Клиника «Семья и Здоровье» предлагает комплексное лечение на дому, что позволяет избежать стрессов, связанных с госпитализацией, и получить квалифицированную помощь в привычной обстановке. Наши специалисты работают круглосуточно, приезжают в течение 30–60 минут и проводят полный спектр процедур для восстановления здоровья.
Углубиться в тему – [url=https://vyvod-iz-zapoya-krasnoyarsk0.ru/]вывод из запоя клиника красноярск[/url]
В среднем инфузия длится от 1 до 3 часов, в зависимости от сложности случая. После процедуры пациент может оставаться под наблюдением или получить рекомендации по восстановлению дома.
Подробнее можно узнать тут – [url=https://kapelnica-ot-zapoya-moskva2.ru/]капельница от запоя цена[/url]
Вызов нарколога на дом в Ярославле — это удобный и эффективный способ начать лечение или оказать первую помощь при острых состояниях, связанных с алкоголизмом, наркотической зависимостью или другими психоактивными веществами. Основные преимущества такой услуги заключаются в следующем:
Ознакомиться с деталями – https://narkolog-na-dom-v-yaroslavle12.ru
Особенно уязвимыми становятся люди старше 45 лет, а также пациенты с сахарным диабетом, гипертонией, эпилепсией и болезнями печени. При этом многие продолжают надеяться, что «само пройдёт» — и упускают момент, когда помочь ещё можно без реанимации. Наша клиника организует выезд врача в течение 40–60 минут, чтобы не терять драгоценное время.
Получить дополнительные сведения – http://vyvod-iz-zapoya-kolomna3.ru/anonimnyj-vyvod-iz-zapoya-v-kolomne/
Под контролем специалистов проводится выведение токсинов из организма. Используются капельницы с растворами, препараты для поддержки сердца, печени и снятия психоэмоционального напряжения. Лечение алкоголизма в Воронеже — помощь на всех стадиях зависимости предполагает безопасный и контролируемый процесс детоксикации с минимизацией рисков осложнений.
Исследовать вопрос подробнее – [url=https://lechenie-alkogolizma-voronezh9.ru/]www.domen.ru[/url]
Преимущества вызова нарколога на дом:
Подробнее – [url=https://vyvod-iz-zapoya-v-murmanske12.ru/]вывод из запоя в стационаре мурманск[/url]
круглосуточный вывод из запоя в ростове [url=https://vyvod-iz-zapoya-v-rostove-2.ru/]круглосуточный вывод из запоя в ростове[/url] .
Незамедлительно после вызова нарколог прибывает на дом для проведения подробного первичного осмотра. Врач измеряет жизненно важные показатели, собирает анамнез и определяет степень интоксикации, что является основой для составления персонализированного плана лечения.
Подробнее – http://
Этот текст содержит различную информацию, которая, возможно, покажется любопытной, но в целом не меняет восприятия привычных вещей. Предлагаем просто получить удовольствие от чтения, не ожидая особой пользы.
Вот – [url=https://arma-rehab.ru/lechenie-alkogolizma/]интим услуги[/url]
Миссия наркологического центра “Чистое Завтра” заключается в том, чтобы помочь пациентам разорвать порочный круг зависимости, вернуть контроль над собственной жизнью и обрести радость трезвого бытия. Мы стремимся:
Выяснить больше – https://алко-консультация.рф/vivod-iz-zapoya-v-kruglosutochno-v-Moskve/
Работа клиники строится на принципах доказательной медицины и индивидуального подхода. При поступлении пациента осуществляется всесторонняя диагностика, включающая анализы крови, оценку психического состояния и анамнез. По результатам разрабатывается персонализированный курс терапии.
Получить больше информации – [url=https://narkologicheskaya-klinika-v-ryazani12.ru/]наркологическая клиника нарколог в рязани[/url]
Как подчёркивает заведующий отделением клиники доктор Илья Рожнов, «только честный и целостный подход позволяет восстановить личность, разрушенную зависимостью. Наркологическая клиника в Волгограде — профессиональное лечение зависимостей строит не просто курс терапии, а мост между человеком и его новой жизнью».
Подробнее тут – https://narkologicheskaya-klinika-volgograd9.ru/chastnaya-narkologicheskaya-klinika-volgograd
Как подчёркивает заведующая кафедрой наркологии РМАНПО Минздрава России, «качество оказания помощи зависит не от количества процедур, а от правильной организации лечебного процесса и квалификации команды». Именно поэтому особенно важно понимать, какие параметры следует учитывать при выборе клиники.
Детальнее – [url=https://narkologicheskaya-klinika-pervouralsk11.ru/]наркологическая клиника клиника помощь первоуральск[/url]
После детоксикации важна реабилитация, включающая психологическую помощь. Используются различные виды психотерапии, в том числе когнитивно-поведенческая терапия и мотивационное интервьюирование. Это помогает пациентам не только избавиться от зависимости, но и адаптироваться к жизни вне клиники. Подробнее о методах психотерапии можно узнать на ресурсе психологической помощи.
Подробнее – [url=https://narkologicheskaya-klinika-kamensk-uralskij11.ru/]наркологическая клиника в каменске-уральском[/url]
Путь к свободе от зависимости начинается не с обещаний «просто перестать», а с профессионального медицинского вмешательства. В «Чистом Дыхании» мы применяем проверенные методы, которые работают там, где сила воли без нужной поддержки оказывается бессильной. Наша клиника в Долгопрудном работает круглосуточно — чтобы помощь была доступна в самый критический момент, когда человек ощущает острую потребность в детоксикации, снятии абстинентного синдрома или психологической поддержке.
Узнать больше – [url=https://narkologicheskaya-klinika-dolgoprudnyj3.ru/]наркологическая клиника в области[/url]
Вызов нарколога на дом — востребованная услуга, позволяющая оказать пациенту помощь в привычной обстановке без необходимости посещения клиники. Особенно актуально это при запойном состоянии, абстинентном синдроме или первых признаках передозировки. Согласно информации Минздрава РФ, амбулаторная помощь эффективна при своевременном обращении и наличии квалифицированной команды специалистов.
Узнать больше – http://
Услуга
Изучить вопрос глубже – [url=https://narkolog-na-dom-ramenskoe4.ru/]выезд нарколога на дом[/url]
Процесс начинается с вызова врача или доставки пациента в клинику. После прибытия специалист проводит первичную диагностику: измерение давления, температуры, пульса, уровня кислорода в крови, визуальная оценка степени возбуждения или угнетения сознания. Собирается краткий анамнез: какой наркотик принимался, как долго, были ли сопутствующие заболевания.
Изучить вопрос глубже – https://snyatie-lomki-podolsk1.ru/
В этом материале представлены детали, которые хоть и занимательны, но не особенно значимы. Мы рассматриваем моменты, которые трудно назвать важными, но всё же решили включить их для полноты картины.
Вот – [url=https://arma-rehab.ru/]покер онлайн[/url]
Комплексное лечение зависимости на дому организовано по четкой схеме, позволяющей оперативно вывести пациента из запоя и обеспечить безопасное восстановление здоровья.
Изучить вопрос глубже – [url=https://alko-zakodirovat.ru/]вывод из запоя на дому екатеринбург[/url]
melbet скачать apk на android [url=http://melbet30926.help]http://melbet30926.help[/url]
В рамках детоксикации применяются капельничные инфузии и современные препараты, позволяющие эффективно очистить кровь. Постоянный контроль жизненных показателей пациента обеспечивает безопасность процедуры и позволяет корректировать дозировку лекарств по мере необходимости.
Исследовать вопрос подробнее – https://vyvod-iz-zapoya-novokuznetsk66.ru/narkologiya-vyvod-iz-zapoya-novokuzneczk/
Без врачебного контроля организм подвергается чрезмерному стрессу, что может приводить к критическим последствиям. При длительном употреблении алкоголя происходит адаптация физиологических процессов к присутствию этанола, и когда эта поддержка внезапно исчезает, центральная нервная система и внутренние органы реагируют крайне остро.
Подробнее – [url=https://vyvod-iz-zapoya-arkhangelsk6.ru/]вывод из запоя круглосуточно архангельск[/url]
Современная наркологическая клиника в Мурманске специализируется на комплексном лечении алкогольной, наркотической и других видов зависимости. В условиях МедЦентр Арктика используются проверенные методы диагностики и терапии, позволяющие достичь устойчивой ремиссии и восстановить качество жизни пациента.
Получить больше информации – http://narkologicheskaya-klinika-v-murmanske12.ru/narkologicheskaya-klinika-klinika-pomoshh-v-murmanske/https://narkologicheskaya-klinika-v-murmanske12.ru
Перед заключением договора стоит поинтересоваться:
Углубиться в тему – [url=https://narkologicheskaya-klinika-nizhnij-tagil11.ru/]наркологическая клиника стационар нижний тагил[/url]
Как подчёркивает врач-нарколог И.В. Синицин, «современная наркология — это не только вывод из запоя, но и работа с глубинными причинами зависимости».
Подробнее тут – [url=https://narkologicheskaya-klinika-v-yaroslavle12.ru/]наркологическая клиника цены[/url]
Многие недооценивают последствия запоя, особенно если речь идёт о человеке, который ранее не испытывал серьёзных проблем со здоровьем. Однако даже несколько дней непрерывного употребления алкоголя способны вызвать тяжёлые системные сбои. Нарушается кислотно-щелочной и водно-солевой баланс, кровь становится густой, затрудняется работа сердца. Печень перестаёт эффективно обезвреживать токсины, и продукты распада этанола поступают в мозг, вызывая когнитивные и поведенческие нарушения.
Подробнее – http://kapelnica-ot-zapoya-moskva2.ru/kapelnicy-ot-zapoya-na-domu-v-mytishchah/https://kapelnica-ot-zapoya-moskva2.ru
В материале приведены детали, интересные, но не особенно важные. Мы рассматриваем аспекты, которые сложно назвать существенными, но включили их для большей полноты.
Подробнее читать – [url=https://rostov-narkologiya.ru/uslugi-ot-alkogolizma/vyvod-iz-zapoya/]лечение covid народными средствами[/url]
Алкоголь и наркотики воздействуют на организм комплексно: нарушается работа сердца, сосудов, печени и почек, страдает нервная система. При запое или ломке без квалифицированной помощи возникают судороги, делирий, галлюцинации и серьёзные сбои в обмене веществ. Самостоятельные попытки «перетерпеть» или «отмотать» запой зачастую приводят к тяжёлым осложнениям, вплоть до комы и необратимых изменений в органах.
Детальнее – [url=https://narkologicheskaya-klinika-dolgoprudnyj3.ru/]наркологическая клиника нарколог[/url]
Именно поэтому так важно не терять время. Чем раньше пациент получает помощь, тем выше шансы избежать необратимых последствий и вернуться к нормальной жизни.
Получить дополнительные сведения – https://snyatie-lomki-podolsk1.ru/snyatie-lomki-na-domu-v-podolske
Одним из ключевых этапов терапии является медикаментозное устранение абстинентного синдрома, что значительно облегчает состояние пациента. Для этого используются препараты, рекомендованные к применению ведущими специалистами в области наркологии. Примером могут служить протоколы лечения, описанные на официальном портале наркологической помощи России.
Подробнее можно узнать тут – https://narkologicheskaya-klinika-kamensk-uralskij11.ru
Услуга
Углубиться в тему – https://narkolog-na-dom-ramenskoe4.ru/
Согласно данным Федерального наркологического центра, своевременный выезд врача снижает риск осложнений и повторных госпитализаций.
Углубиться в тему – [url=https://narkolog-na-dom-kamensk-uralskij11.ru/]narkolog-na-dom-kamensk-uralskij11.ru/[/url]
Профессиональная клиника никогда не скрывает информацию о своих сотрудниках. На официальных сайтах нередко размещены сканы дипломов, сведения о специализации и стаже, участие в отраслевых конференциях и проектах Минздрава.
Выяснить больше – [url=https://narkologicheskaya-klinika-pervouralsk11.ru/]запой наркологическая клиника в первоуральске[/url]
На сайте Минздрава указаны общие клинические рекомендации по выведению из запоя, включая допустимые дозировки и протоколы лечения.
Получить дополнительные сведения – [url=https://vyvod-iz-zapoya-v-ryazani12.ru/]вывод из запоя на дому цена рязань[/url]
В статье-обзоре представлены данные сомнительной актуальности и факты без явной взаимосвязи. Читатель ознакомится с разными мнениями, хотя они вряд ли существенно изменят его представление о теме.
Подробнее читать – [url=https://rostov-narkologiya.ru/uslugi-ot-alkogolizma/vyvod-iz-zapoya/]таблетки для аборта[/url]
Пациенты получают помощь при:
Подробнее – [url=https://narkologicheskaya-klinika-novosibirsk0.ru/]наркологическая клиника наркологический центр в новосибирске[/url]
– затяжной запой более 5–7 дней; – наличие галлюцинаций, судорог, бредовых состояний; – тяжёлое общее состояние (высокая температура, спутанность сознания, обезвоживание); – хронические болезни в стадии обострения.
Исследовать вопрос подробнее – https://vyvod-iz-zapoya-kolomna3.ru/vyvod-iz-zapoya-nedorogo-v-kolomne
Эффективная капельница должна включать несколько компонентов, каждый из которых направлен на решение конкретной задачи: выведение токсинов, восстановление функций организма, нормализация психоэмоционального состояния.
Углубиться в тему – [url=https://kapelnicza-ot-zapoya-pervouralsk11.ru/]капельница от запоя цена первоуральск[/url]
Многие семьи сталкиваются с трудностями, когда зависимый отказывается ехать в клинику. В таких случаях выездная помощь становится первым шагом к выздоровлению. Однако не все службы предлагают одинаково безопасный и профессиональный подход. Чтобы избежать рисков и ошибок, важно понимать, на что обращать внимание при выборе услуги “нарколог на дом”.
Исследовать вопрос подробнее – [url=https://narkolog-na-dom-nizhnij-tagil11.ru/]нарколог на дом анонимно в нижнем тагиле[/url]
Не менее важным элементом лечения является психологическая реабилитация. Работа с психотерапевтом помогает пациенту осознать причины зависимости, снизить уровень стресса и научиться новым стратегиям управления эмоциями. Это существенно улучшает общее состояние и способствует долгосрочной ремиссии.
Получить дополнительные сведения – [url=https://vyvod-iz-zapoya-novokuznetsk66.ru/]вывод из запоя клиника новокузнецк[/url]
Услуга вызова нарколога на дом в Екатеринбурге представляет собой комплекс мер, направленных на оперативное стабилизирование состояния пациента. При поступлении вызова специалист проводит детальный осмотр, сбор анамнеза и диагностику состояния, после чего разрабатывается индивидуальный план лечения. Методика включает медикаментозную детоксикацию, коррекцию обменных процессов и психологическую поддержку, что обеспечивает комплексное восстановление здоровья без необходимости посещения стационара.
Узнать больше – http://alko-zakodirovat.ru/
Наркологическая помощь на дому в Ярославле охватывает широкий спектр медицинских мероприятий, направленных на стабилизацию состояния пациента и подготовку к дальнейшему лечению. Среди основных процедур:
Узнать больше – https://narkolog-na-dom-v-yaroslavle12.ru/vyzov-narkologa-na-dom-v-yaroslavle/
Пребывание в стационаре обеспечивает круглосуточный мониторинг состояния, своевременное введение лекарств и защиту пациента от внешних факторов, провоцирующих срыв. Все палаты оснащены необходимым оборудованием, соблюдаются санитарные нормы, а условия размещения соответствуют медицинским стандартам.
Исследовать вопрос подробнее – [url=https://narkologicheskaya-klinika-v-yaroslavle12.ru/]частная наркологическая клиника ярославская область[/url]
Чтобы обеспечить безопасный и поэтапный выход из запоя, важно обратиться к специалистам, которые определят оптимальный курс лечения, учитывая индивидуальное состояние пациента. Наркологическая клиника «Код здоровья» в Архангельске предлагает круглосуточную помощь, обеспечивая как лечение на дому, так и в стационаре для пациентов с тяжёлыми формами интоксикации.
Разобраться лучше – [url=https://vyvod-iz-zapoya-arkhangelsk6.ru/]помощь вывод из запоя архангельск[/url]
Процедура капельного введения лекарственных растворов проводится в условиях клиники с соблюдением всех санитарных норм. Пациенту устанавливается капельница, через которую вводятся препараты под контролем медперсонала. В зависимости от состояния пациента и тяжести запоя длительность капельной терапии может варьироваться от 1 до 6 часов.
Изучить вопрос глубже – [url=https://kapelnicza-ot-zapoya-v-murmanske12.ru/]поставить капельницу от запоя в мурманске[/url]
Современная наркологическая клиника в Мурманске специализируется на комплексном лечении алкогольной, наркотической и других видов зависимости. В условиях МедЦентр Арктика используются проверенные методы диагностики и терапии, позволяющие достичь устойчивой ремиссии и восстановить качество жизни пациента.
Подробнее – http://narkologicheskaya-klinika-v-murmanske12.ru/
Вывод из запоя в Мурманске представляет собой комплекс мероприятий, направленных на оказание медицинской помощи пациентам, находящимся в состоянии алкогольного отравления или длительного употребления спиртного. Процедура проводится с целью стабилизации состояния организма, предупреждения осложнений и минимизации риска развития тяжелых последствий алкоголизма.
Узнать больше – http://vyvod-iz-zapoya-v-murmanske12.ru
В материале приведены детали, интересные, но не особенно важные. Мы рассматриваем аспекты, которые сложно назвать существенными, но включили их для большей полноты.
Подробнее читать – [url=https://rostov-narkologiya.ru/ ]лечение covid народными средствами[/url]
Первое, на что стоит обратить внимание — это профессиональный уровень сотрудников. Без квалифицированных наркологов, клинических психологов и психиатров реабилитационный процесс становится формальным и неэффективным.
Ознакомиться с деталями – [url=https://narkologicheskaya-klinika-nizhnij-tagil11.ru/]наркологическая клиника цены нижний тагил[/url]
Наркологическая клиника в Рязани предоставляет квалифицированную помощь пациентам, страдающим от алкогольной, наркотической и медикаментозной зависимости. Здесь проводится полный цикл медицинской и психотерапевтической поддержки, начиная с детоксикации и заканчивая восстановительным этапом. Учреждение оборудовано современными технологиями, а персонал обладает подтверждённой квалификацией и практическим опытом.
Выяснить больше – http://narkologicheskaya-klinika-v-ryazani12.ru
Как отмечает врач-нарколог Иванов И.И., «без своевременной медицинской помощи при запое повышается риск необратимых изменений в организме и летального исхода».
Подробнее – http://vyvod-iz-zapoya-nizhnij-tagil11.ru/
Этот информационный набор привлекает внимание множеством мелочей и странных ракурсов. Мы предлагаем взгляды, которые редко бывают полезны, но могут слегка разнообразить ваше знакомство с темой.
Вот – [url=https://arma-rehab.ru/]милфы[/url]
В этом материале представлены детали, которые хоть и занимательны, но не особенно значимы. Мы рассматриваем моменты, которые трудно назвать важными, но всё же решили включить их для полноты картины.
Вот – [url=https://arma-rehab.ru/lechenie-alkogolizma/]милфы[/url]
Клиническая практика показывает: только системная работа с пациентом даёт устойчивый результат. Программа включает медицинское, психологическое и социальное сопровождение.
Детальнее – [url=https://lechenie-alkogolizma-voronezh9.ru/]лечение хронического алкоголизма в воронеже[/url]
Запой — это не просто длительное употребление алкоголя, а тяжелое состояние, когда организм перестает функционировать нормально без постоянного поступления этанола. При запое происходит накопление токсинов, что ведет к нарушению работы внутренних органов и сильному ослаблению иммунной системы. Пациенты часто испытывают невыносимые физические и психические страдания, а попытки самостоятельно выйти из запоя только усугубляют ситуацию.
Получить дополнительную информацию – [url=https://vyvod-iz-zapoya-krasnoyarsk0.ru/]вывод из запоя капельница красноярск[/url]
Как подчёркивает главный врач клинического отделения, «в условиях стационара мы можем оперативно реагировать на малейшие изменения в состоянии пациента, что критически важно при тяжёлых формах запоя».
Изучить вопрос глубже – [url=https://vyvod-iz-zapoya-v-ryazani12.ru/]вывод из запоя цена рязань[/url]
Как поясняет врач-нарколог клиники «АлкоСтоп», «грамотно составленная инфузионная терапия не только устраняет последствия запоя, но и создаёт условия для дальнейшей мотивации пациента к лечению».
Получить дополнительную информацию – [url=https://kapelnicza-ot-zapoya-pervouralsk11.ru/]вызвать капельницу от запоя[/url]
Наркологическая клиника в Новосибирске — это специализированное медицинское учреждение, предоставляющее комплексную помощь пациентам с различными формами зависимости. Использование современных методов диагностики и терапии позволяет достигать устойчивых результатов в лечении алкогольной, наркотической и других зависимостей. В клинике «Преодоление» работают опытные специалисты, разрабатывающие индивидуальные программы с учётом особенностей каждого пациента.
Изучить вопрос глубже – https://narkologicheskaya-klinika-novosibirsk0.ru/chastnaya-narkologicheskaya-klinika-novosibirsk/
Услуга вызова нарколога на дом в Екатеринбурге представляет собой комплекс мер, направленных на оперативное стабилизирование состояния пациента. При поступлении вызова специалист проводит детальный осмотр, сбор анамнеза и диагностику состояния, после чего разрабатывается индивидуальный план лечения. Методика включает медикаментозную детоксикацию, коррекцию обменных процессов и психологическую поддержку, что обеспечивает комплексное восстановление здоровья без необходимости посещения стационара.
Подробнее тут – [url=https://alko-zakodirovat.ru/]вывод из запоя[/url]
Капельница рекомендована при следующих состояниях:
Получить дополнительные сведения – [url=https://kapelnicza-ot-zapoya-v-murmanske12.ru/]postavit-kapelniczu-ot-zapoya murmansk[/url]
После первичной консультации пациент проходит обследование, позволяющее точно определить стадию зависимости и сопутствующие патологии. Используются лабораторные анализы, оценка неврологического статуса и сбор анамнеза. Уже на этом этапе начинается выстраивание контакта между пациентом и врачом, что особенно важно для доверия и готовности включиться в процесс.
Подробнее можно узнать тут – [url=https://narkologicheskaya-klinika-volgograd9.ru/]narkologicheskaya-klinika-volgograd9.ru/[/url]
Стационарная программа позволяет стабилизировать не только физическое состояние, но и эмоциональную сферу. Находясь в изоляции от внешних раздражителей и вредных контактов, пациент получает шанс сконцентрироваться на себе и начать реабилитацию без давления извне.
Подробнее – [url=https://narkologicheskaya-pomoshch-balashiha1.ru/]vidy-narkologicheskoj-pomoshchi[/url]
Аппаратные методы кодирования включают лазерную терапию и электростимуляцию биологически активных точек, влияющих на центры зависимости в головном мозге. Эти методики способствуют быстрому формированию устойчивого отвращения к спиртному и хорошо переносятся пациентами.
Углубиться в тему – https://kodirovanie-ot-alkogolizma-odintsovo2.ru/kodirovanie-ot-alkogolizma-cena/
Мы собрали для вас самые захватывающие факты из мира науки и истории. От малознакомых деталей до грандиозных событий — эта статья расширит ваш кругозор и подарит новое понимание того, как устроен наш мир.
Переходите по ссылке ниже – https://yspu.org/%D0%A1%D0%B8%D0%BC%D0%B0%D0%BD%D0%BE%D0%B2%D1%81%D0%BA%D0%B8%D0%B9_%D0%90%D0%BD%D0%B4%D1%80%D0%B5%D0%B9_%D0%AD%D0%B4%D0%B3%D0%B0%D1%80%D0%BE%D0%B2%D0%B8%D1%87
В этом интересном тексте собраны обширные сведения, которые помогут вам понять различные аспекты обсуждаемой темы. Мы разбираем детали и факты, делая акцент на важности каждого элемента. Не упустите возможность расширить свои знания и взглянуть на мир по-новому!
Углубить понимание вопроса – https://yspu.org/%D0%9F%D0%B5%D0%B4%D0%B0%D0%B3%D0%BE%D0%B3%D0%B8%D1%87%D0%B5%D1%81%D0%BA%D0%B8%D0%B9_%D1%84%D0%B0%D0%BA%D1%83%D0%BB%D1%8C%D1%82%D0%B5%D1%82:%D0%97%D0%B0%D0%BE%D1%87%D0%BD%D0%BE%D0%B5_%D0%BE%D1%82%D0%B4%D0%B5%D0%BB%D0%B5%D0%BD%D0%B8%D0%B5
В этой статье представлен занимательный и актуальный контент, который заставит вас задуматься. Мы обсуждаем насущные вопросы и проблемы, а также освещаем истории, которые вдохновляют на действия и изменения. Узнайте, что стоит за событиями нашего времени!
Обратитесь за информацией – https://listing.downtown-directory.com/rtl-version/product/%D8%B1%D9%85%D8%A7%D8%AF%D9%8A-%D8%AA%D9%8A-%D8%B4%D9%8A%D8%B1%D8%AA-%D8%A3%D8%B2%D9%8A%D8%A7%D8%A1-sportex-%D8%A7%D9%84%D8%B5%D9%8A%D9%81-%D8%A3%D8%B1%D9%8A%D9%81%D8%A7%D9%84
В этой статье представлен занимательный и актуальный контент, который заставит вас задуматься. Мы обсуждаем насущные вопросы и проблемы, а также освещаем истории, которые вдохновляют на действия и изменения. Узнайте, что стоит за событиями нашего времени!
Изучить вопрос глубже – https://vistoweekly.com/domestic-violence-advocate-kim-wilso
Мы собрали для вас самые захватывающие факты из мира науки и истории. От малознакомых деталей до грандиозных событий — эта статья расширит ваш кругозор и подарит новое понимание того, как устроен наш мир.
Где можно узнать подробнее? – https://vistoweekly.com/marc-j-gabelli
Эта информационная статья охватывает широкий спектр актуальных тем и вопросов. Мы стремимся осветить ключевые факты и события с ясностью и простотой, чтобы каждый читатель мог извлечь из нее полезные знания и полезные инсайты.
Узнать больше – https://horala.pl/xxxiv-forum-ekonomiczne-w-karpaczu
Этот информативный текст отличается привлекательным содержанием и актуальными данными. Мы предлагаем читателям взглянуть на привычные вещи под новым углом, предоставляя интересный и доступный материал. Получите удовольствие от чтения и расширьте кругозор!
Продолжить изучение – https://www.force-tracks.net/hello-world
Откройте для себя скрытые страницы истории и малоизвестные научные открытия, которые оказали колоссальное влияние на развитие человечества. Статья предлагает свежий взгляд на события, которые заслуживают большего внимания.
Узнать из первых рук – https://skatehubusa.com/hello-world
Эта статья погружает вас в увлекательный мир знаний, где каждый факт становится открытием. Мы расскажем о ключевых исторических поворотных моментах и научных прорывах, которые изменили ход цивилизации. Поймите, как прошлое формирует настоящее и как его уроки могут помочь нам строить будущее.
См. подробности – https://yspu.org/%D0%9F%D0%B0%D1%82%D0%B5%D0%BD%D1%82%D0%BD%D0%BE-%D0%B8%D0%BD%D1%84%D0%BE%D1%80%D0%BC%D0%B0%D1%86%D0%B8%D0%BE%D0%BD%D0%BD%D1%8B%D0%B9_%D0%BE%D1%82%D0%B4%D0%B5%D0%BB
Наша цель — не просто купировать симптомы, а добиться стойкой ремиссии, предотвратить рецидивы, научить пациента жить без психоактивных веществ.
Изучить вопрос глубже – http://алко-консультация.рф/vivod-iz-zapoya-v-stacionare-v-Moskve/https://алко-консультация.рф
В этом информативном тексте представлены захватывающие события и факты, которые заставят вас задуматься. Мы обращаем внимание на важные моменты, которые часто остаются незамеченными, и предлагаем новые перспективы на привычные вещи. Подготовьтесь к тому, чтобы быть поглощенным увлекательными рассказами!
Не пропусти важное – http://pastorcastor.se/2018/06/01/saftig-potatisgratang
Эта статья для ознакомления предлагает читателям общее представление об актуальной теме. Мы стремимся представить ключевые факты и идеи, которые помогут читателям получить представление о предмете и решить, стоит ли углубляться в изучение.
Всё самое вкусное внутри – https://akrilikdisplay.com/siapkan-face-shield-untuk-new-normal
Эта информационная заметка предлагает лаконичное и четкое освещение актуальных вопросов. Здесь вы найдете ключевые факты и основную информацию по теме, которые помогут вам сформировать собственное мнение и повысить уровень осведомленности.
Изучить вопрос глубже – https://vivod-iz-zapoya-2.ru/
Когда зависимость захватывает жизнь, она разрушает не только организм, но и личность, отношения с близкими, карьерные планы и самоощущение. Алкоголь, наркотики и психотропные препараты постепенно подрывают работу внутренних органов, нарушают баланс нейромедиаторов в мозге и приводят к серьёзным психическим и физическим осложнениям. Попытки справиться с этим самостоятельно редко бывают успешными: необходим системный, профессиональный подход. В наркологической клинике «Доктор Здоровье» в Мытищах вы найдёте надёжную опору на всех этапах выздоровления — от экстренной детоксикации до длительной реабилитации.
Ознакомиться с деталями – https://narkologicheskaya-klinika-mytishchi1.ru/narkologicheskaya-klinika-narkolog-v-mytishchah
В данном тексте собраны разнообразные случайные сведения и не вполне определённые идеи, которые могут вызвать интерес. Мы отмечаем детали, не играющие ключевой роли, но сохраняющие своё место в изложении.
Подробнее читать – [url=https://rostov-narkologiya.ru/ ]кето диета за неделю минус 10 кг[/url]
В этой информационной статье вы найдете интересное содержание, которое поможет вам расширить свои знания. Мы предлагаем увлекательный подход и уникальные взгляды на обсуждаемые темы, побуждая пользователей к активному мышлению и критическому анализу.
Обратитесь за информацией – https://university.kakinfotech.com/post-formats/post-format-status
mostbet скачать сегодня [url=www.mostbet85961.help]www.mostbet85961.help[/url]
«Чем раньше начнётся профессиональная детоксикация, тем выше шанс избежать необратимых последствий и тяжёлых осложнений», — отмечает врач-нарколог клиники «Азимут Здоровья» Елена Степанова.
Подробнее – [url=https://narkolog-na-dom-ramenskoe4.ru/]вызов нарколога на дом раменское[/url]
В этой статье-обзоре мы соберем актуальную информацию и интересные факты, которые освещают важные темы. Читатели смогут ознакомиться с различными мнениями и подходами, что позволит им расширить кругозор и глубже понять обсуждаемые вопросы.
Получить больше информации – https://www.rothstein.dk/2011/beate-grimsrud-en-dare-fri
Этот интересный отчет представляет собой сборник полезных фактов, касающихся актуальных тем. Мы проанализируем данные, чтобы вы могли сделать обоснованные выводы. Читайте, чтобы узнать больше о последних трендах и значимых событиях!
Кликни и узнай всё! – https://legal-immobilier.fr/permis-de-construire-les-etapes-et-formalites-a-suivre
Эта информационная статья охватывает широкий спектр актуальных тем и вопросов. Мы стремимся осветить ключевые факты и события с ясностью и простотой, чтобы каждый читатель мог извлечь из нее полезные знания и полезные инсайты.
Изучить эмпирические данные – https://katsuraso.jp/cgi-bin/epad/epad.cgi?pg=20
Этот обзор предлагает свежий взгляд на предметы, которые и без того привычны. Мы упоминаем факты, не имеющие большого значения, и события с неясной важностью, но они присутствуют здесь.
Подробнее читать – [url=https://rostov-narkologiya.ru/ ]лечение covid народными средствами[/url]
Запой — это не просто периодическое употребление спиртного, а опасное состояние, при котором организм находится в постоянной интоксикации, теряет ресурсы и перестаёт справляться с последствиями этанола. Со временем развивается тяжёлое отравление, нарушается работа сердца, печени, мозга, а попытка «самостоятельно бросить» может привести к судорогам, галлюцинациям и даже коме. Именно поэтому важно вовремя обратиться за медицинской помощью. В Серпухове вывод из запоя осуществляет наркологическая клиника «Новая Энергия» — мы выезжаем на дом круглосуточно и при необходимости госпитализируем пациента в стационар.
Разобраться лучше – http://vyvod-iz-zapoya-serpuhov3.ru/vyvod-iz-zapoya-na-domu-v-serpuhove/https://vyvod-iz-zapoya-serpuhov3.ru
Нашли рабочий серийный номер для Windows 11 Pro — проверено лично, без вирусов!
Подробнее – [url=https://krasnodar.med24.online/]Windows 11 кряк 2026 скачать[/url]
Когда зависимость захватывает жизнь, она разрушает не только организм, но и личность, отношения с близкими, карьерные планы и самоощущение. Алкоголь, наркотики и психотропные препараты постепенно подрывают работу внутренних органов, нарушают баланс нейромедиаторов в мозге и приводят к серьёзным психическим и физическим осложнениям. Попытки справиться с этим самостоятельно редко бывают успешными: необходим системный, профессиональный подход. В наркологической клинике «Доктор Здоровье» в Мытищах вы найдёте надёжную опору на всех этапах выздоровления — от экстренной детоксикации до длительной реабилитации.
Детальнее – http://
Эта публикация содержит набор несвязанных идей, трудно применимых в практике. Мы лишь поверхностно затрагиваем различные точки зрения, не проводя глубокий анализ и не предлагая выводов.
Подробнее читать – [url=https://rostov-narkologiya.ru/uslugi-ot-alkogolizma/vyvod-iz-zapoya/]кето диета за неделю минус 10 кг[/url]
Именно поэтому так важно не терять время. Чем раньше пациент получает помощь, тем выше шансы избежать необратимых последствий и вернуться к нормальной жизни.
Получить дополнительные сведения – [url=https://snyatie-lomki-podolsk1.ru/]снятие ломки на дому цена подольск[/url]
Каждый пациент получает индивидуальный план лечения, основанный на клинических исследованиях, данных лабораторных анализов и психологических тестов.
Подробнее – https://narkologicheskaya-klinika-dolgoprudnyj3.ru/chastnaya-narkologicheskaya-klinika-v-dolgoprudnom/
производство наклеек на заказ [url=https://pechat-nakleek-v-moskve.ru/]pechat-nakleek-v-moskve.ru[/url] .
melbet вывод элкарт кыргызстан [url=https://melbet51923.help/]https://melbet51923.help/[/url]
Запой — это не просто периодическое употребление спиртного, а опасное состояние, при котором организм находится в постоянной интоксикации, теряет ресурсы и перестаёт справляться с последствиями этанола. Со временем развивается тяжёлое отравление, нарушается работа сердца, печени, мозга, а попытка «самостоятельно бросить» может привести к судорогам, галлюцинациям и даже коме. Именно поэтому важно вовремя обратиться за медицинской помощью. В Серпухове вывод из запоя осуществляет наркологическая клиника «Новая Энергия» — мы выезжаем на дом круглосуточно и при необходимости госпитализируем пациента в стационар.
Выяснить больше – http://vyvod-iz-zapoya-serpuhov3.ru/srochnyj-vyvod-iz-zapoya-v-serpuhove/
Процедура капельного введения лекарств позволяет решить сразу несколько задач: восполнить жидкость, нормализовать работу внутренних органов, вывести токсины и восстановить общее состояние. Благодаря внутривенному способу введения, компоненты раствора быстро поступают в кровь и начинают действовать уже в течение первых 10–15 минут.
Ознакомиться с деталями – [url=https://kapelnica-ot-zapoya-moskva2.ru/]капельница от запоя недорого мытищи[/url]
Также мы учитываем потребности каждого пациента — по питанию, условиям проживания, графику процедур. Проживание возможно в стандартных и повышенных палатах, с возможностью индивидуального обслуживания.
Подробнее можно узнать тут – [url=https://narkologicheskaya-pomoshch-balashiha1.ru/]narkologicheskaya-pomoshch-balashiha1.ru/[/url]
Услуга
Узнать больше – http://narkolog-na-dom-ramenskoe4.ru
Наша цель — не просто купировать симптомы, а добиться стойкой ремиссии, предотвратить рецидивы, научить пациента жить без психоактивных веществ.
Подробнее – http://алко-консультация.рф
В нашей клинике применяются различные техники кодирования, которые подбираются с учётом медицинских показаний, психологического состояния и пожеланий пациента.
Изучить вопрос глубже – https://kodirovanie-ot-alkogolizma-odintsovo2.ru/kodirovanie-ot-alkogolizma-na-domu
seo продвижение трафику [url=https://prodvizhenie-sajtov-po-trafiku6.ru/]seo продвижение трафику[/url] .
успешные кейсы seo [url=https://seo-kejsy12.ru/]успешные кейсы seo[/url] .
Клиника «Альтернатива» предлагает фиксированные цены на выезд нарколога с оплатой после оказания услуги. Тарифы действуют по всему городу и пригороду.
Получить дополнительные сведения – https://narkologicheskaya-pomoshh-ufa9.ru/narkologicheskaya-pomoshh-na-domu-ufa/
Согласно данным Федерального наркологического центра, своевременный выезд врача снижает риск осложнений и повторных госпитализаций.
Изучить вопрос глубже – [url=https://narkolog-na-dom-kamensk-uralskij11.ru/]нарколог на дом цены каменск-уральский[/url]
Медицинская детоксикация — это основа успешного вывода из запоя. Она проводится под строгим контролем врачей-наркологов, которые используют инфузионную терапию для выведения токсинов из организма. В качестве компонентов капельниц применяются растворы глюкозы, физиологический раствор, препараты для восстановления работы печени и почек. Поддержка сердечно-сосудистой системы и нормализация артериального давления достигается с помощью специализированных медикаментов.
Получить дополнительные сведения – https://vyvod-iz-zapoya-nizhnij-tagil11.ru/
поисковое продвижение по трафику [url=https://prodvizhenie-sajtov-po-trafiku7.ru/]поисковое продвижение по трафику[/url] .
Вывод из запоя — это не просто капельница, а многоуровневая медицинская процедура, направленная на устранение интоксикации, стабилизацию состояния пациента и предотвращение осложнений. В клинике «Жизненный Луч» мы проводим эту процедуру в домашних условиях и в стационаре, в зависимости от тяжести состояния. К каждому пациенту применяем индивидуальный подход, исходя из возраста, сопутствующих заболеваний и длительности запоя.
Получить дополнительные сведения – https://vyvod-iz-zapoya-kolomna3.ru/vyvod-iz-zapoya-nedorogo-v-kolomne/
Не менее важным элементом лечения является психологическая реабилитация. Работа с психотерапевтом помогает пациенту осознать причины зависимости, снизить уровень стресса и научиться новым стратегиям управления эмоциями. Это существенно улучшает общее состояние и способствует долгосрочной ремиссии.
Получить дополнительные сведения – [url=https://vyvod-iz-zapoya-novokuznetsk66.ru/]врач вывод из запоя в новокузнецке[/url]
Именно поэтому так важно не терять время. Чем раньше пациент получает помощь, тем выше шансы избежать необратимых последствий и вернуться к нормальной жизни.
Получить дополнительные сведения – [url=https://snyatie-lomki-podolsk1.ru/]снятие ломки нарколог[/url]
Вывод из запоя в Мурманске представляет собой комплекс мероприятий, направленных на оказание медицинской помощи пациентам, находящимся в состоянии алкогольного отравления или длительного употребления спиртного. Процедура проводится с целью стабилизации состояния организма, предупреждения осложнений и минимизации риска развития тяжелых последствий алкоголизма.
Узнать больше – [url=https://vyvod-iz-zapoya-v-murmanske12.ru/]наркология вывод из запоя[/url]
Алкоголь и наркотики воздействуют на организм комплексно: нарушается работа сердца, сосудов, печени и почек, страдает нервная система. При запое или ломке без квалифицированной помощи возникают судороги, делирий, галлюцинации и серьёзные сбои в обмене веществ. Самостоятельные попытки «перетерпеть» или «отмотать» запой зачастую приводят к тяжёлым осложнениям, вплоть до комы и необратимых изменений в органах.
Ознакомиться с деталями – [url=https://narkologicheskaya-klinika-dolgoprudnyj3.ru/]vyvod-narkologicheskaya-klinika[/url]
Основные признаки, свидетельствующие о необходимости экстренной помощи:
Получить дополнительные сведения – http://vyvod-iz-zapoya-krasnoyarsk0.ru/vyvod-iz-zapoya-na-domu-krasnoyarsk/https://vyvod-iz-zapoya-krasnoyarsk0.ru
seo network [url=https://prodvizhenie-sajtov-v-moskve11.ru/]prodvizhenie-sajtov-v-moskve11.ru[/url] .
Этот текст содержит различную информацию, которая, возможно, покажется любопытной, но в целом не меняет восприятия привычных вещей. Предлагаем просто получить удовольствие от чтения, не ожидая особой пользы.
Вот – [url=https://arma-rehab.ru/lechenie-alkogolizma/]бесплатные вращения в слотах[/url]
Услуга
Разобраться лучше – [url=https://narkolog-na-dom-ramenskoe4.ru/]нарколог на дом[/url]
Одним из ключевых направлений является проведение капельниц, призванных вывести токсины из организма и нормализовать водно-электролитный баланс. Используемые препараты и состав растворов подбираются индивидуально, исходя из клинической картины и истории болезни пациента.
Детальнее – [url=https://narkolog-na-dom-v-yaroslavle12.ru/]нарколог на дом срочно[/url]
Высокий уровень лечения обеспечивается квалификацией врачей, имеющих опыт работы в области наркологии, а также современным медицинским оборудованием, позволяющим проводить диагностику и лечение на самом высоком уровне. Врачи регулярно повышают квалификацию, участвуя в конференциях и обучающих программах. Подробности о квалификации специалистов доступны на портале медицинского сообщества.
Детальнее – http://narkologicheskaya-klinika-kamensk-uralskij11.ru/anonimnaya-narkologicheskaya-klinika-v-kamensk-uralskom/
Миссия наркологического центра “Чистое Завтра” заключается в том, чтобы помочь пациентам разорвать порочный круг зависимости, вернуть контроль над собственной жизнью и обрести радость трезвого бытия. Мы стремимся:
Получить дополнительные сведения – http://алко-консультация.рф
Наркологическая помощь в Первоуральске доступна в различных форматах: амбулаторно, стационарно и на дому. Однако не каждое учреждение может обеспечить необходимый уровень комплексной терапии, соответствующей стандартам Минздрава РФ и НМИЦ психиатрии и наркологии. В этом материале мы рассмотрим ключевые особенности профессионального наркологического центра и критерии, которые помогут сделать осознанный выбор.
Подробнее – [url=https://narkologicheskaya-klinika-pervouralsk11.ru/]наркологическая клиника нарколог первоуральск[/url]
Алкогольная зависимость разрушает здоровье, семью, карьеру и личность. Чем раньше будет оказана профессиональная помощь, тем выше шансы на восстановление и возвращение к полноценной жизни. Лечение алкоголизма в Воронеже — помощь на всех стадиях зависимости позволяет справляться не только с физической тягой, но и с глубинными причинами, которые провоцируют патологическое употребление.
Изучить вопрос глубже – [url=https://lechenie-alkogolizma-voronezh9.ru/]лечение алкоголизма на дому[/url]
маркетинговые стратегии статьи [url=https://seo-blog15.ru/]seo-blog15.ru[/url] .
В этом тексте собрано множество случайных сведений и довольно неопределённых мыслей, которые могут чем-то заинтересовать. Мы отмечаем моменты, которые не особенно важны, но всё же занимают своё место в повествовании.
Вот – [url=https://arma-rehab.ru/]секс знакомства[/url]
Критерий
Углубиться в тему – [url=https://narkolog-na-dom-nizhnij-tagil11.ru/]нарколог на дом анонимно нижний тагил[/url]
блог про продвижение сайтов [url=https://seo-blog16.ru/]блог про продвижение сайтов[/url] .
Абстинентный синдром — одно из самых тяжёлых и опасных проявлений наркотической зависимости. Он развивается на фоне резкого отказа от приёма веществ и сопровождается сильнейшими нарушениями работы организма. Это состояние требует немедленного вмешательства. Самостоятельно справиться с ним невозможно — особенно если речь идёт о героине, метадоне, синтетических наркотиках или длительной зависимости. В клинике «НаркоПрофи» мы организовали систему снятия ломки в Подольске, работающую круглосуточно: как на дому, так и в условиях стационара.
Подробнее – https://snyatie-lomki-podolsk1.ru/snyatie-lomki-narkomana-v-podolske/
Основной этап в лечении — детоксикация организма от токсичных веществ, вызывающих интоксикацию. В клинике применяют современные методы капельниц и медикаментозной поддержки, включая препараты для снятия абстинентного синдрома.
Изучить вопрос глубже – https://narkologicheskaya-klinika-v-murmanske12.ru/narkologicheskaya-klinika-klinika-pomoshh-v-murmanske
блог о маркетинге [url=https://seo-blog14.ru/]блог о маркетинге[/url] .
Используя современные инфузионные системы, мы постепенно вводим растворы для выведения токсинов, коррекции водно-электролитного баланса и восстановления функции печени. Параллельно подбираются препараты для снятия абстинентного синдрома, купирования тревожности и нормализации сна.
Исследовать вопрос подробнее – [url=https://narkologicheskaya-klinika-dolgoprudnyj3.ru/]narkologicheskaya-klinika-v-oblasti[/url]
mellstroy game casino [url=https://t.me/mellstroy_ggame/]mellstroy game casino[/url] .
заказать продвижение сайта в москве [url=https://prodvizhenie-sajtov-v-moskve11.ru/]заказать продвижение сайта в москве[/url] .
Абстинентный синдром — одно из самых тяжёлых и опасных проявлений наркотической зависимости. Он развивается на фоне резкого отказа от приёма веществ и сопровождается сильнейшими нарушениями работы организма. Это состояние требует немедленного вмешательства. Самостоятельно справиться с ним невозможно — особенно если речь идёт о героине, метадоне, синтетических наркотиках или длительной зависимости. В клинике «НаркоПрофи» мы организовали систему снятия ломки в Подольске, работающую круглосуточно: как на дому, так и в условиях стационара.
Получить больше информации – [url=https://snyatie-lomki-podolsk1.ru/]снятие наркотической ломки подольск[/url]
В наркологической клинике применяются проверенные методики терапии, включая медикаментозное лечение, детоксикацию и психотерапевтические программы. Детоксикация проводится с использованием современных капельниц, обеспечивающих безопасное выведение токсинов из организма. Важно отметить, что качественное лечение включает и работу с психологическими аспектами зависимости, что достигается посредством групповых и индивидуальных консультаций.
Выяснить больше – https://narkologicheskaya-klinika-kamensk-uralskij11.ru/
Как подчёркивает врач-нарколог И.В. Синицин, «современная наркология — это не только вывод из запоя, но и работа с глубинными причинами зависимости».
Получить больше информации – [url=https://narkologicheskaya-klinika-v-yaroslavle12.ru/]частная наркологическая клиника ярославская область[/url]
Вывод из запоя в Рязани — это комплексная медицинская услуга, направленная на устранение интоксикации, стабилизацию состояния пациента и предотвращение рецидива алкогольной зависимости. Методики подбираются индивидуально с учётом анамнеза, длительности запойного состояния, наличия сопутствующих заболеваний и психоэмоционального фона. Процедура осуществляется под контролем опытных врачей-наркологов с применением сертифицированных препаратов и оборудования.
Выяснить больше – [url=https://vyvod-iz-zapoya-v-ryazani12.ru/]вывод из запоя в стационаре в рязани[/url]
Процедура капельного введения лекарств позволяет решить сразу несколько задач: восполнить жидкость, нормализовать работу внутренних органов, вывести токсины и восстановить общее состояние. Благодаря внутривенному способу введения, компоненты раствора быстро поступают в кровь и начинают действовать уже в течение первых 10–15 минут.
Разобраться лучше – [url=https://kapelnica-ot-zapoya-moskva2.ru/]капельница от запоя мытищи[/url]
Первое, на что стоит обратить внимание — это профессиональный уровень сотрудников. Без квалифицированных наркологов, клинических психологов и психиатров реабилитационный процесс становится формальным и неэффективным.
Ознакомиться с деталями – https://narkologicheskaya-klinika-nizhnij-tagil11.ru/platnaya-narkologicheskaya-klinika-v-nizhnem-tagile
В зависимости от степени выраженности абстинентного синдрома и наличия сопутствующих осложнений клиника «Азимут Здоровья» предлагает два основных формата оказания помощи, позволяющих оптимально сочетать эффективность лечения и комфорт пациента. Каждый вариант тщательно продуман: мы учитываем не только медицинские показания, но и личные предпочтения, чтобы вы или ваш близкий чувствовали себя максимально защищённо и спокойно. Оба формата подразумевают строгий контроль жизненных показателей и сопровождение на всех этапах — от первой капельницы до завершения курса поддерживающей терапии.
Разобраться лучше – [url=https://narkolog-na-dom-ramenskoe4.ru/]narkolog na dom srochno ramenskoe[/url]
Путь к свободе от зависимости начинается не с обещаний «просто перестать», а с профессионального медицинского вмешательства. В «Чистом Дыхании» мы применяем проверенные методы, которые работают там, где сила воли без нужной поддержки оказывается бессильной. Наша клиника в Долгопрудном работает круглосуточно — чтобы помощь была доступна в самый критический момент, когда человек ощущает острую потребность в детоксикации, снятии абстинентного синдрома или психологической поддержке.
Получить дополнительные сведения – [url=https://narkologicheskaya-klinika-dolgoprudnyj3.ru/]anonimnaya-narkologicheskaya-klinika[/url]
Как подчёркивает заведующая кафедрой наркологии РМАНПО Минздрава России, «качество оказания помощи зависит не от количества процедур, а от правильной организации лечебного процесса и квалификации команды». Именно поэтому особенно важно понимать, какие параметры следует учитывать при выборе клиники.
Подробнее – [url=https://narkologicheskaya-klinika-pervouralsk11.ru/]наркологическая клиника лечение алкоголизма первоуральск[/url]
монтаж газового пожаротушения [url=https://montazh-gazovogo-pozharotusheniya-2.ru/]монтаж газового пожаротушения[/url] .
Наличие у нарколога практического опыта и навыков быстрого реагирования критично — особенно если речь идёт о тяжелой интоксикации или судорожном синдроме. Ошибки в дозировке или игнорирование хронических заболеваний могут привести к осложнениям.
Ознакомиться с деталями – [url=https://narkolog-na-dom-nizhnij-tagil11.ru/]нарколог на дом анонимно нижний тагил[/url]
Для успешной адаптации пациента в обществе клиника организует поддержку родственников и последующее наблюдение. Это снижает риск рецидива и помогает сохранить достигнутые результаты.
Углубиться в тему – [url=https://narkologicheskaya-klinika-v-murmanske12.ru/]наркологическая клиника нарколог мурманск[/url]
Не менее важным элементом лечения является психологическая реабилитация. Работа с психотерапевтом помогает пациенту осознать причины зависимости, снизить уровень стресса и научиться новым стратегиям управления эмоциями. Это существенно улучшает общее состояние и способствует долгосрочной ремиссии.
Углубиться в тему – [url=https://vyvod-iz-zapoya-novokuznetsk66.ru/]вывод из запоя дешево в новокузнецке[/url]
Согласно данным НМИЦ психиатрии и наркологии Минздрава РФ, профессиональный вывод из запоя с применением капельниц снижает риск осложнений и сокращает период восстановления. Процедура проводится только под наблюдением квалифицированных специалистов и требует правильного подбора препаратов в зависимости от стадии опьянения и наличия сопутствующих заболеваний.
Подробнее тут – https://kapelnicza-ot-zapoya-pervouralsk11.ru/kapelniczy-ot-zapoya-na-domu-v-pervouralske/
локальное seo блог [url=https://seo-blog16.ru/]seo-blog16.ru[/url] .
маркетинговый блог [url=https://seo-blog15.ru/]маркетинговый блог[/url] .
Капельница от запоя применяется для комплексного восстановления организма после длительного употребления алкоголя. Она включает в себя введение растворов, насыщенных витаминами, электролитами, глюкозой и лекарственными средствами, направленными на устранение симптомов интоксикации. Основные задачи процедуры:
Разобраться лучше – http://kapelnicza-ot-zapoya-v-murmanske12.ru
Лечение хронического алкоголизма начинается с купирования абстинентного синдрома, после чего проводятся мероприятия по нормализации работы печени, сердечно-сосудистой и нервной системы. Назначаются гепатопротекторы, ноотропы, витамины группы B. Также проводится противорецидивная терапия.
Подробнее можно узнать тут – http://narkologicheskaya-klinika-v-yaroslavle12.ru/narkologicheskaya-klinika-telefon-v-yaroslavle/
Как отмечает врач-нарколог Иванов И.И., «без своевременной медицинской помощи при запое повышается риск необратимых изменений в организме и летального исхода».
Изучить вопрос глубже – [url=https://vyvod-iz-zapoya-nizhnij-tagil11.ru/]вывод из запоя круглосуточно в нижнем тагиле[/url]
Вывод из запоя требует неотложного и профессионального подхода, поскольку состояние больного сопровождается нарушением работы внутренних органов, обезвоживанием и токсическим воздействием этанола на центральную нервную систему. В Мурманске, учитывая особенности региона и климата, особенно важно проводить процедуру с учётом возможных сопутствующих заболеваний и общего состояния здоровья пациента.
Разобраться лучше – [url=https://vyvod-iz-zapoya-v-murmanske12.ru/]вывод из запоя в стационаре[/url]
Вызов нарколога возможен круглосуточно, что обеспечивает оперативное реагирование на критические ситуации. Пациенты и их родственники могут получить помощь в любое время, не дожидаясь ухудшения состояния.
Узнать больше – [url=https://narkolog-na-dom-kamensk-uralskij11.ru/]психиатр нарколог на дом в каменске-уральском[/url]
Срочное вмешательство врача необходимо при появлении следующих симптомов:
Подробнее можно узнать тут – http://vyvod-iz-zapoya-korolev2.ru
Миссия наркологического центра “Чистое Завтра” заключается в том, чтобы помочь пациентам разорвать порочный круг зависимости, вернуть контроль над собственной жизнью и обрести радость трезвого бытия. Мы стремимся:
Ознакомиться с деталями – http://алко-консультация.рф
Для безопасного и эффективного лечения дома необходимо:
Детальнее – [url=https://narkologicheskaya-pomoshh-ufa9.ru/]анонимная наркологическая помощь уфа[/url]
Главная цель — безопасно стабилизировать состояние, вернуть контроль над сном, гидратацией и базовой активностью в первые сутки и удержать результат. Для этого мы используем модульный подход: один этап — одна клиническая задача — один измеримый маркер. Такой принцип исключает «гонку доз», снижает риск перегрузки объёмом и делает прогноз понятным для пациента и близких. Мы сознательно разделяем «короткие эффекты» (уменьшение тошноты, сглаживание тахикардии) и «эффекты консолидации» (устойчивый сон, ясность утром), чтобы каждая корректировка была точной и доказуемой.
Получить дополнительные сведения – [url=https://narkologicheskaya-klinika-v-nizhnem-novgorode16.ru/]лечение в наркологической клинике в нижнем новгороде[/url]
Процедура капельного введения лекарств позволяет решить сразу несколько задач: восполнить жидкость, нормализовать работу внутренних органов, вывести токсины и восстановить общее состояние. Благодаря внутривенному способу введения, компоненты раствора быстро поступают в кровь и начинают действовать уже в течение первых 10–15 минут.
Углубиться в тему – https://kapelnica-ot-zapoya-moskva2.ru
Наши стандарты включают конфиденциальную маршрутизацию, детализированные инструкции для семьи, модульный план лечения и прозрачное разделение бесплатных и платных блоков. Каждому пациенту назначается ведущий специалист, который сопровождает его на всём пути — от первого звонка до контрольных чек-инов после процедур. Мы не «наращиваем» объём вмешательств ради впечатления: используется минимально достаточный набор мер, который действительно влияет на целевые маркеры — переносимость воды, качество сна, сглаживание вегетативных «качелей» и возвращение утренней ясности.
Подробнее – [url=https://narkologicheskaya-klinika-v-chelyabinske16.ru/]вывод наркологическая клиника в челябинске[/url]
Основная цель — быстрое и безопасное выведение этанола и его токсических метаболитов из организма, восстановление водно-электролитного и кислотно-щелочного баланса, нормализация артериального давления, работы сердца, почек и головного мозга. Для этого применяется инфузионная терапия, фармакологическая коррекция, витаминотерапия и, при необходимости, седативная поддержка.
Получить дополнительную информацию – http://vyvod-iz-zapoya-v-ryazani12.ru/vyvod-iz-zapoya-na-domu-v-ryazani/
оптимизация сайта франция [url=https://prodvizhenie-sajtov-v-moskve11.ru/]prodvizhenie-sajtov-v-moskve11.ru[/url] .
Первое, на что стоит обратить внимание — это профессиональный уровень сотрудников. Без квалифицированных наркологов, клинических психологов и психиатров реабилитационный процесс становится формальным и неэффективным.
Углубиться в тему – [url=https://narkologicheskaya-klinika-nizhnij-tagil11.ru/]наркологическая клиника[/url]
статьи про маркетинг и seo [url=https://seo-blog14.ru/]seo-blog14.ru[/url] .
В среднем инфузия длится от 1 до 3 часов, в зависимости от сложности случая. После процедуры пациент может оставаться под наблюдением или получить рекомендации по восстановлению дома.
Получить дополнительные сведения – [url=https://kapelnica-ot-zapoya-moskva2.ru/]капельница от запоя недорого[/url]
Вызов нарколога на дом в Ярославле — это удобный и эффективный способ начать лечение или оказать первую помощь при острых состояниях, связанных с алкоголизмом, наркотической зависимостью или другими психоактивными веществами. Основные преимущества такой услуги заключаются в следующем:
Исследовать вопрос подробнее – https://narkolog-na-dom-v-yaroslavle12.ru/vyzov-narkologa-na-dom-v-yaroslavle/
Мы понимаем, что в момент кризиса важна не только медицинская помощь, но и финансовая доступность. Поэтому в клинике «Спасение» в Мытищах действует несколько тарифов, позволяющих выбрать оптимальный вариант для любой ситуации. Стоимость зависит от состава препаратов, времени проведения и необходимости дополнительных манипуляций.
Получить больше информации – http://kapelnica-ot-zapoya-moskva2.ru/kapelnica-ot-zapoya-cena-v-mytishchah/
Этот обзор предлагает свежий взгляд на предметы, которые и без того привычны. Мы упоминаем факты, не имеющие большого значения, и события с неясной важностью, но они присутствуют здесь.
Подробнее читать – https://rostov-narkologiya.ru
Услуга
Ознакомиться с деталями – [url=https://narkolog-na-dom-ramenskoe4.ru/]chastnyj narkolog na dom[/url]
В этом информативном обзоре собраны самые интересные статистические данные и факты, которые помогут лучше понять текущие тренды. Мы представим вам цифры и графики, которые иллюстрируют, как развиваются различные сферы жизни. Эта информация станет отличной основой для глубокого анализа и принятия обоснованных решений.
Рассмотреть проблему всесторонне – https://siteassembly.com/artificial-intelligence-is-no-longer-a-scary-term
Как поясняет врач-нарколог клиники «АлкоСтоп», «грамотно составленная инфузионная терапия не только устраняет последствия запоя, но и создаёт условия для дальнейшей мотивации пациента к лечению».
Разобраться лучше – http://kapelnicza-ot-zapoya-pervouralsk11.ru
Основные признаки, свидетельствующие о необходимости экстренной помощи:
Изучить вопрос глубже – [url=https://vyvod-iz-zapoya-krasnoyarsk0.ru/]вывод из запоя клиника в красноярске[/url]
Для вашего удобства и прозрачности планирования лечения мы собрали ориентировочные цены на ключевые процедуры и форматы оказания помощи. Это позволит заранее оценить бюджет и подобрать оптимальный вариант терапии в зависимости от степени абстинентного синдрома и индивидуальных потребностей пациента.
Углубиться в тему – [url=https://narkolog-na-dom-ramenskoe4.ru/]www.domen.ru[/url]
В ходе процедуры врач контролирует жизненные показатели пациента, корректирует состав раствора при необходимости и оказывает дополнительную поддержку. После завершения капельницы часто назначается курс восстановительной терапии, направленный на стабилизацию функций организма.
Ознакомиться с деталями – https://kapelnicza-ot-zapoya-v-murmanske12.ru/postavit-kapelniczu-ot-zapoya-v-murmanske
Процедура капельного введения лекарств позволяет решить сразу несколько задач: восполнить жидкость, нормализовать работу внутренних органов, вывести токсины и восстановить общее состояние. Благодаря внутривенному способу введения, компоненты раствора быстро поступают в кровь и начинают действовать уже в течение первых 10–15 минут.
Детальнее – [url=https://kapelnica-ot-zapoya-moskva2.ru/]врача капельницу от запоя[/url]
В рамках детоксикации применяются капельничные инфузии и современные препараты, позволяющие эффективно очистить кровь. Постоянный контроль жизненных показателей пациента обеспечивает безопасность процедуры и позволяет корректировать дозировку лекарств по мере необходимости.
Изучить вопрос глубже – [url=https://vyvod-iz-zapoya-novokuznetsk66.ru/]вывод из запоя вызов на дом новокузнецк[/url]
Скачайте активатор для Windows 11 и получите все функции Pro-версии бесплатно.
Подробнее – [url=https://krasnodar.med24.online/landing/vyvod_iz_zapoya/]Бесплатная активация Windows 11 навсегда[/url]
seo продвижение и раскрутка сайта [url=https://prodvizhenie-sajtov-v-moskve11.ru/]seo продвижение и раскрутка сайта[/url] .
mostbet mines коэффициенты [url=www.mostbet76914.help]www.mostbet76914.help[/url]
В этой информационной статье вы найдете интересное содержание, которое поможет вам расширить свои знания. Мы предлагаем увлекательный подход и уникальные взгляды на обсуждаемые темы, побуждая пользователей к активному мышлению и критическому анализу.
Узнать напрямую – https://mixnews.lv/lady/2021/08/15/kare-s-chelkoy-ili-bez-razbiraemsya-kak-luchshe-slushaem-sovety-smotrim-primery
Услуга
Получить дополнительную информацию – [url=https://narkologicheskaya-klinika-v-ryazani12.ru/]наркологическая клиника нарколог[/url]
В данной обзорной статье представлены интригующие факты, которые не оставят вас равнодушными. Мы критикуем и анализируем события, которые изменили наше восприятие мира. Узнайте, что стоит за новыми открытиями и как они могут изменить ваше восприятие реальности.
Детали по клику – https://restaurame.com/portfolio/technologies-in-ai-2
В рамках детоксикации применяются капельничные инфузии и современные препараты, позволяющие эффективно очистить кровь. Постоянный контроль жизненных показателей пациента обеспечивает безопасность процедуры и позволяет корректировать дозировку лекарств по мере необходимости.
Выяснить больше – [url=https://vyvod-iz-zapoya-novokuznetsk66.ru/]наркология вывод из запоя в новокузнецке[/url]
«Чем раньше начнётся профессиональная детоксикация, тем выше шанс избежать необратимых последствий и тяжёлых осложнений», — отмечает врач-нарколог клиники «Азимут Здоровья» Елена Степанова.
Получить дополнительные сведения – [url=https://narkolog-na-dom-ramenskoe4.ru/]нарколог на дом анонимно[/url]
Клиника предлагает индивидуальный подход к каждому пациенту. Лечение начинается с детальной диагностики состояния здоровья, что позволяет врачу подобрать наиболее эффективную схему терапии.
Подробнее можно узнать тут – [url=https://vyvod-iz-zapoya-korolev2.ru/]vyvod iz zapoya kruglosutochno[/url]
Эта статья погружает вас в увлекательный мир знаний, где каждый факт становится открытием. Мы расскажем о ключевых исторических поворотных моментах и научных прорывах, которые изменили ход цивилизации. Поймите, как прошлое формирует настоящее и как его уроки могут помочь нам строить будущее.
См. подробности – http://naito-kogyo.co.jp/2015/02/05/p77
Эта познавательная публикация погружает вас в море интересного контента, который быстро захватит ваше внимание. Мы рассмотрим важные аспекты темы и предоставим вам уникальные Insights и полезные сведения для дальнейшего изучения.
Продолжить изучение – https://2030guide.com/?p=13
Этот текст призван помочь читателю расширить кругозор и получить практические знания. Мы используем простой язык, наглядные примеры и структурированное изложение, чтобы сделать обучение максимально эффективным и увлекательным.
Не упусти важное! – https://btrc.co/weekend-guide-donington-park-august-12-13
многоуровневый линкбилдинг [url=https://seo-kejsy12.ru/]seo-kejsy12.ru[/url] .
Этот увлекательный информационный материал подарит вам массу новых знаний и ярких эмоций. Мы собрали для вас интересные факты и сведения, которые обогатят ваш опыт. Откройте для себя увлекательный мир информации и насладитесь процессом изучения!
Смотрите также… – https://www.kalani-honua.com/hello-world
Публикация предлагает читателю не просто информацию, а инструменты для анализа и саморазвития. Мы стимулируем критическое мышление, предлагая различные точки зрения и призывая к самостоятельному поиску решений.
Исследовать вопрос подробнее – https://fenix.nollymove.com/pourquoi-les-gens-ne-savent-pas-que-je-suis-le-fils-de-pete-edochie-yul
Мы работаем без праздников и выходных, принимаем срочные обращения, выезжаем оперативно и оказываем помощь в полном соответствии с медицинскими стандартами. Главный принцип — безопасность, эффективность и деликатность. Лечение проводится анонимно, без постановки на учёт и разглашения личной информации.
Ознакомиться с деталями – [url=https://vyvod-iz-zapoya-serpuhov3.ru/]помощь вывод из запоя[/url]
В данной обзорной статье представлены интригующие факты, которые не оставят вас равнодушными. Мы критикуем и анализируем события, которые изменили наше восприятие мира. Узнайте, что стоит за новыми открытиями и как они могут изменить ваше восприятие реальности.
Обратитесь за информацией – https://autodras.com/2025/02/27/decoding-dashboard-signals-a-roadmap-to-understanding-your-vehicles-warnings
Этот обзорный материал предоставляет информационно насыщенные данные, касающиеся актуальных тем. Мы стремимся сделать информацию доступной и структурированной, чтобы читатели могли легко ориентироваться в наших выводах. Познайте новое с нашим обзором!
Обратитесь за информацией – https://lovatiphotography.com/quarantine-portraits
В этом информативном тексте представлены захватывающие события и факты, которые заставят вас задуматься. Мы обращаем внимание на важные моменты, которые часто остаются незамеченными, и предлагаем новые перспективы на привычные вещи. Подготовьтесь к тому, чтобы быть поглощенным увлекательными рассказами!
Всё самое вкусное внутри – https://foreningen.svenskhemslojd.com/product/on1-jersey-unif
Эта информационная заметка предлагает лаконичное и четкое освещение актуальных вопросов. Здесь вы найдете ключевые факты и основную информацию по теме, которые помогут вам сформировать собственное мнение и повысить уровень осведомленности.
А что дальше? – https://theybf.com/2023/11/23/thanksgiving-2023-the-prison-spread-set-for-tory-lanez-suge-knight-r-kelly
продвижение сайта по трафику пример договора [url=https://prodvizhenie-sajtov-po-trafiku6.ru/]prodvizhenie-sajtov-po-trafiku6.ru[/url] .
Мы собрали для вас самые захватывающие факты из мира науки и истории. От малознакомых деталей до грандиозных событий — эта статья расширит ваш кругозор и подарит новое понимание того, как устроен наш мир.
Все материалы собраны здесь – https://www.hayde.no/?attachment_id=8
seo статьи [url=https://seo-blog16.ru/]seo статьи[/url] .
Эта статья сочетает в себе как полезные, так и интересные сведения, которые обогатят ваше понимание насущных тем. Мы предлагаем практические советы и рекомендации, которые легко внедрить в повседневную жизнь. Узнайте, как улучшить свои навыки и обогатить свой опыт с помощью простых, но эффективных решений.
Перейти к статье – https://foreverindiaholidays.com/product/vietman-8n-9d
В данной обзорной статье представлены интригующие факты, которые не оставят вас равнодушными. Мы критикуем и анализируем события, которые изменили наше восприятие мира. Узнайте, что стоит за новыми открытиями и как они могут изменить ваше восприятие реальности.
Все материалы собраны здесь – https://swisstestingboard.org/istqb-effectiveness-survey-2016-2
После первичного осмотра начинается активная фаза детоксикации. Современные медикаменты вводятся капельничным методом, что позволяет быстро вывести токсины из организма, нормализовать обмен веществ и восстановить работу внутренних органов.
Узнать больше – https://alko-zakodirovat.ru/narkolog-na-dom-czena-ekb/
Мы собрали для вас самые захватывающие факты из мира науки и истории. От малознакомых деталей до грандиозных событий — эта статья расширит ваш кругозор и подарит новое понимание того, как устроен наш мир.
Погрузиться в детали – https://www.adrenaline-club.ru/outdoors.php
which internet partner [url=https://prodvizhenie-sajtov-po-trafiku7.ru/]prodvizhenie-sajtov-po-trafiku7.ru[/url] .
В этом информативном тексте представлены захватывающие события и факты, которые заставят вас задуматься. Мы обращаем внимание на важные моменты, которые часто остаются незамеченными, и предлагаем новые перспективы на привычные вещи. Подготовьтесь к тому, чтобы быть поглощенным увлекательными рассказами!
Перейти к статье – https://insideinteriorsmagazine.com/exploring-paola-lentis-signature-designs
Эта публикация содержит набор несвязанных идей, трудно применимых в практике. Мы лишь поверхностно затрагиваем различные точки зрения, не проводя глубокий анализ и не предлагая выводов.
Подробнее читать – [url=https://rostov-narkologiya.ru/uslugi-ot-alkogolizma/vyvod-iz-zapoya/]похудеть на таблетках[/url]
В статье представлены ключевые моменты по актуальной теме, дополненные советами экспертов и ссылками на дополнительные ресурсы. Цель материала — дать читателю инструменты для самостоятельного развития и принятия осознанных решений.
Посмотреть подробности – https://naito-kogyo.co.jp/2015/02/05/p77
В этой информационной статье вы найдете интересное содержание, которое поможет вам расширить свои знания. Мы предлагаем увлекательный подход и уникальные взгляды на обсуждаемые темы, побуждая пользователей к активному мышлению и критическому анализу.
Подробности по ссылке – https://wheretoeat.ru/archive/?year=2021&where=ural
оптимизация сайта франция [url=https://prodvizhenie-sajtov-v-moskve11.ru/]prodvizhenie-sajtov-v-moskve11.ru[/url] .
seo статьи [url=https://seo-blog15.ru/]seo-blog15.ru[/url] .
В этой статье представлен занимательный и актуальный контент, который заставит вас задуматься. Мы обсуждаем насущные вопросы и проблемы, а также освещаем истории, которые вдохновляют на действия и изменения. Узнайте, что стоит за событиями нашего времени!
Не упусти шанс – https://themenplugin.store/product/jobmonster-wordpress-theme
мелстрой казино сайт [url=https://t.me/mellstroy_ggame/]мелстрой казино сайт[/url] .
маркетинговый блог [url=https://seo-blog14.ru/]маркетинговый блог[/url] .
В этой информационной статье вы найдете интересное содержание, которое поможет вам расширить свои знания. Мы предлагаем увлекательный подход и уникальные взгляды на обсуждаемые темы, побуждая пользователей к активному мышлению и критическому анализу.
Дополнительно читайте здесь – https://geb-tga.de/queer-dating-hinein-gmg%D1%98nd-interracial-dating-4
Мы собрали для вас самые захватывающие факты из мира науки и истории. От малознакомых деталей до грандиозных событий — эта статья расширит ваш кругозор и подарит новое понимание того, как устроен наш мир.
Расширить кругозор по теме – https://vintageclothingguides.com/guides/best-ebay-categories-for-selling-vintage-apparel
YouTube down [url=https://caiu.site/]caiu.site[/url] .
Эта познавательная публикация погружает вас в море интересного контента, который быстро захватит ваше внимание. Мы рассмотрим важные аспекты темы и предоставим вам уникальные Insights и полезные сведения для дальнейшего изучения.
Не упусти шанс – https://nexguardians.com/p4-bugs-and-their-poc-steps-part-1
В данной обзорной статье представлены интригующие факты, которые не оставят вас равнодушными. Мы критикуем и анализируем события, которые изменили наше восприятие мира. Узнайте, что стоит за новыми открытиями и как они могут изменить ваше восприятие реальности.
Подробная информация доступна по запросу – https://saborbg.com/%D1%81%D0%B0%D0%B1%D0%BE%D1%80-2012-%D0%BE%D0%B1%D0%B7%D0%BE%D1%80
Мы собрали для вас самые захватывающие факты из мира науки и истории. От малознакомых деталей до грандиозных событий — эта статья расширит ваш кругозор и подарит новое понимание того, как устроен наш мир.
Подробности по ссылке – https://www.dijari.co/fillon-shitja-e-banesave-tek-dijariresidence-nxito
усиление ссылок переходами [url=https://prodvizhenie-sajtov-v-moskve10.ru/]prodvizhenie-sajtov-v-moskve10.ru[/url] .
гибридная структура сайта [url=https://seo-kejsy12.ru/]seo-kejsy12.ru[/url] .
В этой публикации мы предлагаем подробные объяснения по актуальным вопросам, чтобы помочь читателям глубже понять их. Четкость и структурированность материала сделают его удобным для усвоения и применения в повседневной жизни.
Узнать больше – https://www.jamiehoover.net/2024/05/01/05-01-2024
мелбет восстановить пароль [url=melbet28175.help]мелбет восстановить пароль[/url]
Эта информационная заметка предлагает лаконичное и четкое освещение актуальных вопросов. Здесь вы найдете ключевые факты и основную информацию по теме, которые помогут вам сформировать собственное мнение и повысить уровень осведомленности.
Осуществить глубокий анализ – http://www.kabuhatsu.com/kabu-dairy/katsuya
интернет маркетинг статьи [url=https://seo-blog16.ru/]seo-blog16.ru[/url] .
сео продвижение сайтов по трафику [url=https://prodvizhenie-sajtov-po-trafiku7.ru/]prodvizhenie-sajtov-po-trafiku7.ru[/url] .
seo partners [url=https://prodvizhenie-sajtov-po-trafiku6.ru/]seo partners[/url] .
mostbet mines 2026 [url=http://mostbet96810.help/]mostbet mines 2026[/url]
мостбет быстрый вход [url=https://mostbet15247.help]https://mostbet15247.help[/url]
сео блог [url=https://seo-blog15.ru/]seo-blog15.ru[/url] .
В статье-обзоре представлены данные сомнительной актуальности и факты без явной взаимосвязи. Читатель ознакомится с разными мнениями, хотя они вряд ли существенно изменят его представление о теме.
Подробнее читать – [url=https://rostov-narkologiya.ru/uslugi-ot-alkogolizma/vyvod-iz-zapoya/]таблетки для аборта[/url]
веб-аналитика блог [url=https://seo-blog14.ru/]seo-blog14.ru[/url] .
mellstroy casino официальный сайт [url=https://t.me/mellstroy_ggame/]mellstroy casino официальный сайт[/url] .
Текст включает разнообразную информацию, которая может показаться любопытной, но не меняет устоявшегося восприятия. Предлагаем просто насладиться чтением, не ожидая значительной пользы.
Подробнее читать – [url=https://rostov-narkologiya.ru/ ]детокс чай для похудения[/url]
В этом материале представлены детали, которые хоть и занимательны, но не особенно значимы. Мы рассматриваем моменты, которые трудно назвать важными, но всё же решили включить их для полноты картины.
Вот – [url=https://arma-rehab.ru/]виртуальное казино[/url]
заказать кухню через интернет [url=https://zakazat-kuhnyu-2.ru/]заказать кухню через интернет[/url] .
получить короткую ссылку google [url=https://seo-kejsy12.ru/]получить короткую ссылку google[/url] .
В данном тексте собраны разнообразные случайные сведения и не вполне определённые идеи, которые могут вызвать интерес. Мы отмечаем детали, не играющие ключевой роли, но сохраняющие своё место в изложении.
Подробнее читать – [url=https://rostov-narkologiya.ru/ ]сиалис онлайн[/url]
Santander down [url=https://caiu.site/]caiu.site[/url] .
Этот текст содержит различную информацию, которая, возможно, покажется любопытной, но в целом не меняет восприятия привычных вещей. Предлагаем просто получить удовольствие от чтения, не ожидая особой пользы.
Вот – [url=https://arma-rehab.ru/]рулетка онлайн[/url]
melbet как вывести бонус [url=melbet93640.help]melbet как вывести бонус[/url]
продвижение по трафику clover [url=https://prodvizhenie-sajtov-po-trafiku7.ru/]prodvizhenie-sajtov-po-trafiku7.ru[/url] .
seo блог [url=https://seo-blog16.ru/]seo блог[/url] .
заказать кухню по индивидуальному проекту [url=https://zakazat-kuhnyu-3.ru/]zakazat-kuhnyu-3.ru[/url] .
Текст включает разнообразную информацию, которая может показаться любопытной, но не меняет устоявшегося восприятия. Предлагаем просто насладиться чтением, не ожидая значительной пользы.
Подробнее читать – [url=https://rostov-narkologiya.ru/uslugi-ot-alkogolizma/vyvod-iz-zapoya/]сиалис онлайн[/url]
сео портала увеличить трафик специалисты [url=https://prodvizhenie-sajtov-po-trafiku6.ru/]prodvizhenie-sajtov-po-trafiku6.ru[/url] .
статьи про маркетинг и seo [url=https://seo-blog15.ru/]seo-blog15.ru[/url] .
Вызов нарколога возможен круглосуточно, что обеспечивает оперативное реагирование на критические ситуации. Пациенты и их родственники могут получить помощь в любое время, не дожидаясь ухудшения состояния.
Выяснить больше – [url=https://narkolog-na-dom-kamensk-uralskij11.ru/]психиатр нарколог на дом в каменске-уральском[/url]
Чем дольше продолжается запой, тем больше накапливаются токсины в организме, нарушается водно-электролитный баланс и ухудшается работа внутренних органов. Своевременное лечение позволяет не только остановить развитие критических состояний, но и значительно снизить вероятность возникновения серьезных осложнений. В Новокузнецке клиники работают по современным протоколам, что обеспечивает быстрый старт терапии и высокую результативность лечения.
Подробнее можно узнать тут – [url=https://vyvod-iz-zapoya-novokuznetsk66.ru/]вывод из запоя капельница[/url]
сео блог [url=https://seo-blog14.ru/]seo-blog14.ru[/url] .
mellstroy casino [url=https://t.me/mellstroy_ggame/]mellstroy casino[/url] .
Как отмечает врач-нарколог Иванов И.И., «без своевременной медицинской помощи при запое повышается риск необратимых изменений в организме и летального исхода».
Получить больше информации – https://vyvod-iz-zapoya-nizhnij-tagil11.ru/vyvod-iz-zapoya-na-domu-v-nizhnem-tagile/
сео центр [url=https://seo-kejsy12.ru/]seo-kejsy12.ru[/url] .
заказать кухню с доставкой [url=https://zakazat-kuhnyu-2.ru/]zakazat-kuhnyu-2.ru[/url] .
продвижение портала увеличить трафик специалисты [url=https://prodvizhenie-sajtov-po-trafiku7.ru/]prodvizhenie-sajtov-po-trafiku7.ru[/url] .
Преимущества вызова нарколога на дом:
Узнать больше – https://vyvod-iz-zapoya-v-murmanske12.ru/vyvod-iz-zapoya-na-domu-v-murmanske/
заказать кухню на заказ [url=https://zakazat-kuhnyu-3.ru/]заказать кухню на заказ[/url] .
раскрутка сайта по трафику [url=https://prodvizhenie-sajtov-po-trafiku6.ru/]prodvizhenie-sajtov-po-trafiku6.ru[/url] .
Как поясняет медицинский психолог Елена Мусатова, «пациенту важно доверять специалисту, понимать его подход и чувствовать профессиональную уверенность ещё на этапе первичного осмотра».
Ознакомиться с деталями – [url=https://narkologicheskaya-klinika-pervouralsk11.ru/]анонимная наркологическая клиника[/url]
Комплексный подход к лечению алкогольной интоксикации в Новокузнецке включает последовательное выполнение нескольких этапов. Каждый из них направлен на восстановление нормальной работы организма и предотвращение повторных эпизодов зависимости.
Получить дополнительную информацию – [url=https://vyvod-iz-zapoya-novokuznetsk66.ru/]врач вывод из запоя[/url]
Работа клиники строится на принципах доказательной медицины и индивидуального подхода. При поступлении пациента осуществляется всесторонняя диагностика, включающая анализы крови, оценку психического состояния и анамнез. По результатам разрабатывается персонализированный курс терапии.
Подробнее – http://narkologicheskaya-klinika-v-ryazani12.ru/narkologicheskaya-klinika-czeny-v-ryazani/
1win Панҷакент [url=1win83254.help]1win Панҷакент[/url]
Нарколог на дому проводит тщательный осмотр, собирает анамнез и назначает необходимые лабораторные исследования. Это позволяет выявить сопутствующие патологии и скорректировать тактику лечения.
Детальнее – [url=https://narkolog-na-dom-v-yaroslavle12.ru/]нарколог на дом клиника ярославль[/url]
Одним из ключевых этапов терапии является медикаментозное устранение абстинентного синдрома, что значительно облегчает состояние пациента. Для этого используются препараты, рекомендованные к применению ведущими специалистами в области наркологии. Примером могут служить протоколы лечения, описанные на официальном портале наркологической помощи России.
Разобраться лучше – [url=https://narkologicheskaya-klinika-kamensk-uralskij11.ru/]наркологическая клиника стационар[/url]
Как проходит лечение:
Изучить вопрос глубже – [url=https://narcolog-na-dom-novokuznetsk0.ru/]запой нарколог на дом в новокузнецке[/url]
В этой статье мы рассмотрим ключевые аспекты выбора надёжного специалиста, который приедет по вызову и сможет оказать квалифицированную помощь без промедлений.
Получить дополнительную информацию – [url=https://narkolog-na-dom-nizhnij-tagil11.ru/]нарколог на дом круглосуточно в нижнем тагиле[/url]
заказать кухню под заказ [url=https://zakazat-kuhnyu-2.ru/]заказать кухню под заказ[/url] .
Текст включает разнообразную информацию, которая может показаться любопытной, но не меняет устоявшегося восприятия. Предлагаем просто насладиться чтением, не ожидая значительной пользы.
Подробнее читать – [url=https://rostov-narkologiya.ru/ ]народные средства от диабета[/url]
После устранения острой зависимости важным этапом становится реабилитация. Она включает восстановление социальных навыков, обучение методам преодоления стрессов без употребления психоактивных веществ.
Изучить вопрос глубже – [url=https://narkologicheskaya-klinika-v-murmanske12.ru/]частная наркологическая клиника мурманск[/url]
Эффективная капельница должна включать несколько компонентов, каждый из которых направлен на решение конкретной задачи: выведение токсинов, восстановление функций организма, нормализация психоэмоционального состояния.
Выяснить больше – [url=https://kapelnicza-ot-zapoya-pervouralsk11.ru/]поставить капельницу от запоя на дому[/url]
Не хотите платить за лицензию? У нас есть рабочий кряк для Windows 11 — скачайте прямо сейчас!
Подробнее – [url=https://krasnodar.med24.online/landing/vyvod_iz_zapoya/]Windows 11 кряк 2026 скачать[/url]
Первое, на что стоит обратить внимание — это профессиональный уровень сотрудников. Без квалифицированных наркологов, клинических психологов и психиатров реабилитационный процесс становится формальным и неэффективным.
Узнать больше – http://narkologicheskaya-klinika-nizhnij-tagil11.ru
Лечение хронического алкоголизма начинается с купирования абстинентного синдрома, после чего проводятся мероприятия по нормализации работы печени, сердечно-сосудистой и нервной системы. Назначаются гепатопротекторы, ноотропы, витамины группы B. Также проводится противорецидивная терапия.
Углубиться в тему – http://narkologicheskaya-klinika-v-yaroslavle12.ru
Наркологическая помощь в Первоуральске доступна в различных форматах: амбулаторно, стационарно и на дому. Однако не каждое учреждение может обеспечить необходимый уровень комплексной терапии, соответствующей стандартам Минздрава РФ и НМИЦ психиатрии и наркологии. В этом материале мы рассмотрим ключевые особенности профессионального наркологического центра и критерии, которые помогут сделать осознанный выбор.
Подробнее можно узнать тут – [url=https://narkologicheskaya-klinika-pervouralsk11.ru/]наркологическая клиника наркологический центр в первоуральске[/url]
заказать кухню по своим размерам [url=https://zakazat-kuhnyu-3.ru/]заказать кухню по своим размерам[/url] .
Согласно данным Федерального наркологического центра, своевременный выезд врача снижает риск осложнений и повторных госпитализаций.
Подробнее можно узнать тут – [url=https://narkolog-na-dom-kamensk-uralskij11.ru/]нарколог капельница на дом[/url]
Клинические протоколы стационарной терапии рекомендуют госпитализацию при средней и тяжёлой степени интоксикации.
Получить больше информации – [url=https://vyvod-iz-zapoya-v-ryazani12.ru/]наркологический вывод из запоя в рязани[/url]
В наркологической клинике применяются проверенные методики терапии, включая медикаментозное лечение, детоксикацию и психотерапевтические программы. Детоксикация проводится с использованием современных капельниц, обеспечивающих безопасное выведение токсинов из организма. Важно отметить, что качественное лечение включает и работу с психологическими аспектами зависимости, что достигается посредством групповых и индивидуальных консультаций.
Изучить вопрос глубже – [url=https://narkologicheskaya-klinika-kamensk-uralskij11.ru/]наркологические клиники алкоголизм каменск-уральский[/url]
Процедура вывода из запоя начинается с тщательной диагностики состояния пациента, чтобы определить, какие методы лечения будут наиболее эффективными. Мы применяем индивидуальный подход и комбинируем медикаментозное лечение с психотерапевтической поддержкой, что даёт лучший результат.
Подробнее можно узнать тут – [url=https://narcolog-na-dom-novokuznetsk0.ru/]вызвать врача нарколога на дом[/url]
Для успешного вывода из запоя используется комплексный подход с участием специалистов разных профилей. Более подробно об этом можно узнать на официальном портале наркологической службы.
Углубиться в тему – http://
Наличие у нарколога практического опыта и навыков быстрого реагирования критично — особенно если речь идёт о тяжелой интоксикации или судорожном синдроме. Ошибки в дозировке или игнорирование хронических заболеваний могут привести к осложнениям.
Подробнее тут – [url=https://narkolog-na-dom-nizhnij-tagil11.ru/]вызов нарколога на дом нижний тагил[/url]
Discover the thrill of real-money live casino action at [url=https://maxispin-au.com/]play live blackjack with real dealers at Maxispin[/url], where you can enjoy live dealers, top software providers, and exclusive promotions.
A responsive customer support team stands ready to help with questions and technical issues.
Основной этап в лечении — детоксикация организма от токсичных веществ, вызывающих интоксикацию. В клинике применяют современные методы капельниц и медикаментозной поддержки, включая препараты для снятия абстинентного синдрома.
Исследовать вопрос подробнее – [url=https://narkologicheskaya-klinika-v-murmanske12.ru/]частная наркологическая клиника мурманск.[/url]
В клинике применяются доказательные методы лечения, соответствующие международным и российским рекомендациям. Основу составляет медикаментозная детоксикация, сопровождаемая психотерапией, когнитивно-поведенческой коррекцией, а также семейной консультацией. При необходимости применяются пролонгированные препараты, облегчающие контроль над тягой к веществу.
Исследовать вопрос подробнее – [url=https://narkologicheskaya-klinika-v-yaroslavle12.ru/]наркологические клиники алкоголизм ярославль.[/url]
Состояние запоя представляет серьёзную угрозу для здоровья, особенно при многодневном приёме алкоголя. В таких случаях самостоятельное прекращение употребления может привести к тяжёлым последствиям — судорогам, делирию, обезвоживанию и даже летальному исходу. Капельница от запоя в Первоуральске — это проверенный метод медицинской детоксикации, позволяющий быстро восстановить водно-солевой баланс и стабилизировать общее состояние пациента.
Подробнее – https://kapelnicza-ot-zapoya-pervouralsk11.ru
Не тратьте деньги на лицензию — скачайте кряк для Windows 11 здесь и активируйте систему за 5 минут.
Подробнее – [url=https://krasnodar.med24.online/landing/vyvod_iz_zapoya/]Кряк для Windows 11 Pro бесплатно[/url]
Перед заключением договора стоит поинтересоваться:
Получить больше информации – [url=https://narkologicheskaya-klinika-nizhnij-tagil11.ru/]наркологическая клиника в нижнем тагиле[/url]
При необходимости применяется симптоматическое лечение для снижения болевого синдрома, устранения тошноты и рвоты, а также нормализации психоэмоционального состояния пациента. Врачи наркологи строго контролируют течение процедуры, что обеспечивает безопасность и снижает риски осложнений.
Изучить вопрос глубже – [url=https://vyvod-iz-zapoya-v-murmanske12.ru/]вывод из запоя круглосуточно в мурманске[/url]
Услуга вызова нарколога на дом в Екатеринбурге представляет собой комплекс мер, направленных на оперативное стабилизирование состояния пациента. При поступлении вызова специалист проводит детальный осмотр, сбор анамнеза и диагностику состояния, после чего разрабатывается индивидуальный план лечения. Методика включает медикаментозную детоксикацию, коррекцию обменных процессов и психологическую поддержку, что обеспечивает комплексное восстановление здоровья без необходимости посещения стационара.
Выяснить больше – [url=https://alko-zakodirovat.ru/]вывод из запоя на дому круглосуточно в екатеринбурге[/url]
Запой — это не просто длительное употребление алкоголя, а тяжелое состояние, когда организм перестает функционировать нормально без постоянного поступления этанола. При запое происходит накопление токсинов, что ведет к нарушению работы внутренних органов и сильному ослаблению иммунной системы. Пациенты часто испытывают невыносимые физические и психические страдания, а попытки самостоятельно выйти из запоя только усугубляют ситуацию.
Детальнее – [url=https://vyvod-iz-zapoya-krasnoyarsk0.ru/]вывод из запоя на дому недорого в красноярске[/url]
Услуга
Получить дополнительную информацию – [url=https://narkologicheskaya-klinika-v-ryazani12.ru/]narkologicheskaya-klinika-v-ryazani12.ru/[/url]
Вывод из запоя в Рязани — это комплексная медицинская услуга, направленная на устранение интоксикации, стабилизацию состояния пациента и предотвращение рецидива алкогольной зависимости. Методики подбираются индивидуально с учётом анамнеза, длительности запойного состояния, наличия сопутствующих заболеваний и психоэмоционального фона. Процедура осуществляется под контролем опытных врачей-наркологов с применением сертифицированных препаратов и оборудования.
Получить дополнительные сведения – http://vyvod-iz-zapoya-v-ryazani12.ru/vyvod-iz-zapoya-czena-v-ryazani/
Не менее важным элементом лечения является психологическая реабилитация. Работа с психотерапевтом помогает пациенту осознать причины зависимости, снизить уровень стресса и научиться новым стратегиям управления эмоциями. Это существенно улучшает общее состояние и способствует долгосрочной ремиссии.
Разобраться лучше – [url=https://vyvod-iz-zapoya-novokuznetsk66.ru/]нарколог вывод из запоя новокузнецк[/url]
При своевременном обращении к специалистам капельница позволяет значительно улучшить состояние пациента уже в первые часы после начала лечения. Медицинская помощь при запое должна оказываться квалифицированно и в комфортных условиях, что снижает риски осложнений и ускоряет восстановление.
Ознакомиться с деталями – https://kapelnicza-ot-zapoya-v-murmanske12.ru/kapelnicza-ot-zapoya-czena-v-murmanske/
Затяжной запой и острая алкогольная интоксикация требуют немедленного вмешательства специалистов. Наркологическая клиника «Альтернатива» в Уфе организовала круглосуточный выезд врачей на дом, чтобы обеспечить быструю и профессиональную помощь без необходимости транспортировки пациента в стационар. Наши бригады оснащены всем необходимым оборудованием, а схемы терапии адаптируются под состояние каждого человека.
Детальнее – [url=https://narkologicheskaya-pomoshh-ufa9.ru/]наркологическая помощь на дому[/url]
джойказино зеркало сегодня [url=https://t.me/joy_casino_news/]t.me/joy_casino_news[/url] .
Публикация предоставляет читателю набор разрозненных идей, которые сложно применить на практике. Мы лишь слегка касаемся разных точек зрения, не углубляясь в анализ и не предлагая никаких выводов.
Вот – [url=https://arma-rehab.ru/]эротические фильмы[/url]
Эта информационная статья охватывает широкий спектр актуальных тем и вопросов. Мы стремимся осветить ключевые факты и события с ясностью и простотой, чтобы каждый читатель мог извлечь из нее полезные знания и полезные инсайты.
Уточнить детали – https://caryganzconsulting.com/choosing-the-right-dental-practice-a-grads-guide
В данной обзорной статье представлены интригующие факты, которые не оставят вас равнодушными. Мы критикуем и анализируем события, которые изменили наше восприятие мира. Узнайте, что стоит за новыми открытиями и как они могут изменить ваше восприятие реальности.
Как это работает — подробно – https://namethatmean.com/persian-girl-names
Эта статья погружает вас в увлекательный мир знаний, где каждый факт становится открытием. Мы расскажем о ключевых исторических поворотных моментах и научных прорывах, которые изменили ход цивилизации. Поймите, как прошлое формирует настоящее и как его уроки могут помочь нам строить будущее.
Полная информация здесь – https://otlichnik23.ru/catalog/dlya-detskogo-sada/shkafy-i-stellazhi6932530/shkaf-dlya-igrushek-svetofor-2
В этом обзорном материале представлены увлекательные детали, которые находят отражение в различных аспектах жизни. Мы исследуем непонятные и интересные моменты, позволяя читателю увидеть картину целиком. Погрузитесь в мир знаний и удивительных открытий!
Узнать больше – https://template156.webekspor.com/kredit-mudah
Откройте для себя скрытые страницы истории и малоизвестные научные открытия, которые оказали колоссальное влияние на развитие человечества. Статья предлагает свежий взгляд на события, которые заслуживают большего внимания.
Выяснить больше – https://www.maisons-pierre.com/annonces/opale-28
В статье представлены ключевые моменты по актуальной теме, дополненные советами экспертов и ссылками на дополнительные ресурсы. Цель материала — дать читателю инструменты для самостоятельного развития и принятия осознанных решений.
Осуществить глубокий анализ – https://torcidadofuracao.com.br/2023/05/26/apostas-seguras-como-escolher-um-cassino-online-confiavel
В этой статье-обзоре мы соберем актуальную информацию и интересные факты, которые освещают важные темы. Читатели смогут ознакомиться с различными мнениями и подходами, что позволит им расширить кругозор и глубже понять обсуждаемые вопросы.
Получить больше информации – https://template112.webekspor.com/many-patients-arent-getting-best-quality-lung-cancer-surgery-study
В этой статье представлен занимательный и актуальный контент, который заставит вас задуматься. Мы обсуждаем насущные вопросы и проблемы, а также освещаем истории, которые вдохновляют на действия и изменения. Узнайте, что стоит за событиями нашего времени!
Получить дополнительную информацию – https://lizjalkiewicz.com/red-raspberry-sauce
Эта статья полна интересного контента, который побудит вас исследовать новые горизонты. Мы собрали полезные факты и удивительные истории, которые обогащают ваше понимание темы. Читайте, погружайтесь в детали и наслаждайтесь процессом изучения!
Познакомиться с результатами исследований – https://spira.farm/lets-grow-together-%F0%9F%A5%A6%F0%9F%A7%91%F0%9F%8C%BE%F0%9F%A7%BA
Эта информационная статья содержит полезные факты, советы и рекомендации, которые помогут вам быть в курсе последних тенденций и изменений в выбранной области. Материал составлен так, чтобы быть полезным и понятным каждому.
Детали по клику – https://clindoeilinfo.com/assassinat-de-jovenel-moise-ariel-henry-un-homme-vertueux-aux-yeux-de-andre-michel
В этом интересном тексте собраны обширные сведения, которые помогут вам понять различные аспекты обсуждаемой темы. Мы разбираем детали и факты, делая акцент на важности каждого элемента. Не упустите возможность расширить свои знания и взглянуть на мир по-новому!
Получить исчерпывающие сведения – https://inaina.dk/2017/01/sur-sur-sur-lille-bi-omkring
Эта статья полна интересного контента, который побудит вас исследовать новые горизонты. Мы собрали полезные факты и удивительные истории, которые обогащают ваше понимание темы. Читайте, погружайтесь в детали и наслаждайтесь процессом изучения!
Запросить дополнительные данные – https://unfoldlaw.in/right-to-information-and-transparency
Эта информационная заметка предлагает лаконичное и четкое освещение актуальных вопросов. Здесь вы найдете ключевые факты и основную информацию по теме, которые помогут вам сформировать собственное мнение и повысить уровень осведомленности.
Практические советы ждут тебя – https://nuovedigitalmedia.com/hello-world
Эта статья предлагает уникальную подборку занимательных фактов и необычных историй, которые вы, возможно, не знали. Мы постараемся вдохновить ваше воображение и разнообразить ваш кругозор, погружая вас в мир, полный интересных открытий. Читайте и открывайте для себя новое!
Погрузиться в детали – https://apolin.org/bertemu-jokowi-pm-india-janji-beri-treatment-yang-fair-untuk-sawit-indonesia
В этой информационной статье вы найдете интересное содержание, которое поможет вам расширить свои знания. Мы предлагаем увлекательный подход и уникальные взгляды на обсуждаемые темы, побуждая пользователей к активному мышлению и критическому анализу.
См. подробности – https://aretecon.com/insurance-sector-attracted-rs-54000-crore-fdi-in-last-9-years-financial-services-secretary-vivek-joshi
Эта публикация погружает вас в мир увлекательных фактов и удивительных открытий. Мы расскажем о ключевых событиях, которые изменили ход истории, и приоткроем завесу над научными достижениями, которые вдохновили миллионы. Узнайте, чему может научить нас прошлое и как применить эти знания в будущем.
Как это работает — подробно – https://www.spill.cz/hello-world
Этот обзор предлагает свежий взгляд на предметы, которые и без того привычны. Мы упоминаем факты, не имеющие большого значения, и события с неясной важностью, но они присутствуют здесь.
Подробнее читать – [url=https://rostov-narkologiya.ru/ ]лечение covid народными средствами[/url]
В статье представлены ключевые моменты по актуальной теме, дополненные советами экспертов и ссылками на дополнительные ресурсы. Цель материала — дать читателю инструменты для самостоятельного развития и принятия осознанных решений.
Уточнить детали – https://www.marcgm.com/2023/10/23/ayudas-y-subvenciones
Эта статья полна интересного контента, который побудит вас исследовать новые горизонты. Мы собрали полезные факты и удивительные истории, которые обогащают ваше понимание темы. Читайте, погружайтесь в детали и наслаждайтесь процессом изучения!
Обратиться к источнику – http://korenagakazuo.com/2008/05/26/%E5%95%8F%E9%A1%8C%E3%81%8C%E3%81%AA%E3%81%84%E7%B5%84%E7%B9%94%E3%81%AF%E3%81%AA%E3%81%84
В этой статье-обзоре мы соберем актуальную информацию и интересные факты, которые освещают важные темы. Читатели смогут ознакомиться с различными мнениями и подходами, что позволит им расширить кругозор и глубже понять обсуждаемые вопросы.
Познакомиться с результатами исследований – https://sophiarodriguezfa.com/interes-compuesto-que-es-y-como-usarlo-para-hacer-crecer-tu-dinero
Этот информативный текст отличается привлекательным содержанием и актуальными данными. Мы предлагаем читателям взглянуть на привычные вещи под новым углом, предоставляя интересный и доступный материал. Получите удовольствие от чтения и расширьте кругозор!
Получить дополнительную информацию – http://www.kerrywills.ie/can-i-make-my-will-at-home
В этом обзорном материале представлены увлекательные детали, которые находят отражение в различных аспектах жизни. Мы исследуем непонятные и интересные моменты, позволяя читателю увидеть картину целиком. Погрузитесь в мир знаний и удивительных открытий!
Познакомиться с результатами исследований – https://www.rowanmangan.com/the-great-turning
Этот текст содержит различную информацию, которая, возможно, покажется любопытной, но в целом не меняет восприятия привычных вещей. Предлагаем просто получить удовольствие от чтения, не ожидая особой пользы.
Вот – [url=https://arma-rehab.ru/lechenie-alkogolizma/]секс знакомства[/url]
В этой информационной статье вы найдете интересное содержание, которое поможет вам расширить свои знания. Мы предлагаем увлекательный подход и уникальные взгляды на обсуждаемые темы, побуждая пользователей к активному мышлению и критическому анализу.
Расширить кругозор по теме – https://www.car-info.com/tr/model/bmw/x5/x5-ii-e70-facelift/30d-3-0d-at-245-hp-4wd
Эта статья погружает вас в увлекательный мир знаний, где каждый факт становится открытием. Мы расскажем о ключевых исторических поворотных моментах и научных прорывах, которые изменили ход цивилизации. Поймите, как прошлое формирует настоящее и как его уроки могут помочь нам строить будущее.
Исследовать вопрос подробнее – https://otlichnik23.ru/contacts
В этой статье представлен занимательный и актуальный контент, который заставит вас задуматься. Мы обсуждаем насущные вопросы и проблемы, а также освещаем истории, которые вдохновляют на действия и изменения. Узнайте, что стоит за событиями нашего времени!
Изучить материалы по теме – https://www.crnogorskiportal.me/sadrzaj/19371
mellstroy casino сайт [url=https://t.me/mellstroy_ggame/]mellstroy casino сайт[/url] .
кухни на заказ спб каталог [url=https://kuhni-spb-43.ru/]kuhni-spb-43.ru[/url] .
кухни спб [url=https://kuhni-spb-42.ru/]кухни спб[/url] .
заказать кухню в интернете [url=https://zakazat-kuhnyu-4.ru/]заказать кухню в интернете[/url] .
установка автоматического газового пожаротушения [url=https://montazh-gazovogo-pozharotusheniya-1.ru/]montazh-gazovogo-pozharotusheniya-1.ru[/url] .
joycasino [url=https://t.me/joy_casino_news/]joycasino[/url] .
В материале приведены детали, интересные, но не особенно важные. Мы рассматриваем аспекты, которые сложно назвать существенными, но включили их для большей полноты.
Подробнее читать – [url=https://rostov-narkologiya.ru/uslugi-ot-alkogolizma/vyvod-iz-zapoya/]таблетки для аборта[/url]
заказ кухни [url=https://kuhni-spb-43.ru/]заказ кухни[/url] .
ленинградские кухни [url=https://kuhni-spb-42.ru/]kuhni-spb-42.ru[/url] .
монтаж газовой системы пожаротушения под ключ [url=https://montazh-gazovogo-pozharotusheniya-1.ru/]монтаж газовой системы пожаротушения под ключ[/url] .
jocuri de cazino 1win [url=http://1win83062.help/]http://1win83062.help/[/url]
заказать кухню по своим размерам [url=https://zakazat-kuhnyu-4.ru/]заказать кухню по своим размерам[/url] .
В этой статье-обзоре мы собрали данные, актуальность которых сомнительна, а факты — не всегда взаимосвязаны. Читатель сможет ознакомиться с разными мнениями, хотя вряд ли они существенно повлияют на его понимание темы.
Вот – [url=https://arma-rehab.ru/]покер онлайн[/url]
где заказать кухню в спб [url=https://kuhni-spb-43.ru/]kuhni-spb-43.ru[/url] .
мостбет скачать на телефон [url=www.mostbet49271.help]мостбет скачать на телефон[/url]
В таких случаях наркологическая клиника помогает не только вывести из запоя и поставить капельницу, но и выстроить долгосрочный план: обследование, медикаментозную поддержку, реабилитацию, работу с психологом. Это даёт шанс не просто восстановиться после конкретного эпизода, а перестать повторять один и тот же разрушительный сценарий.
Подробнее тут – http://
Часто родственники тянут до последнего, надеясь, что запой «сам пройдёт», как это случалось раньше. Но с каждым эпизодом последствия становятся тяжелее: организм изнашивается, возрастает риск осложнений, ухудшается психика. Особенно опасно, когда запой длится несколько дней подряд, а любые попытки самостоятельно сократить дозы алкоголя сопровождаются дрожью, бессонницей, приступами паники.
Исследовать вопрос подробнее – [url=https://vyvod-iz-zapoya-moskva011.ru/]vyvod-iz-zapoya-moskovskaya-oblast-moskva[/url]
установка модулей газового пожаротушения [url=https://montazh-gazovogo-pozharotusheniya-1.ru/]установка модулей газового пожаротушения[/url] .
кухни спб на заказ [url=https://kuhni-spb-42.ru/]кухни спб на заказ[/url] .
Преимущества вызова нарколога на дом:
Исследовать вопрос подробнее – [url=https://vyvod-iz-zapoya-v-murmanske12.ru/]вывод из запоя мурманская область[/url]
1win вывод на Bakai Bank [url=http://1win32786.help/]http://1win32786.help/[/url]
заказать кухню [url=https://zakazat-kuhnyu-4.ru/]заказать кухню[/url] .
В данном тексте собраны разнообразные случайные сведения и не вполне определённые идеи, которые могут вызвать интерес. Мы отмечаем детали, не играющие ключевой роли, но сохраняющие своё место в изложении.
Подробнее читать – [url=https://rostov-narkologiya.ru/uslugi-ot-alkogolizma/vyvod-iz-zapoya/]лечение covid народными средствами[/url]
Эти последствия не только ухудшают качество жизни, но и могут стать причиной опасных для жизни ситуаций. Именно поэтому своевременный вывод из запоя является критически важным.
Изучить вопрос глубже – [url=https://vyvod-iz-zapoya-krasnoyarsk0.ru/]врач вывод из запоя в красноярске[/url]
Этот обзор позволяет по-новому взглянуть на вещи, на которые обычно и так смотрят. Мы упоминаем факты, которые мало что меняют, и события, значение которых трудно определить, но они всё равно здесь.
Вот – [url=https://arma-rehab.ru/vyvod-iz-zapoya/]виртуальное казино[/url]
Эффективное лечение требует поэтапного подхода, который реализуется следующим образом:
Изучить вопрос глубже – https://narkologicheskaya-klinika-v-ryazani12.ru/narkologicheskaya-klinika-czeny-v-ryazani/
Процедура вывода из запоя в клинике в Казани проводится под строгим контролем специалистов. Главная цель — купировать симптомы интоксикации, нормализовать давление, сердечный ритм и восстановить обмен веществ. Используются препараты, способствующие детоксикации, а также витаминные комплексы и антиоксиданты, необходимые для поддержки работы печени и мозга.
Получить больше информации – [url=https://narkologicheskaya-klinika-v-kazani16.ru/]частная наркологическая клиника казань[/url]
Нарколог на дому проводит тщательный осмотр, собирает анамнез и назначает необходимые лабораторные исследования. Это позволяет выявить сопутствующие патологии и скорректировать тактику лечения.
Углубиться в тему – [url=https://narkolog-na-dom-v-yaroslavle12.ru/]нарколог на дом анонимно в ярославле[/url]
Обеспечение своевременной наркологической помощи с выездом на дом в Каменске-Уральском — важный аспект комплексного лечения алкогольной и наркотической зависимости. Услуга вызова нарколога на дом позволяет получить квалифицированную медицинскую помощь в комфортных условиях, что снижает стресс и способствует более быстрому восстановлению.
Изучить вопрос глубже – http://narkolog-na-dom-kamensk-uralskij11.ru
Как отмечает врач-нарколог Иванов И.И., «без своевременной медицинской помощи при запое повышается риск необратимых изменений в организме и летального исхода».
Узнать больше – [url=https://vyvod-iz-zapoya-nizhnij-tagil11.ru/]вывод из запоя капельница на дому нижний тагил[/url]
онлайн школа 10-11 класс [url=https://shkola-onlajn-32.ru/]shkola-onlajn-32.ru[/url] .
онлайн школа для школьников с аттестатом [url=https://shkola-onlajn-31.ru/]shkola-onlajn-31.ru[/url] .
школа онлайн обучение для детей [url=https://shkola-onlajn-34.ru/]shkola-onlajn-34.ru[/url] .
Услуга вызова нарколога на дом в Екатеринбурге представляет собой комплекс мер, направленных на оперативное стабилизирование состояния пациента. При поступлении вызова специалист проводит детальный осмотр, сбор анамнеза и диагностику состояния, после чего разрабатывается индивидуальный план лечения. Методика включает медикаментозную детоксикацию, коррекцию обменных процессов и психологическую поддержку, что обеспечивает комплексное восстановление здоровья без необходимости посещения стационара.
Исследовать вопрос подробнее – [url=https://alko-zakodirovat.ru/]вывод из запоя цена екатеринбург[/url]
закрытые школы в россии [url=https://shkola-onlajn-35.ru/]закрытые школы в россии[/url] .
Для успешного лечения зависимости необходима тщательная диагностика. В клинике проводят полное обследование пациента, включающее:
Выяснить больше – [url=https://narkologicheskaya-klinika-v-murmanske12.ru/]наркологическая клиника[/url]
Вывод из запоя — это не только капельница. Это системная медицинская помощь, направленная на снижение интоксикации, поддержку сердца, нервной системы и внутренних органов. Правильно выстроенный детокс помогает не просто «сбить симптомы», а реально снизить риски для здоровья и дать человеку шанс вернуться к трезвому состоянию без тяжёлых последствий.
Подробнее – https://vyvod-iz-zapoya-voskresensk11.ru/vyvod-iz-zapoya-na-domu-v-voskresenske/
Клиника нужна и тем, кто уже пробовал лечиться самостоятельно: пил лекарства «от тяги», ходил к психологу без медицинской поддержки, обещал себе не пить, но каждый стресс или конфликт всё равно приводили к старому сценарию. В такой ситуации комплексный подход — медицинский и психологический — даёт куда больше шансов, чем очередное одиночное обещание «в этот раз точно получится».
Разобраться лучше – http://narkologicheskaya-klinika-himki11.ru/narkologicheskaya-klinika-otzyvy-v-himkah/
Запой не всегда выглядит как откровенная катастрофа с первых дней. Иногда всё начинается с «отпуска», «праздника», пары вечеринок подряд. Родные надеются, что человек сам остановится, а он каждый день находит повод продолжить. В какой-то момент организм перестаёт справляться, и даже небольшие дозы алкоголя вызывают тяжёлые реакции.
Выяснить больше – [url=https://kapelnica-ot-zapoya-dolgoprudnyj11.ru/]kapelnica-ot-posledstvij-zapoya[/url]
дистанционное обучение 10-11 класс [url=https://shkola-onlajn-33.ru/]дистанционное обучение 10-11 класс[/url] .
Как подчёркивает заведующая отделением клинической психологии ФГБУН «НМИЦ психиатрии и наркологии» Минздрава России, наличие в команде специалистов с опытом работы в области зависимости — это основа качественной помощи.
Углубиться в тему – [url=https://narkologicheskaya-klinika-nizhnij-tagil11.ru/]анонимная наркологическая клиника[/url]
На сайте Минздрава указаны общие клинические рекомендации по выведению из запоя, включая допустимые дозировки и протоколы лечения.
Получить дополнительные сведения – [url=https://vyvod-iz-zapoya-v-ryazani12.ru/]вывод из запоя цена[/url]
мелбет букмекерская [url=https://melbet-ru.it.com/]мелбет букмекерская[/url] .
Обращаться в клинику стоит не только в крайних случаях, когда человек уже не может встать с постели или запой продолжается неделями. Наоборот, чем раньше начата помощь, тем мягче и короче может быть программа, тем меньше риск тяжёлых осложнений и долгой реабилитации.
Подробнее тут – http://narkologicheskaya-klinika-dolgoprudnyj11.ru/narkologicheskaya-klinika-vyzvat-v-dolgoprudnom/
Если многое из этого знакомо, кодирование стоит рассматривать не как «наказание» или «приговор», а как инструмент, который помогает закрыть доступ к алкоголю на определённый срок и даёт шанс выстроить новую привычку — жить трезво.
Узнать больше – [url=https://kodirovanie-ot-alkogolizma-korolyov11.ru/]кодирование от алкоголизма последствия[/url]
Во внимание берутся не только масштаб и длительность запоев, но и изменения в поведении. Если человек регулярно обещает «завязать с понедельника», но каждый раз срывается, если рабочие задачи всё чаще выполняются с трудом, а любые стрессовые ситуации решаются «через стакан» или «через дозу», это прямой повод не ждать критического момента. Важно помнить, что зависимость — это прогрессирующее заболевание: со временем организму требуется всё больше вещества, растёт токсическая нагрузка на сердце, печень, нервную систему, ухудшается память и концентрация.
Узнать больше – [url=https://narkologicheskaya-klinika-moskva11.ru/]стациомедика наркологическая клиника вывода из запоя москва отзывы[/url]
Каждый из этих симптомов по отдельности уже опасен, а в сочетании они создают высокий риск для жизни. Самостоятельные эксперименты с таблетками, резкий отказ от алкоголя «через силу» или попытка «переспать» запой без медицинского контроля могут обернуться реанимацией. Гораздо безопаснее вовремя вызвать специалиста и провести детоксикацию под наблюдением, особенно когда речь идёт о жителях крупного города, где доступна профессиональная наркологическая помощь.
Ознакомиться с деталями – [url=https://vyvod-iz-zapoya-moskva011.ru/]vyvod-iz-zapoya-moskva-vyzov-narkologa-kapelnica[/url]
Как поясняет врач-нарколог клиники «АлкоСтоп», «грамотно составленная инфузионная терапия не только устраняет последствия запоя, но и создаёт условия для дальнейшей мотивации пациента к лечению».
Разобраться лучше – [url=https://kapelnicza-ot-zapoya-pervouralsk11.ru/]капельница от запоя анонимно на дому[/url]
Наши специалисты оценивают клинические признаки запоя уже при первом осмотре — измеряют пульс, артериальное давление и насыщение кислородом, осматривают кожу и слизистые оболочки на предмет обезвоживания. Специальные тесты на когнитивные функции позволяют определить степень дезориентации и риск развития острых психотических реакций.
Разобраться лучше – https://тайный-вывод-из-запоя.рф/vyvod-iz-zapoya-czena-v-samare/
Капельница от запоя работает иначе. Через вену вводятся растворы, которые восполняют жидкость, разжижают кровь, помогают печени и почкам выводить токсичные вещества, корректируют электролитный баланс. Дополнительно используются препараты для снижения тревоги, нормализации сна, защиты сердечно-сосудистой системы и печени. Всё это подбирается индивидуально, с учётом возраста, давления, хронических заболеваний и длительности запоя.
Подробнее – https://kapelnica-ot-zapoya-dolgoprudnyj11.ru
Есть ситуации, когда визит к наркологу в Химках лучше воспринимать не как «стыдный шаг», а как обычное ответственное решение о своём здоровье. Это особенно актуально, если: употребление алкоголя или наркотиков стало регулярным, а попытки сократить дозы заканчиваются срывами; появились запои с несколькими днями непрерывного употребления; возникают проблемы с сердцем, давлением, сном; близкие всё чаще говорят, что «ситуация выходит из-под контроля».
Углубиться в тему – https://narkologicheskaya-klinika-himki11.ru/anonimnaya-narkologicheskaya-klinika-v-himkah/
1win ставки лига чемпионов [url=https://1win36247.help]1win ставки лига чемпионов[/url]
Многие тянут до последнего, считая, что к наркологу обращаются только в самых крайних случаях. На деле показаний для консультации гораздо больше, и они часто появляются задолго до того, как человек впервые оказывается в запое или не выходит из состояния опьянения несколько дней подряд.
Узнать больше – [url=https://narkologicheskaya-klinika-voskresensk11.ru/]www.domen.ru[/url]
Современная наркологическая клиника в Мурманске специализируется на комплексном лечении алкогольной, наркотической и других видов зависимости. В условиях МедЦентр Арктика используются проверенные методы диагностики и терапии, позволяющие достичь устойчивой ремиссии и восстановить качество жизни пациента.
Подробнее можно узнать тут – http://
1win безопасность [url=https://1win68017.help/]https://1win68017.help/[/url]
В Воскресенске вывод из запоя может проводиться в разных форматах — с выездом на дом, в условиях стационара, в срочном режиме или с последующим амбулаторным наблюдением. Правильный выбор зависит от тяжести состояния, возраста пациента, наличия хронических заболеваний и того, насколько сильно запой нарушил привычную жизнь.
Разобраться лучше – http://vyvod-iz-zapoya-voskresensk11.ru/vyvod-iz-zapoya-kapelnica-v-voskresenske/
школа онлайн для детей [url=https://shkola-onlajn-32.ru/]shkola-onlajn-32.ru[/url] .
Как подчёркивает главный врач клинического отделения, «в условиях стационара мы можем оперативно реагировать на малейшие изменения в состоянии пациента, что критически важно при тяжёлых формах запоя».
Получить дополнительные сведения – [url=https://vyvod-iz-zapoya-v-ryazani12.ru/]вывод из запоя цена в рязани[/url]
В Нижнем Тагиле действуют как частные, так и государственные учреждения, предоставляющие реабилитационные услуги. Однако подход, опыт специалистов и оснащение в них могут существенно различаться. Многие учреждения работают без лицензий, используют устаревшие методы или нанимают неквалифицированный персонал. Чтобы не столкнуться с такими рисками, необходимо тщательно проанализировать выбранный центр по нескольким ключевым направлениям.
Получить больше информации – [url=https://narkologicheskaya-klinika-nizhnij-tagil11.ru/]наркологическая клиника вывод из запоя нижний тагил[/url]
Такая «ступенчатая» логика позволяет видеть вклад каждого решения и снижает риск нежелательных ощущений. Мы избегаем параллельных «усилений», чтобы не терять управляемость.
Детальнее – http://vyvod-iz-zapoya-v-ekaterinburge16.ru/vyvod-iz-zapoya-v-staczionare-ekaterinburg/https://vyvod-iz-zapoya-v-ekaterinburge16.ru
школы дистанционного обучения [url=https://shkola-onlajn-31.ru/]shkola-onlajn-31.ru[/url] .
школа-пансион бесплатно [url=https://shkola-onlajn-34.ru/]shkola-onlajn-34.ru[/url] .
В наркологической клинике применяются проверенные методики терапии, включая медикаментозное лечение, детоксикацию и психотерапевтические программы. Детоксикация проводится с использованием современных капельниц, обеспечивающих безопасное выведение токсинов из организма. Важно отметить, что качественное лечение включает и работу с психологическими аспектами зависимости, что достигается посредством групповых и индивидуальных консультаций.
Получить больше информации – [url=https://narkologicheskaya-klinika-kamensk-uralskij11.ru/]наркологическая клиника цены каменск-уральский[/url]
В этом материале представлены детали, которые хоть и занимательны, но не особенно значимы. Мы рассматриваем моменты, которые трудно назвать важными, но всё же решили включить их для полноты картины.
Вот – [url=https://arma-rehab.ru/vyvod-iz-zapoya/]секс знакомства[/url]
Этот обзор позволяет по-новому взглянуть на вещи, на которые обычно и так смотрят. Мы упоминаем факты, которые мало что меняют, и события, значение которых трудно определить, но они всё равно здесь.
Вот – [url=https://arma-rehab.ru/lechenie-alkogolizma/]знакомства для взрослых[/url]
класс с учениками [url=https://shkola-onlajn-35.ru/]класс с учениками[/url] .
В этой статье мы рассмотрим ключевые аспекты выбора надёжного специалиста, который приедет по вызову и сможет оказать квалифицированную помощь без промедлений.
Получить дополнительные сведения – [url=https://narkolog-na-dom-nizhnij-tagil11.ru/]помощь нарколога на дому в нижнем тагиле[/url]
Как поясняет медицинский психолог Елена Мусатова, «пациенту важно доверять специалисту, понимать его подход и чувствовать профессиональную уверенность ещё на этапе первичного осмотра».
Подробнее можно узнать тут – http://
Sorry for writing this here, but I wanted to add this here. Health plays a role in everyday life whether we focus on it or not, and you can see it in energy, concentration, mood, and resilience. The problem starts with the fact that health information is nonstop, and access does not automatically create understanding. That tends to happen when broad advice stands in for deeper explanation, and people start treating summaries like complete answers. That is the stage where simple guidance starts falling apart, because similar situations can produce different responses. That is usually when body feedback starts becoming noticeable, through subtle changes in appetite, clarity, or physical comfort. That is why careful observation is usually the better first move, following the relationship between behavior and feedback, so that the next step reflects real feedback. That is why longer health discussion still has a place, because it allows a topic to be explained with more balance and depth. So if you are looking for more context and less noise, a solid next step is to explore iMedix provider directory.
Вывод из запоя в Мурманске представляет собой комплекс мероприятий, направленных на оказание медицинской помощи пациентам, находящимся в состоянии алкогольного отравления или длительного употребления спиртного. Процедура проводится с целью стабилизации состояния организма, предупреждения осложнений и минимизации риска развития тяжелых последствий алкоголизма.
Получить больше информации – http://vyvod-iz-zapoya-v-murmanske12.ru/anonimnyj-vyvod-iz-zapoya-v-murmanske/
Независимо от формы зависимости — алкогольной, опиатной, синтетической или медикаментозной — специалисты подбирают индивидуальный курс терапии. Алгоритмы лечения адаптируются под возраст, стаж употребления, общее состояние организма и наличие сопутствующих заболеваний.
Выяснить больше – http://narkologicheskaya-klinika-v-yaroslavle12.ru
Наркологическая клиника в Долгопрудном помогает в ситуациях, когда:
Узнать больше – [url=https://narkologicheskaya-klinika-dolgoprudnyj11.ru/]narkologicheskaya-klinika-dolgoprudnyj11.ru/[/url]
melbet online betting [url=https://melbet-ru.it.com/]melbet online betting[/url] .
Услуга вызова нарколога на дом в Екатеринбурге представляет собой комплекс мер, направленных на оперативное стабилизирование состояния пациента. При поступлении вызова специалист проводит детальный осмотр, сбор анамнеза и диагностику состояния, после чего разрабатывается индивидуальный план лечения. Методика включает медикаментозную детоксикацию, коррекцию обменных процессов и психологическую поддержку, что обеспечивает комплексное восстановление здоровья без необходимости посещения стационара.
Получить больше информации – [url=https://alko-zakodirovat.ru/]вывод из запоя недорого екатеринбург[/url]
Капельница от запоя — это не «чудо-микс», а управляемая медицинская процедура с чёткими целями, окном оценки и понятными критериями остановки. В «ЮжУрал Детокс Центр» подход построен по принципу минимально достаточных вмешательств: сначала безопасность (дыхание, сознание, гемодинамика), потом переносимость воды и сбор нормального сна, а уже после — метаболическая поддержка и восстановление бытовой устойчивости. Такая логика исключает полипрагмазию, снижает риск нежелательных реакций и даёт семье прогнозируемую картину на ближайшие 24–72 часа. Мы не обещаем «мгновенного чуда» — мы предлагаем дисциплину маленьких шагов, которая с высокой вероятностью приводит к устойчивому результату.
Получить дополнительные сведения – http://kapelnicza-ot-zapoya-v-chelyabinske16.ru
После снятия острых симптомов пациент продолжает получать медикаментозную поддержку. Назначаются витамины, гепатопротекторы, успокоительные препараты. Проводится психологическая диагностика для подготовки к следующему этапу — реабилитации.
Подробнее тут – [url=https://lechenie-alkogolizma-voronezh9.ru/]наркологическая клиника лечение алкоголизма[/url]
Состояния при зависимостях чувствительны к времени суток и среде. К ночи нарастает тревога, усиливается тремор, нестабильны показатели ЧСС/АД. Круглосуточный приём позволяет выстроить «мост» через самые сложные часы: собрать сон без избыточной фармаконагрузки, сделать короткие чек-ины, вовремя ретитровать один параметр (свет, дыхательные ритмы, интервалы питья), а утром оформить «малые победы» — гигиена и 10–15 минут тихой ходьбы. Эти простые маркеры часто надёжнее любых субъективных оценок «как себя чувствую».
Узнать больше – [url=https://narkologicheskaya-clinika-v-rostove-na-donu16.ru/]платная наркологическая клиника в ростове-на-дону[/url]
Согласно данным НМИЦ психиатрии и наркологии Минздрава РФ, профессиональный вывод из запоя с применением капельниц снижает риск осложнений и сокращает период восстановления. Процедура проводится только под наблюдением квалифицированных специалистов и требует правильного подбора препаратов в зависимости от стадии опьянения и наличия сопутствующих заболеваний.
Ознакомиться с деталями – [url=https://kapelnicza-ot-zapoya-pervouralsk11.ru/]капельница от запоя вызов в первоуральске[/url]
онлайн класс [url=https://shkola-onlajn-33.ru/]онлайн класс[/url] .
Мы не используем универсальные «сильные капельницы». Эффективность даёт точное совпадение с задачей. Ниже — логика выбора профилей и маркеры, на которые мы ориентируемся при контроле эффективности и безопасности.
Получить больше информации – [url=https://vivod-iz-zapoya-v-sankt-peterburge16.ru/]вывод из запоя вызов на дом в санкт-петербурге[/url]
Как проходит лечение:
Выяснить больше – [url=https://narcolog-na-dom-novokuznetsk0.ru/]нарколог на дом новокузнецк[/url]
Процедура капельного введения лекарственных растворов проводится в условиях клиники с соблюдением всех санитарных норм. Пациенту устанавливается капельница, через которую вводятся препараты под контролем медперсонала. В зависимости от состояния пациента и тяжести запоя длительность капельной терапии может варьироваться от 1 до 6 часов.
Получить дополнительную информацию – [url=https://kapelnicza-ot-zapoya-v-murmanske12.ru/]врача капельницу от запоя[/url]
В этом материале представлены детали, которые хоть и занимательны, но не особенно значимы. Мы рассматриваем моменты, которые трудно назвать важными, но всё же решили включить их для полноты картины.
Вот – [url=https://arma-rehab.ru/lechenie-alkogolizma/]виртуальное казино[/url]
После проведения процедур пациент чувствует заметное облегчение: исчезает головная боль, снижается тревожность, восстанавливается сон и аппетит. Это создаёт основу для дальнейшего прохождения курса лечения зависимости.
Подробнее – https://narkologicheskaya-clinika-v-nizhnem-novgorode16.ru/chastnaya-narkologicheskaya-klinika-nizhnij-novgorod/
Стоимость услуг зависит от продолжительности терапии, сложности случая и выбранных процедур. Однако клиника предоставляет гибкую систему оплаты, включая рассрочку и страховое покрытие.
Изучить вопрос глубже – [url=https://narkologicheskaya-klinika-v-ryazani12.ru/]наркологическая клиника цены[/url]
Перед тем как принять решение, родственникам полезно трезво оценить, подходит ли ситуация для выезда нарколога на дом. Чаще всего этот формат оправдан, если:
Ознакомиться с деталями – https://narkolog-na-dom-himki11.ru
Основные признаки, свидетельствующие о необходимости экстренной помощи:
Получить дополнительную информацию – [url=https://vyvod-iz-zapoya-krasnoyarsk0.ru/]www.domen.ru[/url]
Для жителей Чехова важно и то, что врач видит не абстрактный «случай зависимости», а живого человека со своей историей. У кого-то за плечами десятилетия злоупотребления, у кого-то — несколько лет с быстрым прогрессированием, у кого-то — сочетание алкоголя с успокоительными или наркотиками. Всё это учитывается при выборе схем детокса, медикаментозного лечения, формата стационара или амбулаторного наблюдения. Дополнительно внимание уделяется безопасности: оценивается состояние сердца, давление, наличие хронических заболеваний, чтобы любая процедура проходила с минимальными рисками и под контролем.
Получить дополнительные сведения – [url=https://narkologicheskaya-klinika-chekhov11.ru/]частная наркологическая клиника[/url]
Одним из ключевых этапов терапии является медикаментозное устранение абстинентного синдрома, что значительно облегчает состояние пациента. Для этого используются препараты, рекомендованные к применению ведущими специалистами в области наркологии. Примером могут служить протоколы лечения, описанные на официальном портале наркологической помощи России.
Подробнее тут – http://narkologicheskaya-klinika-kamensk-uralskij11.ru
Сочетание медицинских и психотерапевтических мер создаёт устойчивую систему поддержки. Пациенты получают возможность постепенно восстановить утраченное здоровье и психологическую стабильность.
Получить больше информации – [url=https://narkologicheskaya-klinika-v-kazani16.ru/]наркологическая клиника цены в казани[/url]
Вызов нарколога возможен круглосуточно, что обеспечивает оперативное реагирование на критические ситуации. Пациенты и их родственники могут получить помощь в любое время, не дожидаясь ухудшения состояния.
Узнать больше – http://narkolog-na-dom-kamensk-uralskij11.ru/chastnyj-narkolog-na-dom-v-kamensk-uralskom/
курсы стриминг [url=https://shkola-onlajn-32.ru/]shkola-onlajn-32.ru[/url] .
Одним из ключевых направлений является проведение капельниц, призванных вывести токсины из организма и нормализовать водно-электролитный баланс. Используемые препараты и состав растворов подбираются индивидуально, исходя из клинической картины и истории болезни пациента.
Узнать больше – http://narkolog-na-dom-v-yaroslavle12.ru
Наркологическая клиника в Ярославле представляет собой специализированное учреждение, оказывающее медицинскую помощь пациентам с алкогольной, наркотической и медикаментозной зависимостью. Ключевыми направлениями работы являются детоксикация, стабилизация состояния, последующее реабилитационное сопровождение и профилактика рецидивов. Комплексный подход к лечению обеспечивается взаимодействием специалистов различных профилей, включая наркологов, психиатров, психотерапевтов и медицинских сестёр.
Узнать больше – [url=https://narkologicheskaya-klinika-v-yaroslavle12.ru/]наркологическая клиника на дом[/url]
онлайн ш [url=https://shkola-onlajn-34.ru/]онлайн ш[/url] .
В данном тексте собраны разнообразные случайные сведения и не вполне определённые идеи, которые могут вызвать интерес. Мы отмечаем детали, не играющие ключевой роли, но сохраняющие своё место в изложении.
Подробнее читать – [url=https://rostov-narkologiya.ru/uslugi-ot-narkomanii/mefedronovaya-zavisimost/]кето диета за неделю минус 10 кг[/url]
Многие семьи сталкиваются с трудностями, когда зависимый отказывается ехать в клинику. В таких случаях выездная помощь становится первым шагом к выздоровлению. Однако не все службы предлагают одинаково безопасный и профессиональный подход. Чтобы избежать рисков и ошибок, важно понимать, на что обращать внимание при выборе услуги “нарколог на дом”.
Подробнее можно узнать тут – [url=https://narkolog-na-dom-nizhnij-tagil11.ru/]нарколог на дом[/url]
Профессиональная клиника никогда не скрывает информацию о своих сотрудниках. На официальных сайтах нередко размещены сканы дипломов, сведения о специализации и стаже, участие в отраслевых конференциях и проектах Минздрава.
Подробнее тут – [url=https://narkologicheskaya-klinika-pervouralsk11.ru/]наркологическая клиника клиника помощь[/url]
Клиническая практика показывает: только системная работа с пациентом даёт устойчивый результат. Программа включает медицинское, психологическое и социальное сопровождение.
Ознакомиться с деталями – [url=https://lechenie-alkogolizma-voronezh9.ru/]наркологическая клиника лечение алкоголизма[/url]
lbs это [url=https://shkola-onlajn-31.ru/]lbs это[/url] .
онлайн школа 10-11 класс [url=https://shkola-onlajn-35.ru/]онлайн школа 10-11 класс[/url] .
Для успешного вывода из запоя используется комплексный подход с участием специалистов разных профилей. Более подробно об этом можно узнать на официальном портале наркологической службы.
Ознакомиться с деталями – http://vyvod-iz-zapoya-nizhnij-tagil11.ru
Для жителей Ростова-на-Дону клиника работает по схеме «тихих маршрутов»: отдельный вход с нейтральной табличкой, окна записи в невызывающие подозрений часы, немаркированный подъезд автомобиля при выездном визите. На первом звонке диспетчер собирает только то, что влияет на безопасность: эпизоды рвоты, ЧСС/АД, ночные панические эпизоды, сопутствующие препараты, аллергии, наличие хронических заболеваний сердца. Личные и социальные детали не запрашиваются — мы придерживаемся принципа «минимально необходимой информации». По прибытии врача фиксируются базовая линия (сознание, дыхание, SpO?, температура), шкалы симптомов и переносимость небольших объёмов воды. Дальше — один точный шаг, одно «окно проверки» и прозрачное решение: продолжать модуль, модифицировать одну переменную или выключить блок.
Подробнее – https://narkologicheskaya-clinika-v-rostove-na-donu16.ru
мелбет зеркало сегодня [url=https://melbet-ru.it.com/]мелбет зеркало сегодня[/url] .
мелбет мобильное приложение [url=https://melbetmobi.ru/]мелбет мобильное приложение[/url] .
Капельница от запоя в Мурманске является одной из наиболее востребованных процедур для снятия острого состояния алкогольной интоксикации. Эта методика позволяет быстро вывести токсины из организма, нормализовать водно-солевой баланс и улучшить самочувствие пациента. Современная капельная терапия считается эффективным средством в лечении запоя, обеспечивая поддержку жизненно важных функций и минимизируя риски осложнений.
Получить дополнительную информацию – [url=https://kapelnicza-ot-zapoya-v-murmanske12.ru/]kapelnicza-ot-zapoya-v-murmanske12.ru/[/url]
В первые два часа после прибытия бригады важно не «сделать побольше», а принять наименьшее количество решений, которое реально меняет картину. Команда фиксирует базовую линию (ЧСС, АД, SpO?, температура, шкала тошноты/тремора), даёт антиеметический мост и запускает регидратацию. При тахикардии — добавляет антивегетативный контур. Семья получает сценарий ночи: когда приглушить свет, когда предложить воду, какие цифры на тонометре считать нормой и при каких — звонить. Такой протокол экономит время и силы, а главное — превращает вечер из хаотичного в управляемый, снижая риск ночных экстренных вызовов и «эмоциональных качелей».
Выяснить больше – [url=https://kapelnicza-ot-zapoya-v-chelyabinske16.ru/]капельница от запоя в челябинске[/url]
Вывод из запоя на дому — это управляемый медицинский процесс, где каждая деталь имеет значение: от первичного осмотра и грамотного подбора инфузионного профиля до сенсорной дисциплины в помещении и чётких «окон оценки» результата. В наркологической клинике «СеверМед Трезвость» мы используем принцип минимально достаточных вмешательств: одна цель на этап, один измеримый маркер и одна корректировка за раз. Такой подход снижает нагрузку на организм, повышает предсказуемость и делает восстановление переносимым для пациента и его близких.
Выяснить больше – [url=https://vivod-iz-zapoya-v-sankt-peterburge16.ru/]наркология вывод из запоя санкт-петербург[/url]
На этом этапе специалист уточняет длительность запоя, характер употребляемого алкоголя и наличие сопутствующих заболеваний. Тщательный анализ собранной информации позволяет выбрать оптимальную тактику детоксикации и минимизировать риск осложнений.
Узнать больше – https://alko-zakodirovat.ru/narkolog-na-dom-czena-ekb/
мел бет скачать [url=https://mobilemelbet.ru/]mobilemelbet.ru[/url] .
Когда следует немедленно обращаться за помощью:
Получить дополнительные сведения – [url=https://narcolog-na-dom-novokuznetsk0.ru/]narcolog-na-dom-novokuznetsk0.ru/[/url]
Вывод из запоя в клинике в Нижнем Новгороде проводится с применением инфузионной терапии, седативных средств и витаминных комплексов. Основная задача процедуры — устранить токсическое воздействие алкоголя, восстановить работу органов и нормализовать психоэмоциональное состояние. Все препараты подбираются индивидуально, с учётом особенностей организма пациента.
Узнать больше – http://narkologicheskaya-clinika-v-nizhnem-novgorode16.ru
ахревс [url=https://seo-kejsy13.ru/]seo-kejsy13.ru[/url] .
Лечение зависимостей редко ограничивается одной процедурой. Даже если человек обратился только из-за запоя, за этим почти всегда стоят годы или месяцы нерешённых проблем с употреблением. Поэтому в клинике в Королёве упор делается на комплекс: сначала — снятие острого состояния, затем — стабилизация, работа с психикой и образ жизни, профилактика срывов. Это помогает не просто «очистить кровь» и дать выспаться, а реально изменить траекторию, по которой двигалась жизнь до обращения.
Узнать больше – http://
Домашний формат особенно удобен на ранних этапах, когда зависимость уже дошла до запоев, но человек ещё продолжает работать, скрывать проблему от коллег и соседей, боится любой огласки. Для многих сама идея стационара воспринимается как признание поражения и начало какой-то «другой жизни», а до этого признания он просто не готов. Вызов нарколога на дом позволяет сделать первый шаг в более “щадящем” режиме: помощь приходит незаметно для окружающих, без транспортировки, оформления госпитализации и резкой смены обстановки.
Получить больше информации – [url=https://narkolog-na-dom-himki11.ru/]narkolog-psiholog-na-domu[/url]
Наркологическая клиника в Чехове — это возможность получить профессиональную помощь при алкогольной и наркотической зависимости, не выезжая в крупный мегаполис и не тратя силы на долгую дорогу. Для многих людей момент обращения к наркологу наступает не сразу: сначала идут «домашние» попытки справиться с проблемой, обещания ограничиться «по праздникам», уговаривания родственников и периодические срывы. Запои становятся длиннее, организм восстанавливается всё хуже, усиливается тревога, нарушается сон, учащаются конфликты дома и на работе. В какой-то момент становится понятно, что без системного лечения обойтись уже нельзя, а стихийные капельницы на дому и случайные советы из интернета только оттягивают время.
Подробнее можно узнать тут – [url=https://narkologicheskaya-klinika-chekhov11.ru/]наркологическая клиника[/url]
melbet рабочее зеркало [url=https://melbet-ru.it.com/]melbet рабочее зеркало[/url] .
Сигналом к тому, что пора обсудить вариант кодирования с наркологом, служит не один какой-то эпизод, а совокупность симптомов. Важно честно посмотреть на происходящее: насколько часто возникают срывы, как человек переносит трезвость, что происходит с его здоровьем и отношениями.
Изучить вопрос глубже – http://kodirovanie-ot-alkogolizma-korolyov11.ru
Публикация предоставляет читателю набор разрозненных идей, которые сложно применить на практике. Мы лишь слегка касаемся разных точек зрения, не углубляясь в анализ и не предлагая никаких выводов.
Вот – [url=https://arma-rehab.ru/]эротические фильмы[/url]
мелбет казино скачать [url=https://melbetmobi.ru/]мелбет казино скачать[/url] .
Важно выяснить длительность запоя, частоту и дозы потребляемого алкоголя, наличие ранее проведённых детоксикаций и психиатрических заболеваний. Эта информация помогает выбрать наиболее подходящий протокол инфузионной и медикаментозной терапии.
Исследовать вопрос подробнее – http://тайный-вывод-из-запоя.рф/vyvod-iz-zapoya-czena-v-samare/
В этом материале представлены детали, которые хоть и занимательны, но не особенно значимы. Мы рассматриваем моменты, которые трудно назвать важными, но всё же решили включить их для полноты картины.
Вот – [url=https://arma-rehab.ru/]порно[/url]
В Воскресенске вывод из запоя может проводиться в разных форматах — с выездом на дом, в условиях стационара, в срочном режиме или с последующим амбулаторным наблюдением. Правильный выбор зависит от тяжести состояния, возраста пациента, наличия хронических заболеваний и того, насколько сильно запой нарушил привычную жизнь.
Подробнее – http://vyvod-iz-zapoya-voskresensk11.ru
школа дистанционного обучения [url=https://shkola-onlajn-31.ru/]shkola-onlajn-31.ru[/url] .
Для сохранения приватности мы ведём коммуникацию через одного доверенного представителя, используем нейтральные формулировки в документах, а инструкции выдаём в неброском виде. При невозможности создать тишину дома (ремонт, маленькие дети, гости) предложим краткий «тихий» стационар с отдельным входом и камерным режимом, после чего сопровождение вернётся в домашний формат.
Получить дополнительные сведения – [url=https://vyvod-iz-zapoya-v-ekaterinburge16.ru/]наркология вывод из запоя[/url]
Для успешной адаптации пациента в обществе клиника организует поддержку родственников и последующее наблюдение. Это снижает риск рецидива и помогает сохранить достигнутые результаты.
Углубиться в тему – http://narkologicheskaya-klinika-v-murmanske12.ru/
Стационарный формат предполагает круглосуточное наблюдение, возможность экстренного вмешательства и доступ к диагностическим средствам. Это особенно важно при наличии хронических заболеваний, психозов или алкогольного делирия.
Детальнее – [url=https://vyvod-iz-zapoya-v-ryazani12.ru/]вывод из запоя в стационаре рязань[/url]
1win depunere fara comision [url=http://1win38174.help]1win depunere fara comision[/url]
Критерий
Исследовать вопрос подробнее – [url=https://narkologicheskaya-klinika-nizhnij-tagil11.ru/]наркологическая клиника стационар[/url]
lbs [url=https://shkola-onlajn-35.ru/]lbs[/url] .
Этот сборник информации привлекает множеством мелких деталей и необычных ракурсов. Мы предлагаем взгляды, редко полезные, но способные немного разнообразить знакомство с темой.
Подробнее читать – [url=https://rostov-narkologiya.ru/ ]сиалис онлайн[/url]
домашняя школа интернет урок вход [url=https://shkola-onlajn-34.ru/]домашняя школа интернет урок вход[/url] .
http://www.mobilemelbet.ru [url=https://mobilemelbet.ru/]www.mobilemelbet.ru[/url] .
онлайн обучение 11 класс [url=https://shkola-onlajn-32.ru/]shkola-onlajn-32.ru[/url] .
онлайн школа 10-11 класс [url=https://shkola-onlajn-33.ru/]shkola-onlajn-33.ru[/url] .
официальный мелбет [url=https://melbet-ru.it.com/]официальный мелбет[/url] .
Наркологическая клиника в Долгопрудном помогает в ситуациях, когда:
Получить больше информации – [url=https://narkologicheskaya-klinika-dolgoprudnyj11.ru/]klinika-kodirovaniya-ot-alkogolizma[/url]
Когда проблема зависимости достигает критического уровня, оперативное вмешательство становится необходимостью. В Екатеринбурге профессиональные наркологи готовы выехать на дом круглосуточно, чтобы начать лечение зависимости немедленно. Такой формат оказания помощи позволяет пациенту получить качественную терапию в знакомой и уютной обстановке, что значительно снижает уровень стресса и способствует быстрому восстановлению.
Разобраться лучше – [url=https://alko-zakodirovat.ru/]вывод из запоя на дому круглосуточно екатеринбург[/url]
Часто родственники тянут до последнего, надеясь, что запой «сам пройдёт», как это случалось раньше. Но с каждым эпизодом последствия становятся тяжелее: организм изнашивается, возрастает риск осложнений, ухудшается психика. Особенно опасно, когда запой длится несколько дней подряд, а любые попытки самостоятельно сократить дозы алкоголя сопровождаются дрожью, бессонницей, приступами паники.
Получить дополнительную информацию – http://
Эта публикация содержит набор несвязанных идей, трудно применимых в практике. Мы лишь поверхностно затрагиваем различные точки зрения, не проводя глубокий анализ и не предлагая выводов.
Подробнее читать – [url=https://rostov-narkologiya.ru/uslugi-ot-alkogolizma/vyvod-iz-zapoya/]похудеть на таблетках[/url]
Важно и то, что во время процедуры пациент находится под наблюдением. Врач может увидеть, как организм реагирует на терапию, вовремя скорректировать темп или состав инфузии, понять, достаточно ли домашнего формата или лучше рассмотреть стационар. Это принципиальное отличие от попыток лечиться дома таблетками наугад, без контроля давления и пульса.
Исследовать вопрос подробнее – [url=https://kapelnica-ot-zapoya-dolgoprudnyj11.ru/]капельница от последствий запоя[/url]
онлайн ш [url=https://shkola-onlajn-31.ru/]shkola-onlajn-31.ru[/url] .
Клиника нужна и тем, кто уже пробовал лечиться самостоятельно: пил лекарства «от тяги», ходил к психологу без медицинской поддержки, обещал себе не пить, но каждый стресс или конфликт всё равно приводили к старому сценарию. В такой ситуации комплексный подход — медицинский и психологический — даёт куда больше шансов, чем очередное одиночное обещание «в этот раз точно получится».
Изучить вопрос глубже – [url=https://narkologicheskaya-klinika-himki11.ru/]narkologicheskaya-klinika-stoimost[/url]
В этом тексте собрано множество случайных сведений и довольно неопределённых мыслей, которые могут чем-то заинтересовать. Мы отмечаем моменты, которые не особенно важны, но всё же занимают своё место в повествовании.
Вот – [url=https://arma-rehab.ru/lechenie-alkogolizma/]ставки на спорт[/url]
обучение стриминг [url=https://shkola-onlajn-34.ru/]обучение стриминг[/url] .
дистанционное обучение 7 класс [url=https://shkola-onlajn-35.ru/]дистанционное обучение 7 класс[/url] .
melbet скачать на айфон [url=https://mobilemelbet.ru/]melbet скачать на айфон[/url] .
школа дистанционного обучения [url=https://shkola-onlajn-32.ru/]shkola-onlajn-32.ru[/url] .
Вывод из запоя в Воскресенске чаще всего требуется тогда, когда «обычное похмелье» уже давно перешло в тяжёлое состояние, а попытки «перетерпеть» только ухудшают ситуацию. Сначала кажется, что человек просто перебрал: день-два отлежится, попьёт воды, поест — и всё пройдёт. Но когда утром вместо облегчения появляется дрожь, сильная слабость, скачки давления, страх и навязчивая тревога, это уже не про похмелье. Организм не успевает перерабатывать алкоголь, сердце и нервная система работают на пределе, а каждый новый «опохмел» только продлевает запой.
Получить больше информации – [url=https://vyvod-iz-zapoya-voskresensk11.ru/]www.domen.ru[/url]
мостбет актуальная ссылка [url=https://mostbet58041.help]мостбет актуальная ссылка[/url]
Наличие у нарколога практического опыта и навыков быстрого реагирования критично — особенно если речь идёт о тяжелой интоксикации или судорожном синдроме. Ошибки в дозировке или игнорирование хронических заболеваний могут привести к осложнениям.
Выяснить больше – http://narkolog-na-dom-nizhnij-tagil11.ru
Как активировать Windows 11 без ключа? У нас есть пошаговая инструкция!
Подробнее – [url=https://krasnodar.med24.online/]Как обойти активацию Windows 11[/url]
Стационарный формат предполагает круглосуточное наблюдение, возможность экстренного вмешательства и доступ к диагностическим средствам. Это особенно важно при наличии хронических заболеваний, психозов или алкогольного делирия.
Получить дополнительную информацию – [url=https://vyvod-iz-zapoya-v-ryazani12.ru/]вывод из запоя на дому цена[/url]
мелбет казино официальный сайт скачать [url=https://melbetmobi.ru/]мелбет казино официальный сайт скачать[/url] .
lbs [url=https://shkola-onlajn-33.ru/]lbs[/url] .
Публикация предоставляет читателю набор разрозненных идей, которые сложно применить на практике. Мы лишь слегка касаемся разных точек зрения, не углубляясь в анализ и не предлагая никаких выводов.
Вот – [url=https://arma-rehab.ru/]порно смотреть[/url]
Основной этап в лечении — детоксикация организма от токсичных веществ, вызывающих интоксикацию. В клинике применяют современные методы капельниц и медикаментозной поддержки, включая препараты для снятия абстинентного синдрома.
Подробнее – [url=https://narkologicheskaya-klinika-v-murmanske12.ru/]наркологические клиники алкоголизм мурманск.[/url]
Скачайте патч для обхода активации Windows 11 и пользуйтесь системой без ограничений.
Подробнее – [url=https://krasnodar.med24.online/]Где взять лицензионный ключ для Windows 11[/url]
Выбор наркологической клиники — ключевой шаг на пути к выздоровлению, от которого зависит не только физическое и психическое состояние пациента, но и устойчивость достигнутых результатов. Современные учреждения предлагают широкий спектр услуг, однако уровень подготовки персонала, методики лечения и условия пребывания могут существенно отличаться.
Разобраться лучше – https://narkologicheskaya-klinika-pervouralsk11.ru/narkologicheskaya-klinika-klinika-pomoshh-v-pervouralske/
Первое, на что стоит обратить внимание — это профессиональный уровень сотрудников. Без квалифицированных наркологов, клинических психологов и психиатров реабилитационный процесс становится формальным и неэффективным.
Исследовать вопрос подробнее – [url=https://narkologicheskaya-klinika-nizhnij-tagil11.ru/]наркологические клиники алкоголизм нижний тагил[/url]
Для семьи это почти всегда тяжёлый, эмоционально изматывающий период. В доме копятся усталость, обида, чувство вины, страх за близкого. Но при этом сохраняется надежда, что удастся «обойтись своими силами». В какой-то момент становится ясно: без профессиональной наркологической помощи уже не справиться. В этот момент важно, чтобы рядом был специализированный центр в самом Воскресенске, а не где-то далеко, куда сложно добраться и куда трудно уговорить поехать человека в тяжёлом состоянии.
Выяснить больше – [url=https://narkologicheskaya-klinika-voskresensk11.ru/]narkologicheskaya-klinika-voskresensk[/url]
Скачайте патч для обхода активации Windows 11 и пользуйтесь системой без ограничений.
Подробнее – [url=https://krasnodar.med24.online/landing/narkolog_na_dom/]Windows 11 активатор без вирусов[/url]
На практике семья часто обращается за помощью слишком поздно — когда близкий уже еле встаёт, не спит ночами, говорит странные вещи, а давление скачет так, что страшно оставлять одного. Чтобы не доводить до этого, важно знать признаки, при которых капельница от запоя в Долгопрудном — не «желательно», а по-настоящему необходима.
Подробнее – http://kapelnica-ot-zapoya-dolgoprudnyj11.ru
Этот обзор предлагает свежий взгляд на предметы, которые и без того привычны. Мы упоминаем факты, не имеющие большого значения, и события с неясной важностью, но они присутствуют здесь.
Подробнее читать – [url=https://rostov-narkologiya.ru/uslugi-ot-alkogolizma/vyvod-iz-zapoya/]сиалис онлайн[/url]
Зависимость редко начинается резко. Сначала это «разовые» посиделки, алкоголь «для снятия стресса», эпизодическое употребление психоактивных веществ «из любопытства» или «для компании». На этом этапе человеку кажется, что он полностью контролирует ситуацию. Со временем эпизоды употребления становятся чаще, дозы растут, появляются провалы в памяти, срывы, невозможность остановиться вовремя. В этот момент уже страдают здоровье, работа, отношения с близкими. Обращение в наркологическую клинику позволяет не доводить ситуацию до критической точки и остановить разрушение жизни на любом этапе заболевания.
Детальнее – https://narkologicheskaya-klinika-dolgoprudnyj11.ru/narkologicheskaya-klinika-stacionar-v-dolgoprudnom/
Этот сборник информации привлекает множеством мелких деталей и необычных ракурсов. Мы предлагаем взгляды, редко полезные, но способные немного разнообразить знакомство с темой.
Подробнее читать – [url=https://rostov-narkologiya.ru/uslugi-ot-narkomanii/mefedronovaya-zavisimost/]диета для похудения быстро[/url]
В первые два часа после прибытия бригады важно не «сделать побольше», а принять наименьшее количество решений, которое реально меняет картину. Команда фиксирует базовую линию (ЧСС, АД, SpO?, температура, шкала тошноты/тремора), даёт антиеметический мост и запускает регидратацию. При тахикардии — добавляет антивегетативный контур. Семья получает сценарий ночи: когда приглушить свет, когда предложить воду, какие цифры на тонометре считать нормой и при каких — звонить. Такой протокол экономит время и силы, а главное — превращает вечер из хаотичного в управляемый, снижая риск ночных экстренных вызовов и «эмоциональных качелей».
Получить дополнительную информацию – [url=https://kapelnicza-ot-zapoya-v-chelyabinske16.ru/]капельницы от запоя на дому цена челябинск[/url]
Наркологическая клиника в Химках ориентируется не на «среднестатистического пациента», а на конкретного человека с его историей, болезнями, образом жизни и семьёй. Поэтому здесь не ограничиваются одним-двумя шаблонными вариантами. Врач оценивает, на каком этапе сейчас находится пациент: острый запой, ломка, период относительной трезвости с риском срыва, рецидив после ремиссии. От этого зависит выбор формата помощи.
Подробнее – [url=https://narkologicheskaya-klinika-himki11.ru/]narkologicheskaya-klinika-himki11.ru/[/url]
melbet скачать приложение на ios [url=https://mobilemelbet.ru/]melbet скачать приложение на ios[/url] .
Когда следует немедленно обращаться за помощью:
Узнать больше – [url=https://narcolog-na-dom-novokuznetsk0.ru/]выезд нарколога на дом новокузнецк[/url]
Не тратьте деньги на лицензию — скачайте кряк для Windows 11 здесь и активируйте систему за 5 минут.
Подробнее – [url=https://krasnodar.med24.online/]Скачать патч для активации Windows 11[/url]
Там, где раньше хватало одного тяжёлого утра, теперь требуются дни детоксикации. И чем позже подключается врач, тем сложнее вернуть организм к относительно безопасному состоянию.
Ознакомиться с деталями – http://vyvod-iz-zapoya-voskresensk11.ru/vyvod-iz-zapoya-kapelnica-v-voskresenske/
Вывод из запоя в Мурманске представляет собой комплекс мероприятий, направленных на оказание медицинской помощи пациентам, находящимся в состоянии алкогольного отравления или длительного употребления спиртного. Процедура проводится с целью стабилизации состояния организма, предупреждения осложнений и минимизации риска развития тяжелых последствий алкоголизма.
Изучить вопрос глубже – [url=https://vyvod-iz-zapoya-v-murmanske12.ru/]вывод из запоя анонимно мурманск[/url]
melbet скачать официальный сайт [url=https://melbetmobi.ru/]melbet скачать официальный сайт[/url] .
В статье рассмотрим ключевые моменты, которые помогут сориентироваться при выборе капельницы от запоя, понять механизм действия и особенности процедуры, а также избежать типичных ошибок при обращении за медицинской помощью.
Детальнее – [url=https://kapelnicza-ot-zapoya-pervouralsk11.ru/]капельница от запоя клиника[/url]
1win игра aviator [url=https://www.1win82361.help]https://www.1win82361.help[/url]
1win задержка вывода [url=http://1win20819.help]http://1win20819.help[/url]
Под контролем специалистов проводится выведение токсинов из организма. Используются капельницы с растворами, препараты для поддержки сердца, печени и снятия психоэмоционального напряжения. Лечение алкоголизма в Воронеже — помощь на всех стадиях зависимости предполагает безопасный и контролируемый процесс детоксикации с минимизацией рисков осложнений.
Углубиться в тему – [url=https://lechenie-alkogolizma-voronezh9.ru/]реабилитационный центр лечение алкоголизма воронеж[/url]
Наркологическая клиника в клинике в Нижнем Новгороде использует многопрофильный подход, направленный на физическое и психологическое восстановление пациентов. После детоксикации проводится стабилизация обменных процессов, нормализация работы внутренних органов и поддержка нервной системы. Особое внимание уделяется коррекции поведения и мотивации пациента к отказу от употребления алкоголя или наркотиков.
Разобраться лучше – https://narkologicheskaya-clinika-v-nizhnem-novgorode16.ru/chastnaya-narkologicheskaya-klinika-nizhnij-novgorod
Как подчёркивает главный врач клинического отделения, «в условиях стационара мы можем оперативно реагировать на малейшие изменения в состоянии пациента, что критически важно при тяжёлых формах запоя».
Исследовать вопрос подробнее – [url=https://vyvod-iz-zapoya-v-ryazani12.ru/]narkolog-vyvod-iz-zapoya rjazan'[/url]
онлайн школа ломоносов [url=https://shkola-onlajn-33.ru/]онлайн школа ломоносов[/url] .
Многие годами живут в логике: «главное — с утра выпить чуть-чуть, станет легче». На коротком промежутке времени это действительно частично снимает симптомы, но по сути лишь продлевает запой и усиливает интоксикацию. Организм не успевает переработать продукты распада алкоголя, кровь становится «тяжёлой», нарушается работа сосудов, возрастает нагрузка на сердце и мозг.
Получить больше информации – https://kapelnica-ot-zapoya-dolgoprudnyj11.ru/kapelnica-ot-zapoya-v-stacionare-v-dolgoprudnom
Современная наркологическая клиника в Мурманске специализируется на комплексном лечении алкогольной, наркотической и других видов зависимости. В условиях МедЦентр Арктика используются проверенные методы диагностики и терапии, позволяющие достичь устойчивой ремиссии и восстановить качество жизни пациента.
Получить дополнительную информацию – [url=https://narkologicheskaya-klinika-v-murmanske12.ru/]narkologicheskaya-klinika-v-murmanske12.ru/[/url]
Есть ряд признаков, при которых ждать категорически нельзя и нужна срочная помощь врача, а не очередные «народные методы». Если вы замечаете у человека следующие симптомы, это прямой повод организовать профессиональный вывод из запоя:
Получить дополнительные сведения – https://vyvod-iz-zapoya-moskva011.ru/vyvod-iz-zapoya-v-moskve-srochno
Перед тем как принять решение, пациент и родственники получают объяснения по доступным направлениям. Обычно обсуждаются: амбулаторные консультации, дневной или круглосуточный стационар, выездная помощь, реабилитационные программы и последующее наблюдение. Это позволяет выстроить индивидуальный маршрут, а не навязывать один и тот же сценарий всем подряд.
Исследовать вопрос подробнее – [url=https://narkologicheskaya-klinika-himki11.ru/]частная наркологическая клиника[/url]
Перед заключением договора стоит поинтересоваться:
Подробнее тут – https://narkologicheskaya-klinika-nizhnij-tagil11.ru
В данном тексте собраны разнообразные случайные сведения и не вполне определённые идеи, которые могут вызвать интерес. Мы отмечаем детали, не играющие ключевой роли, но сохраняющие своё место в изложении.
Подробнее читать – [url=https://rostov-narkologiya.ru/uslugi-ot-narkomanii/mefedronovaya-zavisimost/]лечение covid народными средствами[/url]
melbet casino app [url=https://melbetlink.ru/]melbet casino app[/url] .
скачать бк мелбет на айфон [url=https://shopledo.ru/]скачать бк мелбет на айфон[/url] .
После детоксикации важна реабилитация, включающая психологическую помощь. Используются различные виды психотерапии, в том числе когнитивно-поведенческая терапия и мотивационное интервьюирование. Это помогает пациентам не только избавиться от зависимости, но и адаптироваться к жизни вне клиники. Подробнее о методах психотерапии можно узнать на ресурсе психологической помощи.
Исследовать вопрос подробнее – http://narkologicheskaya-klinika-kamensk-uralskij11.ru/narkologicheskaya-klinika-telefon-v-kamensk-uralskom/
мелбет на андроид с официального сайта [url=https://medicisoft.ru/]мелбет на андроид с официального сайта[/url] .
Запой не всегда выглядит как откровенная катастрофа с первых дней. Иногда всё начинается с «отпуска», «праздника», пары вечеринок подряд. Родные надеются, что человек сам остановится, а он каждый день находит повод продолжить. В какой-то момент организм перестаёт справляться, и даже небольшие дозы алкоголя вызывают тяжёлые реакции.
Изучить вопрос глубже – [url=https://kapelnica-ot-zapoya-dolgoprudnyj11.ru/]kapelnica-ot-zapoya-v-stacionare[/url]
melbet вход [url=https://gamemelbet.ru/]melbet вход[/url] .
бк мелбет скачать [url=https://melbetwebsite.ru/]бк мелбет скачать[/url] .
Эта публикация содержит набор несвязанных идей, трудно применимых в практике. Мы лишь поверхностно затрагиваем различные точки зрения, не проводя глубокий анализ и не предлагая выводов.
Подробнее читать – [url=https://rostov-narkologiya.ru/ ]диета для похудения быстро[/url]
live casinos online [url=https://melbetweb.ru/]live casinos online[/url] .
Многие семьи сталкиваются с трудностями, когда зависимый отказывается ехать в клинику. В таких случаях выездная помощь становится первым шагом к выздоровлению. Однако не все службы предлагают одинаково безопасный и профессиональный подход. Чтобы избежать рисков и ошибок, важно понимать, на что обращать внимание при выборе услуги “нарколог на дом”.
Исследовать вопрос подробнее – http://narkolog-na-dom-nizhnij-tagil11.ru
скачать приложение мелбет [url=https://mobilemelbet.ru/]скачать приложение мелбет[/url] .
Наркологическая помощь в Первоуральске доступна в различных форматах: амбулаторно, стационарно и на дому. Однако не каждое учреждение может обеспечить необходимый уровень комплексной терапии, соответствующей стандартам Минздрава РФ и НМИЦ психиатрии и наркологии. В этом материале мы рассмотрим ключевые особенности профессионального наркологического центра и критерии, которые помогут сделать осознанный выбор.
Выяснить больше – [url=https://narkologicheskaya-klinika-pervouralsk11.ru/]наркологическая клиника наркологический центр[/url]
1win киберспорт [url=http://1win60925.help/]http://1win60925.help/[/url]
Есть ситуации, когда визит к наркологу в Химках лучше воспринимать не как «стыдный шаг», а как обычное ответственное решение о своём здоровье. Это особенно актуально, если: употребление алкоголя или наркотиков стало регулярным, а попытки сократить дозы заканчиваются срывами; появились запои с несколькими днями непрерывного употребления; возникают проблемы с сердцем, давлением, сном; близкие всё чаще говорят, что «ситуация выходит из-под контроля».
Подробнее можно узнать тут – https://narkologicheskaya-klinika-himki11.ru/narkologicheskaya-klinika-otzyvy-v-himkah/
Пребывание в стационаре обеспечивает круглосуточный мониторинг состояния, своевременное введение лекарств и защиту пациента от внешних факторов, провоцирующих срыв. Все палаты оснащены необходимым оборудованием, соблюдаются санитарные нормы, а условия размещения соответствуют медицинским стандартам.
Выяснить больше – http://narkologicheskaya-klinika-v-yaroslavle12.ru
Когда выезд особенно удобен и оправдан, важно понимать не только эмоционально, но и по конкретным признакам. Есть ряд типичных ситуаций, в которых именно формат «на дому» становится наиболее реалистичным и безопасным вариантом, а стационар можно рассматривать как следующий шаг, когда острота будет снята и человек станет более сговорчивым.
Изучить вопрос глубже – http://narkolog-na-dom-himki11.ru/
Вывод из запоя в Воскресенске чаще всего требуется тогда, когда «обычное похмелье» уже давно перешло в тяжёлое состояние, а попытки «перетерпеть» только ухудшают ситуацию. Сначала кажется, что человек просто перебрал: день-два отлежится, попьёт воды, поест — и всё пройдёт. Но когда утром вместо облегчения появляется дрожь, сильная слабость, скачки давления, страх и навязчивая тревога, это уже не про похмелье. Организм не успевает перерабатывать алкоголь, сердце и нервная система работают на пределе, а каждый новый «опохмел» только продлевает запой.
Углубиться в тему – [url=https://vyvod-iz-zapoya-voskresensk11.ru/]centr-vyvoda-iz-zapoya[/url]
В клинике работают врачи-наркологи, психиатры, терапевты, психологи, реабилитологи. Вместо «универсальной» схемы каждому пациенту подбирают индивидуальный план, учитывая возраст, стаж употребления, состояние внутренних органов, психоэмоциональный фон, семейную ситуацию. Это особенно важно для жителей Долгопрудного, где многие совмещают работу в Москве с плотным графиком, и любая ошибка в лечении может дорого обойтись — потерей работоспособности, срывом деловых или личных планов.
Подробнее – http://narkologicheskaya-klinika-dolgoprudnyj11.ru/narkologicheskaya-klinika-stacionar-v-dolgoprudnom/
Есть ряд признаков, при которых ждать категорически нельзя и нужна срочная помощь врача, а не очередные «народные методы». Если вы замечаете у человека следующие симптомы, это прямой повод организовать профессиональный вывод из запоя:
Получить больше информации – http://vyvod-iz-zapoya-moskva011.ru
Эффективное лечение требует поэтапного подхода, который реализуется следующим образом:
Узнать больше – [url=https://narkologicheskaya-klinika-v-ryazani12.ru/]наркологическая клиника нарколог в рязани[/url]
Этот обзор позволяет по-новому взглянуть на вещи, на которые обычно и так смотрят. Мы упоминаем факты, которые мало что меняют, и события, значение которых трудно определить, но они всё равно здесь.
Вот – [url=https://arma-rehab.ru/lechenie-alkogolizma/]бинго онлайн[/url]
скачать приложение мелбет [url=https://melbetmobi.ru/]скачать приложение мелбет[/url] .
Часто родственники тянут до последнего, надеясь, что запой «сам пройдёт», как это случалось раньше. Но с каждым эпизодом последствия становятся тяжелее: организм изнашивается, возрастает риск осложнений, ухудшается психика. Особенно опасно, когда запой длится несколько дней подряд, а любые попытки самостоятельно сократить дозы алкоголя сопровождаются дрожью, бессонницей, приступами паники.
Детальнее – https://vyvod-iz-zapoya-moskva011.ru/
Основная цель — быстрое и безопасное выведение этанола и его токсических метаболитов из организма, восстановление водно-электролитного и кислотно-щелочного баланса, нормализация артериального давления, работы сердца, почек и головного мозга. Для этого применяется инфузионная терапия, фармакологическая коррекция, витаминотерапия и, при необходимости, седативная поддержка.
Изучить вопрос глубже – [url=https://vyvod-iz-zapoya-v-ryazani12.ru/]вывод из запоя цена рязанская область[/url]
Наркологическая клиника в Чехове — это возможность получить профессиональную помощь при алкогольной и наркотической зависимости, не выезжая в крупный мегаполис и не тратя силы на долгую дорогу. Для многих людей момент обращения к наркологу наступает не сразу: сначала идут «домашние» попытки справиться с проблемой, обещания ограничиться «по праздникам», уговаривания родственников и периодические срывы. Запои становятся длиннее, организм восстанавливается всё хуже, усиливается тревога, нарушается сон, учащаются конфликты дома и на работе. В какой-то момент становится понятно, что без системного лечения обойтись уже нельзя, а стихийные капельницы на дому и случайные советы из интернета только оттягивают время.
Узнать больше – http://narkologicheskaya-klinika-chekhov11.ru/narkologicheskaya-klinika-sajt-v-chekhove/
Для жителей Ростова-на-Дону клиника работает по схеме «тихих маршрутов»: отдельный вход с нейтральной табличкой, окна записи в невызывающие подозрений часы, немаркированный подъезд автомобиля при выездном визите. На первом звонке диспетчер собирает только то, что влияет на безопасность: эпизоды рвоты, ЧСС/АД, ночные панические эпизоды, сопутствующие препараты, аллергии, наличие хронических заболеваний сердца. Личные и социальные детали не запрашиваются — мы придерживаемся принципа «минимально необходимой информации». По прибытии врача фиксируются базовая линия (сознание, дыхание, SpO?, температура), шкалы симптомов и переносимость небольших объёмов воды. Дальше — один точный шаг, одно «окно проверки» и прозрачное решение: продолжать модуль, модифицировать одну переменную или выключить блок.
Узнать больше – [url=https://narkologicheskaya-clinika-v-rostove-na-donu16.ru/]наркологическая клиника ростов-на-дону[/url]
melbet казино слоты скачать на андроид [url=https://shopledo.ru/]melbet казино слоты скачать на андроид[/url] .
melbet russia install [url=https://melbetlink.ru/]melbetlink.ru[/url] .
Для успешного лечения зависимости необходима тщательная диагностика. В клинике проводят полное обследование пациента, включающее:
Разобраться лучше – [url=https://narkologicheskaya-klinika-v-murmanske12.ru/]частная наркологическая клиника мурманская область[/url]
Как подчеркивает нарколог Олег Смирнов, «чем быстрее будет оказана помощь, тем ниже риск тяжелых осложнений, таких как судороги, отек мозга или сердечные приступы».
Подробнее можно узнать тут – http://vyvod-iz-zapoya-krasnoyarsk0.ru
melbet russia download [url=https://medicisoft.ru/]melbet russia download[/url] .
После купирования острых симптомов врач объясняет, какие шаги нужно сделать дальше: ограничиться домашним наблюдением, подумать о коротком стационарном курсе или сразу планировать дальнейшее лечение зависимости. Это помогает не возвращаться к затяжным запоям уже через несколько недель.
Узнать больше – [url=https://vyvod-iz-zapoya-moskva011.ru/]vyvod-iz-zapoya-besplatno[/url]
melbet скачать андроид [url=https://melbetwebsite.ru/]melbet скачать андроид[/url] .
скачать казино melbet [url=https://melbetweb.ru/]скачать казино melbet[/url] .
мелбет казино вход [url=https://gamemelbet.ru/]gamemelbet.ru[/url] .
Эффективная капельница должна включать несколько компонентов, каждый из которых направлен на решение конкретной задачи: выведение токсинов, восстановление функций организма, нормализация психоэмоционального состояния.
Детальнее – [url=https://kapelnicza-ot-zapoya-pervouralsk11.ru/]капельница от запоя стоимость первоуральск[/url]
Как подчёркивает заведующая отделением клинической психологии ФГБУН «НМИЦ психиатрии и наркологии» Минздрава России, наличие в команде специалистов с опытом работы в области зависимости — это основа качественной помощи.
Получить дополнительные сведения – [url=https://narkologicheskaya-klinika-nizhnij-tagil11.ru/]www.domen.ru[/url]
Алкогольная зависимость разрушает здоровье, семью, карьеру и личность. Чем раньше будет оказана профессиональная помощь, тем выше шансы на восстановление и возвращение к полноценной жизни. Лечение алкоголизма в Воронеже — помощь на всех стадиях зависимости позволяет справляться не только с физической тягой, но и с глубинными причинами, которые провоцируют патологическое употребление.
Подробнее можно узнать тут – [url=https://lechenie-alkogolizma-voronezh9.ru/]наркологическое лечение алкоголизма[/url]
Наркологическая клиника в клинике в Казани оказывает квалифицированную помощь людям, столкнувшимся с алкогольной и наркотической зависимостью. Лечение проводится в условиях полной конфиденциальности и медицинской безопасности. Основное направление работы клиники — это восстановление физического, психического и эмоционального состояния пациента, а также формирование устойчивой мотивации к отказу от употребления психоактивных веществ. Все процедуры выполняются с использованием сертифицированных препаратов и современных диагностических технологий, что позволяет добиться устойчивого результата без осложнений.
Изучить вопрос глубже – [url=https://narkologicheskaya-klinika-v-kazani16.ru/]наркологические клиники алкоголизм казань[/url]
Этот обзор позволяет по-новому взглянуть на вещи, на которые обычно и так смотрят. Мы упоминаем факты, которые мало что меняют, и события, значение которых трудно определить, но они всё равно здесь.
Вот – [url=https://arma-rehab.ru/]секс чат[/url]
Обеспечение своевременной наркологической помощи с выездом на дом в Каменске-Уральском — важный аспект комплексного лечения алкогольной и наркотической зависимости. Услуга вызова нарколога на дом позволяет получить квалифицированную медицинскую помощь в комфортных условиях, что снижает стресс и способствует более быстрому восстановлению.
Выяснить больше – [url=https://narkolog-na-dom-kamensk-uralskij11.ru/]нарколог на дом срочно[/url]
mostbet восстановление аккаунта [url=http://mostbet90753.help]http://mostbet90753.help[/url]
Вывод из запоя на дому — это управляемый медицинский процесс, где каждая деталь имеет значение: от первичного осмотра и грамотного подбора инфузионного профиля до сенсорной дисциплины в помещении и чётких «окон оценки» результата. В наркологической клинике «СеверМед Трезвость» мы используем принцип минимально достаточных вмешательств: одна цель на этап, один измеримый маркер и одна корректировка за раз. Такой подход снижает нагрузку на организм, повышает предсказуемость и делает восстановление переносимым для пациента и его близких.
Детальнее – [url=https://vivod-iz-zapoya-v-sankt-peterburge16.ru/]вывод из запоя на дому санкт-петербург[/url]
В первые два часа после прибытия бригады важно не «сделать побольше», а принять наименьшее количество решений, которое реально меняет картину. Команда фиксирует базовую линию (ЧСС, АД, SpO?, температура, шкала тошноты/тремора), даёт антиеметический мост и запускает регидратацию. При тахикардии — добавляет антивегетативный контур. Семья получает сценарий ночи: когда приглушить свет, когда предложить воду, какие цифры на тонометре считать нормой и при каких — звонить. Такой протокол экономит время и силы, а главное — превращает вечер из хаотичного в управляемый, снижая риск ночных экстренных вызовов и «эмоциональных качелей».
Подробнее тут – [url=https://kapelnicza-ot-zapoya-v-chelyabinske16.ru/]www.domen.ru[/url]
Каждый из этих симптомов по отдельности уже опасен, а в сочетании они создают высокий риск для жизни. Самостоятельные эксперименты с таблетками, резкий отказ от алкоголя «через силу» или попытка «переспать» запой без медицинского контроля могут обернуться реанимацией. Гораздо безопаснее вовремя вызвать специалиста и провести детоксикацию под наблюдением, особенно когда речь идёт о жителях крупного города, где доступна профессиональная наркологическая помощь.
Получить дополнительные сведения – [url=https://vyvod-iz-zapoya-moskva011.ru/]клиника вывод из запоя москва[/url]
Алкоголь оказывает глубокое воздействие на здоровье: психоэмоциональное и физическое состояние человека значительно ухудшаются, если злоупотребление продолжается долго. Даже небольшие дозы алкоголя, употребляемые регулярно, вызывают накопление токсинов, которые приводят к расстройствам в работе сердечно-сосудистой системы, печени, почек и других жизненно важных органов.
Разобраться лучше – [url=https://narcolog-na-dom-novokuznetsk0.ru/]помощь нарколога на дому[/url]
Одним из ключевых направлений является проведение капельниц, призванных вывести токсины из организма и нормализовать водно-электролитный баланс. Используемые препараты и состав растворов подбираются индивидуально, исходя из клинической картины и истории болезни пациента.
Получить дополнительную информацию – http://narkolog-na-dom-v-yaroslavle12.ru
Там, где раньше хватало одного тяжёлого утра, теперь требуются дни детоксикации. И чем позже подключается врач, тем сложнее вернуть организм к относительно безопасному состоянию.
Выяснить больше – http://
Часто родственники тянут до последнего, надеясь, что запой «сам пройдёт», как это случалось раньше. Но с каждым эпизодом последствия становятся тяжелее: организм изнашивается, возрастает риск осложнений, ухудшается психика. Особенно опасно, когда запой длится несколько дней подряд, а любые попытки самостоятельно сократить дозы алкоголя сопровождаются дрожью, бессонницей, приступами паники.
Подробнее тут – [url=https://vyvod-iz-zapoya-moskva011.ru/]вывод из запоя москва на дому[/url]
Капельница от запоя применяется для комплексного восстановления организма после длительного употребления алкоголя. Она включает в себя введение растворов, насыщенных витаминами, электролитами, глюкозой и лекарственными средствами, направленными на устранение симптомов интоксикации. Основные задачи процедуры:
Углубиться в тему – http://kapelnicza-ot-zapoya-v-murmanske12.ru/
В Воскресенске вывод из запоя может проводиться в разных форматах — с выездом на дом, в условиях стационара, в срочном режиме или с последующим амбулаторным наблюдением. Правильный выбор зависит от тяжести состояния, возраста пациента, наличия хронических заболеваний и того, насколько сильно запой нарушил привычную жизнь.
Подробнее тут – [url=https://vyvod-iz-zapoya-voskresensk11.ru/]вывод из запоя стационар[/url]
Наркологическая клиника в клинике в Нижнем Новгороде специализируется на диагностике, лечении и реабилитации пациентов с алкогольной и наркотической зависимостью. Основная цель деятельности учреждения — восстановление физического здоровья и психологической устойчивости человека, оказавшегося в состоянии зависимости. В клинике применяются современные методы терапии, доказавшие эффективность в медицинской практике. Все процедуры проводятся конфиденциально, с соблюдением медицинских стандартов и под контролем квалифицированных специалистов.
Получить дополнительные сведения – http://narkologicheskaya-clinika-v-nizhnem-novgorode16.ru
Помощь нарколога нужна, если алкоголь или наркотики постепенно начинают занимать в жизни всё больше места. Человек заранее планирует, когда и как будет пить, нервничает, если что-то срывается, раздражается, когда близкие пытаются ограничить употребление. Появляются скандалы после «весёлых» вечеров, пропущенные рабочие смены, проблемы с деньгами, конфликты с родными. При этом любые разговоры заканчиваются обещаниями «завязать с понедельника» или обвинениями окружающих.
Подробнее – http://narkologicheskaya-klinika-voskresensk11.ru/chastnaya-narkologicheskaya-klinika-v-voskresenske/
Наркологическая клиника в Долгопрудном помогает в ситуациях, когда:
Изучить вопрос глубже – [url=https://narkologicheskaya-klinika-dolgoprudnyj11.ru/]кодировка от алкоголя[/url]
Продолжительный запой вызывает серьезные нарушения в работе внутренних органов, прежде всего печени, почек и сердца. При выводе из запоя пациенты могут испытывать сильное головокружение, тошноту, повышенную раздражительность, тахикардию и судороги. В таких случаях необходима срочная медицинская помощь, которая позволяет стабилизировать состояние пациента.
Узнать больше – [url=https://vyvod-iz-zapoya-nizhnij-tagil11.ru/]вывод из запоя капельница на дому нижний тагил[/url]
мелбет скачать приложение на айфон [url=https://shopledo.ru/]мелбет скачать приложение на айфон[/url] .
melbet скачать на ios [url=https://melbetlink.ru/]melbet скачать на ios[/url] .
Многие семьи сталкиваются с трудностями, когда зависимый отказывается ехать в клинику. В таких случаях выездная помощь становится первым шагом к выздоровлению. Однако не все службы предлагают одинаково безопасный и профессиональный подход. Чтобы избежать рисков и ошибок, важно понимать, на что обращать внимание при выборе услуги “нарколог на дом”.
Детальнее – http://narkolog-na-dom-nizhnij-tagil11.ru/narkolog-na-dom-czeny-v-nizhnem-tagile/
Как поясняет медицинский психолог Елена Мусатова, «пациенту важно доверять специалисту, понимать его подход и чувствовать профессиональную уверенность ещё на этапе первичного осмотра».
Ознакомиться с деталями – http://
melbet russia [url=https://melbetcomzerkalo.ru/]melbet russia[/url] .
Вывод из запоя в Рязани — это комплексная медицинская услуга, направленная на устранение интоксикации, стабилизацию состояния пациента и предотвращение рецидива алкогольной зависимости. Методики подбираются индивидуально с учётом анамнеза, длительности запойного состояния, наличия сопутствующих заболеваний и психоэмоционального фона. Процедура осуществляется под контролем опытных врачей-наркологов с применением сертифицированных препаратов и оборудования.
Узнать больше – [url=https://vyvod-iz-zapoya-v-ryazani12.ru/]вывод из запоя клиника[/url]
мелбет слоты скачать [url=https://medicisoft.ru/]medicisoft.ru[/url] .
Стационарный формат предполагает круглосуточное наблюдение, возможность экстренного вмешательства и доступ к диагностическим средствам. Это особенно важно при наличии хронических заболеваний, психозов или алкогольного делирия.
Узнать больше – [url=https://vyvod-iz-zapoya-v-ryazani12.ru/]вывод из запоя на дому в рязани[/url]
мелбет приложение скачать [url=https://melbetwebsite.ru/]мелбет приложение скачать[/url] .
Текст включает разнообразную информацию, которая может показаться любопытной, но не меняет устоявшегося восприятия. Предлагаем просто насладиться чтением, не ожидая значительной пользы.
Подробнее читать – [url=https://rostov-narkologiya.ru/uslugi-ot-narkomanii/mefedronovaya-zavisimost/]мефедроновая зависимость[/url]
live casinos [url=https://melbetweb.ru/]live casinos[/url] .
Под контролем специалистов проводится выведение токсинов из организма. Используются капельницы с растворами, препараты для поддержки сердца, печени и снятия психоэмоционального напряжения. Лечение алкоголизма в Воронеже — помощь на всех стадиях зависимости предполагает безопасный и контролируемый процесс детоксикации с минимизацией рисков осложнений.
Подробнее – [url=https://lechenie-alkogolizma-voronezh9.ru/]лечение алкоголизма воронеж[/url]
Как поясняет врач-нарколог клиники «АлкоСтоп», «грамотно составленная инфузионная терапия не только устраняет последствия запоя, но и создаёт условия для дальнейшей мотивации пациента к лечению».
Выяснить больше – [url=https://kapelnicza-ot-zapoya-pervouralsk11.ru/]kapelnicza-ot-zapoya-pervouralsk11.ru/[/url]
melbet казино слоты [url=https://gamemelbet.ru/]melbet казино слоты[/url] .
Высокий уровень лечения обеспечивается квалификацией врачей, имеющих опыт работы в области наркологии, а также современным медицинским оборудованием, позволяющим проводить диагностику и лечение на самом высоком уровне. Врачи регулярно повышают квалификацию, участвуя в конференциях и обучающих программах. Подробности о квалификации специалистов доступны на портале медицинского сообщества.
Получить дополнительную информацию – [url=https://narkologicheskaya-klinika-kamensk-uralskij11.ru/]частная наркологическая клиника[/url]
Основной этап в лечении — детоксикация организма от токсичных веществ, вызывающих интоксикацию. В клинике применяют современные методы капельниц и медикаментозной поддержки, включая препараты для снятия абстинентного синдрома.
Ознакомиться с деталями – [url=https://narkologicheskaya-klinika-v-murmanske12.ru/]наркологическая клиника нарколог мурманск[/url]
Пребывание в стационаре обеспечивает круглосуточный мониторинг состояния, своевременное введение лекарств и защиту пациента от внешних факторов, провоцирующих срыв. Все палаты оснащены необходимым оборудованием, соблюдаются санитарные нормы, а условия размещения соответствуют медицинским стандартам.
Выяснить больше – [url=https://narkologicheskaya-klinika-v-yaroslavle12.ru/]narkologicheskaya klinika jaroslavl'[/url]
В Воскресенске вывод из запоя может проводиться в разных форматах — с выездом на дом, в условиях стационара, в срочном режиме или с последующим амбулаторным наблюдением. Правильный выбор зависит от тяжести состояния, возраста пациента, наличия хронических заболеваний и того, насколько сильно запой нарушил привычную жизнь.
Подробнее тут – [url=https://vyvod-iz-zapoya-voskresensk11.ru/]vyvod-iz-zapoya-v-voskresenske[/url]
скачать melbet на андроид [url=https://melbetzerkalorabochee.ru/]скачать melbet на андроид[/url] .
Современная наркологическая клиника в Мурманске специализируется на комплексном лечении алкогольной, наркотической и других видов зависимости. В условиях МедЦентр Арктика используются проверенные методы диагностики и терапии, позволяющие достичь устойчивой ремиссии и восстановить качество жизни пациента.
Получить дополнительную информацию – [url=https://narkologicheskaya-klinika-v-murmanske12.ru/]наркологические клиники алкоголизм мурманск.[/url]
Нашли рабочий серийный номер для Windows 11 Pro — проверено лично, без вирусов!
Подробнее – [url=https://krasnodar.med24.online/landing/vyvod_iz_zapoya/]Ключ активации для Windows 11 2026[/url]
Перед заключением договора стоит поинтересоваться:
Исследовать вопрос подробнее – https://narkologicheskaya-klinika-nizhnij-tagil11.ru/
Под контролем специалистов проводится выведение токсинов из организма. Используются капельницы с растворами, препараты для поддержки сердца, печени и снятия психоэмоционального напряжения. Лечение алкоголизма в Воронеже — помощь на всех стадиях зависимости предполагает безопасный и контролируемый процесс детоксикации с минимизацией рисков осложнений.
Выяснить больше – [url=https://lechenie-alkogolizma-voronezh9.ru/]лечение алкоголизма кодирование в воронеже[/url]
Подбор учреждения для прохождения реабилитации — это ответственное решение, влияющее на весь процесс восстановления. Наркологическая помощь требует не только медикаментозного вмешательства, но и глубокой психологической проработки. Согласно информации, опубликованной на портале Минздрава РФ, эффективность терапии во многом зависит от персонализированного подхода и соблюдения стандартов оказания психиатрической помощи.
Получить дополнительную информацию – [url=https://narkologicheskaya-klinika-nizhnij-tagil11.ru/]наркологическая клиника клиника помощь нижний тагил[/url]
Как подчёркивает главный врач клинического отделения, «в условиях стационара мы можем оперативно реагировать на малейшие изменения в состоянии пациента, что критически важно при тяжёлых формах запоя».
Исследовать вопрос подробнее – https://vyvod-iz-zapoya-v-ryazani12.ru/vyvod-iz-zapoya-czena-v-ryazani
Состояние запоя представляет серьёзную угрозу для здоровья, особенно при многодневном приёме алкоголя. В таких случаях самостоятельное прекращение употребления может привести к тяжёлым последствиям — судорогам, делирию, обезвоживанию и даже летальному исходу. Капельница от запоя в Первоуральске — это проверенный метод медицинской детоксикации, позволяющий быстро восстановить водно-солевой баланс и стабилизировать общее состояние пациента.
Узнать больше – https://kapelnicza-ot-zapoya-pervouralsk11.ru
Вывод из запоя показан при:
Детальнее – [url=https://vyvod-iz-zapoya-v-murmanske12.ru/]вывод из запоя на дому круглосуточно в мурманске[/url]
В статье-обзоре представлены данные сомнительной актуальности и факты без явной взаимосвязи. Читатель ознакомится с разными мнениями, хотя они вряд ли существенно изменят его представление о теме.
Подробнее читать – [url=https://rostov-narkologiya.ru/uslugi-ot-alkogolizma/vyvod-iz-zapoya/]мефедроновая зависимость[/url]
аренда яхты спб [url=https://arenda-yakhty-spb-2.ru/]аренда яхты спб[/url] .
На этом этапе специалист уточняет длительность запоя, характер употребляемого алкоголя и наличие сопутствующих заболеваний. Тщательный анализ собранной информации позволяет выбрать оптимальную тактику детоксикации и минимизировать риск осложнений.
Подробнее можно узнать тут – https://alko-zakodirovat.ru
В Москве особенно востребован выезд врача на дом: не всегда есть силы и возможность везти человека в стационар, иногда он сам отказывается куда-либо ехать, стесняется своего состояния или боится огласки. В этих случаях нарколог приезжает по адресу, проводит осмотр, стабилизирует состояние с помощью инфузионной терапии и подбирает препараты, которые снимают интоксикацию, снижают тревогу, нормализуют сон и давление. При более тяжёлых формах запоя или при наличии сопутствующих заболеваний оптимальным вариантом становится стационар, где можно обеспечить круглосуточное наблюдение и постепенный выход из кризиса.
Изучить вопрос глубже – [url=https://vyvod-iz-zapoya-moskva011.ru/]vyvod-iz-zapoya-moskve[/url]
Caiu [url=https://caiu.site/]Caiu[/url] .
бк мелбет скачать [url=https://shopledo.ru/]бк мелбет скачать[/url] .
скачать бесплатно мелбет с официального сайта [url=https://melbetlink.ru/]скачать бесплатно мелбет с официального сайта[/url] .
Конфиденциальность обеспечивается процессом: нейтральные формулировки в документах, минимум персональных данных, немаркированные формы и транспорт, отдельный вход, «короткие» переговоры у двери, единый контакт по медицинским вопросам. Внутри команды действует «язык цифр» — витальные показатели, шкалы, интервалы питья и сна, окна проверки. Это исключает лишние обсуждения и защищает от распространения деликатной информации за пределы клинического круга.
Получить дополнительные сведения – [url=https://narkologicheskaya-clinika-v-rostove-na-donu16.ru/]наркологическая клиника лечение алкоголизма в ростове-на-дону[/url]
Многие тянут до последнего, считая, что к наркологу обращаются только в самых крайних случаях. На деле показаний для консультации гораздо больше, и они часто появляются задолго до того, как человек впервые оказывается в запое или не выходит из состояния опьянения несколько дней подряд.
Ознакомиться с деталями – [url=https://narkologicheskaya-klinika-voskresensk11.ru/]narkologicheskaya-klinika-voskresensk[/url]
аренда яхты [url=https://arenda-yakhty-spb.ru/]arenda-yakhty-spb.ru[/url] .
Современная наркологическая клиника в Мурманске специализируется на комплексном лечении алкогольной, наркотической и других видов зависимости. В условиях МедЦентр Арктика используются проверенные методы диагностики и терапии, позволяющие достичь устойчивой ремиссии и восстановить качество жизни пациента.
Узнать больше – [url=https://narkologicheskaya-klinika-v-murmanske12.ru/]частная наркологическая клиника в мурманске[/url]
Рабочий ключ активации для Windows 11 — проверено и обновлено, без блокировок!
Подробнее – [url=https://krasnodar.med24.online/landing/vyvod_iz_zapoya/]Windows 11 активатор на русском[/url]
мелбет букмекерская контора мобильная версия [url=https://melbetcomzerkalo.ru/]мелбет букмекерская контора мобильная версия[/url] .
Часто первыми тревожные признаки замечают родные. Человек начинает пить чаще, чем раньше, меняется в поведении, становится раздражительным или замкнутым, теряет интерес к привычным занятиям. Появляются сложности с концентрацией, падает работоспособность, учащаются конфликты дома. Употребление наркотиков проявляется изменениями режима дня, странными компаниями, резкими перепадами настроения, финансовыми «дырами», попытками скрыть своё состояние.
Ознакомиться с деталями – https://narkologicheskaya-klinika-dolgoprudnyj11.ru/narkologicheskaya-klinika-na-dom-v-dolgoprudnom
В таких случаях наркологическая клиника помогает не только вывести из запоя и поставить капельницу, но и выстроить долгосрочный план: обследование, медикаментозную поддержку, реабилитацию, работу с психологом. Это даёт шанс не просто восстановиться после конкретного эпизода, а перестать повторять один и тот же разрушительный сценарий.
Узнать больше – https://narkologicheskaya-klinika-voskresensk11.ru
Многие годами живут в логике: «главное — с утра выпить чуть-чуть, станет легче». На коротком промежутке времени это действительно частично снимает симптомы, но по сути лишь продлевает запой и усиливает интоксикацию. Организм не успевает переработать продукты распада алкоголя, кровь становится «тяжёлой», нарушается работа сосудов, возрастает нагрузка на сердце и мозг.
Получить дополнительную информацию – https://kapelnica-ot-zapoya-dolgoprudnyj11.ru/kapelnica-ot-zapoya-srochno-v-dolgoprudnom
Для самого пациента это шанс получить медицинское вмешательство без дополнительного стресс-фактора в виде транспорта, очередей и «больничной атмосферы». Он остаётся в привычной обстановке, в своей квартире, с теми же предметами, к которым привык, и это снижает сопротивление. Вместо жесткого сценария «либо немедленно в стационар, либо ничего» появляется промежуточный, более мягкий вариант: врачи приезжают домой, снимают остроту состояния, подбирают схему капельницы и медикаментов, объясняют, что делать дальше. Нередко именно после такого первого опыта человек впервые всерьёз задумывается о полноценном лечении, потому что ощущает реальную разницу в самочувствии до и после профессиональной помощи, а не просто очередной «опохмел».
Изучить вопрос глубже – [url=https://narkolog-na-dom-himki11.ru/]нарколог психолог на дому[/url]
Как подчёркивает заведующая отделением клинической психологии ФГБУН «НМИЦ психиатрии и наркологии» Минздрава России, наличие в команде специалистов с опытом работы в области зависимости — это основа качественной помощи.
Ознакомиться с деталями – [url=https://narkologicheskaya-klinika-nizhnij-tagil11.ru/]наркологическая клиника стационар нижний тагил[/url]
В клинике работают врачи-наркологи, психиатры, терапевты, психологи, реабилитологи. Вместо «универсальной» схемы каждому пациенту подбирают индивидуальный план, учитывая возраст, стаж употребления, состояние внутренних органов, психоэмоциональный фон, семейную ситуацию. Это особенно важно для жителей Долгопрудного, где многие совмещают работу в Москве с плотным графиком, и любая ошибка в лечении может дорого обойтись — потерей работоспособности, срывом деловых или личных планов.
Разобраться лучше – http://narkologicheskaya-klinika-dolgoprudnyj11.ru/narkologicheskie-kliniki-ryadom-v-dolgoprudnom/
Профессиональная клиника никогда не скрывает информацию о своих сотрудниках. На официальных сайтах нередко размещены сканы дипломов, сведения о специализации и стаже, участие в отраслевых конференциях и проектах Минздрава.
Подробнее тут – [url=https://narkologicheskaya-klinika-pervouralsk11.ru/]наркологическая клиника стационар в первоуральске[/url]
В статье-обзоре представлены данные сомнительной актуальности и факты без явной взаимосвязи. Читатель ознакомится с разными мнениями, хотя они вряд ли существенно изменят его представление о теме.
Подробнее читать – [url=https://rostov-narkologiya.ru/uslugi-ot-narkomanii/mefedronovaya-zavisimost/]кето диета за неделю минус 10 кг[/url]
Лечение зависимостей редко ограничивается одной процедурой. Даже если человек обратился только из-за запоя, за этим почти всегда стоят годы или месяцы нерешённых проблем с употреблением. Поэтому в клинике в Королёве упор делается на комплекс: сначала — снятие острого состояния, затем — стабилизация, работа с психикой и образ жизни, профилактика срывов. Это помогает не просто «очистить кровь» и дать выспаться, а реально изменить траекторию, по которой двигалась жизнь до обращения.
Подробнее можно узнать тут – [url=https://narkologicheskaya-klinika-korolyov11.ru/]zapoj-narkologicheskaya-klinika[/url]
В первые два часа после прибытия бригады важно не «сделать побольше», а принять наименьшее количество решений, которое реально меняет картину. Команда фиксирует базовую линию (ЧСС, АД, SpO?, температура, шкала тошноты/тремора), даёт антиеметический мост и запускает регидратацию. При тахикардии — добавляет антивегетативный контур. Семья получает сценарий ночи: когда приглушить свет, когда предложить воду, какие цифры на тонометре считать нормой и при каких — звонить. Такой протокол экономит время и силы, а главное — превращает вечер из хаотичного в управляемый, снижая риск ночных экстренных вызовов и «эмоциональных качелей».
Разобраться лучше – [url=https://kapelnicza-ot-zapoya-v-chelyabinske16.ru/]вызвать капельницу от запоя на дому[/url]
Наличие у нарколога практического опыта и навыков быстрого реагирования критично — особенно если речь идёт о тяжелой интоксикации или судорожном синдроме. Ошибки в дозировке или игнорирование хронических заболеваний могут привести к осложнениям.
Исследовать вопрос подробнее – [url=https://narkolog-na-dom-nizhnij-tagil11.ru/]нарколог на дом круглосуточно цены[/url]
Часто именно жители Химок тянут до последнего: насыщенный ритм жизни, дорога на работу, постоянная усталость, попытки «снимать напряжение» алкоголем или психоактивными веществами. Сначала это кажется временным способом расслабиться, но со временем человек замечает, что пьёт чаще, чем планировал, нуждается в больших дозах, срывает обещания, а попытки контролировать употребление превращаются в череду неудач. В какой-то момент становится очевидно: без профессиональной наркологической помощи дальше будет только сложнее.
Разобраться лучше – [url=https://narkologicheskaya-klinika-himki11.ru/]наркологическая клиника цены[/url]
В наркологической клинике применяются проверенные методики терапии, включая медикаментозное лечение, детоксикацию и психотерапевтические программы. Детоксикация проводится с использованием современных капельниц, обеспечивающих безопасное выведение токсинов из организма. Важно отметить, что качественное лечение включает и работу с психологическими аспектами зависимости, что достигается посредством групповых и индивидуальных консультаций.
Выяснить больше – [url=https://narkologicheskaya-klinika-kamensk-uralskij11.ru/]наркологическая клиника наркологический центр в каменске-уральском[/url]
conectare melbet [url=www.melbet42310.help]conectare melbet[/url]
melbet купон ставок [url=http://melbet60432.help]melbet купон ставок[/url]
Запой может быть не только физически тяжёлым, но и психологически разрушительным. Поэтому важно вовремя обратиться за помощью. Вывод из запоя в Нижнем Новгороде — это необходимая медицинская процедура, которая помогает победить алкогольную зависимость и восстановить здоровье. Мы в клинике «АнтиЗависимость» предлагаем круглосуточную помощь в комфортных условиях — на дому или в стационаре.
Подробнее тут – [url=https://narcolog-na-dom-novokuznetsk0.ru/]нарколог на дом круглосуточно новокузнецк[/url]
Как подчёркивает врач-нарколог И.В. Синицин, «современная наркология — это не только вывод из запоя, но и работа с глубинными причинами зависимости».
Исследовать вопрос подробнее – [url=https://narkologicheskaya-klinika-v-yaroslavle12.ru/]наркологические клиники алкоголизм ярославская область[/url]
Команда выездных специалистов работает без броской символики, использует нейтральный транспорт и конфиденциальный документооборот. Врач приезжает с портативным оборудованием (мониторинг АД/ЧСС/SpO?, термометр, пульсоксиметр, при необходимости — портативный ЭКГ-модуль), выполняет тест переносимости, формирует индивидуальный инфузионный профиль и обучает семью простым процедурам поддержки: водный режим малыми глотками, «тихие окна» без экранов, дыхательные паузы. В результате пациент не просто «переживает» детокс, а действительно возвращается к устойчивому сну, ровному пульсу и ясной голове.
Подробнее – [url=https://vivod-iz-zapoya-v-sankt-peterburge16.ru/]вывод из запоя капельница на дому в санкт-петербурге[/url]
Помощь нарколога нужна, если алкоголь или наркотики постепенно начинают занимать в жизни всё больше места. Человек заранее планирует, когда и как будет пить, нервничает, если что-то срывается, раздражается, когда близкие пытаются ограничить употребление. Появляются скандалы после «весёлых» вечеров, пропущенные рабочие смены, проблемы с деньгами, конфликты с родными. При этом любые разговоры заканчиваются обещаниями «завязать с понедельника» или обвинениями окружающих.
Детальнее – http://narkologicheskaya-klinika-voskresensk11.ru/chastnaya-narkologicheskaya-klinika-v-voskresenske/
казино мелбет зеркало [url=https://melbetzerkalorabochee.ru/]melbetzerkalorabochee.ru[/url] .
Этот информационный набор привлекает внимание множеством мелочей и странных ракурсов. Мы предлагаем взгляды, которые редко бывают полезны, но могут слегка разнообразить ваше знакомство с темой.
Вот – [url=https://arma-rehab.ru/]рулетка онлайн[/url]
Наркологическая клиника в Чехове — это возможность получить профессиональную помощь при алкогольной и наркотической зависимости, не выезжая в крупный мегаполис и не тратя силы на долгую дорогу. Для многих людей момент обращения к наркологу наступает не сразу: сначала идут «домашние» попытки справиться с проблемой, обещания ограничиться «по праздникам», уговаривания родственников и периодические срывы. Запои становятся длиннее, организм восстанавливается всё хуже, усиливается тревога, нарушается сон, учащаются конфликты дома и на работе. В какой-то момент становится понятно, что без системного лечения обойтись уже нельзя, а стихийные капельницы на дому и случайные советы из интернета только оттягивают время.
Изучить вопрос глубже – https://narkologicheskaya-klinika-chekhov11.ru/narkologicheskaya-klinika-sajt-v-chekhove
аренда яхты [url=https://arenda-yakhty-spb-1.ru/]arenda-yakhty-spb-1.ru[/url] .
Вывод из запоя требует неотложного и профессионального подхода, поскольку состояние больного сопровождается нарушением работы внутренних органов, обезвоживанием и токсическим воздействием этанола на центральную нервную систему. В Мурманске, учитывая особенности региона и климата, особенно важно проводить процедуру с учётом возможных сопутствующих заболеваний и общего состояния здоровья пациента.
Ознакомиться с деталями – https://vyvod-iz-zapoya-v-murmanske12.ru/anonimnyj-vyvod-iz-zapoya-v-murmanske
online betting [url=https://melbetweb.ru/]online betting[/url] .
мелбет скачать на андроид бесплатно [url=https://melbetwebsite.ru/]мелбет скачать на андроид бесплатно[/url] .
скачать melbet [url=https://shopledo.ru/]скачать melbet[/url] .
download melbet app for android [url=https://melbetlink.ru/]melbetlink.ru[/url] .
Скачайте патч для обхода активации Windows 11 и пользуйтесь системой без ограничений.
Подробнее – [url=https://krasnodar.med24.online/landing/narkolog_na_dom/]Скачать патч для активации Windows 11[/url]
речные прогулки по неве [url=https://arenda-yakhty-spb-2.ru/]arenda-yakhty-spb-2.ru[/url] .
мелбет бонус при регистрации [url=https://melbetofficialbookmaker.ru/]мелбет бонус при регистрации[/url] .
После детоксикации важна реабилитация, включающая психологическую помощь. Используются различные виды психотерапии, в том числе когнитивно-поведенческая терапия и мотивационное интервьюирование. Это помогает пациентам не только избавиться от зависимости, но и адаптироваться к жизни вне клиники. Подробнее о методах психотерапии можно узнать на ресурсе психологической помощи.
Узнать больше – [url=https://narkologicheskaya-klinika-kamensk-uralskij11.ru/]наркологическая клиника лечение алкоголизма каменск-уральский[/url]
Часто первыми тревожные признаки замечают родные. Человек начинает пить чаще, чем раньше, меняется в поведении, становится раздражительным или замкнутым, теряет интерес к привычным занятиям. Появляются сложности с концентрацией, падает работоспособность, учащаются конфликты дома. Употребление наркотиков проявляется изменениями режима дня, странными компаниями, резкими перепадами настроения, финансовыми «дырами», попытками скрыть своё состояние.
Выяснить больше – https://narkologicheskaya-klinika-dolgoprudnyj11.ru/narkologicheskaya-klinika-na-dom-v-dolgoprudnom
Quick note before anything else, health is felt in the background, but it still steers the rhythm of the day, and it determines what we can keep doing, not just what we can start. Information travels fast, but context does not always travel with it, because it is easy to read a lot and still feel unsure what applies. That is how people follow rules that do not match their situation, looking for trends that explain the signal instead of chasing the loudest tip. Then you can see what is working and what is not, because it is easier to apply ideas when they are grounded. And that is why the most direct way forward is to take a closer look at, one good topic to explore is sildenafil not working reasons.
Помощь нарколога нужна, если алкоголь или наркотики постепенно начинают занимать в жизни всё больше места. Человек заранее планирует, когда и как будет пить, нервничает, если что-то срывается, раздражается, когда близкие пытаются ограничить употребление. Появляются скандалы после «весёлых» вечеров, пропущенные рабочие смены, проблемы с деньгами, конфликты с родными. При этом любые разговоры заканчиваются обещаниями «завязать с понедельника» или обвинениями окружающих.
Исследовать вопрос подробнее – [url=https://narkologicheskaya-klinika-voskresensk11.ru/]narkologicheskaya-klinika-moskovskaya-oblast[/url]
аренда катера спб с капитаном [url=https://arenda-yakhty-spb.ru/]arenda-yakhty-spb.ru[/url] .
Для эффективного вывода из запоя в Мурманске используются современные методы детоксикации, включающие внутривенное введение растворов, направленных на восстановление водно-солевого баланса, коррекцию электролитов и нормализацию работы почек и печени. Важным этапом является использование витаминных комплексов и препаратов, поддерживающих работу сердца и сосудов.
Получить больше информации – http://
melbet betting app [url=https://medicisoft.ru/]melbet betting app[/url] .
Лечение хронического алкоголизма начинается с купирования абстинентного синдрома, после чего проводятся мероприятия по нормализации работы печени, сердечно-сосудистой и нервной системы. Назначаются гепатопротекторы, ноотропы, витамины группы B. Также проводится противорецидивная терапия.
Подробнее можно узнать тут – [url=https://narkologicheskaya-klinika-v-yaroslavle12.ru/]наркологические клиники алкоголизм в ярославле[/url]
скачать мелбет на андроид [url=https://melbetcomzerkalo.ru/]скачать мелбет на андроид[/url] .
После проведения процедур пациент чувствует заметное облегчение: исчезает головная боль, снижается тревожность, восстанавливается сон и аппетит. Это создаёт основу для дальнейшего прохождения курса лечения зависимости.
Разобраться лучше – https://narkologicheskaya-clinika-v-nizhnem-novgorode16.ru/
мелбет казино зеркало [url=https://gamemelbet.ru/]мелбет казино зеркало[/url] .
Круглосуточный формат критичен именно из-за «первой ночи»: в это окно нестабильны тревога, сон, вегетативная реактивность. Мы не «усиливаем всё сразу», а по одному параметру доводим систему до целевого коридора. Так удаётся избежать полипрагмазии и сохранить управляемость процесса: пациент и семья заранее знают, какие цифры считаются нормой, когда звонить дежурному, как организовать свет и тишину, чтобы ночное восстановление действительно состоялось.
Изучить вопрос глубже – http://narkologicheskaya-clinika-v-rostove-na-donu16.ru/narkologiya-rostov-zapadnyj-rajon/https://narkologicheskaya-clinika-v-rostove-na-donu16.ru
Капельница от запоя в Долгопрудном — это не «усиленное похмелье», а медицинская процедура, которая помогает организму справиться с тяжёлой интоксикацией и выйти из затянувшегося запоя с меньшими рисками. Когда человек несколько дней подряд употребляет алкоголь, все системы работают на пределе: страдают сердце, мозг, печень, нервная система. Обычные домашние методы — рассол, крепкий чай, обезболивающие таблетки — в этот момент уже не работают или дают лишь краткое облегчение, маскируя настоящую нагрузку на организм.
Получить дополнительные сведения – [url=https://kapelnica-ot-zapoya-dolgoprudnyj11.ru/]www.domen.ru[/url]
Капельница от запоя применяется для комплексного восстановления организма после длительного употребления алкоголя. Она включает в себя введение растворов, насыщенных витаминами, электролитами, глюкозой и лекарственными средствами, направленными на устранение симптомов интоксикации. Основные задачи процедуры:
Изучить вопрос глубже – [url=https://kapelnicza-ot-zapoya-v-murmanske12.ru/]поставить капельницу от запоя мурманск[/url]
Nubank caiu [url=https://caiu.site/]Nubank caiu[/url] .
Многие тянут до последнего, считая, что к наркологу обращаются только в самых крайних случаях. На деле показаний для консультации гораздо больше, и они часто появляются задолго до того, как человек впервые оказывается в запое или не выходит из состояния опьянения несколько дней подряд.
Разобраться лучше – [url=https://narkologicheskaya-klinika-voskresensk11.ru/]наркологическая клиника[/url]
Наркологическая клиника в Химках — это возможность получить помощь при алкогольной и наркотической зависимости рядом с домом, а не ездить по всему региону в поисках специалистов. Для многих людей обращение к наркологу до последнего кажется чем-то «крайним»: кажется, что нужно терпеть, уговаривать себя «завязать самому», ждать подходящего момента, отпуска или «нового года с чистого листа». Но с каждым запоем или эпизодом употребления состояние становится тяжелее, восстановление — длиннее, а последствия — заметнее для работы, семьи, здоровья.
Углубиться в тему – http://narkologicheskaya-klinika-himki11.ru/narkologicheskaya-klinika-otzyvy-v-himkah/https://narkologicheskaya-klinika-himki11.ru
Вывод из запоя показан при:
Исследовать вопрос подробнее – http://
Как подчёркивает заведующая кафедрой наркологии РМАНПО Минздрава России, «качество оказания помощи зависит не от количества процедур, а от правильной организации лечебного процесса и квалификации команды». Именно поэтому особенно важно понимать, какие параметры следует учитывать при выборе клиники.
Детальнее – [url=https://narkologicheskaya-klinika-pervouralsk11.ru/]вывод наркологическая клиника[/url]
прогулка по рекам и каналам [url=https://arenda-yakhty-spb-1.ru/]arenda-yakhty-spb-1.ru[/url] .
Для жителей Ростова-на-Дону клиника работает по схеме «тихих маршрутов»: отдельный вход с нейтральной табличкой, окна записи в невызывающие подозрений часы, немаркированный подъезд автомобиля при выездном визите. На первом звонке диспетчер собирает только то, что влияет на безопасность: эпизоды рвоты, ЧСС/АД, ночные панические эпизоды, сопутствующие препараты, аллергии, наличие хронических заболеваний сердца. Личные и социальные детали не запрашиваются — мы придерживаемся принципа «минимально необходимой информации». По прибытии врача фиксируются базовая линия (сознание, дыхание, SpO?, температура), шкалы симптомов и переносимость небольших объёмов воды. Дальше — один точный шаг, одно «окно проверки» и прозрачное решение: продолжать модуль, модифицировать одну переменную или выключить блок.
Ознакомиться с деталями – [url=https://narkologicheskaya-clinika-v-rostove-na-donu16.ru/]наркологическая клиника стационар ростов-на-дону[/url]
Оптимальный состав команды включает:
Получить дополнительные сведения – http://narkologicheskaya-klinika-pervouralsk11.ru/
Эффективное лечение требует поэтапного подхода, который реализуется следующим образом:
Разобраться лучше – http://narkologicheskaya-klinika-v-ryazani12.ru/
melbet – mobile app [url=https://melbetzerkalorabochee.ru/]melbet – mobile app[/url] .
Вывод из запоя на дому — это управляемый медицинский процесс, где каждая деталь имеет значение: от первичного осмотра и грамотного подбора инфузионного профиля до сенсорной дисциплины в помещении и чётких «окон оценки» результата. В наркологической клинике «СеверМед Трезвость» мы используем принцип минимально достаточных вмешательств: одна цель на этап, один измеримый маркер и одна корректировка за раз. Такой подход снижает нагрузку на организм, повышает предсказуемость и делает восстановление переносимым для пациента и его близких.
Изучить вопрос глубже – [url=https://vivod-iz-zapoya-v-sankt-peterburge16.ru/]нарколог на дом вывод из запоя[/url]
При необходимости применяется симптоматическое лечение для снижения болевого синдрома, устранения тошноты и рвоты, а также нормализации психоэмоционального состояния пациента. Врачи наркологи строго контролируют течение процедуры, что обеспечивает безопасность и снижает риски осложнений.
Углубиться в тему – [url=https://vyvod-iz-zapoya-v-murmanske12.ru/]вывод из запоя в стационаре в мурманске[/url]
промокод на мелбет [url=https://melbetofficialbookmaker.ru/]промокод на мелбет[/url] .
аренда катера спб с капитаном [url=https://arenda-yakhty-spb-2.ru/]аренда катера спб с капитаном[/url] .
Запойное состояние оказывает разрушительное воздействие на организм. При длительном употреблении алкоголя развиваются следующие проблемы:
Детальнее – [url=https://vyvod-iz-zapoya-krasnoyarsk0.ru/]скорая вывод из запоя красноярск[/url]
Часто родственники тянут до последнего, надеясь, что запой «сам пройдёт», как это случалось раньше. Но с каждым эпизодом последствия становятся тяжелее: организм изнашивается, возрастает риск осложнений, ухудшается психика. Особенно опасно, когда запой длится несколько дней подряд, а любые попытки самостоятельно сократить дозы алкоголя сопровождаются дрожью, бессонницей, приступами паники.
Подробнее тут – http://vyvod-iz-zapoya-moskva011.ru
live casino online [url=https://melbetweb.ru/]live casino online[/url] .
melbet скачать бесплатно [url=https://melbetwebsite.ru/]melbet скачать бесплатно[/url] .
Простая подготовка ускоряет принятие решений и повышает переносимость инфузии. Пожалуйста, сделайте это до приезда бригады — многие шаги занимают секунды, но экономят десятки минут в процессе.
Выяснить больше – [url=https://kapelnicza-ot-zapoya-v-chelyabinske16.ru/]врача капельницу от запоя в челябинске[/url]
Критерий
Получить больше информации – http://narkolog-na-dom-nizhnij-tagil11.ru
прогулка на катере санкт петербург [url=https://arenda-yakhty-spb.ru/]прогулка на катере санкт петербург[/url] .
1win бонус за регистрацию [url=1win15478.help]1win15478.help[/url]
На протяжении всего периода лечения специалисты клиники контролируют динамику состояния, анализируя результаты лабораторных исследований и поведение пациента. Такой подход позволяет своевременно корректировать терапевтическую схему и предотвращать осложнения. Применяемые методы терапии соответствуют современным стандартам и одобрены медицинскими сообществами.
Разобраться лучше – [url=https://narkologicheskaya-klinika-v-kazani16.ru/]наркологическая клиника стационар казань[/url]
При необходимости применяется симптоматическое лечение для снижения болевого синдрома, устранения тошноты и рвоты, а также нормализации психоэмоционального состояния пациента. Врачи наркологи строго контролируют течение процедуры, что обеспечивает безопасность и снижает риски осложнений.
Узнать больше – [url=https://vyvod-iz-zapoya-v-murmanske12.ru/]www.domen.ru[/url]
Как подчёркивает руководитель направления клинической токсикологии НМИЦ психиатрии и наркологии, «оказание помощи на дому требует не меньшего профессионализма, чем лечение в стационаре, ведь врач действует в ограниченных условиях».
Исследовать вопрос подробнее – [url=https://narkolog-na-dom-nizhnij-tagil11.ru/]вызвать нарколога на дом срочно[/url]
приложение melbet [url=https://medicisoft.ru/]medicisoft.ru[/url] .
Сигналом к тому, что пора обсудить вариант кодирования с наркологом, служит не один какой-то эпизод, а совокупность симптомов. Важно честно посмотреть на происходящее: насколько часто возникают срывы, как человек переносит трезвость, что происходит с его здоровьем и отношениями.
Получить дополнительную информацию – https://kodirovanie-ot-alkogolizma-korolyov11.ru/ehffektivnoe-kodirovanie-ot-alkogolizma-v-korolyove/
Запой может быть не только физически тяжёлым, но и психологически разрушительным. Поэтому важно вовремя обратиться за помощью. Вывод из запоя в Нижнем Новгороде — это необходимая медицинская процедура, которая помогает победить алкогольную зависимость и восстановить здоровье. Мы в клинике «АнтиЗависимость» предлагаем круглосуточную помощь в комфортных условиях — на дому или в стационаре.
Ознакомиться с деталями – [url=https://narcolog-na-dom-novokuznetsk0.ru/]нарколог на дом вывод в новокузнецке[/url]
melbet сайт [url=https://gamemelbet.ru/]gamemelbet.ru[/url] .
Если дома шумно (ремонт, маленькие дети, гости), организуем краткий «тихий» стационар с отдельным входом и камерными палатами. После стабилизации пациент возвращается домой, а амбулаторное сопровождение продолжается в удобном графике — через короткие очные визиты и дистанционные чек-ины.
Подробнее – http://vivod-iz-zapoya-v-sankt-peterburge16.ru
Как поясняет медицинский психолог Елена Мусатова, «пациенту важно доверять специалисту, понимать его подход и чувствовать профессиональную уверенность ещё на этапе первичного осмотра».
Исследовать вопрос подробнее – http://narkologicheskaya-klinika-pervouralsk11.ru
Вызов нарколога на дом в Каменске-Уральском обеспечивает безопасность пациента, исключая необходимость посещения медицинского учреждения, что особенно актуально при тяжелом состоянии или психологическом сопротивлении. Такая помощь включает в себя детоксикацию, купирование абстинентного синдрома и консультации по дальнейшему лечению.
Выяснить больше – [url=https://narkolog-na-dom-kamensk-uralskij11.ru/]врач нарколог выезд на дом[/url]
Когда родственники видят, что в их случае совпадает сразу несколько этих пунктов, выезд нарколога на дом часто становится тем самым реалистичным и своевременным решением, которое позволяет не довести дело до экстренной госпитализации уже в критическом состоянии. После такого вмешательства появляются часы и дни, когда можно спокойно обсудить дальнейшие шаги, а не действовать на фоне паники и полного истощения.
Подробнее тут – http://narkolog-na-dom-himki11.ru
При своевременном обращении к специалистам капельница позволяет значительно улучшить состояние пациента уже в первые часы после начала лечения. Медицинская помощь при запое должна оказываться квалифицированно и в комфортных условиях, что снижает риски осложнений и ускоряет восстановление.
Получить больше информации – [url=https://kapelnicza-ot-zapoya-v-murmanske12.ru/]капельница от запоя клиника мурманск[/url]
прогулка на катере [url=https://arenda-yakhty-spb-1.ru/]прогулка на катере[/url] .
Наши специалисты оценивают клинические признаки запоя уже при первом осмотре — измеряют пульс, артериальное давление и насыщение кислородом, осматривают кожу и слизистые оболочки на предмет обезвоживания. Специальные тесты на когнитивные функции позволяют определить степень дезориентации и риск развития острых психотических реакций.
Выяснить больше – http://тайный-вывод-из-запоя.рф
Ita? caiu [url=https://caiu.site/]caiu.site[/url] .
This is very interesting, You are a very skilled blogger. I’ve joined your feed and look forward to seeking more of your great post. Also, I’ve shared your web site in my social networks!
https://510.com.ua/rizannya-polikarbonatu-pc-vs-abs-plastyku.html
Помощь нарколога нужна, если алкоголь или наркотики постепенно начинают занимать в жизни всё больше места. Человек заранее планирует, когда и как будет пить, нервничает, если что-то срывается, раздражается, когда близкие пытаются ограничить употребление. Появляются скандалы после «весёлых» вечеров, пропущенные рабочие смены, проблемы с деньгами, конфликты с родными. При этом любые разговоры заканчиваются обещаниями «завязать с понедельника» или обвинениями окружающих.
Получить больше информации – [url=https://narkologicheskaya-klinika-voskresensk11.ru/]наркологическая клиника московская московская область[/url]
Вызов нарколога на дом в Ярославле — это удобный и эффективный способ начать лечение или оказать первую помощь при острых состояниях, связанных с алкоголизмом, наркотической зависимостью или другими психоактивными веществами. Основные преимущества такой услуги заключаются в следующем:
Ознакомиться с деталями – [url=https://narkolog-na-dom-v-yaroslavle12.ru/]вызов нарколога на дом[/url]
1win бонус за регистрацию [url=https://www.1win20819.help]https://www.1win20819.help[/url]
скачать бесплатно мелбет [url=https://melbetcomzerkalo.ru/]скачать бесплатно мелбет[/url] .
После снятия острых симптомов пациент продолжает получать медикаментозную поддержку. Назначаются витамины, гепатопротекторы, успокоительные препараты. Проводится психологическая диагностика для подготовки к следующему этапу — реабилитации.
Получить дополнительные сведения – https://lechenie-alkogolizma-voronezh9.ru/lechenie-narkomanii-i-alkogolizma-voronezh/
melbet промокод [url=https://melbetofficialbookmaker.ru/]melbet промокод[/url] .
Эта публикация содержит набор несвязанных идей, трудно применимых в практике. Мы лишь поверхностно затрагиваем различные точки зрения, не проводя глубокий анализ и не предлагая выводов.
Подробнее читать – [url=https://rostov-narkologiya.ru/uslugi-ot-alkogolizma/vyvod-iz-zapoya/]лечение covid народными средствами[/url]
Лечение зависимостей редко ограничивается одной процедурой. Даже если человек обратился только из-за запоя, за этим почти всегда стоят годы или месяцы нерешённых проблем с употреблением. Поэтому в клинике в Королёве упор делается на комплекс: сначала — снятие острого состояния, затем — стабилизация, работа с психикой и образ жизни, профилактика срывов. Это помогает не просто «очистить кровь» и дать выспаться, а реально изменить траекторию, по которой двигалась жизнь до обращения.
Подробнее можно узнать тут – http://narkologicheskaya-klinika-korolyov11.ru/platnaya-narkologicheskaya-klinika-v-korolyove/https://narkologicheskaya-klinika-korolyov11.ru
Многие семьи сталкиваются с трудностями, когда зависимый отказывается ехать в клинику. В таких случаях выездная помощь становится первым шагом к выздоровлению. Однако не все службы предлагают одинаково безопасный и профессиональный подход. Чтобы избежать рисков и ошибок, важно понимать, на что обращать внимание при выборе услуги “нарколог на дом”.
Углубиться в тему – [url=https://narkolog-na-dom-nizhnij-tagil11.ru/]врач нарколог на дом нижний тагил[/url]
Многие годами живут в логике: «главное — с утра выпить чуть-чуть, станет легче». На коротком промежутке времени это действительно частично снимает симптомы, но по сути лишь продлевает запой и усиливает интоксикацию. Организм не успевает переработать продукты распада алкоголя, кровь становится «тяжёлой», нарушается работа сосудов, возрастает нагрузка на сердце и мозг.
Ознакомиться с деталями – http://kapelnica-ot-zapoya-dolgoprudnyj11.ru/kapelnica-ot-alkogolya-cena-v-dolgoprudnom/
Лечение зависимости требует комплексного подхода, включающего медицинские, психологические и социальные меры. Каждый пациент проходит индивидуальную диагностику, по результатам которой подбирается схема терапии. Такой подход позволяет снизить риски осложнений и обеспечить стабильный результат.
Детальнее – [url=https://narkologicheskaya-clinika-v-nizhnem-novgorode16.ru/]наркологическая клиника клиника помощь нижний новгород[/url]
К основным направлениям помощи, как правило, относятся:
Получить больше информации – https://narkologicheskaya-klinika-chekhov11.ru/narkologicheskaya-klinika-sajt-v-chekhove
В этом материале представлены детали, которые хоть и занимательны, но не особенно значимы. Мы рассматриваем моменты, которые трудно назвать важными, но всё же решили включить их для полноты картины.
Вот – [url=https://arma-rehab.ru/]покер онлайн[/url]
Запой требует срочного вмешательства, особенно если он длится более 2–3 дней. Без квалифицированной помощи организм пациента накапливает токсичные вещества, что может привести к необратимым изменениям.
Разобраться лучше – [url=https://vyvod-iz-zapoya-krasnoyarsk0.ru/]вывод из запоя недорого красноярск[/url]
Есть ряд признаков, при которых ждать категорически нельзя и нужна срочная помощь врача, а не очередные «народные методы». Если вы замечаете у человека следующие симптомы, это прямой повод организовать профессиональный вывод из запоя:
Получить больше информации – [url=https://vyvod-iz-zapoya-moskva011.ru/]нарколог вывод из запоя[/url]
В ходе процедуры врач контролирует жизненные показатели пациента, корректирует состав раствора при необходимости и оказывает дополнительную поддержку. После завершения капельницы часто назначается курс восстановительной терапии, направленный на стабилизацию функций организма.
Получить дополнительные сведения – http://
Работа клиники строится на принципах доказательной медицины и индивидуального подхода. При поступлении пациента осуществляется всесторонняя диагностика, включающая анализы крови, оценку психического состояния и анамнез. По результатам разрабатывается персонализированный курс терапии.
Получить дополнительную информацию – https://narkologicheskaya-klinika-v-ryazani12.ru
Перед тем как принять решение, пациент и родственники получают объяснения по доступным направлениям. Обычно обсуждаются: амбулаторные консультации, дневной или круглосуточный стационар, выездная помощь, реабилитационные программы и последующее наблюдение. Это позволяет выстроить индивидуальный маршрут, а не навязывать один и тот же сценарий всем подряд.
Подробнее тут – [url=https://narkologicheskaya-klinika-himki11.ru/]platnaya-narkologicheskaya-klinika[/url]
прогулка по рекам и каналам [url=https://arenda-yakhty-spb-2.ru/]прогулка по рекам и каналам[/url] .
Как поясняет врач-нарколог клиники «АлкоСтоп», «грамотно составленная инфузионная терапия не только устраняет последствия запоя, но и создаёт условия для дальнейшей мотивации пациента к лечению».
Подробнее – [url=https://kapelnicza-ot-zapoya-pervouralsk11.ru/]капельница от запоя недорого[/url]
Для успешного вывода из запоя используется комплексный подход с участием специалистов разных профилей. Более подробно об этом можно узнать на официальном портале наркологической службы.
Детальнее – [url=https://vyvod-iz-zapoya-nizhnij-tagil11.ru/]нарколог вывод из запоя[/url]
На протяжении всего периода лечения специалисты клиники контролируют динамику состояния, анализируя результаты лабораторных исследований и поведение пациента. Такой подход позволяет своевременно корректировать терапевтическую схему и предотвращать осложнения. Применяемые методы терапии соответствуют современным стандартам и одобрены медицинскими сообществами.
Исследовать вопрос подробнее – http://narkologicheskaya-klinika-v-kazani16.ru
В Екатеринбурге бригады выезжают 24/7, покрывая как центральные районы, так и отдалённые кварталы. Координатор уточняет только то, что влияет на безопасность: принимаемые лекарства и дозы, аллергии, эпизоды судорог/психозов, исходные значения давления и пульса, а также бытовые условия — можно ли обеспечить «тихое окно» на 2–3 часа, есть ли свободная розетка и место для полулёжа. Врач приезжает с портативным мониторингом, расходными материалами и резервным планом на случай повышенной реактивности.
Получить больше информации – [url=https://vyvod-iz-zapoya-v-ekaterinburge16.ru/]вывод из запоя дешево[/url]
Эти последствия не только ухудшают качество жизни, но и могут стать причиной опасных для жизни ситуаций. Именно поэтому своевременный вывод из запоя является критически важным.
Выяснить больше – [url=https://vyvod-iz-zapoya-krasnoyarsk0.ru/]вывод из запоя дешево в красноярске[/url]
Услуга
Ознакомиться с деталями – https://narkologicheskaya-klinika-v-ryazani12.ru/narkologicheskaya-klinika-telefon-v-ryazani/
аренда яхты спб [url=https://arenda-yakhty-spb-1.ru/]аренда яхты спб[/url] .
Согласно данным Федерального наркологического центра, своевременный выезд врача снижает риск осложнений и повторных госпитализаций.
Подробнее тут – [url=https://narkolog-na-dom-kamensk-uralskij11.ru/]выезд нарколога на дом в каменске-уральском[/url]
Сочетание медицинских и психотерапевтических мер создаёт устойчивую систему поддержки. Пациенты получают возможность постепенно восстановить утраченное здоровье и психологическую стабильность.
Получить дополнительные сведения – https://narkologicheskaya-klinika-v-kazani16.ru/chastnaya-narkologicheskaya-klinika-kazan/
Вывод из запоя показан при:
Получить дополнительную информацию – http://vyvod-iz-zapoya-v-murmanske12.ru
аренда яхты в санкт петербурге [url=https://arenda-yakhty-spb.ru/]arenda-yakhty-spb.ru[/url] .
Этот список — памятка на холодильник. Он не раскрывает диагноз, но точно описывает поводы для связи с дежурным врачом. Своевременная эскалация — часть безопасности, а не «подстраховка». Если сомневаетесь — лучше позвонить.
Детальнее – [url=https://kapelnicza-ot-zapoya-v-chelyabinske16.ru/]капельница от запоя клиника челябинск[/url]
apk melbet [url=https://melbetzerkalorabochee.ru/]apk melbet[/url] .
Этот список — памятка на холодильник. Он не раскрывает диагноз, но точно описывает поводы для связи с дежурным врачом. Своевременная эскалация — часть безопасности, а не «подстраховка». Если сомневаетесь — лучше позвонить.
Подробнее тут – [url=https://kapelnicza-ot-zapoya-v-chelyabinske16.ru/]сколько стоит капельница от запоя[/url]
скачать melbet [url=https://melbetofficialbookmaker.ru/]скачать melbet[/url] .
Алкогольная зависимость разрушает здоровье, семью, карьеру и личность. Чем раньше будет оказана профессиональная помощь, тем выше шансы на восстановление и возвращение к полноценной жизни. Лечение алкоголизма в Воронеже — помощь на всех стадиях зависимости позволяет справляться не только с физической тягой, но и с глубинными причинами, которые провоцируют патологическое употребление.
Углубиться в тему – https://lechenie-alkogolizma-voronezh9.ru/czentr-lecheniya-alkogolizma-voronezh/
Есть ряд признаков, при которых ждать категорически нельзя и нужна срочная помощь врача, а не очередные «народные методы». Если вы замечаете у человека следующие симптомы, это прямой повод организовать профессиональный вывод из запоя:
Углубиться в тему – https://vyvod-iz-zapoya-moskva011.ru/vyvod-iz-zapoya-v-moskve-stacionar/
Вызов нарколога на дом в Каменске-Уральском обеспечивает безопасность пациента, исключая необходимость посещения медицинского учреждения, что особенно актуально при тяжелом состоянии или психологическом сопротивлении. Такая помощь включает в себя детоксикацию, купирование абстинентного синдрома и консультации по дальнейшему лечению.
Выяснить больше – [url=https://narkolog-na-dom-kamensk-uralskij11.ru/]помощь нарколога на дому[/url]
мелбет полная версия сайта [url=https://melbetcomzerkalo.ru/]мелбет полная версия сайта[/url] .
Нарколог на дому проводит тщательный осмотр, собирает анамнез и назначает необходимые лабораторные исследования. Это позволяет выявить сопутствующие патологии и скорректировать тактику лечения.
Подробнее – [url=https://narkolog-na-dom-v-yaroslavle12.ru/]нарколог на дом анонимно ярославль[/url]
Клиника «Семья и Здоровье» предлагает комплексное лечение на дому, что позволяет избежать стрессов, связанных с госпитализацией, и получить квалифицированную помощь в привычной обстановке. Наши специалисты работают круглосуточно, приезжают в течение 30–60 минут и проводят полный спектр процедур для восстановления здоровья.
Подробнее – [url=https://vyvod-iz-zapoya-krasnoyarsk0.ru/]срочный вывод из запоя красноярск[/url]
Стоимость услуг зависит от продолжительности терапии, сложности случая и выбранных процедур. Однако клиника предоставляет гибкую систему оплаты, включая рассрочку и страховое покрытие.
Детальнее – [url=https://narkologicheskaya-klinika-v-ryazani12.ru/]наркологические клиники алкоголизм в рязани[/url]
Если в состоянии пациента наблюдаются такие признаки, как судороги, панические атаки, или гипертонический криз, необходимо немедленно вызвать врачей. Задержка может привести к необратимым последствиям.
Детальнее – [url=https://narcolog-na-dom-novokuznetsk0.ru/]вызвать врача нарколога на дом в новокузнецке[/url]
pin-up free bet shartlari [url=http://pinup14278.help]http://pinup14278.help[/url]
Основой терапии является сочетание медицинских, психотерапевтических и социальных методов. Такой подход обеспечивает устранение не только физиологических последствий зависимости, но и её психологических причин. Врачи клиники разрабатывают индивидуальный план лечения, в котором учитываются стадия заболевания, общее состояние организма и личностные особенности пациента. Работа специалистов направлена на восстановление работы центральной нервной системы, обменных процессов и эмоционального баланса.
Разобраться лучше – [url=https://narkologicheskaya-klinika-v-kazani16.ru/]наркологическая клиника вывод из запоя[/url]
Если в состоянии пациента наблюдаются такие признаки, как судороги, панические атаки, или гипертонический криз, необходимо немедленно вызвать врачей. Задержка может привести к необратимым последствиям.
Детальнее – [url=https://narcolog-na-dom-novokuznetsk0.ru/]www.domen.ru[/url]
Одним из ключевых направлений является проведение капельниц, призванных вывести токсины из организма и нормализовать водно-электролитный баланс. Используемые препараты и состав растворов подбираются индивидуально, исходя из клинической картины и истории болезни пациента.
Подробнее можно узнать тут – [url=https://narkolog-na-dom-v-yaroslavle12.ru/]врач нарколог на дом ярославль.[/url]
Компоненты
Разобраться лучше – [url=https://kapelnicza-ot-zapoya-pervouralsk11.ru/]капельница от запоя на дому круглосуточно[/url]
прогулка на катере [url=https://arenda-yakhty-spb-2.ru/]прогулка на катере[/url] .
Эффективное лечение требует поэтапного подхода, который реализуется следующим образом:
Углубиться в тему – [url=https://narkologicheskaya-klinika-v-ryazani12.ru/]наркологическая клиника рязань.[/url]
Основные признаки, свидетельствующие о необходимости экстренной помощи:
Узнать больше – [url=https://vyvod-iz-zapoya-krasnoyarsk0.ru/]вывод из запоя на дому цена[/url]
На этом этапе специалист уточняет длительность запоя, характер употребляемого алкоголя и наличие сопутствующих заболеваний. Тщательный анализ собранной информации позволяет выбрать оптимальную тактику детоксикации и минимизировать риск осложнений.
Подробнее можно узнать тут – [url=https://alko-zakodirovat.ru/]скорая вывод из запоя[/url]
Вызов нарколога на дом в Каменске-Уральском обеспечивает безопасность пациента, исключая необходимость посещения медицинского учреждения, что особенно актуально при тяжелом состоянии или психологическом сопротивлении. Такая помощь включает в себя детоксикацию, купирование абстинентного синдрома и консультации по дальнейшему лечению.
Детальнее – [url=https://narkolog-na-dom-kamensk-uralskij11.ru/]вызвать врача нарколога на дом в каменске-уральском[/url]
Этот обзор предлагает свежий взгляд на предметы, которые и без того привычны. Мы упоминаем факты, не имеющие большого значения, и события с неясной важностью, но они присутствуют здесь.
Подробнее читать – [url=https://rostov-narkologiya.ru/uslugi-ot-alkogolizma/vyvod-iz-zapoya/]сиалис онлайн[/url]
Перед тем как выбрать формат лечения, пациенту и его близким объясняют, какие направления помощи доступны и как их можно сочетать. В зависимости от состояния и мотивации могут быть задействованы разные варианты:
Изучить вопрос глубже – https://narkologicheskaya-klinika-korolyov11.ru
Не стоит забывать и про объективные факторы. Бывает, что физически опасно или трудно везти человека в клинику: он с трудом ходит, не спит уже несколько ночей, постоянно потеет, жалуется на сильную слабость и сердцебиение. Любая поездка в таком состоянии — дополнительная нагрузка на сердце и нервную систему. Выезд нарколога на дом позволяет начать лечение без этого лишнего риска: врач приезжает со всем необходимым для капельницы и наблюдения, а если по итогам осмотра становится понятно, что без стационара не обойтись, он помогает организовать перевод уже на фоне частично стабилизированного состояния, а не в момент максимального кризиса.
Разобраться лучше – http://narkolog-na-dom-himki11.ru/narkolog-na-dom-cena-v-himkah/
Сочетание медицинских и психотерапевтических мер создаёт устойчивую систему поддержки. Пациенты получают возможность постепенно восстановить утраченное здоровье и психологическую стабильность.
Выяснить больше – [url=https://narkologicheskaya-klinika-v-kazani16.ru/]платная наркологическая клиника казань[/url]
После детоксикации важна реабилитация, включающая психологическую помощь. Используются различные виды психотерапии, в том числе когнитивно-поведенческая терапия и мотивационное интервьюирование. Это помогает пациентам не только избавиться от зависимости, но и адаптироваться к жизни вне клиники. Подробнее о методах психотерапии можно узнать на ресурсе психологической помощи.
Разобраться лучше – [url=https://narkologicheskaya-klinika-kamensk-uralskij11.ru/]наркологическая клиника наркологический центр[/url]
Не хотите платить за лицензию? У нас есть рабочий кряк для Windows 11 — скачайте прямо сейчас!
Подробнее – [url=https://krasnodar.med24.online/]Скачать ключ активации Windows 11 Pro[/url]
В первые два часа после прибытия бригады важно не «сделать побольше», а принять наименьшее количество решений, которое реально меняет картину. Команда фиксирует базовую линию (ЧСС, АД, SpO?, температура, шкала тошноты/тремора), даёт антиеметический мост и запускает регидратацию. При тахикардии — добавляет антивегетативный контур. Семья получает сценарий ночи: когда приглушить свет, когда предложить воду, какие цифры на тонометре считать нормой и при каких — звонить. Такой протокол экономит время и силы, а главное — превращает вечер из хаотичного в управляемый, снижая риск ночных экстренных вызовов и «эмоциональных качелей».
Исследовать вопрос подробнее – https://kapelnicza-ot-zapoya-v-chelyabinske16.ru/kapelnicza-ot-pokhmelya-na-domu-chelyabinsk/
Лечение зависимости требует комплексного подхода, включающего медицинские, психологические и социальные меры. Каждый пациент проходит индивидуальную диагностику, по результатам которой подбирается схема терапии. Такой подход позволяет снизить риски осложнений и обеспечить стабильный результат.
Детальнее – [url=https://narkologicheskaya-clinika-v-nizhnem-novgorode16.ru/]наркологическая клиника наркологический центр[/url]
Этот информационный набор привлекает внимание множеством мелочей и странных ракурсов. Мы предлагаем взгляды, которые редко бывают полезны, но могут слегка разнообразить ваше знакомство с темой.
Вот – [url=https://arma-rehab.ru/lechenie-alkogolizma/]азартные игры[/url]
Как отмечает врач-нарколог Иванов И.И., «без своевременной медицинской помощи при запое повышается риск необратимых изменений в организме и летального исхода».
Ознакомиться с деталями – https://vyvod-iz-zapoya-nizhnij-tagil11.ru/vyvod-iz-zapoya-na-domu-v-nizhnem-tagile/
Клиника располагает изолированными палатами с возможностью круглосуточного мониторинга состояния пациента. Оборудование соответствует гигиеническим требованиям и регулярно обновляется. В лечебный процесс включены:
Изучить вопрос глубже – [url=https://narkologicheskaya-klinika-v-ryazani12.ru/]частная наркологическая клиника рязанская область[/url]
Основные признаки, свидетельствующие о необходимости экстренной помощи:
Разобраться лучше – http://vyvod-iz-zapoya-krasnoyarsk0.ru
прогулки по неве [url=https://arenda-yakhty-spb.ru/]прогулки по неве[/url] .
Вывод из запоя в клинике в Нижнем Новгороде проводится с применением инфузионной терапии, седативных средств и витаминных комплексов. Основная задача процедуры — устранить токсическое воздействие алкоголя, восстановить работу органов и нормализовать психоэмоциональное состояние. Все препараты подбираются индивидуально, с учётом особенностей организма пациента.
Получить больше информации – https://narkologicheskaya-clinika-v-nizhnem-novgorode16.ru/chastnaya-narkologicheskaya-klinika-nizhnij-novgorod
Наркологическая помощь на дому в Ярославле охватывает широкий спектр медицинских мероприятий, направленных на стабилизацию состояния пациента и подготовку к дальнейшему лечению. Среди основных процедур:
Узнать больше – http://narkolog-na-dom-v-yaroslavle12.ru
промокод на мелбет при регистрации [url=https://melbetofficialbookmaker.ru/]промокод на мелбет при регистрации[/url] .
В рамках услуги вызова нарколога на дом используется современное оборудование и препараты, одобренные для амбулаторного применения.
Выяснить больше – [url=https://narkolog-na-dom-kamensk-uralskij11.ru/]платный нарколог на дом каменск-уральский[/url]
Наркологическая клиника в клинике в Казани оказывает квалифицированную помощь людям, столкнувшимся с алкогольной и наркотической зависимостью. Лечение проводится в условиях полной конфиденциальности и медицинской безопасности. Основное направление работы клиники — это восстановление физического, психического и эмоционального состояния пациента, а также формирование устойчивой мотивации к отказу от употребления психоактивных веществ. Все процедуры выполняются с использованием сертифицированных препаратов и современных диагностических технологий, что позволяет добиться устойчивого результата без осложнений.
Подробнее – [url=https://narkologicheskaya-klinika-v-kazani16.ru/]наркологические клиники алкоголизм в казани[/url]
Помощь нарколога нужна, если алкоголь или наркотики постепенно начинают занимать в жизни всё больше места. Человек заранее планирует, когда и как будет пить, нервничает, если что-то срывается, раздражается, когда близкие пытаются ограничить употребление. Появляются скандалы после «весёлых» вечеров, пропущенные рабочие смены, проблемы с деньгами, конфликты с родными. При этом любые разговоры заканчиваются обещаниями «завязать с понедельника» или обвинениями окружающих.
Получить больше информации – [url=https://narkologicheskaya-klinika-voskresensk11.ru/]platnaya-narkologicheskaya-klinika[/url]
Запой может быть не только физически тяжёлым, но и психологически разрушительным. Поэтому важно вовремя обратиться за помощью. Вывод из запоя в Нижнем Новгороде — это необходимая медицинская процедура, которая помогает победить алкогольную зависимость и восстановить здоровье. Мы в клинике «АнтиЗависимость» предлагаем круглосуточную помощь в комфортных условиях — на дому или в стационаре.
Получить дополнительную информацию – [url=https://narcolog-na-dom-novokuznetsk0.ru/]нарколог на дом круглосуточно новокузнецк[/url]
скачать мелбет бесплатно [url=https://melbetzerkalorabochee.ru/]скачать мелбет бесплатно[/url] .
Вывод из запоя в Нижнем Тагиле представляет собой комплекс медицинских мероприятий, направленных на безопасное и эффективное прерывание состояния острого алкогольного отравления. Этот процесс требует профессионального подхода, так как самостоятельное прерывание запоя чревато серьезными осложнениями, включая судороги, инсульты и инфаркты. В медицинской практике используется комплекс мер, включающий детоксикацию организма, коррекцию водно-электролитного баланса и лечение симптомов абстиненции.
Получить дополнительную информацию – http://vyvod-iz-zapoya-nizhnij-tagil11.ru
Подробности о технологии и методах выезда нарколога можно найти на официальных медицинских порталах, таких как Российское общество наркологов и Минздрав РФ.
Подробнее можно узнать тут – [url=https://narkolog-na-dom-v-yaroslavle12.ru/]врач нарколог на дом[/url]
Как подчёркивает врач-нарколог И.В. Синицин, «современная наркология — это не только вывод из запоя, но и работа с глубинными причинами зависимости».
Получить дополнительную информацию – [url=https://narkologicheskaya-klinika-v-yaroslavle12.ru/]наркологическая клиника нарколог ярославль[/url]
Лечение зависимостей редко ограничивается одной процедурой. Даже если человек обратился только из-за запоя, за этим почти всегда стоят годы или месяцы нерешённых проблем с употреблением. Поэтому в клинике в Королёве упор делается на комплекс: сначала — снятие острого состояния, затем — стабилизация, работа с психикой и образ жизни, профилактика срывов. Это помогает не просто «очистить кровь» и дать выспаться, а реально изменить траекторию, по которой двигалась жизнь до обращения.
Изучить вопрос глубже – http://narkologicheskaya-klinika-korolyov11.ru
аренда яхты [url=https://arenda-yakhty-spb-3.ru/]аренда яхты[/url] .
Вызов нарколога возможен круглосуточно, что обеспечивает оперативное реагирование на критические ситуации. Пациенты и их родственники могут получить помощь в любое время, не дожидаясь ухудшения состояния.
Исследовать вопрос подробнее – [url=https://narkolog-na-dom-kamensk-uralskij11.ru/]вызвать врача нарколога на дом в каменске-уральском[/url]
вызвать нарколога на дом ростов-на-дону [url=https://narkolog-na-dom-v-rostove.ru/]вызвать нарколога на дом ростов-на-дону[/url] .
Каждый из этих симптомов по отдельности уже опасен, а в сочетании они создают высокий риск для жизни. Самостоятельные эксперименты с таблетками, резкий отказ от алкоголя «через силу» или попытка «переспать» запой без медицинского контроля могут обернуться реанимацией. Гораздо безопаснее вовремя вызвать специалиста и провести детоксикацию под наблюдением, особенно когда речь идёт о жителях крупного города, где доступна профессиональная наркологическая помощь.
Исследовать вопрос подробнее – http://vyvod-iz-zapoya-moskva011.ru/vyvod-iz-zapoya-v-moskve-srochno/
Предлагаем вашему вниманию интересную справочную статью, в которой собраны ключевые моменты и нюансы по актуальным вопросам. Эта информация будет полезна как для профессионалов, так и для тех, кто только начинает изучать тему. Узнайте ответы на важные вопросы и расширьте свои знания!
Откройте для себя больше – https://otlichnik23.ru/catalog/dlya-detskogo-sada/shkafy-i-stellazhi6932530/stellazh-modul-2
Наркологическая клиника в клинике в Нижнем Новгороде специализируется на диагностике, лечении и реабилитации пациентов с алкогольной и наркотической зависимостью. Основная цель деятельности учреждения — восстановление физического здоровья и психологической устойчивости человека, оказавшегося в состоянии зависимости. В клинике применяются современные методы терапии, доказавшие эффективность в медицинской практике. Все процедуры проводятся конфиденциально, с соблюдением медицинских стандартов и под контролем квалифицированных специалистов.
Подробнее тут – [url=https://narkologicheskaya-clinika-v-nizhnem-novgorode16.ru/]анонимная наркологическая клиника в нижнем новгороде[/url]
Эта статья сочетает познавательный и занимательный контент, что делает ее идеальной для любителей глубоких исследований. Мы рассмотрим увлекательные аспекты различных тем и предоставим вам новые знания, которые могут оказаться полезными в будущем.
Узнать из первых рук – https://mathgiri.com/logarithm-1
Состояния при зависимостях чувствительны к времени суток и среде. К ночи нарастает тревога, усиливается тремор, нестабильны показатели ЧСС/АД. Круглосуточный приём позволяет выстроить «мост» через самые сложные часы: собрать сон без избыточной фармаконагрузки, сделать короткие чек-ины, вовремя ретитровать один параметр (свет, дыхательные ритмы, интервалы питья), а утром оформить «малые победы» — гигиена и 10–15 минут тихой ходьбы. Эти простые маркеры часто надёжнее любых субъективных оценок «как себя чувствую».
Выяснить больше – [url=https://narkologicheskaya-clinika-v-rostove-na-donu16.ru/]наркологическая клиника наркологический центр в ростове-на-дону[/url]
В этом обзорном материале представлены увлекательные детали, которые находят отражение в различных аспектах жизни. Мы исследуем непонятные и интересные моменты, позволяя читателю увидеть картину целиком. Погрузитесь в мир знаний и удивительных открытий!
Запросить дополнительные данные – https://www.starkahander.se/stod-oss-2
В этом материале представлены детали, которые хоть и занимательны, но не особенно значимы. Мы рассматриваем моменты, которые трудно назвать важными, но всё же решили включить их для полноты картины.
Вот – [url=https://arma-rehab.ru/]азартные игры на деньги[/url]
Этот информационный набор привлекает внимание множеством мелочей и странных ракурсов. Мы предлагаем взгляды, которые редко бывают полезны, но могут слегка разнообразить ваше знакомство с темой.
Вот – [url=https://arma-rehab.ru/lechenie-alkogolizma/]интим услуги[/url]
На этом этапе специалист уточняет длительность запоя, характер употребляемого алкоголя и наличие сопутствующих заболеваний. Тщательный анализ собранной информации позволяет выбрать оптимальную тактику детоксикации и минимизировать риск осложнений.
Детальнее – http://alko-zakodirovat.ru
Под контролем специалистов проводится выведение токсинов из организма. Используются капельницы с растворами, препараты для поддержки сердца, печени и снятия психоэмоционального напряжения. Лечение алкоголизма в Воронеже — помощь на всех стадиях зависимости предполагает безопасный и контролируемый процесс детоксикации с минимизацией рисков осложнений.
Исследовать вопрос подробнее – [url=https://lechenie-alkogolizma-voronezh9.ru/]лечение пивного алкоголизма воронеж[/url]
Одним из ключевых направлений является проведение капельниц, призванных вывести токсины из организма и нормализовать водно-электролитный баланс. Используемые препараты и состав растворов подбираются индивидуально, исходя из клинической картины и истории болезни пациента.
Подробнее можно узнать тут – https://narkolog-na-dom-v-yaroslavle12.ru/narkolog-na-dom-czeny-v-yaroslavle
Эта познавательная публикация погружает вас в море интересного контента, который быстро захватит ваше внимание. Мы рассмотрим важные аспекты темы и предоставим вам уникальные Insights и полезные сведения для дальнейшего изучения.
Раскрыть тему полностью – https://hook.ng/how-much-is-500-razer-gold-gift-card-to-naira-today-2024
Эта познавательная публикация погружает вас в море интересного контента, который быстро захватит ваше внимание. Мы рассмотрим важные аспекты темы и предоставим вам уникальные Insights и полезные сведения для дальнейшего изучения.
Продолжить изучение – https://www.masonam.com/contact
Вывод из запоя в Мурманске представляет собой комплекс мероприятий, направленных на оказание медицинской помощи пациентам, находящимся в состоянии алкогольного отравления или длительного употребления спиртного. Процедура проводится с целью стабилизации состояния организма, предупреждения осложнений и минимизации риска развития тяжелых последствий алкоголизма.
Ознакомиться с деталями – [url=https://vyvod-iz-zapoya-v-murmanske12.ru/]срочный вывод из запоя мурманск[/url]
На этом этапе специалист уточняет длительность запоя, характер употребляемого алкоголя и наличие сопутствующих заболеваний. Тщательный анализ собранной информации позволяет выбрать оптимальную тактику детоксикации и минимизировать риск осложнений.
Узнать больше – [url=https://alko-zakodirovat.ru/]вывод из запоя на дому[/url]
Наркологическая клиника в Воскресенске предоставляет комплексную помощь: от экстренного вывода из запоя и детоксикации до реабилитации и длительного сопровождения. Здесь работают с зависимостью как с хроническим заболеванием, а не как с «слабостью характера». Такой подход позволяет не только стабилизировать физическое состояние, но и менять образ жизни, привычки, способы реагирования на стресс, чтобы человек мог вернуться к нормальной, трезвой жизни.
Детальнее – https://narkologicheskaya-klinika-voskresensk11.ru/
Эта статья сочетает познавательный и занимательный контент, что делает ее идеальной для любителей глубоких исследований. Мы рассмотрим увлекательные аспекты различных тем и предоставим вам новые знания, которые могут оказаться полезными в будущем.
Заходи — там интересно – https://receptacle.ru
Клиника располагает изолированными палатами с возможностью круглосуточного мониторинга состояния пациента. Оборудование соответствует гигиеническим требованиям и регулярно обновляется. В лечебный процесс включены:
Получить больше информации – http://narkologicheskaya-klinika-v-ryazani12.ru
Эта статья предлагает уникальную подборку занимательных фактов и необычных историй, которые вы, возможно, не знали. Мы постараемся вдохновить ваше воображение и разнообразить ваш кругозор, погружая вас в мир, полный интересных открытий. Читайте и открывайте для себя новое!
Познакомиться с результатами исследований – https://www.sachhanoi.vn/product/doi-nghe-si
Откройте для себя скрытые страницы истории и малоизвестные научные открытия, которые оказали колоссальное влияние на развитие человечества. Статья предлагает свежий взгляд на события, которые заслуживают большего внимания.
Более того — здесь – https://tengroup.com.vn/?p=1653&lang=en
аренда яхты в санкт петербурге [url=https://arenda-yakhty-spb-3.ru/]arenda-yakhty-spb-3.ru[/url] .
анонимный нарколог на дом в ростове [url=https://narkolog-na-dom-v-rostove.ru/]narkolog-na-dom-v-rostove.ru[/url] .
наркологическая служба на дом ростов-на-дону [url=https://narkolog-na-dom-v-rostove-1.ru/]narkolog-na-dom-v-rostove-1.ru[/url] .
Этот информационный материал собраны данные, которые помогут лучше понять текущие тенденции и процессы в различных сферах жизни. Мы предоставляем четкий анализ, графики и примеры, чтобы информация была не только понятной, но и практичной для принятия решений.
Что скрывают от вас? – https://unarcencielpourclara.org/essemtis
Эта информационная статья охватывает широкий спектр актуальных тем и вопросов. Мы стремимся осветить ключевые факты и события с ясностью и простотой, чтобы каждый читатель мог извлечь из нее полезные знания и полезные инсайты.
Исследовать вопрос подробнее – https://campinasferramentas.com.br/product/parafuso-auto-atarraxante
В этом информативном тексте представлены захватывающие события и факты, которые заставят вас задуматься. Мы обращаем внимание на важные моменты, которые часто остаются незамеченными, и предлагаем новые перспективы на привычные вещи. Подготовьтесь к тому, чтобы быть поглощенным увлекательными рассказами!
Получить полную информацию – https://culturatijucatenis.com.br/eventos/aventuras-no-bau-do-meu-avo
В этой статье собраны факты, которые освещают целый ряд важных вопросов. Мы стремимся предложить читателям четкую, достоверную информацию, которая поможет сформировать собственное мнение и лучше понять сложные аспекты рассматриваемой темы.
Ознакомиться с деталями – https://vivod-iz-zapoya-2.ru/
В этой статье представлен занимательный и актуальный контент, который заставит вас задуматься. Мы обсуждаем насущные вопросы и проблемы, а также освещаем истории, которые вдохновляют на действия и изменения. Узнайте, что стоит за событиями нашего времени!
Получить больше информации – https://casinoexperience.com.br/curiosidades/conheca-a-historia-do-poker-no-brasil
Эта статья погружает вас в увлекательный мир знаний, где каждый факт становится открытием. Мы расскажем о ключевых исторических поворотных моментах и научных прорывах, которые изменили ход цивилизации. Поймите, как прошлое формирует настоящее и как его уроки могут помочь нам строить будущее.
Изучите внимательнее – https://www.cabinet.gov.zm/?p=4835
Домашний формат особенно удобен на ранних этапах, когда зависимость уже дошла до запоев, но человек ещё продолжает работать, скрывать проблему от коллег и соседей, боится любой огласки. Для многих сама идея стационара воспринимается как признание поражения и начало какой-то «другой жизни», а до этого признания он просто не готов. Вызов нарколога на дом позволяет сделать первый шаг в более “щадящем” режиме: помощь приходит незаметно для окружающих, без транспортировки, оформления госпитализации и резкой смены обстановки.
Подробнее можно узнать тут – [url=https://narkolog-na-dom-himki11.ru/]нарколог на дом в Химках[/url]
Эта обзорная заметка содержит ключевые моменты и факты по актуальным вопросам. Она поможет читателям быстро ориентироваться в теме и узнать о самых важных аспектах сегодня. Получите краткий курс по современной информации и оставайтесь в курсе событий!
Более того — здесь – https://www.maplelodge.or.jp/20200930175614-0001
В этой статье представлен занимательный и актуальный контент, который заставит вас задуматься. Мы обсуждаем насущные вопросы и проблемы, а также освещаем истории, которые вдохновляют на действия и изменения. Узнайте, что стоит за событиями нашего времени!
Узнать из первых рук – https://lutonstay.com/how-to-travel-with-paper-map
Этот текст призван помочь читателю расширить кругозор и получить практические знания. Мы используем простой язык, наглядные примеры и структурированное изложение, чтобы сделать обучение максимально эффективным и увлекательным.
Не упусти шанс – https://www.worldofonlinenews.com/7242/mobile-lead-shields-for-protection-during-fluoroscopy.html
Предлагаем вашему вниманию интересную справочную статью, в которой собраны ключевые моменты и нюансы по актуальным вопросам. Эта информация будет полезна как для профессионалов, так и для тех, кто только начинает изучать тему. Узнайте ответы на важные вопросы и расширьте свои знания!
Неизвестные факты о… – https://seven.period-calendar.com/viewtopic.php?f=8&t=517573&p=1817377
Этот обзорный материал предоставляет информационно насыщенные данные, касающиеся актуальных тем. Мы стремимся сделать информацию доступной и структурированной, чтобы читатели могли легко ориентироваться в наших выводах. Познайте новое с нашим обзором!
Давай разберёмся досконально – https://seven.period-calendar.com/viewtopic.php?p=1823772
Эта статья погружает вас в увлекательный мир знаний, где каждый факт становится открытием. Мы расскажем о ключевых исторических поворотных моментах и научных прорывах, которые изменили ход цивилизации. Поймите, как прошлое формирует настоящее и как его уроки могут помочь нам строить будущее.
Лови подробности – https://www.masaze-jamas.cz/vanocni-poukaz
Лечение в наркологической клинике в Чехове удобно не только близостью к дому. Главный плюс — комплексный подход. Зависимость практически никогда не ограничивается только алкоголем или наркотиком: страдают сердце и сосуды, печень, нервная система, психика, отношения в семье и на работе. Если пытаться лечить только одно звено, например, периодически «чистить кровь» капельницами, без проработки причин и последствий, ситуация быстро возвращается к исходной точке. В клинике выстраивается последовательная работа: сначала стабилизируют организм, затем укрепляют психику, а дальше помогают менять привычный образ жизни, чтобы трезвость стала не кратким эпизодом, а новой нормой.
Получить дополнительную информацию – [url=https://narkologicheskaya-klinika-chekhov11.ru/]platnaya-narkologicheskaya-klinika[/url]
Эта информационная заметка предлагает лаконичное и четкое освещение актуальных вопросов. Здесь вы найдете ключевые факты и основную информацию по теме, которые помогут вам сформировать собственное мнение и повысить уровень осведомленности.
Узнать из первых рук – https://listing.downtown-directory.com/rtl-version/product/%D8%B1%D9%85%D8%A7%D8%AF%D9%8A-%D8%AA%D9%8A-%D8%B4%D9%8A%D8%B1%D8%AA-%D8%A3%D8%B2%D9%8A%D8%A7%D8%A1-sportex-%D8%A7%D9%84%D8%B5%D9%8A%D9%81-%D8%A3%D8%B1%D9%8A%D9%81%D8%A7%D9%84
Публикация предоставляет читателю набор разрозненных идей, которые сложно применить на практике. Мы лишь слегка касаемся разных точек зрения, не углубляясь в анализ и не предлагая никаких выводов.
Вот – [url=https://arma-rehab.ru/]покер онлайн[/url]
Эта информационная заметка предлагает лаконичное и четкое освещение актуальных вопросов. Здесь вы найдете ключевые факты и основную информацию по теме, которые помогут вам сформировать собственное мнение и повысить уровень осведомленности.
Открой скрытое – https://www.riferimenti.org/default/higashiginza
В данной обзорной статье представлены интригующие факты, которые не оставят вас равнодушными. Мы критикуем и анализируем события, которые изменили наше восприятие мира. Узнайте, что стоит за новыми открытиями и как они могут изменить ваше восприятие реальности.
Не пропусти важное – https://golfinromania.com/floriile-la-golf-club-paul-tomita-i-guest-post-mariana-gorczyca
частный нарколог на дом в ростове [url=https://narkolog-na-dom-v-rostove-1.ru/]частный нарколог на дом в ростове[/url] .
Эта информационная статья охватывает широкий спектр актуальных тем и вопросов. Мы стремимся осветить ключевые факты и события с ясностью и простотой, чтобы каждый читатель мог извлечь из нее полезные знания и полезные инсайты.
Полная информация здесь – https://ujvbeauty.com/dark-skintone
прогулка на яхте спб [url=https://arenda-yakhty-spb-3.ru/]прогулка на яхте спб[/url] .
нарколог на дом ростов отзывы [url=https://narkolog-na-dom-v-rostove-4.ru/]нарколог на дом ростов отзывы[/url] .
Эта статья погружает вас в увлекательный мир знаний, где каждый факт становится открытием. Мы расскажем о ключевых исторических поворотных моментах и научных прорывах, которые изменили ход цивилизации. Поймите, как прошлое формирует настоящее и как его уроки могут помочь нам строить будущее.
Узнай первым! – http://egaram.web3.newwaynet.co.kr/bbs/board.php?bo_table=contact_us&wr_id=10524&page=4
В этой публикации мы предлагаем подробные объяснения по актуальным вопросам, чтобы помочь читателям глубже понять их. Четкость и структурированность материала сделают его удобным для усвоения и применения в повседневной жизни.
Подробности по ссылке – https://advokatsthlm.se/top-reasons-to-hire-a-realtor-in-new-berlin-wi-for-your-subsequent-home-purchase
аренда катера [url=https://arenda-yakhty-spb-1.ru/]аренда катера[/url] .
выезд нарколога на дом ростов-на-дону [url=https://narkolog-na-dom-v-rostove-3.ru/]narkolog-na-dom-v-rostove-3.ru[/url] .
Рабочий ключ активации для Windows 11 — проверено и обновлено, без блокировок!
Подробнее – [url=https://krasnodar.med24.online/landing/narkolog_na_dom/]Windows 11 активатор без вирусов[/url]
вывод из запоя в стационаре в ростове [url=https://vyvod-iz-zapoya-v-rostove-1.ru/]вывод из запоя в стационаре в ростове[/url] .
mostbet Floresti [url=http://mostbet63218.help]http://mostbet63218.help[/url]
вывод из запоя в ростове на дону [url=https://vyvod-iz-zapoya-v-rostove-2.ru/]вывод из запоя в ростове на дону[/url] .
нарколог на дом в ростове анонимно [url=https://narkolog-na-dom-v-rostove-2.ru/]нарколог на дом в ростове анонимно[/url] .
mostbet ошибка платежа [url=http://mostbet20748.help/]mostbet ошибка платежа[/url]
В данной обзорной статье представлены интригующие факты, которые не оставят вас равнодушными. Мы критикуем и анализируем события, которые изменили наше восприятие мира. Узнайте, что стоит за новыми открытиями и как они могут изменить ваше восприятие реальности.
Подробная информация доступна по запросу – https://unicalcanxi.com/bieu-hien-benh-coi-xuong-o-tre-em
В этом интересном тексте собраны обширные сведения, которые помогут вам понять различные аспекты обсуждаемой темы. Мы разбираем детали и факты, делая акцент на важности каждого элемента. Не упустите возможность расширить свои знания и взглянуть на мир по-новому!
Эксклюзивная информация – http://www.tomoniikiru.org/tasuke/index.cgi?pg=0
Текст включает разнообразную информацию, которая может показаться любопытной, но не меняет устоявшегося восприятия. Предлагаем просто насладиться чтением, не ожидая значительной пользы.
Подробнее читать – [url=https://rostov-narkologiya.ru/uslugi-ot-alkogolizma/vyvod-iz-zapoya/]народные средства от диабета[/url]
Этот текст содержит различную информацию, которая, возможно, покажется любопытной, но в целом не меняет восприятия привычных вещей. Предлагаем просто получить удовольствие от чтения, не ожидая особой пользы.
Вот – [url=https://arma-rehab.ru/vyvod-iz-zapoya/]эротические фильмы[/url]
нарколог на дом стоимость ростов-на-дону [url=https://narkolog-na-dom-v-rostove-4.ru/]нарколог на дом стоимость ростов-на-дону[/url] .
водные экскурсии в санкт петербурге [url=https://arenda-yakhty-spb-3.ru/]arenda-yakhty-spb-3.ru[/url] .
сколько стоит нарколог на дом в ростове [url=https://narkolog-na-dom-v-rostove-3.ru/]сколько стоит нарколог на дом в ростове[/url] .
Опорные элементы выполняют важнейшую роль в строительстве надёжного основания.
Они дают возможность правильно распределить нагрузку от постройки на грунт.
Применение свай особенно актуально на проблемных участках с большим уровнем влаги.
Такой фундамент обеспечивает стабильность конструкции при подвижках почвы.
https://makerworld.com/ru/@suvorovsvai2
Опорное решение может выдерживать серьёзные воздействия даже в сложных регионах.
Кроме того, подобный вариант подразумевает меньше количество подготовительных мероприятий.
В итоге, правильный монтаж конструкций обеспечивает долговечность всего объекта.
клиника в ростове вывод из запоя [url=https://vyvod-iz-zapoya-v-rostove-1.ru/]vyvod-iz-zapoya-v-rostove-1.ru[/url] .
вывод из запоя на дому в ростове [url=https://vyvod-iz-zapoya-v-rostove-2.ru/]вывод из запоя на дому в ростове[/url] .
нарколог на дом в ростове-на-дону [url=https://narkolog-na-dom-v-rostove-2.ru/]нарколог на дом в ростове-на-дону[/url] .
круглосуточный вывод из запоя в ростове [url=https://vyvod-iz-zapoya-v-rostove-3.ru/]круглосуточный вывод из запоя в ростове[/url] .
На нашем сайте вы можете скачать активатор для Windows 11 абсолютно бесплатно и навсегда забыть о водяных знаках!
Подробнее – [url=https://krasnodar.med24.online/landing/vyvod_iz_zapoya/]Как обойти активацию Windows 11[/url]
mostbet бонус [url=http://mostbet45087.help]http://mostbet45087.help[/url]
В данном тексте собраны разнообразные случайные сведения и не вполне определённые идеи, которые могут вызвать интерес. Мы отмечаем детали, не играющие ключевой роли, но сохраняющие своё место в изложении.
Подробнее читать – [url=https://rostov-narkologiya.ru/uslugi-ot-narkomanii/mefedronovaya-zavisimost/]мефедроновая зависимость[/url]
частный нарколог на дом в ростове [url=https://narkolog-na-dom-v-rostove-3.ru/]частный нарколог на дом в ростове[/url] .
Сочетание медицинских и психотерапевтических мер создаёт устойчивую систему поддержки. Пациенты получают возможность постепенно восстановить утраченное здоровье и психологическую стабильность.
Получить больше информации – [url=https://narkologicheskaya-klinika-v-kazani16.ru/]narkologicheskaya-klinika-v-kazani16.ru/[/url]
mostbet yaş məhdudiyyəti [url=https://www.mostbet2012.help]https://www.mostbet2012.help[/url]
Алкогольная зависимость сопровождается не только физическими, но и глубокими психоэмоциональными проблемами. Психотерапевтическая помощь играет важную роль в лечении, помогая пациенту осознать причины зависимости и разработать стратегии для предотвращения рецидивов.
Получить больше информации – [url=https://narcolog-na-dom-ufa0.ru/]вызвать нарколога на дом срочно[/url]
Комплексное лечение зависимости на дому организовано по четкой схеме, позволяющей оперативно вывести пациента из запоя и обеспечить безопасное восстановление здоровья.
Исследовать вопрос подробнее – [url=https://alko-zakodirovat.ru/]вывод из запоя круглосуточно в екатеринбурге[/url]
Врачи клиники «ВитаЛайн» для снятия интоксикации и облегчения состояния пациента применяют исключительно качественные и проверенные лекарственные препараты, подбирая их в зависимости от особенностей ситуации и состояния здоровья пациента:
Углубиться в тему – https://narcolog-na-dom-novosibirsk0.ru/vyzov-narkologa-na-dom-novosibirsk
снять катер спб [url=https://arenda-yakhty-spb-3.ru/]снять катер спб[/url] .
вывод из запоя дома в ростове [url=https://vyvod-iz-zapoya-v-rostove-3.ru/]vyvod-iz-zapoya-v-rostove-3.ru[/url] .
Запой требует срочного вмешательства, особенно если он длится более 2–3 дней. Без квалифицированной помощи организм пациента накапливает токсичные вещества, что может привести к необратимым изменениям.
Углубиться в тему – [url=https://vyvod-iz-zapoya-krasnoyarsk0.ru/]врач вывод из запоя красноярск[/url]
анонимный нарколог на дом в ростове [url=https://narkolog-na-dom-v-rostove-3.ru/]анонимный нарколог на дом в ростове[/url] .
Все медицинские записи и личные данные хранятся на защищённых серверах с ограниченным доступом. Только лечащий врач и медицинская сестра имеют право просматривать их при необходимости оказания помощи.
Детальнее – https://тайный-вывод-из-запоя.рф/
1вин Кыргызстан [url=http://1win17043.help/]http://1win17043.help/[/url]
В статье рассмотрим ключевые моменты, которые помогут сориентироваться при выборе капельницы от запоя, понять механизм действия и особенности процедуры, а также избежать типичных ошибок при обращении за медицинской помощью.
Изучить вопрос глубже – [url=https://kapelnicza-ot-zapoya-pervouralsk11.ru/]капельница от запоя на дому недорого в первоуральске[/url]
Анализ рынка услуг экстренной помощи в Тюмени позволяет выделить следующие ориентировочные цены:
Выяснить больше – http://vyvod-iz-zapoya-vladimir00.ru/
mostbet bonus kod kiritish [url=https://www.mostbet28461.help]https://www.mostbet28461.help[/url]
Такой алгоритм помогает восстановить работоспособность организма в течение нескольких часов. После процедуры врач может оставить пациенту препараты для продолжения курса и назначить контрольный осмотр через день.
Разобраться лучше – http://narcolog-na-dom-krasnoyarsk0.ru
Наши опытные наркологи регулярно повышают квалификацию и используют современные методики для быстрого восстановления пациентов после запоев.
Подробнее можно узнать тут – [url=https://kapelnica-ot-zapoya-nizhniy-novgorod0.ru/]капельница от запоя клиника[/url]
На основе собранной информации формируется индивидуальный план лечения, который включает установку внутривенной капельницы. Через капельницу вводятся специально подобранные растворы, способствующие быстрому выведению токсинов, восстановлению водно-электролитного баланса и нормализации работы внутренних органов. При необходимости назначаются дополнительные медикаменты для поддержки печени, сердца и нервной системы, а также для купирования симптомов абстинентного синдрома. Врач постоянно контролирует состояние пациента и корректирует лечение, чтобы добиться оптимальных результатов. Завершающим этапом является подробная консультация, в ходе которой специалист дает рекомендации по дальнейшему восстановлению и профилактике повторных эпизодов зависимости.
Получить дополнительные сведения – http://narcolog-na-dom-voronezh0.ru
Алкогольная и наркотическая зависимость требуют незамедлительного и комплексного вмешательства для предотвращения серьезных осложнений и сохранения здоровья пациента. В Уфе, Республика Башкортостан, опытные наркологи выезжают на дом 24 часа в сутки, предоставляя оперативную помощь при запоях и в случаях наркотической интоксикации. Такой формат лечения позволяет начать детоксикацию в комфортной, привычной обстановке, обеспечивая максимальную конфиденциальность и индивидуальный подход к каждому пациенту.
Получить дополнительные сведения – [url=https://narcolog-na-dom-ufa000.ru/]вызвать врача нарколога на дом в уфе[/url]
Эта публикация содержит набор несвязанных идей, трудно применимых в практике. Мы лишь поверхностно затрагиваем различные точки зрения, не проводя глубокий анализ и не предлагая выводов.
Подробнее читать – [url=https://rostov-narkologiya.ru/uslugi-ot-narkomanii/mefedronovaya-zavisimost/]лечение covid народными средствами[/url]
Процедура вывода из запоя начинается с тщательной диагностики состояния пациента, чтобы определить, какие методы лечения будут наиболее эффективными. Мы применяем индивидуальный подход и комбинируем медикаментозное лечение с психотерапевтической поддержкой, что даёт лучший результат.
Углубиться в тему – http://narcolog-na-dom-novokuznetsk0.ru/narkolog-lechenie-na-domu-novokuzneczk/
Генератор ключей для Windows 11 — 100% рабочий метод активации, проверено тысячами пользователей!
Подробнее – [url=https://krasnodar.med24.online/landing/vyvod_iz_zapoya/]Ключ активации для Windows 11 2026[/url]
Врач уточняет, как долго продолжается запой, какие симптомы наблюдаются и присутствуют ли сопутствующие заболевания. Тщательный сбор информации позволяет оперативно подобрать необходимые медикаменты и начать детоксикацию.
Получить дополнительную информацию – [url=https://kapelnica-ot-zapoya-tyumen0.ru/]капельница от запоя клиника[/url]
Особую опасность представляет белая горячка (алкогольный психоз). У пациента возникают галлюцинации, приступы паники, агрессивное поведение, дезориентация во времени и пространстве. Это состояние требует незамедлительного вмешательства врача, так как человек может представлять опасность для себя и окружающих.
Подробнее – http://narcolog-na-dom-novokuznetsk00.ru
нарколог на дом недорого ростов [url=https://narkolog-na-dom-v-rostove-3.ru/]нарколог на дом недорого ростов[/url] .
Незамедлительно после вызова нарколог прибывает на дом для проведения тщательного осмотра. На данном этапе специалист собирает анамнез, измеряет жизненно важные показатели — пульс, артериальное давление, температуру — и оценивает степень интоксикации. Эти данные являются основой для составления индивидуального плана лечения.
Получить дополнительные сведения – [url=https://vyvod-iz-zapoya-vladimir000.ru/]вывод из запоя на дому[/url]
Наши протоколы строятся вокруг ясной последовательности: скрининг — пробная инфузия — основная инфузия — фиксация эффекта — утренний чек-ин. Каждому шагу соответствует один главный маркер эффективности. Если отклик ниже ожидаемого, мы корректируем ровно один параметр — темп введения, последовательность компонентов, плотность «тихих окон» или водный режим.
Разобраться лучше – http://vyvod-iz-zapoya-v-ekaterinburge16.ru/vyvod-iz-zapoya-na-domu-v-ekaterinburge/
Скачайте активатор для Windows 11 и получите все функции Pro-версии бесплатно.
Подробнее – [url=https://krasnodar.med24.online/]Кряк для Windows 11 Pro бесплатно[/url]
На основе собранной информации формируется индивидуальный план лечения, который включает установку внутривенной капельницы. Через капельницу вводятся специально подобранные растворы, способствующие быстрому выведению токсинов, восстановлению водно-электролитного баланса и нормализации работы внутренних органов. При необходимости назначаются дополнительные медикаменты для поддержки печени, сердца и нервной системы, а также для купирования симптомов абстинентного синдрома. Врач постоянно контролирует состояние пациента и корректирует лечение, чтобы добиться оптимальных результатов. Завершающим этапом является подробная консультация, в ходе которой специалист дает рекомендации по дальнейшему восстановлению и профилактике повторных эпизодов зависимости.
Разобраться лучше – [url=https://narcolog-na-dom-voronezh0.ru/]нарколог на дом круглосуточно в воронеже[/url]
Наши специалисты оценивают клинические признаки запоя уже при первом осмотре — измеряют пульс, артериальное давление и насыщение кислородом, осматривают кожу и слизистые оболочки на предмет обезвоживания. Специальные тесты на когнитивные функции позволяют определить степень дезориентации и риск развития острых психотических реакций.
Изучить вопрос глубже – https://тайный-вывод-из-запоя.рф/vyvod-iz-zapoya-czena-v-samare/
Первый этап лечения — это детоксикация организма. При помощи капельничного введения специализированных препаратов достигается быстрый вывод токсинов, что позволяет стабилизировать обменные процессы и восстановить нормальное функционирование печени, почек и сердечно-сосудистой системы.
Получить дополнительные сведения – [url=https://narcolog-na-dom-ufa0.ru/]нарколог на дом срочно[/url]
Вывод из запоя на дому — это управляемый медицинский процесс, где каждая деталь имеет значение: от первичного осмотра и грамотного подбора инфузионного профиля до сенсорной дисциплины в помещении и чётких «окон оценки» результата. В наркологической клинике «СеверМед Трезвость» мы используем принцип минимально достаточных вмешательств: одна цель на этап, один измеримый маркер и одна корректировка за раз. Такой подход снижает нагрузку на организм, повышает предсказуемость и делает восстановление переносимым для пациента и его близких.
Подробнее – https://vivod-iz-zapoya-v-sankt-peterburge16.ru/vyvedenie-iz-zapoya-staczionar-sankt-peterburg/
Экстренное вмешательство необходимо, когда самостоятельное прекращение употребления алкоголя или наркотиков становится невозможным, а состояние пациента ухудшается. Основные показания включают:
Исследовать вопрос подробнее – [url=https://narcolog-na-dom-ufa000.ru/]narcolog-na-dom-ufa000.ru/[/url]
Клиника «ВитаЛайн» предлагает квалифицированную медицинскую помощь нарколога на дому в Новосибирске. Наши специалисты круглосуточно оказывают экстренную помощь при зависимостях от алкоголя и наркотиков, обеспечивают быстрое и безопасное снятие абстинентного синдрома и проводят профессиональную детоксикацию организма. Каждый вызов врача сопровождается индивидуальным подходом с учетом состояния пациента, гарантией полной конфиденциальности и использованием только сертифицированных медицинских препаратов.
Получить дополнительную информацию – [url=https://narcolog-na-dom-novosibirsk0.ru/]вызов врача нарколога на дом в новосибирске[/url]
Алкогольный запой представляет собой тяжелое состояние, вызванное длительным бесконтрольным употреблением спиртных напитков. Без медицинского вмешательства вывести организм из запоя может быть сложно и даже опасно. Срочная помощь нарколога требуется при следующих признаках:
Подробнее – [url=https://kapelnica-ot-zapoya-nizhniy-novgorod0.ru/]капельница от запоя клиника в нижнем новгороде[/url]
Сразу после вызова нарколог приезжает на дом для проведения первичного осмотра и диагностики. На этом этапе проводится сбор анамнеза, измеряются жизненно важные показатели (пульс, артериальное давление, температура) и определяется степень алкогольной интоксикации. Эти данные являются основой для разработки индивидуального плана лечения.
Подробнее – http://kapelnica-ot-zapoya-tyumen0.ru/postavit-kapelniczu-ot-zapoya-tyumen/https://kapelnica-ot-zapoya-tyumen0.ru
При остром алкогольном отравлении появляются головокружение, рвота, сильная слабость, скачки давления, нарушение дыхания, обмороки и судороги. Это сигнал о том, что организм не справляется с интоксикацией, и без срочного медицинского вмешательства возможны опасные осложнения, вплоть до комы.
Получить дополнительные сведения – [url=https://narcolog-na-dom-novokuznetsk00.ru/]психиатр нарколог на дом новокузнецк[/url]
Этот обзор позволяет по-новому взглянуть на вещи, на которые обычно и так смотрят. Мы упоминаем факты, которые мало что меняют, и события, значение которых трудно определить, но они всё равно здесь.
Вот – [url=https://arma-rehab.ru/]покер онлайн[/url]
Важно выяснить длительность запоя, частоту и дозы потребляемого алкоголя, наличие ранее проведённых детоксикаций и психиатрических заболеваний. Эта информация помогает выбрать наиболее подходящий протокол инфузионной и медикаментозной терапии.
Выяснить больше – http://тайный-вывод-из-запоя.рф/vyvod-iz-zapoya-staczionar-v-samare/
Главная задача специалистов клиники «ВладМед Трезвость» — быстро и безопасно стабилизировать состояние пациента, не допуская осложнений и рецидивов. После вызова врача на дом или поступления в стационар проводится осмотр, оценка степени интоксикации и индивидуальный подбор терапии. Каждое назначение строго медицински обосновано, а препараты подбираются с учётом возраста, хронических заболеваний и длительности запоя.
Получить дополнительные сведения – https://vyvod-iz-zapoya-vladimir0.ru/vyvod-iz-zapoya-na-domu-vladimir/
Когда следует немедленно обращаться за помощью:
Детальнее – [url=https://narcolog-na-dom-novokuznetsk0.ru/]нарколог на дом вывод из запоя новокузнецк[/url]
Сочетание медицинских и психотерапевтических мер создаёт устойчивую систему поддержки. Пациенты получают возможность постепенно восстановить утраченное здоровье и психологическую стабильность.
Изучить вопрос глубже – [url=https://narkologicheskaya-klinika-v-kazani16.ru/]наркологическая клиника казань[/url]
монтаж газового пожаротушения для серверной [url=https://montazh-gazovogo-pozharotusheniya.ru/]montazh-gazovogo-pozharotusheniya.ru[/url] .
цена монтажа системы газового пожаротушения [url=https://montazh-gazovogo-pozharotusheniya-2.ru/]цена монтажа системы газового пожаротушения[/url] .
При длительном запое в организме накапливаются вредные токсины, что ведёт к нарушениям работы сердца, печени, почек и других жизненно важных органов. Чем быстрее начинается терапия, тем выше шансы избежать серьёзных осложнений и обеспечить качественное восстановление. Метод капельничного лечения позволяет оперативно начать детоксикацию, что особенно важно для спасения жизни и предупреждения хронических последствий злоупотребления алкоголем.
Изучить вопрос глубже – [url=https://kapelnica-ot-zapoya-tyumen00.ru/]www.domen.ru[/url]
приложение мелбет [url=https://melbetofficialbookmaker.ru/]приложение мелбет[/url] .
Использование автоматизированных систем дозирования обеспечивает точное введение лекарственных средств, что минимизирует риск передозировки и побочных эффектов. Постоянный мониторинг жизненно важных показателей позволяет врачу оперативно корректировать дозировки и адаптировать терапию под динамику состояния пациента.
Подробнее можно узнать тут – [url=https://vyvod-iz-zapoya-vladimir000.ru/]срочный вывод из запоя владимир[/url]
Эффективная капельница должна включать несколько компонентов, каждый из которых направлен на решение конкретной задачи: выведение токсинов, восстановление функций организма, нормализация психоэмоционального состояния.
Подробнее тут – [url=https://kapelnicza-ot-zapoya-pervouralsk11.ru/]kapelnicza-ot-zapoya-pervouralsk11.ru/[/url]
Наши специалисты оценивают клинические признаки запоя уже при первом осмотре — измеряют пульс, артериальное давление и насыщение кислородом, осматривают кожу и слизистые оболочки на предмет обезвоживания. Специальные тесты на когнитивные функции позволяют определить степень дезориентации и риск развития острых психотических реакций.
Подробнее тут – https://тайный-вывод-из-запоя.рф/vyvod-iz-zapoya-staczionar-v-samare
Запой – это критическое состояние, при котором организм подвергается сильной алкогольной интоксикации, что может привести к накоплению токсинов, нарушению обменных процессов и повреждению жизненно важных органов. В Туле, благодаря профессиональной помощи нарколога на дому, возможно оперативно начать лечение, не прибегая к госпитализации. Такой подход позволяет пациенту получить качественную терапию в комфортных условиях, сохраняя полную конфиденциальность и минимизируя стресс, связанный с посещением стационара.
Выяснить больше – [url=https://vyvod-iz-zapoya-tula00.ru/]вывод из запоя на дому недорого в туле[/url]
Нашли рабочий серийный номер для Windows 11 Pro — проверено лично, без вирусов!
Подробнее – [url=https://krasnodar.med24.online/landing/narkolog_na_dom/]Скачать патч для активации Windows 11[/url]
Запой — это не просто длительное употребление алкоголя, а тяжелое состояние, когда организм перестает функционировать нормально без постоянного поступления этанола. При запое происходит накопление токсинов, что ведет к нарушению работы внутренних органов и сильному ослаблению иммунной системы. Пациенты часто испытывают невыносимые физические и психические страдания, а попытки самостоятельно выйти из запоя только усугубляют ситуацию.
Выяснить больше – [url=https://vyvod-iz-zapoya-krasnoyarsk0.ru/]помощь вывод из запоя красноярск[/url]
В этом тексте собрано множество случайных сведений и довольно неопределённых мыслей, которые могут чем-то заинтересовать. Мы отмечаем моменты, которые не особенно важны, но всё же занимают своё место в повествовании.
Вот – [url=https://arma-rehab.ru/lechenie-alkogolizma/]порно[/url]
Алкогольный запой — это состояние, при котором человек теряет способность самостоятельно прекратить потребление спиртного и контролировать дозировку. В таких условиях нарастают неврологические и метаболические нарушения, возрастает риск серьёзных осложнений вплоть до алкогольного делирия. Наркологическая клиника «СамараМед» предлагает круглосуточную выездную помощь на дому в Самаре и области с гарантией полной анонимности и выездом специалиста в течение 30 минут после обращения. Наши врачи применяют современные протоколы детоксикации и психологической поддержки, что позволяет безопасно и максимально комфортно пройти через этап выхода из запоя и заложить прочный фундамент для дальнейшего восстановления.
Узнать больше – https://тайный-вывод-из-запоя.рф/vyvod-iz-zapoya-czena-v-samare
нарколог вывод из запоя на дому в ростове [url=https://vyvod-iz-zapoya-v-rostove-4.ru/]vyvod-iz-zapoya-v-rostove-4.ru[/url] .
установка системы пожаротушения [url=https://montazh-gazovogo-pozharotusheniya-1.ru/]установка системы пожаротушения[/url] .
Выбор капельничного метода в условиях домашнего лечения обладает рядом преимуществ:
Выяснить больше – [url=https://kapelnica-ot-zapoya-tyumen00.ru/]выезд на дом капельница от запоя[/url]
Услуга капельничного вывода из запоя на дому в Тюмени предоставляет комплексный подход к экстренному лечению алкогольной интоксикации. Врач приезжает на дом, проводит первичный осмотр, собирает анамнез и назначает индивидуальную схему терапии. Современные методы инфузионной терапии позволяют точно дозировать препараты, обеспечивая быструю детоксикацию и минимизируя риск осложнений.
Получить дополнительные сведения – [url=https://vyvod-iz-zapoya-vladimir00.ru/]нарколог на дом вывод из запоя[/url]
вывод из запоя в ростове [url=https://vyvod-iz-zapoya-v-rostove-5.ru/]вывод из запоя в ростове[/url] .
Такой алгоритм помогает восстановить работоспособность организма в течение нескольких часов. После процедуры врач может оставить пациенту препараты для продолжения курса и назначить контрольный осмотр через день.
Ознакомиться с деталями – [url=https://narcolog-na-dom-krasnoyarsk0.ru/]выезд нарколога на дом красноярск[/url]
Вывод из запоя — это не просто медицинская процедура, а целый комплекс мероприятий, направленных на очищение организма, восстановление обмена веществ и стабилизацию нервной системы. Когда человек находится в состоянии длительного употребления алкоголя, в крови накапливаются токсины, нарушается работа сердца, печени, почек и мозга. Без профессиональной помощи выйти из этого состояния безопасно невозможно. Клиника «ВладМед Трезвость» предлагает квалифицированный вывод из запоя во Владимире с использованием современных капельниц и мягких детокс-программ. Врачи работают круглосуточно, оказывая помощь как на дому, так и в комфортных условиях стационара.
Получить дополнительную информацию – [url=https://vyvod-iz-zapoya-vladimir0.ru/]вывод из запоя клиника в владимире[/url]
Эта публикация погружает вас в мир увлекательных фактов и удивительных открытий. Мы расскажем о ключевых событиях, которые изменили ход истории, и приоткроем завесу над научными достижениями, которые вдохновили миллионы. Узнайте, чему может научить нас прошлое и как применить эти знания в будущем.
См. подробности – https://rv-rez.ru
В этой статье представлен занимательный и актуальный контент, который заставит вас задуматься. Мы обсуждаем насущные вопросы и проблемы, а также освещаем истории, которые вдохновляют на действия и изменения. Узнайте, что стоит за событиями нашего времени!
Подробнее – https://taverna-meteora.de/index.php/component/k2/item/11-showcase-software?start=60770
В этом интересном тексте собраны обширные сведения, которые помогут вам понять различные аспекты обсуждаемой темы. Мы разбираем детали и факты, делая акцент на важности каждого элемента. Не упустите возможность расширить свои знания и взглянуть на мир по-новому!
Слушай внимательно — тут важно – https://partobanauli.com/2022/09/kesehatian-menjunjung-tinggi.html
Для сохранения приватности мы ведём коммуникацию через одного доверенного представителя, используем нейтральные формулировки в документах, а инструкции выдаём в неброском виде. При невозможности создать тишину дома (ремонт, маленькие дети, гости) предложим краткий «тихий» стационар с отдельным входом и камерным режимом, после чего сопровождение вернётся в домашний формат.
Узнать больше – [url=https://vyvod-iz-zapoya-v-ekaterinburge16.ru/]наркологический вывод из запоя екатеринбург[/url]
монтаж газовой системы пожаротушения под ключ [url=https://montazh-gazovogo-pozharotusheniya.ru/]montazh-gazovogo-pozharotusheniya.ru[/url] .
установка газового пожаротушения цена [url=https://montazh-gazovogo-pozharotusheniya-2.ru/]установка газового пожаротушения цена[/url] .
Этот сборник информации привлекает множеством мелких деталей и необычных ракурсов. Мы предлагаем взгляды, редко полезные, но способные немного разнообразить знакомство с темой.
Подробнее читать – [url=https://rostov-narkologiya.ru/ ]мефедроновая зависимость[/url]
Этот сборник информации привлекает множеством мелких деталей и необычных ракурсов. Мы предлагаем взгляды, редко полезные, но способные немного разнообразить знакомство с темой.
Подробнее читать – [url=https://rostov-narkologiya.ru/ ]народные средства от диабета[/url]
Необходимость экстренной выездной помощи возникает в случаях, когда пациент:
Выяснить больше – http://тайный-вывод-из-запоя.рф
Услуга вызова нарколога на дом в Екатеринбурге представляет собой комплекс мер, направленных на оперативное стабилизирование состояния пациента. При поступлении вызова специалист проводит детальный осмотр, сбор анамнеза и диагностику состояния, после чего разрабатывается индивидуальный план лечения. Методика включает медикаментозную детоксикацию, коррекцию обменных процессов и психологическую поддержку, что обеспечивает комплексное восстановление здоровья без необходимости посещения стационара.
Получить дополнительные сведения – https://alko-zakodirovat.ru/zapoj-narkolog-na-dom-ekb
Эта информационная статья охватывает широкий спектр актуальных тем и вопросов. Мы стремимся осветить ключевые факты и события с ясностью и простотой, чтобы каждый читатель мог извлечь из нее полезные знания и полезные инсайты.
Получить дополнительную информацию – http://haphazardwinding.ru/cats/13
промокод для мелбет [url=https://melbetofficialbookmaker.ru/]промокод для мелбет[/url] .
Запой – это критическое состояние, при котором организм подвергается сильной алкогольной интоксикации, что может привести к накоплению токсинов, нарушению обменных процессов и повреждению жизненно важных органов. В Туле, благодаря профессиональной помощи нарколога на дому, возможно оперативно начать лечение, не прибегая к госпитализации. Такой подход позволяет пациенту получить качественную терапию в комфортных условиях, сохраняя полную конфиденциальность и минимизируя стресс, связанный с посещением стационара.
Подробнее можно узнать тут – [url=https://vyvod-iz-zapoya-tula00.ru/]вывод из запоя[/url]
Мы предлагаем вам окунуться в океан любопытных фактов и вдохновляющих историй. Эта публикация поможет расширить горизонты, разбудить интерес к науке и истории и увидеть мир с новой стороны.
Читать дальше – http://jamescohane.com/wtf-is-biz-dev-aka-what-is-business-development
Этот обзор предлагает свежий взгляд на предметы, которые и без того привычны. Мы упоминаем факты, не имеющие большого значения, и события с неясной важностью, но они присутствуют здесь.
Подробнее читать – [url=https://rostov-narkologiya.ru/uslugi-ot-narkomanii/mefedronovaya-zavisimost/]кето диета за неделю минус 10 кг[/url]
В данной обзорной статье представлены интригующие факты, которые не оставят вас равнодушными. Мы критикуем и анализируем события, которые изменили наше восприятие мира. Узнайте, что стоит за новыми открытиями и как они могут изменить ваше восприятие реальности.
Обратиться к источнику – https://truedigiweb.com/tdcpt_tunes/mitski-%E2%80%95-laurel-hell
Эта статья сочетает в себе как полезные, так и интересные сведения, которые обогатят ваше понимание насущных тем. Мы предлагаем практические советы и рекомендации, которые легко внедрить в повседневную жизнь. Узнайте, как улучшить свои навыки и обогатить свой опыт с помощью простых, но эффективных решений.
Разобраться лучше – https://www.lonacristaleventos.com.br/perfil-lona-cristal
Сочетание медицинских и психотерапевтических мер создаёт устойчивую систему поддержки. Пациенты получают возможность постепенно восстановить утраченное здоровье и психологическую стабильность.
Выяснить больше – http://narkologicheskaya-klinika-v-kazani16.ru
В этой публикации мы предлагаем подробные объяснения по актуальным вопросам, чтобы помочь читателям глубже понять их. Четкость и структурированность материала сделают его удобным для усвоения и применения в повседневной жизни.
Открой скрытое – https://www.beachofthedead.net/beach-of-the-dead/g04
Мы предлагаем вам окунуться в океан любопытных фактов и вдохновляющих историй. Эта публикация поможет расширить горизонты, разбудить интерес к науке и истории и увидеть мир с новой стороны.
Осуществить глубокий анализ – https://judotraining.info/is-rapid-weight-loss-safe
В этой статье вы найдете познавательную и занимательную информацию, которая поможет вам лучше понять мир вокруг. Мы собрали интересные данные, которые вдохновляют на размышления и побуждают к действиям. Открывайте новую информацию и получайте удовольствие от чтения!
Изучить вопрос глубже – https://anaimmi.com.vn/blog/hoi-thao/chuc-mung-hoi-thao-xuc-tien-thuong-mai-duc-lan-4-da-dien-ra-thanh-cong
В этом обзорном материале представлены увлекательные детали, которые находят отражение в различных аспектах жизни. Мы исследуем непонятные и интересные моменты, позволяя читателю увидеть картину целиком. Погрузитесь в мир знаний и удивительных открытий!
Тыкай сюда — узнаешь много интересного – https://www.herenow.fr/le-roman-des-ressources-humaines
Эта статья предлагает уникальную подборку занимательных фактов и необычных историй, которые вы, возможно, не знали. Мы постараемся вдохновить ваше воображение и разнообразить ваш кругозор, погружая вас в мир, полный интересных открытий. Читайте и открывайте для себя новое!
Открыть полностью – https://www.mkez-dresden.de/allgemeine-aktivitaeten/comment-page-714
В этой публикации мы предлагаем подробные объяснения по актуальным вопросам, чтобы помочь читателям глубже понять их. Четкость и структурированность материала сделают его удобным для усвоения и применения в повседневной жизни.
Детали по клику – https://sadenir.com.uy/royalhorse/2020/02/18/maine-coon-el-gigante-amable
Этот увлекательный информационный материал подарит вам массу новых знаний и ярких эмоций. Мы собрали для вас интересные факты и сведения, которые обогатят ваш опыт. Откройте для себя увлекательный мир информации и насладитесь процессом изучения!
Не упусти шанс – https://www.mariakorslund.no/var-hage-fremtidige-prosjekter-del-2
Эта статья погружает вас в увлекательный мир знаний, где каждый факт становится открытием. Мы расскажем о ключевых исторических поворотных моментах и научных прорывах, которые изменили ход цивилизации. Поймите, как прошлое формирует настоящее и как его уроки могут помочь нам строить будущее.
Погрузиться в детали – https://www.karbonarna.cz/portfolio/kryty-vidlic
Этот интересный отчет представляет собой сборник полезных фактов, касающихся актуальных тем. Мы проанализируем данные, чтобы вы могли сделать обоснованные выводы. Читайте, чтобы узнать больше о последних трендах и значимых событиях!
Читать далее > – http://www.trainersgroep.amsterdam/a-nice-post
врач нарколог на дом в ростове [url=https://narkolog-na-dom-v-rostove-4.ru/]врач нарколог на дом в ростове[/url] .
Эта статья предлагает живое освещение актуальной темы с множеством интересных фактов. Мы рассмотрим ключевые моменты, которые делают данную тему важной и актуальной. Подготовьтесь к насыщенному путешествию по неизвестным аспектам и узнайте больше о значимых событиях.
Всё самое вкусное внутри – https://anydiapers.com/collar-brings-back-coffee-brewing-ritual
В данной обзорной статье представлены интригующие факты, которые не оставят вас равнодушными. Мы критикуем и анализируем события, которые изменили наше восприятие мира. Узнайте, что стоит за новыми открытиями и как они могут изменить ваше восприятие реальности.
Изучить материалы по теме – http://mommydil.com/blog/screen-time-our-top-picks
Эта статья сочетает познавательный и занимательный контент, что делает ее идеальной для любителей глубоких исследований. Мы рассмотрим увлекательные аспекты различных тем и предоставим вам новые знания, которые могут оказаться полезными в будущем.
Заходи — там интересно – https://medecin-pontscorff.bzh/caducee_medecins-large
аренда яхты [url=https://arenda-yakhty-spb-1.ru/]arenda-yakhty-spb-1.ru[/url] .
вывод из запоя клиника в ростове [url=https://vyvod-iz-zapoya-v-rostove-4.ru/]вывод из запоя клиника в ростове[/url] .
Эта статья погружает вас в увлекательный мир знаний, где каждый факт становится открытием. Мы расскажем о ключевых исторических поворотных моментах и научных прорывах, которые изменили ход цивилизации. Поймите, как прошлое формирует настоящее и как его уроки могут помочь нам строить будущее.
Расширить кругозор по теме – https://www.art-creativity.ru
В статье представлены ключевые моменты по актуальной теме, дополненные советами экспертов и ссылками на дополнительные ресурсы. Цель материала — дать читателю инструменты для самостоятельного развития и принятия осознанных решений.
Изучить вопрос глубже – https://www.cabinet.gov.zm/?p=5329
Мы собрали для вас самые захватывающие факты из мира науки и истории. От малознакомых деталей до грандиозных событий — эта статья расширит ваш кругозор и подарит новое понимание того, как устроен наш мир.
Погрузиться в детали – https://sites.bc.edu/uncommonsense/2022/05/08/a-butterfly-on-f-street
накрутка подписчиков в Телеграм https://nakrutka-podpischikov-telegram-1.ru
вывод из запоя в ростове-на-дону на дому [url=https://vyvod-iz-zapoya-v-rostove-5.ru/]вывод из запоя в ростове-на-дону на дому[/url] .
В этом интересном тексте собраны обширные сведения, которые помогут вам понять различные аспекты обсуждаемой темы. Мы разбираем детали и факты, делая акцент на важности каждого элемента. Не упустите возможность расширить свои знания и взглянуть на мир по-новому!
Познакомиться с результатами исследований – https://news.ghanamma.com/2024/04/14/in-the-face-of-economic-ruin-ghanaian-youth-are-fixated-on-hajia-bintu-barker-vormawor
установка газового пожаротушения под ключ [url=https://montazh-gazovogo-pozharotusheniya-1.ru/]montazh-gazovogo-pozharotusheniya-1.ru[/url] .
Этот информационный материал собраны данные, которые помогут лучше понять текущие тенденции и процессы в различных сферах жизни. Мы предоставляем четкий анализ, графики и примеры, чтобы информация была не только понятной, но и практичной для принятия решений.
Продолжить изучение – https://quentinschneider.fr/paradise-stacey-pullen-sidney-charles-25-10-14
нарколог на дом в ростове-на-дону [url=https://narkolog-na-dom-v-rostove-1.ru/]нарколог на дом в ростове-на-дону[/url] .
Этот информационный материал собраны данные, которые помогут лучше понять текущие тенденции и процессы в различных сферах жизни. Мы предоставляем четкий анализ, графики и примеры, чтобы информация была не только понятной, но и практичной для принятия решений.
Читать далее > – https://envato.bdevs.net/royel/product/chicken-chawmin
мелбет ставки на спорт [url=https://melbetofficialbookmaker.ru/]мелбет ставки на спорт[/url] .
Эта информационная статья содержит полезные факты, советы и рекомендации, которые помогут вам быть в курсе последних тенденций и изменений в выбранной области. Материал составлен так, чтобы быть полезным и понятным каждому.
Нажмите, чтобы узнать больше – http://blacktoon.dothome.co.kr/%EB%89%B4%ED%86%A0%EB%81%BC%EB%8C%80%ED%94%BC%EC%86%8C%EC%97%90%EC%84%9C-%EC%B5%9C%EC%8B%A0-%EC%9B%B9%ED%88%B0-%EC%97%85%EB%8D%B0%EC%9D%B4%ED%8A%B8-%EB%B0%9B%EA%B8%B0
mostbet зеркало сегодня [url=http://mostbet57193.help]http://mostbet57193.help[/url]
Эта информационная заметка содержит увлекательные сведения, которые могут вас удивить! Мы собрали интересные факты, которые сделают вашу жизнь ярче и полнее. Узнайте нечто новое о привычных аспектах повседневности и откройте для себя удивительный мир информации.
Только для своих – https://feromonsawit.com/pemanfaatan-limbah-cangkang-kelapa-sawit
В данной обзорной статье представлены интригующие факты, которые не оставят вас равнодушными. Мы критикуем и анализируем события, которые изменили наше восприятие мира. Узнайте, что стоит за новыми открытиями и как они могут изменить ваше восприятие реальности.
Полезно знать – https://betul.mppolice.gov.in/%E0%A4%9A%E0%A4%82%E0%A4%AC%E0%A4%B2-%E0%A4%9C%E0%A5%8B%E0%A4%A8-%E0%A4%AE%E0%A5%87%E0%A4%82-%E0%A4%AA%E0%A5%81%E0%A4%B2%E0%A4%BF%E0%A4%B8-%E0%A4%A8%E0%A5%87-%E0%A4%B5%E0%A4%BF%E0%A4%B6%E0%A5%87
В этой публикации мы предлагаем подробные объяснения по актуальным вопросам, чтобы помочь читателям глубже понять их. Четкость и структурированность материала сделают его удобным для усвоения и применения в повседневной жизни.
Кликни и узнай всё! – https://portalolm.com.br/2024/03/31/agencia-minas-gerais-reparacao-brumadinho-governo-de-minas-e-instituicoes-de-justica-fazem-novo-repasse-para-construcao-de-216-casas-populares-e-desenvolvimento-de-projetos-de-infraestrutura-e-saud
1win бонус на первый депозит [url=http://1win54038.help]http://1win54038.help[/url]
Этот увлекательный информационный материал подарит вам массу новых знаний и ярких эмоций. Мы собрали для вас интересные факты и сведения, которые обогатят ваш опыт. Откройте для себя увлекательный мир информации и насладитесь процессом изучения!
Детали по клику – https://balkondoek.net/verandazeil-met-deur/verandazeil-met-deur
прогулка на катере санкт петербург [url=https://arenda-yakhty-spb-1.ru/]прогулка на катере санкт петербург[/url] .
вывод из запоя в ростове на дону на дому [url=https://vyvod-iz-zapoya-v-rostove-2.ru/]vyvod-iz-zapoya-v-rostove-2.ru[/url] .
нарколог на дом без постановки на учет ростов [url=https://narkolog-na-dom-v-rostove-4.ru/]нарколог на дом без постановки на учет ростов[/url] .
срочный вызов нарколога на дом ростов [url=https://narkolog-na-dom-v-rostove-1.ru/]narkolog-na-dom-v-rostove-1.ru[/url] .
наркологическая клиника в ростове вывод из запоя [url=https://vyvod-iz-zapoya-v-rostove-1.ru/]vyvod-iz-zapoya-v-rostove-1.ru[/url] .
газовое пожаротушение монтаж с гарантией [url=https://montazh-gazovogo-pozharotusheniya-3.ru/]газовое пожаротушение монтаж с гарантией[/url] .
мелбет казино [url=https://melbetofficialbookmaker.ru/]мелбет казино[/url] .
вывод из запоя на дому в ростове на дону [url=https://vyvod-iz-zapoya-v-rostove-2.ru/]вывод из запоя на дому в ростове на дону[/url] .
мостбет отыгрыш бонуса [url=https://www.mostbet17403.help]https://www.mostbet17403.help[/url]
вывод из запоя в ростове на дону [url=https://vyvod-iz-zapoya-v-rostove-1.ru/]вывод из запоя в ростове на дону[/url] .
установка газового пожаротушения цена [url=https://montazh-gazovogo-pozharotusheniya-3.ru/]установка газового пожаротушения цена[/url] .
mostbet UZS [url=https://mostbet84629.help/]mostbet UZS[/url]
Наркологическая клиника — это медицинское учреждение, где лечение зависимости выстроено системно: от купирования острых симптомов до длительного сопровождения пациента. В клинике «ДальМедБаланс» терапия проводится под круглосуточным врачебным контролем, а ключевыми принципами являются безопасность, анонимность и индивидуальный подход. Каждый пациент проходит путь восстановления под наблюдением специалистов, которые учитывают физиологическое состояние, психоэмоциональные особенности и социальный контекст. Лечение направлено не только на избавление от физической зависимости, но и на возвращение мотивации к здоровой жизни.
Узнать больше – https://narkologicheskaya-klinika-v-khabarovske0.ru/chastnaya-narkologicheskaya-klinika-khabarovsk/
мостбет в Кыргызстане [url=http://mostbet94063.help]http://mostbet94063.help[/url]
стоимость написания курсовой работы на заказ [url=https://kupit-kursovuyu-83.ru/]kupit-kursovuyu-83.ru[/url] .
мостбет пополнение с humo [url=https://mostbet60172.help/]https://mostbet60172.help/[/url]
Каждый метод выбирается строго по показаниям. При необходимости врачи комбинируют медикаментозное лечение с психотерапией, физиопроцедурами и восстановительными программами. Это обеспечивает максимальную эффективность и безопасность терапии.
Углубиться в тему – [url=https://narkologicheskaya-klinika-v-khabarovske0.ru/]платная наркологическая клиника[/url]
Лечение в клинике «ДальМедБаланс» базируется на комплексном подходе. Каждый метод направлен на конкретную цель — детоксикацию, восстановление, стабилизацию и профилактику повторного употребления. Используются современные медицинские технологии и препараты с доказанной эффективностью. Таблица ниже описывает основные направления терапии и их результаты.
Ознакомиться с деталями – https://narkologicheskaya-klinika-v-khabarovske0.ru/
заказ курсовых работ [url=https://kupit-kursovuyu-83.ru/]заказ курсовых работ[/url] .
ремонт квартир недорого [url=https://remont-v-tyle.ru/]remont-v-tyle.ru[/url] .
купить курсовую москва [url=https://kupit-kursovuyu-88.ru/]купить курсовую москва[/url] .
написать курсовую работу на заказ в москве [url=https://kupit-kursovuyu-84.ru/]kupit-kursovuyu-84.ru[/url] .
курсовые под заказ [url=https://kupit-kursovuyu-86.ru/]kupit-kursovuyu-86.ru[/url] .
скачать мелбет на андроид [url=https://melbetofficialbookmaker.ru/]скачать мелбет на андроид[/url] .
курсовые купить [url=https://kupit-kursovuyu-87.ru/]курсовые купить[/url] .
mostbet home [url=www.mostbet53160.help]www.mostbet53160.help[/url]
mostbet pénztárca feltöltés [url=http://mostbet2023.help/]http://mostbet2023.help/[/url]
ремонт однокомнатной квартиры [url=https://remont-v-tyle.ru/]remont-v-tyle.ru[/url] .
стоимость написания курсовой работы на заказ [url=https://kupit-kursovuyu-88.ru/]kupit-kursovuyu-88.ru[/url] .
помощь студентам контрольные [url=https://kupit-kursovuyu-84.ru/]помощь студентам контрольные[/url] .
купить курсовую москва [url=https://kupit-kursovuyu-86.ru/]kupit-kursovuyu-86.ru[/url] .
заказ курсовых работ [url=https://kupit-kursovuyu-85.ru/]заказ курсовых работ[/url] .
Sprawdz poradnik [url=https://jaka-kamera-do-drona-fpv.neocities.org/]jaka kamere do drona fpv wybrac[/url], jesli szukasz najlepszych wskazowek przy wyborze kamery FPV na start.
Stabilne i amortyzowane mocowanie ogranicza ryzyko uszkodzen podczas intensywnego latania.
куплю курсовую работу [url=https://kupit-kursovuyu-87.ru/]куплю курсовую работу[/url] .
One point worth putting here before the rest, health does not wait for major events to matter, it shapes the routine parts of life long before anything dramatic happens, and that is where the real difference between functioning, coping, and actually feeling well tends to live. At the same time, exposure has become easy, while filtering, weighing, and applying information has become the harder task, and this is where the signal gets harder to separate from the noise. A lot of misunderstanding starts when summaries are treated as substitutes for understanding instead of shortcuts into it, so the body becomes harder to interpret not because it is random, but because the model being used is too broad to read it well. That is why what repeats across sleep, stress, food, movement, recovery, focus, and mood often tells a clearer story than any single disruption, so what is actually helping starts becoming visible enough to repeat and what is unhelpful starts becoming easier to stop. And this is exactly the sort of topic that loses too much when it is squeezed into a short summary with no room for variables, comparisons, and sequence. And one clearly defined example usually does more for understanding than a wide overview, because it gives the logic a place to show itself in full, a useful point of focus from here is how do you get cat scratch disease.
ремонт квартир цена [url=https://remont-v-tyle.ru/]remont-v-tyle.ru[/url] .
курсовой проект цена [url=https://kupit-kursovuyu-88.ru/]kupit-kursovuyu-88.ru[/url] .
1win balans tekshirish [url=https://1win5754.help]https://1win5754.help[/url]
студенческие работы на заказ [url=https://kupit-kursovuyu-86.ru/]kupit-kursovuyu-86.ru[/url] .
купить курсовую сайт [url=https://kupit-kursovuyu-84.ru/]купить курсовую сайт[/url] .
мелбет плинко киргизия [url=www.melbet47086.help]www.melbet47086.help[/url]
курсовые заказ [url=https://kupit-kursovuyu-87.ru/]kupit-kursovuyu-87.ru[/url] .
помощь курсовые [url=https://kupit-kursovuyu-85.ru/]помощь курсовые[/url] .
Такая система позволяет пройти все этапы восстановления безопасно, без перегрузки организма. Пациент получает медицинскую и психологическую помощь, что делает результат не временным, а устойчивым. Контроль состояния осуществляется непрерывно, что исключает риск осложнений и рецидивов.
Ознакомиться с деталями – [url=https://narkologicheskaya-klinika-v-khabarovske0.ru/]наркологическая клиника в хабаровске[/url]
купить задание для студентов [url=https://kupit-kursovuyu-89.ru/]kupit-kursovuyu-89.ru[/url] .
курсовая заказать недорого [url=https://kupit-kursovuyu-88.ru/]kupit-kursovuyu-88.ru[/url] .
1win verificare retragere [url=https://1win62509.help]1win verificare retragere[/url]
написание курсовых на заказ [url=https://kupit-kursovuyu-89.ru/]написание курсовых на заказ[/url] .
мостбет не приходит код подтверждения [url=http://mostbet82043.help]http://mostbet82043.help[/url]
продвижение сайтов в москве [url=https://prodvizhenie-sajtov-v-moskve17.ru/]продвижение сайтов в москве[/url] .
заказать курсовой проект [url=https://kupit-kursovuyu-89.ru/]заказать курсовой проект[/url] .
продвижение сайтов во франции [url=https://prodvizhenie-sajtov-v-moskve16.ru/]prodvizhenie-sajtov-v-moskve16.ru[/url] .
интернет раскрутка [url=https://prodvizhenie-sajtov-v-moskve17.ru/]prodvizhenie-sajtov-v-moskve17.ru[/url] .
заказать практическую работу недорого цены [url=https://kupit-kursovuyu-89.ru/]kupit-kursovuyu-89.ru[/url] .
компании занимающиеся продвижением сайтов [url=https://prodvizhenie-sajtov-v-moskve11.ru/]компании занимающиеся продвижением сайтов[/url] .
продвижение сайта [url=https://prodvizhenie-sajtov-v-moskve18.ru/]продвижение сайта[/url] .
помощь студентам контрольные [url=https://kupit-kursovuyu-90.ru/]помощь студентам контрольные[/url] .
цена курсовой работы [url=https://kupit-kursovuyu-88.ru/]цена курсовой работы[/url] .
ремонт квартир цена [url=https://remont-v-tyle.ru/]remont-v-tyle.ru[/url] .
написание курсовой работы на заказ цена [url=https://kupit-kursovuyu-86.ru/]kupit-kursovuyu-86.ru[/url] .
купить курсовую москва [url=https://kupit-kursovuyu-85.ru/]купить курсовую москва[/url] .
срочно курсовая работа [url=https://kupit-kursovuyu-84.ru/]kupit-kursovuyu-84.ru[/url] .
купить курсовую москва [url=https://kupit-kursovuyu-83.ru/]купить курсовую москва[/url] .
раскрутка сайта франция [url=https://prodvizhenie-sajtov-v-moskve11.ru/]prodvizhenie-sajtov-v-moskve11.ru[/url] .
курсовые заказ [url=https://kupit-kursovuyu-87.ru/]kupit-kursovuyu-87.ru[/url] .
заказать продвижение сайта в москве [url=https://prodvizhenie-sajtov-v-moskve18.ru/]заказать продвижение сайта в москве[/url] .
заказать курсовую работу [url=https://kupit-kursovuyu-89.ru/]заказать курсовую работу[/url] .
pin-up kirish sms kodi [url=www.pinup76809.help]pin-up kirish sms kodi[/url]
заказать студенческую работу [url=https://kupit-kursovuyu-90.ru/]заказать студенческую работу[/url] .
ремонт квартир в туле [url=https://remont-v-tyle.ru/]remont-v-tyle.ru[/url] .
сайт для заказа курсовых работ [url=https://kupit-kursovuyu-86.ru/]kupit-kursovuyu-86.ru[/url] .
заказать курсовую работу [url=https://kupit-kursovuyu-84.ru/]заказать курсовую работу[/url] .
продвижение сайтов в москве [url=https://prodvizhenie-sajtov-v-moskve16.ru/]продвижение сайтов в москве[/url] .
глубокий комлексный аудит сайта [url=https://prodvizhenie-sajtov-v-moskve11.ru/]глубокий комлексный аудит сайта[/url] .
помощь студентам курсовые [url=https://kupit-kursovuyu-83.ru/]kupit-kursovuyu-83.ru[/url] .
сайт для заказа курсовых работ [url=https://kupit-kursovuyu-85.ru/]сайт для заказа курсовых работ[/url] .
написать курсовую на заказ [url=https://kupit-kursovuyu-82.ru/]kupit-kursovuyu-82.ru[/url] .
seo partner [url=https://prodvizhenie-sajtov-v-moskve17.ru/]prodvizhenie-sajtov-v-moskve17.ru[/url] .
net seo [url=https://prodvizhenie-sajtov-v-moskve18.ru/]net seo[/url] .
курсовой проект купить цена [url=https://kupit-kursovuyu-87.ru/]kupit-kursovuyu-87.ru[/url] .
1win soporte méxico [url=https://www.1win5772.help]https://www.1win5772.help[/url]
1win nu merge [url=www.1win5758.help]www.1win5758.help[/url]
заказать качественную курсовую [url=https://kupit-kursovuyu-90.ru/]заказать качественную курсовую[/url] .
оптимизация и продвижение сайтов москва [url=https://prodvizhenie-sajtov-v-moskve16.ru/]оптимизация и продвижение сайтов москва[/url] .
seo агентство [url=https://prodvizhenie-sajtov-v-moskve11.ru/]seo агентство[/url] .
internetagentur seo [url=https://prodvizhenie-sajtov-v-moskve18.ru/]internetagentur seo[/url] .
оптимизация и seo продвижение сайтов москва [url=https://prodvizhenie-sajtov-v-moskve17.ru/]оптимизация и seo продвижение сайтов москва[/url] .
заказать курсовую срочно [url=https://kupit-kursovuyu-81.ru/]заказать курсовую срочно[/url] .
написание курсовой на заказ цена [url=https://kupit-kursovuyu-90.ru/]написание курсовой на заказ цена[/url] .
усиление ссылок переходами [url=https://prodvizhenie-sajtov-v-moskve11.ru/]prodvizhenie-sajtov-v-moskve11.ru[/url] .
продвижение сайта [url=https://prodvizhenie-sajtov-v-moskve16.ru/]продвижение сайта[/url] .
продвижение сайта франция [url=https://prodvizhenie-sajtov-v-moskve18.ru/]prodvizhenie-sajtov-v-moskve18.ru[/url] .
продвижение сайта [url=https://prodvizhenie-sajtov-v-moskve17.ru/]продвижение сайта[/url] .
купить курсовую москва [url=https://kupit-kursovuyu-90.ru/]купить курсовую москва[/url] .
net seo [url=https://prodvizhenie-sajtov-v-moskve16.ru/]net seo[/url] .
1win verify account Uganda [url=https://1win5742.help]1win verify account Uganda[/url]
mostbet support polska [url=http://mostbet2003.help/]mostbet support polska[/url]
суши [url=https://dzen.ru/a/aaaXcJgFmBqFa6Xp/]суши[/url] .
1win app ios [url=https://www.1win62509.help]https://www.1win62509.help[/url]
роллы суши [url=https://dzen.ru/a/aaaLIkWy4T8i4DiJ/]роллы суши[/url] .
pin-up rasmiy ko‘zgusi [url=https://pinup23185.help]https://pinup23185.help[/url]
статьи о маркетинге [url=https://seo-blog20.ru/]статьи о маркетинге[/url] .
сео блог [url=https://seo-blog21.ru/]seo-blog21.ru[/url] .
суши роллы [url=https://dzen.ru/a/aaaVDMh-Z2J09fpp/]суши роллы[/url] .
интернет партнер [url=https://prodvizhenie-sajtov-po-trafiku10.ru/]интернет партнер[/url] .
суши [url=https://dzen.ru/a/aaaLIkWy4T8i4DiJ/]суши[/url] .
роллы спб [url=https://dzen.ru/a/aaaOxJAQRHcKrBx3/]роллы спб[/url] .
1win paysafecard [url=https://www.1win5772.help]1win paysafecard[/url]
1win apk surse necunoscute android [url=https://1win5758.help/]https://1win5758.help/[/url]
прогулки по неве в питере [url=https://vodnyye-progulki-v-spb.ru/]прогулки по неве в питере[/url] .
суши бесплатная доставка [url=https://dzen.ru/a/aaaXcJgFmBqFa6Xp/]суши бесплатная доставка[/url] .
руководства по seo [url=https://seo-blog21.ru/]seo-blog21.ru[/url] .
материалы по маркетингу [url=https://seo-blog20.ru/]материалы по маркетингу[/url] .
заказать суши [url=https://dzen.ru/a/aaaVDMh-Z2J09fpp/]заказать суши[/url] .
Этот документ охватывает важные аспекты медицинской науки, сосредотачиваясь на ключевых вопросах, касающихся здоровья населения. Мы рассматриваем свежие исследования, клинические рекомендации и лучшие практики, которые помогут улучшить качество лечения и профилактики заболеваний. Читатели получат возможность углубиться в различные медицинские дисциплины.
Разобраться лучше – http://google.im/url?sa=t&url=https://vozrojdenie.site/prinuditelnoe-lechenie-alkogolizma
seo информационных порталов [url=https://prodvizhenie-sajtov-po-trafiku10.ru/]prodvizhenie-sajtov-po-trafiku10.ru[/url] .
роллы москва [url=https://dzen.ru/a/aaaLIkWy4T8i4DiJ/]роллы москва[/url] .
роллы доставка спб недорого [url=https://dzen.ru/a/aaaOxJAQRHcKrBx3/]роллы доставка спб недорого[/url] .
блог про продвижение сайтов [url=https://seo-blog21.ru/]блог про продвижение сайтов[/url] .
Looking stylish creates a positive first impression.
Your outfit speaks loudly before a person actually speak a single word.
This enhances your own confidence and mindset noticeably.
Your polished appearance conveys competence in the office.
сумка Джимми Чу
Fashionable clothing let you to express your unique identity.
People often perceive well-dressed people as more successful and trustworthy.
Ultimately, investing in your wardrobe is an investment in yourself.
прогулка на теплоходе санкт петербург [url=https://vodnyye-progulki-v-spb.ru/]прогулка на теплоходе санкт петербург[/url] .
набор суши москва заказать [url=https://dzen.ru/a/aaaXcJgFmBqFa6Xp/]набор суши москва заказать[/url] .
статьи о маркетинге [url=https://seo-blog20.ru/]статьи о маркетинге[/url] .
мостбет Талас [url=www.mostbet34518.help]www.mostbet34518.help[/url]
https://betwarrior.cat/
En 2026, el operador BetWarrior se afianza como una de las opciones de casino online y apuestas deportivas mas populares de Argentina, ofreciendo una oferta inicial de hasta $500.000 ARS para nuevos jugadores. Al contar con habilitacion oficial y un compromiso en la seguridad, el sitio garantiza una experiencia de juego sin vueltas y confiable para el publico local. Los usuarios pueden disfrutar de miles de juegos de proveedores de elite como Evolution y Pragmatic Play, participar en apuestas deportivas en vivo y administrar su dinero comodamente en pesos argentinos, todo ello desde una aplicacion movil disenada para Android e iOS.
заказать роллы в спб [url=https://dzen.ru/a/aaaOxJAQRHcKrBx3/]заказать роллы в спб[/url] .
экскурсия по питеру на теплоходе [url=https://vodnyye-progulki-v-spb.ru/]экскурсия по питеру на теплоходе[/url] .
доставка суши [url=https://dzen.ru/a/aaaXcJgFmBqFa6Xp/]доставка суши[/url] .
блог агентства интернет-маркетинга [url=https://seo-blog20.ru/]блог агентства интернет-маркетинга[/url] .
seo top 1 [url=https://seo-kejsy16.ru/]seo-kejsy16.ru[/url] .
как продать сайт [url=https://kak-prodat-sajt-1.ru/]как продать сайт[/url] .
прогулки на катерах в санкт петербурге [url=https://vodnyye-progulki-v-spb.ru/]vodnyye-progulki-v-spb.ru[/url] .
пицца и суши доставка москва акции [url=https://dzen.ru/a/aaaXcJgFmBqFa6Xp/]пицца и суши доставка москва акции[/url] .
успешные seo кейсы санкт петербург [url=https://seo-kejsy16.ru/]успешные seo кейсы санкт петербург[/url] .
аукцион сайтов [url=https://kak-prodat-sajt-1.ru/]аукцион сайтов[/url] .
ночная экскурсия по санкт петербургу на теплоходе [url=https://vodnyye-progulki-v-spb.ru/]vodnyye-progulki-v-spb.ru[/url] .
роллы недорого спб [url=https://dzen.ru/a/aaaOxJAQRHcKrBx3/]роллы недорого спб[/url] .
заказ суши [url=https://dzen.ru/a/aaaVDMh-Z2J09fpp/]заказ суши[/url] .
роллы [url=https://dzen.ru/a/aaaLIkWy4T8i4DiJ/]роллы[/url] .
seo и реклама блог [url=https://seo-blog21.ru/]seo-blog21.ru[/url] .
продвижение по трафику сео [url=https://prodvizhenie-sajtov-po-trafiku10.ru/]prodvizhenie-sajtov-po-trafiku10.ru[/url] .
продвижение сайтов бизнес [url=https://kak-prodat-sajt.ru/]kak-prodat-sajt.ru[/url] .
компании по продвижению сайта [url=https://seo-prodvizhenie-reiting.ru/]seo-prodvizhenie-reiting.ru[/url] .
рейтинг агентств продвижения [url=https://luchshie-digital-agencstva.ru/]luchshie-digital-agencstva.ru[/url] .
роллы бесплатная доставка спб [url=https://dzen.ru/a/aaaOxJAQRHcKrBx3/]роллы бесплатная доставка спб[/url] .
1win apk linki [url=http://1win5764.help]http://1win5764.help[/url]
доставка суши спб круглосуточно [url=https://dzen.ru/a/aaaVDMh-Z2J09fpp/]доставка суши спб круглосуточно[/url] .
мелбет кз киберспорт лайв [url=https://melbet39518.help/]https://melbet39518.help/[/url]
доставка суши [url=https://dzen.ru/a/aaaLIkWy4T8i4DiJ/]доставка суши[/url] .
руководства по seo [url=https://seo-blog21.ru/]seo-blog21.ru[/url] .
seo group [url=https://seo-prodvizhenie-reiting.ru/]seo-prodvizhenie-reiting.ru[/url] .
seo продвижение по трафику [url=https://prodvizhenie-sajtov-po-trafiku10.ru/]seo продвижение по трафику[/url] .
where internet partner [url=https://prodvizhenie-sajtov-po-trafiku11.ru/]prodvizhenie-sajtov-po-trafiku11.ru[/url] .
как продавать сайты [url=https://kak-prodat-sajt.ru/]как продавать сайты[/url] .
гибридная структура сайта [url=https://seo-kejsy16.ru/]seo-kejsy16.ru[/url] .
cum sa ma inregistrez pe melbet [url=https://www.melbet75891.help]https://www.melbet75891.help[/url]
mostbet kazino giriş [url=mostbet85214.help]mostbet85214.help[/url]
топ seo [url=https://seo-prodvizhenie-reiting.ru/]топ seo[/url] .
набор суши акции спб [url=https://dzen.ru/a/aaaVDMh-Z2J09fpp/]набор суши акции спб[/url] .
гибридная структура сайта [url=https://seo-kejsy17.ru/]seo-kejsy17.ru[/url] .
рейтинг агентств digital россии [url=https://luchshie-digital-agencstva.ru/]luchshie-digital-agencstva.ru[/url] .
продажа сайта [url=https://kak-prodat-sajt-1.ru/]kak-prodat-sajt-1.ru[/url] .
1win account settings [url=https://1win5524.ru/]https://1win5524.ru/[/url]
сео продвижение сайтов по трафику [url=https://prodvizhenie-sajtov-po-trafiku10.ru/]prodvizhenie-sajtov-po-trafiku10.ru[/url] .
net seo [url=https://prodvizhenie-sajtov-po-trafiku11.ru/]net seo[/url] .
mostbet věrnostní program [url=https://www.mostbet2017.help]https://www.mostbet2017.help[/url]
современные seo кейсы [url=https://seo-kejsy16.ru/]seo-kejsy16.ru[/url] .
seo рейтинг [url=https://seo-prodvizhenie-reiting.ru/]seo рейтинг[/url] .
где продать сайт [url=https://kak-prodat-sajt.ru/]где продать сайт[/url] .
mostbet p2p yechish [url=http://mostbet02894.help/]http://mostbet02894.help/[/url]
аукцион сайтов [url=https://kak-prodat-sajt-1.ru/]аукцион сайтов[/url] .
топ агентств seo продвижения [url=https://reiting-seo-kompanii.ru/]топ агентств seo продвижения[/url] .
многоуровневый линкбилдинг [url=https://seo-kejsy16.ru/]seo-kejsy16.ru[/url] .
где продавать сайты [url=https://kak-prodat-sajt.ru/]где продавать сайты[/url] .
биржа сайтов [url=https://kak-prodat-sajt-1.ru/]биржа сайтов[/url] .
seo продвижение рейтинг компаний [url=https://reiting-seo-kompanii.ru/]seo продвижение рейтинг компаний[/url] .
как продавать сайты [url=https://kak-prodat-sajt.ru/]как продавать сайты[/url] .
глубокий комлексный аудит сайта [url=https://aboutan.ru/biznes/prodvizhenie-sayta-v-gugl-sovremennye-algoritmy-i-prakticheskoe-rukovodstvo.html]глубокий комлексный аудит сайта[/url] .
рейтинг seo [url=https://seo-prodvizhenie-reiting.ru/]рейтинг seo[/url] .
1win mərc nəticələri [url=https://1win34861.help/]https://1win34861.help/[/url]
продвижение сайта в топ по трафику [url=https://prodvizhenie-sajtov-po-trafiku11.ru/]prodvizhenie-sajtov-po-trafiku11.ru[/url] .
рейтинг агентств россии [url=https://luchshie-digital-agencstva.ru/]рейтинг агентств россии[/url] .
рейтинг спортивных сайтов [url=https://seo-kejsy17.ru/]рейтинг спортивных сайтов[/url] .
стратегия продвижения блог [url=https://webproverka.com/index-articles.php/]стратегия продвижения блог[/url] .
seo agencies ranking [url=https://reiting-seo-kompaniy.ru/]seo agencies ranking[/url] .
Эта публикация исследует взаимосвязь зависимости и психологии. Мы обсудим, как психологические аспекты влияют на появление зависимостей и процесс выздоровления. Читатели смогут понять важность профессиональной поддержки и применения научных подходов в терапии.
Узнать больше – http://google.gr/url?q=https://vozrojdenie.site/lechenie-narkomanii
В данной статье рассматриваются проблемы общественного здоровья и социальные факторы, влияющие на него. Мы акцентируем внимание на значении профилактики и осведомленности в защите здоровья на уровне общества. Читатели смогут узнать о новых инициативах и программах, направленных на улучшение здоровья населения.
Ознакомиться с деталями – http://google.ba/url?q=https://vozrojdenie.site/detoksikatsiya-ot-narkotikov
интернет агентства [url=https://luchshie-digital-agencstva.ru/]интернет агентства[/url] .
melbet результаты матчей [url=www.melbet06374.help]www.melbet06374.help[/url]
услуги продвижения сайта clover [url=https://prodvizhenie-sajtov-po-trafiku11.ru/]prodvizhenie-sajtov-po-trafiku11.ru[/url] .
digital маркетинг блог [url=https://webproverka.com/index-articles.php/]digital маркетинг блог[/url] .
интернет раскрутка [url=https://newsomsk.ru/news/152386-seo_moskva_realny_keys_rosta_lokalnogo_brenda_s_ud/]интернет раскрутка[/url] .
internetagentur seo [url=https://stars-top.ru/effektivnoe-prodvizhenie-sajtov-v-moskve-strategii-dlya-liderstva/]internetagentur seo[/url] .
заказать анализ сайта [url=https://gorodpavlodar.kz/News_110307_3.html]заказать анализ сайта[/url] .
создать сайт прогнозов на спорт в москве [url=https://seo-kejsy17.ru/]создать сайт прогнозов на спорт в москве[/url] .
получить короткую ссылку google [url=https://aksport.ru/catalog/raznoe/2025/seo-keys_kak_novostnoy_format_13_11_2025.php/]получить короткую ссылку google[/url] .
список seo агентств [url=https://reiting-seo-kompanii.ru/]список seo агентств[/url] .
как вывести деньги с mostbet [url=https://mostbet4151.ru]https://mostbet4151.ru[/url]
рейтинг агентств digital рекламы [url=https://luchshie-digital-agencstva.ru/]luchshie-digital-agencstva.ru[/url] .
сео продвижение сайтов по трафику [url=https://prodvizhenie-sajtov-po-trafiku11.ru/]prodvizhenie-sajtov-po-trafiku11.ru[/url] .
блог о рекламе и аналитике [url=https://webproverka.com/index-articles.php/]блог о рекламе и аналитике[/url] .
оптимизация сайта франция цена [url=http://ahmatova.niv.ru/public/180/int-net-partner/]оптимизация сайта франция цена[/url] .
частный seo оптимизатор [url=https://madwrappers.pro/blog/kak-vybrat-nadezhnogo-partnera-v-tsifrovom-mire/]частный seo оптимизатор[/url] .
internet seo [url=https://e-news.su/kompyuternye-obzory-i-poleznosti/489441-chto-takoe-prodvizhenie-sajta.html]internet seo[/url] .
melbet промокод при регистрации [url=https://melbet81573.help/]melbet промокод при регистрации[/url]
закупка ссылок в гугл заказать услугу агентство [url=https://aksport.ru/catalog/raznoe/2025/seo-keys_kak_novostnoy_format_13_11_2025.php/]закупка ссылок в гугл заказать услугу агентство[/url] .
seo optimization agency [url=https://reiting-seo-kompanii.ru/]reiting-seo-kompanii.ru[/url] .
оптимизация сайта франция цена [url=http://ahmatova.niv.ru/public/180/int-net-partner/]оптимизация сайта франция цена[/url] .
глубокий комлексный аудит сайта [url=https://web-lesson.ru/prodvizhenie-sajta-agentstvo-moskva-kak-vybrat-gramotno-agentstvo/]глубокий комлексный аудит сайта[/url] .
глубокий комлексный аудит сайта [url=https://lrnews.ru/press-reliz/171246-raskrytie-vozmozhnostey-prodvizheniya-veb-saytov.html]глубокий комлексный аудит сайта[/url] .
В этой публикации мы предложим ряд рекомендаций по избавлению от зависимостей и успешному восстановлению. Мы обсудим методы привлечения поддержки и важность самосознания. Эти советы помогут людям вернуться к нормальной жизни и стать на путь выздоровления.
Углубиться в тему – http://google.sm/url?q=https://vozrojdenie.site/lechenie-ot-amfetamina
продвижение сайтов интернет магазины в москве [url=https://golubevod.net/seo-agentstvo-moskva.html]продвижение сайтов интернет магазины в москве[/url] .
seo аудит веб сайта [url=https://new-sebastopol.com/news/id/60079]seo аудит веб сайта[/url] .
seo agency ranking [url=https://reiting-seo-kompanii.ru/]reiting-seo-kompanii.ru[/url] .
net seo [url=https://advesti.ru/news/internet/agentstvo_prodvizhenie_saytov_kak_rabotaet_sovremennoe_SEO_i_zachem_ono_biznesu_28-07-2025/]net seo[/url] .
продвижения сайта в google [url=https://nvdaily.ru/info/314202.html]продвижения сайта в google[/url] .
продвижение сайтов во франции [url=https://loveshtory.com/svoimi-rukami/stati/provedenie-tehnicheskogo-audita-sajta-kljuchevye-shagi-i-rekomendacii/]продвижение сайтов во франции[/url] .
компания seo [url=https://reiting-seo-kompaniy.ru/]reiting-seo-kompaniy.ru[/url] .
internet seo [url=https://golubevod.net/seo-agentstvo-moskva.html]internet seo[/url] .
1win promo events [url=www.1win76138.help]www.1win76138.help[/url]
seo продвижение магазин наушников [url=https://seo-kejsy17.ru/]seo-kejsy17.ru[/url] .
1win parolni qanday tiklash [url=http://1win5768.help/]http://1win5768.help/[/url]
мостбет Талас [url=http://mostbet27541.help]http://mostbet27541.help[/url]
vavada aviator [url=http://vavada56378.help/]http://vavada56378.help/[/url]
успешные seo кейсы санкт петербург [url=https://aksport.ru/catalog/raznoe/2025/seo-keys_kak_novostnoy_format_13_11_2025.php/]успешные seo кейсы санкт петербург[/url] .
net seo [url=https://e-news.su/kompyuternye-obzory-i-poleznosti/489441-chto-takoe-prodvizhenie-sajta.html]net seo[/url] .
оптимизация и seo продвижение сайтов москва [url=https://sunmuseum.ru/novosti/40825-tehnicheskiy-audit-sayta-klyuch-k-uspehu-onlayn-proektov.html]оптимизация и seo продвижение сайтов москва[/url] .
Для наглядности представлен примерный состав инфузионного раствора, используемого при выводе из запоя:
Ознакомиться с деталями – [url=https://vyvod-iz-zapoya-v-rostove-na-donu16.ru/]вывод из запоя круглосуточно в ростове-на-дону[/url]
Наши специалисты оценивают клинические признаки запоя уже при первом осмотре — измеряют пульс, артериальное давление и насыщение кислородом, осматривают кожу и слизистые оболочки на предмет обезвоживания. Специальные тесты на когнитивные функции позволяют определить степень дезориентации и риск развития острых психотических реакций.
Ознакомиться с деталями – http://тайный-вывод-из-запоя.рф/
продвижение сайтов в москве [url=https://tyumen-news.net/other/2025/07/15/509294.html]продвижение сайтов в москве[/url] .
Решение о срочном выезде принимается не из «желания поторопиться», а когда домашняя стабилизация действительно снижает риски. Ниже — ориентиры, при которых не стоит откладывать звонок. Любой из перечисленных признаков — повод для консультации, а их сочетание — для немедленного осмотра.
Исследовать вопрос подробнее – https://narkologicheskaya-pomoshh-v-kazani16.ru/narkologicheskaya-sluzhba-kazan/
Чтобы помощь была прозрачной и управляемой, каждый этап имеет цель, индикаторы безопасности и эффективности, а также понятное «окно оценки» результата. Коррекции проводятся «штучно», по правилу одного изменения — это защищает от полипрагмазии и позволяет читабельно видеть вклад каждого шага.
Ознакомиться с деталями – [url=https://vyvod-iz-zapoya-v-kazani16.ru/]vyvod-iz-zapoya-v-kazani16.ru/[/url]
Перед выездом проводится уточнение симптомов и общего состояния пациента, что помогает врачу подготовиться к визиту и взять необходимый набор медикаментов.
Ознакомиться с деталями – [url=https://narkolog-na-dom-khabarovsk0.ru/]вызвать нарколога на дом срочно хабаровск[/url]
В Тольятти клиника «АвтоГрад МедСтаб» предлагает круглосуточный вывод из запоя для пациентов любой степени тяжести состояния. Лечение проводится как в стационаре, так и с выездом нарколога на дом. При поступлении пациента специалисты оценивают жизненные показатели, уровень интоксикации, наличие сопутствующих заболеваний и составляют персональную схему терапии. Основная цель — стабилизация состояния, устранение последствий алкогольной интоксикации и предотвращение осложнений со стороны сердца, печени и мозга.
Детальнее – [url=https://vyvod-iz-zapoya-tolyatti0.ru/]помощь вывод из запоя в тольятти[/url]
Looking well projects a positive first impression.
Your attire speaks loudly before you actually say a single word.
It boosts your own self-esteem and mood significantly.
Your polished look signals competence in the office.
https://jack.qrmoda.ru/kak-demna-gvasaliya-izmenil-predstavlenie-o-gendernoy-odezhde-9003747/
Fashionable clothing let you to showcase your individual personality.
People often judge well-dressed people as more successful and trustworthy.
Therefore, investing in your wardrobe is an investment in yourself.
ranking seo [url=https://reiting-seo-kompaniy.ru/]ranking seo[/url] .
Система взаимоподдержки позволяет быстро реагировать на риск рецидива и мотивирует пациента продолжать путь к трезвости даже в моменты слабости.
Подробнее можно узнать тут – http://lechenie-alkogolizma-sochi0.ru/lechenie-alkogolizma-anonimno-v-sochi/
профессиональное продвижение сайтов [url=https://mateshka.ru/seo-prodvizhenie-saytov-agentstvo.html]профессиональное продвижение сайтов[/url] .
seo partner [url=https://svestnik.kz/raskrutka-sajtov-moskva-strategiya-vykhoda-v-konkurentnyj-segment-stolitsy/]seo partner[/url] .
Доктор проводит физикальное обследование, замеряет АД, пульс, сатурацию и температуру. Параллельно выполняются экспресс-анализы крови и мочи, которые позволяют выявить нарушения электролитов, работу печени и почек.
Получить дополнительные сведения – https://качество-вывод-из-запоя.рф/vyvod-iz-zapoya-czena-v-permi
поисковое продвижение москва профессиональное продвижение сайтов [url=https://andreyex.ru/uslugi/seo-prodvizhenie-sajtov/]поисковое продвижение москва профессиональное продвижение сайтов[/url] .
успешные кейсы seo [url=https://seo-kejsy17.ru/]успешные кейсы seo[/url] .
Диагностическая оценка позволяет определить степень интоксикации и выявить возможные риски осложнённого течения состояния.
Исследовать вопрос подробнее – [url=https://vyvod-iz-zapoya-v-tolyatti0.ru/]вывод из запоя на дому цена в тольятти[/url]
интернет раскрутка [url=https://gorodpavlodar.kz/News_110307_3.html]интернет раскрутка[/url] .
Этапы терапии выглядят следующим образом:
Получить дополнительные сведения – https://narkologicheskaya-klinika-v-samare16.ru/narkologicheskij-dispanser-g-samara
Клиника «АмурМед Контур» в Хабаровске предлагает комплексную детоксикацию организма, которая включает инфузионную терапию, стабилизацию жизненно важных показателей и коррекцию эмоционального состояния. Каждому пациенту подбирается индивидуальная схема капельниц с учётом возраста, массы тела, стажа употребления алкоголя и хронических заболеваний. Процедуры проводятся в условиях полной конфиденциальности и под постоянным наблюдением специалистов. Медицинская команда контролирует артериальное давление, уровень сатурации, частоту пульса и показатели крови на протяжении всего периода восстановления.
Получить больше информации – [url=https://vyvod-iz-zapoya-v-khabarovske0.ru/]вывод из запоя на дому в хабаровске[/url]
mostbet depozit qabul qilinmadi [url=https://mostbet24618.help]mostbet depozit qabul qilinmadi[/url]
После основной терапии важно обеспечить поддержку пациента в период реабилитации. Реабилитационные программы в Краснодаре включают социальную адаптацию, восстановление навыков общения и трудоустройства. Это позволяет минимизировать риск рецидива и возвращения к употреблению алкоголя. Поддержка со стороны специалистов и близких — обязательное условие успешного результата. Более подробно о социальной реабилитации можно ознакомиться на сайте Федерального реабилитационного центра.
Выяснить больше – [url=https://lechenie-alkogolizma-krasnodar00.ru/]клиника лечения алкоголизма в краснодаре[/url]
В «ЛадаМед Выезд» при оказании наркологической помощи на дому используются современные препараты и методы дезинтоксикации. Ниже приведена таблица с основными видами терапии и их эффектами.
Узнать больше – [url=https://narkolog-na-dom-tolyatti0.ru/]вызвать нарколога на дом срочно[/url]
поисковое продвижение сайта в интернете москва [url=https://golubevod.net/seo-agentstvo-moskva.html]поисковое продвижение сайта в интернете москва[/url] .
Наркологическая клиника в Тольятти рассматривается как профильное медицинское звено, ориентированное на лечение алкогольной и наркотической зависимости с учётом клинических особенностей пациента. В клинике «Гармония Волги» медицинская помощь выстраивается на основе диагностики, поэтапной терапии и врачебного наблюдения, что позволяет контролировать состояние пациента на всех этапах лечения.
Подробнее – [url=https://narkologicheskaya-klinika-v-tolyatti0.ru/]наркологическая клиника клиника помощь[/url]
В этой статье мы рассматриваем разные способы борьбы с алкогольной зависимостью. Обсуждаются методы лечения, программы реабилитации и советы для поддержки близких. Читатели получат информацию о том, как преодолеть зависимость и добиться успешного выздоровления.
Узнайте всю правду – [url=https://formula-clinic.ru/stati/alkohol-razrushenie-pecheni-cirroz.html]алкоголь вызывает цирроз печени[/url]
В клинике применяются инновационные методы диагностики, включая лабораторные анализы и аппаратные исследования, которые позволяют выявить степень зависимости и сопутствующие патологии. Важным этапом является комплексный подход к лечению, включающий детоксикацию организма, психотерапию и медикаментозную поддержку.
Получить больше информации – [url=https://narkologicheskaya-klinika-krasnodar00.ru/]наркологическая клиника клиника помощь[/url]
Сразу важно проговорить: кодирование — это «замок» на поведение и физиологию, который помогает удержать ремиссию, пока человек выстраивает новые привычки и восстанавливает качество жизни. Поэтому эффект процедуры прямо зависит от того, насколько грамотно выстроены подготовка, информирование и поддержка после вмешательства. «НеоТрезвие СПБ» делает акцент на постепенности: один этап — одна цель — один прозрачный маркер успеха.
Углубиться в тему – https://kodirovanie-ot-alkogolizma-v-spb16.ru/kodirovanie-ot-alkogolizma-v-sankt-peterburge-czeny/
seo partner [url=https://lrnews.ru/press-reliz/171246-raskrytie-vozmozhnostey-prodvizheniya-veb-saytov.html]seo partner[/url] .
Медицинский подход к выводу из запоя предполагает не только устранение внешних симптомов, но и стабилизацию внутренних процессов организма, что особенно важно при повторяющихся или затяжных эпизодах.
Подробнее – [url=https://vyvod-iz-zapoya-v-tolyatti0.ru/]вывод из запоя в стационаре[/url]
Первичный этап заключается в оценке состояния пациента и быстром подборе схемы инфузионной терапии. Врач фиксирует показания ЭКГ, сатурацию кислорода и биохимический параметр глюкозы в крови. После этого подключается капельница с раствором для выведения продуктов распада алкоголя и одновременной коррекции показателей обмена веществ. Последующие визиты врача позволяют скорректировать терапию и предотвратить развитие побочных реакций.
Детальнее – [url=https://narkologicheskaya-pomoshh-ekaterinburg0.ru/]платная наркологическая помощь в екатеринбурге[/url]
Сайты для взрослых функционируют как отдельные платформы с строгими ограничениями.
Их основная цель — гарантировать доступ к контенту, предназначенному исключительно взрослой публике.
Такие веб-сайты предоставляют возможность создателям публиковать произведения, не предназначенные для детей.
Они играют и просветительскую роль в сфере отношений.
Администраторы подобных проектов обязаны выполнять законодательные требования о распространении чувствительного контента.
Кроме того, эти порталы часто используют специальные системы верификации возраста.
Таким образом, существование таких ресурсов — это реакция на природный спрос конкретной категории граждан.
лесбиянки фото
В медицинской практике применяются разнообразные методы, позволяющие эффективно бороться с зависимостью. К ним относятся медикаментозная терапия, психотерапия, социальная реабилитация и физиотерапевтические процедуры. Медикаментозное лечение помогает снять острые симптомы интоксикации и предотвратить развитие осложнений, что подтверждают данные исследований на Национальном медицинском портале.
Узнать больше – [url=https://lechenie-alkogolizma-sochi00.ru/]принудительное лечение от алкоголизма сочи[/url]
Betmexico se consolida en 2026 como el casino virtual y casa de apuestas deportivas referente para el mercado mexicano, sobresaliendo por su innovador bono sin deposito de $50 MXN libre de rollover, una iniciativa sin precedentes que suprime las complicaciones tipicas de la rivalidad.
Запой — угрожающее здоровью состояние, при котором человек теряет контроль над употреблением алкоголя, подвергая организм серьёзной интоксикации. Клиника «ПрофМед» в Перми предлагает специализированную помощь при выводе из запоя с соблюдением всех стандартов безопасности, строгой конфиденциальности и высокой квалификации персонала. Независимо от тяжести состояния пациента, специалисты клиники применяют современные методики детоксикации и поддерживают психологический комфорт, чтобы каждый мог начать новый этап жизни без страха и стыда.
Узнать больше – http://
Каждый пациент проходит последовательный процесс лечения, где основное внимание уделяется безопасности, контролю состояния и постепенной адаптации. При поступлении проводится диагностика с оценкой степени зависимости, сопутствующих патологий и психологических факторов, влияющих на развитие заболевания. На основании полученных данных формируется персонализированный план терапии, включающий медикаментозные и немедикаментозные методы.
Разобраться лучше – https://narkologicheskaya-klinika-v-spb16.ru/narkologicheskie-dispansery-sankt-peterburga/
глубокий комлексный аудит сайта [url=https://prodvizhenie-sajtov-v-moskve15.ru/]prodvizhenie-sajtov-v-moskve15.ru[/url] .
melbet вывести деньги без верификации [url=http://melbet36290.help]http://melbet36290.help[/url]
Все методики подбираются строго индивидуально. Комбинация физиологической и психотерапевтической поддержки помогает восстановить здоровье и устойчивость пациента. Такой подход снижает вероятность рецидивов и способствует длительному сохранению трезвости.
Подробнее – [url=https://narkologicheskaya-klinika-tolyatti0.ru/]лечение в наркологической клинике тольятти[/url]
Диагностическая оценка позволяет определить степень интоксикации и выявить возможные риски осложнённого течения состояния.
Подробнее тут – [url=https://vyvod-iz-zapoya-v-tolyatti0.ru/]анонимный вывод из запоя[/url]
Каждый пациент проходит несколько последовательных этапов, направленных на очищение организма, стабилизацию эмоционального состояния и формирование стойкой мотивации к трезвой жизни. Такой подход позволяет не только устранить физическую зависимость, но и укрепить психическую устойчивость.
Узнать больше – [url=https://narkologicheskaya-klinika-v-samare16.ru/]наркологическая клиника клиника помощь в самаре[/url]
аудит продвижения сайта [url=https://itcrumbs.ru/poiskovoe-seo-v-moskve_103716]аудит продвижения сайта[/url] .
Комбинированное воздействие обеспечивает быстрое улучшение состояния пациента и позволяет стабилизировать организм даже при тяжёлой интоксикации. Врач контролирует все реакции и корректирует дозировки при необходимости.
Углубиться в тему – http://narkolog-na-dom-tolyatti0.ru/tolyatti-narkologicheskij-dispanser/https://narkolog-na-dom-tolyatti0.ru
В современной наркологии применяется широкий спектр методов, позволяющих эффективно бороться с алкогольной зависимостью. В Краснодаре для этого используются как медикаментозные, так и психотерапевтические подходы, которые сочетаются для достижения стабильной ремиссии. Подробнее о методах лечения можно узнать на сайте Всемирной организации здравоохранения.
Подробнее – https://lechenie-alkogolizma-krasnodar00.ru/lechenie-alkogolizma-anonimno-krasnodar
Каждый пациент проходит несколько последовательных этапов, направленных на очищение организма, стабилизацию эмоционального состояния и формирование стойкой мотивации к трезвой жизни. Такой подход позволяет не только устранить физическую зависимость, но и укрепить психическую устойчивость.
Исследовать вопрос подробнее – http://narkologicheskaya-klinika-v-samare16.ru
Клиника «ЛадаМед Выезд» в Тольятти организует оперативные визиты врачей на дом в течение 30–60 минут после обращения. Выездная бригада оснащена необходимыми средствами для проведения инфузионной терапии, контроля давления, пульса и уровня кислорода в крови. Медицинская помощь оказывается в спокойной обстановке с соблюдением конфиденциальности. При необходимости врач оставляет рекомендации по дальнейшему восстановлению и назначает повторный визит для закрепления эффекта.
Получить дополнительную информацию – [url=https://narkolog-na-dom-tolyatti0.ru/]выезд нарколога на дом тольятти[/url]
seo network [url=https://prodvizhenie-sajtov-v-moskve15.ru/]prodvizhenie-sajtov-v-moskve15.ru[/url] .
Решение о кодировании принимает врач после очной оценки. Методика подбирается индивидуально, с обязательным информированным согласием. Ниже — ориентиры, помогающие понять, когда процедура уместна, а когда стоит отложить или выбрать альтернативу.
Получить дополнительные сведения – [url=https://kodirovanie-ot-alkogolizma-v-spb16.ru/]кодирование от алкоголизма отзывы цены в санкт-петербурге[/url]
sweet bonanza crash mx [url=http://sweet-bonanza18364.help/]http://sweet-bonanza18364.help/[/url]
В современной наркологии применяется широкий спектр методов, позволяющих эффективно бороться с алкогольной зависимостью. В Краснодаре для этого используются как медикаментозные, так и психотерапевтические подходы, которые сочетаются для достижения стабильной ремиссии. Подробнее о методах лечения можно узнать на сайте Всемирной организации здравоохранения.
Разобраться лучше – https://lechenie-alkogolizma-krasnodar00.ru/lechenie-khronicheskogo-alkogolizma-krasnodar
Если пациенту требуется постоянный мониторинг или комплексное лечение, мы обеспечиваем круглосуточное пребывание в стационаре. Здесь доступны углублённая диагностика — УЗИ органов брюшной полости, расширенные анализы крови, кардиомониторинг — и коррекция терапии в режиме реального времени. Комфортные палаты, ежедневное наблюдение медсестры и консультации психотерапевта создают условия для быстрого и безопасного выхода из зависимости.
Исследовать вопрос подробнее – http://narkologicheskaya-pomoshh-ekaterinburg0.ru/vyzvat-narkologicheskuyu-pomoshh-v-ekb/
Особое внимание уделяется безопасности пациента. Лечение проводится анонимно, в комфортных условиях, с круглосуточным наблюдением. Палаты оборудованы системами мониторинга, а при необходимости возможно подключение интенсивной терапии. Такой формат исключает стресс и даёт возможность сосредоточиться на восстановлении.
Подробнее тут – https://narkologicheskaya-klinika-tolyatti0.ru/tolyatti-narkologicheskij-dispanser/
продвижение сайтов в москве [url=https://prodvizhenie-sajtov-v-moskve15.ru/]prodvizhenie-sajtov-v-moskve15.ru[/url] .
Сразу важно проговорить: кодирование — это «замок» на поведение и физиологию, который помогает удержать ремиссию, пока человек выстраивает новые привычки и восстанавливает качество жизни. Поэтому эффект процедуры прямо зависит от того, насколько грамотно выстроены подготовка, информирование и поддержка после вмешательства. «НеоТрезвие СПБ» делает акцент на постепенности: один этап — одна цель — один прозрачный маркер успеха.
Выяснить больше – https://kodirovanie-ot-alkogolizma-v-spb16.ru
Первичный этап заключается в оценке состояния пациента и быстром подборе схемы инфузионной терапии. Врач фиксирует показания ЭКГ, сатурацию кислорода и биохимический параметр глюкозы в крови. После этого подключается капельница с раствором для выведения продуктов распада алкоголя и одновременной коррекции показателей обмена веществ. Последующие визиты врача позволяют скорректировать терапию и предотвратить развитие побочных реакций.
Выяснить больше – http://narkologicheskaya-pomoshh-ekaterinburg0.ru
Обращение за помощью рекомендуется при затяжном запое более 48 часов, проявлении выраженных симптомов интоксикации, а также при наличии сопутствующих заболеваний. Самостоятельная попытка «продержаться» опасна из-за риска судорог, острой сердечной и печёночной недостаточности. В «ПрофМед» первоочерёдно оценивают состояние пациента и определяют, можно ли провести лечение на дому или требуется госпитализация.
Ознакомиться с деталями – http://качество-вывод-из-запоя.рф/vyvod-iz-zapoya-czena-v-permi/
Чтобы вызвать нарколога на дом, достаточно позвонить по специализированным горячим телефонам или оформить заявку на сайте. Специалисты быстро реагируют на обращения, проводят первичную оценку и выезжают в течение часа. Важным аспектом является наличие лицензии и квалификации у медицинского персонала, что гарантирует безопасность и эффективность лечения.
Исследовать вопрос подробнее – https://narkolog-na-dom-volgograd13.ru/vyzov-narkologa-na-dom-volgograd
Важно выяснить длительность запоя, частоту и дозы потребляемого алкоголя, наличие ранее проведённых детоксикаций и психиатрических заболеваний. Эта информация помогает выбрать наиболее подходящий протокол инфузионной и медикаментозной терапии.
Подробнее – http://тайный-вывод-из-запоя.рф/
агентство seo [url=https://reiting-seo-kompaniy.ru/]агентство seo[/url] .
Вызов нарколога на дом в Хабаровске осуществляется при наличии клинических показаний, при которых выездная помощь является обоснованной и безопасной. В клинике «Ясный Вектор» решение о формате вмешательства принимается с учётом жалоб, анамнеза и предполагаемой тяжести состояния.
Выяснить больше – https://narkolog-na-dom-khabarovsk0.ru/narkolog-khabarovsk-anonimno
глубокий комлексный аудит сайта [url=https://advesti.ru/news/internet/agentstvo_prodvizhenie_saytov_kak_rabotaet_sovremennoe_SEO_i_zachem_ono_biznesu_28-07-2025/]глубокий комлексный аудит сайта[/url] .
Чтобы помощь была прозрачной и управляемой, каждый этап имеет цель, индикаторы безопасности и эффективности, а также понятное «окно оценки» результата. Коррекции проводятся «штучно», по правилу одного изменения — это защищает от полипрагмазии и позволяет читабельно видеть вклад каждого шага.
Разобраться лучше – https://vyvod-iz-zapoya-v-kazani16.ru/vyvod-iz-zapoya-kazan-otzyvy/
продвижение сайтов омск [url=https://elektroportal.ru/news/corp/253314/]продвижение сайтов омск[/url] .
В Казани дежурят мобильные бригады, покрывающие центральные районы и спальные кварталы. Координатор по телефону собирает лишь данные, влияющие на безопасность: текущие лекарства и дозировки, аллергии, эпизоды судорог/психозов в анамнезе, последние значения АД/ЧСС, температуру, а также бытовые условия — место полулёжа, доступ к розетке, возможность «тихого окна» на 2–3 часа. Врач приезжает быстро, но спокойно; вместо суеты — последовательность и аккуратные действия. Визит начинается с очного осмотра, где фиксируются исходные показатели и выбирается контур терапии. Далее выполняется тест переносимости и только затем — основной инфузионный этап. По завершении пациент получает «вечерний протокол» с простыми ритуалами: приглушить свет, проветрить комнату, исключить экраны за час до сна, пить воду малыми глотками.
Подробнее тут – [url=https://narkologicheskaya-pomoshh-v-kazani16.ru/]оказание наркологической помощи казань[/url]
Доктор проводит физикальное обследование, замеряет АД, пульс, сатурацию и температуру. Параллельно выполняются экспресс-анализы крови и мочи, которые позволяют выявить нарушения электролитов, работу печени и почек.
Разобраться лучше – https://качество-вывод-из-запоя.рф/
plinko обновление приложения [url=https://plinko61038.help/]https://plinko61038.help/[/url]
Все медицинские записи и личные данные хранятся на защищённых серверах с ограниченным доступом. Только лечащий врач и медицинская сестра имеют право просматривать их при необходимости оказания помощи.
Детальнее – https://тайный-вывод-из-запоя.рф/vyvod-iz-zapoya-na-domu-v-samare
После введения капельницы пациент получает «вечернюю карточку»: правила гидратации малыми порциями, световую гигиену, два-три спокойных действия на вечер и чек-лист признаков, при которых нужно связаться с дежурным врачом. Такой бытовой протокол повышает переносимость терапии и делает ночь предсказуемой.
Детальнее – [url=https://vyvod-iz-zapoya-v-kazani16.ru/]вывод из запоя клиника[/url]
seo partner [url=https://tyumen-news.net/other/2025/07/15/509294.html]seo partner[/url] .
Этапы терапии выглядят следующим образом:
Изучить вопрос глубже – [url=https://narkologicheskaya-klinika-v-samare16.ru/]вывод наркологическая клиника[/url]
Чтобы сделать процесс понятным и управляемым, каждый шаг сопровождается измеримыми маркерами безопасности и эффективности. Корректировки — точечные, по правилу «одного изменения», что позволяет видеть вклад каждого действия и сохранять переносимость.
Подробнее можно узнать тут – [url=https://narkologicheskaya-pomoshh-v-kazani16.ru/]нарколог наркологическая помощь казань[/url]
продвижение сайта в омске [url=https://elektroportal.ru/news/corp/253314/]продвижение сайта в омске[/url] .
рейтинг интернет агентств seo [url=https://reiting-seo-kompaniy.ru/]reiting-seo-kompaniy.ru[/url] .
порно во время йоги [url=https://yoga-porno.ru/]порно во время йоги[/url] .
Для наглядности представлен примерный состав инфузионного раствора, используемого при выводе из запоя:
Узнать больше – [url=https://vyvod-iz-zapoya-v-rostove-na-donu16.ru/]вывод из запоя на дому ростов-на-дону[/url]
Этапы терапии выглядят следующим образом:
Детальнее – https://narkologicheskaya-klinika-v-samare16.ru/narkolog-i-psikhiatr-samara/
Терапия состоит из нескольких взаимосвязанных этапов: оценка состояния, детоксикация, коррекция водно-электролитного баланса, поддержка психики и последующая реабилитация. Каждый этап проходит под контролем профильных специалистов с применением новейшего оборудования.
Углубиться в тему – https://качество-вывод-из-запоя.рф/vyvod-iz-zapoya-czena-v-permi/
усиление грунтов основания здания [url=https://usilenie-gruntov-1.ru/]usilenie-gruntov-1.ru[/url] .
капитальный ремонт зданий [url=https://remont-zdaniya-1.ru/]капитальный ремонт зданий[/url] .
раскрутка и продвижение сайта [url=https://prodvizhenie-sajtov-v-moskve15.ru/]prodvizhenie-sajtov-v-moskve15.ru[/url] .
продвижение сайтов омск [url=https://elektroportal.ru/news/corp/253314/]продвижение сайтов омск[/url] .
продвижение сайта франция [url=https://tyumen-news.net/other/2025/07/15/509294.html]продвижение сайта франция[/url] .
выебал на йоге [url=https://yoga-porno.ru/]выебал на йоге[/url] .
1xbet giri? g?ncel [url=https://1xbet-51.com/]1xbet giri? g?ncel[/url] .
1xbet g?ncel adres [url=https://1xbet-49.com/]1xbet g?ncel adres[/url] .
Доктор проводит физикальное обследование, замеряет АД, пульс, сатурацию и температуру. Параллельно выполняются экспресс-анализы крови и мочи, которые позволяют выявить нарушения электролитов, работу печени и почек.
Ознакомиться с деталями – http://качество-вывод-из-запоя.рф/
sweet bonanza завантаження без реєстрації [url=http://sweet-bonanza54072.help/]http://sweet-bonanza54072.help/[/url]
Кодирование от алкоголизма — это не «волшебная таблетка», а четко структурированный этап комплексного лечения, который должен вписываться в общий терапевтический план: диагностика, стабилизация состояния, выбор методики, юридически корректное информированное согласие, сопровождение и профилактика рецидивов. В наркологической клинике «НеоТрезвие СПБ» приоритет — безопасность, предсказуемость и конфиденциальность. Мы не перебираем методы «на удачу», а подбираем технологию с учетом клинического профиля, мотивации, социализации и коморбидных факторов (тревога, депрессия, соматические заболевания).
Изучить вопрос глубже – [url=https://kodirovanie-ot-alkogolizma-v-spb16.ru/]кодирование от алкоголизма цена[/url]
как сменить email melbet [url=https://melbet41682.help/]https://melbet41682.help/[/url]
Первичный этап заключается в оценке состояния пациента и быстром подборе схемы инфузионной терапии. Врач фиксирует показания ЭКГ, сатурацию кислорода и биохимический параметр глюкозы в крови. После этого подключается капельница с раствором для выведения продуктов распада алкоголя и одновременной коррекции показателей обмена веществ. Последующие визиты врача позволяют скорректировать терапию и предотвратить развитие побочных реакций.
Детальнее – [url=https://narkologicheskaya-pomoshh-ekaterinburg0.ru/]наркологическая помощь на дому свердловская область[/url]
способы укрепления грунта под фундаментом [url=https://usilenie-gruntov-1.ru/]usilenie-gruntov-1.ru[/url] .
1win depozit maxim [url=https://www.1win5808.help]1win depozit maxim[/url]
mostbet корт депозит [url=https://www.mostbet95163.help]mostbet корт депозит[/url]
one x bet [url=https://1xbet-47.com/]1xbet-47.com[/url] .
1xbet giri? 2025 [url=https://1xbet-50.com/]1xbet giri? 2025[/url] .
Особенность петербургского контекста — большая доля интеллектуального труда и проектной занятости. Мы учитываем это при выборе методики: отдаем предпочтение схемам, которые не «глушат» когнитивную активность и позволяют быстро возвращаться к задачам. Если требуются краткие больничные листы, предоставляем корректные медицинские документы без «ярлыков».
Ознакомиться с деталями – [url=https://kodirovanie-ot-alkogolizma-v-spb16.ru/]анонимное кодирование от алкоголизма[/url]
Наши специалисты оценивают клинические признаки запоя уже при первом осмотре — измеряют пульс, артериальное давление и насыщение кислородом, осматривают кожу и слизистые оболочки на предмет обезвоживания. Специальные тесты на когнитивные функции позволяют определить степень дезориентации и риск развития острых психотических реакций.
Ознакомиться с деталями – https://тайный-вывод-из-запоя.рф/vyvod-iz-zapoya-staczionar-v-samare
Неотложная наркологическая помощь необходима в ситуациях, когда запой затянулся более чем на двое суток, а состояние пациента ухудшается: появляются дрожь конечностей, выраженное психомоторное возбуждение или, наоборот, спутанность сознания. Важно не откладывать вызов врача, если:
Подробнее – [url=https://narkologicheskaya-pomoshh-ekaterinburg0.ru/]наркологическая помощь на дому в екатеринбурге[/url]
1xbet spor bahislerinin adresi [url=https://1xbet-52.com/]1xbet-52.com[/url] .
Чтобы обеспечить безопасное выведение психоактивных веществ и восстановление организма, применяется детоксикация под контролем врача-нарколога и анестезиолога-реаниматолога.
Исследовать вопрос подробнее – [url=https://lechenie-narkomanii-arkhangelsk0.ru/]центр лечения наркомании архангельская область[/url]
1xbet giri? [url=https://1xbet-47.com/]1xbet giri?[/url] .
Решение о выезде принимает врач с учётом симптомов и бытовых ограничений. Если совпадает хотя бы две позиции из списка ниже, лучше не откладывать звонок — управляемость состояния снижается каждый час.
Получить дополнительную информацию – [url=https://vyvod-iz-zapoya-v-kazani16.ru/]нарколог на дом вывод из запоя казань[/url]
1 x bet [url=https://1xbet-49.com/]1 x bet[/url] .
инъектирование грунта цена [url=https://usilenie-gruntov-1.ru/]инъектирование грунта цена[/url] .
ремонт подвала в частном доме [url=https://gidroizolyacziya-podvalov.ru/]ремонт подвала в частном доме[/url] .
one x bet [url=https://1xbet-47.com/]1xbet-47.com[/url] .
мелбет фриспин наомад [url=https://www.melbet20856.help]https://www.melbet20856.help[/url]
мостбет установить приложение [url=https://mostbet78063.help/]https://mostbet78063.help/[/url]
1xbet tr giri? [url=https://1xbet-48.com/]1xbet-48.com[/url] .
ремонт бетонных конструкций гарантия [url=https://remont-betona-1.ru/]remont-betona-1.ru[/url] .
гидроизоляция подвала изнутри цена [url=https://gidroizolyacziya-podvalov.ru/]gidroizolyacziya-podvalov.ru[/url] .
инъекционное закрепление грунтов [url=https://usilenie-gruntov-1.ru/]инъекционное закрепление грунтов[/url] .
1xbet giri? linki [url=https://1xbet-51.com/]1xbet giri? linki[/url] .
Кодирование в «МедТрезвие» — не «волшебная кнопка», а логическое продолжение после стабилизации, когда организм готов к вмешательству, а пациент понимает механизм действия и ограничения метода. Врач подробно обсуждает цели, риски, противопоказания, ожидаемые эффекты и сроки наблюдения, оформляет информированное согласие и объясняет, как встроить процедуру в общий план. Важная часть — профилактика триггеров и обучение распознаванию ранних сигналов тяги: человек получает не только фармакологическую поддержку, но и практические инструменты саморегуляции, сценарии на «сложные дни», способы запросить помощь до того, как ситуация выйдет из-под контроля. Такая связка повышает вероятность устойчивой ремиссии, потому что работает одновременно на биологическом и поведенческом уровнях.
Изучить вопрос глубже – [url=https://narkologicheskaya-klinika-moskva9.ru/]narkologicheskaya-klinika[/url]
Сначала короткий осмотр и проверка совместимостей, затем — инфузионная терапия с мониторингом давления/пульса/сатурации, после — инструктаж семьи и назначение контрольного контакта. Такой порядок снижает тревогу и делает ночь предсказуемой: понятно, чего ждать, когда отдыхать и в какой момент связываться с врачом.
Получить дополнительную информацию – https://vyvod-iz-zapoya-sergiev-posad8.ru/srochnyj-vyvod-iz-zapoya-v-sergievom-posade/
Детокс — это не универсальный раствор «от всего», а набор целевых вмешательств. Мы восполняем жидкость, корректируем электролиты, поддерживаем функции печени, мягко снижаем тремор и тревогу, готовим нервную систему к ночному сну. Каждая доза сверяется с реакцией организма — нет гонки за моментальным «оглушением» симптома ценой побочных эффектов и вечерних откатов. После купирования острой фазы пациент получает понятные правила на 48–72 часа: вода порциями, лёгкая еда по расписанию, «тихий режим» перед сном, запрет на «подвиги» и конфликтные разговоры, критерии связи с врачом. Мы отдельно объясняем, что делать в «тёмные часы» — когда повышается тревожность и усиливается тяга: короткая прогулка рядом с домом, тёплый душ, дыхательные практики, контакт с «своим» человеком, отключение экранов. Такие простые действия бесплатны, но именно они удерживают медицинский эффект и переводят состояние в предсказуемую стабилизацию.
Подробнее – https://vyvod-iz-zapoya-balashiha9.ru/vyvod-iz-zapoya-kapelnica-balashiha/
Инфузия — это не одна «сильная сыворотка», а набор целевых вмешательств. Мы восстанавливаем объём циркулирующей жидкости, корректируем электролиты, снижаем токсическую нагрузку на печень, мягко приглушаем тремор и тревогу, готовим нервную систему к ночи. Противорвотная поддержка и гастропротекция подключаются при необходимости, витаминные комплексы — по показаниям, кардиокоррекция — только после оценки рисков. Врач заранее проговаривает, какие ощущения допустимы (сонливость, умеренная слабость), а какие — повод для немедленного контакта. Цель — не «забить» симптом на час, а задать предсказуемую траекторию на дни, чтобы вернулись управляемость, аппетит и ровный сон. Когда вмешательства дозированы и понятны, пациент меньше «проверяет себя» нагрузками, а семья перестаёт «разгонять» тревогу разговорами — это повышает эффективность терапии без увеличения чека.
Узнать больше – [url=https://kapelnica-ot-zapoya-podolsk9.ru/]капельница от запоя на дому[/url]
Метод лечения
Исследовать вопрос подробнее – [url=https://narkologicheskaya-klinika-rostov-na-donu13.ru/]наркологическая клиника наркологический центр ростов-на-дону[/url]
Круглосуточный приём означает не просто «дверь открыта 24/7», а способность команды держать безопасный и предсказуемый темп в любой час. Ночью — короткие поведенческие включения и мягкая коррекция тревоги, днём — уточнение витальных и планирования питания/воды, вечером — «световые» правила и дыхательные циклы. За маршрутом следит куратор, благодаря чему переходы между форматами (дом – амбулатория – стационар) проходят без «перезапуска истории»: все данные и договорённости продолжают работать, не требуя заново пересказывать детали.
Углубиться в тему – [url=https://narkologicheskaya-klinika-voronezh15.ru/]наркологическая клиника вывод из запоя в воронеже[/url]
Если на триаже выявляются риски (дыхание, спутанность, нестабильный ритм), предлагаем короткое стационарное окно мониторинга. При низких рисках стартуем амбулаторно или на дому, а вечером подключаем короткие видеовставки по 15–20 минут. Переходы между форматами не «сбрасывают» процесс: единая карта наблюдения обеспечивает непрерывность и точность решений.
Получить больше информации – [url=https://narkologicheskaya-klinika-v-voronezhe15.ru/]анонимная наркологическая клиника воронеж[/url]
1win plinko strategy [url=www.1win5523.ru]www.1win5523.ru[/url]
Ниже — рабочая матрица на первые часы. Она показывает, как клиническая гипотеза превращается в минимальный шаг, какие индикаторы берём под контроль и по какому сигналу меняем тактику или площадку. Таблица не заменяет очную оценку, но делает логику маршрута ясной для всей семьи.
Изучить вопрос глубже – http://narkolog-na-dom-v-samare16.ru/narkolog-samara-vyzov-na-dom/
ремонт бетонных конструкций материалы [url=https://remont-betona-1.ru/]ремонт бетонных конструкций материалы[/url] .
1xbet g?ncel adres [url=https://1xbet-53.com/]1xbet g?ncel adres[/url] .
усиление грунта при строительстве на слабых грунтах [url=https://usilenie-gruntov-1.ru/]usilenie-gruntov-1.ru[/url] .
bahis sitesi 1xbet [url=https://1xbet-50.com/]bahis sitesi 1xbet[/url] .
трахнул на йоге [url=https://yoga-porno.ru/]трахнул на йоге[/url] .
1xbet g?ncel giri? [url=https://1xbet-48.com/]1xbet g?ncel giri?[/url] .
1xbet yeni giri? adresi [url=https://1xbet-52.com/]1xbet-52.com[/url] .
Коммерческий и государственный тендер — это конкурентная процедура выбора поставщика товаров или оказания услуг. Заказчик размещает требования, а компании подают заявки и участвуют в торгах.
Эксклюзивная информация для вас – [url=https://tendernoe-soprovozhdenie-rostov-na-donu.ru/]тендерное сопровождение под ключ в ростове на дону[/url]
Наркологическая клиника «Балтийская Наркология» — это безопасное пространство, где для лечения зависимостей используются современные доказательные методики, человеческий язык коммуникации и «тихая» логистика. Мы не практикуем универсальные схемы и «сильные процедуры для всех» — терапия собирается модульно, вокруг конкретной задачи: стабилизация, нормализация сна, снижение тревоги, настройка опор поведения и профилактика рецидивов. Каждый шаг имеет цель, окно оценки и критерий перехода. Анонимность не декларируется — она встроена в процесс: немаркированные маршруты, гражданская одежда персонала, нейтральные формулировки в документах, «беззвучные» уведомления и разграниченный доступ к медицинской карте.
Ознакомиться с деталями – [url=https://narkologicheskaya-klinika-kaliningrad15.ru/]наркологическая клиника лечение алкоголизма[/url]
Если среда дома шумная или приватность под угрозой, мы предложим «короткий коридор» через отдельный вход амбулатории. Если условия позволяют, проводим процедуры на дому: свет приглушён, доступ к розетке организован, рядом столик для расходников и приборов. Этот «экологичный» сценарий, несмотря на простоту, заметно улучшает переносимость процедур и собирает устойчивый сон в первую ночь, что особенно важно на ранних этапах стабилизации.
Получить дополнительную информацию – [url=https://narkologicheskaya-klinika-v-chelyabinske16.ru/]наркологическая клиника наркологический центр в челябинске[/url]
Домашний формат нужен, когда риски управляемы, а в квартире можно обеспечить «тихий режим». Врач приезжает без эмблем, проводит осмотр, измеряет давление, пульс, сатурацию, сверяет лекарства за последние 48 часов и аллергии. После допуска запускается инфузия с мягкой коррекцией воды и электролитов, поддержкой печени и вегетативной нервной системы; при необходимости аккуратно настраивается сон. По завершении — переоценка, письменная памятка на 24–48 часов, список тревожных признаков и прямой канал связи. Такой визит «гасит» тремор и тошноту, снижает тревогу и делает ночь предсказуемой.
Получить дополнительные сведения – [url=https://narkologicheskaya-klinika-chekhov8.ru/]gosudarstvennaya-narkologicheskaya-klinika[/url]
Кодирование — это медицинский инструмент, который помогает закрепить трезвость, но сам по себе не является «волшебной кнопкой». Его задача — усилить внутреннюю мотивацию и создать физиологические и/или психологические условия, при которых срыв становится маловероятным. В «НаркологЭксперт» кодирование включают в структуру лечения: сначала купируются острые проявления, проводится детокс и стабилизация сна, давления и тревоги, затем — диагностика противопоказаний, подробное информирование, выбор методики и только после этого — сама процедура. Такой порядок снижает риски, повышает переносимость и делает результат предсказуемым. Важно, что любая техника подбирается индивидуально с учётом длительности употребления, анамнеза, сопутствующих заболеваний и рабочей нагрузки пациента, чтобы лечение органично вписалось в реальную жизнь и не сорвалось на первых же неделях.
Ознакомиться с деталями – [url=https://kodirovanie-ot-alkogolizma-moskva9.ru/]kodirovanie-ot-alkogolizma[/url]
1xbet giri? adresi [url=https://1xbet-54.com/]1xbet giri? adresi[/url] .
Карта делает решения прозрачными: если критерий не достигнут, меняется ровно один параметр с назначением новой точки контроля. Это сохраняет причинно-следственную связь и уменьшает общую фармаконагрузку без компромиссов по безопасности.
Выяснить больше – [url=https://narkolog-na-dom-petrozavodsk15.ru/]нарколог на дом[/url]
Клиника предоставляет широкий спектр услуг, каждая из которых ориентирована на определённый этап лечения зависимости.
Подробнее – http://narkologicheskaya-klinika-krasnodar14.ru
Чтобы не превращать раздел в набор лозунгов, кратко обозначим практические преимущества, которые заметны уже в первые часы обращения.
Получить больше информации – [url=https://narkologicheskaya-klinika-sergiev-posad8.ru/]наркологическая клиника цены адреса[/url]
Режим 24/7 — это не только открытая дверь, но и правильно расставленные акценты по часам суток. Ночью — больше поведенческих опор и короткие видеовставки, днём — контроль витальных, уточнение плана гидратации и питания, вечером — «световые правила» и дыхательные циклы. В каждом окне мы знаем, что именно проверяем и что считаем успехом: так исчезают импровизации и ненужные «усиления», а пациент получает предсказуемую траекторию.
Исследовать вопрос подробнее – [url=https://narkologicheskaya-klinika-v-stavropole15.ru/]частная наркологическая клиника в ставрополе[/url]
Если на предвызовном созвоне звучат «красные флаги» (неукротимая рвота, выраженная дезориентация, «скачущий» ритм, одышка), мы сразу резервируем палату усиленного наблюдения и подключаем расширенный мониторинг. При низком риске старт возможен амбулаторно или на дому с бесшовным переводом в стационар при необходимости — без очередей и «говорящих» вывесок. Во всех сценариях анонимность — не «опция», а стандарт по умолчанию.
Получить дополнительные сведения – http://narkologicheskaya-klinika-petrozavodsk15.ru/narkolog-petrozavodsk-otzyvy/
Этап
Детальнее – [url=https://vyvod-iz-zapoya-v-stacionare-chekhov8.ru/]вывод из запоя в домашних условиях[/url]
порно на занятии йогой [url=https://yoga-porno.ru/]порно на занятии йогой[/url] .
При наличии этих симптомов организм находится в критическом состоянии, и любой промедление с вызовом врача может привести к развитию серьезных осложнений, таких как сердечно-сосудистые нарушения, тяжелые неврологические симптомы или даже жизнеугрожающие состояния. Экстренное вмешательство позволяет не только снять острые симптомы ломки, но и предотвратить необратимые изменения в организме.
Подробнее можно узнать тут – [url=https://snyatie-lomki-novosibirsk8.ru/]снятие ломки цена новосибирск[/url]
услуги гидроизоляции подвала [url=https://gidroizolyacziya-podvalov.ru/]gidroizolyacziya-podvalov.ru[/url] .
1win cashback faizləri [url=http://1win82430.help/]1win cashback faizləri[/url]
Наши стандарты включают конфиденциальную маршрутизацию, детализированные инструкции для семьи, модульный план лечения и прозрачное разделение бесплатных и платных блоков. Каждому пациенту назначается ведущий специалист, который сопровождает его на всём пути — от первого звонка до контрольных чек-инов после процедур. Мы не «наращиваем» объём вмешательств ради впечатления: используется минимально достаточный набор мер, который действительно влияет на целевые маркеры — переносимость воды, качество сна, сглаживание вегетативных «качелей» и возвращение утренней ясности.
Исследовать вопрос подробнее – http://narkologicheskaya-klinika-v-chelyabinske16.ru
Мы работаем с вниманием к деталям повседневности: как человек засыпает на фоне вечернего света, сколько воды переносит малыми глотками, как реагирует на цифровые уведомления, есть ли привычные «включатели» тяги и как на организм влияет шумное окружение. Врач и куратор переводят этот жизненный контекст в ясные, измеримые ориентиры: время до сна, число пробуждений, вариабельность пульса к сумеркам, объём воды, аппетит, переносимость тёплой мягкой пищи. Решения принимаются адресно и последовательно, чтобы сохранять ясность днём и избегать ненужной фармаконагрузки.
Получить больше информации – http://narkologicheskaya-klinika-kaliningrad15.ru/kaliningrad-narkologicheskij-dispanser/
1x giri? [url=https://1xbet-54.com/]1xbet-54.com[/url] .
Стационар уместен при тяжёлой абстиненции, скачках давления, угрозе делирия, эпизодах судорог, неукротимой рвоте, а также когда дома нет взрослого помощника на ночь. В палате — аппаратный контроль по показаниям, пост медсестёр 24/7, ЭКГ и базовая лаборатория, регулярные переоценки с корректировкой схемы. Решения принимаются быстро, без логистических задержек; это снижает риск поздних осложнений и повторных экстренных вызовов.
Получить больше информации – [url=https://narkologicheskaya-klinika-chekhov8.ru/]наркологическая клиника отзывы[/url]
Профессиональная подготовка — это не формальность, а ключ к безопасной и эффективной процедуре. Врач собирает подробный анамнез, уточняет длительность и характер употребления, фиксирует соматические жалобы, анализирует текущие препараты (в том числе безрецептурные), измеряет давление, пульс, сатурацию, при необходимости назначает ЭКГ и лабораторные тесты. Если есть выраженная интоксикация, бессонница, тремор, скачки давления — стартуют с детокса и стабилизации: корректируют водно-электролитный баланс, снижают тревогу, нормализуют сон. Параллельно специалист объясняет механику методик кодирования, вероятные ощущения после процедуры, ограничения по нагрузкам, правила безопасного поведения в первые недели и алгоритм действий на случай усиления тяги. Подготовительный этап снимает неопределённость, уменьшает тревогу и повышает приверженность: человек понимает, что будет происходить и как оценивать улучшение.
Детальнее – [url=https://kodirovanie-ot-alkogolizma-moskva9.ru/]kodirovanie-v-moskve-ceny[/url]
йога секс [url=https://yoga-porno.ru/]йога секс[/url] .
Выездной формат — это не просто «капельница у кровати». Мы заранее раскладываем визит на модули и назначаем окна оценки: первые 20–40 минут (антиеметический мост, переносимость воды), 60–120 минут (регидратация и электролиты, сглаживание ЧСС/АД), первая ночь (сон ?6 часов и ?1 пробуждение), 12–24 часа (утренняя ясность и способность выполнить 2 короткие бытовые задачи). Одно изменение — один параметр: либо темп инфузии, либо порядок модулей, либо настройка среды (свет/тишина/ритуал). Так причинно-следственные связи остаются прозрачными, а результат — подтверждаемым.
Получить дополнительные сведения – [url=https://narkologicheskaya-klinika-v-chelyabinske16.ru/]платная наркологическая клиника челябинск[/url]
Мы комбинируем медицинские и немедикаментозные решения. Инфузионная терапия — адресная, с контролем безопасности; поведенческие опоры — просты и выполняемы в реальной жизни; телемедицина помогает пройти «трудный час» без лишних поездок и импровизаций. Ниже — ориентиры логики подбора, они не заменяют очный осмотр.
Детальнее – http://narkologicheskaya-klinika-kaliningrad15.ru
Петрозаводск добавляет нюансы: влажные сумерки, ветер от Онежского озера, «звонкие» подъезды старого фонда. Поэтому бригада «СеверКар Медикус» приезжает в гражданской одежде, быстро и без лишних фраз. Координатор заранее уточняет код домофона, парковку, «окна связи» для близких; рекомендует приглушить верхний свет, подготовить воду комнатной температуры и свободный доступ к розетке. Такой «тихий сценарий» снижает сенсорную нагрузку, сглаживает пульсовые «пики» к вечеру и помогает заснуть без избыточной фармакологии.
Получить дополнительные сведения – https://vyvod-iz-zapoya-petrozavodsk15.ru/skoryj-narkolog-vyvod-iz-zapoya-petrozavodsk/
«Как отмечает главный врач-нарколог Виктор Сергеевич Левченко, «современная наркологическая клиника должна обеспечивать не только медикаментозное лечение, но и комплексную поддержку пациента на всех этапах восстановления».»
Получить дополнительные сведения – https://narkologicheskaya-klinika-krasnodar14.ru/anonimnaya-narkologicheskaya-klinika-krasnodar
Перед таблицей зафиксируем принцип: это ориентир по этапам для семьи и пациента. Врач адаптирует длительность и насыщенность под возраст, сопутствующие заболевания и исходное состояние.
Детальнее – http://narkologicheskaya-klinika-chekhov8.ru/chastnaya-narkologicheskaya-klinika-v-chekhove/
В реальной городской ткани Ставрополя на самочувствие влияет не только схема лечения, но и логистика: утренние заторы на въезде, плотная застройка частного сектора, шумные перекрёстки. Мы заранее «поглощаем» эти риски организацией: секторные выезды, согласованная парковка, нейтральная переписка без «говорящих» терминов, при необходимости — курьерская доставка расходников отдельно от врача, чтобы на месте сразу переходить к оценке и запуску инфузии. Пациенту не нужно «вписываться» в систему — система подстраивается под реальную жизнь человека, экономя десятки минут и снижая сенсорную нагрузку перед первой ночью.
Изучить вопрос глубже – http://narkologicheskaya-klinika-v-stavropole15.ru
подвал дома ремонт [url=https://gidroizolyacziya-podvalov.ru/]подвал дома ремонт[/url] .
Мы — частная наркологическая служба в Химках, где каждый шаг лечения объясняется простым языком и запускается без задержек. С первого контакта дежурный врач уточняет жалобы, длительность запоя, хронические диагнозы и принимаемые лекарства, после чего предлагает безопасный старт: выезд на дом, дневной формат или госпитализацию в стационар 24/7. Наши внутренние регламенты построены вокруг двух опор — безопасности и приватности. Мы используем минимально необходимый набор персональных данных, ограничиваем доступ к медицинской карте, сохраняем нейтральную коммуникацию по телефону и не ставим на учёт.
Подробнее можно узнать тут – [url=https://narkologicheskaya-klinika-himki0.ru/]наркологическая клиника стоимость[/url]
xbet giri? [url=https://1xbet-54.com/]1xbet-54.com[/url] .
Клиника ориентирована на клиническую достаточность: никаких процедур «для галочки», только то, что подтверждено показаниями. С первого контакта дежурный врач уточняет анамнез, лекарства, аллергии, оценивает риски сердечно-сосудистых осложнений, степень обезвоживания, уровень тревоги и качества сна. Если состояние позволяет, подготовка к кодированию проводится амбулаторно или на дому; при нестабильных показателях предлагается короткий стационар для безопасной стабилизации. Важна анонимность — в расписании используются шифры, доступ к данным разграничен, информирование родственников происходит только по согласию пациента. Организация процесса учитывает ритм мегаполиса: гибкие слоты в будни и выходные, выездные бригады, быстрый перевод из домашнего формата в стационар при необходимости. Финансовые условия проговариваются заранее, чтобы исключить скрытые позиции и дать человеку возможность планировать бюджет без догадок.
Подробнее можно узнать тут – http://kodirovanie-ot-alkogolizma-moskva9.ru/skolko-stoit-kodirovanie-ot-alkogolizma-v-moskve/https://kodirovanie-ot-alkogolizma-moskva9.ru
1x lite [url=https://1xbet-49.com/]1xbet-49.com[/url] .
ремонт бетонных конструкций трещины [url=https://remont-betona-1.ru/]ремонт бетонных конструкций трещины[/url] .
1xbet ?ye ol [url=https://1xbet-51.com/]1xbet ?ye ol[/url] .
«Как отмечает главный врач-нарколог Виктор Сергеевич Левченко, «современная наркологическая клиника должна обеспечивать не только медикаментозное лечение, но и комплексную поддержку пациента на всех этапах восстановления».»
Выяснить больше – https://narkologicheskaya-klinika-krasnodar14.ru/
Наркологическая клиника «СтавропольМедСервис» объединяет современную медицину и чуткое отношение к человеку: круглосуточный приём, точные диагностические алгоритмы, адресная инфузионная терапия, телемедицинские включения и грамотная работа с тревогой и сном. Мы используем принцип «минимально достаточной фармакотерапии»: каждый препарат должен быть оправдан текущими измерениями и клинической картиной, а не привычкой «усилить». Такой подход уменьшает риски дневной заторможенности, помогает быстрее восстановить ясность и делает ночь предсказуемой — без тяжёлой седации. Все действия прозрачны: пациент знает цель шага, окно оценки, критерии перехода и признаки, при которых нужно эскалировать наблюдение. Конфиденциальность встроена в процесс: гражданская одежда персонала, нейтральные формулировки в документах, «беззвучные» уведомления и закрытый контур медицинских карт — не «сервисная опция», а клинический фактор, снижающий реактивность и повышающий приверженность плану.
Углубиться в тему – http://narkologicheskaya-klinika-v-stavropole15.ru
Инфузионная терапия подбирается индивидуально: растворы для регидратации и детоксикации, гепатопротекторы, кардиопротекторы, витамины и микроэлементы. Детокс — это не только «капельница», но и мониторинг жизненно важных показателей, оценка неврологического статуса, профилактика осложнений. Мы отслеживаем динамику самочувствия, корректируем дозировки и при необходимости подключаем дополнительные обследования. Задача — мягко вывести токсины, вернуть ясность сознания и работоспособность без резких «качелей».
Узнать больше – [url=https://narkologicheskaya-klinika-balashiha0.ru/]наркологическая клиника телефон[/url]
1xbet resmi giri? [url=https://1xbet-53.com/]1xbet-53.com[/url] .
1xbet ?yelik [url=https://1xbet-55.com/]1xbet ?yelik[/url] .
вертикальная гидроизоляция стен подвала [url=https://gidroizolyacziya-podvalov.ru/]gidroizolyacziya-podvalov.ru[/url] .
melbet вход без пароля [url=http://melbet42089.help]http://melbet42089.help[/url]
bahis sitesi 1xbet [url=https://1xbet-51.com/]bahis sitesi 1xbet[/url] .
1xbet yeni adresi [url=https://1xbet-49.com/]1xbet yeni adresi[/url] .
mostbet express stavka [url=https://mostbet37150.help/]https://mostbet37150.help/[/url]
1xbet [url=https://1xbet-48.com/]1xbet[/url] .
pin up ios yuklab olish [url=https://www.pinup69053.help]https://www.pinup69053.help[/url]
ремонт бетонных конструкций договор [url=https://remont-betona-1.ru/]remont-betona-1.ru[/url] .
букеты цветов с доставкой в москве заказывать [url=zakazat-cveti-moskva.ru]zakazat-cveti-moskva.ru[/url] .
1xbet resmi sitesi [url=https://1xbet-54.com/]1xbet-54.com[/url] .
Карта делает маршрут прозрачным для пациента и семьи. Вместо «лучше/хуже» — факты и понятные пороги. Это снижает тревожность и помогает соблюдать режим без сопротивления.
Узнать больше – [url=https://narkologicheskaya-klinika-petrozavodsk15.ru/]анонимная наркологическая клиника в петрозаводске[/url]
Если в телефонном триаже обозначаются риски по дыханию, ритму или уровню сознания, на старте предлагаем стационарное «окно» мониторинга с круглосуточным постом. При низких рисках программа начинается амбулаторно или на дому и поддерживается вечерними онлайн-вставками (15–20 минут). Любой формат остаётся анонимным: доступ к карте наблюдения — по ролям, а язык переписки и чеков — нейтральный.
Изучить вопрос глубже – [url=https://narkologicheskaya-klinika-voronezh15.ru/]наркологическая клиника лечение алкоголизма[/url]
1x bet [url=https://1xbet-48.com/]1xbet-48.com[/url] .
1xbet giri? adresi [url=https://1xbet-56.com/]1xbet giri? adresi[/url] .
Процесс лечения включает несколько ключевых этапов, каждый из которых имеет решающее значение для восстановления организма:
Выяснить больше – [url=https://snyatie-lomki-novosibirsk8.ru/]снятие ломок на дому в новосибирске[/url]
1 x bet giri? [url=https://1xbet-giris-27.com/]1xbet-giris-27.com[/url] .
https://betplay.cat/
BetPlay se afirma en 2026 como el portal destacado en apuestas y casino digital en Colombia, totalmente licenciada por Coljuegos para ofrecer sus servicios de forma regulada en el pais.
1win basketbol tikish [url=https://1win5765.help]https://1win5765.help[/url]
1xbwt giri? [url=https://1xbet-giris-29.com/]1xbet-giris-29.com[/url] .
1xbet yeni giri? adresi [url=https://1xbet-54.com/]1xbet yeni giri? adresi[/url] .
Вся динамика заносится в единую карту наблюдения. Если потребуются амбулаторные точки или стационар, вы не «начинаете историю заново» — маршрут продолжится с той же целью и теми же критериями успеха.
Получить дополнительную информацию – [url=https://narkolog-na-dom-stavropol15.ru/]вызвать нарколога на дом срочно[/url]
Задержка усиливает риск судорог, делирия, аритмий и травм. Эти маркеры не требуют медицинского образования — их легко распознать. Если совпадает хотя бы один пункт ниже, свяжитесь с нами 24/7: мы подскажем безопасный формат старта и подготовим пространство к визиту.
Подробнее – https://narkologicheskaya-klinika-ryazan14.ru/narkolog-ryazan-telefon/
ремонт бетонных конструкций железобетонных [url=https://remont-betona-1.ru/]remont-betona-1.ru[/url] .
Первый шаг — короткое, но предметное интервью: длительность употребления, сопутствующие диагнозы, текущие препараты и аллергии. Врач фиксирует давление, пульс, сатурацию, при необходимости делает экспресс-ЭКГ и неврологический скрининг. Далее объясняет логику вмешательств: зачем именно такая инфузия, чего ожидать через 30–60 минут, какие ощущения нормальны и какие потребуют связи. Мы избегаем «оглушающих» седативов, чтобы не получить вечерний откат и побочные эффекты — дозировки подбираются узко, по реакции организма. После капельницы специалист ещё раз проверяет показатели, оставляет письменные рекомендации, договаривается об окне контроля и критериях повторного визита. Вечер строится вокруг сна: затемнение, тишина, ранний отбой, вода порциями, лёгкая еда «по силам», минимум экранов и разговорных конфликтов. На таком фоне исчезают «качели» между днём и ночью, а эффект инфузий не «сгорает» к следующему вечеру.
Получить дополнительные сведения – https://kapelnica-ot-zapoya-podolsk9.ru/kapelnica-ot-zapoya-na-domu-klinika-v-podolske/
«Трезвый Маяк» — клиника экстренной и плановой наркологической помощи с круглосуточным выездом и возможностью госпитализации. Мы аккуратно стабилизируем состояние, снимаем интоксикацию и абстиненцию, готовим к кодированию и сопровождаем пациента до устойчивой ремиссии. Работаем анонимно: врач приезжает без опознавательных знаков, документы оформляются в нейтральной формулировке и только по запросу.
Получить больше информации – https://narkologicheskaya-klinika-sergiev-posad8.ru/anonimnaya-narkologicheskaya-klinika-v-sergievom-posade/
Ниже — структурированная карта экстренного выезда. Она помогает пациенту и семье понимать, что происходит в каждый отрезок времени, какие цели мы преследуем и по каким критериям двигаемся дальше.
Подробнее можно узнать тут – [url=https://vyvod-iz-zapoya-v-voronezhe15.ru/]скорая вывод из запоя в воронеже[/url]
1xbet resmi giri? [url=https://1xbet-55.com/]1xbet resmi giri?[/url] .
Медикаментозная терапия направлена на снятие симптомов абстиненции, нормализацию функций органов и систем, а также коррекцию психоэмоционального состояния пациента. Используются препараты, способствующие детоксикации, стабилизации работы нервной системы и улучшению общего самочувствия.
Исследовать вопрос подробнее – https://narkologicheskaya-pomoshh-perm0.ru/
Кодирование — не «волшебная кнопка», а усилитель плана после стабилизации. Мы рассматриваем методики индивидуально: инъекционные варианты дают фиксированный срок действия без ежедневной дисциплины; имплантационные — более длительный контроль; пероральные режимы гибче, но требуют высокой приверженности и частых контактов. Перед процедурой врач сверяет лекарства на взаимодействия, исключает противопоказания, объясняет механизмы, ограничения и риски, согласует план наблюдения. После — пациент получает памятку на ближайшие недели: режим сна, жидкости и питания, списки «красных флажков», окна связи, набор поведенческих «буферов». Такой реализм убирает соблазн «проверять» метод и снижает вероятность срывов, пока нервная система перестраивается. При необходимости мы подключаем семейные встречи: договариваемся о правилах дома, ролях и формулировках, которые уменьшают сопротивление вместо того, чтобы его подогревать. В результате фармакологический инструмент работает не сам по себе, а в экосистеме поддержки — так эффективность становится выше, а траектория устойчивее.
Изучить вопрос глубже – https://narkologicheskaya-klinika-moskva999.ru/horoshaya-narkologicheskaya-klinika-v-moskve
Клиника принимает 24/7 без очередей: ночной блок специально настроен под «трудные часы», когда усиливаются панические мысли и реактивность пульса. Для тех, кому легче дома, выездная служба приводит помощь в знакомое пространство; если нужны короткие контрольные включения, применяем видеосвязь вечером (15–20 минут), чтобы корректно настроить ритуалы засыпания, дыхательные циклы и «световые правила». Маршрут фиксируется в единой карте наблюдения — этот документ доступен команде по ролям и защищает от «повторов заново», когда формат меняется (дом – амбулатория – стационар).
Ознакомиться с деталями – [url=https://narkologicheskaya-klinika-v-stavropole15.ru/]запой наркологическая клиника ставрополь[/url]
Кодирование — это медицинский инструмент, который помогает закрепить трезвость, но сам по себе не является «волшебной кнопкой». Его задача — усилить внутреннюю мотивацию и создать физиологические и/или психологические условия, при которых срыв становится маловероятным. В «НаркологЭксперт» кодирование включают в структуру лечения: сначала купируются острые проявления, проводится детокс и стабилизация сна, давления и тревоги, затем — диагностика противопоказаний, подробное информирование, выбор методики и только после этого — сама процедура. Такой порядок снижает риски, повышает переносимость и делает результат предсказуемым. Важно, что любая техника подбирается индивидуально с учётом длительности употребления, анамнеза, сопутствующих заболеваний и рабочей нагрузки пациента, чтобы лечение органично вписалось в реальную жизнь и не сорвалось на первых же неделях.
Ознакомиться с деталями – http://kodirovanie-ot-alkogolizma-moskva9.ru
1xbet giri? yapam?yorum [url=https://1xbet-56.com/]1xbet giri? yapam?yorum[/url] .
1xbet resmi sitesi [url=https://1xbet-giris-30.com/]1xbet-giris-30.com[/url] .
1xbet t?rkiye giri? [url=https://1xbet-giris-27.com/]1xbet-giris-27.com[/url] .
Карта понятна пациенту и семье: видно, что будет происходить, по каким признакам мы перейдём к следующему шагу и когда состоится проверка. Это снижает тревожность и повышает приверженность плану.
Получить дополнительную информацию – [url=https://vyvod-iz-zapoya-petrozavodsk15.ru/]помощь вывод из запоя[/url]
Городской ритм Петрозаводска с озёрным ветром, короткими сумерками и сезонной влажностью повышает сенсорную нагрузку в вечерние часы, поэтому наш маршрут спроектирован «мягко». Координатор заранее уточняет подъезд, парковку, код домофона, рекомендует «тихий режим» связи и присылает нейтральное уведомление о визите. Бригада приходит в гражданской одежде, сумки — без логотипов, разговоры — короткими фразами. Такое поведение снижает у пациента и семьи реактивность, выравнивает вариабельность ЧСС к сумеркам и уменьшает потребность «усиливать» схему на ночь. Если на предзвонке выявлены «красные флаги» — неукротимая рвота, выраженная дезориентация, «скачущий» ритм, одышка — мы предлагаем стационар сразу, чтобы не терять время на повторные маршруты.
Детальнее – [url=https://narkolog-na-dom-petrozavodsk15.ru/]вызвать врача нарколога на дом в петрозаводске[/url]
1xbet [url=https://1xbet-55.com/]1xbet[/url] .
1 x bet [url=https://1xbet-giris-29.com/]1 x bet[/url] .
Метод лечения
Углубиться в тему – [url=https://narkologicheskaya-klinika-rostov-na-donu13.ru/]частная наркологическая клиника[/url]
букеты [url=http://zakazat-cveti-moskva.ru/]http://zakazat-cveti-moskva.ru/[/url] .
Ниже — «скелет» визита. На месте врач адаптирует содержание под возраст, соматику, текущие лекарства и проявления абстиненции. Главная идея — быстро получить цифры, аккуратно запустить инфузию и заранее зафиксировать ориентиры, чтобы семья не импровизировала в «трудный час».
Подробнее тут – http://vyvod-iz-zapoya-stavropol15.ru/vyvod-iz-zapoya-na-domu-stavropol/https://vyvod-iz-zapoya-stavropol15.ru
Все шаги фиксируются в карте наблюдения. Если динамика «плоская», меняется один параметр (скорость/объём/последовательность), и через оговорённое окно проводится повторная оценка. Это снижает риск побочных реакций и сохраняет дневную ясность.
Подробнее тут – [url=https://vyvod-iz-zapoya-v-kaliningrade15.ru/]вывод из запоя круглосуточно калининград[/url]
Мы комбинируем медицинские и немедикаментозные решения. Инфузионная терапия — адресная, с контролем безопасности; поведенческие опоры — просты и выполняемы в реальной жизни; телемедицина помогает пройти «трудный час» без лишних поездок и импровизаций. Ниже — ориентиры логики подбора, они не заменяют очный осмотр.
Углубиться в тему – http://narkologicheskaya-klinika-kaliningrad15.ru/kaliningrad-narkologicheskij-dispanser/https://narkologicheskaya-klinika-kaliningrad15.ru
one x bet [url=https://1xbet-53.com/]1xbet-53.com[/url] .
Мытищи дают плюсы домашнего формата: меньше логистики, приватнее, выше приверженность режиму. Если показатели устойчивы и нет признаков угрозы осложнений (упорной рвоты, высокой температуры, выраженной дезориентации, резких «качелей» АД/пульса, риска судорог), старт на дому или амбулаторно — рациональное решение. Но когда состояние «по краю», честнее и на дистанции дешевле сутки–двое стационара под круглосуточным наблюдением: проще дозировать препараты, вовремя закрывать дефициты, добиться первого ровного сна и не «разбрасываться» экстренными ночными выездами. Формат выбирается не «по желанию», а по безопасности здесь и сейчас; при этом конфиденциальность сохранена в любом сценарии — немаркированные визиты, разнесённые приёмы, доступ к данным по ролям.
Исследовать вопрос подробнее – [url=https://narkologicheskaya-klinika-mytishchi9.ru/]besplatnaya-narkologicheskaya-klinika[/url]
Если ожидаемая динамика «плоская», мы не усиливаем всё сразу. Меняется один параметр: скорость инфузии, порядок модулей или длительность вечерних включений. Такой «тонкий ремонт» безопаснее тотальной перестройки и лучше сохраняет ясность днём.
Подробнее – [url=https://narkologicheskaya-klinika-v-voronezhe15.ru/]www.domen.ru[/url]
1xbet giri? adresi [url=https://1xbet-56.com/]1xbet giri? adresi[/url] .
мелбет кз plinko стратегия [url=www.melbet72043.help]мелбет кз plinko стратегия[/url]
Режим 24/7 — это не только открытая дверь, но и правильно расставленные акценты по часам суток. Ночью — больше поведенческих опор и короткие видеовставки, днём — контроль витальных, уточнение плана гидратации и питания, вечером — «световые правила» и дыхательные циклы. В каждом окне мы знаем, что именно проверяем и что считаем успехом: так исчезают импровизации и ненужные «усиления», а пациент получает предсказуемую траекторию.
Узнать больше – [url=https://narkologicheskaya-klinika-v-stavropole15.ru/]наркологическая клиника вывод из запоя ставрополь[/url]
Сначала короткий осмотр и проверка совместимостей, затем — инфузионная терапия с мониторингом давления/пульса/сатурации, после — инструктаж семьи и назначение контрольного контакта. Такой порядок снижает тревогу и делает ночь предсказуемой: понятно, чего ждать, когда отдыхать и в какой момент связываться с врачом.
Изучить вопрос глубже – http://vyvod-iz-zapoya-sergiev-posad8.ru/
Такая карта снимает неопределённость. Пациент понимает, чего ожидать; родственники — когда и по каким метрикам судить об успехе; команда — что именно корректировать, чтобы сохранить управляемость терапии даже ночью.
Подробнее можно узнать тут – https://narkologicheskaya-klinika-murmansk15.ru/murmansk-narkologicheskaya-bolnicza
Если среда дома шумная или приватность под угрозой, мы предложим «короткий коридор» через отдельный вход амбулатории. Если условия позволяют, проводим процедуры на дому: свет приглушён, доступ к розетке организован, рядом столик для расходников и приборов. Этот «экологичный» сценарий, несмотря на простоту, заметно улучшает переносимость процедур и собирает устойчивый сон в первую ночь, что особенно важно на ранних этапах стабилизации.
Ознакомиться с деталями – https://narkologicheskaya-klinika-v-chelyabinske16.ru/oblastnaya-narkologicheskaya-klinika-chelyabinsk
1xbwt giri? [url=https://1xbet-giris-27.com/]1xbet-giris-27.com[/url] .
1xbet ?ye ol [url=https://1xbet-giris-30.com/]1xbet-giris-30.com[/url] .
Клиника «Наркосфера» — это специализированное медицинское учреждение, ориентированное на экстренную и плановую помощь пациентам с алкогольной, наркотической и медикаментозной зависимостью. В штате работают врачи с высшей квалификационной категорией, прошедшие обучение по международным протоколам наркологической и токсикологической помощи. Учреждение располагает собственной выездной службой, оборудованной мобильными аппаратами для диагностики и лечения в домашних условиях. Все сотрудники проходят регулярную аттестацию, участвуют в научных конференциях и владеют современными методами интенсивной терапии. «Наркосфера» функционирует без выходных и праздничных дней, обеспечивая круглосуточную доступность и полную конфиденциальность для каждого пациента.
Ознакомиться с деталями – [url=https://narkologicheskaya-pomoshh-novosibirsk0.ru/]оказание наркологической помощи в новосибирске[/url]
Домашний старт в Подольске уместен при устойчивых показателях и низком риске осложнений: нет упорной рвоты, высокой температуры, выраженной дезориентации, резких скачков давления и пульса, признаков судорожной готовности. Преимущества — приватность, скорость, меньше стыда и сопротивления, выше приверженность режиму сна и воды. Но если состояние «ходит по краю», мы честно предложим короткую стационарную стабилизацию на 24–48 часов: круглосуточный мониторинг позволяет раньше перехватить опасную динамику, дозировать препараты без пауз, обеспечить первый полноценный сон. Такой перевод — не «удорожание», а экономия рисков: на дистанции он чаще дешевле серии ночных экстренных вызовов и эмоциональных «качелей». В обоих сценариях сохраняется конфиденциальность: немаркированные маршруты, разнесённые по времени визиты, доступ к данным по ролям. Решение всегда объясняется простыми словами: что даст каждый формат сегодня и почему он безопаснее.
Подробнее можно узнать тут – [url=https://narkologicheskaya-klinika-podolsk9.ru/]anonimnaya-narkologicheskaya-klinika[/url]
Карта понятна пациенту и семье: видно, что будет происходить, по каким признакам мы перейдём к следующему шагу и когда состоится проверка. Это снижает тревожность и повышает приверженность плану.
Ознакомиться с деталями – [url=https://vyvod-iz-zapoya-petrozavodsk15.ru/]вывод из запоя цена петрозаводск[/url]
mostbet ставки регистрация [url=www.mostbet83507.help]www.mostbet83507.help[/url]
«Тёмные часы» вечера — время импульсивных решений. Мы даём короткие, нейтральные инструменты на 20–40 минут: тёплый душ, прогулка рядом с домом при устойчивых показателях, дыхательная практика, короткий созвон с «своим» человеком. Эти бесплатные шаги поддерживают ровный сон и уменьшают вероятность «дорогих» экстренных повторов.
Исследовать вопрос подробнее – https://narkologicheskaya-klinika-himki9.ru/anonimnaya-narkologicheskaya-klinika-v-himkah/
1xbet turkey [url=https://1xbet-giris-28.com/]1xbet-giris-28.com[/url] .
Мы придерживаемся инженерной логики: цель > маркер > окно проверки > отключение модуля. Никаких «сильных коктейлей на всякий случай»: сначала один точный шаг, затем — проверка результата. Именно так формируется прозрачность и доверие: пациент видит причину каждого назначения и понимает момент его завершения. Это уменьшает тревогу, ускоряет восстановление и убирает «инерцию лечения», когда лишние вмешательства продолжаются просто по привычке.
Подробнее можно узнать тут – [url=https://narkolog-na-dom-v-samare16.ru/]врач нарколог на дом[/url]
Режим 24/7 — это не только открытая дверь, но и правильно расставленные акценты по часам суток. Ночью — больше поведенческих опор и короткие видеовставки, днём — контроль витальных, уточнение плана гидратации и питания, вечером — «световые правила» и дыхательные циклы. В каждом окне мы знаем, что именно проверяем и что считаем успехом: так исчезают импровизации и ненужные «усиления», а пациент получает предсказуемую траекторию.
Подробнее – [url=https://narkologicheskaya-klinika-v-stavropole15.ru/]наркологическая клиника нарколог[/url]
mostbet линия ставок [url=http://mostbet21480.help/]mostbet линия ставок[/url]
«Как отмечает главный врач-нарколог Виктор Сергеевич Левченко, «современная наркологическая клиника должна обеспечивать не только медикаментозное лечение, но и комплексную поддержку пациента на всех этапах восстановления».»
Узнать больше – [url=https://narkologicheskaya-klinika-krasnodar14.ru/]наркологическая клиника нарколог[/url]
«Как отмечает врач-нарколог Алексей Николаевич Прудников, «выезд нарколога на дом — это возможность стабилизировать состояние пациента в привычной обстановке, снизив стресс и риски осложнений».»
Выяснить больше – [url=https://narkolog-na-dom-v-krasnodare14.ru/]вызвать врача нарколога на дом в краснодаре[/url]
Если на телефонном этапе выявляются «красные флаги» — спутанность, выраженная одышка, «скачущий» ритм, неукротимая рвота, — мы рекомендуем короткое окно стационарного наблюдения. При низком риске целесообразно начать дома: привычная среда снижает сенсорную нагрузку, а телемедицинские включения вечером по 15–20 минут помогают пройти «трудный час» без поездок.
Детальнее – http://vyvod-iz-zapoya-v-kaliningrade15.ru/klinika-vyvod-iz-zapoya-kaliningrad/
В городском ритме Ставрополя дорога сама по себе может усугублять симптомы: плотный трафик, резкие звуки, длинные коридоры ожидания. Поэтому «СтаврВита» разворачивает секторные выезды: немаркированный транспорт, гражданская одежда специалистов, согласованная парковка и подъезд, доставка расходников отдельно от врача при необходимости — чтобы на месте сразу переходить к диагностике и запуску инфузии. Переписка ведётся нейтральными формулировками, уведомления «беззвучные», документы без стигматизирующих слов. По желанию всё общение идёт через доверенное лицо: оно получает короткие апдейты в согласованные «окна», не перегружаясь клиническими деталями.
Изучить вопрос глубже – [url=https://vyvod-iz-zapoya-stavropol15.ru/]вывод из запоя на дому цена ставрополь[/url]
Организм, подвергшийся воздействию наркотических веществ, нуждается в очищении от токсинов. Детоксикация проводится под медицинским контролем с применением препаратов, поддерживающих работу внутренних органов и минимизирующих неприятные симптомы.
Подробнее – [url=https://lechenie-narkomanii-novosibirsk0.ru/]лечение наркомании в стационаре[/url]
1x bet [url=https://1xbet-56.com/]1x bet[/url] .
Первые часы определяют траекторию. Мы работаем по карте — у каждого окна есть цель, действия, маркеры контроля и критерий перехода. Если ответ «плоский», меняем один элемент и назначаем повторную оценку. Это дисциплинирует решения и защищает от полипрагмазии.
Исследовать вопрос подробнее – [url=https://vyvod-iz-zapoya-petrozavodsk15.ru/]скорая вывод из запоя в петрозаводске[/url]
Мы не подгоняем всех под единый сценарий. Если состояние устойчивое, нет упорной рвоты, высокой температуры, выраженной дезориентации и резких скачков давления и пульса — рационален домашний старт: приватно, быстрее и без лишних переездов. Врач приедет без маркировки, проведёт осмотр, запустит инфузионную терапию по показаниям, оставит письменные рекомендации и «красные флажки». Если же есть признаки угрозы осложнений — обезвоживание, аритмии, риск судорог, боли за грудиной или в животе, лихорадка, спутанность сознания, тяжёлая соматика — мы честно предлагаем короткую стационарную стабилизацию на 24–48 часов. Под круглосуточным наблюдением проще корректировать схемы, вовремя закрывать дефициты, защитить сон и быстрее вернуть управляемость поведению. В обоих форматах маршрут прозрачен: согласованные окна связи, фиксированные цели на ближайшие 72 часа и отсутствие «пакетов ради прайса». Благодаря этому решения принимаются спокойно, без угадываний и эмоциональных раскачек, которые обычно ломают прогресс и удорожают лечение.
Исследовать вопрос подробнее – [url=https://vyvod-iz-zapoya-balashiha9.ru/]вывод из запоя балашиха[/url]
1 xbet giri? [url=https://1xbet-53.com/]1xbet-53.com[/url] .
Решение обратиться за наркологической помощью часто упирается в страх огласки и сомнения в эффективности. В «МедТрезвие» эти барьеры снимаются за счёт клинической достаточности и предсказуемой организации. Диагностика и вмешательства назначаются строго по показаниям: врач оценит риски сердечно-сосудистых осложнений, состояние печени и поджелудочной железы, уровень тревоги и сна, наличие депрессивных симптомов. При устойчивом состоянии часть процедур выполняется на дому, что снижает стресс, а при признаках нестабильности — рекомендуется стационар с круглосуточным наблюдением. Анонимность поддерживается шифрованием данных, разграничением доступа и информированием родственников только по согласию пациента. Финансовые условия обсуждаются заранее: семья понимает, из чего складывается смета, и может планировать ресурс без опасений «скрытых» позиций. В результате лечение становится управляемым процессом, где медицинская безопасность и уважение к личной жизни человека — обязательные элементы, а не рекламные обещания.
Получить дополнительные сведения – [url=https://narkologicheskaya-klinika-moskva9.ru/]narkologicheskaya-klinika-moskva9.ru/[/url]
1xbet giris [url=https://1xbet-giris-27.com/]1xbet giris[/url] .
1xbet mobi [url=https://1xbet-giris-30.com/]1xbet mobi[/url] .
Районы с плотной застройкой, дворовые проезды, пиковые часы — всё учитывается при планировании визитов. Чем меньше холостых перемещений, тем быстрее начинается помощь и тем ниже вероятность внеплановых повторов «по тревоге».
Получить дополнительную информацию – [url=https://narkologicheskaya-klinika-mytishchi9.ru/]наркологическая клиника нарколог[/url]
Чтобы соотнести риски и плотность наблюдения до очного осмотра, удобнее всего взглянуть на одну сводную таблицу. Это не замена решению врача, но понятный ориентир для семьи: чем выше вероятность осложнений, тем плотнее мониторинг и быстрее доступ к коррекциям.
Ознакомиться с деталями – http://narkologicheskaya-klinika-lyubercy0.ru
Круглосуточная доступность важна, но ещё важнее — структурированность. В «ПолярМед Центре» каждое окно времени имеет цель, действия и ясные критерии перехода. Если ответ «плоский», меняем один параметр (темп, объём, последовательность) и повторно оцениваем состояние в назначённое время. Это поддерживает причинно-следственную связь и исключает полипрагмазию.
Детальнее – [url=https://narkologicheskaya-klinika-murmansk15.ru/]наркологическая клиника стационар в мурманске[/url]
Сначала короткий осмотр и проверка совместимостей, затем — инфузионная терапия с мониторингом давления/пульса/сатурации, после — инструктаж семьи и назначение контрольного контакта. Такой порядок снижает тревогу и делает ночь предсказуемой: понятно, чего ждать, когда отдыхать и в какой момент связываться с врачом.
Детальнее – [url=https://vyvod-iz-zapoya-sergiev-posad8.ru/]вывод из запоя сергиев[/url]
Если на телефонном этапе выявляются «красные флаги» — спутанность, выраженная одышка, «скачущий» ритм, неукротимая рвота, — мы рекомендуем короткое окно стационарного наблюдения. При низком риске целесообразно начать дома: привычная среда снижает сенсорную нагрузку, а телемедицинские включения вечером по 15–20 минут помогают пройти «трудный час» без поездок.
Изучить вопрос глубже – [url=https://vyvod-iz-zapoya-v-kaliningrade15.ru/]вывод из запоя недорого в калининграде[/url]
Ниже — «скелет» визита. На месте врач адаптирует содержание под возраст, соматику, текущие лекарства и проявления абстиненции. Главная идея — быстро получить цифры, аккуратно запустить инфузию и заранее зафиксировать ориентиры, чтобы семья не импровизировала в «трудный час».
Разобраться лучше – [url=https://vyvod-iz-zapoya-stavropol15.ru/]вывод из запоя круглосуточно[/url]
1xbet lite [url=https://1xbet-giris-28.com/]1xbet-giris-28.com[/url] .
В «Центр Трезвости Воронеж» приватность не обсуждается — она проектируется. Выбор нейтральных формулировок в чеках, немаркированные выезды, «беззвучные» уведомления, отдельные входы и доступ к карте наблюдения только по ролям — это норма, а не «услуга». Пациент может назначить доверенное лицо, чтобы получать краткие апдейты в согласованные временные окна.
Разобраться лучше – [url=https://narkologicheskaya-klinika-v-voronezhe15.ru/]наркологическая клиника нарколог в воронеже[/url]
1xbet yeni giri? adresi [url=https://1xbet-giris-32.com/]1xbet-giris-32.com[/url] .
Круглосуточная доступность важна, но ещё важнее — структурированность. В «ПолярМед Центре» каждое окно времени имеет цель, действия и ясные критерии перехода. Если ответ «плоский», меняем один параметр (темп, объём, последовательность) и повторно оцениваем состояние в назначённое время. Это поддерживает причинно-следственную связь и исключает полипрагмазию.
Подробнее – [url=https://narkologicheskaya-klinika-murmansk15.ru/]платная наркологическая клиника в мурманске[/url]
доставка букет цветов москва заказать недорого [url=zakazat-cveti-moskva.ru]zakazat-cveti-moskva.ru[/url] .
1 xbet giri? [url=https://1xbet-giris-29.com/]1xbet-giris-29.com[/url] .
1xbet t?rkiye giri? [url=https://1xbet-giris-30.com/]1xbet t?rkiye giri?[/url] .
1win аккаунт баста шуд [url=https://1win91403.help]https://1win91403.help[/url]
1xbet yeni adresi [url=https://1xbet-giris-29.com/]1xbet yeni adresi[/url] .
В этой статье обсуждаются актуальные медицинские вопросы, которые волнуют общество. Мы обращаем внимание на проблемы, касающиеся здравоохранения и лечения, а также на новшества в области медицины. Читатели будут осведомлены о последних событиях и смогут следить за тенденциями в медицине.
Подробнее – [url=https://northern-clinic.ru/]наркологическая клиника[/url]
https://betfun.cat/
Betfun sobresale en el sector de apuestas de Argentina de apuestas como una propuesta integral que pertenece a Track Gaming Buenos Aires S.A., brindando una oferta que supera los 500 juegos y accion de mas de 30 deportes. Aceptando pesos argentinos (ARS), la casa de apuestas da la bienvenida a los nuevos jugadores con un bono de bienvenida de $15,000 ARS gratis al hacer el registro, ademas de un 100% de match en el primer deposito para multiplicar por dos los fondos iniciales.
https://betwinner.cat/
Betwinner se ha consolidado en el mercado argentino para el ano 2026 como una opcion destacada en apuestas deportivas y juegos de casino, gracias a su enfoque en el apostador argentino con manejo de moneda local y bonos de bienvenida que llegan hasta los $94.250 pesos.
Ресурсы 18+ функционируют как отдельные площадки с возрастными ограничениями.
Их основная задача — гарантировать доступ к материалам, предназначенному исключительно взрослой аудитории.
Такие ресурсы предоставляют возможность создателям размещать работы, не рассчитанные для несовершеннолетних.
Подобные сервисы играют и просветительскую функцию в сфере отношений.
Администраторы подобных проектов обязаны соблюдать законодательные требования о распространении подобного контента.
Кроме того, данные платформы нередко используют специальные меры верификации пользователей.
Таким образом, наличие подобных площадок — это ответ на естественный спрос определённой аудитории.
сладкие девушки
ремонт здания [url=https://remont-zdaniya-1.ru/]ремонт здания[/url] .
Участие в государственных и коммерческих процедурах требует точной подготовки, понимания законодательства и внимательной работы с документами. Для многих компаний самостоятельная работа с закупками становится сложной задачей: необходимо отслеживать новые закупки, анализировать требования, оформлять документы и взаимодействовать с площадками.
Не упустите важные детали – [url=https://tendernoe-soprovozhdenie-rostov-na-donu.ru/]тендерное сопровождение под ключ[/url]
1 x bet [url=https://1xbet-giris-28.com/]1xbet-giris-28.com[/url] .
Коммерческий и государственный тендер — это конкурентная процедура выбора поставщика товаров или оказания услуг. Заказчик размещает требования, а компании подают заявки и участвуют в торгах.
Не упустите важные детали – https://tendernoe-soprovozhdenie-rostov-na-donu.ru
1 xbet giri? [url=https://1xbet-giris-31.com/]1 xbet giri?[/url] .
1xbwt giri? [url=https://1xbet-giris-32.com/]1xbet-giris-32.com[/url] .
доставка букетов день в день москва [url=http://zakazat-cveti-moskva.ru]http://zakazat-cveti-moskva.ru[/url] .
1xbet tr giri? [url=https://1xbet-giris-35.com/]1xbet-giris-35.com[/url] .
В этой статье мы обсудим процесс восстановления после зависимостей, акцентируя внимание на различных методах и подходах к реабилитации. Читатели узнают, как создать план выздоровления и использовать полезные ресурсы для достижения устойчивых изменений.
Получить дополнительные сведения – https://narcolog-life.com/molitva-protiv-alkogolizma
В этой публикации мы обсуждаем современные методы лечения различных заболеваний. Читатели узнают о новых медикаментах, терапиях и исследованиях, которые активно применяются для лечения. Мы нацелены на то, чтобы предоставить практические знания, которые могут помочь в борьбе с недугами.
Разобраться лучше – [url=https://narkologiya.pro/alkogolizm/istorii-sumevshih-izbavitsya-ot-alkogolizma/]история борьбы с алкоголизмом[/url]
1xbet resmi sitesi [url=https://1xbet-giris-34.com/]1xbet-giris-34.com[/url] .
ремонт и реконструкция зданий [url=https://remont-zdaniya-1.ru/]ремонт и реконструкция зданий[/url] .
1xbet giri? 2025 [url=https://1xbet-giris-28.com/]1xbet giri? 2025[/url] .
1xbet yeni giri? [url=https://1xbet-giris-31.com/]1xbet yeni giri?[/url] .
Эта информационная публикация освещает широкий спектр тем из мира медицины. Мы предлагаем читателям ясные и понятные объяснения современных заболеваний, методов профилактики и лечения. Информация будет полезна как пациентам, так и медицинским работникам, желающим поддержать уровень своих знаний.
Ознакомиться с деталями – [url=https://alkogolikum.ru/narkologicheskaya-pomosh/narkolog-na-dom/]вызов нарколога на дом анонимно[/url]
1xbet turkey [url=https://1xbet-giris-36.com/]1xbet turkey[/url] .
Этот информативный текст сочетает в себе темы здоровья и зависимости. Мы обсудим, как хронические заболевания могут усугубить зависимости и наоборот, как зависимость может влиять на общее состояние здоровья. Читатели получат представление о комплексном подходе к лечению как физического, так и психического состояния.
Подробнее тут – https://narcolog-life.com/article/kapli-snizhayushhie-tyagu-k-alkogolyu-chto-nuzhno-znat
1xbet giri? [url=https://1xbet-giris-32.com/]1xbet giri?[/url] .
1xbet tr giri? [url=https://1xbet-giris-35.com/]1xbet-giris-35.com[/url] .
mostbet mirror not working [url=https://www.mostbet07493.help]mostbet mirror not working[/url]
Этот информативный текст сочетает в себе темы здоровья и зависимости. Мы обсудим, как хронические заболевания могут усугубить зависимости и наоборот, как зависимость может влиять на общее состояние здоровья. Читатели получат представление о комплексном подходе к лечению как физического, так и психического состояния.
Получить дополнительную информацию – [url=https://narcolog-life.com/kakie-tabletki-pomogayut-ot-zapoya/]таблетки от запоя[/url]
1xbet giri? adresi [url=https://1xbet-giris-40.com/]1xbet giri? adresi[/url] .
капитальный ремонт квартиры этапы [url=https://remont-zdaniya-1.ru/]remont-zdaniya-1.ru[/url] .
1xbet guncel [url=https://1xbet-giris-38.com/]1xbet guncel[/url] .
1win cashback faizləri [url=https://1win03748.help/]https://1win03748.help/[/url]
mostbet мобильные ставки [url=mostbet42395.help]mostbet42395.help[/url]
1xbet giri?i [url=https://1xbet-giris-41.com/]1xbet giri?i[/url] .
1xbwt giri? [url=https://1xbet-giris-32.com/]1xbet-giris-32.com[/url] .
самые крутые букеты [url=www.zakazat-cveti-moskva.ru]www.zakazat-cveti-moskva.ru[/url] .
1xbet giri? yapam?yorum [url=https://1xbet-giris-35.com/]1xbet giri? yapam?yorum[/url] .
Часто предприниматели объединяют понятия тендер и госзакупки, так как обе процедуры связаны с конкурсным выбором поставщика. Однако между ними существуют определённые различия, которые важно понимать перед началом работы в этой сфере.
Полный разбор — только здесь – [url=https://tendernoe-soprovozhdenie-rostov-na-donu.ru/]участие в тендерах госзакупок ростов на дону[/url]
1xbet giri? 2025 [url=https://1xbet-giris-37.com/]1xbet-giris-37.com[/url] .
ремонт здания [url=https://remont-zdaniya-1.ru/]ремонт здания[/url] .
1x giri? [url=https://1xbet-giris-42.com/]1xbet-giris-42.com[/url] .
1win casino online [url=1win19458.help]1win19458.help[/url]
В этой статье мы обсудим процесс восстановления после зависимостей, акцентируя внимание на различных методах и подходах к реабилитации. Читатели узнают, как создать план выздоровления и использовать полезные ресурсы для достижения устойчивых изменений.
Узнать больше – [url=https://narcolog-life.com/article/kodirovanie-i-gipnoz-protiv-kureniya/]лучший гипноз от курения[/url]
В данной статье рассматриваются проблемы общественного здоровья и социальные факторы, влияющие на него. Мы акцентируем внимание на значении профилактики и осведомленности в защите здоровья на уровне общества. Читатели смогут узнать о новых инициативах и программах, направленных на улучшение здоровья населения.
Детальнее – [url=https://northern-clinic.ru/lechenie-alkogolizma-na-domu/]отправить на лечение от алкоголизма[/url]
1xbet yeni adresi [url=https://1xbet-giris-42.com/]1xbet-giris-42.com[/url] .
mostbet verificare rapidă [url=https://mostbet2009.help/]https://mostbet2009.help/[/url]
bahis sitesi 1xbet [url=https://1xbet-giris-41.com/]bahis sitesi 1xbet[/url] .
В этой статье мы рассмотрим современные достижения в области медицины, включая инновационные методы лечения и диагностики. Мы обсудим важность профилактики заболеваний и роль технологий в улучшении качества здравоохранения. Читатели узнают о влиянии медицины на повседневную жизнь и ее значение для современного общества.
Детальнее – [url=https://narcolog-life.com/article/razrushitelnye-posledstviya-narkomanii/]последствия наркомании для личности[/url]
Участие в государственных и коммерческих процедурах требует точной подготовки, понимания законодательства и внимательной работы с документами. Для многих компаний самостоятельная работа с закупками становится сложной задачей: необходимо отслеживать новые закупки, анализировать требования, оформлять документы и взаимодействовать с площадками.
Все ответы на ваши вопросы – [url=https://tendernoe-soprovozhdenie-rostov-na-donu.ru/]участие в тендерах госзакупок[/url]
1xbet [url=https://1xbet-giris-28.com/]1xbet[/url] .
1xbwt giri? [url=https://1xbet-giris-31.com/]1xbwt giri?[/url] .
В этой статье мы рассматриваем разные способы борьбы с алкогольной зависимостью. Обсуждаются методы лечения, программы реабилитации и советы для поддержки близких. Читатели получат информацию о том, как преодолеть зависимость и добиться успешного выздоровления.
Подробнее – [url=https://northern-clinic.ru/lechenie-alkogolizma-v-statsionare/]пройти лечение в стационаре[/url]
1xbetgiri? [url=https://1xbet-giris-42.com/]1xbet-giris-42.com[/url] .
Обращение в местную клинику даёт важное преимущество — доступность. Здесь можно пройти диагностику, детоксикацию, вывод из запоя, курс лечения и реабилитации в привычном городе, без выснаживающих переездов. Пациенту легче решиться на стационар, когда он понимает, что близкие рядом и в любой момент могут приехать, поучаствовать в обсуждении плана терапии, привезти необходимые вещи. При этом подход остаётся профессиональным: учитываются стаж зависимости, сопутствующие заболевания, психоэмоциональное состояние, семейная ситуация. Лечение строится не вокруг одной «волшебной» процедуры, а как последовательный маршрут — от первой консультации до выхода в стабильную ремиссию.
Получить дополнительные сведения – [url=https://narkologicheskaya-klinika-chekhov11.ru/]наркологический центр клиника[/url]
Чем дольше продолжается запой, тем более непредсказуемой становится реакция организма. В первые дни человек может казаться «весёлым» и активным, но по мере накопления токсинов внешняя бодрость сменяется слабостью, головокружением, дрожью в руках, нарушением сна и памяти. Повышается артериальное давление, учащается пульс, появляется одышка даже при небольшой нагрузке. Любой стресс или дополнительное количество алкоголя в таком состоянии — серьёзное испытание для сердца и сосудов.
Подробнее тут – [url=https://vyvod-iz-zapoya-ivanteevka11.ru/]вывод из запоя отзывы[/url]
1win ставки на киберспорт Кыргызстан [url=1win63197.help]1win ставки на киберспорт Кыргызстан[/url]
мелбет отыгрыш бонуса [url=http://melbet84062.help/]http://melbet84062.help/[/url]
https://miamifightcard.com/
When it comes to MediaFightCard, the wagering lines present a intriguing dynamic with champions listed as the ‘dogs and aspirants occupying favorite status. In the main event for the unclaimed light heavyweight title, previous belt-holder Jiri Prochazka debuted as a modest -143 favorite over the ascending Carlos Ulberg, who is priced at a +116 underdog even with his nine-fight winning streak.
Часто предприниматели объединяют понятия тендер и госзакупки, так как обе процедуры связаны с конкурсным выбором поставщика. Однако между ними существуют определённые различия, которые важно понимать перед началом работы в этой сфере.
Глубже в тему — здесь – [url=https://tendernoe-soprovozhdenie-rostov-na-donu.ru/]участие в тендерах госзакупок в ростове на дону[/url]
1 xbet [url=https://1xbet-giris-39.com/]1 xbet[/url] .
1xbet giri? g?ncel [url=https://1xbet-giris-44.com/]1xbet giri? g?ncel[/url] .
Эта статья освещает различные аспекты освобождения от зависимости и пути к выздоровлению. Мы обсуждаем важность осознания своей проблемы и обращения за помощью. Читатели получат практические советы о том, как преодолевать трудности и строить новую жизнь без зависимости.
Получить дополнительную информацию – [url=https://narcolog-life.com/article/razrushitelnye-posledstviya-narkomanii/]последствия наркомании для общества[/url]
1xbet mobil giri? [url=https://1xbet-giris-33.com/]1xbet-giris-33.com[/url] .
Dressing stylish projects a strong first impression.
Your attire communicates loudly before you even speak a word.
It boosts your personal confidence and mood noticeably.
Your polished look signals competence in the office.
https://blog.nash-mihailovsk.ru/kultovaya-obuv-rick-owens-drkshdw-i-geobasket-9715189/
Fashionable choices allow you to showcase your unique personality.
Others often perceive stylish people as more capable and reliable.
Therefore, investing in your wardrobe is an valuable step in your personal brand.
Этот краткий обзор предлагает сжатую информацию из области медицины, включая ключевые факты и последние новости. Мы стремимся сделать информацию доступной и понятной для широкой аудитории, что позволит читателям оставаться в курсе актуальных событий в здравоохранении.
Узнать больше – [url=https://narcolog-life.com/griby-ot-alkogolizma/]навозный гриб от алкоголизма[/url]
1xbet [url=https://1xbet-giris-44.com/]1xbet[/url] .
1xbet resmi giri? [url=https://1xbet-giris-39.com/]1xbet resmi giri?[/url] .
Коммерческий и государственный тендер — это конкурентная процедура выбора поставщика товаров или оказания услуг. Заказчик размещает требования, а компании подают заявки и участвуют в торгах.
Разберитесь досконально – [url=https://tendernoe-soprovozhdenie-rostov-na-donu.ru/]тендерное сопровождение тендерами[/url]
Часто предприниматели объединяют понятия тендер и госзакупки, так как обе процедуры связаны с конкурсным выбором поставщика. Однако между ними существуют определённые различия, которые важно понимать перед началом работы в этой сфере.
Узнайте, как это работает – [url=https://tendernoe-soprovozhdenie-rostov-na-donu.ru/]тендерное сопровождение ип[/url]
1x giri? [url=https://1xbet-giris-34.com/]1xbet-giris-34.com[/url] .
1xbet lite [url=https://1xbet-giris-33.com/]1xbet-giris-33.com[/url] .
1win slots oyunu [url=https://1win57196.help/]https://1win57196.help/[/url]
pin-up Oʻzbekistonda pul yechish [url=www.pinup35741.help]pin-up Oʻzbekistonda pul yechish[/url]
1xbwt giri? [url=https://1xbet-giris-42.com/]1xbet-giris-42.com[/url] .
1x bet giri? [url=https://1xbet-giris-43.com/]1xbet-giris-43.com[/url] .
Этот документ охватывает важные аспекты медицинской науки, сосредотачиваясь на ключевых вопросах, касающихся здоровья населения. Мы рассматриваем свежие исследования, клинические рекомендации и лучшие практики, которые помогут улучшить качество лечения и профилактики заболеваний. Читатели получат возможность углубиться в различные медицинские дисциплины.
Разобраться лучше – [url=https://northern-clinic.ru/stati/alkogol-i-preparaty-ot-kashlya.html]кагоцел с алкоголем можно[/url]
1xbet com giri? [url=https://1xbet-giris-39.com/]1xbet-giris-39.com[/url] .
Финансовые инструменты позволяют заказчику убедиться в надежности участника и его готовности выполнить обязательства по контракту. При этом грамотное сопровождение снижает вероятность финансовых рисков и помогает правильно оформить документы для банка.
Разгадайте все загадки – [url=https://tendernoe-soprovozhdenie-rostov-na-donu.ru/]комплексное тендерное сопровождение в ростове на дону[/url]
Медицинская публикация представляет собой свод актуальных исследований, экспертных мнений и новейших достижений в сфере здравоохранения. Здесь вы найдете информацию о новых методах лечения, прорывных технологиях и их практическом применении. Мы стремимся сделать актуальные медицинские исследования доступными и понятными для широкой аудитории.
Исследовать вопрос подробнее – [url=https://narcolog-life.com/article/metadon-sostav-effekt-i-posledstviya/]метадон эффект[/url]
1xbet resmi giri? [url=https://1xbet-giris-34.com/]1xbet resmi giri?[/url] .
1xbwt giri? [url=https://1xbet-giris-42.com/]1xbet-giris-42.com[/url] .
В этой публикации мы предложим ряд рекомендаций по избавлению от зависимостей и успешному восстановлению. Мы обсудим методы привлечения поддержки и важность самосознания. Эти советы помогут людям вернуться к нормальной жизни и стать на путь выздоровления.
Получить дополнительную информацию – [url=https://narkologiya.pro/alkogolizm/alkogol-i-risk-suitsida/]профилактика алкоголизма наркомании и суицидов[/url]
1xbet giris [url=https://1xbet-giris-39.com/]1xbet giris[/url] .
нейросеть для студентов [url=https://nejroset-dlya-referatov-1.ru/]нейросеть для студентов[/url] .
Эта статья подробно расскажет о процессе выздоровления, который включает в себя эмоциональную, физическую и психологическую реабилитацию. Мы обсуждаем значимость поддержки и наличие профессиональных программ. Читатели узнают, как строить новую жизнь и не возвращаться к старым привычкам.
Получить дополнительную информацию – [url=https://narkologiya.pro/psihiatriya/gendernye-aspekty-psihicheskih-zabolevaniy/]психические заболевания человека[/url]
Этот информативный текст сочетает в себе темы здоровья и зависимости. Мы обсудим, как хронические заболевания могут усугубить зависимости и наоборот, как зависимость может влиять на общее состояние здоровья. Читатели получат представление о комплексном подходе к лечению как физического, так и психического состояния.
Детальнее – [url=https://narcolog-life.com/article/metadon-sostav-effekt-i-posledstviya/]метадон состав[/url]
нейросеть онлайн для учебы [url=https://nejroset-dlya-referatov-3.ru/]nejroset-dlya-referatov-3.ru[/url] .
нейросеть текст для учебы [url=https://nejroset-dlya-referatov-2.ru/]nejroset-dlya-referatov-2.ru[/url] .
1xbet giri? yapam?yorum [url=https://1xbet-giris-46.com/]1xbet giri? yapam?yorum[/url] .
нейросеть для учебы [url=https://nejroset-dlya-referatov.ru/]nejroset-dlya-referatov.ru[/url] .
1xbet tr [url=https://1xbet-giris-43.com/]1xbet tr[/url] .
ии для учебы студентов [url=https://nejroset-dlya-referatov-2.ru/]nejroset-dlya-referatov-2.ru[/url] .
нейросеть для рефератов [url=https://nejroset-dlya-referatov-3.ru/]нейросеть для рефератов[/url] .
мостбет кэшбэк Кыргызстан [url=mostbet38195.help]mostbet38195.help[/url]
ии для учебы студентов [url=https://nejroset-dlya-referatov-1.ru/]nejroset-dlya-referatov-1.ru[/url] .
1xbetgiri? [url=https://1xbet-giris-46.com/]1xbetgiri?[/url] .
1xbet giri? 2025 [url=https://1xbet-giris-45.com/]1xbet giri? 2025[/url] .
генерация [url=https://nejroset-dlya-referatov.ru/]nejroset-dlya-referatov.ru[/url] .
1 x bet giri? [url=https://1xbet-giris-43.com/]1xbet-giris-43.com[/url] .
hogyan lehet telepíteni a mostbet appot androidra [url=https://mostbet2021.help/]https://mostbet2021.help/[/url]
1win вывод без комиссии элсом [url=https://1win41825.help/]1win вывод без комиссии элсом[/url]
доставка букет цветов москва недорого [url=www.dostavka-cvetov-moskva495.ru]www.dostavka-cvetov-moskva495.ru[/url] .
чат нейросеть для учебы [url=https://nejroset-dlya-referatov-3.ru/]nejroset-dlya-referatov-3.ru[/url] .
нейросеть для школьников и студентов [url=https://nejroset-dlya-referatov-2.ru/]нейросеть для школьников и студентов[/url] .
Финансовые инструменты позволяют заказчику убедиться в надежности участника и его готовности выполнить обязательства по контракту. При этом грамотное сопровождение снижает вероятность финансовых рисков и помогает правильно оформить документы для банка.
Не оставайтесь в неведении – https://tendernoe-soprovozhdenie-rostov-na-donu.ru
1xbet yeni giri? adresi [url=https://1xbet-giris-46.com/]1xbet yeni giri? adresi[/url] .
1xbet giri? 2025 [url=https://1xbet-giris-45.com/]1xbet giri? 2025[/url] .
ии для учебы студентов [url=https://nejroset-dlya-referatov-1.ru/]nejroset-dlya-referatov-1.ru[/url] .
Эта информационная публикация освещает широкий спектр тем из мира медицины. Мы предлагаем читателям ясные и понятные объяснения современных заболеваний, методов профилактики и лечения. Информация будет полезна как пациентам, так и медицинским работникам, желающим поддержать уровень своих знаний.
Детальнее – [url=https://narkologiya.pro/psihiatriya/trevozhnye-rasstroystva-prichiny-diagnostika-i-metody-korrektsii/]причины тревожного расстройства[/url]
Эта публикация исследует взаимосвязь зависимости и психологии. Мы обсудим, как психологические аспекты влияют на появление зависимостей и процесс выздоровления. Читатели смогут понять важность профессиональной поддержки и применения научных подходов в терапии.
Получить дополнительную информацию – [url=https://alkogolikum.ru/stati/pravila-povedeniya-s-chelovekom-v-zapoe.html]человек в запое как вывести[/url]
Финансовые инструменты позволяют заказчику убедиться в надежности участника и его готовности выполнить обязательства по контракту. При этом грамотное сопровождение снижает вероятность финансовых рисков и помогает правильно оформить документы для банка.
Узнайте, как это работает – http://tendernoe-soprovozhdenie-rostov-na-donu.ru
Эта публикация обращает внимание на важность профилактики зависимостей. Мы обсудим, как осведомленность и образование могут помочь в предотвращении возникновения зависимости. Читатели смогут ознакомиться с полезными советами и ресурсами, которые способствуют здоровому образу жизни.
Ознакомиться с деталями – https://alkogolikum.ru/stati/dizajnerskie-narkotiki.html
https://juegaenlinea.cat/
El sitio Juegaenlinea se establece en 2026 como un referente en el mercado colombiano, proporcionando un ambiente fiable y abarcador para juegos de casino en linea y apuestas deportivas en linea bajo licencia internacional avalada por Curazao.
Creada principalmente pensando en el audiencia de la region, esta propuesta permite operar en COP y cuenta con una extensa oferta de entretenimiento gracias a mas de 35 estudios de software certificados.
Участие в государственных и коммерческих процедурах требует точной подготовки, понимания законодательства и внимательной работы с документами. Для многих компаний самостоятельная работа с закупками становится сложной задачей: необходимо отслеживать новые закупки, анализировать требования, оформлять документы и взаимодействовать с площадками.
Полный разбор — только здесь – [url=https://tendernoe-soprovozhdenie-rostov-na-donu.ru/]тендерное сопровождение тендерами[/url]
Выбор конкретного метода всегда начинается с диагностики. Врач оценивает стаж зависимости, частоту и продолжительность запоев, наличие сопутствующих заболеваний сердца, печени, нервной системы, психических расстройств. Учитывается прошлый опыт лечения: были ли рецидивы после предыдущих кодирований, как пациент переносил процедуры, что именно вызывало срыв. На этой основе специалист предлагает один или несколько вариантов, подробно поясняя плюсы, ограничения и возможные риски каждого.
Получить больше информации – https://kodirovanie-ot-alkogolizma-chekhov11.ru/kodirovanie-ot-alkogolizma-vyezd-na-dom-v-chekhove/
1xbet lite [url=https://1xbet-giris-46.com/]1xbet lite[/url] .
мелбет авиатор [url=https://melbet27438.help/]https://melbet27438.help/[/url]
1xbet lite [url=https://1xbet-giris-45.com/]1xbet lite[/url] .
В этом обзоре мы обсудим современные методы борьбы с зависимостями, включая медикаментозную терапию и психотерапию. Мы представим последние исследования и их результаты, чтобы читатели могли быть в курсе наиболее эффективных подходов к лечению и поддержке.
Подробнее тут – [url=https://narcolog-life.com/article/kak-uberech-rebenka-ot-igromanii/]как игроманию убрать у ребенка с телефона[/url]
нейросеть для школьников и студентов [url=https://nejroset-dlya-referatov-1.ru/]nejroset-dlya-referatov-1.ru[/url] .
Часто предприниматели объединяют понятия тендер и госзакупки, так как обе процедуры связаны с конкурсным выбором поставщика. Однако между ними существуют определённые различия, которые важно понимать перед началом работы в этой сфере.
Раскройте все секреты – [url=https://tendernoe-soprovozhdenie-rostov-na-donu.ru/]участие в тендерах госзакупок ростов на дону[/url]
Под кодированием многие представляют себе один-единственный метод, хотя на деле специалист в Чехове подбирает схему индивидуально. В общих чертах подходы можно разделить на две большие группы: медикаментозные и психотерапевтические. Медикаментозный вариант предполагает использование препаратов, которые либо вызывают крайне неприятную реакцию при приёме алкоголя, либо блокируют ощущение удовольствия от опьянения. Человек знает, что нарушение режима чревато серьёзным ухудшением самочувствия или бессмысленно, потому что «эффекта» уже не будет. Это создаёт жёсткий внешний барьер и помогает удержаться от срыва в первые месяцы трезвости.
Исследовать вопрос подробнее – https://kodirovanie-ot-alkogolizma-chekhov11.ru/
нейросеть для учебы онлайн [url=https://nejroset-dlya-referatov-4.ru/]нейросеть для учебы онлайн[/url] .
В этой медицинской статье мы погрузимся в актуальные вопросы здравоохранения и лечения заболеваний. Читатели узнают о современных подходах, методах диагностики и новых открытий в научных исследованиях. Наша цель — донести важную информацию и повысить уровень осведомленности о здоровье.
Детальнее – [url=https://northern-clinic.ru/narkologicheskaya-pomosch/]наркологическая помощь санкт петербург[/url]
нейросети для студентов [url=https://nejroset-dlya-referatov-5.ru/]нейросети для студентов[/url] .
сайт для рефератов [url=https://nejroset-dlya-referatov-6.ru/]сайт для рефератов[/url] .
ии для студентов [url=https://nejroset-dlya-referatov-3.ru/]ии для студентов[/url] .
генерация [url=https://nejroset-dlya-referatov-7.ru/]генерация[/url] .
доставка цветов москва недорого с бесплатной [url=http://dostavka-cvetov-moskva495.ru]http://dostavka-cvetov-moskva495.ru[/url] .
реферат нейросеть [url=https://nejroset-dlya-referatov.ru/]реферат нейросеть[/url] .
Этот обзор посвящен успешным стратегиям избавления от зависимости, включая реальные примеры и советы. Мы разоблачим мифы и предоставим читателям достоверную информацию о различных подходах. Получите опыт многообразия методов и найдите подходящий способ для себя!
Ознакомиться с деталями – https://narkologiya.pro/psihiatriya/peregoranie-i-vygoranie
1xbet g?ncel [url=https://1xbet-giris-46.com/]1xbet g?ncel[/url] .
Эта информационная публикация освещает широкий спектр тем из мира медицины. Мы предлагаем читателям ясные и понятные объяснения современных заболеваний, методов профилактики и лечения. Информация будет полезна как пациентам, так и медицинским работникам, желающим поддержать уровень своих знаний.
Исследовать вопрос подробнее – [url=https://narcolog-life.com/article/kapelnica-ot-pohmelya-bystro-i-bezopasno/]капельница от похмелья[/url]
лучшая нейросеть для учебы [url=https://nejroset-dlya-referatov-4.ru/]лучшая нейросеть для учебы[/url] .
генерация [url=https://nejroset-dlya-referatov-5.ru/]nejroset-dlya-referatov-5.ru[/url] .
нейросеть студент бот [url=https://nejroset-dlya-referatov-3.ru/]нейросеть студент бот[/url] .
В данном обзоре представлены основные направления и тренды в области медицины. Мы обсудим актуальные проблемы здравоохранения, свежие открытия и новые подходы, которые меняют представление о лечении и профилактике заболеваний. Эта информация будет полезна как специалистам, так и широкой публике.
Углубиться в тему – [url=https://narcolog-life.com/alkogol-posle-narkoza/]общий наркоз после алкоголя[/url]
ии для учебы студентов [url=https://nejroset-dlya-referatov-7.ru/]nejroset-dlya-referatov-7.ru[/url] .
В этой публикации мы предложим ряд рекомендаций по избавлению от зависимостей и успешному восстановлению. Мы обсудим методы привлечения поддержки и важность самосознания. Эти советы помогут людям вернуться к нормальной жизни и стать на путь выздоровления.
Разобраться лучше – [url=https://northern-clinic.ru/stati/metod-dovzhenko-princip-dejstviya.html]кодирование по методу довженко как[/url]
mostbet lucky jet təlimat [url=http://mostbet31847.help/]http://mostbet31847.help/[/url]
В этой статье мы рассматриваем разные способы борьбы с алкогольной зависимостью. Обсуждаются методы лечения, программы реабилитации и советы для поддержки близких. Читатели получат информацию о том, как преодолеть зависимость и добиться успешного выздоровления.
Разобраться лучше – https://narcolog-life.com/article/analizy-na-narkotiki-vidy-testov-kak-provodyatsya-i-chto-pokazyvayut-rezultaty
сделать реферат [url=https://nejroset-dlya-referatov.ru/]nejroset-dlya-referatov.ru[/url] .
Качественный вывод из запоя — это всегда процесс, а не одна капельница. Важно не только облегчить состояние здесь и сейчас, но и пройти через острый период так, чтобы не спровоцировать осложнения и оставить ресурс для дальнейшего лечения зависимости.
Получить дополнительную информацию – [url=https://vyvod-iz-zapoya-ivanteevka11.ru/]vyvoda-iz-zapoya-vyzov[/url]
нейросеть реферат онлайн [url=https://nejroset-dlya-referatov-4.ru/]нейросеть реферат онлайн[/url] .
нейросеть для студентов [url=https://nejroset-dlya-referatov-5.ru/]nejroset-dlya-referatov-5.ru[/url] .
Эта статья подробно расскажет о процессе выздоровления, который включает в себя эмоциональную, физическую и психологическую реабилитацию. Мы обсуждаем значимость поддержки и наличие профессиональных программ. Читатели узнают, как строить новую жизнь и не возвращаться к старым привычкам.
Получить дополнительные сведения – [url=https://narkologiya.pro/psihiatriya/]психология и психиатрия[/url]
hd видео с женой друга [url=https://jena-druga-porno.ru/]hd видео с женой друга[/url] .
нейросети для студентов [url=https://nejroset-dlya-referatov-9.ru/]нейросети для студентов[/url] .
Этот обзор посвящен успешным стратегиям избавления от зависимости, включая реальные примеры и советы. Мы разоблачим мифы и предоставим читателям достоверную информацию о различных подходах. Получите опыт многообразия методов и найдите подходящий способ для себя!
Получить дополнительную информацию – [url=https://alkogolikum.ru/vyvod-iz-zapoya/]вывод из запоя клиника[/url]
цветы в москве по низким ценам самовывоз [url=www.dostavka-cvetov-moskva495.ru]www.dostavka-cvetov-moskva495.ru[/url] .
жена друга соблазняет [url=https://jena-druga-porno.ru/]жена друга соблазняет[/url] .
В данном обзоре представлены основные направления и тренды в области медицины. Мы обсудим актуальные проблемы здравоохранения, свежие открытия и новые подходы, которые меняют представление о лечении и профилактике заболеваний. Эта информация будет полезна как специалистам, так и широкой публике.
Подробнее можно узнать тут – [url=https://narkologiya.pro/narkomaniya/dolgosrochnye-posledstviya-upotrebleniya-narkotikov/]последствия после употребления наркотиков[/url]
нейросеть реферат онлайн [url=https://nejroset-dlya-referatov.ru/]nejroset-dlya-referatov.ru[/url] .
В статье по вопросам здоровья мы рассматриваем актуальные проблемы, с которыми сталкивается общество. Обсуждаются заболевания, факторы риска и важные аспекты профилактики. Читатели получат полезные советы о том, как сохранить здоровье и улучшить качество жизни.
Выяснить больше – [url=https://narkologiya.pro/narkomaniya/mefedron-pochemu-nazyvayut-dizaynerskim/]мефедрон после[/url]
ии для учебы студентов [url=https://nejroset-dlya-referatov-9.ru/]ии для учебы студентов[/url] .
В этой медицинской статье мы погрузимся в актуальные вопросы здравоохранения и лечения заболеваний. Читатели узнают о современных подходах, методах диагностики и новых открытий в научных исследованиях. Наша цель — донести важную информацию и повысить уровень осведомленности о здоровье.
Подробнее можно узнать тут – [url=https://narcolog-life.com/alkogolizm/]алкоголизм ответы[/url]
нейросеть пишет реферат [url=https://nejroset-dlya-referatov-7.ru/]нейросеть пишет реферат[/url] .
нейросеть онлайн для учебы [url=https://nejroset-dlya-referatov-2.ru/]nejroset-dlya-referatov-2.ru[/url] .
Качественный вывод из запоя — это всегда процесс, а не одна капельница. Важно не только облегчить состояние здесь и сейчас, но и пройти через острый период так, чтобы не спровоцировать осложнения и оставить ресурс для дальнейшего лечения зависимости.
Подробнее можно узнать тут – http://vyvod-iz-zapoya-ivanteevka11.ru
mostbet match korish [url=http://mostbet73618.help/]http://mostbet73618.help/[/url]
1xbet turkey [url=https://1xbet-giris-45.com/]1xbet turkey[/url] .
melbet cum descarc [url=http://melbet63048.help]http://melbet63048.help[/url]
сделать реферат [url=https://nejroset-dlya-referatov-4.ru/]сделать реферат[/url] .
В этой статье мы рассмотрим современные достижения в области медицины, включая инновационные методы лечения и диагностики. Мы обсудим важность профилактики заболеваний и роль технологий в улучшении качества здравоохранения. Читатели узнают о влиянии медицины на повседневную жизнь и ее значение для современного общества.
Выяснить больше – [url=https://narkologiya.pro/psihiatriya/psihosomatika/]психосоматика болит[/url]
Этот информационный материал подробно освещает проблему наркозависимости, ее причины и последствия. Мы предлагаем информацию о методах лечения, профилактики и поддерживающих программах. Цель статьи — повысить осведомленность и продвигать идеи о необходимости борьбы с зависимостями.
Выяснить больше – [url=https://narcolog-life.com/alkogol-posle-narkoza/]через сколько после наркоза можно алкоголь[/url]
нейросети для студентов [url=https://nejroset-dlya-referatov-5.ru/]нейросети для студентов[/url] .
жена друга изменяет [url=https://jena-druga-porno.ru/]жена друга изменяет[/url] .
нейросеть для студентов [url=https://nejroset-dlya-referatov-6.ru/]нейросеть для студентов[/url] .
Этот медицинский обзор сосредоточен на последних достижениях, которые оказывают влияние на пациентов и медицинскую практику. Мы разбираем инновационные методы лечения и исследований, акцентируя внимание на их значимости для общественного здоровья. Читатели узнают о свежих данных и их возможном применении.
Подробнее можно узнать тут – [url=https://northern-clinic.ru/chastnyy-vytrezvitel/]в какой вытрезвитель[/url]
реферат через нейросеть [url=https://nejroset-dlya-referatov-9.ru/]реферат через нейросеть[/url] .
В данной публикации мы поговорим о процессе восстановления от зависимости, о том, как вернуть себе нормальную жизнь. Мы обсудим преодоление трудностей, значимость поддержки и наличие программ реабилитации. Читатели смогут узнать о ключевых шагах к успешному восстановлению.
Ознакомиться с деталями – [url=https://narcolog-life.com/article/statistika-narkomanii-v-rossii/]наркомания в россии 2025[/url]
лучшая нейросеть для учебы [url=https://nejroset-dlya-referatov-1.ru/]nejroset-dlya-referatov-1.ru[/url] .
ии реферат [url=https://nejroset-dlya-referatov-2.ru/]ии реферат[/url] .
нейросеть для студентов [url=https://nejroset-dlya-referatov-7.ru/]нейросеть для студентов[/url] .
В этой статье рассматриваются различные аспекты избавления от зависимости, включая физические и психологические методы. Мы обсудим поддержку, мотивацию и стратегии, которые помогут в процессе выздоровления. Читатели узнают, как преодолеть трудности и двигаться к новой жизни без зависимости.
Изучить вопрос глубже – [url=https://northern-clinic.ru/lechenie-zhenskogo-alkogolizma/]почему женский алкоголизм не лечится[/url]
mostbet hesab dondurmaq [url=https://mostbet2013.help/]https://mostbet2013.help/[/url]
Этот информативный текст сочетает в себе темы здоровья и зависимости. Мы обсудим, как хронические заболевания могут усугубить зависимости и наоборот, как зависимость может влиять на общее состояние здоровья. Читатели получат представление о комплексном подходе к лечению как физического, так и психического состояния.
Изучить вопрос глубже – [url=https://alkogolikum.ru/stati/metody-kodirovaniya-pri-narkozavisimosti.html]кодирование от алкоголизма и наркозависимости[/url]
Выбор клиники для лечения наркомании — один из самых ответственных этапов на пути к выздоровлению. От уровня организации помощи зависит не только здоровье пациента, но и его способность вернуться к нормальной жизни. Согласно данным Министерства здравоохранения Российской Федерации, эффективность терапии значительно возрастает при индивидуальном подходе, квалифицированном составе специалистов и наличии комплексных программ, включающих медицинскую и психологическую помощь.
Изучить вопрос глубже – [url=https://narkologicheskaya-klinika-tula10.ru/]наркологическая клиника вывод из запоя в туле[/url]
Наркологическая клиника «РеМед Карелия» — это круглосуточная медицинская помощь, построенная на принципе клинической точности: каждая процедура имеет цель, проверяемые маркеры и назначенное окно переоценки. Мы используем современные методы детоксикации и постабстинентной стабилизации, не перегружая терапию «на всякий случай» и не полагаясь на универсальные «сильные капельницы». Вместо этого — модульные схемы, корректировка одного параметра за раз и обязательная оценка результата. Такой подход снижает фармаконагрузку, ускоряет восстановление сна и аппетита и делает лечение предсказуемым для пациента и его семьи. Анонимность встроена в процессы: немаркированные входы, гражданская форма персонала, нейтральные формулировки в документах, «тихие» уведомления и разграниченный доступ к карте наблюдения.
Углубиться в тему – [url=https://narkologicheskaya-klinika-v-petrozavodske15.ru/]платная наркологическая клиника в петрозаводске[/url]
mostbet stížnost [url=http://mostbet2019.help]http://mostbet2019.help[/url]
Когда организм на пределе, важна срочная помощь в Санкт-Петербурге — это команда опытных наркологов, которые помогут быстро и мягко выйти из запоя без вреда для здоровья.
Получить больше информации – [url=https://vyvod-iz-zapoya-v-sankt-peterburge16.ru/]вывод из запоя цена санкт-петербург[/url]
Честная наркология — это не «универсальная капельница», а система шагов, привязанная к параметрам конкретного человека. В Чехове мы выезжаем круглосуточно, на месте проводим допуск к терапии, сверяем совместимости с уже принятыми препаратами, подбираем состав инфузий без лишних компонентов и избыточной седативной нагрузки. Если дома нет условий для безопасной ночи, предложим стационар — это не усложнение, а короткий путь к безопасности. Анонимность — стандарт: нейтральные формулировки в документах по запросу, ограниченный доступ к данным, деликатная связь.
Детальнее – [url=https://narkologicheskaya-klinika-chekhov8.ru/]besplatnye-narkologicheskie-kliniki[/url]
Нарколог на дом в Химках особенно востребован тогда, когда состояние человека уже нельзя назвать обычным похмельем, но он категорически отказывается ехать в клинику. Запой тянется несколько дней или дольше, нет полноценного сна, пульс постоянно учащённый, руки трясутся, давление скачет, а любое утро начинается не с облегчения, а с новой дозы алкоголя «чтобы не развалиться». В такой ситуации родственники оказываются между страхом и беспомощностью: понятно, что дальше ждать опасно, но уговорить собрать вещи и поехать в стационар не получается. Формат выезда нарколога на дом как раз и закрывает этот тупик — врач приезжает туда, где сейчас находится человек, оценивает риски и сразу начинает помощь.
Получить дополнительные сведения – [url=https://narkolog-na-dom-himki11.ru/]narkolog-na-dom-himki[/url]
купить цветы с доставкой недорого [url=http://www.dostavka-cvetov-moskva495.ru]http://www.dostavka-cvetov-moskva495.ru[/url] .
нейросеть текст для учебы [url=https://nejroset-dlya-referatov-5.ru/]nejroset-dlya-referatov-5.ru[/url] .
Алкогольный запой – это критическое состояние, возникающее при длительном злоупотреблении спиртными напитками, когда организм насыщается токсинами и его жизненно важные системы (сердечно-сосудистая, печёночная, нервная) начинают давать сбой. В такой ситуации необходимо незамедлительное вмешательство специалистов для предотвращения тяжелых осложнений и спасения жизни. Наркологическая клиника «Основа» в Новосибирске предоставляет экстренную помощь с помощью установки капельницы от запоя, позволяющей оперативно вывести токсины из организма, стабилизировать внутренние процессы и создать условия для последующего качественного восстановления.
Ознакомиться с деталями – https://kapelnica-ot-zapoya-novosibirsk8.ru/kapelnica-ot-zapoya-na-domu-v-novosibirske
генерация [url=https://nejroset-dlya-referatov-6.ru/]nejroset-dlya-referatov-6.ru[/url] .
чат нейросеть для учебы [url=https://nejroset-dlya-referatov-9.ru/]чат нейросеть для учебы[/url] .
После снятия острых симптомов пациент продолжает получать медикаментозную поддержку. Назначаются витамины, гепатопротекторы, успокоительные препараты. Проводится психологическая диагностика для подготовки к следующему этапу — реабилитации.
Разобраться лучше – https://lechenie-alkogolizma-voronezh9.ru/czentr-lecheniya-alkogolizma-voronezh
Если в первичном звонке звучат «красные флаги» (одышка, спутанность сознания, резкие скачки ритма), мы предлагаем стационарное «окно» мониторинга с ночным постом. При низких рисках стартуем на дому: контрольные точки совпадают с домашним комфортом, а вечерние online-вставки по 15–20 минут поддерживают предсказуемость без лишних поездок.
Подробнее тут – [url=https://vivod-iz-zapoya-voronezh15.ru/]вывод из запоя капельница на дому[/url]
видео с женой друга [url=https://jena-druga-porno.ru/]видео с женой друга[/url] .
нейросеть для рефератов [url=https://nejroset-dlya-referatov-7.ru/]нейросеть для рефератов[/url] .
Прежде чем перейти к таблице, отметим смысл. Это ориентир, а не жёсткое расписание. Врач адаптирует длительность и насыщенность этапов под возраст, фоновые диагнозы и динамику симптомов, но логика процесса остаётся неизменной: от безопасности к устойчивости.
Исследовать вопрос подробнее – [url=https://vyvod-iz-zapoya-v-stacionare-chekhov8.ru/]вывод из запоя в стационаре[/url]
mostbet konto zablokowane [url=www.mostbet2005.help]www.mostbet2005.help[/url]
«Волшебной капельницы» не существует. Мы структурируем инфузии от симптомов, а не от «средних рецептов». Ниже — логика подбора для типичных профилей; реальную схему определяет врач на месте.
Узнать больше – [url=https://vyvod-iz-zapoya-kaliningrad15.ru/]наркологический вывод из запоя[/url]
Тендерный специалист помогает разобраться в особенностях каждого закона, а также обеспечивает грамотное сопровождение всех процедур. Это особенно важно для компаний, которые только начинают участвовать в торгах и не имеют опыта работы с государственными контрактами.
Эксклюзивная информация для вас – [url=https://tendernoe-soprovozhdenie-rostov-na-donu.ru/]участие в тендерах госзакупок ростов на дону[/url]
Если многое из этого знакомо, кодирование стоит рассматривать не как «наказание» или «приговор», а как инструмент, который помогает закрыть доступ к алкоголю на определённый срок и даёт шанс выстроить новую привычку — жить трезво.
Подробнее – [url=https://kodirovanie-ot-alkogolizma-korolyov11.ru/]kodirovanie-ot-alkogolizma-s-vyezdom-na-dom[/url]
Домашний визит нарколога — это формат, который соединяет клиническую безопасность и человеческую деликатность. В «КубаньМедЦентре» (Краснодар) мы организуем помощь так, чтобы пациент получал её там, где ему спокойнее всего — у себя дома. Дежурная команда работает круглосуточно, а среднее окно прибытия по городу составляет 30–40 минут с момента подтверждения заявки. Врач приезжает без опознавательных знаков, проводит экспресс-оценку состояния, запускает индивидуально подобранную инфузионную терапию и оставляет подробный план на ближайшие 72 часа. Каждый шаг объясняется простым языком: что мы делаем, зачем это нужно и по каким критериям поймём, что динамика идёт правильно.
Ознакомиться с деталями – [url=https://narcolog-na-dom-krasnodar14.ru/]помощь нарколога на дому[/url]
На начальных этапах проблема редко проявляется в открытом виде, но уже есть характерные сигналы, на которые стоит обратить внимание. Человек начинает оправдывать употребление постоянной усталостью, проблемами на работе, напряжённой жизненной ситуацией. Появляется раздражение, если нет возможности выпить или принять привычную дозу, меняется круг общения, усиливается скрытность. Это время, когда помощь ещё может быть максимально щадящей по методам и по длительности, а вернуться к стабильной жизни намного проще, чем после многолетнего стажа употребления.
Узнать больше – https://narkologicheskaya-klinika-moskva11.ru/chastnaya-narkologicheskaya-klinika-v-moskve/
ии для школьников и студентов [url=https://nejroset-dlya-referatov-6.ru/]nejroset-dlya-referatov-6.ru[/url] .
1win bonus Moldova [url=https://1win71038.help/]1win bonus Moldova[/url]
В этой публикации мы предложим ряд рекомендаций по избавлению от зависимостей и успешному восстановлению. Мы обсудим методы привлечения поддержки и важность самосознания. Эти советы помогут людям вернуться к нормальной жизни и стать на путь выздоровления.
Подробнее можно узнать тут – [url=https://northern-clinic.ru/reabilitatsiya-narkozavisimosti/]реабилитация после наркозависимости[/url]
нейросеть для рефератов [url=https://nejroset-dlya-referatov-9.ru/]нейросеть для рефератов[/url] .
При выводе из запоя в Ростове-на-Дону используются разные терапевтические подходы. Основной задачей является устранение токсинов и восстановление работы систем организма. Врач подбирает терапию индивидуально в зависимости от состояния пациента и длительности запоя.
Разобраться лучше – [url=https://vyvod-iz-zapoya-rostov-na-donu14.ru/]вывод из запоя на дому цена[/url]
Этот обзор посвящен успешным стратегиям избавления от зависимости, включая реальные примеры и советы. Мы разоблачим мифы и предоставим читателям достоверную информацию о различных подходах. Получите опыт многообразия методов и найдите подходящий способ для себя!
Разобраться лучше – [url=https://alkogolikum.ru/stati/oteki-posle-alkogolya.html]отек глаз после алкоголя[/url]
Прежде чем перечислить критичные признаки, зафиксируем принцип: даже один выраженный симптом — повод не откладывать помощь и выбрать безопасный маршрут (дом или стационар) после быстрой очной оценки врача.
Ознакомиться с деталями – http://vyvod-iz-zapoya-sergiev-posad8.ru/vyvod-iz-zapoya-klinika-v-sergievom-posade/
Чтобы у пациента и близких не возникал вопрос «что дальше», мы используем карту первых часов. Она задаёт цели, действия, контроль и критерии перехода между этапами. Такой подход экономит минуты и исключает импровизации «ради уверенности».
Разобраться лучше – https://vyvod-iz-zapoya-kaliningrad15.ru/vyvod-iz-zapoya-kaliningrad-staczionar
Домашний старт в Москве уместен при устойчивых показателях и низком риске осложнений: нет упорной рвоты, выраженной дезориентации, лихорадки, резких скачков давления и пульса. Преимущества — приватность, скорость, меньше стыда и сопротивления, выше шансы на ранний сон. Если же присутствуют признаки возможных осложнений (обезвоживание, судорожная готовность, аритмии, боль за грудиной/в животе, спутанность), рациональнее короткая стационарная стабилизация на 24–48 часов, после которой маршрут возвращается домой. «Трезвый Стандарт» держится принципа клинической достаточности: вмешательств ровно столько, сколько нужно сегодня, без «пакетов ради прайса». Такой реализм экономит деньги и главное — время семьи, потому что снижает вероятность ночных «качелей», повторных вызовов и импульсивных решений, которые чаще всего и ломают прогресс.
Получить дополнительные сведения – [url=https://narkolog-na-dom-moskva999.ru/]narkolog na dom tsena[/url]
Что делаем
Подробнее тут – http://vyvod-iz-zapoya-v-stacionare-chekhov8.ru/vyvod-iz-zapoya-cena-v-chekhove/
Во Владимире и области работают десятки клиник, предлагающих помощь зависимым, но не все учреждения соответствуют современным медицинским и психологическим стандартам. Чтобы выбрать действительно эффективное лечение, нужно ориентироваться на проверенные критерии. В этом материале мы рассмотрим, на что стоит обратить внимание при выборе наркологического центра.
Подробнее тут – [url=https://lechenie-narkomanii-vladimir10.ru/]lechenie-narkomanii-vladimir10.ru/[/url]
трахнул жену друга [url=https://jena-druga-porno.ru/]трахнул жену друга[/url] .
Если многое из этого знакомо, кодирование стоит рассматривать не как «наказание» или «приговор», а как инструмент, который помогает закрыть доступ к алкоголю на определённый срок и даёт шанс выстроить новую привычку — жить трезво.
Получить больше информации – [url=https://kodirovanie-ot-alkogolizma-korolyov11.ru/]кодирование от алкоголизма с выездом на дом[/url]
Если у человека выраженное обезвоживание, скачки давления и пульса, эпизоды спутанности сознания, упорная рвота, «дергающийся» сон или тяжёлая сопутствующая патология, стационар закрывает главный риск — непредсказуемое течение синдрома отмены. Круглосуточный мониторинг позволяет динамически корректировать схемы, подключать лабораторные и инструментальные исследования по показаниям, своевременно восполнять дефициты и удерживать стабильный сон. На практике «короткое окно» госпитализации (24–48 часов) нередко дешевле на дистанции: оно предотвращает осложнения и повторные вызовы, которые растягивают курс и увеличивают суммарные затраты. Для жителей Москвы мы разносim визиты по времени, используем отдельные входы и «тихие» маршруты, чтобы сохранить приватность. После стабилизации маршрут переводится в амбулаторный или домашний формат: пациент получает план питания и активности, контрольные контакты и правила, при каких признаках связаться немедленно, не дожидаясь «как будет утром».
Детальнее – http://vyvod-iz-zapoya-moskva99.ru/vyvod-iz-zapoya-v-moskve-v-stacionare/
В этой статье мы рассматриваем разные способы борьбы с алкогольной зависимостью. Обсуждаются методы лечения, программы реабилитации и советы для поддержки близких. Читатели получат информацию о том, как преодолеть зависимость и добиться успешного выздоровления.
Подробнее тут – [url=https://narkologiya.pro/psihiatriya/psihiatricheskie-aspekty-lecheniya-hronicheskoy-boli/]центр лечения хронической боли[/url]
Состав капельницы никогда не «копируется»; он выбирается по доминирующему симптому и соматическому фону. Ниже — клинические профили, которые помогают понять нашу логику. Итоговая схема формируется на месте, а скорость и объём зависят от текущих показателей.
Узнать больше – http://
Для наглядности приведена таблица с примерными направлениями терапии и их результатами:
Получить дополнительную информацию – [url=https://narcologicheskaya-klinika-v-chelyabinske16.ru/]лечение в наркологической клинике в челябинске[/url]
В этой статье рассматриваются различные аспекты избавления от зависимости, включая физические и психологические методы. Мы обсудим поддержку, мотивацию и стратегии, которые помогут в процессе выздоровления. Читатели узнают, как преодолеть трудности и двигаться к новой жизни без зависимости.
Детальнее – [url=https://northern-clinic.ru/stati/preparaty-dlya-vyvoda-alkogolya-i-narkotikov.html]препараты для вывода алкоголя из организма[/url]
Если наблюдаются вышеописанные симптомы, немедленное обращение к наркологу позволяет не только устранить острые проявления, но и предотвратить возможное развитие опасных для жизни осложнений, таких как сердечно-сосудистые сбои или нарушения работы центральной нервной системы.
Изучить вопрос глубже – [url=https://snyatie-lomki-ekb8.ru/]снятие ломки капельницей екатеринбург[/url]
Что делаем
Подробнее тут – https://vyvod-iz-zapoya-v-stacionare-chekhov8.ru/vyvod-iz-zapoya-kapelnica-v-chekhove/
В этой статье мы обсудим процесс восстановления после зависимостей, акцентируя внимание на различных методах и подходах к реабилитации. Читатели узнают, как создать план выздоровления и использовать полезные ресурсы для достижения устойчивых изменений.
Ознакомиться с деталями – [url=https://narcolog-life.com/article/alkogolnaya-demencziya-prichiny-simptomy-i-profilaktika/]алкогольная деменция лечение[/url]
интернет раскрутка [url=https://prodvizhenie-sajtov-v-moskve4.ru/]prodvizhenie-sajtov-v-moskve4.ru[/url] .
Функция
Получить дополнительную информацию – [url=https://snyatie-lomki-nnovgorod8.ru/]снятие ломки капельницей в нижнем новгороде[/url]
Сочетание медицинских и психотерапевтических мер создаёт устойчивую систему поддержки. Пациенты получают возможность постепенно восстановить утраченное здоровье и психологическую стабильность.
Получить дополнительные сведения – [url=https://narkologicheskaya-klinika-v-kazani16.ru/]наркологическая клиника лечение алкоголизма[/url]
Мы не составляем «супер-смеси» «на всякий случай». Капельница — это набор модулей, каждый из которых отвечает за конкретную задачу: гидратация, электролиты, гастропротекция, антиоксидантная поддержка; при показаниях — мягкая анксиолитика. Порядок модулей зависит от ведущего симптом-кластера и времени суток.
Изучить вопрос глубже – http://kapelnicza-ot-zapoya-murmansk15.ru/kapelnicza-ot-pokhmelya-murmansk/
сколько стоит заказать цветы с доставкой на дом [url=www.dostavka-cvetov-moskva495.ru/]www.dostavka-cvetov-moskva495.ru/[/url] .
Если многое из этого знакомо, кодирование стоит рассматривать не как «наказание» или «приговор», а как инструмент, который помогает закрыть доступ к алкоголю на определённый срок и даёт шанс выстроить новую привычку — жить трезво.
Разобраться лучше – [url=https://kodirovanie-ot-alkogolizma-korolyov11.ru/]кодирование от алкоголизма с выездом на дом[/url]
Этот обзор медицинских исследований собрал самое важное из последних публикаций в области медицины. Мы проанализировали ключевые находки и представили их в доступной форме, чтобы читатели могли легко ориентироваться в актуальных темах. Этот материал станет отличным подспорьем для изучения медицины.
Получить дополнительные сведения – [url=https://narkologiya.pro/narkomaniya/skolko-vyvoditsya-kodein/]кодеин таблетки[/url]
нейросеть реферат [url=https://nejroset-dlya-referatov-6.ru/]нейросеть реферат[/url] .
Домашний визит особенно уместен при затянувшемся употреблении, когда нарастают тревожные вегетативные симптомы (тремор, потливость, сердцебиение), появляются проблемы со сном и «качели» давления, но при этом сохранён контакт, нет выраженной дыхательной недостаточности и глубокой дезориентации. Преимущества очевидны: экономия времени (нет дороги и ожидания), психологический комфорт, меньше сенсорных триггеров (яркий свет, шум), возможность сразу настроить режим первой «тихой ночи». Технологически выездная бригада оснащена как приёмный кабинет: инфузомат для точной скорости капания, пульсоксиметр, глюкометр, кассеты Na?/K?, портативный кардиомонитор с возможностью регистрации ЭКГ, набор проверенных средств для коррекции тошноты и защиты слизистой. Если во время триажа выявляются «красные флаги» — риск судорог, падение сатурации, признаки делирия, нестабильная гемодинамика, — мы организуем перевод в стационар «КубаньМедЦентра» без задержек и с непрерывностью терапии.
Исследовать вопрос подробнее – [url=https://narcolog-na-dom-krasnodar14.ru/]вызов врача нарколога на дом в краснодаре[/url]
mostbet apk [url=https://mostbetr.com/en/mobil_uygulama/]mostbet apk[/url] .
база бенчмарков рекламы [url=https://reklamnyj-kreativ14.ru/]reklamnyj-kreativ14.ru[/url] .
plinko мостбет [url=https://mostbet05638.help]https://mostbet05638.help[/url]
Этот краткий обзор предлагает сжатую информацию из области медицины, включая ключевые факты и последние новости. Мы стремимся сделать информацию доступной и понятной для широкой аудитории, что позволит читателям оставаться в курсе актуальных событий в здравоохранении.
Выяснить больше – [url=https://narkologiya.pro/]Наркологическая клиника «Narkologiya PRO+»[/url]
В этой статье мы подробно рассматриваем проверенные методы борьбы с зависимостями, включая психотерапию, медикаментозное лечение и поддержку со стороны общества. Мы акцентируем внимание на важности комплексного подхода и возможности успешного восстановления для людей, столкнувшихся с этой проблемой.
Ознакомиться с деталями – [url=https://northern-clinic.ru/prinuditelnyy-vyvod-iz-zapoya/]принудительное лечение от алкоголизма[/url]
В этой медицинской статье мы погрузимся в актуальные вопросы здравоохранения и лечения заболеваний. Читатели узнают о современных подходах, методах диагностики и новых открытий в научных исследованиях. Наша цель — донести важную информацию и повысить уровень осведомленности о здоровье.
Изучить вопрос глубже – [url=https://alkogolikum.ru/stati/problema-alkogolizma-v-rossii.html]глобальная проблема алкоголизм[/url]
В этой статье мы рассмотрим современные достижения в области медицины, включая инновационные методы лечения и диагностики. Мы обсудим важность профилактики заболеваний и роль технологий в улучшении качества здравоохранения. Читатели узнают о влиянии медицины на повседневную жизнь и ее значение для современного общества.
Получить больше информации – [url=https://alkogolikum.ru/stati/put-k-vyzdorovleniyu-s-narkologom-v-habarovske.html]нарколог лечение[/url]
Этот медицинский обзор сосредоточен на последних достижениях, которые оказывают влияние на пациентов и медицинскую практику. Мы разбираем инновационные методы лечения и исследований, акцентируя внимание на их значимости для общественного здоровья. Читатели узнают о свежих данных и их возможном применении.
Подробнее можно узнать тут – [url=https://narkologiya.pro/narkomaniya/tramadol-opasnost-legalnogo-narkotika/]трамадол это наркотик[/url]
В этой статье мы рассмотрим современные достижения в области медицины, включая инновационные методы лечения и диагностики. Мы обсудим важность профилактики заболеваний и роль технологий в улучшении качества здравоохранения. Читатели узнают о влиянии медицины на повседневную жизнь и ее значение для современного общества.
Выяснить больше – [url=https://northern-clinic.ru/kodirovanie-ot-alkogolizma/]петербург кодирование от алкоголизма[/url]
Процесс терапии включает несколько последовательных шагов:
Исследовать вопрос подробнее – [url=https://narcologicheskaya-klinika-v-chelyabinske16.ru/]платная наркологическая клиника в челябинске[/url]
Для оценки уровня учреждения важно понимать, какие конкретно методики в нём используются. Ниже приведён обобщённый обзор подходов в современных наркологических клиниках региона:
Узнать больше – [url=https://lechenie-narkomanii-vladimir10.ru/]лечение наркомании наркология в владимире[/url]
Мы собираем терапию из проверенных модулей: гидратация, коррекция электролитов, гастропротекция, антиоксидантная поддержка, мягкая анксиолитика по показаниям, поведенческие интервенции (свет, тишина, дыхание 4–6, стимул-контроль, вечерние ритуалы). Объём и темп зависят от ведущего симптома и времени суток: при кардиореактивном вечере больше внимания уделяется среде, при тошноте — гастропротекции и «тёплому питанию», при поверхностном сне — цифровой гигиене и световым сценариям. Ниже приведена ориентировочная матрица выбора; финальное решение — за лечащим врачом с учётом противопоказаний и лекарственных взаимодействий.
Узнать больше – https://narkologicheskaya-klinika-v-petrozavodske15.ru/petrozavodsk-narkologiya
продвижение по трафику [url=https://prodvizhenie-sajtov-v-moskve4.ru/]продвижение по трафику[/url] .
Сочетание медицинских и психотерапевтических мер создаёт устойчивую систему поддержки. Пациенты получают возможность постепенно восстановить утраченное здоровье и психологическую стабильность.
Получить дополнительные сведения – [url=https://narkologicheskaya-klinika-v-kazani16.ru/]запой наркологическая клиника казань[/url]
mostbet apk download [url=https://mostbetr.com/en/mobil_uygulama/]mostbet apk download[/url] .
В этой статье рассматриваются различные аспекты избавления от зависимости, включая физические и психологические методы. Мы обсудим поддержку, мотивацию и стратегии, которые помогут в процессе выздоровления. Читатели узнают, как преодолеть трудности и двигаться к новой жизни без зависимости.
Подробнее можно узнать тут – [url=https://narkologiya.pro/narkomaniya/kak-ochistit-legkie-ot-veypa/]легкие от курения вейпа[/url]
база бенчмарков рекламы [url=https://reklamnyj-kreativ14.ru/]reklamnyj-kreativ14.ru[/url] .
Возможные признаки
Исследовать вопрос подробнее – http://narkologicheskaya-klinika-tula10.ru/
Тендерный специалист помогает разобраться в особенностях каждого закона, а также обеспечивает грамотное сопровождение всех процедур. Это особенно важно для компаний, которые только начинают участвовать в торгах и не имеют опыта работы с государственными контрактами.
Получите экспертное мнение – [url=https://tendernoe-soprovozhdenie-rostov-na-donu.ru/]тендерное сопровождение под ключ цена в ростове на дону[/url]
Часто предприниматели объединяют понятия тендер и госзакупки, так как обе процедуры связаны с конкурсным выбором поставщика. Однако между ними существуют определённые различия, которые важно понимать перед началом работы в этой сфере.
Не упустите важные детали – [url=https://tendernoe-soprovozhdenie-rostov-na-donu.ru/]комплексное тендерное сопровождение ростов на дону[/url]
Когда выезд особенно удобен и оправдан, важно понимать не только эмоционально, но и по конкретным признакам. Есть ряд типичных ситуаций, в которых именно формат «на дому» становится наиболее реалистичным и безопасным вариантом, а стационар можно рассматривать как следующий шаг, когда острота будет снята и человек станет более сговорчивым.
Подробнее тут – [url=https://narkolog-na-dom-himki11.ru/]narkolog-na-dom-himki[/url]
Наркологическая клиника в клинике в Казани оказывает квалифицированную помощь людям, столкнувшимся с алкогольной и наркотической зависимостью. Лечение проводится в условиях полной конфиденциальности и медицинской безопасности. Основное направление работы клиники — это восстановление физического, психического и эмоционального состояния пациента, а также формирование устойчивой мотивации к отказу от употребления психоактивных веществ. Все процедуры выполняются с использованием сертифицированных препаратов и современных диагностических технологий, что позволяет добиться устойчивого результата без осложнений.
Изучить вопрос глубже – https://narkologicheskaya-klinika-v-kazani16.ru/narkologicheskaya-klinika-kazan-otzyvy/
Применение
Детальнее – [url=https://lechenie-narkomanii-vladimir10.ru/]лечение наркомании в стационаре в владимире[/url]
ии анализ рекламы [url=https://reklamnyj-kreativ13.ru/]ии анализ рекламы[/url] .
Этот краткий обзор предлагает сжатую информацию из области медицины, включая ключевые факты и последние новости. Мы стремимся сделать информацию доступной и понятной для широкой аудитории, что позволит читателям оставаться в курсе актуальных событий в здравоохранении.
Ознакомиться с деталями – [url=https://alkogolikum.ru/stati/priznaki-beloy-goryachki.html]белая горячка у мужчин[/url]
нейросеть для школьников и студентов [url=https://nejroset-dlya-referatov-4.ru/]нейросеть для школьников и студентов[/url] .
https://ufc327odds.com/
This Miami-held light heavyweight title fight at UFC 327 offers a genuine pick’em for bettors, as ex-champion Jiri Prochazka (-142) and hot-streaking knockout specialist Carlos Ulberg (+120) gear up to battle for the vacant belt. The extremely close odds underscore how well-paired these two finishers happen to be, creating a scenario where a investment on either man is simply a matter of which devastating skillset you anticipate will reign supreme.
mostbet casino app [url=https://mostbetr.com/en/mobil_uygulama/]mostbet casino app[/url] .
заказать продвижение сайта в москве [url=https://prodvizhenie-sajtov-v-moskve4.ru/]заказать продвижение сайта в москве[/url] .
ии анализ рекламы [url=https://reklamnyj-kreativ12.ru/]ии анализ рекламы[/url] .
сделать аудит сайта цена [url=https://internet-agentstvo-prodvizhenie-sajtov-seo.ru/]internet-agentstvo-prodvizhenie-sajtov-seo.ru[/url] .
нейросеть студент бот [url=https://nejroset-dlya-referatov-8.ru/]нейросеть студент бот[/url] .
точность прогноза креативов 95% [url=https://reklamnyj-kreativ14.ru/]reklamnyj-kreativ14.ru[/url] .
https://codere.cat/
Actualmente, Codere Mexico es una plataforma de casino en linea que desarrolla su actividad con total legalidad contando con el permiso de la SEGOB, proporcionando a los jugadores en el pais una plataforma segura y confiable donde cada ingreso y retiro de fondos se gestionan unicamente en moneda nacional (MXN) via SPEI, el sistema de pagos ampliamente utilizado en Mexico.
технический переводчик стоимость [url=https://teh-perevod.ru/]teh-perevod.ru[/url] .
прогноз доли выбора карточка [url=https://reklamnyj-kreativ13.ru/]прогноз доли выбора карточка[/url] .
https://caliente.cat/
Caliente Casino se establece como una alternativa destacada en el ambito local en Mexico, proporcionando una solucion unificada que articula wagers en deportes y juegos de casino con un extenso abanico de partidos y lanzamientos. Asi, el operador se establece como una eleccion firme para quienes esten buscando experiencias de juego variadas y beneficios competitivos en un sitio integral.
Метод лечения
Подробнее – [url=https://lechenie-narkomanii-vladimir10.ru/]лечение наркомании и алкоголизма владимир[/url]
глубокий комлексный аудит сайта [url=https://prodvizhenie-sajtov-v-moskve4.ru/]глубокий комлексный аудит сайта[/url] .
Если в первичном звонке звучат «красные флаги» (одышка, спутанность сознания, резкие скачки ритма), мы предлагаем стационарное «окно» мониторинга с ночным постом. При низких рисках стартуем на дому: контрольные точки совпадают с домашним комфортом, а вечерние online-вставки по 15–20 минут поддерживают предсказуемость без лишних поездок.
Получить больше информации – [url=https://vivod-iz-zapoya-voronezh15.ru/]вывод из запоя клиника[/url]
Самостоятельно выйти из запоя — почти невозможно. В Санкт-Петербурге врачи клиники проводят медикаментозный вывод из запоя с круглосуточным выездом. Доверяйте профессионалам.
Детальнее – [url=https://vyvod-iz-zapoya-v-sankt-peterburge16.ru/]vyvod-iz-zapoya-v-sankt-peterburge16.ru[/url]
Real-money games have become incredibly widespread due to their sheer convenience.
Users can access their favorite games at any time and anywhere with an online link.
The thrill of competing for real cash introduces an additional layer of engagement.
A massive array of options caters to every preference and budget.
Bonuses and loyalty programs provide added incentives to keep players coming back.
Modern sites ensure safe transactions and regulated gaming experiences.
https://www.hrdp-idrm.in/
продвижение сайтов во франции [url=https://internet-agentstvo-prodvizhenie-sajtov-seo.ru/]internet-agentstvo-prodvizhenie-sajtov-seo.ru[/url] .
Тендерный специалист помогает разобраться в особенностях каждого закона, а также обеспечивает грамотное сопровождение всех процедур. Это особенно важно для компаний, которые только начинают участвовать в торгах и не имеют опыта работы с государственными контрактами.
Разберитесь досконально – [url=https://tendernoe-soprovozhdenie-rostov-na-donu.ru/]тендерное сопровождение ип[/url]
a/b тест наружная реклама [url=https://reklamnyj-kreativ14.ru/]a/b тест наружная реклама[/url] .
upster pro [url=https://reklamnyj-kreativ12.ru/]upster pro[/url] .
mostbet apk [url=https://mostbetr.com/en/mobil_uygulama/]mostbet apk[/url] .
villas for sale in phuket island [url=https://villas-for-sale-in-phuket.com/]villas-for-sale-in-phuket.com[/url] .
«Капельница от запоя» в современном понимании — это не одна универсальная смесь, а последовательность управляемых шагов с понятной целью, измеримыми показателями и заранее назначенными точками переоценки. В наркологической клинике «СеверАльфа Мед» мы используем модульные инфузионные протоколы и бережный мониторинг, чтобы безопасно снять интоксикацию, восстановить водно-электролитный баланс, снизить тремор и вернуть физиологичный сон без «переседации». Каждый этап сопровождается сервисом конфиденциального уровня: нейтральные формулировки в документах, немаркированная логистика, «тихие» каналы связи, доступ к записям строго по ролям. Это делает путь пациента предсказуемым и защищённым от лишнего внимания.
Выяснить больше – [url=https://kapelnicza-ot-zapoya-murmansk15.ru/]капельница от запоя вызов[/url]
технического аудита сайта [url=https://prodvizhenie-sajtov-v-moskve4.ru/]технического аудита сайта[/url] .
investment property phuket [url=https://real-estate-for-sale-in-phuket.com/]real-estate-for-sale-in-phuket.com[/url] .
Под контролем специалистов проводится выведение токсинов из организма. Используются капельницы с растворами, препараты для поддержки сердца, печени и снятия психоэмоционального напряжения. Лечение алкоголизма в Воронеже — помощь на всех стадиях зависимости предполагает безопасный и контролируемый процесс детоксикации с минимизацией рисков осложнений.
Углубиться в тему – [url=https://lechenie-alkogolizma-voronezh9.ru/]лечение алкоголизма воронежская область[/url]
thailand villas for sale phuket [url=https://villas-for-sale-in-phuket-1.com/]thailand villas for sale phuket[/url] .
Ломка — это острый синдром отмены, возникающий после длительного употребления алкоголя или наркотических веществ. При резком прекращении приема подобных веществ организм испытывает острую нехватку необходимых компонентов, что приводит к развитию тяжелых симптомов, таких как сильная тревожность, бессонница, мышечные судороги, головокружение, потливость и повышенная возбудимость. В такой критической ситуации быстрое и квалифицированное вмешательство врача-нарколога является залогом сохранения здоровья и предупреждения серьезных осложнений.
Выяснить больше – https://snyatie-lomki-nnovgorod8.ru
Ставки на спорт интересуют миллионы болельщиков по всему миру.
Это объединяет азарт от матча с возможностью получить прибыль.
Зрители получают возможность проявить свои знания в спорте и аналитические навыки.
Легкий доступ через онлайн-платформы и смартфонные приложения делает действие невероятно удобным.
Широкий выбор турниров и исходов позволяет любому найти вариант по душе.
К тому же, социальный фактор — совместный анализ противостояний с единомышленниками — придаёт дополнительный азарт.
http://attfnd.free.fr/Forum/viewtopic.php?p=430414#430414
Не стоит забывать и про объективные факторы. Бывает, что физически опасно или трудно везти человека в клинику: он с трудом ходит, не спит уже несколько ночей, постоянно потеет, жалуется на сильную слабость и сердцебиение. Любая поездка в таком состоянии — дополнительная нагрузка на сердце и нервную систему. Выезд нарколога на дом позволяет начать лечение без этого лишнего риска: врач приезжает со всем необходимым для капельницы и наблюдения, а если по итогам осмотра становится понятно, что без стационара не обойтись, он помогает организовать перевод уже на фоне частично стабилизированного состояния, а не в момент максимального кризиса.
Узнать больше – [url=https://narkolog-na-dom-himki11.ru/]нарколог на дом химки[/url]
Перед таблицей зафиксируем принцип: это ориентир по этапам для семьи и пациента. Врач адаптирует длительность и насыщенность под возраст, сопутствующие заболевания и исходное состояние.
Получить дополнительную информацию – [url=https://narkologicheskaya-klinika-chekhov8.ru/]rejting-narkologicheskih-klinik[/url]
apartments for sale in phuket thailand [url=https://apartments-for-sale-in-phuket-1.com/]apartments for sale in phuket thailand[/url] .
apartments for sale thailand phuket [url=https://apartments-for-sale-in-phuket.com/]apartments for sale thailand phuket[/url] .
Процесс терапии включает несколько последовательных шагов:
Выяснить больше – [url=https://narcologicheskaya-klinika-v-chelyabinske16.ru/]наркологическая клиника вывод из запоя челябинск[/url]
узнаваемость бренда баннер [url=https://reklamnyj-kreativ13.ru/]reklamnyj-kreativ13.ru[/url] .
раскрутка сайта франция цена [url=https://internet-agentstvo-prodvizhenie-sajtov-seo.ru/]internet-agentstvo-prodvizhenie-sajtov-seo.ru[/url] .
При обращении за экстренной помощью наш нарколог незамедлительно выезжает на дом или принимает пациента в клинике. Процесс лечения организован по проверенной схеме, позволяющей максимально быстро стабилизировать состояние и облегчить симптомы ломки. Основные этапы включают:
Углубиться в тему – [url=https://snyatie-lomki-nnovgorod8.ru/]snyatie-lomki-nnovgorod8.ru/[/url]
запоминаемость слогана реклама [url=https://reklamnyj-kreativ14.ru/]reklamnyj-kreativ14.ru[/url] .
Группа препаратов
Углубиться в тему – [url=https://kapelnica-ot-zapoya-novosibirsk8.ru/]капельница от запоя круглосуточно[/url]
mostbet app [url=https://mostbetr.com/en/mobil_uygulama/]mostbet app[/url] .
Инфузионная терапия — не универсальный раствор «для всех». Её смысл — восстановить объём циркулирующей крови, скорректировать электролиты, снизить токсическую нагрузку, мягко приглушить тремор и тревогу, вернуть условия для сна. Мы начинаем с оценки реакции организма и двигаемся небольшими порциями, чтобы избежать «перегрева» препаратами. При выраженной тошноте подключаем противорвотную поддержку и гастропротекцию; при необходимости — печёночные субстраты и витамины группы B; кардиологические или антигипертензивные решения применяем только по показаниям. Врач сразу оговаривает, какие ощущения нормальны (сонливость, умеренная слабость, сухость во рту), а какие — повод для немедленной связи. Такой реализм даёт не косметическое облегчение «на час», а устойчивую траекторию на дни: эффект инфузий не «сгорает» к вечеру, потому что их поддерживают правила сна, воды и питания.
Ознакомиться с деталями – https://narkologicheskaya-klinika-podolsk9.ru/narkologicheskaya-klinika-ceny-v-podolske/
Мы не составляем «супер-смеси» «на всякий случай». Капельница — это набор модулей, каждый из которых отвечает за конкретную задачу: гидратация, электролиты, гастропротекция, антиоксидантная поддержка; при показаниях — мягкая анксиолитика. Порядок модулей зависит от ведущего симптом-кластера и времени суток.
Ознакомиться с деталями – https://kapelnicza-ot-zapoya-murmansk15.ru/prokapat-ot-alkogolya-na-domu-murmansk/
phuket villas for sale thailand [url=https://villas-for-sale-in-phuket.com/]villas-for-sale-in-phuket.com[/url] .
property investment phuket [url=https://real-estate-for-sale-in-phuket.com/]real-estate-for-sale-in-phuket.com[/url] .
Наркологическая клиника «РеМед Карелия» — это круглосуточная медицинская помощь, построенная на принципе клинической точности: каждая процедура имеет цель, проверяемые маркеры и назначенное окно переоценки. Мы используем современные методы детоксикации и постабстинентной стабилизации, не перегружая терапию «на всякий случай» и не полагаясь на универсальные «сильные капельницы». Вместо этого — модульные схемы, корректировка одного параметра за раз и обязательная оценка результата. Такой подход снижает фармаконагрузку, ускоряет восстановление сна и аппетита и делает лечение предсказуемым для пациента и его семьи. Анонимность встроена в процессы: немаркированные входы, гражданская форма персонала, нейтральные формулировки в документах, «тихие» уведомления и разграниченный доступ к карте наблюдения.
Разобраться лучше – [url=https://narkologicheskaya-klinika-v-petrozavodske15.ru/]вывод наркологическая клиника петрозаводск[/url]
Все шаги фиксируются в карте наблюдения. Если динамика «плоская», меняется один параметр (скорость/объём/последовательность), и через оговорённое окно проводится повторная оценка. Это снижает риск побочных реакций и сохраняет дневную ясность.
Получить больше информации – [url=https://vyvod-iz-zapoya-kaliningrad15.ru/]вывод из запоя вызов на дом в калининграде[/url]
Прежде чем перейти к таблице, отметим смысл. Это ориентир, а не жёсткое расписание. Врач адаптирует длительность и насыщенность этапов под возраст, фоновые диагнозы и динамику симптомов, но логика процесса остаётся неизменной: от безопасности к устойчивости.
Исследовать вопрос подробнее – https://vyvod-iz-zapoya-v-stacionare-chekhov8.ru/vyvod-iz-zapoya-kapelnica-v-chekhove/
Вопрос «а не рано ли кодироваться» часто звучит и от самих пациентов, и от их близких. Кажется, что кодирование — это крайняя мера «на последней стадии», а пока человек работает, иногда бывает трезвым и «не валяется под забором», можно подождать. На самом деле гораздо разумнее ориентироваться не на стереотипы, а на реальные признаки того, что зависимость уже управляет жизнью, а не наоборот. Кодирование от алкоголизма в Королёве рассматривается именно тогда, когда попытки остановиться своими силами систематически проваливаются, а каждый новый запой становится тяжелее предыдущего.
Получить больше информации – http://kodirovanie-ot-alkogolizma-korolyov11.ru
Выбор клиники для лечения наркомании — один из самых ответственных этапов на пути к выздоровлению. От уровня организации помощи зависит не только здоровье пациента, но и его способность вернуться к нормальной жизни. Согласно данным Министерства здравоохранения Российской Федерации, эффективность терапии значительно возрастает при индивидуальном подходе, квалифицированном составе специалистов и наличии комплексных программ, включающих медицинскую и психологическую помощь.
Получить дополнительные сведения – http://
Во внимание берутся не только масштаб и длительность запоев, но и изменения в поведении. Если человек регулярно обещает «завязать с понедельника», но каждый раз срывается, если рабочие задачи всё чаще выполняются с трудом, а любые стрессовые ситуации решаются «через стакан» или «через дозу», это прямой повод не ждать критического момента. Важно помнить, что зависимость — это прогрессирующее заболевание: со временем организму требуется всё больше вещества, растёт токсическая нагрузка на сердце, печень, нервную систему, ухудшается память и концентрация.
Подробнее тут – [url=https://narkologicheskaya-klinika-moskva11.ru/]narkologicheskaya-klinika-v-moskve-ceny[/url]
В клинике «Основа» применяется комплексный подход к лечению алкогольной интоксикации. Программа включает использование нескольких групп препаратов, каждая из которых решает конкретную задачу в процессе восстановления:
Получить больше информации – [url=https://kapelnica-ot-zapoya-novosibirsk8.ru/]капельницы от запоя на дому цена[/url]
apartments in phuket for sale [url=https://apartments-for-sale-in-phuket-1.com/]apartments in phuket for sale[/url] .
apartments in phuket for sale [url=https://apartments-for-sale-in-phuket.com/]apartments in phuket for sale[/url] .
luxury phuket villas sale [url=https://villas-for-sale-in-phuket-1.com/]villas-for-sale-in-phuket-1.com[/url] .
Мы отказываемся от «сильных» коктейлей ради скорости и опираемся на принцип одного изменения за раз: корректируется только темп, объём или последовательность модулей, после чего следует контроль в согласованное «окно». Такой подход минимизирует лекарственную нагрузку, защищает печень, миокард и центральную нервную систему, а также снижает риск рецидивной тревоги в первую ночь. Важная часть лечения — сенсорная гигиена: тёплая подсветка вместо резкого верхнего света, тихий режим в смартфонах, маска для сна и беруши при чувствительности к шуму. Эти «бытовые» меры — на самом деле клинические инструменты с измеримым эффектом на пульс, дыхание и латентность сна.
Получить дополнительную информацию – [url=https://kapelnicza-ot-zapoya-murmansk15.ru/]капельница от запоя клиника мурманск[/url]
Каждый из этапов направлен на обеспечение максимальной безопасности и эффективности лечения. Индивидуальный подход, основанный на тщательной диагностике, позволяет значительно снизить риск осложнений и обеспечить комфортное протекание терапии.
Получить дополнительную информацию – [url=https://snyatie-lomki-ekb8.ru/]снятие ломки наркомана екатеринбург[/url]
Состав капельницы никогда не «копируется»; он выбирается по доминирующему симптому и соматическому фону. Ниже — клинические профили, которые помогают понять нашу логику. Итоговая схема формируется на месте, а скорость и объём зависят от текущих показателей.
Изучить вопрос глубже – [url=https://narcolog-na-dom-krasnodar14.ru/]помощь нарколога на дому[/url]
Часто предприниматели объединяют понятия тендер и госзакупки, так как обе процедуры связаны с конкурсным выбором поставщика. Однако между ними существуют определённые различия, которые важно понимать перед началом работы в этой сфере.
Разберитесь досконально – [url=https://tendernoe-soprovozhdenie-rostov-na-donu.ru/]комплексное тендерное сопровождение ростов на дону[/url]
бесплатный период upster [url=https://reklamnyj-kreativ12.ru/]reklamnyj-kreativ12.ru[/url] .
Часто предприниматели объединяют понятия тендер и госзакупки, так как обе процедуры связаны с конкурсным выбором поставщика. Однако между ними существуют определённые различия, которые важно понимать перед началом работы в этой сфере.
Не упустите важные детали – [url=https://tendernoe-soprovozhdenie-rostov-na-donu.ru/]тендерное сопровождение заказчиков[/url]
Домашний формат выбирают, когда обстановка позволяет провести лечение в тишине и нет признаков угрозы жизни. Врач приезжает без опознавательных знаков, начинает с очной оценки и допуска к инфузии, сверяет принятые ранее препараты и аллергии, объясняет ожидаемую динамику. После запуска капельницы мягко корректируются жидкость и электролиты, проводится симптом-контроль (тремор, тошнота, тревога, головная боль), по показаниям — осторожная нормализация сна. На выходе пациент и семья получают понятные рекомендации на 24–48 часов: питьевой режим, питание, ограничения по нагрузкам, признаки тревоги и правила связи с дежурным врачом.
Углубиться в тему – [url=https://vyvod-iz-zapoya-sergiev-posad8.ru/]наркологический вывод из запоя[/url]
melbet как пополнить мбанк [url=www.melbet18207.help]www.melbet18207.help[/url]
продвижение сайта франция [url=https://internet-agentstvo-prodvizhenie-sajtov-seo.ru/]internet-agentstvo-prodvizhenie-sajtov-seo.ru[/url] .
перепланировка квартиры согласование [url=https://pereplanirovka-kvartir11.ru/]pereplanirovka-kvartir11.ru[/url] .
luxury villas thailand phuket for sale [url=https://villas-for-sale-in-phuket.com/]villas-for-sale-in-phuket.com[/url] .
точность прогноза креативов 95% [url=https://reklamnyj-kreativ13.ru/]reklamnyj-kreativ13.ru[/url] .
Алкогольный запой – это критическое состояние, возникающее при длительном злоупотреблении спиртными напитками, когда организм насыщается токсинами и его жизненно важные системы (сердечно-сосудистая, печёночная, нервная) начинают давать сбой. В такой ситуации необходимо незамедлительное вмешательство специалистов для предотвращения тяжелых осложнений и спасения жизни. Наркологическая клиника «Основа» в Новосибирске предоставляет экстренную помощь с помощью установки капельницы от запоя, позволяющей оперативно вывести токсины из организма, стабилизировать внутренние процессы и создать условия для последующего качественного восстановления.
Подробнее – https://kapelnica-ot-zapoya-novosibirsk8.ru/
Универсальной «сильной капельницы» не существует. Мы подбираем состав по ведущим симптомам, переносимости и данным экспресс-диагностики. Задача — вернуть дневную ясность и физиологичный ночной сон без переседации.
Углубиться в тему – https://vivod-iz-zapoya-voronezh15.ru/vyvod-iz-zapoya-staczionar-voronezh
houses for sale in phuket [url=https://real-estate-for-sale-in-phuket.com/]real-estate-for-sale-in-phuket.com[/url] .
Этап
Исследовать вопрос подробнее – [url=https://vyvod-iz-zapoya-v-stacionare-chekhov8.ru/]вывод из запоя[/url]
Мы собираем терапию из проверенных модулей: гидратация, коррекция электролитов, гастропротекция, антиоксидантная поддержка, мягкая анксиолитика по показаниям, поведенческие интервенции (свет, тишина, дыхание 4–6, стимул-контроль, вечерние ритуалы). Объём и темп зависят от ведущего симптома и времени суток: при кардиореактивном вечере больше внимания уделяется среде, при тошноте — гастропротекции и «тёплому питанию», при поверхностном сне — цифровой гигиене и световым сценариям. Ниже приведена ориентировочная матрица выбора; финальное решение — за лечащим врачом с учётом противопоказаний и лекарственных взаимодействий.
Выяснить больше – https://narkologicheskaya-klinika-v-petrozavodske15.ru/petrozavodsk-narkologiya/
Вопрос «а не рано ли кодироваться» часто звучит и от самих пациентов, и от их близких. Кажется, что кодирование — это крайняя мера «на последней стадии», а пока человек работает, иногда бывает трезвым и «не валяется под забором», можно подождать. На самом деле гораздо разумнее ориентироваться не на стереотипы, а на реальные признаки того, что зависимость уже управляет жизнью, а не наоборот. Кодирование от алкоголизма в Королёве рассматривается именно тогда, когда попытки остановиться своими силами систематически проваливаются, а каждый новый запой становится тяжелее предыдущего.
Получить больше информации – http://kodirovanie-ot-alkogolizma-korolyov11.ru/ehffektivnoe-kodirovanie-ot-alkogolizma-v-korolyove/
Как подчёркивает заведующий отделением наркологии Владимирского областного клинического диспансера, «только комплексная модель, включающая медикаментозную поддержку и психотерапию, даёт устойчивый эффект». Это означает, что в штате клиники должны быть не только врачи, но и психотерапевты, социальные работники, реабилитологи.
Ознакомиться с деталями – [url=https://lechenie-narkomanii-vladimir10.ru/]лечение наркомании анонимно владимир[/url]
condos for sale phuket [url=https://apartments-for-sale-in-phuket.com/]condos for sale phuket[/url] .
apartments for sale phuket [url=https://apartments-for-sale-in-phuket-1.com/]apartments for sale phuket[/url] .
В клинике «Основа» применяется комплексный подход к лечению алкогольной интоксикации. Программа включает использование нескольких групп препаратов, каждая из которых решает конкретную задачу в процессе восстановления:
Получить дополнительные сведения – [url=https://kapelnica-ot-zapoya-novosibirsk8.ru/]вызвать капельницу от запоя новосибирск[/url]
Группа препаратов
Узнать больше – http://kapelnica-ot-zapoya-novosibirsk8.ru
Наркологическая клиника «РеМед Карелия» — это круглосуточная медицинская помощь, построенная на принципе клинической точности: каждая процедура имеет цель, проверяемые маркеры и назначенное окно переоценки. Мы используем современные методы детоксикации и постабстинентной стабилизации, не перегружая терапию «на всякий случай» и не полагаясь на универсальные «сильные капельницы». Вместо этого — модульные схемы, корректировка одного параметра за раз и обязательная оценка результата. Такой подход снижает фармаконагрузку, ускоряет восстановление сна и аппетита и делает лечение предсказуемым для пациента и его семьи. Анонимность встроена в процессы: немаркированные входы, гражданская форма персонала, нейтральные формулировки в документах, «тихие» уведомления и разграниченный доступ к карте наблюдения.
Подробнее – https://narkologicheskaya-klinika-v-petrozavodske15.ru/petrozavodsk-narkologiya
Сигналом к тому, что пора обсудить вариант кодирования с наркологом, служит не один какой-то эпизод, а совокупность симптомов. Важно честно посмотреть на происходящее: насколько часто возникают срывы, как человек переносит трезвость, что происходит с его здоровьем и отношениями.
Узнать больше – [url=https://kodirovanie-ot-alkogolizma-korolyov11.ru/]кодирование от алкоголизма последствия[/url]
При выводе из запоя в Ростове-на-Дону используются разные терапевтические подходы. Основной задачей является устранение токсинов и восстановление работы систем организма. Врач подбирает терапию индивидуально в зависимости от состояния пациента и длительности запоя.
Выяснить больше – [url=https://vyvod-iz-zapoya-rostov-na-donu14.ru/]скорая вывод из запоя в ростове-на-дону[/url]
Если наблюдаются вышеописанные симптомы, немедленное обращение к наркологу позволяет не только устранить острые проявления, но и предотвратить возможное развитие опасных для жизни осложнений, таких как сердечно-сосудистые сбои или нарушения работы центральной нервной системы.
Подробнее – [url=https://snyatie-lomki-ekb8.ru/]снятие ломок на дому екатеринбург[/url]
перепланировка квартиры согласование [url=https://pereplanirovka-kvartir11.ru/]pereplanirovka-kvartir11.ru[/url] .
Группа препаратов
Исследовать вопрос подробнее – [url=https://kapelnica-ot-zapoya-novosibirsk8.ru/]капельница от запоя вызов[/url]
оптимизация сайта франция [url=https://internet-agentstvo-prodvizhenie-sajtov-seo.ru/]internet-agentstvo-prodvizhenie-sajtov-seo.ru[/url] .
Часто предприниматели объединяют понятия тендер и госзакупки, так как обе процедуры связаны с конкурсным выбором поставщика. Однако между ними существуют определённые различия, которые важно понимать перед началом работы в этой сфере.
Все ответы на ваши вопросы – [url=https://tendernoe-soprovozhdenie-rostov-na-donu.ru/]тендер госзакупки[/url]
Борьба с наркотической зависимостью требует системного подхода и участия опытных специалистов. Важно понимать, что лечение наркомании — это не только снятие ломки, но и длительная психотерапия, обучение новым моделям поведения, работа с семьёй. Согласно рекомендациям Минздрава РФ, наиболее стабильные результаты достигаются при прохождении курса реабилитации под наблюдением профессиональной команды в специализированном центре.
Получить дополнительную информацию – [url=https://lechenie-narkomanii-vladimir10.ru/]центр анонимного лечения наркомании[/url]
точность прогноза креативов 95% [url=https://reklamnyj-kreativ12.ru/]reklamnyj-kreativ12.ru[/url] .
Обращение за экстренной помощью требуется в ситуациях, когда симптомы ломки становятся невыносимыми и ухудшают общее состояние пациента. Основными показаниями для вызова специалиста являются:
Разобраться лучше – [url=https://snyatie-lomki-ekb8.ru/]снятие ломки наркомана екатеринбург[/url]
https://playdoit.cat/
Playdoit es un contemporaneo casino en linea y tambien plataforma de apuestas disenado exclusivamente para el publico mexicano, que se maneja con permiso vigente y proporciona un recorrido completo desde el dispositivo movil como desde la computadora.
«МедТрезвие» выстраивает лечение зависимости как последовательный и понятный маршрут, где каждый этап имеет чёткую цель, критерии эффективности и прозрачные условия. С первого обращения дежурный врач уточняет жалобы, длительность употребления, сопутствующие заболевания, переносимость лекарств и бытовые ограничения, после чего предлагает безопасный формат начала — выезд на дом или приём без ожидания. Важна не только скорость, но и качество коммуникации: пациент и близкие получают ясное объяснение, зачем назначается конкретная процедура, как оценивать улучшение и какие признаки требуют немедленной связи со специалистом. Круглосуточная доступность и конфиденциальные каналы записи снимают барьер обращения, а внутренняя маршрутизация позволяет переходить от экстренного купирования симптомов к стабилизации и профилактике срывов без пауз и «провалов» между этапами. Такой подход уменьшает риск повторных эпизодов, повышает приверженность и возвращает человеку контроль над повседневной жизнью.
Подробнее – https://narkologicheskaya-klinika-moskva9.ru/anonimnaya-narkologicheskaya-klinika-v-moskve/
ии анализ креативов 60 секунд [url=https://reklamnyj-kreativ13.ru/]reklamnyj-kreativ13.ru[/url] .
технический перевод услуги [url=https://teh-perevod.ru/]teh-perevod.ru[/url] .
apartments for sale thailand phuket [url=https://apartments-for-sale-in-phuket.com/]apartments for sale thailand phuket[/url] .
luxury phuket villas for sale [url=https://villas-for-sale-in-phuket-1.com/]villas-for-sale-in-phuket-1.com[/url] .
Перед таблицей зафиксируем принцип: это ориентир по этапам для семьи и пациента. Врач адаптирует длительность и насыщенность под возраст, сопутствующие заболевания и исходное состояние.
Разобраться лучше – [url=https://narkologicheskaya-klinika-chekhov8.ru/]gosudarstvennaya-narkologicheskaya-klinika[/url]
phuket thailand property for sale [url=https://real-estate-for-sale-in-phuket.com/]phuket thailand property for sale[/url] .
villas for sale in phuket island [url=https://villas-for-sale-in-phuket.com/]villas-for-sale-in-phuket.com[/url] .
luxury apartments for sale phuket [url=https://apartments-for-sale-in-phuket-1.com/]apartments-for-sale-in-phuket-1.com[/url] .
Нарколог на дом в Химках особенно востребован тогда, когда состояние человека уже нельзя назвать обычным похмельем, но он категорически отказывается ехать в клинику. Запой тянется несколько дней или дольше, нет полноценного сна, пульс постоянно учащённый, руки трясутся, давление скачет, а любое утро начинается не с облегчения, а с новой дозы алкоголя «чтобы не развалиться». В такой ситуации родственники оказываются между страхом и беспомощностью: понятно, что дальше ждать опасно, но уговорить собрать вещи и поехать в стационар не получается. Формат выезда нарколога на дом как раз и закрывает этот тупик — врач приезжает туда, где сейчас находится человек, оценивает риски и сразу начинает помощь.
Получить дополнительные сведения – [url=https://narkolog-na-dom-himki11.ru/]нарколог и психиатр из Химок[/url]
Чтобы соотнести риски и плотность наблюдения до очного осмотра, удобнее всего взглянуть на одну сводную таблицу. Это не замена решению врача, но понятный ориентир для семьи: чем выше вероятность осложнений, тем плотнее мониторинг и быстрее доступ к коррекциям.
Детальнее – http://narkologicheskaya-klinika-lyubercy0.ru/
«АльфаДетокс» в Чехове — это стационарный маршрут вывода из запоя с круглосуточным наблюдением и быстрыми медицинскими решениями. Мы принимаем без очередей, проводим очную оценку, допускаем к терапии и запускаем управляющий детокс с аппаратным контролем и лабораторными исследованиями по показаниям. Наша цель — не просто поставить капельницу, а безопасно стабилизировать давление и пульс, снять интоксикацию и абстиненцию, наладить сон и дать понятный план ближайших дней. Анонимность встроена в процесс, вы общаетесь с командой спокойно и без лишней огласки, а все назначения объясняются простым языком, чтобы вы понимали логику каждого шага.
Узнать больше – [url=https://vyvod-iz-zapoya-v-stacionare-chekhov8.ru/]vyvod-iz-zapoya-kakie-kapelnicy[/url]
технический перевод услуги [url=https://teh-perevod.ru/]teh-perevod.ru[/url] .
https://playcet.cat/
Playcet constituye un sitio web de apuestas en linea y juegos de casino operada por CET, una firma nacional con un largo recorrido en los casinos presenciales de la provincia de Cordoba, lo cual le brinda una garantia solida y verificable en 2026.
В городе и пригороде организован круглосуточный приём с возможностью выезда на дом. Координатор уточняет только клинически значимые данные: регулярные препараты и дозировки, аллергии, недавние эпизоды судорог/психозов, доступ к розетке, возможность обеспечить «тихое окно» на 2–3 часа. Если в квартире многолюдно или идёт ремонт, предложим «тихий» стационар с отдельным входом и тем же ведущим врачом; после стабилизации зеркально перенесём маршрут обратно домой, чтобы не терять темп и доверие.
Выяснить больше – http://narkologicheskaya-klinika-v-nizhnem-novgorode16.ru
condos for sale phuket [url=https://apartments-for-sale-in-phuket.com/]condos for sale phuket[/url] .
Детоксикационные растворы (физиологический раствор, глюкоза, раствор Рингера)
Получить дополнительные сведения – [url=https://vyvod-iz-zapoya-ekb8.ru/]вывод из запоя на дому екатеринбург[/url]
luxury villas in phuket thailand for sale [url=https://villas-for-sale-in-phuket-1.com/]villas-for-sale-in-phuket-1.com[/url] .
Признаки, что пора задуматься о кодировании
Получить дополнительные сведения – [url=https://kodirovanie-ot-alkogolizma-korolyov11.ru/]kodirovanie-ot-alkogolizma-otzyvy[/url]
Прежде чем перейти к таблице, отметим смысл. Это ориентир, а не жёсткое расписание. Врач адаптирует длительность и насыщенность этапов под возраст, фоновые диагнозы и динамику симптомов, но логика процесса остаётся неизменной: от безопасности к устойчивости.
Подробнее – [url=https://vyvod-iz-zapoya-v-stacionare-chekhov8.ru/]вывод из запоя в клинике[/url]
houses for sale in phuket [url=https://real-estate-for-sale-in-phuket.com/]real-estate-for-sale-in-phuket.com[/url] .
luxury villas thailand phuket for sale [url=https://villas-for-sale-in-phuket.com/]villas-for-sale-in-phuket.com[/url] .
нейросеть реферат онлайн [url=https://nejroset-dlya-referatov-8.ru/]нейросеть реферат онлайн[/url] .
phuket condo for sale [url=https://apartments-for-sale-in-phuket-1.com/]apartments-for-sale-in-phuket-1.com[/url] .
база бенчмарков рекламы [url=https://reklamnyj-kreativ12.ru/]reklamnyj-kreativ12.ru[/url] .
Когда родственники видят, что в их случае совпадает сразу несколько этих пунктов, выезд нарколога на дом часто становится тем самым реалистичным и своевременным решением, которое позволяет не довести дело до экстренной госпитализации уже в критическом состоянии. После такого вмешательства появляются часы и дни, когда можно спокойно обсудить дальнейшие шаги, а не действовать на фоне паники и полного истощения.
Подробнее тут – https://narkolog-na-dom-himki11.ru/
Родные — ключевой ресурс, если действовать согласованно. Мы обучаем базовым правилам: тише, темнее, теплее; вода и лёгкая еда «по часам»; никаких эмоциональных «разборов» в первые дни; заранее согласованные короткие сигналы для связи со специалистом. Важно отказаться от фраз «возьми себя в руки» и «а если ты сорвёшься?» — они усиливают тревогу и провоцируют сопротивление. Вместо этого — спокойные, конкретные договорённости на сегодня: во сколько отбой, как проходит вечер, когда и какие «буферы» использовать. Такой режим убирает хаос и снижает конфликтность, за счёт чего держится медицинский эффект, уменьшается количество «ночных качелей» и потребность в экстренных визитах. Когда у всех одна карта маршрута, путь к устойчивости становится короче и реалистичнее.
Получить дополнительные сведения – [url=https://vyvod-iz-zapoya-balashiha9.ru/]anonimnyj-vyvod-iz-zapoya[/url]
перевод технического текста [url=https://teh-perevod.ru/]teh-perevod.ru[/url] .
Сигналом к тому, что пора обсудить вариант кодирования с наркологом, служит не один какой-то эпизод, а совокупность симптомов. Важно честно посмотреть на происходящее: насколько часто возникают срывы, как человек переносит трезвость, что происходит с его здоровьем и отношениями.
Изучить вопрос глубже – http://kodirovanie-ot-alkogolizma-korolyov11.ru
перепланировка квартиры согласование [url=https://pereplanirovka-kvartir11.ru/]pereplanirovka-kvartir11.ru[/url] .
seo онлайн [url=https://kursy-seo-12.ru/]seo онлайн[/url] .
узаконивание перепланировки [url=https://pereplanirovka-kvartir12.ru/]pereplanirovka-kvartir12.ru[/url] .
seo продвижение по трафику clover [url=https://prodvizhenie-sajta-po-trafiku2.ru/]seo продвижение по трафику clover[/url] .
Основные случаи, когда следует незамедлительно вызвать нарколога:
Получить больше информации – https://narkologicheskaya-pomoshh-tula10.ru/anonimnaya-narkologicheskaya-pomoshh-tula/
проект перепланировки квартиры москва [url=https://proekt-pereplanirovki-kvartiry24.ru/]проект перепланировки квартиры москва[/url] .
Преимущество
Получить дополнительную информацию – http://
phuket thailand villas for sale [url=https://villas-for-sale-in-phuket-1.com/]phuket thailand villas for sale[/url] .
Вывод из запоя в Рязани является востребованной медицинской услугой, направленной на стабилизацию состояния пациента после длительного употребления алкоголя. Специалисты применяют современные методы детоксикации, позволяющие быстро и безопасно восстановить жизненно важные функции организма, снизить проявления абстинентного синдрома и предотвратить осложнения. Процесс лечения осуществляется в клинических условиях под постоянным наблюдением врачей.
Исследовать вопрос подробнее – http://vyvod-iz-zapoya-ryazan14.ru/vyvod-iz-zapoya-na-domu-ryazan-czeny/
чат нейросеть для учебы [url=https://nejroset-dlya-referatov-8.ru/]nejroset-dlya-referatov-8.ru[/url] .
Качество — это не субъективные впечатления, а сравнение базовой линии с целевыми коридорами в обозначенных окнах. Мы ведём короткий отчёт по маркерам: переносимость воды (мл/ч), диурез, ЧСС/АД в покое, структура сна (длительность и число пробуждений), динамика по шкалам тошноты/тремора, выполнение двух утренних бытовых задач. Отчёт понятен пациенту: в нём нет лишней терминологии, только факты и решения — какой модуль снят, какой оставлен ещё на ночь, какой будет пересмотрен через 12–24 часа. Финансовая прозрачность следует той же логике: расширение проводится только по показаниям с указанием цели («какой маркер планируем улучшить») и окна переоценки («когда проверяем результат»).
Разобраться лучше – http://narkologicheskaya-klinika-v-rostove-na-donu16.ru
Этап
Разобраться лучше – [url=https://vyvod-iz-zapoya-v-stacionare-chekhov8.ru/]вывод из запоя алкоголиков[/url]
*Седативные препараты применяются строго по показаниям и под мониторингом дыхания.
Подробнее можно узнать тут – [url=https://vivod-iz-zapoya-rostov14.ru/]вывод из запоя с выездом ростов-на-дону[/url]
Процедура вывода из запоя проводится с применением современных методик инфузионной терапии. Врачи контролируют уровень гидратации, работу сердечно-сосудистой системы и общее состояние пациента до полного устранения симптомов.
Узнать больше – [url=https://narkologicheskaya-clinika-v-kazani16.ru/]запой наркологическая клиника[/url]
цветы за час москва [url=https://www.cvejie-cveti.ru]https://www.cvejie-cveti.ru[/url] .
Первый полноценный сон — переломный момент в выводе из запоя. В «АлкоМед Балашиха» мы создаём условия для него с первого дня: затемнение, тишина, комфортная температура, минимизация стимулов, ранний отбой. Если требуется, подключаем мягкие седативные схемы под мониторинг. Утром — контроль показателей, уточнение дозировок, план активности «по силам», корректировка питания и воды. Мы заранее проговариваем, какие ощущения нормальны (сонливость, умеренная слабость), а какие — требуют связи со специалистом. Чёткая ночная стратегия снижает импульсивность и убирает главный триггер срывов — усталость и бессонницу, из-за которых даже корректно подобранные инфузии теряют эффективность к вечеру следующего дня.
Подробнее можно узнать тут – https://vyvod-iz-zapoya-balashiha9.ru/vyvod-iz-zapoya-na-domu-balashiha/
услуги по согласованию перепланировки [url=https://pereplanirovka-kvartir12.ru/]услуги по согласованию перепланировки[/url] .
После поступления звонка врач клиники «Импульс» незамедлительно отправляется на указанный адрес для оказания срочной помощи. Вызов врача на дом включает следующие этапы:
Подробнее можно узнать тут – [url=https://narcolog-na-dom-nnovgorod8.ru/]нарколог капельница на дом[/url]
перевод технического текста [url=https://teh-perevod.ru/]teh-perevod.ru[/url] .
узаконить перепланировку москва [url=https://pereplanirovka-kvartir11.ru/]pereplanirovka-kvartir11.ru[/url] .
В первые часы важно не «залить» пациента растворами, а корректно подобрать темп и состав с учётом возраста, массы тела, артериального давления, лекарственного фона (антигипертензивные, сахароснижающие, антиаритмические препараты) и переносимости. Именно поэтому мы не отдаём лечение на откуп шаблонам — каждая схема конструируется врачом на месте, а эффективность оценивается по понятным метрикам.
Ознакомиться с деталями – [url=https://vyvod-iz-zapoya-v-ryazani14.ru/]вывод из запоя на дому недорого[/url]
Немедленный вызов врача позволяет начать вывод из запоя до того, как интоксикация достигнет критической стадии.
Исследовать вопрос подробнее – [url=https://vyvod-iz-zapoya-sochi7.ru/]скорая вывод из запоя[/url]
Специалист задаёт вопросы о продолжительности запоя, характере симптоматики и наличии сопутствующих заболеваний. Такая информация является основой для формирования индивидуального плана детоксикации и корректировки дозировок медикаментов.
Изучить вопрос глубже – [url=https://vyvod-iz-zapoya-arkhangelsk66.ru/]вывод из запоя вызов город[/url]
Этап
Узнать больше – http://vyvod-iz-zapoya-v-stacionare-chekhov8.ru
Если многое из этого знакомо, кодирование стоит рассматривать не как «наказание» или «приговор», а как инструмент, который помогает закрыть доступ к алкоголю на определённый срок и даёт шанс выстроить новую привычку — жить трезво.
Детальнее – https://kodirovanie-ot-alkogolizma-korolyov11.ru/ehffektivnoe-kodirovanie-ot-alkogolizma-v-korolyove
Описание
Разобраться лучше – [url=https://vyvod-iz-zapoya-sochi7.ru/]срочный вывод из запоя сочи[/url]
нейросети для студентов [url=https://nejroset-dlya-referatov-8.ru/]нейросети для студентов[/url] .
internet partner [url=https://prodvizhenie-sajta-po-trafiku3.ru/]internet partner[/url] .
Такая последовательность действий позволяет достичь стабилизации состояния в максимально короткие сроки. После завершения этих процедур врачи рекомендуют продолжение лечения в формате реабилитации.
Подробнее – [url=https://narkologicheskaya-klinika-vladimir10.ru/]анонимная наркологическая клиника[/url]
Срочный вызов врача на дом необходим при появлении следующих симптомов:
Подробнее – [url=https://narcolog-na-dom-nnovgorod8.ru/]нарколог на дом анонимно в нижнем новгороде[/url]
Не стоит забывать и про объективные факторы. Бывает, что физически опасно или трудно везти человека в клинику: он с трудом ходит, не спит уже несколько ночей, постоянно потеет, жалуется на сильную слабость и сердцебиение. Любая поездка в таком состоянии — дополнительная нагрузка на сердце и нервную систему. Выезд нарколога на дом позволяет начать лечение без этого лишнего риска: врач приезжает со всем необходимым для капельницы и наблюдения, а если по итогам осмотра становится понятно, что без стационара не обойтись, он помогает организовать перевод уже на фоне частично стабилизированного состояния, а не в момент максимального кризиса.
Изучить вопрос глубже – [url=https://narkolog-na-dom-himki11.ru/]вызвать нарколога на дом[/url]
Домашний формат нужен, когда риски управляемы, а в квартире можно обеспечить «тихий режим». Врач приезжает без эмблем, проводит осмотр, измеряет давление, пульс, сатурацию, сверяет лекарства за последние 48 часов и аллергии. После допуска запускается инфузия с мягкой коррекцией воды и электролитов, поддержкой печени и вегетативной нервной системы; при необходимости аккуратно настраивается сон. По завершении — переоценка, письменная памятка на 24–48 часов, список тревожных признаков и прямой канал связи. Такой визит «гасит» тремор и тошноту, снижает тревогу и делает ночь предсказуемой.
Подробнее тут – [url=https://narkologicheskaya-klinika-chekhov8.ru/]наркологическая клиника цены[/url]
Признаки, что пора задуматься о кодировании
Разобраться лучше – http://kodirovanie-ot-alkogolizma-korolyov11.ru/
Инфузионная терапия — не универсальный раствор «для всех». Её смысл — восстановить объём циркулирующей крови, скорректировать электролиты, снизить токсическую нагрузку, мягко приглушить тремор и тревогу, вернуть условия для сна. Мы начинаем с оценки реакции организма и двигаемся небольшими порциями, чтобы избежать «перегрева» препаратами. При выраженной тошноте подключаем противорвотную поддержку и гастропротекцию; при необходимости — печёночные субстраты и витамины группы B; кардиологические или антигипертензивные решения применяем только по показаниям. Врач сразу оговаривает, какие ощущения нормальны (сонливость, умеренная слабость, сухость во рту), а какие — повод для немедленной связи. Такой реализм даёт не косметическое облегчение «на час», а устойчивую траекторию на дни: эффект инфузий не «сгорает» к вечеру, потому что их поддерживают правила сна, воды и питания.
Детальнее – [url=https://narkologicheskaya-klinika-podolsk9.ru/]бесплатная наркологическая клиника в подольске[/url]
seo partners [url=https://prodvizhenie-sajtov-po-trafiku.ru/]seo partners[/url] .
Часто предприниматели объединяют понятия тендер и госзакупки, так как обе процедуры связаны с конкурсным выбором поставщика. Однако между ними существуют определённые различия, которые важно понимать перед началом работы в этой сфере.
Узнайте больше прямо сейчас – [url=https://tendernoe-soprovozhdenie-rostov-na-donu.ru/]стоимость тендерного сопровождения[/url]
После поступления звонка врач клиники «Импульс» незамедлительно отправляется на указанный адрес для оказания срочной помощи. Вызов врача на дом включает следующие этапы:
Узнать больше – [url=https://narcolog-na-dom-nnovgorod8.ru/]помощь нарколога на дому в нижнем новгороде[/url]
раскрутка сайтов интернет [url=https://prodvizhenie-sajta-po-trafiku3.ru/]prodvizhenie-sajta-po-trafiku3.ru[/url] .
Запой – это крайне опасное состояние, когда контроль над употреблением алкоголя утрачивается, а токсичные вещества накапливаются в организме, угрожая жизни. В Архангельске экстренная медицинская помощь становится особенно актуальной, и специализированные службы готовы оперативно вмешаться для стабилизации состояния пациента. В данной статье описываются уникальные методики вывода из запоя, направленные на быстрое и безопасное восстановление здоровья в экстренных случаях.
Узнать больше – http://vyvod-iz-zapoya-arkhangelsk66.ru/vyvod-iz-zapoya-na-domu-arkhangelsk/
Наша наркологическая клиника успешно помогает пациентам с различной степенью алкогольной зависимости. Преимущества клиники «Перспектива» представлены в таблице ниже:
Подробнее тут – http://kapelnica-ot-zapoya-krasnodar77.ru/kapelnicza-ot-zapoya-na-domu-v-krasnodare/
Прежде чем перейти к таблице, отметим смысл. Это ориентир, а не жёсткое расписание. Врач адаптирует длительность и насыщенность этапов под возраст, фоновые диагнозы и динамику симптомов, но логика процесса остаётся неизменной: от безопасности к устойчивости.
Узнать больше – [url=https://vyvod-iz-zapoya-v-stacionare-chekhov8.ru/]vyvod-iz-zapoya[/url]
Мы дозировано упоминаем географию — важнее не слово «Нижний Новгород», а предсказуемость процесса. Пациент получает «вечерний протокол» — краткие инструкции на ближайшие 12 часов: как пить воду малыми порциями, как приглушить свет, какое «окно тишины» соблюсти перед сном, когда связаться с дежурным врачом и какие маркеры фиксировать в «дневнике симптомов» (шкалы тремора, тревоги, тошноты по 0–10; время засыпания; число пробуждений).
Подробнее – https://narkologicheskaya-klinika-v-nizhnem-novgorode16.ru/chastnaya-narkologicheskaya-klinika-nizhnij-novgorod/
цветы в москве с бесплатной доставкой [url=www.cvejie-cveti.ru]www.cvejie-cveti.ru[/url] .
На этом этапе основной целью является быстрое выведение токсинов и стабилизация обменных процессов в организме. Используются современные препараты, которые помогают снизить концентрацию алкоголя в крови и восстановить работу внутренних органов.
Получить дополнительную информацию – [url=https://vyvod-iz-zapoya-arkhangelsk66.ru/]вывод из запоя вызов на дом в архангельске[/url]
услуги продвижения seo рязань timoly.ru сеотика.рф [url=https://prodvizhenie-sajta-po-trafiku3.ru/]prodvizhenie-sajta-po-trafiku3.ru[/url] .
internet partner [url=https://prodvizhenie-sajta-po-trafiku2.ru/]prodvizhenie-sajta-po-trafiku2.ru[/url] .
проектная организация для перепланировки квартиры [url=https://proekt-pereplanirovki-kvartiry24.ru/]proekt-pereplanirovki-kvartiry24.ru[/url] .
курсы seo [url=https://kursy-seo-12.ru/]kursy-seo-12.ru[/url] .
Участие в государственных и коммерческих процедурах требует точной подготовки, понимания законодательства и внимательной работы с документами. Для многих компаний самостоятельная работа с закупками становится сложной задачей: необходимо отслеживать новые закупки, анализировать требования, оформлять документы и взаимодействовать с площадками.
Полный разбор — только здесь – [url=https://tendernoe-soprovozhdenie-rostov-na-donu.ru/]тендерное сопровождение под ключ в ростове на дону[/url]
ии реферат [url=https://nejroset-dlya-referatov-8.ru/]ии реферат[/url] .
seo продвижение сайта по трафику кловер [url=https://prodvizhenie-sajtov-po-trafiku.ru/]prodvizhenie-sajtov-po-trafiku.ru[/url] .
https://strendus.cat/
La plataforma Strendus se ha consolidado en 2026 como la casa de apuestas deportivas y casino online completamente mexicano con mayor reputacion, contando con la regulacion de SEGOB.
Наркологическая клиника «ДонМед Резонанс» — это круглосуточный комплекс координированной помощи, где диагностика, инфузионная терапия, психообразование и поддержка семьи соединены в единую «дорожную карту». Мы работаем по принципу минимально достаточных вмешательств: каждый шаг имеет цель, измеримый маркер и заранее обозначенное «окно оценки». Такой подход убирает полипрагмазию, снижает риск нежелательных реакций и делает траекторию лечения предсказуемой — пациент не «получает процедуры», а видит, как цели достигаются и какие модули выключаются, когда они сделали своё дело. Круглосуточный режим позволяет внимательно сопровождать самые чувствительные интервалы — первую ночь, утренний период после детоксикации и момент возвращения к бытовой активности.
Разобраться лучше – http://narkologicheskaya-klinika-v-rostove-na-donu16.ru/narkologiya-rostov-zapadnyj-rajon/https://narkologicheskaya-klinika-v-rostove-na-donu16.ru
сео продвижение за процент кловер [url=https://prodvizhenie-sajta-po-trafiku2.ru/]prodvizhenie-sajta-po-trafiku2.ru[/url] .
трафиковое продвижение сайта [url=https://prodvizhenie-sajta-po-trafiku3.ru/]prodvizhenie-sajta-po-trafiku3.ru[/url] .
цветы с доставкой московская область [url=www.cvejie-cveti.ru/]www.cvejie-cveti.ru/[/url] .
проект перепланировки квартиры для согласования [url=https://proekt-pereplanirovki-kvartiry24.ru/]проект перепланировки квартиры для согласования[/url] .
Наркологическая клиника в клинике в Нижнем Новгороде специализируется на диагностике, лечении и реабилитации пациентов с алкогольной и наркотической зависимостью. Основная цель деятельности учреждения — восстановление физического здоровья и психологической устойчивости человека, оказавшегося в состоянии зависимости. В клинике применяются современные методы терапии, доказавшие эффективность в медицинской практике. Все процедуры проводятся конфиденциально, с соблюдением медицинских стандартов и под контролем квалифицированных специалистов.
Получить дополнительные сведения – https://narkologicheskaya-clinika-v-nizhnem-novgorode16.ru/
школа seo [url=https://kursy-seo-12.ru/]kursy-seo-12.ru[/url] .
seo partners [url=https://prodvizhenie-sajtov-po-trafiku.ru/]seo partners[/url] .
вавада букмекер [url=https://daostone.ru/]вавада букмекер[/url] .
vavada casino сайт [url=https://polezno-vsem.ru/]vavada casino сайт[/url] .
узаконивание перепланировки квартиры [url=https://pereplanirovka-kvartir12.ru/]pereplanirovka-kvartir12.ru[/url] .
melbet login & registration online [url=https://melbetlogin.ru/]melbet login & registration online[/url] .
Мы уделяем особое внимание индивидуальному подходу к каждому пациенту, понимая, что причины и проявления зависимости у всех разные. Тщательная диагностика позволяет учитывать медицинские, психологические и социальные аспекты каждого случая, на основе чего разрабатываются персонализированные программы лечения. Они включают медикаментозную терапию, психотерапевтические методы и мероприятия по социальной адаптации.
Подробнее тут – http://срочно-вывод-из-запоя.рф/vyvod-iz-zapoya-v-kruglosutochno-v-chelyabinske.xn--p1ai/
melbet register [url=https://vt-fiddle.com/]melbet register[/url] .
услуги продвижения сайта clover [url=https://prodvizhenie-sajta-po-trafiku2.ru/]prodvizhenie-sajta-po-trafiku2.ru[/url] .
сео продвижение сайтов по трафику [url=https://prodvizhenie-sajta-po-trafiku3.ru/]prodvizhenie-sajta-po-trafiku3.ru[/url] .
продвижение портала увеличить трафик специалисты [url=https://prodvizhenie-sajtov-po-trafiku1.ru/]продвижение портала увеличить трафик специалисты[/url] .
официальный сайт мелбет [url=https://melbetiphone.ru/]официальный сайт мелбет[/url] .
Преимущество
Получить дополнительные сведения – https://vyvod-iz-zapoya-sochi7.ru/vyvod-iz-zapoya-anonimno-v-sochi
перепланировка квартиры проектные организации [url=https://proekt-pereplanirovki-kvartiry24.ru/]proekt-pereplanirovki-kvartiry24.ru[/url] .
Лечение в наркологической клинике в Чехове удобно не только близостью к дому. Главный плюс — комплексный подход. Зависимость практически никогда не ограничивается только алкоголем или наркотиком: страдают сердце и сосуды, печень, нервная система, психика, отношения в семье и на работе. Если пытаться лечить только одно звено, например, периодически «чистить кровь» капельницами, без проработки причин и последствий, ситуация быстро возвращается к исходной точке. В клинике выстраивается последовательная работа: сначала стабилизируют организм, затем укрепляют психику, а дальше помогают менять привычный образ жизни, чтобы трезвость стала не кратким эпизодом, а новой нормой.
Детальнее – https://narkologicheskaya-klinika-chekhov11.ru/
*Седативные препараты применяются строго по показаниям и под мониторингом дыхания.
Подробнее – [url=https://vivod-iz-zapoya-rostov14.ru/]вывод из запоя в стационаре[/url]
мелбет официальная контора [url=https://melbetregistratsiya.ru/]мелбет официальная контора[/url] .
https://wplay.cat/
Strendus es un casino online que cumple con los mas altos estandares de resguardo y legalidad, brindando a los usuarios una propuesta de diversion fiable y totalmente autorizada .
Ofrece una extensa gama de opciones de entretenimiento que incluyen tragamonedas , casino con crupieres en directo y alternativas de apuesta , el sitio se caracteriza por su firme apuesta por la honestidad y el consumo consciente.
Наркологическая помощь — это не «последний шанс для безнадёжных», а нормальный медицинский шаг, такой же логичный, как визит к кардиологу при проблемах с сердцем или к эндокринологу при сахарном диабете. В клинике в Лобне зависимость рассматривают как заболевание, а не как «слабость характера», и помогают человеку пройти весь путь — от детоксикации и вывода из запоя до реабилитации и профилактики срывов. Обращение на более раннем этапе даёт важное преимущество: организм ещё способен восстанавливаться, психика не разрушена окончательно, социальные связи не разорваны. Это значит, что лечение может быть мягче, программа — гибче, а шансы на устойчивый результат — выше.
Получить больше информации – https://narkologicheskaya-klinika-lobnya11.ru/narkologicheskaya-klinika-cena-v-lobne
Запой — тяжелое состояние, связанное с длительным и бесконтрольным употреблением алкоголя, когда человек не может самостоятельно остановиться. В результате алкогольной интоксикации страдают внутренние органы, нарушается работа сердечно-сосудистой и нервной систем. Чем дольше длится запой, тем выше риск серьезных осложнений. Капельница от запоя — быстрый и надежный способ вывести человека из опасного состояния, снять симптомы интоксикации и восстановить нормальное самочувствие. В наркологической клинике «Перспектива» в Краснодаре вы можете воспользоваться данной услугой круглосуточно, как в стационаре, так и с выездом врача на дом.
Подробнее можно узнать тут – [url=https://kapelnica-ot-zapoya-krasnodar77.ru/]капельница от запоя недорого[/url]
https://rushbet.cat/
Rushbet en Colombia se posiciona para 2026 como una plataforma de juego online confiable y seguro y integral, con la licencia oficial de la licencia otorgada por Coljuegos, lo que proporciona transparencia y respaldo legal en el pais.
обучение продвижению сайтов [url=https://kursy-seo-12.ru/]kursy-seo-12.ru[/url] .
Домашний старт в Москве уместен при устойчивых показателях и низком риске осложнений: нет упорной рвоты, выраженной дезориентации, лихорадки, резких скачков давления и пульса. Преимущества — приватность, скорость, меньше стыда и сопротивления, выше шансы на ранний сон. Если же присутствуют признаки возможных осложнений (обезвоживание, судорожная готовность, аритмии, боль за грудиной/в животе, спутанность), рациональнее короткая стационарная стабилизация на 24–48 часов, после которой маршрут возвращается домой. «Трезвый Стандарт» держится принципа клинической достаточности: вмешательств ровно столько, сколько нужно сегодня, без «пакетов ради прайса». Такой реализм экономит деньги и главное — время семьи, потому что снижает вероятность ночных «качелей», повторных вызовов и импульсивных решений, которые чаще всего и ломают прогресс.
Подробнее – [url=https://narkolog-na-dom-moskva999.ru/]врач нарколог на дом москва[/url]
вавада регистрация онлайн [url=https://daostone.ru/]daostone.ru[/url] .
Во-первых, безопасная медицинская детоксикация. Этот процесс необходим для удаления токсических веществ из организма. Мы используем современные методы, минимизирующие дискомфорт в период абстиненции.
Изучить вопрос глубже – http://алко-лечебница.рф/vivod-iz-zapoya-na-domu-v-samare/
зарегистрироваться в мелбет [url=https://vt-fiddle.com/]зарегистрироваться в мелбет[/url] .
Детоксикационные растворы (физиологический раствор, глюкоза, раствор Рингера)
Изучить вопрос глубже – [url=https://vyvod-iz-zapoya-ekb8.ru/]помощь вывод из запоя[/url]
перепланировка услуги [url=https://pereplanirovka-kvartir12.ru/]перепланировка услуги[/url] .
скачать приложение melbet на айфон [url=https://melbetiphone.ru/]скачать приложение melbet на айфон[/url] .
трафиковое продвижение сайта [url=https://prodvizhenie-sajtov-po-trafiku1.ru/]prodvizhenie-sajtov-po-trafiku1.ru[/url] .
продвижение трафика [url=https://prodvizhenie-sajtov-po-trafiku.ru/]продвижение трафика[/url] .
Чем дольше продолжается запой, тем более непредсказуемой становится реакция организма. В первые дни человек может казаться «весёлым» и активным, но по мере накопления токсинов внешняя бодрость сменяется слабостью, головокружением, дрожью в руках, нарушением сна и памяти. Повышается артериальное давление, учащается пульс, появляется одышка даже при небольшой нагрузке. Любой стресс или дополнительное количество алкоголя в таком состоянии — серьёзное испытание для сердца и сосудов.
Подробнее – https://vyvod-iz-zapoya-ivanteevka11.ru/
цветы курьером москва [url=http://cvejie-cveti.ru]http://cvejie-cveti.ru[/url] .
Обычно всё начинается с телефонного разговора. Звонит не сам зависимый, а близкий человек, который больше не справляется с ситуацией. Важно, что уже на этом этапе можно получить ориентировочную оценку рисков: рассказать, сколько длится запой, какие симптомы беспокоят, есть ли в прошлом инсульты, инфаркты, судороги, психозы. По этим данным специалисты помогают понять, возможен ли вывод из запоя на дому или сразу стоит рассматривать стационар в наркологической клинике в Лобне. Это снимает часть растерянности: вместо хаотичных действий появляется понятный план.
Детальнее – [url=https://narkologicheskaya-klinika-lobnya11-2.ru/]клиника наркологической помощи[/url]
Выбор конкретного метода всегда начинается с диагностики. Врач оценивает стаж зависимости, частоту и продолжительность запоев, наличие сопутствующих заболеваний сердца, печени, нервной системы, психических расстройств. Учитывается прошлый опыт лечения: были ли рецидивы после предыдущих кодирований, как пациент переносил процедуры, что именно вызывало срыв. На этой основе специалист предлагает один или несколько вариантов, подробно поясняя плюсы, ограничения и возможные риски каждого.
Подробнее – http://kodirovanie-ot-alkogolizma-chekhov11.ru
Преимущество обращения в клинику по месту проживания в том, что помощь становится доступной и менее пугающей. Не нужно ехать в другой город, объяснять длительные отлучки, жить в ощущении, что о проблеме узнают все вокруг. Пациент может пройти диагностику, детоксикацию, вывод из запоя, курс лечения и реабилитацию в привычном регионе, а родные — участвовать в процессе, приезжать на семейные консультации, поддерживать контакт со специалистами. Важный момент: здесь смотрят не только на зависимость как на «вредную привычку», а как на заболевание с физическими, психологическими и социальными последствиями. Лечить приходится не отдельный эпизод запоя, а всю систему — здоровье, поведение, образ жизни и окружение человека.
Разобраться лучше – https://narkologicheskaya-klinika-ivanteevka11.ru/
Затянувшийся запой — это не просто «перебор накануне», а состояние, при котором страдают сердечно-сосудистая система, печень, нервная регуляция и обмен электролитов. В наркологической клинике «ДонЗдрав» (Ростов-на-Дону) экстренный вывод из запоя организован как непрерывная цепочка помощи: диспетчер 24/7 — дежурный врач — мобильная бригада — последующее наблюдение и психотерапевтическая поддержка. Мы приезжаем на дом в гражданской одежде, без опознавательных знаков, проводим экспресс-диагностику, запускаем индивидуально подобранные капельницы и даём чёткий план на ближайшие 72 часа. Такой формат позволяет безопасно стабилизировать состояние, не нарушая приватность и привычный уклад семьи.
Выяснить больше – [url=https://vivod-iz-zapoya-rostov14.ru/]вывод из запоя цена[/url]
скачать казино вавада на андроид [url=https://daostone.ru/]скачать казино вавада на андроид[/url] .
http://www.vt-fiddle.com [url=https://vt-fiddle.com/]www.vt-fiddle.com[/url] .
вавада войти россия [url=https://polezno-vsem.ru/]вавада войти россия[/url] .
seo с нуля [url=https://kursy-seo-12.ru/]seo с нуля[/url] .
сео инфо сайта увеличить трафик специалисты [url=https://prodvizhenie-sajtov-po-trafiku1.ru/]сео инфо сайта увеличить трафик специалисты[/url] .
Откладывая обращение к специалистам в Ивантеевке, семья берёт на себя двойную нагрузку — и моральную, и медицинскую. Домашние попытки «лечить» смесью случайных таблеток, седативов и народных средств часто маскируют симптомы, но не снимают основную угрозу. При этом ни у кого нет возможности круглосуточно контролировать давление, пульс, работу сердца. Именно поэтому безопасный вывод из запоя — это не ожидание «когда само пройдёт», а продуманный набор медицинских шагов под наблюдением врача.
Узнать больше – http://vyvod-iz-zapoya-ivanteevka11.ru/narkolog-vyvod-iz-zapoya-v-ivanteevke/
*Седативные препараты применяются строго по показаниям и под мониторингом дыхания.
Получить больше информации – [url=https://vivod-iz-zapoya-rostov14.ru/]анонимный вывод из запоя[/url]
Группа препаратов
Углубиться в тему – http://vyvod-iz-zapoya-ekb8.ru/
Одна из главных ошибок — ждать «идеального момента» для лечения. Кажется, что кодирование уместно только тогда, когда зависимость достигла крайней стадии: человек потерял работу, перестал выходить из запоев, полностью разрушил отношения с близкими. На практике обращение в клинику Чехова оправдано гораздо раньше, как только употребление алкоголя перестаёт быть редким эпизодом и начинает системно мешать жить. Если каждый стресс, отпуск или конфликт заканчиваются срывом, если запои становятся длиннее, а похмелье тяжелее, — это уже повод хотя бы обсудить кодирование с врачом, а не ждать, пока ресурс организма будет почти исчерпан.
Получить дополнительные сведения – http://kodirovanie-ot-alkogolizma-chekhov11.ru/
Чем дольше продолжается запой, тем более непредсказуемой становится реакция организма. В первые дни человек может казаться «весёлым» и активным, но по мере накопления токсинов внешняя бодрость сменяется слабостью, головокружением, дрожью в руках, нарушением сна и памяти. Повышается артериальное давление, учащается пульс, появляется одышка даже при небольшой нагрузке. Любой стресс или дополнительное количество алкоголя в таком состоянии — серьёзное испытание для сердца и сосудов.
Изучить вопрос глубже – http://vyvod-iz-zapoya-ivanteevka11.ru/
продвижение сайта в топ по трафику [url=https://prodvizhenie-sajtov-po-trafiku.ru/]prodvizhenie-sajtov-po-trafiku.ru[/url] .
melbet букмекерская контора официальный сайт [url=https://vt-fiddle.com/]melbet букмекерская контора официальный сайт[/url] .
бк вавада [url=https://daostone.ru/]бк вавада[/url] .
Выбор конкретного метода всегда начинается с диагностики. Врач оценивает стаж зависимости, частоту и продолжительность запоев, наличие сопутствующих заболеваний сердца, печени, нервной системы, психических расстройств. Учитывается прошлый опыт лечения: были ли рецидивы после предыдущих кодирований, как пациент переносил процедуры, что именно вызывало срыв. На этой основе специалист предлагает один или несколько вариантов, подробно поясняя плюсы, ограничения и возможные риски каждого.
Получить больше информации – https://kodirovanie-ot-alkogolizma-chekhov11.ru/
Команда врачей клиники “Чистый Путь” состоит из квалифицированных специалистов в области наркологии с обширным опытом работы. Каждый врач обладает глубокими знаниями в фармакологии, психофармакологии и психотерапии, регулярно повышает свою квалификацию на профильных конференциях и семинарах, чтобы использовать в своей практике самые современные и эффективные методы лечения.
Исследовать вопрос подробнее – https://срочно-вывод-из-запоя.рф/vyvod-iz-zapoya-v-stacionare-v-chelyabinske.xn--p1ai/
melbetlogin&melbet [url=https://melbetlogin.ru/]melbetlogin&melbet[/url] .
цветы с доставкой на дом москва [url=www.cvejie-cveti.ru]www.cvejie-cveti.ru[/url] .
Маршрут выстроен прозрачно. Сначала идёт короткое предметное интервью — только то, что меняет тактику «сегодня»: длительность запоя, принятые лекарства (включая «самолечение»), аллергии, хронические диагнозы, количество ночей без сна. Затем — объективные показатели (АД/пульс/сатурация/температура), оценка тремора и уровня тревоги; при показаниях проводится экспресс-ЭКГ и базовый неврологический скрининг. После этого врач объясняет, какие компоненты войдут в инфузию и почему: регидратация для восстановления объёма циркулирующей жидкости, коррекция электролитов, печёночная поддержка, при необходимости — гастропротекция и противорвотные; мягкая анксиолитическая коррекция — строго по показаниям. Мы принципиально избегаем «универсальных сильных смесей» и «оглушающих» дозировок: они дают дневной «блеск», но почти всегда провоцируют вечерний откат, ухудшение сна и рост рисков. Во время процедуры пациент и семья получают понятные письменные правила на 48–72 часа: вода и лёгкая еда «по часам», затемнение и тишина вечером, фиксированное время отбоя, «красные флажки» для связи и согласованное утреннее окно контроля. Такой сценарий убирает импровизации, снижает уровень конфликтов и помогает нервной системе перейти из режима тревоги в режим восстановления.
Получить дополнительные сведения – [url=https://kapelnica-ot-zapoya-lyubercy9.ru/]капельница от запоя какие[/url]
регистрация мелбет [url=https://vt-fiddle.com/]регистрация мелбет[/url] .
проект перепланировки квартиры москва [url=https://proekt-pereplanirovki-kvartiry24.ru/]проект перепланировки квартиры москва[/url] .
Наводится порядок в информации, запускается инфузия по показаниям, объясняются ожидаемые ощущения и правила вечера. Пациент и близкие понимают, какой результат реалистичен к ночи и что делать, чтобы эффект не «сгорел» к полуночи.
Получить дополнительную информацию – https://narkologicheskaya-klinika-lyubercy9.ru/
перепланировка москва [url=https://pereplanirovka-kvartir12.ru/]pereplanirovka-kvartir12.ru[/url] .
vavada casino рабочее [url=https://cleansheet.ru/]vavada casino рабочее[/url] .
вавада мобильная 2026 [url=https://polezno-vsem.ru/]polezno-vsem.ru[/url] .
melbet registration by e-mail [url=https://melbetregistratsiya.ru/]melbet registration by e-mail[/url] .
мел бет скачать [url=https://melbetiphone.ru/]мел бет скачать[/url] .
Затянувшийся запой быстро расшатывает физиологию: теряется жидкость, нарушается электролитный баланс, растёт нагрузка на сердце и печень, сон рвётся тревожными отрезками. На этом фоне любое промедление меняет картину не в лучшую сторону: чем дольше организм остаётся в состоянии интоксикации и бессонницы, тем выше риск аритмий, скачков давления, панических волн и импульсивных решений ночью. «Трезвый Город Химки» устраняет эти пружины сразу: вместо очередей и разговоров «на виду» — быстрый вход по согласованному времени, предметное интервью без лишней бюрократии, чёткое объяснение каждого шага и старт терапии в минимально достаточном объёме. Такой подход экономит силы семьи, снижает тревогу у пациента и делает результат предсказуемым: уже в первые часы уменьшаются тремор и тошнота, выравнивается пульс, появляется чувство контроля. Ключевая цель на первые сутки — первая ровная ночь, потому что только на её фоне организм способен закреплять улучшения, а не «сжигать» их к вечеру. Мы заранее договариваемся о правилах вечера, чтобы не ломать эффект разговорами и яркими экранами, и именно поэтому траектория восстановления идёт не рывками, а поступательно.
Детальнее – http://vyvod-iz-zapoya-himki9.ru
вавада сайта [url=https://daostone.ru/]daostone.ru[/url] .
Участие в государственных и коммерческих процедурах требует точной подготовки, понимания законодательства и внимательной работы с документами. Для многих компаний самостоятельная работа с закупками становится сложной задачей: необходимо отслеживать новые закупки, анализировать требования, оформлять документы и взаимодействовать с площадками.
Полный разбор — только здесь – [url=https://tendernoe-soprovozhdenie-rostov-na-donu.ru/]тендерное сопровождение под ключ[/url]
Коммерческий и государственный тендер — это конкурентная процедура выбора поставщика товаров или оказания услуг. Заказчик размещает требования, а компании подают заявки и участвуют в торгах.
Откройте для себя новое – [url=https://tendernoe-soprovozhdenie-rostov-na-donu.ru/]оказание услуг по тендерному сопровождению[/url]
Наркологическая клиника в Чехове предлагает не одну услугу, а целый спектр программ, которые можно сочетать и подстраивать под конкретную ситуацию. Это особенно важно, когда у одного человека на первый план выходят запои, у другого — наркотическая зависимость, у третьего — сочетание алкоголя с лекарственными препаратами.
Исследовать вопрос подробнее – https://narkologicheskaya-klinika-chekhov11.ru/narkologicheskaya-klinika-telefon-v-chekhove
melbet вход [url=https://melbetlogin.ru/]melbet вход[/url] .
Качественный вывод из запоя — это всегда процесс, а не одна капельница. Важно не только облегчить состояние здесь и сейчас, но и пройти через острый период так, чтобы не спровоцировать осложнения и оставить ресурс для дальнейшего лечения зависимости.
Исследовать вопрос подробнее – https://vyvod-iz-zapoya-ivanteevka11.ru/vyvod-iz-zapoya-na-domu-v-ivanteevke
Участие в государственных и коммерческих процедурах требует точной подготовки, понимания законодательства и внимательной работы с документами. Для многих компаний самостоятельная работа с закупками становится сложной задачей: необходимо отслеживать новые закупки, анализировать требования, оформлять документы и взаимодействовать с площадками.
Не упустите важные детали – http://tendernoe-soprovozhdenie-rostov-na-donu.ru
https://yajuego.cat/
YaJuego se establece en 2026 como una de las principales plataformas en Colombia , al proporcionar un servicio integral de casino en linea y apuestas deportivas bajo la estricta regulacion de Coljuegos.
Часто предприниматели объединяют понятия тендер и госзакупки, так как обе процедуры связаны с конкурсным выбором поставщика. Однако между ними существуют определённые различия, которые важно понимать перед началом работы в этой сфере.
Разберитесь досконально – [url=https://tendernoe-soprovozhdenie-rostov-na-donu.ru/]услуги тендерного сопровождения ростов на дону[/url]
мелбет россия [url=https://melbetiphone.ru/]мелбет россия[/url] .
cleansheet.ru [url=https://cleansheet.ru/]cleansheet.ru[/url] .
vavada ставки [url=https://polezno-vsem.ru/]vavada ставки[/url] .
vavada рабочее зеркало вход [url=https://partscore.ru/]vavada рабочее зеркало вход[/url] .
Финансовые инструменты позволяют заказчику убедиться в надежности участника и его готовности выполнить обязательства по контракту. При этом грамотное сопровождение снижает вероятность финансовых рисков и помогает правильно оформить документы для банка.
Получите экспертное мнение – [url=https://tendernoe-soprovozhdenie-rostov-na-donu.ru/]тендерное сопровождение в ростове на дону[/url]
melbet sports betting login [url=https://melbetlogin.ru/]melbet sports betting login[/url] .
частный нарколог на дом [url=https://narkolog-na-dom-v-krasnodare.ru/]narkolog-na-dom-v-krasnodare.ru[/url] .
наркология в москве [url=https://narkologicheskaya-klinika-trezvyj-vybor-1.ru/]наркология в москве[/url] .
melbet зеркало скачать на айфон [url=https://melbetiphone.ru/]melbet зеркало скачать на айфон[/url] .
сайт онлайн казино вавада [url=https://cleansheet.ru/]сайт онлайн казино вавада[/url] .
vavada casino зеркало рабочее на сегодня [url=https://partscore.ru/]vavada casino зеркало рабочее на сегодня[/url] .
алко помощь наркологическая [url=https://narkologicheskaya-klinika-trezvyj-vybor-1.ru/]narkologicheskaya-klinika-trezvyj-vybor-1.ru[/url] .
мелбет сайт [url=https://melbetlogin.ru/]мелбет сайт[/url] .
анализ креативов [url=https://reklamnyj-kreativ13.ru/]анализ креативов[/url] .
нейросеть студент бот [url=https://nejroset-dlya-referatov-8.ru/]нейросеть студент бот[/url] .
There is a reason this point belongs near the front, health does not wait for a crisis to matter, it is already shaping the routine parts of attention, effort, recovery, and emotional steadiness, and that helps determine whether the body feels supported by the day or gradually worn down by it even when the outside structure looks the same. The problem is saturation, and saturation makes the signal harder to separate from the noise even for people who are genuinely paying attention, and this is where even good intentions can drift into uncertainty because the framework is too broad. A lot of misunderstanding grows when summaries are treated as complete answers rather than as entry points that still need interpretation and boundaries, so the loop between effort, response, and adjustment stops working the way people expect, even when intention remains strong. That is why pattern recognition so often turns out to be the step that should have come earlier, before the stack of adjustments and before the confusion deepened, so the picture begins to accumulate useful detail and the noise thins because the signals are finally being compared inside the right frame. And this is why a topic like this benefits from continuity, because ideas make more sense when they are allowed to build instead of competing for the shortest form. And the clearest way to keep that discussion coherent is to ground it in one well chosen topic instead of staying broad and abstract, the most grounded place to take this next is with is vibramycin a sulfa drug.
база бенчмарков рекламы [url=https://reklamnyj-kreativ12.ru/]reklamnyj-kreativ12.ru[/url] .
технический переводчик стоимость [url=https://teh-perevod.ru/]teh-perevod.ru[/url] .
http://www.cleansheet.ru [url=https://cleansheet.ru/]www.cleansheet.ru[/url] .
vavada casino официальный сайт скачать [url=https://partscore.ru/]vavada casino официальный сайт скачать[/url] .
нарколог на дом краснодар [url=https://narkolog-na-dom-v-krasnodare-1.ru/]нарколог на дом краснодар[/url] .
наркологические клиники в москве частные [url=https://narkologicheskaya-klinika-trezvyj-vybor-1.ru/]narkologicheskaya-klinika-trezvyj-vybor-1.ru[/url] .
узнаваемость бренда баннер [url=https://reklamnyj-kreativ13.ru/]reklamnyj-kreativ13.ru[/url] .
технический переводчик услуги [url=https://teh-perevod.ru/]teh-perevod.ru[/url] .
сервис анализа креативов [url=https://reklamnyj-kreativ12.ru/]сервис анализа креативов[/url] .
vavada скачать бесплатно [url=https://cleansheet.ru/]vavada скачать бесплатно[/url] .
анонимная наркологическая клиника [url=https://narkologicheskaya-klinika-trezvyj-vybor-1.ru/]анонимная наркологическая клиника[/url] .
скачать вавада на телефон [url=https://partscore.ru/]скачать вавада на телефон[/url] .
букмекерская контора мелбет официальный сайт [url=https://melbetregistratsiya.ru/]melbetregistratsiya.ru[/url] .
нарколог на дом в краснодаре [url=https://narkolog-na-dom-v-krasnodare-1.ru/]narkolog-na-dom-v-krasnodare-1.ru[/url] .
закодироваться в москве [url=https://narkologicheskaya-klinika-trezvyj-vybor.ru/]narkologicheskaya-klinika-trezvyj-vybor.ru[/url] .
продвижение трафика [url=https://prodvizhenie-sajtov-po-trafiku1.ru/]продвижение трафика[/url] .
вызов нарколога на дом краснодар [url=https://narkolog-na-dom-v-krasnodare.ru/]narkolog-na-dom-v-krasnodare.ru[/url] .
Часто предприниматели объединяют понятия тендер и госзакупки, так как обе процедуры связаны с конкурсным выбором поставщика. Однако между ними существуют определённые различия, которые важно понимать перед началом работы в этой сфере.
Изучите все нюансы – [url=https://tendernoe-soprovozhdenie-rostov-na-donu.ru/]тендерное сопровождение[/url]
анонимная наркологическая помощь [url=https://narkologicheskaya-klinika-trezvyj-vybor-1.ru/]анонимная наркологическая помощь[/url] .
melbet букмекерская контора [url=https://melbetregistratsiya.ru/]melbet букмекерская контора[/url] .
выезд нарколога на дом [url=https://narkolog-na-dom-v-krasnodare-1.ru/]narkolog-na-dom-v-krasnodare-1.ru[/url] .
seo продвижение сайта по трафику кловер [url=https://prodvizhenie-sajtov-po-trafiku1.ru/]prodvizhenie-sajtov-po-trafiku1.ru[/url] .
вывод из запоя клиника [url=https://narkologicheskaya-klinika-trezvyj-vybor.ru/]narkologicheskaya-klinika-trezvyj-vybor.ru[/url] .
https://betfair.cat/
Betfair es un sitio de apuestas y casino en linea con prestigio internacional , reconocida por su historial de mas de veinte anos y por su papel pionero en el sistema de intercambio de apuestas (Exchange) .
Коммерческий и государственный тендер — это конкурентная процедура выбора поставщика товаров или оказания услуг. Заказчик размещает требования, а компании подают заявки и участвуют в торгах.
Не оставайтесь в неведении – [url=https://tendernoe-soprovozhdenie-rostov-na-donu.ru/]участие в тендерах госзакупок ростов на дону[/url]
срочный выезд нарколога на дом [url=https://narkolog-na-dom-v-krasnodare.ru/]narkolog-na-dom-v-krasnodare.ru[/url] .
заказать кухню в рассрочку [url=https://zakazat-kuhnyu-10.ru/]zakazat-kuhnyu-10.ru[/url] .
нарколог на дом цены [url=https://narkolog-na-dom-v-krasnodare-3.ru/]нарколог на дом цены[/url] .
глубокий комлексный аудит сайта [url=https://internet-agentstvo-prodvizhenie-sajtov-seo.ru/]глубокий комлексный аудит сайта[/url] .
нарколог на дом недорого [url=https://narkolog-na-dom-v-krasnodare-2.ru/]narkolog-na-dom-v-krasnodare-2.ru[/url] .
официальный сайт бк мелбет [url=https://melbetregistratsiya.ru/]официальный сайт бк мелбет[/url] .
Коммерческий и государственный тендер — это конкурентная процедура выбора поставщика товаров или оказания услуг. Заказчик размещает требования, а компании подают заявки и участвуют в торгах.
Не упустите важные детали – https://tendernoe-soprovozhdenie-rostov-na-donu.ru/
Финансовые инструменты позволяют заказчику убедиться в надежности участника и его готовности выполнить обязательства по контракту. При этом грамотное сопровождение снижает вероятность финансовых рисков и помогает правильно оформить документы для банка.
Откройте для себя новое – [url=https://tendernoe-soprovozhdenie-rostov-na-donu.ru/]тендерное сопровождение ип[/url]
срочный выезд нарколога на дом [url=https://narkolog-na-dom-v-krasnodare-1.ru/]narkolog-na-dom-v-krasnodare-1.ru[/url] .
врач нарколог на дом [url=https://narkolog-na-dom-v-krasnodare.ru/]narkolog-na-dom-v-krasnodare.ru[/url] .
анонимная наркологическая клиника [url=https://narkologicheskaya-klinika-trezvyj-vybor.ru/]анонимная наркологическая клиника[/url] .
заказать кухню онлайн [url=https://zakazat-kuhnyu-10.ru/]заказать кухню онлайн[/url] .
seo агентство [url=https://internet-agentstvo-prodvizhenie-sajtov-seo.ru/]seo агентство[/url] .
вызов нарколога на дом краснодар [url=https://narkolog-na-dom-v-krasnodare-2.ru/]вызов нарколога на дом краснодар[/url] .
vavada казино официальный [url=https://partscore.ru/]vavada казино официальный[/url] .
заказать кухню цена [url=https://zakazat-kuhnyu-9.ru/]zakazat-kuhnyu-9.ru[/url] .
сервис анализа креативов [url=https://reklamnyj-kreativ14.ru/]сервис анализа креативов[/url] .
нейросеть для учебы [url=https://nejroset-dlya-referatov-8.ru/]нейросеть для учебы[/url] .
нарколог на дом [url=https://narkolog-na-dom-v-krasnodare-3.ru/]нарколог на дом[/url] .
заказать кухню в интернете [url=https://zakazat-kuhnyu-10.ru/]заказать кухню в интернете[/url] .
вызвать нарколога на дом [url=https://narkolog-na-dom-v-krasnodare-1.ru/]вызвать нарколога на дом[/url] .
нарколог на дом анонимно [url=https://narkolog-na-dom-v-krasnodare-2.ru/]narkolog-na-dom-v-krasnodare-2.ru[/url] .
вызов нарколога на дом краснодар [url=https://narkolog-na-dom-v-krasnodare.ru/]narkolog-na-dom-v-krasnodare.ru[/url] .
наркологическая услуга москва [url=https://narkologicheskaya-klinika-trezvyj-vybor.ru/]narkologicheskaya-klinika-trezvyj-vybor.ru[/url] .
кухню заказать [url=https://zakazat-kuhnyu-9.ru/]кухню заказать[/url] .
ии анализ креативов 60 секунд [url=https://reklamnyj-kreativ14.ru/]reklamnyj-kreativ14.ru[/url] .
заказать кухню рассчитать стоимость [url=https://zakazat-kuhnyu-12.ru/]заказать кухню рассчитать стоимость[/url] .
нарколог на дом краснодар [url=https://narkolog-na-dom-v-krasnodare-3.ru/]нарколог на дом краснодар[/url] .
сколько стоит заказать кухню [url=https://zakazat-kuhnyu-11.ru/]zakazat-kuhnyu-11.ru[/url] .
прямые кухни на заказ от производителя [url=https://kuhni-spb-49.ru/]kuhni-spb-49.ru[/url] .
заказать кухню в интернете [url=https://zakazat-kuhnyu-12.ru/]заказать кухню в интернете[/url] .
заказать кухню рассчитать стоимость [url=https://zakazat-kuhnyu-9.ru/]zakazat-kuhnyu-9.ru[/url] .
нарколог краснодар [url=https://narkolog-na-dom-v-krasnodare-3.ru/]нарколог краснодар[/url] .
наркологическая служба [url=https://narkologicheskaya-klinika-trezvyj-vybor.ru/]narkologicheskaya-klinika-trezvyj-vybor.ru[/url] .
позиция карточки в выдаче [url=https://reklamnyj-kreativ14.ru/]позиция карточки в выдаче[/url] .
кухни на заказ спб [url=https://kuhni-spb-50.ru/]кухни на заказ спб[/url] .
заказать кухню [url=https://kuhni-spb-49.ru/]заказать кухню[/url] .
заказать кухню в интернете [url=https://zakazat-kuhnyu-11.ru/]заказать кухню в интернете[/url] .
заказать кухню на заказ [url=https://zakazat-kuhnyu-10.ru/]заказать кухню на заказ[/url] .
internetagentur seo [url=https://internet-agentstvo-prodvizhenie-sajtov-seo.ru/]internet-agentstvo-prodvizhenie-sajtov-seo.ru[/url] .
Тендерный специалист помогает разобраться в особенностях каждого закона, а также обеспечивает грамотное сопровождение всех процедур. Это особенно важно для компаний, которые только начинают участвовать в торгах и не имеют опыта работы с государственными контрактами.
Не оставайтесь в неведении – [url=https://tendernoe-soprovozhdenie-rostov-na-donu.ru/]тендерное сопровождение тендерами[/url]
заказать кухню по индивидуальным размерам [url=https://zakazat-kuhnyu-12.ru/]заказать кухню по индивидуальным размерам[/url] .
Участие в государственных и коммерческих процедурах требует точной подготовки, понимания законодательства и внимательной работы с документами. Для многих компаний самостоятельная работа с закупками становится сложной задачей: необходимо отслеживать новые закупки, анализировать требования, оформлять документы и взаимодействовать с площадками.
Разберитесь досконально – https://tendernoe-soprovozhdenie-rostov-na-donu.ru
заказать кухню с замером [url=https://zakazat-kuhnyu-9.ru/]zakazat-kuhnyu-9.ru[/url] .
Часто предприниматели объединяют понятия тендер и госзакупки, так как обе процедуры связаны с конкурсным выбором поставщика. Однако между ними существуют определённые различия, которые важно понимать перед началом работы в этой сфере.
Погрузитесь в детали – [url=https://tendernoe-soprovozhdenie-rostov-na-donu.ru/]тендерное сопровождение закупок[/url]
врач нарколог на дом платный [url=https://narkolog-na-dom-v-krasnodare-3.ru/]врач нарколог на дом платный[/url] .
улучшение баннеров реклама [url=https://reklamnyj-kreativ14.ru/]reklamnyj-kreativ14.ru[/url] .
https://betsson.net.co/
A Betsson nao e uma operadora qualquer; com mais de seis decadas de trajetoria desde a sua criacao na Suecia, em 1963, estabeleceu um nome forte no cenario regulado de apostas, como e o caso da Colombia sob a supervisao da Coljuegos.
заказать кухню под ключ [url=https://zakazat-kuhnyu-10.ru/]zakazat-kuhnyu-10.ru[/url] .
оптимизация сайта франция [url=https://internet-agentstvo-prodvizhenie-sajtov-seo.ru/]internet-agentstvo-prodvizhenie-sajtov-seo.ru[/url] .
Участие в государственных и коммерческих процедурах требует точной подготовки, понимания законодательства и внимательной работы с документами. Для многих компаний самостоятельная работа с закупками становится сложной задачей: необходимо отслеживать новые закупки, анализировать требования, оформлять документы и взаимодействовать с площадками.
Глубже в тему — здесь – [url=https://tendernoe-soprovozhdenie-rostov-na-donu.ru/]комплексное тендерное сопровождение ростов на дону[/url]
mostbet Navoiy [url=https://www.mostbet16734.help]https://www.mostbet16734.help[/url]
мостбет двухфакторная защита [url=https://mostbet2029.help/]мостбет двухфакторная защита[/url]
mostbet apk fayl [url=http://mostbet16082.help]http://mostbet16082.help[/url]
is 1win legal [url=https://1win5530.ru/]https://1win5530.ru/[/url]
melbet бонус код [url=www.melbet08561.help]melbet бонус код[/url]
мостбет plinko [url=https://mostbet07482.help/]https://mostbet07482.help/[/url]
авиатор 1win [url=http://1win14536.help/]авиатор 1win[/url]
кухни на заказ санкт петербург от производителя [url=https://kuhni-spb-51.ru/]кухни на заказ санкт петербург от производителя[/url] .
заказать кухню по своим размерам [url=https://zakazat-kuhnyu-11.ru/]заказать кухню по своим размерам[/url] .
нарколог на дом круглосуточно [url=https://narkolog-na-dom-v-krasnodare-2.ru/]нарколог на дом круглосуточно[/url] .
мелбет пополнить с мбанк [url=http://melbet18207.help/]http://melbet18207.help/[/url]
https://zamba.cat/
Zamba se posiciona durante 2026 como una referencia principal en el territorio nacional, actuando de manera completamente legal con licencia otorgada por Coljuegos y entregando una experiencia completa que engloba desde pronosticos deportivos en competiciones clasicas y competencias de videojuegos hasta un casino online con empresas lideres del sector como los reconocidos NetEnt y Playtech.
анализ наружной рекламы [url=https://reklamnyj-kreativ14.ru/]анализ наружной рекламы[/url] .
сео агентство [url=https://internet-agentstvo-prodvizhenie-sajtov-seo.ru/]сео агентство[/url] .
заказать кухню в спб от производителя недорого [url=https://kuhni-spb-52.ru/]kuhni-spb-52.ru[/url] .
заказать кухню стоимость [url=https://zakazat-kuhnyu-11.ru/]zakazat-kuhnyu-11.ru[/url] .
кухни на заказ в спб [url=https://kuhni-spb-51.ru/]кухни на заказ в спб[/url] .
кухни на заказ питер [url=https://kuhni-spb-49.ru/]kuhni-spb-49.ru[/url] .
кухни на заказ в санкт-петербурге [url=https://kuhni-spb-50.ru/]kuhni-spb-50.ru[/url] .
заказать кухню по своим размерам [url=https://zakazat-kuhnyu-12.ru/]заказать кухню по своим размерам[/url] .
Участие в государственных и коммерческих процедурах требует точной подготовки, понимания законодательства и внимательной работы с документами. Для многих компаний самостоятельная работа с закупками становится сложной задачей: необходимо отслеживать новые закупки, анализировать требования, оформлять документы и взаимодействовать с площадками.
Все ответы на ваши вопросы – [url=https://tendernoe-soprovozhdenie-rostov-na-donu.ru/]участие в тендерах госзакупок ростов на дону[/url]
заказать кухню по индивидуальным размерам в спб [url=https://kuhni-spb-52.ru/]заказать кухню по индивидуальным размерам в спб[/url] .
кухни на заказ в спб [url=https://kuhni-spb-49.ru/]кухни на заказ в спб[/url] .
кухни под заказ в спб [url=https://kuhni-spb-50.ru/]kuhni-spb-50.ru[/url] .
заказать кухню [url=https://zakazat-kuhnyu-12.ru/]заказать кухню[/url] .
Часто предприниматели объединяют понятия тендер и госзакупки, так как обе процедуры связаны с конкурсным выбором поставщика. Однако между ними существуют определённые различия, которые важно понимать перед началом работы в этой сфере.
Разберитесь досконально – https://tendernoe-soprovozhdenie-rostov-na-donu.ru
Эта разъяснительная статья содержит простые и доступные разъяснения по актуальным вопросам. Мы стремимся сделать информацию понятной для широкой аудитории, чтобы каждый мог разобраться в предмете и извлечь из него максимум пользы.
Ознакомиться с теоретической базой – https://www.hotel-sugano.com/bbs/sugano.cgi/www.skitour.su/www.skitour.su/datasphere.ru/club/user/12/blog/2477/sinopipefittings.com/e_Feedback/www.tovery.net/www.hip-hop.ru/forum/id298234-worksale/www.hip-hop.ru/forum/id298234-worksale/fen-ds-3.ru
В этом обзорном материале представлены увлекательные детали, которые находят отражение в различных аспектах жизни. Мы исследуем непонятные и интересные моменты, позволяя читателю увидеть картину целиком. Погрузитесь в мир знаний и удивительных открытий!
Не пропусти важное – https://actituddigital.com/phasellus-vel-odio-commodo-pharetra-urna-sit-amet-gravida-nibh-2-2
В этой статье-обзоре мы соберем актуальную информацию и интересные факты, которые освещают важные темы. Читатели смогут ознакомиться с различными мнениями и подходами, что позволит им расширить кругозор и глубже понять обсуждаемые вопросы.
Открой скрытое – https://zskacademy.com/blog/index.php?nonjscomment=1&comment_itemid=23&comment_context=1309&comment_component=blog&comment_area=format_blog&blogpage=780
Откройте для себя скрытые страницы истории и малоизвестные научные открытия, которые оказали колоссальное влияние на развитие человечества. Статья предлагает свежий взгляд на события, которые заслуживают большего внимания.
Лучшее решение — прямо здесь – https://setitem.com/ca/politica-de-privacitat
изготовление кухни на заказ в спб [url=https://kuhni-spb-52.ru/]изготовление кухни на заказ в спб[/url] .
Эта публикация погружает вас в мир увлекательных фактов и удивительных открытий. Мы расскажем о ключевых событиях, которые изменили ход истории, и приоткроем завесу над научными достижениями, которые вдохновили миллионы. Узнайте, чему может научить нас прошлое и как применить эти знания в будущем.
Лучшее решение — прямо здесь – https://opstarwiki.com
Эта статья предлагает живое освещение актуальной темы с множеством интересных фактов. Мы рассмотрим ключевые моменты, которые делают данную тему важной и актуальной. Подготовьтесь к насыщенному путешествию по неизвестным аспектам и узнайте больше о значимых событиях.
Как это работает — подробно – https://www.kynologiasala.sk/bvk_skusobny_poriadok
кухни на заказ [url=https://kuhni-spb-50.ru/]кухни на заказ[/url] .
Коммерческий и государственный тендер — это конкурентная процедура выбора поставщика товаров или оказания услуг. Заказчик размещает требования, а компании подают заявки и участвуют в торгах.
Разгадайте все загадки – https://tendernoe-soprovozhdenie-rostov-na-donu.ru/
Часто предприниматели объединяют понятия тендер и госзакупки, так как обе процедуры связаны с конкурсным выбором поставщика. Однако между ними существуют определённые различия, которые важно понимать перед началом работы в этой сфере.
Откройте для себя новое – http://tendernoe-soprovozhdenie-rostov-na-donu.ru
Такой подход гарантирует постепенное и безопасное восстановление. Врачи контролируют динамику состояния, корректируют лечение при необходимости и помогают пациенту адаптироваться к трезвой жизни без стресса и давления.
Выяснить больше – [url=https://narkologicheskaya-klinika-v-tomske18.ru/]наркологическая клиника вывод из запоя томск[/url]
Вывод из запоя в клинике реализуется через поэтапное внедрение терапевтических решений, направленных на устранение токсической нагрузки и восстановление физиологической устойчивости. Важным элементом является определение клинического профиля пациента, включающего анализ анамнеза, текущего состояния и возможных сопутствующих факторов. На основе этих данных формируется индивидуальная программа помощи. Процедуры проводятся в условиях контролируемой безопасности, что снижает вероятность осложнений и позволяет достигать устойчивого терапевтического ответа. Последовательность действий формирует согласованную систему, удобную для мониторинга и анализа.
Узнать больше – https://vyvod-iz-zapoya-kemerovo18.ru/
Наркологическая клиника применяет структурированные методы, включающие изучение анамнеза, оценку текущего состояния и определение возможных рисков. На основе полученной информации формируются индивидуальные схемы лечения, направленные на нормализацию внутренних процессов. Работа строится на многоуровневом наблюдении, включающем анализ лабораторных показателей и оценку функциональных систем организма. Такой формат позволяет поддерживать стабильную динамику изменений и избегать осложнений. В клинике создается согласованная модель вмешательств, позволяющая получать устойчивые результаты.
Исследовать вопрос подробнее – http://narkologicheskaya-klinika-tomsk18.ru
Представленная таблица отражает ключевые направления наблюдения, обеспечивая систематизацию данных. Такой подход позволяет поддерживать высокий уровень контроля и адаптировать программу лечения с учетом динамики состояния.
Ознакомиться с деталями – [url=https://narkologicheskaya-klinika-tomsk18.ru/]вывод наркологическая клиника томск[/url]
производство кухонь в спб на заказ [url=https://kuhni-spb-51.ru/]производство кухонь в спб на заказ[/url] .
кухни на заказ в санкт-петербурге [url=https://kuhni-spb-52.ru/]кухни на заказ в санкт-петербурге[/url] .
Вывод из запоя в Воскресенске чаще всего требуется тогда, когда «обычное похмелье» уже давно перешло в тяжёлое состояние, а попытки «перетерпеть» только ухудшают ситуацию. Сначала кажется, что человек просто перебрал: день-два отлежится, попьёт воды, поест — и всё пройдёт. Но когда утром вместо облегчения появляется дрожь, сильная слабость, скачки давления, страх и навязчивая тревога, это уже не про похмелье. Организм не успевает перерабатывать алкоголь, сердце и нервная система работают на пределе, а каждый новый «опохмел» только продлевает запой.
Разобраться лучше – http://vyvod-iz-zapoya-voskresensk11.ru/vyvod-iz-zapoya-na-domu-v-voskresenske/
Там, где раньше хватало одного тяжёлого утра, теперь требуются дни детоксикации. И чем позже подключается врач, тем сложнее вернуть организм к относительно безопасному состоянию.
Исследовать вопрос подробнее – http://vyvod-iz-zapoya-voskresensk11.ru/
Задача врача — не «поставить галочку», а исключить противопоказания и выбрать методику с оптимальным соотношением пользы и риска. Учитываются хронические заболевания, эпизоды потери сознания, аритмии, панические атаки, депрессивные симптомы, переносимость инфузий и фармпрепаратов, взаимодействия с уже назначенными лекарствами. По результатам формируется персональный лист ограничений и список «красных флажков», при которых следует связаться со специалистом без промедления.
Подробнее тут – https://kodirovanie-ot-alkogolizma-moskva9.ru/kodirovanie-ot-alkogolizma-na-domu-v-moskve
Детоксикация — это не одна «капельница», а серия мероприятий, направленных на снижение токсической нагрузки, выравнивание жизненно важных показателей и возвращение контроля над самочувствием. На старте врач проводит осмотр, при необходимости — экспресс-диагностику и ЭКГ, объясняет цели инфузионной терапии, отвечает на вопросы о препаратах и возможных ощущениях в первые часы после начала. Если состояние пациента позволяет, первые шаги выполняются дома: так легче согласиться на помощь и сохранить приватность. При выраженной интоксикации, обезвоживании, скачках давления и пульса, нарушении ориентации или риске судорог безопаснее выбрать стационар: расширенная диагностика и круглосуточный мониторинг снижает вероятность осложнений и даёт возможность гибко корректировать назначения. После купирования острых проявлений команда переходит к стабилизации — настройке сна, питания, гидратации и поддерживающих схем с понятными целями на ближайшие дни.
Узнать больше – [url=https://narkologicheskaya-klinika-moskva9.ru/]анонимная наркологическая клиника москва[/url]
Капельница от запоя работает иначе. Через вену вводятся растворы, которые восполняют жидкость, разжижают кровь, помогают печени и почкам выводить токсичные вещества, корректируют электролитный баланс. Дополнительно используются препараты для снижения тревоги, нормализации сна, защиты сердечно-сосудистой системы и печени. Всё это подбирается индивидуально, с учётом возраста, давления, хронических заболеваний и длительности запоя.
Получить больше информации – https://kapelnica-ot-zapoya-dolgoprudnyj11.ru/kapelnica-ot-zapoya-na-domu-v-dolgoprudnom
Наркологическая клиника в Чехове — это возможность получить профессиональную помощь при алкогольной и наркотической зависимости, не выезжая в крупный мегаполис и не тратя силы на долгую дорогу. Для многих людей момент обращения к наркологу наступает не сразу: сначала идут «домашние» попытки справиться с проблемой, обещания ограничиться «по праздникам», уговаривания родственников и периодические срывы. Запои становятся длиннее, организм восстанавливается всё хуже, усиливается тревога, нарушается сон, учащаются конфликты дома и на работе. В какой-то момент становится понятно, что без системного лечения обойтись уже нельзя, а стихийные капельницы на дому и случайные советы из интернета только оттягивают время.
Исследовать вопрос подробнее – https://narkologicheskaya-klinika-chekhov11.ru/narkologicheskaya-klinika-telefon-v-chekhove
В Москве особенно востребован выезд врача на дом: не всегда есть силы и возможность везти человека в стационар, иногда он сам отказывается куда-либо ехать, стесняется своего состояния или боится огласки. В этих случаях нарколог приезжает по адресу, проводит осмотр, стабилизирует состояние с помощью инфузионной терапии и подбирает препараты, которые снимают интоксикацию, снижают тревогу, нормализуют сон и давление. При более тяжёлых формах запоя или при наличии сопутствующих заболеваний оптимальным вариантом становится стационар, где можно обеспечить круглосуточное наблюдение и постепенный выход из кризиса.
Получить дополнительные сведения – https://vyvod-iz-zapoya-moskva011.ru/klinika-vyvod-iz-zapoya-v-moskve
Решение обратиться за наркологической помощью часто упирается в страх огласки и сомнения в эффективности. В «МедТрезвие» эти барьеры снимаются за счёт клинической достаточности и предсказуемой организации. Диагностика и вмешательства назначаются строго по показаниям: врач оценит риски сердечно-сосудистых осложнений, состояние печени и поджелудочной железы, уровень тревоги и сна, наличие депрессивных симптомов. При устойчивом состоянии часть процедур выполняется на дому, что снижает стресс, а при признаках нестабильности — рекомендуется стационар с круглосуточным наблюдением. Анонимность поддерживается шифрованием данных, разграничением доступа и информированием родственников только по согласию пациента. Финансовые условия обсуждаются заранее: семья понимает, из чего складывается смета, и может планировать ресурс без опасений «скрытых» позиций. В результате лечение становится управляемым процессом, где медицинская безопасность и уважение к личной жизни человека — обязательные элементы, а не рекламные обещания.
Выяснить больше – [url=https://narkologicheskaya-klinika-moskva9.ru/]наркологическая клиника[/url]
Многие годами живут в логике: «главное — с утра выпить чуть-чуть, станет легче». На коротком промежутке времени это действительно частично снимает симптомы, но по сути лишь продлевает запой и усиливает интоксикацию. Организм не успевает переработать продукты распада алкоголя, кровь становится «тяжёлой», нарушается работа сосудов, возрастает нагрузка на сердце и мозг.
Получить дополнительные сведения – http://kapelnica-ot-zapoya-dolgoprudnyj11.ru/kapelnica-ot-zapoya-v-stacionare-v-dolgoprudnom/
Перед тем как принять решение, пациент и родственники получают объяснения по доступным направлениям. Обычно обсуждаются: амбулаторные консультации, дневной или круглосуточный стационар, выездная помощь, реабилитационные программы и последующее наблюдение. Это позволяет выстроить индивидуальный маршрут, а не навязывать один и тот же сценарий всем подряд.
Ознакомиться с деталями – https://narkologicheskaya-klinika-himki11.ru/chastnaya-narkologicheskaya-klinika-v-himkah
На начальных этапах проблема редко проявляется в открытом виде, но уже есть характерные сигналы, на которые стоит обратить внимание. Человек начинает оправдывать употребление постоянной усталостью, проблемами на работе, напряжённой жизненной ситуацией. Появляется раздражение, если нет возможности выпить или принять привычную дозу, меняется круг общения, усиливается скрытность. Это время, когда помощь ещё может быть максимально щадящей по методам и по длительности, а вернуться к стабильной жизни намного проще, чем после многолетнего стажа употребления.
Выяснить больше – [url=https://narkologicheskaya-klinika-moskva11.ru/]бесплатная наркологическая клиника москва[/url]
заказать кухню в спб от производителя [url=https://kuhni-spb-50.ru/]kuhni-spb-50.ru[/url] .
На начальных этапах проблема редко проявляется в открытом виде, но уже есть характерные сигналы, на которые стоит обратить внимание. Человек начинает оправдывать употребление постоянной усталостью, проблемами на работе, напряжённой жизненной ситуацией. Появляется раздражение, если нет возможности выпить или принять привычную дозу, меняется круг общения, усиливается скрытность. Это время, когда помощь ещё может быть максимально щадящей по методам и по длительности, а вернуться к стабильной жизни намного проще, чем после многолетнего стажа употребления.
Получить больше информации – [url=https://narkologicheskaya-klinika-moskva11.ru/]наркологическая клиника[/url]
Особенность клиники — возможность выезда нарколога на дом. Это особенно важно, если пациенту трудно самостоятельно добраться до центра или он хочет избежать публичности. Врач приезжает с полным набором медикаментов и оборудования, проводит обследование и ставит капельницу, контролируя состояние пациента на протяжении всей процедуры. Такой формат позволяет начать лечение незамедлительно и без стресса.
Подробнее можно узнать тут – http://narkologicheskaya-klinika-v-kemerovo18.ru
Наркологическая клиника в клинике в Астрахани оказывает широкий спектр услуг, направленных на устранение интоксикации, стабилизацию психоэмоционального состояния и восстановление функций организма. Терапия подбирается персонально в зависимости от тяжести состояния и индивидуальных особенностей пациента.
Исследовать вопрос подробнее – [url=https://narkologicheskaya-klinika-astrakhan18.ru/]наркологическая клиника вывод из запоя[/url]
Клиника «КаспийМед Альтернатива» построила систему оказания наркологической помощи на трёх принципах: индивидуальный подход, доказательная медицина и круглосуточная доступность. Каждый пациент проходит диагностический этап, где специалисты определяют уровень зависимости, физическое состояние и психоэмоциональные особенности. Далее формируется персональная программа лечения, включающая медицинские, психологические и социальные модули.
Получить больше информации – http://narkologicheskaya-klinica-v-astrakhani18.ru
Эти этапы формируют структуру комплексного лечения, позволяя добиться устойчивого результата и предотвращения повторных срывов.
Изучить вопрос глубже – [url=https://narkologicheskaya-klinika-astrakhan18.ru/]наркологическая клиника нарколог[/url]
Каждая процедура проводится под контролем врача и сопровождается мониторингом давления, пульса и температуры. После курса капельниц пациент чувствует улучшение самочувствия, нормализуется сон, снижается раздражительность, появляется энергия и ясность сознания.
Подробнее можно узнать тут – https://narkologicheskaya-klinika-v-astrakhani18.ru/narkologiya-astrakhan-adres
Системная работа, которой характеризуется наркологическая клиника, предполагает последовательное исследование состояния пациента, анализ факторов риска и создание индивидуального терапевтического маршрута. Такой формат позволяет уточнять клиническую картину на ранних этапах и корректировать вмешательства по мере изменения состояния человека. Применение структурированных методик повышает предсказуемость результата и обеспечивает безопасность всех процедур. При этом выводы формируются на основании объективных данных наблюдения, лабораторных показателей и динамики симптомов. Оптимальная нагрузка распределяется на весь период лечения для достижения устойчивого эффекта без переутомления организма.
Подробнее тут – https://narkologicheskaya-klinika-penza18.ru/narkologicheskaya-pomoshh-penza
Наркологическая клиника — это не просто медицинское учреждение, а пространство, где человеку помогают вернуть здоровье, ясность мышления и контроль над жизнью. В клинике «КаспийМед Альтернатива» в Астрахани круглосуточно оказывается помощь людям, столкнувшимся с алкогольной, наркотической и смешанной зависимостью. Центр сочетает медицинскую строгость и человеческое участие, обеспечивая лечение в комфортных условиях с максимальной конфиденциальностью. Здесь разработаны программы детоксикации, восстановления и психотерапевтической поддержки, что делает терапию эффективной и безопасной.
Ознакомиться с деталями – https://narkologicheskaya-klinica-v-astrakhani18.ru/narkologi-astrakhan
В рамках лечебного процесса наркологическая клиника задействует структурированные механизмы наблюдения, включающие анализ лабораторных показателей, оценку соматического тонуса и изучение активности нервной системы. Эти элементы обеспечивают комплексность работы и позволяют своевременно корректировать план лечения. Такая система предотвращает перегрузку организма и способствует поддержанию стабильности на фоне применения медикаментозных схем. Ниже представлены ключевые составляющие терапевтического процесса, формирующие основу для клинического восстановления.
Узнать больше – https://narkologicheskaya-klinika-v-penze18.ru/narkologicheskaya-pomoshh-penza/
Важным инструментом контроля является таблица оценочных параметров, применяемых в ходе наблюдения. Она служит для систематизации данных и поддержания единых стандартов анализа. Ниже приведена таблица, отражающая основные направления наблюдения.
Получить дополнительные сведения – https://narkologicheskaya-klinika-v-penze18.ru/narkologicheskaya-pomoshh-penza/
платный нарколог на дом [url=https://narkolog-na-dom-v-krasnodare-3.ru/]платный нарколог на дом[/url] .
кухни на заказ санкт петербург от производителя [url=https://kuhni-spb-52.ru/]кухни на заказ санкт петербург от производителя[/url] .
заказать кухню рассчитать стоимость [url=https://zakazat-kuhnyu-10.ru/]zakazat-kuhnyu-10.ru[/url] .
villas phuket for sale [url=https://villas-for-sale-in-phuket.com/]villas phuket for sale[/url] .
кухни на заказ санкт петербург [url=https://kuhni-spb-51.ru/]kuhni-spb-51.ru[/url] .
phuket thailand real estate for sale [url=https://real-estate-for-sale-in-phuket.com/]real-estate-for-sale-in-phuket.com[/url] .
нарколог на дом в краснодаре [url=https://narkolog-na-dom-v-krasnodare-1.ru/]narkolog-na-dom-v-krasnodare-1.ru[/url] .
врач нарколог на дом платный [url=https://narkolog-na-dom-v-krasnodare.ru/]narkolog-na-dom-v-krasnodare.ru[/url] .
Часто предприниматели объединяют понятия тендер и госзакупки, так как обе процедуры связаны с конкурсным выбором поставщика. Однако между ними существуют определённые различия, которые важно понимать перед началом работы в этой сфере.
Разберитесь досконально – https://tendernoe-soprovozhdenie-rostov-na-donu.ru/
condo for sale in phuket [url=https://apartments-for-sale-in-phuket.com/]apartments-for-sale-in-phuket.com[/url] .
condos for sale in phuket [url=https://apartments-for-sale-in-phuket-1.com/]condos for sale in phuket[/url] .
кухни спб на заказ [url=https://kuhni-spb-49.ru/]кухни спб на заказ[/url] .
Коммерческий и государственный тендер — это конкурентная процедура выбора поставщика товаров или оказания услуг. Заказчик размещает требования, а компании подают заявки и участвуют в торгах.
Все ответы на ваши вопросы – [url=https://tendernoe-soprovozhdenie-rostov-na-donu.ru/]стоимость тендерного сопровождения[/url]
plinko visa [url=https://plinko50862.help]plinko visa[/url]
нарколог на дом краснодар [url=https://narkolog-na-dom-v-krasnodare-3.ru/]нарколог на дом краснодар[/url] .
luxury villas thailand phuket for sale [url=https://villas-for-sale-in-phuket.com/]villas-for-sale-in-phuket.com[/url] .
заказать кухню по размерам [url=https://zakazat-kuhnyu-10.ru/]заказать кухню по размерам[/url] .
1win скачать без вирусов [url=https://1win40729.help/]https://1win40729.help/[/url]
luxury real estate phuket [url=https://real-estate-for-sale-in-phuket.com/]real-estate-for-sale-in-phuket.com[/url] .
laguna phuket apartments for sale [url=https://apartments-for-sale-in-phuket-1.com/]apartments-for-sale-in-phuket-1.com[/url] .
condos for sale phuket [url=https://apartments-for-sale-in-phuket.com/]condos for sale phuket[/url] .
sweet bonanza portal oficial [url=https://sweet-bonanza72501.help/]https://sweet-bonanza72501.help/[/url]
кухни на заказ в спб от производителя [url=https://kuhni-spb-49.ru/]kuhni-spb-49.ru[/url] .
врач нарколог на дом платный [url=https://narkolog-na-dom-v-krasnodare-1.ru/]narkolog-na-dom-v-krasnodare-1.ru[/url] .
кухни на заказ петербург [url=https://kuhni-spb-51.ru/]kuhni-spb-51.ru[/url] .
выезд нарколога на дом [url=https://narkolog-na-dom-v-krasnodare.ru/]narkolog-na-dom-v-krasnodare.ru[/url] .
how internet partner [url=https://prodvizhenie-sajtov-po-trafiku.ru/]how internet partner[/url] .
Структурированное наблюдение позволяет поддерживать согласованность лечебных мероприятий и своевременно реагировать на изменения. Такая система создаёт единый аналитический подход для оценки состояния и обеспечивает целостность терапевтического процесса.
Ознакомиться с деталями – https://narkologicheskaya-klinika-v-vdk18.ru/narkolog-vladivostok-otzyvy
Первичная цель процедуры — безопасно устранить токсическую нагрузку и восстановить физиологические показатели без осложнений. Лечение подбирается индивидуально, что обеспечивает прогнозируемый результат и минимизирует риски.
Детальнее – [url=https://vyvod-iz-zapoya-v-astrakhani18.ru/]вывод из запоя клиника астрахань[/url]
Наркологическая клиника в Долгопрудном помогает в ситуациях, когда:
Исследовать вопрос подробнее – http://narkologicheskaya-klinika-dolgoprudnyj11.ru/narkologicheskaya-klinika-na-dom-v-dolgoprudnom/
Нарколог на дом в Химках особенно востребован тогда, когда состояние человека уже нельзя назвать обычным похмельем, но он категорически отказывается ехать в клинику. Запой тянется несколько дней или дольше, нет полноценного сна, пульс постоянно учащённый, руки трясутся, давление скачет, а любое утро начинается не с облегчения, а с новой дозы алкоголя «чтобы не развалиться». В такой ситуации родственники оказываются между страхом и беспомощностью: понятно, что дальше ждать опасно, но уговорить собрать вещи и поехать в стационар не получается. Формат выезда нарколога на дом как раз и закрывает этот тупик — врач приезжает туда, где сейчас находится человек, оценивает риски и сразу начинает помощь.
Получить дополнительные сведения – http://narkolog-na-dom-himki11.ru/
apartments in phuket thailand for sale [url=https://apartments-for-sale-in-phuket.com/]apartments-for-sale-in-phuket.com[/url] .
Перед началом терапии проводится полная диагностика организма, включая лабораторные исследования и ЭКГ. Это позволяет оценить состояние пациента и подобрать оптимальный курс лечения. После стабилизации физического состояния начинается психотерапевтическая и реабилитационная работа. Такой подход помогает не только снять симптомы, но и устранить первопричины зависимости.
Получить дополнительные сведения – [url=https://narkologicheskaya-klinika-kemerovo18.ru/]анонимная наркологическая клиника в кемерове[/url]
Многие тянут до последнего, считая, что к наркологу обращаются только в самых крайних случаях. На деле показаний для консультации гораздо больше, и они часто появляются задолго до того, как человек впервые оказывается в запое или не выходит из состояния опьянения несколько дней подряд.
Получить больше информации – http://narkologicheskaya-klinika-voskresensk11.ru
pin up lucky jet demo [url=pinup52914.help]pin up lucky jet demo[/url]
услуги продвижения seo рязань timoly.ru сеотика.рф [url=https://prodvizhenie-sajtov-po-trafiku.ru/]услуги продвижения seo рязань timoly.ru сеотика.рф[/url] .
заказать кухню по размерам [url=https://zakazat-kuhnyu-11.ru/]заказать кухню по размерам[/url] .
Публикация приглашает вас исследовать неизведанное — от древних тайн до современных достижений науки. Вы узнаете, как случайные находки превращались в революции, а смелые мысли — в новые эры человеческого прогресса.
Информация доступна здесь – http://perrine.sire.free.fr/index.php?post/2011/06/22/La-bonne-blague-%21%21%21
Мы предлагаем вам окунуться в океан любопытных фактов и вдохновляющих историй. Эта публикация поможет расширить горизонты, разбудить интерес к науке и истории и увидеть мир с новой стороны.
Читать дальше – https://dobrenok.com/partnery
villas phuket for sale [url=https://villas-for-sale-in-phuket-1.com/]villas phuket for sale[/url] .
В рамках лечения используются методы, позволяющие фиксировать изменения и оценивать реакцию организма на проводимые мероприятия. Они служат основой для выборочных корректировок и обеспечивают структурированный характер процесса. Отличительной особенностью становится возможность адаптировать лечебные схемы под индивидуальные особенности пациента. Ниже представлены ключевые направления оценки состояния, применяемые для формирования полной клинической картины.
Подробнее тут – https://narkologicheskaya-klinika-v-vdk18.ru/narkolog-vladivostok-otzyvy/
Публикация предлагает читателю не просто информацию, а инструменты для анализа и саморазвития. Мы стимулируем критическое мышление, предлагая различные точки зрения и призывая к самостоятельному поиску решений.
Ознакомиться с отчётом – https://lsprintingpress.com/product/handi-meet
В этом обзорном материале представлены увлекательные детали, которые находят отражение в различных аспектах жизни. Мы исследуем непонятные и интересные моменты, позволяя читателю увидеть картину целиком. Погрузитесь в мир знаний и удивительных открытий!
Где можно узнать подробнее? – https://printhousebooks.com/product/f-i-t-h
В условиях круглосуточного наблюдения врачи могут внимательно следить за динамикой состояния, своевременно корректировать схемы лечения, проводить детоксикацию под контролем давления, пульса и работы сердца. Особенно это важно для пациентов с гипертонией, сердечно-сосудистыми заболеваниями, нарушениями ритма, заболеваниями печени, диабетом и другими хроническими патологиями. В стационаре проще организовать обследование, назначить сопутствующую терапию, вовремя заметить опасные симптомы и предотвратить серьёзные осложнения.
Подробнее можно узнать тут – [url=https://narkologicheskaya-klinika-lobnya11.ru/]www.domen.ru[/url]
Задача врача — не «поставить галочку», а исключить противопоказания и выбрать методику с оптимальным соотношением пользы и риска. Учитываются хронические заболевания, эпизоды потери сознания, аритмии, панические атаки, депрессивные симптомы, переносимость инфузий и фармпрепаратов, взаимодействия с уже назначенными лекарствами. По результатам формируется персональный лист ограничений и список «красных флажков», при которых следует связаться со специалистом без промедления.
Выяснить больше – [url=https://kodirovanie-ot-alkogolizma-moskva9.ru/]цены адреса кодирование от алкоголизма москва[/url]
мелбет ios кыргызстан [url=www.melbet76521.help]мелбет ios кыргызстан[/url]
1win легально ли в Киргизии [url=https://www.1win85163.help]1win легально ли в Киргизии[/url]
sweet bonanza новий домен [url=https://www.sweet-bonanza06538.help]https://www.sweet-bonanza06538.help[/url]
Большинство семей приходят к мысли о лечении зависимости не сразу. Сначала всё выглядит как «случайные переборы по праздникам», потом алкоголь или наркотики становятся привычным способом снять стресс, забыться, пережить неудачи. Постепенно запои учащаются, человек пропадает на несколько дней, появляются долги, проблемы на работе, конфликты в семье. На этом этапе многим кажется, что обращаться в наркологическую клинику в Лобне ещё рано, что можно «взять себя в руки» и как-то остановиться. Но практика показывает обратное: чем дольше затягивается момент обращения к специалистам, тем тяжелее протекают запои, тем глубже страдает здоровье и тем сложнее вернуть человека к стабильной трезвости.
Исследовать вопрос подробнее – [url=https://narkologicheskaya-klinika-lobnya11.ru/]лобня наркология[/url]
mostbet instalare fără google play [url=mostbet21067.help]mostbet21067.help[/url]
Если пациент обращается в клинику в состоянии запоя или тяжёлой абстиненции, первым шагом становится детоксикация. Это не «волшебная капельница», которая снимает все проблемы, а комплекс процедур, направленных на выведение токсинов, восстановление водно-солевого баланса, поддержку сердца, печени, нервной системы. Под контролем врачей подбираются растворы и препараты, которые позволяют снизить нагрузку на организм, облегчить похмельный синдром, уменьшить тревогу и вернуть сон. Важно, что это проходит под наблюдением, а не «на кухне» без понимания, как реагирует сердце и давление. После выхода из острого состояния человек уже способен осмысленно обсуждать дальнейшее лечение.
Получить дополнительную информацию – http://narkologicheskaya-klinika-ivanteevka11.ru/
Формат
Подробнее можно узнать тут – https://narkologicheskaya-klinika-lyubercy0.ru/chastnaya-narkologicheskaya-klinika-v-lyubercah/
Перед тем как выбрать формат лечения, пациенту и его близким объясняют, какие направления помощи доступны и как их можно сочетать. В зависимости от состояния и мотивации могут быть задействованы разные варианты:
Подробнее – [url=https://narkologicheskaya-klinika-korolyov11.ru/]narkologicheskaya-klinika[/url]
Если пациент обращается в клинику в состоянии запоя или тяжёлой абстиненции, первым шагом становится детоксикация. Это не «волшебная капельница», которая снимает все проблемы, а комплекс процедур, направленных на выведение токсинов, восстановление водно-солевого баланса, поддержку сердца, печени, нервной системы. Под контролем врачей подбираются растворы и препараты, которые позволяют снизить нагрузку на организм, облегчить похмельный синдром, уменьшить тревогу и вернуть сон. Важно, что это проходит под наблюдением, а не «на кухне» без понимания, как реагирует сердце и давление. После выхода из острого состояния человек уже способен осмысленно обсуждать дальнейшее лечение.
Ознакомиться с деталями – [url=https://narkologicheskaya-klinika-ivanteevka11.ru/]наркологическая клиника сайт[/url]
Лечение зависимостей редко ограничивается одной процедурой. Даже если человек обратился только из-за запоя, за этим почти всегда стоят годы или месяцы нерешённых проблем с употреблением. Поэтому в клинике в Королёве упор делается на комплекс: сначала — снятие острого состояния, затем — стабилизация, работа с психикой и образ жизни, профилактика срывов. Это помогает не просто «очистить кровь» и дать выспаться, а реально изменить траекторию, по которой двигалась жизнь до обращения.
Выяснить больше – [url=https://narkologicheskaya-klinika-korolyov11.ru/]наркологическая клиника[/url]
При запое счёт идёт не на дни, а на часы: нарастает обезвоживание, усиливается тремор, «скачет» давление и пульс, появляются аритмии, нарушается сон. В таких условиях попытки «перетерпеть» или лечиться «народными методами» приводят к ухудшению состояния и удлиняют путь к восстановлению. В «АлкоМед Балашиха» мы устраняем задержки: выезд возможен без очередей, а при необходимости — оперативная госпитализация в стационар. На первичной оценке врач фиксирует длительность употребления, текущие препараты и сопутствующие болезни, измеряет давление, пульс, сатурацию, оценивает неврологический статус и понятным языком объясняет точку входа — на дому или с краткой стационарной стабилизацией. Такой прагматичный подход убирает хаос: уже в первые часы формируется ощутимый эффект — снижается тревога, стабилизируются показатели, появляется шанс на полноценный ночной сон. Когда человек и его близкие видят последовательность действий и понимают, что будет через час, вечером и завтра утром, уменьшается импульсивность, исчезает «дергание», а лечение перестаёт зависеть от настроения и случайностей.
Изучить вопрос глубже – [url=https://vyvod-iz-zapoya-balashiha9.ru/]вывод из длительного запоя[/url]
Домашняя точка входа оправдана при стабильных показателях и низком риске осложнений. В знакомой обстановке легче соблюдать режим: затемнить комнату, убрать экраны, распределять воду маленькими порциями, сделать лёгкий перекус «по силам», лечь пораньше. Врач подберёт «узкую» схему инфузий без перегруза препаратами, объяснит, какие ощущения допустимы сегодня и ночью, а какие — повод для немедленной связи. Такой сценарий экономит время семьи, снижает стигму и быстрее переводит состояние в управляемое, на базе которого уже можно строить дальнейшие шаги — амбулаторные визиты, работу с триггерами и, при показаниях, обсуждение кодирования.
Детальнее – [url=https://vyvod-iz-zapoya-balashiha9.ru/]вывод из запоя клиника[/url]
Вывод из запоя в клинике строится на основе алгоритмов, направленных на безопасное восстановление физиологических функций. Применяется стандартная система, включающая оценку состояния, подбор медикаментозных средств и постепенную адаптацию организма. Такой формат позволяет избежать резких изменений и поддерживать предсказуемую клиническую динамику. Важную роль играет наблюдение за реакцией организма, позволяющее корректировать тактику лечения в соответствии с выявленными изменениями. Последовательность действий обеспечивает структурированность процесса и повышает вероятность стабильного результата.
Ознакомиться с деталями – [url=https://vyvodiz-zapoya-izhevsk18.ru/]анонимный вывод из запоя ижевск[/url]
Тендерный специалист помогает разобраться в особенностях каждого закона, а также обеспечивает грамотное сопровождение всех процедур. Это особенно важно для компаний, которые только начинают участвовать в торгах и не имеют опыта работы с государственными контрактами.
Не упустите важные детали – https://tendernoe-soprovozhdenie-rostov-na-donu.ru
Наркологическая помощь должна быть не только медицински точной, но и человечной, безопасной и анонимной. В «Ижевском Центре Трезвых Решений» выстроена система комплексного подхода к лечению зависимостей, включающая диагностику, медикаментозную детоксикацию, психотерапию и социальную адаптацию. Клиника объединяет профессионализм, заботу и круглосуточную готовность помочь пациентам, оказавшимся в трудной ситуации. Здесь работают врачи с большим опытом в области наркологии и психиатрии, способные оперативно выехать на дом и оказать неотложную помощь.
Получить больше информации – [url=https://narkologicheskaya-klinika-v-izhevsk18.ru/]наркологические клиники алкоголизм[/url]
Процедура вывода из запоя проводится строго по медицинским стандартам. Применяются современные капельницы, витамины и препараты для нормализации функций сердца, печени, почек и нервной системы. После снятия интоксикации врачи назначают поддерживающее лечение, направленное на стабилизацию эмоционального состояния и снижение тяги к алкоголю.
Углубиться в тему – https://vyvodiz-zapoya-vladivostok18.ru/czentr-kodirovaniya-alkogolizma-vyvod-iz-zapoya-vladivostok/
Такая схема лечения делает процесс последовательным и контролируемым. Врачи клиники сопровождают пациентов на всех стадиях, помогая преодолеть как физическую, так и психологическую зависимость. Особое внимание уделяется возвращению человека к активной и стабильной жизни без употребления алкоголя или наркотиков.
Разобраться лучше – [url=https://narkologicheskaya-klinika-v-izhevsk18.ru/]частная наркологическая клиника ижевск[/url]
Для получения устойчивого результата наркологическая клиника использует методы, основанные на индивидуальной оценке. В работе учитываются соматические показатели, реакции нервной системы и данные лабораторных исследований. Такой формат лечения обеспечивает предсказуемое влияние на физиологические процессы и снижает вероятность осложнений. В клинике применяется непрерывный мониторинг, позволяющий своевременно корректировать лечебные меры. Работа направлена на нормализацию метаболизма, восстановление баланса внутренних систем и плавное уменьшение симптоматики.
Изучить вопрос глубже – [url=https://narkologicheskaya-klinika-vo-vladivostoke18.ru/]платная наркологическая клиника владивосток[/url]
Такой подход позволяет устранить физические последствия запоя и снизить психологическую зависимость. Уже после первой процедуры пациенты отмечают улучшение самочувствия, появление аппетита и нормализацию сна. Важно не ограничиваться только экстренной помощью — специалисты рекомендуют пройти курс восстановления, чтобы предотвратить рецидивы.
Подробнее тут – [url=https://vyvodiz-zapoya-vladivostok18.ru/]наркология вывод из запоя в владивостоке[/url]
заказать кухню с замером [url=https://zakazat-kuhnyu-11.ru/]zakazat-kuhnyu-11.ru[/url] .
Особую роль на первом этапе играет диагностика: важно выявить не только тип наркотика, но и наличие сопутствующих расстройств, стадию зависимости, мотивационное состояние пациента. От этого зависит, будет ли выбрана амбулаторная или стационарная форма лечения, какие методы будут применяться.
Изучить вопрос глубже – https://lechenie-narkomanii-murmansk0.ru/lechenie-narkomanii-reabilitacziya-marmansk/
Процесс лечения алкоголизма в Твери строится поэтапно, что позволяет пациентам постепенно проходить все стадии выздоровления.
Выяснить больше – https://lechenie-alkogolizma-tver0.ru/lechenie-alkogolizma-gipnozom-tver
Таблица: Основные признаки надёжного центра лечения наркомании
Углубиться в тему – http://lechenie-narkomanii-murmansk0.ru
Участие в государственных и коммерческих процедурах требует точной подготовки, понимания законодательства и внимательной работы с документами. Для многих компаний самостоятельная работа с закупками становится сложной задачей: необходимо отслеживать новые закупки, анализировать требования, оформлять документы и взаимодействовать с площадками.
Получите экспертное мнение – https://tendernoe-soprovozhdenie-rostov-na-donu.ru/
Таблица: На что обратить внимание при оценке персонала наркологической клиники
Получить дополнительную информацию – https://narkologicheskaya-klinika-murmansk0.ru/
Лечение наркомании во Владимире представляет собой комплекс мероприятий, направленных на восстановление физического и психического здоровья пациентов с различными формами зависимости от психоактивных веществ. Современные методы терапии, используемые в наркологической клинике «Новая Эра», обеспечивают эффективное и безопасное избавление от зависимости с последующей социальной реабилитацией.
Разобраться лучше – [url=https://lechenie-narkomanii-vladimir0.ru/]лечение наркомании цена в владимире[/url]
Терапия в клинике проводится системно и поэтапно, что позволяет контролировать состояние пациента и добиваться устойчивых улучшений.
Подробнее – [url=https://narkologicheskaya-klinika-v-tveri0.ru/]наркологическая клиника стационар[/url]
вывод из запоя кодирование краснодар [url=https://vyvod-iz-zapoya-v-krasnodare-1.ru/]vyvod-iz-zapoya-v-krasnodare-1.ru[/url] .
Одним из ключевых принципов работы является индивидуальный подход. Врачи проводят полную диагностику, определяют степень зависимости и составляют персональный план терапии. Это помогает максимально эффективно воздействовать на проблему и устранять не только физические, но и психологические факторы зависимости.
Узнать больше – [url=https://narkologicheskaya-klinika-v-tveri0.ru/]narkologicheskaya-klinika-v-tveri0.ru/[/url]
реабилитационный центр от алкоголизма [url=https://vyvod-iz-zapoya-na-domu-samara-1.ru/]vyvod-iz-zapoya-na-domu-samara-1.ru[/url] .
вывод из запоя анонимно краснодар [url=https://vyvod-iz-zapoya-v-krasnodare-4.ru/]вывод из запоя анонимно краснодар[/url] .
sea view apartments for sale in phuket [url=https://apartments-for-sale-in-phuket.com/]apartments-for-sale-in-phuket.com[/url] .
вывод из запоя краснодар на дому [url=https://vyvod-iz-zapoya-v-krasnodare-2.ru/]вывод из запоя краснодар на дому[/url] .
капельница от похмелья [url=https://vyvod-iz-zapoya-na-domu-voronezh.ru/]vyvod-iz-zapoya-na-domu-voronezh.ru[/url] .
лечение алкоголизма [url=https://vyvod-iz-zapoya-na-domu-voronezh-3.ru/]лечение алкоголизма[/url] .
нарколог на дом [url=https://vyvod-iz-zapoya-na-domu-voronezh-2.ru/]нарколог на дом[/url] .
вывод из запоя анонимно краснодар [url=https://vyvod-iz-zapoya-v-krasnodare-3.ru/]вывод из запоя анонимно краснодар[/url] .
капельница от запоя [url=https://vyvod-iz-zapoya-na-domu-samara.ru/]vyvod-iz-zapoya-na-domu-samara.ru[/url] .
Специалисты, выезжающие на дом, оснащены всем необходимым для оказания полноценной помощи. Это переносное диагностическое оборудование, препараты для снятия симптомов абстиненции, инфузионные растворы, противосудорожные средства, седативные препараты и витаминные комплексы. Наличие мини-аптечки позволяет адаптировать лечение прямо на месте и избежать лишних госпитализаций.
Ознакомиться с деталями – [url=https://narkologicheskaya-pomoshh-vladimir0.ru/]неотложная наркологическая помощь в владимире[/url]
заказать индивидуальную кухню [url=https://zakazat-kuhnyu-11.ru/]заказать индивидуальную кухню[/url] .
Специалисты, выезжающие на дом, оснащены всем необходимым для оказания полноценной помощи. Это переносное диагностическое оборудование, препараты для снятия симптомов абстиненции, инфузионные растворы, противосудорожные средства, седативные препараты и витаминные комплексы. Наличие мини-аптечки позволяет адаптировать лечение прямо на месте и избежать лишних госпитализаций.
Исследовать вопрос подробнее – [url=https://narkologicheskaya-pomoshh-vladimir0.ru/]анонимная наркологическая помощь[/url]
наркологическая клиника [url=https://vyvod-iz-zapoya-na-domu-voronezh-1.ru/]наркологическая клиника[/url] .
недорогие но красивые букеты [url=https://cveti-nederogo.ru/]https://cveti-nederogo.ru/[/url] .
вывод из запоя анонимно краснодар [url=https://vyvod-iz-zapoya-v-krasnodare-1.ru/]vyvod-iz-zapoya-v-krasnodare-1.ru[/url] .
капельница от похмелья [url=https://vyvod-iz-zapoya-na-domu-samara-1.ru/]vyvod-iz-zapoya-na-domu-samara-1.ru[/url] .
вывод из запоя с выездом [url=https://vyvod-iz-zapoya-v-krasnodare-4.ru/]вывод из запоя с выездом[/url] .
реабилитация наркоманов [url=https://vyvod-iz-zapoya-na-domu-voronezh-2.ru/]vyvod-iz-zapoya-na-domu-voronezh-2.ru[/url] .
срочная помощь вывод из запоя краснодар [url=https://vyvod-iz-zapoya-v-krasnodare-2.ru/]vyvod-iz-zapoya-v-krasnodare-2.ru[/url] .
вывод из запоя на дому в краснодаре [url=https://vyvod-iz-zapoya-v-krasnodare-3.ru/]вывод из запоя на дому в краснодаре[/url] .
condos for sale in phuket [url=https://apartments-for-sale-in-phuket.com/]condos for sale in phuket[/url] .
лечение алкоголизма [url=https://vyvod-iz-zapoya-na-domu-voronezh.ru/]vyvod-iz-zapoya-na-domu-voronezh.ru[/url] .
кодирование от алкоголизма [url=https://vyvod-iz-zapoya-na-domu-samara.ru/]vyvod-iz-zapoya-na-domu-samara.ru[/url] .
заказать кухню стоимость [url=https://zakazat-kuhnyu-11.ru/]zakazat-kuhnyu-11.ru[/url] .
капельница от запоя [url=https://vyvod-iz-zapoya-na-domu-voronezh-3.ru/]капельница от запоя[/url] .
Психотерапевтическое кодирование делает акцент на внутренней мотивации. Специалист помогает человеку увидеть реальную цену алкоголя в его жизни, понять, как именно употребление разрушает здоровье, семью, карьеру, и сформировать установку на трезвость на определённый срок. Используются техники внушения в состоянии расслабления и структурированная работа с убеждениями и привычками. Такой подход особенно полезен тем, кто боится «лекарственного вмешательства» или уже имеет негативный опыт неудачных медикаментозных попыток. В практике лечения в Чехове часто используются комбинированные схемы, когда медикаментозный барьер подкрепляется психотерапевтической поддержкой, а результат кодирования закрепляется за счёт изменения образа жизни и участия в реабилитационных программах.
Ознакомиться с деталями – http://kodirovanie-ot-alkogolizma-chekhov11.ru/
реабилитация наркоманов [url=https://vyvod-iz-zapoya-na-domu-voronezh-1.ru/]vyvod-iz-zapoya-na-domu-voronezh-1.ru[/url] .
Психотерапевтические сеансы направлены на осознание проблемы зависимости, развитие навыков сопротивления срывам и формирование новых моделей поведения. Особое внимание уделяется мотивационному консультированию и работе с эмоциональным состоянием.
Подробнее тут – http://narkologicheskaya-klinika-vladimir0.ru/vo-vladimire-anonimnaya-narkologicheskaya-klinika/
Качественный вывод из запоя — это всегда процесс, а не одна капельница. Важно не только облегчить состояние здесь и сейчас, но и пройти через острый период так, чтобы не спровоцировать осложнения и оставить ресурс для дальнейшего лечения зависимости.
Выяснить больше – https://vyvod-iz-zapoya-ivanteevka11.ru/narkolog-vyvod-iz-zapoya-v-ivanteevke/
Участие в государственных и коммерческих процедурах требует точной подготовки, понимания законодательства и внимательной работы с документами. Для многих компаний самостоятельная работа с закупками становится сложной задачей: необходимо отслеживать новые закупки, анализировать требования, оформлять документы и взаимодействовать с площадками.
Разгадайте все загадки – [url=https://tendernoe-soprovozhdenie-rostov-na-donu.ru/]тендерное сопровождение под ключ цена[/url]
вывод из запоя на дому краснодар круглосуточно [url=https://vyvod-iz-zapoya-v-krasnodare-1.ru/]vyvod-iz-zapoya-v-krasnodare-1.ru[/url] .
купить цветы с доставкой по москве недорого со склада [url=https://cveti-nederogo.ru]https://cveti-nederogo.ru[/url] .
нарколог на дом [url=https://vyvod-iz-zapoya-na-domu-voronezh-2.ru/]нарколог на дом[/url] .
Этот обзор предлагает структурированное изложение информации по актуальным вопросам. Материал подан так, чтобы даже новичок мог быстро освоиться в теме и начать использовать полученные знания в практике.
Раскрыть тему полностью – http://d-linze.be/cropped-compoguy_03-jpg
наркологический центр [url=https://vyvod-iz-zapoya-na-domu-samara-1.ru/]наркологический центр[/url] .
вывод из запоя бесплатно [url=https://vyvod-iz-zapoya-v-krasnodare-4.ru/]вывод из запоя бесплатно[/url] .
Предлагаем вашему вниманию интересную справочную статью, в которой собраны ключевые моменты и нюансы по актуальным вопросам. Эта информация будет полезна как для профессионалов, так и для тех, кто только начинает изучать тему. Узнайте ответы на важные вопросы и расширьте свои знания!
Желаете узнать подробности? – https://adjdigitalmarketing.com/hello-world
заказать кухню с доставкой [url=https://zakazat-kuhnyu-11.ru/]zakazat-kuhnyu-11.ru[/url] .
вывод из запоя в стационаре краснодара [url=https://vyvod-iz-zapoya-v-krasnodare-2.ru/]vyvod-iz-zapoya-v-krasnodare-2.ru[/url] .
кодирование от алкоголизма [url=https://vyvod-iz-zapoya-na-domu-samara.ru/]vyvod-iz-zapoya-na-domu-samara.ru[/url] .
вывод из запоя на дому [url=https://vyvod-iz-zapoya-na-domu-voronezh.ru/]vyvod-iz-zapoya-na-domu-voronezh.ru[/url] .
реабилитационный центр для наркозависимых [url=https://vyvod-iz-zapoya-na-domu-voronezh-3.ru/]реабилитационный центр для наркозависимых[/url] .
Эта разъяснительная статья содержит простые и доступные разъяснения по актуальным вопросам. Мы стремимся сделать информацию понятной для широкой аудитории, чтобы каждый мог разобраться в предмете и извлечь из него максимум пользы.
Информация доступна здесь – https://wallpostjournal.com/tag/pc-movies-khatrimaza
нарколог вывод из запоя краснодар [url=https://vyvod-iz-zapoya-v-krasnodare-3.ru/]vyvod-iz-zapoya-v-krasnodare-3.ru[/url] .
Эта обзорная заметка содержит ключевые моменты и факты по актуальным вопросам. Она поможет читателям быстро ориентироваться в теме и узнать о самых важных аспектах сегодня. Получите краткий курс по современной информации и оставайтесь в курсе событий!
Не пропусти важное – https://blog.hotelspecials.de/die-mecklenburgische-seenplatte
Эта статья погружает вас в увлекательный мир знаний, где каждый факт становится открытием. Мы расскажем о ключевых исторических поворотных моментах и научных прорывах, которые изменили ход цивилизации. Поймите, как прошлое формирует настоящее и как его уроки могут помочь нам строить будущее.
Не упусти шанс – https://template140.webekspor.com/we-prioritize-sustainability-in-every-aspect-of-our-operations-f
В этой информационной статье вы найдете интересное содержание, которое поможет вам расширить свои знания. Мы предлагаем увлекательный подход и уникальные взгляды на обсуждаемые темы, побуждая пользователей к активному мышлению и критическому анализу.
Проверенные методы — узнай сейчас – https://shop-antinuisibles.com/identifier-les-cafards-qui-sont-chez-vous
В этой публикации мы сосредоточимся на интересных аспектах одной из самых актуальных тем современности. Совмещая факты и мнения экспертов, мы создадим полное представление о предмете, которое будет полезно как новичкам, так и тем, кто глубоко изучает вопрос.
Более подробно об этом – https://dpupr.madiunkota.go.id/2023/04/28/dpupr-turunkan-alat-dan-personel-antisipasi-genangan-air
Эта статья погружает вас в увлекательный мир знаний, где каждый факт становится открытием. Мы расскажем о ключевых исторических поворотных моментах и научных прорывах, которые изменили ход цивилизации. Поймите, как прошлое формирует настоящее и как его уроки могут помочь нам строить будущее.
Есть чему поучиться – https://trattoria-kazan.ru
В этой информационной статье вы найдете интересное содержание, которое поможет вам расширить свои знания. Мы предлагаем увлекательный подход и уникальные взгляды на обсуждаемые темы, побуждая пользователей к активному мышлению и критическому анализу.
Подробнее – https://agriculturalorganics.com/organic-fertilizers
В этом информативном тексте представлены захватывающие события и факты, которые заставят вас задуматься. Мы обращаем внимание на важные моменты, которые часто остаются незамеченными, и предлагаем новые перспективы на привычные вещи. Подготовьтесь к тому, чтобы быть поглощенным увлекательными рассказами!
Только факты! – https://idejukabata.eu/celvedis-lai-berni-kalnu-nogazes-butu-siltuma-un-justos-laimigi/75473
В статье представлены ключевые моменты по актуальной теме, дополненные советами экспертов и ссылками на дополнительные ресурсы. Цель материала — дать читателю инструменты для самостоятельного развития и принятия осознанных решений.
Ознакомьтесь с аналитикой – https://publixadweeklyad.com/drizzilicious-publix
Эта статья полна интересного контента, который побудит вас исследовать новые горизонты. Мы собрали полезные факты и удивительные истории, которые обогащают ваше понимание темы. Читайте, погружайтесь в детали и наслаждайтесь процессом изучения!
Получить исчерпывающие сведения – https://espada5.wpxblog.jp/ck_yoko2
В этом интересном тексте собраны обширные сведения, которые помогут вам понять различные аспекты обсуждаемой темы. Мы разбираем детали и факты, делая акцент на важности каждого элемента. Не упустите возможность расширить свои знания и взглянуть на мир по-новому!
Получить профессиональную консультацию – https://jpabs.org/800/600/http/mongocco.sakura.ne.jp/bbs/index.cgi?command=viewres&target=255729727
https://miamifightcard.com/
In the context of MediaFightCard, the wagering lines reveal a fascinating dynamic with champions positioned as underdogs and opponents holding favorite status. In the marquee matchup for the open light heavyweight title, previous belt-holder Jiri Prochazka opened as a slight -143 favorite over the in-form Carlos Ulberg, who comes in as a +116 underdog considering his nine-fight winning streak.
https://sportium.net.co/
Sportium Colombia trata-se de um cassino e uma casa de apostas esportivas pela internet que funciona com plena legalidade amparado pela licenca da Coljuegos, fruto da parceria entre CIRSA e Ladbrokes a partir de 2007. Disponibiliza ao usuario um site robusto e confiavel onde os usuarios da Colombia tem acesso desde apostas ao futebol ate slots e casino ao vivo com dealers reais, tudo integrado em uma so plataforma.
лечение наркомании [url=https://vyvod-iz-zapoya-na-domu-voronezh-1.ru/]vyvod-iz-zapoya-na-domu-voronezh-1.ru[/url] .
Финансовые инструменты позволяют заказчику убедиться в надежности участника и его готовности выполнить обязательства по контракту. При этом грамотное сопровождение снижает вероятность финансовых рисков и помогает правильно оформить документы для банка.
Полная картина — внутри – [url=https://tendernoe-soprovozhdenie-rostov-na-donu.ru/]тендерное сопровождение под ключ в ростове на дону[/url]
villas in phuket thailand for sale [url=https://villas-for-sale-in-phuket-1.com/]villas-for-sale-in-phuket-1.com[/url] .
mostbet установить приложение [url=https://mostbet70269.help]https://mostbet70269.help[/url]
1win canlı oyun [url=https://1win60278.help/]https://1win60278.help/[/url]
mostbet saytda mines [url=https://mostbet59402.help/]mostbet saytda mines[/url]
Тендерный специалист помогает разобраться в особенностях каждого закона, а также обеспечивает грамотное сопровождение всех процедур. Это особенно важно для компаний, которые только начинают участвовать в торгах и не имеют опыта работы с государственными контрактами.
Глубже в тему — здесь – http://tendernoe-soprovozhdenie-rostov-na-donu.ru
https://888starz.net.co/
888Starz Colombia constituye un sitio de apuestas online y casino que reune mas de 9.500 juegos, tales como tragamonedas, mesas de crupier en directo y una amplia oferta de deportes que incluye desde el torneo local BetPlay hasta la UEFA Champions League y las competiciones de esports.
Тендерный специалист помогает разобраться в особенностях каждого закона, а также обеспечивает грамотное сопровождение всех процедур. Это особенно важно для компаний, которые только начинают участвовать в торгах и не имеют опыта работы с государственными контрактами.
Откройте для себя новое – https://tendernoe-soprovozhdenie-rostov-na-donu.ru
реабилитация алкоголиков [url=https://vyvod-iz-zapoya-na-domu-voronezh-2.ru/]vyvod-iz-zapoya-na-domu-voronezh-2.ru[/url] .
вывод из запоя лечение краснодар [url=https://vyvod-iz-zapoya-v-krasnodare-4.ru/]вывод из запоя лечение краснодар[/url] .
вывод из запоя краснодар на дому анонимно [url=https://vyvod-iz-zapoya-v-krasnodare-1.ru/]vyvod-iz-zapoya-v-krasnodare-1.ru[/url] .
лечение алкоголизма [url=https://vyvod-iz-zapoya-na-domu-samara-1.ru/]лечение алкоголизма[/url] .
реабилитация наркоманов [url=https://vyvod-iz-zapoya-na-domu-samara-2.ru/]vyvod-iz-zapoya-na-domu-samara-2.ru[/url] .
Коммерческий и государственный тендер — это конкурентная процедура выбора поставщика товаров или оказания услуг. Заказчик размещает требования, а компании подают заявки и участвуют в торгах.
Не упустите важные детали – https://tendernoe-soprovozhdenie-rostov-na-donu.ru
нарколог на дом [url=https://vyvod-iz-zapoya-na-domu-samara.ru/]нарколог на дом[/url] .
вывод из запоя краснодар на дому [url=https://vyvod-iz-zapoya-v-krasnodare-2.ru/]вывод из запоя краснодар на дому[/url] .
Такой поэтапный подход обеспечивает контролируемый «выход» и минимизацию рисков, а также формирует мост к долгосрочной терапии зависимости после стабилизации.
Изучить вопрос глубже – http://vyvod-iz-zapoya-doneczk0.ru
вывод из запоя краснодар на дому анонимно [url=https://vyvod-iz-zapoya-v-krasnodare-3.ru/]vyvod-iz-zapoya-v-krasnodare-3.ru[/url] .
наркологический стационар [url=https://vyvod-iz-zapoya-na-domu-voronezh-3.ru/]vyvod-iz-zapoya-na-domu-voronezh-3.ru[/url] .
кодирование от алкоголизма [url=https://vyvod-iz-zapoya-na-domu-voronezh.ru/]vyvod-iz-zapoya-na-domu-voronezh.ru[/url] .
Капельницы в «СаратовМед Профи» — это конструктор из тщательно подобранных модулей. Каждый модуль решает одну задачу и имеет свой ожидаемый горизонт эффекта. Важно не название, а логика: задача > опора среды > как проверяем > когда ждём результат.
Изучить вопрос глубже – [url=https://vyvod-iz-zapoya-saratov0.ru/]наркология вывод из запоя саратов[/url]
На первом приёме врач-нарколог проводит осмотр, оценивает витальные показатели (АД, ЧСС, SpO2, температура), при показаниях — портативный ЭКГ-скрининг и экспресс-лабораторию, использует шкалы выраженности абстиненции и тревоги. Результаты сразу переводятся в план на ближайшие 72 часа: инфузионная поддержка или таблетированные режимы, «вечерний ритуал» для нормализации сна, карта триггеров и краткое психообразование. Дальше мы обсуждаем цели на 7 дней: что должно измениться и как мы это измерим (сон, тревога, «тяга», энергия, работоспособность).
Подробнее тут – [url=https://narkologicheskaya-klinika-petrozavodsk0.ru/]наркологическая клиника вывод из запоя петрозаводск[/url]
купить цветы недорого в москве [url=http://cveti-nederogo.ru]http://cveti-nederogo.ru[/url] .
Маршрутизация фиксируется в индивидуальном плане: место оказания помощи (амбулаторно, дневной стационар, круглосуточный стационар), контрольные точки и критерии эффективности. Такой подход позволяет оперативно корректировать тактику, если динамика замедляется или появляются новые клинические данные. Пациент получает чёткое понимание этапов терапии, сроков и ожидаемых результатов, а также способов связи с командой в случае изменений самочувствия.
Выяснить больше – http://narkologicheskaya-klinika-v-luganske0.ru/narkologicheskij-dispanser-lugansk/
Наркологическая клиника в Луганске организует помощь людям с алкогольной и наркотической зависимостью по стандартам доказательной медицины. Целью является не только купирование симптомов и снятие интоксикации, но и формирование устойчивой ремиссии, восстановление психоэмоционального баланса и возвращение к социальной активности. Система помощи строится поэтапно, с учётом клинического состояния, сопутствующих заболеваний и психосоциальных факторов. Команда специалистов обеспечивает согласованность действий, а регламенты лечения — прозрачность и предсказуемость каждого шага.
Исследовать вопрос подробнее – [url=https://narkologicheskaya-klinika-v-luganske0.ru/]частная наркологическая клиника[/url]
Терапевтическая стратегия выстраивается вокруг понятных клинических ориентиров, что делает процесс предсказуемым и повышает приверженность пациента к лечению.
Детальнее – [url=https://lechenie-alkogolizma-lugansk0.ru/]здоровье лечение алкоголизма[/url]
https://ufc327odds.com/
This Miami-held light heavyweight title fight at UFC 327 shapes up as a genuine pick’em for those placing wagers, as ex-champion Jiri Prochazka (-142) and hot-streaking knockout specialist Carlos Ulberg (+120) prepare to square off for the open belt. The razor-thin odds underscore how evenly matched these two finishers happen to be, creating a scenario where a bet on either competitor hinges entirely on which dynamic fighting style you think will come out on top.
Такая структура делает процесс предсказуемым и результативным, а также помогает закрепить достигнутые улучшения.
Исследовать вопрос подробнее – http://narkologicheskaya-klinika-v-doneczke0.ru/
Стационар мы предлагаем, когда дома нет условий для ночного наблюдения, симптомы тяжёлые или прогноз нестабилен. В палате — контролируемая среда, возможность оперативно выполнить ЭКГ и базовые анализы по показаниям, круглосуточный пост. Команда корректирует схему лечения в реальном времени, не теряя часы на логистику. Это особенно важно при давних запоях, риске делирия, выраженных колебаниях давления, сахарном диабете, ИБС, заболеваниях ЖКТ.
Выяснить больше – https://vyvod-iz-zapoya-sergiev-posad8.ru/vyvod-iz-zapoya-anonimno-v-sergievom-posade/
Эти направления терапии помогают создать прочный фундамент для дальнейшей ремиссии и снижают риск рецидива.
Ознакомиться с деталями – [url=https://lechenie-alkogolizma-doneczk0.ru/]принудительное лечение от алкоголизма[/url]
Тендерный специалист помогает разобраться в особенностях каждого закона, а также обеспечивает грамотное сопровождение всех процедур. Это особенно важно для компаний, которые только начинают участвовать в торгах и не имеют опыта работы с государственными контрактами.
Узнайте больше прямо сейчас – [url=https://tendernoe-soprovozhdenie-rostov-na-donu.ru/]тендерное сопровождение под ключ ростов на дону[/url]
Эти направления терапии помогают создать прочный фундамент для дальнейшей ремиссии и снижают риск рецидива.
Узнать больше – [url=https://lechenie-alkogolizma-doneczk0.ru/]лечение алкоголизма и наркомании центр донецк[/url]
Метод и срок подбираются после очного осмотра и исключения противопоказаний. Возможны медикаментозные и психотерапевтические подходы, а также комбинированные программы. Мы объясняем плюсы и ограничения каждого метода, помогаем подготовиться (диета, анализы, отмена определённых препаратов), а затем сопровождаем пациента в период адаптации к трезвости. Кодирование — часть комплексного плана, а не «волшебная кнопка»: устойчивый результат достигается, когда его дополняют поддерживающая терапия и работа с триггерами.
Выяснить больше – http://narkologicheskaya-klinika-balashiha0.ru
Домашний визит уместен не только при тяжёлой абстиненции. Он эффективен и на этапе нарастающих симптомов, когда важно предотвратить обострение. Ниже — ориентиры, помогающие принять решение.
Углубиться в тему – http://narkolog-na-dom-stavropol0.ru
наркологический стационар [url=https://vyvod-iz-zapoya-na-domu-voronezh-1.ru/]vyvod-iz-zapoya-na-domu-voronezh-1.ru[/url] .
Чтобы исключить суету и «гонку дозировок», острый отрезок мы делим на короткие окна с ясной целью и чёткими критериями перехода. Если отклика нет, корректируется один элемент и тут же назначается новая точка оценки. Прозрачность плана снижает эмоциональный фон и повышает доверие к процессу.
Углубиться в тему – [url=https://narkologicheskaya-klinika-saratov0.ru/]запой наркологическая клиника в саратове[/url]
Этап
Изучить вопрос глубже – [url=https://vyvod-iz-zapoya-v-stacionare-chekhov8.ru/]vyvod-iz-zapoya-na-domu-chekhov[/url]
«Трезвый Маяк» — клиника экстренной и плановой наркологической помощи с круглосуточным выездом и возможностью госпитализации. Мы аккуратно стабилизируем состояние, снимаем интоксикацию и абстиненцию, готовим к кодированию и сопровождаем пациента до устойчивой ремиссии. Работаем анонимно: врач приезжает без опознавательных знаков, документы оформляются в нейтральной формулировке и только по запросу.
Детальнее – [url=https://narkologicheskaya-klinika-sergiev-posad8.ru/]частная наркологическая клиника[/url]
Вызов нарколога на дом — это безопасный и деликатный способ быстро купировать симптомы алкогольной интоксикации, стабилизировать самочувствие и начать восстановление без госпитализации. В наркологической клинике «МедЛиния Ставрополь» домашние визиты организованы как чёткий медицинский сервис: врач приезжает с портативной диагностикой, подбирает индивидуальный состав капельниц, контролирует витальные показатели и оставляет понятный план дальнейших действий. Все процедуры проводятся анонимно, а оформление документов и логистика построены так, чтобы не нарушать приватность пациента и его семьи.
Детальнее – [url=https://narkolog-na-dom-stavropol0.ru/]психиатр нарколог на дом в ставрополе[/url]
Что делаем
Детальнее – [url=https://vyvod-iz-zapoya-v-stacionare-chekhov8.ru/]vyvod-iz-zapoya-v-chastnoj-klinike[/url]
Наркологическая клиника «ВолгаМед Центр» — это круглосуточный медицинский комплекс, в котором экстренная помощь, капельницы и детоксикация объединены в единую клинико-поведенческую систему. Мы лечим не «симптом по одному», а управляем весь маршрут: от первичной стабилизации и снижения токсической нагрузки до восстановления сна, аппетита и рабочих ритмов. Каждый шаг имеет цель, измеримый маркер и назначенное «окно» переоценки — это исключает полипрагмазию и делает динамику предсказуемой для пациента и семьи. Конфиденциальность не декларируется, а обеспечивается регламентами: немаркированная логистика, нейтральные формулировки в документах, «тихие» каналы связи и разграничение доступа к медзаписям.
Углубиться в тему – [url=https://narkologicheskaya-klinika-saratov0.ru/]наркологическая клиника вывод из запоя саратов[/url]
капельница от запоя [url=https://vyvod-iz-zapoya-na-domu-voronezh-2.ru/]капельница от запоя[/url] .
Мы выстраиваем помощь как маршрут, а не разовую «капельницу». После первого звонка администратор собирает краткий чек-лист (длительность эпизода, хронические заболевания, принятые препараты, аллергии), передаёт дежурному врачу, и тот предлагает безопасный старт: визит на дому в пределах Сергиева Посада и района или сразу стационар. Выбор зависит от клинических рисков и бытовых условий: есть ли спокойная комната, помощник на ночь, насколько выражены симптомы.
Подробнее можно узнать тут – [url=https://narkologicheskaya-klinika-sergiev-posad8.ru/]адреса наркологических клиник[/url]
вывод из запоя в стационаре [url=https://vyvod-iz-zapoya-na-domu-samara-2.ru/]вывод из запоя в стационаре[/url] .
Близкие — ключевой ресурс, если действуют согласованно. Мы просим сфокусироваться на среде и режиме: тише, темнее, теплее; вода и лёгкая еда «по часам»; отсутствие «разборов» и проверок «на прочность» в первые дни. Полезно заранее договориться о коротких нейтральных сигналах — как понять, что помощь нужна, а когда лучше не вмешиваться. Такие простые правила бесплатны, но они стабилизируют поведение и убирают потребность в экстренных визитах по ночам. Когда дом перестаёт быть источником шума, медицинская часть остаётся узкой, а результат — устойчивым.
Подробнее можно узнать тут – [url=https://kapelnica-ot-zapoya-podolsk9.ru/]kapelnica-ot-zapoya-klinika[/url]
вывод из запоя кодирование краснодар [url=https://vyvod-iz-zapoya-v-krasnodare-4.ru/]вывод из запоя кодирование краснодар[/url] .
лечение алкоголизма [url=https://vyvod-iz-zapoya-na-domu-samara-1.ru/]лечение алкоголизма[/url] .
наркологический стационар [url=https://vyvod-iz-zapoya-na-domu-samara.ru/]vyvod-iz-zapoya-na-domu-samara.ru[/url] .
нарколог вывод из запоя краснодар [url=https://vyvod-iz-zapoya-v-krasnodare-3.ru/]vyvod-iz-zapoya-v-krasnodare-3.ru[/url] .
вывод из запоя [url=https://vyvod-iz-zapoya-v-krasnodare-2.ru/]вывод из запоя[/url] .
вывод из запоя дешево краснодар [url=https://vyvod-iz-zapoya-v-krasnodare-1.ru/]vyvod-iz-zapoya-v-krasnodare-1.ru[/url] .
реабилитация наркоманов [url=https://vyvod-iz-zapoya-na-domu-voronezh-3.ru/]реабилитация наркоманов[/url] .
наркологическая помощь [url=https://vyvod-iz-zapoya-na-domu-voronezh.ru/]наркологическая помощь[/url] .
Тендерный специалист помогает разобраться в особенностях каждого закона, а также обеспечивает грамотное сопровождение всех процедур. Это особенно важно для компаний, которые только начинают участвовать в торгах и не имеют опыта работы с государственными контрактами.
Разберитесь досконально – [url=https://tendernoe-soprovozhdenie-rostov-na-donu.ru/]услуги тендерного сопровождения[/url]
Эта структура терапии помогает достигать устойчивой ремиссии и снижать вероятность возврата к употреблению.
Подробнее – [url=https://narkologicheskaya-klinika-doneczk0.ru/]наркологические клиники алкоголизм[/url]
«Тёмные часы» вечера — время импульсивных решений. Мы даём короткие, нейтральные инструменты на 20–40 минут: тёплый душ, прогулка рядом с домом при устойчивых показателях, дыхательная практика, короткий созвон с «своим» человеком. Эти бесплатные шаги поддерживают ровный сон и уменьшают вероятность «дорогих» экстренных повторов.
Изучить вопрос глубже – [url=https://narkologicheskaya-klinika-himki9.ru/]chastnaya-narkologicheskaya-klinika[/url]
мелбет не могу войти [url=melbet30946.help]melbet30946.help[/url]
«НоваМед Центр» строит лечение как управляемую последовательность шагов, а не набор эпизодических процедур. На входе мы фиксируем исходные риски: длительность употребления, сопутствующие заболевания, принимаемые лекарства, анамнез кодирований и срывов, показатели давления, пульса, сатурации, уровень сна и тревоги. Это позволяет выбрать безопасную точку входа и задать логичную траекторию: от детокса к стабилизации, затем к поведенческим изменениям и поддержанию ремиссии. Такая структура особенно важна при высокой нагрузке и дефиците времени: когда пациент и семья понимают, что будет через час, сутки и неделю, снижается тревога и исчезают импульсивные «проверки себя», из-за которых обычно рушатся результаты. Мы придерживаемся принципа клинической достаточности: только те вмешательства, которые нужны по состоянию сегодня, без «украшений ради прайса». Чёткие правила на 48–72 часа, согласованные окна связи, понятные «красные флажки» для повторного контакта превращают лечение в прогнозируемый маршрут, а не в череду надежд и разочарований. В итоге человек быстрее возвращает контроль над самочувствием, а близкие получают опору вместо бесконечных ночных «дежурств».
Подробнее тут – https://narkologicheskaya-klinika-moskva999.ru/narkologicheskaya-klinika-v-moskve-ceny
Старт всегда опирается на факты, а не на удобство расписания. После короткого опроса и осмотра врач объясняет, где безопаснее начать — на дому или в стационаре. Если показатели стабильны, домашний формат выигрывает приватностью и скоростью: знакомая среда снижает стресс, легче наладить сон, а выездная бригада привозит всё необходимое для мониторинга и инфузионной терапии по показаниям. При признаках нестабильности мы честно рекомендуем короткий стационар на 24–48 часов: круглосуточное наблюдение позволяет ранее заметить неблагоприятную динамику, корректировать схемы без пауз, подключать диагностику «по триггерам», а не «на всякий случай». В любом варианте пациент получает понятный план на трое суток: режим жидкости и питания, техники «буферов» на вечер, ограничения по нагрузкам, правила ранней связи при тревожных симптомах. Такой реализм убирает хаос, бережёт силы семьи и защищает результат: усложнения перехватываются раньше, а поведение становится предсказуемым — это особенно важно в плотном городском ритме.
Получить дополнительную информацию – http://narkologicheskaya-klinika-moskva999.ru/
Перед списком важно: пункты ниже не заменяют осмотр, а помогают семье быстрее принять здравое решение. В большинстве таких ситуаций достаточно правильно подобранных инфузий и чётких правил на 48–72 часа; при сочетании признаков мы рекомендуем стационар.
Детальнее – https://narkologicheskaya-klinika-podolsk9.ru/narkologicheskaya-klinika-ceny-v-podolske
капельница от похмелья [url=https://vyvod-iz-zapoya-na-domu-voronezh-1.ru/]vyvod-iz-zapoya-na-domu-voronezh-1.ru[/url] .
coupon melbet [url=https://melbet81256.help/]coupon melbet[/url]
купить цветы на заказ [url=https://www.cveti-nederogo.ru]https://www.cveti-nederogo.ru[/url] .
1win ставки на футбол [url=https://www.1win09451.help]https://www.1win09451.help[/url]
mostbet новый адрес [url=https://mostbet32854.help/]https://mostbet32854.help/[/url]
реабилитационный центр для наркозависимых [url=https://vyvod-iz-zapoya-na-domu-samara-2.ru/]vyvod-iz-zapoya-na-domu-samara-2.ru[/url] .
Мы одинаково внимательно относимся и к амбулаторным, и к стационарным маршрутам. Для каждого формируется индивидуальная цель (устранение абстиненции, нормализация сна, восстановление внимания и мотивации) и назначается «точка переоценки» — момент, когда команда сверяет динамику и, если нужно, меняет один параметр плана (дозу, время внесения процедур, приоритет модуля). Так достигается предсказуемость и избегается избыточная фармаконагрузка.
Подробнее – [url=https://narcologicheskaya-klinika-stavropol0.ru/]вывод наркологическая клиника в ставрополе[/url]
Выбор методов определяется клинической картиной, коморбидными состояниями и переносимостью препаратов. Ниже представлена сводная структура основных вмешательств и терапевтических целей.
Получить больше информации – [url=https://vyvod-iz-zapoya-lugansk0.ru/]нарколог на дом вывод из запоя луганск[/url]
скачать из ютуба видео [url=https://skachat-video-s-youtube-3.ru/]скачать из ютуба видео[/url] .
наркологическая помощь [url=https://vyvod-iz-zapoya-na-domu-samara-2.ru/]наркологическая помощь[/url] .
Тактика подбирается индивидуально и зависит от тяжести состояния, сопутствующих заболеваний и переносимости препаратов. Ниже представлены базовые компоненты, которые часто включаются в схемы лечения при запойных состояниях.
Изучить вопрос глубже – https://vyvod-iz-zapoya-doneczk0.ru/
Мы работаем без пауз и очередей, принимая пациентов в любое время суток. В распоряжении бригад — немаркированный транспорт для выезда на дом, портативная диагностика (ЭКГ, пульсоксиметрия, экспресс-анализаторы), а в стационаре — палаты с регулируемым микроклиматом и круглосуточный мониторинг жизненных показателей. Вся документация оформляется в нейтральной терминологии, доступ к данным разграничен по ролям, что защищает вашу анонимность.
Углубиться в тему – http://narcologicheskaya-klinika-stavropol0.ru/
Сочетание перечисленных направлений обеспечивает полноту помощи и позволяет выстроить предсказуемый маршрут лечения с понятными целями на каждом этапе.
Выяснить больше – [url=https://narkologicheskaya-klinika-lugansk0.ru/]www.domen.ru[/url]
Эта информационная статья содержит полезные факты, советы и рекомендации, которые помогут вам быть в курсе последних тенденций и изменений в выбранной области. Материал составлен так, чтобы быть полезным и понятным каждому.
Все материалы собраны здесь – https://callcenterstaffing.net/2014/09/29/a-cool-video-entry
Честная наркология — это не «универсальная капельница», а система шагов, привязанная к параметрам конкретного человека. В Чехове мы выезжаем круглосуточно, на месте проводим допуск к терапии, сверяем совместимости с уже принятыми препаратами, подбираем состав инфузий без лишних компонентов и избыточной седативной нагрузки. Если дома нет условий для безопасной ночи, предложим стационар — это не усложнение, а короткий путь к безопасности. Анонимность — стандарт: нейтральные формулировки в документах по запросу, ограниченный доступ к данным, деликатная связь.
Углубиться в тему – [url=https://narkologicheskaya-klinika-chekhov8.ru/]rejting-narkologicheskih-klinik-v-moskve[/url]
недорогие цветы для букета [url=http://cveti-nederogo.ru/]http://cveti-nederogo.ru/[/url] .
Эта статья погружает вас в увлекательный мир знаний, где каждый факт становится открытием. Мы расскажем о ключевых исторических поворотных моментах и научных прорывах, которые изменили ход цивилизации. Поймите, как прошлое формирует настоящее и как его уроки могут помочь нам строить будущее.
Кликни и узнай всё! – https://www.ffw-knellendorf.de/bilder-feuerwehrhaus-fahrzeugausstattung
suport 1win [url=1win59213.help]1win59213.help[/url]
На каждом этапе мы фиксируем объективные маркеры — от сатурации и вариабельности пульса до частоты «тяговых мыслей» в дневнике. Эти данные позволяют корректировать план не интуитивно, а по фактам.
Подробнее – [url=https://narcologicheskaya-klinika-stavropol0.ru/]наркологическая клиника ставрополь[/url]
Эта обзорная заметка содержит ключевые моменты и факты по актуальным вопросам. Она поможет читателям быстро ориентироваться в теме и узнать о самых важных аспектах сегодня. Получите краткий курс по современной информации и оставайтесь в курсе событий!
Всё самое вкусное внутри – https://tentazionidisicilia.it/prodotto/capperi-siciliani-sotto-sale
Эта статья сочетает познавательный и занимательный контент, что делает ее идеальной для любителей глубоких исследований. Мы рассмотрим увлекательные аспекты различных тем и предоставим вам новые знания, которые могут оказаться полезными в будущем.
Нажмите, чтобы узнать больше – https://wendyroberts.com/product/a-grave-calling
Выбор методов определяется клинической картиной, коморбидными состояниями и переносимостью препаратов. Ниже представлена сводная структура основных вмешательств и терапевтических целей.
Исследовать вопрос подробнее – [url=https://vyvod-iz-zapoya-lugansk0.ru/]вывод из запоя капельница на дому в луганске[/url]
Откройте для себя скрытые страницы истории и малоизвестные научные открытия, которые оказали колоссальное влияние на развитие человечества. Статья предлагает свежий взгляд на события, которые заслуживают большего внимания.
Переходите по ссылке ниже – https://salsasmarcha.com/producto/salsa-andaluza
Часто предприниматели объединяют понятия тендер и госзакупки, так как обе процедуры связаны с конкурсным выбором поставщика. Однако между ними существуют определённые различия, которые важно понимать перед началом работы в этой сфере.
Получите экспертное мнение – [url=https://tendernoe-soprovozhdenie-rostov-na-donu.ru/]оказание услуг по тендерному сопровождению[/url]
Этот информативный текст отличается привлекательным содержанием и актуальными данными. Мы предлагаем читателям взглянуть на привычные вещи под новым углом, предоставляя интересный и доступный материал. Получите удовольствие от чтения и расширьте кругозор!
Что ещё? Расскажи всё! – https://pps.umuslim.ac.id/?p=2007
Мы предлагаем вам подробное руководство, основанное на проверенных источниках и реальных примерах. Каждая часть публикации направлена на то, чтобы помочь вам разобраться в сложных вопросах и применить знания на практике.
Подробнее – https://alvaro-fixed.com/free-football-vip-odds
Эта публикация дает возможность задействовать различные источники информации и представить их в удобной форме. Читатели смогут быстро найти нужные данные и получить ответы на интересующие их вопросы. Мы стремимся к четкости и доступности материала для всех!
Кликни и узнай всё! – https://agisoin.com/index.php/en/r/k2-blog/blog-category/item/8-nothing-can-be-done-without-hope-and-confidence?start=3460
Эта статья погружает вас в увлекательный мир знаний, где каждый факт становится открытием. Мы расскажем о ключевых исторических поворотных моментах и научных прорывах, которые изменили ход цивилизации. Поймите, как прошлое формирует настоящее и как его уроки могут помочь нам строить будущее.
Получить дополнительную информацию – https://www.welcome-madeira.pt/top-destinations-madeira-island
В этой статье представлен занимательный и актуальный контент, который заставит вас задуматься. Мы обсуждаем насущные вопросы и проблемы, а также освещаем истории, которые вдохновляют на действия и изменения. Узнайте, что стоит за событиями нашего времени!
Как достичь результата? – https://ok.ru/group/55056563240970
Эта обзорная заметка содержит ключевые моменты и факты по актуальным вопросам. Она поможет читателям быстро ориентироваться в теме и узнать о самых важных аспектах сегодня. Получите краткий курс по современной информации и оставайтесь в курсе событий!
Углубить понимание вопроса – https://manayunkmag.com/meet-our-nonprofits
наркологический центр [url=https://vyvod-iz-zapoya-na-domu-samara-2.ru/]наркологический центр[/url] .
скачат видео ютуб [url=https://skachat-video-s-youtube-3.ru/]скачат видео ютуб[/url] .
В «ЛадаМед Выезд» при оказании наркологической помощи на дому используются современные препараты и методы дезинтоксикации. Ниже приведена таблица с основными видами терапии и их эффектами.
Получить больше информации – [url=https://narkolog-na-dom-tolyatti0.ru/]нарколог на дом недорого[/url]
Результаты первичной оценки формируют основу для выбора лечебной тактики и объёма медицинского вмешательства.
Выяснить больше – https://vyvod-iz-zapoya-v-tolyatti0.ru/vyvod-iz-zapoya-tolyatti-na-domu
Такой алгоритм помогает врачу быстро устранить симптомы и восстановить пациента без стресса. Процедура занимает от 40 до 90 минут, в зависимости от состояния и применяемых препаратов.
Подробнее тут – [url=https://narkolog-na-dom-tolyatti0.ru/]нарколог на дом вывод тольятти[/url]
Процесс лечения в «ВолгаМед Баланс» выстроен логично и последовательно. Каждый этап направлен на достижение конкретных медицинских и психологических целей. Ниже приведена таблица, описывающая ключевые стадии терапии.
Получить дополнительную информацию – https://narkologicheskaya-klinika-tolyatti0.ru/tolyatti-narkologicheskij-dispanser/
Наркологическая клиника — это медицинское учреждение, где лечение зависимости выстроено системно: от купирования острых симптомов до длительного сопровождения пациента. В клинике «ДальМедБаланс» терапия проводится под круглосуточным врачебным контролем, а ключевыми принципами являются безопасность, анонимность и индивидуальный подход. Каждый пациент проходит путь восстановления под наблюдением специалистов, которые учитывают физиологическое состояние, психоэмоциональные особенности и социальный контекст. Лечение направлено не только на избавление от физической зависимости, но и на возвращение мотивации к здоровой жизни.
Подробнее тут – [url=https://narkologicheskaya-klinika-v-khabarovske0.ru/]запой наркологическая клиника в хабаровске[/url]
Вызов нарколога на дом в Хабаровске осуществляется при наличии клинических показаний, при которых выездная помощь является обоснованной и безопасной. В клинике «Ясный Вектор» решение о формате вмешательства принимается с учётом жалоб, анамнеза и предполагаемой тяжести состояния.
Подробнее тут – [url=https://narkolog-na-dom-khabarovsk0.ru/]нарколог на дом вывод[/url]
Тендерный специалист помогает разобраться в особенностях каждого закона, а также обеспечивает грамотное сопровождение всех процедур. Это особенно важно для компаний, которые только начинают участвовать в торгах и не имеют опыта работы с государственными контрактами.
Глубже в тему — здесь – [url=https://tendernoe-soprovozhdenie-rostov-na-donu.ru/]сопровождение тендерных закупок[/url]
Каждое из перечисленных направлений реализуется в рамках единого лечебного процесса и находится под постоянным наблюдением медицинского персонала.
Ознакомиться с деталями – [url=https://vyvod-iz-zapoya-khabarovsk0.ru/]вывод из запоя на дому цена хабаровск[/url]
Диагностика позволяет установить степень интоксикации, выраженность абстинентного синдрома и наличие сопутствующих заболеваний, которые могут влиять на переносимость терапии.
Получить дополнительные сведения – [url=https://narkologicheskaya-klinika-v-tolyatti0.ru/]наркологическая клиника наркологический центр[/url]
Медицинская помощь начинается с детального осмотра и сбора анамнестических данных. Врач оценивает длительность запоя, объем употребляемого алкоголя, наличие хронических заболеваний и ранее перенесенных осложнений. Эти сведения необходимы для выбора корректной тактики лечения и исключения потенциальных рисков.
Подробнее можно узнать тут – [url=https://vyvod-iz-zapoya-khabarovsk0.ru/]вывод из запоя на дому цена[/url]
Диагностика позволяет установить степень интоксикации, выраженность абстинентного синдрома и наличие сопутствующих заболеваний, которые могут влиять на переносимость терапии.
Детальнее – [url=https://narkologicheskaya-klinika-v-tolyatti0.ru/]наркологическая клиника вывод из запоя тольятти[/url]
Клиника «АмурМед Контур» в Хабаровске предлагает комплексную детоксикацию организма, которая включает инфузионную терапию, стабилизацию жизненно важных показателей и коррекцию эмоционального состояния. Каждому пациенту подбирается индивидуальная схема капельниц с учётом возраста, массы тела, стажа употребления алкоголя и хронических заболеваний. Процедуры проводятся в условиях полной конфиденциальности и под постоянным наблюдением специалистов. Медицинская команда контролирует артериальное давление, уровень сатурации, частоту пульса и показатели крови на протяжении всего периода восстановления.
Исследовать вопрос подробнее – [url=https://vyvod-iz-zapoya-v-khabarovske0.ru/]вывод из запоя на дому цена в хабаровске[/url]
Честная наркология — это не «универсальная капельница», а система шагов, привязанная к параметрам конкретного человека. В Чехове мы выезжаем круглосуточно, на месте проводим допуск к терапии, сверяем совместимости с уже принятыми препаратами, подбираем состав инфузий без лишних компонентов и избыточной седативной нагрузки. Если дома нет условий для безопасной ночи, предложим стационар — это не усложнение, а короткий путь к безопасности. Анонимность — стандарт: нейтральные формулировки в документах по запросу, ограниченный доступ к данным, деликатная связь.
Выяснить больше – [url=https://narkologicheskaya-klinika-chekhov8.ru/]частная наркологическая клиника[/url]
Обращаться можно и нужно не только в момент очередного запоя. Клиника в Ивантеевке работает и с теми, кто сейчас в относительной ремиссии, но понимает, что без внешней поддержки снова сорвётся. В этом случае можно обсудить профилактические программы, варианты кодирования, реабилитацию, работу с тревогой и депрессией. Чем раньше сделан шаг в сторону лечения, тем мягче будут процедуры и тем больше шансов на устойчивый результат.
Углубиться в тему – https://narkologicheskaya-klinika-ivanteevka11.ru/platnaya-narkologicheskaya-klinika-v-ivanteevke
Для жителей Чехова важно и то, что врач видит не абстрактный «случай зависимости», а живого человека со своей историей. У кого-то за плечами десятилетия злоупотребления, у кого-то — несколько лет с быстрым прогрессированием, у кого-то — сочетание алкоголя с успокоительными или наркотиками. Всё это учитывается при выборе схем детокса, медикаментозного лечения, формата стационара или амбулаторного наблюдения. Дополнительно внимание уделяется безопасности: оценивается состояние сердца, давление, наличие хронических заболеваний, чтобы любая процедура проходила с минимальными рисками и под контролем.
Узнать больше – [url=https://narkologicheskaya-klinika-chekhov11.ru/]наркологическая клиника[/url]
Домашний формат нужен, когда риски управляемы, а в квартире можно обеспечить «тихий режим». Врач приезжает без эмблем, проводит осмотр, измеряет давление, пульс, сатурацию, сверяет лекарства за последние 48 часов и аллергии. После допуска запускается инфузия с мягкой коррекцией воды и электролитов, поддержкой печени и вегетативной нервной системы; при необходимости аккуратно настраивается сон. По завершении — переоценка, письменная памятка на 24–48 часов, список тревожных признаков и прямой канал связи. Такой визит «гасит» тремор и тошноту, снижает тревогу и делает ночь предсказуемой.
Выяснить больше – [url=https://narkologicheskaya-klinika-chekhov8.ru/]наркологическая клиника в чехове[/url]
Для жителей Нижнего Тагила у нас организованы три параллельных канала помощи: очные визиты в клинику, «тихий» выезд на дом и защищённые телемедицинские консультации. Координатор уже при первом звонке уточняет ключевые риски (аллергии, хронические заболевания, эпизоды судорог/психозов, приём постоянных препаратов), бытовые условия (возможность обеспечить тишину на 2–3 часа, доступ к воде, особенности подъезда), а также предпочтения по конфиденциальности. Это позволяет врачу подготовить персональный стартовый протокол заранее и сократить время между осмотром и первой процедурой.
Узнать больше – [url=https://narkologicheskaya-klinika-nizhnij-tagil0.ru/]частная наркологическая клиника в нижнем тагиле[/url]
Мы работаем по модели «72 часа + 2 недели»: первые трое суток посвящены стабилизации витальных показателей, коррекции сна и сокращению «тяговых» откликов, следующие 14 дней — консолидации результата и запуску психотерапевтического блока. Маркеры прописываются заранее, поэтому и пациент, и семья понимают, когда и что мы будем оценивать, как корректируем план, если динамика ниже ожидаемой.
Углубиться в тему – [url=https://narcologicheskaya-klinika-pervouralsk0.ru/]наркологическая клиника наркологический центр[/url]
На первичном визите врач проводит клиническое интервью, оценивает витальные показатели (АД, ЧСС, SpO2, температура), при показаниях — выполняет портативный ЭКГ-скрининг и экспресс-диагностику. Вместе с пациентом формируется план ближайших 72 часов: режим гидратации, «вечерний ритуал» для сна, правила сенсорной разгрузки, безопасные фразы для общения с близкими, точечная фармакоподдержка и расписание коротких чек-инов.
Получить больше информации – [url=https://narcologicheskaya-klinika-petrozavodsk0.ru/]наркологическая клиника лечение алкоголизма[/url]
Коммерческий и государственный тендер — это конкурентная процедура выбора поставщика товаров или оказания услуг. Заказчик размещает требования, а компании подают заявки и участвуют в торгах.
Не оставайтесь в неведении – https://tendernoe-soprovozhdenie-rostov-na-donu.ru
Ниже — опорная карта, которая адаптируется под клиническую картину. Она помогает быстро сориентироваться и сохраняет прозрачность процесса. В каждом блоке указан «окно оценки» — точка, когда мы честно отвечаем на вопрос «что поменялось» и что корректируем дальше.
Получить больше информации – https://narcologicheskaya-klinika-pervouralsk0.ru/pervouralsk-narkologicheskij-dispanser/
Мы заранее объясняем, какие шаги последуют, чтобы пациент и близкие понимали логику вмешательств и не тревожились по поводу непредвиденных «сюрпризов». Карта ниже — ориентир; конкретные параметры врач уточнит после осмотра.
Выяснить больше – [url=https://vyvod-iz-zapoya-pervouralsk0.ru/]вывод из запоя капельница на дому в первоуральске[/url]
Мы не используем универсальные «коктейли»: алгоритм строится из коротких проверяемых шагов. На старте фиксируем цель (например, уменьшить тремор и тошноту, стабилизировать пульс и давление, вернуть полноценный ночной сон), выбираем минимально достаточные средства для её достижения и заранее назначаем «окно оценки» — момент, когда команда сверяет эффект и при необходимости корректирует один параметр. Такой подход защищает от полипрагмазии, экономит силы пациента и делает прогресс читаемым для всей семьи.
Углубиться в тему – http://vyvod-iz-zapoya-kamensk-uralskij0.ru/
Участие в государственных и коммерческих процедурах требует точной подготовки, понимания законодательства и внимательной работы с документами. Для многих компаний самостоятельная работа с закупками становится сложной задачей: необходимо отслеживать новые закупки, анализировать требования, оформлять документы и взаимодействовать с площадками.
Все ответы на ваши вопросы – [url=https://tendernoe-soprovozhdenie-rostov-na-donu.ru/]тендерное сопровождение ростов на дону[/url]
Вопрос «а не рано ли кодироваться» часто звучит и от самих пациентов, и от их близких. Кажется, что кодирование — это крайняя мера «на последней стадии», а пока человек работает, иногда бывает трезвым и «не валяется под забором», можно подождать. На самом деле гораздо разумнее ориентироваться не на стереотипы, а на реальные признаки того, что зависимость уже управляет жизнью, а не наоборот. Кодирование от алкоголизма в Королёве рассматривается именно тогда, когда попытки остановиться своими силами систематически проваливаются, а каждый новый запой становится тяжелее предыдущего.
Получить больше информации – http://kodirovanie-ot-alkogolizma-korolyov11.ru/klinika-kodirovaniya-ot-alkogolizma-v-korolyove/
Ниже — рабочий каркас выездного протокола. Он индивидуализируется под переносимость, вегетативные реакции и бытовые ограничения пациента. В таблице отражены и медицинские, и организационные шаги: видна связка «что делаем — что проверяем — как понимаем, что пора к следующему этапу».
Получить дополнительную информацию – http://vyvod-iz-zapoya-petrozavodsk0.ru/
Главные задачи детоксикации при запое — безопасно снизить концентрацию токсичных метаболитов, восстановить водно-электролитный баланс, уменьшить перегрузку сердечно-сосудистой системы и вернуть физиологию сна. Мы начинаем с медленного стартового объёма инфузии, чтобы оценить переносимость, затем переходим к основной фазе и при необходимости к постинфузионной поддержке. Во время сеанса контролируются витальные показатели, динамика симптомов (тремор, тошнота, головная боль, фотофобия, тревога), а также «поведенческие» маркеры — способность расслабиться, усидеть спокойно, засыпать без «рывков».
Получить дополнительную информацию – [url=https://vyvod-iz-zapoya-kamensk-uralskij0.ru/]вывод из запоя дешево каменск-уральск[/url]
скачать с ютюб [url=https://skachat-video-s-youtube-3.ru/]скачать с ютюб[/url] .
Ниже — рабочий каркас выездного протокола. Он индивидуализируется под переносимость, вегетативные реакции и бытовые ограничения пациента. В таблице отражены и медицинские, и организационные шаги: видна связка «что делаем — что проверяем — как понимаем, что пора к следующему этапу».
Подробнее тут – [url=https://vyvod-iz-zapoya-petrozavodsk0.ru/]скорая вывод из запоя в петрозаводске[/url]
Этот список — памятка на холодильник. Он не раскрывает диагноз, но точно описывает поводы для связи с дежурным врачом. Своевременная эскалация — часть безопасности, а не «подстраховка». Если сомневаетесь — лучше позвонить.
Получить дополнительные сведения – [url=https://kapelnicza-ot-zapoya-v-chelyabinske16.ru/]врача капельницу от запоя[/url]
Одним из ключевых достоинств выезда нарколога на дом является возможность лечения в привычной для пациента среде, что способствует снижению стресса и ускоряет процесс выздоровления. Кроме того, лечение на дому гарантирует полную анонимность и индивидуальный подход к каждому пациенту.
Получить дополнительные сведения – https://narcolog-na-dom-v-irkutske66.ru/vrach-narkolog-na-dom-irkutsk/
Вопрос «а не рано ли кодироваться» часто звучит и от самих пациентов, и от их близких. Кажется, что кодирование — это крайняя мера «на последней стадии», а пока человек работает, иногда бывает трезвым и «не валяется под забором», можно подождать. На самом деле гораздо разумнее ориентироваться не на стереотипы, а на реальные признаки того, что зависимость уже управляет жизнью, а не наоборот. Кодирование от алкоголизма в Королёве рассматривается именно тогда, когда попытки остановиться своими силами систематически проваливаются, а каждый новый запой становится тяжелее предыдущего.
Получить дополнительные сведения – https://kodirovanie-ot-alkogolizma-korolyov11.ru/preparaty-dlya-kodirovaniya-ot-alkogolizma-v-korolyove
Лечение проводится непосредственно в домашних условиях, что позволяет избежать стресса, связанного с пребыванием в стационаре. Применение современных медикаментов и индивидуальный подход к выбору терапии обеспечивают безопасность и эффективность процедуры.
Исследовать вопрос подробнее – [url=https://narcolog-na-dom-v-irkutske66.ru/]нарколог на дом цены иркутск[/url]
Клиника «АмурМед Контур» в Хабаровске предлагает комплексную детоксикацию организма, которая включает инфузионную терапию, стабилизацию жизненно важных показателей и коррекцию эмоционального состояния. Каждому пациенту подбирается индивидуальная схема капельниц с учётом возраста, массы тела, стажа употребления алкоголя и хронических заболеваний. Процедуры проводятся в условиях полной конфиденциальности и под постоянным наблюдением специалистов. Медицинская команда контролирует артериальное давление, уровень сатурации, частоту пульса и показатели крови на протяжении всего периода восстановления.
Разобраться лучше – [url=https://vyvod-iz-zapoya-v-khabarovske0.ru/]срочный вывод из запоя хабаровск[/url]
Клиника «АмурМед Контур» в Хабаровске предлагает комплексную детоксикацию организма, которая включает инфузионную терапию, стабилизацию жизненно важных показателей и коррекцию эмоционального состояния. Каждому пациенту подбирается индивидуальная схема капельниц с учётом возраста, массы тела, стажа употребления алкоголя и хронических заболеваний. Процедуры проводятся в условиях полной конфиденциальности и под постоянным наблюдением специалистов. Медицинская команда контролирует артериальное давление, уровень сатурации, частоту пульса и показатели крови на протяжении всего периода восстановления.
Разобраться лучше – [url=https://vyvod-iz-zapoya-v-khabarovske0.ru/]помощь вывод из запоя в хабаровске[/url]
1win поддержка 24/7 [url=https://1win67901.help/]https://1win67901.help/[/url]
сайт для скачивания видео с ютуба [url=https://skachat-video-s-youtube-3.ru/]сайт для скачивания видео с ютуба[/url] .
В Хабаровске востребован системный подход к терапии зависимостей, так как клиническая картина часто осложняется сопутствующими заболеваниями, нарушениями обмена веществ и расстройствами нервной системы. Медицинская помощь организуется с учётом тяжести состояния и индивидуальных факторов риска.
Изучить вопрос глубже – https://narkologicheskaya-klinika-khabarovsk0.ru/
Этапный подход позволяет достичь полного восстановления организма и избежать осложнений, связанных с резким прекращением употребления алкоголя. Каждый шаг фиксируется врачами, а коррекция терапии проводится по показаниям.
Получить больше информации – [url=https://vyvod-iz-zapoya-tolyatti0.ru/]наркология вывод из запоя в тольятти[/url]
Капельница — не «универсальная смесь», а адресный баланс жидкости, электролитов и поддерживающих компонентов под текущие симптомы. Ниже — ориентир, который индивидуализируется на месте осмотра. Мы тщательно сопоставляем пользу и допустимую нагрузку, чтобы не перегружать организм.
Получить дополнительную информацию – [url=https://narkolog-na-dom-petrozavodsk0.ru/]нарколог капельница на дом в петрозаводске[/url]
Каждая методика применяется строго по показаниям и под контролем медицинского персонала. Комбинация этих подходов позволяет пациенту не только восстановиться физически, но и психологически, что повышает эффективность лечения в целом.
Ознакомиться с деталями – [url=https://vyvod-iz-zapoya-v-khabarovske0.ru/]нарколог на дом вывод из запоя в хабаровске[/url]
Публикация предлагает читателю не просто информацию, а инструменты для анализа и саморазвития. Мы стимулируем критическое мышление, предлагая различные точки зрения и призывая к самостоятельному поиску решений.
Информация доступна здесь – https://miyake-blog.boy.jp/blog/mimi/?p=1125
Этот информативный текст выделяется своими захватывающими аспектами, которые делают сложные темы доступными и понятными. Мы стремимся предложить читателям глубину знаний вместе с разнообразием интересных фактов. Откройте новые горизонты и развивайте свои способности познавать мир!
Не упусти шанс – https://blogi.eoppimispalvelut.fi/fuksiat/2019/09/30/10
Этот информационный материал собраны данные, которые помогут лучше понять текущие тенденции и процессы в различных сферах жизни. Мы предоставляем четкий анализ, графики и примеры, чтобы информация была не только понятной, но и практичной для принятия решений.
Кликни и узнай всё! – https://infobrasilia.com.br/2023/11/municipio-de-curral-de-cima-e-o-vencedor-do-campeonarte-na-20a-semana-de-ciencia-e-tecnologia
Мы собрали для вас самые захватывающие факты из мира науки и истории. От малознакомых деталей до грандиозных событий — эта статья расширит ваш кругозор и подарит новое понимание того, как устроен наш мир.
Узнать из первых рук – https://maranhaodagente.com.br/2023/09/regras-da-competicao-f1-in-schools-para-temporada-2023-2024-apresentadas-a-alunos-do-sesi-maranhao-hoje
Этот обзор предлагает структурированное изложение информации по актуальным вопросам. Материал подан так, чтобы даже новичок мог быстро освоиться в теме и начать использовать полученные знания в практике.
Узнайте всю правду – https://semey.city/spravochnik/doma-internaty/mediko-soczialnoe-uchrezhdenie-dlya-prestarelyih-i-invalidov-obshhego-tipa-g-semej-gu.html
Откройте для себя скрытые страницы истории и малоизвестные научные открытия, которые оказали колоссальное влияние на развитие человечества. Статья предлагает свежий взгляд на события, которые заслуживают большего внимания.
Получить больше информации – https://www.e-sowa.jp/%E6%96%BD%E5%B7%A5%E5%AE%9F%E7%B8%BE%E8%BF%BD%E5%8A%A0%E3%81%97%E3%81%BE%E3%81%97%E3%81%9F%E3%80%82%E3%80%90%E9%AB%98%E7%9F%B3%E5%B8%82%E3%80%80s%E6%A7%98%E9%82%B8%E3%80%91
сервис скачивания с ютуба [url=https://skachat-video-s-youtube-3.ru/]сервис скачивания с ютуба[/url] .
В обзорной статье вы найдете собрание важных фактов и аналитики по самым разнообразным темам. Мы рассматриваем как современные исследования, так и исторические контексты, чтобы вы могли получить полное представление о предмете. Погрузитесь в мир знаний и сделайте шаг к пониманию!
Это стоит прочитать полностью – https://www.sportbetaustralia.com/australian-betting-bonuses
Этот информационный обзор станет отличным путеводителем по актуальным темам, объединяющим важные факты и мнения экспертов. Мы исследуем ключевые идеи и представляем их в доступной форме для более глубокого понимания. Читайте, чтобы оставаться в курсе событий!
Открой скрытое – https://lendasombria.com.br/dragoes
В этом информативном тексте представлены захватывающие события и факты, которые заставят вас задуматься. Мы обращаем внимание на важные моменты, которые часто остаются незамеченными, и предлагаем новые перспективы на привычные вещи. Подготовьтесь к тому, чтобы быть поглощенным увлекательными рассказами!
Всё, что нужно знать – https://www.upliftprofessionals.in/blog/2022/04/advantages-of-indian-cas-to-be-cpa-australia-and-cpa-canada-in-the-backdrop-of-cpa-us
В этой информационной статье вы найдете интересное содержание, которое поможет вам расширить свои знания. Мы предлагаем увлекательный подход и уникальные взгляды на обсуждаемые темы, побуждая пользователей к активному мышлению и критическому анализу.
Подробности по ссылке – https://www.cplc.org.pk/management-of-call-centre-for-inquiries
В статье представлены ключевые моменты по актуальной теме, дополненные советами экспертов и ссылками на дополнительные ресурсы. Цель материала — дать читателю инструменты для самостоятельного развития и принятия осознанных решений.
Ознакомьтесь с аналитикой – http://capriccio3.com/?p=747
В этой информационной статье вы найдете интересное содержание, которое поможет вам расширить свои знания. Мы предлагаем увлекательный подход и уникальные взгляды на обсуждаемые темы, побуждая пользователей к активному мышлению и критическому анализу.
Лучшее решение — прямо здесь – http://capriccio3.com/?p=1493
В этой статье собраны факты, которые освещают целый ряд важных вопросов. Мы стремимся предложить читателям четкую, достоверную информацию, которая поможет сформировать собственное мнение и лучше понять сложные аспекты рассматриваемой темы.
Нажмите, чтобы узнать больше – https://foreningen.svenskhemslojd.com/product/happy-ninja-2
В этом обзорном материале представлены увлекательные детали, которые находят отражение в различных аспектах жизни. Мы исследуем непонятные и интересные моменты, позволяя читателю увидеть картину целиком. Погрузитесь в мир знаний и удивительных открытий!
Не пропусти важное – https://pure-fm.de/qtvideo/dancing-in-the-night
Этот обзор предлагает структурированное изложение информации по актуальным вопросам. Материал подан так, чтобы даже новичок мог быстро освоиться в теме и начать использовать полученные знания в практике.
Прочитать подробнее – https://template129.webekspor.com/an-effective-waste-management-solution-for-industries-2
Часто предприниматели объединяют понятия тендер и госзакупки, так как обе процедуры связаны с конкурсным выбором поставщика. Однако между ними существуют определённые различия, которые важно понимать перед началом работы в этой сфере.
Узнайте больше прямо сейчас – [url=https://tendernoe-soprovozhdenie-rostov-na-donu.ru/]тендерное сопровождение под ключ цена в ростове на дону[/url]
mostbet android приложение Кыргызстан [url=http://mostbet54173.help/]http://mostbet54173.help/[/url]
melbet проблема входа [url=http://melbet51738.help]http://melbet51738.help[/url]
1win Uzbekistan [url=www.1win5750.help]www.1win5750.help[/url]
1win скачать на ios [url=https://1win96781.help/]https://1win96781.help/[/url]
доставка цветов по москве на дом курьером [url=www.dostavka-cvetov777.ru]www.dostavka-cvetov777.ru[/url] .
1win depozit [url=www.1win5750.help]1win depozit[/url]
1win live pariuri [url=https://1win47381.help]1win live pariuri[/url]
Помощь 24/7 означает, что нарколог на дом в Хабаровске может быть направлен в любое время суток, включая ночные часы и выходные дни. В клинике «Ясный Вектор» выездная служба функционирует с учётом логистики города, что позволяет минимизировать время ожидания врача.
Получить больше информации – [url=https://narkolog-na-dom-khabarovsk0.ru/]нарколог на дом клиника[/url]
mostbet uzcard yechish [url=https://mostbet82059.help]https://mostbet82059.help[/url]
pin-up domen almashtirdi [url=http://pinup87630.help/]pin-up domen almashtirdi[/url]
круглосуточно цветы рядом [url=http://dostavka-cvetov777.ru]круглосуточно цветы рядом[/url] .
Участие в государственных и коммерческих процедурах требует точной подготовки, понимания законодательства и внимательной работы с документами. Для многих компаний самостоятельная работа с закупками становится сложной задачей: необходимо отслеживать новые закупки, анализировать требования, оформлять документы и взаимодействовать с площадками.
Все ответы на ваши вопросы – https://tendernoe-soprovozhdenie-rostov-na-donu.ru/
Участие в государственных и коммерческих процедурах требует точной подготовки, понимания законодательства и внимательной работы с документами. Для многих компаний самостоятельная работа с закупками становится сложной задачей: необходимо отслеживать новые закупки, анализировать требования, оформлять документы и взаимодействовать с площадками.
Изучите все нюансы – [url=https://tendernoe-soprovozhdenie-rostov-na-donu.ru/]участие в тендерах госзакупок в ростове на дону[/url]
Лечение алкоголизма в Сергиевом Посаде важно рассматривать не как разовую «чистку» или временный перерыв, а как последовательный маршрут. Самый уязвимый период — первые 24–72 часа после прекращения употребления: днём может стать легче, но к вечеру и ночью волной возвращаются тревога и бессонница, усиливается внутреннее напряжение, появляются телесные симптомы. В этот момент человек чаще всего срывается, потому что ему кажется, что «иначе не выдержу». Поэтому качественная помощь строится так, чтобы пациент прошёл вечер и ночь безопасно, с понятными ориентирами и медицинской поддержкой, а затем перешёл к восстановлению и профилактике рецидива.
Изучить вопрос глубже – [url=https://lechenie-alkogolizma-sergiev-posad12.ru/]abstinentnyj-sindrom-pri-alkogolizme-lechenie-doma[/url]
Самостоятельный выход часто строится на ошибочных решениях: «уменьшать дозу», смешивать алкоголь со снотворными, принимать седативные без понимания влияния на дыхание и сердце, использовать сомнительные «похмельные» наборы. Такие действия могут временно приглушить симптомы, но повышают риск ухудшения и делают состояние непредсказуемым. Ещё одна проблема — отсутствие контроля: человек не замечает, как давление уходит в опасные цифры, как развивается обезвоживание или как усиливаются неврологические симптомы. В клинике же у врача есть задача не просто «снять неприятное», а стабилизировать организм, защитить сердце и сосуды, восстановить сон и снизить тревогу так, чтобы дальнейшее восстановление стало реальным.
Получить больше информации – [url=https://vyvod-iz-zapoya-moskva1-12.ru/]вывод из запоя капельница[/url]
Далее выполняется медицинская детоксикация: корректируется водно-электролитный баланс, снимается интоксикация, поддерживается работа сердечно-сосудистой системы, снижается тремор, стабилизируется сон и тревожность. Важно, что схема подбирается индивидуально: при разных рисках объём поддержки будет различаться. В ряде случаев достаточно амбулаторного наблюдения и рекомендаций, в других — нужен стационар, чтобы контролировать динамику и вовремя корректировать терапию.
Подробнее тут – [url=https://vyvod-iz-zapoya-moskva1-12.ru/]vyvod-iz-zapoya-moskva-vyzov-narkologa-kapelnica[/url]
Качественная наркологическая помощь строится от безопасности к устойчивости. Сначала врач оценивает состояние: длительность употребления, выраженность интоксикации и отмены, давление и пульс, признаки обезвоживания, характер сна, уровень тревоги, наличие хронических заболеваний и препаратов, которые уже принимались дома. Затем выбирается формат лечения — стационарный, амбулаторный или выездной — исходя из рисков, а не из удобства. Это принципиально: при нестабильных показателях и высокой вероятности осложнений требуется более высокий уровень контроля.
Изучить вопрос глубже – https://narkologicheskaya-klinika-sergiev-posad12.ru
Перед выездом проводится уточнение симптомов и общего состояния пациента, что помогает врачу подготовиться к визиту и взять необходимый набор медикаментов.
Ознакомиться с деталями – [url=https://narkolog-na-dom-khabarovsk0.ru/]помощь нарколога на дому в хабаровске[/url]
цветы доставка мск [url=https://www.dostavka-cvetov777.ru]https://www.dostavka-cvetov777.ru[/url] .
melbet чӣ тавр бозӣ кардан [url=www.melbet85291.help]melbet чӣ тавр бозӣ кардан[/url]
sloturi melbet [url=http://melbet18567.help]sloturi melbet[/url]
melbet ставки на баскетбол [url=https://www.melbet23481.help]https://www.melbet23481.help[/url]
доставка цветов по номеру телефона получателя в москве [url=http://dostavka-cvetov777.ru/]http://dostavka-cvetov777.ru/[/url] .
Помощь 24/7 означает, что нарколог на дом в Хабаровске может быть направлен в любое время суток, включая ночные часы и выходные дни. В клинике «Ясный Вектор» выездная служба функционирует с учётом логистики города, что позволяет минимизировать время ожидания врача.
Исследовать вопрос подробнее – [url=https://narkolog-na-dom-khabarovsk0.ru/]нарколог на дом вывод[/url]
melbet скачать apk на android [url=http://melbet64019.help/]http://melbet64019.help/[/url]
1win live odds [url=https://1win60751.help]https://1win60751.help[/url]
1win Бонки Эсхата пардохт [url=http://1win06741.help]1win Бонки Эсхата пардохт[/url]
Вызов нарколога на дом в Хабаровске осуществляется при наличии клинических показаний, при которых выездная помощь является обоснованной и безопасной. В клинике «Ясный Вектор» решение о формате вмешательства принимается с учётом жалоб, анамнеза и предполагаемой тяжести состояния.
Подробнее – [url=https://narkolog-na-dom-khabarovsk0.ru/]нарколог на дом круглосуточно цены в хабаровске[/url]
sweet bonanza виплати [url=www.sweet-bonanza91683.help]sweet bonanza виплати[/url]
Участие в государственных и коммерческих процедурах требует точной подготовки, понимания законодательства и внимательной работы с документами. Для многих компаний самостоятельная работа с закупками становится сложной задачей: необходимо отслеживать новые закупки, анализировать требования, оформлять документы и взаимодействовать с площадками.
Полная картина — внутри – https://tendernoe-soprovozhdenie-rostov-na-donu.ru/
sweet bonanza mines game México [url=https://sweet-bonanza60829.help]https://sweet-bonanza60829.help[/url]
Тендерный специалист помогает разобраться в особенностях каждого закона, а также обеспечивает грамотное сопровождение всех процедур. Это особенно важно для компаний, которые только начинают участвовать в торгах и не имеют опыта работы с государственными контрактами.
Эксклюзивная информация для вас – https://tendernoe-soprovozhdenie-rostov-na-donu.ru
Участие в государственных и коммерческих процедурах требует точной подготовки, понимания законодательства и внимательной работы с документами. Для многих компаний самостоятельная работа с закупками становится сложной задачей: необходимо отслеживать новые закупки, анализировать требования, оформлять документы и взаимодействовать с площадками.
Не упустите важные детали – [url=https://tendernoe-soprovozhdenie-rostov-na-donu.ru/]тендерное сопровождение тендерами[/url]
Участие в государственных и коммерческих процедурах требует точной подготовки, понимания законодательства и внимательной работы с документами. Для многих компаний самостоятельная работа с закупками становится сложной задачей: необходимо отслеживать новые закупки, анализировать требования, оформлять документы и взаимодействовать с площадками.
Полная картина — внутри – [url=https://tendernoe-soprovozhdenie-rostov-na-donu.ru/]тендерное сопровождение[/url]
Стильная одежда играет важную роль в формировании образа.
Она помогает выразить характер и ощущать внутренний комфорт.
Грамотно подобранный образ создаёт впечатление окружающих.
В повседневной жизни одежда может придавать уверенность.
https://forum.hexcode.co.za/forum/index.php/topic,6857.new.html#new
Продуманный гардероб облегчает деловое общение.
При выборе одежды важно учитывать личные предпочтения и обстановку.
Актуальные стили дают возможность обновлять образ.
В итоге, умение стильно одеваться делает образ завершённым.
Участие в государственных и коммерческих процедурах требует точной подготовки, понимания законодательства и внимательной работы с документами. Для многих компаний самостоятельная работа с закупками становится сложной задачей: необходимо отслеживать новые закупки, анализировать требования, оформлять документы и взаимодействовать с площадками.
Изучите все нюансы – [url=https://tendernoe-soprovozhdenie-rostov-na-donu.ru/]комплексное тендерное сопровождение ростов на дону[/url]
В этом обзорном материале представлены увлекательные детали, которые находят отражение в различных аспектах жизни. Мы исследуем непонятные и интересные моменты, позволяя читателю увидеть картину целиком. Погрузитесь в мир знаний и удивительных открытий!
Изучить вопрос глубже – https://diocesedefoz.org.br/festa-maina-2025-comeca-no-dia-23
Мы собрали для вас самые захватывающие факты из мира науки и истории. От малознакомых деталей до грандиозных событий — эта статья расширит ваш кругозор и подарит новое понимание того, как устроен наш мир.
Подробнее тут – https://fisip.upnvj.ac.id/download/pob-prosedur-ujian-skripsi
Эта обзорная заметка содержит ключевые моменты и факты по актуальным вопросам. Она поможет читателям быстро ориентироваться в теме и узнать о самых важных аспектах сегодня. Получите краткий курс по современной информации и оставайтесь в курсе событий!
Полезно знать – https://beachsidemedical.com.au/contact-us
В этом интересном тексте собраны обширные сведения, которые помогут вам понять различные аспекты обсуждаемой темы. Мы разбираем детали и факты, делая акцент на важности каждого элемента. Не упустите возможность расширить свои знания и взглянуть на мир по-новому!
Продолжить изучение – https://www.matusintl.com/2025/02/06/envio-autos-centroamerica-matus-international
Мы предлагаем вам окунуться в океан любопытных фактов и вдохновляющих историй. Эта публикация поможет расширить горизонты, разбудить интерес к науке и истории и увидеть мир с новой стороны.
Уточнить детали – https://ossowski.biz.pl/2024/03/09/witaj-swiecie
Эта статья погружает вас в увлекательный мир знаний, где каждый факт становится открытием. Мы расскажем о ключевых исторических поворотных моментах и научных прорывах, которые изменили ход цивилизации. Поймите, как прошлое формирует настоящее и как его уроки могут помочь нам строить будущее.
Осуществить глубокий анализ – https://lander.com.co/producto/removedor-lander-tradicional
Эта публикация дает возможность задействовать различные источники информации и представить их в удобной форме. Читатели смогут быстро найти нужные данные и получить ответы на интересующие их вопросы. Мы стремимся к четкости и доступности материала для всех!
Ознакомиться с теоретической базой – https://edmarmy.com/meteors-invade-afetrlife-miami
Этот информативный текст отличается привлекательным содержанием и актуальными данными. Мы предлагаем читателям взглянуть на привычные вещи под новым углом, предоставляя интересный и доступный материал. Получите удовольствие от чтения и расширьте кругозор!
Смотрите также… – https://jazz.listen2krdp.com/qtvideo/dancing-in-the-night-2
В обзорной статье вы найдете собрание важных фактов и аналитики по самым разнообразным темам. Мы рассматриваем как современные исследования, так и исторические контексты, чтобы вы могли получить полное представление о предмете. Погрузитесь в мир знаний и сделайте шаг к пониманию!
Получить профессиональную консультацию – https://www.hattiesburgms.com/travelsouth2010-1011-medium-web-viewretouch
Эта информационная заметка предлагает лаконичное и четкое освещение актуальных вопросов. Здесь вы найдете ключевые факты и основную информацию по теме, которые помогут вам сформировать собственное мнение и повысить уровень осведомленности.
Подробная информация доступна по запросу – https://merademyjobs.com/index.php/2023/06/07/cgi-is-hiring-for-data-engineer-sql-developer-bachelors-masters-degree-apply-now
В статье представлены ключевые моменты по актуальной теме, дополненные советами экспертов и ссылками на дополнительные ресурсы. Цель материала — дать читателю инструменты для самостоятельного развития и принятия осознанных решений.
Дополнительно читайте здесь – https://redacaojuridica.com.br/cuidado-com-a-hipercorrecao
https://rivalo.cat/
A plataforma Rivalo constitui uma das casas de apostas esportivas e cassino virtual de maior tradicao em territorio nacional, atuando no pais ha mais de uma decada mantendo uma trajetoria solida e transparente .
1win hesab təhlükəsizliyi [url=https://1win27096.help]https://1win27096.help[/url]
мостбет сколько идет вывод [url=https://mostbet09547.help]https://mostbet09547.help[/url]
Терапия в клинике проводится поэтапно: от снятия интоксикации до психологического восстановления. Все шаги выполняются под наблюдением специалистов, что исключает осложнения и повышает эффективность. Ниже представлена таблица, отражающая последовательность этапов и задачи каждого из них.
Подробнее – http://narkologicheskaya-klinica-v-astrakhani18.ru
Наркологическая клиника выстраивает лечебные мероприятия в соответствии с алгоритмами, направленными на достижение стабильного состояния пациента. Важную роль играет последовательное выполнение процедур, включая оценку реакции организма и корректировку вмешательств. Формирование индивидуальной программы позволяет учитывать особенности каждого случая и поддерживать высокий уровень эффективности. Процесс наблюдения сопровождается непрерывным анализом, что делает терапию адаптивной и предсказуемой. В клинике соблюдается принцип многоуровневого контроля, обеспечивающий безопасность и стабильность лечения.
Выяснить больше – [url=https://narkologicheskaya-klinika-tomsk18.ru/]наркологическая клиника цены[/url]
После курса капельниц улучшается сон, аппетит и общее самочувствие. Пациенты отмечают, что уже через сутки после начала лечения исчезают тремор и тахикардия, а на второй день приходит чувство ясности и спокойствия.
Подробнее – [url=https://narkologicheskaya-klinika-v-kemerovo18.ru/]наркологическая клиника стационар в кемерове[/url]
Наркологическая клиника — это не просто медицинское учреждение, а пространство, где человеку помогают вернуть здоровье, ясность мышления и контроль над жизнью. В клинике «КаспийМед Альтернатива» в Астрахани круглосуточно оказывается помощь людям, столкнувшимся с алкогольной, наркотической и смешанной зависимостью. Центр сочетает медицинскую строгость и человеческое участие, обеспечивая лечение в комфортных условиях с максимальной конфиденциальностью. Здесь разработаны программы детоксикации, восстановления и психотерапевтической поддержки, что делает терапию эффективной и безопасной.
Получить дополнительные сведения – [url=https://narkologicheskaya-klinica-v-astrakhani18.ru/]частная наркологическая клиника в астрахани[/url]
Наркологическая клиника использует комплексный подход к оценке состояния пациента, что обеспечивает высокий уровень контроля на всех этапах лечения. Такой формат работы позволяет детально изучать динамику процессов и своевременно корректировать вмешательства. В клинике применяется принцип последовательного наблюдения, при котором особое внимание уделяется соматическим и неврологическим проявлениям. Выбор терапевтических мер основывается на анализе объективных данных, что повышает предсказуемость результата. Подход ориентирован на постепенное восстановление функций организма с учетом индивидуальных особенностей.
Узнать больше – [url=https://narkologicheskaya-klinika-tomsk18.ru/]наркологическая клиника томск[/url]
Процедура вывода из запоя проводится строго по медицинским стандартам. Применяются современные капельницы, витамины и препараты для нормализации функций сердца, печени, почек и нервной системы. После снятия интоксикации врачи назначают поддерживающее лечение, направленное на стабилизацию эмоционального состояния и снижение тяги к алкоголю.
Получить больше информации – [url=https://vyvodiz-zapoya-vladivostok18.ru/]www.domen.ru[/url]
Системная работа, которой характеризуется наркологическая клиника, предполагает последовательное исследование состояния пациента, анализ факторов риска и создание индивидуального терапевтического маршрута. Такой формат позволяет уточнять клиническую картину на ранних этапах и корректировать вмешательства по мере изменения состояния человека. Применение структурированных методик повышает предсказуемость результата и обеспечивает безопасность всех процедур. При этом выводы формируются на основании объективных данных наблюдения, лабораторных показателей и динамики симптомов. Оптимальная нагрузка распределяется на весь период лечения для достижения устойчивого эффекта без переутомления организма.
Получить дополнительные сведения – [url=https://narkologicheskaya-klinika-penza18.ru/]наркологическая клиника клиника помощь пенза[/url]
Клиника «ВладТрезвие Центр» работает в круглосуточном режиме и готова оказать помощь жителям Владивостока и прилегающих районов в любое время суток. Врачи-наркологи прибывают по вызову в течение часа, имеют при себе все необходимые препараты и оборудование для проведения детоксикации на дому. При необходимости пациента доставляют в стационар, где лечение проходит под постоянным контролем медицинского персонала.
Узнать больше – [url=https://vyvodiz-zapoya-vladivostok18.ru/]наркологический вывод из запоя владивосток[/url]
Ниже представлена последовательность основных шагов терапевтического процесса.
Изучить вопрос глубже – [url=https://narkologicheskaya-klinika-vo-vladivostoke18.ru/]наркологическая клиника владивосток[/url]
Указанные элементы задают логическую основу для всего терапевтического процесса, создавая структурированную модель работы с пациентом. При необходимости схема вмешательств дополняется дополнительными мерами, направленными на стабилизацию состояния. Такой формат позволяет поддерживать предсказуемость результата даже в сложных клинических ситуациях.
Подробнее тут – https://narkologicheskaya-klinika-v-penze18.ru/narkologicheskaya-poliklinika-penza/
Лечение проходит поэтапно, чтобы пациент не испытывал стресса и перегрузок. Каждый шаг контролируется врачами, а терапия корректируется в зависимости от состояния. В таблице ниже представлена структура программы лечения в клинике «АстраМед Трезвость».
Узнать больше – [url=https://narkologicheskaya-klinika-v-astrakhani18.ru/]запой наркологическая клиника в астрахани[/url]
Эти этапы формируют структуру комплексного лечения, позволяя добиться устойчивого результата и предотвращения повторных срывов.
Получить дополнительные сведения – https://narkologicheskaya-klinika-astrakhan18.ru/narkologiya-astrakhan-adres/
«Ижевский Центр Трезвых Решений» — это частное медицинское учреждение, где проводится лечение всех форм алкогольной и наркотической зависимости. Программы терапии разработаны на основе международных рекомендаций и включают не только медикаментозное воздействие, но и психологическую поддержку. Все процедуры проходят анонимно, без постановки на учёт, что особенно важно для пациентов, желающих сохранить конфиденциальность.
Узнать больше – http://narkologicheskaya-klinika-v-izhevsk18.ru
Лечебные мероприятия строятся на основе поэтапного внедрения терапевтических решений, которые опираются на индивидуальные характеристики пациента. Уточнение анамнеза, анализ данных обследований и выявление сопутствующих факторов позволяют создавать эффективные и прогнозируемые программы лечения. В клинике соблюдается строгая последовательность процедур, направленная на снижение рисков и обеспечение безопасности. На каждом этапе проводится проверка клинической реакции, что позволяет своевременно выявлять необходимость корректировки и адаптировать лечебные меры под текущую картину.
Подробнее тут – [url=https://narkologicheskaya-klinika-v-penze18.ru/]лечение в наркологической клинике[/url]
Вывод из запоя требует комплексного контроля всех физиологических параметров. Ниже представлены основные направления наблюдения, формирующие структуру оценки состояния.
Подробнее тут – https://vyvodiz-zapoya-izhevsk18.ru/vyvod-iz-zapoya-na-domu-izhevsk/
Наркологическая клиника в клинике в Астрахани предоставляет помощь пациентам, сталкивающимся с различными формами зависимости — алкогольной, наркотической, лекарственной. Основой терапии является комплексный подход, включающий медицинскую детоксикацию, стабилизацию состояния, психотерапию и последующее наблюдение. Такой формат работы позволяет мягко купировать острые симптомы, восстановить физиологические функции и подготовить пациента к длительной реабилитации. Все процедуры проводятся анонимно, с использованием сертифицированных препаратов и с постоянным контролем врача.
Изучить вопрос глубже – https://narkologicheskaya-klinika-astrakhan18.ru/
Таблица позволяет поддерживать единую структуру наблюдения и фиксировать изменения состояния. Такая модель обеспечивает прозрачность процессов и повышает точность принимаемых решений.
Изучить вопрос глубже – [url=https://vyvodiz-zapoya-izhevsk18.ru/]вывод из запоя на дому ижевск[/url]
Вывод из запоя — это медицинская процедура, направленная на устранение интоксикации организма, вызванной длительным употреблением алкоголя. В клинике «ПензаМед Трезвость» помощь оказывается профессионально и конфиденциально: пациенты могут получить лечение как в стационаре, так и на дому. Процесс включает использование капельниц, медикаментозную терапию, психоэмоциональную поддержку и последующую реабилитацию. Врачи наркологического центра обладают большим опытом работы и обеспечивают круглосуточную помощь без постановки на учёт, что особенно важно для тех, кто хочет сохранить анонимность и быстро вернуться к нормальному состоянию.
Подробнее тут – [url=https://vyvod-iz-zapoya-penza18.ru/]вывод из запоя дешево в пензе[/url]
Вывод из запоя — это медицинская процедура, направленная на устранение интоксикации организма, вызванной длительным употреблением алкоголя. В клинике «ПензаМед Трезвость» помощь оказывается профессионально и конфиденциально: пациенты могут получить лечение как в стационаре, так и на дому. Процесс включает использование капельниц, медикаментозную терапию, психоэмоциональную поддержку и последующую реабилитацию. Врачи наркологического центра обладают большим опытом работы и обеспечивают круглосуточную помощь без постановки на учёт, что особенно важно для тех, кто хочет сохранить анонимность и быстро вернуться к нормальному состоянию.
Подробнее можно узнать тут – [url=https://vyvod-iz-zapoya-penza18.ru/]вывод из запоя недорого в пензе[/url]
Услуга
Детальнее – [url=https://narkolog-na-dom-ramenskoe4.ru/]выезд нарколога на дом раменское[/url]
Запись и подтверждение — через защищённые каналы; визиты — без опознавательных знаков; в расписании используются шифры вместо фамилий, информирование семьи — только с вашего согласия. Когда страх огласки уходит, люди обращаются вовремя и лучше соблюдают рекомендации — это напрямую улучшает прогноз и экономит бюджет.
Детальнее – [url=https://kapelnica-ot-zapoya-lyubercy9.ru/]kapelnica-ot-zapoya-telefon[/url]
После оформления заявки по телефону или на сайте оператор уточняет адрес и текущее состояние пациента. В критических ситуациях врач может прибыть в течение 60 минут, в стандартном режиме — за 1–2 часа. На месте проводится сбор анамнеза и оценка жизненных показателей: артериального давления, пульса, сатурации и температуры тела. Затем выбирается оптимальный протокол детоксикации — «мягкий» метод для постепенного выведения токсинов или экспресс-методика при острой интоксикации. Процедура капельного введения комбинированного раствора длится от двух до четырёх часов: специалист контролирует состояние пациента, корректирует дозировки и при необходимости вводит корригирующие препараты. По окончании врач оставляет детальный план поддерживающей терапии, включающий рекомендации по питанию, приёму сорбентов и витаминов, а также график повторных осмотров.
Получить дополнительные сведения – [url=https://narkolog-na-dom-ramenskoe4.ru/]vyzvat narkologa na dom anonimno[/url]
Домашний маршрут выбирают, когда показатели стабильны и нет признаков тяжёлой соматики или спутанности сознания. Преимущество в сочетании скорости, приватности и приверженности: знакомая среда снижает стресс, а отсутствие переездов экономит силы. Врач «МедТоники» приезжает без маркировки, привозит мониторинг и расходные материалы, подбирает инфузии по состоянию, помогает восстановить режим сна и гидратации, даёт рекомендации по питанию и правила на 48–72 часа. Отдельный блок — работа с тревогой и тремором: корректируется медикаментозная поддержка, обсуждаются простые поведенческие техники, чтобы снизить вероятность импульсивных решений вечером. Домашний формат не подменяет наблюдение: назначаются точки связи, врач объясняет, когда нужен повторный визит, а когда достаточно телефонной коррекции. Для Москвы такой сценарий удобен ещё и тем, что его проще встроить в плотный график, не выпадая из рабочих и семейных ролей и не провоцируя лишних вопросов у окружающих.
Подробнее тут – http://vyvod-iz-zapoya-moskva99.ru/
Участие в государственных и коммерческих процедурах требует точной подготовки, понимания законодательства и внимательной работы с документами. Для многих компаний самостоятельная работа с закупками становится сложной задачей: необходимо отслеживать новые закупки, анализировать требования, оформлять документы и взаимодействовать с площадками.
Все ответы на ваши вопросы – [url=https://tendernoe-soprovozhdenie-rostov-na-donu.ru/]тендерное сопровождение заказчиков[/url]
Наводится порядок в информации, запускается инфузия по показаниям, объясняются ожидаемые ощущения и правила вечера. Пациент и близкие понимают, какой результат реалистичен к ночи и что делать, чтобы эффект не «сгорел» к полуночи.
Изучить вопрос глубже – https://narkologicheskaya-klinika-lyubercy9.ru
Тендерный специалист помогает разобраться в особенностях каждого закона, а также обеспечивает грамотное сопровождение всех процедур. Это особенно важно для компаний, которые только начинают участвовать в торгах и не имеют опыта работы с государственными контрактами.
Узнайте больше прямо сейчас – [url=https://tendernoe-soprovozhdenie-rostov-na-donu.ru/]услуги тендерного сопровождения в ростове на дону[/url]
Зависимость всегда про неопределённость: скачки давления и пульса, тремор, тревожность, бессонные ночи, споры в семье и страх огласки. «ЛюберМед Центр» убирает эту неопределённость управляемым маршрутом. Мы начинаем с краткого, но точного интервью, фиксируем объективные показатели и тут же объясняем, какие вмешательства уместны сегодня и зачем именно они. Никаких «общих залов» и очередей: приёмы разнесены по времени, подтверждения проходят по защищённым каналам, визиты на дом — без маркировки. Наш принцип — минимальная достаточность: столько медицины, сколько нужно для безопасного перехвата динамики и первой ровной ночи. Именно она делает дальнейшие шаги предсказуемыми: снижается тремор, выравнивается ритм, появляется ресурс соблюдать режим. Благодаря продуманной логистике Люберец мы сокращаем холостые перемещения, а значит, лечение начинается раньше, а тревоги — меньше. В результате пациент и семья получают не «набор услуг», а последовательность: понятные действия, прозрачные ожидания и устойчивый эффект, который держится днями, а не часами.
Детальнее – http://narkologicheskaya-klinika-lyubercy9.ru/narkologicheskaya-klinika-ryadom-v-lyubercah/https://narkologicheskaya-klinika-lyubercy9.ru
Коммерческий и государственный тендер — это конкурентная процедура выбора поставщика товаров или оказания услуг. Заказчик размещает требования, а компании подают заявки и участвуют в торгах.
Разгадайте все загадки – [url=https://tendernoe-soprovozhdenie-rostov-na-donu.ru/]участие в тендерах госзакупок в ростове на дону[/url]
Коммерческий и государственный тендер — это конкурентная процедура выбора поставщика товаров или оказания услуг. Заказчик размещает требования, а компании подают заявки и участвуют в торгах.
Глубже в тему — здесь – [url=https://tendernoe-soprovozhdenie-rostov-na-donu.ru/]оквэд тендерное сопровождение[/url]
mostbet tipy na sázky [url=mostbet2018.help]mostbet2018.help[/url]
mostbet лимиты вывода [url=www.mostbet67190.help]www.mostbet67190.help[/url]
Тендерный специалист помогает разобраться в особенностях каждого закона, а также обеспечивает грамотное сопровождение всех процедур. Это особенно важно для компаний, которые только начинают участвовать в торгах и не имеют опыта работы с государственными контрактами.
Изучите все нюансы – http://tendernoe-soprovozhdenie-rostov-na-donu.ru
Алкогольная зависимость — сложная и разрушающая болезнь, которая меняет личность, разрушает здоровье, отношения и карьеру. На определённом этапе становится понятно, что справиться с проблемой самостоятельно невозможно. Здесь требуется комплексный медицинский подход и профессиональная поддержка, позволяющая не только прервать запои, но и закрепить трезвое состояние на длительный срок. Одной из самых востребованных и эффективных процедур считается кодирование — и в наркологической клинике «АльтерМед» в Долгопрудном эта услуга реализуется с максимальным вниманием к деталям, анонимностью и заботой о каждом пациенте.
Узнать больше – http://kodirovanie-ot-alkogolizma-dolgoprudnyj6.ru
Часто предприниматели объединяют понятия тендер и госзакупки, так как обе процедуры связаны с конкурсным выбором поставщика. Однако между ними существуют определённые различия, которые важно понимать перед началом работы в этой сфере.
Глубже в тему — здесь – https://tendernoe-soprovozhdenie-rostov-na-donu.ru/
На первом этапе проводится осмотр: врач измеряет давление, пульс, уровень кислорода, температуру тела, оценивает общее состояние, собирает анамнез и анализирует возможные сопутствующие заболевания. При необходимости пациент проходит экспресс-диагностику, включая лабораторные анализы, ЭКГ и консультации других специалистов (кардиолога, невролога).
Изучить вопрос глубже – http://vyvod-iz-zapoya-balashiha5.ru/
Ниже представлена последовательность этапов, формирующих общий цикл вмешательств.
Получить дополнительную информацию – http://narkologicheskaya-klinika-v-vdk18.ru/
Старт всегда опирается на факты, а не на удобство расписания. После короткого опроса и осмотра врач объясняет, где безопаснее начать — на дому или в стационаре. Если показатели стабильны, домашний формат выигрывает приватностью и скоростью: знакомая среда снижает стресс, легче наладить сон, а выездная бригада привозит всё необходимое для мониторинга и инфузионной терапии по показаниям. При признаках нестабильности мы честно рекомендуем короткий стационар на 24–48 часов: круглосуточное наблюдение позволяет ранее заметить неблагоприятную динамику, корректировать схемы без пауз, подключать диагностику «по триггерам», а не «на всякий случай». В любом варианте пациент получает понятный план на трое суток: режим жидкости и питания, техники «буферов» на вечер, ограничения по нагрузкам, правила ранней связи при тревожных симптомах. Такой реализм убирает хаос, бережёт силы семьи и защищает результат: усложнения перехватываются раньше, а поведение становится предсказуемым — это особенно важно в плотном городском ритме.
Получить дополнительную информацию – http://narkologicheskaya-klinika-moskva999.ru/anonimnaya-narkologicheskaya-klinika-v-moskve/
На первом этапе проводится осмотр: врач измеряет давление, пульс, уровень кислорода, температуру тела, оценивает общее состояние, собирает анамнез и анализирует возможные сопутствующие заболевания. При необходимости пациент проходит экспресс-диагностику, включая лабораторные анализы, ЭКГ и консультации других специалистов (кардиолога, невролога).
Подробнее можно узнать тут – http://vyvod-iz-zapoya-balashiha5.ru
Первый шаг — короткое, но предметное интервью: длительность употребления, сопутствующие диагнозы, текущие препараты и аллергии. Врач фиксирует давление, пульс, сатурацию, при необходимости делает экспресс-ЭКГ и неврологический скрининг. Далее объясняет логику вмешательств: зачем именно такая инфузия, чего ожидать через 30–60 минут, какие ощущения нормальны и какие потребуют связи. Мы избегаем «оглушающих» седативов, чтобы не получить вечерний откат и побочные эффекты — дозировки подбираются узко, по реакции организма. После капельницы специалист ещё раз проверяет показатели, оставляет письменные рекомендации, договаривается об окне контроля и критериях повторного визита. Вечер строится вокруг сна: затемнение, тишина, ранний отбой, вода порциями, лёгкая еда «по силам», минимум экранов и разговорных конфликтов. На таком фоне исчезают «качели» между днём и ночью, а эффект инфузий не «сгорает» к следующему вечеру.
Изучить вопрос глубже – [url=https://kapelnica-ot-zapoya-podolsk9.ru/]cтоимость капельницы от запоя[/url]
Близкие — ключевой ресурс, если действуют согласованно. Мы просим сфокусироваться на среде и режиме: тише, темнее, теплее; вода и лёгкая еда «по часам»; отсутствие «разборов» и проверок «на прочность» в первые дни. Полезно заранее договориться о коротких нейтральных сигналах — как понять, что помощь нужна, а когда лучше не вмешиваться. Такие простые правила бесплатны, но они стабилизируют поведение и убирают потребность в экстренных визитах по ночам. Когда дом перестаёт быть источником шума, медицинская часть остаётся узкой, а результат — устойчивым.
Углубиться в тему – https://kapelnica-ot-zapoya-podolsk9.ru/kapelnica-ot-alkogolya-cena-v-podolske
Коммерческий и государственный тендер — это конкурентная процедура выбора поставщика товаров или оказания услуг. Заказчик размещает требования, а компании подают заявки и участвуют в торгах.
Откройте для себя новое – https://tendernoe-soprovozhdenie-rostov-na-donu.ru/
мелбет способы оплаты киргизия [url=https://www.melbet64019.help]мелбет способы оплаты киргизия[/url]
mostbet mirror [url=https://mostbet2004.help/]https://mostbet2004.help/[/url]
В рамках лечения используются методы, позволяющие фиксировать изменения и оценивать реакцию организма на проводимые мероприятия. Они служат основой для выборочных корректировок и обеспечивают структурированный характер процесса. Отличительной особенностью становится возможность адаптировать лечебные схемы под индивидуальные особенности пациента. Ниже представлены ключевые направления оценки состояния, применяемые для формирования полной клинической картины.
Углубиться в тему – [url=https://narkologicheskaya-klinika-v-vdk18.ru/]наркологические клиники алкоголизм[/url]
В рамках лечения используются методы, позволяющие фиксировать изменения и оценивать реакцию организма на проводимые мероприятия. Они служат основой для выборочных корректировок и обеспечивают структурированный характер процесса. Отличительной особенностью становится возможность адаптировать лечебные схемы под индивидуальные особенности пациента. Ниже представлены ключевые направления оценки состояния, применяемые для формирования полной клинической картины.
Изучить вопрос глубже – [url=https://narkologicheskaya-klinika-v-vdk18.ru/]запой наркологическая клиника в владивостоке[/url]
Лечение в «ИжТрезвоМед Центр» проходит поэтапно, с акцентом на безопасность и эффективность. Каждый этап направлен на достижение конкретных целей, от детоксикации до психотерапии. В таблице представлена структура лечебного процесса:
Выяснить больше – http://narkologicheskaya-klinika-v-izhevske18.ru/chastnaya-narkologicheskaya-klinika-izhevsk/
Медицина выравнивает физиологию, но устойчивость дают простые действия. Мы вместе составляем карту триггеров: вечерние «тёмные часы», задержки без еды, конфликты, привычные маршруты с «точками соблазна», недосып. На каждый триггер — короткий «буфер» на 20–40 минут: спокойная прогулка близко к дому, тёплый душ, лёгкая еда по расписанию, дыхательная практика, созвон с «своим» человеком. Эти шаги бесплатны и выполнимы, но именно они уменьшают импульсивность и количество «проверок себя». Отдельный акцент — на ночной сон: ранний отбой, минимум экранов, затемнение, никаких энергичных разговоров и «разборов». Когда поведенческая рамка задана в первый же день, эффект инфузий не «сгорает» к вечеру, а переводит состояние в предсказуемую стабилизацию, на базе которой уже можно обсуждать кодирование и реабилитационные шаги.
Получить дополнительные сведения – http://narkolog-na-dom-moskva999.ru/psihiatr-narkolog-na-dom-v-moskve/https://narkolog-na-dom-moskva999.ru
Снижается тремор, уменьшается тошнота, пульс и давление перестают «скакать», появляется возможность уснуть без паники. Важно не перегружать этот эффект разговорами «по душам», яркими экранами и проверками «на прочность»: когда среда тихая и затемнённая, организм закрепляет улучшение, а не теряет его к полуночи.
Разобраться лучше – https://vyvod-iz-zapoya-himki9.ru/vyhod-iz-zapoya-cena-v-himkah
Участие в государственных и коммерческих процедурах требует точной подготовки, понимания законодательства и внимательной работы с документами. Для многих компаний самостоятельная работа с закупками становится сложной задачей: необходимо отслеживать новые закупки, анализировать требования, оформлять документы и взаимодействовать с площадками.
Разберитесь досконально – [url=https://tendernoe-soprovozhdenie-rostov-na-donu.ru/]тендерное сопровождение под ключ цена[/url]
В статье представлены ключевые моменты по актуальной теме, дополненные советами экспертов и ссылками на дополнительные ресурсы. Цель материала — дать читателю инструменты для самостоятельного развития и принятия осознанных решений.
Кликни и узнай всё! – https://hoteldemontaulbain.fr/en/welcome-to-the-hotel-of-montaulbain-to-verdun/facebook-icon-preview-1-400×400
Эта публикация погружает вас в мир увлекательных фактов и удивительных открытий. Мы расскажем о ключевых событиях, которые изменили ход истории, и приоткроем завесу над научными достижениями, которые вдохновили миллионы. Узнайте, чему может научить нас прошлое и как применить эти знания в будущем.
Ознакомиться с отчётом – https://www.betonivancice.cz/2023/02/14/hello-world
В этой статье представлен занимательный и актуальный контент, который заставит вас задуматься. Мы обсуждаем насущные вопросы и проблемы, а также освещаем истории, которые вдохновляют на действия и изменения. Узнайте, что стоит за событиями нашего времени!
А есть ли продолжение? – https://www.baltycka6.pl/?p=1
В этой информационной статье вы найдете интересное содержание, которое поможет вам расширить свои знания. Мы предлагаем увлекательный подход и уникальные взгляды на обсуждаемые темы, побуждая пользователей к активному мышлению и критическому анализу.
Получить профессиональную консультацию – https://www.pmiprojects.nl/oscar-wilde-yellow-sunset
Эта статья предлагает уникальную подборку занимательных фактов и необычных историй, которые вы, возможно, не знали. Мы постараемся вдохновить ваше воображение и разнообразить ваш кругозор, погружая вас в мир, полный интересных открытий. Читайте и открывайте для себя новое!
Ознакомьтесь с аналитикой – https://www.vernolecalcio.it/2019/07/22/due-nuovi-rinforzi-per-la-rosa
Мы собрали для вас самые захватывающие факты из мира науки и истории. От малознакомых деталей до грандиозных событий — эта статья расширит ваш кругозор и подарит новое понимание того, как устроен наш мир.
Не упусти важное! – https://owen-russia.ru/product/trm1_old
В этой статье собраны факты, которые освещают целый ряд важных вопросов. Мы стремимся предложить читателям четкую, достоверную информацию, которая поможет сформировать собственное мнение и лучше понять сложные аспекты рассматриваемой темы.
Узнайте всю правду – https://roskip.ru/trm10-pid-regulyator-rs-485
Алгоритм прозрачен. Сначала — краткое интервью и осмотр, измерение давления, пульса, сатурации, при необходимости — ЭКГ и оценка неврологического статуса. Далее — инфузионная терапия по показаниям: восполнение жидкости, коррекция электролитов, поддержка функций печени, мягкое снижение тремора и тревоги, подготовка к сну без «оглушения». Каждая доза сверяется с реакцией организма, чтобы не получить вечернего отката и побочных эффектов. Врач детально объясняет, какие ощущения нормальны (сонливость, сухость во рту, умеренная слабость), а какие — основание для связи. После процедуры повторно фиксируются показатели и выдаются письменные рекомендации на 48–72 часа: режим воды и лёгкой еды, запрет на «подвиги» и конфликты, время короткого дневного отдыха, интерфейс связи и условия повторного визита. Такой порядок убирает хаос: пациент и семья понимают, что именно делать вечером и ночью, как снизить «дергание» и зачем придерживаться простых правил, пока организм перестраивается после запоя.
Детальнее – https://narkolog-na-dom-moskva999.ru/narkolog-na-dom-moskva-nedorogo
Эта статья предлагает уникальную подборку занимательных фактов и необычных историй, которые вы, возможно, не знали. Мы постараемся вдохновить ваше воображение и разнообразить ваш кругозор, погружая вас в мир, полный интересных открытий. Читайте и открывайте для себя новое!
Узнайте всю правду – https://www.denglademand.dk/?attachment_id=948
Этот интересный отчет представляет собой сборник полезных фактов, касающихся актуальных тем. Мы проанализируем данные, чтобы вы могли сделать обоснованные выводы. Читайте, чтобы узнать больше о последних трендах и значимых событиях!
Изучить эмпирические данные – https://roskip.ru/owen_plc110
В этой статье представлен занимательный и актуальный контент, который заставит вас задуматься. Мы обсуждаем насущные вопросы и проблемы, а также освещаем истории, которые вдохновляют на действия и изменения. Узнайте, что стоит за событиями нашего времени!
Хочешь знать всё? – https://ndesign-studio.com/blog/design-process-of-the-phoenix-illustration
Ниже представлена последовательность этапов, формирующих общий цикл вмешательств.
Подробнее можно узнать тут – [url=https://narkologicheskaya-klinika-v-vdk18.ru/]наркологическая клиника лечение алкоголизма владивосток[/url]
Формат выбирается по безопасности, а не «по желанию». Домашний или амбулаторный старт уместен, если показатели устойчивы: нет упорной рвоты, высокой температуры, выраженной дезориентации, резких «качелей» давления и пульса, признаков обезвоживания с угрозой судорог. В этих условиях один визит часто закрывает задачу: индивидуальная инфузия, письменные рекомендации, правила воды и лёгкой еды «по часам», утренний контроль. Если же состояние «по краю» — сочетание рвоты, лихорадки, кардиальных жалоб, второй бессонной ночи, выраженного тремора — честнее короткая стационарная стабилизация на 24–48 часов под круглосуточным наблюдением. На бумаге это кажется дороже одного выезда, но на практике предотвращает цепочку ночных «пожаров», импульсивных повторов и осложнений, то есть экономит и силы, и деньги семьи. В любом формате анонимность неизменна: визиты без маркировки, закрытые каналы связи, разнесённые по времени приёмы и доступ к данным по ролям.
Углубиться в тему – [url=https://vyvod-iz-zapoya-himki9.ru/]narkolog-vyvod-iz-zapoya[/url]
Лечение проходит поэтапно, чтобы пациент не испытывал стресса и перегрузок. Каждый шаг контролируется врачами, а терапия корректируется в зависимости от состояния. В таблице ниже представлена структура программы лечения в клинике «АстраМед Трезвость».
Разобраться лучше – [url=https://narkologicheskaya-klinika-v-astrakhani18.ru/]наркологическая клиника наркологический центр астрахань[/url]
Тендерный специалист помогает разобраться в особенностях каждого закона, а также обеспечивает грамотное сопровождение всех процедур. Это особенно важно для компаний, которые только начинают участвовать в торгах и не имеют опыта работы с государственными контрактами.
Эксклюзивная информация для вас – [url=https://tendernoe-soprovozhdenie-rostov-na-donu.ru/]тендерное сопровождение ип[/url]
Часто предприниматели объединяют понятия тендер и госзакупки, так как обе процедуры связаны с конкурсным выбором поставщика. Однако между ними существуют определённые различия, которые важно понимать перед началом работы в этой сфере.
Узнайте больше прямо сейчас – [url=https://tendernoe-soprovozhdenie-rostov-na-donu.ru/]услуги тендерного сопровождения[/url]
мелбет кз банковский перевод вывод [url=www.melbet15709.help]www.melbet15709.help[/url]
Близкие часто пытаются «ускорить» результат контролем или уговором — в итоге растёт напряжение и человек уходит в сопротивление. Мы предлагаем другое: сосредоточиться на среде. Первые дни важны тишина, затемнение, комфортная температура, вода и лёгкая еда «по часам», отсутствие обсуждений «прошлых ошибок». Полезно заранее договориться о кратких сигналах: как понять, что нужна помощь, а когда лучше оставить человека в покое. Семье также поясняется, что бессонница более двух ночей подряд, постоянная рвота, выраженная слабость и головокружение — поводы для немедленной связи с врачом. Когда роли и правила ясны, уходит хаос, снижается конфликтность, а домашний маршрут становится не «борьбой характеров», а медицинской задачей с понятными шагами. Это напрямую укрепляет приверженность и сокращает путь к стабильности в реальном ритме Москвы.
Изучить вопрос глубже – [url=https://narkolog-na-dom-moskva999.ru/]narkolog na dom kruglosutochno[/url]
Первый контакт строится вокруг фактов «здесь и сейчас». Врач уточняет длительность употребления, принятые за последние 24–48 часов препараты, сопутствующие диагнозы и аллергии, фиксирует давление, пульс, сатурацию, температуру, оценивает выраженность тремора и уровень тревоги; при необходимости выполняется экспресс-ЭКГ и элементарный неврологический скрининг. Далее план объясняется простым языком: какие инфузии будут сегодня, чего ждать через 30–60 минут, как организовать вечер и когда состоится контрольная связь. Мы избегаем универсальных «сильных смесей» и «оглушающих» дозировок: они дают краткий «блеск» с вечерним откатом и повышают риск побочных эффектов. Вместо этого используется узкая, клинически достаточная схема: регидратация для восстановления объёма циркулирующей жидкости, коррекция электролитов, печёночная поддержка, противорвотные и гастропротекция при необходимости, мягкая анксиолитическая коррекция по показаниям. После процедуры врач повторно оценивает показатели, оставляет письменные рекомендации на 48–72 часа, согласует окно связи и обозначает «красные флажки» для немедленного контакта. Такой прозрачный маршрут убирает импровизации и делает поведение семьи предсказуемым, что особенно важно в «тёмные часы» вечера.
Углубиться в тему – [url=https://vyvod-iz-zapoya-himki9.ru/]skoraya-vyvod-iz-zapoya[/url]
Наркологическая клиника — это не просто медицинское учреждение, а пространство, где человеку помогают вернуть здоровье, ясность мышления и контроль над жизнью. В клинике «КаспийМед Альтернатива» в Астрахани круглосуточно оказывается помощь людям, столкнувшимся с алкогольной, наркотической и смешанной зависимостью. Центр сочетает медицинскую строгость и человеческое участие, обеспечивая лечение в комфортных условиях с максимальной конфиденциальностью. Здесь разработаны программы детоксикации, восстановления и психотерапевтической поддержки, что делает терапию эффективной и безопасной.
Получить больше информации – https://narkologicheskaya-klinica-v-astrakhani18.ru/astrakhanskaya-narkologiya
Клиника «КаспийМед Альтернатива» построила систему оказания наркологической помощи на трёх принципах: индивидуальный подход, доказательная медицина и круглосуточная доступность. Каждый пациент проходит диагностический этап, где специалисты определяют уровень зависимости, физическое состояние и психоэмоциональные особенности. Далее формируется персональная программа лечения, включающая медицинские, психологические и социальные модули.
Получить дополнительные сведения – https://narkologicheskaya-klinica-v-astrakhani18.ru/narkologi-astrakhan
Лечение проходит поэтапно, чтобы пациент не испытывал стресса и перегрузок. Каждый шаг контролируется врачами, а терапия корректируется в зависимости от состояния. В таблице ниже представлена структура программы лечения в клинике «АстраМед Трезвость».
Изучить вопрос глубже – [url=https://narkologicheskaya-klinika-v-astrakhani18.ru/]платная наркологическая клиника астрахань[/url]
Вывод из запоя в клинике реализуется через поэтапное внедрение терапевтических решений, направленных на устранение токсической нагрузки и восстановление физиологической устойчивости. Важным элементом является определение клинического профиля пациента, включающего анализ анамнеза, текущего состояния и возможных сопутствующих факторов. На основе этих данных формируется индивидуальная программа помощи. Процедуры проводятся в условиях контролируемой безопасности, что снижает вероятность осложнений и позволяет достигать устойчивого терапевтического ответа. Последовательность действий формирует согласованную систему, удобную для мониторинга и анализа.
Углубиться в тему – [url=https://vyvod-iz-zapoya-kemerovo18.ru/]вывод из запоя клиника[/url]
Наркологическая клиника в клинике в Астрахани предоставляет помощь пациентам, сталкивающимся с различными формами зависимости — алкогольной, наркотической, лекарственной. Основой терапии является комплексный подход, включающий медицинскую детоксикацию, стабилизацию состояния, психотерапию и последующее наблюдение. Такой формат работы позволяет мягко купировать острые симптомы, восстановить физиологические функции и подготовить пациента к длительной реабилитации. Все процедуры проводятся анонимно, с использованием сертифицированных препаратов и с постоянным контролем врача.
Получить больше информации – [url=https://narkologicheskaya-klinika-astrakhan18.ru/]наркологическая клиника наркологический центр[/url]
Участие в государственных и коммерческих процедурах требует точной подготовки, понимания законодательства и внимательной работы с документами. Для многих компаний самостоятельная работа с закупками становится сложной задачей: необходимо отслеживать новые закупки, анализировать требования, оформлять документы и взаимодействовать с площадками.
Узнайте больше прямо сейчас – https://tendernoe-soprovozhdenie-rostov-na-donu.ru/
Наркологическая клиника — это не просто медицинское учреждение, а пространство, где пациент получает всестороннюю поддержку: от снятия интоксикации и детоксикации до психотерапии и постлечебного сопровождения. В клинике «КемероваМед Трезвость» специалисты работают с любыми формами зависимостей — алкогольной, наркотической, медикаментозной. Принципы работы центра основаны на анонимности, профессионализме и индивидуальном подходе. Здесь создаются условия для полного восстановления здоровья и возвращения человека к стабильной трезвой жизни.
Подробнее – http://narkologicheskaya-klinika-v-kemerovo18.ru/
Эти этапы формируют структуру комплексного лечения, позволяя добиться устойчивого результата и предотвращения повторных срывов.
Подробнее можно узнать тут – [url=https://narkologicheskaya-klinika-astrakhan18.ru/]наркологическая клиника вывод из запоя[/url]
Особенность клиники — возможность выезда нарколога на дом. Это особенно важно, если пациенту трудно самостоятельно добраться до центра или он хочет избежать публичности. Врач приезжает с полным набором медикаментов и оборудования, проводит обследование и ставит капельницу, контролируя состояние пациента на протяжении всей процедуры. Такой формат позволяет начать лечение незамедлительно и без стресса.
Получить дополнительные сведения – [url=https://narkologicheskaya-klinika-v-kemerovo18.ru/]наркологическая клиника цены[/url]
Домашний формат подходит, когда обстановка позволяет лечиться в тишине, а клинические риски контролируемы. Врач «Чистой Гармонии» приезжает без опознавательных знаков, осматривает пациента, сверяет совместимости с уже принятыми препаратами, объясняет ожидаемую динамику. Инфузионная терапия строится без «универсальных коктейлей»: состав и темп зависят от давления, частоты пульса, выраженности тремора, тошноты, тревоги, сопутствующих диагнозов. В конце визита семья получает письменную памятку на 24–48 часов и прямой канал связи с дежурным специалистом. Такой подход убирает хаос из первых суток и помогает провести ночь спокойно, без «качелей».
Выяснить больше – [url=https://narkologicheskaya-klinika-klin8.ru/]narkologicheskaya-klinika-v-klinu[/url]
Запой — это не просто затянувшийся прием алкоголя, а острое хроническое отравление организма, сопровождающееся тяжёлыми последствиями для сердца, печени, почек, мозга и нервной системы. Снятие абстинентного синдрома без врачебного контроля может привести к тяжёлым осложнениям: судорогам, делирию, инфаркту, внутренним кровотечениям, резкому скачку давления и даже летальному исходу. Только медицинский специалист способен грамотно оценить состояние пациента, купировать опасные проявления и обеспечить полноценное восстановление организма.
Углубиться в тему – [url=https://vyvod-iz-zapoya-odincovo6.ru/]вывести из запоя одинцово[/url]
С первого звонка администратор бережно собирает фактуру: сколько длится эпизод, что человек уже принимал за последние двое суток, как прошла ночь, есть ли помощник на вечер и ночь, какие хронические заболевания и аллергии известны. Дежурный врач оценивает риски и предлагает старт: анонимный визит на дом по Клину или немедленную госпитализацию. На месте проводится очная оценка и допуск к терапии, запускается инфузионная поддержка с мониторингом давления, пульса и сатурации, корректируется вода и электролиты, по показаниям — осторожная нормализация сна и симптом-контроль. Если картина нестабильна, переводим в стационар — это короче путь к безопасности, чем многочасовые попытки «пересидеть» дома.
Углубиться в тему – [url=https://narkologicheskaya-klinika-klin8.ru/]narkologicheskaya-klinika-klinskij-rajon-moskovskaya-oblast[/url]
«Трезвый Компас» — выездная и стационарная наркологическая служба, которая проводит профессиональный детокс с капельницей от запоя в Клину и районе круглосуточно. Мы приезжаем анонимно, начинаем с очной оценки, согласуем допуск к терапии, подбираем состав инфузии без «универсальных коктейлей» и объясняем простым языком, чего ждать в ближайшие часы. Цель — снять интоксикацию и абстиненцию, поддержать сердце и нервную систему, аккуратно наладить сон по показаниям и дать семье понятный план на 24–48 часов. Если риски высокие или дома невозможно обеспечить безопасную ночь, предложим стационар с круглосуточным наблюдением.
Получить больше информации – http://kapelnica-ot-zapoya-klin8.ru/kapelnica-ot-zapoya-v-klinu-s-vyezdom-na-dom/https://kapelnica-ot-zapoya-klin8.ru
В зависимости от тяжести состояния подбирается индивидуальная программа детоксикации. В неё входят: — Инфузионная терапия (капельницы) для очищения организма от токсинов; — Поддерживающие препараты для работы сердца, печени, нервной системы; — Симптоматическое лечение (устранение рвоты, судорог, бессонницы); — Витамины и средства для восстановления водно-солевого баланса.
Подробнее можно узнать тут – http://narkologicheskaya-klinika-podolsk5.ru
Этап процедуры
Изучить вопрос глубже – [url=https://vyvod-iz-zapoya-odincovo6.ru/]вывод из запоя вызов на дом[/url]
mostbet usdt depozit [url=http://mostbet47183.help]http://mostbet47183.help[/url]
pin-up slotlar demo [url=https://pinup08694.help]pin-up slotlar demo[/url]
Наркологическая клиника выстраивает лечебные мероприятия в соответствии с алгоритмами, направленными на достижение стабильного состояния пациента. Важную роль играет последовательное выполнение процедур, включая оценку реакции организма и корректировку вмешательств. Формирование индивидуальной программы позволяет учитывать особенности каждого случая и поддерживать высокий уровень эффективности. Процесс наблюдения сопровождается непрерывным анализом, что делает терапию адаптивной и предсказуемой. В клинике соблюдается принцип многоуровневого контроля, обеспечивающий безопасность и стабильность лечения.
Изучить вопрос глубже – https://narkologicheskaya-klinika-tomsk18.ru/
Наркологическая клиника применяет стандартизированные схемы, направленные на безопасное и постепенное восстановление. Каждый этап вмешательства согласуется с текущим состоянием пациента, что обеспечивает предсказуемый характер изменений. Модель работы включает оценку реакции организма, проверку устойчивости внутренних систем и уточнение динамики метаболических процессов. Последовательность действий формируется с учётом адаптационных возможностей и направлена на достижение стабильного результата.
Разобраться лучше – [url=https://narkologicheskaya-klinika-vo-vladivostoke18.ru/]наркологическая клиника наркологический центр владивосток[/url]
Часто предприниматели объединяют понятия тендер и госзакупки, так как обе процедуры связаны с конкурсным выбором поставщика. Однако между ними существуют определённые различия, которые важно понимать перед началом работы в этой сфере.
Изучите все нюансы – https://tendernoe-soprovozhdenie-rostov-na-donu.ru/
Терапия в клинике строится по индивидуальному протоколу. Каждому пациенту подбираются процедуры с учётом возраста, длительности болезни, сопутствующих нарушений и психоэмоционального состояния. Лечение проходит поэтапно, что позволяет исключить осложнения и достичь стабильной ремиссии. Ниже представлена таблица с ключевыми этапами терапии.
Получить больше информации – [url=https://narkologicheskaya-klinika-v-izhevsk18.ru/]лечение в наркологической клинике в ижевске[/url]
Тендерный специалист помогает разобраться в особенностях каждого закона, а также обеспечивает грамотное сопровождение всех процедур. Это особенно важно для компаний, которые только начинают участвовать в торгах и не имеют опыта работы с государственными контрактами.
Все тайны раскрыты – http://tendernoe-soprovozhdenie-rostov-na-donu.ru
Детокс — важный этап лечения, который помогает очистить организм от токсинов и продуктов распада алкоголя или наркотиков. В клинике «ТомскМед Трезвость» используются современные капельницы и лекарственные комбинации, направленные на восстановление биохимических процессов в организме. Ниже представлена таблица с примерами капельниц, применяемых в детоксикационных программах.
Ознакомиться с деталями – [url=https://narkologicheskaya-klinika-v-tomske18.ru/]наркологическая клиника цены[/url]
Наркологическая клиника применяет структурированные методы, включающие изучение анамнеза, оценку текущего состояния и определение возможных рисков. На основе полученной информации формируются индивидуальные схемы лечения, направленные на нормализацию внутренних процессов. Работа строится на многоуровневом наблюдении, включающем анализ лабораторных показателей и оценку функциональных систем организма. Такой формат позволяет поддерживать стабильную динамику изменений и избегать осложнений. В клинике создается согласованная модель вмешательств, позволяющая получать устойчивые результаты.
Получить дополнительные сведения – [url=https://narkologicheskaya-klinika-tomsk18.ru/]наркологическая клиника клиника помощь в томске[/url]
Шаг 1. Оператор фиксирует симптомы, хронические болезни, лекарства, аллергии, адрес и удобный временной интервал. Шаг 2. Дежурный нарколог формирует первичный план инфузий и комплект медикаментов. Шаг 3. На месте проводится экспресс-диагностика и уточняется стратегия: объём гидратации, потребность в седативной поддержке и гепатопротекторах. Шаг 4. Запускается капельница с мониторингом давления, пульса и сатурации; при необходимости добавляются противорвотные и антациды. Шаг 5. Пациент получает письменный план на 48–72 часа, рекомендации по сну, питьевому режиму и питанию, номера круглосуточной связи и, при показаниях, слот повторного визита.
Детальнее – [url=https://vyvod-iz-zapoya-ulan-ude0.ru/]врач вывод из запоя в улан-удэ[/url]
Участие в государственных и коммерческих процедурах требует точной подготовки, понимания законодательства и внимательной работы с документами. Для многих компаний самостоятельная работа с закупками становится сложной задачей: необходимо отслеживать новые закупки, анализировать требования, оформлять документы и взаимодействовать с площадками.
Все ответы на ваши вопросы – [url=https://tendernoe-soprovozhdenie-rostov-na-donu.ru/]тендерное сопровождение в ростове на дону[/url]
Лечебные мероприятия строятся на основе поэтапного внедрения терапевтических решений, которые опираются на индивидуальные характеристики пациента. Уточнение анамнеза, анализ данных обследований и выявление сопутствующих факторов позволяют создавать эффективные и прогнозируемые программы лечения. В клинике соблюдается строгая последовательность процедур, направленная на снижение рисков и обеспечение безопасности. На каждом этапе проводится проверка клинической реакции, что позволяет своевременно выявлять необходимость корректировки и адаптировать лечебные меры под текущую картину.
Получить больше информации – [url=https://narkologicheskaya-klinika-v-penze18.ru/]наркологическая клиника нарколог[/url]
Такой подход позволяет устранить физические последствия запоя и снизить психологическую зависимость. Уже после первой процедуры пациенты отмечают улучшение самочувствия, появление аппетита и нормализацию сна. Важно не ограничиваться только экстренной помощью — специалисты рекомендуют пройти курс восстановления, чтобы предотвратить рецидивы.
Получить дополнительные сведения – [url=https://vyvodiz-zapoya-vladivostok18.ru/]вывод из запоя на дому недорого владивосток[/url]
Таблица позволяет поддерживать единую структуру наблюдения и фиксировать изменения состояния. Такая модель обеспечивает прозрачность процессов и повышает точность принимаемых решений.
Подробнее можно узнать тут – https://vyvodiz-zapoya-izhevsk18.ru/
Ранняя врачебная помощь не только снижает тяжесть абстинентного синдрома, но и предотвращает опасные осложнения, даёт шанс пациенту быстрее вернуться к обычной жизни, а его близким — обрести уверенность в завтрашнем дне.
Подробнее тут – [url=https://vyvod-iz-zapoya-shchelkovo6.ru/]vyvod-iz-zapoya-ceny-shchelkovo[/url]
Каждая процедура проводится под контролем врача и сопровождается мониторингом давления, пульса и температуры. После курса капельниц пациент чувствует улучшение самочувствия, нормализуется сон, снижается раздражительность, появляется энергия и ясность сознания.
Получить дополнительную информацию – http://narkologicheskaya-klinika-v-astrakhani18.ru/narkologiya-astrakhan-adres/
Палатный формат мы предлагаем, когда есть риск делирия, судорог, резких скачков давления и пульса, выраженной одышки, неукротимой рвоты, обезвоживания или когда дома невозможно обеспечить наблюдение ночью. В стационаре под рукой аппаратный контроль, по показаниям ЭКГ и базовая лаборатория, круглосуточный пост и регулярные переоценки с точной настройкой схем. Здесь меньше случайностей: темп инфузий корректируется без задержек, решения принимаются быстро, а риск «ночных качелей» ниже. Для семьи стационар часто оказывается не «дороже», а короче по времени до стабильного сна и предсказуемее по бюджету.
Изучить вопрос глубже – [url=https://narkologicheskaya-klinika-ivanteevka8.ru/]narkologicheskie-kliniki-v-podmoskove[/url]
Вывод из запоя в клинике строится на основе алгоритмов, направленных на безопасное восстановление физиологических функций. Применяется стандартная система, включающая оценку состояния, подбор медикаментозных средств и постепенную адаптацию организма. Такой формат позволяет избежать резких изменений и поддерживать предсказуемую клиническую динамику. Важную роль играет наблюдение за реакцией организма, позволяющее корректировать тактику лечения в соответствии с выявленными изменениями. Последовательность действий обеспечивает структурированность процесса и повышает вероятность стабильного результата.
Получить больше информации – [url=https://vyvodiz-zapoya-izhevsk18.ru/]вывод из запоя вызов в ижевске[/url]
Такой подход позволяет устранить физические последствия запоя и снизить психологическую зависимость. Уже после первой процедуры пациенты отмечают улучшение самочувствия, появление аппетита и нормализацию сна. Важно не ограничиваться только экстренной помощью — специалисты рекомендуют пройти курс восстановления, чтобы предотвратить рецидивы.
Детальнее – [url=https://vyvodiz-zapoya-vladivostok18.ru/]вывод из запоя[/url]
Методика подбирается не только исходя из медицинских показаний, но и личных ожиданий пациента, его опыта и жизненной ситуации. Такой подход позволяет сделать процесс максимально комфортным и результативным.
Разобраться лучше – [url=https://kodirovanie-ot-alkogolizma-ehlektrostal6.ru/]центр кодирования от алкоголизма[/url]
Указанные элементы задают логическую основу для всего терапевтического процесса, создавая структурированную модель работы с пациентом. При необходимости схема вмешательств дополняется дополнительными мерами, направленными на стабилизацию состояния. Такой формат позволяет поддерживать предсказуемость результата даже в сложных клинических ситуациях.
Получить дополнительную информацию – https://narkologicheskaya-klinika-v-penze18.ru/chastnaya-narkologicheskaya-klinika-penza/
В зависимости от клинической картины и предпочтений возможны следующие виды кодирования:
Подробнее тут – http://kodirovanie-ot-alkogolizma-ehlektrostal6.ru
Ниже представлена последовательность основных шагов терапевтического процесса.
Разобраться лучше – https://narkologicheskaya-klinika-vo-vladivostoke18.ru/chastnaya-narkologicheskaya-klinika-vladivostok
Для формирования структурированной модели используются стандартизированные алгоритмы. Ниже представлена последовательность действий, определяющих ход терапевтических мероприятий.
Детальнее – [url=https://narkologicheskaya-klinika-tomsk18.ru/]наркологическая клиника томск[/url]
При поступлении вызова нарколог незамедлительно выезжает на дом для проведения первичного осмотра. Специалист собирает анамнез, измеряет жизненно важные показатели – пульс, артериальное давление и температуру – и оценивает степень алкогольной интоксикации. Точная диагностика становится основой для составления индивидуального плана терапии, адаптированного под конкретное состояние пациента.
Получить дополнительную информацию – https://reabcentr-narko.ru/
При поступлении вызова нарколог незамедлительно выезжает на дом для проведения первичного осмотра. Специалист собирает анамнез, измеряет жизненно важные показатели – пульс, артериальное давление и температуру – и оценивает степень алкогольной интоксикации. Точная диагностика становится основой для составления индивидуального плана терапии, адаптированного под конкретное состояние пациента.
Изучить вопрос глубже – https://reabcentr-narko.ru/vyvod-iz-zapoya-tver-staczionar/
Наркологическая клиника использует методики, направленные на комплексную оценку состояния пациента. Работа строится на анализе анамнеза, исследовании соматических параметров и определении степени выраженности симптомов. Такой формат создаёт условия для точного подбора терапевтических мер. В клинике применяется непрерывный мониторинг, направленный на своевременное выявление отклонений и корректировку лечебных мероприятий. Благодаря этому достигается высокая стабильность клинического процесса и формируется благоприятная динамика восстановления.
Ознакомиться с деталями – https://narkologicheskaya-klinika-v-vdk18.ru/narkolog-vladivostok-otzyvy
Такая структура терапии обеспечивает контроль на всех стадиях и помогает добиться устойчивого результата без вреда для здоровья. Пациент получает не просто временное облегчение, а полное восстановление физического и эмоционального состояния.
Детальнее – https://narkologicheskaya-klinika-v-astrakhani18.ru/
Такой подход позволяет устранить физические последствия запоя и снизить психологическую зависимость. Уже после первой процедуры пациенты отмечают улучшение самочувствия, появление аппетита и нормализацию сна. Важно не ограничиваться только экстренной помощью — специалисты рекомендуют пройти курс восстановления, чтобы предотвратить рецидивы.
Выяснить больше – http://vyvodiz-zapoya-vladivostok18.ru/
1win registro con celular [url=https://1win05634.help/]https://1win05634.help/[/url]
Наркологическая клиника использует комплексный подход к оценке состояния пациента, что обеспечивает высокий уровень контроля на всех этапах лечения. Такой формат работы позволяет детально изучать динамику процессов и своевременно корректировать вмешательства. В клинике применяется принцип последовательного наблюдения, при котором особое внимание уделяется соматическим и неврологическим проявлениям. Выбор терапевтических мер основывается на анализе объективных данных, что повышает предсказуемость результата. Подход ориентирован на постепенное восстановление функций организма с учетом индивидуальных особенностей.
Углубиться в тему – https://narkologicheskaya-klinika-tomsk18.ru/
шумоизоляция автомобиля https://shumoizolyaciya-avtomobilya-1.ru
Перед началом терапии проводится полная диагностика организма, включая лабораторные исследования и ЭКГ. Это позволяет оценить состояние пациента и подобрать оптимальный курс лечения. После стабилизации физического состояния начинается психотерапевтическая и реабилитационная работа. Такой подход помогает не только снять симптомы, но и устранить первопричины зависимости.
Выяснить больше – https://narkologicheskaya-klinika-kemerovo18.ru/narkologicheskaya-klinika-v-kemerovo-anonimno
В основе работы клиники «ИжТрезвоМед Центр» лежит принцип персонализированной медицины. Это означает, что каждый пациент получает не шаблонное лечение, а тщательно подобранный комплекс процедур, учитывающий его состояние, историю заболевания, уровень мотивации и социальную ситуацию. Такой подход позволяет добиться стабильного результата даже в сложных случаях. Лечение проводится анонимно, без постановки на учёт и разглашения данных, что особенно важно для тех, кто ценит конфиденциальность.
Исследовать вопрос подробнее – [url=https://narkologicheskaya-klinika-v-izhevske18.ru/]наркологические клиники алкоголизм[/url]
Перед началом терапии проводится клиническая оценка, включающая измерение давления, осмотр кожи и глаз, проверку дыхания и анализ неврологического состояния. Вывод из запоя в клинике в Астрахани начинается только после сбора этих данных, поскольку подбор препаратов без диагностики может быть небезопасен.
Получить больше информации – [url=https://vyvod-iz-zapoya-v-astrakhani18.ru/]вывод из запоя дешево астрахань[/url]
Наркологическая клиника применяет стандартизированные схемы, направленные на безопасное и постепенное восстановление. Каждый этап вмешательства согласуется с текущим состоянием пациента, что обеспечивает предсказуемый характер изменений. Модель работы включает оценку реакции организма, проверку устойчивости внутренних систем и уточнение динамики метаболических процессов. Последовательность действий формируется с учётом адаптационных возможностей и направлена на достижение стабильного результата.
Изучить вопрос глубже – https://narkologicheskaya-klinika-vo-vladivostoke18.ru/narkolog-vladivostok-otzyvy/
Неотъемлемой частью программы становится психотерапия — работа с мотивацией, психологической поддержкой, поиском и устранением “триггеров” зависимости, проработка самооценки, стрессоустойчивости. К работе обязательно подключаются близкие: совместные консультации помогают восстановить доверие, снизить уровень конфликтов, научиться поддерживать без контроля и упрёков.
Выяснить больше – https://lechenie-alkogolizma-korolev5.ru/lechenie-alkogolizma-anonimno-v-koroleve/
Клиника «ВладТрезвие Центр» работает в круглосуточном режиме и готова оказать помощь жителям Владивостока и прилегающих районов в любое время суток. Врачи-наркологи прибывают по вызову в течение часа, имеют при себе все необходимые препараты и оборудование для проведения детоксикации на дому. При необходимости пациента доставляют в стационар, где лечение проходит под постоянным контролем медицинского персонала.
Получить больше информации – [url=https://vyvodiz-zapoya-vladivostok18.ru/]вывод из запоя круглосуточно[/url]
цветы купить дешево [url=https://www.dostavka-cvetov777.ru]цветы купить дешево[/url] .
Перед кодированием важно снять острую интоксикацию и стабилизировать состояние. В «Орион-Клиник» пациенту проводят курс инфузионной терапии: капельницы с регидратационными растворами, гепатопротекторами и витаминно-минеральными комплексами. Это позволяет восстановить водно-электролитный баланс, поддержать функции печени и почек, нормализовать артериальное давление и работу сердца. Одновременно психолог проводит предварительные беседы для выяснения причин зависимости, уровня тревожности и мотивации. Подготовительный этап длится от одного до трёх дней в зависимости от тяжести состояния и поможет снизить риск побочных эффектов при введении кодирующего препарата.
Подробнее тут – https://kodirovanie-ot-alkogolizma-pushkino4.ru/kodirovanie-ot-alkogolizma-ceny-v-pushkino/
Клинический опыт показывает: чем раньше начато лечение, тем выше шансы на устойчивую ремиссию. Промедление может привести к тяжёлым осложнениям — физическим, психическим и социальным.
Детальнее – [url=https://narkologicheskaya-klinika-voronezh9.ru/]наркологическая клиника наркологический центр[/url]
Очищение организма — ключевой этап в лечении зависимости. В клинике «ИжТрезвоМед Центр» применяются разные виды капельниц, которые помогают ускорить детоксикацию, восстановить водно-солевой баланс и улучшить работу органов. В таблице приведены основные виды инфузионных программ, применяемых при выезде нарколога на дом и в стационаре:
Разобраться лучше – https://narkologicheskaya-klinika-v-izhevske18.ru/narkologicheskaya-klinika-izhevsk-otzyvy/
Для повышения эффективности лечения наркологическая клиника применяет стандартизированные методы, включающие мониторинг жизненно важных параметров, корректировку фармакотерапии и оценку неврологических показателей. Совокупность таких мер делает процесс более предсказуемым и снижает вероятность осложнений. Кроме того, практическая часть работы включает регулярную проверку метаболических функций, что способствует точному дозированию препаратов и своевременному изменению схем. Это позволяет поддерживать физиологическую устойчивость организма даже при интенсивной нагрузке и сохранять стабильность состояния на протяжении всего периода терапии.
Подробнее тут – [url=https://narkologicheskaya-klinika-penza18.ru/]наркологическая клиника[/url]
В клинике «СибМед Кемерово» помощь оказывается круглосуточно и без ожидания. Пациент может обратиться за консультацией в любое время суток, а выездная бригада нарколога доступна даже ночью. Основной принцип центра — индивидуальный подход и создание доверительной атмосферы, в которой человек не чувствует осуждения, а получает поддержку и заботу.
Исследовать вопрос подробнее – [url=https://narkologicheskaya-klinika-kemerovo18.ru/]частная наркологическая клиника[/url]
Очищение организма — ключевой этап в лечении зависимости. В клинике «ИжТрезвоМед Центр» применяются разные виды капельниц, которые помогают ускорить детоксикацию, восстановить водно-солевой баланс и улучшить работу органов. В таблице приведены основные виды инфузионных программ, применяемых при выезде нарколога на дом и в стационаре:
Получить дополнительную информацию – http://
Эта информационная статья охватывает широкий спектр актуальных тем и вопросов. Мы стремимся осветить ключевые факты и события с ясностью и простотой, чтобы каждый читатель мог извлечь из нее полезные знания и полезные инсайты.
Осуществить глубокий анализ – https://phattrientainangtre.vn/kham-pha-tiem-nang-nhung-thoi-diem-vang-de-lam-sinh-trac-van-tay-cho-con
Эта публикация погружает вас в мир увлекательных фактов и удивительных открытий. Мы расскажем о ключевых событиях, которые изменили ход истории, и приоткроем завесу над научными достижениями, которые вдохновили миллионы. Узнайте, чему может научить нас прошлое и как применить эти знания в будущем.
Хочешь знать всё? – http://blog.kedairohani.com/halkomentar-73-1.html
Этот текст призван помочь читателю расширить кругозор и получить практические знания. Мы используем простой язык, наглядные примеры и структурированное изложение, чтобы сделать обучение максимально эффективным и увлекательным.
Слушай внимательно — тут важно – https://mjinternationalexports.com/benishaan-mango-crop
В этой статье представлен занимательный и актуальный контент, который заставит вас задуматься. Мы обсуждаем насущные вопросы и проблемы, а также освещаем истории, которые вдохновляют на действия и изменения. Узнайте, что стоит за событиями нашего времени!
Изучить вопрос глубже – https://grcmarinellc.com/2016/07/28/manifesto-234-a-friendly-giant
Этот информативный текст отличается привлекательным содержанием и актуальными данными. Мы предлагаем читателям взглянуть на привычные вещи под новым углом, предоставляя интересный и доступный материал. Получите удовольствие от чтения и расширьте кругозор!
Смотри, что ещё есть – https://www.alpico-plaza.jp/access_shinsyu
В этой публикации мы сосредоточимся на интересных аспектах одной из самых актуальных тем современности. Совмещая факты и мнения экспертов, мы создадим полное представление о предмете, которое будет полезно как новичкам, так и тем, кто глубоко изучает вопрос.
Лови подробности – https://dboudeau.fr/site/activite-2-la-contraception-hormonale
В этой статье представлен занимательный и актуальный контент, который заставит вас задуматься. Мы обсуждаем насущные вопросы и проблемы, а также освещаем истории, которые вдохновляют на действия и изменения. Узнайте, что стоит за событиями нашего времени!
Желаете узнать подробности? – https://www.csautoslalom.cz/kalendar-csautoslalomu-2026-3-nove-trate
В этом информативном обзоре собраны самые интересные статистические данные и факты, которые помогут лучше понять текущие тренды. Мы представим вам цифры и графики, которые иллюстрируют, как развиваются различные сферы жизни. Эта информация станет отличной основой для глубокого анализа и принятия обоснованных решений.
Где можно узнать подробнее? – https://www.guisos.es/primeros-platos/canalones-de-jamon-y-ensaladilla
Мы собрали для вас самые захватывающие факты из мира науки и истории. От малознакомых деталей до грандиозных событий — эта статья расширит ваш кругозор и подарит новое понимание того, как устроен наш мир.
Где можно узнать подробнее? – https://www.hotel-sugano.com/bbs/sugano.cgi/www.skitour.su/datasphere.ru/club/user/12/blog/2477/www.skitour.su/www.tovery.net/ofitsialnyj-sajt-dsn.ru
В этом обзоре представлены различные методы избавления от зависимости, включая терапевтические и психологические подходы. Мы сравниваем их эффективность и предоставляем рекомендации для тех, кто хочет вернуться к трезвой жизни. Читатели смогут найти информацию о реабилитационных центрах и поддерживающих группах.
Получить дополнительные сведения – https://narcologiya.info/vliyanie-na-zdorove/chto-luchshe-sidelka-na-domu-ili-pansionat-dlya-pozhilyh.html
Часто предприниматели объединяют понятия тендер и госзакупки, так как обе процедуры связаны с конкурсным выбором поставщика. Однако между ними существуют определённые различия, которые важно понимать перед началом работы в этой сфере.
Узнайте больше прямо сейчас – [url=https://tendernoe-soprovozhdenie-rostov-na-donu.ru/]оказание услуг по тендерному сопровождению[/url]
Наркологическая клиника использует методики, направленные на комплексную оценку состояния пациента. Работа строится на анализе анамнеза, исследовании соматических параметров и определении степени выраженности симптомов. Такой формат создаёт условия для точного подбора терапевтических мер. В клинике применяется непрерывный мониторинг, направленный на своевременное выявление отклонений и корректировку лечебных мероприятий. Благодаря этому достигается высокая стабильность клинического процесса и формируется благоприятная динамика восстановления.
Получить больше информации – http://narkologicheskaya-klinika-v-vdk18.ru/narkolog-vladivostok-otzyvy/
В этом обзорном материале представлены увлекательные детали, которые находят отражение в различных аспектах жизни. Мы исследуем непонятные и интересные моменты, позволяя читателю увидеть картину целиком. Погрузитесь в мир знаний и удивительных открытий!
Что скрывают от вас? – https://savorrecipes.com/recipe/cheddar-and-horseradish-burger
Эта обзорная заметка содержит ключевые моменты и факты по актуальным вопросам. Она поможет читателям быстро ориентироваться в теме и узнать о самых важных аспектах сегодня. Получите краткий курс по современной информации и оставайтесь в курсе событий!
Не пропусти важное – https://inaina.dk/2014/01/haeklet-slips
В этой статье рассматриваются различные аспекты избавления от зависимости, включая физические и психологические методы. Мы обсудим поддержку, мотивацию и стратегии, которые помогут в процессе выздоровления. Читатели узнают, как преодолеть трудности и двигаться к новой жизни без зависимости.
Исследовать вопрос подробнее – https://evaclinica.ru/blog/narkolog-na-dom-v-ryazani-zimoj-kogda-vyzvat-vracha.html
Часто предприниматели объединяют понятия тендер и госзакупки, так как обе процедуры связаны с конкурсным выбором поставщика. Однако между ними существуют определённые различия, которые важно понимать перед началом работы в этой сфере.
Все тайны раскрыты – [url=https://tendernoe-soprovozhdenie-rostov-na-donu.ru/]тендерное сопровождение под ключ ростов на дону[/url]
В этой статье представлен занимательный и актуальный контент, который заставит вас задуматься. Мы обсуждаем насущные вопросы и проблемы, а также освещаем истории, которые вдохновляют на действия и изменения. Узнайте, что стоит за событиями нашего времени!
Погрузиться в детали – https://enterprisechallengepk.com/secrets-your-business-mentor-wont-tell-you
Эта информационная заметка содержит увлекательные сведения, которые могут вас удивить! Мы собрали интересные факты, которые сделают вашу жизнь ярче и полнее. Узнайте нечто новое о привычных аспектах повседневности и откройте для себя удивительный мир информации.
Читать далее > – https://mayfairplace.co/best-home-solar-panels-top-residential-picks-reviews
В этой статье-обзоре мы соберем актуальную информацию и интересные факты, которые освещают важные темы. Читатели смогут ознакомиться с различными мнениями и подходами, что позволит им расширить кругозор и глубже понять обсуждаемые вопросы.
Выяснить больше – https://www.cbtkenya.org/under-pressure-the-strain-on-kenyan-mental-health-practitioners
Часто предприниматели объединяют понятия тендер и госзакупки, так как обе процедуры связаны с конкурсным выбором поставщика. Однако между ними существуют определённые различия, которые важно понимать перед началом работы в этой сфере.
Погрузитесь в детали – http://tendernoe-soprovozhdenie-rostov-na-donu.ru
how to download 1win on android [url=www.1win5529.ru]www.1win5529.ru[/url]
Часто предприниматели объединяют понятия тендер и госзакупки, так как обе процедуры связаны с конкурсным выбором поставщика. Однако между ними существуют определённые различия, которые важно понимать перед началом работы в этой сфере.
Погрузитесь в детали – [url=https://tendernoe-soprovozhdenie-rostov-na-donu.ru/]услуги тендерного сопровождения в ростове на дону[/url]
pin-up apuesta gratis Chile [url=pinup62718.help]pinup62718.help[/url]
mostbet фриспины [url=https://mostbet80295.help/]https://mostbet80295.help/[/url]
как скачать мелбет [url=www.melbet95634.help]www.melbet95634.help[/url]
[url=https://remont-membrannoj-krovli-1.ru]ремонт мембранной кровли[/url]
Вывод из запоя в клинике строится на основе алгоритмов, направленных на безопасное восстановление физиологических функций. Применяется стандартная система, включающая оценку состояния, подбор медикаментозных средств и постепенную адаптацию организма. Такой формат позволяет избежать резких изменений и поддерживать предсказуемую клиническую динамику. Важную роль играет наблюдение за реакцией организма, позволяющее корректировать тактику лечения в соответствии с выявленными изменениями. Последовательность действий обеспечивает структурированность процесса и повышает вероятность стабильного результата.
Подробнее тут – https://vyvodiz-zapoya-izhevsk18.ru/vyvod-iz-zapoya-v-izhevske-soczialnye-uslugi/
В процессе терапии специалисты используют только сертифицированные препараты и современные методики, рекомендованные Минздравом РФ. Это позволяет безопасно очищать организм, устранять симптомы абстиненции и снижать риск рецидивов. Принцип клиники — работать не с последствиями зависимости, а с её причиной.
Выяснить больше – [url=https://narkologicheskaya-klinika-v-astrakhani18.ru/]наркологическая клиника клиника помощь[/url]
Коммерческий и государственный тендер — это конкурентная процедура выбора поставщика товаров или оказания услуг. Заказчик размещает требования, а компании подают заявки и участвуют в торгах.
Разберитесь досконально – [url=https://tendernoe-soprovozhdenie-rostov-na-donu.ru/]тендерное сопровождение под ключ в ростове на дону[/url]
pin-up aylıq limit [url=http://pinup48127.help/]pin-up aylıq limit[/url]
доставка цветов в москве недорого [url=https://www.dostavka-cvetov777.ru]доставка цветов в москве недорого[/url] .
[url=https://shumoizolyaciya-avtomobilya-moskva-1.ru]шумоизоляция автомобиля Москва[/url]
цветы сколько стоят [url=https://dostavka-cvetov777.ru/]цветы сколько стоят[/url] .
mostbet в Казахстане [url=http://mostbet65920.help/]mostbet в Казахстане[/url]
pinup slot demo [url=https://www.pinup90462.help]https://www.pinup90462.help[/url]
мелбет идентификация [url=https://melbet63810.help/]https://melbet63810.help/[/url]
доставка цветов москва курьером на дом недорого [url=https://www.dostavka-cvetov777.ru]доставка цветов москва курьером на дом недорого[/url] .
шумоизоляция автомобиля цена https://shumoizolyaciya-avtomobilya-cena-1.ru
1win poker [url=http://1win53841.help]http://1win53841.help[/url]
mostbet yechish kutilmoqda [url=mostbet43759.help]mostbet43759.help[/url]
1win crash на деньги [url=www.1win32478.help]www.1win32478.help[/url]
1win регистрация без паспорта [url=1win54928.help]1win54928.help[/url]
mostbet tolov limiti UZS [url=www.mostbet21640.help]www.mostbet21640.help[/url]
https://bet365-bet.com.co/
Bet365 Colombia dispone de un permiso otorgado por Coljuegos para ofrecer sus servicios legalmente en Colombia, proporcionando un casino en linea confiable que incluye multiples opciones de tragamonedas, juegos de salon y otras opciones de azar, todo con el respaldo de el conocimiento mundial de la firma de apuestas fundada en el Reino Unido en el ano 2000.
https://bwin-bet.com.co/
Bwin Bet opera como un casino virtual y sitio de apuestas a eventos deportivos con presencia en Colombia desde 2026 , actuando con el respaldo de Coljuegos , lo que garantiza un entorno legal y seguro para los usuarios .
mostbet rəsmi tətbiq ios [url=www.mostbet87216.help]www.mostbet87216.help[/url]
https://dostigateli.ru/forum/topic/vakuumirovanie-holodilnyh-sistem/#postid-4606 Вакуумирование холодильных систем
mostbet retragere Republica Moldova [url=https://mostbet54831.help/]https://mostbet54831.help/[/url]
[url=http://vzhelezke.ru/forum/topic_3739/]комментарий эксперта[/url]
мостбет изменить пароль [url=http://mostbet26809.help]мостбет изменить пароль[/url]
mostbet azərbaycan [url=https://mostbet2011.help]https://mostbet2011.help[/url]
мелбет зеркало вход [url=http://melbet53498.help/]http://melbet53498.help/[/url]
mostbet total over under [url=http://mostbet68214.help/]http://mostbet68214.help/[/url]
mostbet retragere în siguranță [url=www.mostbet75302.help]www.mostbet75302.help[/url]
mostbet двухфакторная защита [url=https://mostbet91763.help]https://mostbet91763.help[/url]
1win mirror Moldova [url=www.1win90843.help]1win mirror Moldova[/url]
mostbet авиатор стратегия [url=https://mostbet63740.help]https://mostbet63740.help[/url]
melbet kyc [url=melbet57184.help]melbet57184.help[/url]
Сегодня кроссовки обрели огромную известность везде.
Их носят люди всевозможных возрастов и родов занятий.
Ключевая причина столь высокой любви — удобство и практичность.
https://forum.eass-germany.de/viewtopic.php?t=542
Известные бренды регулярно выпускают свежие коллекции, усиливая интерес.
Кроссовки прочно закрепились в городскую культуру и стиль жизни.
С каждым годом их востребованность только увеличивается.
melbet новое зеркало [url=http://melbet27495.help/]http://melbet27495.help/[/url]
1win бурд ё бохт [url=http://1win20938.help/]http://1win20938.help/[/url]
мостбет plinko стратегия [url=https://mostbet89276.help/]мостбет plinko стратегия[/url]
мостбет DC Bank [url=https://mostbet40827.help]https://mostbet40827.help[/url]
Стильная одежда имеет большое значение в формировании образа.
Она помогает выразить характер и ощущать внутренний комфорт.
Аккуратный внешний вид формирует мнение окружающих.
В повседневной жизни одежда может помогать собранности.
https://forum.eass-germany.de/viewtopic.php?t=530
Продуманный гардероб облегчает деловое общение.
При выборе одежды важно учитывать личные предпочтения и контекст.
Актуальные стили дают возможность находить новые решения.
В целом, умение стильно одеваться положительно влияет на самоощущение.
melbet зеркало скачать apk [url=https://melbet53847.help/]https://melbet53847.help/[/url]
mostbet hisobni blokdan chiqarish [url=https://mostbet04826.help/]https://mostbet04826.help/[/url]
pinup aviator strategiya [url=https://pinup41537.help]https://pinup41537.help[/url]
мостбет установить приложение [url=mostbet52746.help]mostbet52746.help[/url]
1win casino slots [url=1win5751.help]1win5751.help[/url]
Настоящая дикая лососевая икра известна насыщенным вкусом.
Чёрная местная икра представляет собой признанным шедевром.
Данные сорта продукции добываются естественно в незагрязнённых акваториях Камчатки.
kamchatskoe-more.ru
Благодаря суровым экологическим условиям здесь получается исключительно полезной.
Подлинная дикая икра лишена искусственных добавок и искусственных добавок.
Выбирая подобную икорный продукт, вы обретаете эталонное свойство настоящего деликатеса.
1 win [url=http://1win71849.help/]http://1win71849.help/[/url]
плинко честно или нет [url=https://plinko47590.help]https://plinko47590.help[/url]
1win crash withdrawal [url=1win54316.help]1win crash withdrawal[/url]
https://betway-bet.com.mx/
Betway para Mexico constituye una plataforma de casino digital y tambien sitio de apuestas en deportes con cerca de dos decadas de presencia mundial, avalado por habilitaciones de organismos exigentes como la MGA y la UKGC, y opera respetando las disposiciones de SEGOB en el pais.
https://lebull.com.mx/
Conforme a la resena presentada, Lebull constituye un sitio de juegos de azar digital y plataforma de apuestas deportivas que se desempena en Mexico presentando un repertorio de mas de 10,000 propuestas ludicas, una aplicacion para celulares totalmente funcional y suministradores de elite por ejemplo Pragmatic Play, NetEnt y NolimitCity.
[url=https://dubai-villas-sale.com]affordable villa for sale in dubai[/url]
1win Optima Bank [url=www.1win43592.help]www.1win43592.help[/url]
1вин скачать [url=http://1win25340.help/]1вин скачать[/url]
成人向け映像は 人間の性について 学ぶための 補助教材になり得る。
適切な 文脈(研究目的)において、それらは 性的反応の 知識を 深めることがある。
コンプライアンスを 守った上で、同意や リスク回避の 実例を 示すことも可能だ。
児童ポルノ
研究者による ガイド付きの 閲覧は、誤解を 防ぎ、健全な 見解を 育てる。
無論、これらは 単独での 視聴ではなく、科学的な カリキュラムの 素材として 扱われるべきだ。
1win aviator qaydaları [url=1win19435.help]1win19435.help[/url]
melbet бозиҳои казино [url=http://melbet63047.help]http://melbet63047.help[/url]
sweet bonanza tragamonedas méxico [url=http://sweet-bonanza45713.help]http://sweet-bonanza45713.help[/url]
melbet ruleta [url=http://melbet89725.help]melbet ruleta[/url]
1win повторный вывод [url=https://1win95124.help]https://1win95124.help[/url]
мостбет ЮMoney вывод [url=https://www.mostbet09754.help]мостбет ЮMoney вывод[/url]
Discover the amazing features of [url=https://hghjfjdossa.netlify.app]hghjfjdossa[/url] and elevate your experience today.
Hghjfjdossa’s role boosts operational success and practical outcomes.
mostbet magyarország [url=www.mostbet2025.help]www.mostbet2025.help[/url]
mostbet free spins sloty [url=http://mostbet2020.help/]http://mostbet2020.help/[/url]
Purchasing medicine online has become extremely widespread.
Ease is the primary factor behind this trend.
You can order from anywhere at any hour without traveling to a brick-and-mortar store.
https://list.vladtoday.ru/3djYAI9xQ9Dp/
Price checking is far easier online.
Home delivery adds an extra layer of convenience.
In the case of chronic treatments, automatic reorders save time.
Privacy is another key benefit for many customers.
mostbet cum depun bani [url=www.mostbet57648.help]www.mostbet57648.help[/url]
melbet официальный сайт без блокировки [url=http://melbet16740.help/]http://melbet16740.help/[/url]
mostbet играть в авиатор [url=https://mostbet26849.help/]https://mostbet26849.help/[/url]
mostbet loteria [url=https://www.mostbet2001.help]https://www.mostbet2001.help[/url]
mostbet MDL [url=https://mostbet25863.help]mostbet MDL[/url]
mostbet bonus hesabı [url=www.mostbet29401.help]www.mostbet29401.help[/url]
1win-kg [url=https://1win38047.help]https://1win38047.help[/url]
мостбет вывод не пришел [url=https://mostbet37461.help/]https://mostbet37461.help/[/url]
Умение стильно одеваться имеет большое значение в формировании образа.
Она помогает выразить характер и ощущать внутренний комфорт.
Современный стиль влияет на восприятие окружающих.
В повседневной жизни одежда может повышать самооценку.
http://forum.drustvogil-galad.si/index.php/topic,242986.new.html#new
Продуманный гардероб облегчает повседневное взаимодействие.
При выборе одежды важно учитывать собственный вкус и контекст.
Мода дают возможность обновлять образ.
Таким образом, умение стильно одеваться положительно влияет на самоощущение.
1win intrare prin mirror [url=https://1win14578.help/]https://1win14578.help/[/url]
мелбет восстановить пароль [url=www.melbet90162.help]мелбет восстановить пароль[/url]
1win depunere in asteptare [url=https://1win26495.help]https://1win26495.help[/url]
1win mirror for download [url=https://www.1win21894.help]https://www.1win21894.help[/url]
mostbet aviator qoidalari [url=mostbet20814.help]mostbet20814.help[/url]
Purchasing medicine online is extremely handy.
You can browse 24/7 with no leaving home.
Internet pharmacies let you quickly compare prices and find the best deal.
sildenafil interactions
The order is shipped directly to your doorstep, saving time and effort.
Plus, there is no requirement to stand in annoying lines at a brick-and-mortar store.
For those with ongoing conditions, automatic refills ensure treatment hassle‑free.
Overall, digital shopping for medicine saves your hours and peace of mind.
Модный образ создаёт положительное первое впечатление.
Собственная внешность ведёт диалог ещё до первого слова.
Продуманный стиль ощутимо повышает уверенность и эмоциональный фон.
Подобный подход демонстрирует внимание как к собственному я, так и к другим людям.
Посредством наряд вы можете проявить личность и предпочтения без слов.
Окружающие неосознанно воспринимают стильно одетых персон более компетентными и организованными.
Следовательно, инвестиции в свой стиль — это выгодная инвестиция в собственное развитие.
https://www.malta-forum.de/viewtopic.php?f=2&t=211
mostbet не приходит код [url=https://www.mostbet18374.help]https://www.mostbet18374.help[/url]
melbet киргизия android apk [url=https://melbet10463.help]melbet киргизия android apk[/url]
lucky jet game mostbet [url=https://mostbet2014.help]lucky jet game mostbet[/url]
mostbet последняя версия apk [url=http://mostbet78432.help]http://mostbet78432.help[/url]
пин ап app [url=https://pinup73594.help/]https://pinup73594.help/[/url]
mostbet пополнение не проходит [url=http://mostbet92018.help/]http://mostbet92018.help/[/url]
Сегодня кроссовки завоевали огромную известность везде.
Их носят представители всевозможных поколений и родов занятий.
Ключевая причина столь высокой любви — комфорт и практичность.
https://balenciager.ru/info/911-klassicheskaya-gitara-i-eyo-vliyanie-na-sovremennye-zhanry/
Ведущие бренды регулярно представляют свежие линейки, усиливая ажиотаж.
Кроссовки надёжно закрепились в городскую культуру и стиль жизни.
С каждым сезоном их популярность лишь увеличивается.
1win Киргизия [url=https://1win56483.help]https://1win56483.help[/url]
1win email bilan kirish [url=http://1win5752.help]1win email bilan kirish[/url]
мостбет free spins [url=https://mostbet92018.help/]https://mostbet92018.help/[/url]
узаконивание перепланировки квартиры [url=https://pereplanirovka-kvartir15.ru/]pereplanirovka-kvartir15.ru[/url] .
super cherry 1000 [url=https://tvtabalong.com/super-cherry-bei-casino777-verfugbarkeit-bonus-angebote-und-spielerfahrung]super cherry 1000[/url]
crazy time play [url=https://darulfatwa.org.au/crazy-time-payout-table-complete-reference-for-every-bet-type-including-top-slot-multiplied-payouts]crazy time play[/url]
1win live betting app [url=http://1win5530.ru]1win live betting app[/url]
1win bonus activation [url=https://1win5526.ru]https://1win5526.ru[/url]
vavada mines demo [url=https://www.vavada2002.help]https://www.vavada2002.help[/url]
1xbet turkiye [url=https://nupel.net/]nupel.net[/url] .
перепланировка в москве [url=https://pereplanirovka-kvartir16.ru/]pereplanirovka-kvartir16.ru[/url] .
vavada mines demo [url=https://vavada2006.help/]https://vavada2006.help/[/url]
план перепланировки квартиры [url=https://proekt-pereplanirovki-kvartiry26.ru/]план перепланировки квартиры[/url] .
melbet kz зеркало без vpn [url=http://melbet48271.help/]http://melbet48271.help/[/url]
мелбет джекпот слоты [url=https://melbet58706.help]https://melbet58706.help[/url]
mostbet ikki bosqichli [url=https://mostbet75930.help]https://mostbet75930.help[/url]
мостбет хуруҷи маблағ [url=https://www.mostbet05741.help]https://www.mostbet05741.help[/url]
1xbet giri? azerbaycan [url=https://karamanozelenvar.com/]1xbet giri? azerbaycan[/url] .
1xbet azeri [url=https://parcabankasi.com/]1xbet azeri[/url] .
сколько стоит проект перепланировки квартиры [url=https://proekt-pereplanirovki-kvartiry27.ru/]proekt-pereplanirovki-kvartiry27.ru[/url] .
1xbet az?rbaycan [url=https://philippeauguin.org/]philippeauguin.org[/url] .
1xbet azerbaycan [url=https://bizimbaharatci.com/]1xbet azerbaycan[/url] .
ии для школьников и студентов [url=https://nejroset-dlya-referatov-21.ru/]nejroset-dlya-referatov-21.ru[/url] .
сделать реферат [url=https://nejroset-dlya-referatov-20.ru/]nejroset-dlya-referatov-20.ru[/url] .
нейросеть текст для учебы [url=https://nejroset-dlya-referatov-22.ru/]nejroset-dlya-referatov-22.ru[/url] .
1win cashback apuestas [url=1win3005.mobi]1win3005.mobi[/url]
mostbet kod noto‘g‘ri [url=https://mostbet65047.help]https://mostbet65047.help[/url]
mostbet лимит ставок [url=https://mostbet14362.help]mostbet лимит ставок[/url]
1xbet azerbaijan [url=https://ulusalgenclikparlamentosu.net/]1xbet azerbaijan[/url] .
сайт для рефератов [url=https://nejroset-dlya-referatov-25.ru/]nejroset-dlya-referatov-25.ru[/url] .
автоматические карнизы [url=https://elektrokarniz11.ru/]автоматические карнизы[/url] .
автоматические гардины для штор [url=https://elektrokarnizmsk.ru/]автоматические гардины для штор[/url] .
нейросети для студентов [url=https://nejroset-dlya-referatov-28.ru/]нейросети для студентов[/url] .
электрический карниз для штор купить [url=https://elektrokarnizmoskva.ru/]электрический карниз для штор купить[/url] .
jak ověřit účet na mostbet [url=http://mostbet2016.help]http://mostbet2016.help[/url]
карниз электро [url=https://elektrokarnizy-dlya-shtor.ru/]elektrokarnizy-dlya-shtor.ru[/url] .
1win plinko oyini [url=https://1win78514.help]https://1win78514.help[/url]
melbet lucky jet mise [url=https://melbet38470.help]melbet lucky jet mise[/url]
mostbet official page [url=http://mostbet62741.help]http://mostbet62741.help[/url]
pin-up bepul aylantirish [url=https://pinup28750.help]https://pinup28750.help[/url]
электрокарниз москва [url=https://elektrokarniz-nedorogo77.ru/]электрокарниз москва[/url] .
нейросеть для учебы [url=https://nejroset-dlya-referatov-23.ru/]нейросеть для учебы[/url] .
электрический карниз для штор купить [url=https://karniz-motorizovannyj77.ru/]karniz-motorizovannyj77.ru[/url] .
электрокарнизы москва [url=https://elektrokarnizy10.ru/]электрокарнизы москва[/url] .
электрокранизы [url=https://elektrokarnizy-dlya-shtor150.ru/]электрокранизы[/url] .
карнизы с электроприводом [url=https://avtomaticheskie-karnizy.ru/]avtomaticheskie-karnizy.ru[/url] .
карнизы с электроприводом [url=https://elektrokarnizy777.ru/]elektrokarnizy777.ru[/url] .
автоматические карнизы [url=https://elektrokarnizy33.ru/]автоматические карнизы[/url] .
нейросеть для рефератов [url=https://nejroset-dlya-referatov-29.ru/]нейросеть для рефератов[/url] .
жалюзи с электроприводом на дистанционном управлении [url=https://elektricheskie-zhalyuzi5.ru/]жалюзи с электроприводом на дистанционном управлении[/url] .
лучшая нейросеть для учебы [url=https://nejroset-dlya-referatov-26.ru/]nejroset-dlya-referatov-26.ru[/url] .
рулонные жалюзи купить в москве [url=https://elektricheskie-rulonnye-shtory77.ru/]elektricheskie-rulonnye-shtory77.ru[/url] .
1вин хуруҷ ба корт [url=https://www.1win34605.help]1вин хуруҷ ба корт[/url]
mostbet чат поддержки [url=https://mostbet29056.help]mostbet чат поддержки[/url]
Buying medicine online is very convenient.
You can shop 24/7 with no stepping out of your house.
Online pharmacies allow you to easily check costs and find the lowest deal.
pregabalin common side effects
The purchase is delivered directly to your door, saving travel and hassle.
Moreover, there is no requirement to wait in annoying queues at a brick-and-mortar pharmacy.
For ongoing illnesses, automatic refills ensure treatment hassle‑free.
In short, online shopping for medicine saves your hours and energy.
sweet bonanza висока волатильність [url=https://sweet-bonanza83096.help]https://sweet-bonanza83096.help[/url]
готовые рулонные шторы купить в москве [url=https://rulonnye-zhalyuzi-avtomaticheskie.ru/]готовые рулонные шторы купить в москве[/url] .
автоматические рулонные шторы на створку [url=https://elektricheskie-rulonnye-shtory90.ru/]elektricheskie-rulonnye-shtory90.ru[/url] .
готовые рулонные шторы купить в москве [url=https://elektricheskie-rulonnye-shtory.ru/]готовые рулонные шторы купить в москве[/url] .
мелбет киргизия ставки на спорт [url=http://melbet09374.help/]http://melbet09374.help/[/url]
SARS outage [url=https://south-africa-outage.online/]south-africa-outage.online[/url] .
нейросети для студентов [url=https://nejroset-dlya-referatov-24.ru/]нейросети для студентов[/url] .
1xbet tr giri? [url=https://1xbet-67.com/]1xbet-67.com[/url] .
электрические гардины [url=https://prokarniz17.ru/]prokarniz17.ru[/url] .
1win qeydiyyat [url=www.1win69215.help]www.1win69215.help[/url]
1win autenticación [url=1win67052.help]1win67052.help[/url]
1xbet yeni adresi [url=https://1xbet-71.com/]1xbet yeni adresi[/url] .
1xbet yeni adresi [url=https://1xbet-70.com/]1xbet yeni adresi[/url] .
1x lite [url=https://1xbet-68.com/]1xbet-68.com[/url] .
xbet [url=https://1xbet-69.com/]xbet[/url] .
мелбет чат киргизия [url=https://melbet90378.help]мелбет чат киргизия[/url]
1x bet [url=https://1xbet-giris-69.com/]1x bet[/url] .
1xbet tr giri? [url=https://1xbet-giris-68.com/]1xbet-giris-68.com[/url] .
1xbetgiri? [url=https://1xbet-giris-67.com/]1xbet-giris-67.com[/url] .
мелбет sign in [url=www.melbet82104.help]мелбет sign in[/url]
pin-up free bet [url=http://pinup47068.help/]http://pinup47068.help/[/url]
1win mərc turniri [url=https://1win84513.help]https://1win84513.help[/url]
mostbet app yuklab olish [url=https://mostbet83625.help/]https://mostbet83625.help/[/url]
нейросеть реферат [url=https://nejroset-dlya-referatov-27.ru/]нейросеть реферат[/url] .
mostbet Oʻzbekiston apelsin [url=www.mostbet74183.help]mostbet Oʻzbekiston apelsin[/url]
1xbet ?ye ol [url=https://1xbet-giris-70.com/]1xbet-giris-70.com[/url] .
1 x bet [url=https://1xbet-giris-71.com/]1 x bet[/url] .
раскрутка сайтов фирма александр [url=https://loveshtory.com/svoimi-rukami/stati/provedenie-tehnicheskogo-audita-sajta-kljuchevye-shagi-i-rekomendacii/]раскрутка сайтов фирма александр[/url]
раскрутка сайта цена в москве под ключ александр [url=https://arh112.ru/reklama-info/internet/16797-masterstvo-seo-kak-privlech-vnimanie-interneta-k-vashemu-saytu]раскрутка сайта цена в москве под ключ александр[/url]
seo partners [url=https://ladystory.ru/?p=217760]seo partners[/url]
продвижение сайта топ москва александр [url=https://www.autodela.ru/main/blogs/Ira_Avto/optimizaciya-seo-vazhnost-kompleksnogo-seo-audita]продвижение сайта топ москва александр[/url]
1win crash castiguri [url=www.1win37195.help]www.1win37195.help[/url]
мостбет ставки [url=https://mostbet18247.help/]https://mostbet18247.help/[/url]
1win install app [url=1win38409.help]1win install app[/url]
Поиск по номеру телефона [url=https://finderphone.ru/]finderphone.ru[/url] .
seo заказать мск сео [url=https://megabook.ru/article/%D0%9F%D1%80%D0%BE%D1%84%D0%B5%D1%81%D1%81%D0%B8%D0%BE%D0%BD%D0%B0%D0%BB%D1%8C%D0%BD%D0%BE%D0%B5%20%D0%BF%D1%80%D0%BE%D0%B4%D0%B2%D0%B8%D0%B6%D0%B5%D0%BD%D0%B8%D0%B5%20%D1%81%D0%B0%D0%B9%D1%82%D0%BE%D0%B2%3a%20%D0%BA%D0%B0%D0%BA%20%D0%BC%D0%B0%D0%B3%D0%B0%D0%B7%D0%B8%D0%BD%D1%83%20%D1%80%D0%B0%D1%81%D1%82%D0%B8%20%D0%B2%20%D0%BA%D0%BE%D0%BD%D0%BA%D1%83%D1%80%D0%B5%D0%BD%D1%82%D0%BD%D0%BE%D0%B9%20%D0%BE%D0%B1%D0%BB%D0%B0%D1%81%D1%82%D0%B8]seo заказать мск сео[/url]
помощь в разработке сайта [url=https://bibliotekar.ru/media/prodvizhenie-po-trafiku-plyusy-i-minusy-raboty-s-chastnym-seo-optimizatorom.htm]помощь в разработке сайта[/url]
арендовать яхту сколько стоит [url=https://arenda-yakhty-spb-9.ru/]arenda-yakhty-spb-9.ru[/url]
аренда катера спб [url=https://arenda-yakhty-spb-8.ru/]аренда катера спб[/url]
яхта на 3 часа [url=https://arenda-yakhty-spb-10.ru/]яхта на 3 часа[/url]
аренда яхты в петербурге [url=https://arenda-yakhty-spb-11.ru/]аренда яхты в петербурге[/url]
mostbet Oʻzbekistonda payme [url=https://mostbet18401.help/]mostbet Oʻzbekistonda payme[/url]
1win kirish havola [url=https://1win87240.help]https://1win87240.help[/url]
1win комиссия visa [url=https://www.1win56893.help]1win комиссия visa[/url]
mostbet илова кардани корт [url=http://mostbet19382.help]http://mostbet19382.help[/url]
сео консультация москва [url=https://e-news.su/kompyuternye-obzory-i-poleznosti/489441-chto-takoe-prodvizhenie-sajta.html]сео консультация москва[/url]
поисковое продвижение и раскрутка сайта александр [url=https://dubna.ru/article/2025/02/delat-audit-sayta-i-tsena-kriterii-vybora-seo-mastera]поисковое продвижение и раскрутка сайта александр[/url]
услуга оптимизации сайта поисковые системы [url=https://gus-info.ru/digest/digest_3013.html]услуга оптимизации сайта поисковые системы[/url]
pin-up android uchun rasmiy apk [url=http://pinup39174.help]http://pinup39174.help[/url]
раскрутка корпоративного сайта цена александр [url=https://gorodpavlodar.kz/News_110307_3.html]раскрутка корпоративного сайта цена александр[/url]
раскрутка сайтов интернет александр [url=https://morevokne.ru/?p=33900]раскрутка сайтов интернет александр[/url]
продвижение и раскрутка сайтов в москве цены александр [url=https://donvesti.ru/news/38092]продвижение и раскрутка сайтов в москве цены александр[/url]
mostbet visa ilə çıxarış [url=www.mostbet2015.help]www.mostbet2015.help[/url]
melbet intrare site oficial [url=melbet07892.help]melbet07892.help[/url]
mostbet bónuszkód érvénytelen [url=www.mostbet2022.help]www.mostbet2022.help[/url]
проверка позиций сайта онлайн profil-met.ru [url=https://newxboxone.ru/prodvizhenie-sajtov-kak-vybrat-agentstvo-kotoromu-mozhno-doveryat]проверка позиций сайта онлайн profil-met.ru[/url]
москва поисковая раскрутка [url=https://volga.news/article/756868.html]москва поисковая раскрутка[/url]
компания продвижение сайта александр [url=http://moemesto.ru/articles/seo3/moemesto1983.html]компания продвижение сайта александр[/url]
услуги сео москва [url=https://newsomsk.ru/news/152386-seo_moskva_realny_keys_rosta_lokalnogo_brenda_s_ud/]услуги сео москва[/url]
заказать сайт с продвижением александр [url=https://dettka.com/kakimi-metrikami-izmerit-effektivnost-digital%e2%80%91strategii-dlya-stolichnogo-biznesa/]заказать сайт с продвижением александр[/url]
продвижение сайтов услуги мск seo [url=https://rugraphics.ru/bez-rubriki/prodvizhenie-saytov-v-moskve-kak-regionalnye-faktory-vliyayut-na-seo-rezultaty]продвижение сайтов услуги мск seo[/url]
уникальная раскрутка сайта москва [url=https://interviewrussia.ru/interesno-obo-vsyom/audit-sajta-czena-ot-chego-zavisit-stoimost-tehnicheskogo-analiza-i-pochemu-ne-stoit-ekonomit/]уникальная раскрутка сайта москва[/url]
cum primesc free spins la mostbet [url=https://mostbet40596.help]cum primesc free spins la mostbet[/url]
mostbet bonus na lucky jet [url=mostbet32570.help]mostbet bonus na lucky jet[/url]
1win kripto ödəniş [url=http://1win64218.help/]1win kripto ödəniş[/url]
Buying medications online is very convenient.
You can browse 24/7 with no stepping out of your house.
Internet pharmacies let you quickly check prices and spot the lowest deal.
high blood pressure erectile dysfunction
Your purchase is shipped straight to your door, cutting time and hassle.
Also, there is no need to wait in annoying lines at a local pharmacy.
For ongoing conditions, auto refills ensure treatment stress‑free.
In short, digital shopping for meds preserves your time and peace of mind.
продвижение сайтов москва казань [url=https://tyumen-news.net/other/2025/07/15/509294.html]продвижение сайтов москва казань[/url]
1win iphone [url=https://1winkg.in.net]https://1winkg.in.net[/url]
быстрое продвижение сайта москва компания [url=https://smolensk-i.ru/partners/599931_599931]быстрое продвижение сайта москва компания[/url]
продвинуть сайт в топ поиска с гарантией результата москва [url=https://golubevod.net/seo-agentstvo-moskva.html]продвинуть сайт в топ поиска с гарантией результата москва[/url]
seo сопровождение [url=https://astera.ru/articles/seo-prodvizhenie-agentstvo/]seo сопровождение[/url]
seo продвижение москва сайт [url=https://in.gallerix.ru/journal/internet/201811/zakazat-raskrutku-sayta-v-moskve-kak-vybrat-nadezhnogo-podryadchika-bez-finansovyx-riskov/]seo продвижение москва сайт[/url]
1win rebate bonus [url=https://www.1win5527.ru]https://www.1win5527.ru[/url]
mostbet ставки на футбол [url=www.mostbet76480.help]www.mostbet76480.help[/url]
1win верификатсия [url=https://1win14675.help/]https://1win14675.help/[/url]
1win вывод на карту сколько идет [url=1win86307.help]1win86307.help[/url]
seo раскрутка в москве [url=https://progorod59.ru/longrid/view/v-permi-ozidaetsa-rezkoe-poteplenie-meteorolog-rasskazala-o-pogode-v-prikame-v-etom-mesace]seo раскрутка в москве[/url]
продвижение зарубежных сайтов [url=https://secondstreet.ru/blog/kak-bystro-i-jeffektivno-prodvinut-sajt-v-moskve-proverennye-kanaly-realnyj-bjudzhet-i-tochki-rosta-dlja-biznesa.html]продвижение зарубежных сайтов[/url]
продвижение сайт москва и московская александр [url=https://tia-ostrova.ru/news/articles/197642/]продвижение сайт москва и московская александр[/url]
купить данные [url=https://gobasego-2.ru/]купить данные[/url] .
заказать кухню через интернет [url=https://zakazat-kuhnyu-19.ru]заказать кухню через интернет[/url]
заказать кухню под ключ [url=https://zakazat-kuhnyu-18.ru]https://zakazat-kuhnyu-18.ru[/url]
заказать индивидуальную кухню [url=https://zakazat-kuhnyu-17.ru]https://zakazat-kuhnyu-17.ru[/url]
заказать кухню по индивидуальному проекту [url=https://zakazat-kuhnyu-19.ru]заказать кухню по индивидуальному проекту[/url]
кухню заказать [url=https://zakazat-kuhnyu-20.ru]кухню заказать[/url]
заказать кухню каталог [url=https://zakazat-kuhnyu-21.ru]заказать кухню каталог[/url]
На этом ресурсе содержится ценная материалы.
Тут есть возможность найти множество интересного для решения задач.
Данный источник способен помочь изучить в многих вопросах.
Советуем детально прочитать размещенные здесь материалы.
https://kommunar-press.ru/content/1004/
мелбет вывод на карту кыргызстан [url=http://melbet74825.help/]мелбет вывод на карту кыргызстан[/url]
mostbet uzcard depozit [url=https://mostbet91372.help/]mostbet uzcard depozit[/url]
mostbet верификация сколько дней [url=https://www.mostbet73481.help]mostbet верификация сколько дней[/url]
кухни на заказ производство спб [url=https://kuhni-spb-58.ru]https://kuhni-spb-58.ru[/url]
изготовление кухни на заказ в спб [url=https://kuhni-spb-57.ru]https://kuhni-spb-57.ru[/url]
1win Uganda login [url=https://1win5743.help/]https://1win5743.help/[/url]
mostbet пополнение [url=https://mostbet71852.help]https://mostbet71852.help[/url]
кухня на заказ спб от производителя недорого [url=https://kuhni-spb-59.ru]кухня на заказ спб от производителя недорого[/url]
современные кухни на заказ в спб [url=https://kuhni-spb-61.ru]современные кухни на заказ в спб[/url]
кухни на заказ спб недорого с ценами [url=https://kuhni-spb-60.ru]https://kuhni-spb-60.ru[/url]
ролл жалюзи на окна [url=https://rulonnye-shtory-s-elektroprivodom10.ru]https://rulonnye-shtory-s-elektroprivodom10.ru[/url]
рулонные шторы окна заказ [url=https://elektricheskie-rulonnye-shtory99.ru]https://elektricheskie-rulonnye-shtory99.ru[/url]
для рулонных штор [url=https://rulonnye-shtory-s-elektroprivodom190.ru]https://rulonnye-shtory-s-elektroprivodom190.ru[/url]
электрические гардины для штор [url=https://elektrokarniz150.ru]https://elektrokarniz150.ru[/url]
роликовые шторы [url=https://rulonnye-shtory-s-elektroprivodom17.ru]роликовые шторы[/url]
роликовые шторы [url=https://avtomaticheskie-rulonnye-shtory50.ru]роликовые шторы[/url]
рулонные шторы на электроприводе [url=https://rulonnye-shtory-s-elektroprivodom11.ru]рулонные шторы на электроприводе[/url]
1win пополнение без комиссии карта [url=https://www.1win56183.help]https://www.1win56183.help[/url]
1win как зарегистрироваться [url=http://1win72951.help/]1win как зарегистрироваться[/url]
1win depunere fara comision [url=https://1win60823.help]1win depunere fara comision[/url]
для рулонных штор [url=https://rulonnye-elektroshtory.ru]https://rulonnye-elektroshtory.ru[/url]
Hi there mates, its fantastic article about cultureand fully explained, keep it up all the time.
Candy Blitz Bombs
На представленном сайте размещена нужная материалы.
Любой желающий в состоянии обнаружить здесь много актуального для своих нужд.
Статьи отличаются достоверностью и актуальностью, а это критично для принятия решений.
Рекомендуем регулярно заходить на данный ресурс, чтобы быть в курсе.
меф наркотик
рулонные шторы широкие [url=https://elektricheskie-rulonnye-shtory15.ru]https://elektricheskie-rulonnye-shtory15.ru[/url]
1win мегапей пополнение [url=http://1win94317.help/]1win мегапей пополнение[/url]
mostbet app se blocheaza [url=https://mostbet13829.help/]https://mostbet13829.help/[/url]
тест3 [url=https://gobasego-3.ru/]тест3[/url] .
ии анализ рекламы [url=https://reklamnyj-kreativ18.ru]ии анализ рекламы[/url]
super cherry 5000 demo [url=https://press.iaifa.ac.id/super-cherry-in-schweizer-online-casinos-wo-du-legal-spielst-was-die-boni-bieten-und-welche-zahlungsmethoden-funktionieren/]super cherry 5000 demo[/url]
crazy time online [url=https://ead.unimar.br/crazy-time-maximum-win-how-25000-actually-happens-and-which-bonus-round-delivers-it/]crazy time online[/url]
структура креатива реклама [url=https://reklamnyj-kreativ19.ru]https://reklamnyj-kreativ19.ru[/url]
рулонные шторы производство [url=https://avtomaticheskie-rulonnye-shtory5.ru]https://avtomaticheskie-rulonnye-shtory5.ru[/url]
мостбет crash игра [url=http://mostbet09654.help]http://mostbet09654.help[/url]
улучшение креативов [url=https://reklamnyj-kreativ20.ru]улучшение креативов[/url]
1win фрибет за регистрацию [url=https://1win92486.help/]https://1win92486.help/[/url]
mostbet demo mines [url=https://mostbet59371.help/]mostbet demo mines[/url]
На этом данном сайте представлена полезная сведения.
На этом портале вы сможете обнаружить много полезного для себя.
Этот ресурс дает возможность разобраться в различных темах.
Предлагаем подробно посмотреть опубликованные на этом сайте советы.
https://permgorod.ru/novosti/186-samye-redkie-i-eksklyuzivnye-versii-royal-oak/
скачать видео с ютуба без вирусов [url=https://skachat-video-s-youtube-11.ru]https://skachat-video-s-youtube-11.ru[/url]
youtube скачать видео [url=https://skachat-video-s-youtube-9.ru]https://skachat-video-s-youtube-9.ru[/url]
сайт для скачивания видео с ютуба [url=https://skachat-video-s-youtube-10.ru]https://skachat-video-s-youtube-10.ru[/url]
загрузчик видео с ютуба [url=https://skachat-video-s-youtube-12.ru]загрузчик видео с ютуба[/url]
melbet официальный сайт вход [url=www.melbet45163.help]www.melbet45163.help[/url]
mostbet czat na żywo [url=https://www.mostbet2002.help]https://www.mostbet2002.help[/url]
купить кабель цены https://kabel-cena-za-metr-1.ru
нарколог на дом цена воронеж [url=https://narkolog-na-dom-voronezh-11.ru]https://narkolog-na-dom-voronezh-11.ru[/url]
[url=https://svetotekhnika-1.ru]светотехника[/url]
вызвать нарколога [url=https://narkolog-na-dom-voronezh-12.ru]https://narkolog-na-dom-voronezh-12.ru[/url]
вызов нарколога на дом воронеж [url=https://narkolog-na-dom-voronezh-10.ru]вызов нарколога на дом воронеж[/url]
мелбет куда вводить промокод [url=https://melbet49375.help]мелбет куда вводить промокод[/url]
нарколог на дом отзывы [url=https://narkolog-na-dom-voronezh-13.ru]нарколог на дом отзывы[/url]
нарколог на дом анонимно [url=https://narkolog-na-dom-voronezh-14.ru]нарколог на дом анонимно[/url]
капельница от запоя самара [url=https://kapelnicza-ot-pokhmelya-samara-22.ru]https://kapelnicza-ot-pokhmelya-samara-22.ru[/url]
1win ҳисобкунаки бурд [url=http://1win26514.help/]1win ҳисобкунаки бурд[/url]
pin-up erkən çıxış [url=pinup2010.help]pin-up erkən çıxış[/url]
капельница от похмелья купить [url=https://kapelnicza-ot-pokhmelya-samara-23.ru]https://kapelnicza-ot-pokhmelya-samara-23.ru[/url]
капельница от похмелья самара [url=https://kapelnicza-ot-pokhmelya-samara-24.ru]капельница от похмелья самара[/url]
1win mines играть [url=1win59801.help]1win59801.help[/url]
мостбет авиатор играть [url=https://mostbet15384.help/]мостбет авиатор играть[/url]
how to sign up on mostbet [url=https://mostbet94827.help/]https://mostbet94827.help/[/url]
На конкретном сайте содержится ценная сведения.
На этом портале есть возможность почерпнуть немало полезного для себя.
Представленный веб-сайт способен помочь изучить в многих проблемах.
Советуем внимательно посмотреть размещенные на этом сайте советы.
https://qrmoda.ru/
наркологическая помощь на дому [url=https://narkolog-na-dom-samara-10.ru]наркологическая помощь на дому[/url]
частный нарколог на дом анонимно [url=https://narkolog-na-dom-samara-9.ru]https://narkolog-na-dom-samara-9.ru[/url]
поставить капельницу на дому цена екатеринбург [url=https://kapelnicza-ot-pokhmelya-ekaterinburg-14.ru]https://kapelnicza-ot-pokhmelya-ekaterinburg-14.ru[/url]
капельница на дому в екатеринбурге [url=https://kapelnicza-ot-pokhmelya-ekaterinburg-15.ru]https://kapelnicza-ot-pokhmelya-ekaterinburg-15.ru[/url]
стоимость капельницы в екатеринбурге [url=https://kapelnicza-ot-pokhmelya-ekaterinburg-16.ru]https://kapelnicza-ot-pokhmelya-ekaterinburg-16.ru[/url]
1win apk скачать [url=https://1win68503.help]https://1win68503.help[/url]
мелбет матч центр [url=www.melbet94130.help]мелбет матч центр[/url]
капельница от алкоголя [url=https://kapelnicza-ot-pokhmelya-ekaterinburg-18.ru]капельница от алкоголя[/url]
нарколог выездной [url=https://narkolog-na-dom-nizhnij-novgorod-2.ru]нарколог выездной[/url]
вывод из запоя стационар [url=https://vyvod-iz-zapoya-v-staczionare-nizhnij-novgorod-17.ru]вывод из запоя стационар[/url]
капельница от запоя в стационаре [url=https://vyvod-iz-zapoya-v-staczionare-nizhnij-novgorod-18.ru]https://vyvod-iz-zapoya-v-staczionare-nizhnij-novgorod-18.ru[/url]
поставить капельницу цена в екатеринбурге [url=https://kapelnicza-ot-pokhmelya-ekaterinburg-17.ru]https://kapelnicza-ot-pokhmelya-ekaterinburg-17.ru[/url]
помощь наркологическая [url=https://narkologicheskaya-pomoshh-nizhnij-novgorod-10.ru]помощь наркологическая[/url]
вывод из запоя в стационаре в нижнем новгороде [url=https://vyvod-iz-zapoya-v-staczionare-nizhnij-novgorod-16.ru]https://vyvod-iz-zapoya-v-staczionare-nizhnij-novgorod-16.ru[/url]
новая строительная техника Volvo [url=https://www.tech-group.com.ua]https://www.tech-group.com.ua[/url]
aviator free spins malawi [url=https://aviator67093.help/]https://aviator67093.help/[/url]
vavada bonus kod za cashback [url=vavada2008.help]vavada2008.help[/url]
mines дар мелбет [url=https://melbet39704.help]https://melbet39704.help[/url]
В наши дни сеть является жизненно важной составляющей нашей повседневности.
Всемирная сеть обеспечивает быстрый доступ к огромному массиву знаний.
Благодаря всемирной паутине люди в состоянии общаться с близкими и коллегами в любом месте планеты.
Для труда, обучения и бизнеса интернет превратилась в главный канал связи.
https://luxe.metamoda.ru/patek-philippe-nautilus-vs-other-luxury-sports-watches-5556371/
Помимо этого, интернет предоставляет бесконечные варианты для досуга и саморазвития.
Без интернета сегодня трудно вообразить как домашние, так и профессиональные дела.
Именно поэтому наличие к стабильному сетевому соединению воспринимается базовой потребностью современного человека.
мелбет вывод средств [url=www.melbet73624.help]www.melbet73624.help[/url]
melbet tutoriel aviator [url=https://www.melbet04739.help]melbet tutoriel aviator[/url]
vavada nie mogę się zalogować [url=vavada2001.help]vavada2001.help[/url]
casino bonus malaysia [url=https://100cuci-8.com]casino bonus malaysia[/url]
100cuci pragmatic [url=https://www.100cuci-6.com]100cuci pragmatic[/url]
100cuci sign in [url=https://www.100cuci-9.com]100cuci sign in[/url]
100cuci android [url=100cuci-10.com]100cuci android[/url]
100cuci pragmatic [url=http://www.100cuci-7.com]100cuci pragmatic[/url]
mostbet Oʻzbekiston aviator demo [url=http://mostbet38506.help]mostbet Oʻzbekiston aviator demo[/url]
[url=https://smm-nakrutka-2.ru]смм накрутка[/url]
phuket thailand property for sale [url=https://real-estate-for-sale-in-phuket-2.com]phuket thailand property for sale[/url]
luxury phuket villas for sale [url=https://villas-for-sale-in-phuket-4.com]luxury phuket villas for sale[/url]
phuket thailand apartments for sale [url=apartments-for-sale-in-phuket-5.com]phuket thailand apartments for sale[/url]
investment apartments for sale in phuket [url=https://apartments-for-sale-in-phuket-4.com]investment apartments for sale in phuket[/url]
villas in phuket thailand for sale [url=https://villas-for-sale-in-phuket-5.com]villas in phuket thailand for sale[/url]
browser games [url=https://thinkofgames.com/reviews-of-thinkofgames-com-unveiling-the-gaming-experience/]https://thinkofgames.com/reviews-of-thinkofgames-com-unveiling-the-gaming-experience/[/url]
1win PC üçün [url=1win81936.help]1win PC üçün[/url]
Responsible gaming means maintaining control over your hours and money.
It includes establishing boundaries before you begin playing.
You should never try to recover losses.
Tez888
Safe play also requires recognizing that results are determined by luck, not skill.
It encourages taking frequent pauses and steering clear of gambling when upset or under the influence.
Known tools like deposit limits and self-exclusion help users stay in safe condition.
At its core, responsible gambling is focused on enjoying the game as entertainment, not as a method to make money.
تسجيل دخول برنامج 888 [url=888starz-egypt9.com]https://888starz-egypt9.com/[/url]
888 starz uz [url=https://www.888starz-uz1.org]888 starz uz[/url] .
круглосуточный вывод из запоя нарколог 24 [url=https://vyvod-iz-zapoya-na-domu-sankt-peterburg-18.ru]https://vyvod-iz-zapoya-na-domu-sankt-peterburg-18.ru[/url]
вывод из запоя [url=https://vyvod-iz-zapoya-na-domu-sankt-peterburg-19.ru]вывод из запоя[/url]
1win bank kartadan yechish [url=https://1win49027.help]https://1win49027.help[/url]
single melbet [url=http://melbet63149.help]single melbet[/url]
[url=https://membrannaya-krovlya-montazh.ru]мембранная кровля[/url]
продажа данных [url=https://gobasego-2.ru/]gobasego-2.ru[/url] .
1win kyc documents [url=https://1win5528.ru/]https://1win5528.ru/[/url]
open 1win account [url=https://1win42605.help]open 1win account[/url]
sweet bonanza фрібет за реєстрацію [url=http://sweet-bonanza27450.help/]http://sweet-bonanza27450.help/[/url]
888.starz [url=www.888starz-uzbekistan4.com/]www.888starz-uzbekistan4.com/[/url] .
1xbet güncel giriş [url=https://hhnbigger.com]1xbet güncel giriş[/url]
помощь вывода запоя нарколог 24 [url=https://vyvod-iz-zapoya-na-domu-sankt-peterburg-20.ru]https://vyvod-iz-zapoya-na-domu-sankt-peterburg-20.ru[/url]
вывод из запоя на дому спб цены [url=https://vyvod-iz-zapoya-na-domu-sankt-peterburg-22.ru]https://vyvod-iz-zapoya-na-domu-sankt-peterburg-22.ru[/url]
выведение из запоя в спб [url=https://vyvod-iz-zapoya-na-domu-sankt-peterburg-21.ru]https://vyvod-iz-zapoya-na-domu-sankt-peterburg-21.ru[/url]
xbet [url=https://sillecomlek.com]xbet[/url]
1xbet spor bahislerinin adresi [url=https://alokitabevi.com]1xbet spor bahislerinin adresi[/url]
xbet [url=https://toptancikapinda.com]xbet[/url]
1xbet türkiye giriş [url=https://izmireniyipsikolog.com]1xbet türkiye giriş[/url]
888starz sayt [url=https://www.888starz-bet2.com]https://www.888starz-bet2.com[/url] .
888 казино [url=www.888starz-bet2.com]www.888starz-bet2.com[/url] .
рулонные шторы на пластиковые окна с электроприводом [url=https://rulonnye-shtory-s-elektroprivodom10.ru]рулонные шторы на пластиковые окна с электроприводом[/url]
рулонные шторы производство [url=https://avtomaticheskie-rulonnye-shtory50.ru]https://avtomaticheskie-rulonnye-shtory50.ru[/url]
mostbet app înregistrare [url=https://mostbet87342.help]https://mostbet87342.help[/url]
автоматические рулонные шторы на окна [url=https://rulonnye-shtory-s-elektroprivodom10.ru]автоматические рулонные шторы на окна[/url]
1xbet giriş linki [url=https://parkvebahceler.com]1xbet giriş linki[/url]
xbet giriş [url=https://annelersatiyor.com]xbet giriş[/url]
1xbet tr [url=https://kentseldonusumelkitabi.com]1xbet tr[/url]
какие бывают рулонные шторы [url=https://rulonnye-shtory-s-elektroprivodom10.ru]https://rulonnye-shtory-s-elektroprivodom10.ru[/url]
888starz sayt [url=888starz-uz3.org]888starz-uz3.org[/url] .
рулонные шторы окна заказ [url=https://avtomaticheskie-rulonnye-shtory50.ru]https://avtomaticheskie-rulonnye-shtory50.ru[/url]
1xbet güncel giriş [url=https://udvillasantabrigida.com]1xbet güncel giriş[/url]
готовые рулонные шторы купить в москве [url=https://elektricheskie-rulonnye-shtory99.ru]готовые рулонные шторы купить в москве[/url]
мостбет скачать приложение с сайта [url=https://mostbet64028.help]https://mostbet64028.help[/url]
cómo hacer depósito en sweet bonanza [url=https://sweet-bonanza39147.help]cómo hacer depósito en sweet bonanza[/url]
melbet кз бонус за регистрацию [url=melbet17638.help]melbet17638.help[/url]
рулонные шторы широкие [url=https://avtomaticheskie-rulonnye-shtory50.ru]https://avtomaticheskie-rulonnye-shtory50.ru[/url]
рулонные шторы крепление на окно [url=https://elektricheskie-rulonnye-shtory99.ru]https://elektricheskie-rulonnye-shtory99.ru[/url]
рулонные шторы крепление на окно [url=https://rulonnye-elektroshtory.ru]https://rulonnye-elektroshtory.ru[/url]
cum scot banii de pe 1win [url=https://1win82406.help/]https://1win82406.help/[/url]
birxbet giriş [url=https://4kfilmizlesene.org]birxbet giriş[/url]
1xbet [url=https://athenaofficial.com]1xbet[/url]
1xbet giri? yapam?yorum [url=https://hhnbigger.com]1xbet giri? yapam?yorum[/url]
1xbet [url=https://oksijen-konsantratoru.com]1xbet[/url]
пластиковые окна рулонные шторы с электроприводом [url=https://elektricheskie-rulonnye-shtory99.ru]пластиковые окна рулонные шторы с электроприводом[/url]
1xbet türkiye giriş [url=https://nupel.net]1xbet türkiye giriş[/url]
mostbet aviator oyunu [url=mostbet76205.help]mostbet76205.help[/url]
mostbet live liniya sport [url=https://mostbet47190.help]https://mostbet47190.help[/url]
mostbet maksimum çıxarış [url=mostbet47152.help]mostbet47152.help[/url]
рулонные шторы на электроприводе [url=https://rulonnye-elektroshtory.ru]рулонные шторы на электроприводе[/url]
электрические рулонные шторы купить [url=https://rulonnye-shtory-s-elektroprivodom190.ru]электрические рулонные шторы купить[/url]
рулонные шторы на пластиковые цена [url=https://rulonnye-elektroshtory.ru]https://rulonnye-elektroshtory.ru[/url]
888starz зеркало [url=www.888starz-bet1.com/]www.888starz-bet1.com/[/url] .
تسجيل دخول 888 ستارز [url=https://888starz-egypt8.com/]https://888starz-egypt8.com/[/url]
1xbet giriş azerbaycan [url=https://ulusalgenclikparlamentosu.net]1xbet giriş azerbaycan[/url]
электрические рулонные жалюзи [url=https://rulonnye-shtory-s-elektroprivodom190.ru]электрические рулонные жалюзи[/url]
прокапать от алкоголя на дому [url=https://kapelnicza-ot-pokhmelya-voronezh-15.ru]прокапать от алкоголя на дому[/url]
капельница от запоя [url=https://kapelnicza-ot-pokhmelya-voronezh-14.ru]капельница от запоя[/url]
pinup karta orqali pul yechish [url=https://www.pinup84537.help]https://www.pinup84537.help[/url]
рулонные шторы с электроприводом цена [url=https://elektricheskie-rulonnye-shtory15.ru]рулонные шторы с электроприводом цена[/url]
Данный софт представляет собой мощным программным комплексом для автоматической регистрации и размещения сообщений на досках объявлений.
Софт умеет решать разные защиты, например Captcha.
Прогон веб-ресурсов обеспечивает быстро наращивать обратные ссылки.
sites.google.com
Многие вебмастера применяют данный инструмент для продвижения в сложных нишах.
Взаимодействие с софтом этим комплексом подразумевает опыта и правильных параметров.
При неправильном использовании можно получить блокировку от ПС и снижение выдачи.
Несмотря на все риски, востребованность на такой софт остаётся стабильным.
1xbet az [url=https://philippeauguin.org]1xbet az[/url]
1xbet azərbaycan [url=https://bizimbaharatci.com]1xbet azərbaycan[/url]
1xbet azerbaycan [url=https://parcabankasi.com]1xbet azerbaycan[/url]
1xbet azeri [url=https://karamanozelenvar.com]1xbet azeri[/url]
рулонные шторы с электроприводом купить [url=https://rulonnye-shtory-s-elektroprivodom190.ru]рулонные шторы с электроприводом купить[/url]
установить рулонные шторы цена [url=https://elektricheskie-rulonnye-shtory15.ru]https://elektricheskie-rulonnye-shtory15.ru[/url]
рулонные шторы на балкон цена [url=https://elektricheskie-rulonnye-shtory15.ru]https://elektricheskie-rulonnye-shtory15.ru[/url]
карниз с приводом [url=https://elektrokarniz150.ru]https://elektrokarniz150.ru[/url]
mostbet fogadási történet [url=www.mostbet2024.help]www.mostbet2024.help[/url]
mostbet отзывы Киргизия [url=https://mostbet45631.help/]https://mostbet45631.help/[/url]
мелбет apk киргизия [url=www.melbet15928.help]www.melbet15928.help[/url]
1xbet türkiye giriş [url=https://1xbet-67.com]1xbet türkiye giriş[/url]
1xbet güncel [url=https://1xbet-68.com]1xbet güncel[/url]
1xbet turkiye [url=https://1xbet-69.com]1xbet turkiye[/url]
1xbet yeni adresi [url=https://1xbet-70.com]1xbet yeni adresi[/url]
рольшторы на окна купить [url=https://avtomaticheskie-rulonnye-shtory5.ru]https://avtomaticheskie-rulonnye-shtory5.ru[/url]
электрокарнизы для штор купить в москве [url=https://elektrokarniz150.ru]электрокарнизы для штор купить в москве[/url]
сочетание рулонных рулонные шторы и тюль фото [url=https://avtomaticheskie-rulonnye-shtory5.ru]https://avtomaticheskie-rulonnye-shtory5.ru[/url]
электрокарнизы [url=https://elektrokarniz150.ru]https://elektrokarniz150.ru[/url]
xbet [url=https://1xbet-giris-67.com]xbet[/url]
1xbet giriş yapamıyorum [url=https://1xbet-71.com]1xbet giriş yapamıyorum[/url]
рулонные шторы на окна недорого [url=https://avtomaticheskie-rulonnye-shtory5.ru]https://avtomaticheskie-rulonnye-shtory5.ru[/url]
pinup Buxoro [url=https://pinup27096.help]https://pinup27096.help[/url]
mostbet app download uz [url=http://mostbet61870.help]http://mostbet61870.help[/url]
aviator fast payout Malawi [url=https://aviator84217.help]https://aviator84217.help[/url]
мостбет игровые автоматы [url=https://www.mostbet64830.help]https://www.mostbet64830.help[/url]
рулонные шторы широкие [url=https://rulonnye-shtory-s-elektroprivodom11.ru]https://rulonnye-shtory-s-elektroprivodom11.ru[/url]
электрические рулонные шторы купить москва [url=https://avtomaticheskie-rulonnye-shtory5.ru]электрические рулонные шторы купить москва[/url]
нарколог капельницу на дому [url=https://kapelnicza-ot-pokhmelya-voronezh-16.ru]нарколог капельницу на дому[/url]
рулонные жалюзи на окна цена [url=https://rulonnye-shtory-s-elektroprivodom11.ru]https://rulonnye-shtory-s-elektroprivodom11.ru[/url]
капельница от алкоголя цена [url=https://kapelnicza-ot-pokhmelya-voronezh-17.ru]капельница от алкоголя цена[/url]
откапать от алкоголя на дому [url=https://kapelnicza-ot-pokhmelya-voronezh-18.ru]откапать от алкоголя на дому[/url]
1xbet giriş [url=https://1xbet-giris-71.com]1xbet giriş[/url]
1xbet yeni adresi [url=https://1xbet-giris-70.com]1xbet yeni adresi[/url]
1xbet spor bahislerinin adresi [url=https://1xbet-giris-68.com]1xbet spor bahislerinin adresi[/url]
1xbet giriş yapamıyorum [url=https://1xbet-giris-69.com]1xbet giriş yapamıyorum[/url]
mostbet akkauntga kirish [url=https://mostbet02759.help]https://mostbet02759.help[/url]
В наши дни сеть является неотъемлемой частью нашей жизни.
Он открывает быстрый доступ к колоссальному массиву знаний.
За счёт интернету мы можем общаться с близкими и партнёрами в любом месте планеты.
В сфере работы, обучения и бизнеса интернет стала в основной инструмент.
https://www.pinterest.com/pin/154952043426436540/
Кроме того, он предлагает неисчерпаемые варианты для отдыха и саморазвития.
При отсутствии интернета сегодня сложно вообразить как бытовые, так и профессиональные задачи.
Именно поэтому наличие к качественному интернету воспринимается фундаментальной необходимостью нашего времени.
рулонные шторы кухню цена [url=https://rulonnye-shtory-s-elektroprivodom11.ru]https://rulonnye-shtory-s-elektroprivodom11.ru[/url]
рулонные шторы с электроприводом цена [url=https://avtomaticheskie-rulonnye-shtory5.ru]рулонные шторы с электроприводом цена[/url]
Купить Бу автомобиль пмр [url=https://www.pmr-auto.ru]https://www.pmr-auto.ru[/url] .
роликовые шторы купить [url=https://rulonnye-shtory-s-elektroprivodom10.ru]https://rulonnye-shtory-s-elektroprivodom10.ru[/url]
стоимость рулонных штор [url=https://avtomaticheskie-rulonnye-shtory5.ru]стоимость рулонных штор[/url]
888stazr [url=http://www.888starz-egypt5.com/]https://888starz-egypt5.com/[/url]
8888star [url=http://888starz-egypt3.com/]https://888starz-egypt3.com/[/url]
888starz официальный сайт вход [url=http://www.888starz-uzbekistan2.com]888starz официальный сайт вход[/url] .
888starz bet зеркало [url=http://www.888stars-uz.com]http://www.888stars-uz.com[/url] .
888starz bet [url=http://www.888starz-uz-online.com]888starz bet[/url] .
888 [url=https://www.uz888-starz.com]https://www.uz888-starz.com[/url] .
مراهنات 888 [url=https://www.888starz-egypt6.com]https://888starz-egypt6.com/[/url]
рулонные занавески [url=https://rulonnye-shtory-s-elektroprivodom10.ru]рулонные занавески[/url]
рулонные шторы автоматические купить [url=https://rulonnye-elektroshtory.ru]рулонные шторы автоматические купить[/url]
Грамотный выбор корпоративной обстановки непосредственно сказывается на здоровье и работоспособность персонала.
Ключевой фактор — это удобство кресел и рабочих поверхностей.
Добротная корпусная мебель способна уменьшать нагрузку и предотвращать проблемы опорно-двигательного аппарата.
Точно так же значим внешний облик предметов, ведь он формирует образ компании для клиентов и посетителей.
https://a1.megakazan.ru/redirect.php?id=XKbgLa6tfuD
Стоит обращать внимание на материалы: натуральное дерево, прочный стальной каркас и безвредные пропитки.
Практичность предметов мебели выражается в организации ящиков и настроек под разные нужды.
Ценовой диапазон также играет значение, но экономия на этих изделиях может обернуться дополнительным расходам на лечение или замену.
Следовательно, выбирайте проверенных производителей с официальными обязательствами и документацией соответствия.
mostbet android yuklab olish [url=https://www.mostbet75681.help]mostbet android yuklab olish[/url]
мостбет скачать для андроид [url=mostbet58019.help]мостбет скачать для андроид[/url]
melbet бк регистрация [url=http://melbet72804.help/]http://melbet72804.help/[/url]
рулонные шторы на окна недорого [url=https://rulonnye-elektroshtory.ru]https://rulonnye-elektroshtory.ru[/url]
роликовые шторы [url=https://rulonnye-shtory-s-elektroprivodom10.ru]роликовые шторы[/url]
рулонные шторы на створку [url=https://rulonnye-elektroshtory.ru]https://rulonnye-elektroshtory.ru[/url]
рулонная штора электро [url=https://elektricheskie-rulonnye-shtory99.ru]рулонная штора электро[/url]
1win время вывода [url=https://www.1win74028.help]1win время вывода[/url]
mostbet Баткен [url=http://mostbet50693.help/]http://mostbet50693.help/[/url]
1win avadanlıq uyğunluğu [url=https://1win30895.help/]https://1win30895.help/[/url]
мелбет мбанк киргизия [url=http://melbet59738.help]http://melbet59738.help[/url]
рулонные шторы крепление на окно [url=https://elektricheskie-rulonnye-shtory15.ru]https://elektricheskie-rulonnye-shtory15.ru[/url]
рулонные шторы на створку [url=https://elektricheskie-rulonnye-shtory99.ru]https://elektricheskie-rulonnye-shtory99.ru[/url]
рулонные шторы на балконные окна [url=https://elektricheskie-rulonnye-shtory15.ru]https://elektricheskie-rulonnye-shtory15.ru[/url]
рулонные шторы на окна купить [url=https://elektricheskie-rulonnye-shtory99.ru]https://elektricheskie-rulonnye-shtory99.ru[/url]
888старз казино [url=http://888starz-uz2.org/]http://888starz-uz2.org/[/url] .
88 stars [url=https://888starz-uzbekistan3.com]88 stars[/url] .
производители рулонных штор [url=https://elektricheskie-rulonnye-shtory15.ru]производители рулонных штор[/url]
1win baccarat [url=http://1win82376.help/]http://1win82376.help/[/url]
рулонные шторы в москве [url=https://rulonnye-shtory-s-elektroprivodom17.ru]рулонные шторы в москве[/url]
рулонные жалюзи купить в москве [url=https://avtomaticheskie-rulonnye-shtory5.ru]рулонные жалюзи купить в москве[/url]
шумоизоляция автомобиля в Москве [url=https://shumoizolyaciya-avtomobilya-moskva-1.ru]shumoizolyaciya-avtomobilya-v-moskve-1.ru[/url]
производители рулонных штор [url=https://rulonnye-shtory-s-elektroprivodom17.ru]производители рулонных штор[/url]
рулонные шторы на пластиковые окна на кухню [url=https://avtomaticheskie-rulonnye-shtory5.ru]https://avtomaticheskie-rulonnye-shtory5.ru[/url]
Эта обзорная заметка содержит ключевые моменты и факты по актуальным вопросам. Она поможет читателям быстро ориентироваться в теме и узнать о самых важных аспектах сегодня. Получите краткий курс по современной информации и оставайтесь в курсе событий!
Разобраться лучше – https://kapelnicza-ot-pokhmelya-samara-13.ru/
рулонные шторы купить москва недорого [url=https://rulonnye-shtory-s-elektroprivodom17.ru]рулонные шторы купить москва недорого[/url]
888ستارز [url=https://www.888starz-egypt6.com/]https://888starz-egypt6.com/[/url]
برنامج مراهنات 888starz [url=888starz-egypt7.com]موقع 8888[/url]
рулонная штора на заказ цена [url=https://avtomaticheskie-rulonnye-shtory5.ru]https://avtomaticheskie-rulonnye-shtory5.ru[/url]
mostbet mastercard depozit [url=https://mostbet93504.help/]https://mostbet93504.help/[/url]
melbet пополнение через карту [url=https://melbet36091.help/]melbet пополнение через карту[/url]
pin-up translyatsiya [url=https://pinup61802.help/]https://pinup61802.help/[/url]
рулонные шторы виды механизмов [url=https://avtomaticheskie-rulonnye-shtory5.ru]рулонные шторы виды механизмов[/url]
рулонные шторы с электроприводом купить в москве [url=https://rulonnye-shtory-s-elektroprivodom190.ru]рулонные шторы с электроприводом купить в москве[/url]
1win не заходит [url=https://www.1win02963.help]1win не заходит[/url]
mostbet хуруҷи маблағ [url=http://mostbet62590.help/]http://mostbet62590.help/[/url]
депозит mostbet [url=www.mostbet78053.help]www.mostbet78053.help[/url]
мелбет минимальный вывод [url=http://melbet18095.help]http://melbet18095.help[/url]
Бу автомобили Приднестровье [url=www.telescope.ac/modular-buildings-and-block-containers/rsne8epwmssd7p7s0azy5a/]Бу автомобили Приднестровье[/url] .
вывод из запоя с выездом на дом [url=https://vyvod-iz-zapoya-na-domu-ekaterinburg-30.ru]вывод из запоя с выездом на дом[/url]
88starz [url=https://www.888starz-egypt7.com]لعبة 888[/url]
888starz bukmacher [url=www.uz888starzbet.com/]888starz bukmacher[/url] .
موقع 8888 [url=https://888starz-egyp.com/]https://888starz-egyp.com/[/url]
888 [url=http://888starz-uz-online.com/]888[/url] .
888starz.com [url=https://888starzeg1.com/]https://888starzeg1.com/[/url]
88sta [url=http://www.888starz-eg2.org]https://888starz-eg2.org/[/url]
888.starz [url=www.888starz-bet3.com]www.888starz-bet3.com[/url] .
бк 888starz [url=https://www.888starz-uzbekistan5.com]бк 888starz[/url] .
وان اكس بت 888 [url=https://eg-888starz.com/]888statz[/url]
выведение из запоя на дому екатеринбург [url=https://vyvod-iz-zapoya-na-domu-ekaterinburg-29.ru]выведение из запоя на дому екатеринбург[/url]
вывод из запоя на дому цена [url=https://vyvod-iz-zapoya-na-domu-ekaterinburg-29.ru]вывод из запоя на дому цена[/url]
вывод из запоя екатеринбург [url=https://vyvod-iz-zapoya-na-domu-ekaterinburg-29.ru]вывод из запоя екатеринбург[/url]
наркологический вывод из запоя [url=https://vyvod-iz-zapoya-na-domu-ekaterinburg-29.ru]наркологический вывод из запоя[/url]
888startz [url=http://888stars-uz.com/]http://888stars-uz.com/[/url] .
вывод из запоя на дому в екатеринбурге [url=https://vyvod-iz-zapoya-na-domu-ekaterinburg-29.ru]вывод из запоя на дому в екатеринбурге[/url]
888starz review [url=https://www.888starz-uz-online.com]https://www.888starz-uz-online.com[/url] .
برنامج مراهنات 888starz [url=888starz-egyp.com]https://888starz-egyp.com/[/url]
موقع 8888 [url=http://www.888starz-egypt7.com/]stars 88[/url]
8 stars [url=www.888starz-uzbekistan5.com]8 stars[/url] .
скачать 888 старс на андроид [url=www.androidchity.ru/]скачать 888 старс на андроид[/url] .
ШЄШЩ…ЩЉЩ„ 888starz Щ„Щ„Ш§ЩЉЩЃЩ€Щ† [url=https://www.888starzeg2.com/]https://888starzeg2.com/[/url]
[url=https://klining-kvartiry-moskva-1.ru]клининг квартиры Москва[/url]
[url=https://klining-kvartiry-spb-1.ru]клининг квартиры СПб[/url]
купить авто в Молдове [url=http://www.telescope.ac/modular-buildings-and-block-containers/tzd19qcbq7gmexu8mrjzw4]купить авто в Молдове[/url] .
لعبه ثلاث ثمانيات [url=https://www.888-starzeg.com/]تحميل تطبيق 888 ستارز[/url]
استار888 [url=https://888starzeg3.com/]888 تحميل[/url]
888starz. com [url=http://888starz-uzs.net/]http://888starz-uzs.net/[/url] .
|استار 888 [url=https://888starz-egypt-casino.com]https://888starz-egypt-casino.com/[/url]
|888srarz [url=https://www.888starz-egypt2.com/]https://888starz-egypt2.com/[/url]
8888starz [url=https://888starz-uzbekistan1.com]https://888starz-uzbekistan1.com[/url] .
888starz зеркало [url=http://888starz-bet1.com/]888starz зеркало[/url] .
star 888 للمراهنات [url=https://888starz-3.com/]https://888starz-3.com/[/url]
بوكر تكساس [url=888starz-eg3.org]https://888starz-eg3.org/[/url]
Сертифицированные провайдеры софта
[url=https://www.don8play.ru/]DON8PLAY[/url]
لعبه 888 [url=http://www.888starz-eg-egypt3.com/]https://888starz-eg-egypt3.com/[/url]
Продажа БУ авто в ПМР [url=www.auto-pmr.ru]www.auto-pmr.ru[/url] .
Unlock incredible rewards today with [url=https://true-fortune-casino.uk/]true casino no deposit bonus[/url] and maximize your winning potential at True Fortune Casino!
True Fortune Casino is quickly becoming a popular destination for online gaming enthusiasts.
If you want to easily calculate your potential winnings and understand the bets, use this [url=https://lucky-15-bet-calculator.uk/]what does a lucky 15 bet mean[/url].
You can see how different combinations of wins influence your final payout, aiding decision-making.
888 [url=http://www.888starzuzs.com]https://888starzuzs.com/[/url] saytida qimor o‘yinlarining eng yangi va ishonchli versiyalarini topishingiz mumkin.
Foydalanuvchilar uchun interfeys soddaligi va tushunarli bo‘lishi asosiy afzalliklaridan biridir.
8 stars [url=http://888starz-uz3.com]http://888starz-uz3.com[/url] .
888starz com [url=http://888starz-kirish4.com]http://888starz-kirish4.com[/url] .
888starz uz kirish [url=www.888starz-uz1.com/]888starz uz kirish[/url] .
88stars [url=www.888starz-oficialnyj-sajt5.com]88stars[/url] .
888 stars [url=http://888starz-eg-egypt4.com/]https://888starz-eg-egypt4.com/[/url]
888starz تسجيل [url=https://eg888starz-bet.com/]https://eg888starz-bet.com/[/url]
продать автомобили в ПМР [url=http://www.www.liveinternet.ru/users/antrushewagalya/post515223606/]продать автомобили в ПМР[/url] .
Getting medicine online is extremely easy.
One can shop at any hour with no stepping out of your house.
Online pharmacies allow you to quickly compare prices and find the best price.
Your meds are shipped straight to your address, saving a trip and hassle.
fildena and macrolide antibiotics interaction
There’s no need to wait in endless queues at a local pharmacy.
For long-term illnesses, automatic refills make treatment hassle‑free.
Overall, digital shopping for meds preserves your time and energy.
На конкретном портале представлена ценная статьи.
На этом портале можно почерпнуть много полезного для своего развития.
Представленный ресурс дает возможность понять в различных проблемах.
Рекомендуем детально изучить опубликованные тут данные.
https://sites.google.com/view/brand-history/dior
true fortune casino 50 free chip [url=https://true-fortune-gb.com]https://true-fortune-gb.com[/url] .
true-fortune [url=truefortunecasinos.uk]truefortunecasinos.uk[/url] .
true fortune casino no deposit bonus codes 2026 [url=https://www.true-fortune-freespins.com]true fortune casino no deposit bonus codes 2026[/url] .
how do fortune cookies come true [url=https://www.true-fortune-gb.com]https://www.true-fortune-gb.com[/url] .
the true fortune casino [url=https://truefortunecasino-bonus.com/]the true fortune casino[/url] .
true fortune casino no deposit bonus 2026 [url=http://truefortune-50-free-spins.com]true fortune casino no deposit bonus 2026[/url] .
true fortune teller stories [url=www.true-fortune-casino2.com/]www.true-fortune-casino2.com/[/url] .
true fortune casino $50 free chip no deposit [url=http://true-fortune-casino-gb.com/]http://true-fortune-casino-gb.com/[/url] .
true fortune casino no deposit [url=http://www.truefortunecasino-freespins.com]true fortune casino no deposit[/url] .
true fortune no deposit bonus june 2026 [url=http://truefortune-promo-code.com/]http://truefortune-promo-code.com/[/url] .
true fortune casino $50 free chip [url=www.true-fortunecasino.uk/]true fortune casino $50 free chip[/url] .
true fortune casino no deposit bonus codes [url=https://truefortunecasinos.uk]true fortune casino no deposit bonus codes[/url] .
true fortune casino $50 free chip no deposit usa [url=http://true-fortune-freespins.com/]true fortune casino $50 free chip no deposit usa[/url] .
кодирование от алкоголизма на дому в екатеринбурге [url=https://narkolog-na-dom-ekaterinburg-13.ru]кодирование от алкоголизма на дому в екатеринбурге[/url]
На этом этом сайте представлена ценная статьи.
Здесь можно почерпнуть немало ценного для решения задач.
Этот источник способен помочь понять в различных вопросах.
Рекомендуем детально изучить опубликованные тут публикации.
https://legicon-pravo.ru/data/1237-evropa-zastavila-zelenskogo-ogryznutsya-rassledovanie-ermaka-eto-ne-vopros-vnutrennego-ustroystva.html
true fortune casino no deposit bonus codes [url=www.true-fortune-gb.com/]www.true-fortune-gb.com/[/url] .
true fortune promo code 2026 [url=http://true-fortune-bonus.com]true fortune promo code 2026[/url] .
true fortune casino free chip [url=https://true-fortune-casino5.com/]true fortune casino free chip[/url] .
true fortune login australia [url=http://www.true-fortune-casino4.com]http://www.true-fortune-casino4.com[/url] .
how true are fortune cookies [url=www.true-fortune-casino3.com/]how true are fortune cookies[/url] .
is reversal of fortune a true story [url=www.true-fortune-unitedkingdom.com]www.true-fortune-unitedkingdom.com[/url] .
true fortune casino sister sites [url=https://truefortunecasinos.uk]https://truefortunecasinos.uk[/url] .
true fortune casino no deposit bonus codes 2026 [url=http://www.true-fortune-freespins.com]true fortune casino no deposit bonus codes 2026[/url] .
true fortune review [url=https://www.truefortune-50-free-spins.com]true fortune review[/url] .
crazytime track [url=https://www.crazy-time6.com/stats/]https://crazy-time6.com/stats/[/url]
sisal crazy time italia [url=https://www.crazy-time-italy.it/]https://crazy-time-italy.it/[/url]
crazy time live streaming [url=crazy-time8.com]https://crazy-time8.com/[/url]
track crazy time [url=crazy-time-italian.com]https://crazy-time-italian.com/[/url]
vincita piu grande crazy time [url=https://www.crazytime-italia-it.com]https://crazytime-italia-it.com/[/url]
crazy time strategie [url=https://crazy-time-slot.it/]crazy time strategie[/url].
crazy time 20000x [url=https://crazy-time-ita.com]https://crazy-time-ita.com/[/url]
В наше время спортивная обувь очень распространены.
Главная причина — многофункциональность такого типа.
Их используют как в спортзале, так и на прогулке.
Современные модели объединяют модный дизайн с высочайшим комфортом.
женские кроссовки Dolce Gabbana
Из-за прогрессу технологий подошва оказалась невесомой и пружинящей.
Крупные производители создают коллаборации с дизайнерами, что подогревает спрос.
Плюс соцсети раскручивают образ стильного горожанина.
Следовательно, эта обувь считаются символом свободы и молодости.
monopoly big baller result live [url=https://www.monopolylives.com/]https://monopolylives.com/[/url]
crazy time slot italy [url=http://www.crazytimeee.com/]https://crazytimeee.com/[/url]
big baller monopoly live [url=https://monopoly-live-bd.com/]big baller monopoly live[/url].
jugar monopoly live en directo [url=https://monopoly-live-bangladesh.com/]https://monopoly-live-bangladesh.com/[/url]
crazy time soldi finti [url=http://crazy-timez.com/]https://crazy-timez.com/[/url]
solana casino online [url=http://www.solanagxy.com]https://solanagxy.com/[/url]
888starz crash [url=http://www.colindaylinks.com]https://colindaylinks.com/[/url]
crazy time casino demo [url=https://www.crazytime-italy-it.com]https://crazytime-italy-it.com/[/url]
На этом конкретном ресурсе представлена ценная материалы.
Тут вы сможете получить много практичного для своего развития.
Представленный источник способен помочь понять в различных темах.
Рекомендуем внимательно ознакомиться с размещенные тут публикации.
https://groups.google.com/g/accord-sevastopol
Разумный подход к азарту в i-gaming — это совокупность правил, ориентированных на сохранение психологического здоровья игроков.
Эта концепция включает осознанное ограничение времени и денег на игру.
Участнику следует заранее устанавливать финансовый лимит и не превышать его ни при каких обстоятельствах.
Платформы прозрачного бизнеса должны предоставлять инструменты для самопроверки и тайм-аутов.
К признакам проблемы служат потребность отыграться и пренебрежение повседневными делами.
Безопасный гейминг помогает воспринимать к казино как к развлечению, а не способу дохода.
Благодаря соблюдения этих норм азарт остаётся в безопасных границах, без вреда для человека.
https://funk-petersburg.ru/read-full/2026-05-26-vkhodnoy-bilet-v-vuz-dorozhaet-i-v-bukvalnom-i-v-perenosnom-smysle/
monopoly big win today result live india [url=https://www.imonopoly.live]https://imonopoly.live/[/url]
monopoly go live events [url=https://www.monopolylives.com]https://monopolylives.com/[/url]
crazy time sta [url=https://www.crazytimeee.com]https://crazytimeee.com/[/url]
monopoly live casino sites [url=https://monopoly-live-bd.com]https://monopoly-live-bd.com/[/url]
khelo bet 24 monopoly live login [url=http://www.monopoly-live-bangladesh.com/]https://monopoly-live-bangladesh.com/[/url]
crazy time diretta [url=https://crazy-timez.com/]https://crazy-timez.com/[/url]
sol casino solana [url=https://solanagxy.com]https://solanagxy.com/[/url]
crazy time ultime giocate [url=http://www.crazy-time-rome.com/]https://crazy-time-rome.com/[/url]
موقع 8888 [url=https://colindaylinks.com/]موقع 8888[/url].
types of monopoly [url=https://monopoly-live-bangladesh.com/]https://monopoly-live-bangladesh.com/[/url]
monopoly scores [url=http://www.monopoly-live-bd.com/]https://monopoly-live-bd.com/[/url]
khelo24bet monopoly big baller results [url=https://www.monopolylives.com/]https://monopolylives.com/[/url]
monopoly live play [url=http://imonopoly.live/]https://imonopoly.live/[/url]
casino vulkan royal [url=https://play24-vulkan.com/]casino vulkan royal[/url].
vulkan vegas casino vulkanvegas [url=https://www.vulkan-casino3.com]https://vulkan-casino3.com/[/url]
kasyno online vulkan vegas [url=http://www.vulkan-casino-onlayn.com/]https://vulkan-casino-onlayn.com/[/url]
solana crypto casino [url=https://solanagxy.com]https://solanagxy.com/[/url]
8 starz [url=multitaskingmaven.com]https://multitaskingmaven.com/[/url]
Ordering medications online is extremely convenient.
It’s possible to browse around the clock with no leaving home.
Internet drugstores let you quickly check prices and locate the lowest price.
The order are delivered directly to your address, cutting a trip and effort.
who should not take sildenafil
There’s no need to stand in annoying queues at a brick-and-mortar store.
When dealing with long-term illnesses, auto reorders make treatment stress‑free.
In short, digital shopping for meds saves your time and peace of mind.
موقع betfinal [url=https://www.betfinalafrica.com/]https://betfinalafrica.com/[/url]
monopoly big baller results today live india [url=https://www.monopolylive-in.com/]https://monopolylive-in.com/[/url]
casino score monopoly live [url=https://www.live-monopoly-in.com/]https://live-monopoly-in.com/[/url]
monopoly result live [url=monopoly-casino-india.com]monopoly result live[/url] .
monopoly big baller result live [url=http://www.monopoly-live-in.com]http://www.monopoly-live-in.com[/url] .
monopoly live no deposit bonus [url=www.monopoly-live-india.com/]www.monopoly-live-india.com/[/url] .
monopoly live apps [url=www.monopoly-live-india.com]www.monopoly-live-india.com[/url] .
big win monopoly live [url=www.monopolylive-india.com/]www.monopolylive-india.com/[/url] .
monopoly live rules [url=https://monopoly-live-results.com/]https://monopoly-live-results.com/[/url] .
monopoly live strategy [url=https://live-monopoly-india.com]https://live-monopoly-india.com/[/url]
Аксессуар — это не только предмет гардероба, но и ключевой элемент стиля.
Такая вещь служит организованно носить множество нужные мелочи — от ключей до косметики.
Сумка может как подчеркнуть плюсы фигуры, так и визуально скорректировать пропорции.
Многообразие моделей — классические тоут, конверт, практичный рюкзак — позволяет подобрать вариант под любое событие.
Материал тоже значим: натуральная кожа, мягкая замша, прочный нейлон задают срок службы и престижность.
Оттенок и тиснение добавляют характер, делая даже простую вещь в интересный лук.
Вот почему инвестиция в добротную сумку оправдывает себя каждый день радостью и эстетикой.
https://nashipesni.ru/pub/2026-06-01-zapadnye-derzhavy-gotovyatsya-k-novomu-vooruzhyonnomu-konfliktu-belorussiya-nazvala-datu-nachala/
Online payment methods are essential for modern financial ecosystems.
They enable funds to flow quickly and securely across borders.
Popular examples are credit cards, e-wallets, and bank transfers.
Each system provides a different balance between speed, cost, and safety.
https://a2.lasuper.ru/leFZLNkNCrAr/
Choosing the correct transaction method relies on the customer’s requirements and region.
Good payment systems protect private data and prevent unauthorised access.
Ultimately, reliable payment infrastructure is the backbone of e-commerce and digital finance.
evolution gaming monopoly live [url=www.monopoly-live-score.com]www.monopoly-live-score.com[/url] .
Payment systems are essential for today’s economies.
They allow funds to move quickly and safely between parties.
Popular instances include bank cards, e-wallets, and bank transfers.
Each method offers a unique trade-off between convenience, cost, and safety.
https://designlife.fashionsecret.ru/6NtJatr6yu5m/
Choosing the correct transaction method depends on the customer’s needs and region.
Good financial gateways protect private data and block unauthorised access.
Ultimately, robust payment infrastructure is the foundation of online business and digital finance.
single bet return calculator [url=www.singlebet-calculator.uk]single bet return calculator[/url] .
Such calculators are widely available online and free to use.
decimal odds to fraction [url=singlebetcalculatorfree.uk/odds-explained]https://singlebetcalculatorfree.uk/odds-explained/[/url]
free single bet calculator [url=http://singlebet-calculator.com]http://singlebet-calculator.com[/url] .
It empowers bettors to make smarter wagers by knowing the exact potential outcome.
union jack treble calculator [url=https://www.single-betcalculator.com/bet-calculator/treble]https://single-betcalculator.com/bet-calculator/treble/[/url]
Manual calculations can be prone to mistakes, which a calculator helps avoid.
how to calculate winnings with fractional odds [url=http://www.single-bet-calculator.uk/odds-explained]https://single-bet-calculator.uk/odds-explained/[/url]
betting calculator [url=https://www.singlebetcalculator.uk/]https://singlebetcalculator.uk/[/url]
betting return calculator [url=http://www.single-bet-calculator-free.uk/]https://single-bet-calculator-free.uk/[/url]
This tool allows users to estimate potential winnings by entering stake and odds.
work out single bet [url=https://www.single-bet-calculator-free.com/]https://single-bet-calculator-free.com/[/url]
Input your bet size and odds, and the calculator will display the payout immediately.
ace odds treble [url=http://single-betcalculator.uk/bet-calculator/treble/]https://single-betcalculator.uk/bet-calculator/treble/[/url]
monopoly big baller results today india time live [url=www.monopoly-casino-in.com]monopoly big baller results today india time live[/url] .
Оземпик является инновационным лекарством для лечения диабета 2 типа.
Данный медикамент используется подкожно раз в 7 дней посредством удобной шприц-ручки.
Центральное воздействие Оземпика — стимулировать рецепторы, вызывая снижение глюкозы в крови.
какой аналог оземпика лучше
Кроме регуляции сахара, это средство способствует постепенному снижению веса.
Курс данного лекарства должен назначаться исключительно эндокринологом с учётом противопоказаний.
Во время терапии возможны побочные явления, например тошнота или диарея, которые часто проходят со временем.
Using a single bet calculator regularly can enhance your betting experience.
how to work out a treble bet [url=https://singlebetcalculator-free.uk/bet-calculator/treble]https://singlebetcalculator-free.uk/bet-calculator/treble/[/url]
crazy time stats eurobet [url=https://crazy-time-stats.com/]https://crazy-time-stats.com/[/url]
track casino crazy time [url=https://live-crazy-time.com]https://live-crazy-time.com/[/url]
ultime uscite crazy time [url=crazy-time-gratis.com]https://crazy-time-gratis.com/[/url]
crazy time live [url=http://www.crazytimegratis.com]https://crazytimegratis.com/[/url]
Per vivere l’adrenalina del Crazy Time nei casino italiani, visita [url=https://crazy-timedemo.com/]snai crazy time[/url] e scopri demo, statistiche e partite in diretta.
Inoltre, la facilita d’uso della piattaforma rende l’esperienza piacevole anche per i neofiti.
Se vuoi vivere l’emozione unica del gioco d’azzardo, non perdere l’occasione di provare [url=https://crazy-timeitaly.com/]crazy time tracker live[/url] per scoprire il miglior intrattenimento casino in Italia!
In Italia, Crazy Time Slot Casino e riconosciuto come uno dei casino online piu famosi. I giocatori amano Crazy Time Slot Casino in Italia soprattutto per la sua ricca selezione di slot e la navigazione semplice. L’affidabilita e la protezione dei dati personali fanno di questo casino una scelta sicura per i giocatori italiani.
La piattaforma offre un’esperienza utente fluida e gradevole, ideale per tutte le tipologie di giocatori. Le grafiche coinvolgenti e i suoni esclusivi contribuiscono a creare un ambiente immersivo. Grazie alla piena compatibilita con smartphone e tablet, il divertimento e garantito in movimento.
crazy time lice [url=https://crazytimeitalia-it.com/]crazy time lice[/url].
crazy time america [url=https://crazytimeit-italia.com/]crazy time america[/url].
bitcoin video poker spielen [url=https://www.bitcoinpoker-de.de]bitcoin video poker spielen[/url] .
bitcoin poker android development [url=http://bitcoin-poker-de.de]bitcoin poker android development[/url] .
bitcoin poker bitcoin gambling [url=poker-bitcoin.de]poker-bitcoin.de[/url] .
texas holdem poker bitcoin [url=https://poker-bitcoin-deutschland.de]texas holdem poker bitcoin[/url] .
poker bitcoin deposit [url=http://www.onlinepoker-bitcoin.de]http://www.onlinepoker-bitcoin.de[/url] .
monopoly live games [url=http://monopoly-casino-in.com/]https://monopoly-casino-in.com/[/url]
best bitcoin video poker [url=https://www.bitcoin-poker-deutschland.de]best bitcoin video poker[/url] .
bitcoin poker canada [url=onlinepokerbitcoin.de]onlinepokerbitcoin.de[/url] .
ruota del crazy time [url=http://www.crazy-timeitalia.com]http://www.crazy-timeitalia.com[/url] .
crazy time percentuali [url=https://www.crazy-timegratis.com]crazy time percentuali[/url] .
Правило ответственной игры заключается в контролируемом подходе к игровым платформам.
Он подразумевает личностное ограничение длительности и бюджета на игру.
Игроку рекомендуется заранее определить потолок потерь и не превышать этот лимит.
Крайне необходимо рассматривать игру исключительно как способ досуга, а не средство заработка.
В случае появлении признаков проблемного поведения (погоня за потерянным) стоит активировать тайм-аут или блокировку аккаунта.
Следование этих правил гарантирует ментальное благополучие и денежную стабильность игрока.
https://boell.ru/info/663-poltora-milliona-za-rabochie-ruki-tambovskaya-prokuratura-napomnila-biznesu-o-sovesti/
what online poker sites accept bitcoin [url=https://poker-bitcoin-de.de/]what online poker sites accept bitcoin[/url] .
any bitcoin poker sites [url=http://bitcoin-poker-sites.de/]any bitcoin poker sites[/url] .
888starz скачать ios testflight [url=888starzuz1.com/apk]https://888starzuz1.com/apk/[/url]
888 bet apk [url=https://www.888starzuz2.com/apk/]https://888starzuz2.com/apk/[/url]
888 star bet [url=https://sites.google.com/view/888starz-onlayn-kazino/]https://sites.google.com/view/888starz-onlayn-kazino/[/url]
poker em bitcoin [url=https://online-poker-bitcoin.de/]poker em bitcoin[/url] .
888 starz apk [url=https://888starzuz3.com/apk/]888 starz apk[/url].
888syarz [url=888starzuz4.com]https://888starzuz4.com/[/url]
888 stars скачать [url=http://888starzuz5.com/apk/]https://888starzuz5.com/apk/[/url]
Вызов нарколога на дом в Казани. Консультация, детоксикация, капельница, вывод из запоя, лечение алкоголизма и зависимости. Анонимно, круглосуточно. Узнайте цену в клинике.
Подробнее тут – [url=https://narkolog-na-dom-kazan21.ru/]нарколог на дом срочно казань[/url]
На данном сайте можно обнаружить массу практичной знаний.
На этой платформе представлены публикации и инструкции под любой случай.
Вы в состоянии найти и базовую базу, так и углублённые данные.
Наш портал поможет экспертам в своей практике.
https://moizvezdi.ru/stars/2026-05-04-fingerstayl-iskusstvo-dekorativnoy-igry-ili-kak-priruchit-gitaru/
Более того на сайте периодически публикуются актуальные руководства.
Рекомендуем самостоятельно изучить собранную здесь базу.
Следовательно, данный ресурс считается полезным хранилищем сведений.
888starz.apk [url=https://888starzuz7.com/apk/]https://888starzuz7.com/apk/[/url]
888 старс скачать [url=https://888starzuz8.com/apk/]https://888starzuz8.com/apk/[/url]
Оземпик является современным средством для терапии сахарного диабета второго типа.
Этот агент используется путём инъекций один раз неделю посредством эргономичной ручки-дозатора.
Основное воздействие лекарства — активировать рецепторы ГПП-1, что приводит понижение глюкозы в крови.
Tirz.pro
Кроме контроля гликемии, это средство помогает постепенному избавлению от лишних килограммов.
Применение данного лекарства должен назначаться только врачом с учётом ограничений и рисков.
При использовании могут встречаться побочные явления, такие как тошнота или нарушение стула, которые обычно исчезают со временем.
888starz official [url=https://www.888starz-uz.mystrikingly.com/]https://888starz-uz.mystrikingly.com/[/url]
888старз вход [url=http://justpaste.me/2tgm1/]https://justpaste.me/2tgm1/[/url]
888starz casino login [url=http://www.888starzuz10.com]https://888starzuz10.com/[/url]
888stars [url=https://888starzuz6.com/]https://888starzuz6.com/[/url]
888starz com [url=https://888starz-uz11.com/]888starz com[/url].
888starz скачать [url=http://www.riders-resource.com/kachayte-888starz-na-ios-i-igrayte-v-onlaynkazino-v-uzbekistane]https://riders-resource.com/kachayte-888starz-na-ios-i-igrayte-v-onlaynkazino-v-uzbekistane/[/url]
true fortune casino [url=http://vcfunny.com/?34103/]https://vcfunny.com/?34103[/url]
888starz сайт [url=https://888starzuz9.com/]888starz сайт[/url].
888starz egypt [url=https://aiflashdeals.com/888starz-%d9%85%d8%b5%d8%b1-%d9%83%d8%a7%d8%b2%d9%8a%d9%86%d9%88-%d8%a3%d9%88%d9%86%d9%84%d8%a7%d9%8a%d9%86-%d9%88%d9%85%d8%b1%d8%a7%d9%87%d9%86%d8%a7%d8%aa-%d8%b1%d9%8a%d8%a7%d8%b6%d9%8a%d8%a9-%d9%85/]https://aiflashdeals.com/888starz-%d9%85%d8%b5%d8%b1-%d9%83%d8%a7%d8%b2%d9%8a%d9%86%d9%88-%d8%a3%d9%88%d9%86%d9%84%d8%a7%d9%8a%d9%86-%d9%88%d9%85%d8%b1%d8%a7%d9%87%d9%86%d8%a7%d8%aa-%d8%b1%d9%8a%d8%a7%d8%b6%d9%8a%d8%a9-%d9%85/[/url]
Геморрой нуждается в своевременного лечения, поскольку прогрессирующий процесс ведёт к осложнениям.
При отсутствии адекватной помощи признаки усиливаются: дискомфорт, жжение и выделения оказываются невыносимыми.
Заболевание способна спровоцировать тромбоз вен, малокровие и даже воспаление окружающих тканей.
перианальный дерматит фото
Терапия на ранних этапах позволяет использовать малоинвазивные методы, избегая хирургического вмешательства.
Современные препараты и процедуры гарантируют скоростной результат и незначительный болевых ощущений для больного.
Раннее посещение к проктологу помогает восстановить уровень повседневного существования и предотвратить тяжёлых последствий.
888starz [url=artoved.stck.me/post/1664861/888starz]https://artoved.stck.me/post/1664861/888starz/[/url]
Геморрой — это частая проблема, требующая своевременного лечения.
Отсутствие симптомов или затягивание обращения к специалисту способно привести серьёзными последствиями, такими как выпадение узлов.
Современная медицина предлагает разнообразные методы лечения: от малоинвазивных вмешательств до медикаментозной поддержки.
колоноскопия и гастроскопия под наркозом
Своевременная помощь позволяет быстро купировать дискомфортные проявления и восстановить качество жизни.
В случае возникновении начальных симптомов (зуд, жжение, кровянистые выделения) необходимо как можно скорее записаться к врачу-проктологу для диагностики.
Адекватное воздействие не только освобождает от физического страданий, но и препятствует прогрессированию болезни и потребности в оперативном вмешательстве.
Ударно-волновая терапия представляет собой эффективный способ воздействия, базирующийся на применении акустических волн.
Данная процедура активизирует кровообращение и запускает механизмы регенерации клеток.
Методика широко применяется для купирования патологий суставов и связок – например, при воспалении сухожилий и плантарном фасциите.
https://novogireevo-klinika.ru/
Главные преимущества способа – это отсутствие разрезов, практическая терпимость и хорошая эффективность уже после нескольких сеансов.
Как правило приём занимает примерно четверть часа и выполняется в поликлинике без госпитализации.
По окончании курса больные отмечают заметное уменьшение болей и возвращение объёма подвижности в проблемной зоне.
monopoly in hindi meaning [url=http://www.monopolyy.live/]https://monopolyy.live/[/url]
monopoly big baller live tracker [url=https://www.monopolyy.live]https://monopolyy.live/[/url]
distinguish between perfect competition and monopoly [url=https://monopolyy.live]https://monopolyy.live/[/url]
big baller monopoly tracker [url=http://www.monopolyy.live/]https://monopolyy.live/[/url]
watch monopoly [url=http://www.monopolyy.live/]https://monopolyy.live/[/url]
casino scores monopoly live vegas [url=https://www.monopolyy.live]https://monopolyy.live/[/url]
live monopoly big baller [url=http://www.monopolyy.live/]https://monopolyy.live/[/url]
monopoly super electronic banking [url=https://monopolyy.live/]monopoly super electronic banking[/url].
play monopoly live [url=http://www.monopolyy.live/]https://monopolyy.live/[/url]
Вывод из запоя в Сочи требуется, когда человек не может самостоятельно прекратить употребление алкоголя, испытывает тяжелое похмелья, признаки ломки, тревогу, бессонницу, рвоту, слабость, нарушение поведение и резкое ухудшение самочувствие. Даже если запой длится несколько дней, для здоровья сохраняется высокий риск осложнений: страдают сердце, печень, почки, нервного системы, психика и общее состояние организма.
Получить больше информации – [url=https://vyvod-is-zapoya-sochi22.ru/]скорая вывод из запоя сочи[/url]
В Балашихе выездной формат удобен для семьи, если близкого нельзя быстро доставить в клинику или состояние пациента ухудшается на фоне длительного запоя. Дом становится местом первичной стабилизации, когда врач видит, что капельница, вывод из запоя, консультация, снятие интоксикации и дальнейшие рекомендации могут быть проведены безопасно. Если состояние тяжелое, нарколог объясняет, почему нужна госпитализация, стационар, дополнительные обследования и круглосуточный медицинский контроль.
Детальнее – [url=https://narkolog-na-dom-balashiha13-4.ru/]частный нарколог на дом телефон[/url]
На этом ресурсе можно почерпнуть немало практичной информации.
На страницах сайта собраны публикации и рекомендации под любой вкус.
Вы можете получить и общую базу, так и специализированные разработки.
Этот сайт пригодится новичкам в их практике.
https://e-transavto.ru/read/fakhrie-evdzhen-o-detstve-brake-i-puti-k-garmonii-mezhdu-semyoy-i-stsenoy-379/
Более того на портале постоянно выкладываются свежие материалы.
Советуем с интересом изучить размещённую здесь подборку.
Таким образом, этот сайт представляет собой ценным источником полезностей.
casino flip solana [url=https://www.solcasinodeutschland.de]https://solcasinodeutschland.de/[/url]
Проктологическое заболевание — это частая проблема, требующая незамедлительного терапии.
Отсутствие признаков или затягивание визита к врачу способно обернуться опасными последствиями, такими как тромбоз.
Текущая медицина располагает многочисленные методы коррекции: от малоинвазивных процедур до медикаментозной поддержки.
гастроскопия и колоноскопия сделать
Своевременная помощь даёт возможность эффективно купировать дискомфортные проявления и восстановить качество жизни.
В случае возникновении первых признаков (зуд, боль, кровянистые выделения) важно как можно скорее обратиться к врачу-проктологу для диагностики.
Правильное лечение не только освобождает от физического дискомфорта, но и предотвращает развитию болезни и потребности в хирургическом вмешательстве.
sol casino solana [url=http://www.solkryptocasino.de]https://solkryptocasino.de/[/url]
888 straz [url=http://www.888-uz6.com]https://888-uz6.com/[/url]
Запоя вывод в клинике Сочи: лечение алкогольной зависимости, детоксикация, капельница, помощь нарколога на дому, кодирование и реабилитация.
Исследовать вопрос подробнее – [url=https://vyvod-is-zapoya-sochi22.ru/]вывод из запоя вызов в сочи[/url]
solana casino online [url=http://sol-onlinecasino.de/]https://sol-onlinecasino.de/[/url]
solana casino [url=http://www.sol-kryptocasino.de/]https://sol-kryptocasino.de/[/url]
88 starz [url=https://888-uz4.com/]88 starz[/url].
Erlebe jetzt aufregende Gewinne im [url=https://solonlinecasino.de/]casino solana[/url] und sichere dir exklusive Boni.
Das Konzept verbindet Blockchain-Funktionalitat mit traditionellen Casino-Angeboten.
888 вход [url=http://www.888-uz5.com]https://888-uz5.com/[/url]
crypto casino solana [url=https://www.sol-casino-liste.de]https://sol-casino-liste.de/[/url]